

Page 1
Product Name:
Adventure System – Class II
Product Code:
59108
Please read all instructions carefully before assembly, installation and/or use of this product.
1
TOOLS REQUIRED
3/16” Allen Wrench
7/32” Allen Wrench
1/2” Wrench
9/16” Wrench
Parts List:
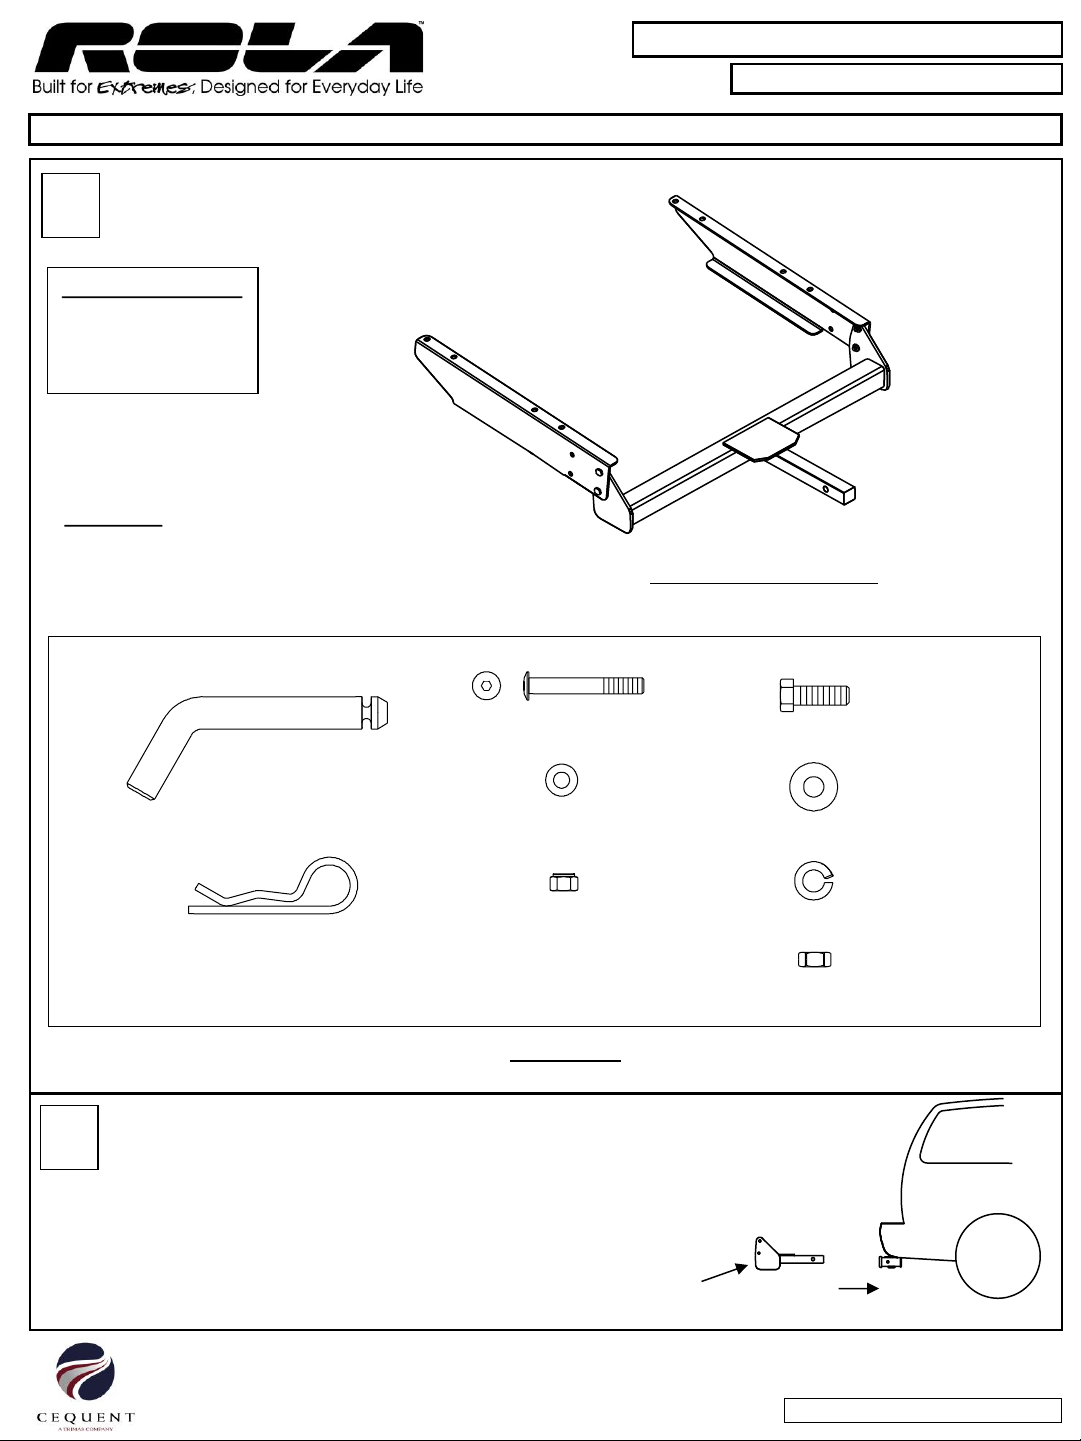
(1) Main Support
(2) Mounting Brackets
(1) Cargo Tray & Pod
(1) Hardware Kit (listed below)
Main Support Assembly
2
5/16" x 2-1/4" Lg. Cap Screw - (4)
(Black Zinc Finish)
1/2" Pin - (1)
5/16" Flat Washer - (8 )
(Black Zinc Finish)
5/16" Lock Nut -(4)
Spring Clip - (1)
Hardware Kit
Note: For ease of assembly, it is recommended the vehicle’s hitch is used to hold main
support. Slide the 1-1/4” square shank portion of the Main Support into your vehicle's hitch as
shown. Install 1/2” pin and spring clip.
MAIN SUPPORT
3/8" x 1-1/4" Lg. Hex Bolt - (4)
3/8" Flat Washer - (4)
3/8" Lock Washer - (4)
3/8" Hex Nut -(4)
Cequent Consumer Products, Inc.
Solon, OH 44139 USA
Cequent Help Hotline: 1-800-234-6992
Page 1 of 5
www.rolaproducts.com
59108 Rev A 1007
Page 2
Product Name:
Adventure System – Class II
Product Code:
59108
Please read all instructions carefully before assembly, installation and/or use of this product.
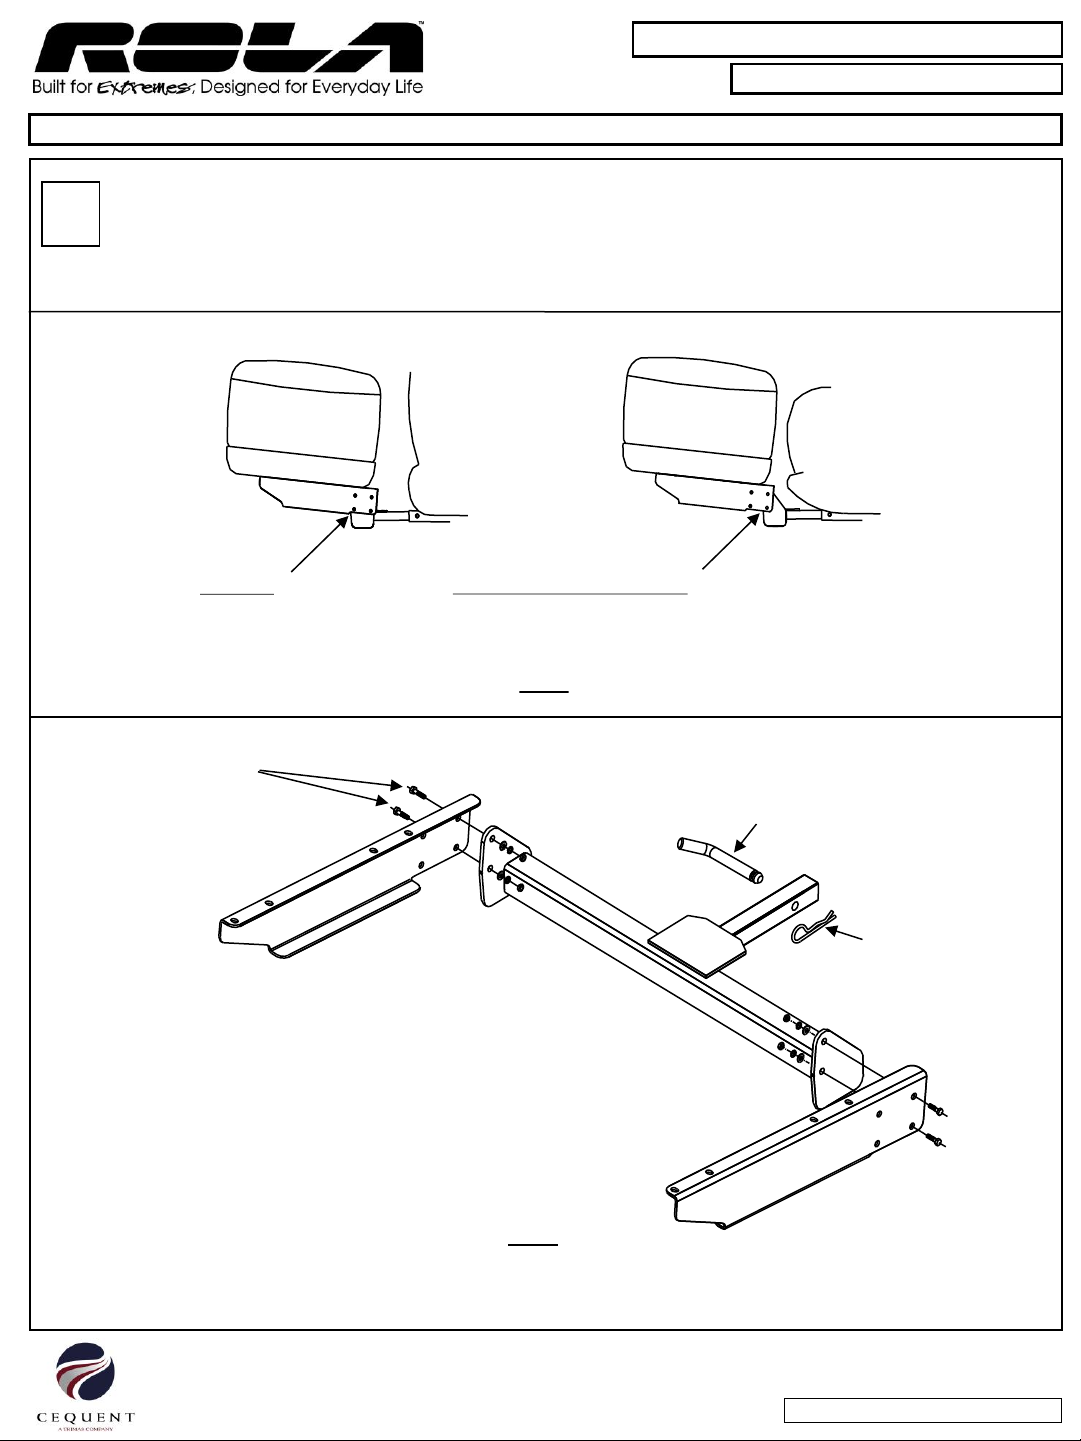
Determine the appropriate setting for bumper fascia clearance (reference Fig A), and attach the support brackets to the Main
3
Support. Install the 3/8” x 1.25” hex bolts, flat washers, lock washers and hex nuts through the holes in support bracket and
through the holes in plates on the Main Support as shown in Fig B.
NOTE: Attach support brackets with the flanges to the inside as shown. Tighten 3/8” hex bolts to 30 ft-lb.
3/8” x 1.25 Hex Bolts
Setting (1)
Setting (2) – Additional clearance
3/8” x 1.25 Hex Bolts
3/8” x 1.25 HEX BOLT
3/8” FLAT WASHER
3/8” LOCK WASHER
3/8” LOCK NUT
(BOTH SIDES)
Fig A
1/2” PIN
SPRING CLIP
Fig B
SUPPORT BRACKET FLANGES MUST BE
TOWARD THE INSIDE AS SHOWN
Cequent Consumer Products, Inc.
Solon, OH 44139 USA
Cequent Help Hotline: 1-800-234-6992
Page 2 of 5
www.rolaproducts.com
59108 Rev A 1007
Page 3

Product Name:
Adventure System – Class II
Product Code:
59108
Please read all instructions carefully before assembly, installation and/or use of this product.
Remove the Bumper Pack from the tray, and place the empty Cargo Tray onto the support brackets with the lights or reflectors
4
5/16” Flat Washer - Black Zinc
facing rearward. Line up the outer holes in the Cargo Tray with the last hole in each end of the support brackets. Install the four
(4) 5/16” x 2-1/4” long cap screws with 5/16” black zinc flat washers through the cargo tray and holes in support brackets.
Loosely install the black zinc 5/16” flat washers and lock nuts on cap screws. Tighten 5/16” cap screws to 12-24 ft-lb.
5/16 x 2-1/4” Cap Screws
(4 PLACES)
USE THE LAST HOLE IN EACH
END OF SUPPORT BRACKETS
TOP VIEW OF CARGO TRAY
Cequent Consumer Products, Inc.
Solon, OH 44139 USA
Cequent Help Hotline: 1-800-234-6992
Flat Washer – Black Zinc
Use outermost holes to
attach cargo tray to
support brackets.
Page 3 of 5
Lock Nut
(4 Places)
Cargo Tray
View of fasteners
to mount tray.
www.rolaproducts.com
59108 Rev A 1007
Page 4

Product Name:
Adventure System – Class II
Product Code:
59108
Please read all instructions carefully before assembly, installation and/or use of this product.
General Operating Instructions
Loading Cargo Tray or Bumper Pack
• Load the heaviest items first and in the center of the Tray or Bumper Pack.
• Make sure load is evenly distributed.
• Secure loads before moving vehicle.
CORRECT
• Check all functions of lights before moving vehicle. To check functions, turn car on, turn on lights, press
on brakes, left turn signal on, and right turn signal on.
INCORRECT
Latch Closed
Latch Opened Latch Partially Closed - INCORRECT
• To install Bumper Pack to Cargo Tray, lift Bumper Pack up and over tray. Rotate the Bumper Pack down
toward the lights so the two connector pins properly engage the tie-down slots in cargo tray as shown above.
• Seat the Bumper Pack into the Cargo Tray.
• Latch and lock the Cargo Tray/Bumper Pack latches before every use.
Note: The latch keys are taped to the inside of the lid of Bumper Pack.
CONNECTOR PIN
Cequent Consumer Products, Inc.
Page 4 of 5
LOCK LATCHES
BEFORE EVERY USE
www.rolaproducts.com
Solon, OH 44139 USA
Cequent Help Hotline: 1-800-234-6992
59108 Rev A 1007
Page 5

Product Name:
Adventure System – Class II
Product Code:
59108
WARNING!
• Maximum capacity is 150 pounds. Do not exceed maximum capacity.
• Not for transport of people, animals, or flammable liquids.
• Do not use as a seat or step.
• Use light kit if load or cargo carrier blocks the taillights or turn signals.
• Securely fasten load to cargo carrier.
• All Pins and Locks must be secured and locked before every use.
• Check security of load, fasteners, pin, and clip at fuel and rest stops.
• Severe bumps can damage your tow vehicle, hitch, and cargo carrier. Drive slowly on rough roads. Stop and
make a thorough inspection if your cargo carrier strikes the road. Correct any problems before resuming
travel.
• Do not carry any loads wider than your vehicle.
• Relocate license plate if blocked by load or cargo carrier. (Optional license plate light kit P/N: 59117)
• If the cargo carrier or the contents being transported is in line with the exhaust outlet, an exhaust tip must be
used to redirect the exhaust flow away from the cargo carrier or contents.
CAUTION:
• Do not allow harsh chemicals, road salt, or mud to accumulate on the product for an extended period of time.
• Wash the product with mild soap and water only and a non-abrasive cloth.
Cequent Consumer Products, Inc.
Solon, OH 44139 USA
Cequent Help Hotline: 1-800-234-6992
Page 5 of 5
www.rolaproducts.com
59108 Rev A 1007
 Loading...