

Page 1
MAPLE SLAT, HEAT-SEAMED HEM
PENCIL
HARDWARE
Techmatic Window Shades
Window shade with smooth, quiet operation, and independent control
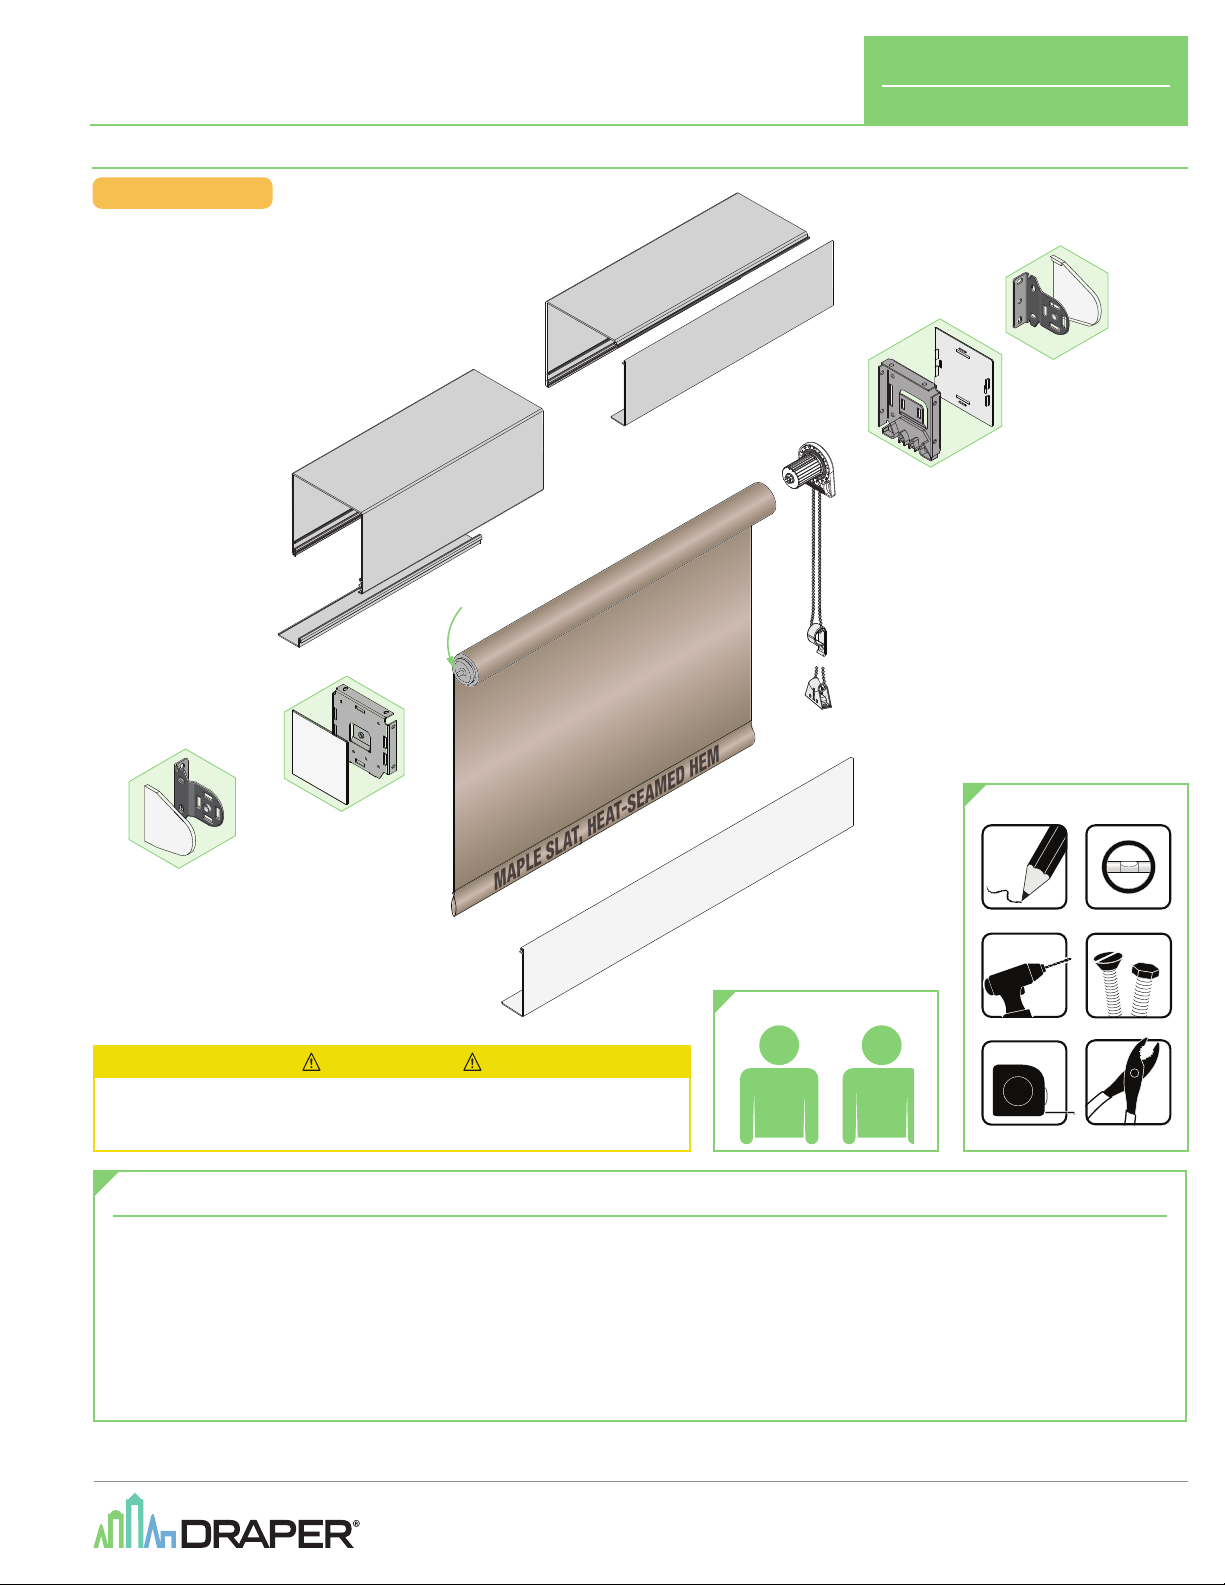
Overview - Components
TECHMATIC CL
POCKET HEADBOX
Spring Loaded
Idler End
SURFACE HEADBOX
Clutch
INSTRUCTIONS
INS TALL ATIO N & OPE R ATIO N
Universal
Mounting
and Cover
(small and large
Endcap
and Cover
Bead
Chain
BEAD CHAIN HOLD DOWN:
P Clip
BEAD CHAIN HOLD DOWN:
(small and large
(standard)
sizes available)
Spring Loaded Tensioner
sizes available)
(optional)
Bracket
Endcap
and Cover
Universal
Mounting
Bracket
(small and large
sizes available)
and Cover
(small and large
sizes available)
CAUTION
Read and understand all warnings
before beginning installation.
Contents
Overview - Components .......................................................................................1
PLEASE READ - Safety Information ....................................................................2
PLEASE READ - Field Adjustments, Cleaning and Maintenance ...................2
PLEASE READ - Important Installation Information ........................................3
Section 1 - Bracket-Only Installation .................................................................3
Section 2 - Endcap Installation ...........................................................................4
(Page 2 of this document)
TOOLS REQUIRED
(optional)
FASCIA
PERSONNEL REQUIRED
Section 3 -Attaching Fascia ................................................................................5
Section 4 - Surface Headbox Installation .........................................................6
Section 5 - Pocket Headbox Installation ...........................................................7
Section 6 - Bead Chain Limits and Safety Device Installation.......................8
Section 7 - Dimensions ........................................................................................8
21
POWER DRILL
TAPE MEASURE
LEVEL
PLIERS
(by others)
If you have any difficulties installing or servicing your
Techmatic WIndow Shades, call your dealer or Draper, Inc.
Draper, Inc. | 411 S. Pearl St. Spiceland, IN 47385
draperinc.com | 765.987.7999 | 800.238.7999
© 2021 All Rights Reserved | FORM: Techmatic_Inst21
Page 2
Techmatic Window Shades
PLEASE READ - Safety Information
page 2 of 8
Important Safety Information Important Safety Information
Improper installation and use of Techmatic Window Shades can result in serious injury or death. Primarily, injuries can occur if the unit falls due to
imprecise installation, mishandling of the shade during installation, or installation on an insufficient wall or ceiling structure. Please use extreme care.
1.
Please read the following installation guidelines thoroughly and follow them
carefully. Failure to do so may cause product to fall or otherwise fail, and could
result in serious injury.
2.
Installation and calibration of the shade should only be performed by an
authorized, qualified, and experienced professional.
3.
Do not affix the unit to wall or ceilings that have inadequate strength to
permanently hold the unit during use. It is the owner’s and installer’s
responsibility to confirm the wall or ceiling to which the unit attaches is
sufficient to permanently hold the weight and stress loads of the unit at all
times. Draper, Inc., is not responsible for improper installation, application,
testing, or workmanship related to the product at place of installation.
4.
It is the installer’s responsibility to make sure appropriate fasteners are used
for mounting.
5.
All brackets, fascia, headboxes, pockets, wall clips, and other hardware must
be installed level. Shade unit must be level and square.
6.
Never leave the area while operating the shade during installation,
maintenance, or normal operation, unless it is secure and safe.
7.
Before testing or operation, carefully inspect the entire area and path of the
shade and areas underneath the shade to be sure no persons or objects are in
the area.
WARNING
8.
During testing or operation, carefully watch the surrounding area for any
potential safety concerns including nearby persons or objects.
9.
After installation, the entire system should be carefully tested to ensure safe
and normal operation. Extreme care should be taken during testing to remain
clear of moving parts to avoid possible injury.
10.
Operation of shade should be performed only by authorized and qualified
personnel, who have been trained in the safe and effective operation of the
shade and understand its safety features.
11.
The safety features of the shade should never be disabled, bypassed, or
overridden. The system should not be operated until all safety features are
properly and completely installed, calibrated, and tested.
12.
Shade may need to comply with local, state, or district rules and regulations, in
particular when installed in schools. All applicable rules and regulations should
be reviewed before installation and use.
13.
Failure to precisely follow installation guidelines invalidates all warranties.
14.
Custom products/installations may not be reflected in this manual. Call Draper,
Inc., if you have questions regarding your installation.
Before Beginning Installation
1.
Look for any job site conditions that could interfere with installation or operation
of the system.
2.
Read carefully and be sure to understand all installation instructions and all
related operations manuals. These instructions are intended to serve as a guide
for the installer and owner. They should be followed closely and combined with
the expertise of experienced qualified installers. Draper, Inc., is not responsible
for improper installation, application, testing, or workmanship related to the
product at place of installation. Please retain all instructions for future use.
3.
Open cartons lengthwise.
4.
Locate and lay out all pieces.
5.
Inspect all boxes to make sure you have received the proper shade and parts.
Controls may be shipped separately, or in same carton as shade.
6.
If you have any difficulties with installing, servicing, or operating your shade,
call your dealer or Draper, Inc., 765-987-7999.
Child Safety Information
ANSI/WCMA A100.1-2018 standard
was established on December 15, 2018, to eliminate strangulation hazards for small children from hanging cords and chain loops.
When a Draper® dealer specifies that custom shades comply with ANSI/WCMA A100.1-2018, Draper provides a pre-installed Spring-Loaded Chain
Tension Device
When properly installed, the tension device prevents the creation of a hazardous loop by maintaining tension on the bead chain.
If not installed properly, the shade is partially inoperable. A warning label
For more information, please see the Draper ANSI/WCMA A100.1-2018 compliance page: www.draperinc.com/windowshades/wcmacompliance.aspx
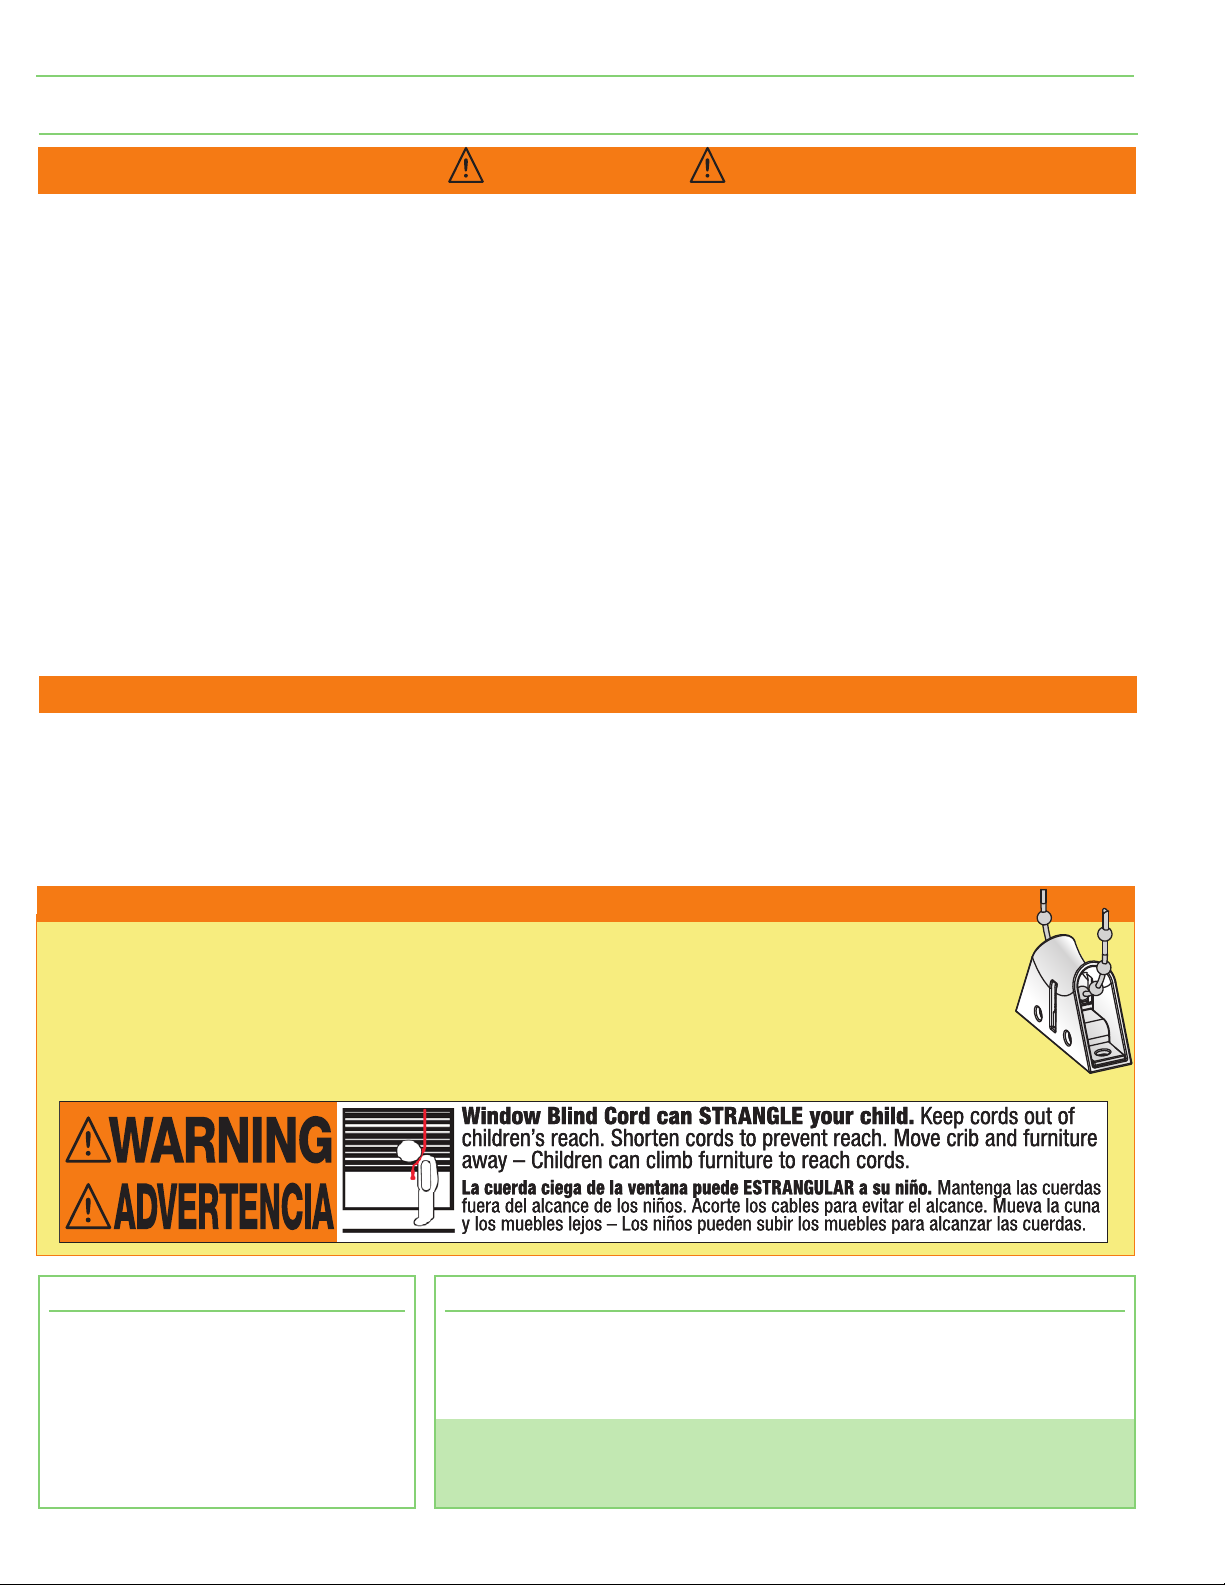
(shown at right)
PLEASE READ - Field Adjustments
Each Draper Solar Control Shade is tested to ensure
proper operation. Even with this testing, some field
adjustments may be needed for telescoping.
If the shade is telescoping, place a piece of high
quality gaffer tape about 1"
exposed roller
that the fabric will be drawn toward. For example: if
the fabric is tracking to the left, place the tape on the
right side.
(where the fabric will cover it)
(developed by the Window Coverings Manufacturer’s Association and the Consumer Product Safety Commission)
for clutch-operated units. A warning label is attached to the kit and approved mechanical fasteners are included.
(shown below)
is also added to the shade roller.
PLEASE READ - Cleaning and Maintenance
Window covering products manufactured by Draper, when properly installed, should require no
operational maintenance or lubrication.
Most standard Draper fabrics may be cleaned at the window by vacuuming with a soft brush
attachment. They also may be cleaned by using a sponge or soft cloth and mild solution of warm soapy
(25mm)
wide on the
on the side
water. A mild dishwashing liquid is recommended. A clean dr y cloth is recommended for the metal finish.
Please Note: Exceptions are GreenScreen Evolve®, GreenScreen Revive®, Flocké®, and Phifer®
SW7000 fabrics, which must be cleaned with a dry art sponge.
( GreenScreen Evolve®, GreenScreen Revive®, and Flocké® are registered trademarks of Mermet® USA.
SheerWeave® is a registered trademark of Phifer® Incorporated.)
Page 3
10 lb Clutch
1"
40mm
2"
60mm
1"
30mm
2"
56mm
1"
44mm
"
24mm
"
24mm
"
17mm
Small
2x 2
(60mm x 56mm)
Techmatic Window Shades
PLEASE READ - Important Installation Information
Caution:
1.
Inspect all boxes to make sure you have received the proper
shades and parts. Controls may be shipped separately, or in
same car ton as shades.
2.
Open cartons lengthwise.
3.
Before mounting shades, verify measurements on label provided
with shade, and ensure unit is installed at correct width.
Section 1 - Bracket-Only Installation
Caution: Before mounting shades, verify
measurements on label provided with shade, and
ensure unit is installed at correct width.
Please Note: Installer is responsible for selecting
mounting hardware appropriate for site conditions.
page 3 of 8
4.
All endcaps, fascia, pocket headbox, and other hardware must be
installed level. Shades must be level and square.
5.
Read the following installation guidelines thoroughly and follow
them carefully. Failure to do so may cause product to fall or
otherwise fail, and invalidates warranty.
6.
Installer is responsible for selecting mounting hardware
appropriate for site conditions.
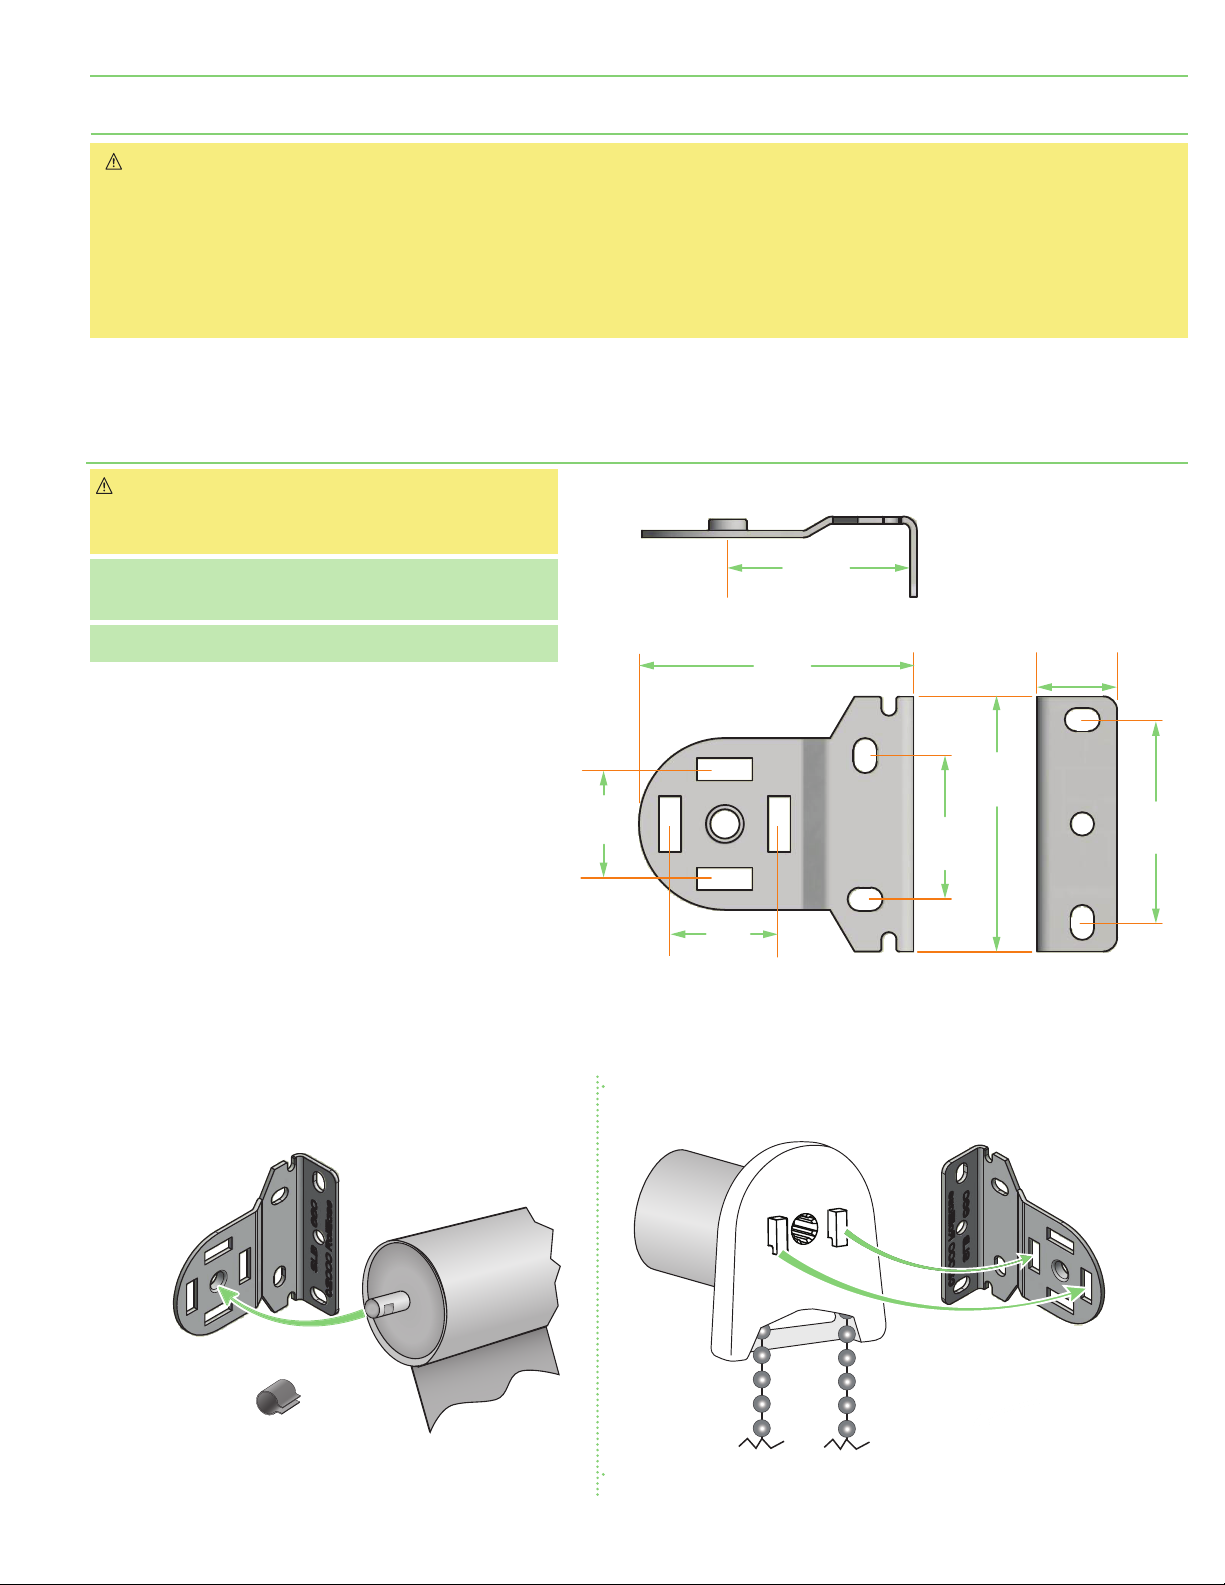
Figure 1-A
Please Note: Idler End must be installed FIRST.
1. Mark wall, jamb, or ceiling for placement of
mounting brackets and drill small starter hole
(if necessary)
in mounting surface.
2. Place spring-loaded pin into idler bracket,
slip notches on clutch into clutch bracket.
Press down to lock in place.
3. Install optional bracket covers
Figure 1-B Figure 1-C
Idler
Bracket
(if provided)
.
Idler End
of Roller
Retainer Clip
Clutch Bracket
Page 4
3
"
Clutch
Techmatic Window Shades
Section 2 - Endcap Installation
page 4 of 8
Caution: Before mounting shades, verify
measurements on label provided with shade,
and ensure unit is installed at correct width.
Please Note: Installer is responsible for selecting
mounting hardware appropriate for site
conditions.
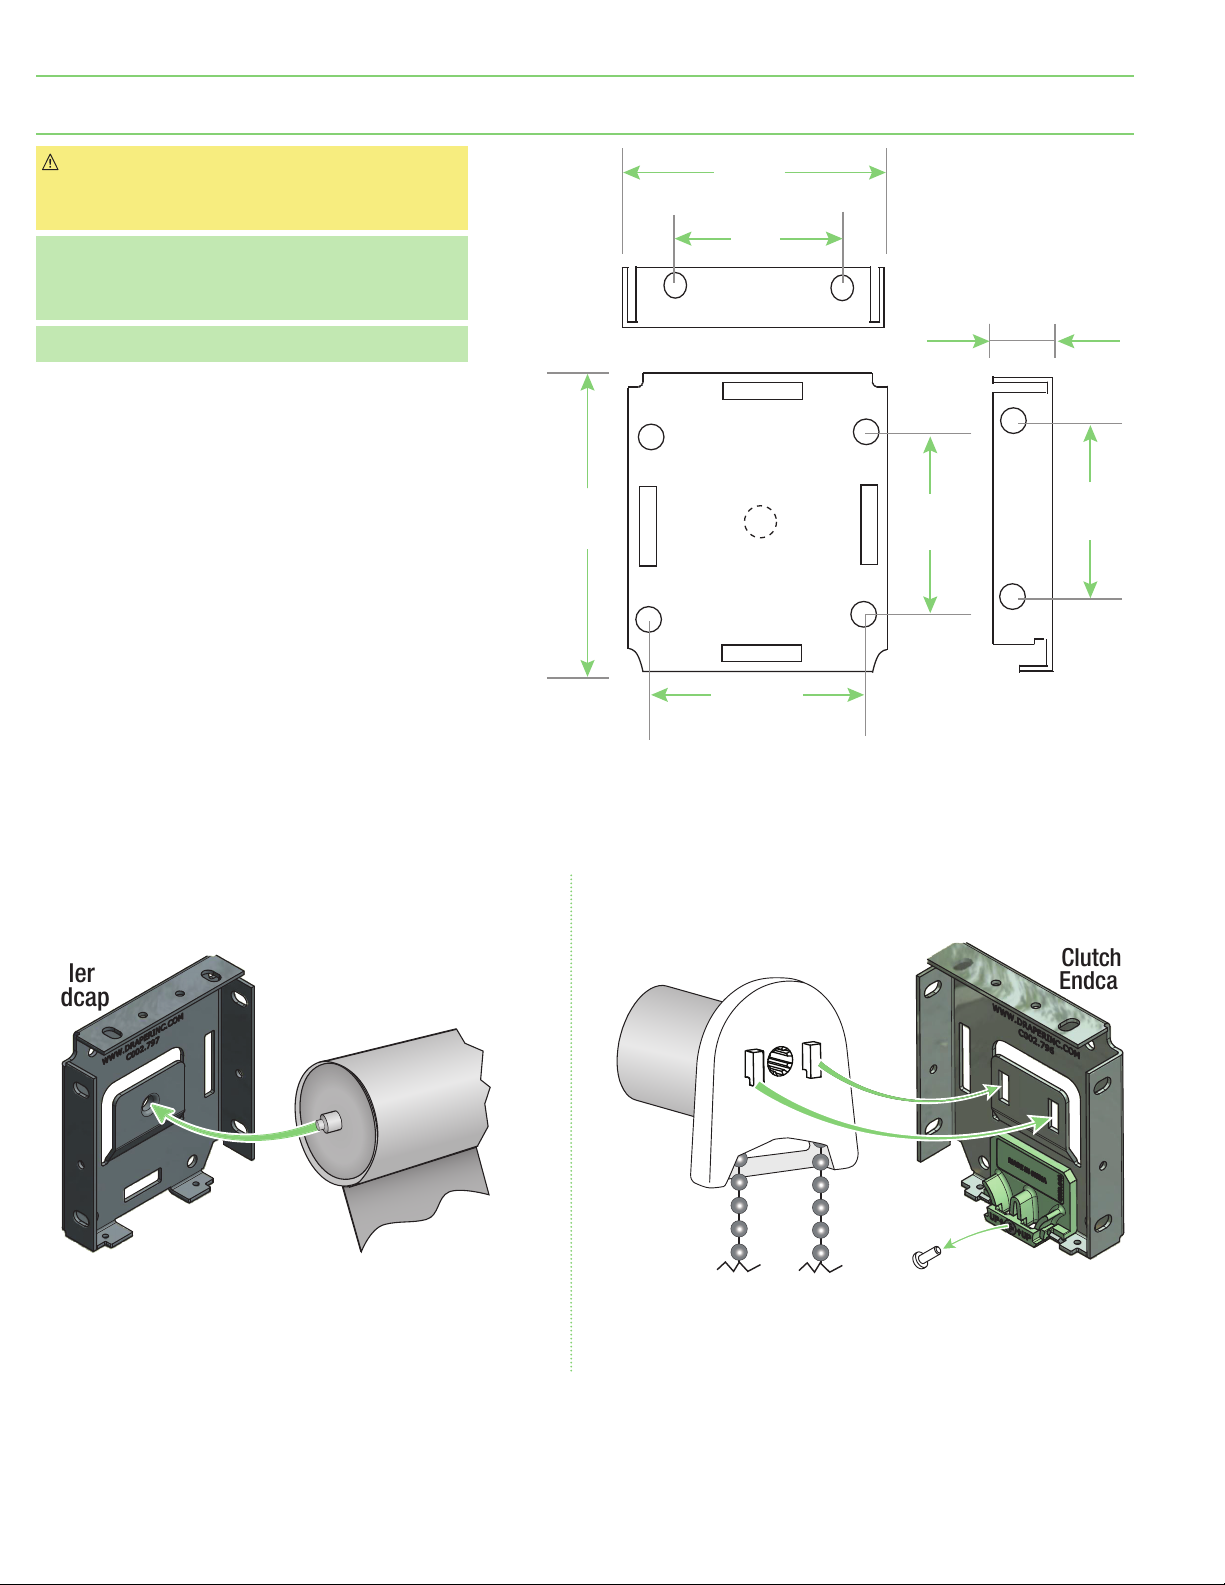
Please Note: If installing Fascia, see Section 3.
1. Snap on Endcap Covers.
2. Mark wall, jamb, or ceiling for placement
of mounting endcaps and drill small
starter hole
surface.
3. Place spring-loaded pin into idler endcap
(Fig.2-B)
4. Slip notches on clutch into clutch
endcap. Press down to lock in place
2-C)
.
5. Route bead chain through chain guide,
then attach cover using provided screw.
(if necessary)
in mounting
(Fig.
Figure 2-A
3
(98 mm)
"
(86 mm)
2"
(51 m m)
2 "
(64 mm)
2"
(51 m m)
"
(8 mm)
2"
(51 m m)
Idler
Endcap
Figure 2-B
Idler End
of Roller
Figure 2-C
Endcap
Page 5
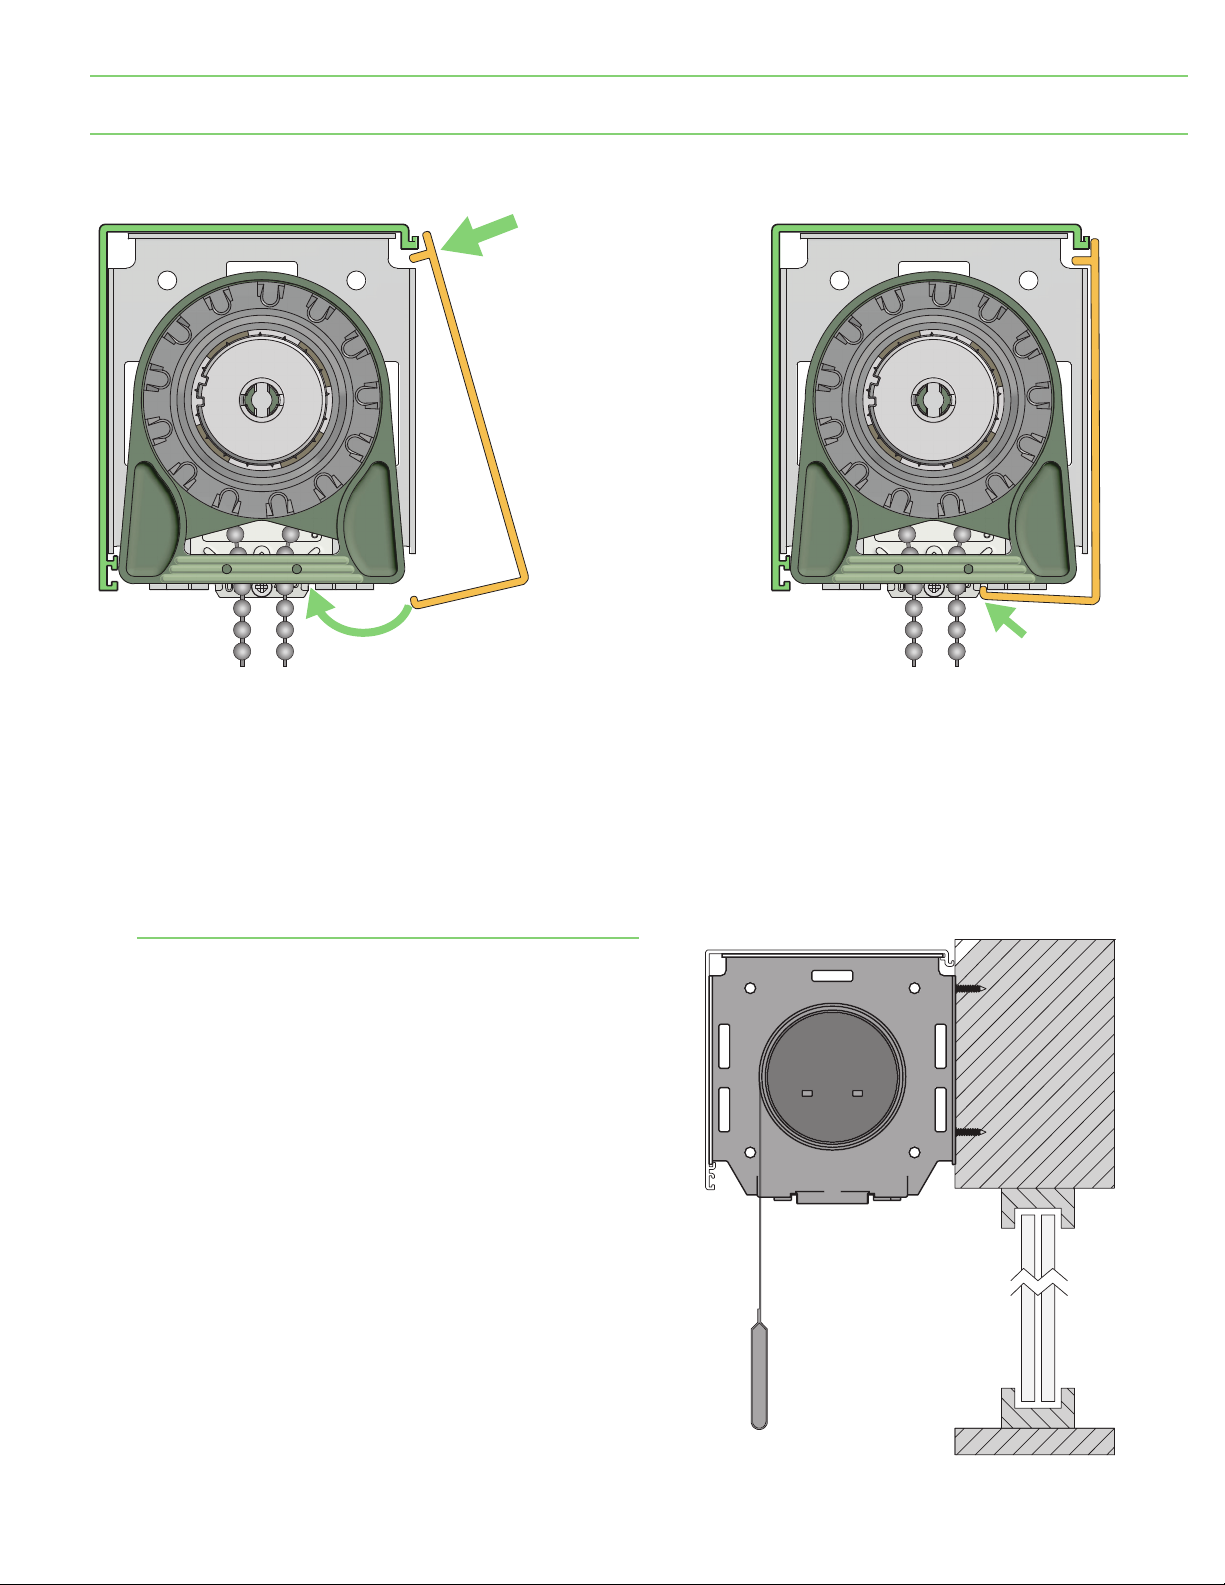
Techmatic Window Shades
Section 3 -Attaching Fascia
Figure 3-A
Position fascia
1.
flush to edge of
bracket and/or
butted to
endcap cover.
page 5 of 8
Reverse Roll Fascia
Slide endcaps
1.
into Fascia.
Using provided holes in endcaps, mark
2.
the Fascia for drilling.
Attach endcaps
3.
to fascia.
Mount Endcaps/Reverse
4.
Roll Fascia.
Install roller/fabric/operator assembly
5.
according to relevant instructions.
!
Figure 3-B
REVERSE ROLL FASCIA
Snap firmly
2.
into place.
Fascia is not fully seated
until it clicks into place
on both ends.
Once in place, check
for secure fit.
Attach endcap covers to endcaps.
6.
Use double-sided tape to help secure in place.
Once in place, check for secure fit.
7.
If not secure, secure with appropriate
fastener
(not included)
.
Page 6
Techmatic Window Shades
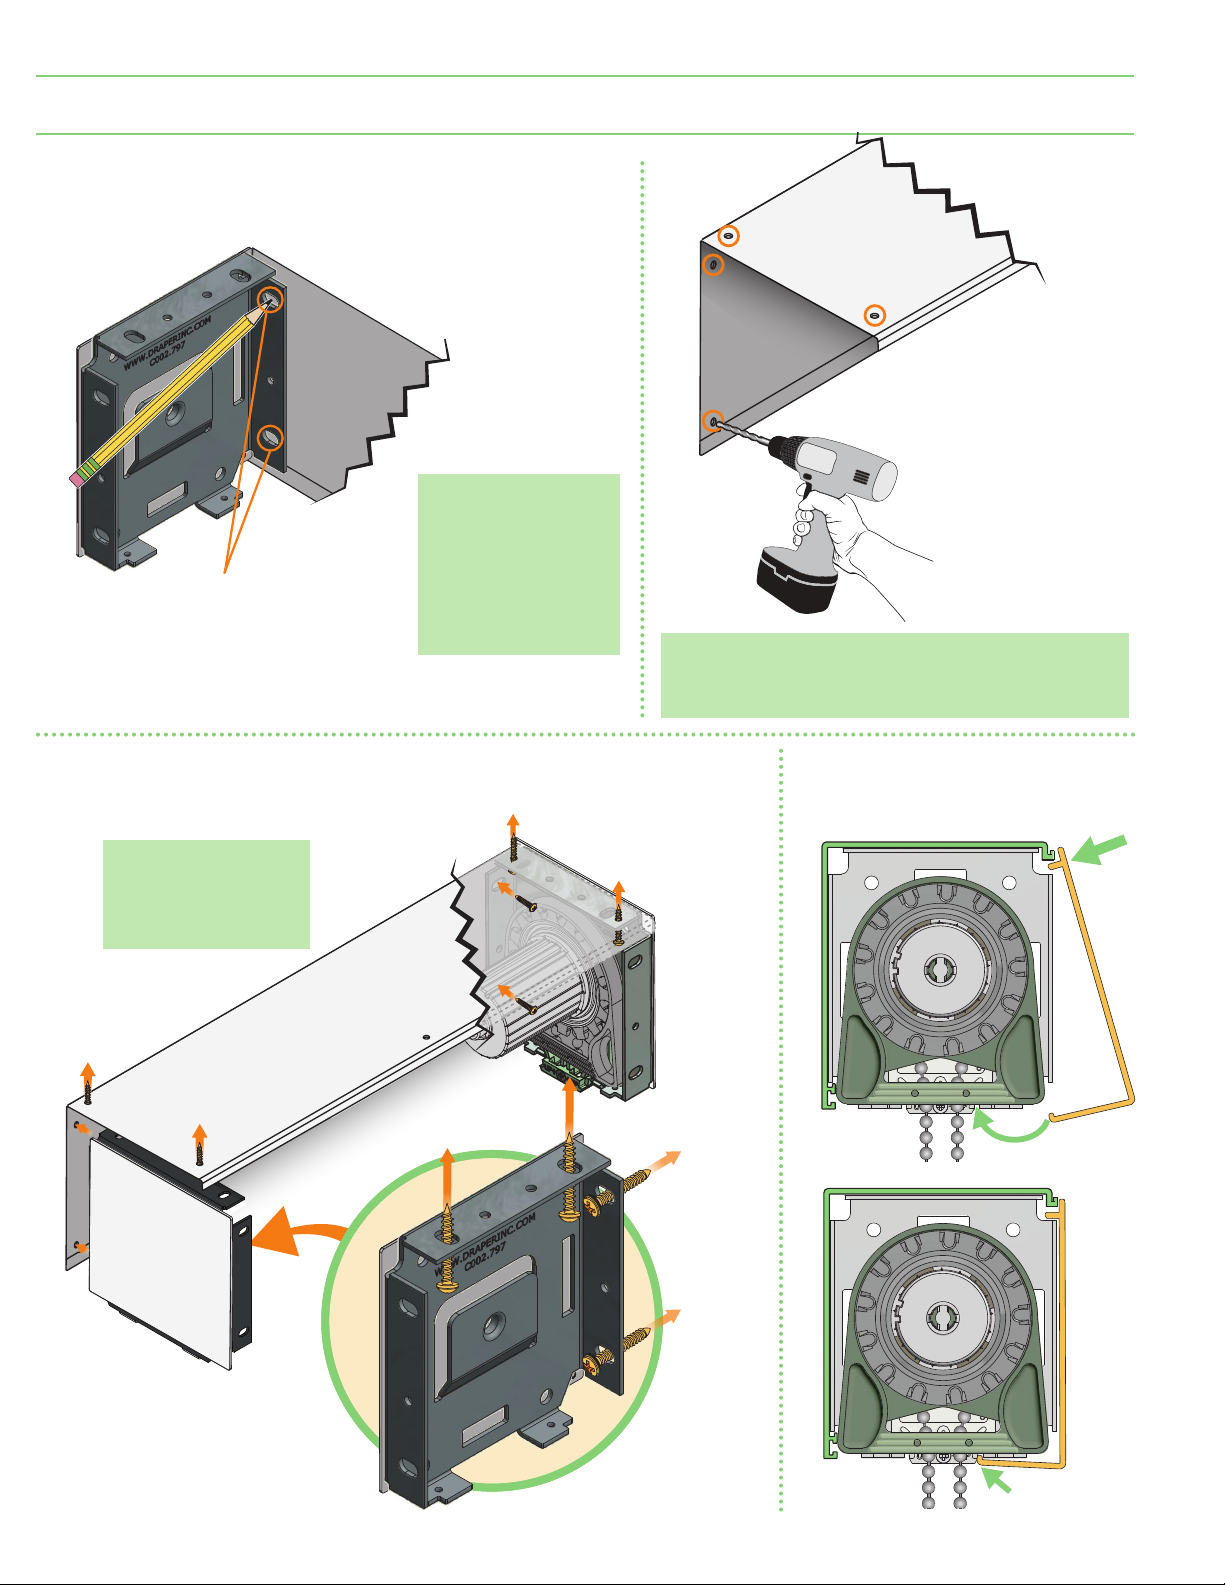
Section 4 - Surface Headbox Installation
page 6 of 8
Figure 4-A Figure 4-B
BACK COVER
Place endcaps
1.
into top/back
cover piece
of ceiling/wall
headbox.
IDLER ENDCAP
AND COVER
BACK COVER
Please Note: Installer
must provide
adequate clearance
for removal of Roller
Assembly during
Using pre-drilled holes
2.
in endcaps, mark
headbox for drilling.
installation and
maintenance.
Please Note: Headbox MUST BE mounted directly to
ceiling or wall, or to a continuous blocking that has
been secured to building structure.
TOP
COVER
3.
Drill holes in back
(wall mount)
(ceiling mount)
top/back cover
piece.
or top
of
Attach endcaps and top/back cover piece
4.
to wall or ceiling, using mounting hardware
appropriate for site conditions.
Please Note: A
minimum of two
screws is required
for each endcap.
Next, mount roller
assemblies
(2)
TOP COVER
IDLER
ENDCAP
& COVER
BACK COVER
OPERATOR
ENDCAP
& COVER
Attach fascia
5.
as in Section 3.
Figure 4-C
Page 7
Secure to Endcap
with Screw
Techmatic Window Shades
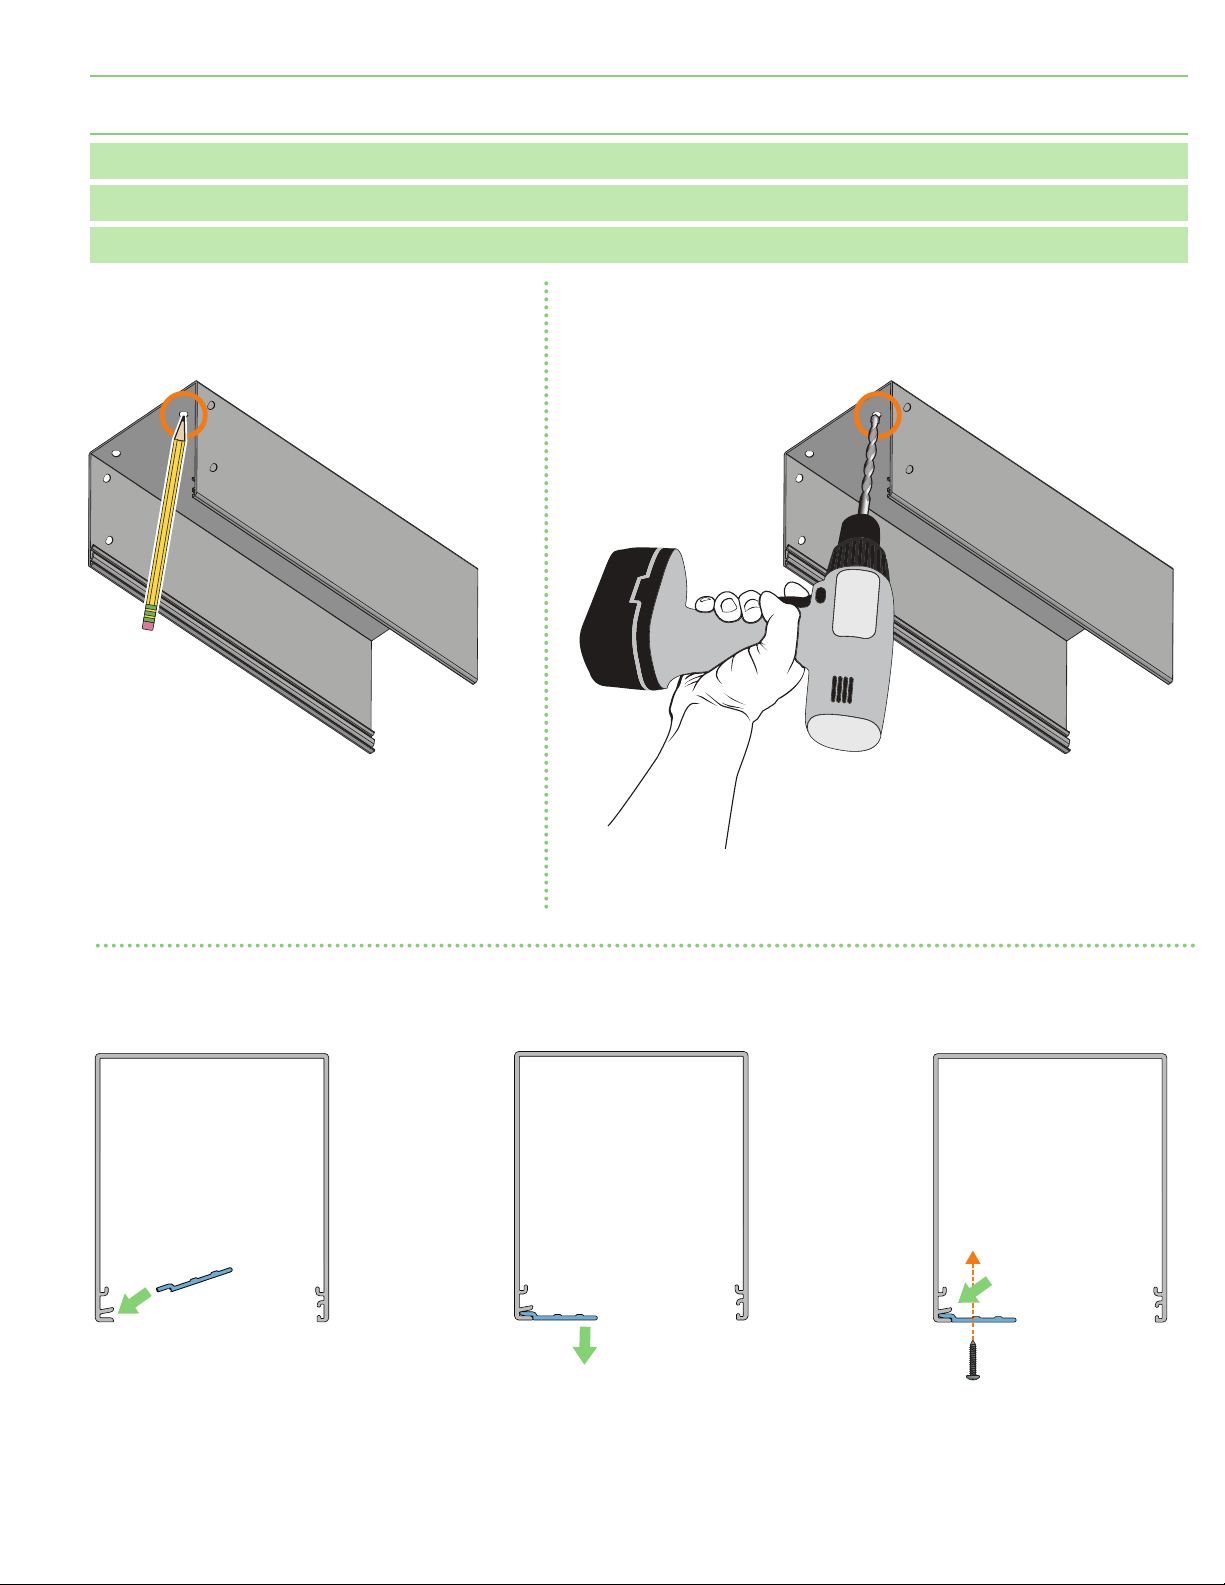
Section 5 - Pocket Headbox Installation
Please Note: Installer must provide adequate clearance for removal of Roller Assembly during installation and maintenance.
Please Note: Headbox must be mounted directly to ceiling, or to a continuous blocking that is secured to building structure.
Please Note: For pocket style headbox, small size will require securing closure panel to endcap with provided screw.
page 7 of 8
Lift headbox into mounting
1.
position. Slide endcaps into the
pocket extrusion of headbox.
Mark location of optional pre-drilled
2.
pocket mounting holes and endcap
mounting holes on top side of headbox
on mounting surface.
Figure 5-A
Drill small starter
3.
hole
(if necessary)
mounting surface.
Figure 5-B
Figure 6-C
in
4.
Mount endcaps using
5.
appropriate fasteners
for surface.
Mount pocket
headbox using
appropriate
fasteners for
surface.
Mount pocket
6.
closure.
STEP 1
Figure 5-C
STEP 2
STEP 3
Page 8
Sill
Mount
Jamb
Mount
Tensioner
"
"
Techmatic Window Shades
Section 6 - Bead Chain Limits and Safety Device Installation
page 8 of 8
Attaching Stop Balls
Set upper and lower travel limits by installing stop balls to bead chain
(crimp closed using pliers) (Fig. 6-A)
Caution: Be sure to use stop balls provided in hardware packet by Draper to set up and down
travel limits. Stop balls by others may be too small, and become lodged in clutch mechanism.
.
P-Clip Cord Tension Device
Please Note: Draper Bead Chain Clutch-Operated shades that do not comply with WMCA/ANSI
Standard A100.1-2018 come with a P-Clip cord tension device pre-attached to bead chain
(Fig. 6 -B)
. This device must be attached to wall, jamb, or sill so that bead chain is held taut enough
that children cannot pull it away from wall or fit their head into loop.
(Safety notes, page 2)
Spring-Loaded Cord Tension Device
For Draper® Clutch FlexShades that comply with WMCA/ANSI Standard A100.1-2012, a SpringLoaded Cord Tension Device comes installed on bead chain
warning label is attached, and approved mechanical fasteners
chain tension device to wall, jamb, or sill.
To install, pull tensioner down and use mounting hardware to keep bead chain taut enough to
move smoothly through device. Without sufficient tension, device will not allow bead chain to
operate shade. This device is designed so that children cannot pull bead chain away from wall
or fit their head into loop
For more information, visit www.draperinc.com/WindowShades/WCMAcompliance.aspx.
Please Note: Overtightening screws will damage the Spring Loaded Tension Device.
(Safety notes, page 2)
.
(Fig. 6-C)
. An approved permanent
(wood screws)
are included. Install
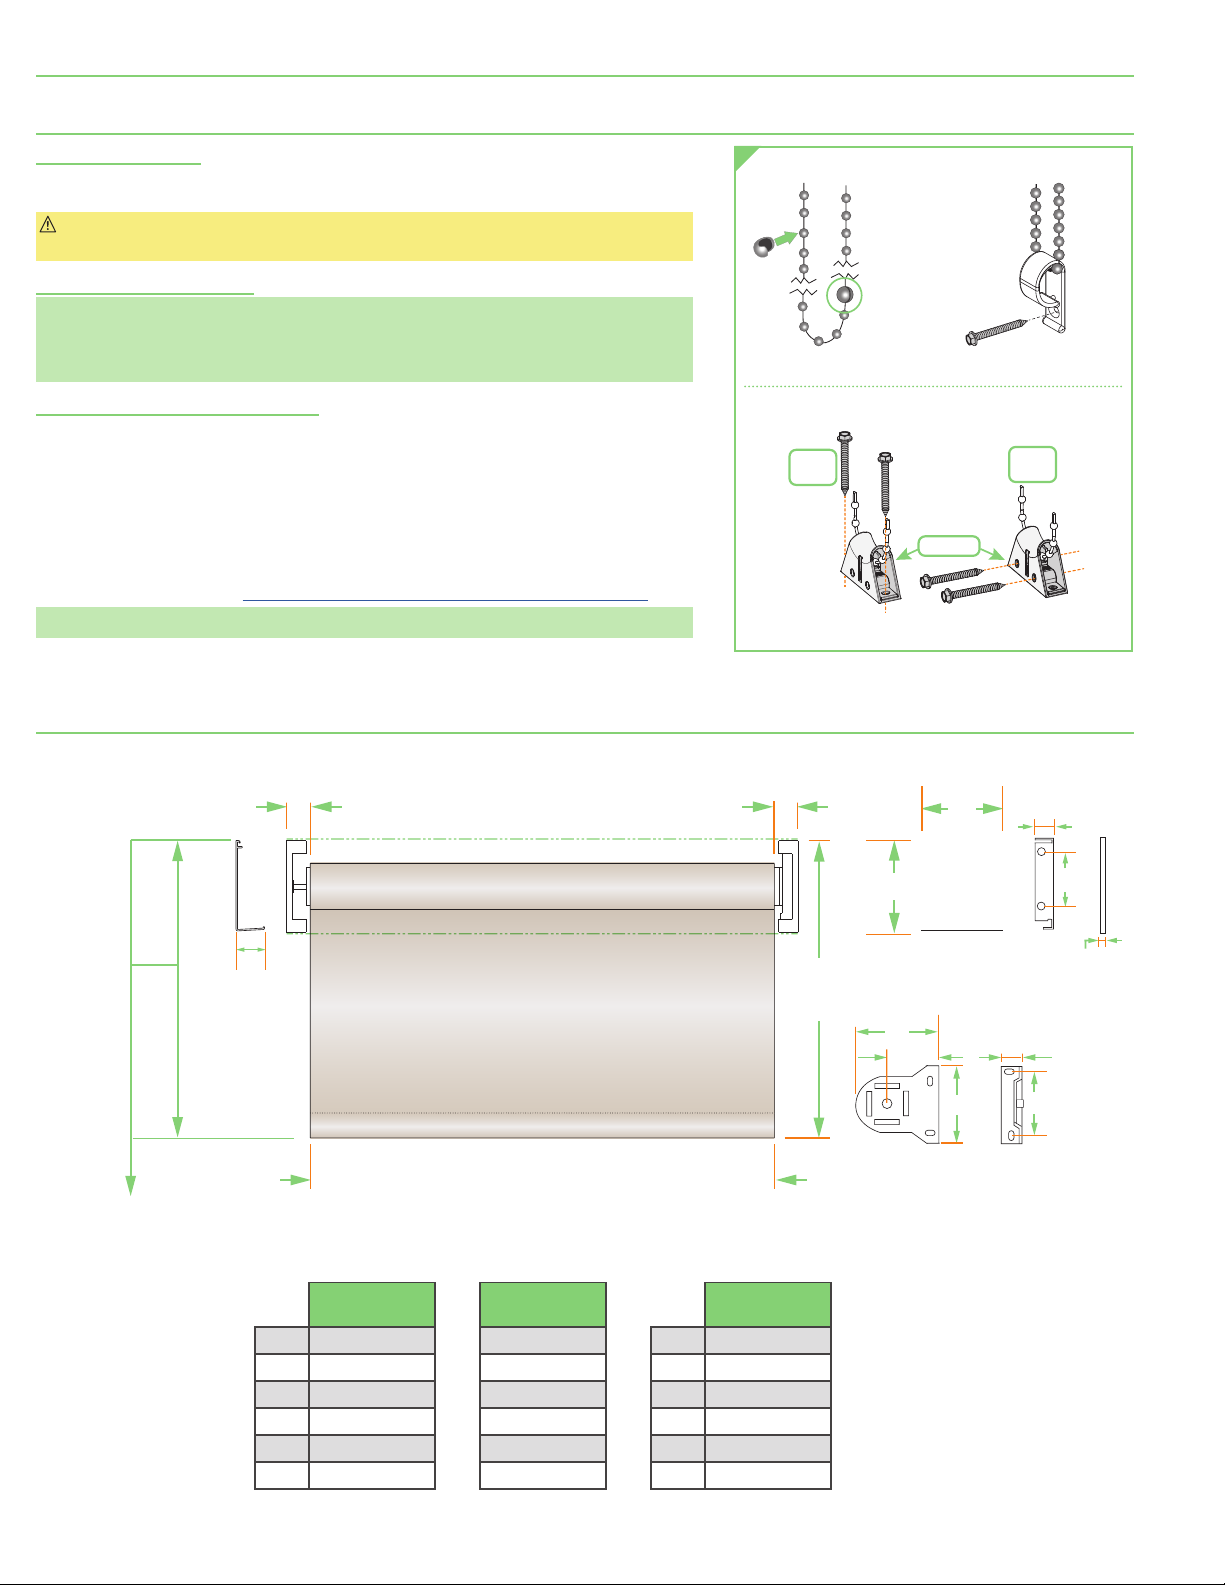
Section 7 - Dimensions
CHAIN LIMITS
1. Attach
stop balls.
Figure 6-A
CHAIN TENSION DEVICE
2. Crimp
closed
with
pliers.
P-CLIP
P-Clip
Figure 6-B
Figure 6-C
When measuring shade
height, include endcaps
and fascia or headbox.
(21 mm)
1
F
Cloth width with brackets = Overall width - 1"
Cloth width with endcaps = Overall width -
Above dimensions based upon 10 lb clutch and 1
HEADBOX WITH
1
A
3
1
B
3
1
C
1
D
1
E
1
F
1
ENDCAPS
⁄
"
(100 mm)
⁄
"
(87mm)
⁄
"
(16mm)
2"
(51mm)
⁄
"
(2mm)
⁄
"
(30mm)
FASCIA WITH
ENDCAPS
3
⁄
"
(98mm)
3
⁄
"
(86mm)
⁄
"
(16mm)
2"
(51mm)
⁄
"
(2mm)
1
⁄
"
(30mm)
"
(32mm)
(35 mm)
1"
(41 mm)
diameter roller.
BRACKETS
2
A
2
2
B
2
2
C
1
2
D
E
F
1
2
1 ¾"
2
⁄
⁄
⁄
⁄
(21 mm)
"
(56mm)
"
(60 mm)
"
(27mm)
"
(41mm)
(44mm)
N/A
Overall
Height
1
B
1
A
2
B
2
D
2
A
1
C
1
D
1
E
2
C
2
E
 Loading...