

Page 1
EN
Original Instructions
Version 1
January 2024
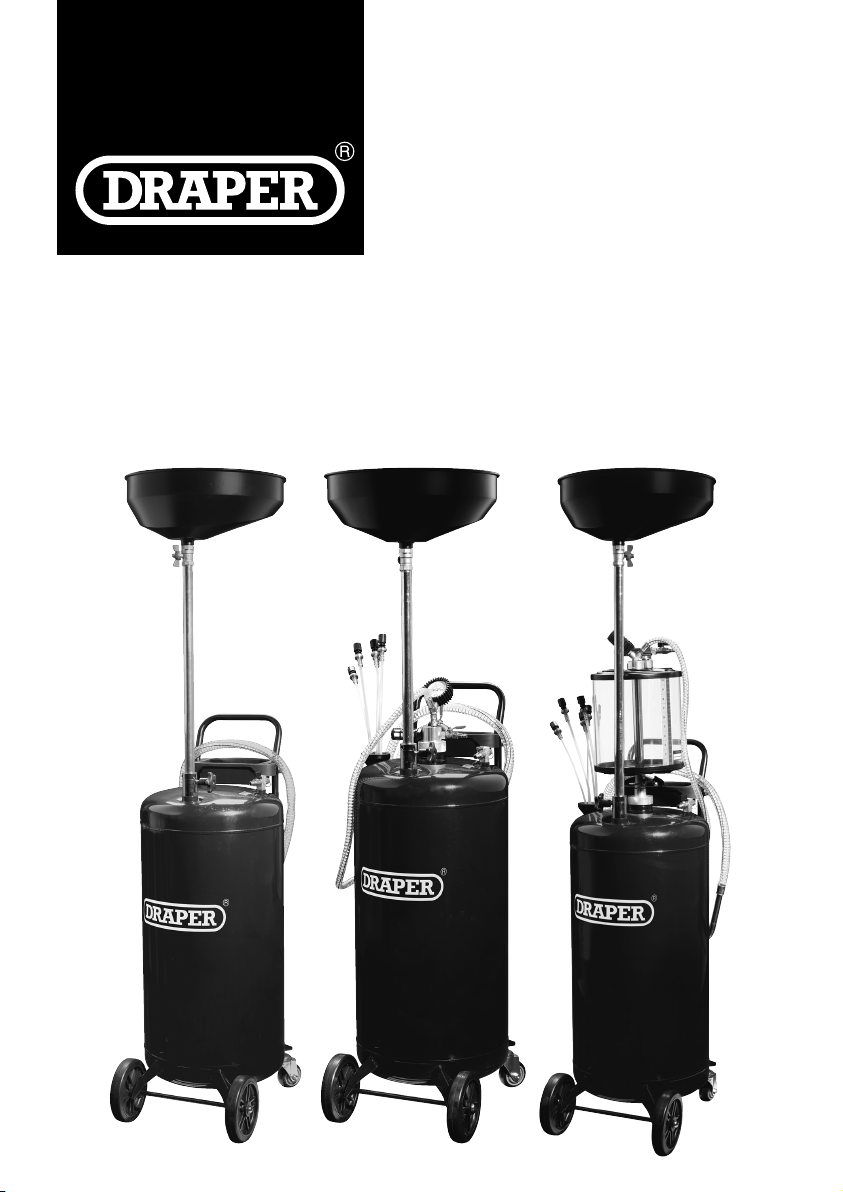
90L GRAVITY AND SUCTION
OIL DRAINERS
13246 ,13247. 13265
Page 2
1. Preface
EN
These are the original product instructions. This
document is part of the product; retain it for the life
of the product, passing it on to subsequent holders.
Read this manual in full before attempting to
assemble, operate or maintain this product.
This Draper Tools manual describes the purpose
of the product and contains all the necessary
information to ensure its correct and safe use.
Following all the instructions and guidance in
this manual will ensure the safety of both the
product and the operator and increase the
lifespan of the product.
1.1 Product Reference
User Manual for: 90L Gravity and Suction Oil Drainers
Stock No: 13246 ,13247. 13265
Part No: OD90L
1.2 Revisions
Version 1: January 2024
First release
As our manuals are continually updated, always ensure
that the latest version is used.
Please visit drapertools.com/manuals for the latest
version of this manual and the associated parts list, if
applicable.
All photographs and drawings within this manual are
supplied by Draper Tools to help illustrate correct
operation of the product.
Every eort has been made to ensure the
information contained in this manual is accurate.
However, Draper Tools reserves the right to amend
this document without prior warning. Always use the
latest version of the product manual.
1.3 Understanding the Safety Content of
This Manual
WARNING!
in personal injury or death.
CAUTION! – Situations or actions that may result
in damage to the product or surroundings.
Important: – Information or instructions of particular
importance.
– Situations or actions that may result
1.4 Copyright © Notice
Copyright © Draper Tools Limited.
Permission is granted to reproduce this manual for
personal and educational use ONLY. Commercial
copying, redistribution, hiring or lending is strictly
prohibited.
No part of this manual may be stored in a retrieval system
or transmitted in any other form or means without written
permission from Draper Tools Limited.
In all cases, this copyright notice must remain intact.
– 2 –
Page 3
2. Contents
EN
1. Preface 2
1.1 Product Reference 2
1.2 Revisions 2
1.3 Understanding the Safety Content of This
Manual 2
1.4 Copyright © Notice 2
2. Contents 3
3. Product Introduction 4
3.1 Intended Use 4
3.2 Specication 4
4. Health and Safety Information 5
4.1 General Health and Safety 5
4.2 Residual Risk 5
5. Identication and Unpacking 6-7
5.1 Product Overview 13246 6
5.2 Product Overview 13247/13265 7
5.3 Packaging 7
6. Assembling Instructions 8
7. Operating Instructions 9-10
7.1 Gravity - Waste Oil Collection 9
7.2 Suction - Oil Waste Collection 9
7.3 Draining the Waste Oil Tank 10
8. Maintenance and Troubleshooting 11
8.1 General Maintenance 11
8.2 Troubleshooting 11
9. Spares, Returns and Disposal 12
10. Warranty 13
– 3 –
Page 4
3. Product Introduction
EN
3.1 Intended Use
This product is designed to drain waste engine and gear
oil by either gravity (13246) or suction (13247 and
13265). Model 13265 is also supplied with an Ocular
measurement system to allow inspection of extracted oil.
Any other application beyond the conditions established
for use will be considered misuse. Draper Tools accepts
no responsibility for improper use of this product.
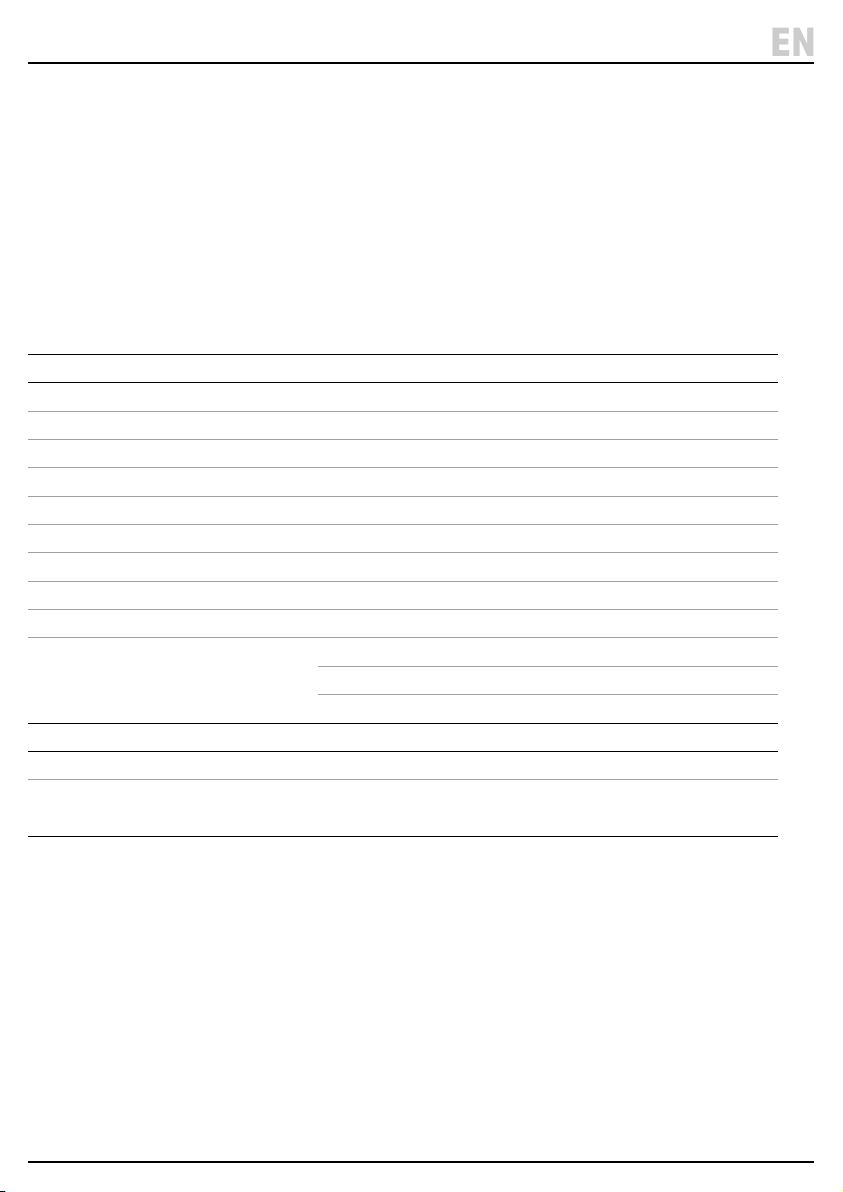
3.2 Specication
Stock No. 13246 13247 13265
Part No. OD90L OD90L OD90L
Oil Tank Capacity: 90L 90L 90L
Collection Drainer Capacity: 10L 10L 10L
Ocular Measuring Tank: - - 10L
Coupler Type: 1/4” BSP UK 1/4” BSP UK 1/4” BSP UK
Air Working Pressure: 1-3 Bars 8 - 10Bars 8 - 10Bars
Va cuu m P res sure: - - 0 – 0.8Bars
Recommended Working Oil Temperature: 40 - 60°C 40 - 60°C 40 - 60°C
Max. Collection Height: 1740mm 1740mm 1740mm
Min. Collection Height: 1240mm 1340mm 1340mm
Oil suction ow rate
(Suction probe diameter)
- 0.8L/min (Ø5x3.5mm) 0.8L/min (Ø5x3.5mm)
- 1L/min (Ø6x4.5mm) 1L/min (Ø6x4.5mm)
- 1.6 L/min (Ø8x6.5mm) 1.6 L/min (Ø8x6.5mm)
Read this manual in full before assembling, operating or
maintaining the product, and retain it for later use.
Weight (empty): 23kg 24kg 27kg
Product Dimensions:
430 X 490
X 1740mm
430 X 490
X 1740mm
– 4 –
430 X 490
X 1740mm
Page 5
4. Health and Safety Information
EN
Important: Read all the Health and Safety instructions
before operating, maintaining or repairing this product.
Non-compliance with these instructions may result in
injury or damage to the user or the product.
4.1 General Health and Safety Warnings
WARNING! Read all safety warnings,
instructions, illustrations and specications
provided with this product. Failure to follow all
instructions listed below may result in damage
or injury to the user.
• Ensure all Health and Safety, Local Authority and
general workshop regulations are followed when
using this equipment.
• Familiarise yourself with the process and all
limitations of the oil drainers as well as any potential
hazards.
WARNING! Ensure that the oil drainer is
disconnected from the air supply before
changing accessories, servicing or undertaking
any maintenance.
• DO NOT modify any parts and only use accessories
and spare parts supplied by Draper Tools.
• Keep the work area clean and tidy and ensure that
there is adequate lighting.
• For ecient and safe performance keep the oil
drainer clean.
• Ensure the oor is not slippery and wear non-slip
shoes in case of oil spillages.
WARNING! When extracting high temperature
oils, ensure that hands, face and body are
protected using suitable personal protective
equipment (PPE).
• DO NOT extract caustic or ammable liquids.
WARNING! Ensure the correct air pressure is
maintained and it does not exceed the maximum
specied (Refer to section 3.2 specication).
• Keep the air hose away from heat, oil or sharp edges.
Check the air hose for signs of wear and tear before
each use. Ensure that all connections are secure.
• Only use the oil drainer for its intended purpose.
• DO NOT operate if any parts are damaged or missing
as this may cause failure and/or personal injury.
• DO NOT stand on the oil drainer.
• DO NOT adjust or tamper with the safety valve.
• DO NOT move the drainer by the hose or pull the hose
from its air supply, always use the handle.
• DO NOT place attachments close to your face
(especially eyes or ears). Do not point or direct the
hose at person(s) or animals.
• DO NOT operate if you are tired or under the inuence
of alcohol, drugs or intoxicating medicine.
• DO NOT leave the oil drainer unattended when
operating.
WARNING! DO NOT release the oil pan drainage
valve if there is pressure in the tank as the
drainage tube and pan will be propelled upwards
with great force. This could result in damage to
the equipment or risk serious injury.
• Always use on a at level surface capable of
supporting the product and its maximum load.
• When not in use, disconnect from the air supply, vent
the tank and store in a safe, dry and childproof place.
• Dispose of any waste oil in accordance with local
authority regulations.
• Important: Always ensure the vehicle engine is
switched o before draining oil or irreparable damage
will occur to the engine.
CAUTION! Never use the oil drainer near open
ames or other heat sources.
• NEVER ll the tank above the maximum level
indicator on the gauge.
• Keep children and unauthorised personnel away from
the work area.
• Only trained and competent personnel may operate
this equipment.
WARNING! DO NOT pollute the environment
through uncontrolled discharge of any waste oil.
4.2 Residual Risk
The safety instructions in this manual cannot account for
all possible conditions and situations that may occur.
Exercise common sense and caution when using this
product and protect against any additional conceivable
risks.
– 5 –
Page 6
5. Identication and Unpacking
EN
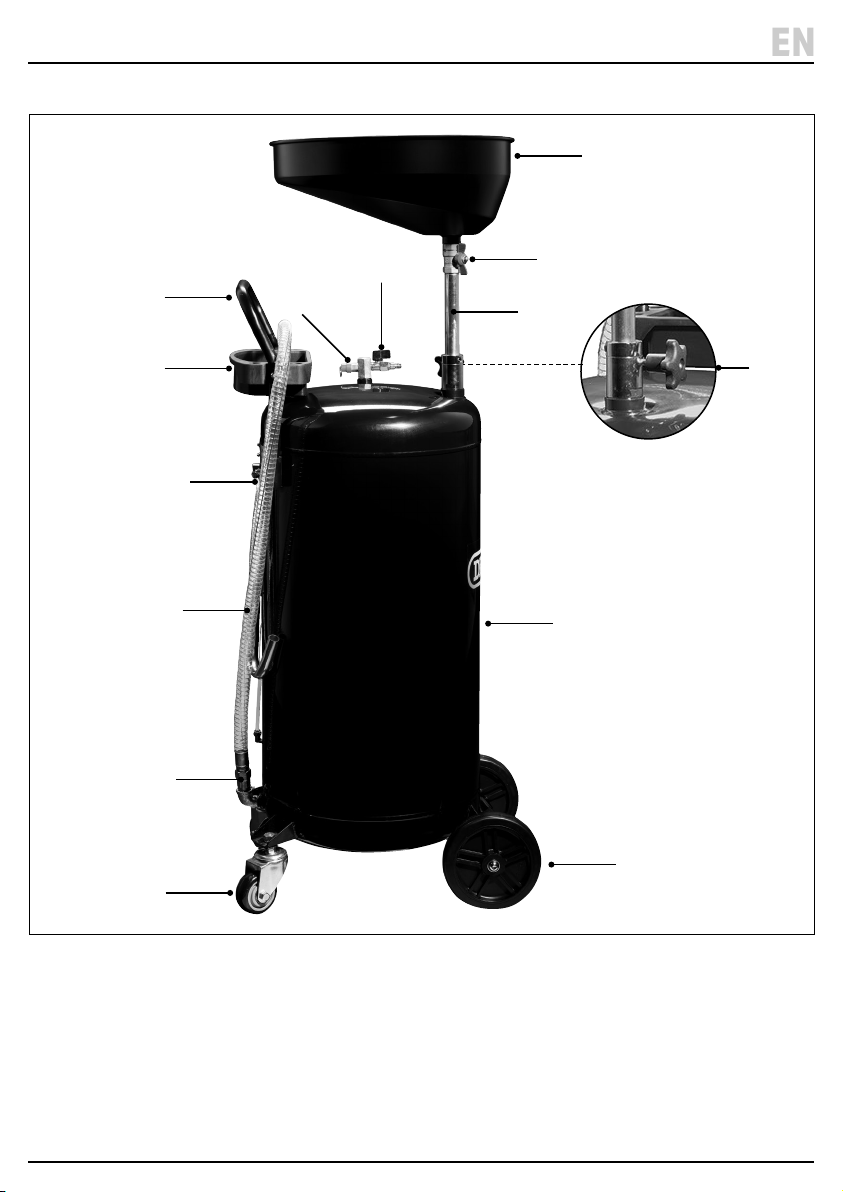
5.1 Product Overview (13246 shown)
(1)
(11)
(10)
(7)
(8)
(9)
(12)
(13)
(2)
(3)
(4)
(5)
(6)
(1) Oil collecting pan
(2) Oil pan drainage valve
(3) Oil drainage steel tube
(4) Oil drainage height adjustment
(5) Oil waste tank
(6) Wheels/castors
(7) Tank drainage hose valve
(6)
13246
(8) Tank drainage hose
(9) Tank level indicator tube
(10) Parts tray
(11) Handle
(12) Safety valve
(13) Air connector with valve
– 6 –
Page 7
5. Identication and Unpacking
EN
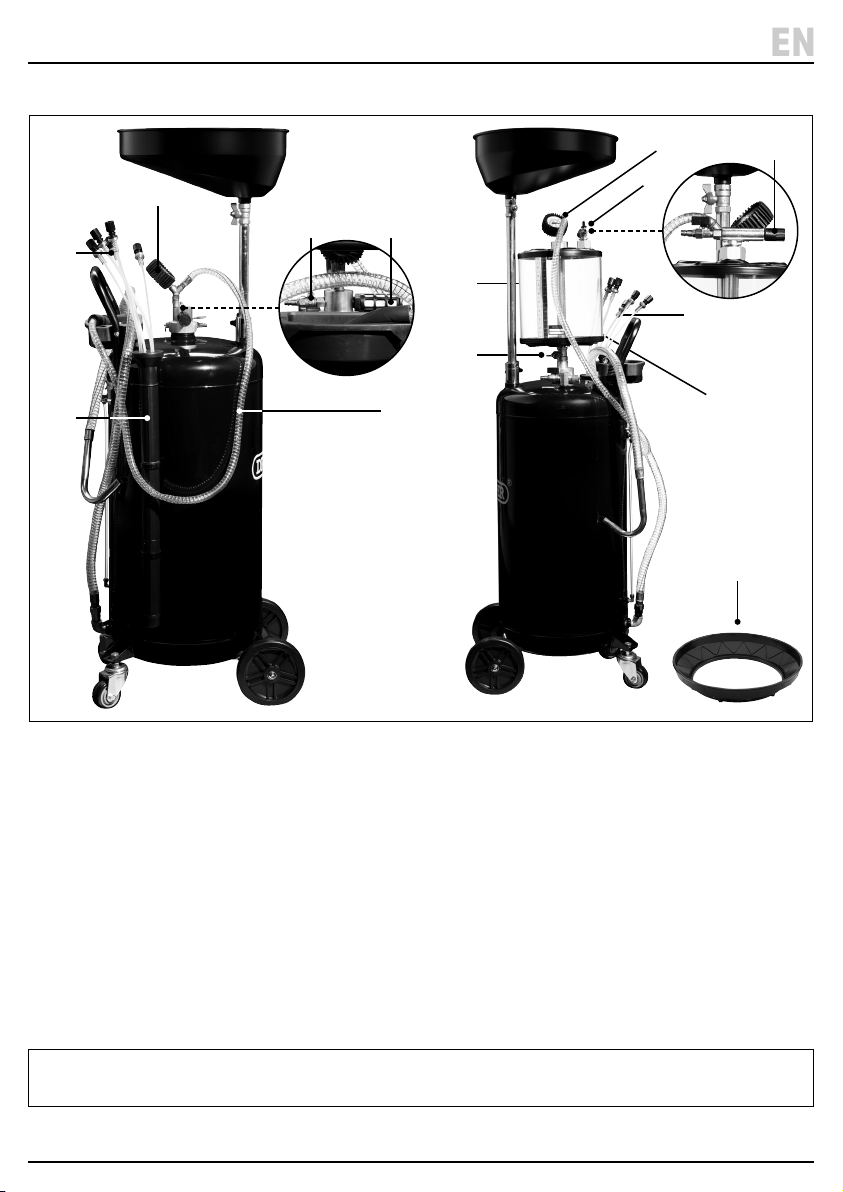
5.2 Product Overview 13247 & 13265
(16)
(15)
(17)
(18)
(19)
(20)
(21)
(14)
13247 13265
(17)
(18)
(19)
(16)
(14)
optional
drainer
extension
(18114)
(14) Suction hose with valve
(15) Suction probe holder
(16) 3 X Suction probes
1 X Ø5 x 3.5mm
1 X Ø6 x 4.5mm
1 X Ø8 x 6.5mm
(17) Air pressure gauge
5.3 Packaging
Keep the product packaging for the duration of the
warranty period for reference should the product need to
be returned for repair.
Please visit drapertools.com for our full range of accessories and consumables.
(18) Suction air inlet with valve
(19) Air lter
13265
(20) Ocular measuring tank
(21) Ocular tank valve
Oil drainer extension
(optional attachment Stock No: 18114)
WARNING! Keep packaging materials out of reach of
children. Dispose of packaging correctly and
responsibly and in accordance with local regulations.
– 7 –
Page 8
6. Assembling Instructions
EN
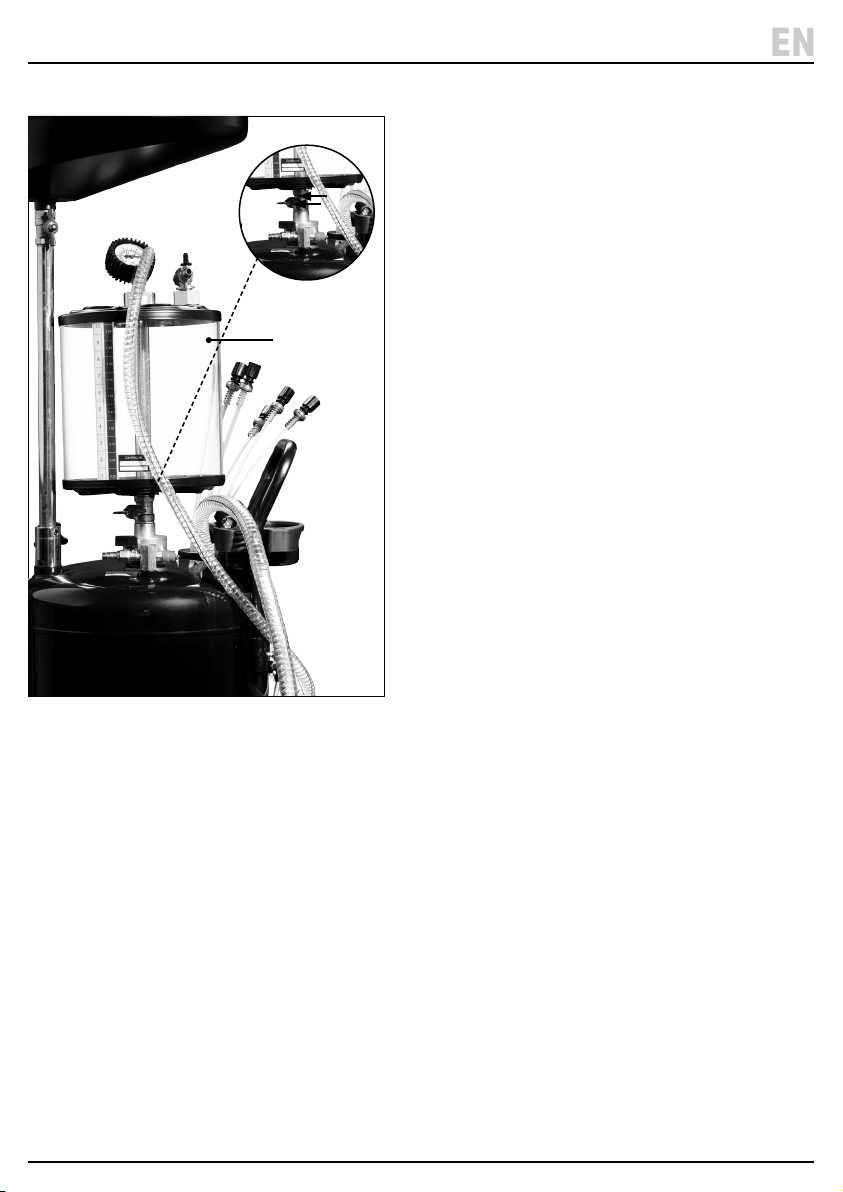
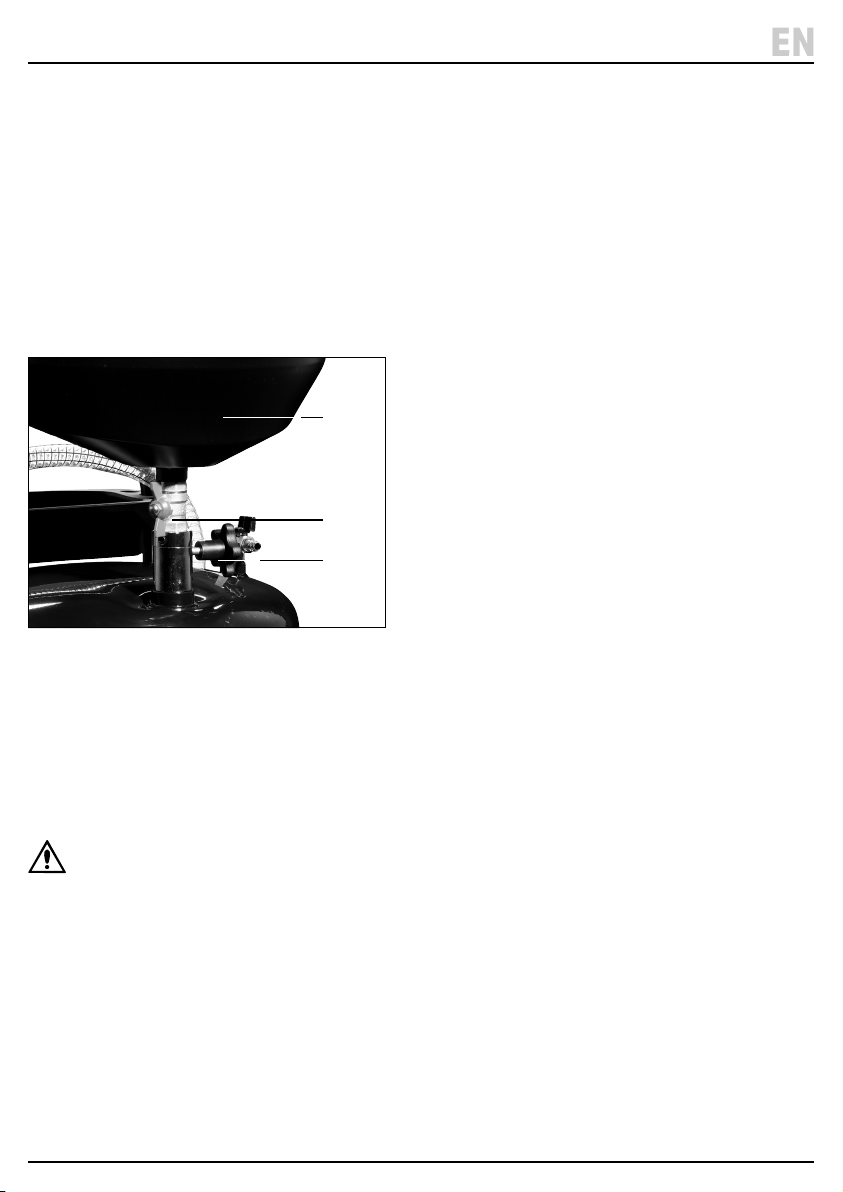
6.1 13265 only - Ocular Measuring tank (20)
(20)
Fig.
1
The Ocular Measuring tank is supplied in a separate box.
The tanks must be tted to the top of the oil waste tank
before the oil drainer can be used.
Align the Ocular tank (20) with the top of the waste tank
and turn clockwise until securely locked in place.
– 8 –
Page 9
7. Operating Instructions
EN
Important: Before preparing or adjusting this product,
read and understand all the safety instructions listed in
this manual.
Important: Always ensure the vehicle engine is switched
o before draining oil or irreparable damage will occur
to the engine.
13265 only - the ocular measuring tank (20) must be
tted before the oil drainer can be used (refer to section
6. Assembling Instructions) .
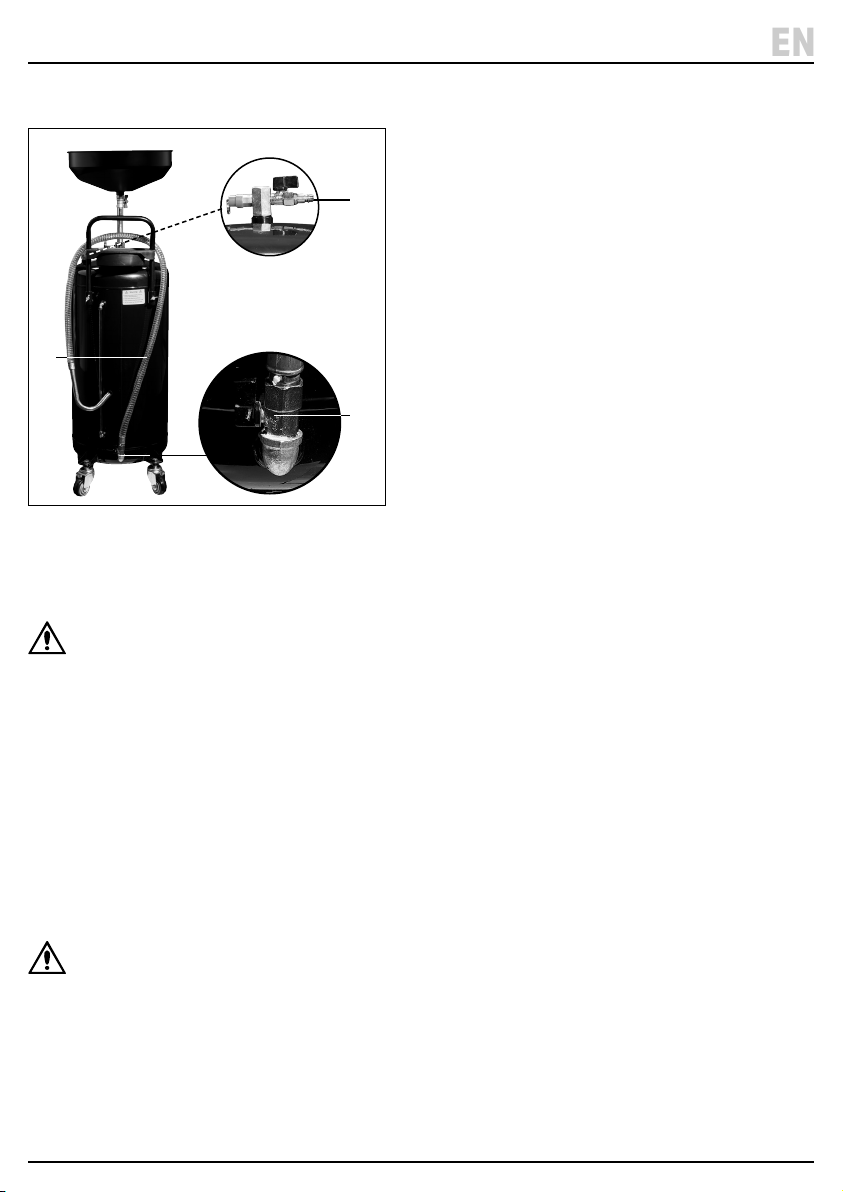
7.1 Collecting Waste Oil by Gravity
(Available on all 3 models)
(1)
(2)
(4)
2 Fig.
1. Open the oil pan drainage valve (2).
2. Raise the vehicle with a vehicle lift.
3. Push the oil drainer underneath the vehicle ensuring
that the oil pan (1) is directly beneath the oil drain
plug. Adjust the height of the oil pan (1) as required
using the height adjustment (4).
4. Then unscrew the vehicle’s oil drainage plug.
7.2 Collecting Waste Oil by Suction
(13247 & 13265)
Refer to illustrations under section 5.2 Product
Overview).
1. Connect a pressurised air supply to the suction air
inlet (18) and open the valve.
2. Check the air pressure gauge (17) and allow the
pressure drop down to -0.5bars. Then close the air
inlet valve and shut o the compressed air. The oil
drainer is depressurised and ready to use.
3. With the vehicle’s engine still warm, remove the
vehicle’s oil dipstick. Then select the most suitable
suction probe (16) and insert into the engine as far as
possible.
4. Connect the suction hose (14) to the probe.
5. Open the valve on the suction hose (14), to extract
the oil.
6. Once the oil is completely drained from then engine,
close the valve on the suction hose.
• Stock No: 13265 Ocular Measuring Tank
− The Ocular measuring tank (20) allows inspection
of the oil as it is extracted.
− When using to inspect the oil ensure that the valve
(21) underneath the Ocular tank is closed.
− After extracting the oil, close the suction hose
valve (14) and open the ocular tank valve (21) to
allow the drainage oil to ow into the waste tank.
WARNING! Ensure that the oil pan is positioned
correctly and that all the valves are closed
before opening the vehicle’s oil drainage plug.
• DO NOT smoke or have any source of ignition near the
oil drainer.
• Keep an eye on the oil level in the tank during
operation. DO NOT ll above the maximum level on
the tank indicator tube.
– 9 –
Page 10
7. Operating Instructions
EN
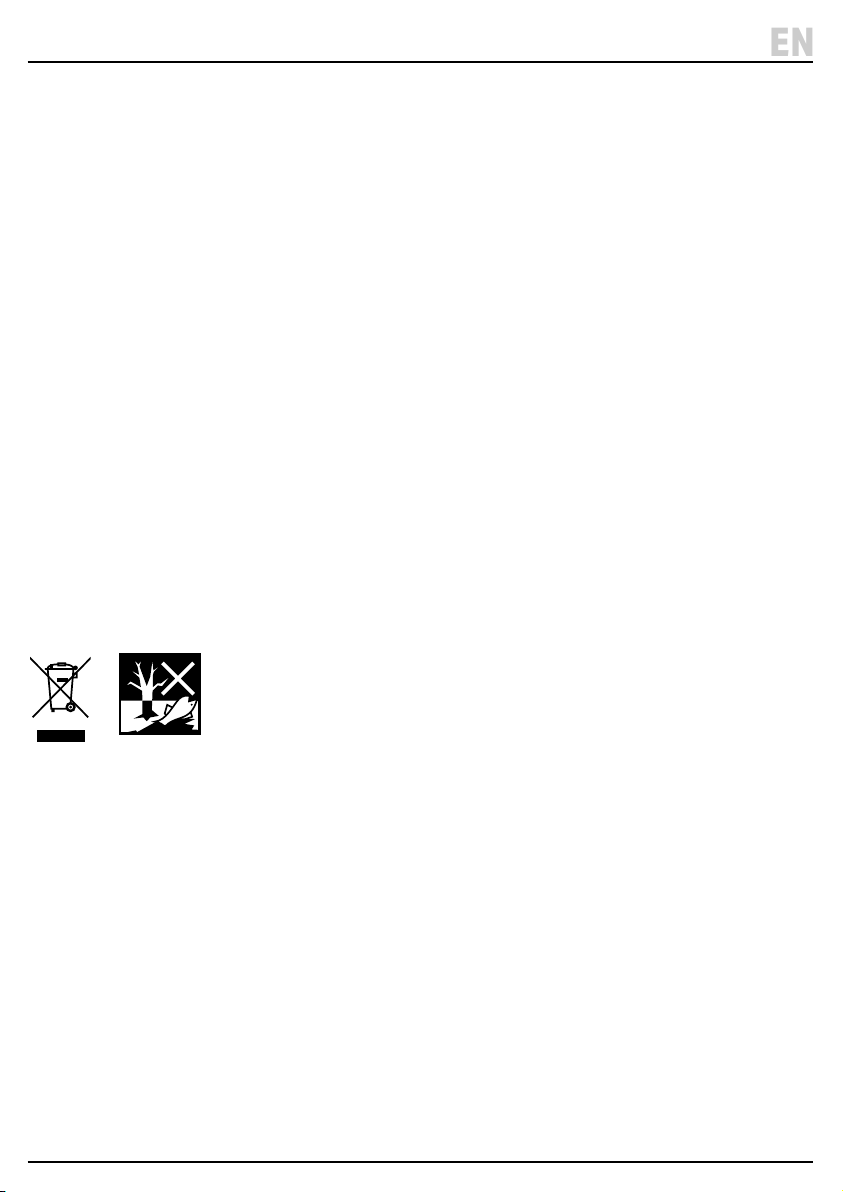
7.3 Draining the Waste Oil Tank
(13)
(8)
(7)
3 Fig.
• The clear oil level indicator (9) on the side of the tank
will show the level of waste oil collected. Empty when
at the maximum level.
WARNING! Ensure the oil pan and suction hose
valves are closed before draining.
• Stock No: 13265 – close the Ocular tank valve (20)
between the Ocular tank and oil waste tank before
draining the oil.
1. Put the end of the tank drainage hose (8) into a
suitable waste oil container.
2. Connect an air supply to the air inlet connector (13)
and open the air valve.
3. Then open the tank drainage hose valve (7).
4. After all the oil has been transferred from the tank to
the waste container, close the hose drainage valve (7)
and disconnect the air supply.
WARNING! Clean up any spillages immediately
and wash your hand afterwards.
– 10 –
Page 11

8. Maintenance and Troubleshooting
EN
8.1 General Maintenance
• When not in use, disconnect from the air supply, vent
the tank and store in a safe, dry and childproof place.
• Check the suction air hoses for signs of wear and tear
before each use. Ensure that all connections are
secure.
• 13247 & 13265 - Regularly unscrew and clean the air
lter (19).
• To prevent corrosion do not store waste oil in the tank
for long periods.
• Wipe the surface areas of the oil drainer regularly to
keep it clean.
• When not in use store in a cool, dark place and out of
direct sunlight.
8.2 Troubleshooting
Problem Possible Cause Remedy
Pressure not dropping on air
pressure gauge
Oil not pumping even with
correct pressure
Valve left open. Close valve correctly.
Incorrect air pressure value. Check section 3.2 Specication
For correct pressure required.
Poor seal between air supply and
suction hose.
Suction hose valve closed. Open the valve.
Suction hose blocked or touching
bottom of the tan.
Check engine is still warm.
Clean hose or reposition in tank.
– 11 –
Page 12
9. Spares, Returns and Disposal
EN
For spare parts, servicing, and repair and replacement
options, please contact the Draper Tools Product
Helpline for details of your nearest authorised agent.
Draper Tools will endeavour to hold any spare parts, if
applicable, for seven years from the date that it sells the
nal matching stock item.
Any servicing or repairs carried out by unauthorised
personnel or installation of spare parts not supplied by
Draper Tools will invalidate your warranty.
Important: For safety, ALWAYS drain and clean the
product of any oil, fuel, chemicals or other substances
before returning it to Draper Tools or its authorised
agent. Store these materials in suitable containers and
dispose of them in accordance with local regulations.
Draper Tools and its agents cannot be responsible for the
disposal of these substances.
At the end of its working life, dispose of the product
responsibly and in line with local regulations. Recycle
where possible.
• DO NOT dispose of this product with domestic waste;
most local authorities provide appropriate recycling
facilities.
• Dispose of oil separately and in accordance with local
regulations; DO NOT abandon it in the environment.
– 12 –
Page 13

10. Warranty
EN
This warranty covers parts and labour for the lifetime of
the product. However, if the tools are hired out, the
warranty period is 90 days from the date of purchase.
Draper Tools products are carefully tested and inspected
before shipment and are guaranteed to be free from
defective materials and workmanship.
Should the tool develop a fault, return the complete tool
to your nearest distributor or contact Draper Tools
directly. Contact information can be found at the back of
this manual.
Proof of purchase must be provided.
This warranty does not apply to any consumable parts,
batteries or normal wear and tear, nor does it cover any
damage caused by misuse, careless or unsafe handling,
alterations, accidents, or repairs attempted or made by
any personnel other than the authorised Draper Tools
repair agent.
In all cases, to make a claim for faulty workmanship or
materials within the standard warranty period, please
contact or return the product to the place of purchase.
Proof of purchase may be required.
If the place of purchase is no longer trading or if you
experience any diculties with your warranty, please
contact Customer Services with the product details and
your proof of purchase. Contact details can be found at
the back of this manual.
If the tool is not covered by the terms of this warranty,
repairs and carriage charges will be quoted and charged
accordingly.
This warranty supersedes any other guarantees
expressed or implied and variations of its terms are not
authorised.
Your Draper Tools guarantee is not eective until you can
produce, upon request, a dated receipt or invoice to
verify your purchase within the guarantee period.
Please note that this warranty is an additional benet
and does not aect your statutory rights.
Draper Tools Limited
– 13 –
Page 14

Notes
EN
– 14 –
Page 15

Notes
EN
– 15 –
Page 16

Contact Details
Draper Tools
Draper Tools Limited
Hursley Road
Chandler’s Ford
Eastleigh
Hampshire
SO53 1YF
UK
Website: drapertools.com
Email: [email protected]
Product Helpline: +44 (0) 23 8049 4344
Telephone Sales Desk: +44 (0) 23 8049 4333
General Enquiries: +44 (0) 23 8026 6355
General Fax: +44 (0) 23 8026 0784
Please contact the Draper Tools Product Helpline for repair and servicing enquiries.
Delta International
Delta International BV
Oude Graaf 8
6002 NL
Weert
Netherlands
© Published by Draper Tools Limited© Published by Draper Tools Limited
 Loading...