

Page 1
INSTRUCTIONS FOR
230V 1500W
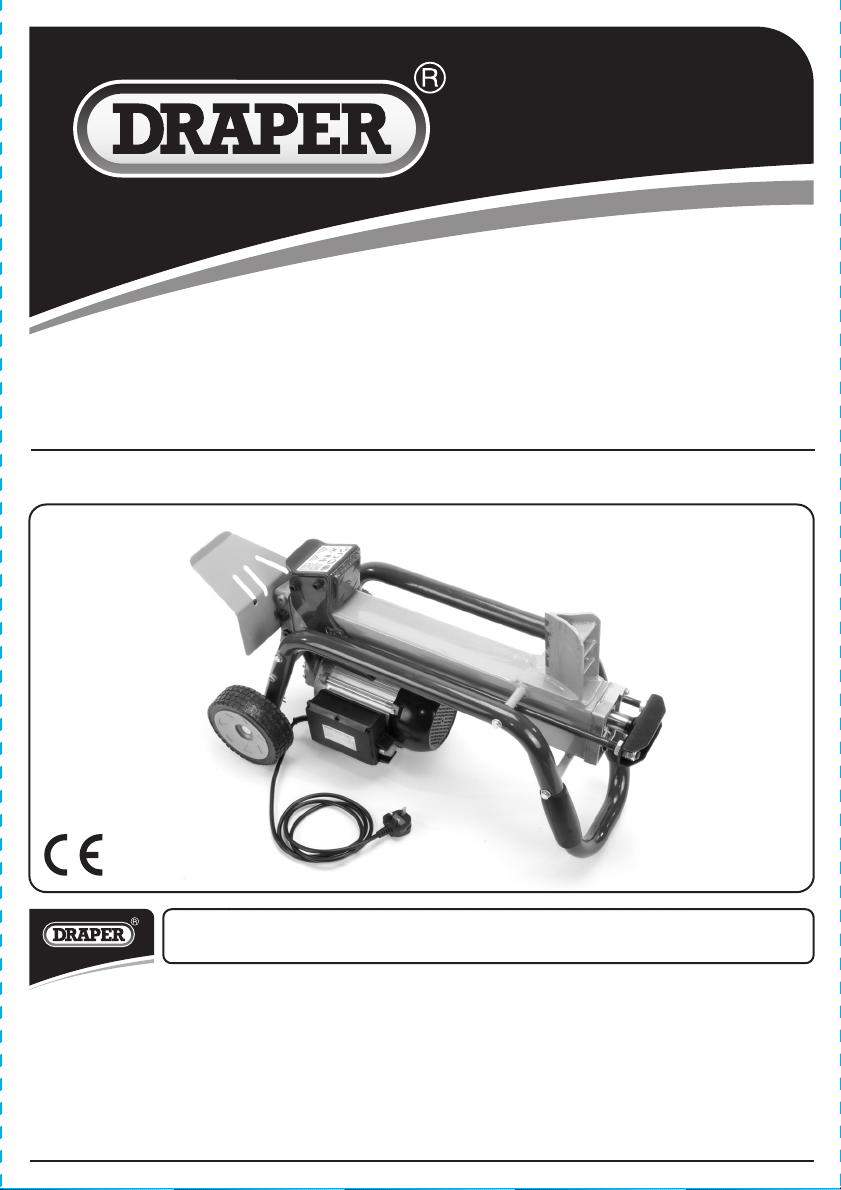
4Tonne Log Splitter
Stock No.81203 Part No.LS4T
IMPORTANT: PLEASE READ THESE INSTRUCTIONS CAREFULLY TO ENSURE THE SAFE AND
EFFECTIVE USE OF THIS PRODUCT.
GENERAL INFORMATION
These instructions accompanying the product are the original instructions. This document is part of the product, keep it
for the life of the product passing it on to any subsequent holder of the product. Read all these instructions before
assembling, operating or maintaining this product.
This manual has been compiled by Draper Tools describing the purpose for which the product has been designed, and
contains all the necessary information to ensure its correct and safe use. By following all the general safety instructions
contained in this manual, it will ensure both product and operator safety, together with longer life of the product itself.
AlI photographs and drawings in this manual are supplied by Draper Tools to help illustrate the operation of the product.
Whilst every effort has been made to ensure the accuracy of information contained in this manual, the Draper Tools policy
of continuous improvement determines the right to make modifications without prior warning.
Page 2

1. TITLE PAGE
1.1 INTRODUCTION:
USER MANUAL FOR:
230V 1500W 4TONNE LOG SPLITTER
Stock no. 81203
Part no. LS4T
1.2 REVISIONS:
Date first published April 2015.
As our user manuals are continually updated, users should make sure that they use the very
latest version.
Downloads are available from: http://www.drapertools.com/b2c/b2cmanuals.pgm
DRAPER TOOLS LIMITED WEBSITE: drapertools.com
HURSLEY ROAD PRODUCT HELPLINE: +44 (0) 23 8049 4344
CHANDLER’S FORD GENERAL FAX: +44 (0) 23 8026 0784
EASTLEIGH
HAMPSHIRE
SO53 1YF
UK
1.3 UNDERSTANDING THIS MANUALS SAFETY CONTENT:
WARNING! Information that draws attention to the risk of injury or death.
CAUTION! Information that draws attention to the risk of damage to the product or
NOTE! Important information.
surroundings.
1.4 COPYRIGHT © NOTICE:
Copyright © Draper Tools Limited.
Permission is granted to reproduce this publication for personal & educational use only.
Commercial copying, redistribution, hiring or lending is prohibited.
No part of this publication may be stored in a retrieval system or transmitted in any other
form or means without written permission from Draper Tools Limited.
In all cases this copyright notice must remain intact.
Page 3

2. CONTENTS
2.1 CONTENTS
PAGE CONTENT PAGE
1 TITLE PAGE
1.1 INTRODUCTION ............................................................................................... 2
1.2 REVISION HISTORY........................................................................................... 2
1.3 UNDERSTANDING THIS MANUAL ................................................................... 2
1.4 COPYRIGHT NOTICE.........................................................................................2
2 CONTENTS
2.1 CONTENTS ........................................................................................................ 3
3 GUARANTEE
3.1 GUARANTEE ..................................................................................................... 4
4 INTRODUCTION
4.1 SCOPE ............................................................................................................... 5
4.2 SPECIFICATION ................................................................................................. 5
4.3 HANDLING & STORAGE ...................................................................................5
5 HEALTH & SAFETY INFORMATION
5.1 GENERAL SAFETY INSTRUCTIONS FOR GARDEN TOOL USE .......................... 6-7
5.2 ADDITIONAL SAFETY RULES............................................................................ 7-8
5.3 CONNECTION TO POWER SUPPLY................................................................... 8
6 TECHNICAL DESCRIPTION
6.1 IDENTIFICATION ............................................................................................... 9
7 UNPACKING & CHECKING
7.1 PACKAGING......................................................................................................10
8 PREPARING THE LOG SPLITTER
8.1 UNDERSTAND YOUR LOG SPLITTER................................................................ 11
8.2 INSPECT YOUR LOG SPLITTER.......................................................................... 11
8.3 AIR BLEEDING PROCEDURE ............................................................................. 11
9 OPERATING THE LOG SPLITTER
9.1 "ZHB" CONTROL SYSTEM................................................................................ 12
9.2 LOG SPLITTING ................................................................................................. 12
9.3 FREEING A JAMMED LOG ................................................................................ 13
9.4 REPLACING HYDRAULIC OIL............................................................................ 13
9.5 SHARPENING WEDGE....................................................................................... 13
10 ACCESSORIES ...................................................................................................................... 14
11. TROUBLESHOOTING........................................................................................................... 15
12. MAINTENANCE
12.1 MAINTENANCE & PARTS REPLACEMENT........................................................ 16
13. DISPOSAL
13.1 DISPOSAL..........................................................................................................17
14. EXPLANATION OF SYMBOLS
14.1 EXPLANATION OF SYMBOLS ........................................................................... 18
DECLARATION OF CONFORMITY .....................................................................................ENCLOSED
3
Page 4

3. GUARANTEE
3.1 GUARANTEE
Draper tools have been carefully tested and inspected before shipment and are guaranteed
to be free from defective materials and workmanship.
Should the tool develop a fault, please return the complete tool to your nearest distributor
or contact Draper Tools Limited, Chandler's Ford, Eastleigh, Hampshire, SO53 1YF. England.
Telephone Sales Desk: (023) 8049 4333 or Product Helpline (023) 8049 4344.
A proof of purchase must be provided with the tool.
If upon inspection it is found that the fault occurring is due to defective materials or
workmanship, repairs will be carried out free of charge. This guarantee period covering
parts/labour is 12 months from the date of purchase except where tools are hired out when
the guarantee period is ninety days from the date of purchase. The guarantee is extended to
24 months for parts only. This guarantee does not apply to normal wear and tear, nor does it
cover any damage caused by misuse, careless or unsafe handling, alterations, accidents, or
repairs attempted or made by any personnel other than the authorised Draper warranty
repair agent.
Note: If the tool is found not to be within the terms of warranty, repairs and carriage charges
will be quoted and made accordingly.
This guarantee applies in lieu of any other guarantee expressed or implied and variations of
its terms are not authorised.
Your Draper guarantee is not effective unless you can produce upon request a dated receipt
or invoice to verify your proof of purchase within the guarantee period.
Please note that this guarantee is an additional benefit and does not affect your statutory
rights.
Draper Tools Limited.
4
Page 5

4. INTRODUCTION
4.1 SCOPE
This machine is designed to split logs, safely, easily and quickly. Use for consistent and
accurate sizing of logs..
4.2 SPECIFICATION
Stock no. .................................................................................................................................81203
Part no. ....................................................................................................................................LS4T
Rated voltage ...............................................................................................................230V~50Hz
Rated input .......................................................................................................................... 1500W
Log capacity ...............................................................................Diameter 5-25cm Length 37cm*
Max. cutting force .............................................................................................................. 4 tonne
Hydraulic pressure ............................................................................................................... 16Mpa
Hydraulic oil capacity ...............................................................................................................2.4L
Weight (machine only) ...........................................................................................................43kg
* The diameter of the log is indicative – a small log can be difficult to split when it has knots
or a particularly tough fibre.
Equally, it may not be difficult to split logs with regular fibres even if its diameter exceeds the
max. figure indicated above.
4.3 HANDLING & STORAGE
Always lift the machine by its purpose designed handle. Ensure you have a good stable
position whilst using this product. Care should be exercised when using this product due to
moving parts etc.
Store the product together with this manual in a cool dry place.
This product should be cleaned and maintained regularly to ensure it is operating at peak
performance.
5
Page 6

5. HEALTH & SAFETY INFORMATION
5.1 GENERAL SAFETY INSTRUCTIONS FOR GARDEN TOOL USE
WARNING: Please read the following instructions carefully, failure to do so could lead to serious personal injury. When
using electric tools, basic safety precautions, including the following, should always be followed to reduce the risk of
fire, electric shock and personal injury. Read all these instructions before operating this product and save these
instructions.
IMPORTANT: Draper Tools Limited recommends that this machine should not be modified or used for any application
other than that for which it was designed. If you are unsure of its relative applications do not hesitate to contact us in
writing and we will advise you.
1. KNOW YOUR POWER TOOL: Read and understand the owner's manual and labels affixed to the tool. Learn its
application and limitations as well as the specific potential hazards peculiar to this tool.
2. KEEP WORK AREA CLEAN: Cluttered areas and benches invite accidents. Floors must not be slippery due to oil or
sawdust.
3. AVOID DANGEROUS ENVIRONMENTS: Do not use power tools in damp or wet locations, or expose them to rain.
Keep work area well lit. Provide adequate space surrounding the work area. Do not use in environments with a
potentially explosive atmosphere.
4. KEEP CHILDREN AWAY: All visitors should be kept a safe distance from work area.
5. STORED TOOLS: When not being used, all tools should be stored in a dry, locked cupboard and out of the reach of
children.
6. WEAR PROPER CLOTHING: Do not wear loose clothing, neckties or jewellery (rings, wristwatches) to catch in
moving parts. NONSLIP footwear is recommended. Wear protective hair covering to contain long hair. Roll long
sleeves above the elbow.
7. USE SAFETY GOGGLES (Head Protection): Wear CE approved safety goggles at all times. Normal spectacles only
have impact resistant lenses, they are NOT safety glasses. Also, use face or dust mask if application is dusty and ear
protectors (plugs or muffs) during extended periods of operation.
8. NOISE LEVELS: Some types of machines may have high noise levels when working. In such cases ear protection
must be worn.
9. VIBRATION LEVELS: Hand held power tools produce different vibration levels. You should always refer to the
specifications and relevant Health and Safety guide.
10. DUST EXTRACTION: If your tool is fitted with a dust extraction fitting, always ensure that it is connected and being
used with a dust extractor. Vacuum cleaners can be used if suitable for the material being extracted.
11. PROTECT YOURSELF FROM ELECTRIC SHOCK: When working with power tools, avoid contact with any earthed
items (e.g. pipes, radiators, hobs and refrigerators, etc.). If you are using a power tool in extreme conditions (e.g.
high humidity or generating metal dust), always use an RCD (residual current device) at the power socket.
12. STAY ALERT: Always watch what you are doing and use common sense. Do not operate a power tool when you are
tired or under the influence of alcohol or drugs.
13. WHEN WORKING OUT OF DOORS: Only use extension leads designed for that purpose.
14. ACCESS TO MAINS SOCKET: If a stationary machine is fitted with a moulded plug and cable, the machine should
not be positioned so that access to the mains socket is restricted.
15. DISCONNECT POWER TO THE TOOL: When not in use, before servicing and when changing accessories such as
cutters, etc.
16. AVOID ACCIDENTAL STARTING: Make sure the switch is in the OFF position before plugging the machine into the
power supply.
17. NEVER LEAVE MACHINE RUNNING UNATTENDED: Turn power off. Do not leave machine until it comes to a
complete stop.
18. DO NOT ABUSE THE CORD: Never carry the tool by the power cable or pull it from the socket. Keep the power
cable away from heat, oil and sharp edges. If the supply cord is damaged, it must be replaced by the manufacturer
or its service agent or a similarly qualified person in order to avoid hazard.
19. NEVER STAND ON TOOL: Serious injury could occur if the tool is tipped or if the cutting tool is accidentally
contacted. Do not store materials above or near the tool, so that it is necessary to stand on the tool to reach them.
20. CHECK DAMAGED PARTS: Before further use of the tool, a guard or other part that is damaged should be carefully
checked to determine that it will operate properly and perform its intended function. Check for alignment of
moving parts, free running of moving parts, breakage of parts, mounting and any other conditions that may affect
its operation. A guard or other part that is damaged should be repaired properly or replaced by an authorized
service centre unless otherwise indicated in this instruction manual. Have defective switches replaced by an
authorized service facility. Do not use the tool if the switch does not turn it on and off.
21. KEEP GUARDS IN PLACE: And in working order.
22. MAINTAIN TOOLS WITH CARE: Keep tools sharp and clean for the best and safest performance. Follow instructions
for lubricating and changing accessories. All extension cables must be checked at regular intervals and replaced if
damaged. Always keep the hand grips on the tool clean, dry and free of oil and grease.
23. USE RECOMMENDED ACCESSORIES: Consult the owners manual for recommended accessories. Follow the
instructions that accompany the accessories. The use of improper accessories may cause hazards.
24. REMOVE ADJUSTING KEYS AND WRENCHES: Form a habit of checking to see that keys and adjusting wrenches are
removed from the tool before turning it on.
6
Page 7

5. HEALTH & SAFETY INFORMATION
25. SECURE WORK: Use clamps or a vice to hold work. This frees both hands to operate the tool.
26. DO NOT OVERREACH: Keep proper footing and balance at all times.
27. USE RIGHT TOOL: Do not force the tool or attachment to do a job for which it was not designed.
28. DO NOT FORCE TOOL: It will do the job better and safer at the rate for which it was designed.
29. DIRECTION OF FEED: Feed work into a blade or cutter against the direction of rotation of the blade or cutter only.
30. HAVE YOUR TOOL REPAIRED BY A QUALIFIED PERSON: This electric tool is in accordance with the relevant safety
requirements. Repairs should only be carried out by qualified persons using original spare parts, otherwise this
may result in considerable danger to the user.
IMPORTANT NOTE: Residual Risk. Although the safety instructions and operating manuals for our tools contain
extensive instructions on safe working with power tools, every power tool involves a certain residual risk which can not
be completely excluded by safety mechanisms. Power tools must therefore always be operated with caution!
5.2 ADDITIONAL SAFETY RULES
WARNING: Connect the machine only to a supply circuit protected by a residual current device (RCD) with a tripping
current of not more than 30 MA.
WARNING:
- Keep bystanders away.
- Remove the plug from the socket before carrying out adjustment, cleaning or maintenance.
- Read user instructions before operating this machine.
- The lawn mower shall not be operated without either the entire grass catcher or the guard in place.
- CAUTION: Do not touch rotating blade.
- Beware of blades. Blades continue to rotate after the motor is switched off. Remove plug from mains before
maintenance or if cord is damaged.
- Keep supply cord away from the blades. Blades can cause damage to the cords and lead to contact with live parts.
1. Training.
- Read the instructions carefully. Be familiar with the controls and the proper use of the appliances.
- Never allow children or people unfamiliar with these instructions to use the appliance. Local regulations may
restrict the age of the operator.
- Never mow while people, especially children, or pets are nearby.
- The operator or user is responsible for accidents or hazards occurring to other people or their property.
2. Preparation.
- While operating, always wear substantial footwear and long trousers.
- Do not operate the appliance when barefoot or wearing open sandals.
- Thoroughly inspect the area where the appliance is to be used and remove all stones, sticks, wires bones and other
foreign objects.
- Before using, always visually inspect to see that the blades, blade bolts and cutter assembly are not worn or
damaged. Replace worn or damaged blades and bolts in sets to preserve balance.
- On multi-bladed appliances, take care as rotating one blade can cause other blades to rotate.
- Prior to each use, thoroughly check the supply and extension cord for signs of damage or ageing.
WARNING:
- Do not use the lawn mower if the cords are damaged or worn.
3. Operation.
WARNING:
- Do not connect a damaged cord to the supply or touch a damaged cord before it is disconnected from the supply.
A damaged cord can lead to contact with live parts.
- Mow only in daylight or in good artificial light.
- Avoid operating the appliance in wet grass, where feasible.
- Always be sure of your footing on slopes.
- Walk, never run.
- For wheeled rotary mowers, mow across the face of slopes, never up and down.
- Exercise extreme caution when changing direction on slopes.
- Do not mow excessively steep slopes.
- Use extreme caution when reversing or pulling the appliance towards you.
7
Page 8

5. HEALTH & SAFETY INFORMATION
- Stop the blade(s) if the appliance has to be tilted for transportation when crossing surfaces other than grass, and
when transporting the appliance to and from the area to be mowed.
- Never operate the appliance with defective guards or shields, or without safety devices, for example deflectors
and/or grass catchers, in place.
- Switch on the motor according to instructions and with hands and feet well away from the blade(s).
- Do not tilt appliance when switching on the motor, except if the appliance has to be tilted for starting. In this case,
do not tilt it more than absolutely and lift only the part which is away from the operator.
- Always ensure that both hands are in the operating position before returning the appliance to the ground.
- Do not put hands or feet near or under rotating parts. For rotary mowers, keep clear of the discharge opening at
all times.
WARNING:
- Do not touch the blades before the machine is disconnected from the supply and the blades have come to a
complete stop.
- Never pick up or carry an appliance while the motor is running.
- Immediately disconnect the mains from the cord if it becomes damaged during use.
- Remove the plug from the socket.
• whenever you leave the machine;
• before cleaning a blockage;
• before checking, cleaning or working on the machine;
• after striking a foreign object. Inspect the appliance for damage and make repairs as necessary;
• if the appliance starts to vibrate abnormally (check immediately).
4. Maintenance and storage.
- Replace safety parts subjected to regular wear and tear.
- Keep all nuts, bolts and screws tight to be sure the appliance is in safe working condition.
- Check the grass catcher frequently for wear or deterioration.
- Replace worn or damaged parts for safety.
- For cylinder mowers, be careful during adjustment of the appliance to prevent entrapment of the fingers between
moving blades and fixed parts of the appliance.
- For rotary mowers, ensure that only replacement cutting means of the right type are used.
5.3 CONNECTION TO THE POWER SUPPLY
Make sure the power supply information on the machine’s rating plate are compatible with
the power supply you intend to connect it to.
This product comes supplied with a UK standard 3 pin plug fitted. It is designed for
connection to a domestic power supply rated at 230V AC.
If an extension lead is required, use an approved and compatible lead rated for this
appliance. Follow all the instruction supplied with the extension lead.
This product requires no earth connection as supplementary insulation is applied to the basic
insulation to protect against electric shock in the event of failure of the basic insulation.
Apart from replacing the fuse in the plug, no other electrical work is recommended on this
product.
Page 9
6. TECHNICAL DESCRIPTION
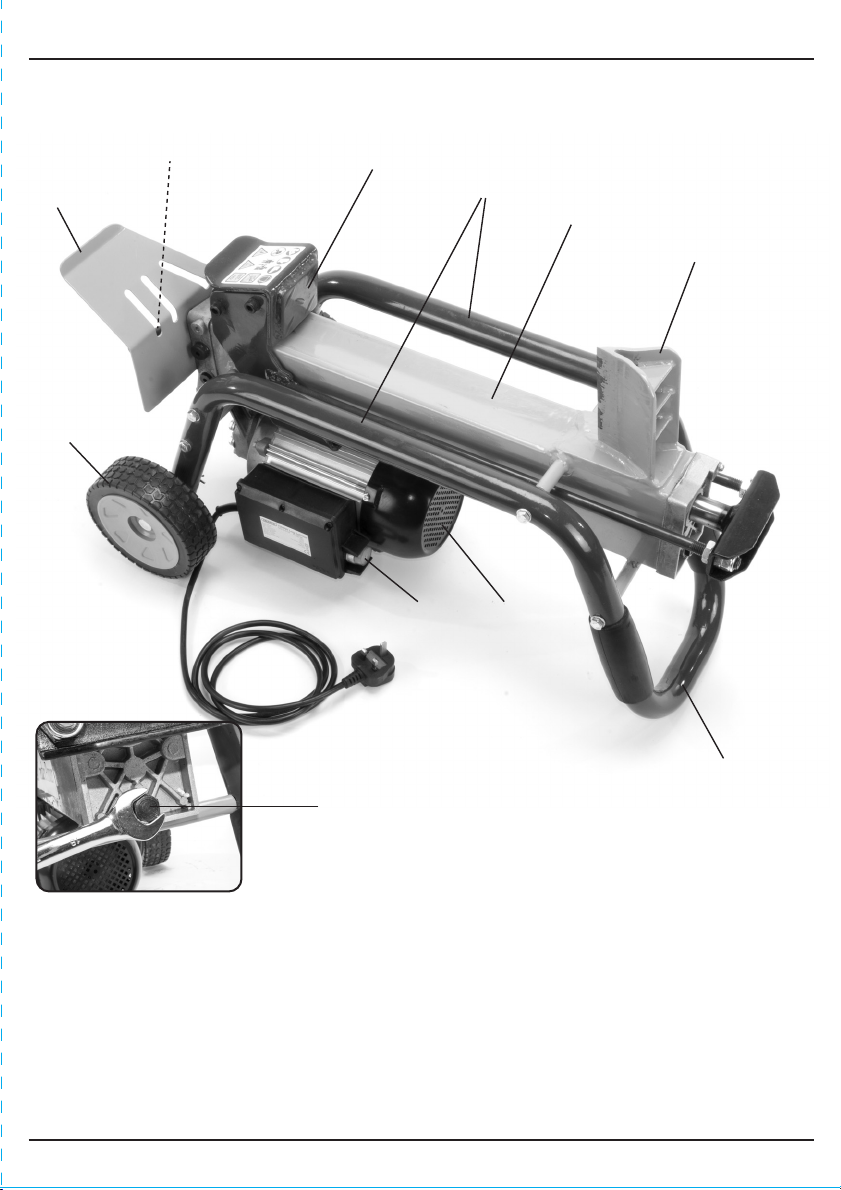
6.1 IDENTIFICATION
Wheels for minor moving ONLY.
Control lever guard.
Hydraulic control lever.
Log pusher.
Log retaining bars.
Work table.
Wedge.
Lift handle/support.
Motor.
ON/OFF Switch.
Oil drain bolt with dipstick.
912
Page 10

7. UNPACKING & CHECKING
7.1 PACKAGING
Carefully remove the log splitter from the packaging and examine it for any sign of damage
that may have happened during shipping. Lay the contents out and check them against the
parts shown on page 9. If any part is damaged or missing; please contact the Draper
Helpline (the telephone number appears on the Title page) and do not attempt to use the
shredder.
The packaging material should be retained at least during the guarantee period: in case the
machine needs to be returned for repair.
Warning! Some of the packaging materials used may be harmful to children. Do not leave
any of these materials in the reach of children.
If any of the packaging is to be thrown away, make sure they are disposed of correctly;
according to local regulations.
10
Page 11
8. PREPARING THE LOG SPLITTER
NOTE: Remove the plug from the socket before carrying
out adjustment, servicing or maintenance.
8.1 UNDERSTAND YOUR LOG SPLITTER
Read and understand the owners manual and labels
fixed to the log splitter. Learn it’s application and
limitations before first use.
Carefully unpack the machine and check that all parts
are present.
Familiarize yourself with the controls and features of
this machine before use.
8.2 INSPECT YOUR LOG SPLITTER
Always check your log splitter before turning it on.
Keep all guards in place and in good functioning
condition. Form a habit of checking that all tools are
removed from the area where the log splitter is to be
operated. Always replace any loose, damaged or worn
parts before turning this machine on.
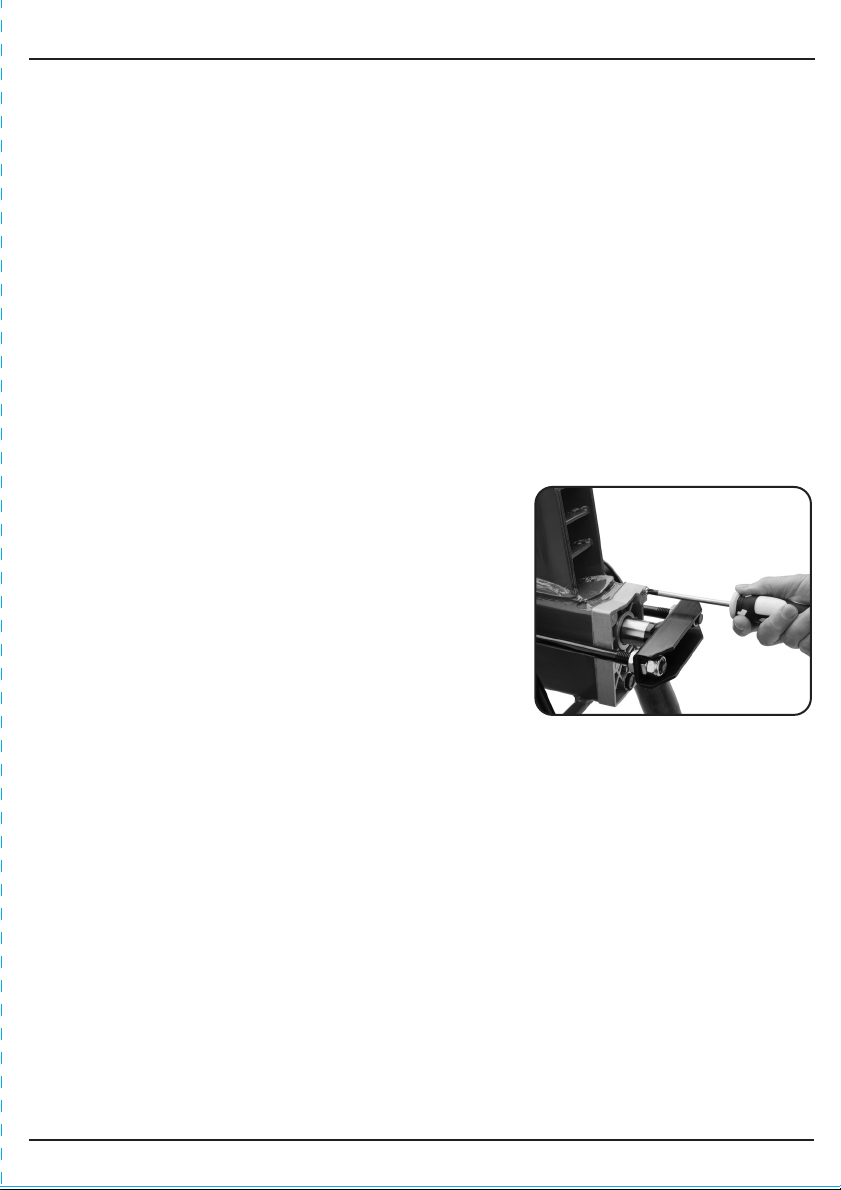
8.3 AIR BLEEDING PROCEDURE - FIG. 1
The maximum safe working pressure for this machine
has been set at the factory. Unauthorised resetting of
this screw could cause serious damage to this machine
as well as injury to the operator.
Before operating the log splitter, the bleed bolt should
be loosened by some rotations until air can go in and
out of the tank smoothly. Air flow through the bleed
screw hole should be detectable while the log splitter is
in operation. Before moving the log splitter, make sure
the bleed bolt is tightened to avoid oil leaking from this
point.
WARNING: Failure to loosen the bleed bolt will keep the
sealed air in hydraulic system being compressed after
being decompressed. Such continuous air compression
and decompression will blow out the seals of the
hydraulic system and cause permanent damage to the
log splitter.
FIG.1
11
Page 12
9. OPERATING THE LOG SPLITTER
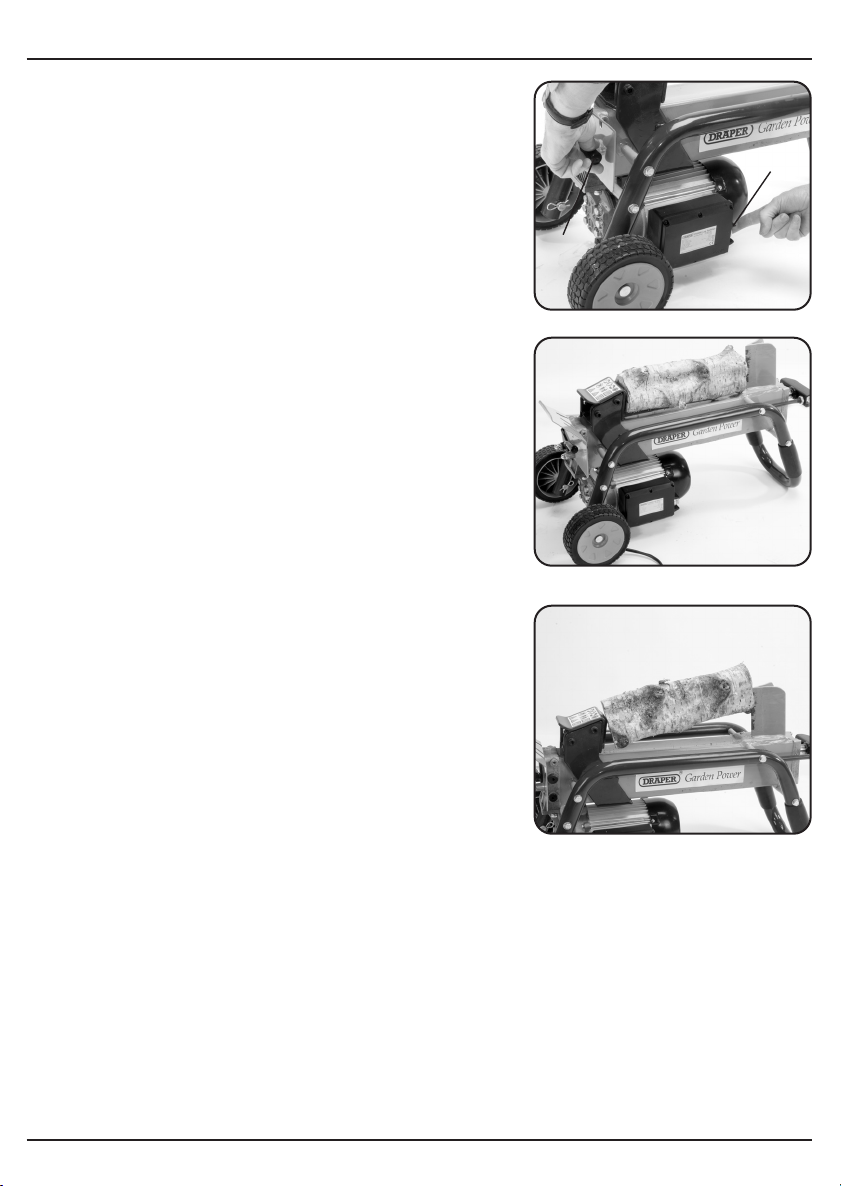
9.1 SAFETY CONTROL SYSTEM - FIG.2
The log splitter is equipped with safety control system.
This requires the machine to be operated by both hands
of the operator, the left hand controls the hydraulic
control lever whilst the right hand controls the push
button switch .
If either hand is removed the log splitter will stop. If
both hands release the controls the log pusher will
return to it’s start position.
9.2 LOG SPLITTING - FIGS. 3 - 4
Place the log you want to split centrally on the log
retaining plates and work table. Ensure that the log
cannot twist or slip whilst being split. Once the log is
placed correctly on the machine, operate the hydraulic
control lever with your left hand and press the push
button switch, the log pusher will travel to the right and
split the log.
WARNING: Never force the log splitter for more than 5
seconds if it stops whilst splitting. Trying to force the log
splitter to split excessively hard wood could result in
damage to the machine and risks injury to the operator.
If the log fails to split, rotate it 90° and try again. If the
log still will not split then the logs hardness exceeds the
capacity of the machine and thus the log should be
discarded to avoid damage to the machine and injury to
the operator.
Always split logs in the same direction as their grain,
attempting to split the log against it’s grain will cause
damage to the machine and risk injury to the operator.
Only split one log at a time. Attempting to split more
than one log at a time exposes the operator and
machine to the risk of personal injury and damage.
NOTE: As logs are a natural product, they vary in how
well they split. The diameter of the log (5 – 25cm) is
indicative of the capabilities of this splitter. However,
allowances should be made for log age, condition,
wood type and knots. These will all effect performance.
FIG.3
FIG.3
3
FIG.3
FIG.4
3
FIG.2
4
4
Page 13
9. OPERATING THE LOG SPLITTER
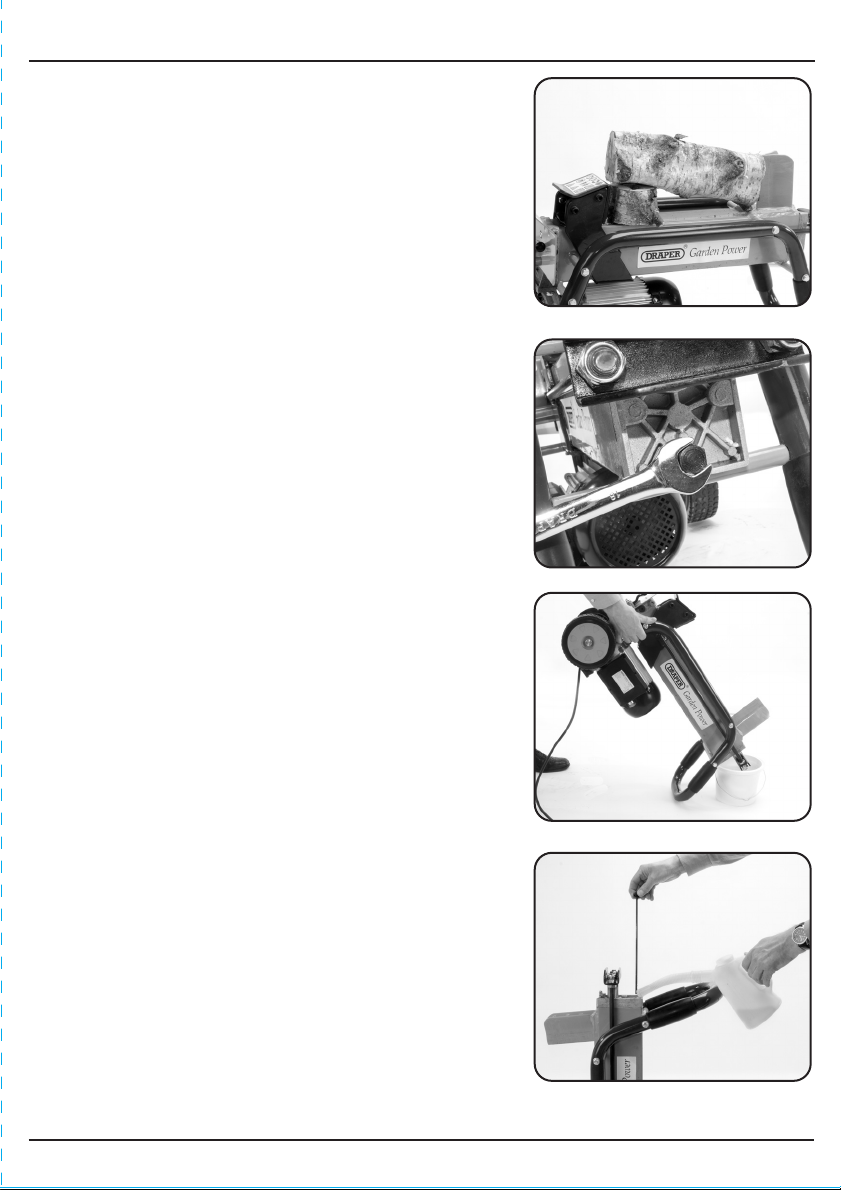
9.3 FREEING A JAMMED LOG - FIG. 5
Release both controls.
After the log pusher moves back and completely stops
at it’s starting position, insert a wooden wedge under
the jammed log.
Repeat above procedure with sharper slope wedges
until the log is completely freed.
NOTE: Do not try to knock the jammed log off.
Knocking about will damage the machine or may launch
the log and cause accident.
9.4 REPLACING HYDRAULIC OIL FIGS. 6 - 8
Replace the hydraulic oil in the log splitter after every
150 hours of use. Take following steps to replace it.
- Make sure all moving parts stop and the log splitter
is unplugged.
- Unscrew oil drain bolt.
- Turn the log splitter on the support leg side over a 4
litre capacity container to drain the hydraulic oil off.
- Turn the log splitter on the motor side.
- Refill fresh hydraulic at the volume as per the
hydraulic oil capacity of a particular model indicated
in specification.
- Clean the surface of oil dipstick on the oil drain bolt
and put it back into the oil tank whilst keeping the
log splitter vertical.
- Make sure the level of the refilled oil is just
between 2 grooves around the dipstick.
- Clean the oil drain bolt before threading them back.
Make sure they are tightened to avoid leakage
before placing the log splitter back level
horizontally.
NOTE: Periodically check oil level to ensure it is between
the 2 grooves around the dipstick. if the level is low,
refill immediately.
NOTE: The following hydraulic oils or equivalent are
recommended for use with the log splitter’s
transmission system:
WARNING: Follow bleeding procedure detailed on Page
11.
SHELL Tellus 22, MOBIL DTE11, ARAL Vitam GF 22
BP Energol HLP-HM 22.
9.5 SHARPENING WEDGE
After prolonged use the blade can become blunt.
Sharpen the blade wedge of the log splitter using a
fine-toothed file and smooth any burrs or crushed area
along the cutting edge.
FIG.5
FIG.6
FIG.7
FIG.8
138
Page 14

10. OPTIONAL ACCESSORIES
82122 4-Way Spliting Wedge
14
Page 15

11. TROUBLESHOOTING
TROUBLE PROBABLE CAUSE REMEDY
Motor fails to
start.
Fails to split logs.
1. Overload Protection
Device disengaged to
protect the log splitter
from being damaged.
1. Log is improperly
positioned.
2. The sizes or hardness
of the log exceeds the
capacity of the
machine.
3. Wedge cutting edge is
blunt.
4. Oil leaks.
5. Unauthorized
adjustment was made
on max. pressure
limiting screw. Lower
max pressure rating
was set.
1. Contact a qualified electrician for
1. Refer to "operation and use"
2. Reduce the log sizes before
3. Refer to "sharpening wedge"
4. Locate leak(s) and contact the
5. Contact your nearest
opening the push button box to
engage the overload protection
device inside.
section for perfect log loading.
splitting it on the log splitter.
section (page 9) to sharpen the
cutting edge.
authorized service agent.
warranty/service agent.
The log pusher
moves fails to
move
smoothly/makes
abnormal sounds
or vibrates
excessively
Oil leaks around
cylinder ram or
from other
points.
1. Lack of hydraulic oil
and excessive air in
the hydraulic system.
1. Air sealed in hydraulic
system whilst
operating.
2. Bleed screw is not
tightened before
moving the log
splitter.
3. Oil drain bolt with
dipstick is not tight
enough.
4. Hydraulic control valve
assembly and/or seal(s)
are worn.
1. Check oil level for possible oil
refuelling.
2. Contact your nearest
warranty/service agent.
1. Loosen bleed screw by 3-4
rotations before operating the log
splitter.
2. Tighten the bleed screw up before
moving the log splitter.
3. Tighten the oil drain bolt with
dipstick.
4. Contact your nearest
warranty/service agent.
15
Page 16

12. MAINTENANCE
12.1 MAINTENANCE & PARTS REPLACEMENT
Remove the plug from the socket before carrying out adjustment, servicing or maintenance.
Regular inspection and cleaning reduces the necessity for maintenance operations and will
keep your tool in good working condition.
The motor must be correctly ventilated during tool operation. For this reason avoid blocking
the air inlets.
If the replacement of the supply cord is necessary, this has to be done by the manufacturer or
his agent in order to avoid a safety hazard.
16
Page 17

13. DISPOSAL
13.1 DISPOSAL
- At the end of the machine’s working life, or when it can no longer be repaired, ensure
that it is disposed of according to national regulations.
- Contact your local authority for details of collection schemes in your area.
In all circumstances:
• Do not dispose of power tools with domestic waste.
• Do not incinerate.
• Do not abandon in the environment.
• Do not dispose of WEEE*
as unsorted municipal waste.
* Waste Electrical & Electronic Equipment.
17
Page 18
14. EXPLANATION OF SYMBOLS
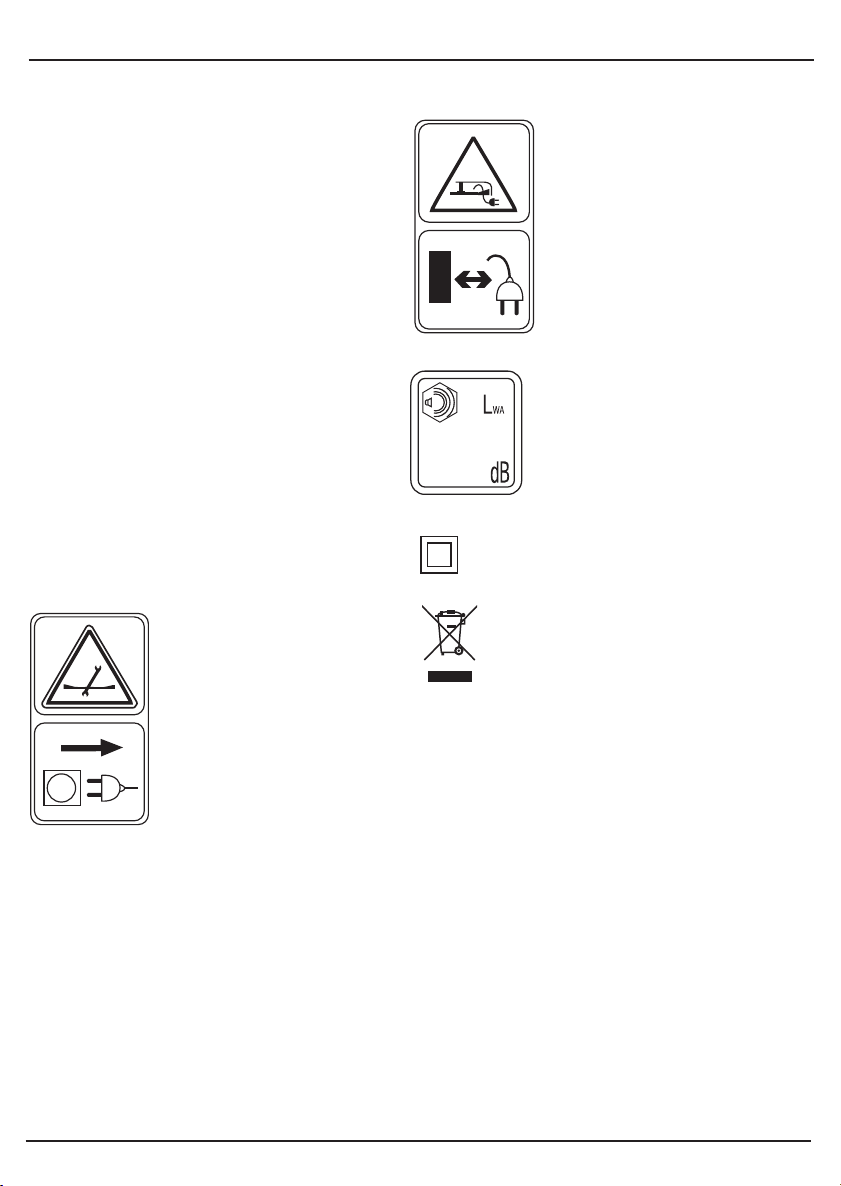
14.1 EXPLANATION OF SYMBOLS
Read operators manual.
Keep bystanders away.
Keep supply cord
away from cutting
means.
Single value noise marking.
(Maximum declared
A-weighted sound power
level in decibels).
Class II construction
(Double insulated).
18
Remove plug from
mains before
maintenance or if
cord is damaged.
Do not dispose of WEEE*
as unsorted municipal waste.
* Waste Electrical & Electronic Equipment.
Page 19

NOTES
19
Page 20

CONTACTS
- DRAPER TOOLS LIMITED,
Hursley Road, Chandler's Ford,
Eastleigh, Hampshire. SO53 1YF. U.K.
- Helpline: (023) 8049 4344
- Sales Desk: (023) 8049 4333
- Internet: www.drapertools.com
- E-mail: [email protected]
- Sales Fax: (023) 8049 4209
- General Enquiries: (023) 8026 6355
- Service/Warranty Repair Agent
For aftersales servicing or warranty repairs, please
contact the Draper Tools Helpline for details of an
agent in your local area.
YOUR DRAPER STOCKIST
PSKC290415
 Loading...