

Page 1
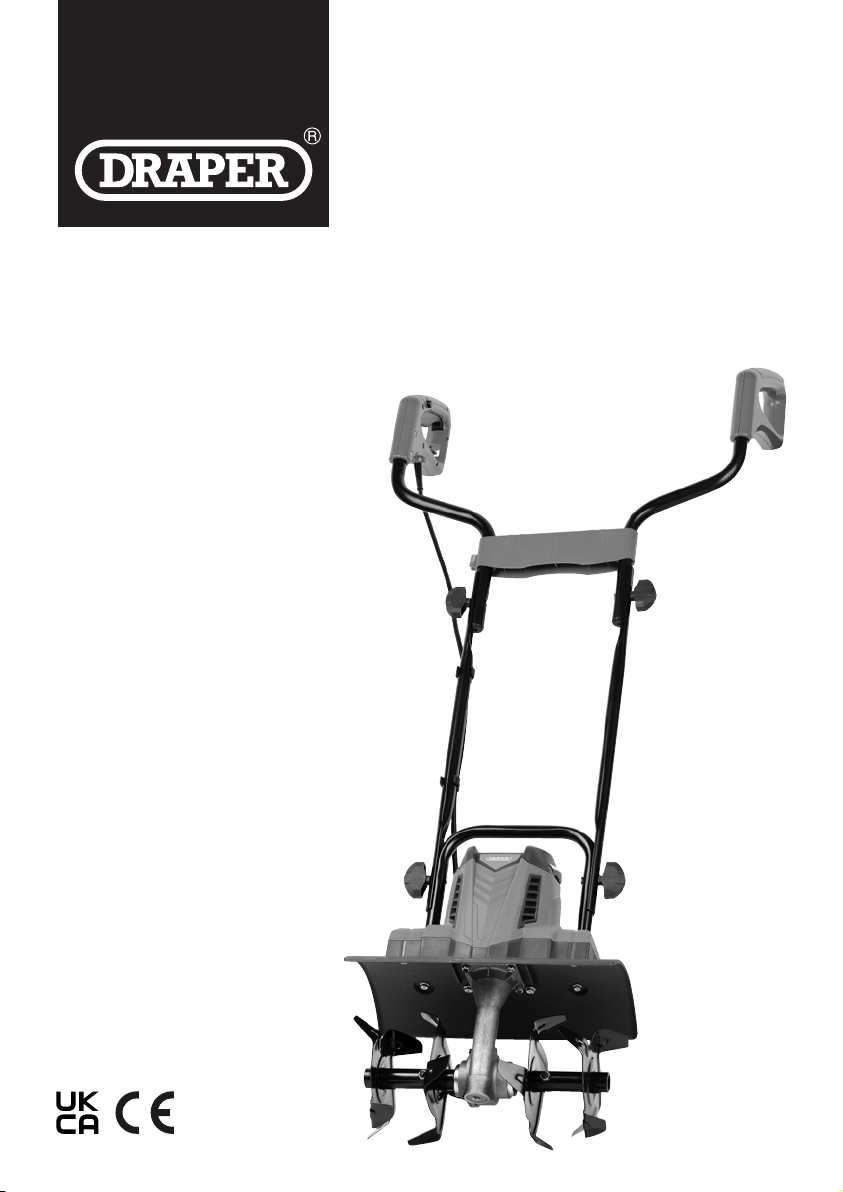
230V 1050W
ELECTRIC
TILLER
24183
EN
Original Instructions
Version 1 - December 2024
Page 2
1. Preface
These are the original product instructions. This
document is part of the product; retain it for the life
of the product, passing it on to subsequent holders.
Read this manual in full before attempting to
assemble, operate or maintain this product.
This Draper Tools manual describes the purpose
of the product and contains all the necessary
information to ensure its correct and safe use.
Following all the instructions and guidance in
this manual will ensure the safety of both the
product and the operator and increase the
lifespan of the product.
1.1 Product Reference
User Manual for: 230V 1050W Electric Tiller
Stock No: 24183
Part No: GT1050/360D
1.2 Revisions
Version 1: December 2024
First release
As our manuals are continually updated, always ensure
that the latest version is used.
Please visit drapertools.com/manuals for the latest
version of this manual and the associated parts list, if
applicable.
All photographs and drawings within this manual are
supplied by Draper Tools to help illustrate correct
operation of the product.
Every eort has been made to ensure the
information contained in this manual is accurate.
However, Draper Tools reserves the right to amend
this document without prior warning. Always use the
latest version of the product manual.
1.3 Understanding the Safety Content of
This Manual
WARNING! – Situations or actions that may result
in personal injury or death.
CAUTION! – Situations or actions that may result
in damage to the product or surroundings.
Important: – Information or instructions of particular
importance.
1.4 Copyright © Notice
Copyright © Draper Tools Limited.
Permission is granted to reproduce this manual for
personal and educational use ONLY. Commercial
copying, redistribution, hiring or lending is strictly
prohibited.
No part of this manual may be stored in a retrieval system
or transmitted in any other form or means without written
permission from Draper Tools Limited.
In all cases, this copyright notice must remain intact.
– 2 –
Page 3

2. Contents
EN
1. Preface 2
1.1 Product Reference 2
1.2 Revisions 2
1.3 Understanding the Safety Content of This
Manual 2
1.4 Copyright © Notice 2
2. Contents 3
3. Product Introduction 4
3.1 Intended Use 4
3.2 Specication 4
4. Health and Safety Information 5-6
4.1 General Health and Safety Precautions 5
4.2 Connection to the Power Supply 6
4.3 Residual Risk 6
5. Identication and Unpacking 7-8
5.1 Product Overview 7
5.2 What’s in the Box? 8
5.3 Packaging 8
6. Assembly Instructions 9
6.1 Fitting the Frame 9
6.2 Assembling the Handles 9
7. Operating Instructions 10
7.1 ON/OFF Switch Operation 10
7.2 Basic Operation 10
8. Maintenance and Troubleshooting 11-12
8.1 General Maintenance 11
8.2 Replacing the Cutting Blades 11
8.3 Troubleshooting 12
9. Spares, Returns and Disposal 12
10. Warranty 13
11. Explanation of Symbols 14
– 3 –
Page 4
3. Product Introduction
EN
3.1 Intended Use
This product is designed to loosen and turn over soil and
for mixing coarse soil with fertiliser, peat and compost.
Ideal for use in small gardens, allotments and ower beds.
Any other application beyond the conditions established
for use will be considered misuse. Draper Tools accepts
no responsibility for improper use of this product.
3.2 Specication
Stock No. 24183
Part No. GT1050/360D
Rated Voltage: 220 - 240V/50Hz
Rated Power Input: 1050W
Maximum Speed (No load): 390rpm
Maximum Working:
Depth: 180mm
Width: 360mm
Cord Length (approx.): 10M
Noise Emissions:
Sound Pressure Level: 80.4dB (A)
Sound Power Level: 89.5dB (A)
Guaranteed Sound Power Level: 93dB (A)
Vibrations: 1.582m/S
Storage Temperature: 10 - 30°C
Protection Rating: IPX4
Net weight: 9.6kg
Read this manual in full before attempting to assemble,
operate or maintain the product, and retain it for later use.
2
Important: The declared vibration total values and noise
emissions values have been measured in accordance
with a standard test method and may be used for
comparing one tool with another. These values may also
be used in a preliminary assessment of exposure.
– 4 –
WARNING! The vibration and noise emissions
during actual use of the product can dier from
the declared values depending on the type of
work and the area upon which it is used. Before
each use, estimate the likely exposure resulting
from the actual conditions of use. Take into
account all parts of the operation cycle in order
to identify any safety measures required to
protect the operator.
Page 5

4. Health and Safety Information
EN
Important: Read all the Health and Safety instructions
before attempting to operate, maintain or repair this
product. Failure to follow these instructions may result in
injury or damage to the user, or the product.
4.1 General Health and Safety Precautions
Training
• Read the instructions carefully. Be familiar with the
controls and the proper use of the equipment. Retain
for later use.
• Never allow children or people unfamiliar with these
instructions to use this machine. Local regulations
can restrict the age of the operator.
• Never work while people, especially children or pets,
are nearby.
• This machine MUST NOT be used by children and
persons with reduced physical, sensory or mental
capabilities, or lack of experience and knowledge,
unless they have been given supervision or
instruction concerning the use of the machine by a
person responsible for their safety.
• Children should be supervised to ensure that they do
not play with the machine.
• Keep in mind that the operator or user is responsible
for accidents or hazards occurring to other people or
their property.
Preparation
• While operating the machine, always wear substantial
footwear and long trousers.
• DO NOT operate the machine when barefoot or
wearing open-toed sandals.
• Thoroughly inspect the area where the tiller is to be
used and remove all objects which could be thrown up
by the machine.
• Before using, always visually inspect the blades, blade
bolts and blade assembly for wear or damage.
Replace any worn or damaged components.
• Before use check the supply and extension cord for
signs of damage or wear. If the cord becomes
damaged during use, disconnect the cord from the
power supply immediately. DO NOT TOUCH THE
CORD BEFORE DISCONNECTING THE SUPPLY. Do
not use the machine if the cord is damaged or worn.
• DO NOT abuse the cord. Never use the cord for
carrying, pulling or unplugging the machine. Keep
the cord away from heat, oil, sharp edges and moving
parts. Damaged or entangled cords increase the risk
of electric shock.
Operation
• NEVER use the machine in rain or wet conditions.
• DO NOT use this product to till extremely dry or wet soil.
• DO NOT work close to trees in case the machine cuts
through roots.
• Operate the machine only in daylight or in good
articial light.
• Always be sure of your footing on slopes.
• Walk, never run.
• Work across slopes, never up and down.
• Exercise extreme caution when changing direction
on slopes.
• DO NOT use on excessively steep slopes.
• Use extreme caution when reversing or pulling the
machine towards you.
• DO NOT change the motor governor settings or over
speed the motor.
• NEVER operate the machine with defective guards or
without safety devices tted.
• Ensure that all warning labels are in place and safety
features and operation controls function correctly
before use.
WARNING! Always keep a rm grip on the
machine with both hands and watch your feet;
the blades may cause an accident. Take care
when moving backwards to prevent tripping!
• Keep the cord and your feet well away from the
cutting blades.
• DO NOT start the machine when standing in front of
the discharge opening.
• DO NOT put hands or feet near or under rotating parts.
Keep clear of the discharge opening at all times.
• Do not transport the machine while the cutting blade
is running.
• You must stop and unplug the machine immediately from
the socket (or other disabling device), and make sure that
all moving parts have come to a complete stop:
− Whenever you leave the machine.
− Before clearing blockages.
− Before checking, cleaning or working on the
machine.
– 5 –
Page 6

4. Health and Safety Information
EN
− After striking a foreign object. Inspect the
machine for damage and repair before restar ting
and operating the machine.
• If the machine starts to vibrate abnormally, stop
immediately and manually:
− Inspect for damage:
− Replace or repair any damaged parts.
− Check for and tighten any loose parts.
• DO NOT touch the gearbox, as it may become hot
during operation.
WARNING! To avoid damage to the machine.
− NEVER lift or drag the machine while the motor is
running.
− Always lift the machine when moving it over
hard surfaces, such as tiles or steps.
Maintenance and Servicing
• Keep all nuts, bolts and screws tight to be sure the
machine is in a safe working condition.
• Take care as manually rotating one blade can cause
other blades to rotate.
• Be careful when adjusting the machine to prevent
entrapment of the ngers between moving blades and
xed parts of the machine.
• Always allow the machine to cool down before
storing.
• Replace worn or damaged parts and only use genuine
recommended replacement parts and accessories.
• Have your machine repaired by an authorised service
agent. To avoid danger, equipment must only be
repaired by qualied technicians.
• The value of the fuse tted is marked on the pin face
of the plug. Should the fuse need replacing, use a
small plain-slot screwdriver to remove the fuse cover.
Ensure the substitute is of the correct rating, approved
to BS 1363/A and ASTA or BS Kite marked. This
should only be performed by suitably qualied
personnel.
• If an extension lead is required, use an approved and
compatible lead rated for this appliance and for
outdoor use.
• Follow all the instructions supplied with the
extension lead.
Important: Always follow the extension lead instructions
regarding maximum load while the cable is wound. If in
doubt, unwind the entire cable. A coiled extension lead
generates heat which could melt the lead and cause a re.
• It is recommended that this product is used with a
residual current device (RCD) with a tripping current
of not more than 30mA to reduce the risk of electrical
shocks.
†
Double insulated : This product is double
insulated and does not require an earth connection to
protect against electric shock from accessible
conductive parts in the event of failure of the basic
insulation.
4.3 Residual Risk
• The safety instructions in this manual cannot account
for all possible conditions and situations that may
occur. Exercise common sense and caution when
using this product and protect against any additional
conceivable risks.
4.2 Connection to the Power Supply
• This appliance is supplied with an approved plug and
cord for your safety.
• If the power supply cord is damaged, it must be
replaced by Draper Tools, an authorised ser vice agent
or similarly qualied personnel in order to avoid a
hazard.
• The damaged or incomplete plug, when cut from the
cord, shall be disabled to prevent connection to a live
electrical outlet.
• This product is a Class II† appliance and is designed
for connection to a power supply matching that
detailed on the rating label and compatible with the
plug tted.
– 6 –
Page 7
5. Identication and Unpacking
EN
5.1 Product Overview
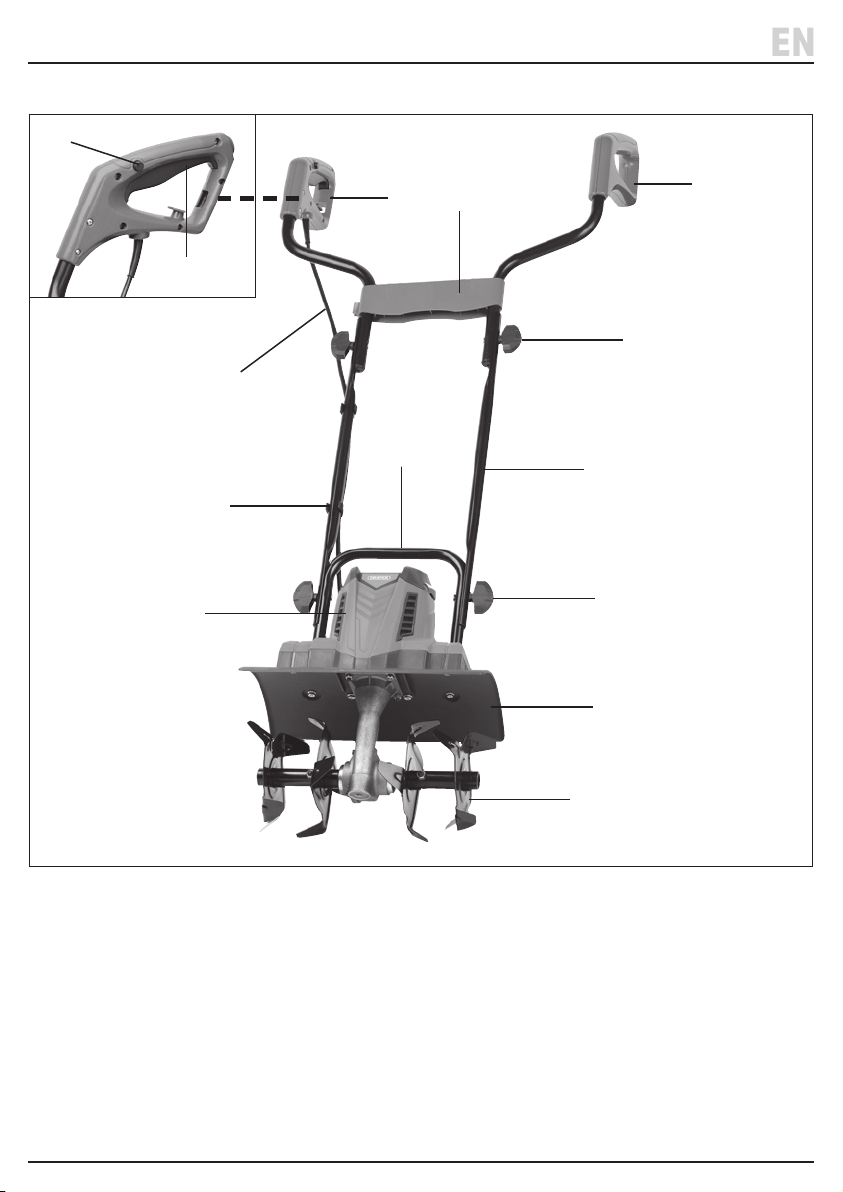
(3)
(4)
(1)
(13)
(2)
(5)
(10)
(6)
(7)
(9)
(8)
(9)
(11)
(1) Motor housing
(2) 2 x cord clips
(3) Lock button
(4) ON/OFF trigger
(5) Right handle grip with ON/OFF control
(6) Frame
(7) Left handle grip
(12)
(8) 2 X Middle handle sections
(9) 4 X Handle bolts
(10) Lower handle
(11) Protection guards
(12) 4 X Rotor blades
(13) Power cord and plug
– 7 –
Page 8
5. Identication and Unpacking
EN
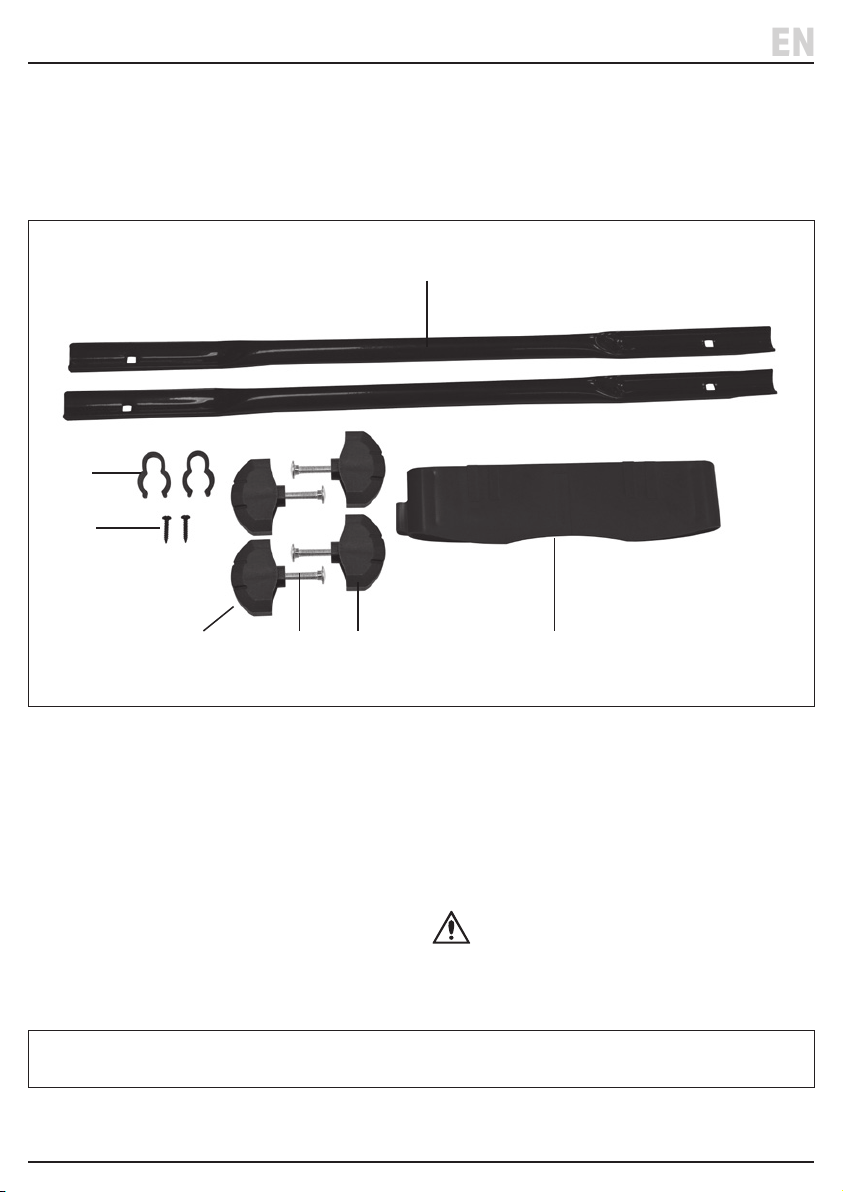
5.2 What’s in the Box?
Carefully remove the product from the packaging and
examine it for any signs of damage that may have occurred
during shipment. Before assembling the product, lay the
contents out and check them against the parts shown
(2)
(14)
below. If any part is damaged or missing, do not attempt to
use the product. Please contact the Draper Helpline;
contact details can be found at the back of this manual.
(8)
(2) 2 X Cord clips
(6) 1 X Frame
(8) 2 X Middle handle section
(9) Handle Fixings
5.3 Packaging
Keep the product packaging for the duration of the
warranty period in case the product needs to be returned
for repair.
Please visit drapertools.com for our full range of accessories and consumables.
(9b) (6)(9a)(9)
(9a) 4 X bolts
(9b) 4 X nuts
(14) 2 X Frame screws
WARNING! Keep packaging materials out of
reach of children. Dispose of packaging
correctly and responsibly and in accordance
with local regulations.
– 8 –
Page 9
6. Assembly Instructions
EN
Important: Before preparing or adjusting this product,
read and understand all the safety instructions listed in
this manual.
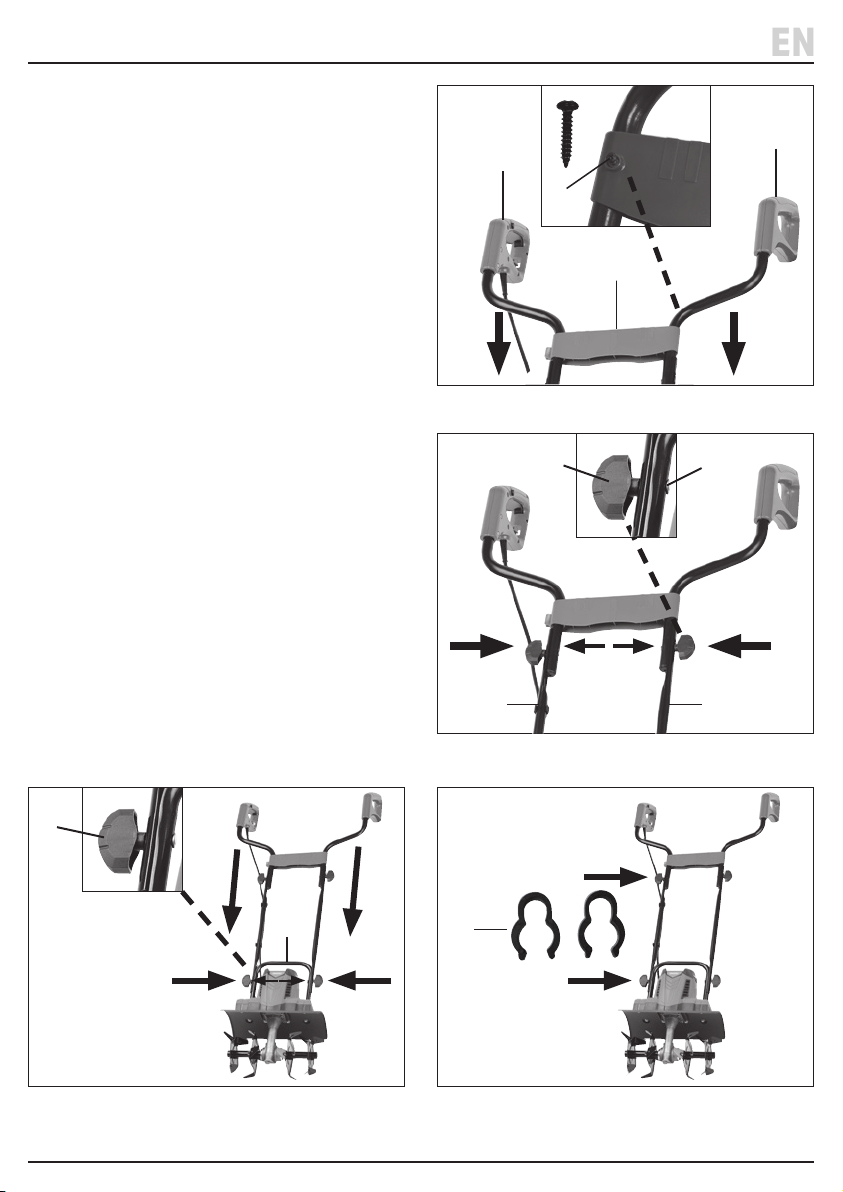
6.1 Fitting the Frame (Fig.1)
1. Slide the right (5) and left (7) handle bars into the
frame (6).
• Ensure that the cord holder is positioned on the same
side as the control handle (5).
2. Align the hole in the handle with the hole in the frame
and fasten one at at time.
3. Secure the frame using the two screws (14) supplied
with a cross-slot screwdriver.
6.2 Assembling the Handles (Fig. 2 – Fig. 4)
1. Align the upper handles (5) and (7) with the middle
handle sections (8).
2. Secure together using two xing bolts and nuts (9).
3. Then align the assembled handles with the lower handle
(10) and secure with two xing bolts and nuts (9).
Note:
4. Clamp the cord in the cord clips (2) and t the clips to
the middle section of the right handle.
Fig. 1
(9)
(5)
(14)
(6)
(9b) (9a)
(8)
(7)
(9)
(8)
(9b) (9a)
(10)
(9)
Fig. 3 Fig.4
(9)
Fig. 2
(2)
– 9 –
Page 10
7. Operating Instructions
EN
Important: Before operating this product, read and
understand all the safety instructions listed in this
manual. Ensure that the product is fully assembled and
correctly prepared for use.
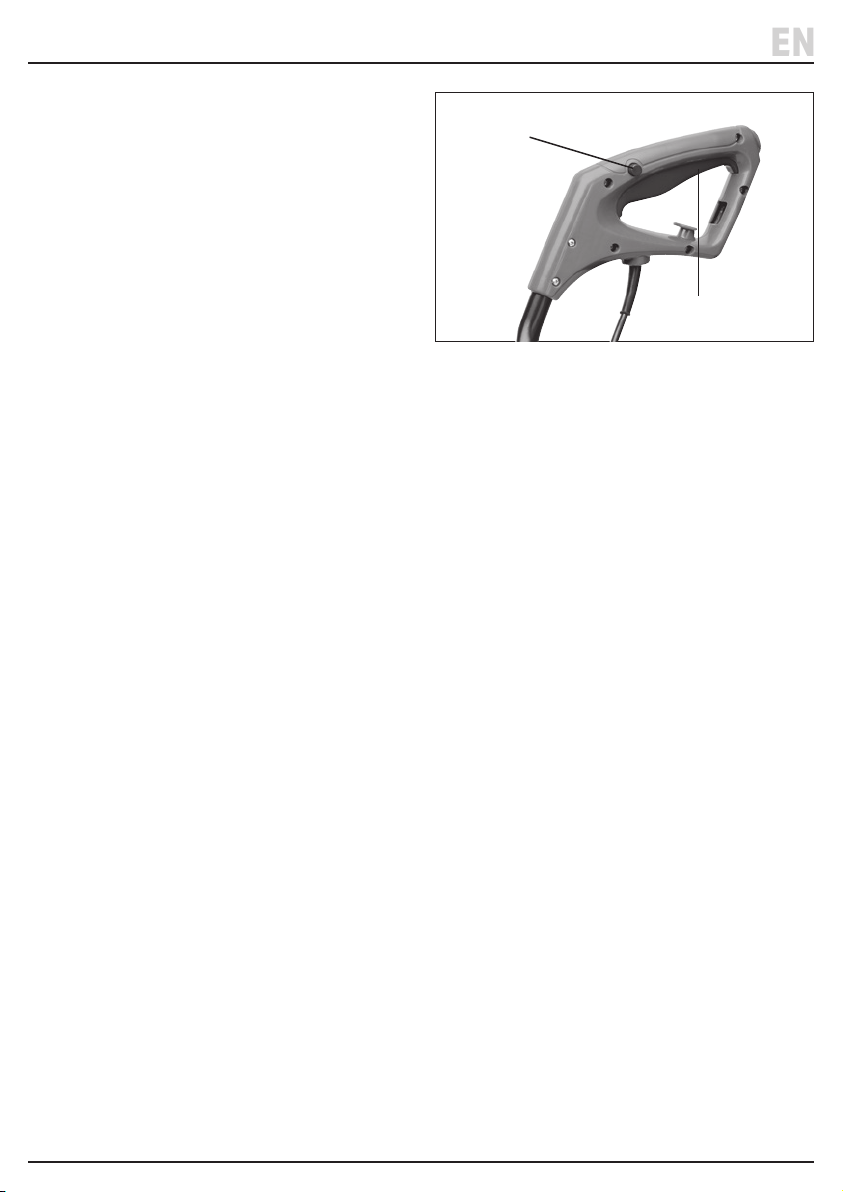
7.1 ON/OFF Switch Operation (Fig. 5)
Note: For your safety, this tiller is equipped with a double
switch system. This system prevents starting the machine
inadvertently. You must rst press the lock button (3),
and then press and hold the trigger switch (4).
• To switch ‘ON’ – Press the lock button (3). Then press
and hold the trigger (4) and release the lock button.
• To switch ‘OFF’ – Release the trigger switch (4).
Note: NEVER attempt to hold the trigger switch without
pressing the lock button rst.
7.2 Basic Operation
• Move the tiller forward through the soil at a normal
pace and in as straight a line as possible.
• Important: ALWAYS work away from the mains
socket. Ensure that the cord is kept well away from the
working area and the blades.
• Overload Protection: The motor will cut out
immediately if overloaded. The machine cannot be
used again until it has completely cooled down.
(3)
(4)
Fig. 5
– 10 –
Page 11
8. Maintenance and Troubleshooting
EN
• Proper and regular maintenance of the product will
ensure a longer lifespan and consistent performance.
Failure to correctly maintain the product may result in
rapid deterioration of its performance.
• Important: ALWAYS switch o the tiller, allow it to
completely stop and cool before performing any
maintenance. NEVER attempt to perform any
maintenance with the blades rotating.
8.1 General Maintenance
• Wipe over the exterior with a damp cloth only. DO NOT
use abrasive cleaners or solvent as they may damage
the plastic parts.
• Always keep the air vents clean and free from
obstructions. Clean the air vents after every use with a
cloth and brush.
• Check for and replace any worn and damaged parts
after and before each use.
• Regularly check for obvious defects, such as loose,
dislodged or damaged cutting devices, loose xings
and worn or damaged components.
• Check that safety guard is undamaged and correctly
tted.
• Store the product in a dark, dry, frost-free, well-
ventilated place, out of the reach of children.
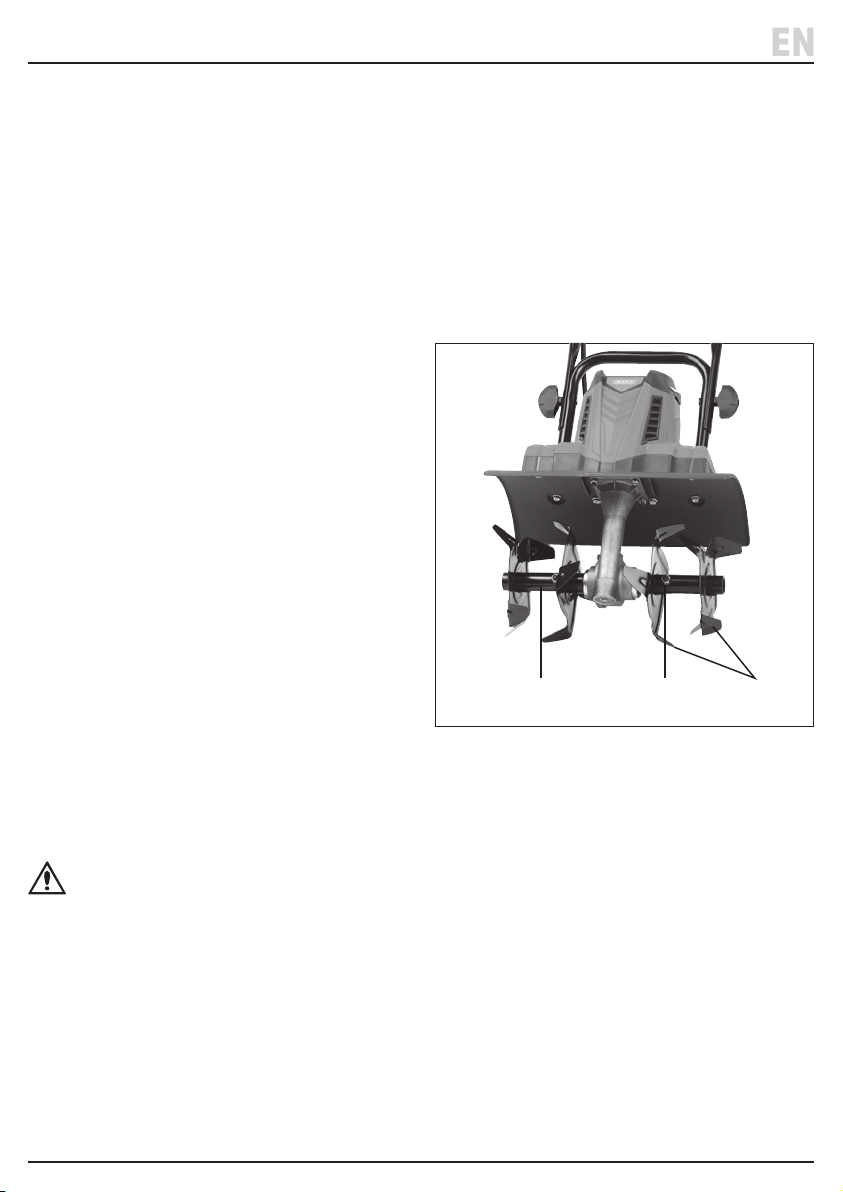
1. Unscrew the hex bolt and the self-locking nut (A) on
the blade pair (C).
2. Slide the blade pair o the drive shaft (B).
3. Clean the drive shaft with a suitable lubricating oil.
4. Slide the new blades onto the drive shaft with the
holes on the axles aligned to the holes on the drive
shaft (B).
5. Slide the hex bolt through the hole and tighten on the
self-locking nut (A).
8.2 Replacing the Cutting Blades (Fig. 6)
Important:
• Always wear safety gloves when working on the
cutting blades.
• Important: The tiller is tted with four blades that
can be placed in pairs and tted on either the left or
right side.
WARNING! Make sure that the blades (C) are set
to the correct turning direction. NOTE: The
arrows on the gearbox and blades should point
the same way.
(B) (A) (C)
Fig. 6
– 11 –
Page 12
8. Maintenance and Troubleshooting
EN
8.3 Troubleshooting
Problem Possible Cause Remedy
Tiller does not start. Not connected to power supply. Connect to power supply.
On/O control not operated
correctly.
Tiller does operate at full power. Extension cord not suitable. Use a correctly rated extension
Air vents blocked. Switch o and unplug and Clean
Poor results. Cutting blades. Replace or sharpen blades – Refer
Press the lock button and hold and
press the trigger.
cord.
the air vents.
to Section 8.2.
9. Spares, Returns and Disposal
For spare parts, servicing, and repair and replacement
options, please contact the Draper Tools Product
Helpline for details of your nearest authorised agent.
Draper Tools will endeavour to hold any spare parts, if
applicable, for seven years from the date that it sells the
nal matching stock item.
Any servicing or repairs carried out by unauthorised
personnel or installation of spare parts not supplied by
Draper Tools will invalidate your warranty.
• DO NOT dispose of this product with domestic waste;
most local authorities provide appropriate recycling
facilities.
– 12 –
Page 13

10. Warranty
Draper Tools products are carefully tested and inspected
before shipment and are guaranteed to be free from
defective materials and workmanship.
Should the tool develop a fault, return the complete tool
to your nearest distributor or contact Draper Tools
directly. Contact information can be found at the back of
this manual.
Proof of purchase must be provided.
If, upon inspection, it is found that the fault occurring is
due to defective materials or workmanship, repairs will
be carried out free of charge. This warranty period covers
parts and labour for 24 months from the date of
purchase.
Where tools have been hired out, the warranty period
covers 90 days from the date of purchase.
This warranty does not apply to any consumable parts,
batteries or normal wear and tear, nor does it cover any
damage caused by misuse, careless or unsafe handling,
alterations, accidents, or repairs attempted or made by
any personnel other than the authorised Draper Tools
repair agent.
In all cases, to make a claim for faulty workmanship or
materials within the standard warranty period, please
contact or return the product to the place of purchase.
Proof of purchase may be required.
If the place of purchase is no longer trading or if you
experience any diculties with your warranty, please
contact Customer Services with the product details and
your proof of purchase. Contact details can be found at
the back of this manual. If the tool is not covered by the
terms of this warranty, repairs and carriage charges will
be quoted and charged accordingly.
This warranty supersedes any other guarantees
expressed or implied and variations of its terms are not
authorised.
Your Draper Tools guarantee is not eective until you can
produce, upon request, a dated receipt or invoice to
verify your purchase within the guarantee period.
Please note that this warranty is an additional benet
and does not aect your statutory rights.
Draper Tools Limited
– 13 –
Page 14

11. Explanation of Symbols
EN
Read the instruction manual.
Warning!
Wear face mask and safety glasses
Wear ear defenders
Rotating parts may cause serious injury.
Make sure the blades come to a complete
stop before transporting the machine or
before inspecting, cleaning, or conducting
any other maintenance.
Beware of sharp blades. Blades continue
to rotate after the motor is switched o.
Remove the plug from the mains before
maintenance or if the cord is damaged.
Wear suitable protective footwear.
WEEE –
Waste Electrical & Electronic Equipment.
Do not dispose of Waste Electrical & Electronic Equipment in
with domestic rubbish.
UK Conformity Assessed
European conformity
Class II construction
(Double insulated)
There is a risk that some objects could be
thrown out by the machine. Keep
bystanders away.
Keep the exiable supply cord away from
cutting means.
Disconnect the mains plug if the cord
becomes damaged or entangled.
Do not operate or expose the product to
rain or wet conditions.
Continuous A-Weighted Sound Pressure
Level.
– 14 –
Page 15

Notes
EN
– 15 –
Page 16

Contact Details
Draper Tools
Draper Tools Limited
Hursley Road
Chandler’s Ford
Eastleigh
Hampshire
SO53 1YF
UK
Website: drapertools.com
Email: [email protected]
Product Helpline: +44 (0) 23 8049 4344
Telephone Sales Desk: +44 (0) 23 8049 4333
General Enquiries: +44 (0) 23 8026 6355
Please contact the Draper Tools Product Helpline for repair and servicing enquiries.
Delta International
Delta International BV
Oude Graaf 8
6002 NL
Weert
Netherlands
© Published by Draper Tools Limited© Published by Draper Tools Limited
 Loading...