

Page 1

230V MOBILE
DEHUMIDIFIER
56135 - DH10
IMPORTANT: PLEASE READ THESE INSTRUCTIONS CAREFULLY TO ENSURE THE
SAFE AND EFFECTIVE USE OF THIS PRODUCT.
INSTRUCTIONS
These instructions accompanying the product are the original instructions. This document is part of the product, keep
it for the life of the product passing it on to any subsequent holder of the product. Read all these instructions before
assembling, operating or maintaining this product.
This manual has been compiled by Draper Tools describing the purpose for which the product has been designed,
and contains all the necessary information to ensure its correct and safe use. By following all the general safety
instructions contained in this manual, it will ensure both product and operator safety, together with longer life of the
product itself.
AlI photographs and drawings in this manual are supplied by Draper Tools to help illustrate the operation of the
product.
Whilst every effort has been made to ensure the accuracy of information contained in this manual, the Draper Tools
policy of continuous improvement determines the right to make modifications without prior warning.
Page 2

1. TITLE PAGE
1.1 INTRODUCTION:
USER MANUAL FOR:
230V MOBILE DEHUMIDIFIER
Stock no. 56135.
Part no. DH10.
1.2 REVISIONS:
Date first published November 2016
As our user manuals are continually updated, users should make sure that they use the very latest
version.
Downloads are available from: http://www.drapertools.com/manuals
DRAPER TOOLS LIMITED WEBSITE: drapertools.com
HURSLEY ROAD PRODUCT HELPLINE: +44 (0) 23 8049 4344
CHANDLER’S FORD GENERAL FAX: +44 (0) 23 8026 0784
EASTLEIGH
HAMPSHIRE
SO53 1YF
UK
1.3 UNDERSTANDING THIS MANUALS SAFETY CONTENT:
WARNING! Information that draws attention to the risk of injury or death.
CAUTION! Information that draws attention to the risk of damage to the product or
surroundings.
1.4 COPYRIGHT © NOTICE:
Copyright © Draper Tools Limited.
Permission is granted to reproduce this publication for personal & educational use only.
Commercial copying, redistribution, hiring or lending is prohibited.
No part of this publication may be stored in a retrieval system or transmitted in any other form or
means without written permission from Draper Tools Limited.
In all cases this copyright notice must remain intact.
Page 3

2. CONTENTS
2.1 CONTENTS
Page content Page
1 TITLE PAGE
1.1 INTRODUCTION .......................................................................................................... 2
1.2 REVISION HISTORY.................................................................................................... 2
1.3 UNDERSTANDING THIS MANUAL ............................................................................. 2
1.4 COPYRIGHT NOTICE.................................................................................................. 2
2 CONTENTS
2.1 CONTENTS ..................................................................................................................3
3 GUARANTEE
3.1 GUARANTEE................................................................................................................ 4
4 INTRODUCTION
4.1 SCOPE.......................................................................................................................... 5
4.2 SPECIFICATION........................................................................................................... 5
4.3 HANDLING & STORAGE.............................................................................................. 5
5 HEALTH & SAFETY INFORMATION
5.1 GENERAL SAFETY INSTRUCTIONS.......................................................................... 6
5.2 CAUTION: RISK OF ELECTRIC SHOCK. DO NOT OPEN..........................................7
6 TECHNICAL DESCRIPTION
6.1 IDENTIFICATION.......................................................................................................... 8
7 UNPACKING & CHECKING
7.1 PACKAGING.................................................................................................................9
8 INSTALLATION EXPLANATIONS
8.1 INSTALLATION EXPLANATIONS.............................................................................. 10
9 OPERATING INSTRUCTIONS
9.1 CONTROL PANEL......................................................................................................11
9.2 OUTLET FLAP............................................................................................................ 11
9.3 START DEHUMIDIFIER ............................................................................................. 11
9.4 EMPTYING THE DRAINAGE TANK...........................................................................12
9.5 REPLACING THE DRAINAGE TANK.........................................................................13
9.6 CONTINUOUS WATER DRAINAGE.......................................................................... 13
10 MAINTENANCE
10.1 CLEANING THE DEHUMIDIFIER............................................................................... 14
10.2 STORING THE DEHUMIDIFIER................................................................................. 15
11 TROUBLESHOOTING
11.1 TROUBLESHOOTING ................................................................................................ 16
12 EXPLANATION OF SYMBOLS
12.1 EXPLANATION OF SYMBOLS................................................................................... 17
13 DISPOSAL
13.1 DISPOSAL ................................................................................................................. 18
DECLARATION OF CONFORMITY.......................................................................................ENCLOSED
3
Page 4

3. GUARANTEE
3.1 GUARANTEE
Draper products have been carefully tested and inspected before shipment and are guaranteed to
be free from defective materials and workmanship.
Should the tool develop a fault, please return the complete unit to your nearest distributor or
contact Draper Tools Limited, Chandler's Ford, Eastleigh, Hampshire, SO53 1YF. England.
Telephone Sales Desk: (023) 8049 4333 or Product Helpline (023) 8049 4344.
A proof of purchase must be provided with the unit.
If upon inspection it is found that the fault occurring is due to defective materials or workmanship,
repairs will be carried out free of charge. This guarantee period covering parts/labour is 12 months
from the date of purchase except where tools are hired out when the guarantee period is 90 days
from the date of purchase. The guarantee is extended to 24 months for parts only. This guarantee
does not apply to normal wear and tear, nor does it cover any damage caused by misuse, careless
or unsafe handling, alterations, accidents, or repairs attempted or made by any personnel other
than the authorised Draper warranty repair agent.
Note: If the unit is found not to be within the terms of warranty, repairs and carriage charges will be
quoted and made accordingly.
This guarantee applies in lieu of any other guarantee expressed or implied and variations of its
terms are not authorised.
Your Draper guarantee is not effective unless you can produce upon request a dated receipt or
invoice to verify your proof of purchase within the guarantee period.
Please note that this guarantee is an additional benefit and does not affect your statutory rights.
Draper Tools Limited.
4
Page 5

4. INTRODUCTION
4.1 SCOPE
This unit removes unwanted moisture from the air to create a more comfortable environment in
your home or office. It can be conveniently moved from room to room within your home.
4.2 SPECIFICATION
Stock no. ..................................................................................................................................56135
Part no. .................................................................................................................................... DH10
Rated voltage ..........................................................................................................220-240V~50Hz
Rated input ...............................................................................................................................240W
Refrigerant...............................................................................................................................R134A
...........................................................................GWP=1430 with co2 equivalent of 0.09295 tonnes
Moisture removal...................................................................................................................10L/day
Noise level...........................................................................................................................<42dB(A)
Air flow volume......................................................................................................................150M
Dimensions (WxHxD)............................................................................................. 276x185x480mm
Weight (machine only) .............................................................................................................. 9.5kg
4.3 HANDLING & STORAGE
Care must still be taken when handling and lifting. Dropping this machine will have an effect on its
operation and may also result in personal injury. This machine is not a toy and must be respected.
The environment will have a negative result on its operation if you are not careful. If the machine is
unprotected from dust and debris; components will become clogged: And if not cleaned and
maintained correctly or regularly the machine will not perform at its best.
3
/h
5
Page 6

5. HEALTH & SAFETY INFORMATION
5.1 GENERAL SAFETY INSTRUCTIONS
WARNING: Read all instructions. Failure to follow all instructions listed below may result in electric
shock, fire and/or serious injury.
Save all warnings and instructions for future reference.
1. Do not connect the unit to any AC power
supply in disrepair, or with loose
connections.
2. Do not use in the following locations:
- Next to source of fire.
- An area where oil is likely to splash,
or spill.
- An area exposed to direct sunlight.
- An area where water is likely to splash
or spill.
3. Never insert your fingers or any foreign
objects into the air outlet. Take special care
to warn children of these dangers.
4. Always store the unit upright in order to
maintain the compressor in its proper
condition.
5. Be sure to unplug the unit before cleaning.
6. When moving the air-conditioner, always
turn off and disconnect the power supply,
and move it slowly.
7. To avoid the possibility of fire, the
air-conditioner must not be covered.
8. The air-conditioner plug must comply with
the local electric safety requirements. If
necessary, please check before use.
9. Young children should be supervised to
ensure that they do not play with the
appliance.
10. This appliance is not intended for use by
persons (including children) with reduced
physical, sensory, or mental capacities, or
lack of experience and knowledge, unless
they have been given supervision or
instruction concerning use of the appliance
by a person responsible for their safety.
Notes:
- If any parts are damaged, please contact
the dealer or a designated repair shop;
- In case of any damage, please turn off,
disconnect the power supply, and contact
the dealer or a designated repair shop;
- To avoid the possibility of danger, if power
cord is damaged, please turn off and
disconnect the power supply. It must be
replaced by dealer or a designated repair
shop.
WARNING
In use condensation may form on the base of the unit. DO NOT use on sensitive or
absorbent surfaces (carpet, unprotected wood floors etc). Base must be on a flat, level
surface to operate correctly and efficiently.
6
Page 7

5. HEALTH & SAFETY INFORMATION
5.2 CAUTION: RISK OF ELECTRIC SHOCK. DO NOT OPEN.
Caution: Risk of electric shock. Do not open.
This appliance is supplied with a moulded 3 pin mains plug for your safety. The value of the fuse fitted is
marked on the pin face of the plug. Should the fuse need replacing, ensure the substitute is of the
correct rating, approved to BS1362 and ASTA or BS Kite marked.
ASTA
BSI
The fuse cover is removable with a small plain slot screwdriver. Ensure the fuse cover is replaced before
attempting to connect the plug to an electrical outlet. If the cover is missing, a replacement must be
obtained or the plug replaced with a suitable type.
If a replacement plug is to be fitted this must be carried out by a qualified electrician.
The damaged or incomplete plug, when cut from the cable should be disabled to prevent connection to a
live electrical outlet.
This appliance is Class I
detailed on the rating label and compatible with the plug fitted.
Earthed : This product requires an earth connection to protect against electric shock from accessible
conductive parts in the event of a failure of the basic insulation.
Important: On products exceeding 2000W it is recommended that the power cable is fully extended
before a connection is made to the power supply. We do not recommend the use of extension cables
with this unit.
†
and is designed for connection to an earthed power supply matching that
7
Page 8
6. TECHNICAL DESCRIPTION
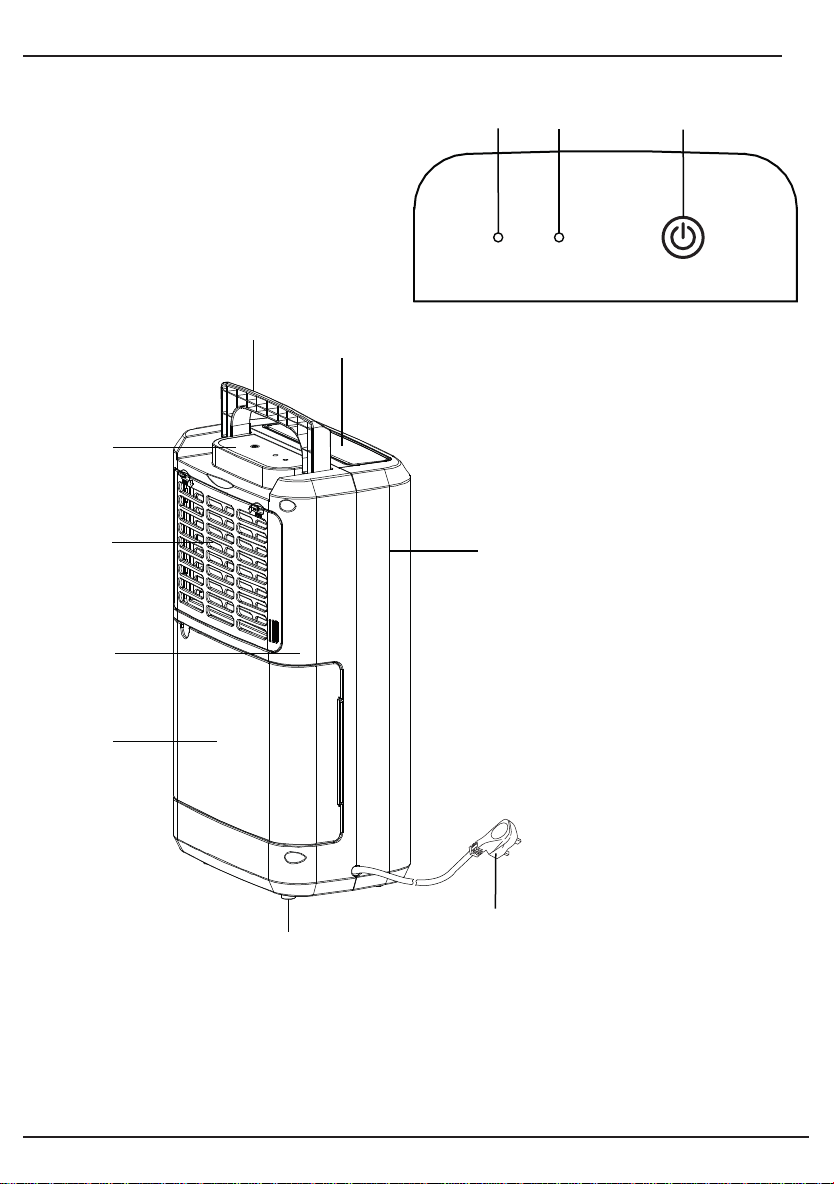
6.1 IDENTIFICATION
WATER FULL
POWER
Control panel
POWER
Front shell
Air Outlet
Handle
Control panel
Inlet filter
Back shell
8
Water tank
Rubber feet
Plug & cable
Power button
Power LED (Green)
Water tank full LED (Red)
Page 9

7. UNPACKING & CHECKING
7.1 PACKAGING
Carefully remove the product from the packaging and examine it for any sign of damage that may
have happened during shipping. Lay the contents out and check them against the parts shown
below. If any part is damaged or missing; please contact the Draper Helpline (the telephone
number appears on the Title page) and do not attempt to use the tool.
The packaging material should be retained at least during the guarantee period: in case the
machine needs to be returned for repair.
Warning! Some of the packaging materials used may be harmful to children. Do not leave any of
these materials in the reach of children.
If any of the packaging is to be thrown away, make sure they are disposed of correctly; according
to local regulations.
9
Page 10
8. INSTALLATION INSTRUCTIONS
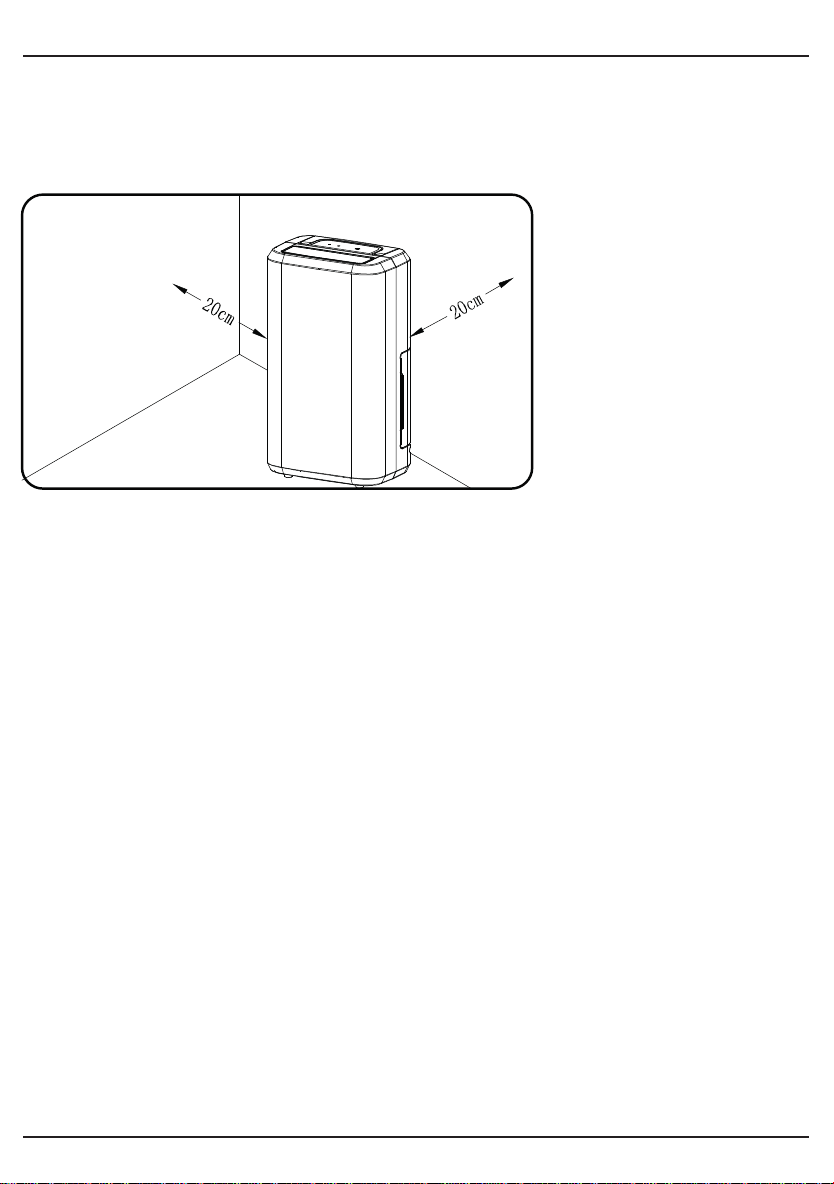
8.1 INSTALLATION EXPLANATIONS - FIG. 1
IMPORTANT:
Install the mobile dehumidifier unit on a flat surface where the air outlet will not be covered up. A
minimum clearance of 20cm from a wall or other obstacles is required.
FIG.1
WARNING
In use condensation may form on the base of the unit. DO NOT use on sensitive or
absorbent surfaces (carpet, unprotected wood floors etc). Base must be on a flat, level
surface to operate correctly and efficiently.
10
Page 11

9. OPERATING INSTRUCTIONS
9.1 CONTROL PANEL - FIG. 1
Plug the dehumidifier into wall socket.
FIG.1
The power LED will illuminate
flashing blue.
WATER FULL
9.2 OUTLET FLAP - FIG. 2
Insure that the outlet flap is open before starting the
dehumidifier.
Press down on back of flap to open flap, the outlet flap
can stop at 3 preset angles.
POWER
FIG.2
POWER
9.3 START DEHUMIDIFIER
Press the power button once to start operation.
While in operation the power LED will illuminate a constant blue.
Press again to stop operation.
The power LED will return to flashing blue.
When the water tank is full the Water Full LED will illuminate Red.
11
Page 12
9. OPERATING INSTRUCTIONS
DRAINING THE COLLECTED WATER
When the drainage tank is full, the tank full indicator light will turn on, the operation will stop
automatically and the buzzer will beep 15 times to alert the user, that the water needs to be
emptied from the drainage tank.
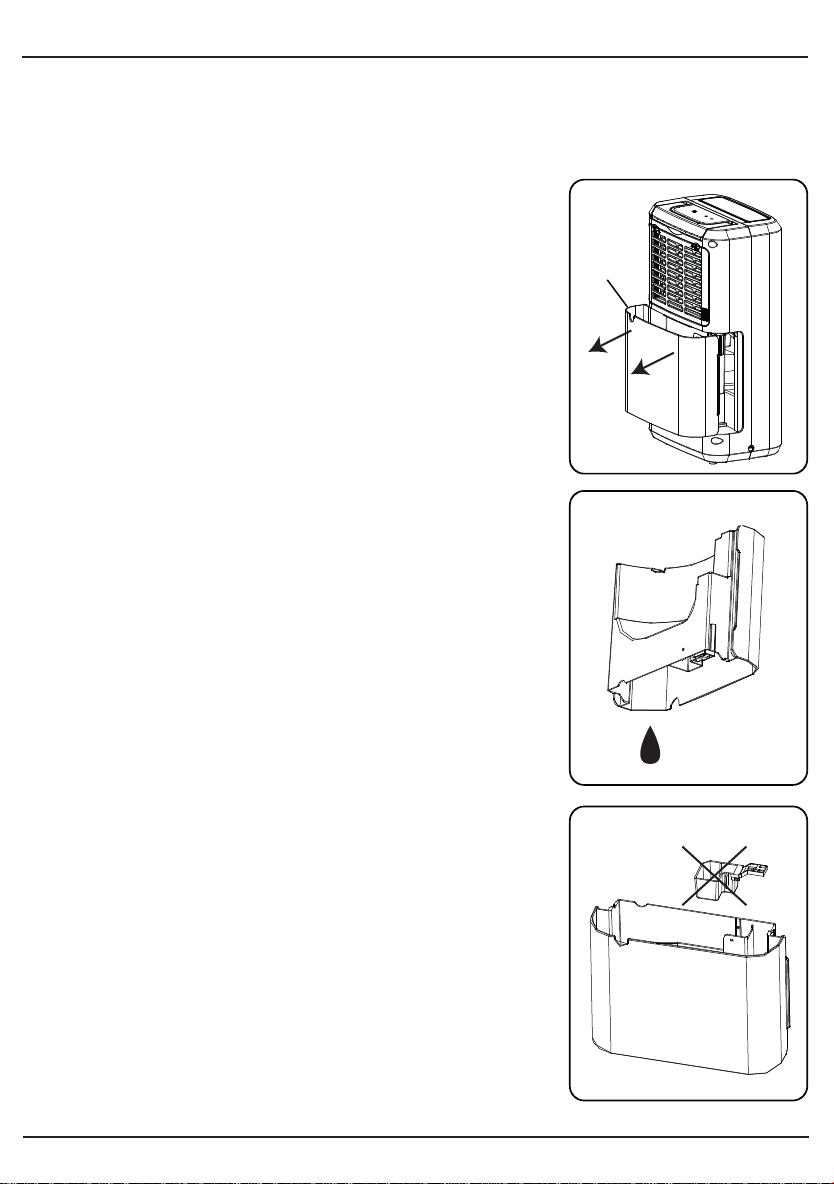
9.4 EMPTYING THE DRAINAGE TANK - FIG. 3 - 5
Lightly press on the sides of the tank with both hands and pull
the tank out gently.
Discard the collected water, taking care not to lose or damage
the float assembly.
FIG.3
FIG.4
NOTE: Do not remove the float from the water tank. The water
full sensor will no longer be able to detect the water level
correctly without the float and water will leak from the water
tank.
12
FIG.5
Page 13
9. OPERATING INSTRUCTIONS
If the drainage tank is dirty, wash it with cold or lukewarm water. Do not use detergent, scouring
pads, chemically treated dust cloths, gasoline, benzene, thinner, or other solvents, as these can
scratch and damage the tank and cause water leakage.
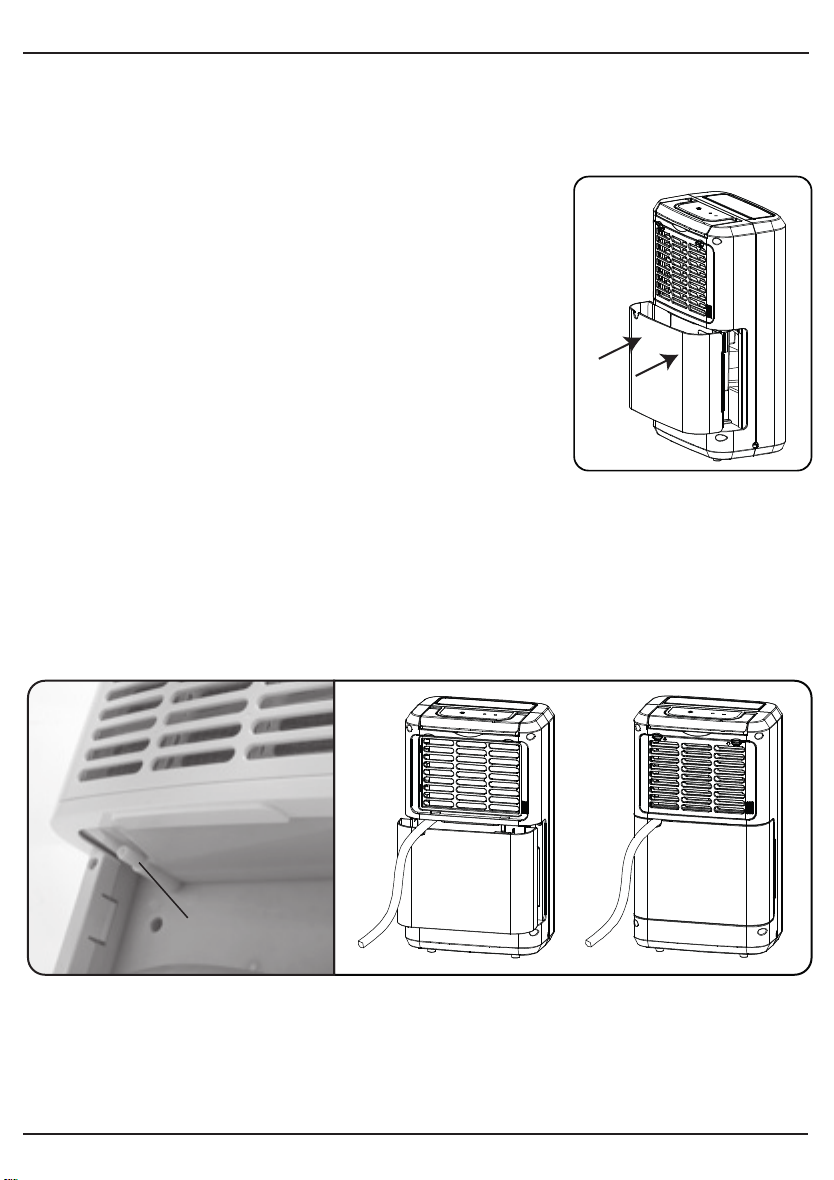
9.5 REPLACING THE DRAINAGE TANK - FIG. 6
When replacing the drainage tank, press the tank firmly into
place with both hands. If the tank is not positioned properly, the
“TANK FULL” sensor will be activated, and the dehumidifier will
not operate.
FIG.6
9.6 CONTINUOUS WATER DRAINAGE - FIG. 7
The unit features a continuous drainage port .Using a plastic pipe (with an inner diameter of
10mm) insert into drain hole to reach out from side of water tank. Ensure the end of the drain tube
is always below the level of the machine outlet otherwise the machine will flood with water.
FIG.7
13
Page 14

10. MAINTENANCE
10.1 CLEANING THE DEHUMIDIFIER - FIG. 8 - 11
To clean the Body
Wipe it with a soft damp cloth. DO NOT use detergents or chemicals.
To Clean the Air Filter
Open the inlet grill by depressing the tabs gently, then remove the cover then remove the air filter.
FIG.8 FIG.9 FIG.10
Run a vacuum cleaner lightly over the surface of the air filter to remove dirt.
If the air filter is exceptionally dirty, wash it with warm water and a mild detergent and leave to dry
thoroughly before refitting. DO NOT operate the dehumidifier without the filter assembly in place.
FIG.11
14
Page 15

10. MAINTENANCE
10.2 STORING THE DEHUMIDIFIER
When the unit is not being used for a long period of time and you want to store it; follow these steps:
1. Empty any water left in the drainage tank.
2. Fold up the power supply cord.
3. Clean the air filter
4. Store in a cool and dry place .
15
Page 16

11. TROUBLESHOOTING
11.1 TROUBLESHOOTING
PROBLEM
Unit does not
operate
The dehumidifying
function doesn't
work
No air is discharged
Operation is noisy
POSSIBLE CAUSES SOLUTION
Has the power cord been
disconnected?
Is the tank full indication
lamp blinking? (The tank is
full or in a wrong position.)
Is the temperature of the
room above 35 or below
5 ?
Is the air filter clogged?
Is the intake duct or discharge duct
obstructed?
Is the air filter clogged?
Is the outlet not open?
Is the unit tilted or unsteady? Move the unit to a stable, sturdy
Is the air filter clogged? Clean the air filter as instructed
Plug the power cord into the outlet.
Empty the water in the drainage
tank and then reposition the tank.
The protection device is
activated and the unit cannot be
started.
Clean the air filter as instructed
under "Cleaning the dehumidifier".
Remove the obstruction from the
discharge duct or intake duct.
Clean the air filter as instructed
under "Cleaning the dehumidifier".
Open the air outlet
location.
under "Cleaning the dehumidifier".
16
Page 17

12. EXPLANATION OF SYMBOLS
12.1 EXPLANATION OF SYMBOLS
WEEE
Do not dispose of Waste Electrical
& Electronic Equipment in with
domestic rubbish
Class I construction
earthed.
Warning!
Read instruction manuals before
operating and servicing this
equipment.
Unplug immediately if the power
cord or plug becomes damaged.
For indoor use only.
Do not expose to rain.
17
Page 18

13. DISPOSAL
13.1 DISPOSAL
- At the end of the machine’s working life, or when it can no longer be repaired, ensure that it is
disposed of according to national regulations.
- Contact your local authority for details of collection schemes in your area.
In all circumstances:
• Do not dispose of power tools with domestic waste.
• Do not incinerate.
• Do not abandon in the environment.
• Do not dispose of WEEE*
as unsorted municipal waste.
* Waste Electrical & Electronic Equipment.
18
Page 19

NOTES
19
Page 20

CONTACTS
- DRAPER TOOLS LIMITED,
Hursley Road, Chandler's Ford,
Eastleigh, Hampshire. SO53 1YF. U.K.
- Helpline: (023) 8049 4344
- Sales Desk: (023) 8049 4333
- General Enquiries: (023) 8026 6355
- Service/Warranty Repair Agent
For aftersales servicing or warranty repairs, please
contact the Draper Tools Helpline for details of an
agent in your local area.
YOUR DRAPER STOCKIST
RDMC1116
drapertools.com
 Loading...