

Page 1
MULTI-TOOL BATTERY SYSTEM
ORIGINAL LANGUAGE
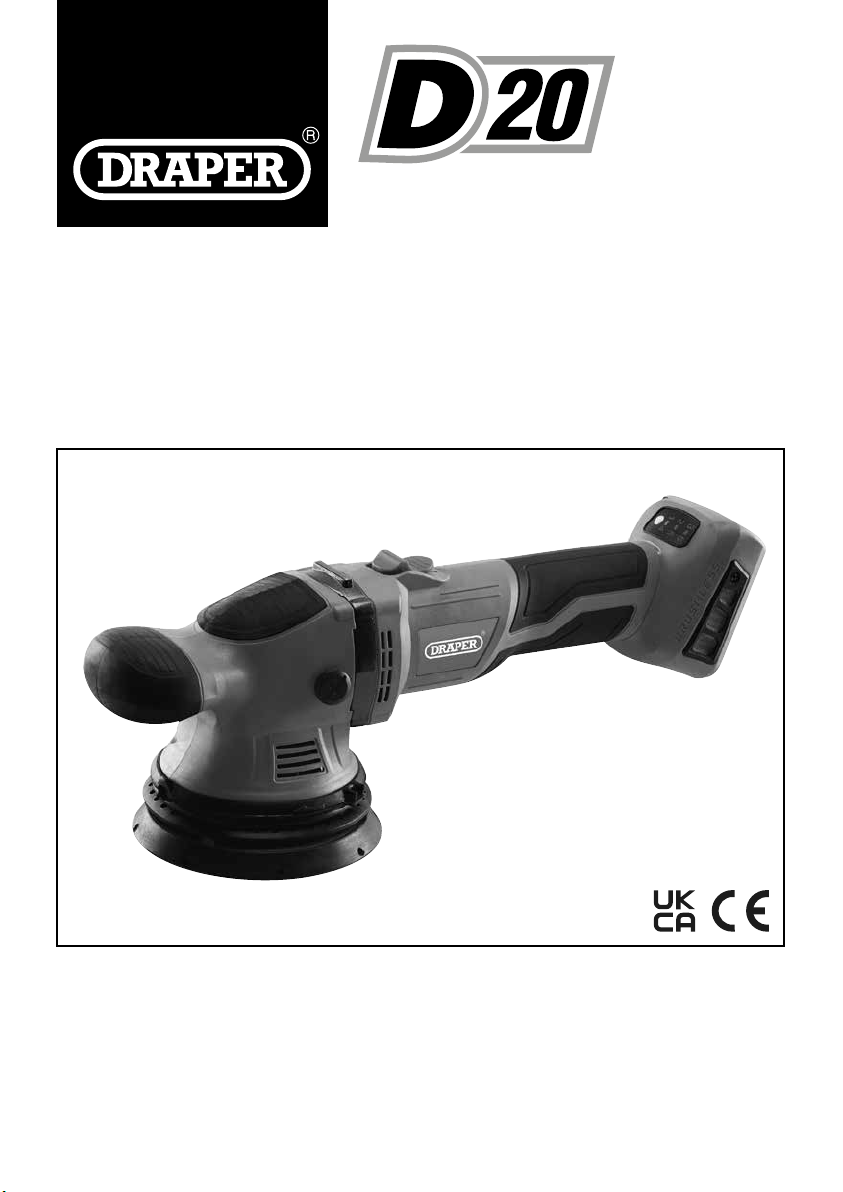
20V BRUSHLESS 125mm
RANDOM ORBIT
POLISHER
58318
These instructions accompanying the product are the original instructions. This document is part of the product,
keep it for the life of the product passing it on to any subsequent holder of the product. Read all these instructions
before assembling, operating or maintaining this product.
This manual has been compiled by Draper Tools describing the purpose for which the product has been designed,
and contains all the necessar y information to ensure its correct and safe use. By following all the general safety
instructions contained in this manual, it will ensure both product and operator safety, together with longer life of the
product itself.
All photographs and drawings in this manual are supplied by Draper Tools to help illustrate the operation of the
product.
Whilst every effort has been made to ensure the accuracy of information contained in this manual, the Draper
Tools policy of continuous improvement determines the right to make modications without prior warning.
Page 2
1. INTRODUCTION
1.1 SCOPE
Part of our core range, this product is suitable for
enthusiasts and tradespersons alike. Any application
other than that it was intended for, is considered misuse.
This product is not a toy and must not be used by
children or any person with reduced physical, sensory or
mental capabilities or lack of experience and knowledge,
or people unfamiliar with these instructions.
Local regulations may restrict the age of the operator.
1.2 UNDERSTANDING THIS MANUALS
SAFETY CONTENT:
Warning! – Information that draws attention to the
risk of injury or death.
Caution! – Information that draws attention to the risk of
damage to the product or surroundings.
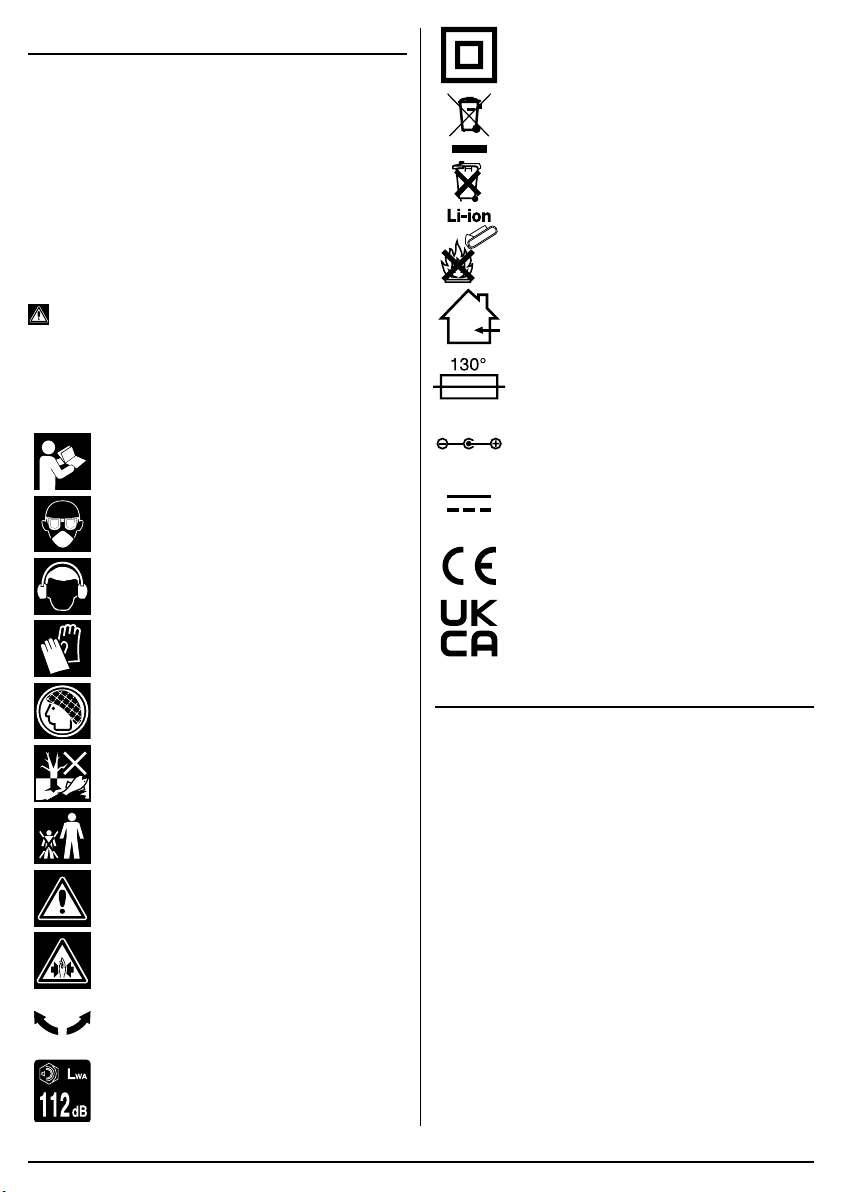
1.3 EXPLANATION OF SYMBOLS
Read the instruction manual.
Wear face mask and safety glasses.
Wear ear defenders.
Class II construction
(Double insulated).
WEEE –
Waste Electrical & Electronic Equipment.
Do not dispose of Waste Electrical & Electronic
Equipment in with domestic rubbish.
Lithium-ion product.
Do not incinerate or throw
onto re.
For indoor use only.
Do not expose to rain.
Fuse protective device.
Polarity indication.
Rated voltage.
European conformity.
Wear protective gloves.
Long hair must be tied back.
Do not abandon into the environment.
Keep out of the reach of children.
Warning!
Warning! Risk of crushing.
Direction of rotation.
Continuous A-Weighted Sound
Pressure Level.
UK Conformity Assessed.
2. SPECIFICATION
2.1 SPECIFICATION
Stock No. .............................................................. 58318
Part No. ............................................................ D20ROP
Rated voltage .............................................................20V
Disc diameter ..................................................... 125mm
Orbit ..................................................................... 15mm
Speed (no load) ...............................................................
............1600, 2240, 2880, 3520, 4160, 4710o/min
Sound pressure level (LpA): ............................. 112dB(A)
Vibration level Main handle: ........................ AG=28.2m/s
Weight (machine only):......................................... 1.94kg
– 2 –– 3
Page 3

3. HEALTH AND SAFETY
INFORMATION
3.1 GENERAL SAFETY
INSTRUCTIONS FOR POWER TOOL
USE
Warning! Read all safety warnings, instructions,
illustrations and specications provided with this
power tool. Failure to follow all instructions listed below
may result in electric shock, re and/or serious injury.
Save all warnings and instructions for future
reference.
The term “power tools” in the warnings refers to your
mains-operated (corded) power tool or battery-operated
(cordless) power tool.
1) Work area safety
a) Keep work area clean and well lit. Cluttered
or dark areas invite accidents.
b) Do not operate power tools in explosive
atmospheres, such as in the presence of
ammable liquids, gases or dust. Power
tools create sparks which may ignite the dust
or fumes.
c) Keep children and bystanders away while
operating a power tool. Distractions can
cause you to lose control.
2) Electrical safety
a) Power tool plugs must match the outlet.
Never modify the plug in any way. Do not
use any adapter plugs with earthed
(grounded) power tools. Unmodied plugs
and matching outlets will reduce risk of
electric shock.
b) Avoid body contact with earthed or
grounded surfaces, such as pipes,
radiators, ranges and refrigerators. There
is an increased risk of electric shock if your
body is earthed or grounded.
c) Do not expose power tools to rain or wet
conditions. Water entering a power tool will
increase the risk of electric shock.
d) Do not abuse the cord. Never use the cord
for carrying, pulling or unplugging the
power tool. Keep cord away from heat, oil,
sharp edges or moving parts. Damaged or
entangled cords increase the risk of electric
shock.
e) When operating a power tool outdoors,
use an extension cord suitable for outdoor
use. Use of a cord suitable for outdoor use
reduces the risk of electric shock.
f) If operating a power tool in a damp
location is unavoidable, use a residual
current device (RCD) protected supply.
Use of an RCD reduces the risk of electric
shock.
3) Personal safety
a) Stay alert, watch what you are doing and
use common sense when operating a
power tool. Do not use a power tool while
you are tired or under the inuence of
drugs, alcohol or medication. A moment of
inattention while operating power tools may
result in serious personal injury.
b) Use personal protective equipment Always
wear eye protection. Protective
equipment such as a dust mask, non-skid
safety shoes, hard hat or hearing protection
use for appropriate conditions will reduce
personal injuries.
c) Prevent unintentional starting. Ensure the
switch is in the off-position before
connecting to power source and/or battery
pack, picking up or carrying the tool.
Carrying power tools with your nger on the
switch or energising power tools that have the
switch on invites accidents.
d) Remove any adjusting key or wrench
before turning the power tool on. A wrench
or a key left attached to a rotating part of the
power tool may result in personal injury.
e) Do not overreach. Keep proper footing and
balance at all times. This enables better
control of the power tool in unexpected
situations.
f) Dress properly. Do not wear loose clothing
or jewellery. Keep your hair and clothing
away from moving parts. Loose clothes,
jewellery or long hair can be caught in moving
parts.
g) If devices are provided for the connection
of dust extraction and collection facilities,
ensure these are connected and properly
used. Use of dust collection can reduce
dust-related hazards.
h) Do not let familiarity gained from frequent
use of tools allow you to become
complacent and ignore tool safety
principles. A careless action can cause
severe injury within a fraction of a second.
4) Power tool use and care
a) Do not force the power tool. Use the
correct power tool for your application.
The correct power tool will do the job better
and safer at the rate for which it was
designed.
b) Do not use the power tool if the switch
does not turn it on and off. Any power tool
that cannot be controlled with the switch is
dangerous and must be repaired.
c) Disconnect the plug from the power
source and/or remove the battery pack, if
detachable, from the power tool before
–
making any adjustments, changing
Page 4

accessories, or storing power tools. Such
preventive safety measures reduce the risk of
starting the power tool accidentally.
d) Store idle power tools out of the reach of
children and do not allow persons
unfamiliar with the power tool or these
instructions to operate the power tool.
Power tools are dangerous in the hands of
untrained users.
e) Maintain power tools and accessories.
Check for misalignment or binding of
moving parts, breakage of parts and any
other condition that may affect the power
tool’s operation. If damaged, have the
power tool repaired before use. Many
accidents are caused by poorly maintained
power tools.
f) Keep cutting tools sharp and clean.
Properly maintained cutting tools with sharp
cutting edges are less likely to bind and are
easier to control.
g) Use the power tool, accessories and tool
bits etc. in accordance with these
instructions, taking into account the
working conditions and the work to be
performed. Use of the power tool for
operations different from those intended could
result in a hazardous situation.
h) Keep handles and grasping surfaces dry,
clean and free from oil and grease.
Slippery handles and grasping surfaces do
not allow for safe handling and control of the
tool in unexpected situations.
5) Service
a) Have your power tool serviced by a
qualied repair person using only identical
replacements parts. This will ensure that the
safety of the power tool is maintained.
3.2 ADDITIONAL SAFETY
INSTRUCTIONS FOR BELT AND DRUM
SANDERS
Warning!
1) Safety instructions for all operations
a)
Hold the power tool by insulated gripping
surfaces, because the sanding surface may
contact its own cord. Cutting a “live” wire
may make exposed metal parts of the power
tool “live” and could give the operator an
electric shock.
3.3 SAFETY INSTRUCTIONS FOR
MAINS POWERED CHARGERS &
BATTERY PACKS
Chargers
– The charger is for indoor use only.
– Prior to plugging the charger in to the supply, check
that the plug, cable and charger casing are in good
condition. If any are damaged, have the defective
part(s) replaced immediately by a suitably qualied
person.
– Only use a correctly rated mains outlet to provide
power, do not plug into site generators, attach to
engine generators or D.C. sources. Do not use a
mains socket outlet that is not switched.
– Use the correct Draper charger in conjunction with
it’s corresponding battery pack (consult the Draper
website for more information or to nd your local
stockist).
– Do not charge any other batteries with Draper
chargers. Any other application is considered
misuse.
– Do not attempt to charge battery packs that are too
hot (over 30°C) or too cold (under 5°C), if these
conditions apply set the battery pack aside to
“normalise” before proceeding with the charging
operation.
– Set up the charger and cable in a safe place where it
won’t be knocked, tripped over, stepped on, etc. and
where it is well ventilated. Make sure the ventilation
slots in the charger case are not obstructed.
– Inspect the battery pack for damage, if it is
undamaged, plug it into the charger, ensuring the
correct orientation.
– Switch the charger on and check that the correct
indicators illuminate, allow the battery pack to charge
(see the specic instructions for your charger). Once
charging is complete, switch the charger off,
disconnect from power supply, remove the battery
pack and store.
Battery packs
– Before charging, read the instructions.
– Do not expose to rain.
– Only use Draper D20 battery packs with this product.
Consult your Draper stockist for details.
– Do not charge any other batteries with Draper
chargers. Any other application is considered
misuse.
– The charger must be disconnected from the power
supply before removing the battery.
– The battery must be removed from the appliance
before it is recycled.
– The battery is to be disposed of in-line with local
authority procedures.
– Do not crush, open or burn the battery. Exposure to
potentially harmful materials may occur.
– In case of re use CO2 or dry chemical extinguisher.
– Do not expose to high temperatures >50°C. The
battery may degrade at high temperatures.
– Charge battery in conditions between 5°C to 30°C
with the designated charger for the battery.
– 4 –
Page 5
– Do not use battery if it has been stored at 5°C or
less. Allow it to “normalise” at room temperature
before usage/charging.
Warning! – Leaking battery packs
– The electrolyte in battery packs is corrosive. Avoid
contact with the skin.
– If contact is made, ush the area with clean water,
pat dry and seek medical attention at the
earliest opportunity.
– Inform medical personnel that the contaminant is a
“high alkaline, corrosive liquid”.
– If electrolyte comes into contact with the eyes, ush
with copious amounts of water only.
Seek immediate medical attention, relaying the
information above.
3.4 CONNECTION TO THE POWER
SUPPLY (CHARGER)
Caution: Risk of electric shock. Do not open.
This appliance is supplied with an approved plug and
cable for your safety.. The value of the fuse tted is
marked on the pin face of the plug. Should the fuse
need replacing, ensure the substitute is of the correct
rating, approved to BS1362 and ASTA
marked.
Ensure the fuse cover is replaced before attempting to
connect the plug to an electrical outlet. If the cover is
missing, a replacement must be obtained or the plug
replaced with a suitable type.
If a replacement plug is to be tted this must be carried
out by a qualied electrician.
Never use a damaged or incomplete plug.
This appliance is Class II
connection to a power supply matching that detailed on
the rating label and compatible with the plug tted.
Carefully select an extension lead. Some machines are
not suitable for use with extension leads. If the tool is
designed for use outdoors, only use an extension lead
suitable for that environment in conjunction with an RCD
adaptor. When using an extension lead, select one
capable of handling the current (amps) drawn by the
machine in use. Ensure the cable is fully unwound
regardless of the distance between the power supply
and the tool. Excess current (amps) and a coiled
extension lead will cause the cable to heat up and can
result in re.
Keep extension leads away from moving hazardous
parts to avoid damages to the cable which can lead to
contact with live parts. Position cable safely to avoid
tripping over.
†
Double insulated : This product requires no earth
connection as supplementary insulation is applied to the
basic insulation to protect against electric shock in the
event of failure of the basic insulation.
Important! If using an extension lead, follow the
instructions that came with your lead regarding
†
and is designed for
or BSI Kite
maximum load while cable is wound. If in doubt, ensure
that the entire cable is unwound. Using a coiled
extension lead will generate heat which could melt the
lead and cause a re.
4. UNPACKING AND
CHECKING
4.1 PACKAGING
Carefully remove the product from the packaging and
examine it for any sign of damage. Check contents
against the parts shown in Fig A. If any part is damaged
or missing, please contact the Draper Help Line (see
back page). Do not attempt to use the product!
The packaging material should be retained during the
warranty period, in case the product needs to be
returned for repair.
Warning!
• Some of the packaging materials may be harmful to
children. Do not leave any of these materials in
reach of children.
• If any of the packaging is to be thrown away, make
sure they are disposed of correctly, according to local
regulations.
– 5 –
Page 6
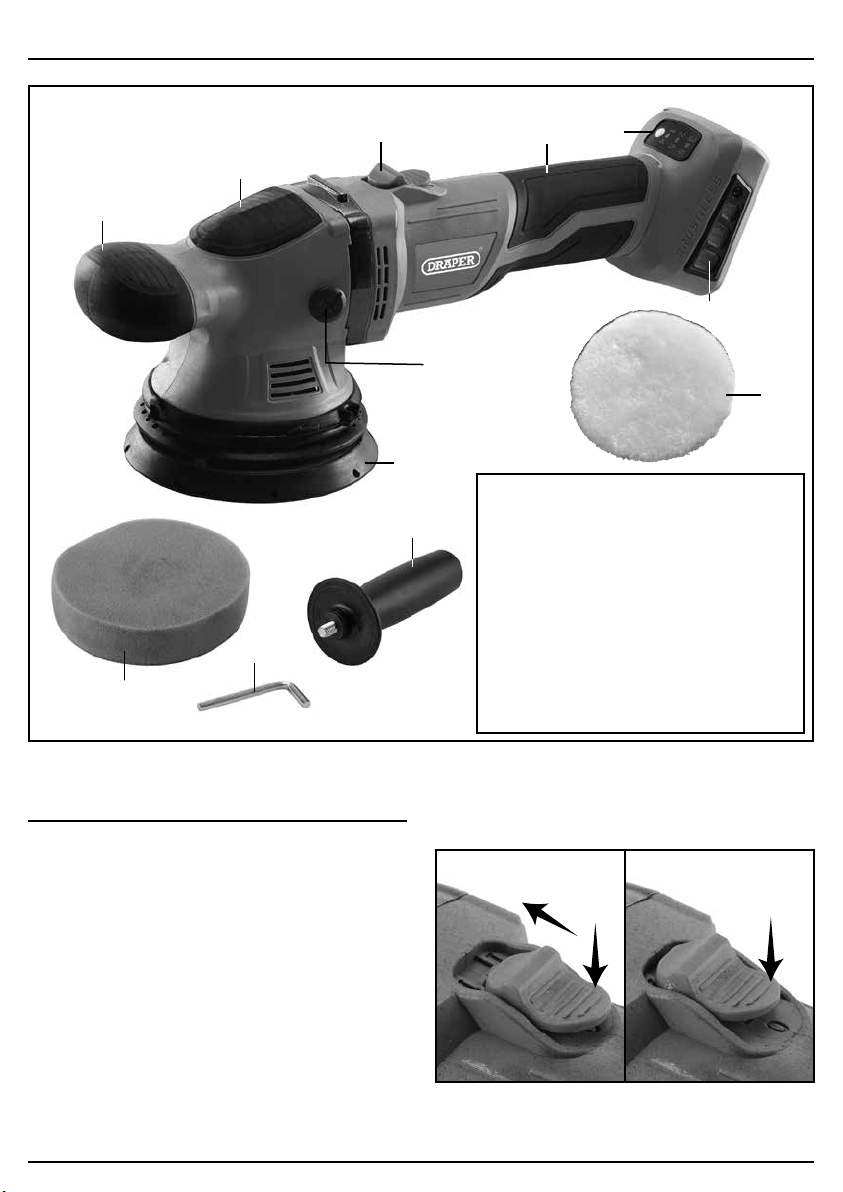
5. IDENTIFICATION – FIG.A
(1)
(7)
(1)
(8)
(2)
(6)
(9)
(5)
(1)
(1) Soft grip
(2) On/off button
(3) 6 speed control
(4) Dust Screen
(5) Auxiliary handle mount cover (both
sides)
(6) 125mmØ hook and loop backing pad
(7) Sponge pad (hook and loop type)
(8) Hex. wrench
(9) Auxiliary handle
(10) Wool pad (hook and loop type)
(3)
(4)
(10)
FIG.A
6. BASIC OPERATIONS
Note: For details of our full range of accessories, please
visit drapertools.com
6.1 ON/OFF SWITCH – FIG. 1
Note: When using a polishing sponge/mop set a
medium speed. Always test on a small inconspicuous
area before applying all over.
Important! Excessive pressure on the machine does
not result in higher working speed. It increases wear on
the internal mechanics and can damage the polisher.
To turn on.
Simultaneously press back of switch down and push
forward, then release. Switch will lock on in forward
position.
To turn off.
Press back of switch down, switch will spring back.
Turn ON Turn OFF
FIG.
1
– 6 –
Page 7
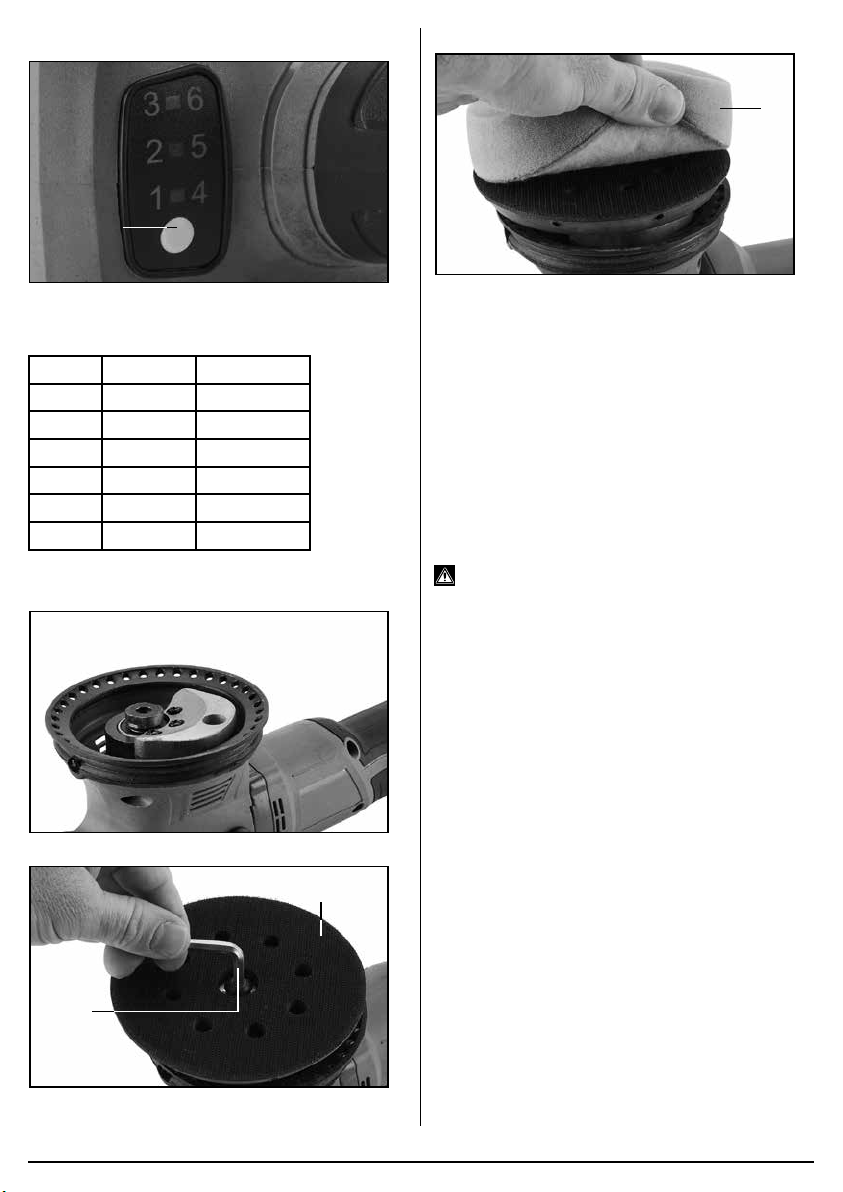
6.2 VARIABLE SPEED CONTROL – FIG.2
(3)
FIG.
2
Press button (3) to select desired speed.
Number Light colour Speed o/min
1 Green 1,600
2 Green 2,240
3 Green 2,880
4 Red 3,520
5 Red 4,160
6 Red 4,710
6.3 FITTING THE BACKING PAD
– FIGS. 3–4
FIG.
3
(8)
6.4 HOOK AND LOOP – FIG. 5
(7)
FIG.
5
Compatible with all 125mm hook and loop accessories.
6.5 BATTERY PACK CHARGING –
FIGS. 6–7
“This power product is supplied “bare”, without battery
pack or charger. For compatible batteries, chargers and
accessories please visit www.drapertools.com”
Important! Draper designated battery packs and
chargers must only be used with this product. Use of
any other third-party battery packs/chargers is
considered misuse and will invalidate the warranty.
Once connected to the mains supply, recharging of the
battery can be left generally unsupervised.
Warning! Check the condition of the charger and
battery prior to each charge. Do not use if there is any
sign of damage.
The battery pack is supplied un-charged and must be
charged before initial use.
To charge the battery pack (12):
– Plug the battery charger (11) unit into a suitable
mains power supply socket.
– The red LED (11.1) will illuminate to show the
charger has power.
– Slide the battery into the charger’s aligning pins.
– After a few seconds delay, the red LED will ash to
show that charging has begun, then changes to solid
red.
– Whilst the battery is charging, the green LED (11.2)
will ash, (the red LED will go from ashing to
constant red.
– When the battery is fully charged when the green
LED stops ashing and changes to solid green. The
red LED will turn off.
FIG.
(6)
4
– 7 –
Page 8
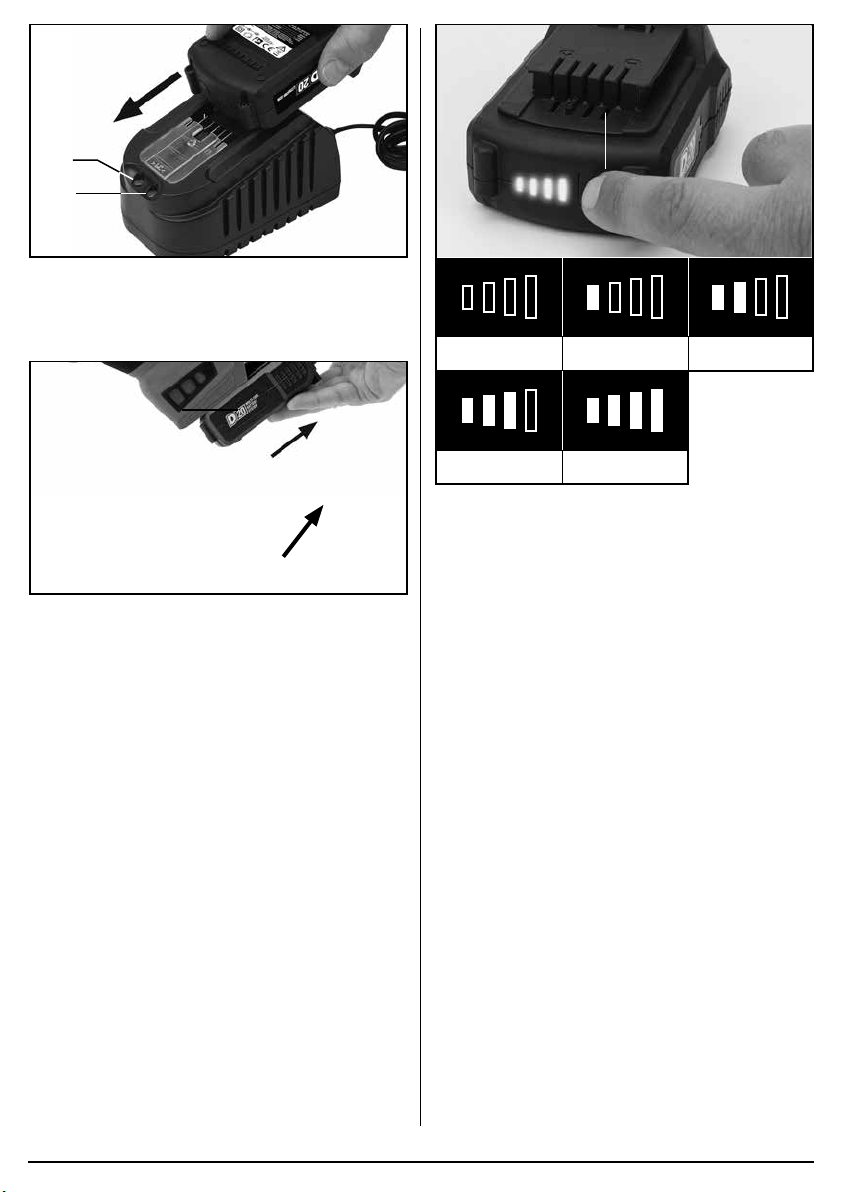
(11.1)
(11.2)
FIG.
6
To release the battery pack:
– Press the battery release button (12.1) and gently
slide the battery pack off.
(12.1)
FIG.
7
6.5 BATTERY PACK PROTECTION
FEATURES
Overcharging protection: When the battery pack is
fully charged, the transformer/charger will automatically
shuts off, protecting the internal components.
Over-discharging protection: Stops the battery pack
from discharging beyond the recommended lowest
safety voltage.
Overheating protection: An internal thermistor cut-off
sensor shuts off the battery pack should it become too
hot during operation. For example, if the tool is
overloaded or used for extended periods. 30 minutes
cooling time may be required.
Current protection: If the battery is overloaded or the
maximum current draw exceeded, the battery will shut
off to protect internal components. The battery pack will
resume operation once the current draw is at a safe
level.
Short circuit protection: The battery pack will stop
operating immediately if it was to short circuit.
(12.2)
0 – 10% 0 – 25%
25 – 50%
50 – 75% 75 – 100%
FIG.
8
6.7 BATTERY LIFE EFFICIENCY AND
CHARGING ADVICE
– A rechargeable battery will be hot immediately after
use. If such a battery is recharged immediately after
use the battery life will be shortened. Leave the
battery and recharge it after it has cooled.
– The battery needs to be warmed-up or cooled down
to prevent damaging to the batteries internal
components.
6.6 BATTERY PACK CHARGE STATUS
– FIG.8
Press the charge level indicator button (12.2) to display
the battery charge level.
– 8 –
Page 9
7. MAINTENANCE AND TROUBLESHOOTING
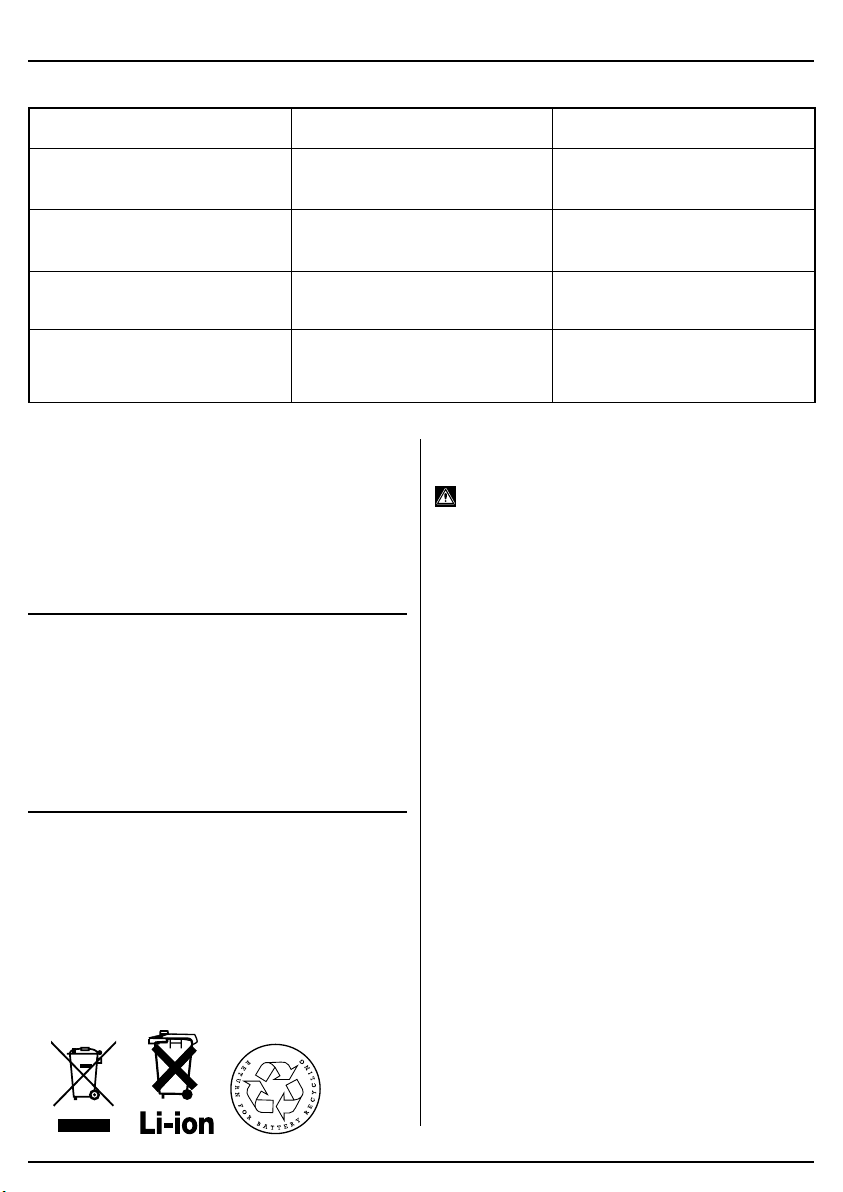
7.1 TROUBLESHOOTING GUIDE
Problems Possible cause Required action
Polisher does not operate. – Battery pack no charge.
– Battery pack faulty or damaged.
Motor runs, but slowly/ losing
power.
Machine vibrates. – Pad/bonnet damaged or out of
Battery pack doesn’t charge / non
illumination of charger.
7.2 MAINTENANCE
Regular inspection and cleaning reduces the necessity
for maintenance operations and will keep your tool in
good working condition.
Do not use solvents or fuels to clean the product. When
not in use, store the product in a safe, dry place.
8. WARRANTY
8.1 WARRANTY
Draper power tools have been carefully tested &
inspected and are guaranteed to be free from defective
materials or workmanship.
For details of warranty and terms and conditions
please visit the Draper Tools website at
www.drapertools.com/warranty
9. DISPOSAL
– Battery pack no charge.
– Battery pack faulty or damaged.
balance.
– Fuse blown in charger plug.
– Charger faulty.
9.2 BATTERY PACK DISPOSAL
INFORMATION
Warning!
− Do not put battery packs in a re or mutilate – cells
may burst or release toxic materials.
− Do not short circuit cells, may cause burns.
− The battery pack must be removed from the
appliance before it is scrapped.
− The battery pack is to be disposed of safely.
− Do not mutilate batteries, corrosive electrolyte will be
released.
− Do not dispose of batteries or cells in a charged
condition.
Expired batteries must be recycled/disposed of in
accordance with the appropriate regulation or legislation.
They should be returned to your local warranty agent/
stockist.
– Re-charge battery pack.
– Replace battery pack.
– Re-charge battery pack.
– Replace battery pack.
– Replace pad/bonnet.
– Replace fuse.
– Replace charger.
9.1 DISPOSAL
Ensure that the machine is disposed of according to
national regulations at the end of its working life or when
it can no longer be repaired.
DO NOT:
• Dispose of power tools with domestic waste.
• Incinerate.
• Abandon in the environment.
• Dispose of WEEE as unsorted municipal waste.
– 9 –
Page 10

NOTES
.................................................................................................
.................................................................................................
.................................................................................................
.................................................................................................
.................................................................................................
.................................................................................................
.................................................................................................
.................................................................................................
.................................................................................................
.................................................................................................
.................................................................................................
.................................................................................................
.................................................................................................
.................................................................................................
.................................................................................................
.................................................................................................
.................................................................................................
.................................................................................................
.................................................................................................
.................................................................................................
.................................................................................................
.................................................................................................
.................................................................................................
.................................................................................................
.................................................................................................
.................................................................................................
.................................................................................................
.................................................................................................
.................................................................................................
.................................................................................................
.................................................................................................
.................................................................................................
.................................................................................................
.................................................................................................
.................................................................................................
.................................................................................................
.................................................................................................
.................................................................................................
.................................................................................................
.................................................................................................
.................................................................................................
.................................................................................................
.................................................................................................
.................................................................................................
.................................................................................................
.................................................................................................
.................................................................................................
.................................................................................................
.................................................................................................
.................................................................................................
.................................................................................................
.................................................................................................
.................................................................................................
.................................................................................................
.................................................................................................
.................................................................................................
.................................................................................................
.................................................................................................
.................................................................................................
.................................................................................................
.................................................................................................
.................................................................................................
.................................................................................................
.................................................................................................
.................................................................................................
.................................................................................................
.................................................................................................
.................................................................................................
.................................................................................................
.................................................................................................
.................................................................................................
.................................................................................................
.................................................................................................
.................................................................................................
.................................................................................................
.................................................................................................
.................................................................................................
.................................................................................................
.................................................................................................
.................................................................................................
.................................................................................................
.................................................................................................
.................................................................................................
.................................................................................................
.................................................................................................
.................................................................................................
.................................................................................................
.................................................................................................
.................................................................................................
.................................................................................................
– 10 –
 Loading...