

Page 1
EN
Original Instructions
Version 3 - May 2024
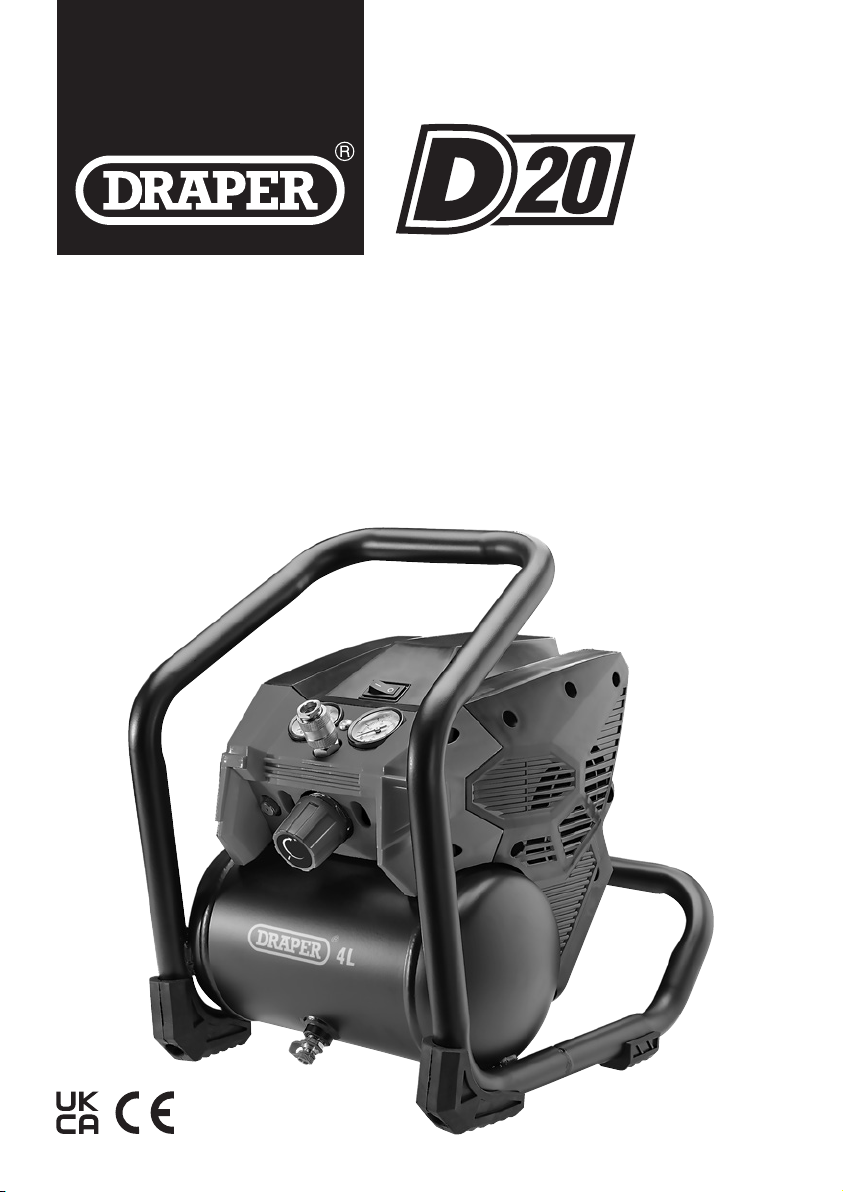
MULTI-TOOL BATTERY SYSTEM
20V
AIR
COMPRESSOR
08093
Page 2
1. Preface
These are the original product instructions. This
document is part of the product; retain it for the life
of the product, passing it on to subsequent holders.
Read this manual in full before attempting to
assemble, operate or maintain this product.
This Draper Tools manual describes the purpose
of the product and contains all the necessary
information to ensure its correct and safe use.
Following all the instructions and guidance in
this manual will ensure the safety of both the
product and the operator and increase the
lifespan of the product.
1.1 Product Reference
User Manual for: D20 20V Cordless Air Compressor,
4L (Bare)
Stock No: 08093
Part No: D20AC4L
1.2 Revisions
Version 1: February 2023
First release
Version 2: October 2023
Version 3: May 2024
For the latest version of this manual and the associated
parts list, if applicable, please visit drapertools.com/
manuals
All photographs and drawings within this manual are
supplied by Draper Tools to help illustrate correct
operation of the product.
Every eort has been made to ensure the
information contained in this manual is accurate.
However, Draper Tools reserves the right to amend
this document without prior warning. Always use the
latest version of the product manual.
1.3 Understanding the Safety Content of
This Manual
WARNING!
in personal injury or death.
CAUTION! – Situations or actions that may result
in damage to the product or surroundings.
Important: – Information or instructions of particular
importance.
– Situations or actions that may result
1.4 Copyright © Notice
Copyright © Draper Tools Limited.
Permission is granted to reproduce this manual for
personal and educational use ONLY. Commercial
copying, redistribution, hiring or lending is strictly
prohibited.
No part of this manual may be stored in a retrieval system
or transmitted in any other form or means without written
permission from Draper Tools Limited.
In all cases, this copyright notice must remain intact.
– 2 –
Page 3
2. Contents
EN
1. Preface 2
1.1 Product Reference 2
1.2 Revisions 2
1.3 Understanding the Safety Content
of This Manual 2
1.4 Copyright © Notice 2
2. Contents 3
3. Warranty 4
4. Product Introduction 5
4.1 Scope 5
4.2 Specication 5
5. Health and Safety Information 7
5.1 General Health and Safety Precautions 7
5.2 Additional Safety Instructions for
This Air Compressor 7
5.3 Additional Safety Instructions for
Rechargeable Batteries 8
5.4 Residual Risk 8
6. Identication and Unpacking 9
6.1 Product Overview 9
6.2 Packaging 9
7. Operating Instructions 10
7.1 Inserting and Removing the
Battery Pack 10
7.2 Connecting an Air Line or Tool 11
7.3 Pressurising the Compressor Tank 12
7.4 Setting the Output Pressure 12
7.5 Depressurising the Compressor Tank 13
7.6 The Safety Valve 13
7.7 Thermal Overload Protection 13
7.8 Moisture in Compressed Air 13
8. Maintenance and Troubleshooting 14
8.1 General Maintenance 14
8.2 Draining Moisture from the
Compressor Tank 14
8.3 Storing the Compressor 15
8.4 Troubleshooting 15
9. Spares, Returns and Disposal 17
10. Explanation of Symbols 18
– 3 –
Page 4

3. Warranty
Draper power tools have been carefully tested &
inspected and are guaranteed to be free from defective
materials or workmanship.
For details of warranty and terms and conditions
please visit the Draper Tools website at
www.drapertools.com/warranty
– 4 –
Page 5
4. Product Introduction
EN
4.1 Scope
This product is designed to generate a supply of
compressed air at up to the rated pressure for use in
operations such as air-brushing and toy and tyre ination.
Important: This product is suitable for pressurising air
ONLY and must NOT be used to pressurise any other gas.
CAUTION! This product is NOT continuously
rated and is for intermittent use ONLY. DO NOT
use this product with the compressor
continuously repressurising.
Part of our core range, this product is suitable for regular
use by enthusiasts and tradespersons alike.
WARNING! This product is not a toy and must be
respected.
Read this manual in full before attempting to assemble,
operate or maintain the product, and retain it for later
use.
4.2 Specication
Stock No.: 08093
Part No.: D20AC4L
Rated voltage: 20V
Motor:
Speed: 4,200rpm
Cut-out pressure: 8bar
Cut-in pressure: 5.4bar
Max. pressure: 8bar (116psi)
Safety valve: 8.3~9.13bar
Tank size: 3.785L
Air outlet: Female Euro adaptor with 1/4” BSP thread
Air ow:
90psi: 0.6m3/h
40psi: 1.3m3/h
Pressurising speed: 90s approx. (0–8bar)
Running time: 14.5min (1 x 4.0Ah battery)
Noise emissions:
Sound pressure level: 66.6dB(A)
Uncertainty: 2.3dB(A)
Sound power level: 89dB(A)
Uncertainty: 2.3dB(A)
IP rating: IP20
Dimensions: W 305 H 410 x D 400mm
Net weight: 7.7kg
– 5 –
Page 6
4. Product Introduction
Battery packs (sold separately):
Stock No. 55907 55898
Part No. D20B5.0AH D20B4.0AH
Type Li-ion Li-ion
Rated voltage 20V 20V
Rating 5.0Ah 4.0Ah
Chargers (sold separately):
Stock No. 97914 55913
Part No. D20BCS/2 D20BCF
Rated voltage 230V~ 230V~
Rated frequency 50Hz 50Hz
Rated output 35W 35W
Rated DC output voltage 20V 20V
Rated DC output current 2.4A 2.0A
Construction Class II Class II
Important: The declared noise emissions values have
been measured in accordance with a standard test
method and may be used for comparing one tool with
another. These values may also be used in a preliminary
assessment of exposure.
WARNING! The noise emissions during actual
use of the product can dier from the declared
values depending on the output pressure and
the tools with which it is used. Before each use,
estimate the likely exposure resulting from the
actual conditions of use. Take into account all
parts of the operation cycle in order to identify
any safety measures required to protect the
operator.
– 6 –
Page 7
5. Health and Safety Information
EN
5.1 General Health and Safety
Precautions
• Only authorised personnel who have carefully read
and understood this manual may operate, adjust and
maintain this product.
• Observe all standard safety precautions and good
practices when working with air tools and compressed
air.
• Always wear adequate eye and ear protection when
using this product.
• Wear protective gloves while using this product.
• Keep your work environment clear and well-lit, with
bystanders at a safe distance.
• Use this product ONLY in well-ventilated
environments where no air pollutants, dust, acids, or
ammable, explosive or toxic vapours are present.
• Before every use, inspect the product for missing,
broken, loose or corroded parts and leaks.
Important: DO NOT use this product if it is damaged
or leaking in any way. Contact Draper Tools to discuss
repair and replacement options.
• DO NOT use this machine if the on/o switch does not
function correctly.
• DO NOT use this product if either of the gauges are
unresponsive or inaccurate.
• Ensure that all connections are securely fastened
before use.
• Use the product only in the manner instructed in this
manual.
• DO NOT modify this product in any way.
• DO NOT adjust the safety valve.
• ALWAY S ensure that the motor air vents are clear and
free from dust and debris during use.
• DO NOT cover any part of this product during
operation.
• NEVER immerse this product in water or expose it to
damp conditions or frost.
• ALWAY S use, store and transport this product in an
upright position.
• ONLY use spare parts supplied by Draper Tools.
• Stay alert at all times; DO NOT use this product while
tired or under the inuence of alcohol, drugs or other
medication.
• Position the product in an upright position on a rm
and at surface during use and ensure that it is not
likely to fall.
• DO NOT move the compressor while it is switched on.
• NEVER leave this product unattended while it is
pressurising, pressurised or in use.
5.2 Additional Safety Instructions for This
Air Compressor
Important: ALWAYS check local regulations regarding
pressure vessels before use.
WARNING! The air produced by this product is
NOT suitable for breathing equipment.
• Compressed air can cause severe injury.
− ALWAYS turn o and disconnect the air supply
before making any adjustments to the attached
tools.
− NEVER direct compressed air towards yourself or
others.
− Ensure that compressed air is not blocked by or in
contact with any part of your body.
• This product is not intended for use by persons
(including children) with reduced physical, sensory or
mental capabilities, or lack of experience and
knowledge.
− Children should be supervised to ensure that they
do not play with the product.
• Draper Tools recommends the use of a whip hose
between the tool and the air supply to reduce
vibration.
CAUTION! Whipping hoses can cause severe
injury. Always check for and replace damaged or
loose hoses and ttings.
• Ensure that any connected tool is compatible with the
air supply before use.
• ALWAY S ensure that the air ow is shut o when
connecting an air line or tool.
− Pressurise the compressor tank before connecting
an air line or tool and set the regulator to its
minimum setting.
− DO NOT depress the tool trigger or open the air
line while connecting them to the compressor.
– 7 –
Page 8
5. Health and Safety Information
• DO NOT exceed the maximum stated air pressure of
this compressor or any connected tools.
− The pressure of the air supply MUST NOT exceed
more than 10% of the rated pressure of any
connected tool.
• NEVER carry the compressor or any connected tool
by the air line.
• DO NOT use this tool in temperatures that do not fall
within 0–40°C.
• DO NOT use this product to supply air tools that
require greater air ow than this compressor can
provide.
• NEVER strike or pierce the compressor tank or expose
it to ames sources or sources of heat.
• DO NOT use this product if you suspect that the
integrity of the compressor tank has been
compromised.
• NEVER weld anything to or drill holes in the
compressor tank.
• Drain the compressor tank of condensation before
and after EVERY use and before storing the product.
• Have the safety valve replaced every 12 months by an
authorised service agent.
WARNING! DO NOT use this product if the
safety valve or gauges are damaged in any way.
The tank pressure must be monitorable and able
to self-vent in the event of over-pressurisation.
WARNING! This product may become hot during
use. DO NOT touch the motor housing or
compressor tank during use. Allow the product
to cool before adjusting, moving or maintaining
the product.
WARNING! ALWAYS depressurise the tank after
use; DO NOT store the compressor with a
pressurised tank.
5.3 Additional Safety Instructions for
Rechargeable Batteries
Important: Use ONLY Draper Tools D20 range 4.0Ah
(Stock No. 55898) and 5.0Ah (Stock No. 55907) battery
packs and chargers with this product (not supplied).
Read all instructions supplied with the batteries and
charger before use.
WARNING! DO NOT use or charge the battery if
leakage is evident.
• Recharge batteries ONLY using the charger specied.
• DO NOT open, crush or burn the battery as this may
release potentially harmful chemicals.
• DO NOT expose the battery to temperatures greater
than 50°C.
• Charge the battery in a dry and well-ventilated
environment in ambient temperatures between 5 and
40°C, ensuring that the ventilation slots on the
charger casing are not obstructed.
• DO NOT attempt to charge batteries that exhibit a
temperature that is not between 5 and 30°C.
− Allow batteries that are too hot or too cold to
normalise before charging.
• DO NOT short-circuit the battery by connecting the
positive and negative terminals while it is outside of
the product.
− Keep the battery away from metallic objects that
may inadvertently cause a connection between
the terminals.
• DO NOT expose the battery pack to rain or other wet
conditions or immerse it in liquid.
• ALWAY S remove the battery before storing the
product for extended periods.
• ALWAYS remove the battery from the tool before
recycling and dispose of it in accordance with local
regulations.
• If a re occurs, use a CO2 or dry chemical
extinguisher.
WARNING! The electrolyte in the battery pack is
corrosive. Avoid contact with skin.
If contact occurs, ush the area with clean water and pat
it dry. Seek medical attention at the earliest opportunity
and inform the responder that the contaminant is a
“high-alkaline corrosive liquid”. If contact with the eyes
occurs, ush immediately with plenty of water ONLY and
seek medical advice at the earliest opportunity.
5.4 Residual Risk
The safety instructions in this manual cannot account for
all possible conditions and situations that may occur.
Exercise common sense and caution when using this
product and protect against any additional conceivable
risks.
– 8 –
Page 9
6. Identication and Unpacking
EN
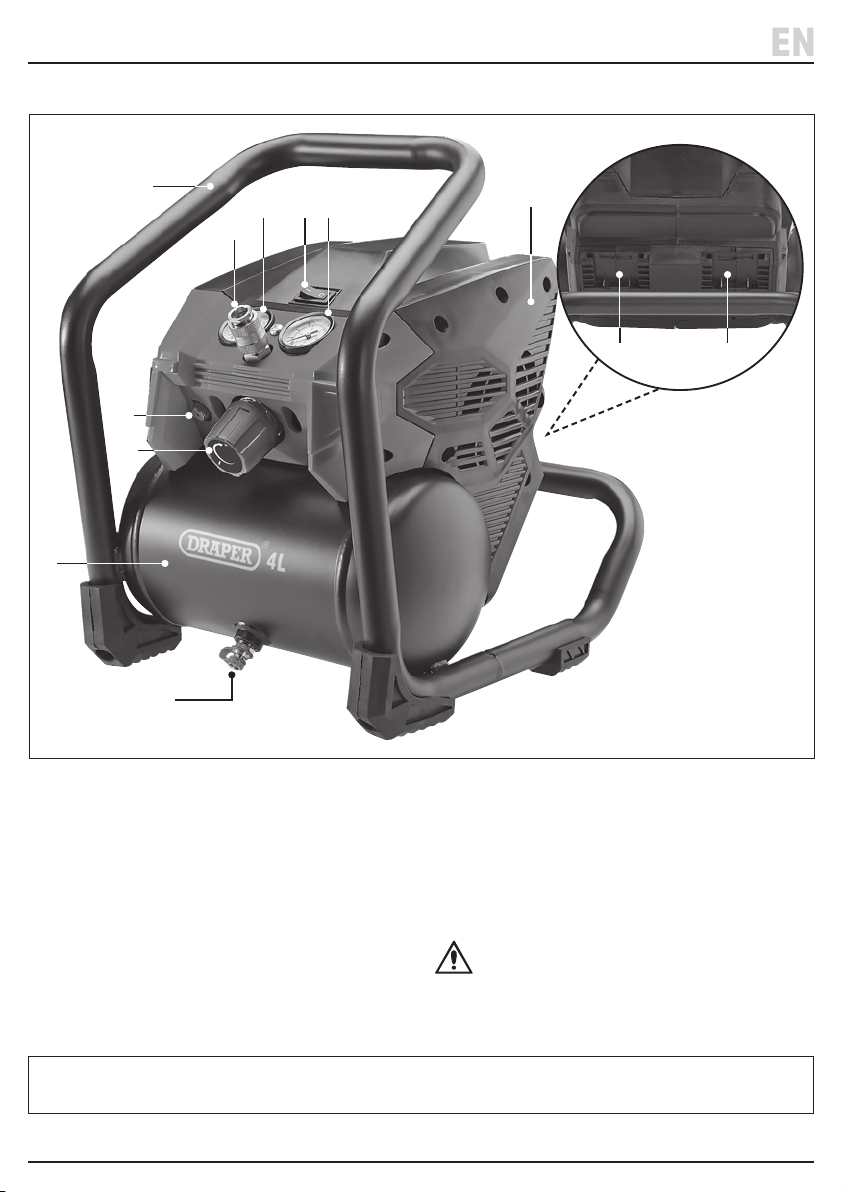
6.1 Product Overview
(3)
(10)
(9)
(2)
(4)
(7)
(11)
(6) (8)
(5)
(1)(1)
(1) Battery mounts
(2) Carry handle
(3) Compressor tank
(4) Drain valve
(5) Motor housing
(6) ON/OFF switch
6.2 Packaging
Keep the product packaging for the duration of the
warranty period for reference should the product need to
be returned for repair.
Please visit drapertools.com for our full range of accessories and consumables.
(7) Outlet
(8) Output pressure gauge
(9) Output pressure regulator
(10) Safety valve
(11) Tank pressure gauge
WARNING! Keep packaging materials out of
reach of children. Dispose of packaging
correctly and responsibly and in accordance
with local regulations.
– 9 –
Page 10
7. Operating Instructions
7.1 Inserting and Removing the
Battery Pack
Important: ONLY use this tool with batteries and
chargers from the Draper Tools D20 range. The batteries
MUST be rated 4.0AH or higher. Use of third-party
batteries or chargers will invalid your warranty. Read all
the safety and operation instructions provided with these
parts before use.
Important: ALWAYS ensure that the compressor is
switched o when inserting or removing the battery.
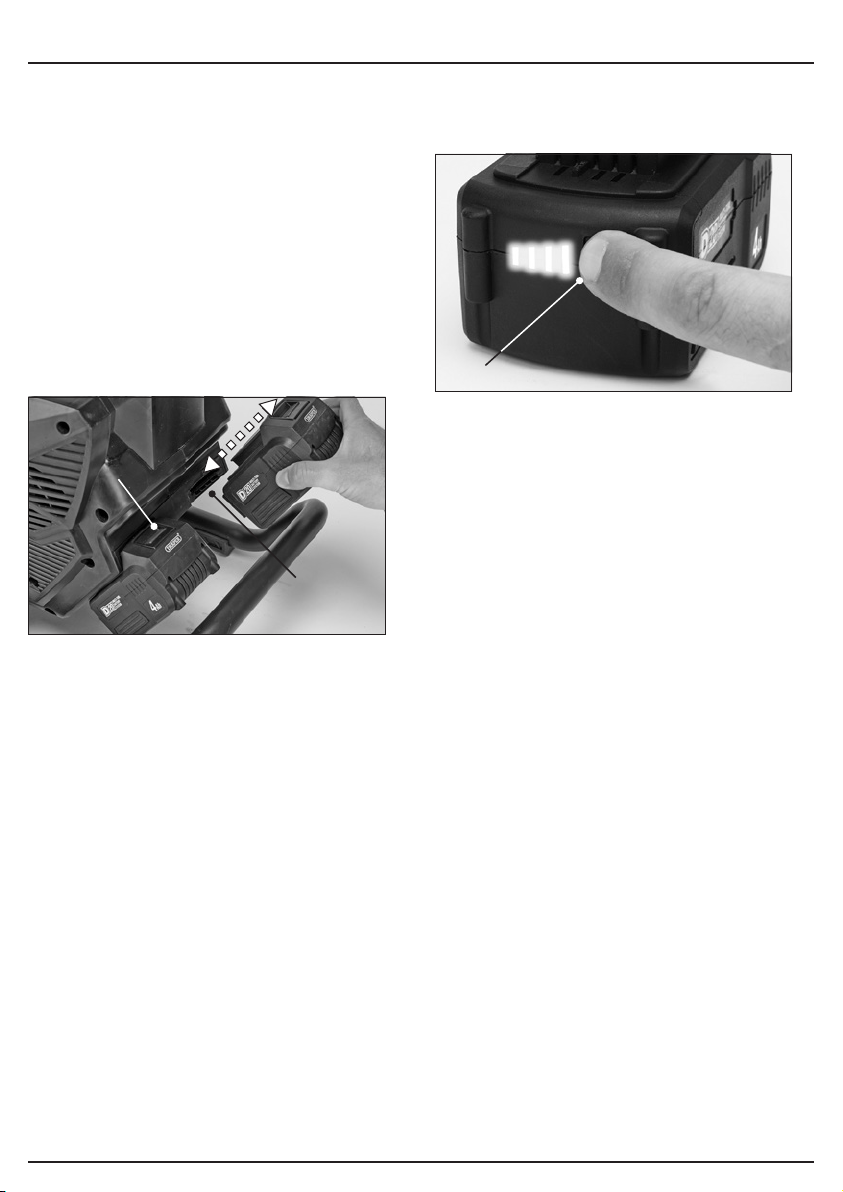
This product can be used with either one or two 4.0Ah or
5.0Ah D20 batteries installed and will drain the charge
from each battery in turn.
(12)
(1)
1 Fig.
To install a battery pack, slide it down into the battery
mounts at the back of the compressor until it clicks into
place.
Important: DO NOT force the battery and ensure it is
rmly secured before use.
To remove a battery pack, press and hold the battery
release button (12) and slide the battery up and out from
the compressor.
(13)
2 Fig.
To view the battery charge on the battery itself, press the
charge indicator button (13) at any time.
– 10 –
Page 11
EN
7. Operating Instructions
7.2 Connecting an Air Line or Tool
CAUTION! ALWAYS check the air line
requirements for any tools or air lines connected
to this device. DO NOT use this compressor with
any air line or tool with which it is not
compatible.
WARNING! ALWAYS ensure that the air line is
interrupted when connecting an air line or tool.
DO NOT attempt to connect an air line or tool if
air is escaping from the compressor.
Important: ALWAYS ensure that the on/o switch (6) is in
the o (
line or tool. Draper Tools recommends pressurising the
tank rst, leaving the output pressure regulator (9) in its
lowest position, then connecting the air line and tool.
) position before attaching or detaching an air
(7)
(8)
4 Fig.
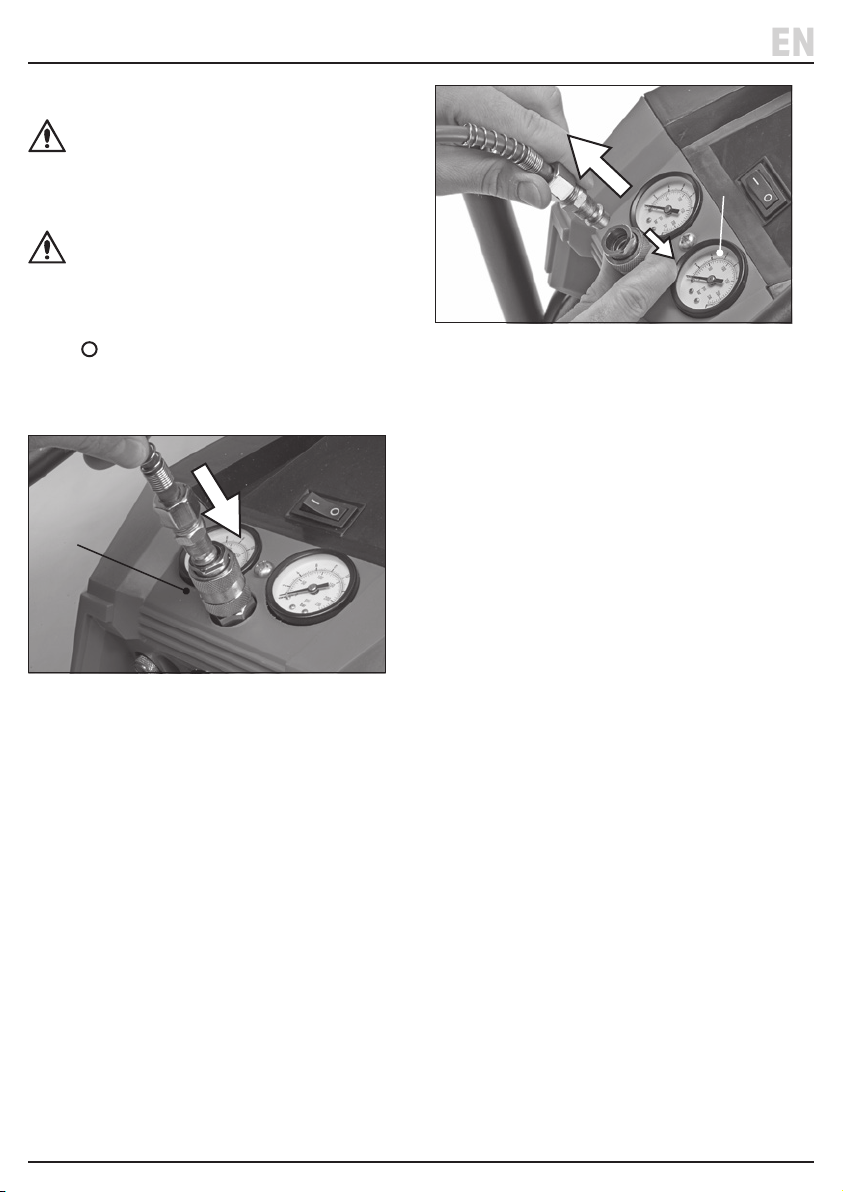
To detach the connection from the compressor outlet,
rotate the output pressure regulator (9) fully
anticlockwise and allow the output pressure gauge (8) to
drop to zero. Then pull down the collar to eject the
connected item.
Important: ALWAYS rst allow the outlet pressure to
drop to zero and grip the air line when detaching it from
the compressor to avoid injury from whipping hoses.
Important: This product is NOT rated for continuous use.
ALWAY S allow the device to rest and cool down between
each use.
3 Fig.
This device is tted with a female Euro-style air line
adaptor. To connect an air line or tool, insert a male
Euro-style air line coupling (attached to the item) into the
outlet (7) and allow the collar to snap up to secure it.
Once the air line is connected, the output pressure may
be set; see 7.4 Setting the Output Pressure.
Important: Draper Tools strongly recommends that this
compressor is used with an in-line water separator in the
air line to protect your connected tools and any sprayed
materials. ALWAY S adhere to the manufacturer
instructions of any accessories.
Important: Draper Tools recommends that PTFE tape is
wrapped around all threaded connections along the air
line for better airtight seals. For best results, wrap the
tape in the opposite direction to the thread.
Important: Draper Tools recommends using a suitable
whip hose between the connected tool and the air line to
reduce vibrations at the tool. Take care as whipping
hoses may cause injury.
– 11 –
Page 12
7. Operating Instructions
7.3 Pressurising the Compressor Tank
Important: Place the compressor on a rm and at
surface before use. DO NOT move the compressor while
it is switched on.
The compressor tank (3) must be pressurised before use.
The tank pressure is indicated by the tank pressure
gauge (11) (the left of the two gauges).
Important: Draper Tools recommends pressurising the
tank BEFORE attaching an air line or tool.
To pressurise the tank:
1. Turn the output pressure regulator (9) fully
anticlockwise and allow the output pressure gauge to
drop to zero.
2. Press the on/o switch (6) into the on (
observe the tank pressure gauge.
− If only a small quantity of air is required, press the
on/o switch into the o (
required pressure is reached.
− If a full tank is required, allow the compressor to
operate until it cuts out automatically.
3. Attach the air line and accessories; see 7.2
Connecting an Air Line or Tool.
4. Set the desired output pressure; see 7.4 Setting the
Output Pressure.
The tank can be pressurised to a maximum pressure of
8bar, at which point the compressor will automatically
cut out. If the compressor remains switched on during
use, it will automatically repressurise once its internal
pressure drops to approximately 5.4bar.
To reduce the pressure in the tank slightly without
connecting a tool, pull gently on the safety valve (10) pin
to allow air to escape until the desired pressure is
reached.
Important: DO NOT use the drain valve to reduce the
tank pressure.
For more accurate results when reducing the tank
pressure, allow the pressure to drop slightly below the
desired level, then repressurise to the level required.
WARNING! DO NOT leave the tank unattended
while it is pressurised. Depressurise the tank if it
will not be used for extended periods.
) position when the
) position and
WARNING! The compressor must only be
operated for 90 seconds within a 10 minute
period. After pressurising the tank, allow 10
minutes for the product to rest before using the
air line.
7.4 Setting the Output Pressure
Important: This air tool delivers a maximum output
pressure of 8bar (116psi). NEVER exceed the maximum
operating pressure of any component of the connected
air line.
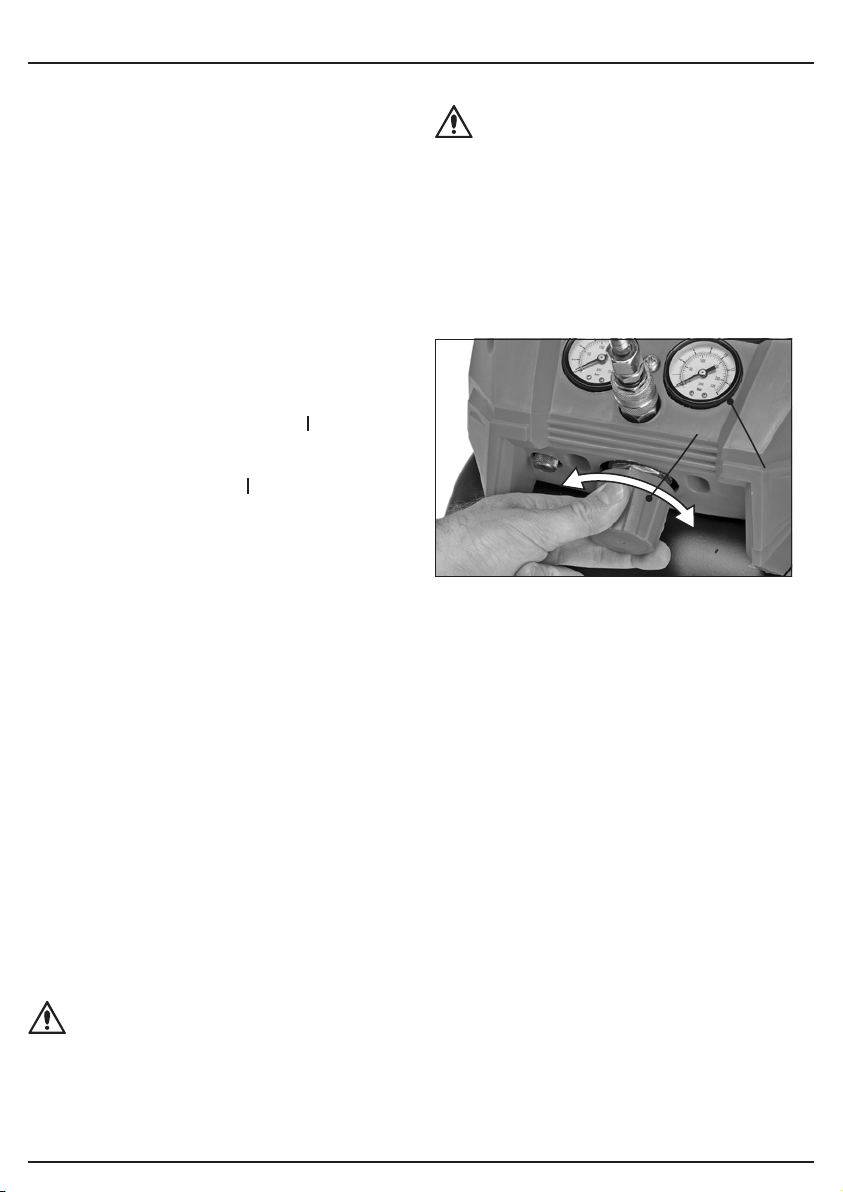
(9)
(8)
5 Fig.
The output pressure can be set using the output pressure
regulator (9) and monitored using the output pressure
gauge (8) (the right of the two gauges). The current
output pressure can only be viewed when the tank is
pressurised.
Important: ALWAYS use the minimum outlet pressure
required for the operation. Use of excessive pressure will
require the compressor to operate and rest more
frequently and may cause the operation to take longer.
• To increase the output pressure, rotate the output
pressure regulator clockwise.
• To decrease the output pressure, rotate the output
pressure regulator anticlockwise.
Important: If the regulator is rotated to its full extent in
either direction, it may require a few turns before the
output pressure begins to change.
When the tank pressure reaches the same level as the
output pressure, both will decrease at the same rate
unless the tank is repressurised.
– 12 –
Page 13

EN
7. Operating Instructions
7.5 Depressurising the Compressor Tank
Important: ALWAYS ensure that the compressor is
switched o, has completely cooled and the battery has
been removed before depressurising the compressor
tank.
The compressor tank must be depressurised when not in
use and before storage.
To depressurise the tank, use the attached tool to
exhaust the pressure. To reduce small amounts of
pressure, rotate the output pressure regulator (9) fully
anticlockwise and pull gently on the safety valve (10) pin.
7.6 The Safety Valve
Important: The safety valve (10) has been set at the
factory to the value rated for this product. NEVER adjust
the safety valve.
The safety valve automatically relieves pressure within
the compressor tank if it exceeds the maximum rated
pressure for this device.
To test the safety valve, pull gently on the ring pin to
allow air to escape from the compressor. If air does not
escape, the safety valve is faulty.
If the safety valve is activated during use, switch o the
compressor and allow the pressure to return to an
acceptable level. Check the compressor for blockages or
damage before resuming.
If the safety valve is activated frequently, contact Draper
Tools for support.
Important: The safety valve MUST be replaced every
12 months, regardless of use, by an authorised service
agent; contact Draper Tools for support.
If the thermal overload protection is triggered frequently,
stop the operation and contact Draper Tools for support.
7.8 Moisture in Compressed Air
Moisture in compressed air will form into droplets as it
leaves the compressor pump. In high-humidity
environments or when the compressor is used
continuously for an extended period, this moisture may
collect in the tank. This moisture is then carried into the
connected tool and contaminates the sprayed material,
which may damage the nish and the tool itself.
Important: ALWAYS drain the compressor tank and air
lines of moisture before and after EVERY use and before
storing the product.
7.7 Thermal Overload Protection
This compressor is tted with a thermal overload safety
feature that will cause the motor to shut o if it becomes
overheated.
If this safety feature is activated, switch o the
compressor and allow it to cool for at least 30 minutes
before resuming the operation.
Thermal overload may be caused by:
• Blocked or covered motor air vents
• Excessive pressure inside the tank
• Prolonged use over extended periods
• Use in abnormal ambient temperatures
– 13 –
Page 14
8. Maintenance and Troubleshooting
Important: Maintenance and repairs should be carried
out ONLY by authorised and suitably qualied personnel.
DO NOT attempt to disassemble the product.
WARNING! ALWAYS ensure that the on/o
switch is in the o ( ) position, the battery
pack has been removed and the tank has been
fully depressurised before performing any
maintenance to this product.
8.1 General Maintenance
Important: Only the battery pack and charger (not
supplied) and any accessories may be replaced by the
user.
• Drain the compressor tank before and after EVERY
use; see 8.2 Draining the Compressor Tank.
• Clean the product using a dry cloth ONLY.
− NEVER use solvents or other aggressive
substances to clean this product as they may
damage plastic or insulated parts
− DO NOT allow liquids to come into contact with
the battery pack or battery contacts.
• Check for signs of corrosion or holes around the
compressor tank before and after every use.
− If there is signicant evidence of corrosion, have
your product inspected by an authorised service
engineer; contact Draper Tools for support.
WARNING! DO NOT use the compressor if
you suspect that the structural integrity
of the tank has been compromised.
• Keep the motor vents and air outlet clear and free
from dust and debris.
− Use a vacuum or compressed gas to clean around
the vents and outlet.
• Keep the gauges and safety valve clean and free from
debris.
Important: Take care to ensure that the safety valve is
not adjusted during cleaning.
• Have the safety valve replaced every 12 months,
regardless of use, by an authorised service agent;
contact Draper Tools for support.
8.2 Draining Moisture from the
Compressor Tank
Important: ALWAYS ensure that the compressor is
switched o, fully depressurised, completely cooled and
that the battery has been removed before draining the
compressor tank.
WARNING! DO NOT open the drain vent while
the tank is pressurised.
Drain the compressor tank of moisture before and after
EVERY use, and before storing the product.
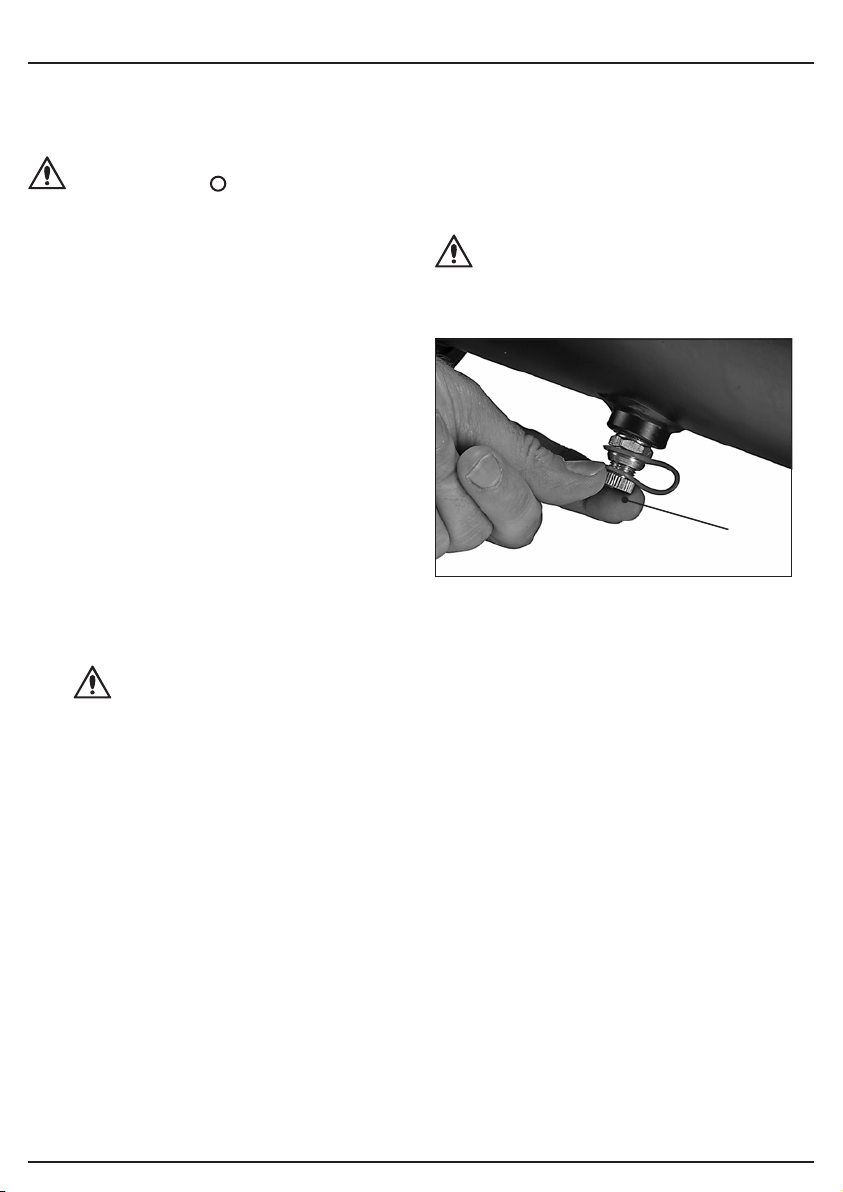
(4)
6 Fig.
1. Depressurise the compressor tank; see 7.5
Depressurising the Compressor Tank.
2. Slowly loosen the drain valve (4) fully until the cap
can be detached.
3. Carefully tilt the compressor downwards to drain any
excess moisture from inside the tank into a suitable
container.
4. Return the compressor to its upright position and
tighten the drain valve.
Important: Dispose of condensate in accordance with
local regulations.
– 14 –
Page 15

8. Maintenance and Troubleshooting
EN
8.3 Storing the Compressor
• ALWAY S, before storing the product:
− Remove the battery.
− Turn the output pressure regulator (9) fully
anticlockwise.
− Depressurise and drain the compressor tank; see
8.2 Draining Moisture from the Compressor Tank.
− Detach the air line or tool and hang the open end
vertically downward to drain any residual
moisture.
− Open the drain valve (4).
− Depressurise any other air tools before storing
them.
• Store the product in a cool, clean and dry
environment, out of direct sunlight and out of the
reach of children.
• DO NOT store this product in environments exceeding
40°C.
• ALWAY S store the product in its upright position.
8.4 Troubleshooting
Problem Possible Cause Remedy
The compressor does not start up. The battery is missing or
discharged.
The compressor is switched o. Move the on/o switch to the on
The tank is at maximum pressure. The tank will automatically
The ambient temperature is too low. Move the compressor to an
Check that at least one battery with
sucient charge is installed.
position.
repressurise when pressure drops to
approx. 5.4bar.
environment with an ambient
temperature of 5°C or greater.
The tank or output pressures are
abnormally low.
The thermal overload safety feature
has been activated.
Connections are loose or a seal is
damaged.
The output pressure regulator is set
too low.
The safety valve is faulty. Cease operations immediately and
Switch o the compressor and allow
it to cool for at 30 minutes before
reuse.
Inspect all connections for loose
ttings or damaged parts. Have any
damaged parts replaced
immediately.
Turn the output pressure regulator
clockwise to increase the output
pressure.
contact Draper Tools for support.
DO NOT adjust the safety valve.
– 15 –
Page 16

8. Maintenance and Troubleshooting
Problem Possible Cause Remedy
Connected air lines and tools are
delivering low pressure.
The tank pressure drops when the
compressor is switched o.
Air or liquid output from connected
tools contains moisture.
The compressor starts and stops
excessively.
The thermal overload safety feature
is triggered repeatedly.
The connected hoses or tools are
faulty or are not airtight.
Connections are loose or a seal is
damaged.
The output adaptor or drain valve
are loose or clogged.
The regulator or gauges are faulty. Contact Draper Tools for support.
Condensation is present in the
compressor tank.
The environment is too humid. Move the compressor to a less
There is excessive moisture inside
the tank.
The battery voltage is too low. Recharge the battery before use.
The motor vents are clogged. Clean the vents using a vacuum or
The environment is poorly
ventilated or the ambient
temperature is too high.
Check connected hoses and tools
for signs of cracks, splits or other
damage that may cause air leakage.
Inspect all connections for loose
ttings or damaged parts. Have any
damaged parts replaced
immediately.
Check and clean the output adaptor
and drain valve as necessary.
Drain the compressor tank and
connected tools and hoses; see 8.2.
humid environment.
Drain the compressor tank; see 8.2.
compressed air.
Move the compressor to an area
with increased ventilation and a
lower temperature and allow it to
cool.
The compressor makes an unusual
noise or vibrates excessively.
A valve is malfunctioning. Contact Draper Tools for support.
Fixings are loose or the internal
mechanism is damaged.
Check that all external bolts are
suitably tight. Contact Draper Tools
for support.
– 16 –
Page 17
EN
9. Spares, Returns and Disposal
For spare parts, servicing, and repair and replacement
options, please contact the Draper Tools Product
Helpline for details of your nearest authorised agent.
Draper Tools will endeavour to hold any spare parts, if
applicable, for seven years from the date that it sells the
nal matching stock item.
Any servicing or repairs carried out by unauthorised
personnel or installation of spare parts not supplied by
Draper Tools will invalidate your warranty.
At the end of its working life, dispose of the product
responsibly and in line with local regulations. Recycle
where possible.
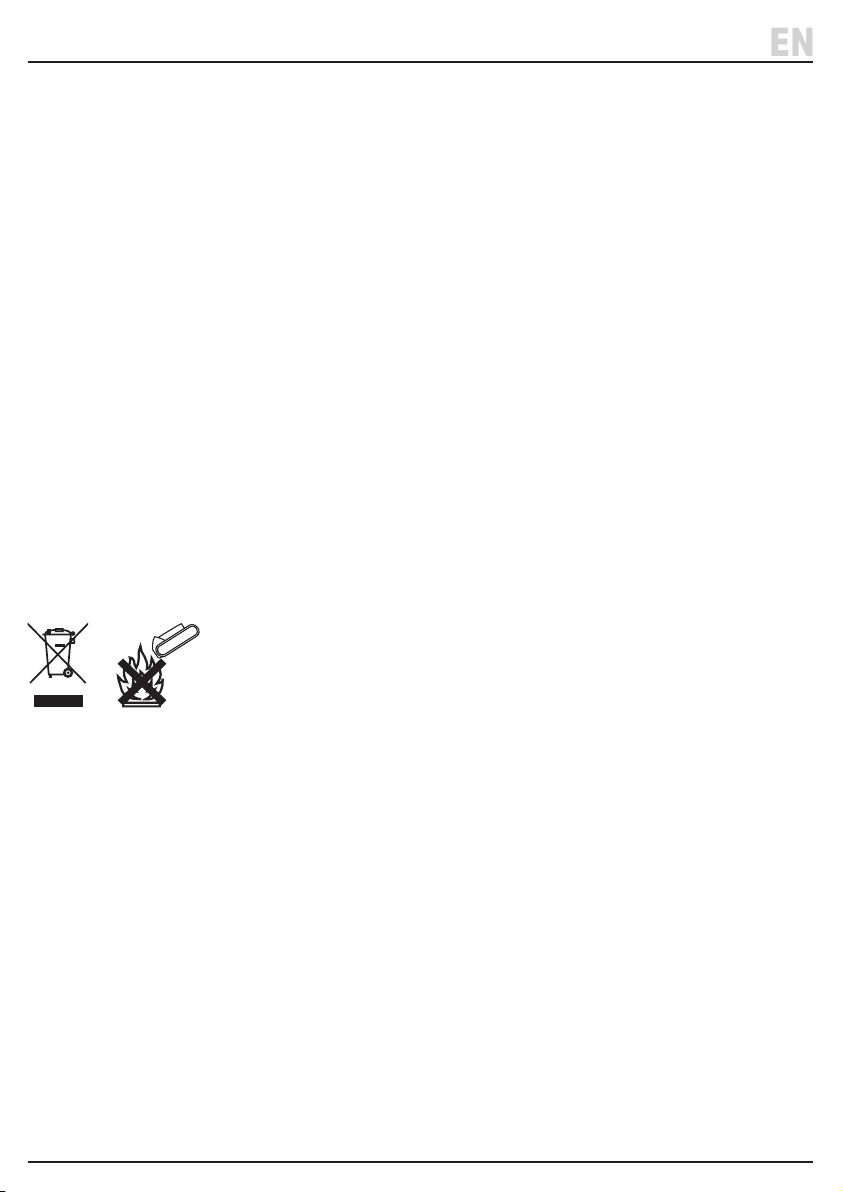
• DO NOT dispose of this product with domestic waste;
most local authorities provide appropriate recycling
facilities.
• DO NOT incinerate this product or throw it into re.
• DO NOT burn or mutilate batteries; this may release
toxic or corrosive substances.
• Dispose of batteries separately and in accordance
with local regulations.
• Dispose of condensate in accordance with local
regulations.
– 17 –
Page 18
10. Explanation of Symbols
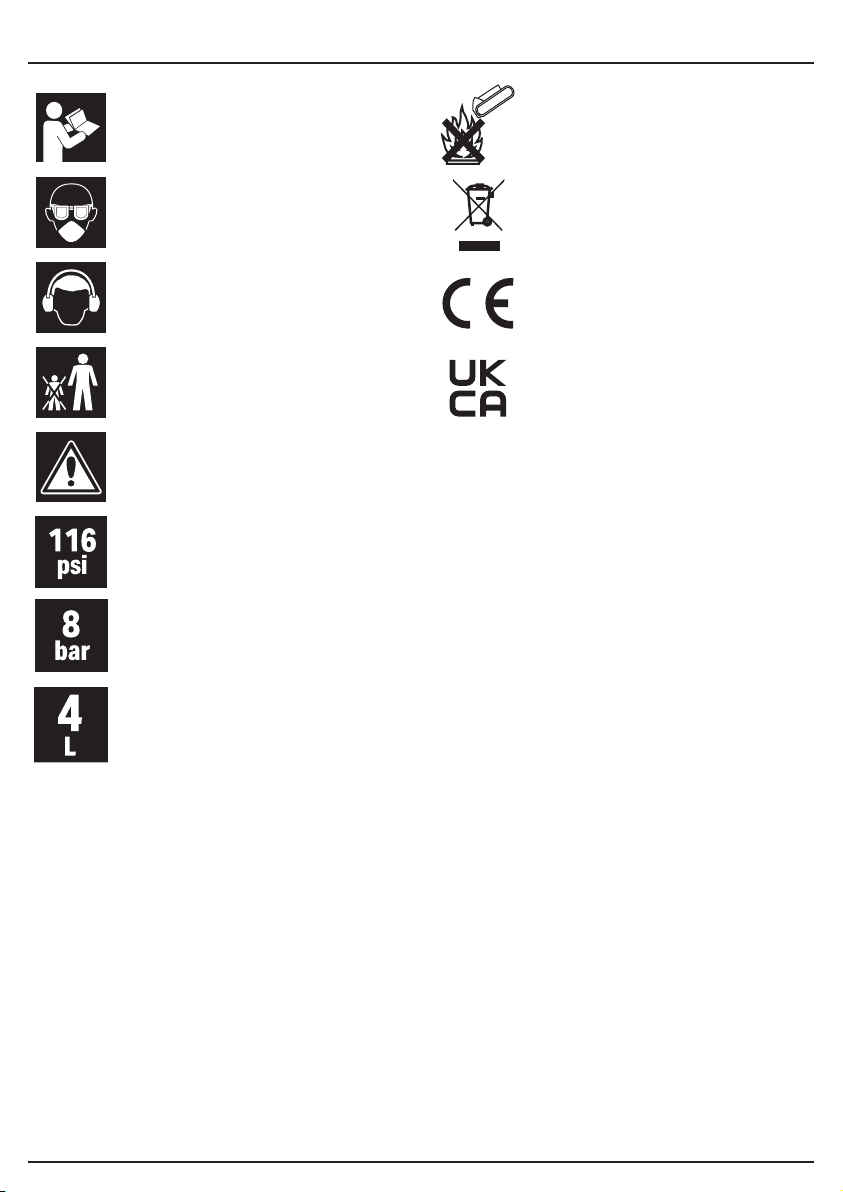
Read the instruction manual
Wear face mask and safety glasses
Wear ear defenders
Keep out of the reach of children
Warning!
Max. tank pressure
Max. output pressure
DO NOT incinerate or throw onto re
WEEE –
Waste Electrical & Electronic Equipment
Do not dispose of Waste Electrical & Electronic Equipment
in with domestic rubbish
European conformity
UK Conformity Assessed
Compressor tank capacity
– 18 –
Page 19

Notes
EN
– 19 –
Page 20

Contact Details
Draper Tools
Draper Tools Limited
Hursley Road
Chandler’s Ford
Eastleigh
Hampshire
SO53 1YF
UK
Website: drapertools.com
Email: [email protected]
Product Helpline: +44 (0) 23 8049 4344
Telephone Sales Desk: +44 (0) 23 8049 4333
General Enquiries: +44 (0) 23 8026 6355
Please contact the Draper Tools Product Helpline for repair and servicing enquiries.
Delta International
Delta International BV
Oude Graaf 8
6002 NL
Weert
Netherlands
© Published by Draper Tools Limited© Published by Draper Tools Limited
 Loading...