

Page 1

20V LI-ION 12L
ASH
VACUUM CLEANER
98503
These instructions accompanying the product are the original instructions. This document is part of the product,
keep it for the life of the product passing it on to any subsequent holder of the product. Read all these instructions
before assembling, operating or maintaining this product.
This manual has been compiled by Draper Tools describing the purpose for which the product has been designed,
and contains all the necessary information to ensure its correct and safe use. By following all the general safety
instructions contained in this manual, it will ensure both product and operator safety, together with longer life of the
product itself.
AlI photographs and drawings in this manual are supplied by Draper Tools to help illustrate the operation of the
product.
Whilst every effort has been made to ensure the accuracy of information contained in this manual, the Draper Tools
policy of continuous improvement determines the right to make modications without prior warning.
Page 2

1. TITLE PAGE
1.1 INTRODUCTION:
USER MANUAL FOR: 20V LI-ION 12L ASH VACUUM CLEANER
Stock No: 98503
Part No: D20AV12
1.2 REVISION HISTORY:
Date first published: July 2020.
As our user manuals are continually updated, users should make sure that they use
the very latest version.
Downloads are available from: http://drapertools.com/manuals
Draper Tools Limited
Hursley Road
Chandler’s Ford
Eastleigh
Hampshire
SO53 1YF
UK
Website: drapertools.com
Product help line: +44 (0) 23 8049 4344
General Fax: +44 (0) 23 8026 0784
1.3 UNDERSTANDING THIS MANUAL’S SAFETY CONTENT:
WARNING! – Information that draws attention to the risk of injury or death.
CAUTION! – Information that draws attention to the risk of damage to the product or surroundings.
1.4 COPYRIGHT © NOTICE:
Copyright © Draper Tools Limited.
Permission is granted to reproduce this publication for personal and educational use only.
Commercial copying, redistribution, hiring or lending is prohibited.
No part of this publication may be stored in a retrieval system or transmitted in any other form or
means without written permission from Draper Tools Limited.
In all cases this copyright notice must remain intact.
– 2 –
Page 3

2. CONTENTS
2.1 CONTENTS
1. TITLE PAGE
1.1 INTRODUCTION ..................................................................................................................2
1.2 REVISION HISTORY ............................................................................................................2
1.3 UNDERSTANDING THIS MANUAL’S SAFETY CONTENT .................................................2
1.4 COPYRIGHT® NOTICE .......................................................................................................2
2. CONTENTS
2.1 CONTENTS ..........................................................................................................................3
3. WARRANTY
3.1 WARRANTY .........................................................................................................................4
4. INTRODUCTION
4.1 SCOPE .................................................................................................................................5
4.2 SPECIFICATION ..................................................................................................................5
4.3 HANDLING AND STORAGE ................................................................................................5
5. HEALTH AND SAFETY INFORMATION
5.1 GENERAL SAFETY INSTRUCTIONS FOR POWER TOOL USE ........................................6
5.2 SPECIFIC PRODUCT USE AND CARE ...............................................................................7
5.3 RESIDUAL RISK ..................................................................................................................8
5.4 SAFETY INSTRUCTIONS FOR MAINS POWERED CHARGERS/BATTERY PACKS ........8
5.5 CONNECTION TO THE POWER SUPPLY (CHARGER) .....................................................9
6. TECHNICAL DESCRIPTION
6.1 IDENTIFICATION ...............................................................................................................10
7. UNPACKING AND CHECKING
7.1 PACKAGING .......................................................................................................................11
7.2 D20 MULTI-TOOL INTERCHANGEABLE BATTERY SYSTEM ........................................11
7.3 WHAT’S IN THE BOX .........................................................................................................11
8. PREPARING THE VACUUM CLEANER
8.1 ASSEMBLY .........................................................................................................................12
8.2 INSERTING THE BATTERY PACK ....................................................................................13
8.3 BATTERY PACK PROTECTION FEATURES ....................................................................14
8.4 BATTERY PACK CHARGE STATUS ..................................................................................14
8.5 BATTERY LIFE EFFICIENCY AND CHARGING ADVICE ..................................................14
9. OPERATING THE VACUUM CLEANER
9.1 OPERATING THE ASH VACUUM ......................................................................................15
10. MAINTENANCE
10.1 CLEANING AND MAINTENANCE ....................................................................................16
10.2 CARE AND STORAGE .....................................................................................................17
10.3 BATTERY REMOVAL AND DISPOSAL ............................................................................17
11. TROUBLESHOOTING
11.1 TROUBLESHOOTING GUIDE .........................................................................................18
12. EXPLANATION OF SYMBOLS/PICTOGRAMS
12.1 EXPLANATION OF SYMBOLS ........................................................................................19
13. DISPOSAL
13.1 DISPOSAL ........................................................................................................................19
DECLARATION OF CONFORMITY .............................................................................. ENCLOSED
– 3 –
Page 4

3. WARRANTY
3.1 WARRANTY
Draper tools have been carefully tested and inspected before shipment and are guaranteed to be
free from defective materials and workmanship.
Should the tool develop a fault, please return the complete tool to your nearest distributor or
contact
Draper Tools Limited, Chandler’s Ford, Eastleigh, Hampshire, SO53 1YF. England.
Telephone Sales Desk: (023) 8049 4333 or Product Help Line (023) 8049 4344.
A proof of purchase must be provided with the tool.
If upon inspection it is found that the fault occurring is due to defective materials or workmanship,
repairs will be carried out free of charge. This warranty period covering parts is 24 months and
labour is 12 months from the date of purchase except where tools are hired out when the warranty
period is 90 days from the date of purchase. This warranty does not apply to any consumable
parts, any type of battery or normal wear and tear, nor does it cover any damage caused by
misuse, careless or unsafe handling, alterations, accidents, or repairs attempted or made by any
personnel other than the authorised Draper warranty repair agent.
Note: If the tool is found not to be within the terms of warranty, repairs and carriage charges will
be quoted and made accordingly.
This warranty applies in lieu of any other warranty expressed or implied and variations of its terms
are not authorised.
Your Draper warranty is not effective unless you can produce upon request a dated receipt or
invoice to verify your proof of purchase within the warranty period.
Please note that this warranty is an additional benet and does not affect your statutory rights.
Draper Tools Limited.
– 4 –
Page 5

4. INTRODUCTION
4.1 SCOPE
20V 12L ash vacuum cleaner for res, stoves and barbecues. Suitable for wood and coal burning
debris.
This product is intended for use in the workshop and garage or DIY work around the home not for
commercial use.
Any application other than that it was intended for, is considered misuse.
4.2 SPECIFICATION
Stock no. ...................................................................................................................................98503
Part no. ............................................................................................................................... D20AV12
Tank volume .................................................................................................................................12L
Vacuum pressure ....................................................................................................................... 8kPa
Weight (nett) ...............................................................................................................................2.3kg
4.3 HANDLING AND STORAGE
– Care must be taken when handling this product.
• Dropping this power tool could have an effect on its accuracy and could also result in
personal injury. This product is not a toy and must be respected.
– Environmental conditions can have a detrimental effect on this product if neglected.
• Exposure to damp air can gradually corrode components.
• If the product is unprotected from dust and debris, components will become clogged.
• If not cleaned and maintained correctly or regularly, the machine will not perform at its best.
– 5 –
Page 6

5. HEALTH AND SAFETY INFORMATION
5.1 GENERAL SAFETY INSTRUCTIONS FOR POWER TOOL USE
When using any type of power tool there are steps that should be taken to make sure that you,
as the user, remain safe.
Common sense and a respect for the tool will help reduce the risk of injury.
Read the instruction manual fully. Do not attempt any operation until you have read and
understood this manual.
Most important you must know how to safely start and stop this machine, especially in an
emergency.
Keep the work area tidy and clean. Attempting to clear clutter from around the machine during
use will reduce your concentration. Mess on the oor creates a trip hazard. Any liquid spilt on the
oor could result in you slipping.
Find a suitable location. If the machine is bench mounted the location should provide good
natural light or articial lighting as a replacement. Avoid damp and dust locations as it will have a
negative effect on the machine’s performance. If the machine is portable do not expose the tool to
rain. In all cases do not operate power tools near any ammable materials.
Keep bystanders away. Children, onlookers and passers by must be restricted from entering the
work area for their own protection. The barrier must extend a suitable distance from the tool user.
Unplug and house all power tools that are not in use. A power tool should never be left unattended
while connected to the power supply. They must be housed in a suitable location, away locked up
and from children. This includes battery chargers.
Do not overload or misuse the tool. All tools are designed for a purpose and are limited to
what they are capable of doing. Do not attempt to use a power tool (or adapt it in any way) for an
application it is not designed for. Select a tool appropriate for the size of the job. Overloading a tool
will result in tool failure and user injury. This covers the use of accessories.
Dress properly. Loose clothing, long hair and jewellery are all dangerous because they can
become entangled in moving machinery. This can also result in parts of body being pulled into the
machine. Clothing should be close tted, with any long hair tired back and jewellery and neck ties
removed. Footwear must be fully enclosed and have a non-slip sole.
Wear personal protective equipment (PPE). Dust, noise, vibration and swarf can all be
dangerous if not suitably protected against. If the work involving the power tool creates dust or
fumes wear a dust mask. Vibration to the hand, caused by operating some tools for longer periods
must be protected against. Wear vibration reducing gloves and allow long breaks between uses.
Protect against dust and swarf by wearing approved safety goggles or a face shield. These are
some of the more common hazards and preventions however, always nd out what hazards
are associated with the machine/work process and wear the most suitable protective equipment
available.
Do not breathe contaminated air. If the work creates dust or fumes connect the machine
(if possible) to an extraction system either locally or remotely. Working outdoors can also help if
possible.
Move the machine as instructed. If the machine is hand held, do not carry it by the power supply
cable. If the product is heavy, employ a second or third person to help move it safely or use a
mechanical device. Always refer to the instructions for the correct method.
Do not overreach. Extending your body too far can result in a loss of balance and you falling.
This could be from a height or onto a machine and will result in injury.
Maintain your tools correctly. A well maintained tool will do the job safely. Replace any damaged
or missing parts immediately with original parts from the manufacturer. As applicable keep blades
sharp moving parts clean, oiled or greased handles clean and emergency devices working.
– 6 –
Page 7

5. HEALTH AND SAFETY INFORMATION
Wait for the machine to stop. Unless the machine is tted with a safety brake, some parts may
continue to move due to momentum. Wait for all parts to stop, then unplug it from the power supply
before making any adjustments, carrying out maintenance operations or just nishing using the tool.
Remove and check setting tools. Some machinery requires the use of additional tools or keys to set,
load or adjust the power tool. Before starting the power tool always check to make certain they have
been removed and are safely away from the machine.
Prevent unintentional starting. Before plugging any machine in to the power supply, make sure the
switch is in the OFF position. If the machine is portable, do not hold the machine near the switch and
take care when putting the machine down, that nothing can operate the switch.
Carefully select an extension lead. Some machines are not suitable for use with extension leads. If
the tool is designed for use outdoors, use an extension lead also suitable for that environment. When
using an extended lead, select one capable of handling the current (amps) drawn by the machine in use.
Fully extend the lead regardless of the distance between the power supply and the tool. Excess current
(amps) and a coiled extension lead will both cause the cable to heat up and can result in re.
Concentrate and stay alert. Distractions are likely to cause an accident. Never operate a power tool
if you are under the inuence of drugs (prescription or otherwise), including alcohol or if you are feeling
tired. Being disorientated will result in an accident.
Have this tool repaired by a qualified person. This tool is designed to conform to the relevant
international and local standards and as such should be maintained and repaired by someone qualied,
using only original parts supplied by the manufacturer. This will ensure the tool remains safe to use.
5.2 SPECIFIC PRODUCT USE AND CARE
WARNING: DO NOT USE THIS ASH CAN TO COLLECT HOT ASHES, COALS OR WOOD
EMBERS. ALWAYS ALLOW THE RESIDUE FROM STOVES AND FIREPLACES TO COOL
FULLY BEFORE COLLECTING WITH THIS ASH CAN.
1. Prior to use, all users should become familiar with this instruction booklet.
2. Always maintain the ash can with care and keep it clean for best/safest performance.
3. Never use this product if any part is damaged. Have it inspected and repaired by your dealer. Do not
use if the electric cable, plug, or the product itself, is in poor condition.
4. Only use extension leads that are of an appropriate power rating and suitable for the work
environment. Extension leads must have an earth connection. Inspect the extension lead regularly
and replace if damaged.
6. Always take care when a long hose is required in the work area as it presents a trip hazard. Tidy the
hose away when the job is nished.
7. Never pick up ammable or readily combustible material such, or use in the presence of explosive
liquids or vapours.
8. Never pick up burning cigarettes or other smoking substances.
9. Never abuse the ash can by standing on it.
10. Always transport the ash can using the handle.
11. Only use the metal suction hose provided with this ash can. A normal plastic vacuum cleaner hose is
not suitable and may be damaged.
12. This application can be used by children aged from 8 years and above and persons with reduced
physical, sensory or mental capabilties or lack of experience and knowledge if they have been given
supervision or instruction concerning use of thr apppliance in a safe way and understand the hazards
involved. Children shall not play with tha appliance. Cleaning and user maintenance shall not be
made by children without supervision.
13. Substance to be vacuumed - cold ashes from replaces, wood/coal stoves, ashtrays, grill.
14. Empty and clean vacuum cleaner before and after vacuuming to avoid potential re hazards.
15. Do not use for the separation of health-hazardous dusts (dust classes L, M, H).
16. Vacuum only ashes from admissible fuels
15. Do not vacuum soot.
16. Do not vacuum any hot, burning or glowing objects or any objects that are hotter than > 40 °C.
– 7 –
Page 8

5. HEALTH AND SAFETY INFORMATION
5.3 RESIDUAL RISK
Important: Although the safety instructions and operating manuals for our tools contain extensive
instructions of safe working with power tools, every power tool involves a certain residual risk
which can not be completely excluded by safety mechanisms. Power tools must therefore always
be operated with caution!
5.4 SAFETY INSTRUCTIONS FOR MAINS POWERED CHARGERS
& BATTERY PACKS
– The charger is for indoor use only.
– Prior to plugging the charger in to the supply, check that the plug and the cable are in good
repair. If either are damaged, have the defective item replaced immediately by a suitably
qualied person. If the casing of the battery charger is damaged, it is good policy to have the
charger checked over by a suitably qualied person.
– Only use a correctly rated mains outlet to provide power, do not plug into site generators,
attach to engine generators or D.C. sources. Do not use a mains socket outlet that is not
switched.
– Use the correct Draper charger in conjunction with it’s corresponding battery pack (consult the
Draper website for more information or to nd your local stockist).
– Do not charge any other batteries with Draper chargers. Any other application is
considered misuse.
– Do not attempt to charge battery packs that are too hot (over 30ºC) or too cold (under 5ºC),
if these conditions apply set the battery pack aside to “normalise” before proceeding with the
charging operation.
– Set up the charger and cable in a safe place where it won’t be knocked, tripped over, stepped
on, etc. and where it is well ventilated. Make sure the ventilation slots in the charger case are
not obstructed, plug the charger into the socket outlet.
– Inspect the battery pack for damage, if it is undamaged, plug it into the charger, ensuring
the correct orientation. (Most chargers and batteries have ‘keys’ etc, to make sure the battery
pack is not inserted incorrectly, if you are having to ‘force’ the battery pack into the charger,
the chances are you have it the wrong way round, check and try again.)
– Switch the charger on and check that the correct indicators illuminate, allow the battery pack
to charge (see the specic instructions for your charger). Once charging is complete, switch
the charger off, remove the battery pack and store, repeat the procedure if you have more
than one battery pack to charge.
Caution: When the battery charger has been continuously used, the battery charger will be hot.
Once the charging has been completed, give 15 minutes rest until the next charge.
– After charging is complete, unplug the charger from the socket outlet by pulling on the plug.
Do not pull on the cable. Store the charger in a dry secure place.
– If, when the charger was switched on, the correct indications did not occur, leave for two or
three minutes to allow the charger to stabilise, if the correct indications occur, allow the
charging cycle to proceed as normal. If no indication appears at all, switch off, remove the
battery pack, unplug the charger, check that the charger contacts and the battery contacts
are clean and repeat the process. If there is still no indication, switch off, remove the battery
pack, unplug the charger and check the fuse. If the fuse is blown, replace and repeat the
process. If the fuse blows again, or if the fuse was intact, attempt no further action. Refer the
charger to a suitably qualied person for repair.
– 8 –
Page 9

5. HEALTH AND SAFETY INFORMATION
Battery packs
– Before charging, read the instructions.
– For indoor use. Do not expose to rain.
– Only use Draper D20 battery packs with this product. Consult your Draper stockist for details.
– Do not charge any other manufacturer’s battery packs using Draper chargers. Any other
application is considered misuse.
– The battery must be removed from the appliance before it is recycled.
– The charger must be disconnected from the supply mains when removing the battery.
– The battery is to be disposed of in-line with local authority procedures.
– Do not use any other than the designated Draper batteries/chargers with this product.
– Do not crush, open or burn the battery. Exposure to potentially harmful materials may occur.
– In case of re use CO2 or dry chemical extinguisher.
– Do not expose to high temperatures >50°C. The battery may degrade at high temperatures.
–
Charge battery in conditions between 5°C to 30°C with the specied charger designed for this battery.
– Do not use battery if it has been stored at 5°C or less. Allow it to “normalise” at room
temperature before usage/charging.
Warning!
• Leaking battery packs
– The electrolyte in battery packs is corrosive. Avoid contact with the skin.
– If contact is made, ush the area with running water, pat dry and seek medical attention
and advice at the earliest opportunity.
– Inform medical personnel that the contaminant is a “high alkaline, corrosive liquid”.
– If electrolyte comes into contact with the eyes, ush with copious amounts of water only.
Seek medical attention immediately, relaying the information above.
5.5 CONNECTION TO THE POWER SUPPLY (CHARGER)
Caution: Risk of electric shock. Do not open.
This appliance is supplied with an approved plug and cable for your safety. The value of the fuse
tted is marked on the pin face of the plug. Should the fuse need replacing, ensure the substitute
is of the correct rating, approved to BS1362 and ASTA or BSI Kite marked.
ASTA
BSI
The fuse cover is removable with a small plain slot screwdriver. Ensure the fuse cover is replaced
before attempting to connect the plug to an electrical outlet. If the cover is missing, a replacement
must be obtained or the plug replaced with a suitable type.
If a replacement plug is to be tted this must be carried out by a qualied electrician.
The damaged or incomplete plug, when cut from the cable should be disabled to prevent
connection to a live electrical outlet.
This appliance is Class II† and is designed for connection to a power supply matching that detailed
on the rating label and compatible with the plug tted.
If an extension lead is required, use an approved and compatible lead rated for this appliance.
Follow all the instructions supplied with the extension lead.
†Double insulated : This product requires no earth connection as supplementary insulation is
applied to the basic insulation to protect against electric shock in the event of failure of the basic
insulation.
IMPORTANT: If using an extension lead, follow the instructions that came with your lead
regarding maximum load while cable is wound. If in doubt, ensure that the entire cable is
unwound. Using a coiled extension lead will generate heat which could melt the lead and
cause a fire.
– 9 –
Page 10
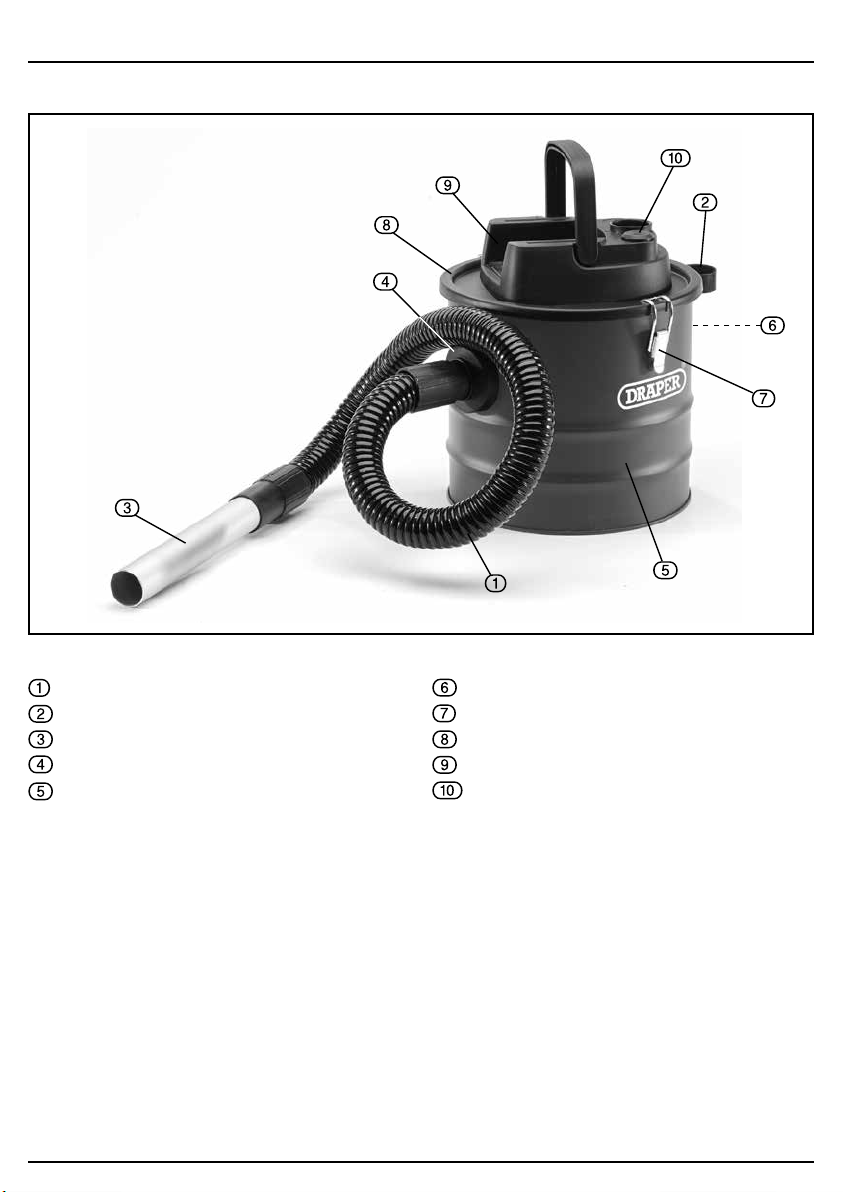
6. TECHNICAL DESCRIPTION
6.1 IDENTIFICATION
Hose
Aluminium hose (tied)
Aluminium nozzle
Inlet
Tank
Hook rack
Hook
Top cover
Battery pack port
On/off switch
– 10 –
Page 11
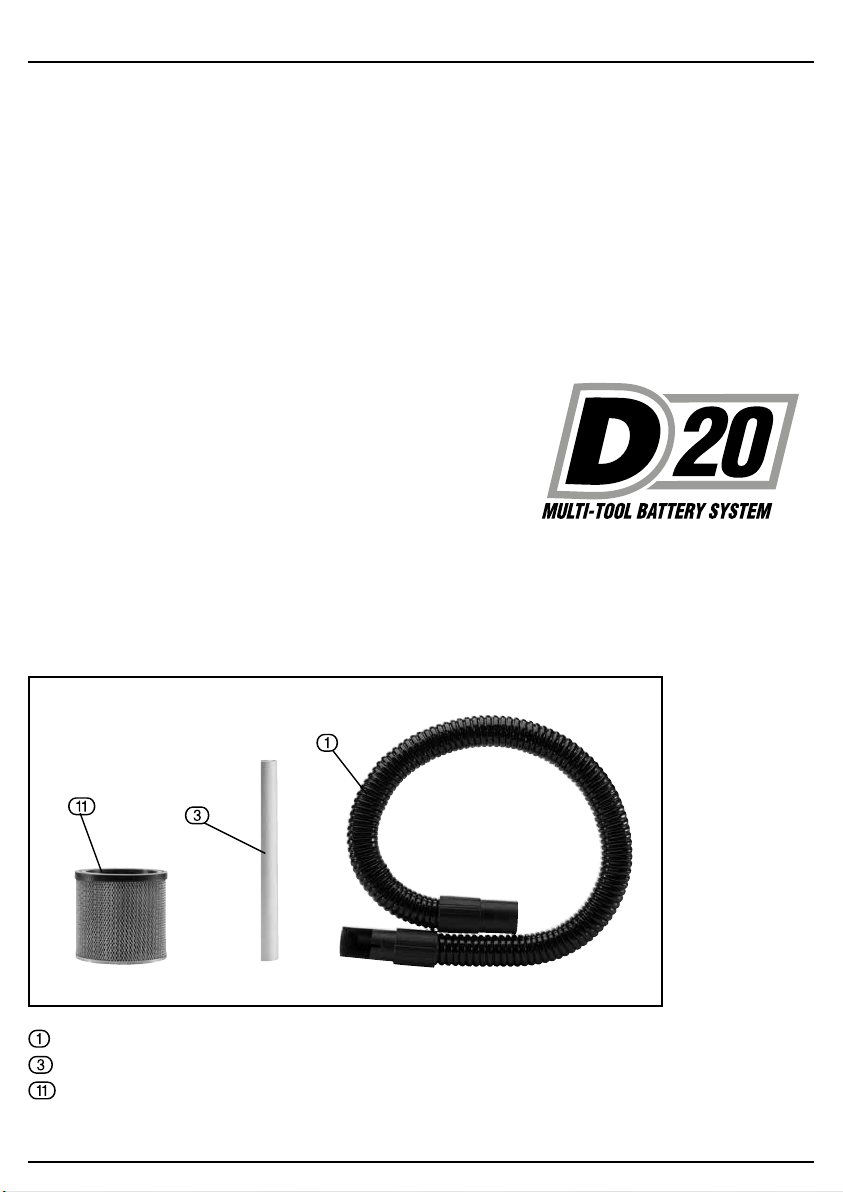
7. UNPACKING AND CHECKING
7.1 PACKAGING
Carefully remove the product from the packaging and examine it for any sign of damage that may
have happened during shipping. Lay the contents out and check them against the parts shown
below. If any part is damaged or missing, please contact the Draper Help Line (the telephone
number appears on the Title page) and do not attempt to use the product.
The packaging material should be retained at least during the warranty period, in case the
machine needs to be returned for repair.
Warning!
− Some of the packaging materials used may be harmful to children. Do not leave any of these
materials in the reach of children.
− If any of the packaging is to be thrown away, make sure they are disposed of correctly,
according to local regulations.
7.2 D20 MULTI-TOOL INTERCHANGEABLE
BATTERY SYSTEM
The D20 range of tools are a range of tools suitable for
enthusiasts and tradespersons alike, featuring a wide array of
machines all running from the same range of batteries. Many
different capacity batteries are available making sure you can
balance tool weight with longevity and nd a battery that meets
your needs. To nd out the latest range of accessories including batteries and chargers please
consult the Draper website for more information or to nd your local Draper stockist.
MULTI-TOOL BATTERY SYSTEM
7.3 WHAT’S IN THE BOX
Note: For details of our full range of accessories and consumables, please visit drapertools.com
Hose
Aluminium nozzle
Dust lter
– 11 –
Page 12
8. PREPARING THE VACUUM CLEANER
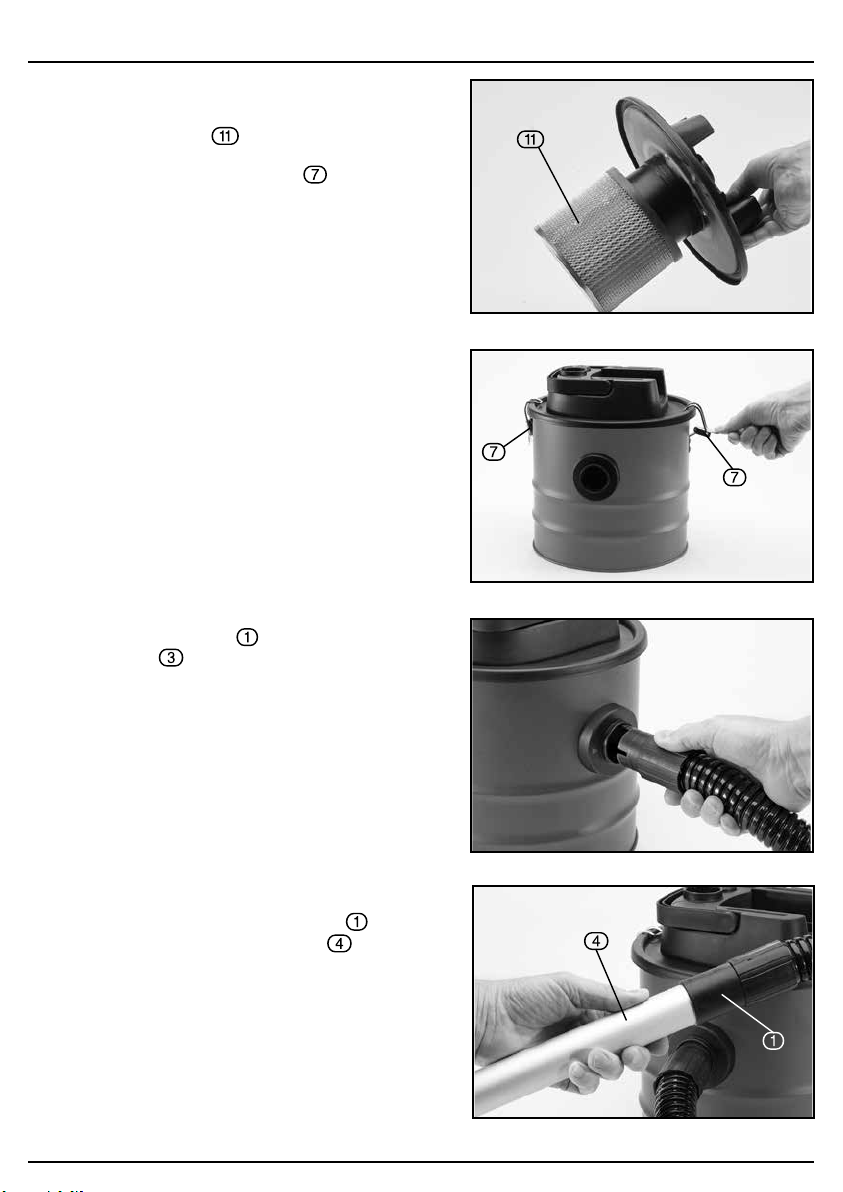
8.1 ASSEMBLY – FIG. 1
NOTE: Before you start the ash vacuum, make
sure that the dust lter is in the position.
Ensure that the buttery nut is tightened and seal
the lid securing with the 2 x hooks .
(5)
(12)
FIG. 1
FIG. 2
(9)
(18)
(19)
Insert the end of the hose into the
inlet connection of the tank (Fig.3).
Insert the other end of the suction hose
into one end of the aluminium nozzle (Fig. 4).
– 12 –
(18)
(19)
FIG. 3
(18)
(19)
FIG. 4
Page 13
8. PREPARING THE VACUUM CLEANER
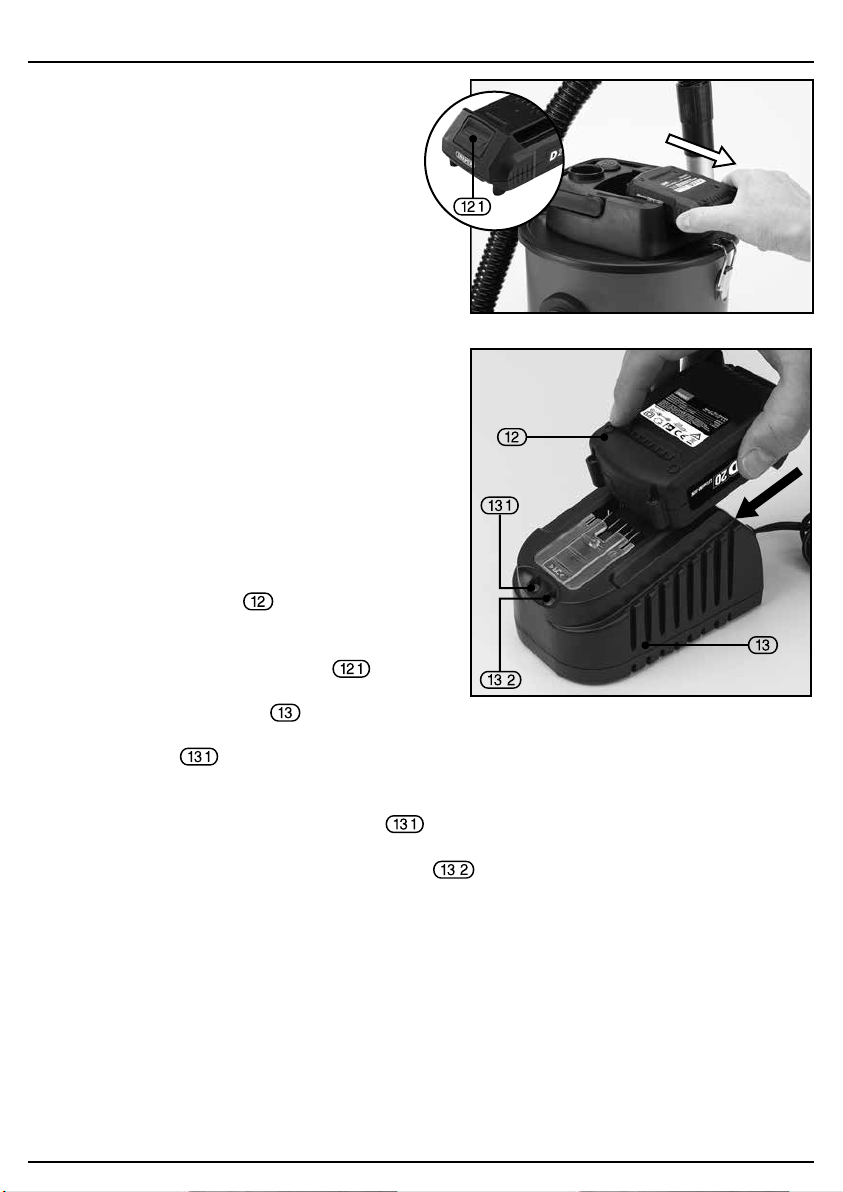
8.2 BATTERY PACK CHARGING –
FIG. 5
This power product us supplied “bare” without
battery pack or charger. Compatible batteries,
chargers and accessories are available through
Draper Tools stockists.
Important: Only Draper D20 designated battery
packs and chargers can be used in conjunction with
this product. Use of any other third party battery
packs/chargers with this product is considered
misuse and will invalidate the product’s warranty.
Once connected to the mains supply, recharging of
the battery can be left generally unsupervised,
requiring minimal attention. Complex circuit
construction monitors the battery condition, adjusting
the recharge current to suit. When the recharge cycle
is complete, to maintain the full capacity, a low output
current will continue as required.
Warning! Check the condition of the charger and
battery prior to each charge. If there is any sign of
damage then do not commence charging, seek
advice from Draper Tools.
The battery pack is supplied un-charged and must
be charged before initial use.
To charge the battery pack , it must rst be
removed from the tool.
To release the battery pack:
– Press the battery release button and
gently slide the battery pack off (Fig.5).
– Plug the battery charger unit into a 230V/
AC 13amp three pin supply socket.
– The red LED will illuminate to show the
charger has power.
– Slide the battery into the charger (the battery is shaped to t into the charger one way only.
– After a few seconds delay, the red LED will ash to show that charging has begun, then
illuminate solid red.
– Whilst the battery is charging, the green LED will ash, (the red LED will go from
ashing to constant red.
– When the battery is fully charged the green LED stops ashing and remains a constant
green. The red LED will extinguish.
Caution: Do not pull the plug out of the power supply by pulling on the cord. Make sure to grasp
the plug when removing from power supply to avoid damaging the cord.
To remove the battery from the battery charger:
– Supporting the battery charger with hand, pull out the battery from the battery charger.
Caution: If the battery charger has been in continuous use it will be hot. Once the charging has
been completed, leave the charger 15 minutes to cool until next use.
.
.
.
.
FIG. 5
FIG. 6
.
.
1 FIG.
.
– 13 –
Page 14
8. PREPARING THE VACUUM CLEANER
If the battery is charged when it is warm due to
battery use or exposure to sunlight, the battery will
not be recharged. In such a case, let the battery cool
before charging.
If the red indicator ickers rapidly at 0.2 second
intervals, check or and remove any foreign objects in
the charger’s battery slot. If there are no foreign
objects, it is probable that the battery or charger is
malfunctioning. Allow battery/charger to normalise
and try again. If a fault remains after trying this then
contact Draper Tools.
8.3 BATTERY PACK PROTECTION
FEATURES
Overcharging protection: This feature that ensures
that the battery pack can never be overcharged.
When the battery pack reaches full charge capacity,
the transformer/charger will automatically shut off,
protecting the internal components from being
damaged.
Over-discharging protection: This feature will stop
the battery pack from discharging beyond the
recommended lowest safety voltage.
Overheating protection: The battery pack contains
an internal thermistor cut-off sensor which shuts off
the battery pack should it become too hot during
operation. This can happen if the tool is overloaded
or being used for extended periods. Up to 30 minutes
cooling time may be required, depending on ambient
temperature.
Current protection: Should the battery be overloaded
and the maximum current draw be exceeded, the
battery will shut off to protect the internal components.
The battery pack will resume working once excessive
current draw has returned to normal, safe level.
Short circuit protection: If, for any reason, the
battery pack was to short circuit, the short circuit
protection would immediately stop the battery pack from operating.
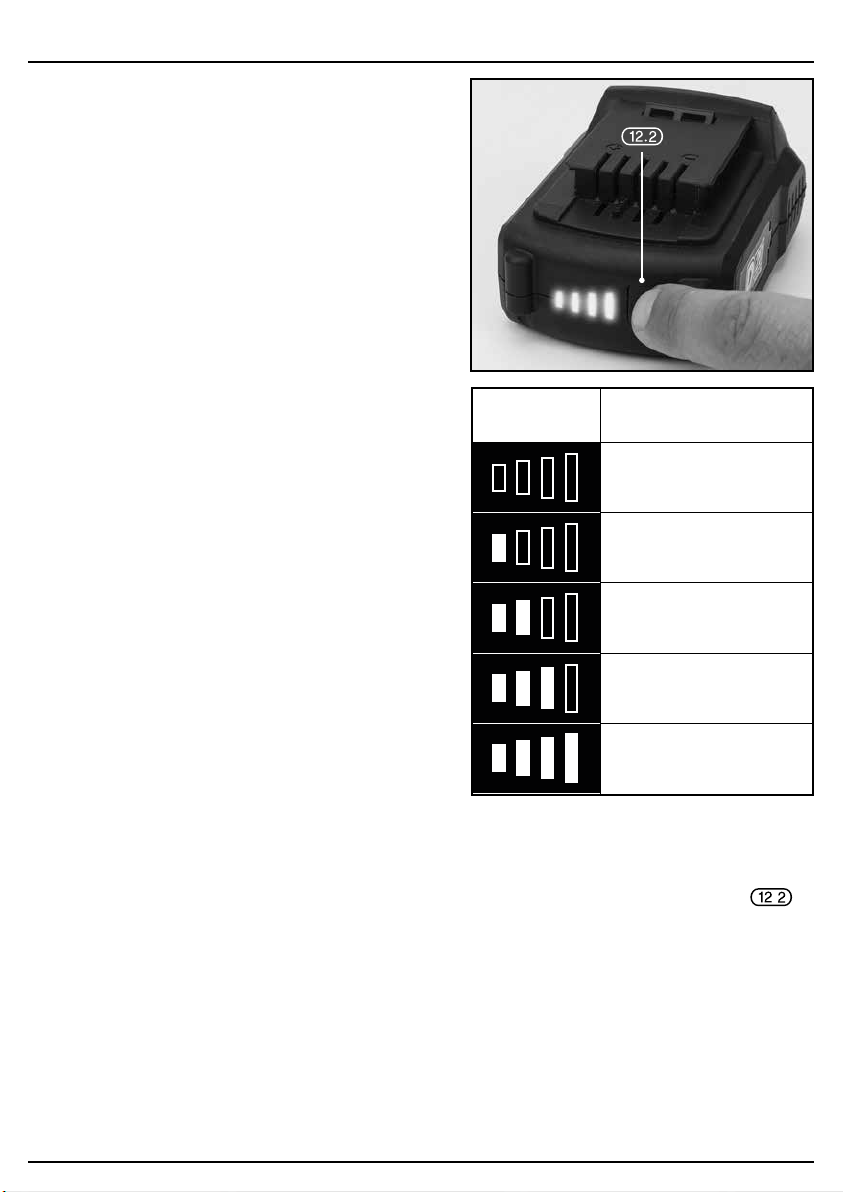
8.4 BATTERY PACK CHARGE STATUS – FIG. 7
To display the amount of charge left in the battery pack, press the charge level indicator button .
8.5 BATTERY LIFE EFFICIENCY AND CHARGING ADVICE
– Avoid recharging at high temperatures. A rechargeable battery will be hot immediately after use. If
such a battery is recharged immediately after use, its internal chemical substance will deteriorate, and
the battery life will be shortened. Leave the battery and recharge it after it has cooled for a while.
– The battery should only be used and/or charged when battery temperature is between 5°C and 30°C.
– The battery needs to be warmed-up or cooled down in order to prevent damage to the batteries
internal components,
Note: If battery is too hot or too cold, allow it to ‘normalise’ before use or charging.
Note: Failure to warm up or cool down a battery could result in serious damage to the battery,
charger and user.
– 14 –
Charge level
indicator
FIG.7
Amount of charge
remaining
0 – 10%
10 – 25%
25 – 50%
50 – 75%
75 – 100%
.
Page 15
9. OPERATING THE VACUUM CLEANER
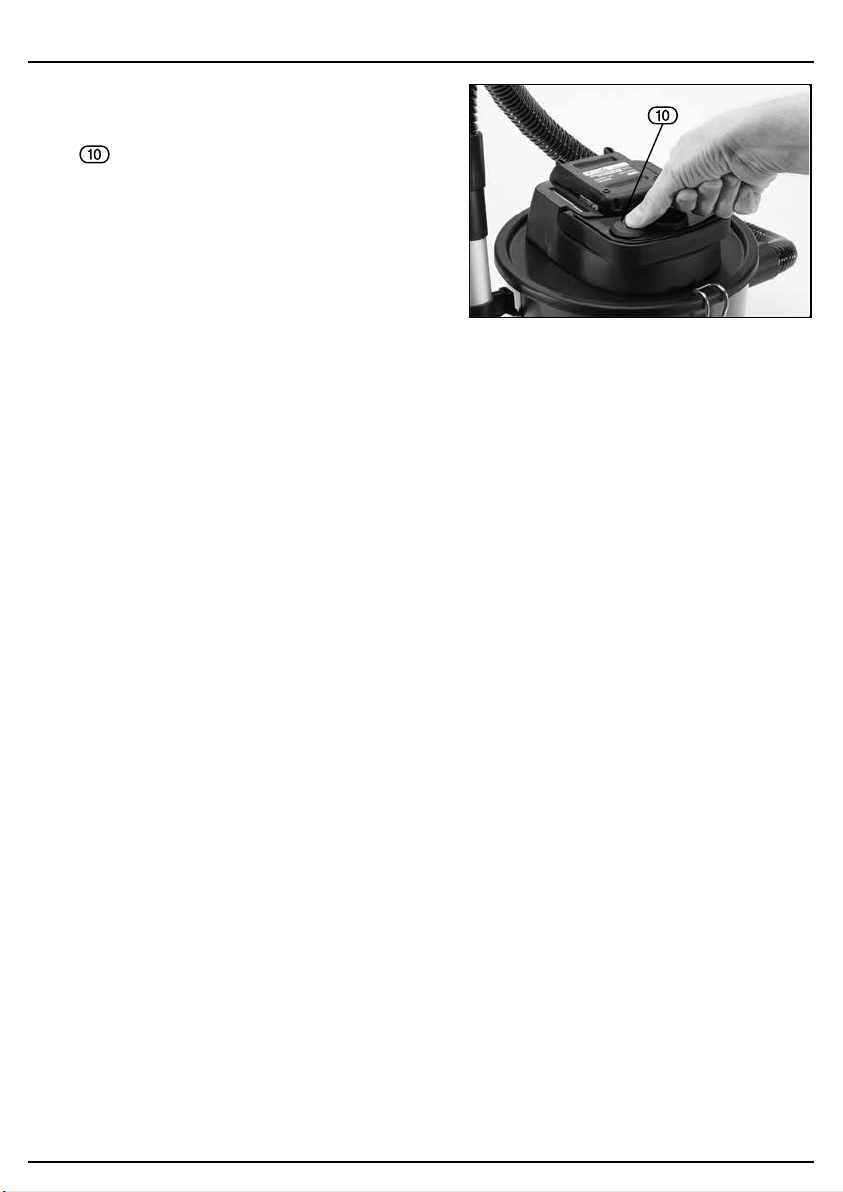
9.1 OPERATING THE ASH VACUUM –
FIG. 8
Switch the machine on by pressing the on/off
switch .
NOTE: Return the battery to the charger
immediately after use so that it will be ready and
fully charged for the next use. Ensure that the
product is fully inserted into the charger.
IMPORTANT: The ash can should be positioned
on a rm, level surface. Do not cover the ash
can and always position it with good all-round air
ventilation. The ash can must remain upright.
1. Switch on the ash can and use the suction
tube to collect the ash.
2. When moving the ash can:
• Always use the handle.
• Do not lift it by (or place a strain on) the hose
or cable.
• Always switch it off and disconnect it from the
20V battery.
CAUTION: Make sure that replaces and stoves
are cold before you attempt to vacuum them clean.
Wait until the ash has cooled down completely
before you begin to collect it.
• Take care not to collect material
which appears to have cooled down on the
outside but which may still be hot on the
inside. Hot ash particles may ignite again in
the air ow.
• Any ash which has a temperature exceeding
40°C may damage the ash can.
3. Do not attempt to quickly extinguish res in
replaces or stoves with water in order to
achieve cool ash. The construction material
in the replace or stove may not withstand
any sudden variations in temperature and
suffer permanent damage.
4. Continuously check the tube and ash can
for excess temperature during use. If you
notice a signicant temperature rise, switch
off immediately and disconnect the ash can
from the power supply. Let the ash can cool
down under supervision before emptying the
vacuumed material.
CAUTION: Excessive temperatures can lead to
damage to the suction hose and the ash can and
cause a risk of re.
FIG. 8
– 15 –
Page 16
10. MAINTENANCE
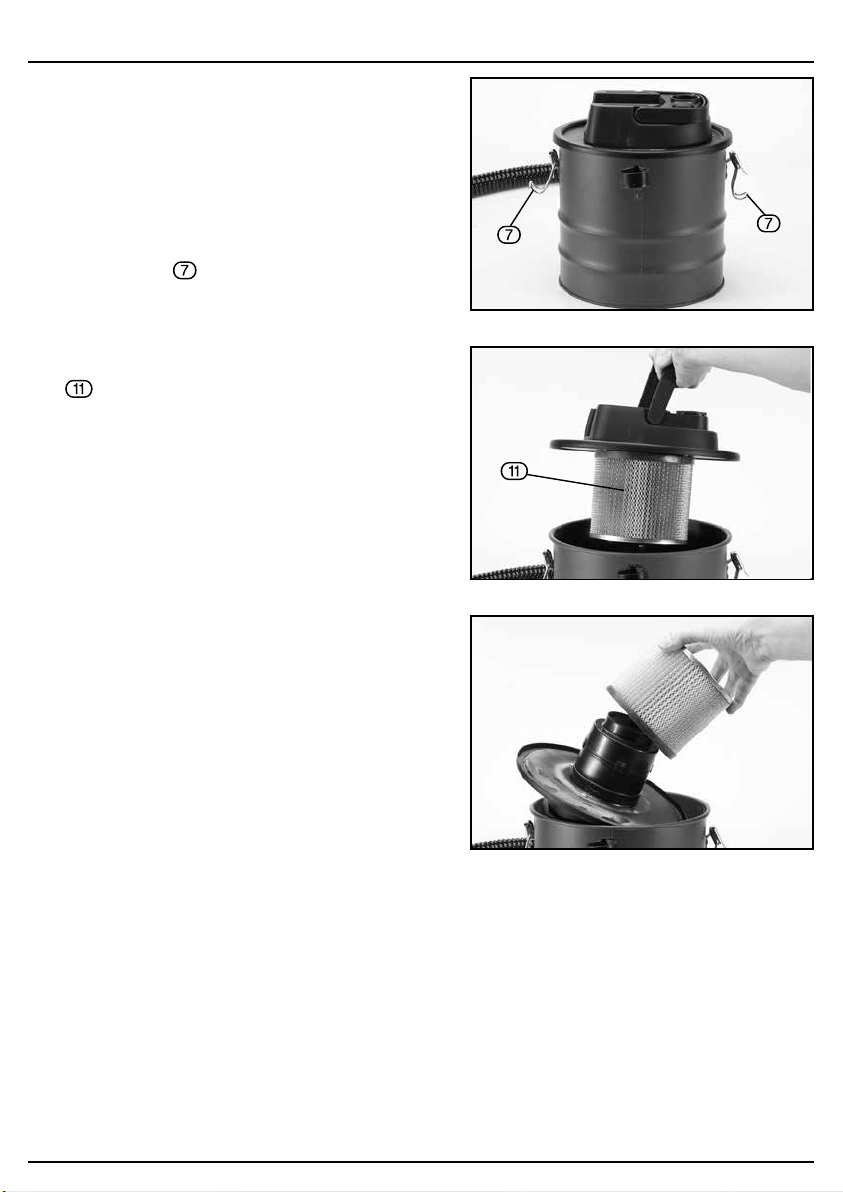
10.1 CLEANING AND MAINTENANCE –
FIGS. 9-11
NOTE: Regular inspection and cleaning reduces
the necessity for maintenance operations and will
keep your tools in good working condition.
The motor must be correctly ventilated during the
tools operation. For this reason avoid blocking the
air inlets.
Release the hook and remove the top cover
(FIG. 9).
Unscrew the buttery nut and remove the
lter (FIG. 10).
FIG. 9
(18)
(19)
FIG. 10
Empty the dust container (FIG. 11).
FIG. 11
– 16 –
Page 17
10. MAINTENANCE
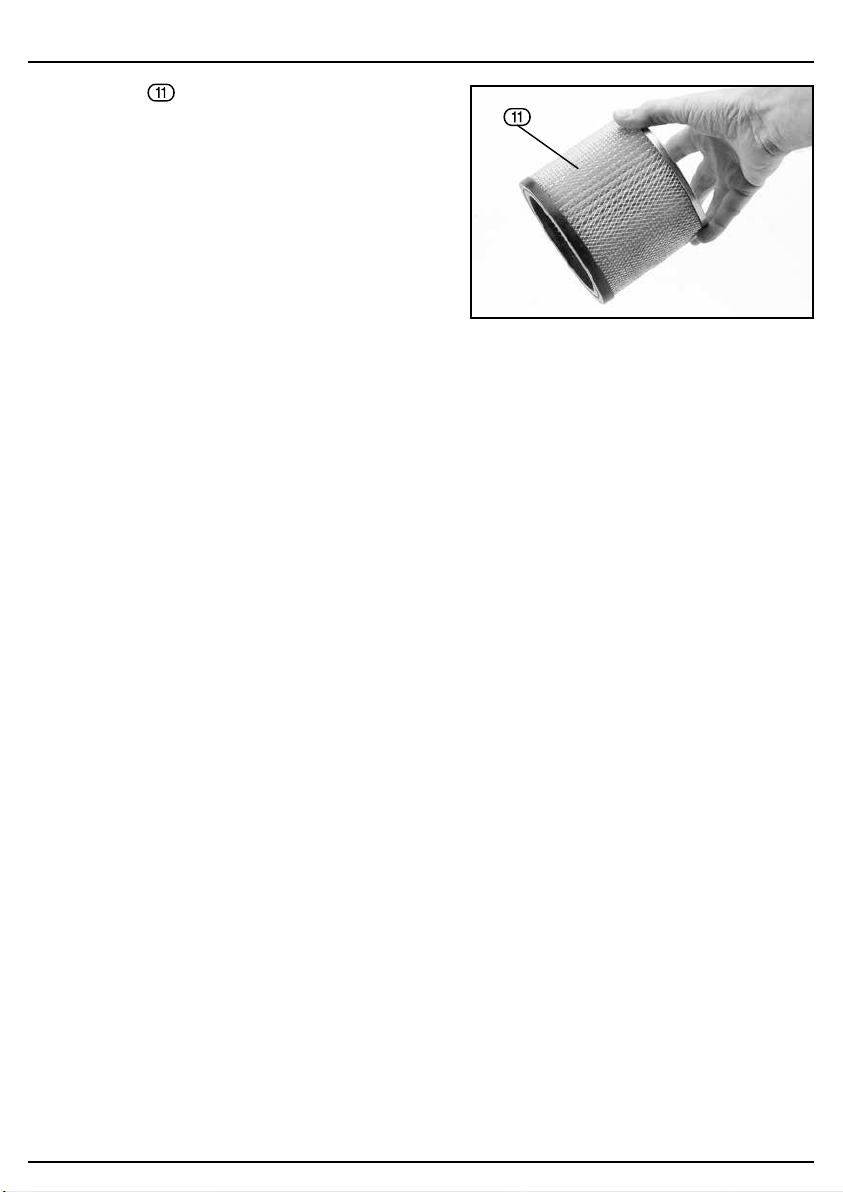
Clean the lter by shaking to dislodge and
dispose of any ash (FIG. 12).
Note: Replacement lters are available - see
drapertools.com.
Note: Do not leave the lter to dry in direct
sunlight.
FIG. 12
10.2 CARE AND STORAGE
1. When not in use, turn off using the switch on top of the ash can, then disconnect and
remove the 20V Li-ion battery.
2. Do not change lters, or carry out any cleaning or servicing, without rst disconnecting
the ash can from the power supply.
4. Keep the external surfaces clean. Avoid impact damage & do not allow the ash can to come
into contact with abrasive or corrosive materials.
5. Do not use solvents, thinners or alcohol to clean the ash can, as these chemicals will damage
the nish. With the ash can disconnected from the power supply, use a dry cloth to wipe over
the casing.
6. When not in use the ash can should be stored in a secure, dry place, out of the reach of
children. DO NOT leave it exposed to the elements and avoid direct sunlight, direct heat,
rain/moisture etc.
7. Only use parts and accessories recommended in this manual. The use of unauthorised
accessories or attachments is not permitted and may result in personal injury or damage
to the ash can.
8. Do not attempt to repair or modify the ash can. Do not attempt any electrical repair yourself.
Consult a qualied electrician.
10.3 BATTERY REMOVAL AND DISPOSAL
NOTE: This product uses Lithium lon rechargeable and recyclable batteries. When the batteries
no longer hold a charge, they should be removed fron the Vac and recycled. They must not be
incinerated or composted.
To remove the battery pack for disposal:
1. First, before attempting to disassemble the product, turn it on and leave it on until the
motor completely stops insuring a complete discharge of the batteries.
2. Using a phillips screwdriver, remove the seven screws securing the two housing halves.
3. Lift the housing cover away from the assembly.
4. Detach all lead connections from battery pack. Remove battery pack and dispose of as
per recommended guidelines.
– 17 –
Page 18

11. TROUBLESHOOTING
11.1 TROUBLESHOOTING GUIDE
Note: Repairs should only be carried out by a qualied person.
Problem Possible Cause Remedy
Motor does not start. No battery inserted.
No power from the battery.
Vacuum is not power on.
Battery pack is damaged.
Suction power is weak. Vacuum unit is clogged.
Dust lter is clogged.
Dust container not in position.
Insert the battery.
Battery needs to be charged.
Power on the vacuum.
Replace the battery pack
Remove the blockage.
Clean or change the lter.
Attach the dust container
again to the cleaner.
– 18 –
Page 19
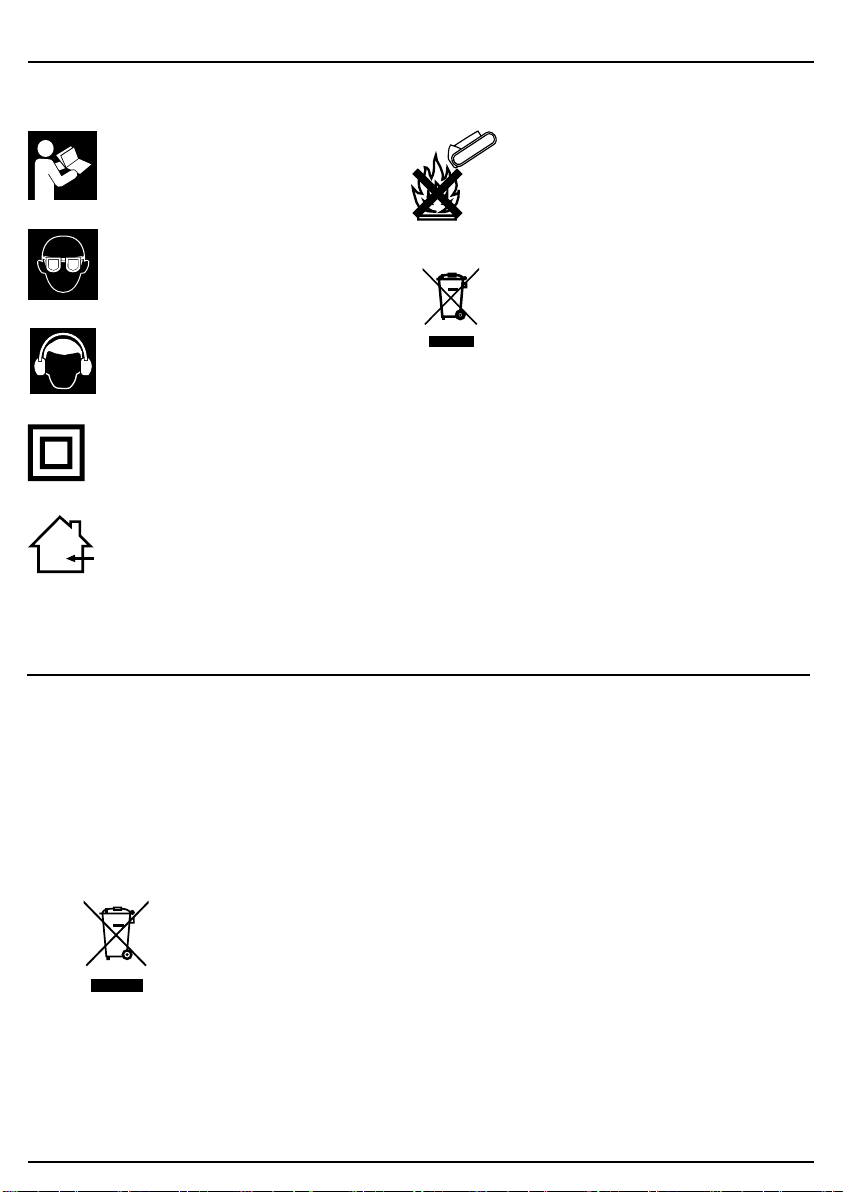
12. EXPLANATION OF SYMBOLS/PICTOGRAMS
12.1 EXPLANATION OF SYMBOLS
Read the instruction manual.
Wear safety glasses.
Wear ear defenders.
Class II construction
(Double insulated).
For indoor use only.
Do not expose to rain.
Do not incinerate or throw
onto re.
WEEE –
Waste Electrical & Electronic
Equipment.
Do not dispose of Waste Electrical
& Electronic Equipment in with
domestic rubbish.
13. DISPOSAL
13.1 DISPOSAL
– At the end of the machine’s working life, or when it can no longer be repaired, ensure that it is
disposed of according to national regulations.
– Contact your local authority for details of collection schemes in your area.
In all circumstances:
• Do not dispose of power tools with domestic waste.
• Do not incinerate.
• Do not dispose of WEEE* as unsorted municipal waste.
* Waste Electrical & Electronic Equipment.
– 19 –
Page 20

CONTACTS
Draper Tools Limited, Hursley Road,
Chandler’s Ford, Eastleigh, Hampshire. SO53 1YF. U.K.
Help line: (023) 8049 4344
Sales desk: (023) 8049 4333
Internet: drapertools.com
E-mail: [email protected]
General enquiries: (023) 8026 6355
Service/Warranty Repair Agent:
For aftersales servicing or warranty repairs, please contact the
Draper Tools help line for details of an agent in your local area.
YOUR DRAPER STOCKIST
TADH0620
©Published by Draper Tools Limited.
No part of this publication may be reproduced, stored in a retrieval system or transmitted in any form or by any means,
electronic, mechanical photocopying, recording or otherwise without prior permission in writing from Draper Tools Ltd.
 Loading...