

Page 1
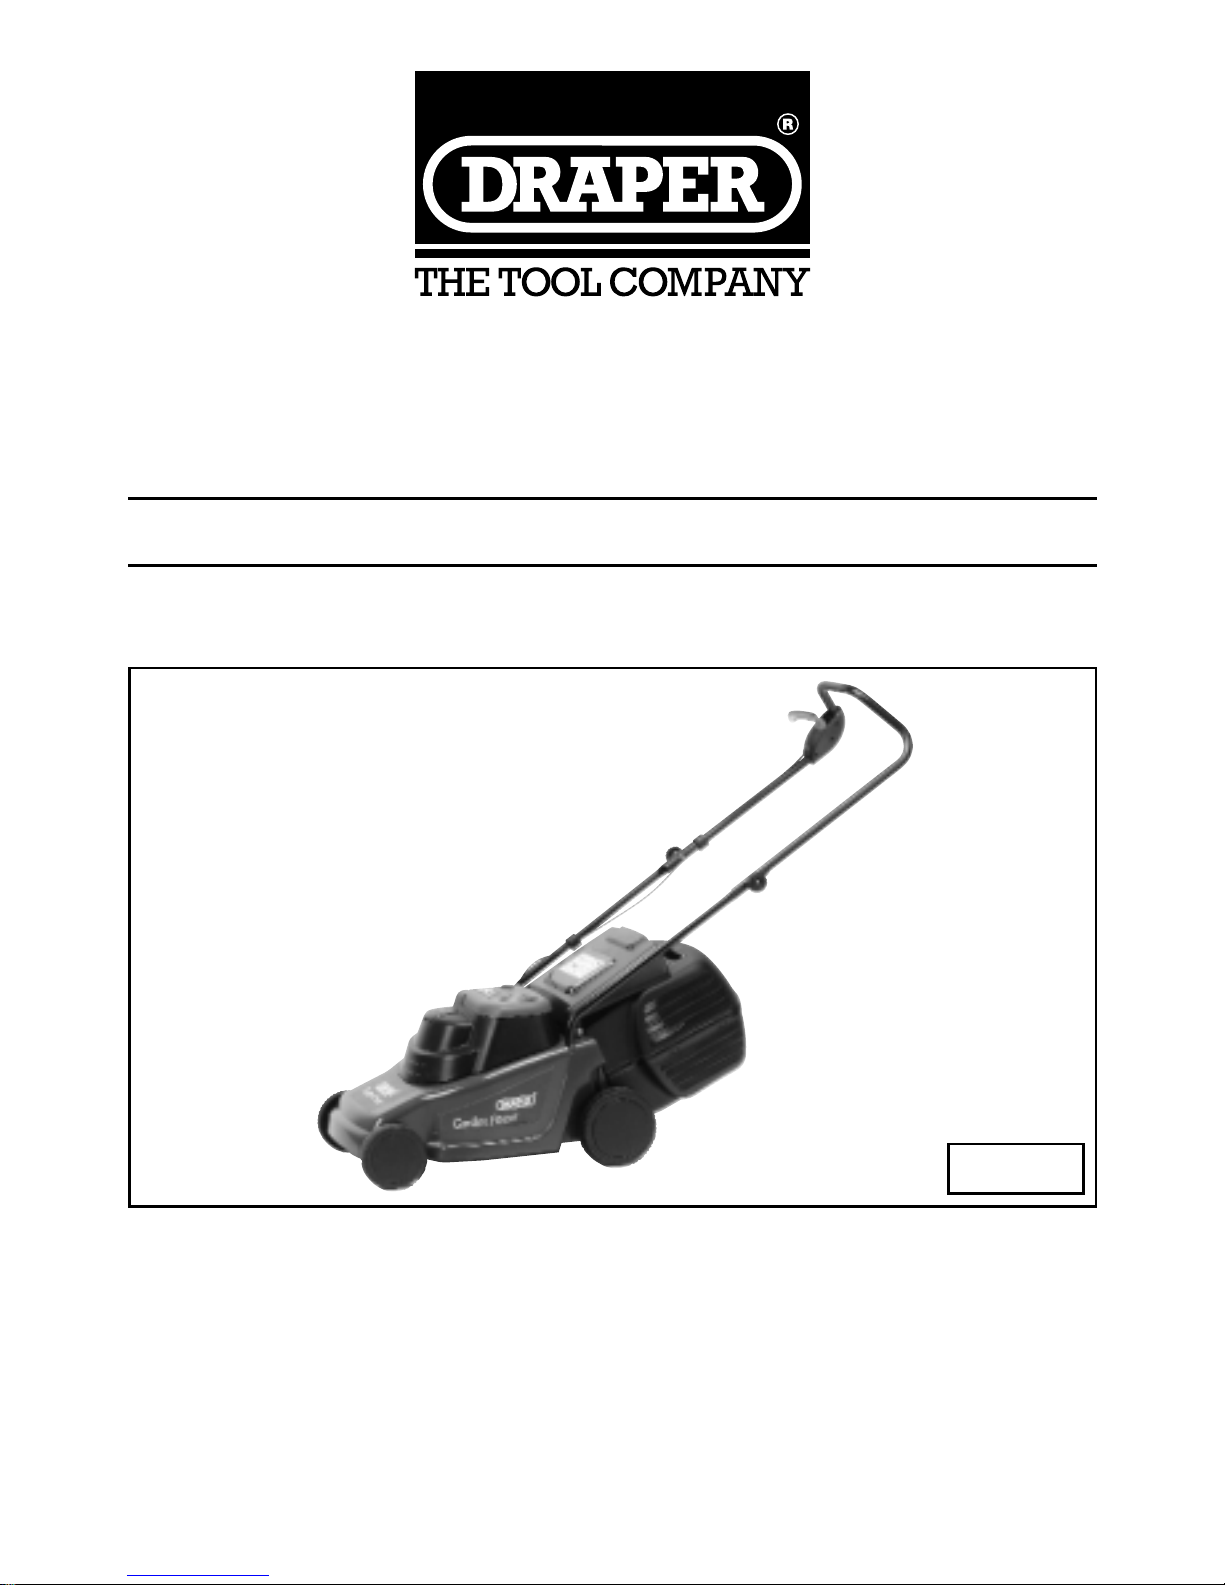
12 VOLT CORDLESS
ROTARY MOWER
■ STOCK No.64097 ■ PART No.LM12
• INSTRUCTIONS •
IMPORTANT: PLEASE READ THESE INSTRUCTIONS CAREFULLY TO ENSURE THE
SAFE AND EFFECTIVE USE OF THIS TOOL.
GENERAL INFORMATION
This manual has been compiled by Draper Tools and is an integrated part of the power tool equipment, which
should be kept with the machine.
This manual describes the purpose for which this tool has been designed and contains all the necessary
information to ensure its correct and safe use.We recommend that this manual is read before any operation of
the machine, before performing any kind of adjustment to the machine, and prior to any maintenance tasks. By
following all the general safety instructions contained in this manual, it will ensure both machine and operator
safety, together with longer life of the tool itself.
All photographs and drawings in this manual are supplied by Draper Tools to help illustrate the operation of the
machine.
Whilst every effort has been made to ensure accuracy of information contained in this manual, the Draper Tool
policy of continuous improvement determines the right to make modifications without prior warning.
12/2000
Page 2

12 VOLT CORDLESS
ROTARY MOWER
■ STOCK No.64097 ■ PART No.LM12
CONTENTS:
Page No.
Contents/Declaration of Conformity ................................................................1
Specification/Guarantee...................................................................................2
Power Supply ...................................................................................................3
General Safety Instructions ..............................................................................4
Additional Safety Rules for Rotary Mowers.......................................................5
Unpacking and Checking Contents..................................................................6
Assembly Instruction........................................................................................7
Adjustments and Operations ............................................................................8
Charging the Battery........................................................................................9
Changing the Blade........................................................................................10
Maintenance and Trouble Shooting ................................................................11
Optional Accessories .....................................................................................12
We
Draper Tools Ltd. Hursley Road, Chandler’s Ford, Eastleigh, Hampshire.
SO53 1YF. England.
Declare under our sole responsibility that the product:
Stock Nos:- 64097.
Part Nos:- LM12.
Description:- Cordless Lawn Mower.
To which this declaration relates is in conformity with the following directive(s)
98/37/EC, 89/336/EEC, 73/23/EEC & 84/538/EEC.
JOHN DRAPER
Managing Director 09/02/2000
DECLARATION OF CONFORMITY
- 1 -
Page 3

- 2 -
The Draper Tools policy of continuous improvement determines the right to change specification
without notice.
Stock No...................................................................................................................64097
Part No. ....................................................................................................................LM12
Voltage ..............................................................................................................12V/17Ah
Charge Time (approx.) ......................................................................................24-30Hrs
Induction Motor......................................................................................................1200W
Cutting Capacity ................................................................................................380mmØ
Cutting Heights ................................................................................3(25-60mm approx.)
RPM ..........................................................................................................................3715
Grass Box Capacity ..................................................................................................30Ltr.
Advised Maximum Cutting Area* ............................................................450m
2
(approx.)
Noise Power Level ................................................................................................96dB(A)
Noise Pressure Level ............................................................................................90dB(A)
Vibration Level......................................................................................................2.5m/s
2
Nett Weight ..............................................................................................................22kg
(*from a fully charged battery pack)
SPECIFICATION
GUARANTEE
Draper tools have been carefully tested and inspected before shipment and are guaranteed to be
free from defective materials and workmanship for a period of 12 months from the date of purchase
except where the tools are hired out when the guarantee period is ninety days from the date of
purchase.
Should the tool develop any fault, please return the complete tool to your nearest authorised
warranty repair agent or contact Draper Tools Limited, Chandler’s Ford, Eastleigh, Hampshire,
SO53 1YF England.
Telephone: (023) 8026 6355.
If upon inspection it is found that the fault occurring is due to defective materials or workmanship,
repairs will be carried out free of charge.This guarantee does not apply to normal wear and tear,
nor does it cover any damage caused by misuse, careless or unsafe handling, alterations, accidents,
or repairs attempted or made by personnel other than the authorized Draper warranty repair agent.
This guarantee applies in lieu of any other guarantee expressed or implied and variations of its
terms are not authorised.
Your Draper guarantee is not effective unless you can produce upon request a dated receipt or
invoice to verify your proof of purchase within the 12 month period.
Please note that this guarantee is an additional benefit and does not affect your statutory rights.
Draper Tools Limited.
Page 4

- 3 -
POWER SUPPLY
The lead-acid battery in this lawn mower has a normal life of many years.When the battery
expires, it should be removed from the lawn mower for recycling
Please contact your local solid waste authority for recycling information.
WARNING
BATTERY MUST BE CHARGED FOR 24-30 HOURS PRIOR TO FIRST USE.
CAUTION:
This lawn mower has a sealed lead acid battery that should be kept at full charge. Recharge when
first received, immediately after each use, and every three months if not used. Immediately charge
when the unit has been incorrectly overdischarged. Do not operate the unit while charging. Failure
to do this may cause the battery life to be reduced greatly.
Page 5

- 4 -
GENERAL SAFETY INSTRUCTIONS
FOR POWER TOOLS
1. KNOW YOUR POWER TOOL
Read and understand the owner's manual and labels
affixed to the tool. Learn its application and limitations as
well as the specific potential hazards peculiar to this tool.
2. KEEP WORK AREA CLEAN
Cluttered areas and benches invite accidents. Floors must
not be slippery due to oil or sawdust.
3. AVOID DANGEROUS ENVIRONMENTS
Do not use power tools in damp or wet locations, or
expose them to rain. Keep work area well lit. Provide
adequate space surrounding the work area. Do not use in
environments with a potentially explosive atmosphere.
4. KEEP CHILDREN AWAY
All visitors should be kept a safe distance from work area.
5. STORED TOOLS
When not being used, all tools should be stored in a dry,
locked cupboard or out of the reach of children.
6. WEAR PROPER CLOTHING
Do not wear loose clothing,neckties or jewellery (rings,
wristwatches) to catch in moving parts. NONSLIP footwear
is recommended.Wear protective hair covering to contain
long hair.Roll long sleeves above the elbow.
7. USE SAFETY GOGGLES (Head Protection)
Wear CE approved safety goggles at all times.Normal
spectacles only have impact resistant lenses, they are
NOT safety glasses. Also, use face or dust mask if
application is dusty and ear protectors (plugs or muffs)
during extended periods of operation.
8. NOISE LEVELS
Some types of machines may have high noise levels when
working. In such cases ear protection must be worn.
9. VIBRATION LEVELS
Hand held power tools produce different vibration levels.
You should always refer to the specifications and relevant
Health and Safety guide.
10. DUST EXTRACTION
If your tool is fitted with a dust extraction fitting, always
ensure that it is connected and being used with a dust
extractor. Vacuum cleaners can be used if suitable for the
material being extracted.
11. PROTECT YOURSELF FROM ELECTRIC SHOCK
When working with power tools, avoid contact with any
earthed items (e.g. pipes, radiators,hobs and
refrigerators,etc.). If you are using a power tool in
extreme conditions (e.g. high humidity or generating
metal dust), always use an RCD (residual current device)
at the power socket.
12. STAY ALERT
Always watch what you are doing and use common sense.
Do not operate a power tool when you are tired or under
the influence of alcohol or drugs.
13. WHEN WORKING OUT OF DOORS
Only use extension leads designed for that purpose.
14. ACCESS TO MAINS SOCKET
If a stationary machine is fitted with a moulded plug and
cable, the machine should not be positioned so that
access to the mains socket is restricted.
15. DISCONNECT POWER TO THE TOOL
When not in use, before servicing and when changing
accessories such as cutters, etc.
16. AVOID ACCIDENTAL STARTING
Make sure the switch is in the OFF position before
plugging the machine into the power supply.
17. NEVER LEAVE MACHINE RUNNING UNATTENDED
Turn power off. Do not leave machine until it comes to a
complete stop.
18. DO NOT ABUSE THE CORD
Never carry the tool by the power cable or pull it from
the socket. Keep the power cable away from heat, oil and
sharp edges.
19. NEVER STAND ON TOOL
Serious injury could occur if the tool is tipped or if the
cutting tool is accidentally contacted. Do not store
materials above or near the tool, so that it is necessary to
stand on the tool to reach them.
20. CHECK DAMAGED PARTS
Check for damage to parts, breakage of parts, mountings
and any other conditions that may affect its operation.
A guard or other part that is damaged should be properly
repaired or replaced.
21. KEEP GUARDS IN PLACE
And in working order.
22. MAINTAIN TOOLS WITH CARE
Keep tools sharp and clean for the best and safest
performance. Follow instructions for lubricating and
changing accessories. All extension cables must be
checked at regular intervals and replaced if damaged.
Always keep the hand grips on the tool clean,dry and
free of oil and grease.
23. USE RECOMMENDED ACCESSORIES
Consult the owners manual for recommended
accessories. Follow the instructions that accompany the
accessories. The use of improper accessories may cause
hazards.
24. REMOVE ADJUSTING KEYS AND WRENCHES
Form a habit of checking to see that keys and adjusting
wrenches are removed from the tool before turning it on.
25. SECURE WORK
Use clamps or a vice to hold work.This frees both hands
to operate the tool.
26. DO NOT OVERREACH
Keep proper footing and balance at all times.
27. USE RIGHT TOOL
Do not force the tool or attachment to do a job for which it
was not designed.
28. DO NOT FORCE TOOL
It will do the job better and safer at the rate for which it
was designed.
29. DIRECTION OF FEED
Feed work into a blade or cutter against the direction of
rotation of the blade or cutter only.
30. WHEN DRILLING OR SCREWING INTO WALLS
Always make sure there is no danger of hitting any hidden
power cables, water or gas pipes in the wall.
WARNING
Please read the following instructions carefully, failure to do so could lead to serious personal injury.
IMPORTANT
Draper Tools Limited recommends that this machine should not be modified or used for any application other
than that for which it was designed. If you are unsure of its relative applications do not hesitate to contact us in
writing and we will advise you.
IMPORTANT NOTE
Residual Risk. Although the safety instructions and operating manuals for our tools contain extensive
instructions on safe working with power tools, every power tool involves a certain residual risk which can not be
completely excluded by safety mechanisms. Power tools must therefore always be operated with caution !
Page 6

- 5 -
ADDITIONAL SAFETY RULES FOR
ROTARY MOWERS
1. Always disconnect your mower from the power
supply before cleaning, inspecting or adjusting
any part of it, or if the supply cable has become
damaged or entangled.
2. To protect your feet, always wear stout shoes or
boots. Freshly cut grass is damp and slippery. Do
not mow barefoot or in open sandals.
3. Always check that your lawn or cutting path is
clear of all sticks, stones, wire or other debris.
Contact with such debris may damage your
mower and could be thrown by the blade.
4. Wear long trousers to protect your legs from any
debris left on the lawn or cutting path that may
be thrown by the blade.
5. Do not use your mower in the rain and do not
allow it to get wet. Avoid using the mower in wet
grass if possible.
6. Before using your mower visually inspect the
blade and rotating parts for damage.
7. Keep children, animals and other adults at least
6m (20 ft) away from the cutting area.
8. Start your mower carefully with feet well away
from the blades.
9. When the motor is running the safety distance,
given by the handle, must always be maintained.
10. Do not leave your mower unattended whilst it is
connected to the power supply.
11. Never allow people unfamiliar with these
instructions to use the mower.
12. Keep in mind that the operator or user is
responsible for accidents or hazards occurring
to other people or their property.
13. This mower is fitted with a blade brake which
stops the blade from rotating within three
seconds once the switch box lever is released.
Under no circumstances should you attempt to
turn your mower over on to its side whilst the
motor is still running, or attempt to stop the
blade, always allow it to stop on its own.
14. If the blade strikes an object, release the switch
lever at once, disconnect your mower from the
power supply and when the blade is stationary,
turn your mower on to its side and examine the
blade and nut for damage. Repair or replace any
damaged parts before restarting and operating
the mower.
15. Always disconnect your mower from the power
supply before lifting or carrying.
16. Stop the blade if the mower has to be tilted up
for transportation when crossing surfaces other
than grass.
17. Do not tilt the mower when starting the motor.
(The only exception is when the mower will not
start due to long grass, in which case do not tilt it
more than absolutely necessary and lift only the
part which is away from the operator).
18. Do not pull your mower towards you or walk
backwards when mowing.
19. Walk, never run.
20. Always mow across the face of slopes, never up
and down. Exercise extreme caution when
changing direction on slopes. Do not mow
excessively steep slopes and always wear nonslip footwear.
21. Mow only in daylight.
22. Never use the mower without the grass box in
place.
23. Switch the motor off and wait until the blade
comes to a complete stop before removing the
grass box.
24. Switch the motor off and disconnect from the
power supply, wait until the blade comes to a
complete stop before unclogging the chute.
25. Switch the motor off and disconnect the power
supply, wait until the blade comes to a complete
stop before making a wheel height adjustment.
26. Do not put hands or feet near or under rotating
parts. Keep clear of the discharge opening at all
times.
27. If the mower should start to vibrate abnormally
switch the motor off, wait until the blade comes
to a complete stop, disconnect the power supply
and check immediately for the cause.Vibration
is generally a warning of trouble.
28. The cutting edges of the mower blade are sharp
and can lacerate (cut) skin tissue. Care should
be taken when doing any repair work on or
around the mower blade.To prevent injury, it is
recommended that gloves are worn or the
cutting edge of the blade be wrapped with
newspaper or any other suitable material.
29. Do not use solvent or cleaning fluids to clean
your mower. Use a blunt scraper to remove grass
and dirt. Always disconnect from the power
supply before cleaning.
Page 7
- 6 -
OPERATION & USE
✛✌
✖✌
✘✌
✗✌
✙✌
✚✌
✜✌
✢✌
✕✌
WARNING
For your own safety, do not connect the fuse key to the power supply until all the assembly steps are
completed and you have read and understood the safety and operational instructions.
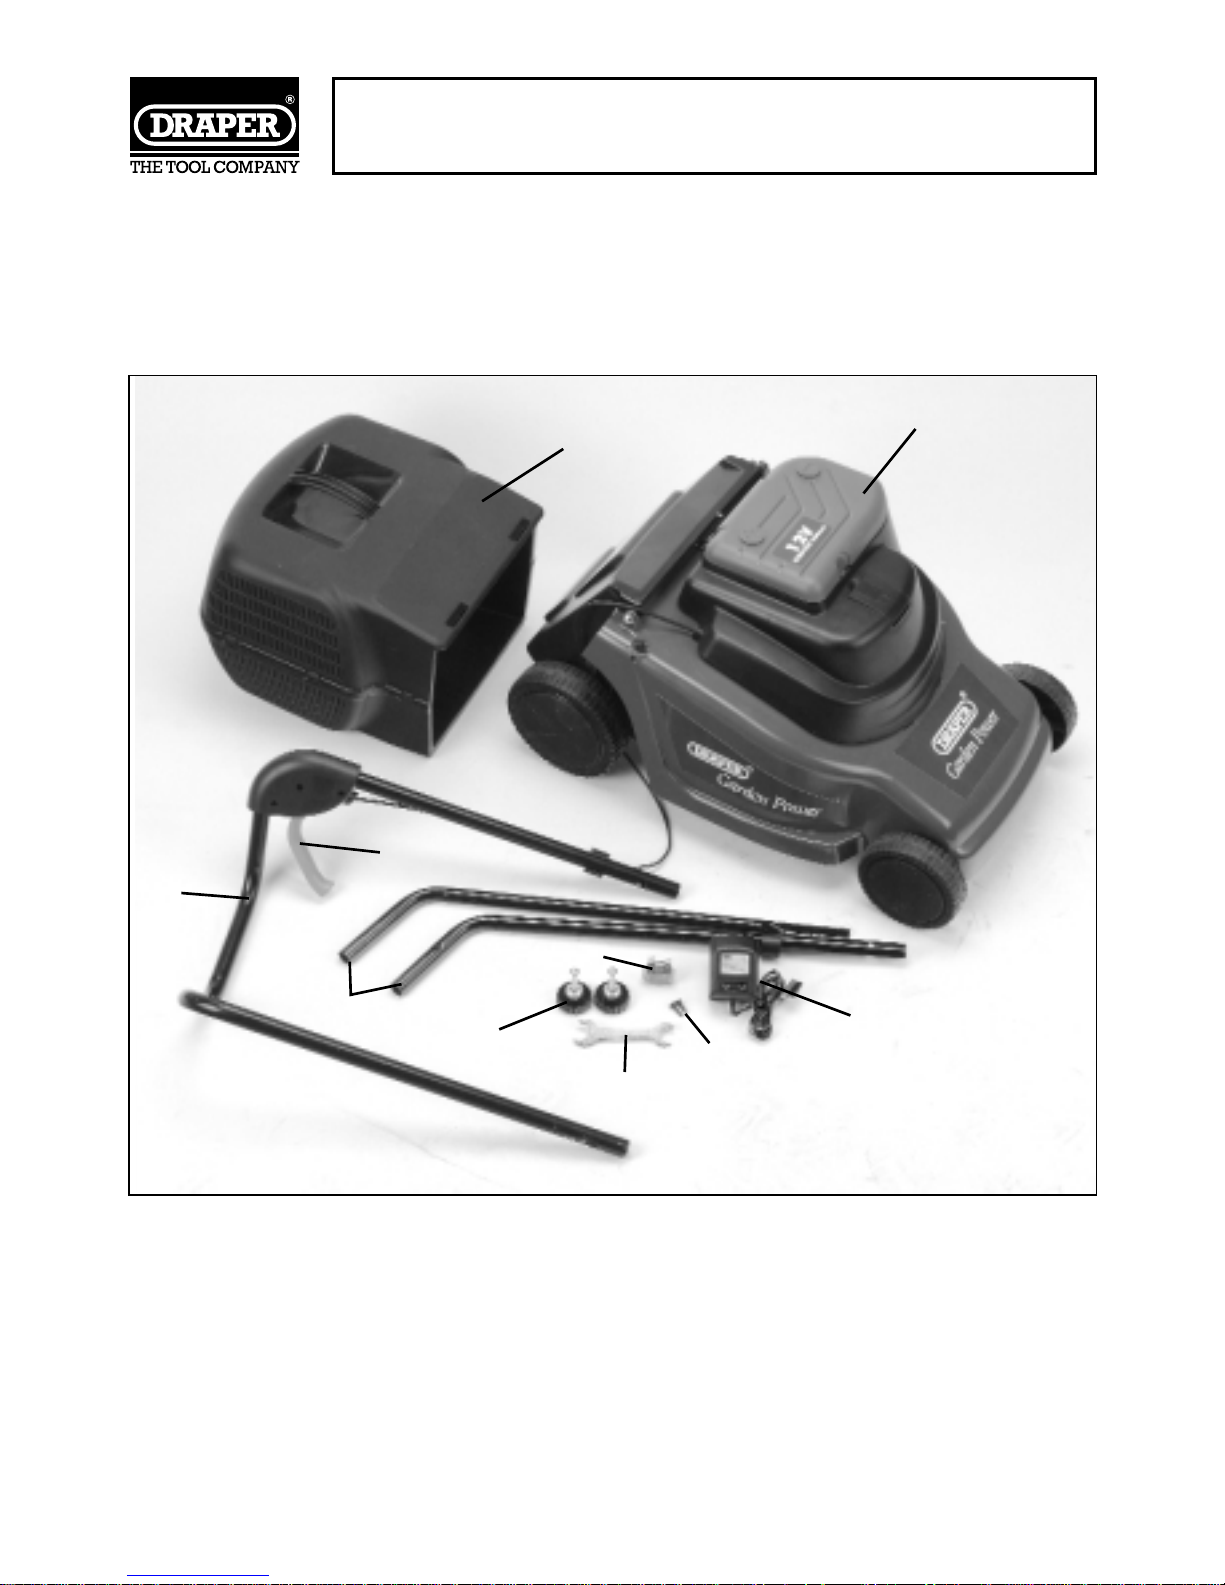
Carefully unpack the mower and all the loose items from the carton.( Fig.1). Referring to Fig.1.
check that all the parts are present.
1. Mower (1)
2. Top handle (1)
3. Switch (1)
4. Bolts and knobs (2)
5. Lower handles (2)
6. Handle screws (2)
7. Grass box (1)
8. Fuse Key (1)
9. 3 Pin Adapter Charger (1)
10.Blade Spanner (1)
If any parts are missing or damaged please contact the stockist where your purchase was made or
call the Draper Helpline on (023) 8049 4344.
Fig.1
✕✔✌
Page 8
- 7 -
ASSEMBLY INSTRUCTIONS
Assembly of the mower
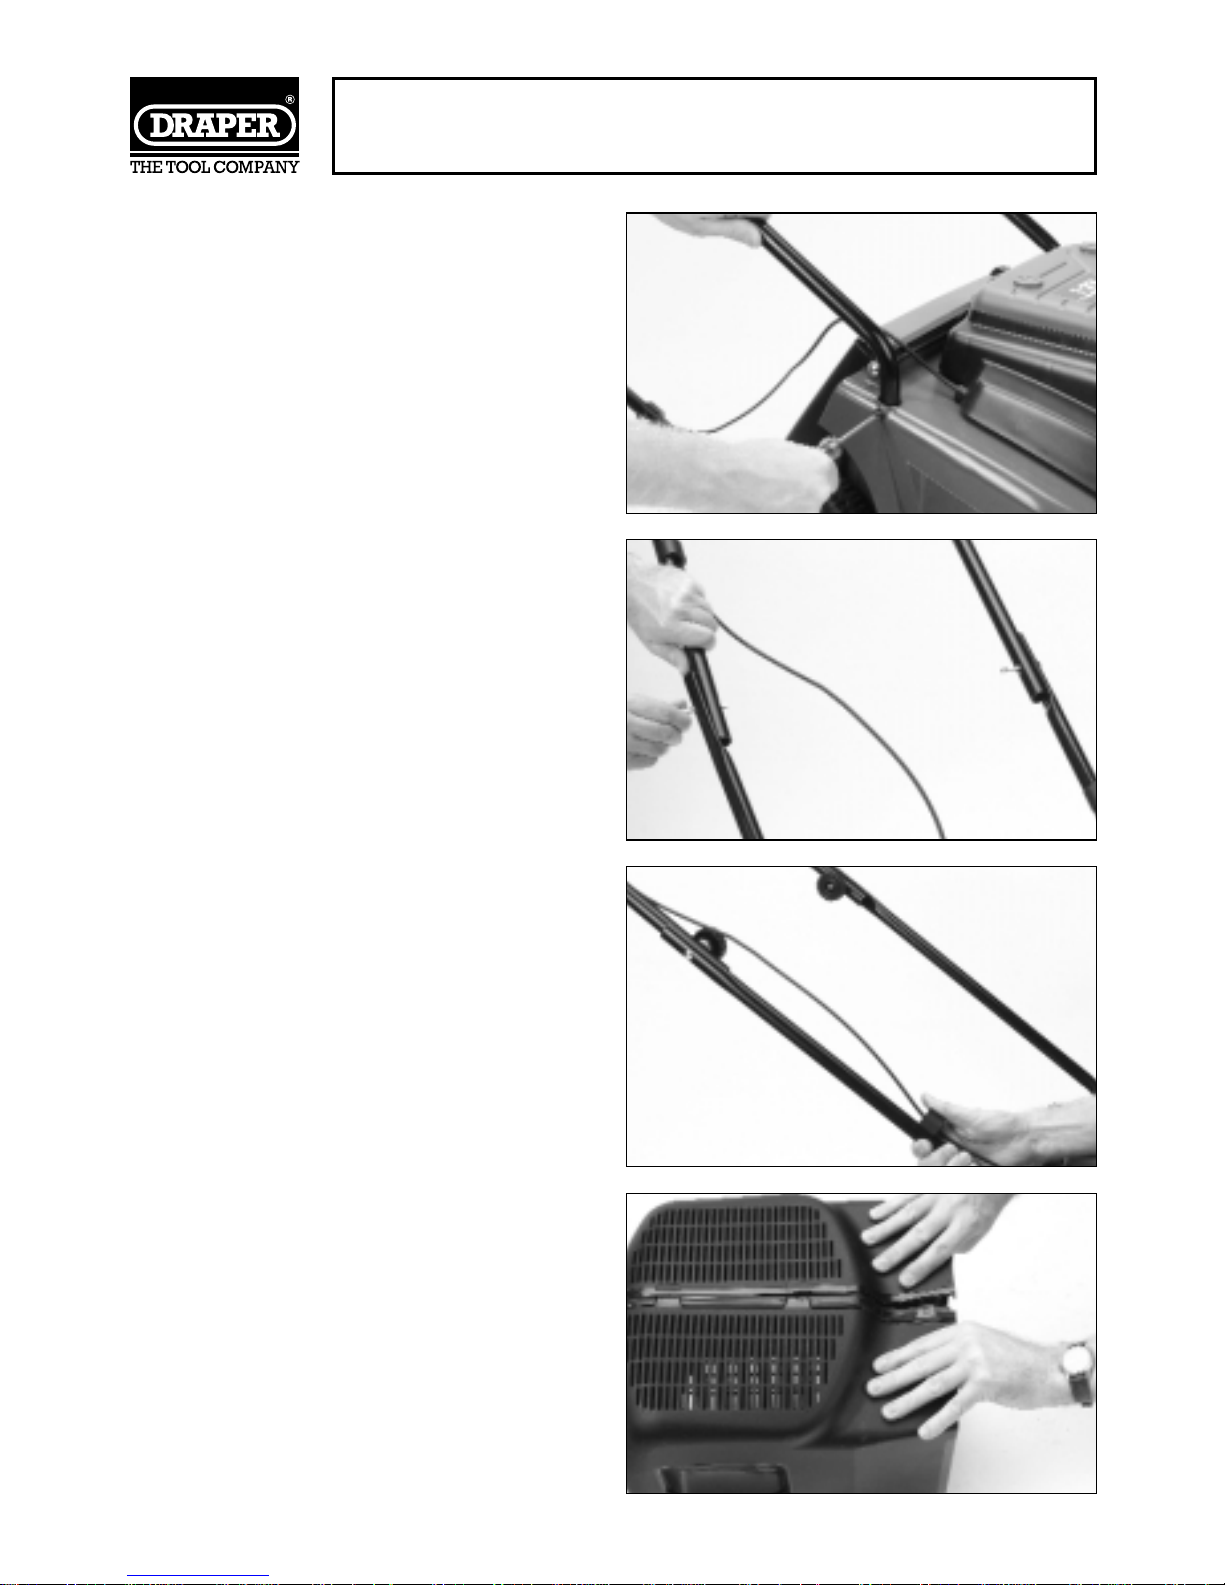
1. Locate from the loose parts the two lower
handle parts and the two handle screws.
Insert the short end of each handle into the
sockets at the rear of the mower deck so the
concave side of the handle is innermost.
Once the handles are positioned locate the
holes in the side of the deck that are in line
with the socket and make sure the
corresponding hole in the handle lines up.
Screw in the self tapping handle screws but
do not over tighten as this will damage the
plastic.(Fig.1).
2. Locate from the loose parts the two bolts,
caps, knobs and top handle. Push one of the
bolts through the top handle on the right
hand side (same side as the switch) from the
inside so the square under the bolt head
engages with the square in the handle. Put
the second bolt into the left hand side of the
handle from the inside so the bolt only just
protrudes through the handle (Fig.2). Make
sure the motor lead is inside the handles
and feed the first bolt through the right
lower handle and then push the other bolt
through the other lower left handle. Fit both
caps onto the bolts so the hollow side faces
outwards and then secure with the two
knobs.
3. Use the cable clips supplied to clip the
motor lead to the handles (Fig3).
Assembly of the grass box
1. Offer the two halves of the grass box
together. Clip the two halves together
ensuring that all the tongues locate into
their corresponding grooves and all the
clips are secure (Fig.4).
2. Carefully fold the two flaps under the top
handle together making sure the fingers
knit together. Do the same for the flaps
under the lower handle.
Fig.1
Fig.2
Fig.3
Fig.4
Page 9
- 8 -
ADJUSTMENTS & OPERATION
Wheel height adjustment
Warning
Before adjusting wheel assembly, ensure that
your mower is disconnected from the mains.
Each of the two axle wheels has its own means
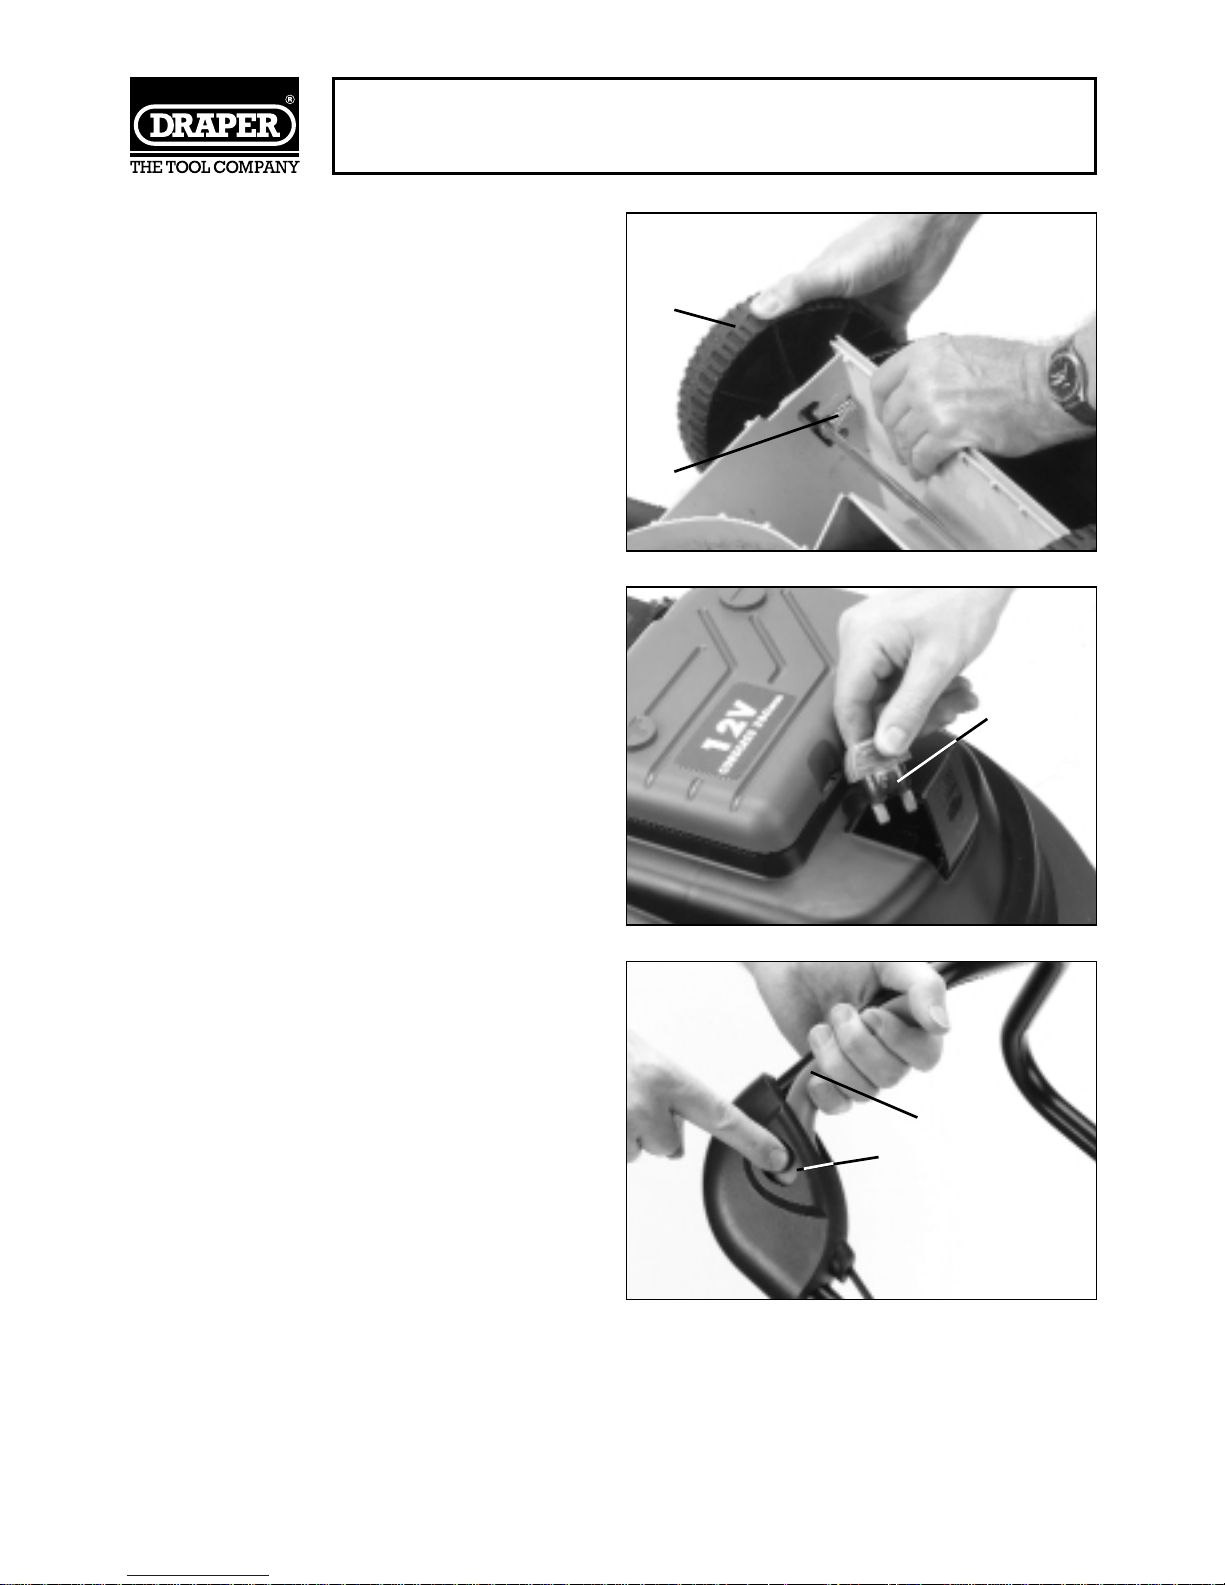
of height adjustment, which gives three cutting
height positions.
To select a cutting height, move the wheel ✪✌
into the slot required using the spring system
✫✌.(Fig.5)
Adjust the other three wheels in the same way.
To ensure an even cut, please make sure that all
four wheels are set to the same position,
however in some situations having the front
wheels one notch lower than the rear wheels
may produce a better result.
Operation
1. Adjust the wheel height if required.
2. Fit the grass box.
3. Connect the mower Fuse Key ✬✌(Fig.6).
4. The mower is equipped with an electrical
safety switch to protect against accidental
starting and a motor brake to stop the motor
in less than three seconds once the switch is
off.
5. To start the mower depress the safety lockoff button ✭✌on the switch box, and whilst
still depressed pull the switch lever
✮✌(Fig.7).The mower will start.
To stop the mower release the lever.The
brake will operate and the mower will stop
in less than three seconds.
Fig.5
Fig.6
Fig.7
✪✌
✫✌
✬✌
✭✌
✮✌
Page 10
- 9 -
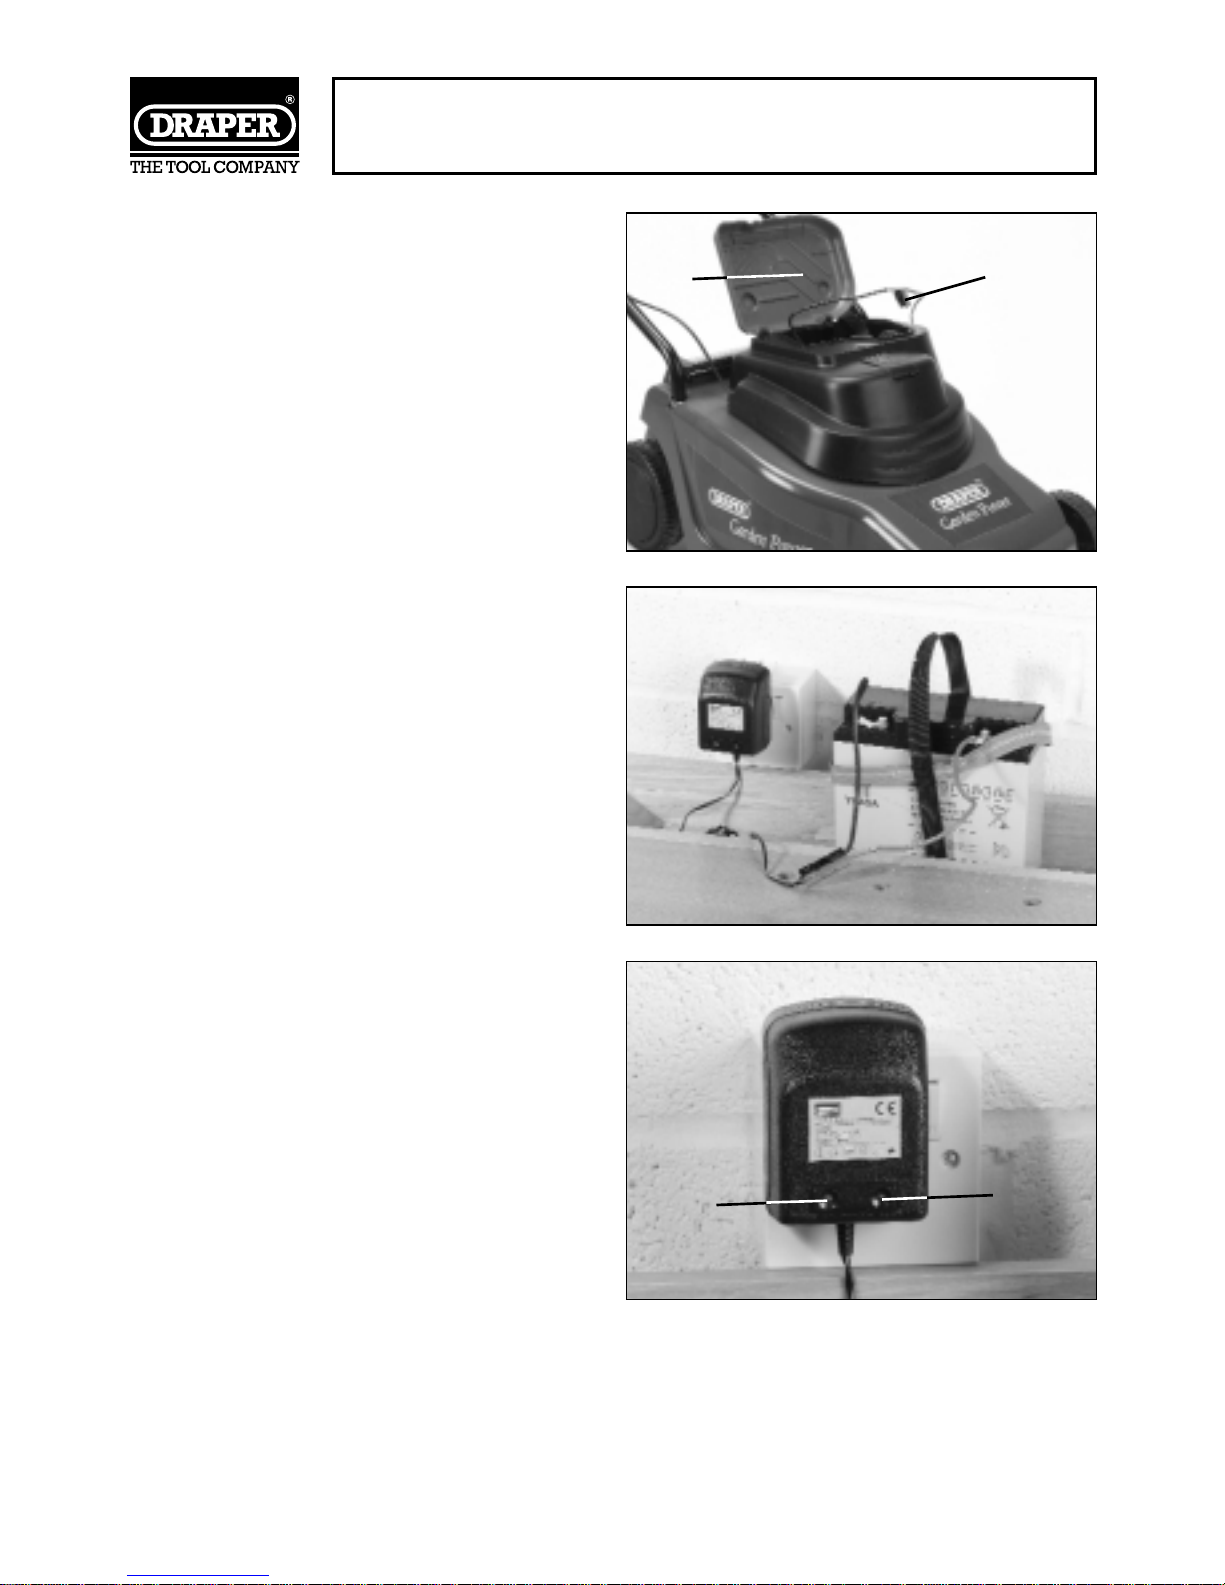
CHARGING THE BATTERY
Disconnecting Battery
Note: Before any operation is carried out
remove the fuse key (see page 8).
Open the battery cover ✮✌ and disconnect the
red and black plug ✯✌. The battery removal for
charging is optional. To remove the battery use
the strap provided, lift the battery out of the
mower. It is secured with 2 tabs of hook and
loop on the base. Plug in the adaptor charger,
connect the red and black plug, red to red and
black to black, then switch power on.
When the battery is charging the indicator
lights will denote what the state of charge is.
(Fig.10)
Red light ✰✌ illuminated, the battery is
charging.
Green light ✱✌illuminated the battery is fully
charged.
Fig.8
Fig.9
Fig.10
✮✌
✯✌
✰✌
✱✌
Page 11
- 10 -
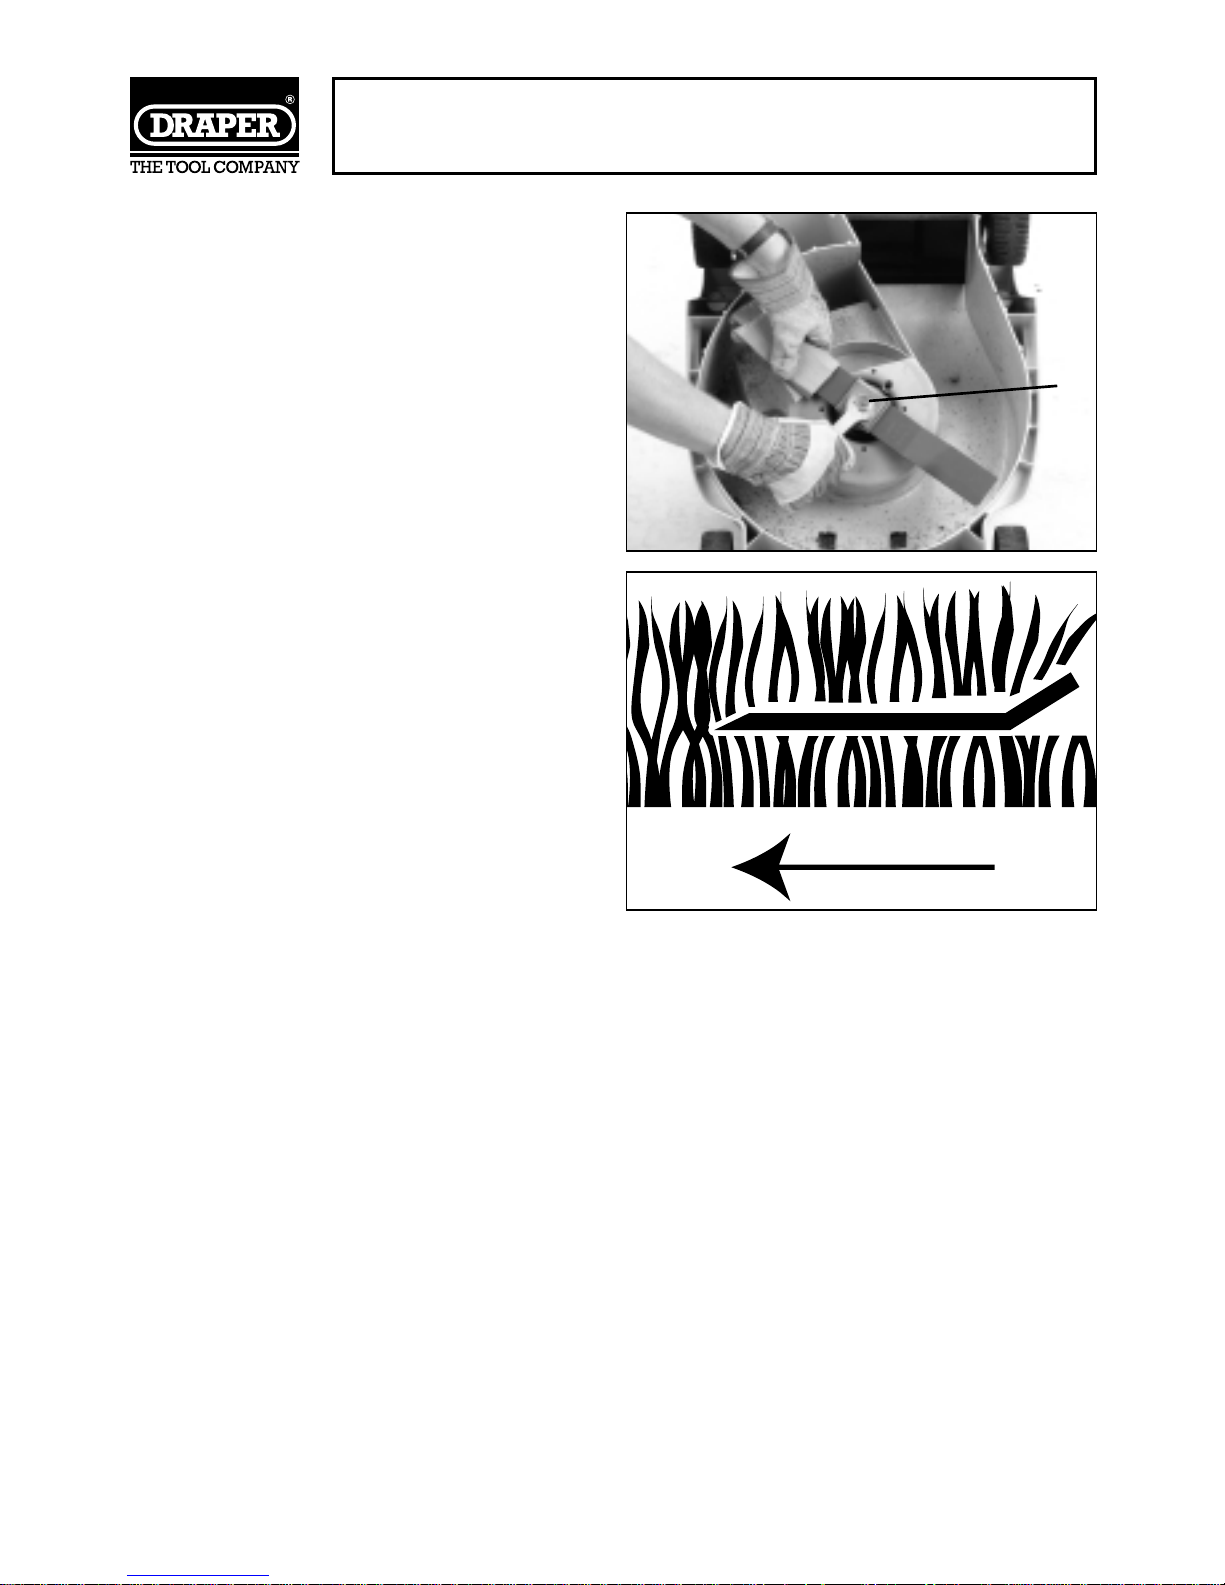
CHANGING THE BLADE
With the fuse key removed, the battery
disconnected and removed (page 8-9), turn the
lawn mower upside down (Fig.11).
Using some newspaper or rag, wrap the blade,
covering the sharp edges. Grip the blade with
a gloved hand and using the wrench supplied
undo the centre nut ✲✌ in an anticlockwise
direction, remove the nut and two locating
plates, then the blade. To replace the blade
follow these instructions in reverse making sure
the wing on the back of the blade is angled
upwards when fitted on the mower (and the
mower on it’s wheels)(Fig.12).
Fig.11
Fig.12
✲✌
Page 12
- 11 -
MAINTENANCE AND TROUBLE
SHOOTING
Maintenance
Inspect the mower before each use for damage or loose parts.
Clean the mower after each use and make sure the blade is still sharp. If the blade is blunt have
it sharpened before the next time the mower is used.
Protect the blade against rusting by covering it with oil or a rust inhibitor when the mower is
stored for the winter.
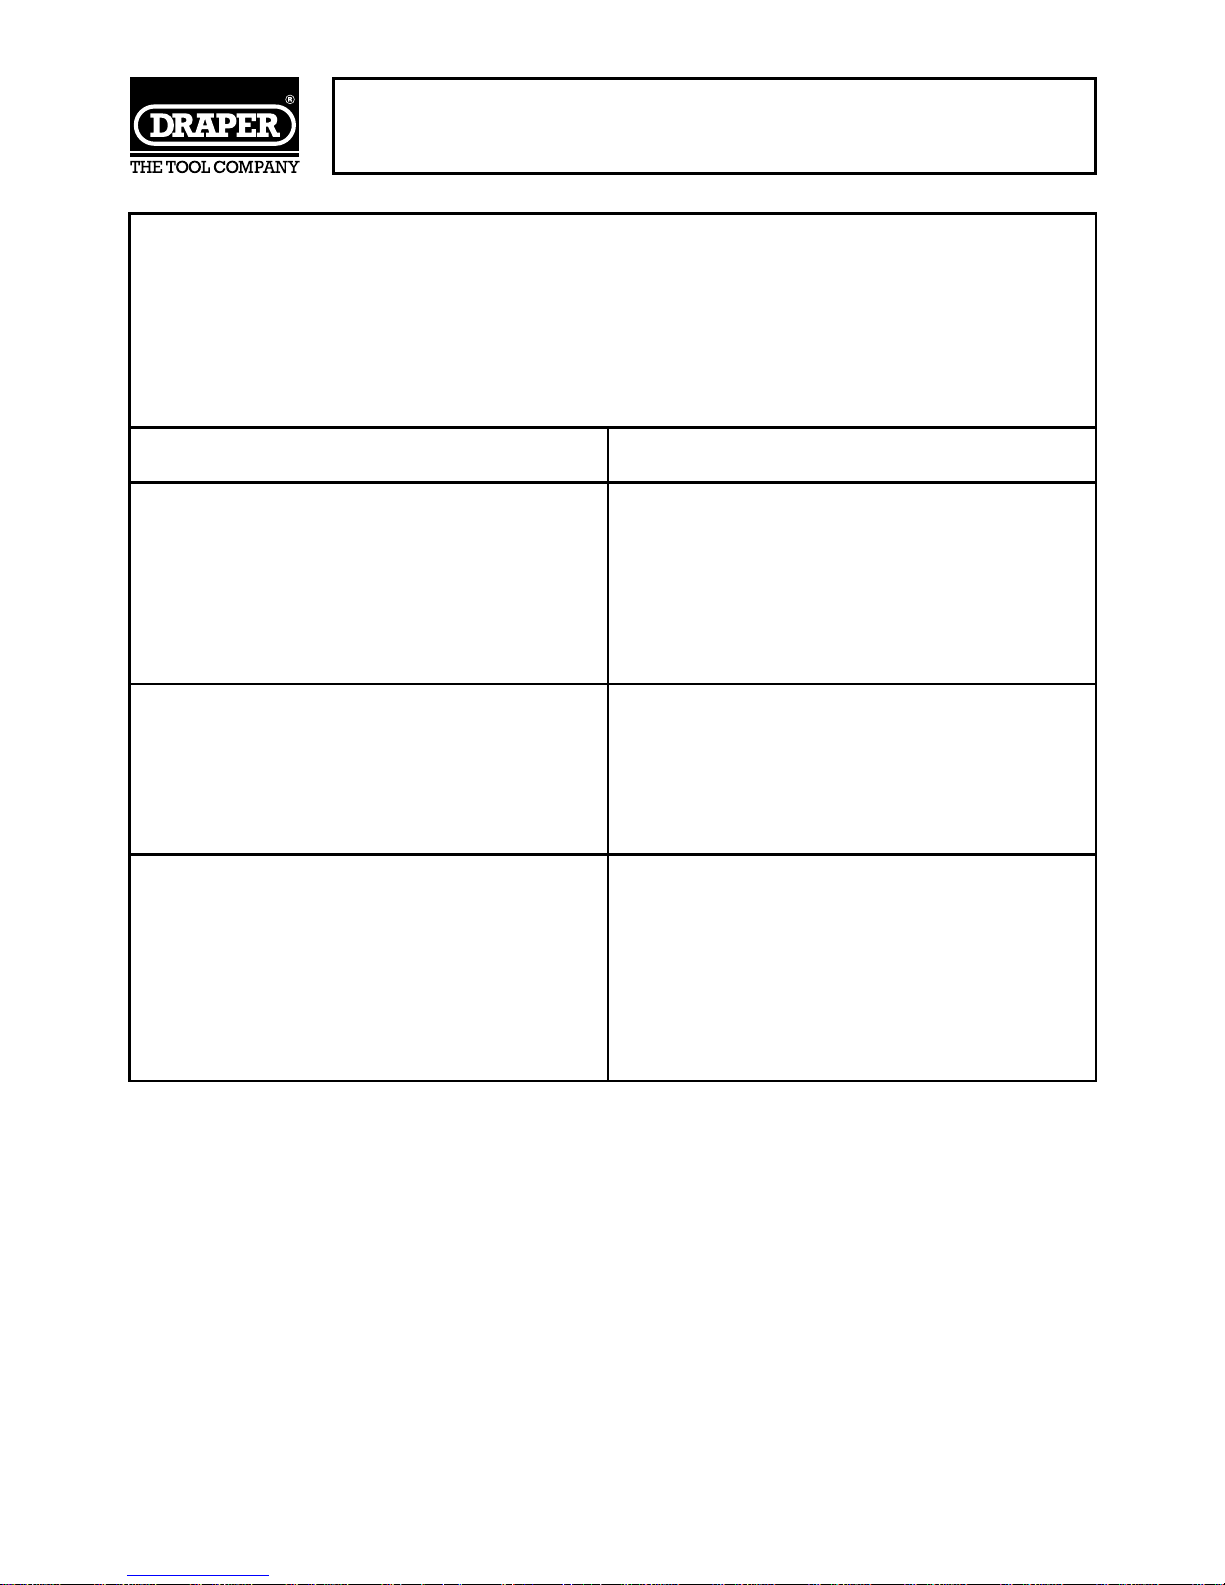
Fault Remedy
Mower will not start 1. Check battery connection/charge.
2. Check the fuse key and replace if
necessary.
3. With the mower disconnected from the
battery check the blade rotates (is there
some friction due to the brake). If the blade
does not move contact a service repair
agent.
Mower vibrates in use Stop using immediately.
Disconnect the mowers fuse key from the
power supply, with the blade stopped, check
to see if the blade bolt is loose, tighten if
necessary (see page 10). If the blade bolt is
already tight contact a service repair agent.
Mower does not pick up the grass cuttings 1. Grass box is full. Empty grass box.
2. Grass is wet.Wait until the grass has dried.
3. The under side of the deck is clogged with
grass cuttings. Stop the mower and
disconnect the fuse key and clean the
under side of the deck.
4. Blade is blunt or damaged. Have the blade
sharpened or replace as required (see
page 10).
DRAPER HELPLINE:
(023) 8049 4344
Page 13

- 12 -
OPTIONAL ACCESSORIES
Part No.: AGP15
Stock No.: 64553
Description: Spare Blade
Part No.: YLM12
Stock No.: 64560
Description: Fuse Key
Page 14

NOTES
- 13 -
Page 15

NOTES
- 14 -
Page 16

DRAPER TOOLS LIMITED,
Hursley Road, Chandler's Ford, Eastleigh, Hants. SO53 1YF. U.K.
Helpline: (023) 8049 4344.
Sales Desk: (023) 8049 4333.
General Enquiries: (023) 8026 6355.
Fax: (023) 8026 0784.
www.draper.co.uk
e-mail: [email protected]
©Published by Draper Tools Ltd.
No part of this publication may be reproduced,
stored in a retrieval system or transmitted in
any form or by any means, electronic, mechanical
photocopying, recording or otherwise without prior
permission in writing from Draper Tools Ltd.
YOUR DRAPER STOCKIST
 Loading...