

Page 1

EN
Original Instructions
Version 1
12V
CORDLESS
AIR COMPRESSOR
20582
Page 2

1. Preface
These are the original product instructions. This
document is part of the product; retain it for the life
of the product, passing it on to subsequent holders.
Read this manual in full before attempting to
assemble, operate, or maintain this product.
This Draper Tools manual describes the purpose
of the product and contains all the necessary
information to ensure its correct and safe use.
Following all the instructions and guidance in
this manual will ensure the safety of both the
product and the operator and increase the
lifespan of the product.
1.1 Product Reference
User Manual for: 12V Cordless Air Compressor
Stock No: 20582
Part No: DA12/151
1.2 Revisions
Version 1: March 2018
First release
Version 1.1: April 2022
General revision and image updates
As our manuals are continually updated, always ensure
that the latest version is used.
Download the latest version from:
drapertools.com/manuals
All photographs and drawings within this manual are
supplied by Draper Tools to help illustrate correct
operation of the product.
Every eort has been made to ensure the
information contained in this manual is accurate.
However, Draper Tools reserves the right to amend
this document without prior warning. Always use the
latest version of the product manual.
1.3 Understanding the Safety Content
WARNING! – Situations or actions that may result in
personal injury or death.
CAUTION! – Situations or actions that may result in
damage to the product or surroundings.
Important: – Information or instructions of particular
importance.
1.4 Copyright © Notice
Copyright © Draper Tools Limited.
Permission is granted to reproduce this manual for
personal and educational use ONLY. Commercial
copying, redistribution, hiring, or lending is strictly
prohibited.
No part of this manual may be stored in a retrieval system
or transmitted in any other form or means without written
permission from Draper Tools Limited.
In all cases, this copyright notice must remain intact.
– 2 –
Page 3

2. Contents
EN
1. Preface 2
1.1 Product Reference 2
1.2 Revisions 2
1.3 Understanding the Safety Content 2
1.4 Copyright © Notice 2
2. Contents 3
3. Warranty 4
4. Product Introduction 5
4.1 Scope 5
4.2 Specication 5
5. Health and Safety Information 6
5.1 General Safety Instructions for Compressors 6
5.2 General Safety Information for Battery Packs
and Chargers 6
5.3 Connection to the Power Supply 7
6. Identication and Unpacking 8
6.1 Product Overview 8
6.2 What’s in The Box? 9
6.3 Packaging 9
7. Preparing the Air Compressor 10
7.1 Charging the Battery (230V) 10
7.2 Using the 12V DC In-Car Adaptor 10
7.3 Notes on Battery Life 11
8. Operating Instructions 12
8.1 Using the Compressor 12
8.2 Using the Ination Adaptors 13
8.3 Using the Light 13
9. Maintenance and Troubleshooting 14
9.1 General Maintenance 14
9.2 Troubleshooting 14
10. Disposal 15
11. Explanation of Symbols 16
– 3 –
Page 4

3. Warranty
Draper Tools products are carefully tested and inspected
before shipment and are guaranteed to be free from
defective materials and workmanship.
Should the tool develop a fault, return the complete tool
to your nearest distributor or contact Draper Tools
directly. Contact information can be found at the back of
this manual.
Proof of purchase must be provided.
If, upon inspection, it is found that the fault occurring is
due to defective materials or workmanship, repairs will
be carried out free of charge. This warranty period covers
parts and labour for 24 months from the date of
purchase. Where tools have been hired out, the warranty
period covers 90 days from the date of purchase.
This warranty does not apply to any consumable parts,
batteries or normal wear and tear, nor does it cover any
damage caused by misuse, careless or unsafe handling,
alterations, accidents, or repairs attempted or made by
any personnel other than the authorised Draper Tools
repair agent.
In all cases, to make a claim for faulty workmanship or
materials within the standard warranty period, please
contact or return the product to the place of purchase.
Proof of purchase may be required.
If the place of purchase is no longer trading or if you
experience any diculties with your warranty, please
contact Customer Services with the product details and
your proof of purchase. Contact details can be found at
the back of this manual.
If the tool is not covered by the terms of this warranty,
repairs and carriage charges will be quoted and charged
accordingly.
This warranty supersedes any other guarantees
expressed or implied and variations of its terms are not
authorised.
Your Draper Tools guarantee is not eective until you can
produce, upon request, a dated receipt or invoice to
verify your purchase within the guarantee period.
Please note that this warranty is an additional benet
and does not aect your statutory rights.
Draper Tools Limited
– 4 –
Page 5

4. Product Introduction
EN
4.1 Scope
This multi-functional air compressor is designed to
inate tyres, dinghies and sports equipment as part of
domestic and infrequent trade use. The product also
includes an LED lamp for visibility and to attract
attention. Any other application beyond the conditions
established for use will be considered misuse.
Draper Tools accepts no responsibility for improper use
of this product.
4.2 Specication
Stock No. 20582
Part No. DA12/151
Rated voltage 12V
Battery type Li-ion, 1,500mAh
Charging time 3h
Maximum current 10A
Maximum pressure 150psi (10.3bar)
Recommended cycle time 15min
Display unit psi/bar/KPa
Power cable length 3.5m
Hose length 150mm approx.
Weight (excluding accessories) 800g
Battery charging adaptor
Rated input 230V~50Hz
Rated voltage 12V
Rated current 1.5A
WARNING! This product is not a toy and must be
respected.
Read this manual in full before attempting to assemble,
operate or maintain the product, and retain it for later use.
– 5 –
Page 6

5. Health and Safety Information
EN
Important: Read all Health and Safety instructions
before attempting to operate, maintain or repair this
product. Non-compliance with these instructions may
result in injury or damage to the user, the product or the
item to be inated.
5.1 General Safety Instructions for
Compressors
• WARNING! This compressor is capable of supplying
air at high pressure. NEVER point this product at
any person or any object for which its use is not
intended.
• Observe and adhere to all standard safety precautions
and good practices when working in a workshop
environment.
• Keep the work environment clear and well-lit,
with bystanders at a safe distance.
• Before use, inspect the product carefully for signs of
damage or battery leakage.
WARNING! DO NOT use this product if damage or
defects are present; take it out of service until it has
been repaired or replaced. Contact Draper Tools for
repair and replacement options. If the power
adaptor or charger cords are damaged, they must
be replaced by a special cord available from Draper
Tools or its authorised service agents.
• ALWAY S ensure that the air hose and valve
connections are tight and secure, and rmly hold the
item to be inated during operation.
• ALWAY S ensure that the trigger lock is in the “locked”
position before inserting the battery or power
adaptor.
• DO NOT use this product in wet conditions or expose
it to rain.
• DO NOT use this product near ammable or
combustible materials or in dangerous or explosive
environments.
• DO NOT store the product with the battery pack still
attached.
• DO NOT attempt to open or modify this product in
any way.
• NEVER leave the compressor running unattended and
allow it to stop completely before moving away.
• Use this product ONLY for the recommended cycle
time and allow approx. 30 minutes for it to cool before
the next use, subject to environmental conditions.
WARNING! Extended continual use of the product
may cause it to overheat and harm both the product
and the operator.
• After use, ALWAYS check the tyre pressure using a
tyre pressure gauge that complies with
BS EN 12645:2014.
• CAUTION! NEVER exceed the maximum pressure
recommended by the manufacturer of the item to
be inated. Check the manufacturer information
before every use and continually monitor the item
during ination.
• NEVER carry the compressor by the hose.
• ONLY use accessories supplied by Draper Tools.
5.2 General Safety Information for
Battery Packs and Chargers
Important: This product is supplied with a 1,500mAh
battery pack. Use ONLY the battery pack and charger
supplied with this product.
• WARNING! NEVER charge non-rechargeable
batteries.
• WARNING! DO NOT use the battery if there is
evidence of leakage. If battery uid comes into
contact with your skin, rinse the aected area
immediately with water. If it comes into contact
with your eyes, ush with plenty of water and seek
medical advice.
• NEVER attempt to open the battery for any reason.
• Charge the battery in a dry and well-ventilated
environment in ambient temperatures between 5
and 40°C.
• Use ONLY the charger supplied with the product to
charge the battery pack.
• DO NOT short-circuit the battery by connecting the
positive and negative terminals while it is detached
from the product.
− Keep the battery away from metallic objects that
may inadvertently cause connection of the
terminals.
• DO NOT store the battery pack in environments with
ambient temperatures exceeding 50°C.
• Dispose of the battery pack responsibly and in
accordance with local regulations.
– 6 –
Page 7

5. Health and Safety Information
EN
5.3 Connection to the Power Supply
Always ensure that the power supply on the machine’s
rating plate is compatible with the power supply to which
you intend to connect it.
The rechargeable battery pack is supplied with a UK
standard three-pin plug and is intended for connection
to a domestic power supply rated at 230V AC. An in-car
power adaptor is also supplied and is intended for
connection to a 12V DC socket found in vehicle interiors.
This is a Class II
connection to a power supply matching that detailed on
the rating label and compatible with the plug tted.
CAUTION! Use ONLY the power supplies provided.
Important: If using an extension lead, follow the
instructions that came with your lead regarding
maximum load while the cable is wound. If in doubt,
ensure that the entire cable is unwound. Using a coiled
extension lead will generate heat which could melt the
lead and cause a re.
†Double insulated
connection as supplementary insulation is applied to the
basic insulation to protect against electric shock in the
event of failure of the basic insulation.
†
appliance and is designed for
: This product requires no earth
– 7 –
Page 8
6. Identication and Unpacking
EN
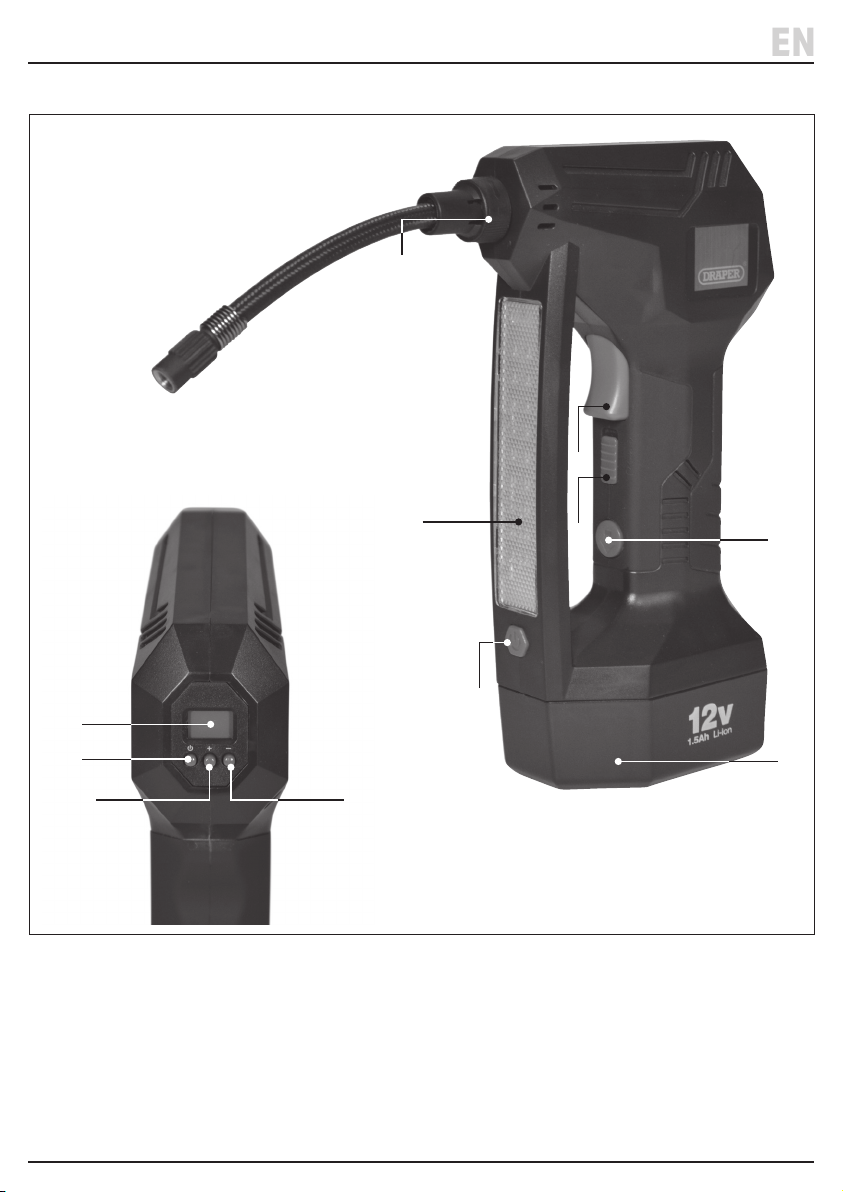
6.1 Product Overview
(7)
(5)
(1)
(2)
(3)
(1) LCD pressure display
(2) Compressor power button
(3) Increase pressure button
(4) Decrease pressure button
(5) Trigger
(6) Trigger lock
(4)
(9)
(8)
(7) Attachment lock
(8) SMD LED light on/o switch
(9) SMD LED light
(10) Battery release button
(11) 12V Battery pack
(6)
(10)
(11)
– 8 –
Page 9
6. Identication and Unpacking
EN
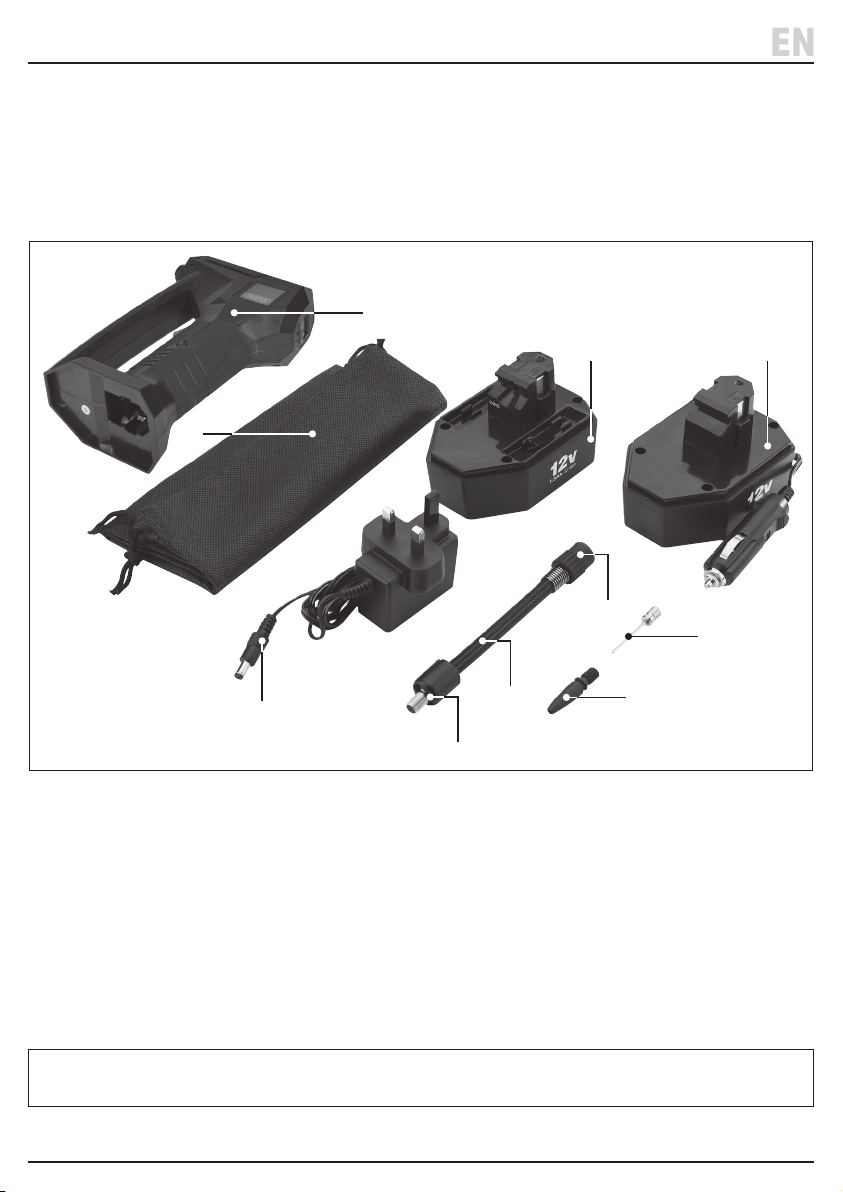
6.2 What’s in The Box?
Carefully remove the product from the packaging and
examine it for any signs of damage that may have
occurred during shipment.
(A)
(H)
Before assembling the product, lay the contents out and
check them against the parts shown below. If any part is
damaged or missing, do not attempt to use the product.
Please contact the Draper Helpline; contact details can
be found at the back of this manual.
(E) (F)
(B1)
(C)
(G)
(A) 1 x 12V air compressor
(B) 1 x Air hose
(B1) Air hose attachment
(B2) Threaded hose connector
(C) 1 x Needle adaptor
6.3 Packaging
Keep the product packaging for the duration of the
warranty period for reference should the product need to
be returned for repair.
Please visit drapertools.com for our full range of accessories and consumables.
(B)
(B2)
(D) 1 x Inating adaptor
(E) 1 x 12V battery pack
(F) 1 x 12V DC in-car power adaptor
(G) 1 x 230V adaptor
(H) 1 x Storage bag
WARNING! Keep packaging materials out of reach of
children. Dispose of packaging correctly and
responsibly and in accordance with local regulations.
(D)
– 9 –
Page 10
EN
7. Preparing the Air Compressor
Important: Charge the compressor for ve hours before
rst use.
7.1 Charging the Battery (230V)
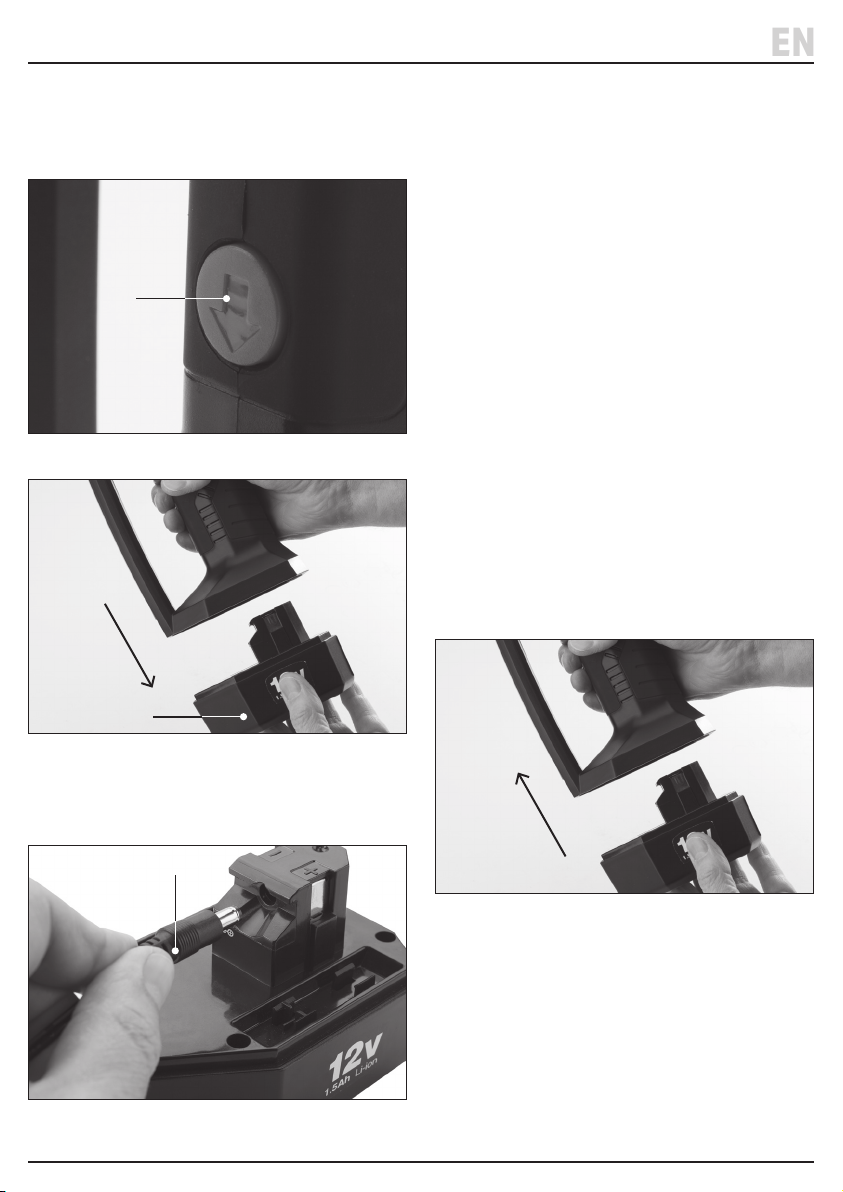
(10)
1 Fig.
2. Insert the 230V adaptor (G) pin into the battery pack
and connect the plug to a 230V mains power socket.
3. The charging status is indicated by the LED on the
charging adaptor:
− Red LED: The battery is charging.
− Green LED: The battery is fully charged.
4. Disconnect the 230V adaptor and insert the battery
back into the compressor, ensuring it locks into place.
Charging may take up to three hours. The compressor
should run for approximately 15 minutes on a full charge.
Important: To preserve the battery health, Draper Tools
recommends that the compressor charging time does
not exceed ve hours.
7.2 Using the 12V DC In-Car Adaptor
Important: The 12V adaptor is not a battery and can
only be used with an active power supply. Unravel the
cord fully before use. Always ensure that the cable runs
through the hole at the base of the adaptor.
1. If installed, remove the battery from the base of the
compressor by pressing the battery release button
(10) and pulling the battery (11) downwards
(Fig. 1–2).
(11)
2 Fig.
1. If installed, remove the battery from the base of the
compressor by pressing the battery release button
(10) and pulling the battery (11) downwards.
(G)
3 Fig.
4 Fig.
2. Insert the 12V DC in-car adaptor (F) into the base of
the compressor, ensuring it locks into place.
– 10 –
Page 11
EN
7. Preparing the Air Compressor
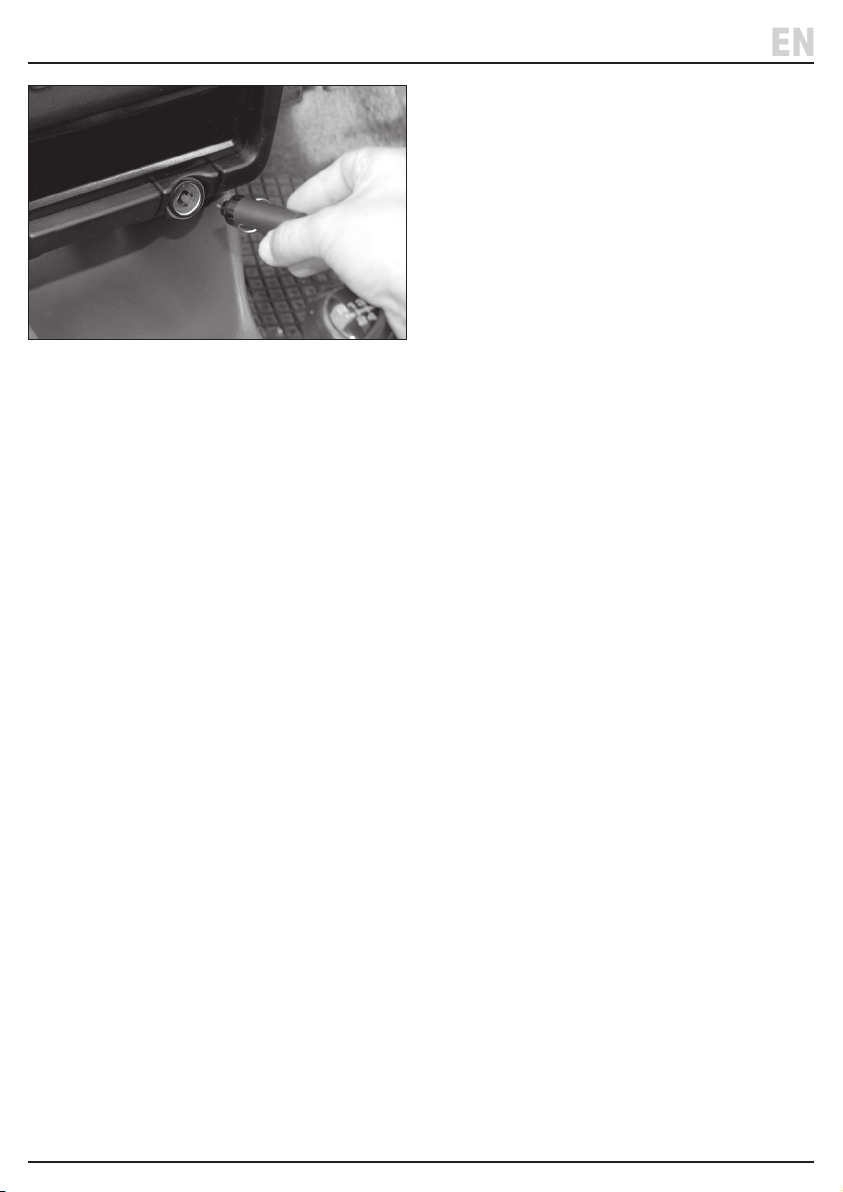
5 Fig.
3. Insert the other end of the adaptor into the vehicle
DC socket.
4. To power the air compressor, switch the vehicle on.
Important: To avoid draining the vehicle battery,
keep the engine running during use. ONLY run the
vehicle engine in well-ventilated areas.
7.3 Notes on Battery Life
Typical run time will vary according to the level of
charge, pressure load during use and the operating
conditions:
• High-pressure loading or excessive back pressure may
result in increased battery consumption.
• Cold temperatures may result in increased battery
consumption; Draper Tools recommends using the
12V DC in-car adaptor in cold conditions.
– 11 –
Page 12
EN
8. Operating Instructions
Important: Read all Health and Safety instructions
before using this product.
8.1 Using the Compressor
Important: ALWAYS follow the manufacturer’s
recommendations for pressure levels. After ination,
vehicle tyre pressure should ALWAYS be double-checked
using a purpose-built tyre pressure gauge complying
with BS EN 12645:2014.
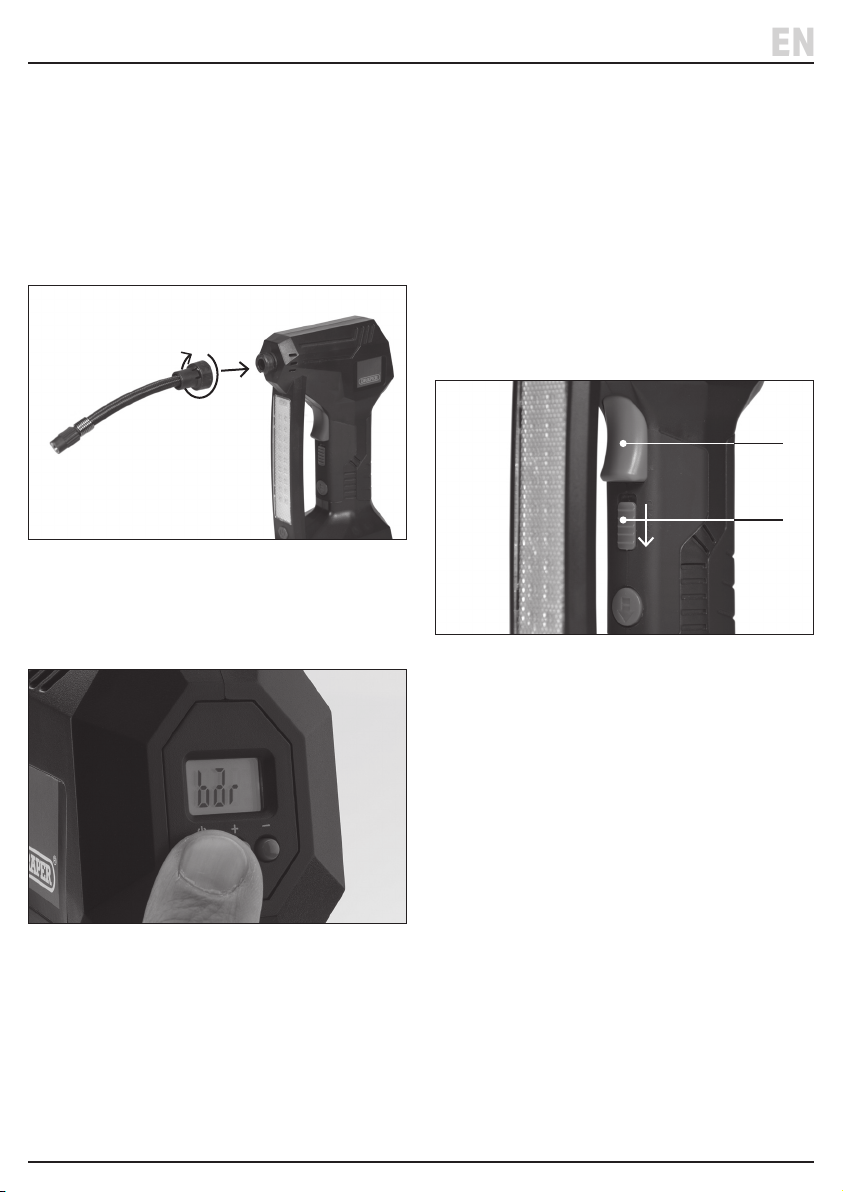
6 Fig.
1. Attach the air hose (B) by twisting the hose
attachment (B1) clockwise into the attachment lock
(7) until it clicks until place.
3. To change the display pressure units, press the
compressor power button repeatedly until the
required units are displayed.
4. Screw the threaded hose connector (B2) onto the
valve of the item to be inated; the current pressure
reading is shown on the display in the chosen units.
5. Use the increase (3) and decrease (4) pressure buttons
to select the desired pressure level, then wait for the
current pressure reading to be displayed.
Important: ALWAYS check and follow the
manufacturer’s pressure recommendations.
For vehicles, this is often located on the inside of the
door. For bicycles, check the markings on the tyre.
(5)
(6)
8 Fig.
7 Fig.
2. Press the compressor power button (2) beneath the
LCD pressure display (1).
Important: The compressor cannot be used until the
LCD display is switched on. The LCD display turns o
automatically after 30 seconds of inactivity.
6. Slide the trigger lock (6) into the “unlocked” position.
7. Press and release the trigger (5) to inate the item;
the compressor will stop automatically when the
chosen pressure level is reached.
Important: The compressor will continue to operate
until the trigger is pressed a second time. DO NOT
press and hold the trigger.
8. When complete, press the trigger once to switch o
the compressor then slide the trigger lock into the
”locked” position.
9. Disconnect the air hose from the item valve and
quickly replace the valve seal or cap, if required.
WARNING! The hose connector may be hot
after use. Exercise caution when detaching it
from a valve.
– 12 –
Page 13
EN
8. Operating Instructions
8.2 Using the Ination Adaptors
To attach the needle adaptor (C) or ination adaptor (D),
screw it into the threaded hose connector (B2) until tight.
Operate the compressor as described in 8.1 Using the
Compressor.
8.3 Using the Light
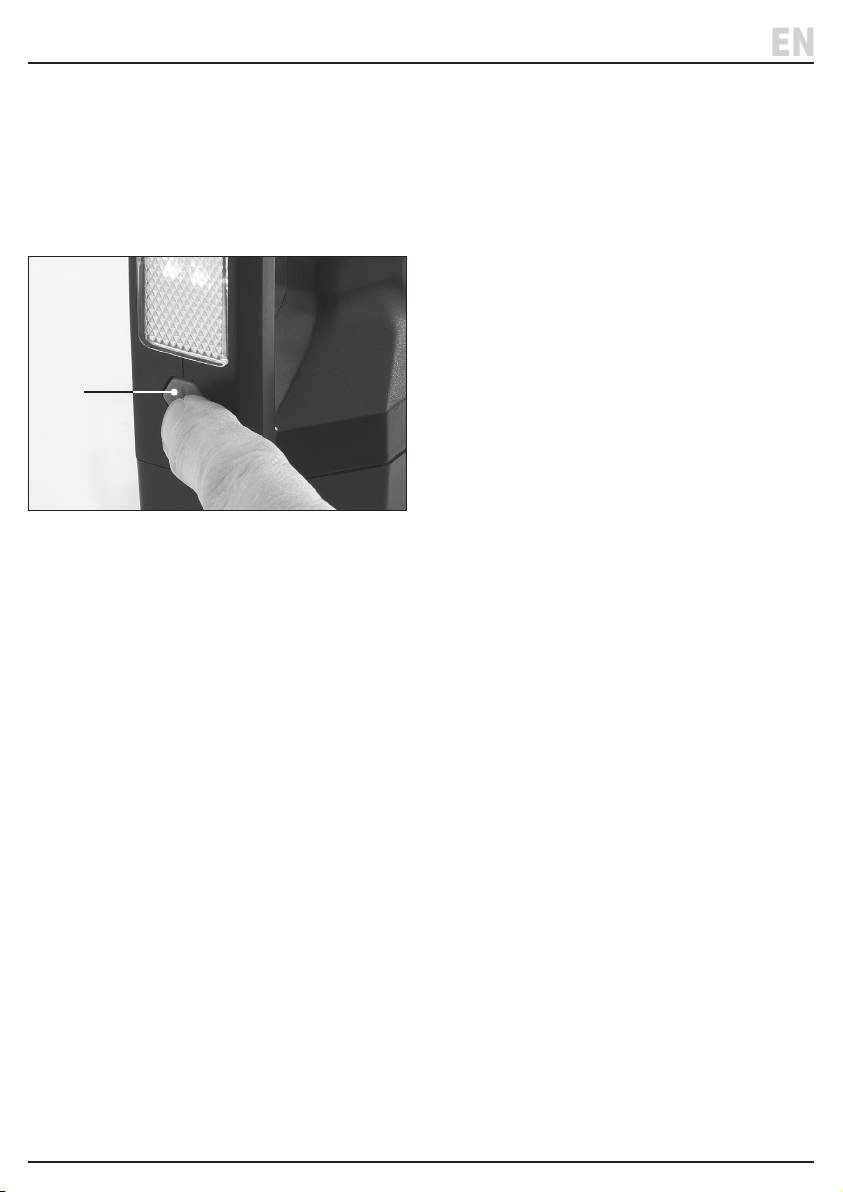
(8)
9 Fig.
To switch the light on, press the light on/o switch (8)
until the required mode is enabled. The light illuminates
in the following modes:
• Constant white light
• Flashing red light
• SOS mode (red light ashes in Morse code)
• O
– 13 –
Page 14

EN
9. Maintenance and Troubleshooting
Important: Maintenance and repairs should be carried
out ONLY by authorised and suitably qualied personnel.
WARNING! Disconnect the battery or power supply
before carrying out any maintenance on the product.
9.1 General Maintenance
• Charge the compressor for ve hours before rst use.
• DO NOT allow the battery pack to be completely
exhausted before recharging.
• DO NOT charge the battery pack unless the charge
is low.
• ALWAY S remove the battery from the compressor
when not in use.
• Keep all ventilation openings clean from dust and dirt.
• Keep the air hose and adaptors clean and free from
obstructions.
• Clean the product regularly using a damp cloth.
CAUTION! NEVER use aggressive chemicals to
clean the product as these may damage the
product frame.
• Store the product in a clean and dry location,
out of reach of children.
• When stored for extended periods, charge the battery
periodically to maintain battery health.
9.2 Troubleshooting
Problem Possible Cause Remedy
The battery pack will not charge. Poor connection between the
The compressor functions but
does not inate the item.
charging/power adaptor and
the socket.
The power supply fuse has blown. Check the mains fuse (230V) or 12V
The connection to the item valve is
not airtight.
Check all connections are secure.
supply fuse as appropriate.
Reattach the threaded hose
connector (B2) to the valve and
tighten appropriately.
The compressor inates
items slowly.
Air is escaping from the tool or
inated item.
The compressor is overheating. Unplug the compressor from the
The voltage is too low. Check the charge and condition of
Check that all connections at the
compressor are airtight and that the
compressor and hose are not leaking.
Check that the inated item does
not have leaks.
power supply and leave to cool for
approximately 30min.
Check that the air vents are clear
and the battery pack is clean
and dry.
the battery pack.
Check the condition of the 12V
socket, if in use.
– 14 –
Page 15
EN
10. Disposal
At the end of its working life, or when it can no longer be
repaired, dispose of the product according to local
regulations.
Contact your local authority for details of collection
schemes in your area.
In all circumstances:
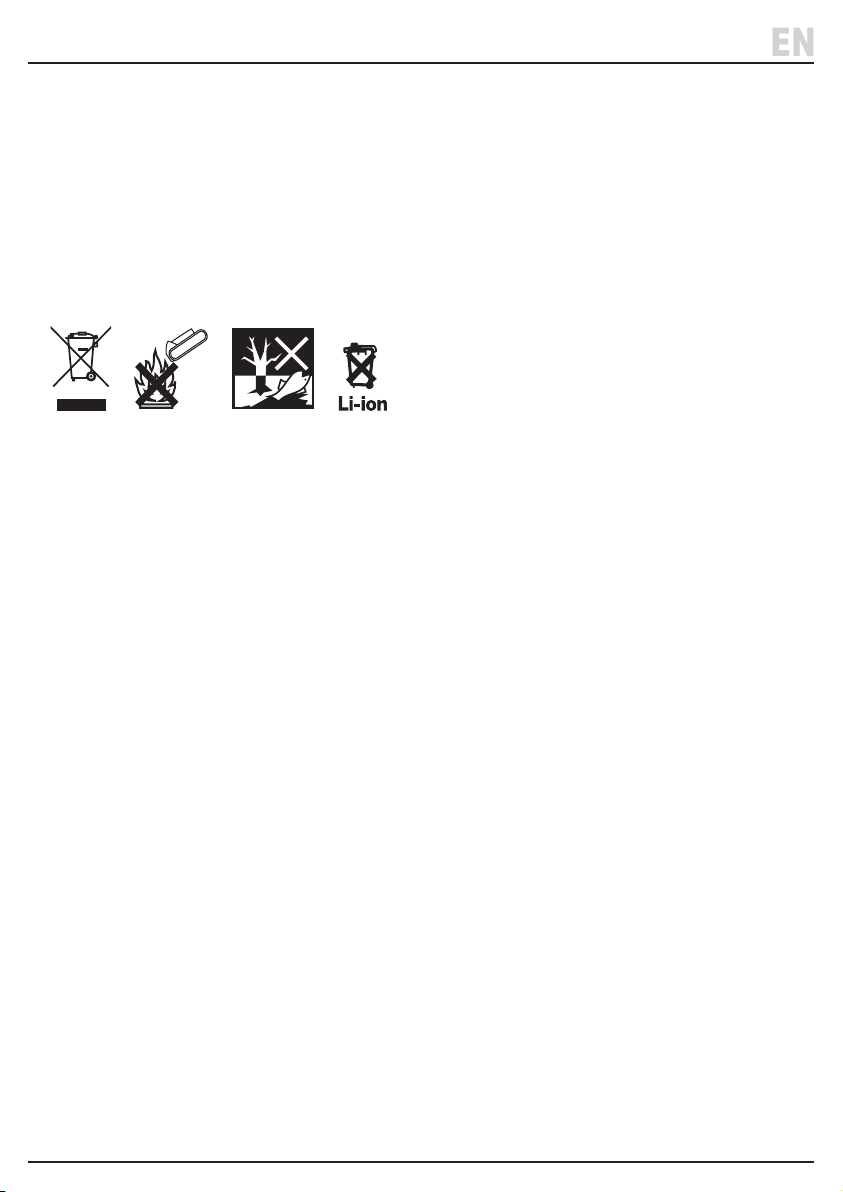
• DO NOT dispose of power tools with domestic waste
• DO NOT incinerate
• DO NOT abandon in the environment
– 15 –
Page 16
EN
11. Explanation of Symbols
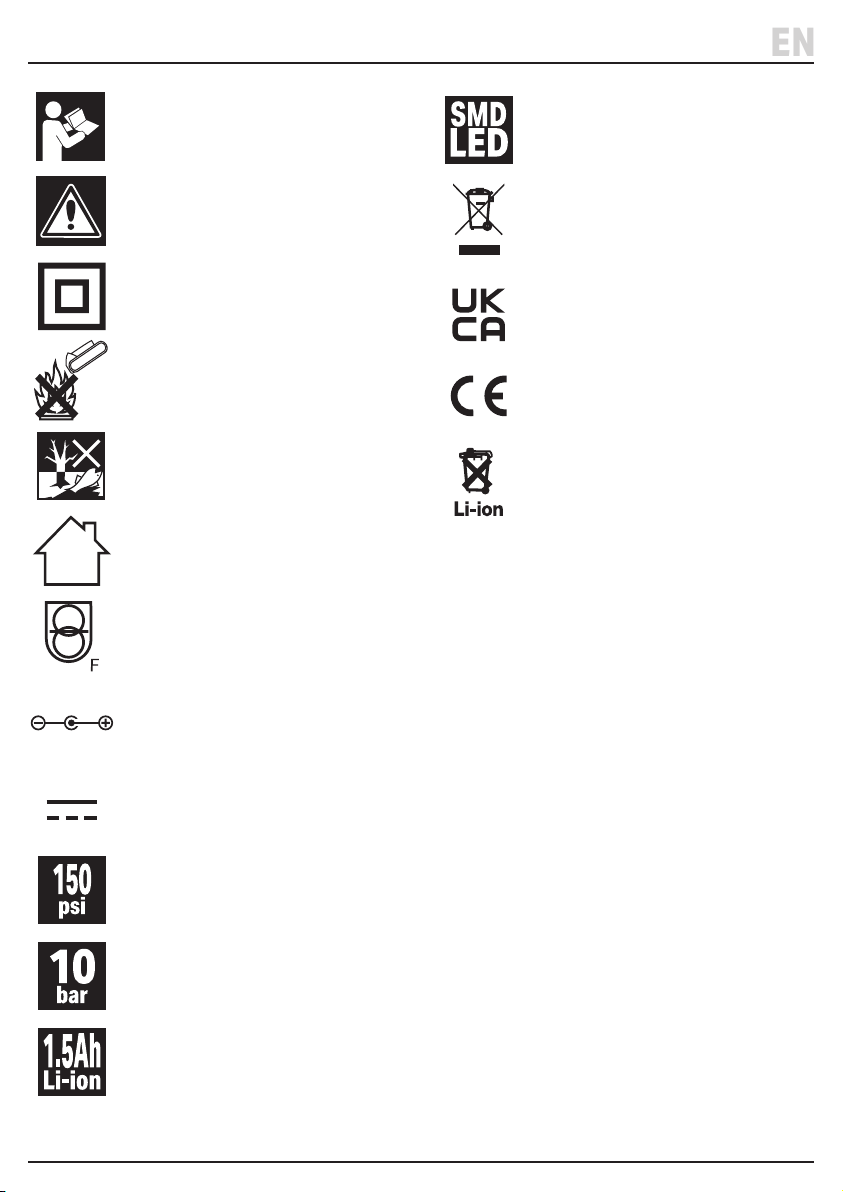
Read the instruction manual
Warning!
Class II construction
(Double insulated)
Do not incinerate or throw onto re
Do not abandon in the environment
For indoor use only
Fused
Includes a surface-mounted diode
LED light
WEEE –
Waste Electrical & Electronic Equipment
Do not dispose of Waste Electrical & Electronic Equipment
in with domestic rubbish
UKCA – UK Conformity Assessed
CE – European Conformity
Lithium-ion battery – Do not dispose of
this battery with domestic waste
Polarity indication
Rated voltage
Operating air pressure (example)
Operating air pressure (example)
Li-ion battery, 1,500mAh
– 16 –
Page 17

Notes
EN
– 17 –
Page 18

Notes
EN
– 18 –
Page 19

Notes
EN
– 19 –
Page 20

Contact Details
Draper Tools
Draper Tools Limited
Hursley Road
Chandler’s Ford
Eastleigh
Hampshire
SO53 1YF
UK
Website: drapertools.com
Email: [email protected]
Product Helpline: +44 (0) 23 8049 4344
Telephone Sales Desk: +44 (0) 23 8049 4333
General Enquiries: +44 (0) 23 8026 6355
General Fax: +44 (0) 23 8026 0784
Service / Warranty Repair Agents
For aftersales servicing or warranty repairs, please contact the Draper Tools Product
Helpline for details of an agent in your area.
Delta International
Delta International BV
Oude Graaf 8
6002 NL
Weert
Netherlands
© Published by Draper Tools Limited
 Loading...