

Page 1
USER MANUAL
Page 2
41 - 50
21 - 30
11 - 20
01 - 10
31 - 40
51 - 60
日本語
CONTENTS
Page 3
Browse the Web
Visit your favorite websites.
Check your e-mail
Keep in touch with friends and family.
Watch YouTube™ videos
Browse the world’s most popular video- sharing community.
Read your favorite books
Download thousands of books with the included E-book reader*.
Discover thousands of apps for Android™ Games, applications, and more with Play Store
(Customer need to download it from Google Play Store).
Connect to the Internet wirelessly
High-speed Wi-Fi 802.11 b/g/n networking.
Enjoy your media library anywhere.
Portable powerhouse plays popular music, video, and photo formats.
Micro SD memory card reader.
Increase your storage capacity (up to 64 GB supported)
Built-in camera
Convenient Front-facing Camera 0.3MP / Rear Camera 2.0MP.
Automatic orientation detection
Read any way you want; the display adjusts automatically!
Reading books in the ePub format requires the included E-book reader application.
FEATURES
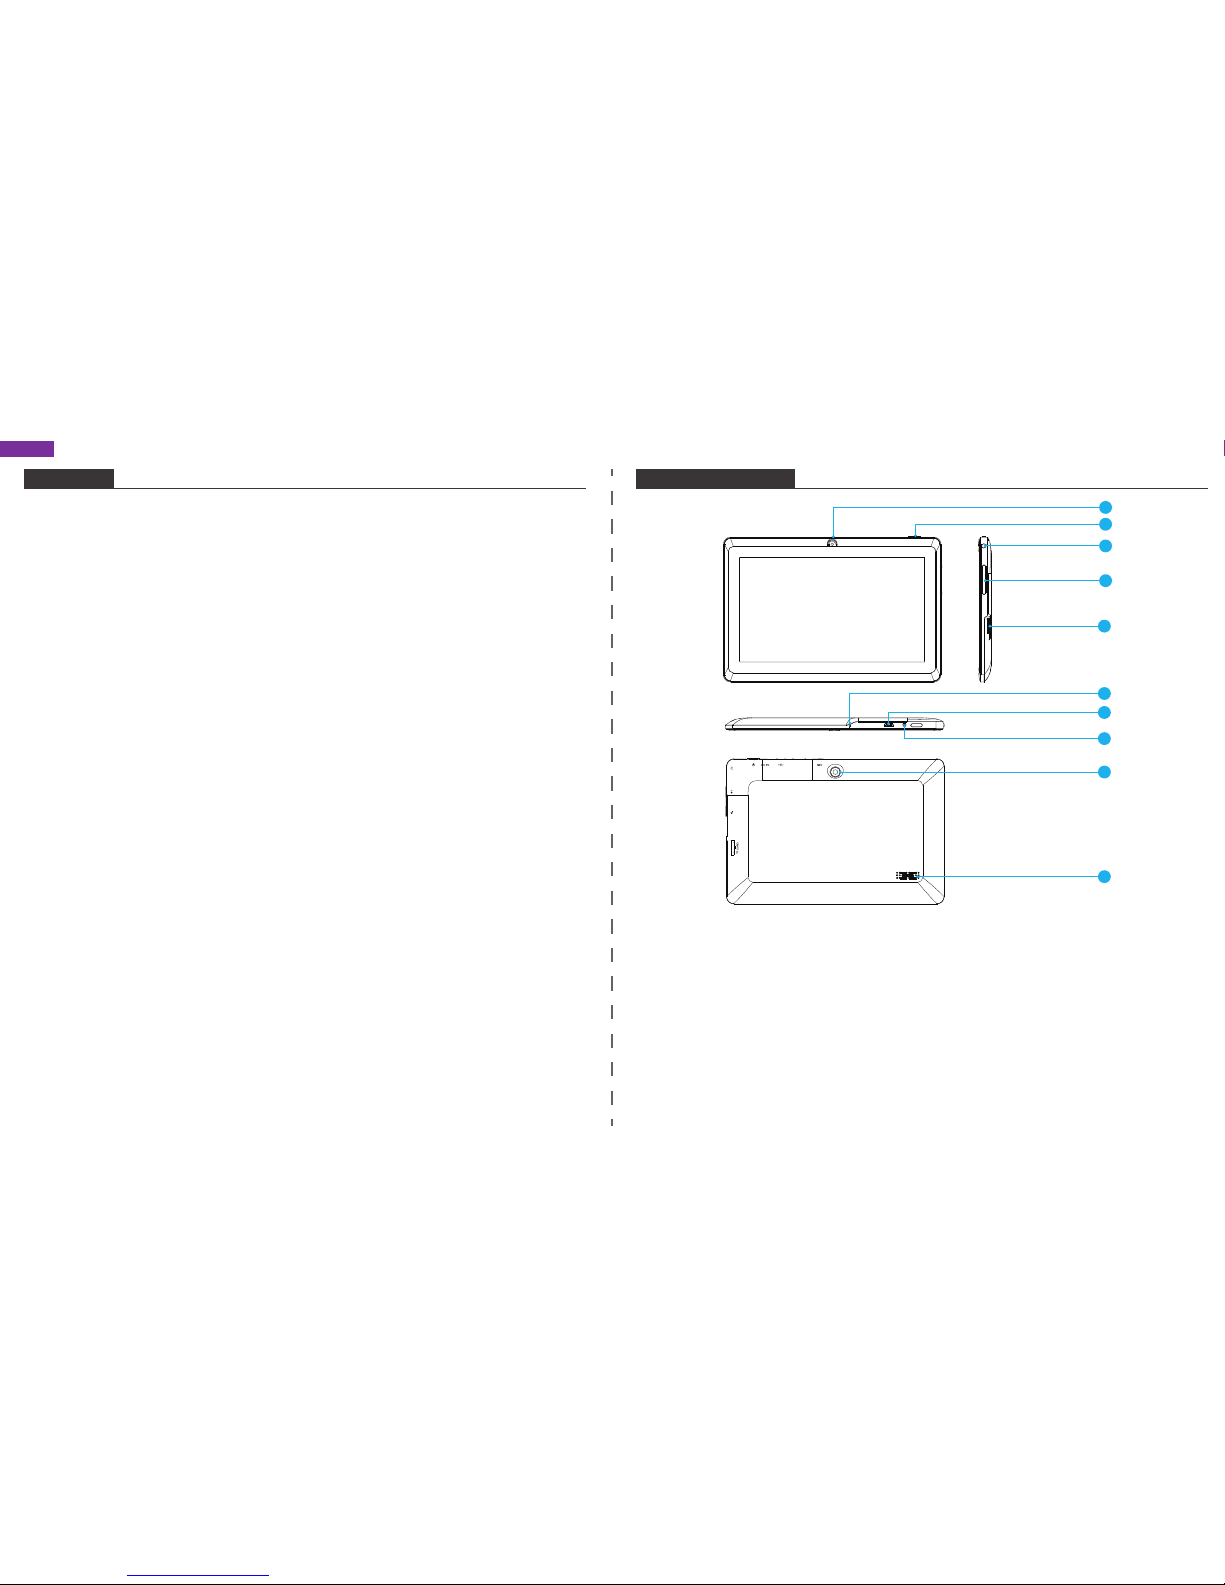
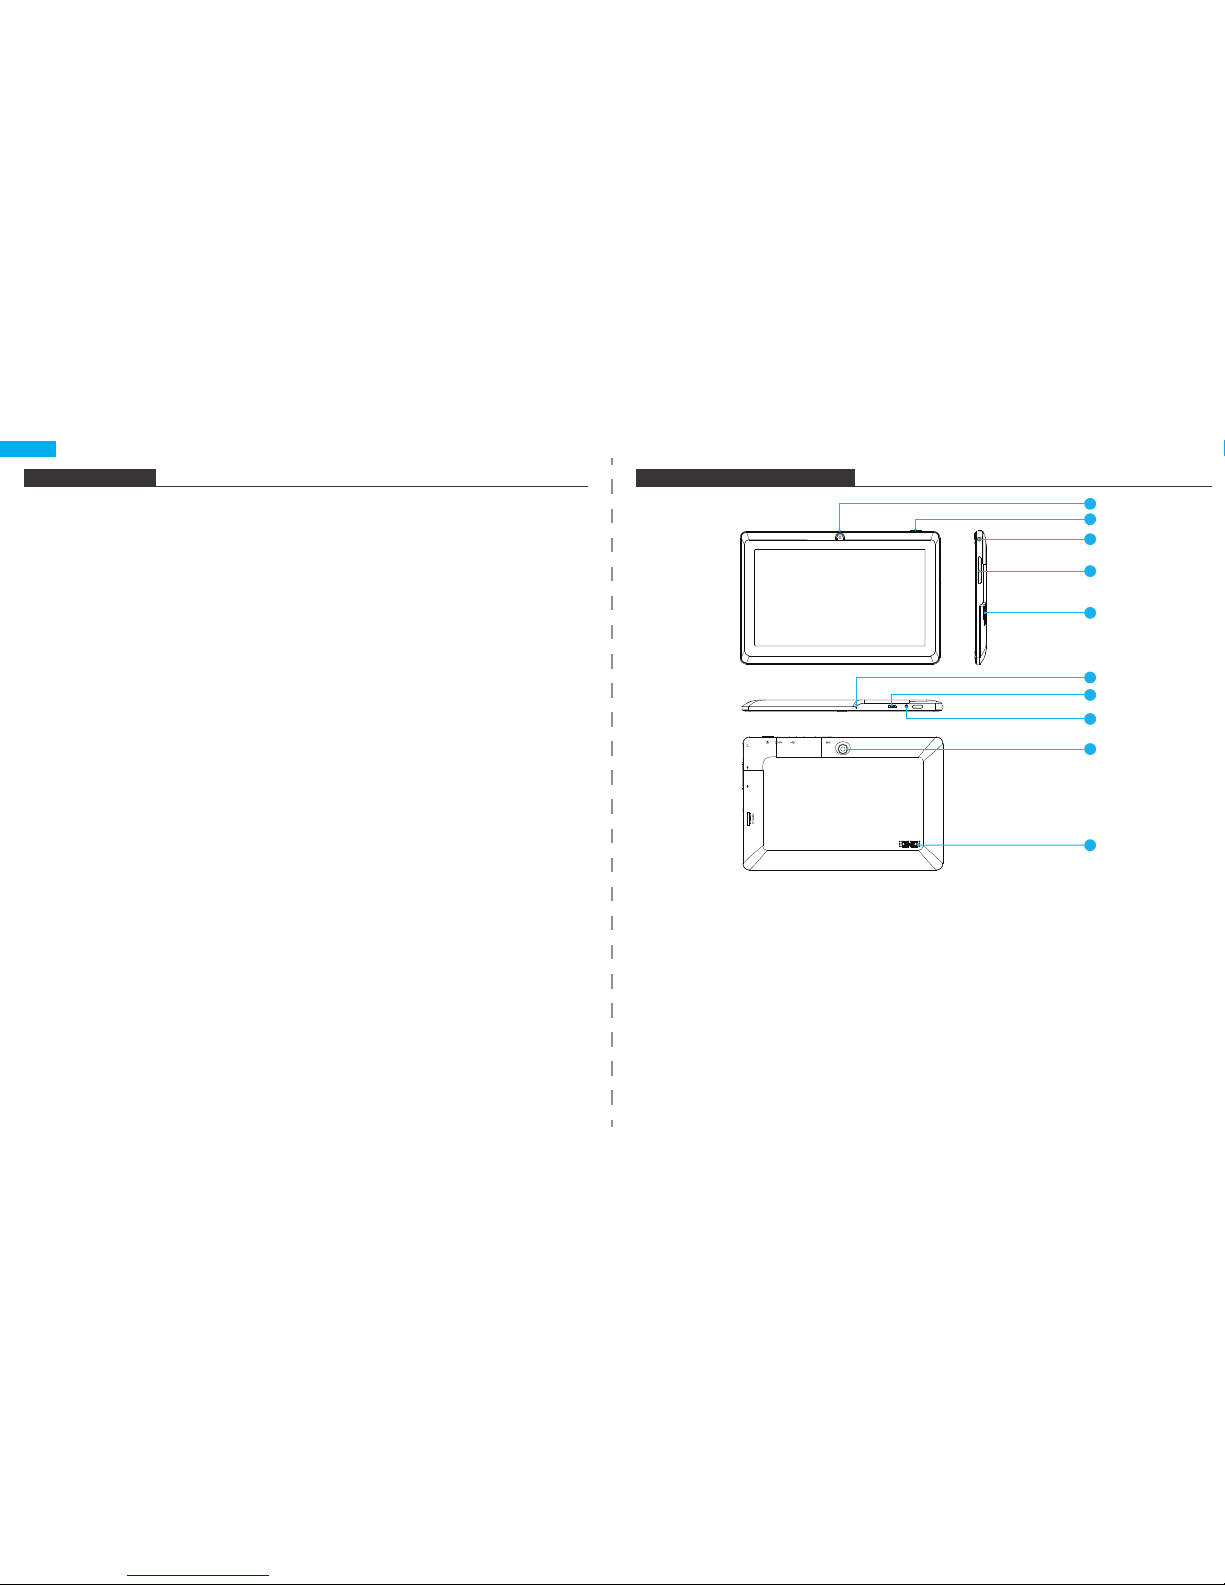
UNIT AT A GLANCE
1. Front Camera
2. Power Button / Screen Saver
3. Headphone: Audio output connection for headphones.
4. VOL+ / VOL-
5. MicroSD Card Slot
6. MIC: Use internal MIC to record voice.
7. Micro USB Port: Connect to a USB device.
8. DC Power Port
9. Rear Camera
10. Speaker
3
4
5
2
1
6
7
8
9
10
English
1 2
Page 4
GETTING STARTED
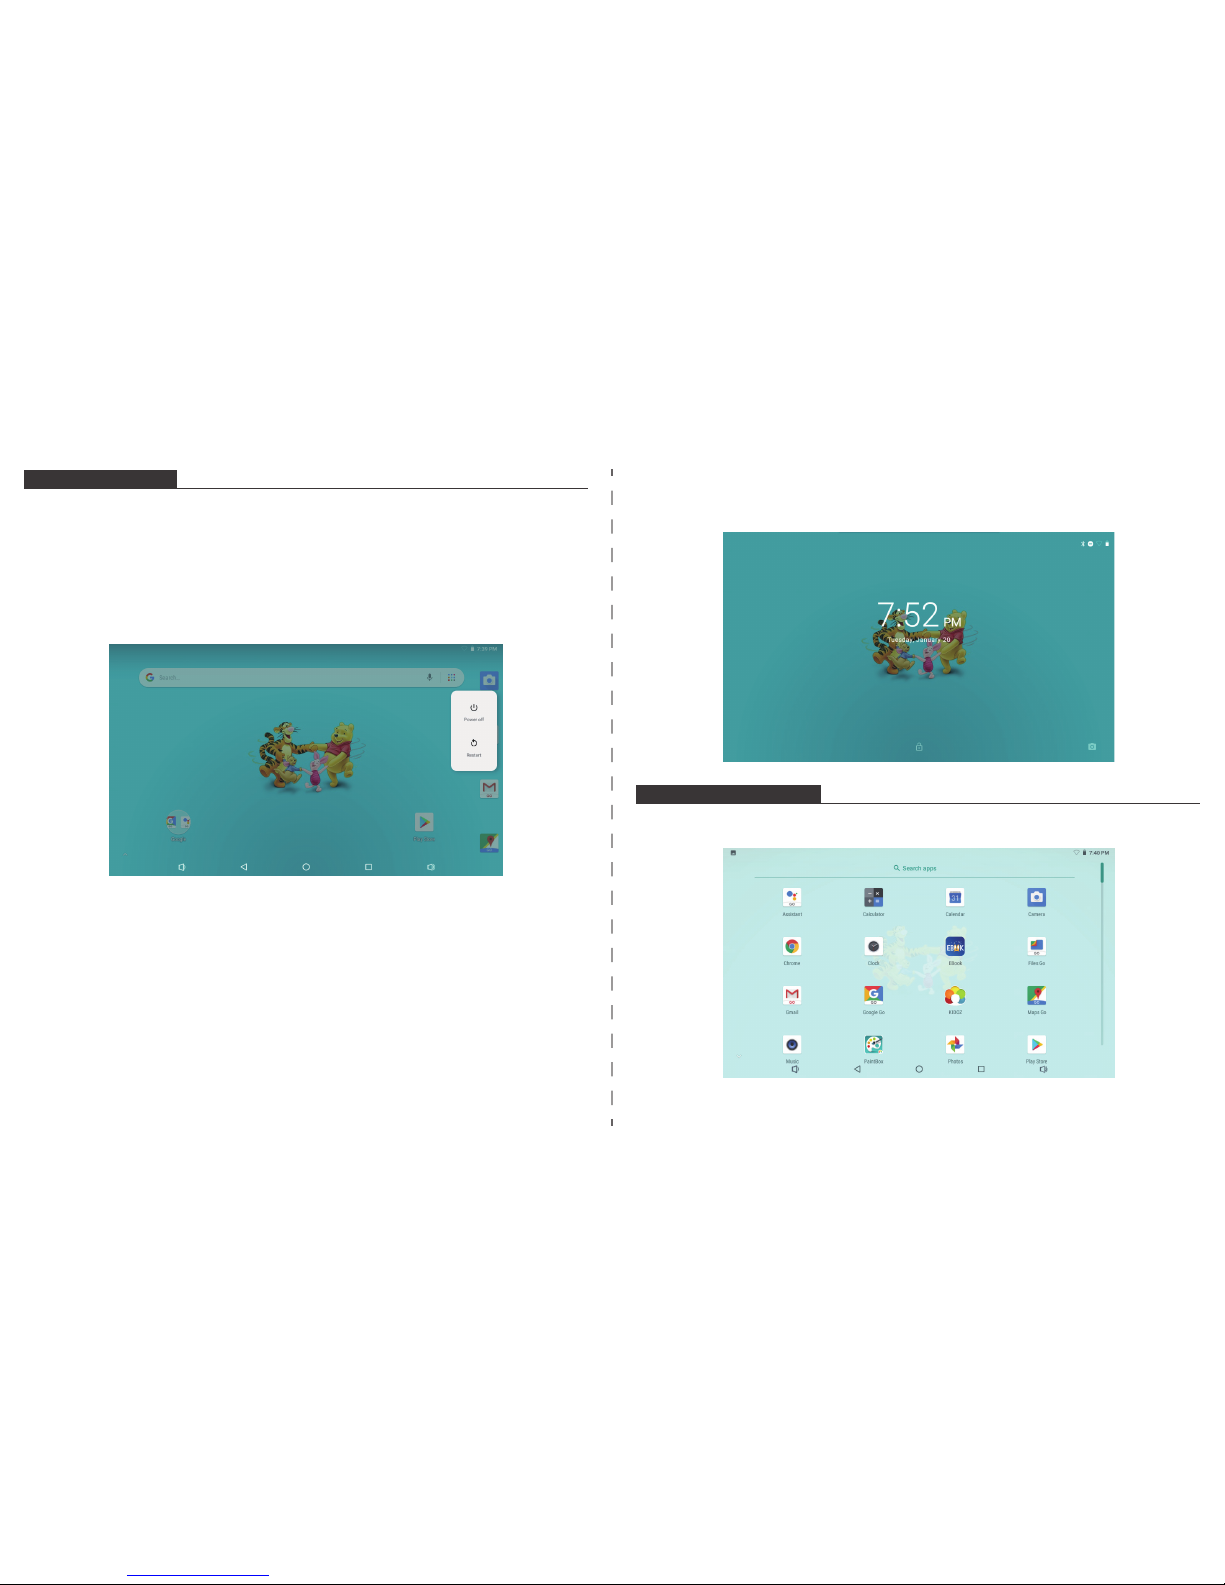
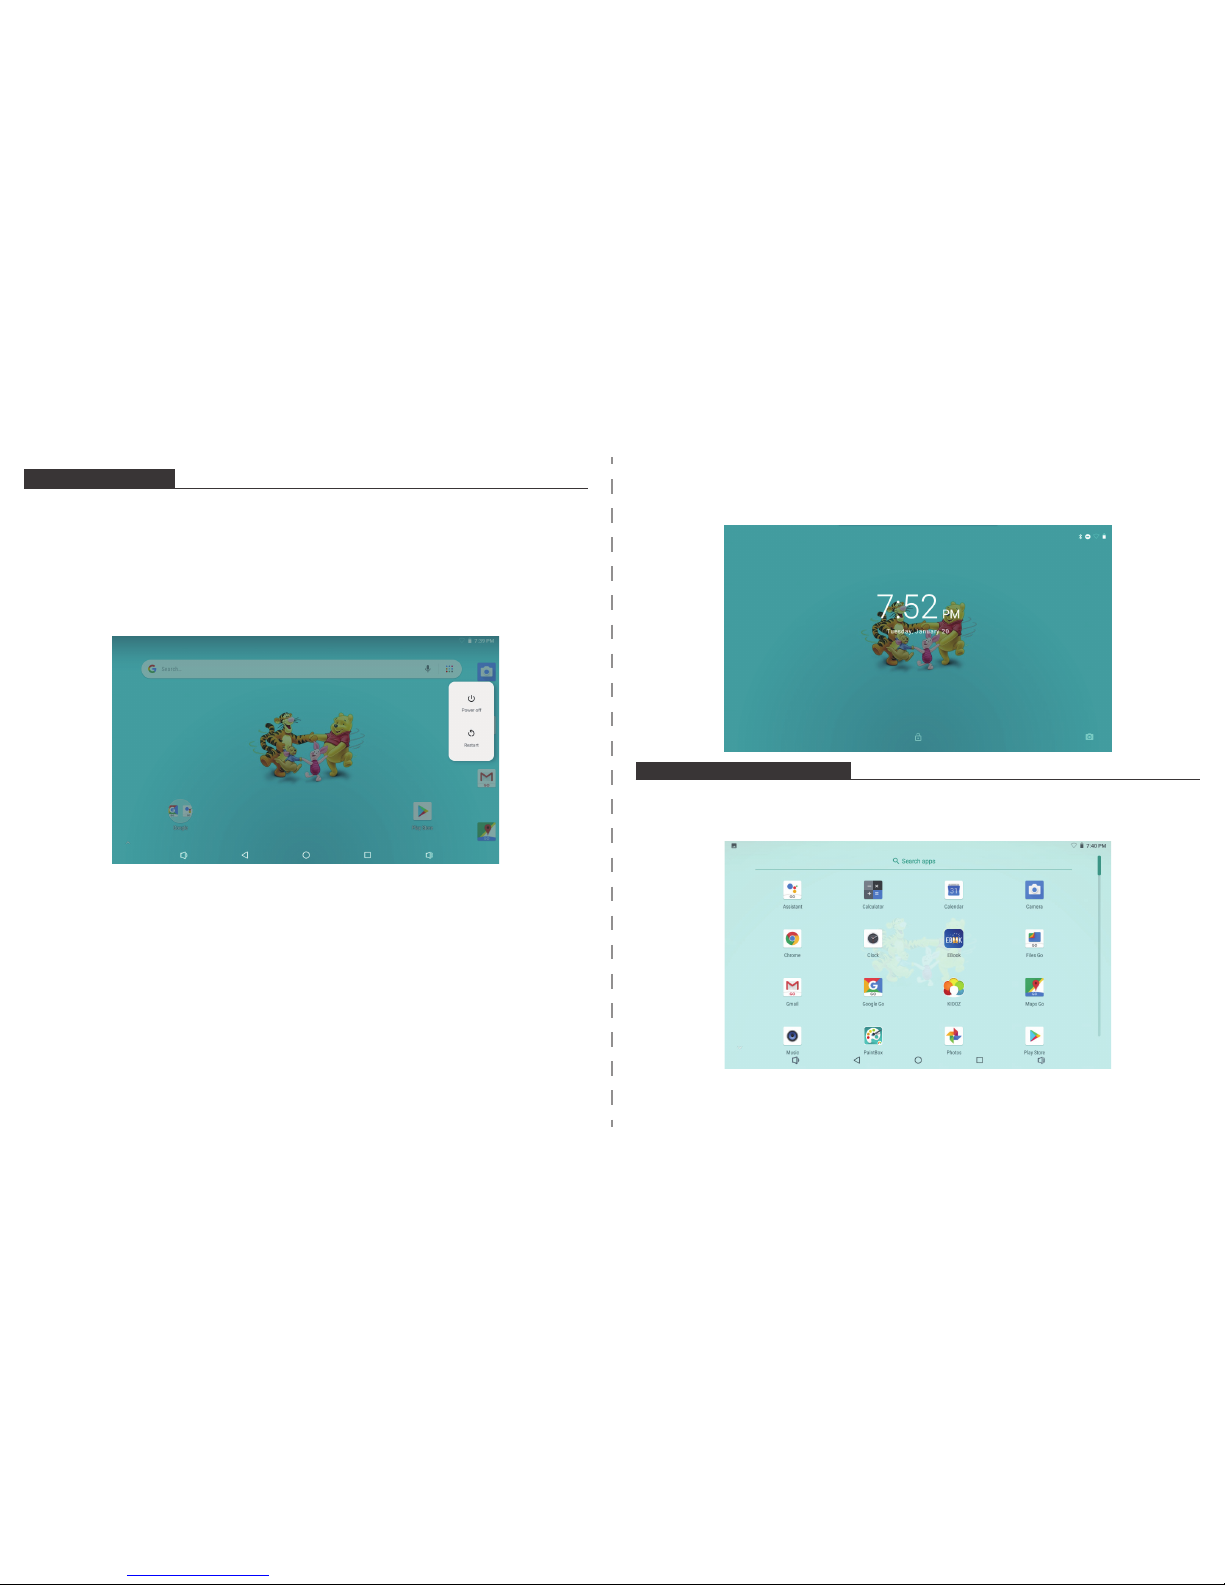
Turning on / off the tablet
To turn on the tablet:
Press and hold the Power button until the LCD screen turns on. Wait until the Home screen
appears, the tablet is now ready for use.
To turn off the tablet:
1. Press and hold the Power button until the Device Options menu appears.
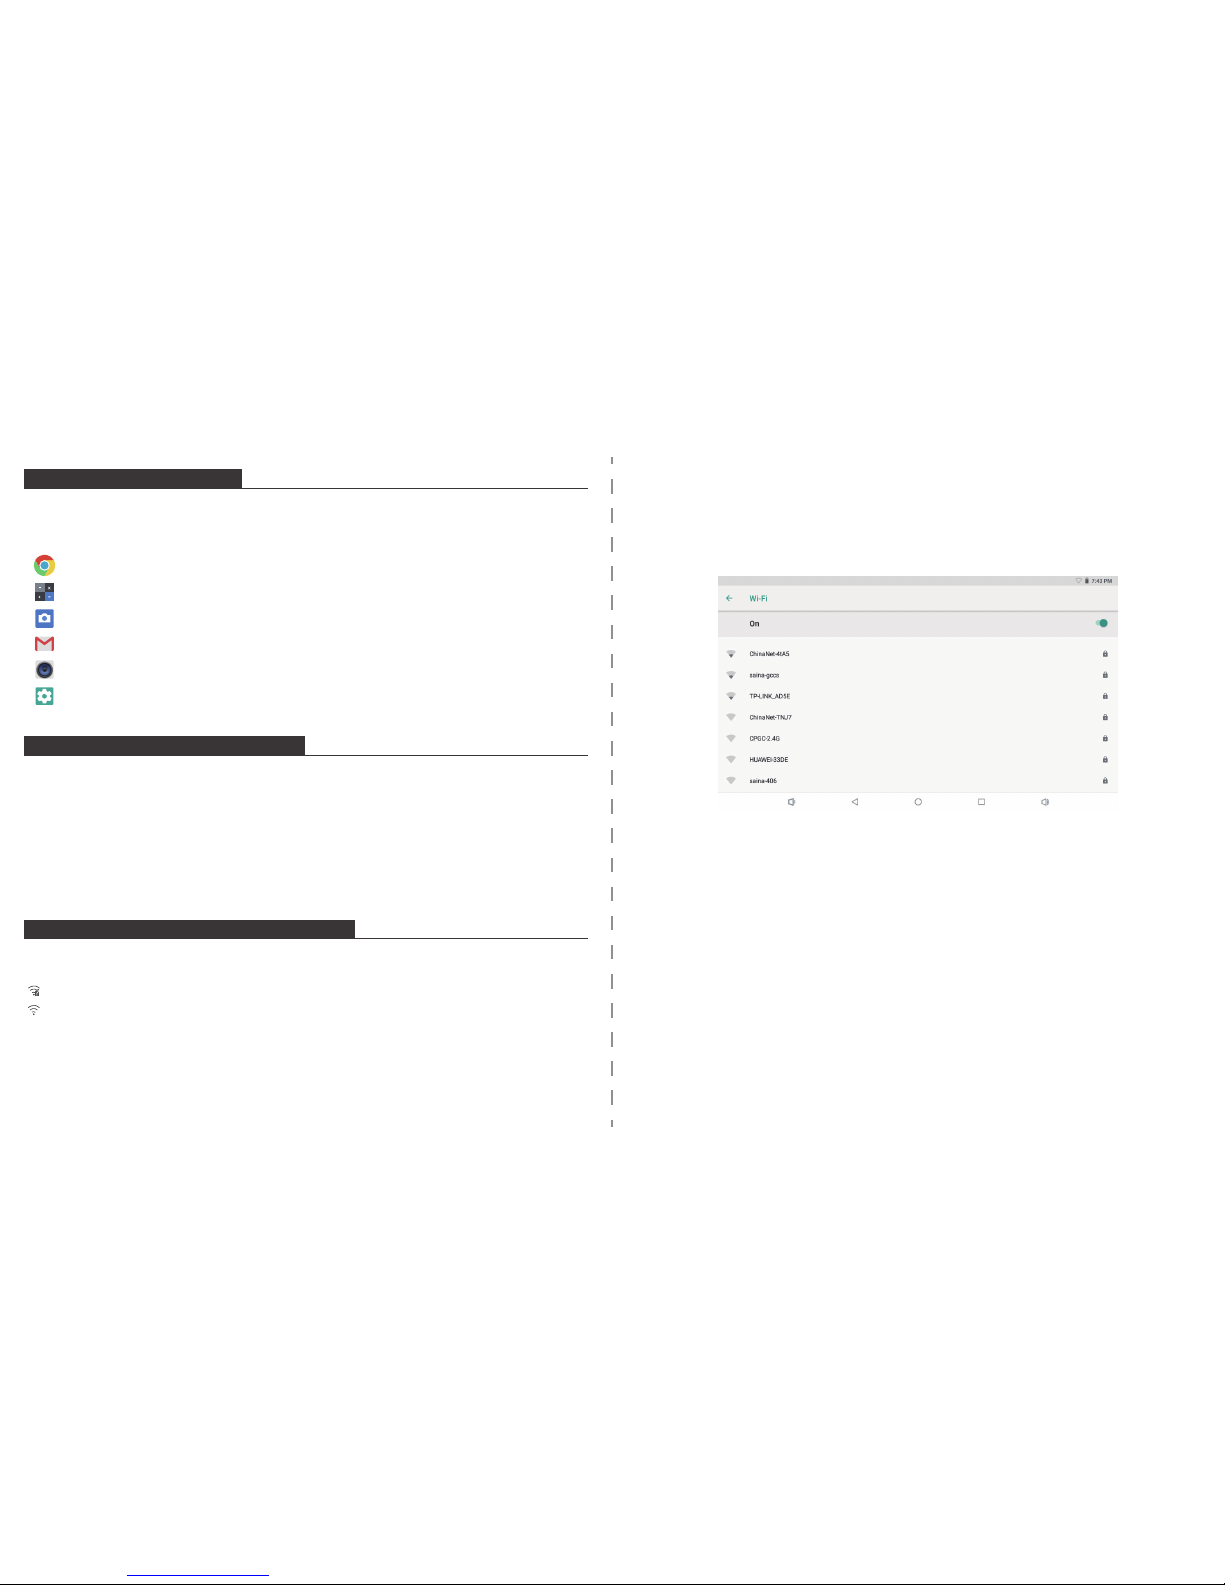
ABOUT APPLICATIONS
To open an application, touch the application icon on the home screen or in the Launcher where you can tap the
icon right up on the home screen to get in. Launcher screen:
2. Tap “OK” to turn off the tablet.
Turning on / off the screen (Sleep mode)
When the tablet is on, you can turn off the screen to save battery power. Simply press the power button
once to turn the screen off. Press the power button again to turn the screen back on.
To save batter y power, the screen can be set to turn off automatically when the tablet is not in use
(between 1 minute and 30 minutes).
This screen timeout option can be found in the Display menu.
Unlocking the screen
When the screen turns off, you will have to unlock the screen when you turn it back on.
To unlock the screen, swipe up the lock icon.
The screen shown above is for illustrative purposes only. We reserve the right to modify and improve
the final list of applications available on the tablet.
3 4
Page 5
ABOUT APPLICATIONS
Preinstalled Applications
Some applications have been installed on your tablet for your convenience.
These applications include:
PREINSTALLED APPLICATIONS
Installing Applications
You can also download an install additional applications from the device’s applications
marketplace, the web browser, or other sources.
The tablet must be set to allow installation of applications from non-Market sources. The
Unknown sources option can be set in the Application settings menu.
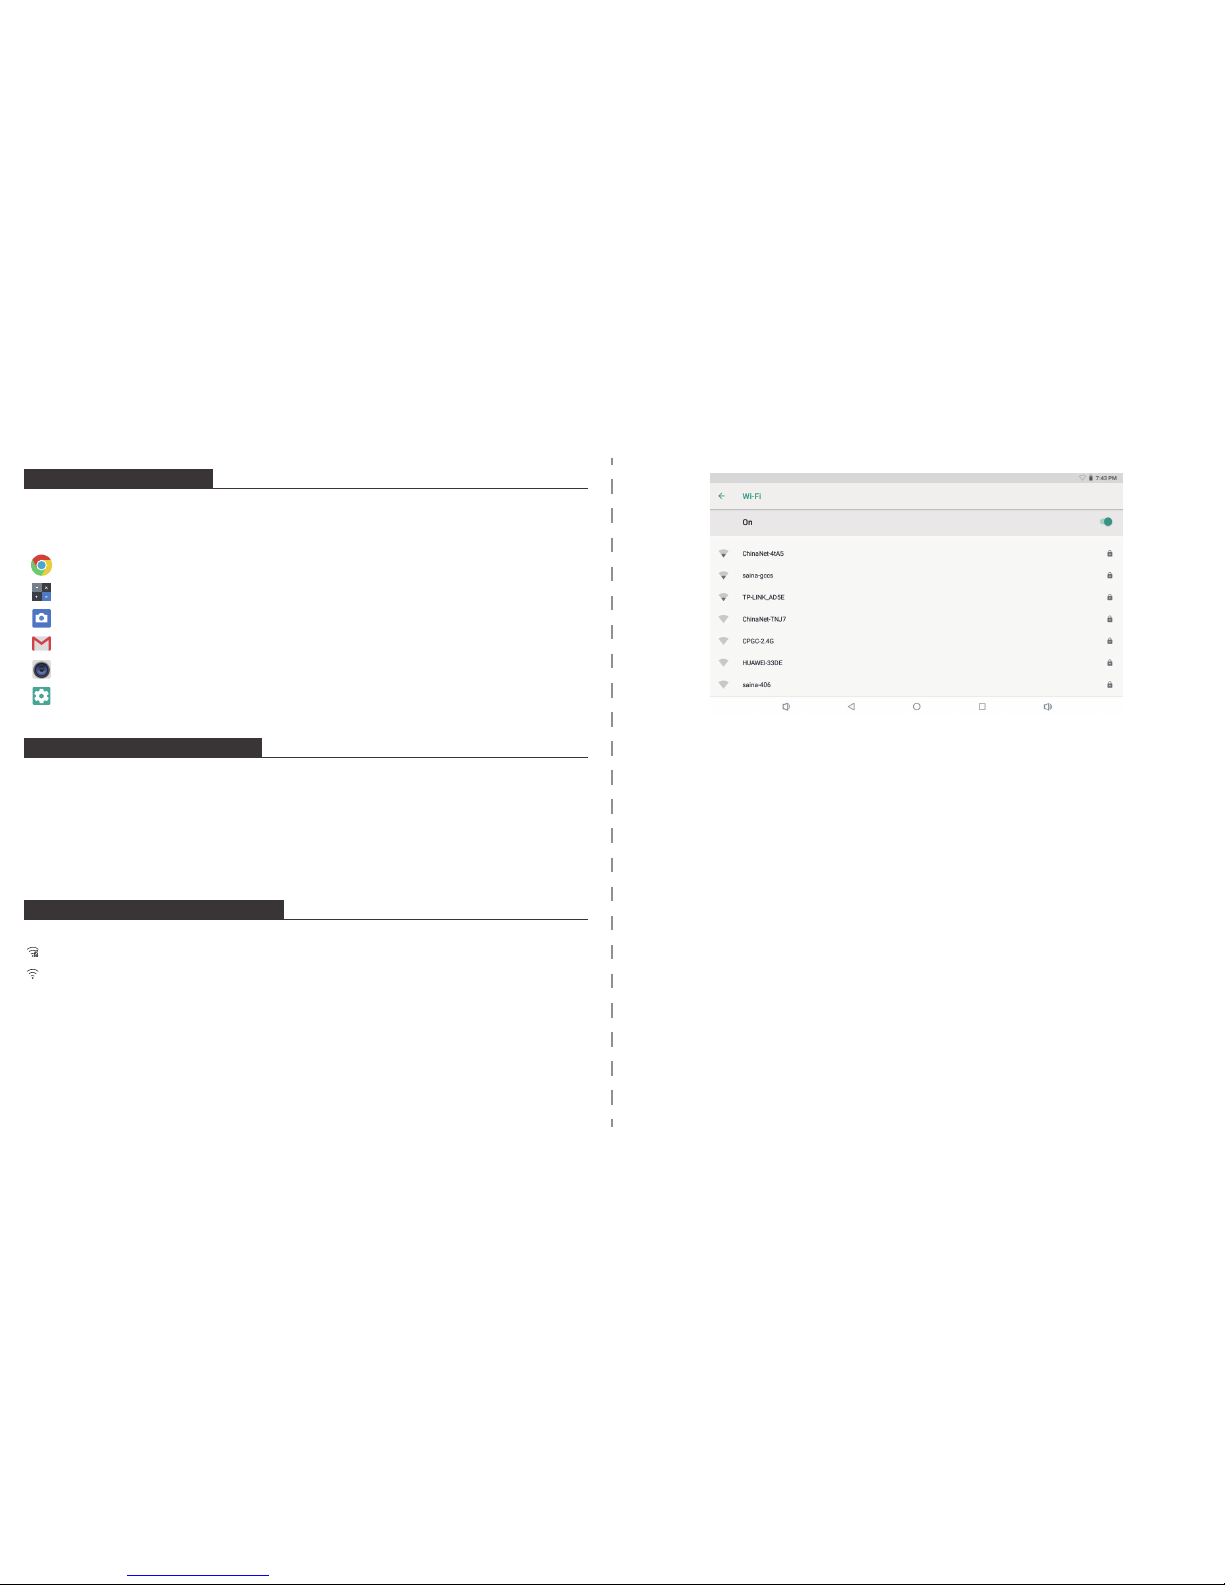
CONNECT TO A WI-FI NETWORK
The Notification bar displays icons that indicate your tablet’s Wi-Fi status.
Notification that an open Wi-Fi network is in range.
Connected to a Wi-Fi network (waves indicate connection strength).
[no icon] There are no Wi-Fi networks in range, or the Wi-Fi radio is off.
1. Turn on the Wi-Fi radio if it is not already on. To turn on Wi-Fi:
a. Go to the Home screen: Press the home botton.
b. Open the Settings menu: tap the icon right up on the home screen to get into the launcher,
then tap settings icon.
c. Open the Wireless & networks menu: Slide the icon to ON status.
Browse the web.
Perform simple mathematical operations.
Take pictures or videos with the camera.
Check your e-mail.
Play music.
Access the Settings menu to adjust the tablet’s options.
When Wi-Fi is on, the tablet will look for and display a list of available Wi-Fi networks.
Notes: If a network that you have connected to previously is found, the tablet will connect to it. If you
don’t see your network in the list, you can force the tablet to re-scan. To scan for networks, tap the
Menu key, and then touch Scan.
2. Select an available Wi-Fi network to connect to:
In the same Wi-Fi settings menu above, tap a network in the list.
If the network is open, the tablet will prompt you to confirm connection to the network.
Tap connect to confirm.
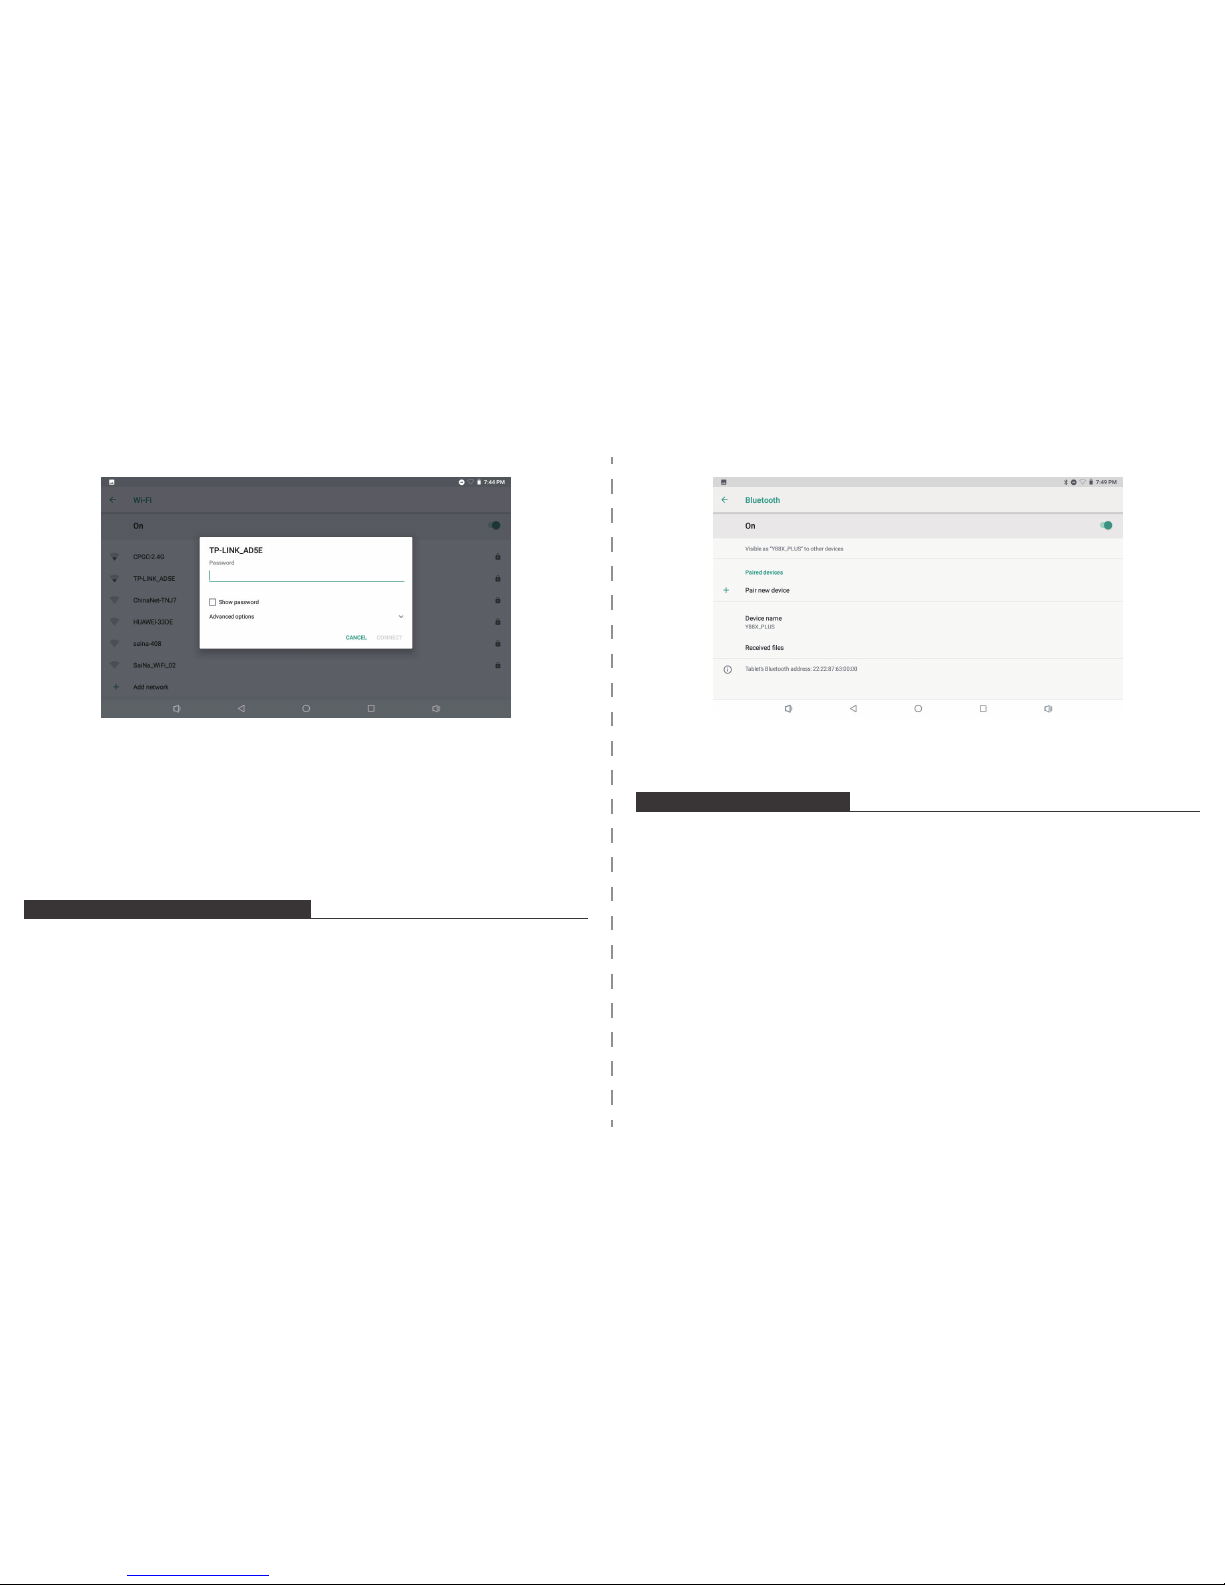
If the network is secured (as indicated by a Lock icon), the tablet will prompt you to enter a password
or other credentials. Tap the Wireless password box to show the on-screen keyboard and then use it
to enter the password. Tap connect to confirm.
5 6
Page 6
When you have successfully connected to a Wi-Fi network, the Notifications bar at the upper
right of the screen will show a Wi-Fi signal indicator.
Notes: To learn about how to add a Wi-Fi network when it is not in range or when the router
is set to obscure the network name (SSID), or to configure advanced Wi-Fi options, please
refer to the manual.
CONNECT TO A BLUETOOTH DEVICE
1. Turn on Bluetooth.
Go to Settings > Bluetooth.
2. Tap the device in the Devices list, then follow the onscreen instructions to connect to it. The
tablet must be within about 30 feet (10 meters) of the Bluetooth device.
OPTIONAL CONNECTIONS
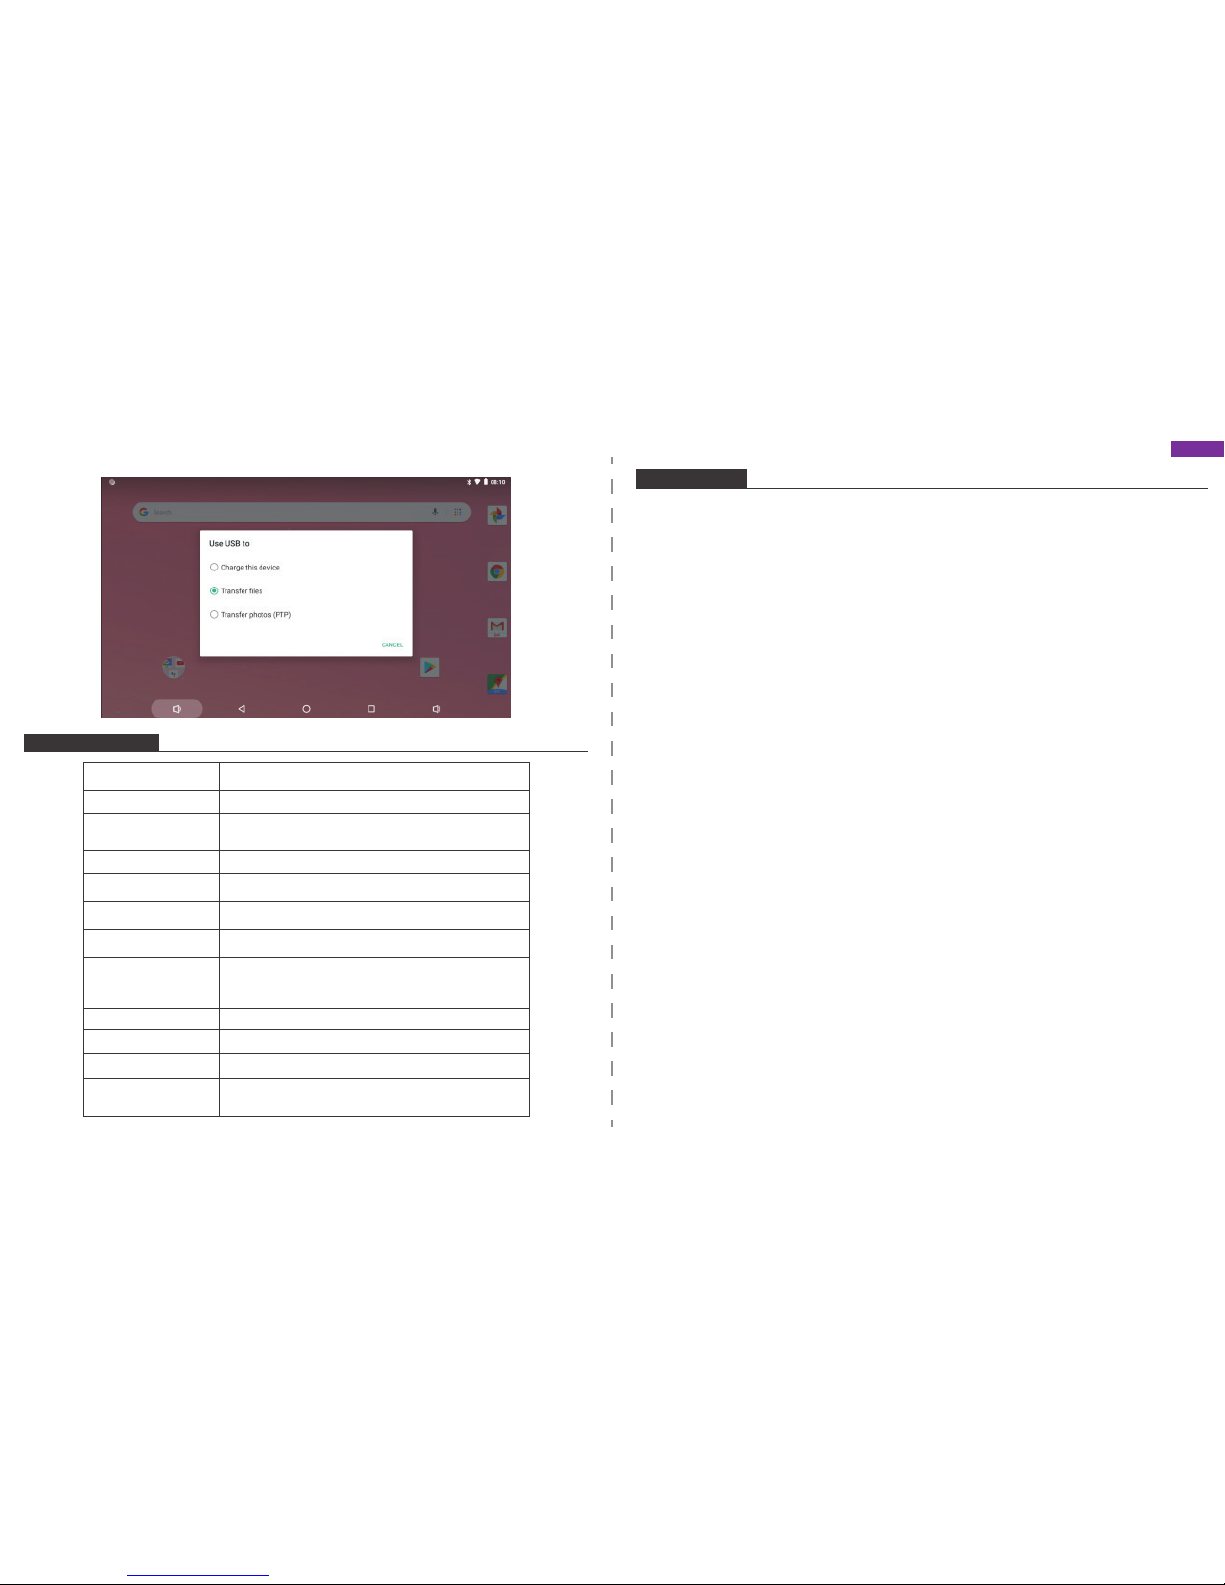
Connecting to a Computer
Connect the tablet to a computer to transfer files.
1. Connect your tablet to the computer.
With the included USB cable: Plug the small end of the cable into the USB 2.0 high speed
connector of the tablet. Plug the large end of the cable into an available USB 2.0 high speed
port on the computer.
2. When your tablet is connected, slide down the USB icon then touch icon USB
connected.
3. Mount the storage.
Touch button Transfer files(MTP) to mount the tablet’s built-in storage. When it is mounted, you
can copy files to or from your tablet.
7 8
Page 7
9
SPECIFICATIONS
Processor
RAM
Storage
Display
Wi-Fi Networking
Audio Output
PC Interface
Additional Features
Operating System
Power
Playback Time
(hours)
RK3126 (Quad-core Cortex-A7 up to 1.2GHz)
1GB DDR3
8GB/16GB(Optional ) flash built-in;
Micro SD card slot (max.64GB supported)
7'' 1024*600, Capcitive touchscreen
IEEE 802.1 1 b/g/n
3.5mm headphone
USB 2.0 high speed
Up to 6 hours music, 3 hours video, 3 hours web browsing
Built-in microphone
Front facing camera(0.3MP) Rear camera (2.0MP)
1X1W speaker
Android 8.1 (Go edition)
Rechargeable Li-poly battery Power Adapter (DC 5V, 1.5A)
Bluetooth
2.0
CONTACT US
For any inquires, issue or comments concerning our products, please send E-mail to the
address below, and we will respond as soon as possible.
E-mail: cs@tabletexpress.com
Google, Android, Google Play and other marks are trademarks of Google LLC
English
10
Page 8
Deutsch
Surfen Sie im Web
Besuchen Sie Ihre Lieblingswebseiten.
Checken Sie Ihre E-Mails
Bleiben Sie mit Freunden und Familie in Verbindung.
Schauen Sie YouTube™ Videos
Durchforsten Sie die weltweit berühmteste Video-Sharing Community.
Lesen Sie Ihre Lieblingsbücher
Laden Sie tausende von Büchern mithilfe des integrierten E-Book Readers* herunter.
Entdecken Sie tausende von Android™ Spiele Apps, andere Anwendungen und mehr mit dem
Play Store (muss installiert sein).
Verbinden Sie sich kabellos mit dem Internet
High-speed Wi-Fi 802.11 b/g/n Netzwerk.
Genießen Sie Ihre Medienbibliothek überall.
Das tragbare Tablet spielt berühmte Musik, Videos und jegliche Foto Formate ab.
Micro SD Kartenleser.
Erweitern Sie die Speicherkapazität (bis zu 64 GB wird unterstützt).
Eingebaute Kamera
Praktische, nach vorne gerichtete Kamera mit 0.3MP / Kamera auf der Rückseite 2.0MP.
Automatische Ausrichtungserkennung
Lesen Sie so, wie Sie es möchten. Der Bildschirm passt sich automatisch an!
Um Bücher im ePub Format zu lesen, wird die integrierte E-Book Reader Anwendung benötigt.
EIGENSCHAFTEN
DAS GERÄT AUF EINEN BLICK
1. Vordere Kamera
2. Power: Drücken Sie den Knopf, um das Gerät einzuschalten oder um den Bildschirm
ein-und auszuschalten. Drücken und halten Sie den Knopf, um zum Ausschalten
Menü zu gelangen.
3. Kopfhörer: Audio Ausgang Verbindung für Kopfhörer.
4. VOL+ / VOL-
5. MicroSD Karte
6. Mikrofon: Verwenden Sie das integrierte Mikrofon, um Ihre Stimme aufzunehmen.
7. USB Stecker: Verbinden Sie ein USB Gerät.
8. Hintere Kamera
9. Lautsprecher
10. Speaker
3
4
5
2
1
6
7
8
9
10
11 12
Page 9
INBETRIEBNAHME
Das Tablet ein- und ausschalten
Um das Tablet einzuschalten:
Drücken und halten Sie den Power Knopf bis der LCD Bildschirm angeht. Warten Sie bis
der Startbildschirm erscheint. Das Tablet kann nun bedient werden.
Um das Tablet auszuschalten:
1. Drücken und halten Sie den Power Knopf bis das Optionen Menü des Geräts erscheint.
ÜBER DIE ANWENDUNGEN
Um eine Anwendungen zu öffnen, berühren Sie das Anwendungssymbol auf dem Startbildschirm oder im
Startprogramm, wo Sie durch Tippen auf das Symbol oben rechts auf dem Startbildschirm hingelangen.
Startprogramm Bildschirm:
2. Berühren Sie Ausschalten auf dem Bildschirm, um das Tablet auszuschalten.
Den Bildschirm ein- und ausschalten (Standby)
Wenn das Tablet eingeschaltet ist, können Sie den Bildschirm ausschalten, um Strom zu
sparen. Drücken Sie einfach den Power Knopf einmal, um den Bildschirm auszuschalten.
Drücken Sie den Power Knopf erneut, um den Bildschirm wieder einzuschalten.
Um den Stromverbrauch zu minimieren, kann das Gerät so eingestellt werden, dass der
Bildschirm automatisch ausgeschaltet wird, wenn das Tablet nicht in Gebrauch ist (zwischen
1 und 30 Minuten).
Die Einstellung für die Dauer kann im Display Menü gefunden werden.
Den Bildschirm entsperren
Wenn der Bildschirm ausgeht, müssen Sie ihn beim erneuten Anschalten entsperren.
Um den Bildschirm zu entsperren, wischen Sie beim Schloss Symbol nach oben.
Der Bildschirm, der hier gezeigt wird, dient nur zu Erklärungszwecken. Wir behalten uns das Recht vor, die
endgültige Anwendungsliste, die auf dem Tablet verfügbar sein wird, entsprechend zu verändern und zu
verbessern.
13
14
Page 10
ÜBER DIE ANWENDUNGEN
Vorinstallierte Anwendungen
Manche Anwendungen wurden zu Ihrer Bequemlichkeit auf dem Tablet schon vorinstalliert.
Diese Anwendungen beinhalten:
VORINSTALLIERTE ANWENDUNGEN
Anwendungen installieren
Sie können auch zusätzliche Anwendungen vom Anwendungsshop des Geräts, über den Web
Browser oder anderen Quellen herunterladen und installieren.
Das Tablet muss so eingestellt werden, dass es die Installation von Anwendungen aus anderen
Quellen erlaubt. Die Einstellungen für unbekannte Quellen kann in den
Anwendungseinstellungen vorgenommen werden.
VERBINDUNG ZU EINEM Wi-Fi NETZWERK
Die Benachrichtigungsleiste zeigt Symbole, welche den Wi-Fi Status Ihres Tablets erkennen
lassen.
Benachrichtigung, dass ein offenes Wi-Fi Netzwerk in Ihrer Nähe ist.
Mit einem Wi-Fi Netzwerk verbunden (die Wellen zeigen die Stärke der Verbindung an).
[kein Symbol] Es befindet sich kein Wi-Fi Netzwerk in der Nähe oder der Wi-Fi Funk ist
ausgeschaltet.
1. Schalten Sie den Wi-Fi Funk ein, wenn er nicht schon eingeschaltet ist. Um Wi-Fi
einzuschalten:
Surfen Sie im Web.
Führen Sie einfache mathematische Berechnungen durch.
Nehmen Sie Fotos oder Videos mit der Kamera auf.
Checken Sie Ihre E-Mails.
Spielen Sie Musik ab.
Greifen Sie auf die Einstellungen zu, um Ihr Tablet anzupassen.
Wenn das Wi-Fi eingeschaltet ist, wird das Tablet nach Wi-Fi Netzwerken suchen und eine Liste
von verfügbaren Netzwerken anzeigen.
Hinweis: Falls ein Netzwerk gefunden wird, mit welchem Sie schon einmal verbunden waren,
wird sich das Tablet automatisch mit diesem erneut verbinden. Falls Sie Ihr Netzwerk nicht in
der Liste finden, können Sie das Tablet zu einem erneuten Suchvorgang zwingen.
Um nach Netzwerken zu suchen, drücken Sie den Menü Knopf und dann berühren Sie
Durchsuchen.
2. Wählen Sie ein verfügbares Wi-Fi Netzwerk aus, um zu verbinden:
Drücken Sie im selben Menü wie oben auf ein Netzwerk aus der Liste.
Wenn das Netzwerk offen ist, wird das Tablet sofort nach einer Bestätigung fragen, sich mit
dem Netzwerk zu verbinden.
Berühren Sie Verbinden um zu bestätigen.
a. Gehen Sie zum Startbildschirm: Drücken Sie den Home Knopf.
b. Öffnen Sie das Einstellungsmenü: tippen Sie das Symbol rechts oben auf dem
Startbildschirm um zum Startprogramm zu gelangen. Drücken Sie dann das
Einstellungssymbol.
c. Öffnen Sie das Drahtlos & Netzwerk Menü: Wischen Sie das Symbol auf AN.
15
16
Page 11

Wenn Sie sich erfolgreich mit einem Wi-Fi Netzwerk verbunden haben, wird auf der
Benachrichtigungsleiste oben rechts auf dem Bildschirm eine Wi-Fi Signalanzeige sichtbar sein.
Hinweis: Um zu lernen, wie man ein Wi-Fi Netzwerk hinzufügt, welches sich außerhalb Ihrer
Reichweite befindet oder wessen Netzwerk Namen (SSID) durch den Router verdeckt wird
oder um fortgeschrittene Wi-Fi Optionen zu konfigurieren, wenden Sie sich bitte an das
Handbuch.
MIT EINEM BLUETOOTH GERÄT VERBINDEN
1. Schalten Sie Bluetooth an.
Gehen Sie zu den Einstellungen > Bluetooth.
2. Tippen Sie ein Gerät in der Geräteliste an. Folgen Sie dann den Anweisungen auf dem
Bildschirm, um sich mit dem Gerät zu verbinden. Das Tablet muss sich in unmittelbarer Nähe
(ca. 10 Meter) zum Bluetooth Gerät befinden.
WEITERE VERBINDUNGEN
Mit einem Computer verbinden
Verbinden Sie das Tablet mit einem Computer, um Dateien zu übertragen.
1. Verbinden Sie Ihr Tablet mit dem Computer
Mit dem beigefügten USB Kabel: Stecken Sie das kleine Ende des Kabels in den USB 2.0
High-Speed-Stecker des Tablets. Stecken Sie das große Ende des Kabels in den vorhandenen
USB 2.0 High-Speed-Stecker des Computers.
2. Wenn das Tablet verbunden ist, streichen Sie das USB Symbol nach unten und
berühren Sie das Symbol USB Verbunden.
3. Den Speicher freigeben.
Berühren Sie die Taste Daten Übertragen (MTP), um den eingebauten Speicher des Tablets
freizugeben. Wenn er freigegeben ist, können Sie Dateien auf und von Ihrem Tablet kopieren.
Falls das Netzwerk geschützt ist (angezeigt durch das Schloss Symbol), wird das Tablet Sie
dazu auffordern, ein Passwort oder Ähnliches einzugeben. Berühren Sie das Passwortfeld der
drahtlosen Verbindung um die Bildschirmtastatur aufzurufen und ein Passwort einzugeben.
Berühren Sie Verbinden um zu bestätigen.
17 18
Page 12

TECHNISCHE DETAILS
Prozessor
RAM
Speicher
Bildschirm
Wi-Fi
Audio Ausgang
PC Schnittstelle
Zusätzliche
Eigenschaften
Betriebssystem
Power
Wiedergabezeit
(Stunden)
RK3126 (Quad-core Cortex-A7 bis zu 1.2GHz)
1GB DDR3
8GB/16GB Optional ) Flash eingebaut;
Micro SD Kartenschlitz (max.64GB unterstützt)
7'' 1024*600, kapazitiver touchscreen
IEEE 802.1 1 b/g/n
3.5mm Klinke
USB 2.0 High Speed
Bis zu 6 Stunden Musik, 3 Stunden Video, 3 Stunden Internet Surfen
Eingebautes Mikrofon Vorderkamera(0.3MP)
Hinterkamera (2.0MP) 1X1W Lautsprecher
Android 8.1 (Go edition)
Wiederaufladbare Li-poly Batterien. Power Adapter (DC 5V, 1.5A)
Bluetooth
2.0
KONTAKT MIT UNS
Für Anfragen, Probleme oder Kommentare zu unseren Produkten senden Sie bitte eine
E-Mail an an die untenstehende Adresse, und wir werden so schnell wie möglich
antworten.
E-mail: cs@tabletexpress.com
Google, Android, Google Play and other marks are trademarks of Google LLC
Deutsch
19
20
Page 13

Español
Navegar la Web
Visitar sus sitios web favoritos.
Revisar su correo electrónico
Mantenerse en contacto con amigos y familiares.
Ver los videos de YouTube™
Explorar la comunidad más popular del mundo de compartición de vídeos.
Leer los libros favoritos
Descargar miles de libros con el dispositivos de lectura* de E-book incluido.
Descubrir miles de aplicaciones para juegos, aplicaciones y más de Android™ en la Tienda
de Juegos.( El cliente necesita descargarlo desde Google Play Store.)
Conectar a Internet de forma inalámbrica
Red 802.11 b/g/n Wi-Fi de alta velocidad.
Disfrutar de su biblioteca multimedia en cualquier lugar.
La central eléctrica portátil reproduce música, vídeo y formatos de fotos populares.
Lector de tarjetas de memoria Micro SD.
Aumentr su capacidad de almacenamiento (hasta 64 GB apoyado)
Cámara incorporada
Fácil cámara frontal 0.3MP / cámara trasera 2.0MP.
Detección automática de la orientación
Léalo como quiera; ¡la pantalla se ajusta automáticamente!
Leer los libros en formato ePub requiere la aplicación del lector de E-book incluido.
CARACTERISTICAS
UN VISTAZO DE LA UNIDAD
1. Cámara frontal
2. Botón de encendido / Protector de pantalla.
3. Auriculares: Conexión de salida de audio para auriculares.
4. VOL+ / VOL-
5. Ranura para tarjeta microSD
6. MIC: Se usa el micrófono interno para grabar la voz.
7. Puerto micro usb: Conectarse a un dispositivo USB.
8. DC
9. Cámara trasera
10. Altavoz
3
4
5
2
1
6
7
8
9
10
21 22
Page 14

PARA EMPEZAR
Encender o apagar la tableta
Para encender la tableta:
Mantener presionada el botón de Encendido hasta que se encienda la pantalla LCD.
Espere hasta que aparezca la pantalla de inicio, la tableta estará lista para su uso.
Para apagar la tableta:
1. Mantener presionada el botón de Encendido hasta que aparezca el menú Opciones del
dispositivo.
ACERCA DE LAS APLICACIONES
Para abrir una aplicación, toque el icono de la aplicación en la pantalla de inicio o en el
Iniciador, donde puede tocar el icono directamente en la pantalla de inicio para entrar.
Pantalla de inicio:
2. Toqcar OK en la pantalla para apagar la tableta.
Encendido y apagado de la pantalla (en espera)
Cuando la tableta está encendida, puede apagar la pantalla para conservar la energía de la
batería. Simplemente presione el botón de Encendido una vez para apagar la pantalla.
Pulse de nuevo el botón de Encendido para volver a encender la pantalla.
Para conservar la energía de la batería, la pantalla se puede configurar para que se apague
automáticamente cuando la tableta no esté en uso (entre 1 y 30 minutos).
Esta opción de tiempo de espera de la pantalla se encuentra en el menú Pantalla.
Desbloquear de la pantalla
Cuando la pantalla se apague, tendrá que desbloquearla cuando la vuelva a encender.
Para desbloquear la pantalla, deslice hacia arriba el icono del candado.
La pantalla que se muestra arriba es sólo para fines ilustrativos. Nos reservamos el derecho
de modificar y mejorar la lista final de aplicaciones disponibles en la tableta.
23 24
Page 15

ACERCA DE LAS APLICACIONES
Aplicaciones preinstaladas
Algunas aplicaciones han sido instaladas en su tableta para su conveniencia.
Estas aplicaciones incluyen:
APLICACIONES PREINSTALADAS
Instalación de aplicaciones
También puede descargar una instalación de aplicaciones adicionales desde el mercado de
aplicaciones del dispositivo, el navegador web u otras fuentes.
La tableta debe configurarse para permitir la instalación de aplicaciones de fuentes no
comerciales. La opción Fuentes desconocidas se puede configurar en el menú
Configuración de la aplicación.
CONÉCTESE A UNA RED WI-FI
La barra de notificaciones muestra iconos que indican el estado de Wi-Fi de su tableta.
Notificación de que una red Wi-Fi abierta está dentro del alcance.
Conectado a una red Wi-Fi (las ondas indican la intensidad de la conexión).
[no icon] No hay ninguna red Wi-Fi al alcance, o la radio Wi-Fi está apagada.
1. Encender la radio Wi-Fi si no está encendida. Para activar Wi-Fi:
a. Ir a la pantalla de inicio: Pulse la tecla Inicio.
b. Abrir el menú Configuración: toque el icono en la pantalla de inicio para entrar en el
lanzador y, a continuación, toque el icono Configuración.
c. Abrir el menú Redes inalámbricas y redes: Deslice el icono hasta el estado ON.
Navegar la Web.
Realizar operaciones matemáticas simples.
Tomar fotografías o vídeos con la cámara.
Revisar su correo electrónico.
Producir música.
Acceder al menú Configuración para ajustar las opciones de la tableta.
Cuando la conexión Wi-Fi está activada, la tableta buscará y mostrará una lista de redes Wi-Fi
disponibles.
Notas: Si se encuentra una red a la que se ha conectado anteriormente, la tableta se
conectará a ella. Si no ve su red en la lista, puede forzar a la tableta a volver a escanearla.
Para buscar redes, puntee en la tecla Menú y, a continuación, toque Escanear.
2. Seleccionar una red Wi-Fi disponible a la que conectarse:
En el mismo menú de configuración de Wi-Fi de arriba, toque una red de la lista.
Si la red está abierta, la tableta le pedirá que confirme la conexión a la red.
Tocar la conexión para confirmar.
Si la red está protegida (como se indica en el icono de bloqueo), la tableta le pedirá que
introduzca una contraseña u otras credenciales. Toque Conectar para confirmar.
25 26
Page 16

Cuando se haya conectado correctamente a una red Wi-Fi, la barra de notificaciones
situada en la parte superior derecha de la pantalla mostrará un indicador de señal Wi-Fi.
Notas: Para obtener más información sobre cómo agregar una red Wi-Fi cuando no está
dentro del alcance o cuando el enrutador está configurado para ocultar el nombre de red
(SSID), o para configurar opciones avanzadas de Wi-Fi, consulte el manual.
CONECTAR A UN DISPOSITIVO BLUETOOTH
1. Activar Bluetooth
Ir a Configuración > Bluetooth.
2. Puntar en el dispositivo en la lista Dispositivos y siga las instrucciones en pantalla para
conectarse a él. La tableta debe estar a una distancia de aproximadamente 30 pies (10
metros) del dispositivo Bluetooth.
CONEXIONES OPCIONALES
Conexión a un ordenador
Conectar la tableta a un ordenador para transferir archivos.
1. Conectar su tableta a la computadora.
Con el cable USB incluido: Enchufe el extremo pequeño del cable en el conector de alta
velocidad USB 2.0 de la tableta. Conecte el extremo grande del cable a un puerto USB 2.0
de alta velocidad disponible en el ordenador.
2. Cuando la tableta esté conectada, deslice el icono USB hacia abajo y luego toque
el icono USB conectado.
3. Montar el almacenamiento.
Botón táctil Transferir archivos (MTP) para montar el almacenamiento integrado de la
tableta. Cuando está montado, puede copiar archivos a o desde su tableta.
27 28
Page 17

Español
ESPECIFICACIONES
Procesador
RAM
Almacenamiento
Pantalla
Redes Wi-Fi
Salida de audio
Interfaz de PC
Características
adicionales
Sistema Operativo
Potencia
Tiempo de
reproducción (horas)
RK3126 (Corteza de cuatro núcleos-A7 hasta 1,2 GHz)
1GB DDR3
Flash opcional de 8GB / 16GB incorporado;
Ranura para tarjetas Micro SD (máx. 64GB)
7'' 1024*600, Pantalla táctil cautiva
IEEE 802.1 1 b/g/n
Auriculares de 3,5 mm
USB 2.0 de alta velocidad
Hasta 6 horas de música, 3 horas de vídeo,
3 horas de navegación web
Micrófono incorporado Cámara frontal (0.3MP)
Altavoz 1X1W
Android 8.1 (Go edition)
Batería recargable de poliéster de litio,
Adaptador de alimentación (DC 5V, 1.5A)
Bluetooth
2.0
CONTÁCTENOS
Para cualquier consulta, problema o comentario sobre nuestros productos, por favor envíe
un correo electrónico a la dirección que aparece a continuación, y le responderemos lo
antes posible.
E-mail: cs@tabletexpress.com
Google, Android, Google Play and other marks are trademarks of Google LLC
29 30
Page 18

Français
Surfez sur le Web
Visitez vos sites préférés.
Vérifiez votre e-mail
Restez en contact avec vos amis et votre famille.
Regarder des vidéos sur YouTube™
Feuilletez la communauté de partage de vidéos la plus populaire au monde.
Lisez vos livres préférés
Téléchargez des milliers de livres via le lecteur de livre électronique inclus*.
Découvrez des milliers d'applications pour Android ™ Jeux, applications et plus encore via
Play Store (installation requise par le client).
Connectez-vous à Internet sans fil
Réseau Wi-Fi de haut débit 802.11 b/g/n
Profitez de votre médiathèque où que vous soyez.
Une centrale portable prend en charge les formats de musique populaire, vidéo et photo.
Lecteur de carte mémoire Micro SD.
Augmentez votre capacité de stockage (supportez jusqu'à 64 GB).
Caméra intégrée
Caméra frontale 0.3MP / Caméra arrière 2.0MP pratique.
Détection de l'orientation automatique
Lisez de façon comme vous voulez; l'affichage s'ajuste automatiquement!
La lecture de livres au format ePub nécessite l'application de lecteur de livre électronique
incluse.
CARACTÉRISTIQUES
UNITÉ EN UN COUP D'CEIL
1. Caméra Frontale
2. Bouton Power: Appuyez pour allumer l'appareil, allumer ou éteindre l'écran.
Appuyez longuement pour accéder au menu “Mise hors tension”.
3. Écouteur: Connexion de sortie audio pour les écouteurs.
4. VOL+ / VOL-
5. CARTE MicroSD: Insérez ici les cartes mémoire microSD externes.
6. MIC: Utilisez le MIC interne pour enregistrer la voix.
7. PORT USB: Connectez à une périphérique USB.
8. DC
9. Caméra Arrière
10. Haut-parleur
3
4
5
2
1
6
7
8
9
10
31
32
Page 19

COMMENCEZ
Allumer ou éteindre la Tablette
Pour allumer la tablette:
Appuyez sur le bouton Power de façon prolongée jusqu'à ce que l'écran LCD s'allume.
Attendez que l'écran d'Accueil apparaisse, la tablette est maintenant prête pour l’utilisation.
Pour éteindre la tablette:
1. Appuyez sur le bouton Power de façon prolongée jusqu'à ce que Le menu Options de
l'appareil apparaisse.
A PROPOS DES APPLICATIONS
Pour ouvrir une application, appuyez sur l'icône de l'application sur l'écran d'accueil ou
dans le Lanceur où vous pouvez appuyer sur l'icône directement sur l'écran d'accueil pour
y accéder. Écran Lanceur:
2. Touchez ok sur l’écran pour éteindre la tablette.
Allumer ou éteindre l'Écran (Mise en veille)
Lorsque la tablette est allumée, vous pouvez éteindre l'écran pour économiser la batterie.
Il suffit d'appuyer une fois sur le bouton Power pour éteindre l'écran. Appuyez sur le
bouton Power de nouveau pour rallumer l’écran.
Pour économiser la batterie, l'écran peut être configuré pour s'éteindre automatiquement
lorsque la tablette n'est pas utilisée (entre 1 minute et 30 minutes).
Cette option de délai d’écran se trouve dans le menu Affichage.
Déverrouiller l'Écran
Lorsque l'écran s'éteint, vous devrez le déverrouiller pour le rallumer.
Pour déverrouiller l’écran, balayer l’icône de verrouillage du bas vers le haut.
L'écran présenté ci-dessus est uniquement à des fins d'illustration. Nous réservons le droit
de modifier et d’améliorer la liste finale des applications disponibles sur la tablette.
33
34
Page 20

A PROPOS DES APPLICATIONS
Applications Préinstallées
Certaines applications ont été installées sur votre tablette à votre disposition.
Ces applications incluent:
APPLICATIONS PRÉINSTALLÉES
Installez les Applications
Vous pouvez également télécharger une autre application pour l’installer à partir du marché
des applications, du navigateur Web ou d’autres sources.
La tablette doit être configurée pour permettre l’installation d’applications provenant de
sources non-Market. L'option Sources Inconnues (Unknown sources) peut être définie dans le
menu Paramètres de l’Application (Application Settings).
CONNECTEZ À RÉSEAU WI-FI
La barre de Notification affiche des icônes indiquant le statut Wi-Fi de votre tablette.
Notification qu'un réseau Wi-Fi ouvert est à portée.
Connecté à un réseau Wi-Fi (les ondes indiquent la qualité de la connexion).
[sans icône] Il n'y a pas de réseaux Wi-Fi à portée ou la radio Wi-Fi est éteinte.
1. Allumez la radio Wi-Fi si elle ne l’est pas déjà. Pour activer Wi-Fi:
a. Aller à l'écran d'accueil: Appuyez sur le bouton Home.
b. Ouvrez le menu Paramètres: appuyez sur l'icône sur l'écran d'accueil pour accéder au
Lanceur, puis appuyez sur l'icône Paramètres.
c. Ouvrez le menu Wireless & networks: faites glisser l’icône sur le statut ON.
Surfez sur le web.
Effectuer des opérations mathématiques simples.
Prendre des photos ou des vidéos avec la caméra.
Vérifiez votre courrier électronique.
Jouer de la musique.
Accédez au menu Paramètres pour configurer les options de la tablette.
Lorsque le Wi-Fi est activé, la tablette recherche les réseaux et affiche une liste des réseaux
Wi-Fi disponibles.
Remarques: Si un réseau auquel vous vous êtes connecté précédemment est trouvé, la
tablette s'y connectera. Si votre réseau ne figure pas dans la liste, vous pouvez permettre à la
tablette de renouveler une recherche. Pour rechercher des réseaux, appuyez sur la touche
Menu, puis sur la touche Rechercher (Scan).
2. Sélectionnez un réseau Wi-Fi disponible auquel vous pouvez connecter:
Dans le même menu de Paramètres Wi-Fi (Wi-Fi settings) ci-dessus, touchez un réseau dans
la liste.
Si le réseau est ouvert, la tablette vous invitera à confirmer la connexion au réseau.
Touchez Connecter pour le confirmer.
Si le réseau est sécurisé (comme indiqué par une icône de verrouillage), la tablette vous
invitera à entrer un mot de passe ou d'autres informations d'identification. Appuyez sur la
case Mot de passe Wireless pour afficher le clavier à l'écran, puis utilisez-le pour saisir le mot
de passe. Touchez Connecter pour le confirmer.
35
36
Page 21

Lorsque vous vous êtes connecté avec succès à un réseau Wi-Fi, un indicateur de signal Wi-Fi
s'affiche dans la barre de Notifications située en haut et à droite de l'écran.
Remarques: Pour savoir comment ajouter un réseau Wi-Fi lorsqu'il n'est pas à portée ou
lorsque le routeur est configuré pour masquer le nom du réseau (SSID), ou pour régler les
options Wi-Fi avancées, veuillez faire référence au manuel.
CONNECTEZ AU DISPOSITIF BLUETOOTH
1. Activez Bluetooth.
Allez au menu Paramètres > Bluetooth.
2. Appuyez sur l'appareil dans la liste des Appareils (Devices list), puis suivez les instructions à l'écran
pour vous y connecter. La tablette doit se trouver à moins de 30 pieds (10 mètres) du périphérique
Bluetooth.
CONNEXIONS OPTIONNELLES
Connectez à un Ordinateur
Connectez la tablette à un ordinateur afin de transférer les documents.
1. Connectez votre tablette à l’ordinateur.
Avec le câble USB inclus: Branchez la petite extrémité du câble au port USB 2.0 de haute
vitesse de la tablette. Branchez la grande extrémité du câble au port USB 2.0 de haute vitesse
disponible sur l'ordinateur.
2. Une fois votre tablette connectée, faites glisser l’icône USB vers le bas, puis appuyez
sur l’icône USB Connecté.
3. Montez le stockage.
Touchez le bouton Transférer des fichiers (MTP) pour monter le stockage intégré de la tablette.
Une fois monté, vous pouvez copier des fichiers depuis ou vers votre tablette.
37 38
Page 22

Français
SPECIFICATIONS
Processeur
RAM
Stockage
Affichage
Wi-Fi Réseau
Sortie Audio
Interface PC
Caractéristiques
supplémentaires
Système Opérateur
Alimentation en Énergie
Durée de Lecture
(heures)
RK3126 (Quad-core Cortex-A7 jusqu’à 1.2GHz)
1GB DDR3
(8GB/16GB Optionnel ) flash intégré;
Fente pour carte Micro SD (max.64GB supportés)
7'' 1024*600, Écran tactile capacitif
IEEE 802.1 1 b/g/n
3.5mm écouteur
USB 2.0 high speed
Jusqu’à 6 heures de musique, 3 heures de vidéo, 3 heures de navigation
sur le Web
Microphone intégré Caméra frontale (0.3MP)
1X1W haut-parleur Caméra arrière (2.0MP)
Android 8.1 (Go edition)
Batterie Li-poly rechargeable Adaptateur Secteur (DC 5V, 1.5A)
Bluetooth
2.0
CONTACTEZ-NOUS
En cas de toute demande de renseignement, problème ou commentaire concernant nos
produits, veuillez envoyer un courrier électronique à l'adresse ci-dessous, et nous vous
répondrons dans les meilleurs délais.
E-mail: cs@tabletexpress.com
Google, Android, Google Play and other marks are trademarks of Google LLC
39 40
Page 23

Italiano
Navigare in Internet
Visitare i tuoi siti Web preferiti.
Controllare la tua e-mail
Restare in contatto con amici e familia.
Guardare i video di YouTube™
Nevigare la communita’ di video in condivisione più famosa del mondo.
Leggere i tuoi libri preferiti
Scaricare migliaia di libri con il lettore di e-book incluso
Scoprire migliaia di app per giochi Android ™, applicazioni e altro con Play Store (necessità
per il cliente installato)
Connetterti a Internet in modalità wireless
Rete Wi-Fi 802.11 b / g / n ad alta velocità.
Godere la tua libreria multimediale ovunque.
La centrale elettrica portabile riproduce musica popolare, video e formati fotografici.
Lettore di schede di memoria Micro SD.
Aumentare la tua capacità di archiviazione (supportati fino a 64 GB).
Telecamera incorporata
Comoda telecamera frontale 0.3MP / Telecamera posteriore 2.0MP.
Rilevamento automatico dell'orientamento
Leggere come vuoi; lo schermo si regola automaticamente!
La lettura dei libri nel formato ePub richiede l'applicazione di E-book lettore incluso.
CARATTERIS
UNIT AT A GLANCE
1. Telecamera frontale
2. Pulsante di accensione / screen saver
3. Cuffia: Connessione uscita audio per cuffie.
4. VOL+ / VOL-
5. Slot per scheda MicroSD
6. MIC: Usare il MIC interno per registrare la voce.
7. USB HOST: Connettere a un dispositivo USB
8. Porta di alimentazione CC
9. Telecamera posteriore
10. Altoparlante
3
4
5
2
1
6
7
8
9
10
41 42
Page 24

INIZIATO
Accensione e spegnimento del tablet
Per accendere il tablet:
Premere e tenere premuto il tasto di accensione fino a quando lo schermo LCD si accende.
Attendere fino a quando appare la schermata iniziale. Il tablet è ora pronto per l'uso.
Per spegnere il tablet:
1. Premere e tenere premuto il tasto di accensione fino a visualizzare il menu Opzioni del
Dispositivo.
RIFERIMENTO ALL’APPLICAZIONE
Per aprire un'applicazione, toccare l'icona dell'applicazione nella schermata iniziale o nella
schermata di avvio in cui è possibile toccare l'icona direttamente nella schermata iniziale
per entrare. Schermata di avvio:
2. Toccare ok lo schermo per spegnere il tablet.
Accensione o spegnimento dello schermo (Standby)
Quando il tablet è acceso, è possibile spegnere lo schermo per risparmiare la carica della
batteria. Premere semplicemente il tasto di accensione una volta per spegnere lo schermo.
Premere di nuovo il tasto di accensione per riaccendere lo schermo.
Per conservare la carica della batteria, è possibile impostare lo schermo in modo che si
spenga automaticamente quando il tablet non è in uso (tra 1 minuto e 30 minuti).
Questa opzione di timeout dello schermo è disponibile nella schermata di menu.
Sbloccare lo schermo
Quando lo schermo e’ spento, dovresti sbloccare lo schermo quando lo riaccendi.
Per sbloccare lo schermo, scorrere verso l'alto l'icona del lucchetto.
La schermata mostrata sopra è solo per scopo illustrativo. Ci riserviamo il diritto di modificare
e migliorare l'elenco finale delle applicazioni disponibili sul tablet.
43 44
Page 25

RIFERIMENTO ALL’APP
Applicazioni preinstallate
Alcune applicazioni sono state gia’ installate sul tablet per comodità dell'utente
Queste applicazioni includono:
APPLICAZIONI PREINSTALLATE
Installazione di applicazioni
Puoi anche scaricare un'installazione di applicazioni aggiuntive dal mercato di applicazioni
del dispositivo, dal programma di navigazione in rete o da altre fonti.
Il tablet deve essere impostato per consentire l'installazione di applicazioni da fonti non di
mercato. L'opzione di fonti sconosciute può essere impostata nel menu Impostazioni
applicazione.
COLLEGARE AD UNA RETE WI-FI
La barra delle notifiche visualizza icone che indicano lo stato del Wi-Fi del tablet.
Notifica che una rete Wi-Fi aperta è nel campo.
Connesso a una rete Wi-Fi (le onde indicano la forza della connessione).
[nessuna icona] Non ci sono reti Wi-Fi nel campo, o la radio Wi-Fi è spenta.
1. Accendere la radio Wi-Fi se non è ancora attivata. Per attivare il Wi-Fi:
a. Vai alla schermata iniziale: Premere il tasto Home.
b. Aprire il menu Impostazioni: Toccare l'icona nella parte destra superiore della schermata
iniziale per accedere al programma di avvio. Quindi toccare l'icona Impostazioni.
Navigare in Internet.
Eseguire semplici operazioni matematiche.
Scattare foto o video con la fotocamera.
Controllare la tua e-mail.
Riproduzione di musica.
Accedere al menu Impostazioni per regolare le opzioni del tablet.
Quando il Wi-Fi è attivo, il tablet cercherà e visualizzerà un elenco di reti Wi-Fi disponibili.
Note: Se viene trovata una rete che hai collegato in precedenza, Il tablet si collegherà ad esso.
Se non vedi la tua rete nell'elenco, è possibile forzare il tablet di ri-scansione. Per cercare reti,
toccare il tasto Menu, quindi toccare Scansione.
2. Selezionare una rete Wi-Fi disponibile per la connessione:
Nello stesso menu delle impostazioni Wi-Fi sopra, toccare una rete nell'elenco.
Se la rete è aperta, il tablet ti chiederà di confermare la connessione alla rete. Toccare
Connessione per confermare.
Se la rete è protetta (come indicato da un'icona di blocco) , Il tablet ti chiederà di inserire una
password o altre credenziali. Toccare la casella Password wireless per visualizzare la tastiera
sullo schermo e quindi utilizzarla per inserire la password. Toccare Connessione per
confermare.
c. Aprire il menu Wireless e reti: Fare scorrere l'icona su ON.
45 46
Page 26

Quando sei riuscito a fare la connessione a una rete Wi-Fi, la barra delle notifiche nella
parte superiore destra dello schermo mostrerà un indicatore di segnale Wi-Fi.
Note: Per informazioni su come aggiungere una rete Wi-Fi quando non è nel campo di
portata o quando il router è impostato per oscurare il nome della rete (SSID), o per
configurare le opzioni Wi-Fi avanzate, fare riferimento al manuale.
CONNESSIONE A UN DISPOSITIVO BLUETOOTH
1. Attivare il Bluetooth.
Vai alle Impostazioni > Bluetooth.
2. Toccare il dispositivo nell'elenco Dispositivi, quindi seguire le istruzioni sullo schermo per
connettersi ad esso. Il tablet deve trovarsi dentro circa 30 piedi (10 m) dal dispositivo
Bluetooth.
COLLEGAMENTI OPZIONALI
Connessione a un computer
Collegare il tablet a un computer per trasferire i file.
1. Collegare il tablet al computer.
Con il cavo USB incluso: Inserire l'estremità piccola del cavo nel connettore USB 2.0 ad alta
velocità del tablet. Inserire l'estremità grande del cavo nella porta USB 2.0 ad alta velocità
disponibile sul computer.
2. Quando il tuo tablet è collegato, scorrere verso il basso l'icona USB, quindi toccare
l'icona USB collegata.
3. Montare la memoria
Toccare il pulsante Trasferire file (MTP) per montare la memoria incorporata del tablet.
Quando è stata montata, è possibile copiare i file sul o dal tablet.
47 48
Page 27

SPECIFICHE
Processore
RAM
Memoria
Schermo a contatto
Rete Wi-Fi
Uscita Audio
PC Interfaccia
Caratteristiche
aggiuntive
Sistema operativo
Potenza
Tempo di
Riproduzione (ore)
RK3126 (Quad-core Cortex-A7 fino a 1,2 GHz)
1GB DDR3
8GB/16GB Opzionale ) flash incorporato;
Fessura per scheda Micro SD (supportati max.64 GB)
7'' 1024*600, Schermo a contatto capacitivo
IEEE 802.1 1 b/g/n
3.5mm cuffie
USB 2.0 alta velocità
Fino a 6 ore di musica, 3 ore di video, 3 ore di navigazione sul web
Microfono incorporato Telecamera frontale (0.3MP)
1X1W altoparlante Telecamera posteriore (2.0MP)
Android 8.1 (Vai all'edizione)
Batteria ricaricabile Li-Poly
Adattatore di alimentazione (DC 5V, 1.5A)
Bluetooth
2.0
CONTATTARCI
Per qualsiasi domanda, problema o commento riguardante i nostri prodotti.Si prega di
inviare e-mail all'indirizzo sotto, e ti risponderemo il piu’ presto possibile.
E-mail: cs@tabletexpress.com
Google, Android, Google Play and other marks are trademarks of Google LLC
Italiano
49 50
Page 28

日本語
ウェブページの閲覧
お気に 入りのウェブサイトにアクセスします。
メールの確認
お友達やご家族と連絡します。
YouTube™動画の鑑賞
世界で最も人気のある動画共有コミュニティにアクセスします。
お気に入りの読書
電子書籍リーダー*で多くの本をダウンロードします。
Play Store(インストールする必要あり)で無数のAndroid™向けゲーム、アプリなどを発見
します。
ワイヤレスでインターネットに 接続
高速のWi-Fi 802.11 b/g/n 規格
どこでもメ ディアライブラリを楽しみます。
ポータブルモバイルバッテリーで人気音楽、動画や写真を再生します。
Micro SDメモリカードリーダー。
ストレージ容量を増やします(最大64GB対応)。
内蔵 カメラ
便利な前面カメラ0.3MP/背面カメラ2.0MP。
自動的な向き検出
ディスプレイは自動的に対応するので、お気に入りの向きで読むことができます!
ePubフォーマットの本を読むには、付属の電子書籍リーダーアプリが必要です。
機能
外観
1. 前面 カメラ
2. 電源ボタン/スクリーンセーバー
3. ヘッドホン:ヘッドフォン用のオーディオ出力ポート。
4. 音量+/音量-
5. Micro SDカード:外部のMicroSDメモリカードを挿入します。
6. マイク:内部マイクで録音します。
7. USBホスト:USBデバイスに接続します。
8. DC
9.背面カメラ
10. スピーカー
3
4
5
2
1
6
7
8
9
10
51 52
Page 29

使用について
タブレットの電源の入れ方と切り方
電源の入れ方:
LCD画面がオンになるまで、電源ボタンを押し続けてください。ホーム画面が表示されると、
タブレットは 使用できます。
電源の切り方:
1. デバイスオプションメニューが表示されるまで電源ボタンを押し続けてください。
アプリについて
アプリを開くには、ホー ム画 面で アプリのアイコンをタップする か、また はランチャー画 面で
タップして開いてください。ランチャー画面:
2. 画面で確認してタブレットの電源を切ります。
画面をオンまたはオフにする方法(スタンバイ)
タブレットの電源が入っているとき、画面をオフにして電池の電力を節約できます。電源ボタ
ンを1回押すだけで画面が消えます。電源ボタンをもう一度押すと、画面がまたオンになりま
す。
電池の電力を節約するには、タブレットが使用されていないとき(1分-30分)に画面が自動的
に消えるように設定できます。
このタイマーオプションは表示メニューで利用できます。
画面のロック解除方法
画面が消えると、もう一度起動するにはロック解除する必要があります。ロックアイコンをスワ
イプして、ロック解 除してください。
ご 注 意: 上記の画面はイメージだけです。当社は、最終的にこのタブレットで利用可能なア
プリを変更・改善する権利を留保します。
53 54
Page 30

アプリについて
プリインストールアプリ
ご都合の良いように、いくつかのプリインストールアプリがあります。
下記の通りです:
プリインストールアプリ
アプリのインストール
このデバイスのアプリストア、ウェブブラウザなどの提供元でその他のアプリをダウンロード
することもできま す。
非ストアによるアプリのインストールは、タブレットで許可を設定する必要があります。提供
元不明のアプションは、アプリ設定メニューで設定できます。
WI-FI接続方法
通知バーには、タブレットのWi-Fi状態を示すアイコンが表示されます。
起動しているWi-Fiネットワークが範囲内にあること。
Wi-Fi ネットワークに接続していること(波は接続の強度を示します)。
[アイコンなし]範囲内にネットワークがない、またはWi-Fiがオフになっています。
1. Wi-Fi がオンになっていない場合は、オンにしてください。方法:
a. ホーム画面に入ります:ホームボタンを押します。
b. 設定メニューを開きます:ホーム画面でアイコンをタップしてランチャーに入り、設定ア
イコンをタップします。
c. ワイヤレス &ネットワークメニューを開きます:アイコンをオンにします。
ウェブページを閲覧します。
簡単な数学演算を実行します。
カメラで写真またはビデオを撮ります。
メールを確認します。
音楽を再生します。
設定メニューにアクセスし、タブレットのオプションを変更します。
Wi-Fiをオンにすると、タブレットは利用可能なWi-Fiネットワークを検索して表示します。
ご注意:
以前に接続したことがあるネットワークが見つかった場合、タブレットはそれに接続
します。表示されたリストに自分のネットワークがない場合は、再検索することができます。
2. 利用可能なWi-Fiネットワークを 選択して接続します:
上記のWi-Fi設定と同じメニューで、リストにあるネットワークをタップします。
そのネットワークが起動している場合、タブレットは接続を確認する画面を表示します。
接続をタップして確認します。
そのネットワークが保護されている場 合(ロックアイコンで示される)、パスワードやその 他の
認証情報を入力する必要があります。ワイヤレスパスワードボックスをタップすると、オンスク
リーンキーボードが表示され、それを使用してパスワードを入力します。接続をタップして確
認 し ま す 。
55 56
Page 31

Wi-Fi ネットワークに接続した後、画面の右上にある通知バーにWi-Fi電波の標識が表示され
ます。
Notes: Wi-Fi ネットワークが範囲内にない場合、またはルーターのネットワーク名(SSID)を
隠すように設定されている場合は、それに接続したり、高度なWi-Fiオプションを設定したり
するには、マニュアルを参照してください。
BLUETOOTHデバイス接続方法
1. Bluetoothをオン にします。
設定に入ります > Bluetooth.
2. 一覧でデバイスをタップして、画面上の指示にしたがって接続します。タブレットを
Bluetoothデバイスの約10メートル以内に置く必要があります。
その他の接続方法
パソコンに 接続します
タブレットをパソコンに接続してファイルを転送します。
1. タブレットをパソコンに 接 続します。
付属のUSBケーブルで:ケーブルの小さい方の端をタブレットのUSB2.0高速コネクタに差し
込みます。大きい方の端をパソコンの利用可能なUSB2.0高速ポートに差し込みます。
2.
タブレットを接続した後、USBアイコンを下にスライドして、USB接続アイコンをタップしま
す。
3. ストレージを読み込みます。
ファイル転送(MTP)ボタンをタップして、内蔵ストレージを読み込みます。読み込んだ後、
ファイルをパソコンまた はタブレットに転送することができます。
57 58
Page 32

仕様
プロ セッサ
RAM
ストレ ー ジ
表示
Wi-Fi 接続
オーディオ出力
PC インターフェース
追加機能
OS
電源
再生時間(時間)
RK3126(クアッドコア Cortex-A7 最大1.2GHz)
1GB DDR3
8GB / 16GB(オプション) 内蔵フラッシュ
Micro SDカードスロット(最大64GB対応)
7'' 1024*600,静電容量タッチパネル
IEEE 802.1 1 b/g/n
3.5mm ヘ ッド ホ ン
高速 USB 2.0
音楽6時間・動画3時間・ウェブページ閲覧3時間まで
内蔵マイク前面カメラ(0.3MP)
1X1Wスピーカー背面カメラ(2.0MP)
Android 8.1 (Go edition)
充電式リチウムポリマー電池 電源アダプタ(DC 5V・1.5A)
Bluetooth
2.0
お問い合わせ
当社製品に関するご相談、ご質問、ご意見につきましては、下記のアドレスにメールをお送り
ください。できるだけ早く返信させていただきます。
E-mail: cs@tabletexpress.com
Google, Android, Google Play and other marks are trademarks of Google LLC
日本語
59 60
 Loading...