

Page 1

USER MANUAL
Dragon Touch Vista 5 Action Camera
Page 2
CONTENTS
01 - 27 28 - 54
82 - 10855 - 81
109 - 135
136 - 162
日本語
V1.1
Page 3
English
CONTENTS
What’s in the Box
Your Vista 5
Getting Started
Overview of Modes
Customizing Your Vista 5
Connecting To The RoadCam App
Offloading Your Content
Playing Back Your Content
Deleting Videos and Photos on Your Vista 5
Reformatting Your microSD Card
Maintenance Your Camera
Maximizing Battery Life
Battery Storage and Handling
Remote
Mounting Your Camera
Contact US
01
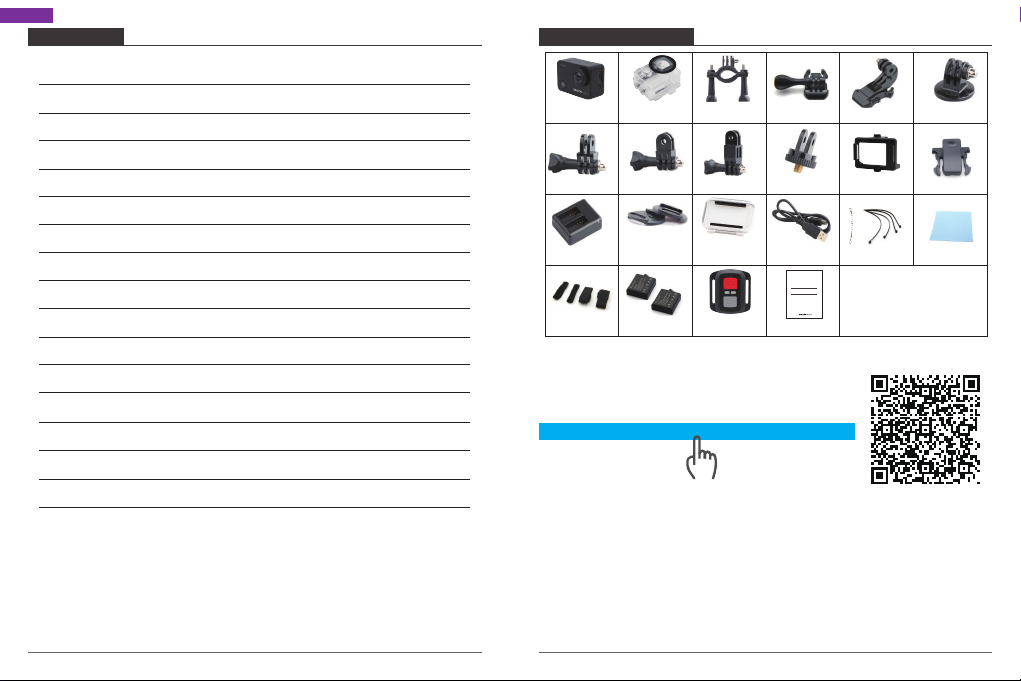
WHAT'S IN THE BOX
2
3
5
Vista 5
Waterproof
Housing
6
11
Mount 5Mount 4 Mount 7
19
19
21
Changer
Helmet
Mounts
21
22
22
22
22
23
Bandages Remote
How to use all sorts of accessories of action camera?
Scan the following QR code or enter the
website to watch the video.
www.youtube.com/watch?v=UqKtElRXqI8&feature=youtu.be
Battery
25
27
Unboxing: 00:00-00:19
How to remove the camera from the box it's mounted on? : 00:20-00:31
How to remove the camera from the waterproof case? : 00:32-01:05
How to mount the camera to a tripod? : 01:17-01:49
How to mount the camera to your body? : 01:50-02:08
How to mount the camera to a self stick? : 02:09-02:55
How to mount the camera to a bike? : 02:56-04:34
How to mount the protective backdoor? : 04:35-04:59
How to mount the camera to a helmet? : 05:03-11:16
Handele Bar/
Pole Mount
Mount 6
Protective
Backdoor
Mount 1
USB Cable
Quick Start Guide
AKASO Vision 5 Lite Action Camera
Quick Start Guide
Mount 2
Clip 1
Tethers
Mount 3
Clip 2
Lens Cloth
02
Page 4
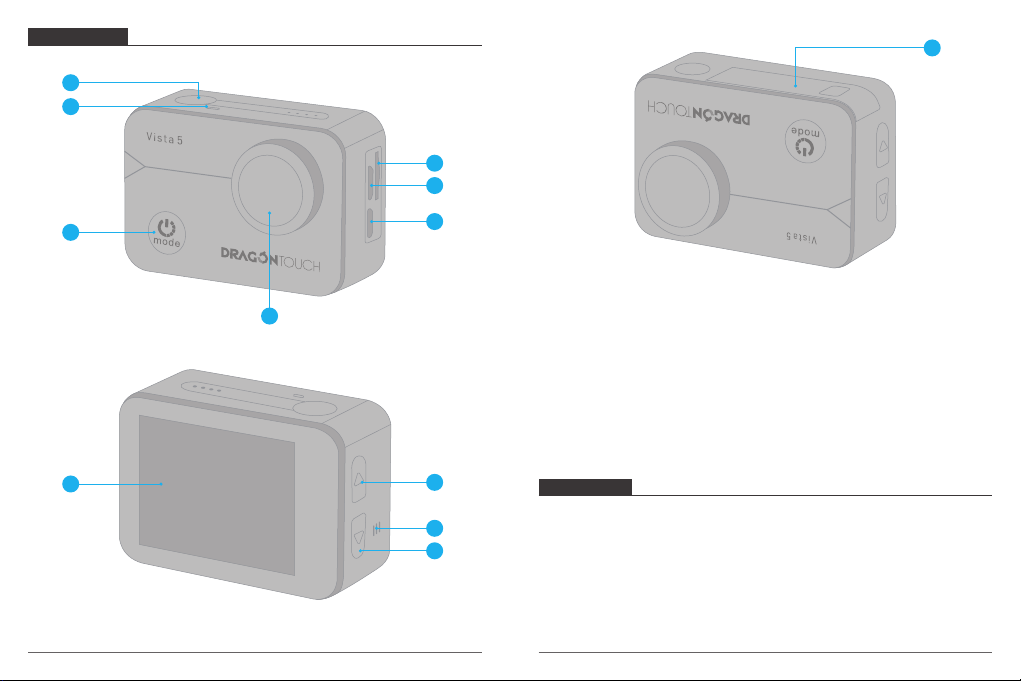
YOUR VISTA 5
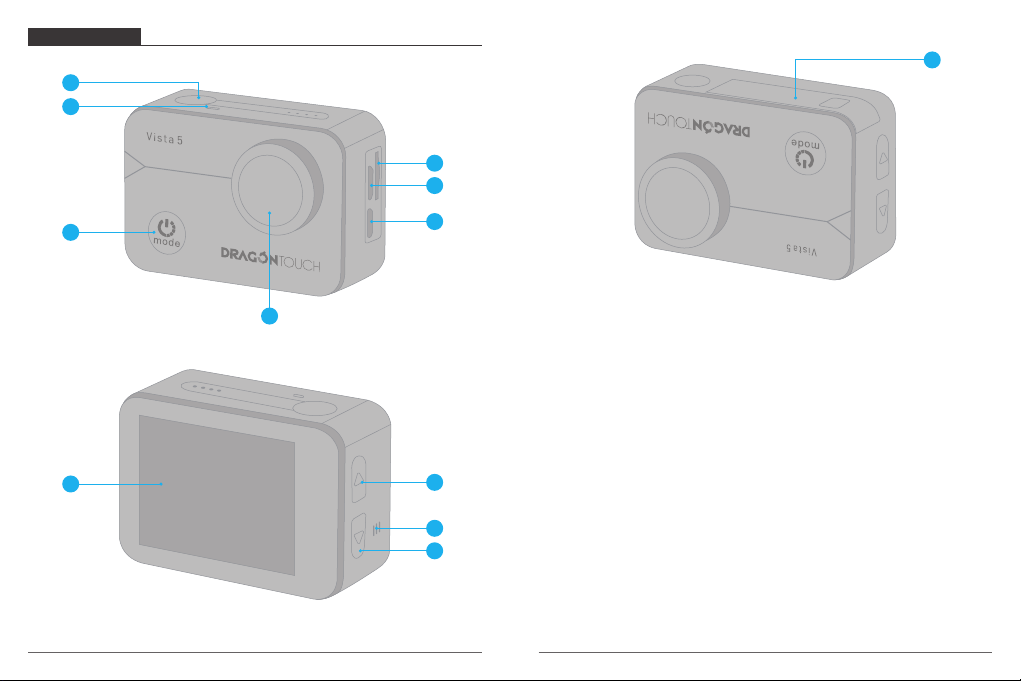
1
2
12
4
5
3
7
8
03
6
1. Shutter / Select Button
2. Indicator
3. Power / Mode Button
4. MicroSD Slot
5. Micro HDMI Port
6. Micro USB
9
7. Lens
8. Touch Screen
9. Up Button
10. Speaker
11. Down Button
12. Battery Door
Note: Camera does not record sound when it is in the waterproof case.
10
11
04
Page 5
GETTING STARTED
Welcome to your new Vista 5. To capture video and photos, you need a microSD card
(sold separately).
MICROSD CARDS
Use brand name memory cards that meet these requirements:
• MicroSD, MicroSDHC, or MicroSDXC
• Class 10 or UHS-I rating
• Capacity up to 64GB 100MB/s
Note:
1. Please format the microSD card first in this camera before using. To keep your microSD
card in good condition, reformat it on a regular basis. Reformatting erases all of your
content, so be sure to offload your photos and videos first.
2. FAT32 format microSD card stops recording when the storage of each file is over 4GB
and starts to record again on a new file.
POWERING ON + OFF
To Power On:
Press and hold Mode button for three seconds. The camera beeps while the camera status
light is on. When information appears on the LCD display or the camera status screen,
your camera is on.
To Power Off:
Press and hold the Mode button for three seconds. The camera beeps while the camera
status light is off.
SWITCHING MODE:
To Switch Mode:
Press the Mode button after you turn on the camera, you can switch the mode.
To Exit Mode:
Press the Mode button to exit mode.
TURNING ON / OFF Wi-Fi
To turn on Wi-Fi:
Turn on camera, press and hold Up button for three seconds to turn on Wi-Fi.
05
To turn off Wi-Fi:
Press Up button to turn off Wi-Fi.
Note: Camera does not record sound when it is in the waterproof case.
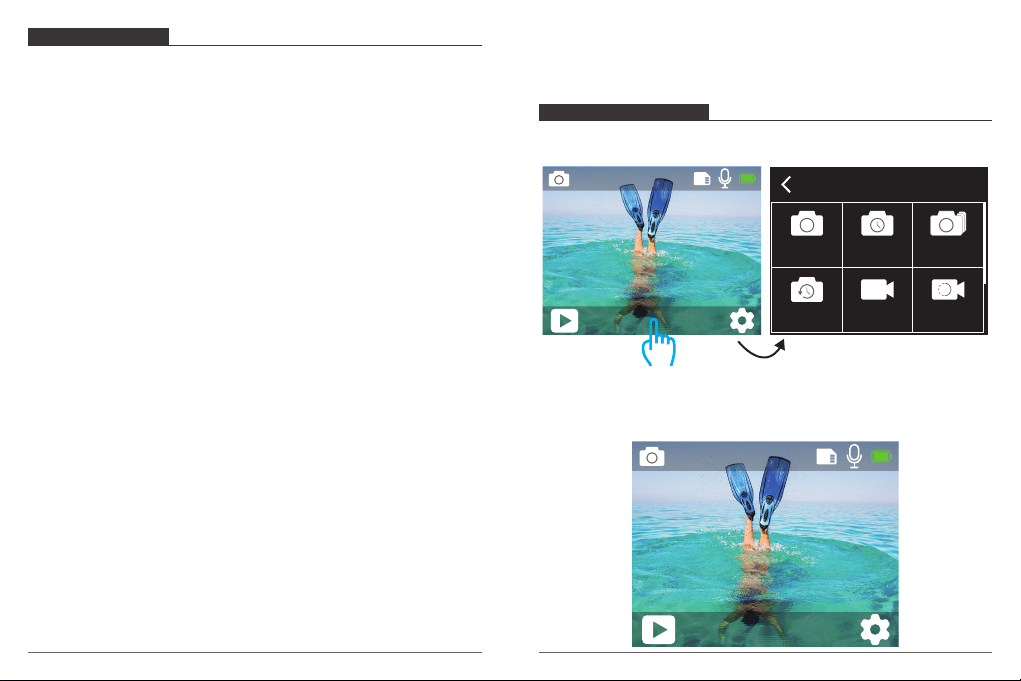
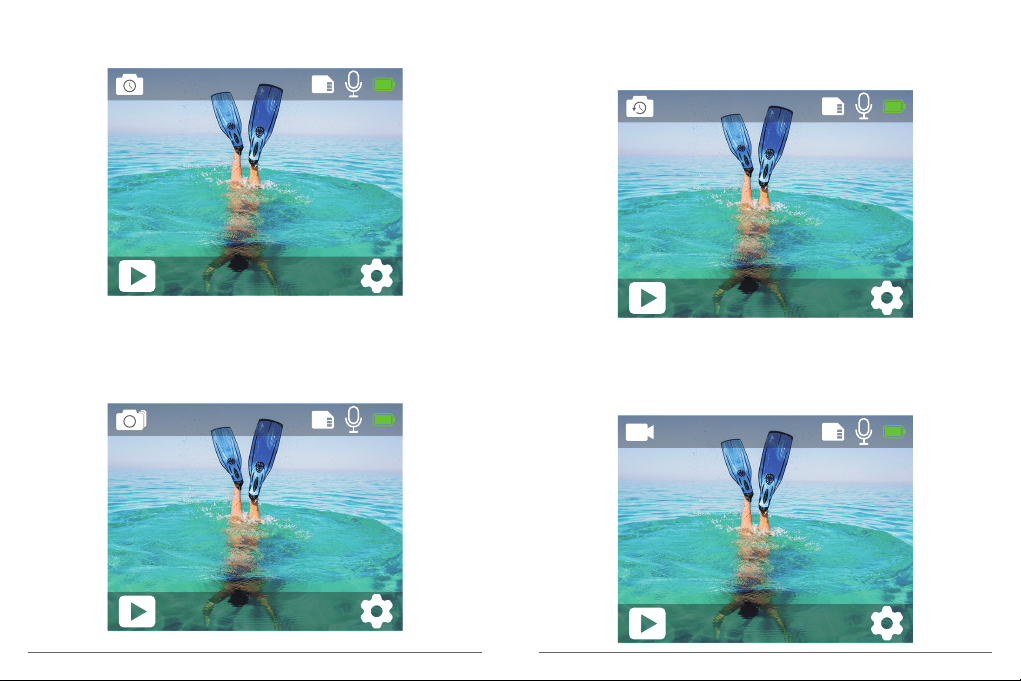
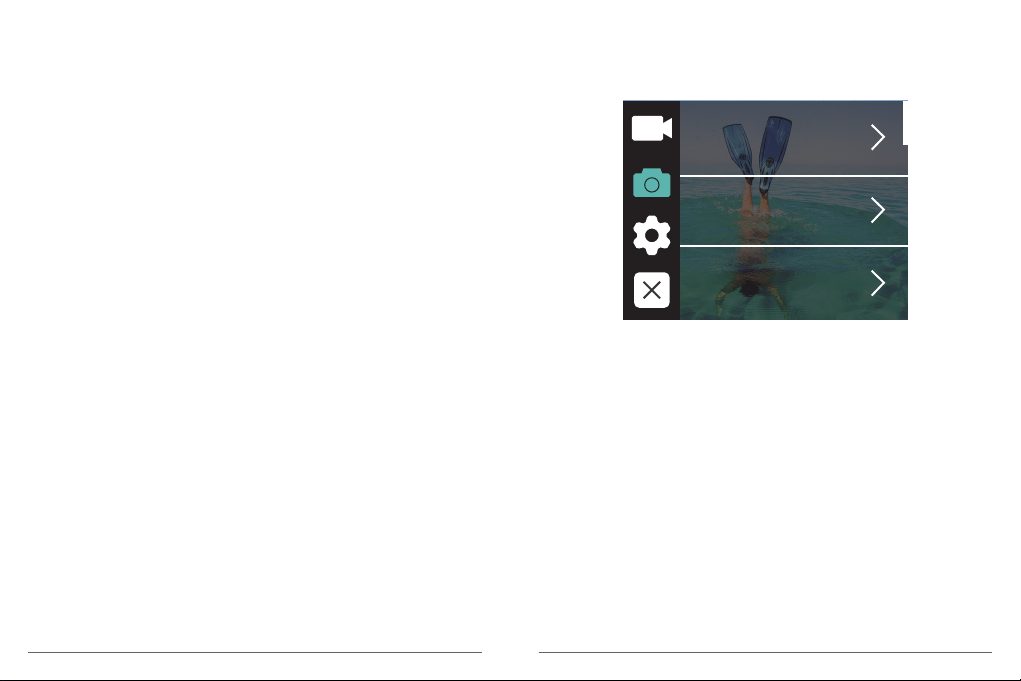
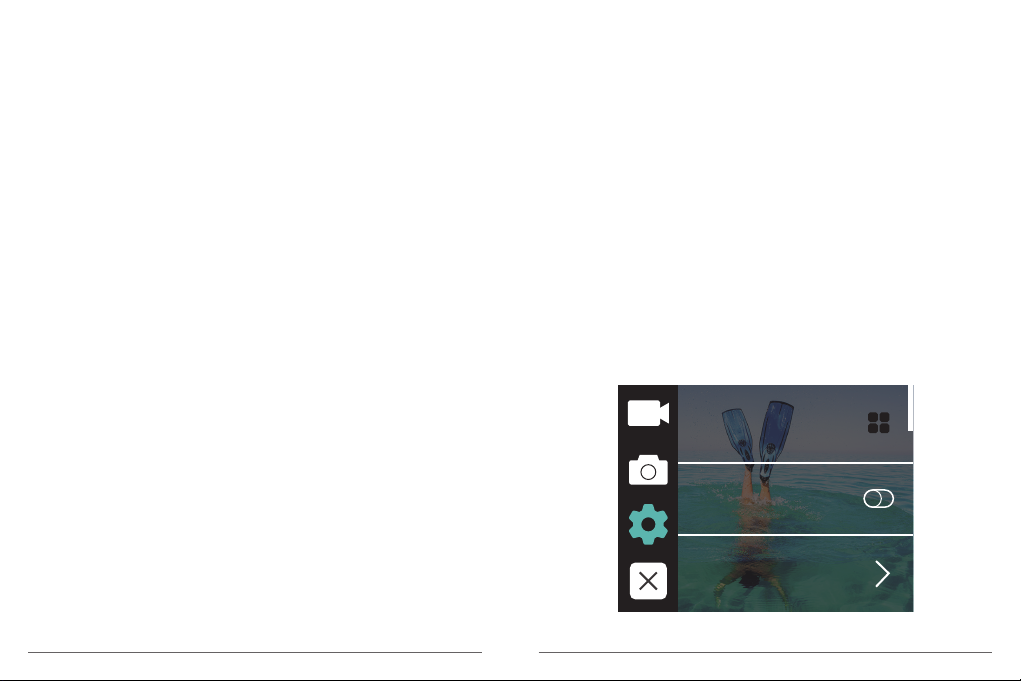
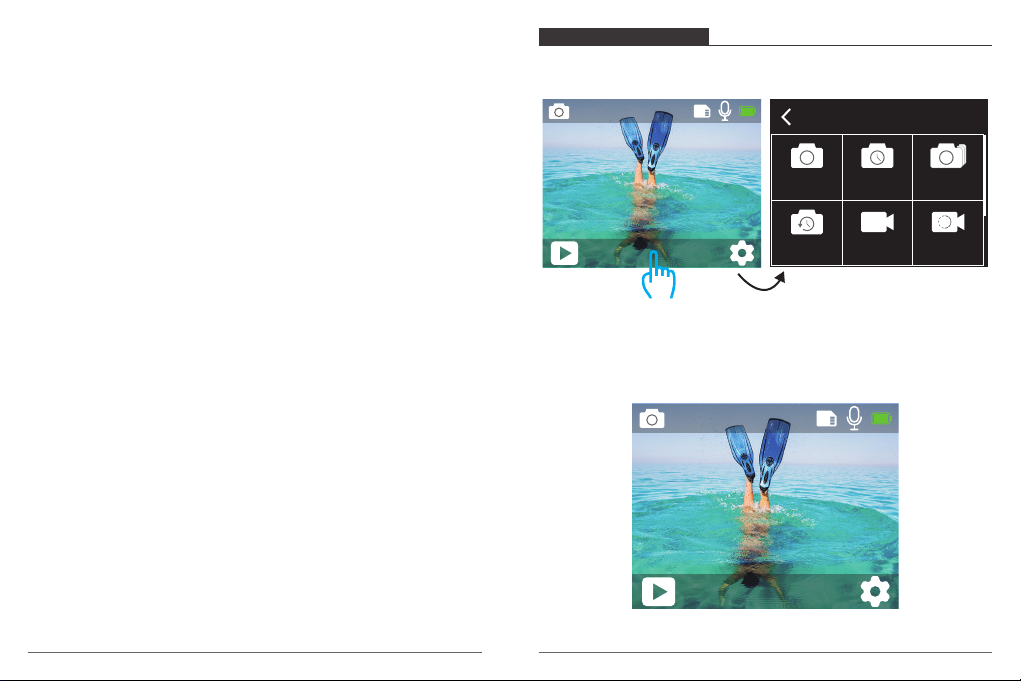
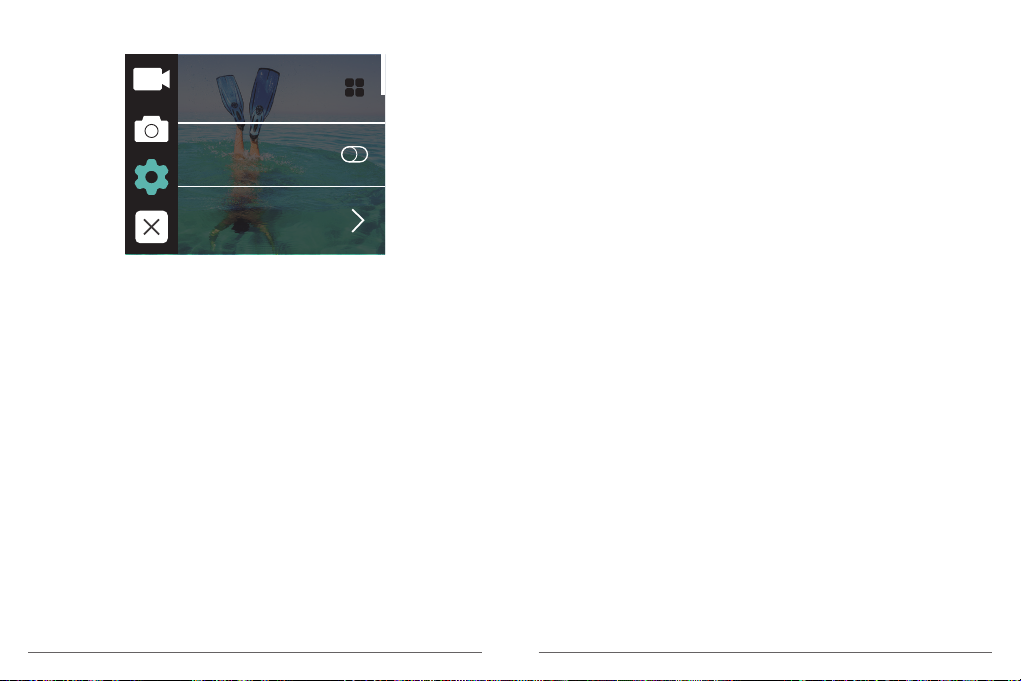
OVERVIEW OF MODES
There are 9 modes: Photo, Self Timer, Burst Photo, Time Lapse Photo,
Video, Slow Motion, Time Lapse Video, Still Photo and Driving Mode.
0002/5467
Photo
12M
Tap here
PHOTO MODE
In Photo mode, press Shutter button, the camera takes a photo.
0002/5467
Photo
12M
Working mode
Photo Self Timer Burst Photo
Time Lapse Video Slow Motion
06
Page 6
SELF TIMER MODE
In Self-timer mode, press OK button, it takes a self-timer photo.
0002/5467
Self Timer
12M
TIME LAPSE PHOTO MODE
In Time Lapse Photo Mode, press Shutter button, the camera takes a serial of photos at
3s / 5s / 10s intervals.
0002/5467
Time Lapse
12M
BURST PHOTO MODE
In Burst Photo mode, press Shutter button, the camera takes 3 photos per second,
5 photos per second or 10 photos per second.
0002/5467
Burst Photo
12M
07
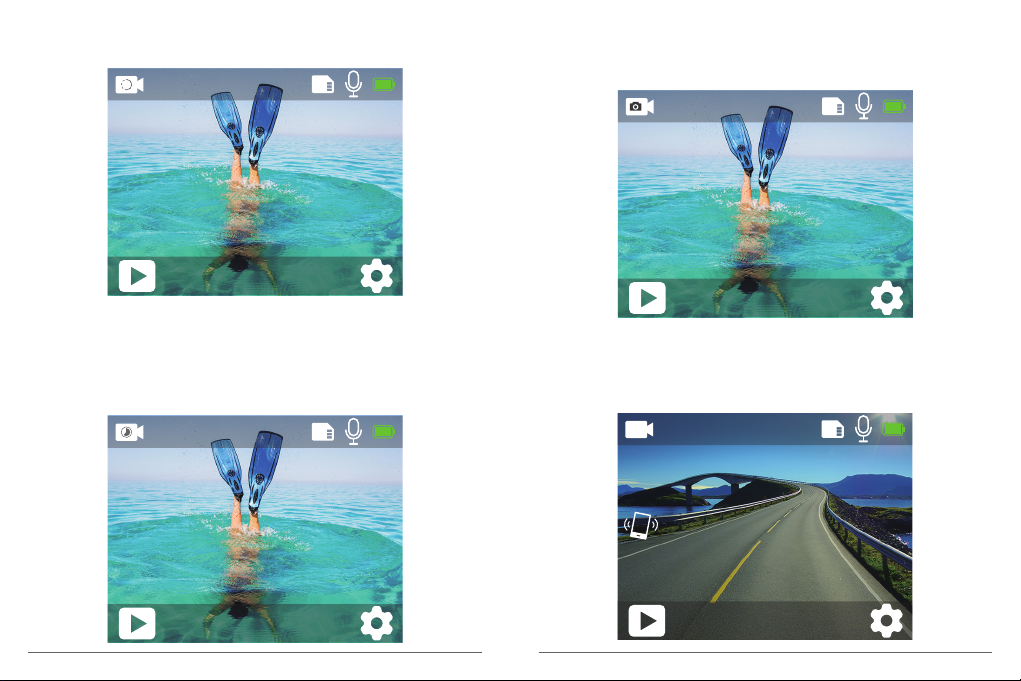
VIDEO MODE
Video Mode is the default mode when you turn on the camera.
In Video Mode, press Shutter button, the camera starts recording video. Press Shutter
button to stop recording video.
00:00:00/00:31:55
Video
4K 30fps
08
Page 7
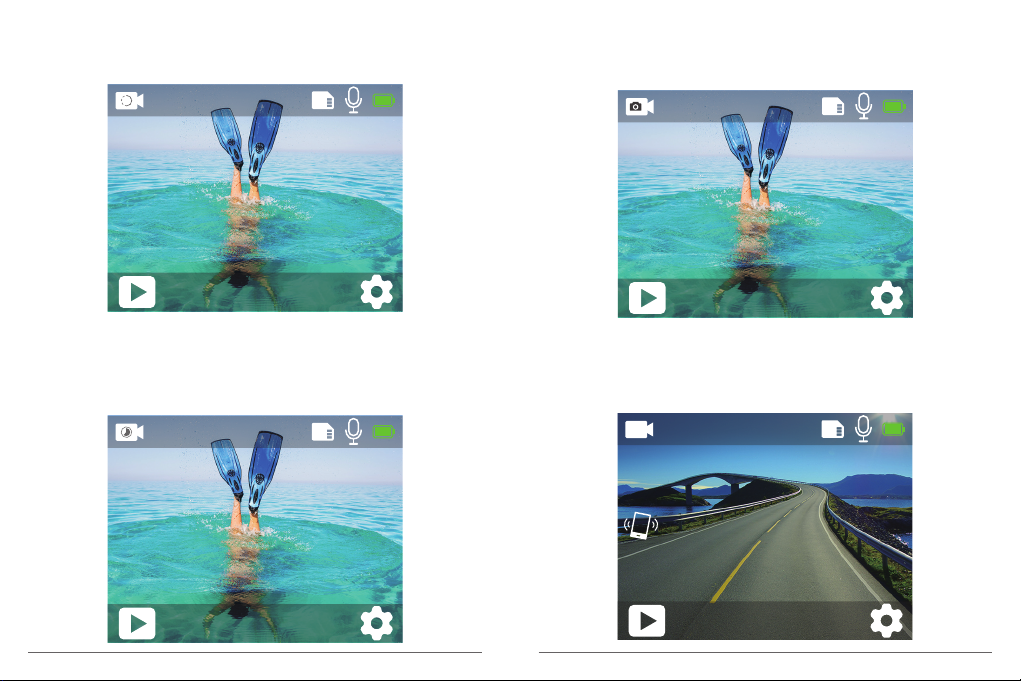
SLOW MOTION VIDEO MODE
In Slow Motion video mode, press Shutter button, the camera records slow motion video.
00:00:00/00:40:37
Slow Motion
1080P 90fps
STILL PHOTO MODE
In Still Photo mode, the camera takes a photo every 3 Sec / 5 Sec / 10 Sec / 30 Sec
automatically during video recording.
00:00:00/00:31:55
Still Photo
4K 30fps
TIME LAPSE VIDEO MODE
In Time Lapse Video mode, press Shutter button, the camera records video from frames
captured at specific intervals.
Time Lapse Video is captured without audio.
00:00:00/00:40:37
Time Lapse
4K 30fps
09
DRIVING MODE
In Driving Mode, you connect the camera with car cigarette lighter, the camera will turn on
automatically if you start your car and will turn off if you stop your car.
00:00:00/00:31:55
Video
4K 30fps
10
Page 8

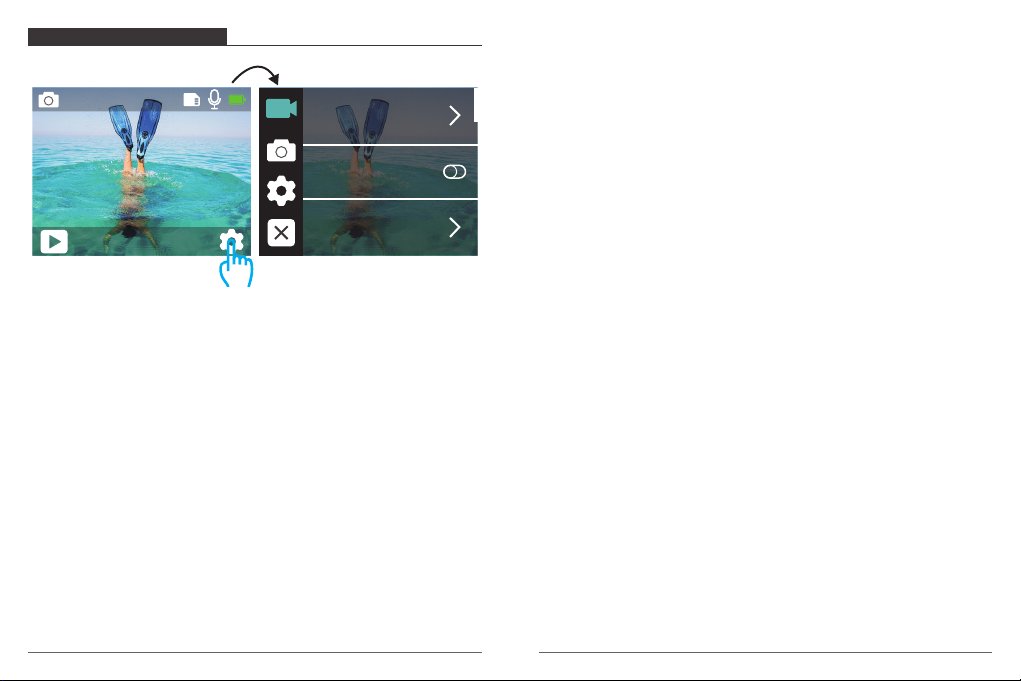
CUSTOMIZING YOUR VISTA 5
VIDEO SETTING
0002/5467
Photo
12M
Tap here
1. Resolution: 4K 30fps, 2.7K 30fps, 2K 60fps, 2K 30fps, 1080P 90fps, 1080P 60fps,
1080P 30fps, 720P 120fps, 720P 60fps, 720P 30fps
Default setting is 4K 30fps.
2. Image Stabilization: ON / OFF
Default setting is OFF.
3. Video Encode: H.264, H.265
Default setting is H.264.
A video codec is an electronic circuit or software that compresses or decompresses digital
video. It converts uncompressed video to a compressed format or vice versa.
According to multiple studies, HEVC, High Efficiency Video Coding (H.265) should deliver
up to 50% better compression than H.264 in video on demand (VOD) applications, which
means better quality at half the bit rate. In live encoding, which obviously has to be
performed in real time, the initial expectations are a 35% bandwidth reduction at similar
quality levels. Alternatively, HEVC can also enable larger resolution movies, whether 2K or
4K.
In addition, encoding existing SD and HD content with HEVC rather than H.264 will add to
cost savings and/or the ability to stream higher quality video to lower bit rate connections.
11
Resolution
Image Stabilization
Video Encode
4. Slow Motion: 1080P 90fps, 720P 120fps
Default setting is 1080P 90fps.
Slow motion is an effect in film-making whereby time appears to be slowed down.
Note: If you want to record slow motion video, please turn off Image Stabilization first.
5. Still Photo: 4K 30fps
Default setting is 4KP 30fps.
6. Still Photo Time: 3 Sec, 5 Sec, 10 Sec, 30 Sec
Default setting is 3 Sec.
In still photo mode, the camera takes a photo every 3 Sec/ 5 Sec/ 10 Sec/ 30 Sec
automatically during video recording.
7. Time Lapse Interval: 0.2 Sec, 0.3 Sec, 0.5 Sec, 1 Sec, 2 Sec, 5 Sec, 10 Sec, 30 Sec, 1 Min
Default setting is 0.5 Sec.
Time Lapse Video creates video from frames captured at specific intervals. This option lets
you capture a time lapse event and immediately view or share it as a video. Time Lapse
Video is captured without audio.
Select 2 seconds means recording 2 seconds to get one frame per second.
For example: If you select 4K/30FPS and 2 seconds, you need to record 60 seconds, then
you can get 1 second video for 4K/30FPS.
8. Loop Recording Time: Off, 3 Min., 5 Min, 7 Min
Default setting is OFF.
Using Loop Recording, you can continuously record video, but save only the moments
that you want. For example, if you select a 5-minute interval, only the previous 5 minutes
are saved when you press the Shutter button to stop recording. If you record for 5 minutes
and do not press the Shutter button to stop recording and save, the camera records a new
5-minute interval by recording over your previous 5 minutes of footage. When the micro
SD card is full, the new files will cover the old one if loop recording is on.
12
Page 9
9. Audio Record: ON/OFF
Default setting is ON.
Turn off Audio Record, the camera does not record sound when you record video.
10. Exposure Value: -2, -1.7, -1.5, -1.3, -1, -0.5, -0.3, 0, +0.3, +0.5, +1, +1.3, +1.5, +1.7, +2
Default setting is 0.
By default, your camera uses the entire image to determine the appropriate exposure level.
However, Exposure lets you select an area that you want the camera to prioritize when
determining exposure. This setting is particularly useful in shots where an important region
might otherwise be over- or underexposed.
When you change this setting, the LCD display immediately shows you the effect on your
image. If you change modes, the camera returns to using the entire scene to determine
the correct level of exposure.
11. ISO: Auto, 100, 200, 400, 800
Default setting is Auto.
ISO determines the camera’s sensitivity to light, and creates a trade-off between brightness
and resulting image noise. Image noise refers to the degree of graininess in the image.
In low light, higher ISO values result in brighter images, but with greater image noise.
Lower values result in lower image noise, but darker images. When you change this
setting, the LCD display immediately shows you the effect on your image.
12. White Balance: Auto, Tungsten, Fluorescent, Daylight, Cloudy, Dawn
Default setting is Auto.
White Balance lets you adjust the color temperature of videos and photos to optimize for
cool or warm lighting conditions. When you change this setting, the LCD display
immediately shows you the effect on your image.
13. Meter: Center, Average, Spot
Default setting is Average.
In photography, the metering mode refers to the way in which a camera determines
exposure. Cameras generally allow the user to select between center, average or spot
metering modes. The different metering modes allow the user to select the most
appropriate one for use in a variety of lighting conditions.
13
14. Color: Natural, Black & White, Sepia
Default setting is Natural.
PHOTO SETTING
Resolution
Delay Timer
Burst Photo
1. Resolution: 12M, 8M, 5M, 3M
Default setting is 12M.
2. Self-Timer: 1 Sec, 3 Sec, 5 Sec, 10 Sec, 30 Sec
Default setting is 3 Sec.
A Self Timer gives a delay between pressing the shutter release and the shutter's firing. It is
most commonly used to let photographers to take a photo of themselves (often with
family).
3. Time Lapse Photo: 3 Sec, 5 Sec, 10 Sec, 30 Sec, 1 Min
Default setting is 3 Sec.
Time Lapse Photo captures a series of photos at specified intervals. Use this mode to
capture photos of any activity, then choose the best ones later.
4. Burst Photo: 3shots / 1s, 5shots / 1s, 10shots / 1s
Default setting is 3shots / 1s.
Burst captures up to 30 photos in 8 seconds, so it is perfect for capturing fast-moving
activities.
14
Page 10
5. Scene: Auto, Light Painting
Default setting is Auto.
6. Exposure Value: -2, -1.7, -1.5, -1.3, -1, -0.5, -0.3, 0, +0.3, +0.5, +1, +1.3, +1.5, +1.7, +2
Default setting is 0.
By default, your camera uses the entire image to determine the appropriate exposure level.
However, Exposure lets you select an area that you want the camera to prioritize when
determining exposure. This setting is particularly useful in shots where an important region
might otherwise be over- or underexposed.
When you change this setting, the LCD display immediately shows you the effect on your
image. If you change modes, the camera returns to using the entire scene to determine
the correct level of exposure.
7. Exposure Time: Auto, 2 Sec, 5 Sec, 10 Sec, 30 Sec
Default setting is Auto.
The exposure time, respectively period of exposure means the time span for which the film
of a traditional camera or a sensor of a modern digital camera is actually exposed to the
light so as to record a picture.
8. ISO: Auto, 400, 800, 1600, 3200
Default setting is Auto.
ISO determines the camera’s sensitivity to light, and creates a trade-off between brightness
and resulting image noise. Image noise refers to the degree of graininess in the image.
In low light, higher ISO values result in brighter images, but with greater image noise.
Lower values result in lower image noise, but darker images. When you change this
setting, the LCD display immediately shows you the effect on your image.
9. White Balance: Auto, Tungsten, Fluorescent, Daylight, Cloudy, Dawn
Default setting is Auto.
White Balance lets you adjust the color temperature of videos and photos to optimize for
cool or warm lighting conditions. When you change this setting, the LCD display
immediately shows you the effect on your image.
10. Meter: Center, Average, Spot
Default setting is Average.
In photography, the metering mode refers to the way in which a camera determines
exposure. Cameras generally allow the user to select between center, average or spot
metering modes. The different metering modes allow the user to select the most
appropriate one for use in a variety of lighting conditions.
11. Sharpness: Strong, Normal, Soft
Default setting is Normal.
Sharpness controls the quality of details captured in your video footage or photos. When
you change this setting, the touch display immediately shows you the effect on your image.
12. Color: Natural, Black & White, Sepia
Default setting is Natural.
13. Photo Quality: Fine, Normal, Economy
Default setting is Fine.
SYSTEM SETTING
Sounds
Distortion Calibration
Angle
15
16
Page 11

1. Sounds: Volume, Key Tone, Touch Tone, Boot Tone
You can adjust the volume of the camera and turn on/off key tone, touch tone or boot
tone.
2. Distortion Calibration: ON / OFF
Default setting is OFF.
Turn on Distortion Calibration, it can correct the image distortion.
3. Angle: 170°, 140°, 110°, 70°
Default setting is 170°.
The angle refers to how much of the scene (measured in degrees) can be captured
through the camera lens. Super Wide angle captures the largest amount of the scene,
while Narrow angle captures the least.
4. Diving Mode: ON / OFF
Default setting is OFF.
Turn on Diving Mode, it can compensate for the lack of red light in underwater scenes.
Diving Mode is designed to be used in tropical and blue water, optimized for use between
10 and 80 feet.
5. WDR: ON / OFF
Default setting is OFF.
Wide Dynamic Range (WDR) retains a greater level of detail in the dark and bright areas of
an image. The result is a photo that is properly exposed for both of these extremes. This
setting is especially useful for scenes that are backlist or that have large bright regions and
a dark foreground. WDR is available in Video mode only.
6. Auto Power Off: Off, 1 Min, 3 Min, 5 Min, 10 Min
Default setting is OFF.
Powers off your Vista 5 after a period of inactivity to save battery life.
7. Screen Saver: Off, 30 Sec, 1 Min, 3 Min
Default setting is 1 Min.
Turns off the display after a period of inactivity to save battery life. To turn on the display
again, press any button on the camera.
17
8. Language: English / Français / Deutsch / Español / Italiano/ Português
Default setting is English.
9. Date Format: YYYY/MM/DD, MM/DD/YYYY, DD/MM/YYYY
Default setting is MM/DD/YYYY
10. Set Date: MM/DD/YYYY
You can set the date of the camera.
11. Set Time: HH/MM
You can set the time of the camera.
12. Date Stamp: Off, Date & Time, Date
Default setting is Date & Time.
If you select Date & Time, this camera adds Date & Time to the videos and photos you
take.
13. Power Frequency: 50Hz, 60Hz
Default setting is 50Hz.
14. Format Card
To keep your micro SD card in good condition, reformat it on a regular basis. Reformatting
erases all of your content, so be sure to offload your photos and videos first.
To reformat your card, please enter System Setting, then scroll through the options to
locate and tap ‘Format Card’, then tap ‘Confirm’.
15. Reset: Reset to factory? Cancel / Confirm
This option resets all settings to their default values.
16. About: Model / Version
You can check the model and version of your Vista 5.
18
Page 12
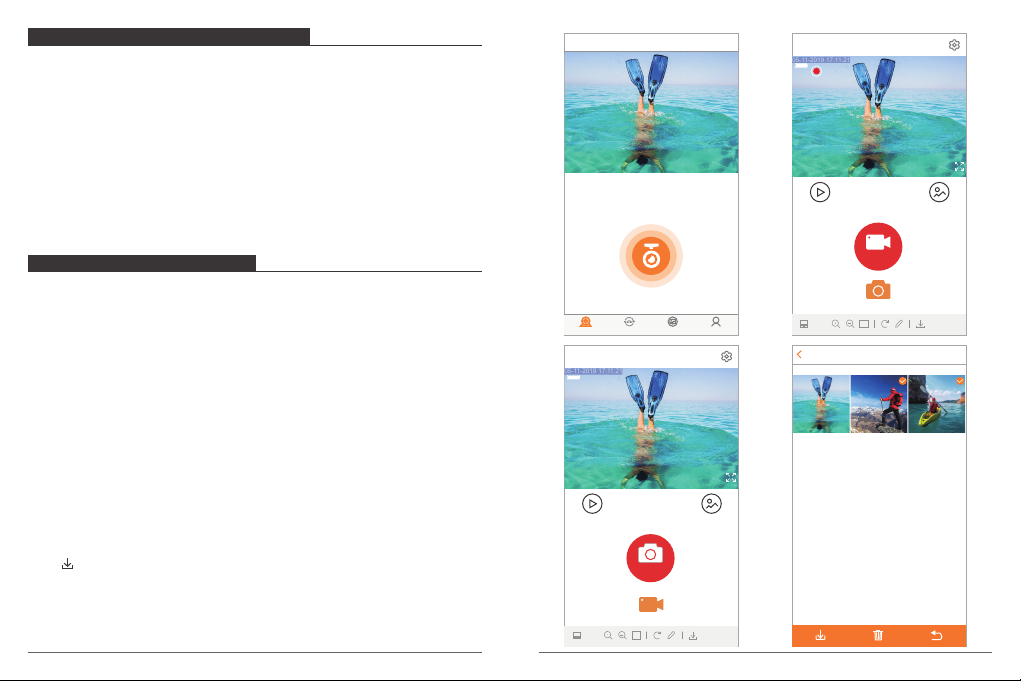
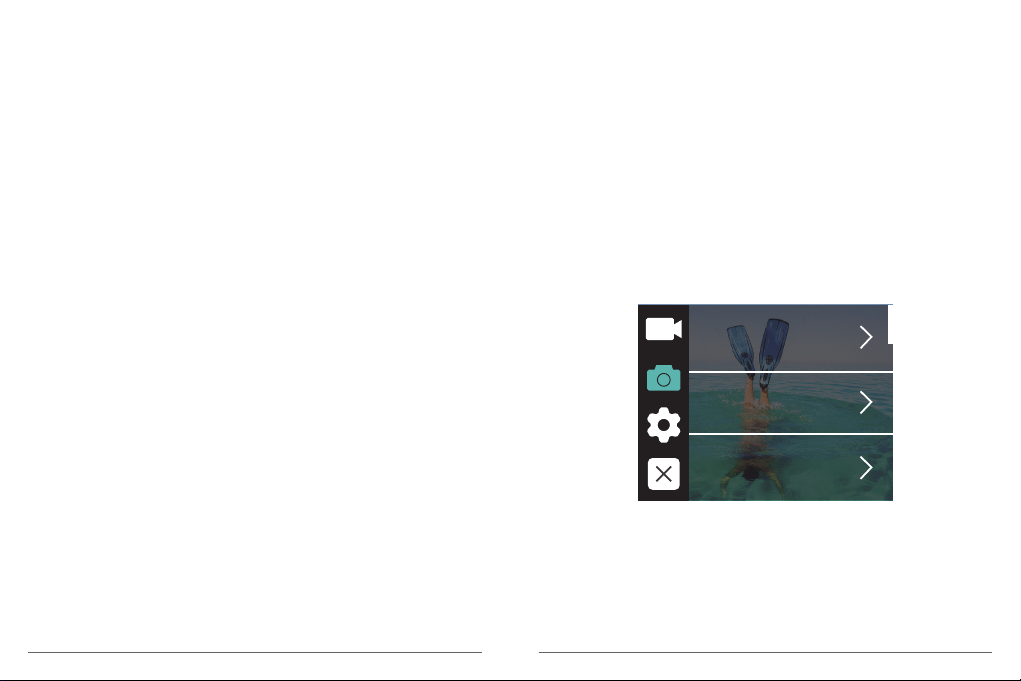
CONNECTING TO THE ROADCAM APP
05-11-2019 17:11:21
05-11-2019 17:11:21
The Roadcam app lets you control your camera remotely using a smartphone or tablet.
Features include full camera control, live preview, playback, download and sharing of
content.
1. Download Roadcam app from Google Play or Apple Store.
2. Turn on the camera, press and hold up button for 3 seconds to turn on Wi-Fi.
3. Turn on Wi-Fi of your phone, connect to the Wi-Fi SSID: ‘DragonTouch_Vista5_7DAB’.
4. Enter the password: 1234567890.
5. Open the app Roadcam. Tap ‘Add Recorder’. You connect to the Roadcam app
successfully.
Recording instrument
DragonTouch_Vista5
Break off
00:01:32
HUD video HUD photo
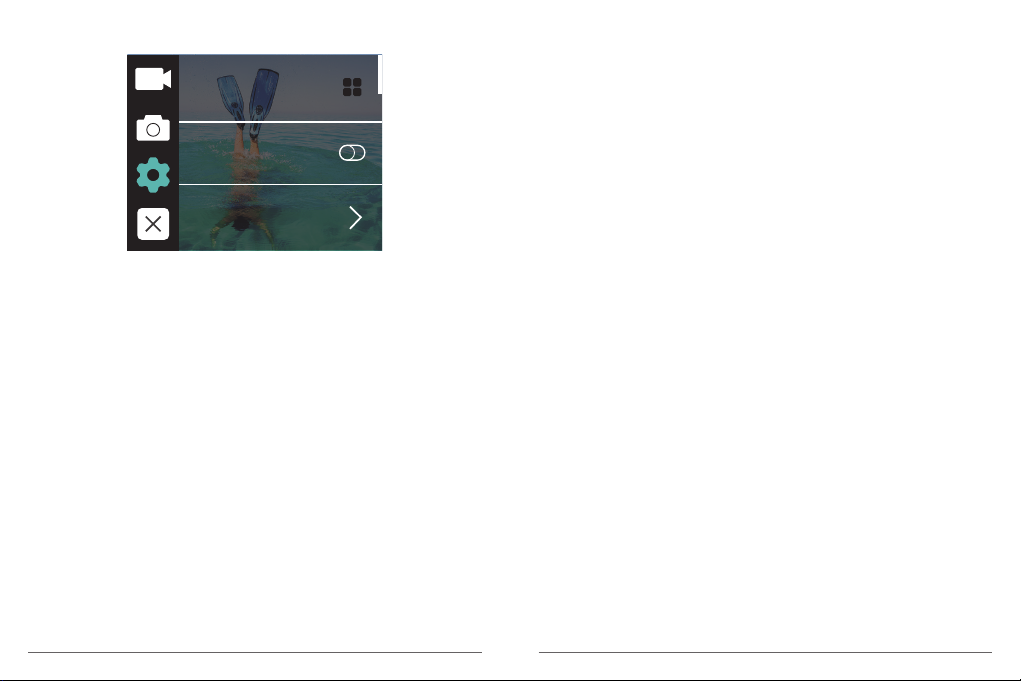
OFFLOADING YOUR CONTENT
OFFLOADING YOUR CONTENT TO A COMPUTER
To play back your video and photos on a computer, you must first transfer these files to a
computer. Transferring also frees up space on your microSD card for new content.
To offload files to a computer using a card reader (sold separately) and your computer’s
file explorer, connect the card reader to the computer, then insert the microSD card. You
can then transfer files to your computer or delete selected files on your card. You can also
offload files to a computer using a USB cable.
OFFLOADING YOUR CONTENT TO SMARTPHONE OR TABLET
1. Connect to the Roadcam app.
2. Open the Roadcam app. Tap ‘Add Recorder’. Then tap the icon at the middle of the
screen.
3. Tap ‘HD Photo’ icon.
4. Tap any file for 3 seconds. Then you can select many files.
5. Tap . You download the files successfully to your phone.
19
Add Recorder
Recording instrument
Break off
HUD video HUD photo
Album Mine
Moments
DragonTouch_Vista5
Photo
1:1
2019/01/01
Video
1:1
Picture
20
Page 13

PLAYING BACK YOUR CONTENT
You can playback your content on the camera’s LCD display, your computer, TV, or
smartphone / tablet.
You can also playback content by inserting the microSD card directly into a device, such
as a computer or compatible TV. With this method, playback resolution depends on the
resolution of the device and its ability to playback that resolution.
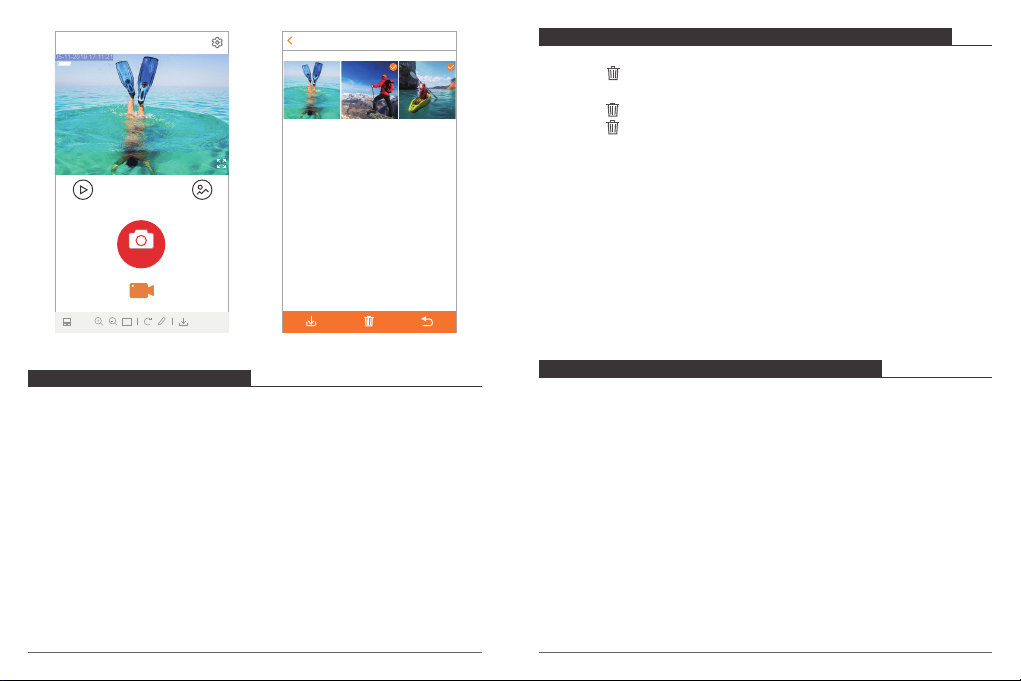
VIEWING VIDEOS AND PHOTOS ON YOUR VISTA 5
1. Press and hold down button for 3 seconds or tap file icon to enter Playback mode.
If your microSD card contains a lot of content, it might take a minute for it to load.
2. Tap any video or photo file.
3. Tap For ward or Backward icon to playback video or photo files.
DELETING VIDEOS AND PHOTOS ON YOUR VISTA 5
Delete videos and photos with touch screen:
1. Tap file icon to enter playback mode. If your microSD card contains a lot of content,
it might take a minute for it to load.
2. Tap and tap the video or photo file you want to delete.
3. Tap , the screen shows “Are you sure delete files? Cancel / Confirm”.
4. Tap ‘Confirm’. The selected file will be deleted.
Delete videos and photos with buttons:
1. Press and hold down button for 3 seconds to enter playback mode. If your microSD
card contains a lot of content, it might take a minute for it to load.
2. Press down button several times to locate the file you want to delete. Press shutter
button. Then press and hold shutter button for 3 seconds. The screen shows “Are you
sure delete files? Cancel / Confirm”
3. Press down button then shutter button. The selected file will be deleted.
21
REFORMATTING YOUR MICROSD CARD
To keep your microSD card in good condition, reformat it on a regular basis. Reformatting
erases all of your content, so be sure to offload your photos and videos first.
1. Turn on Vista 5.
2. Enter System Setting.
3. Scroll through the screen to locate and tap ‘Format Card’, then tap ‘Confirm’.
4. Tap ‘Confirm’. Then you format your microSD card successfully.
MAINTENANCE YOUR CAMERA
Follow these guidelines to get the best performance from your camera:
1. For best audio performance, shake the camera or blow on the mic to remove debris
from the microphone holes.
2. To clean the lens, wipe it with a soft, lint-free cloth. Do not insert foreign objects around
the lens.
3. Don’t touch the lens with fingers.
4. Keep the camera away from drops and bumps, which may cause damage to the parts
inside.
5. Keep the camera away from high temperature and strong sunshine to avoid being
damaged.
MAXIMIZING BATTERY LIFE
If the battery reaches 0% while recording, the camera saves the file and powers off.
To maximize batter y life, follow these guidelines when possible:
• Turn off Wireless Connections.
• Capture video at lower frame rates and resolutions.
• Use Screen Saver setting.
BATTERY STORAGE AND HANDLING
The camera contains sensitive components, including the battery. Avoid exposing your
camera to very cold or very hot temperatures. Low or high temperature conditions may
temporarily shorten the battery life or cause the camera to temporarily stop working
properly. Avoid dramatic changes in temperature or humidity when using the camera, as
condensation may form on or within the camera.
22
Page 14
Do not dry the camera or battery with an external heat source such as a microwave oven
or hair dryer. Damage to the camera or battery caused by contact with liquid inside the
camera is not covered under the warranty.
To stop recording:
Press the Grey Video Button again. The camera will emit one beep and the camera light
will stop flashing while recording.
Do not store your battery with metal objects, such as coins, keys or necklaces. If the
battery terminals come in contact with metal objects, this may cause a fire.
Do not make any unauthorized alterations to the camera. Doing so may compromise
safety, regulatory compliance, performance, and may void the warranty.
WARNING: Do not drop, disassemble, open, crush, bend, deform, puncture, shred,
microwave, incinerate or paint the camera or battery. Do not insert foreign objects into
the battery opening on the camera. Do not use the camera or the battery if it has been
damaged-for example, if cracked, punctured or harmed by water. Disassembling or
puncturing the battery can cause an explosion or fire.
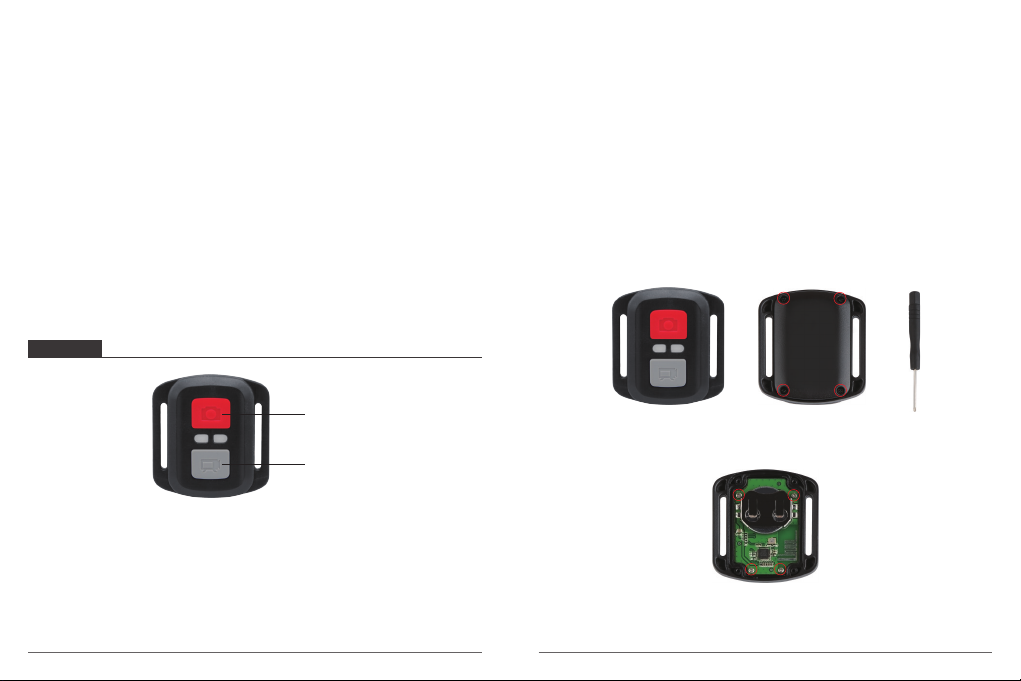
REMOTE
Photo Button
Video Button
Splashproof only, not waterproof
VIDEO
To record Video, verify the camera is in Video mode.
To start recording:
Press the Grey Video Button. The camera will emit one beep and the camera light will
flash while recording.
23
PHOTO
To capture a photo, verify the camera is in Photo mode.
To take a photo:
Press the Red Photo Button. The camera will emit a camera shutter sound.
CR2032 BATTERY REPLACEMENT FOR VISTA 5 REMOTE
1. Use a 1.8mm Phillips tip screwdriver to remove the 4 screws on the back cover of the
remote, allowing you to open it.
2. Remove another 4 screws on PCB board.
24
Page 15
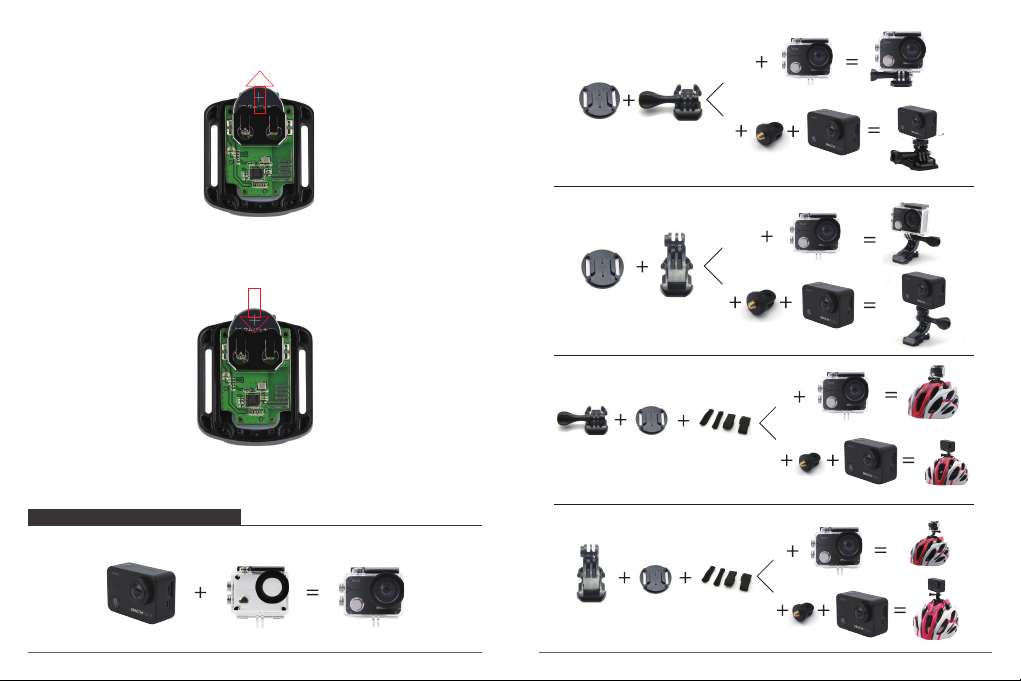
3. Lift the PCB board and slide out the battery, as shown in the picture.
Note: Do NOT rotate the PCB board to avoid reversing the camera and video button functions.
4. Install the new battery, keeping the “+” pole facing up.
5. Install all 4 screws back onto the PCB board.
6. Install all 4 screws back into the cover.
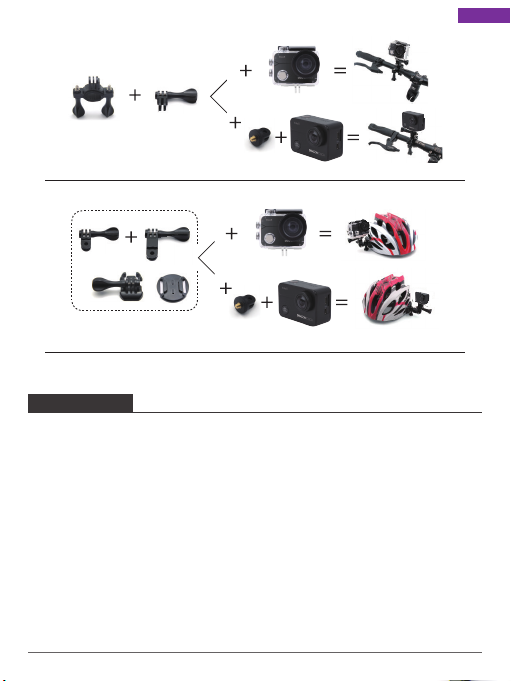
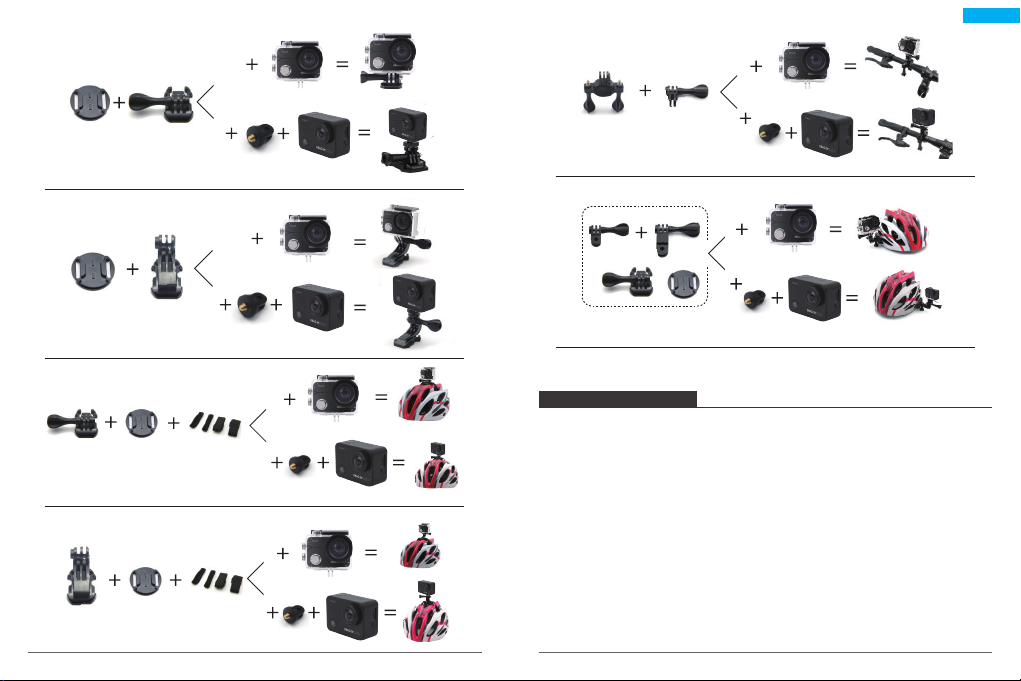
MOUNTING YOUR CAMERA
Attach your camera to helmets, gear and equipment.
25
26
Page 16
English
CONTACT US
For any problem with Dragon Touch products, please feel free to contact us, we will respond
within 24 hours.
E-mail: cs@dragontouch.com
Tel: 1-888-811-1140 (US) Mon-Fri (except holiday) 9am-5pm (EST)
Official website: www.dragontouch.com
27
Page 17

Deutsch
INHALT
Ihr Vista 5
Gestartet
Übersicht der Modi
Anpassen Ihres Vista 5
Verbindung mit der RoadCam-App
Inhalte Entladen
Wiedergabe Ihrer Inhalte
Löschen von Videos und Fotos auf Ihrem Vista 5
Neu-Formatierung Ihrer MikroSD-Karte
Wartung Ihrer Kamera
Maximierung der Akku-Laufzeit
Lagerung und Handhabung des Akkus
Fernbedienung
Montage Ihrer Kamera
Kontaktieren Sie uns
29
30
32
37
45
46
47
48
48
49
49
49
50
52
54
28
Page 18
IHR VISTA 5
1
2
12
4
5
3
7
6
1. Auslöser / Auswahl-Taste
2. Indikator
3. Power / Modi-Taste
4. Mikro SD Slot
5. Mikro-HDMI-Anschluss
6. Mikro USB
7. Lens
8. Berühren Bildschirm
9. Oben-Taste
10. Redner
11. Unten-Taste
12. BatterieFach
Hinweis: Die Kamera nimmt im wasserdichten Gehäuse keinen Ton auf.
8
29
9
10
11
GESTARTET
Willkommen Sie bei Ihrem neuen Vista 5. Es ist nötig,eine Mikro-SD-Karte (separat
erhältlich)für Aufnehmen von Videos und Fotos zu haben.
MIKRO SD-KARTEN
Verwenden Sie die Marken-Speicherkarten, die diese Anforderungen erfüllen:
• Mikro SD, Mikro SDHC oder Mikro SDXC
• Klasse 10 oder UHS-I-Einstufung
• Kapazität bis zu 64GB 100MB/s
30
Page 19
Hinweis:
1. Bitte formatieren Sie die Mikro-SD-Karte zuerst in dieser Kamera, bevor Sie sie
verwenden. Um Ihre Mikro-SD-Karte in gutem Zustand zu halten, dann bitte formatieren
Sie sie regelmäßig wieder. Durch das Neuformatieren werden alle Inhalte gelöscht.
Laden Sie daher zuerst Ihre Fotos und Videos herunter
2. Die Mikro-SD-Karte im FAT32-Format stoppt die Aufzeichnung, wenn der Speicher jeder
Datei mehr als 4 GB beträgt, und beginnt mit der Aufzeichnung einer neuen Dateierneut.
ÜBERSICHT DER MODI
Es gibt 9 Modi: Foto, Selbst-Auslöser, Serien-Bild, Zeitraffer Foto, Video, Zeitlupe,
Zeitraffer Video, Standbild und Fahrmodi.
0002/5467
Arbeit-Modi
EIN-UND AUSSCHALTEN
Einschalten:
Drücken Sie die Modi-Taste drei Sekunden lang. Die Kamera piept, während die KameraStatus Anzeige leuchtet. Wenn Informationen auf dem LCD-Display oder dem Bildschirm
des Kamera Statuses angezeigt werden, ist Ihre Kamera eingeschaltet.
Ausschalten:
Drücken Sie die Modi-Taste drei Sekunden lang. Die Kamera piept, während die KameraStatus Anzeige ausgeschaltet ist.
SCHALTMODI
Modi wechseln:
Drücken Sie die Modi-Taste, nachdem Sie die Kamera eingeschaltet haben. Sie können
den Modi wechseln.
Zum Verlassen des Modi:
Drücken Sie die Modi-Taste, um den Modi zu verlassen.
Ein-und Ausschalten von Wi-Fi
Wi-Fi einschalten:
Schalten Sie die Kamera ein und drücken Sie die Aufwärt-Taste drei Sekunden lang, um
Wi-Fi einzuschalten.
Deaktivieren Sie Wi-Fi:
Drücken Sie die Oben-Taste, um Wi-Fi auszuschalten.
Hinweis: Die Kamera nimmt im wasserdichten Gehäuse keinen Ton auf.
31
Foto Selbst-Auslöser Serien-Bild
Foto
12M
Hier drücken
Zeitraffer Video Zeitlupe
FOTO-MODI
Drücken Sie im Fotomodus den Auslöser. Die Kamera nimmt ein Foto auf.
0002/5467
Foto
12M
32
Page 20

SELBST-AUSLÖSERMODI
Drücken Sie im Selbst -Auslöser Modi die Taste OK, um ein Selbst -Auslöser Foto
aufzunehmen.
0002/5467
ZEITRAFFER-FOTOMODI
Drücken Sie im Zeitraffer-Foto Modi den Auslöser. Die Kamera nimmt eine Fotoserie in
Intervallen von 3s / 5s / 10s auf.
0002/5467
Selbst-Auslöser
12M
SERIEN-BILD-MODI
Drücken Sie im Serien-Bild Modi den Auslöser. Die Kamera nimmt 3 Fotos pro Sekunde,
5 Fotos pro Sekunde oder 10 Fotos pro Sekunde auf.
0002/5467
Serien-Bild
12M
33
Zeitraffer-Foto
12M
VIDEO MODI
Der Video Modi ist der Standard Modi, wenn Sie die Kamera einschalten.
Drücken Sie im Video Modi den Auslöser, um die Video Aufnahme zu starten. Drücken Sie
die Auslöser Taste, um die Video Aufnahme zu beenden.
00:00:00/00:31:55
Video
4K 30fps
34
Page 21
ZEITLUPE VIDEOMODI
Drücken Sie im Zeitlupen-Video Modi den Auslöser. Die Kamera zeichnet Zeitlupen Video
auf.
00:00:00/00:40:37
Standbild-MODI
Im Foto Modi nimmt die Kamera alle 3 Sekunden / 5 Sekunden / 10 Sekunden /
30 Sekunden während der Video Aufnahme automatisch ein Foto auf.
00:00:00/00:31:55
Zeitlupen-Video
1080P 90fps
ZEITRAFFER-VIDEOMODI
Drücken Sie im Zeitraffer-Video Modi den Auslöser. Die Kamera zeichnet Videos von
Bildern auf, die in bestimmten Intervallen aufgenommen wurden.
Zeitraffer Video wird ohne Ton aufgenommen.
00:00:00/00:40:37
Zeitraffer Video
4K 30fps
35
Standbild
4K 30fps
FAHRMODI
Im Fahr Modi verbinden Sie die Kamera mit dem Zigaretten Anzünder. Die Kamera schaltet
sich automatisch ein, wenn Sie Ihr Auto starten, und schaltet sich automatischaus, wenn
Sie Ihr Auto anhalten.
00:00:00/00:31:55
Fahr
4K 30fps
36
Page 22
ANPASSEN IHRES VISTA 5
VIDEO-EINSTELLUNG
0002/5467
Auflösung
Bild Stabilisierung
Darüber hinaus werden die Codierung vorhandener SD- und HD-Inhalte mit HEVC von
H.264 hinzugefügt,um die Einsparungen der Kosten, qualitativ hochwertigere Videos auf
Verbindungen mit niedrigeren Bitraten zu reduzieren.
4. Zeitlupe: 1080P 90fps, 720P 120fps
Die Standard Einstellung ist 1080P 90fps
Zeitlupe ist ein Effekt beim Filmemachen, bei dem die Zeit verlangsamt ist.
Hinweis: Wenn Sie Zeitlupen Videos aufnehmen möchten, deaktivieren Sie zuerst die Bild
Stabilisierung.
Photo
12M
Video Encode
Hier drücken
1. Auflösung: 4K 30fps, 2.7K 30fps, 2K 60fps, 2K 30fps, 1080P 90fps, 1080P 60fps,
1080P 30fps, 720P 120fps, 720P 60fps, 720P 30fps
Die Standard Einstellung ist 4K 30fps.
2. Bild Stabilisierung: Ein / Aus
Die Standard Einstellung ist.
3. Videocode: H.264, H.265
Die Standard Einstellung ist H.264.
Ein Video Codec ist eine elektronische Schaltung oder Software, die digitales Video
komprimiert oder dekomprimiert. Es kann unkomprimiertes Video in ein komprimiertes
Format konvertieren.
Nach vielen Studien sollte HEVC (High Efficiency Video Coding, H.265) in Video-onDemand-Anwendungen (VOD) eine bessere Komprimierung,was bis zu 50% ist, als H.264
liefern, und es bedeutet eine bessere Qualität bei der halben Bitrate. Bei der LiveCodierung, die natürlich in Echtzeit durchgeführt werden muss, wird zunächst eine
Reduzierung der Bandbreite um 35% bei ähnlichen Qualität -Stufen erwartet. Alternativ
kann HEVC auch Filme mit höherer Auflösung (2K oder 4K) ermöglichen.
37
5. Standbild: 4K 30fps
Die Standard Einstellung ist 4KP 30fps.
6. Standbild-Zeit: 3 Sec, 5 Sec, 10 Sec, 30 Sec
Die Standard Einstellung ist3 Sec.
Im Standbild Modi nimmt die Kamera während der Videoaufnahme alle 3 Sek. / 5 Sek. /
10 Sek. / 30 Sek. automatisch ein Foto auf.
7. Zeitraffer Intervall: 0.2 Sec, 0.3 Sec, 0.5 Sec, 1 Sec, 2 Sec, 5 Sec, 10 Sec, 30 Sec.1 Min.
Die Standard Einstellung ist 0,5 Sek.
Zeitraffer Video erstellt Videos aus Bildern, die in bestimmten Intervallen aufgenommen
wurden. Mit dieser Option können Sie ein Zeitraffer Ereignis erfassen und sofort als Video
anzeigen oder freigeben. Zeitraffer Video wird ohne Ton aufgenommen.
Bei Auswahl von 2 Sekunden werden 2 Sekunden aufgezeichnet, um ein Bild pro Sekunde
zu erhalten.
Beispiel: Wenn Sie 4K/30FPS und 2 Sekunden auswählen, müssen Sie 60 Sekunden
aufnehmen, dann können Sie 1 Sekunde Video für 4K/30FPS erhalten.
8. LoopAufnahme Zeit: AUS 3 Min., 5 Min, 7 Min
Die Standard Einstellung ist AUS.
Mit der Loop-Aufnahme können Sie kontinuierlich Videos aufnehmen, aber nur die
gewünschten Momente speichern. Wenn Sie beispielsweise ein 5-Minuten-Intervall
auswählen, werden nur die vorherigen 5 Minuten gespeichert. Wenn Sie 5 Minuten
aufnehmen und den Auslöser nicht drücken, um die Aufnahme zu beenden und zu
38
Page 23
speichern, zeichnet die Kamera ein neues 5-Minuten-Intervall auf, indem Sie über Ihre
vorherigen 5 Minuten Film -Material aufnehmen. Wenn die Mikro-SD-Karte voll ist,
deckendie neuen Dateien die alten Dateienab.
9. Ton Aufnahme: Ein / Aus
Einstellung ist Aus
Schalten Sie die Audio Aufnahme aus, und die Kamera nimmt keinen Ton auf, wenn Sie ein
Video aufnehmen.
10. Belichtung Wert: -2, -1.7, -1.5, -1.3, -1, -0.5, -0.3, 0, +0.3, +0.5, +1, +1.3, +1.5, +1.7,
+2
Die Standard Einstellung ist 0.
Standardmäßig verwendet Ihre Kamera das gesamte Bild, um die geeignete Belichtung
Stufe zu bestimmen. Mit Belichtung können Sie jedoch einen Bereich auswählen, den die
Kamera bei der Bestimmung der Belichtung priorisieren soll. Diese Einstellung ist besonders
nützlich bei Aufnahmen, bei denen ein wichtiger Bereich ansonsten über-oder
unterbelichtet sein könnte.
Wenn Sie diese Einstellung ändern, wird der Effektauf dem LCD-Display sofort auf Ihr Bild
angezeigt. Wenn Sie den Modi ändern, verwendet die Kamera wieder die gesamte Szene,
um die richtige Stufe der Belichtungzu bestimmen.
11. ISO: Auto, 100, 200, 400, 800
Die Standard Einstellung ist Auto.
ISO bestimmt die Empfindlichkeit von Lichtder Kamera und schafft einen Kompromiss
zwischen Helligkeit und resultierendem Bild Rauschen. Bild Rauschen bezieht sich auf den
Grad der Körnigkeit von Bildern.
Bei schlechten Licht Verhältnissen führen höhere ISO-Werte zu helleren Bildern, jedoch mit
größerem Bild Rauschen. Niedrigere Werte führen zu geringerem Bild Rauschen, aber
dunkleren Bildern. Wenn Sie diese Einstellung ändern, wird der Effekt auf dem LCD-Display
sofort auf Ihr Bild angezeigt.
12. Weiß Abgleich: Automatisch, Kunstlicht, Neonlicht, Tageslicht, Bewölkt,
Die Standard Einstellung ist Auto.
Mit dem Weiß Abgleich können Sie die Farb Temperatur von Videos und Fotos anpassen,
39
um sie für kühle oder warme Licht-Verhältnisse zu optimieren. Wenn Sie diese Einstellung
ändern, wird der Effekt auf dem LCD-Display sofort auf Ihr Bild angezeigt.
13. Messgerät: Mitte, Durchschnitt, Punkt
Die Standard Einstellung ist Durchschnitt.
In der Fotografie bezieht sich der Mess Modi auf die Art und Weise, wie eine Kamera die
Belichtung ermittelt. Mit Kameras kann der Benutzer im Allgemeinen zwischen Mittelwertund Spotmessung Modi wählen. Die verschiedenen Messmodi ermöglichen es dem
Benutzer, den am besten geeigneten Modi für eine Vielzahl von Licht-Verhältnissen
auszuwählen.
14. Farbe: Natur, Schwarz Weiß, Sepia
Die Standard Einstellung ist Natürlich.
FOTO-EINSTELLUNG
Auflösung
Zeitschalter
Serienbild
1. Resolution: 12M, 8M, 5M, 3M
Die Standard Einstellung ist 12M.
2. Selbst Auslöser: 1 Sec, 3 Sec, 5 Sec, 10 Sec, 30 Sec
Die Standard Einstellung ist 3 Sec.
Es gibt eine Verzögerung zwischen dem Drücken des Auslösers und dem Auslösen des
Verschlusses. Es wird am häufigsten verwendet, ein Foto von sich selbst zu machen (häufig
mit der Familie).
40
Page 24

3. Serienbild: 3shots / 1s, 5shots / 1s, 10shots / 1s
Die Standard Einstellung ist 3shots / 1s.
Serien Bilder erfassen bis zu 30 Fotos in 8 Sekunden und eignen sich daher perfekt für die
Aufnahme von sich schnell bewegenden Aktivitäten.
4. Zeitraffer-Foto: 3 Sec, 5 Sec, 10 Sec, 30 Sec, 1 Min
Die Standard Einstellung ist 3 Sec.
Zeitraffer Foto nimmt eine Reihe von Fotos in festgelegten Intervallen auf. In diesem Modi
können Sie Fotos von Aktivitäten aufnehmen und später die besten auswählen.
5. Szene: Auto, Lichtmalerei
Die Standard Einstellung ist Auto.
zwischen Helligkeit und resultierendem Bildrauschen. Bild Rauschen bezieht sich auf den
Körnigkeit Grad des Bildes.
Bei schlechten Licht-Verhältnissen führen höhere ISO-Werte zu helleren Bildern, jedoch
mit größerem Bild Rauschen. Niedrigere Werte führen zu geringerem Bild Rauschen, aber
dunkleren Bildern. Wenn Sie diese Einstellung ändern, wird der Effekt auf dem LCD-Display
sofort auf Ihr Bild angezeigt.
9. Weiß Abgleich: Automatisch, Kunstlicht, Neonlicht, Tageslicht, Bewölkt
Die Standard Einstellung ist Auto.
Mit dem Weiß Abgleich können Sie die Farb-Temperatur von Videos und Fotos anpassen,
um sie für kühle oder warme Licht Verhältnisse zu optimieren. Wenn Sie diese Einstellung
ändern, wird der Effekt auf dem LCD-Display sofort auf Ihr Bild angezeigt.
6. Belichtung Wert: -2, -1.7, -1.5, -1.3, -1, -0.5, -0.3, 0, +0.3, +0.5, +1, +1.3, +1.5, +1.7,
+2
Die Standard Einstellung ist 0.
Standardmäßig verwendet Ihre Kamera das gesamte Bild, um die geeignete Belichtung
Stufe zu bestimmen. Mit Belichtung können Sie jedoch einen Bereich auswählen, den die
Kamera bei der Bestimmung der Belichtung priorisieren soll. Diese Einstellung ist
besonders nützlich bei Aufnahmen, bei denen ein wichtiger Bereich ansonsten über-oder
unterbelichtet sein könnte.
Wenn Sie diese Einstellung ändern, wird der Effekt auf dem LCD-Display sofort auf Ihr Bild
angezeigt. Wenn Sie den Modi ändern, verwendet die Kamera wieder die gesamte Szene,
um die richtige Belichtung Stufe zu bestimmen.
7. Belichtung Zeit: Auto, 2 Sec, 5 Sec, 10 Sec, 30 Sec
Die Standard Einstellung ist Auto.
Unter Belichtung -Zeit bzw. Belichtung-Dauer versteht man die Zeitspanne, für die der
Film einer herkömmlichen Kamera oder ein Sensor einer modernen Digital Kamera
tatsächlich dem Licht ausgesetzt wird, um ein Bild aufzunehmen.
8. ISO: Auto, 400, 800, 1600, 3200
Die Standard Einstellung ist Auto.
ISO bestimmt die Licht -Empfindlichkeit der Kamera und schafft einen Kompromiss
41
10. Meter: Mitte, Durchschnitt, Spot
Die Standard Einstellung ist Durchschnitt.
In der Fotografie bezieht sich der Messmodi auf die Art und Weise, wie eine Kamera die
Belichtung ermittelt. Mit Kameras kann der Benutzer im Allgemeinen zwischen Mittelwertund Spotmessung Modi wählen. Die verschiedenen Messmodi ermöglichen es dem
Benutzer, den am besten geeigneten Modi für eine Vielzahl von Licht-Verhältnissen
auszuwählen.
11. Schärfe: Stark, normal, weich
Die Standard Einstellung ist Normal.
Die Schärfe steuert die Qualität der Details, was in Ihrem Videomaterial oder Ihren Fotos
erfasst sind. Wenn Sie diese Einstellung ändern, zeigt Ihnen das Berühren-Anzeige sofort
den Effekt auf Ihr Bild.
12. Farbe: Natur, Schwarz Weiß, Sepia
Die Standard Einstellung ist Natural..
13. Bild Qualität: Gut, Normal,
Die Standard Einstellung ist is gut.
42
Page 25
SYSTEMEINSTELLUNG
Geräusche
Verzerrung Kalibrierung
Winkel
5. WDR: Ein / Aus
Die Standard Einstellung istaus.
Wide Dynamic Range (WDR) behält eine größere Detail -Genauigkeit in den dunklen und
hellen Bereichen eines Bildes bei. Das Ergebnis ist ein Foto, das für beide Extreme richtig
belichtet ist. Diese Einstellung ist besonders nützlich für Szenen mit einer Liste oder
großen hellen Bereichen und einem dunklen Vordergrund. WDR ist nur im Videomodi
verfügbar.
6. Automatische Abschaltung: Off, 1 Min, 3 Min, 5 Min, 10 Min
Die Standard Einstellung istaus.
Schalten Sie den V50X nach einer gewissen Zeit der Inaktivität aus, um die Laufzeit von
Akkuzu verlängern.
1. Geräusche: Volume, Key Tone, Touch Tone, Boot Tone
Sie können die Laut-Stärke der Kamera einstellen und den Tastenton, den Berührungston
oder den Startton ein-und ausschalten.
2. Verzerrung Kalibrierung: Ein / Aus
Die Standard Einstellung istaus.
Aktivieren Sie die Verzerrung-Kalibrierung, um die Bild-Verzerrung zu korrigieren.
3. Angle: 170°, 140°, 110°, 70°
Die Standard Einstellung ist 170°.
Der Winkel bezieht sich darauf, wie viel von der Szene (gemessen in Grad) durch das
Kamera-Objektiv erfasst werden kann. Super Weit Winkel erfasst den größten Teil der
Szene, während der enge Winkel den geringsten Teil erfasst.
4. Tauchmodi: Ein / Aus
Die Standard Einstellung istaus.
Wenn Sie den Tauchmodi einschalten, kann dies den Mangel an Rotlicht in Szenen von
Unterwasserausgleichen. Der Tauchmodi ist für die Verwendung in tropischem und blauem
Wasser ausgelegt und für die Ver wendung zwischen 10 und 80 Fuß optimiert.
43
7. Bildschirm Schoner: Aus, 30 Sec, 1 Min, 3 Min
Die Standard Einstellung ist 1 Min.
Schalten Siedie Anzeige nach einer bestimmten Zeit ohne Aktivität aus, um die
Lebensdauer der Batteriezu verlängern. Um die Anzeige wieder einzuschalten, drücken Sie
eine beliebige Taste an der Kamera.
8. Sprache: English / Français / Deutsch / Español / Italiano / Português
Standard Einstellung ist English.
9. Datum Format: YYYY/MM/DD, MM/DD/YYYY, DD/MM/YYYY
Die Standard Einstellungist MM/DD/YYYY.
10. Datum Einstellen: MM/DD/YYYY
Sie können das Datum der Kamera einstellen.
11. Uhrzeit Einstellen: HH/MM
Sie können die Uhrzeit der Kamera einstellen.
12. Datum Stempel: Aus, Datum&Uhrzeit, Datum
Die Standard Einstellung ist Datum und Uhrzeit.
Wenn Sie Datum und Uhrzeit auswählen, fügt diese Kamera den von Ihnen
aufgenommenen Videos und Fotos Datum und Uhrzeit hinzu.
44
Page 26

13. Strom Frequenz: 50Hz, 60Hz
05-11-2019 17:11:21
Die Standard Einstellung ist 50Hz.
14. Format Karte
Um Ihre Mikro-SD-Karte in gutem Zustand zu halten, formatieren Sie sie regelmäßig neu.
Durch das Neuformatieren werden alle Inhalte gelöscht. Stellen Sie daher sicher, dass Sie
zuerst Ihre Fotos und Videos auslagern.
Um Ihre Karte neu zu formatieren, bitte rufen Sie die Einstellungen von Systemauf,
navigieren Sie zu den gewünschten Optionen, dann tippen Sie auf “Karte formatieren”
und anschließend auf “Bestätigen”.
15. Zurücksetzen: Zum Werkszustand zurücksetzen? Abbrechen / Bestätigen
Diese Option setzt alle Einstellungen auf ihre Standardwerte zurück.
16. Über: Modell / Version
Sie können das Modell und die Version Ihres Vista 5 überprüfen.
VERBINDUNG MIT DER ROADCAM-APP
Mit der Roadcam-App können Sie Ihre Kamera über ein Smartphone oder Tablet
fernsteuern.Die vollständigen Kamera-Steuerung, Live-Vorschau, Wiedergabe,
Herunterladen und Teilen von Inhalten sind die Funktionen.
1. Laden Sie die Roadcam-App von Google Play oder Apple Store herunter.
2. Schalten Sie die Kamera ein und drücken Sie die Taste 3 Sekunden lang, um Wi-Fi
einzuschalten.
3. Schalten Sie das WLAN Ihres Telefons ein und stellen Sie eine Verbindung zur
WLAN-SSID her: ,,DragonTouch_Vista5_7DAB”.
4. Geben Sie das Passwort ein: 1234567890.
5. Öffnen Sie die App Roadcam. Tippen Sie auf “Rekorder hinzufügen”. Sie stellen
erfolgreich eine Verbindung zur Roadcam-App her.
45
INHALTE ENTLADEN
LADENSIE DEN INHALT AUF EINEN COMPUTER HERUNTER
Um Ihre Videos und Fotos auf einem Computer wiederzugeben, müssen Sie diese Dateien
zuerst auf einen Computer übertragen. Durch die Übertragung wird außerdem Speicher
Platz auf Ihrer Mikro-SD-Karte für neue Inhalte freigegeben.
Um Dateien mit einem Karten Leser (separat erhältlich) und dem Datei-Explorer Ihres
Computers zu übertragen, schließen Sie den Karten Leser an den Computer an und legen
Sie die Mikro-SD-Karte ein. Sie können dann Dateien auf Ihren Computer übertragen oder
ausgewählte Dateien auf Ihrer Karte löschen. Sie können Dateien auch über ein USB-Kabel
auf einen Computer übertragen.
LADEN SIE DEN INHALT AUF EIN SMARTPHONE ODER EIN TABLET HERUNTER
1. Stellen Sie eine Verbindung zur Roadcam-App her
2. Öffnen Sie die Roadcam-App. Tippen Sie auf “Rekorder hinzufügen”. Tippen Sie dann
auf das Symbol in der Mitte des Bildschirms.
3. Tippen Sie ‘HD Photo’ icon.
4. Tippen Sie 3 Sekunden lang auf Datei. Dann können Sie viele Dateien auswählen
5. Tippen Sie . Sie haben die Dateien erfolgreich auf Ihr Telefon heruntergeladen.
Recording instrument
Recording instrument
Add Recorder
Album Mine
Moments
DragonTouch_Vista5
Break off
00:01:32
HUD video HUD photo
Video
1:1
46
Page 27
Break off
05-11-2019 17:11:21
DragonTouch_Vista5
2019/01/01
Picture
LÖSCHEN VON VIDEOS UND FOTOS AUF IHREM VISTA 5
Löschen Sie Videos und Fotos mit dem Bildschirm:
1. Tippen Sie auf das Datei-Symbol, um den Wiedergabe Modi aufzurufen. Wenn Ihre
Mikro-SD-Karte viel Inhalt enthält, kann das Laden eine Minute dauern.
2. Tippen Sie auf die Video-oder Foto Datei, die Sie löschen möchten.
3. Tippen Sie und auf dem Bildschirm wird es angezeigt: “Sind Sie sicher, dass Sie
Dateien löschen? Abbrechen/Bestätigen".
4. Tippen Sie auf “Bestätigen”. Die ausgewählte Datei wird gelöscht.
HUD video HUD photo
Photo
1:1
WIEDERGABE IHRER INHALTE
Sie können Ihre Inhalte auf dem LCD-Display der Kamera, Ihrem Computer, Fernseher
oder Smartphone / Tablet wiedergeben.
Sie können Inhalte auch wiedergeben, indem Sie die Mikro-SD-Karte direkt in ein Gerät
wie einen Computer oder ein kompatibles Fernsehgerät einlegen. Bei dieser Methode
hängt die Wiedergabe-Auflösung von der Auflösung des Geräts und seiner Fähigkeit ab,
diese Auflösung wiederzugeben.
VIDEOS UND FOTOS AUF IHREM VISTA 5
1. Drücken Sie die Taste 3 Sekunden lang oder tippen Sie auf das Datei-Symbol, um in den
Wiedergabe-Modi zu wechseln. Wenn Ihre Mikro-SD-Karte viel Inhalt enthält, kann das
Laden eine Minute dauern.
2. Tippen Sie auf eine Video-oder Foto Datei
3. Tippen Sie auf das Vorwärts- oder Rückwärtssymbol, um Video- oder Foto Dateien
abzuspielen.
47
Löschen Sie Videos und Fotos mit den Tasten:
1. Drücken Sie die Taste 3 Sekunden lang, um in den Wiedergabe Modi zu wechseln.
Wenn Ihre Mikro-SD-Karte viel Inhalt enthält, kann das Laden eine Minute dauern.
2. Drücken Sie die Abwärt -Taste mehrmals, um die zu löschende Datei zu finden. Drücken
Sie den Auslöser. Drücken Sie dann den Auslöser 3 Sekunden lang. Der Bildschirm zeigt
“Sind Sie sicher, dass Sie Dateien löschen? Abbrechen / Bestätigen".
3. Drücken Sie die Abwärt-Taste und dann den Auslöser. Die ausgewählte Datei wird
gelöscht.
NEU-FORMATIERUNG IHRER MIKRO SD-KARTE
Um Ihre Mikro-SD-Karte in gutem Zustand zu halten, formatieren Sie sie regelmäßig neu.
Durch das Neuformatieren werden alle Inhalte gelöscht. Laden Sie daher zuerst Ihre Fotos
und Videos herunter.
1. Schalten Sie Vista 5 ein.
2. Rufen Sie die System Einstellungen auf.
3. Blättern Sie durch den Bildschirm, und tippen Sie auf “Karte formatieren”. Tippen Sie
anschließend auf ,,Bestätigen”.
4. Tippen Sie auf ,,Bestätigen”. Dann formatieren Sie Ihre Mikro-SD-Karte erfolgreich.
48
Page 28

WARTUNG IHRER KAMERA
Befolgen Sie diese Richtlinien, um die bestmögliche Leistung Ihrer Kamera zu erzielen:
1. Schütteln Sie die Kamera oder pusten Sie auf das Mikrofon, um die Mikrofon -Löcher
von Schmutz zu befreien.
2. Wischen Sie die Linse zum Reinigen mit einem weichen, fusselfreien Tuch ab. Führen Sie
keine Fremdkörper um das Objektiv ein.
3. Berühren Sie die Linse nicht mit den Fingern.
4. Halten Sie die Kamera von Tropfen und Stößen fern, da diese die Innenteile
beschädigen können.
5. Halten Sie die Kamera von hohen Temperaturen und starker Sonnen-Einstrahlung fern,
um die Beschädigungen zu vermeiden.
MAXIMIERUNG DER AKKU-LAUFZEIT
Wenn der Akku während der Aufnahme 0% erreicht, speichert die Kamera die Datei und
schaltet sich aus.
Befolgen Sie zur Maximierung der Batterie Lebensdauer nach Möglichkeit diese Richtlinien.
• Deaktivieren Sie die drahtlosen Verbindungen.
• Nehmen Sie Videos mit niedrigeren Bildraten und Auflösungen auf.
• Verwenden Sie die Einstellung von Bildschirm Schoner.
Bewahren Sie den Akku nicht zusammen mit Metall Gegenständen wie Münzen, Schlüsseln
oder Halsketten auf. Wenn die Batterie -Polenden Metall berühren, kann dies einen Brand
verursachen.
Nehmen Sie keine unbefugten Änderungen an der Kamera vor. Dies kann die Sicherheit,
die Einhaltung gesetzlicher Bestimmungen und die Leistung beeinträchtigen und zum
Erlöschen der Garantie führen.
WARNING: Lassen Sie die Kamera oder den Akku nicht fallen, zerlegen, öffnen,
zerdrücken, biegen, verformen, durchstoßen, zerkleinernoder lackieren. Führen Sie keine
Fremdkörper in dieKamera ein. Verwenden Sie die Kamera oder den Akku nicht, wenn er
beschädigt wurde, z. B. durch Risse, Einstiche oder Wasser -Schäden. Das Zerlegen oder
Durchstoßen der Batterie kann zu einer Explosion oder einem Brand führen.
DIE FERNBEDIENUNG
LAGERUNG UND HANDHABUNG DES AKKU
Die Kamera enthält empfindliche Komponenten, einschließlich des Akkus. Setzen Sie Ihre
Kamera keinen sehr kalten oder sehr heißen Temperaturen aus. Niedrige oder hohe
Temperaturen können die Lebensdauer des Akkus verkürzen oder dazu führen, dass die
Kamera nicht mehr richtig funktioniert. Vermeiden Sie dramatische Änderungen der
Temperatur oder Feuchtigkeit, wenn Sie die Kamera ver wenden.
Trocknen Sie die Kamera oder den Akku nicht mit einer externen Wärmequelle wie einer
Mikrowelle oder einem Haar Trockner. Schäden an der Kamera oder am Akku, die durch
Kontakt mit Flüssigkeiten in der Kamera verursacht wurden, sind von der Garantie
ausgeschlossen.
49
Foto Taste
Video Taste
Nur spritzwassergeschützt, nicht wasserdicht.
VIDEO
Stellen Sie zum Aufnehmen von Videos sicher, dass sich die Kamera im Videomodi befindet.
Aufnahme starten:
Drücken Sie die graue Video Taste. Die Kamera gibt einen Signalton aus und die Kamera
Lampe blinkt während der Aufnahme.
50
Page 29

Beenden Sie die Aufnahme:
Drücken Sie erneut die graue Video Taste. Die Kamera gibt einen Piepton aus und die
Kamera hört während der Aufnahme auf zu blinken.
PHOTO
Vergewissern Sie sich, dass sich die Kamera im Fotomodi befindet, um ein Foto
aufzunehmen.
Ein Foto machen:
Drücken Sie die rote Foto- Taste. Die Kamera gibt ein Kamera Verschluss-Geräusch aus.
3. Heben Sie die Platine an und ziehen Sie den Akku heraus, wie in der Abbildung gezeigt
Tipp: Drehen Sie die Platine NICHT, um die Funktionen der Kamera und der Video Tasten
nicht zu beeinträchtigen.
CR2032 BATTERIEWECHSEL FÜR VISTA 5-FERNBEDIENUNG
1. Entfernen Sie mit einem 1,8-mm Schrauben- Dreher von Kreuzschlitzdie 4 Schrauben auf
der Rückseite von Fernbedienung, damit Sie sie öffnen können.
2. Entfernen Sie weitere 4 Schrauben auf der Leiterplatte.
51
4. Setzen Sie die neue Batterie ein und achten Sie dabei darauf, dass der Pluspol nach oben zeigt.
5. Bringen Sie alle 4 Schrauben wieder auf der Leiterplatte an.
6. Setzen Sie alle 4 Schrauben wieder in die Abdeckung ein.
MONTAGE IHRER KAMERA
Befestigen Sie Ihre Kamera an Helmenund Ausrüstung.
52
Page 30
KONTAKTIEREN UNS
Bei Problemen mit Dragon Touch-Produkten können Sie sich gerne an uns wenden. Wir
werden Ihnen innerhalb von 24 Stunden antworten.
E-Mail-Addresse: cs@dragontouch.com
Offizielle website: www.dragontouch.com
Deutsch
53
54
Page 31

Español
CONTENIDO
Su Vista 5
Cómo Comenzar
Resumen del Productos
Personalizar su Vista 5
Conectar la Roadcam App
Descargar su Contenito
Reproducer su Contenito
Eliminar Vídeos y Fotos en su Vista 5
Formatear su Tarjeta microSD
Mantener su Cámara
Maximizar la Vida Útil de la Batería
Mantenimiento y Manipulación de la Batería
Control Remoto
Montaje de la Camara
Contáctenos
56
57
59
64
72
72
74
75
75
76
76
76
77
79
81
55
Page 32

SU VISTA 5
1
2
12
4
5
3
7
6
1. Botón del Obturador / de Selección
2. Indicator
3. Botón de Encendido / Modo
4. Ranura microSD
5. Puerto Micro HDMI
6. Micro USB
7. Lentes
8. Pantalla Táctil
9. Botón Arriba
10. Altavoz
11. Botón Abajo
12. Tapa de Batería
Nota: La cámara no graba el sonido cuando está en la carcasa impermeable.
8
56
9
10
11
CÓMO COMENZAR
Bienvenido a su nuevo Vista 5. Para capturar vídeo y fotos, necesita una tarjeta de
microSD (vendida por separado).
TARJETA MICROSD
Use tarjetas de memoria de marca que cumplan con estos requisitos:
• micro SD, microSDHC, o microSDXC
• Clase 10 o clasificación UHS-I
• Capacidad de hasta 64GB 100MB/s
57
Page 33

Nota:
1. Formatee la tarjeta microSD primero en esta cámara antes de utilizarla. Para mantener
su tarjeta microSD en buena condición, reformatéela de nuevo periódicamente.
Reformatear borrará todo su contenido, así que asegúrese de descargar primero sus
fotos y vídeos.
2. La tarjeta microSD en formato FAT32 deja de grabar cuando el almacenamiento de
cada archivo supera los 4GB y comienza a grabar nuevamente en un archivo nuevo.
RESUMEN DEL PRODUCTOS
Hay 9 modos: Foto, Temporizador, Foto de ráfaga, Foto de lapso de tiempo, Vídeo,
cámara lenta, vídeo a intervalos, foto fija y modo de conducción.
0002/5467
Modo
ENCENDIDO + APAGADO
Para encender:
Presione el botón Modo durante 3 segundos. La cámara emite un pitido mientras la luz
de estado de la cámara está encendida. Cuando aparezca la información en la pantalla
LCD o la pantalla de estado de la cámara, la cámara está encendida.
Para apagar:
Mantenga presionado el botón Modo durante 3 segundos. La cámara emite un pitido
mientras la luz de estado de la cámara está apagada.
MODO DE CAMBIO
Para cambiar modo:
Presione el botón Modo después de encender la cámara, puede cambiar el modo.
Para salir del modo:
Presione el botón Modo para salir del modo.
ENCENDIDO / APAGADO Wi-Fi
Para encender Wi-Fi:
Encienda la cámara, presione y mantenga presionado el botón Arriba durante tres
segundos para encender el Wi-Fi.
Para apagar Wi-Fi:
Presiona el botón Arriba para apagar el Wi-Fi.
Nota: La cámara no graba el sonido cuando está en la carcasa impermeable.
58
Foto Temporizador
Foto
12M
Lapso de
tiempo
Pulse aquí
MODO DE FOTO
En el modo Foto, presione el disparador, la cámara toma una foto.
0002/5467
Foto
12M
Vídeo
Foto de
ráfaga
Vídeo
Cámara lenta
59
Page 34

Modo de Temporizador
En el modo de disparador automático, presione el botón OK, toma una foto del
disparador automático.
0002/5467
MODO DE FOTO DE LAPSO DE TIEMPO
En el modo de foto de lapso de tiempo, presione el disparador, la cámara toma una serie
de fotos en intervalos de 3s / 5s / 10s.
0002/5467
Temporizador
12M
MODO DE FOTO DE RÁFAGA
En el modo Foto de ráfaga, presione el botón Disparador, la cámara toma 3 fotos por
segundo, 5 fotos por segundo o 10 fotos por segundo.
0002/5467
Foto de ráfaga
12M
60
Lapso de tiempo
12M
MODO DE VÍDEO
Modo de vídeo es el modo predeterminado cuando enciende la cámara.
En el modo de vídeo, presione el botón del obturador, la cámara comienza a grabar el
vídeo. Presione el botón del obturador para detener la grabación de vídeo.
00:00:00/00:31:55
Vídeo
4K 30fps
61
Page 35

MODO DE VÍDEO EN CÁMARA LENTA
En el modo de vídeo Cámara lenta, presione el botón del Disparador, la cámara graba el
vídeo en cámara lenta.
MODO DE FOTO FIJA
En el modo de foto fija, la cámara toma una foto cada 3 seg / 5 seg / 10 seg / 30 seg
automáticamente durante la grabación de vídeo.
00:00:00/00:40:37
Cámara Lenta
1080P 90fps
MODO VÍDEO DE LAPSO DE TIEMPO
En el modo de vídeo de lapso de tiempo, presione el botón del obturador, la cámara
graba vídeo desde cuadros capturados a intervalos específicos.
Time Lapse Vídeo es capturado sin audio.
00:00:00/00:40:37
Lapso de tiempo
4K 30fps
62
00:00:00/00:31:55
Foto Fija
4K 30fps
MODO DE CONDUCCIÓN
En el modo de conducción, conecta la cámara con el encendedor de cigarrillos del coche,
la cámara se encenderá automáticamente si enciende su coche y se apagará si la detiene.
00:00:00/00:31:55
Conducción
4K 30fps
63
Page 36

PERSONALIZAR SU VISTA 5
CONFIGURACIÓN DE VÍDEO
0002/5467
Foto
12M
Resolución
Estabilización de imagen
Codificar vídeo
Además, la codificación de contenido SD y HD existente con HEVC en lugar de H.264
aumentará los ahorros en costos y / o la capacidad de transmitir vídeo de mayor calidad a
conexiones de menor tasa de bits.
4. Cámara lenta: 1080P 90fps, 720P 120fps
La configuración predeterminada es 1080P 90fps.
La cámara lenta es un efecto en la realización de películas en la que el tiempo parece
disminuir.
Nota: Si desea grabar un vídeo a cámara lenta, primero desactive la Estabilización de
imagen.
5. Foto Fija: 4K 30fps
La configuración predeterminada es 4KP 30fps.
Pulse aquí
1. Resolución: 4K 30fps, 2.7K 30fps, 2K 60fps, 2K 30fps, 1080P 90fps, 1080P 60fps,
1080P 30fps, 720P 120fps, 720P 60fps, 720P 30fps
La configuración predeterminada es 4K 30fps.
2. Estabilización de imagen: Encendido / Apagado
La configuración predeterminada es Apagado.
3. Codificar vídeo: H.264, H.265
La configuración predeterminada es H.264.
Un códec de vídeo es un circuito electrónico o software que comprime o descomprime
vídeo digital. Convierte vídeo sin comprimir a un formato comprimido o viceversa.
Según varios estudios, HEVC, la codificación de vídeo de alta eficiencia (H.265) debe
ofrecer hasta un 50% de mejor compresión que H.264 en aplicaciones de vídeo bajo
demanda (VOD), lo que significa una mejor calidad a la mitad de la velocidad de bits. En
la codificación en vivo, que obviamente tiene que realizarse en tiempo real, las
expectativas iniciales son una reducción del 35% del ancho de banda en niveles de calidad
similares. Alternativamente, HEVC también puede habilitar películas de mayor resolución,
ya sea 2K o 4K.
64
6. Foto Fija Tiempo: 3 Sec, 5 Sec, 10 Sec, 30
La configuración predeterminada es 3 Sec.
En el modo de foto fija, la cámara toma una foto cada 3 Seg / 5 Seg / 10 Seg / 30 Sec
automáticamente durante la grabación de vídeo.
7. Intervalo de lapso de tiempo: 0.2 Sec, 0.3 Sec, 0.5 Sec, 1 Sec, 2 Sec, 5 Sec, 10 Sec,
30 Sec, 1 Min
La configuración predeterminada es 0.5 Sec.
Vídeo de lapso de tiempo crea vídeo desde cuadros capturados a intervalos específicos.
Esta opción le permite capturar un evento de lapso de tiempo e inmediatamente verlo o
compartirlo como un vídeo. Time Lapse Vídeo es capturado sin audio. Seleccionar 2
segundos significa grabar 2 segundos para obtener un cuadro por segundo.
Por ejemplo: si selecciona 4K / 30FPS y 2 segundos, necesita grabar 60 segundos, luego
puede obtener un vídeo de 1 segundo para 4K / 30FPS.
8. Tiempo de grabación en bucle: apagado, 3 min., 5 min., 7 min.
La configuración predeterminada es Apagado.
Con la grabación en bucle, puede grabar vídeos continuamente, pero guardar solo los
momentos que desee. Por ejemplo, si selecciona un intervalo de 5 minutos, solo se
guardan los 5 minutos anteriores cuando presiona el botón del obturador para detener la
65
Page 37

grabación. Si graba durante 5 minutos y no presiona el botón del Disparador para detener
la grabación y guardar, la cámara graba un nuevo intervalo de 5 minutos grabando sus
5 minutos anteriores de grabación. Cuando la tarjeta micro SD esté llena, los archivos
nuevos cubrirán la antigua si la grabación en bucle está activada.
9. Grabación de audio: Encendido / Apagado
La configuración predeterminada es Encendido.
Desactive la Grabación de audio, la cámara no graba el sonido cuando graba un vídeo.
10. Valor de exposición: -2, -1.7, -1.5, -1.3, -1, -0.5, -0.3, 0, +0.3, +0.5, +1, +1.3, +1.5,
+1.7, +2
La configuración predeterminada es 0.
De forma predeterminada, su cámara utiliza la imagen completa para determinar el nivel de
exposición adecuado. Sin embargo, la exposición le permite seleccionar un área que desea
que la cámara priorice al determinar la exposición. Esta configuración es particularmente útil
en tomas en las que una región importante podría estar sobre o subexpuesta.
Cuando cambia esta configuración, la pantalla LCD muestra inmediatamente el efecto sobre
su imagen. Si cambia de modo, la cámara vuelve a usar toda la escena para determinar el
nivel correcto de exposición..
El balance de blancos le permite ajustar la temperatura del color de los videos y las fotos
para optimizar las condiciones de iluminación cálidas o frías. Cuando cambia esta
configuración, la pantalla LCD muestra inmediatamente el efecto sobre su imagen.
13. Metro: Centro, Promedio, Punto
La configuración predeterminada es Promedio.
En fotografía, el modo de medición se refiere a la forma en que una cámara determina la
exposición. Las cámaras generalmente permiten al usuario seleccionar entre los modos de
medición central, promedio o puntual. Los diferentes modos de medición permiten al
usuario seleccionar el más apropiado para usar en una variedad de condiciones de
iluminación.
14. Color: Natural, Blanco y Negro, Sepia
La configuración predeterminada es Natural.
CONFIGURACIÓN DE FOTO
Resolución
11. ISO: Auto, 100, 200, 400, 800
La configuración predeterminada es Auto.
ISO determina la sensibilidad de la cámara a la luz y crea una compensación entre el brillo
y el ruido de la imagen resultante. El ruido de la imagen se refiere al grado de
granulosidad de la imagen.
En condiciones de poca luz, los valores ISO más altos dan como resultado imágenes más
brillantes, pero con un mayor ruido de imagen. Los valores más bajos producen un ruido
de imagen más bajo, pero las imágenes más oscuras. Cuando cambia esta configuración,
la pantalla LCD muestra inmediatamente el efecto sobre su imagen.
12. Balance de blancos: Automático, Tungsteno, Fluorescente, Luz del día, Nublado,
Amanecer
La configuración predeterminada es Automático.
66
Autodisparador
Foto de ráfaga
1. Resolución: 12M, 8M, 5M, 3M
La configuración predeterminada es 12M.
2. Autodisparador: 1 Sec, 3 Sec, 5 Sec, 10 Sec, 30 Sec
La configuración predeterminada es 3 Sec.
Un temporizador automático produce un retraso entre la pulsación del disparador y el
disparo del obturador. Se usa más comúnmente para permitir que los fotógrafos se tomen
una foto (a menudo con la familia).
67
Page 38

3. Foto de ráfaga: 3shots / 1s, 5shots / 1s, 10shots / 1s
La configuración predeterminada es 3shots / 1s.
La ráfaga captura hasta 30 fotos en 8 segundos, por lo que es perfecta para capturar
actividades en rápido movimiento.
4. Foto de lapso de tiempo: 3 Sec, 5 Sec, 10 Sec, 30 Sec, 1 Min
La configuración predeterminada es 3 Sec.
Lapso de tiempo de fotos captura una serie de fotos a intervalos especificados. Utilice
este modo para capturar fotos de cualquier actividad y luego elija las mejores.
5. Escena: Auto, pintura ligera
La configuración predeterminada es Auto.
6. Valor de exposición: -2, -1.7, -1.5, -1.3, -1, -0.5, -0.3, 0, +0.3, +0.5, +1, +1.3, +1.5,
+1.7, +2
La configuración predeterminada es 0.
De forma predeterminada, su cámara utiliza la imagen completa para determinar el nivel
de exposición adecuado. Sin embargo, la exposición le permite seleccionar un área que
desea que la cámara priorice al determinar la exposición. Esta configuración es
particularmente útil en tomas en las que una región importante podría estar sobre o
subexpuesta.
Cuando cambia esta configuración, la pantalla LCD muestra inmediatamente el efecto
sobre su imagen. Si cambia de modo, la cámara vuelve a usar toda la escena para
determinar el nivel correcto de exposición.
7. Tiempo de exposición: Auto, 2 Sec, 5 Sec, 10 Sec, 30 Sec
La configuración predeterminada es Auto.
El tiempo de exposición, respectivamente, período de exposición significa el lapso de
tiempo durante el cual la película de una cámara tradicional o un sensor de una cámara
digital moderna está realmente expuesta a la luz para grabar una imagen.
y el ruido de la imagen resultante. El ruido de la imagen se refiere al grado de
granulosidad de la imagen.
En condiciones de poca luz, los valores ISO más altos dan como resultado imágenes más
brillantes, pero con un mayor ruido de imagen. Los valores más bajos producen un ruido
de imagen más bajo, pero las imágenes más oscuras. Cuando cambia esta configuración,
la pantalla LCD muestra inmediatamente el efecto sobre su imagen.
9. Balance de blancos: Automático, Tungsteno, Fluorescente, Luz del día, Nublado,
Amanecer
La configuración predeterminada es Auto.
El balance de blancos le permite ajustar la temperatura del color de los vídeos y las fotos
para optimizar las condiciones de iluminación cálidas o frías. Cuando cambia esta
configuración, la pantalla LCD muestra inmediatamente el efecto sobre su imagen.
10. Medidor: Centro, Promedio, Punto
La configuración predeterminada es Promedio.
En fotografía, el modo de medición se refiere a la forma en que una cámara determina la
exposición. Las cámaras generalmente permiten al usuario seleccionar entre los modos de
medición central, promedio o puntual. Los diferentes modos de medición permiten al
usuario seleccionar el más apropiado para usar en una variedad de condiciones de
iluminación.
11. Nitidez: Fuerte, Normal, Suave
La configuración predeterminada es Normal.
La nitidez controla la calidad de los detalles capturados en sus secuencias de vídeo o
fotos. Cuando cambia esta configuración, la pantalla táctil le muestra inmediatamente el
efecto en su imagen.
12. Color: Natural, Blanco & Negro, Sepia
La configuración predeterminada es Natural. Natural.
8. ISO: Auto, 400, 800, 1600, 3200
La configuración predeterminada es Auto.
ISO determina la sensibilidad de la cámara a la luz y crea una compensación entre el brillo
68
13. Calidad de la foto: Fina, Normal, Economía
La configuración predeterminada es Buena.
69
Page 39
CONFIGURACIÓN DEL SISTEMA
Sonidos
Calibración de la distorsión
Ángulo
1. Sonidos: Volumen, Tono de tecla, Tono de toque, Tono de inicio
Puede ajustar el volumen de la cámara y activar / desactivar el tono de tecla, el tono de
toque o el tono de inicio.
2. Calibración de la distorsión: Encendido / Apagado
La configuración predeterminada es Apagado.
Active la calibración de distorsión, puede corregir la distorsión de la imagen.
3. Ángulo: 170°, 140°, 110°, 70°
La configuración predeterminada es 170°.
El ángulo se refiere a la cantidad de la escena (medida en grados) que se puede capturar
a través de la lente de la cámara. El Super gran angular captura la mayor cantidad de la
escena, mientras que el Ángulo estrecho captura la menor cantidad.
5. WDR: Encendido / Apagado
La configuración predeterminada es Apagado.
El rango dinámico amplio (WDR) conserva un mayor nivel de detalle en las áreas oscuras
y brillantes de una imagen. El resultado es una foto que está expuesta correctamente para
ambos extremos. Esta configuración es especialmente útil para las escenas que son de la
lista o que tienen grandes regiones brillantes y un primer plano oscuro. WDR está
disponible solo en modo Vídeo.
6. Apagado automático: apagado, 1 Min, 3 Min, 5 Min, 10 Min
La configuración predeterminada es apagado.
Apaga su V50X después de un período de inactividad para ahorrar batería.
7. Salvapantallas: apagado, 30 Sec, 1 Min, 3 Min
La configuración predeterminada es 1 Min.
Apaga la pantalla después de un período de inactividad para ahorrar batería. Para volver
a encender la pantalla, presione cualquier botón de la cámara.
8. Idioma: English / Français / Deutsch / Español / Italiano / Português
La configuración predeterminada es inglés.
9. Formato de fecha: AAAA/MM/DD, MM/DD/AAAA, DD/MM/AAAA
La configuración predeterminada es MM/DD/AAAA.
10. Establece fecha: MM/DD/AAAA
Puede establecer la fecha de la cámara.
11. Fijar tiempo: HH/MM
Puede configurar la hora de la cámara.
4. Modo de buceo: Encendido / Apagado
La configuración predeterminada es Apagado.
Activar el modo de buceo, puede compensar la falta de luz roja en las escenas bajo el
agua. El modo de buceo está diseñado para ser utilizado en aguas tropicales y azules,
optimizado para su uso entre 10 y 80 pies.
70
12. Sello de fecha: apagado, Date & Time
La configuración predeterminada es Date & Time.
Si selecciona Fecha y hora, esta cámara agrega Fecha y hora a los vídeos y fotos que
toma.
71
Page 40

13. Frecuencia de potencia: 50Hz, 60Hz
05-11-2019 17:11:21
La configuración predeterminada es 50Hz.
14. Formato de tarjeta
Para mantener su tarjeta micro SD en buenas condiciones, vuelva a formatearla
regularmente. Al volver a formatear se borra todo su contenido, así que asegúrese de
descargar primero sus fotos y vídeos.
Para reformatear su tarjeta, ingrese la Configuración del sistema, luego desplácese por las
opciones para ubicar y toque "Formatear tarjeta", luego presione "Confirmar".
15. Restablecer: Restablecer a la fábrica? Cancelar / Confirmar
Esta opción restablece todas las configuraciones a sus valores predeterminados.
16. Sobre: Modelo / Versión
Puedes consultar el modelo y la versión de tu Vista 5.
CONECTAR LA ROADCAM APP
La APP Roadcam le permite controlar su cámara de forma remota utilizando un teléfono
inteligente o tableta. Las características incluyen control completo de la cámara, vista
previa en vivo, reproducción, descarga, uso compartido de contenido y configuración de
la cámara.
1. Descargue la APP Roadcam desde Google Play o Apple Store.
2. Encienda la cámara, presione y mantenga presionado el botón durante 3 segundos
para encender el Wi-Fi.
3. Encienda el Wi-Fi de su teléfono, conéctese al SSID de
Wi-Fi: ‘DragonTouch_Vista5_7DAB’.
4. Introduzca la contraseña: 1234567890.
5. Abre la APP Roadcam. Presiona ‘Agregar grabadora’. Te conectas a la aplicación
Roadcam con éxito.
DESCARGAR SU CONTENITO
DESCARGAR SU CONTENIDO A COMPUTADORA
Para reproducir sus vídeos y fotos en una computadora, primero debe transferir estos
72
archivos a una computadora. La transferencia también libera espacio en su tarjeta
microSD para obtener contenido nuevo.
Para descargar archivos a una computadora con un lector de tarjetas (vendido por
separado) y el explorador de archivos de su computadora, conecte el lector de tarjetas a
la computadora, luego inserte la tarjeta microSD. Puede transferir archivos a su
computadora o eliminar archivos seleccionados en su tarjeta. También puede descargar
archivos a una computadora con Windows usando un cable USB.
DESCARGAR SU CONTENIDO A SMARTPHONE O TABLET
1. Conecta a la APP Roadcam.
2. Encender la APP Roadcam. Toque ”Añadir grabadora”. Luego toque el ícono en la mitad
de la pantalla.
3. Toque el ícono “HD Photo”.
4. Toque cualquier archivo durante 3 segundos. A continuación, puede seleccionar
muchos archivos
5. Toque . Usted descarga los archivos con éxito a su teléfono.
Recording instrument
Recording instrument
Add Recorder
Album Mine
Moments
DragonTouch_Vista5
Break off
HUD vídeo HUD foto
Vídeo
1:1
00:01:32
73
Page 41

DragonTouch_Vista5
05-11-2019 17:11:21
Break off
HUD vídeo HUD foto
Foto
1:1
2019/01/01
Picture
ELIMINAR VÍDEO Y FOTOS EN SU VISTA 5
Eliminar vídeos y fotos con pantalla táctil:
1. Toque el ícono del archivo para ingresar al modo de reproducción. Si su tarjeta
microSD contiene mucho contenido, puede tardar un minuto en cargarse
2. Toque y toque el archivo de vídeo o foto que desea eliminar.
3. Toque , la pantalla muestra "¿Está seguro de eliminar archivos? Cancelar / Confirmar ”.
4. Toque "Confirmar". El archivo seleccionado será eliminado.
Eliminar vídeos y fotos con botones:
1. Mantenga presionado el botón durante 3 segundos para ingresar al modo de
reproducción. Si su tarjeta microSD contiene mucho contenido, puede tardar un
minuto en cargarse.
2. Presione el botón hacia abajo varias veces para localizar el archivo que desea eliminar.
Presione el botón disparador. Luego, mantenga presionado el botón disparador
durante 3 segundos. La pantalla muestra "¿Está seguro de eliminar archivos? Cancelar /
Confirmar”.
3. Presione el botón hacia abajo y luego el botón del obturador. El archivo seleccionado
será eliminado.
REPRODUCER SU CONTENITO
Puede reproducir su contenido en la pantalla LCD de la cámara, su computadora,
televisor, o teléfono inteligente / tableta.
También se puede reproducir contenido insertando la tarjeta microSD en un dispositivo,
tal como una computadora o un televisor compatible. Con ese método, la resolución de
reproducción depende de la resolución del dispositivo y su capacidad de reproducer.
VER VíDEOS Y FOTOS EN SU VISTA 5
1. Mantenga presionado el botón durante 3 segundos o toque el ícono de archivo para
ingresar al modo de reproducción. Si su tarjeta microSD contiene mucho contenido,
puede tardar un minuto en cargarse.
2. Toca cualquier archivo de vídeo o foto.
3. Toque el icono Adelante o Atrás para reproducir archivos de vídeo o foto.
74
FORMATEAR SU TARJETA MICROSD
Para mantener su tarjeta microSD en buenas condiciones, reformatearlo regularmente. Al
volver a formatear se borra todo su contenido, así que asegúrese de descargar primero
sus fotos y vídeos.
1. Encienda Vista 5.
2. Introduzca la configuración del sistema.
3. Desplázate por la pantalla para localizar y toca "Formatear tarjeta", luego toca
"Confirmar".
4. Toque "Confirmar". Luego formatea su tarjeta microSD con éxito.
75
Page 42
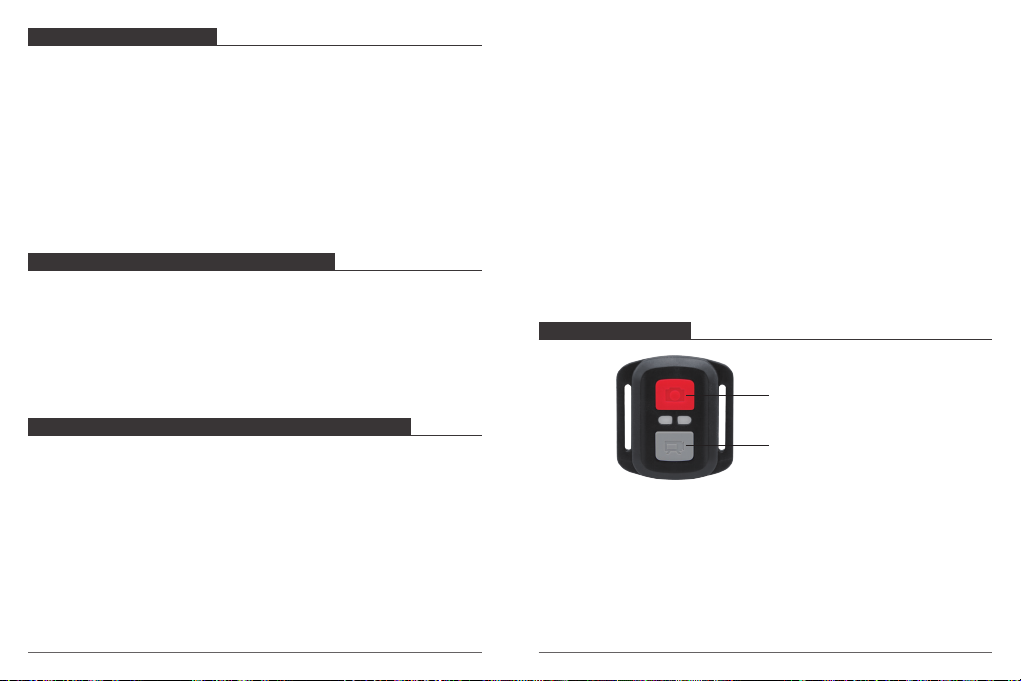
MANTENER SU CÁMARA
Siga estas pautas para obtener el mejor rendimiento de su cámara:
1. Para obtener el mejor rendimiento de audio, agite la cámara o sopla el micrófono para
eliminar los residuos de los orificios del micrófono
2. Para limpiar la lente, límpiela con un paño suave y sin pelusas. No inserte objetos
extraños alrededor de la lente.
3. No toque la lente con los dedos.
4. Mantenga la cámara alejada de caídas y golpes, ya que podría dañar las piezas del
interior.
5. Mantenga la cámara alejada de la temperatura alta y la luz solar intensa para evitar
daños.
MAXIMIZAR LA VIDA ÚTIL DE LA BATERÍA
Si la batería alcanza el 0% durante la grabación, la cámara guardará el archivo y se
apagará.
Para maximizar la vida útil de batería, siga las siguientes reglas si es posible:
• Apague conexiones inalámbricas.
• Capture vídeo a velocidades de cuadro y resoluciones más bajas.
• Se la configuración de salvapantallas.
MANTENIMIENTO Y MANIPULACIÓN DE LA BATERÍA
La cámara contiene componentes sensibles, incluida la batería. Evite exponer su cámara a
temperaturas muy frías o muy altas. Las condiciones de temperatura baja o alta pueden
acortar temporalmente la vida útil de la batería o hacer que la cámara deje de funcionar
temporalmente. Evite los cambios dramáticos en la temperatura o la humedad cuando
use la cámara, ya que puede formarse condensación dentro o dentro de la cámara.
No seque la cámara o la batería con una fuente de calor externa, como un horno
microondas o un secador de pelo. La garantía no cubre los daños a la cámara o la batería
causados por el contacto con el líquido dentro de la cámara.
76
No almacene su batería con objetos metálicos, como monedas, llaves o collares. Si los
terminales de la batería entran en contacto con objetos metálicos, esto puede provocar
un incendio.
No realice alteraciones no autorizadas a la cámara. Si lo hace, puede comprometer la
seguridad, el cumplimiento normativo, el rendimiento y puede anular la garantía.
ADVERTENCIA: No deje caer, desmonte, abra, aplaste, doble, deforme, perfore, triture,
cocine en microondas, incinere o pinte la cámara o la batería. No inserte objetos extraños
en la abertura de la batería de la cámara. No utilice la cámara o la batería si está dañada,
por ejemplo, si está agrietada, perforada o dañada por el agua. El desmontaje o la
perforación de la batería pueden provocar una explosión o un incendio.
CONTROL REMOTO
Botón Foto
Botón Vídeo
Resistente solo a los choros de agua, no impermeable
VÍDEO
Para registrar un vídeo, verificar que la cámara esté en Modo vídeo.
Para comenzar a grabar:
Presionar el Botón Gris del vídeo. La cámara emitirá una señal acústica y la luz de la
cámara parpadeará durante la grabación.
77
Page 43

Para detener la grabación:
Presionar nuevamente el Botón Gris del vídeo. La cámara emitirá una señal acústica y la
luz de la cámara parpadeará durante la grabación.
FOTO
Para tomar una foto, asegúrese de que la cámara esté en Modo Foto.
Para tomar una foto:
Presionar el botón rojo de la foto. La cámara emitirá un pitido.
CR2032 REEMPLAZO DE LA BATERÍA PARA VISTA5 PRO MANDO A DISTANCIA
1. Utilizar un destornillador Phillips de 1,8 mm para quitar los 4 tornillos de la tapa
posterior del control remoto, lo que permite que se abra.
3. Levantar la placa PCB y deslizar la batería hacia afuera, como se muestra en la figura.
Nota: NO girar la PCB para evitar invertir las funciones de la cámara y los botones de
vídeo.
4. Instalar la batería nueva, manteniendo el polo '+' hacia arriba.
5. Reemplazar los 4 tornillos en la placa PCB.
2. Retirar otros 4 tornillos en la placa PCB.
78
6. Reemplazar los 4 tornillos en la cubierta.
MONTAJE DE LA CAMARA
Sujete su cámara a cascos, equipos y equipo.
79
Page 44
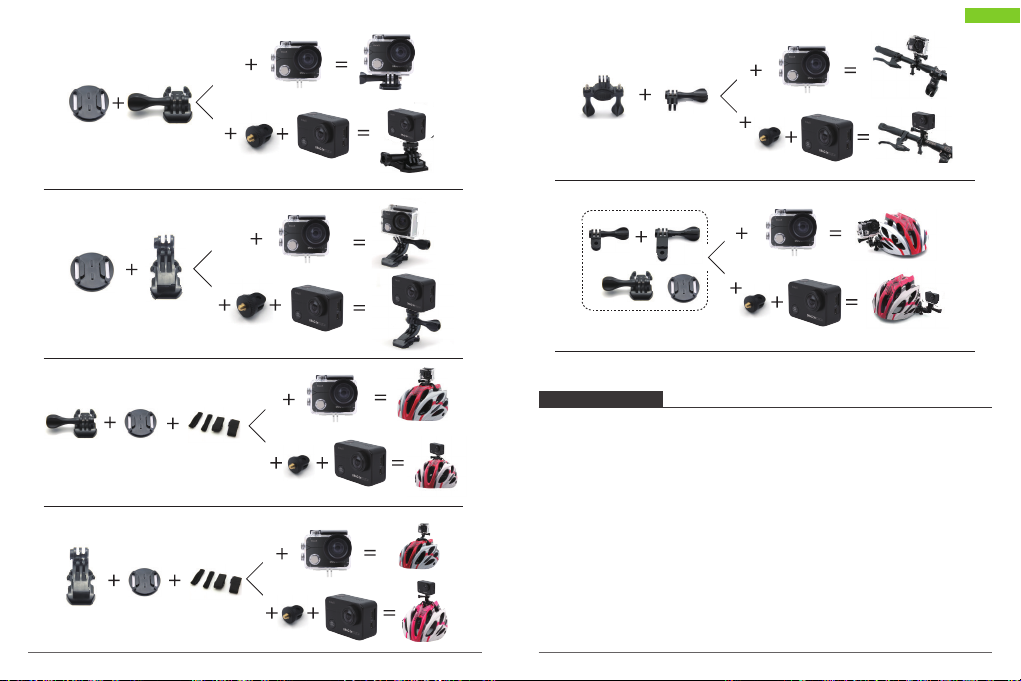
Español
CONTÁCTENOS
Cualquier problema con los productos Dragon Touch, por favor sin duda en contactarnos,
le responderemos dentro de 24 horas.
Dirección de correo electrónico: cs@dragontouch.com
Sitio web oficial: www.dragontouch.com
80
81
Page 45

Français
CONTENU
Votre Vista 5
Guide de Demarrage
Generalites des Modes
Personnalisation de Votre Vista 5
Connexion a L'application Roadcam
Déchargement de Votre Contenu
Dechargement de Votre Contenu
Lecture de Votre Contenu
Suppression de Videos et de Photos sur Votre Vista 5
Reformation de Votre Carte Micro SD
Entretien de Votre Caméra
Maximiser la Vie de la Batterie
Stockage et Manipulation des Piles
Télécommande
Montage de Votre Camera
Contactez Nous
83
84
86
91
99
99
100
101
102
102
103
103
103
104
106
108
82
Page 46

VOTRE VISTA 5
1
2
12
4
5
3
7
6
1. Auslöser / Auswahl-Taste
2. Indicateur
3. Bouton Puissance / Mode
4. Slot Micro SD
5. Port Micro HDMI
6. Port Micro USB
7. Lentille
8. Écran tactile
9. Bouton haut
10. Haut-parleur
11. Bouton bas
12. Porte de batterie
Remarque: Aucun son n’est enregistré par la caméra sport qui se trouve
dans le boîtier étanche.
8
83
9
10
11
GUIDE DE DEMARRAGE
Bienvenue dans votre nouveau Vista 5. Pour capturer des vidéos et des photos, vous avez
besoin d’une carte micro SD ( à vendre séparément).
CARTES MICRO SD
Utiliser des cartes de mémoire de marque répondant aux exigences suivantes:
• Micro SD, Micro SDHC, ou Micro SDXC
• Classe 10 ou niveau UHS-I
• Capacité jusqu’à 64GB 100MB/s
84
Page 47
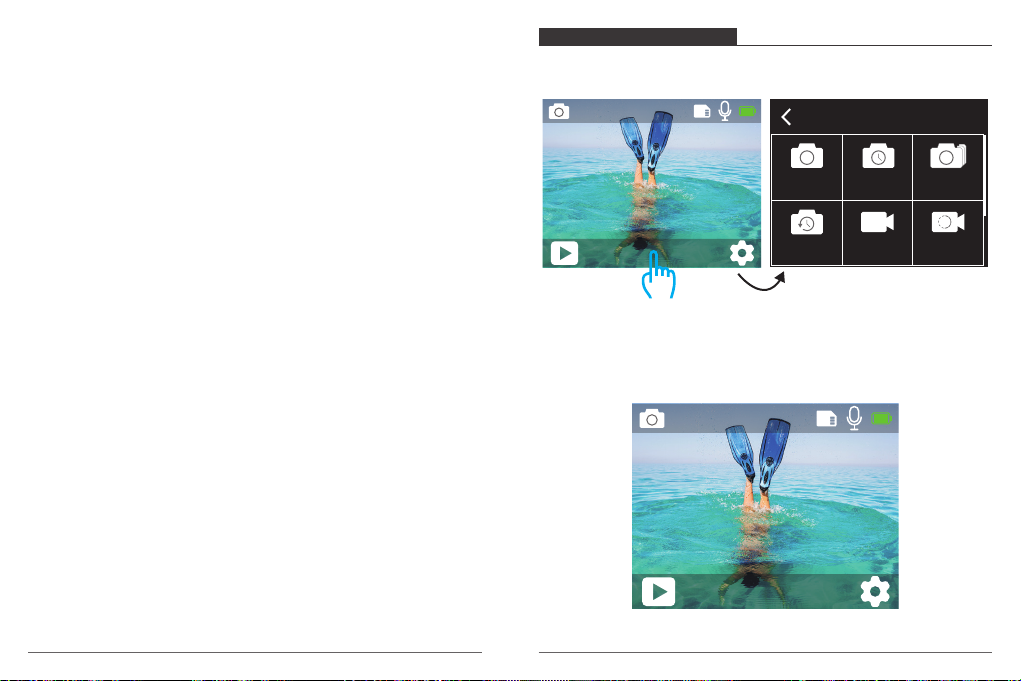
Remarque:
1. Formater d'abord la carte micro SD dans cette caméra sport avant l'utilisation. Pour
maintenir votre carte micro SD en bon état, la reformater régulièrement. Supprimer
tous les contenus lors de reformatage, assurer de décharger d'abord les photos et les
vidéos.
2. La carte Micro SD en format FAT32 arrêtera l’enregistrement lorsque la capacité de
mémorisation de chaque fichier dépasse 4 Go, et recommencera à enregistrer sur un
nouveau fichier.
ALLUMER +ÉTEINDRE
Pour Allumer:
Appuyer sur le bouton Mode et maintenir son enfoncé durant trois secondes. La caméra
émet un bip lorsque le voyant d'état de la caméra sport s'allume. Lorsque le message est
affiché sur l'écran LCD ou sur l'écran d'état de caméra sport, la caméra sport est ainsi mise
sous tension.
Pour Éteindre:
Appuyer sur le bouton Mode et maintenir son enfoncé durant trois secondes. La caméra
sport émet un bip lorsque le voyant d'état de la caméra est éteint.
MODE DE COMMUTATION
Pour changer le mode:
Le mode sera changé en appuyant sur le bouton Mode après que la caméra est activée.
Pour quitter le mode:
Appuyer sur le bouton Mode pour quitter le mode.
Activer / Désactiver le Wi-Fi
Pour activer le Wi-Fi:
Mettre la caméra sous tension, appuyer sur le bouton et maintenir son enfoncé durant
trois secondes pour activer le Wi-Fi.
Pour désactiver Wi-Fi:
Appuyer sur le bouton Haut pour désactiver le Wi-Fi.
Remarque: Aucun son n’est enregistré par la caméra sport qui se trouve dans le boîtier
étanche.
85
GENERALITES DES MODES
Il y a 9 modes: Coup unique, Automatique photos, Multi-shot, Timer photo, Vidéo
ordinaire, Enregistrement vidéo lent, Time-lapse vidéo, Enregistrement et Voiture ACC .
0002/5467
Photo
12M
Cliquer ici
MODE DE PHOTO UNIQUE
En mode de photo unique, en appuyant sur le bouton de l’obturateur, la caméra sport
prendra une photo.
0002/5467
Photo
12M
Photo unique
Timer photo
Mode de travail
Automatique
photos
Vidéo
ordinaire
Multi-shot
Enregistrement
vidéo lent
86
Page 48
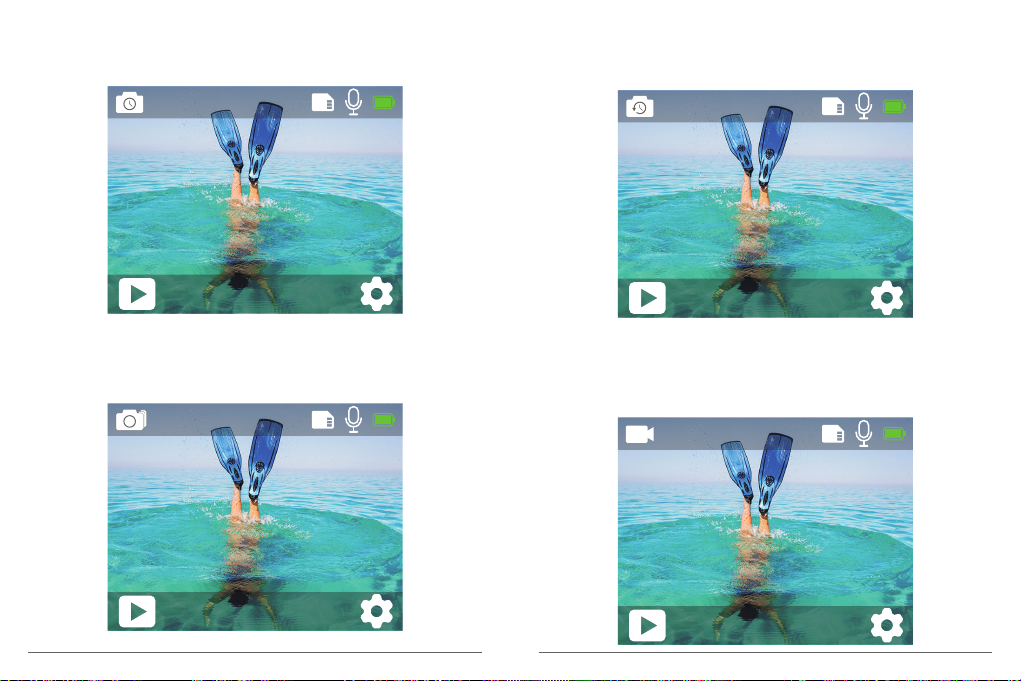
MODE D’AUTOMATIQUE PHOTOS
En mode d’automatique photost, en appuyant sur le bouton de l’obturateur, la caméra
sport prendra une photo en automatique.
0002/5467
MODE DE TIMER PHOTO
En mode de timer photo, en appuyant sur le bouton de l’obturateur, la caméra sport
prend une série de photos à intervalles de 3s / 5s / 10s.
0002/5467
Automatique
12M
MODE DE MULTI-SHOT
En mode de multi-shot, en appuyant sur le bouton de l’obturateur, la caméra sport prend
3 photos par seconde, 5 photos par seconde ou 10 photos par seconde.
0002/5467
Multi-shot
12M
87
Zeitraffer-Foto
12M
MODE DE VIDÉO ORDINAIRE
Le mode de vidéo ordinaire est un par défaut lorsque la caméra est activée.
En mode vidéo, en appuyant sur sur le bouton d’obturateur, la caméra commence à
enregistrer une vidéo. Appuyer sur le bouton de l'obturateur pour arrêter l'enregistrement
de vidéo.
00:00:00/00:31:55
Vidéo ordinaire
4K 30fps
88
Page 49

MODE D’ENREGISTREMENT VIDÉO LENT
En mode d’enregistrement vidéo lent, en appuyant sur le bouton de l’obturateur, la caméra
sport enregistre une vidéo au ralenti.
00:00:00/00:40:37
MODE D’ENREGISTREMENT
En mode d’enregistrement, la caméra sport prendra automatiquement une photo toutes
les 3 secondes / 5 secondes / 10 secondes / 30 secondes au cours d'enregistrement de
vidéo.
00:00:00/00:31:55
Enregistrement vidéo lent
1080P 90fps
MODE DE TIME-LAPSE VIDÉO
En mode de time-lapse vidéo, en appuyant sur le bouton de l’obturateur, la caméra sport
enregistre des vidéos à partir d’images capturées aux intervalles spécifiques.
La vidéo accélérée est capturée sans audio.
00:00:00/00:40:37
Time-lapse vidéo
4K 30fps
89
Enregistrement
4K 30fps
MODE DE VOITURE ACC
En mode de voiture ACC, lorsque vous connectez la caméra sport à l’allume-cigare, elle
sera activée automatiquement lors de démarrage de votre véhicule et sera désactivée lors
de stationnement de votre véhicule.
00:00:00/00:31:55
Voiture ACC
4K 30fps
90
Page 50
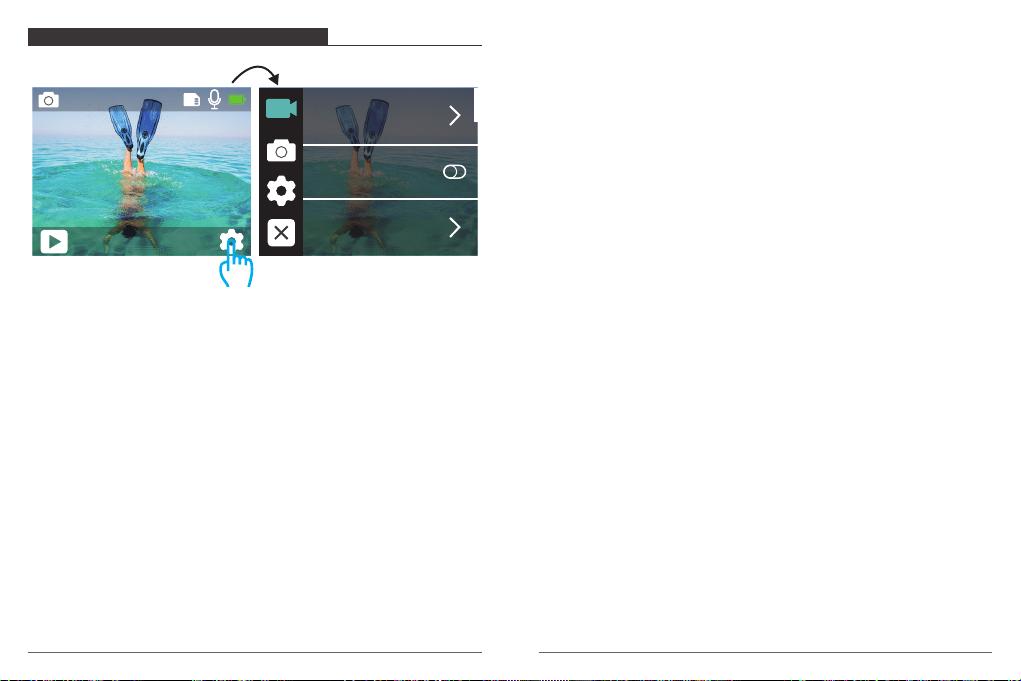
PERSONNALISATION DE VOTRE VISTA 5
REGLAGES DE VIDEO
0002/5467
Résolution
Anti-tremblement
En outre, le codage de contenu SD et HD existant avec HEVC plutôt que H.264 permettra
de réaliser des économies de coûts et / ou la possibilité de diffuser du contenu vidéo de
meilleure qualité sur des connexions à faible débit.
4. Enregistrement vidéo lent: 1080P 90fps, 720P 120fps
Le réglage par défaut est de 1080P 90fps.
Le ralenti est un effet de réalisation de film dans lequel le temps semble d'être ralenti.
Remarque: Si vous voulez enregistrer une vidéo au ralenti, veuillez d'abord désactiver la
stabilisation d'image.
Photo unique
12M
Type de codage
Cliquer ici
1. Résolution: 4K 30fps, 2.7K 30fps, 2K 60fps, 2K 30fps, 1080P 90fps, 1080P 60fps,
1080P 30fps, 720P 120fps, 720P 60fps, 720P 30fps
Le réglage par défaut est de 4K 30fps.
2. Anti-tremblement: ON / OFF
Le réglage par défaut est OFF.
3. Type de codage: H.264, H.265
Le réglage par défaut est H.264.
Un codec vidéo est un circuit électronique ou un logiciel qui compresse ou décompresse
une vidéo numérique. Il convertit la vidéo non compressée en un format compressé ou
inversement.
Selon plusieurs études, HEVC, le codage vidéo à haute efficacité (H.265) devrait offrir une
compression jusqu'à 50% supérieure à celle du H.264 dans les applications de vidéo à la
demande (VOD), ce qui signifie une meilleure qualité à la moitié du débit binaire. Dans le
codage en direct, qui doit évidemment être effectué en temps réel, les attentes initiales
sont une réduction de la bande passante de 35% à des niveaux de qualité similaires. HEVC
peut également activer des films de résolution supérieure, en résolution 2K ou 4K.
91
5. Enregistrement: 4K 30fps
Le réglage par défaut est de 4KP 30fps.
6. Retardateur: 3 Sec, 5 Sec, 10 Sec, 30 Sec
Le réglage par défaut est de 3 Sec.
En mode d'enregistrement, la caméra sport prendra automatiquement une photo toutes
les 3 secondes / 5 secondes / 10 secondes / 30 secondes au cours d'enregistrement de
vidéo.
7. Intervalle Time-Lapse: 0.2Sec, 0.3Sec, 0.5Sec, 1Sec, 2Sec, 5Sec, 10Sec, 30Sec, 1Min
Le réglage par défaut est de 0.5 Sec.
La vidéo accélérée crée des vidéos à partir d'images capturées aux intervalles spécifiques.
Cette option vous permet de capturer un événement accéléré et de le visualiser ou de le
partager immédiatement sous forme de vidéo. La vidéo accélérée est capturée sans audio.
Sélectionner 2 secondes signifie que vous enregistrez 2 secondes pour obtenir une image
par seconde.
Par exemple: Si vous sélectionnez 4K/30FPS et 2 secondes, vous devez enregistrer 60
secondes. Et puis vous pouvez obtenir une vidéo d'une seconde pour 4K/30FPS.
8. Enregistrement en boucle: Off, 3 Min., 5 Min, 7 Min
Le réglage par défaut est OFF.
En utilisant l'enregistrement en boucle, vous pouvez enregistrer de la vidéo en continu,
mais gardez uniquement les moments souhaités. Par exemple, si vous sélectionnez un
intervalle de 5 minutes, seules les 5 dernières minutes sont enregistrées lorsque vous
92
Page 51

appuyez sur le déclencheur pour arrêter l'enregistrement. Si vous enregistrez pendant
5 minutes et que vous n'appuyez pas sur le bouton d'obturateur pour arrêter
l'enregistrement et enregistrer, la caméra enregistre un nouvel intervalle de 5 minutes en
enregistrant sur les 5 minutes précédentes. Lorsque la carte micro SD est pleine, les
nouveaux fichiers recouvrent l’ancien si l’enregistrement en boucle est activé.
9. Enregistrement audio: ON/OFF
Le réglage par défaut est ON.
En désactivant l’enregistrement audio, aucun son n’est enregistré dans la caméra lorsque
vous enregistrez une vidéo.
10. Compensation d’exposition: -2, -1.7, -1.5, -1.3, -1, -0.5, -0.3, 0, +0.3, +0.5, +1, +1.3,
+1.5, +1.7, +2
Le réglage par défaut est 0.
Par défaut, votre caméra sport utilise l'intégralité de l'image pour déterminer le niveau
d'exposition approprié. Toutefois, l'exposition vous permet de sélectionner une zone que
vous souhaitez que la caméra priorise lors de la détermination de l'exposition. Ce paramètre
est particulièrement utile pour les plans où une région importante pourrait être surexposée
ou sous-exposée.
Lorsque vous modifiez ce paramètre, l’écran LCD vous montre immédiatement l’effet sur
votre image. Si vous changez de mode, la caméra sport utilise à nouveau toute la scène
pour déterminer le niveau d'exposition correct.
11. ISO: Automatique, 100, 200, 400, 800
Le réglage par défaut est Auto.
ISO détermine la sensibilité de la caméra sport à la lumière et crée un compromis entre la
luminosité et le bruit de l'image. Le bruit de l'image fait référence au degré de grain de
l'image.
En cas de faible luminosité, des valeurs ISO plus élevées produisent des images plus
lumineuses, mais avec un bruit d'image plus important. Des valeurs inférieures entraînent
un bruit d'image inférieur, mais des images plus sombres. Lorsque vous modifiez ce
paramètre, l’écran LCD vous montre immédiatement l’effet sur votre image.
12. Balance des blancs: Automatique, Lampe de tungstène, Lampe fluorescent,
Lumière du jour, Nuageux, Aube
93
Le réglage par défaut est Auto.
La balance des blancs vous permet de régler la température de couleur de vos vidéos et
de vos photos pour optimiser les conditions d'éclairage froid ou chaud. Lorsque vous
modifiez le présent réglage, l’écran LCD affichera immédiatement l’effet sur l’image.
13. Mode de Mesure: Centre, Moyenne, point
Le réglage par défaut est Moyenne.
En photographie, le mode de mesure signifie la manière dont la caméra détermine
l'exposition. Les caméras permettent généralement à l'utilisateur de choisir entre les
modes de mesure centrale, moyenne et de spot. Différents modes de mesure permettent
à l'utilisateur de sélectionner le mode le plus approprié pour effectuer une sélection dans
diverses conditions d'éclairage.
14. Effets spéciaux: Couleur, Noir et blanc, Tan
Le réglage par défaut est de Couleur.
REGLAGE DE PHOTO
Résolution
Retardateur
Photo en rafale
1. Résolution: 12M, 8M, 5M, 3M
Le réglage par défaut est de 12M.
2. Retardateur: 1 Sec, 3 Sec, 5 Sec, 10 Sec, 30 Sec
Le réglage par défaut est de 3 Sec.
L'Autoportrait donne un délai entre l'appui sur le déclencheur et le déclenchement de
l'obturateur. Il est le plus souvent utilisé pour permettre aux photographes de prendre
leurs propres photos (généralement avec leur famille).
94
Page 52

3. Type multi-coup: 3 coups / 1s, 5 coups / 1s, 10 coups / 1s
Le réglage par défaut est de 3 coups / 1s.
La capture rapide permet de capturer jusqu'à 30 photos durant 8 secondes, ce qui la rend
idéale pour les activités à mouvement rapide.
4. Photo en rafale: 3 Sec, 5 Sec, 10 Sec, 30 Sec, 1 Min
Le réglage par défaut est de 3 Sec.
La photo en rafale capture une série de photos aux intervalles spécifiés. Le présent mode
est prévu pour capturer une photo active, puis sélectionner la meuilleure au plus tard.
5. Scène: Automatique,Light painting
Le réglage par défaut est Automatique.
luminosité et le bruit de l'image. Le bruit de l'image fait référence au degré de grain de
l'image.
En cas de faible luminosité, des valeurs ISO plus élevées produisent des images plus
lumineuses, mais avec un bruit d'image plus important. Des valeurs inférieures entraînent
un bruit d'image inférieur, mais des images plus sombres. Lorsque vous modifiez ce
paramètre, l’écran LCD vous montre immédiatement l’effet sur votre image.
9. Balance blanche: Auto, tungstène, fluorescent, lumière du jour, nuageux, aube
Le réglage par défaut est Auto.
La balance des blancs vous permet de régler la température de couleur des vidéos et des
photos afin de l’optimiser par temps froid ou chaud. Lorsque vous modifiez ce paramètre,
l’écran LCD affiche immédiatement l’effet sur votre image.
6. Compensation d’exposition: -2, -1.7, -1.5, -1.3, -1, -0.5, -0.3, 0, +0.3, +0.5, +1, +1.3,
+1.5, +1.7, +2
Le réglage par défaut est 0
Par défaut, votre caméra sport utilise l'intégralité de l'image pour déterminer le niveau
d'exposition approprié. Toutefois, l'exposition vous permet de sélectionner une zone que
vous souhaitez que la caméra priorise lors de la détermination de l'exposition. Ce
paramètre est particulièrement utile pour les plans où une région importante pourrait être
surexposée ou sous-exposée.
Lorsque vous modifiez ce paramètre, l’écran LCD vous montre immédiatement l’effet sur
votre image. Si vous changez de mode, la caméra sport utilise à nouveau toute la scène
pour déterminer le niveau d'exposition correct.
7. Temps d’exposition: Auto, 2 Sec, 5 Sec, 10 Sec, 30 Sec
Le réglage par défaut est Auto.
Le temps d'exposition, respectivement la période d'exposition, correspond à la période de
temps pendant laquelle le film d'une caméra traditionnelle ou d'un capteur d'une caméra
numérique moderne est réellement exposé à la lumière afin d'enregistrer une image.
8. ISO: Auto, 400, 800, 1600, 3200.
Le réglage par défaut est Auto.
ISO détermine la sensibilité de la caméra sport à la lumière et crée un compromis entre la
95
10. Mètre: Centre, Moyenne, Spot Le réglage par défaut est Moyenne.
En photographie, le mode de mesure fait référence à la manière dont la caméra sport
détermine l'exposition. Les caméras permettent généralement à l'utilisateur de choisir
entre les modes de mesure centrale, moyenne et spot. Les différents modes de mesure
permettent à l'utilisateur de sélectionner le plus approprié pour une utilisation dans une
variété de conditions d'éclairage.
11. Netteté: Forte, Standard, Doux
Le réglage par défaut est Standard.
La netteté contrôle la qualité des détails capturés dans les séquences vidéo ou la qualité
des photos. Lorsque vous modifiez le présent réglage, l'écran tactile affichera
immédiatement l'effet sur l'image.
12. Effets spéciaux: Couleur, Noir et blanc, Tan
Le réglage par défaut est de Couleur.
13. Qualité d’image: Haut qualité, Standard, Économie
Le réglage par défaut est Haut qualité.
96
Page 53

REGLAGE DU SYSTEME
Voix
Correction de distorsion
Angle
5. WDR: ON / OFF
Le réglage par défaut est OFF.
WDR conserve un niveau de détail plus élevé dans les zones sombres et lumineuses d'une
image. Le résultat est une photo correctement exposée pour ces deux extrêmes. Le
présent réglage est particulièrement utile pour les scènes figurant dans la liste noire ou
comportant des grandes régions lumineuses et un premier plan sombre. WDR est
uniquement disponible en mode de vidéo.
6. Arrêt automatique: Off, 1 Min, 3 Min, 5 Min, 10 Min
Le réglage par défaut est OFF.
Mettre votre V50X hors tension après une période d’inactivité pour économiser la vie de la
batterie.
1. Voix: Volume, Son bouton, Touch tone, Ton de départ
Vous pouvez régler le volume de la caméra et activer / désactiver le son bouton,, le touch
tone ou le ton de départ.
2. Correction de distorsion: ON / OFF
Le réglage par défaut est OFF.
En activant correction de distorsion, il est capable de corriger la distorsion de l'image.
3. Angle: 170°, 140°, 110°, 70°
Le réglage par défaut est de 170°.
L'angle signifie la quantité de scène (mesurée en degrés) pouvant être capturée à travers
l'objectif de la caméra. L'angle super-large capture la plus grande quantité de la scène,
tandis que l'angle étroit en capture le moins.
4. Mode plongée: ON / OFF
Le réglage par défaut est OFF.
En activant le mode plongée, il est capable de compenser le manque de lumière rouge
dans les scènes sous-marines. Le mode de plongée est conçu pour les eaux bleues et
tropicales, avec une utilisation optimale entre 10 et 20 mètres.
97
7. Sommeil d'écran: Off, 30 Sec, 1 Min, 3 Min
Le réglage par défaut est de 1 Min.
Mettre l'écran hors tension après une période d'inactivité pour économiser la vie de la
batterie. Pour rallumer l'écran, appuyer sur n'importe quel bouton de la caméra sport.
8. Langues: English / Français / Deutsch / Español / Italiano / Português
Le réglage par défaut est Anglais.
9. Format de date: AAAA/MM/JJ, MM/JJ/AAAA, DD/MM/AAAA
Le réglage par défaut est de JJ/MM/AAAA.
10. Date: MM/JJ/AAAA
Vous pouvez définir la date de la caméra sport.
11. Le temps: HH/MM
Vous pouvez définir l'heure de la caméra sport.
12. OSD: OFF, Date / heure, date
Le réglage par défaut est Date / heure.
Si vous sélectionnez Date / heure, la caméra ajoute la Date / heure dans les vidéos et
photos que vous avez pris.
98
Page 54

13. Source de lumière fréquence: 50Hz, 60Hz
05-11-2019 17:11:21
Le réglage par défaut est de 50Hz.
14. Formater la carte mémoir
Pour maintenir votre carte micro SD en bon état, la reformater régulièrement. Supprimer
tous les contenus lors de reformatage, assurer de décharger d'abord les photos et les
vidéos.
Pour reformater votre carte, saisir les réglages du système, faire défiler les options pour
localiser et appuyer sur «Formater la carte», puis sur «Confirmer».
15. Réinitialisation d’usine: Réinitialiser par défaut? Annuler / confirmer
Cette option réinitialise tous les réglages à leurs valeurs par défaut.
16. A propos de: Modèle / SoftVersion
Vous pouvez vérifier le modèle et la softversion de votre Vista 5.
CONNEXION A L'APPLICATION ROADCAM
L'application Roadcam vous permet de contrôler votre caméra sport à distance à l'aide
d'un smartphone ou d'une tablette. Les fonctionnalités concernent le contrôle complet de
la caméra, l'aperçu en direct, la lecture, le téléchargement et le partage de contenu.
1. Télécharger l'application Roadcam à partir de Google Play ou de l'Apple Store.
2. Activer la caméra, maintenir le bouton haut enfoncé durant 3 secondes pour activer le
Wi-Fi.
3. Activer le Wi-Fi de votre téléphone, connecter au SSID Wi-Fi:
‘DragonTouch_Vista5_7DAB’.
4. Entrer le mot de passe: 1234567890.
5. Activer l'application Roadcam. Appuyer sur ‘Ajouter un enregistreur ’.
Vous vous connectez à l'application Roadcam avec succès.
DÉCHARGEMENT DE VOTRE CONTENU
DÉCHARGEMENT DE VOTRE CONTENU SUR UN ORDINATEUR
Pour lire vos vidéos et vos photos sur un ordinateur, vous devez d’abord transférer ces
fichiers sur un ordinateur. Le transfert libère également de l'espace sur votre carte micro
99
SD pour le nouveau contenu.
Pour transférer des fichiers sur un ordinateur à l’aide d’un lecteur de carte (vendu
séparément) et de l’explorateur de fichiers de votre ordinateur, connectez le lecteur de
carte à l’ordinateur, puis insérez la carte micro SD. Vous pouvez ensuite transférer des
fichiers sur votre ordinateur ou supprimer des fichiers sélectionnés sur votre carte. Vous
pouvez également décharger des fichiers sur un ordinateur à l'aide d'un câble USB.
DECHARGEMENT DE VOTRE CONTENU
DECHARGEMENT DE VOTRE CONTENU SUR UN SMARTPHONE OU SUR UNE
TABLETTE
1. Connecter à l'application Roadcam.
2. Activer l’application Roadcam. Appuyer sur «Ajouter un enregistreur».
Puis appuyer sur l'icône au milieu de l'écran.
3. Appuyer sur l’icône «Photo HD».
4. En appuyant sur n’importe quel fichier pendant 3 secondes, vous pouvez ainsi
sélectionner plusieurs fichiers.
5. En appuyant sur , vous téléchargez les fichiers avec succès sur votre téléphone.
Instrument d'enregistrement
Recording instrument
Ajouter un enregistreur
Moments Album
Mine
DragonTouch_Vista5
Break off
00:01:32
Vidéo HUD Photo HUD
Vidéo
1:1
100
Page 55

Interrompre
05-11-2019 17:11:21
DragonTouch_Vista5
2019/01/01
Photo
SUPPRESSION DE VIDEOS ET DE PHOTOS SUR VOTRE VISTA 5
Supprimer des vidéos et des photos avec l'écran tactile:
1. Appuyer sur l'icône du fichier pour passer en mode de lecture. Si votre carte micro
SD contient beaucoup des informations, son chargement peut prendre queques minutes.
2. Appuyer sur et sur le fichier de vidéo ou de photo que vous souhaitez de supprimer.
3. En appuyant sur , l'écran affiche «Etes-vous sûr de supprimer des fichiers?
Annuler / Confirmer ».
4. En appuyant sur «Confirmer», le fichier sélectionné sera supprimé.
Vidéo HUD Photo HUD
Photo
1:1
LECTURE DE VOTRE CONTENU
Vous pouvez lire votre contenu sur l’écran LCD de la caméra sport, sur votre ordinateur,
sur votre téléviseur ou sur votre smartphone / tablette.
Vous pouvez également lire le contenu en insérant directement la carte micro SD dans un
périphérique, tel qu'un ordinateur ou un téléviseur compatible. Avec cette méthode, la
résolution de lecture dépend de la résolution de l'appareil et de sa capacité à lire cette
résolution.
VISUALISATION DE VIDÉOS ET DE PHOTOS SUR VOTRE VISTA 5
1. Appuyer sur le bouton et maintenir l'état enfoncé durant 3 secondes ou appuyer sur
l'icône du fichier pour passer en mode de lecture. Si votre carte micro SD contient
beaucoup des informations, son chargement peut prendre queques minutes.
2. Appuyer sur n’importe quel fichier de vidéo ou de photo.
3. Appuyer sur l'icône Avant ou Arrière pour lire les fichiers de vidéo ou de photo.
101
Supprimer des vidéos et des photos avec boutons:
1. Appuyer sur le bouton et maintenir l'état enfoncé durant 3 secondes ou appuyer sur
l'icône du fichier pour passer en mode de lecture. Si votre carte micro SD contient
beaucoup des informations, son chargement peut prendre queques minutes.
2. Appuyer plusieurs fois sur le bouton bas pour localiser le fichier que vous souhaitez de
supprimer. Appuyer sur le déclencheur. Ensuite, maintenir le déclencheur enfoncé
durant 3 secondes. L'écran affiche ««Etes-vous sûr de supprimer des fichiers? Annuler /
Confirmer ».
3. Press down button then shutter button. En appuyant sur le bouton bas et puis sur le
déclencheur, le fichier sélectionné sera supprimé.
REFORMATION DE VOTRE CARTE MICRO SD
Pour maintenir votre carte micro SD en bon état, la reformater régulièrement. Supprimer
tous les contenus lors de reformatage, assurer de décharger d'abord les photos et les
vidéos.
1. Mettre Vista 5 sous tension.
2. Entrer dans les réglages du système.
3. Pour reformater votre carte, saisir les réglages du système, faire défiler les options pour
localiser et appuyer sur «Formater la carte», puis sur «Confirmer».
4. Appuyer sur «Confirmer ». Et puis formater votre carte micro SD avec succès.
102
Page 56

ENTRETIEN DE VOTRE CAMÉRA
Suivez ces instructions pour obtenir les meilleures performances de votre appareil photo:
1. Pour une performance audio optimale, secouez la caméra ou soufflez sur le micro pour
enlever les débris des orifices du microphone.
2. Pour nettoyer l'objectif, essuyez-le avec un chiffon doux et non pelucheux. Ne pas
insérer d'objets étrangers autour de l'objectif.
3. Ne touchez pas l’objectif avec les doigts.
4. Gardez l'appareil photo à l'écart des chutes et des bosses, ce qui pourrait endommager
les pièces internes.
5. Eloignez l'appareil photo des températures élevées et du soleil intense pour éviter de
l'endommager.
MAXIMISER LA VIE DE LA BATTERIE
Si la batterie atteint 0% pendant l'enregistrement, l'appareil enregistre le fichier et s'éteint.
Pour optimiser la durée de vie de la batterie, suivez ces directives lorsque cela est possible:
• Désactivez les connexions sans fil.
• Capturez des vidéos à des taux de trame et des résolutions plus faibles.
• Utilisez le paramètre Écran de veille.
Ne rangez pas votre batterie avec des objets métalliques, tels que des pièces de monnaie,
des clés ou des colliers. Si les bornes de la batterie entrent en contact avec des objets
métalliques, cela peut provoquer un incendie.
Ne modifiez pas la caméra sans autorisation. Cela pourrait compromettre la sécurité, la
conformité réglementaire, les performances et annuler la garantie.
ADVERTENCIA: Ne laissez pas tomber, ne pas démonter, ouvrir, écraser, plier, déformer,
perforer, déchiqueter, micro-ondes, incinérer ou peindre l'appareil photo ou la batterie.
N'insérez pas d'objets étrangers dans l'ouverture de la batterie de l'appareil photo.
N'utilisez ni l'appareil photo ni la batterie si elle a été endommagée, par exemple si elle
est fissurée, perforée ou endommagée par l'eau. Le démontage ou la perforation de la
batterie peut provoquer une explosion ou un incendie.
TÉLÉCOMMANDE
STOCKAGE ET MANIPULATION DES PILES
La caméra sport contient des composants sensibles, notamment la batterie. Évitez
d'exposer votre caméra sport à des températures très froides ou très chaudes. Des
conditions de température basse ou élevée peuvent raccourcir temporairement la durée
de vie de la batterie ou causer la caméra sport temporairement cesser de fonctionner
correctement. Évitez les changements brusques de température ou d'humidité lors de
l'utilisation de la caméra sport, car la condensation peut se former sur ou dans la caméra
sport.
Ne séchez pas la caméra sport ou la batterie avec une source de chaleur externe telle
qu'un four à micro-ondes ou un sèche-cheveux. Les dommages à la caméra sport ou à la
batterie causés par le contact avec le liquide à l'intérieur de la caméra sport ne sont pas
couverts par la garantie.
103
Bouton Photo
Bouton Vidéo
Résiste seulement aux éclaboussements, pas à l’eau
VIDÉO
Pour enregistrer une Vidéo, vérifiez que la caméra est en mode Vidéo.
Pour commencer un enregistrement:
Appuyez sur le Bouton Gris vidéo. La camera émettra un bip et la lumière de la camera
clignotera pendant l’enregistrement.
104
Page 57

Pour arrêter l’enregistrement:
Appuyez de nouveau sur le Bouton Vidéo Gris. La caméra emmétra un bip et la lumière
de la caméra arrêtera de clignoter lors de l’enregistrement.
PHOTO
Pour capturer une image, vérifiez que la caméra est en Mode Photo.
Pour prendre une photo:
Appuyez sur le Bouton Rouge Photo. La caméra émettra un son de déclencheur photo.
3. Soulevez la carte PCB, faite coulissez la batterie à l’extérieur, comme montré sur l’image.
Remarque: Ne PAS faite pivoter la car te PCB afin d’éviter de renverser les fonctions des boutons
caméra et vidéo.
Remplacement de Batterie CR2032 pour Télécommande Caméra d’Action AKASO
1. Utilisez un tournevis de type Phillips 1.8mm pour retirer les 4 vis au dos du couvercle
de la télécommande, vous permettant ainsi de l’ouvrir.
2. Retirez 4 vis supplémentaire sur la carte PCB.
105
4. Installez la nouvelle batterie, en gardant le pole "+” tourné vers le haut.
5. Réinstallez toutes les 4 vis dans la carte PCB.
6. Setzen Sie alle 4 Schrauben wieder in die Abdeckung ein.
MONTAGE DE VOTRE CAMERA
Fixez votre caméra sport aux casques, au matériel et aux équipements.
106
Page 58

CONTACTEZ NOUS
Pour tout problème avec les produits Dragon Touch, n'hésitez pas à nous contacter, nous
vous répondrons dans les 24 heures.
Adresse E-mail: cs@dragontouch.com
Site web officiel: www.dragontouch.com
Français
107
108
Page 59

Italiano
CONTENUTO
La tua Vista 5
Iniziare
Panoramica del Modi
Personalizzando la tua Vista 5
Connessione All'app Roadcam
Scaricare Il tuo Contenuto
Riproduzione dei Tuoi Contenuti
Cancellazione di Video e Foto Sulla tua Vista 5
Riformatura Della Scheda Micro SD
Manutenzione Della Fotocamera
Massimizzare la Vita Della Batteria
Stoccaggio e Manipolazione Della Batteria
A Distanza
Montaggio Della Telecamera
Contatti
110
111
112
118
126
127
128
129
129
130
130
130
131
133
135
109
Page 60
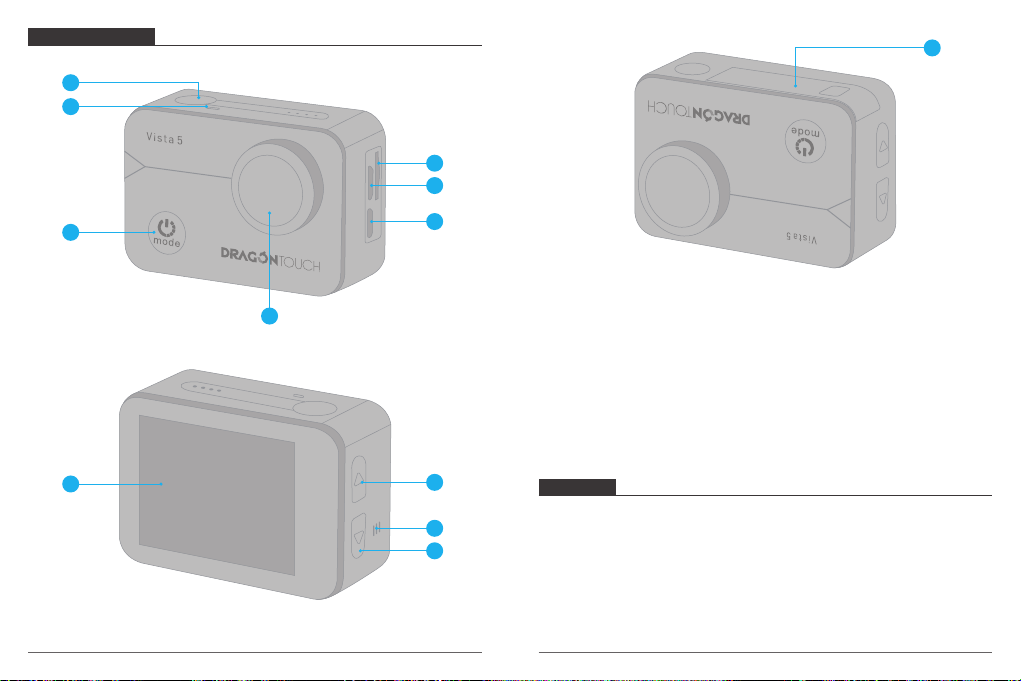
LA TUA VISTA 5
1
2
12
4
5
110
3
7
6
1. Pulsante di Scatto / Selezione
2. Indicatore
3. Pulsante di Accensione / Modalità
4. Slot microSD
5. Porto Micro HDMI
6. Micro USB
7. Lente
8. Touch Screen
9. Pulsante Su
10. Altoparlante
11. Pulsante Giù
12. Porta della batteria
Nota: La fotocamera non registra il suono quando è nella custodia
impermeabile.
8
9
10
11
INIZIARE
Benvenuti nella nuova Vista 5. Per acquisire video e foto, è necessaria una scheda microSD
(venduta separatamente).
SCHEDE MICROSD
Utilizzare schede di memoria di marca che soddisfano questi requisiti:
• MicroSD, MicroSDHC o MicroSDXC
• Classificazione di Classe 10 o UHS-I
• Capacità fino a 64GB 100 MB/s
111
Page 61

Nota:
1. Si prega di formattare la scheda microSD prima in questa fotocamera prima dell'uso.
Per mantenere in buone condizioni la scheda microSD, riformattarla regolarmente.
La riformattazione cancella tutti i tuoi contenuti, quindi assicurati di scaricare prima le
tue foto e i tuoi video.
2. La scheda microSD di formato FAT32 interrompe la registrazione quando la memoria di
ciascun file supera i 4GB e inizia a registrare di nuovo su un nuovo file.
PANORAMICA DEL MODI
Ci sono 9 modalità: Foto, Autoscatto, Foto di Scoppio, Time Lapse, Video, Rallentatore,
Time Lapse Video, Foto Ferma e Modalità di Guida.
0002/5467
Working mode
ACCENSIONE + SPENTO
Per accendere:
Tenere premuto il pulsante Modalità per tre secondi. La fotocamera emette un segnale
acustico mentre la spia di stato della videocamera è accesa. Quando le informazioni
vengono visualizzate sul display LCD o sullo schermo di stato della fotocamera, la
fotocamera è accesa.
Per spegnere:
Premere e tenere premuto il pulsante Mode per tre secondi. La fotocamera emette un
segnale acustico mentre la spia di stato della fotocamera è spenta.
MODALITÀ DI COMMUTAZIONE
Per cambiare modalità:
Premere il pulsante Modalità dopo aver acceso la fotocamera, è possibile cambiare la
modalità.
Per uscire dalla modalità:
Premi il pulsante Modalità per uscire dalla modalità.
ACCENDERE / SPEGNERE il Wi-Fi
Per attivare il Wi-Fi:
Accendi la fotocamera, premi e tieni premuto il Pulsante Su per tre secondi per accendere
il Wi-Fi.
Per disattivare il Wi-Fi:
Premi il Pulsante Su per spegnere il Wi-Fi.
Nota: La fotocamera non registra il suono quando è nella custodia impermeabile.
112
Foto Autoscatto
Foto
12M
Time Lapse Video Rallentatore
Tocca qui
MODALITÀ FOTO
In modalità Foto, premere il Pulsante di Scatto, la fotocamera scatta una foto.
0002/5467
Foto
12M
Foto di
Scoppio
113
Page 62

MODALITÀ AUTOSCATTO
Nella modalità Autoscatto, premere il Pulsante OK per scattare una foto autoscatto.
0002/5467
MODALITÀ FOTO TIME LAPSE
Nella modalità Foto Time Lapse, premere il Pulsante di Scatto, la fotocamera scatta una
serie di foto a intervalli 3s / 5s / 10s.
0002/5467
Autoscatto
12M
MODALITÀ FOTO DI SCOPPIO
Nella modalità Foto di Scoppio, premere il Pulsante di Scatto, la fotocamera scatta 3 foto
al secondo, 5 foto al secondo o 10 foto al secondo.
0002/5467
Foto di Scoppio
12M
114
Foto Time Lapse
12M
MODALITÀ VIDEO
La modalità video è la modalità predefinita quando si accende la fotocamera.
In modalità video, premere il Pulsante di Scatto, la videocamera inizia a registrare il video.
Premere il Pulsante di Scatto per interrompere la registrazione del video.
00:00:00/00:31:55
Video
4K 30fps
115
Page 63
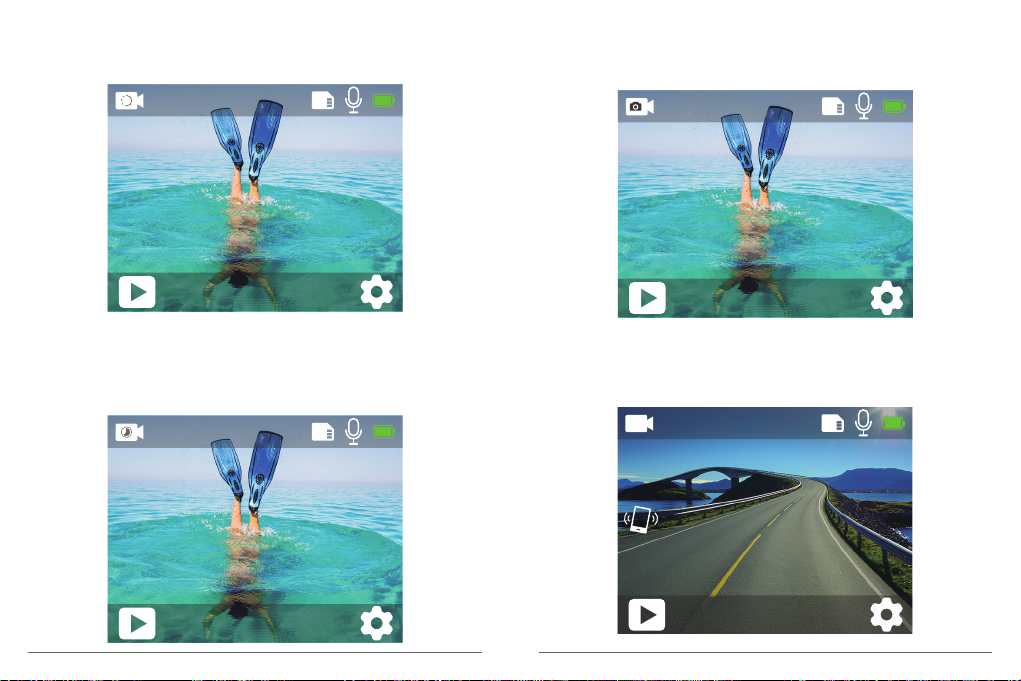
MODALITÀ RALLENTATORE
In modalità Rallentatore, premere il Pulsante di Scatto, la fotocamera registra il video al
rallentatore.
00:00:00/00:40:37
MODALITÀ FOTO FERMA
Nella modalità Foto Ferma, la fotocamera scatta una foto ogni 3 secondi / 5 secondi /
10 secondi / 30 secondi automaticamente durante la registrazione video.
00:00:00/00:31:55
Rallentatore
1080P 90fps
MODALITÀ VIDEO TIME LAPSE
Nella modalità Video Time Lapse, premere il Pulsante di Scatto, la fotocamera registra il
video da fotogrammi catturati a intervalli specifici.
Il video Time Lapse viene catturato senza audio.
00:00:00/00:40:37
Video Foto Time Lapse
4K 30fps
116
Foto Ferma
4K 30fps
MODALITÀ DI GUIDA
In modalità guida, connetti la fotocamera con l'accendisigari dell'auto, la fotocamera si
accende automaticamente se si avvia l'auto e si spegne se si ferma la macchina.
00:00:00/00:31:55
Guida
4K 30fps
117
Page 64

PERSONALIZZANDO LA TUA VISTA 5
IMPOSTAZIONE VIDEO
0002/5467
Resoluzione
4. Rallentatore: 1080P 90fps, 720P 120fps
Impostazione predefinita è 1080P 90fps.
Il rallentatore è un effetto nella realizzazione di un film in cui il tempo sembra essere
rallentato.
Nota: Se si desidera registrare video al rallentatore, disattivare innanzitutto la
stabilizzazione dell'immagine.
Stabilizzazione dell'immagine
Photo
12M
Codifica Video
Tocca qui
1. Resoluzione: 4K 30fps, 2.7K 30fps, 2K 60fps, 2K 30fps, 1080P 90fps, 1080P 60fps,
1080P 30fps, 720P 120fps, 720P 60fps, 720P 30fps
Impostazione predefinita è 4K 30fps.
2. Stabilizzazione dell'immagine: ON / OFF
Impostazione predefinita è OFF.
3. Codifica Video: H.264, H.265
Un codec video è un circuito o un software elettronico che comprime o decomprime i
video digitali. Converte i video non compressi in un formato compresso o viceversa.
Secondo numerosi studi, HEVC, High Efficiency Video Coding (H.265) dovrebbe offrire una
compressione fino al 50% migliore rispetto a H.264 nelle applicazioni video on demand
(VOD), il che significa una migliore qualità a metà della velocità in bit. Nella codifica live,
che ovviamente deve essere eseguita in tempo reale, le aspettative iniziali sono una
riduzione della larghezza di banda del 35% a livelli di qualità simili. In alternativa, HEVC
può anche abilitare filmati con risoluzione maggiore, 2K o 4K.
Inoltre, la codifica di contenuti SD e HD esistenti con HEVC anziché H.264 contribuirà a
ridurre i costi e / o la possibilità di trasmettere video di qualità più elevata a connessioni a
bit rate più basse.
118
5. Foto Ferma: 4K 30fps
Impostazione predefinita è 4KP 30fps.
6. Tempo di Foto Ferma: 3 Sec, 5 Sec, 10 Sec, 30 Sec
Impostazione predefinita è 3 Sec.
In still photo mode, the camera takes a photo every 3 Sec / 5 Sec / 10 Sec / 30 Sec
automatically during video recording.
7. Intervallo di Time Lapse: 0.2Sec, 0.3Sec, 0.5Sec, 1Sec, 2Sec, 5Sec, 10Sec, 30Sec, 1Min
Impostazione predefinita è 0.5 Sec.
Video Time Lapse crea video da frame catturati a intervalli specifici. Questa opzione ti
consente di catturare un evento time lapse e visualizzarlo o condividerlo immediatamente
come video. Time Lapse Il video viene catturato senza audio.
Per esempio: Se si seleziona 4K/30FPS e 2 secondi, è necessario registrare 60 secondi,
quindi puoi ottenere 1 secondo video per 4K/30FPS.
8. Tempo di registrazione loop: Off, 3 Min., 5 Min, 7 Min
Impostazione predefinita è OFF.
Usando la registrazione ciclica, puoi registrare continuamente video, ma solo i momenti
che desideri. Ad esempio, se si seleziona un intervallo di 5 minuti, vengono salvati solo i
5 minuti precedenti quando si preme il pulsante dell'otturatore per interrompere la
registrazione. Se si registra per 5 minuti e non si preme il pulsante dell'otturatore per
interrompere la registrazione e salvare, la fotocamera registra un nuovo intervallo di
5 minuti registrando i precedenti 5 minuti di filmati. Quando la scheda micro SD è piena,
i nuovi file copriranno quelli vecchi se la registrazione in loop è attiva.
119
Page 65

9. Registrazione Audio: ON / OFF
Impostazione predefinita è ON.
Disattiva la registrazione audio, la fotocamera non registra l'audio quando si registra un
video.
10. Valore di Esposizione: -2, -1.7, -1.5, -1.3, -1, -0.5, -0.3, 0, +0.3, +0.5, +1, +1.3, +1.5,
+1.7, +2
Impostazione predefinita è 0.
Per impostazione predefinita, la fotocamera utilizza l'intera immagine per determinare il
livello di esposizione appropriato. Tuttavia, l'esposizione consente di selezionare un'area che
si desidera assegnare alla fotocamera la priorità per determinare l'esposizione. Questa
impostazione è particolarmente utile negli scatti in cui una regione importante potrebbe
essere sovraesposta o sottoesposta.
11. ISO: Auto, 100, 200, 400, 800
Impostazione predefinita è Auto.
ISO determina la sensibilità della fotocamera alla luce e crea un compromesso tra
luminosità e rumore dell'immagine risultante. Il rumore dell'immagine si riferisce al grado
di granulosità nell'immagine.
In condizioni di scarsa illuminazione, valori ISO più elevati producono immagini più
luminose, ma con un maggiore rumore dell'immagine. Valori più bassi producono un
rumore dell'immagine più basso, ma immagini più scure. Quando si modifica questa
impostazione, il display LCD mostra immediatamente l'effetto sull'immagine.
12. Bilanciamento del Bianco: Auto, Tungsteno, Fluorescente, Luce Diurna, Nuvoloso,
Alba
Impostazione predefinita è Auto.
Il bilanciamento del bianco consente di regolare la temperatura del colore di video e foto
per ottimizzare le condizioni di luce fredda o calda. Quando si modifica questa
impostazione, il display LCD mostra immediatamente l'effetto sull'immagine.
120
13. Metro: Centro, Media, Spot
Impostazione predefinita è Media.
Nella fotografia, la modalità di misurazione si riferisce al modo in cui una fotocamera
determina l'esposizione. Le telecamere generalmente consentono all'utente di selezionare
tra modalità di misurazione centrale, media o spot. Le diverse modalità di misurazione
consentono all'utente di selezionare quella più appropriata da utilizzare in una varietà di
condizioni di illuminazione.
14. Colore: Naturale, Bianco e Nero, Seppia
Impostazione predefinita è Naturalel.
IMPOSTAZIONE FOTO
Resoluzione
Timer del Ritardo
Foto di Scoppio
1. Resoluzione: 12M, 8M, 5M, 3M
Impostazione predefinita è 12M.
2. Autoscatto: 1 Sec, 3 Sec, 5 Sec, 10 Sec, 30 Sec
Impostazione predefinita è 3 Sec.
Un autoscatto dà un ritardo tra la pressione del pulsante di scatto e l'accensione del
scatto. È più comunemente usato per consentire ai fotografi di scattare una foto di se
stessi (spesso con la famiglia).
121
Page 66

3. Foto di Scoppio: 3shots / 1s, 5shots / 1s, 10shots / 1s
Impostazione predefinita è 3shots / 1s.
Scoppio acquisisce fino a 30 foto in 8 secondi, quindi è perfetto per catturare attività in
rapido movimento.
4. Foto Time Lapse: 3 Sec, 5 Sec, 10 Sec, 30 Sec, 1 Min
Impostazione predefinita è 3 Sec.
Foto Time Lapse acquisisce una serie di foto a intervalli specificati. Usa questa modalità
per catturare foto di qualsiasi attività, quindi scegli le migliori in seguito.
5. Scena: Auto, Pittura Leggera
Impostazione predefinita è Auto.
6. Valore di Esposizione: -2, -1.7, -1.5, -1.3, -1, -0.5, -0.3, 0, +0.3, +0.5, +1, +1.3, +1.5,
+1.7, +2
Impostazione predefinita è 0.
Per impostazione predefinita, la fotocamera utilizza l'intera immagine per determinare il
livello di esposizione appropriato. Tuttavia, l'esposizione consente di selezionare un'area
che si desidera assegnare alla fotocamera la priorità per determinare l'esposizione. Questa
impostazione è particolarmente utile negli scatti in cui una regione importante potrebbe
essere sovraesposta o sottoesposta.
Quando si modifica questa impostazione, il display LCD mostra immediatamente l'effetto
sull'immagine. Se cambi modalità, la fotocamera ritorna a utilizzare l'intera scena per
determinare il livello corretto di esposizione.
7. Tempo di Esposizione: Auto, 2 Sec, 5 Sec, 10 Sec, 30 Sec
Impostazione predefinita è Auto.
Il tempo di esposizione, rispettivamente periodo di esposizione, indica l'intervallo di
tempo per il quale il film di una fotocamera tradizionale o un sensore di una moderna
fotocamera digitale viene effettivamente esposto alla luce in modo da registrare
un'immagine.
8. ISO: Auto, 400, 800, 1600, 3200
Impostazione predefinita è Auto.
122
ISO determina la sensibilità della fotocamera alla luce e crea un compromesso tra
luminosità e rumore dell'immagine risultante. Il rumore dell'immagine si riferisce al grado
di granulosità nell'immagine.
In condizioni di scarsa illuminazione, valori ISO più elevati producono immagini più
luminose, ma con un maggiore rumore dell'immagine. Valori più bassi producono un
rumore dell'immagine più basso, ma immagini più scure. Quando si modifica questa
impostazione, il display LCD mostra immediatamente l'effetto sull'immagine.
9. White Balance: Auto, Tungsteno, Fluorescente, Luce Diurna, Nuvoloso, Alba
Impostazione predefinita è Auto.
Il bilanciamento del bianco consente di regolare la temperatura del colore di video e foto
per ottimizzare le condizioni di luce fredda o calda. Quando si modifica questa
impostazione, il display LCD mostra immediatamente l'effetto sull'immagine.
10. Metro: Centro, Media, Spot Impostazione predefinita è Media.
Nella fotografia, la modalità di misurazione si riferisce al modo in cui una fotocamera
determina l'esposizione. Le telecamere generalmente consentono all'utente di selezionare
tra modalità di misurazione centrale, media o spot. Le diverse modalità di misurazione
consentono all'utente di selezionare quella più appropriata da utilizzare in una varietà di
condizioni di illuminazione.
11. Nitidezza: Forte, Normale, Morbido
Impostazione predefinita è Normale.
La nitidezza controlla la qualità dei dettagli catturati nelle riprese video o nelle foto.
Quando modifichi questa impostazione, il display touch mostra immediatamente l'effetto
sull'immagine.
12. Colore: Naturale, Bianco e Nero, Seppia
Impostazione predefinita è Naturale.
13. Qualità Fotografica: Bene, Normale, Economia
Impostazione predefinita è Bene.
123
Page 67
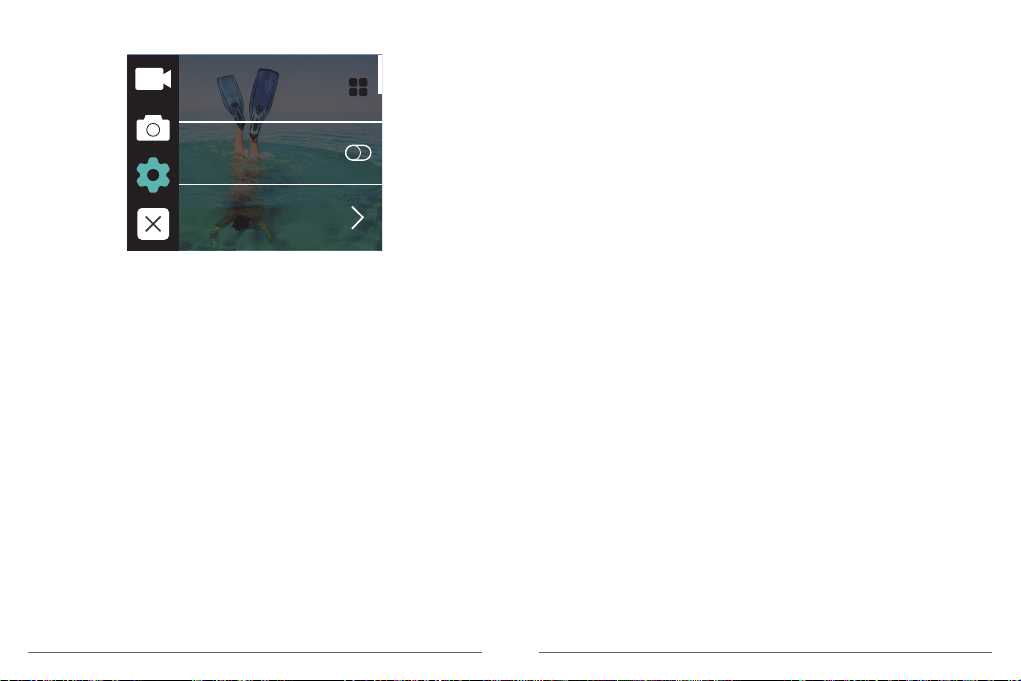
IMPOSTAZIONI DI SISTEMA
Suoni
Calibrazione della distorsione
Angolo
1. Suoni: Volume, Tono Tasti, Tono Tocco, Tono Avvio
È possibile regolare il volume della fotocamera e attivare / disattivare i toni dei tasti, il tono
del tocco o il tono di avvio.
2. Calibrazione di distorsione: ON / OFF
Impostazione predefinita è OFF.
Attiva la calibrazione della distorsione, può correggere la distorsione dell'immagine.
3. Angolo: 170°, 140°, 110°, 70°
Impostazione predefinita è 170°.
L'angolo si riferisce a quanto della scena (misurata in gradi) può essere catturata
attraverso l'obiettivo della fotocamera. Super Grandangolo cattura la quantità maggiore
della scena, mentre l'angolo stretto cattura il minimo.
4. Modalità di Immersione: ON / OFF Impostazione predefinita è OFF.
Attiva la modalità di immersione, può compensare la mancanza di luce rossa nelle scene
subacquee. La modalità Immersione è progettata per l'uso in acqua tropicale e blu,
ottimizzata per l'uso tra 10 e 80 piedi.
5. WDR: ON / OFF
Impostazione predefinita è OFF.
Wide Dynamic Range (WDR) mantiene un livello maggiore di dettaglio nelle aree scure e
luminose di un'immagine. Il risultato è una foto correttamente esposta per entrambi questi
estremi. Questa impostazione è particolarmente utile per le scene che sono in backlist o
che hanno ampie regioni luminose e un primo piano scuro. WDR è disponibile solo in
modalità Video.
6. Spegnimento Automatico: Off, 1 Min, 3 Min, 5 Min, 10 Min
Impostazione predefinita è OFF.
Spegne Vista5 dopo un periodo di inattività per risparmiare la durata della batteria.
7. Salvaschermo: Off, 30 Sec, 1 Min, 3 Min
Impostazione predefinita è 1 Min.
Turns off the display after a period of inactivity to save battery life. To turn on the display
again, press any button on the camera.
8. Linguaggio: English / Français / Deutsch / Español / Italiano / Português
Impostazione predefinita è English.
9. Formato Data: YYYY/MM/DD, MM/DD/YYYY, DD/MM/YYYY
Impostazione predefinita è MM/DD/YYYY.
10. Impostare Data: MM/DD/YYYY
È possibile impostare la data della fotocamera.
11. Impostare Tempo: HH/MM
È possibile impostare l'ora della fotocamera.
12. Il Timbro della Data: Off, Data & Tempo, Data
Impostazione predefinita è Data & Tempo.
Se si seleziona Data & Tempo, questa fotocamera aggiunge Data & Tempo ai video e alle
foto scattate.
124
125
Page 68

13. Frequenza di Alimentazione: 50Hz, 60Hz
05-11-2019 17:11:21
Impostazione predefinita è 50Hz.
14. Formatta la Scheda
Per mantenere in buone condizioni la scheda micro SD, riformattarla regolarmente. La
riformattazione cancella tutti i tuoi contenuti, quindi assicurati di scaricare prima le tue
foto e i tuoi video.
Per riformattare la tua carta, inserisci Impostazioni di sistema, quindi scorri le opzioni per
individuare e tocca "Formatta scheda", quindi tocca "Conferma".
15. Reset: Resetta alla fabbrica? Annulla / Conferma
Questa opzione ripristina tutte le impostazioni ai valori predefiniti.
16. Su: Modello / Versione
Puoi controllare il modello e la versione di Vista 5.
CONNESSIONE ALL'APP ROADCAM
L'app Roadcam ti consente di controllare la videocamera da remoto utilizzando uno
smartphone o un tablet. Le funzionalità includono il controllo completo della videocamera,
l'anteprima dal vivo, la riproduzione, il download e la condivisione di contenuti.
1. Scaricare l'app Roadcam da Google Play o Apple Store.
2. Accendere la fotocamera, premere e tenere premuto il pulsante per 3 secondi per
accendere il Wi-Fi.
3. Accendi il Wi-Fi del tuo telefono, connettiti al SSID Wi-Fi: "DragonTouch_Vista5_7DAB".
4. Immettere la password: 1234567890.
5. Apri l'app Roadcam. Tocca "Aggiungi registratore". Ti colleghi correttamente all'app
Roadcam.
126
SCARICARE IL TUO CONTENUTO
SCARICARE I TUOI CONTENUTI AD UN COMPUTERO
Per riprodurre video e foto su un computer, è necessario innanzitutto trasferire questi file
su un computer. Il trasferimento consente inoltre di liberare spazio sulla scheda micro SD
per i nuovi contenuti.
Per scaricare i file su un computer utilizzando un lettore di schede
(venduto separatamente) e il file explorer del computer, collegare il lettore di schede al
computer, quindi inserire la scheda micro SD. È quindi possibile trasferire file sul computer
o eliminare i file selezionati sulla scheda. Puoi anche scaricare i file su un computer usando
un cavo USB.
SCARICARE I TUOI CONTENUTI SU SMARTPHONE O TABLET
1. Collegarsi all'app Roadcam..
2. Apri l'app Roadcam. Tocca "Aggiungi registratore". Quindi tocca l'icona al centro dello
schermo.
3. Toccare l'icona “Foto HD”.
4. Toccare qualsiasi file per 3 secondi. Quindi puoi selezionare molti file.
5. Toccare . Si scaricano i file correttamente sul telefono.
Recording instrument
Recording instrument
Aggiungi registratore
Moments
Album Mine
DragonTouch_Vista5
Break off
00:01:32
HUD video HUD photo
Video
1:1
127
Page 69

DragonTouch_Vista5
05-11-2019 17:11:21
Break off
HUD video HUD photo
Photo
1:1
2019/01/01
Picture
CANCELLAZIONE DI VIDEO E FOTO SULLA TUA VISTA 5
Elimina video e foto con il touch screen:
1. Tocca l'icona del file per accedere alla modalità di riproduzione. Se la tua scheda
microSD contiene molti contenuti, potrebbe volerci un minuto per caricarla.
2. Tocca e tocca il file video o foto che desideri eliminare.
3. Tocca , lo schermo mostra "Sei sicuro di eliminare i file? Annulla / Conferma".
4. Tocca “conferma”. Il file selezionato verrà cancellato.
Elimina video e foto con i pulsanti:
1. Premere e tenere premuto il pulsante per 3 secondi per accedere alla modalità di
riproduzione. Se la tua scheda microSD contiene molti contenuti, potrebbe volerci un
minuto per caricarla.
2. Premere il pulsante più volte per individuare il file che si desidera eliminare. Premere il
pulsante di scatto. Quindi premere e tenere premuto il pulsante di scatto per 3 secondi.
Lo schermo mostra "Sei sicuro di cancellare i file? Annulla / Conferma".
3. Premere il tasto giù quindi il pulsante di scatto. Il file selezionato verrà cancellato.
RIPRODUZIONE DEI TUOI CONTENUTI
È possibile riprodurre i contenuti sul display LCD della fotocamera, sul computer, sulla TV
o sullo smartphone / tablet.
È inoltre possibile riprodurre il contenuto inserendo la scheda microSD direttamente in un
dispositivo, ad esempio un computer o una TV compatibile. Con questo metodo, la
risoluzione della riproduzione dipende dalla risoluzione del dispositivo e dalla sua capacità
di riprodurre quella risoluzione.
VISUALIZZAZIONE DI VIDEO E FOTO SULLA TUA VISTA 5
1. Premere e tenere premuto il pulsante per 3 secondi o toccare l'icona del file per
accedere alla modalità di riproduzione. Se la tua scheda microSD contiene molti
contenuti, potrebbe volerci un minuto per caricarla.
2. Toccare qualsiasi file video o foto.
3. Toccare l'icona Avanti o Indietro per riprodurre file video o foto.
128
RIFORMATURA DELLA SCHEDA MICROSD
Per mantenere in buone condizioni la scheda microSD, riformattarla regolarmente. La
riformattazione cancella tutti i tuoi contenuti, quindi assicurati di scaricare prima le tue
foto e i tuoi video.
1. Accendi Vista 5.
2. Inserisci le impostazioni di sistema.
3. Scorri lo schermo per individuare e tocca "Formatta scheda", quindi tocca "Conferma".
4. Tocca "Conferma". Quindi si formatta la scheda micro SD con successo.
129
Page 70

MANUTENZIONE DELLA FOTOCAMERA
Segui queste linee guida per ottenere le migliori prestazioni dalla tua fotocamera:
1. Per ottenere prestazioni audio ottimali, scuotere la fotocamera o soffiare sul microfono
per rimuovere i detriti dai fori del microfono.
2. Per pulire l'obiettivo, pulirlo con un panno morbido e privo di lanugine. Non inserire
oggetti estranei attorno all'obiettivo.
3. Non toccare l'obiettivo con le dita.
4. Tenere la fotocamera lontana da cadute e urti, che potrebbero causare danni alle parti
interne.
5. Tenere la fotocamera lontana da alte temperature e forte luce solare per evitare di
essere danneggiata.
MASSIMIZZARE LA VITA DELLA BATTERIA
Se la batteria raggiunge lo 0% durante la registrazione, la fotocamera salva il file e si
spegne.
Per ottimizzare la durata della batteria, seguire queste linee guida quando possibile:
• Disattiva le connessioni wireless.
• Cattura video con frame rate e risoluzioni più bassi.
• Usa l'impostazione Screen Saver.
Non conservare la batteria con oggetti metallici, come monete, chiavi o collane. Se i
terminali della batteria vengono a contatto con oggetti metallici, ciò potrebbe causare un
incendio.
Non apportare modifiche non autorizzate alla fotocamera. Ciò potrebbe compromettere
la sicurezza, la conformità alle normative, le prestazioni e potrebbe invalidare la garanzia.
AVVERTIMENTO: Non far cadere, smontare, aprire, schiacciare, piegare, deformare,
forare, distruggere, forare, incenerire o verniciare la fotocamera o la batteria. Non inserire
oggetti estranei nell'apertura della batteria della fotocamera. Non utilizzare la fotocamera
o la batteria se è stata danneggiata, ad esempio se incrinata, perforata o danneggiata
dall'acqua. Smontare o forare la batteria può causare un'esplosione o un incendio.
A DISTANZA
STOCCAGGIO E MANIPOLAZIONE DELLA BATTERIA
La fotocamera contiene componenti sensibili, inclusa la batteria. Evitare di esporre la
fotocamera a temperature molto fredde o molto calde. Le condizioni di bassa o alta
temperatura possono temporaneamente ridurre la durata della batteria o causare il blocco
temporaneo della fotocamera. Evitare forti variazioni di temperatura o umidità durante
l'utilizzo della fotocamera, poiché potrebbe formarsi della condensa all'interno o
all'interno della fotocamera.
Non asciugare la fotocamera o la batteria con una fonte di calore esterna come un forno
a microonde o un asciugacapelli. I danni alla fotocamera o alla batteria causati dal
contatto con liquidi all'interno della fotocamera non sono coperti dalla garanzia.
130
Pulsante Foto
Pulsante Video
Solo a prova di spruzzi d'acqua, non impermeabile.
VIDEO
Per registrare video, verificare che la fotocamera sia in modalità Video.
Per iniziare la registrazione:
Premi il pulsante video grigio. La fotocamera emetterà un segnale acustico e la luce della
videocamera lampeggerà durante la registrazione.
131
Page 71

Per interrompere la registrazion:
Premi di nuovo il pulsante video grigio. La fotocamera emetterà un segnale acustico e la
luce della videocamera smetterà di lampeggiare durante la registrazione.
FOTO
Per catturare una foto, verificare che la fotocamera sia in modalità Foto.
Per fare una foto:
Premi il pulsante rosso Foto. La fotocamera emetterà un suono di scatto della fotocamera.
3. Sollevare la scheda PCB e sfilare la batteria, come mostrato in figura.
Nota: Non ruotare la scheda PCB per evitare di invertire le funzioni della fotocamera e
dei pulsanti video.
CR2032 SOSTITUZIONE BATTERIA PER TELECOMANDO VISTA 5
1. Utilizzare un cacciavite a punta Phillips da 1,8 mm per rimuovere le 4 viti sul coperchio
posteriore del telecomando, consentendo di aprirlo.
2. Rimuovere altre 4 viti sulla scheda PCB.
132
4. Installare la nuova batteria, mantenendo il polo "+" rivolto verso l'alto.
5. Rimontare tutte e 4 le viti sulla scheda PCB.
6. Rimontare tutte e 4 le viti nel coperchio.
MONTAGGIO DELLA TELECAMERA
Attacca la tua fotocamera a caschi, attrezzi e attrezzature.
133
Page 72

CONTATTI
Per qualsiasi problema con i prodotti di Dragon Touch, non esitate a contattarci,
risponderemo entro 24 ore.
Indirizzo email: cs@dragontouch.com
Sito ufficiale: www.dragontouch.com
Italiano
134
135
Page 73

日本語
目次
製品一覧
はじめ に
モード機能一覧
取扱説明
アプリ「Roadcam」に接続する
データをダウンロ ードする
データを再生する
Vista 5でビデオ/写真を削除する
SDカードをフォーマットする
カメラを保護する
電池寿命を最大化にする
バッテリーの保管と取扱方法
リモコン
アクセサリーの取り付け
アフターサービス
137
138
140
145
153
153
155
155
156
156
156
157
158
160
162
136
Page 74

製品一覧
1
2
12
4
5
137
3
7
6
1. シャッター/選択ボタン
2. インジケータ
3. 電源/モードボタン
4. Micro SD ス ロ ット
5. Micro HDMI ポート
6. Micro USB
7. レンズ
8. タッチスクリーン
9. UPボタン
10. スピーカー
11. Downボタン
12. バッテリー カバー
ご注意: 防水ケースに入っていると、カメラは音声を録音できません。
8
9
10
11
はじめに
弊社の製品、Vista 5をご支持いただき、誠にありがとうございます。ビデオや写真をキャ
チャする には 、micro SDカード(別売)が必要です。
MIKROSD カード
これらの要件を満たすブランドのメモリカードを使用してください。
• MicroSD, MicroSDHC, または MicroSDXC
• Class 10 または UHS-I Rating
• 最大64GB(FAT32)、100MB/s
138
Page 75
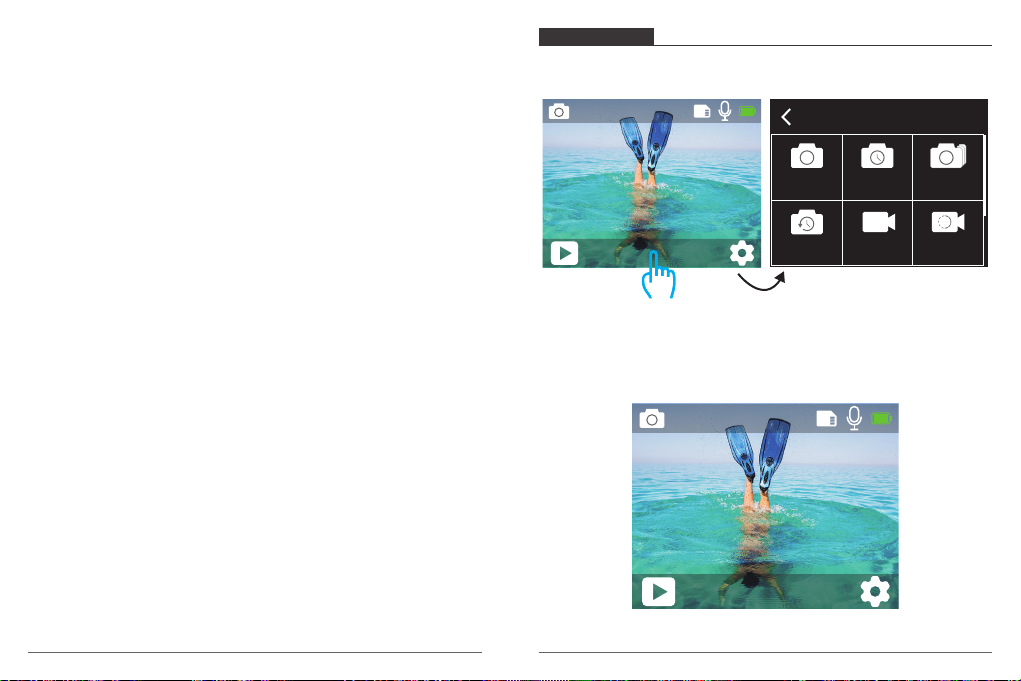
ご注意:
1. 使用する前に、カメラでSDカードをフォーマットしてください。SDカードを良好な状態
に保つために、定期的に再フォーマットしてください。再フォーマットすると、すべての
ファイルが削除されるので、まず写真やビデオをダウンロードしてください。
2. 各ファイルの保存容量が4GBを 超 えると 、MicroSDカード(FAT32)は記録を停止し、新し
いファイルへの記録を再開します。
モード機能一覧
9つのモードがあります: ビデオ、ループ録画、タイムラプス、スローモーション、撮影、
セルフタイマ ーと連写撮 影、ダイビングモ ード
0002/5467
モード
電源 オン/オフ
電源をオンにする:
電源を切る状態で電源ボタンを3秒間押し続けると電源を入れます。
電源をオフにする:
電源を入れる状態で電源ボタンを3秒間押し続けると電源を切ります。
切り替えモ ード
モード を切り替 えるに は :
カメラの電源を入れ、モードボタンを押してモードを切り替えます。
モードを終了するには:
モードボタンを押してモードを終了します。
Wi-Fiをオン/オフ する
Wi-Fiをオンに する:
カメラの電源を入れ、上ボタンを長押ししてWi-Fiをオンにします。設定設置にWi-Fiをオ
ンに することもできます。
Wi-Fiをオフにする:
上ボタンを押してWi-Fiをオフにします。
ご 注 意: 防水ケースに入っていると、カメラは音声を録音できません。
139
ビデオ ループ録画
ビデオ
12M
タイムラプ
ス写真
撮影
ここを クリックし てくだ さ い
撮 影 モ ード
撮影モードでは、シャッターボタンを押すと、カメラが写真を撮ります。
0002/5467
ビデオ
12M
連写撮影
スローモー
ション
140
Page 76
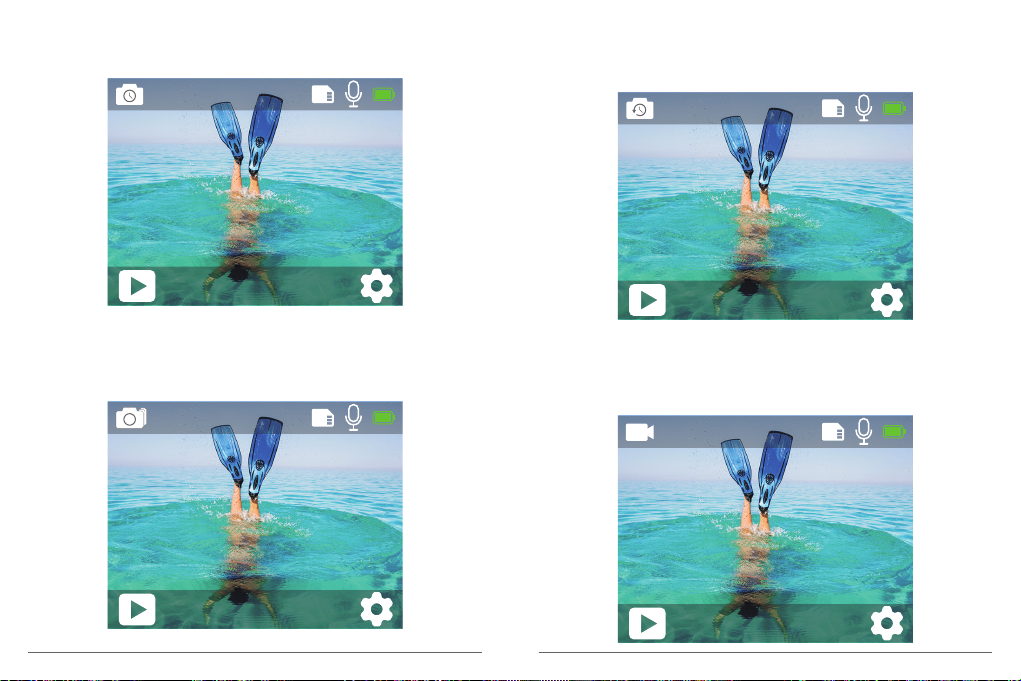
セルフタイマー
セルフタイマーモードには、OKボタンを押すと、セルフタイマー写真が撮られます。
0002/5467
タイムラプス写真モード
タイムラプス写 真 モード、シャッタ ーボタンを 押 すと、カメラは 3秒/ 5秒/10秒間隔で数
枚の写真を撮影します。
0002/5467
セルフタイマ ー
12M
連写撮影
連写撮影モードでは、シャッターボタンを押すと、1秒間に3枚/ 5枚/ 10枚の写真が撮ら
れます。
0002/5467
連写撮影
12M
141
タイムラプス 写 真
12M
ビデオモード
ビデオモードは、カメラの電源を入れたときのデフォルトモードです。
ビデオモードには、OKボタンを押すと、ビデオの録画を開始します。もう一度OKボタンを
押すと録画を停止します。
00:00:00/00:31:55
ビデオ
4K 30fps
142
Page 77

スローモーション
スローモーションモードには、OKボタンを押すと、スローモーションの録画を開始します。
00:00:00/00:40:37
静止画モード
静止画モードには、録画中、カメラは3秒/5秒/10秒/30秒ごとに自動的に写真を撮影
します。
00:00:00/00:31:55
スローモーション
1080P 90fps
タイムラプスビデオモード
タイムラプスビデオモードで、シャッターボタンを押すと、カメラは特定の間隔でキャプチ
ャされたフレームからビデオを録 画します。
タイムラプスビ デオ は 音声 なしで キャプチャさ れま す。
00:00:00/00:40:37
タイムラプスビデオ
4K 30fps
143
静止画
4K 30fps
カーモード
カーモードでは、カメラと車のシガーライターを接続します。車を起動するとカメラは
自動的にオンになり、車を停止するとオフになります。
00:00:00/00:31:55
カー
4K 30fps
144
Page 78
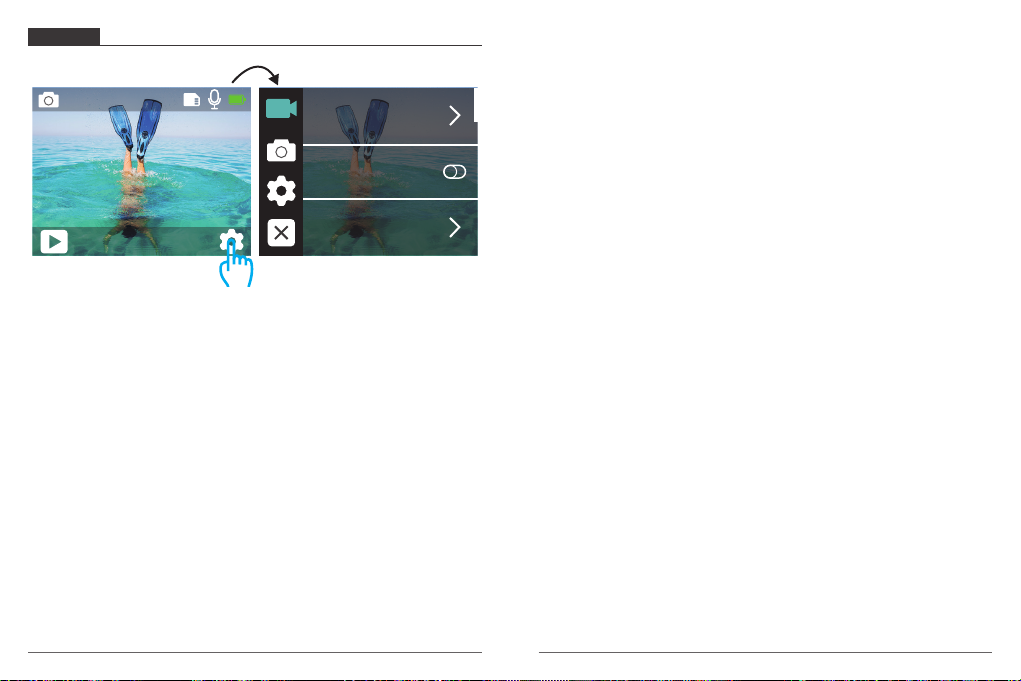
取扱説明
ビデオ設定
5.録画: 4K 30fps
デフォルト設定は4K/30fpsです。
0002/5467
解像度
画像安定化
ビデオ
12M
ビデオエンコード
ここを クリックし てくだ さ い
1. 解像度: 4K 30fps, 2.7K 30fps, 2K 60fps, 2K 30fps, 1080P 90fps, 1080P 60fps,
1080P 30fps, 720P 120fps, 720P 60fps, 720P 30fps
デフォ ルト値 は 4K/30FPSで す。
2. 画像安定化: オン/オフ
デフォ ルト設 定 は オフに なりま す。
3. ビデオエンコード: H.264, H.265
デフォ ルト値 は H.264で す。
ビデオコーデックは、デジタルビデオを圧縮/圧縮解除する電子回路またはソフトウェア
です。非圧縮ビデオを圧縮形式に、またはその逆に変換します。非圧縮ビデオを圧縮形式
に変 換します。
4.スロモーション:1080P/90fps, 720P/120fps
デフォルト設定は1080P/90fpsです。
スローモーションは映画制作において効果があり、それによって時間が遅くなるように見
えます。スローモーションで録画する場合は、まず画像安定化をオフにしてください。
145
6. 静止画撮影時間: 3秒 / 5秒 / 10秒 / 30秒
デフォルト設定は3秒で す。
静止画モードには、録画しながら、カメラは3秒 / 5秒 / 10秒 / 30秒ごとに自動的に写真を
撮影します。
7.タイムラプスビデオ: 0.2秒/ 0.3秒/ 0.5秒/ 1秒/ 2秒/ 5秒/ 10秒/ 30秒/ 1秒
デフォルト設定は0.5秒です。
タイムラプスビデオは、特定の間隔でキャプチャされたフレームからビデオを作成しま
す。この設 定 を使 用 すると、タイム ラプス イベ ントをキャプ チャしてすぐ にビ デ オとして表
示または共有できます。音声なしでタイムラプスビデオをキャプチャできます。
2秒を選択すると、1秒間に1つフレームキャプチャするために2秒間録画します。
例 え ば: 4K/30FPSと2秒を選択した場合、60秒間録画する必要があります。4K/30FPSの場
合は1秒のビデオを取得できます。
8. ループ録画: オフ/ 3分/ 5分/ 7分
デフォルト設 定 はオ フにします。
ループ録画を使用すると、ビデオを連続的に録画できますが、必要な瞬間だけを保存で
きます。たとえば、5分間隔を選択した場合、シャッターボタンを押して録画を停止しても、
直前の5分だけが保存されます。5分間録画し、録画を停止して保存するためにシャッター
ボタンを押さないと、カメラは過 去5分間の録画を保存して、新しい5分間の間隔を録画し
ま す 。マ イ ク ロ SD
カードがいっぱいになると、ループ録画がオンの場合、新しいファイルは
古いファイルを覆 います。
9. 録音する: オン/オフ
デフォ ルト設 定 は オン に なりま す。
音声記録をオフにすると、ビデオを記録するときにカメラは音声を記録しません。
146
Page 79

10. 露出補正: -2, -1.7, -1.5, -1.3, -1, -0.5, -0.3, 0, +0.3, +0.5, +1, +1.3, +1.5, +1.7, +2
デフォルト設定は0です。
デフォルトでは、カメラは画像全体によって適切な露出レベルを決定します。ただし、露出
を選択すると、露出を決定するときにカメラを優先的に露出させる領域を選択できます。
この設定は、重要な領域が露出オーバーまたは露出アンダーになる可能性があるショッ
トで特に便利です。
この設定を変更すると、LCDディスプレイにすぐ画像への影響が表示されます。モードを
変更すると、カメラは全体のシーンに戻り、正しい露出レベルを決定します。
画像設定
画素
セルフタイマ ー
11. ISO: 自動, 100, 200, 400, 800
デフォルト設定は自動になります。
ISOは、カメラの光に対する感度を決定し、明るさとその結果生じる画像ノイズの間でト
レードオフします。画像ノイズは、画像の粒状性の程度を表します。
暗い場所では、ISO値を高くすると画像は明るくなりますが、画像のノイズが大きくなりま
す。ISO値を小さくすると画像のノイズが少なくなりますが、画像は暗くなります。この設定
を変更すると、LCDディスプレイにすぐに画像への影響が表示されます。
12. ホ ワイトバ ラン ス : 自动 /晴天/阴天/白炽灯/荧光灯
デフォ ルト設 定 は オ ートにしま す。
ホワイトバランスを使用すると、ビデオや写真の色温度を調整して、白いまたは暖かい照
明条件に最適化できます。この設定を変更すると、LCDディスプレイにすぐ画像への影響
が表示されます。
13. 測 光モード : センター/平均/スポット
デフォルト設定は平均にします。
撮影には、測光モードはカメラが露出を決定する方法を指します。一般的には、ユーザが
中央/平均/スポットなどのモードに選択できます。異なる計量モードにより、ユーザは様
々な照明条件での使用に最適なモードを選択することができます。
14. カーラ: 自然/ブラック/ホワイト/セピア
デフォルト設定は自然です。
147
連写撮影
1. 画素: 12M, 8M, 5M, 3M
デフォルト設定は12Mです。
2. セルフタイマ ー: オフ/ 3S / 5S / 10S / 20S
デフォルト設定は3秒です。
セルフタイマーは、一定時間が経過すると自動的にシャッターを切る機能です。これは、
撮影者自身が被写体になる場合(通常は家族と一緒にする)に使用されるものが多いで
す。
3. 連写撮影: 3P/S, 5P/S, 10P/S
デフォルト設定は3P/Sにします。
連写撮影には、1秒間に最大10枚の写真をキャプチャするので、動きの速いアクティビテ
ィをキャプチャするのに最適です。
4. タイムラプス写真: 3秒 / 5秒 / 10秒 / 30秒 / 1分
デフォルト設定は3秒で す。
タイムラプス写真は、指定した間隔で一連の写真をキャプチャします。このモード
を使用してあらゆる活動の写真を撮影し、後で最適な写真を選択します。
148
Page 80

5. シーン: オート/ライト
デフォルト設定は自動にします。
6. 露出補正: -2, -1.7, -1.5, -1.3, -1, -0.5, -0.3, 0, +0.3, +0.5, +1, +1.3, +1.5, +1.7, +2
デフォルト設定は0です。
デフォルトでは、カメラは画像全体によって適切な露出レベルを決定します。ただし、露出
を選択すると、露出を決定するときにカメラを優先的に露出させる領域を選択できます。
この設定は、重要な領域が露出オーバーまたは露出アンダーになる可能性があるショッ
トで特に便利です。
この設定を変更すると、LCDディスプレイにすぐ画像への影響が表示されます。モードを
変更すると、カメラは全体のシーンに戻り、正しい露出レベルを決定します。
7. 露出時間: オート / 2秒/ 5秒/ 10秒/ 30秒
デフォ ルト設 定 は オ ートにしま す。
露光時間は、画像を記録するため、伝統のカメラフィルムまたは現代のデジタルカメラの
センサの実際の露光の時間間隔を意味します。
10. 測光モード: センター/平均/スポット
デフォルト設定は平均にします。
撮影には、測光モードはカメラが露出を決定する方法を指します。一般的には、ユーザが
中央/平均/スポットなどのモードに選択できます。異なる計量モードにより、ユーザは様
々な照明条件での使用に最適なモードを選択することができます。
11. シャープ ネス : 強い 、ノー マル、柔らかい
デフォルト設定はノーマルです。
シャープネスは、ビデオや写真に取り込まれる詳細の品質を制御します。この設定を変更
すると、LCDディスプレイにすぐに画像への影響が表示されます。
12. カーラ: 自然/黒&白
デフォルト設定は自然です。
13. 画像品質: 良い/ノーマル/経済
デフォルト設定は良いです。
8. ISO: オート , 400, 800, 1600, 3200
ISO設 定 は オ ートに なりま す。
ISOは、カメラの光に対する感度を決定し、明るさとその結果生じる画像ノイズの間でトレ
ードオフします。画像ノイズは、画像の粒状性の程度を表します。
暗い場所では、ISO値を高くすると画像は明るくなりますが、画像のノイズが大きくなりま
す。ISO値を小さくすると画像のノイズが少なくなりますが、画像は暗くなります。この設定
を変更すると、LCDディスプレイにすぐに画像への影響が表示されます。
9. ホ ワ イト バ ラ ン ス: 自动 /晴天/阴天/白炽灯/荧光灯
デフォ ルト設 定 は オ ートにしま す。
ホワイトバランスを使用すると、ビデオや写真の色温度を調整して、白いまたは暖かい照
明条件に最適化できます。この設定を変更すると、LCDディスプレイにすぐ画像への影響
が表示されます。
149
設定設置
音声
歪み校正
広角
1. 音声: 音量/キートーン/タッチトーン/起動トーン
カメラの音量を調整したり、キートーン、タッチトーン、または起動トーンのオン/オフを
切り替えま す。
150
Page 81

2. 歪み校正: オン/ オフ
デフォルト設 定 はオ フにします。
歪み補正をオンにすると、画像の歪みを補正できます。
3. 広角: 170°, 140°, 110°, 70°
デフォルト設定は170°です。
広角とは、カメラレンズを通してシーンをどれだけ(度単位)キャプチャできるかを意味し
ます。スーパーワイドアングルはシーンを最大化にキャプチャし、ナローアングルは最小
のシーンをキャプチャします。
4. ダイビングモード: オン / オフ
デフォルト設 定 はオ フにします。
ダイビングモードをオンにすると、水中シーンでの赤信号の不足を補うことができます。
ダイビングモードは熱 帯および 10と80フィートの間の青い水で使用されるように設計さ
れています。
5. WDR: オン/ オフ
デフォルト設 定 はオ フにします。
WDRは、画像の暗い部分と明るい部分の細部を保存するため、写真はこれら2つの極端
な環境での露光に適しています。この設定は、バッキングリストや大きな明るい領域と暗
い前景を持つシーンで特に役立ちます。WDRはビデオモードでのみ使用可能です。
6. 自動パワーオフ: オフ/1分/3分/5分/10分
デフォルト設 定 はオ フにします。
バッテリーの寿命を節約するために、一定時間操作しないとカメラの電源を切れます。
7. スクリーンセーバー: オフ/30秒/1分/3分
デフォルト設定は1分です。
バッテリーの寿命を節約するために、一定時間操作しないとディスプレイがオフになりま
す。ディスプレイを再びオンにするには、カメラのいずれかのボタンを押します。
8.言語:English / Français / Deutsch / Español / Italiano / Português
デフォルト設定は英語です。
9. 日 付 フ ォ ー マ ット : YYYY/MM/DD, MM/DD/YYYY, DD/MM/YYYY
デフォルト設定はMM / DD / YYYYです。
10. 日付を設定する: MM/DD/YYYY
カメラの日付を設定できます。
11. 日時を設定する: HH/MM
カメラの時刻を設定できます。
12. 日付スタンプ: オフ/ 日 付と時刻
日付デフォルト設定は日付と時刻です。
日付と時刻を選択すると、このカメラは撮ったビデオと写真に日付と時刻を追加します。
13. 電源周波数: 50Hz, 60Hz
デフォルト設定は50Hzです。
14. フォ ー マ ット : SDカードをフォーマットしますか?OK/キャンセル
カードを良好な状態に保つために、定期的に再フォーマットしてください。再フォーマ
SD
ットすると、すべてのファイルが削除されるので、まず写真やビデオをダウンロードしてく
ださい。
15. 出荷時設定へ戻る:出荷時設定へ戻りますか?OK/キャンセル
このオプ ションは 、すべて の設 定 をデフォルト値にリセットします。
16. ファームウェア/バ ー ジョン
アクションカメラVista5で、モデルとバージョンを確認できます。
151
152
Page 82

アプリ「Roadcam」に接続する
05-11-2019 17:11:21
05-11-2019 17:11:21
アプリ「 Roadcam」を使用すると、スマートフォンやタブレットを使ってカメラを遠隔操作
できます。カメラのフルコントロール、ライブプレビュー、再生、ダウンロード、デ ータの共
有、カメラの設定などの機能を利用できます。
1. Google Play または Apple App Store か ら「 Roadcam」をダウンロードします。
2. 電源を入れ、UPボタンを3秒間押してWi-Fiをオ ンにします。
3. モバイルデバイスのWi-Fiをオンにして、Wi-Fi SSID「DragonTouch_Vista5_7DAB」に接続
します。
4. パ ス ワ ー ド「 1234567890」を 入 力 し ま す 。
5. アプリ「Roadcam」をスマートフォンやタブレットで開きます。
Recording instrument
DragonTouch_Vista5
Break off
00:01:32
HUD video HUD photo
データをダウンロードする
データをコンピュータにダウンロードする
ビデオや 写真 をコンピュータで再生するに は、まずこれらのファイルをコンピュータに転
送する必要があります。転送すると、新しいデータ用にSDカードのスペースも解放されま
す。
カードリーダー(別売)を使用してファイルをコンピューターにダウンロードするには、カ
ードリーダー をコン ピューター に 接 続してから、マイクロS Dカードを 挿 入します。ファイル
をコンピュータに転送したり、削除したりできます。US Bケーブルを使用してファイルをコ
ンピュー タにダウン ロード することもでき ます。
ス マ ートフォン ま た はタブ レットにダ ウ ン ロ ード す る
1. アプリ「Roadcam」に 接 続 し ま す 。
2. アプリ「Roadcam」を開き、「レコーダーを追加する」をタップします。次に画面中央のア
イコンをタップします。
3. ア イ コ ン「 HD写 真 」を タ ッ プ し ま す 。
4. 任意のファイルを3秒間タップして、それから多くのファイルを選択できます。
5. 「」タップします。ファイルをスマホに正常にダウンロードできます。
153
Add Recorder
Recording instrument
Break off
HUD video HUD photo
Album Mine
Moments
DragonTouch_Vista5
Photo
1:1
2019/01/01
Video
1:1
Picture
154
Page 83

データを再生する
カメラ、コンピュータ、テレビ、またはスマートフォン/タブレットでファイルを再生できま
す。SDカードをコンピューターやテレビなどのデバイスに直 接挿入してファイルを再生
できます。再生解像度は、デバイスの解像度とその解像度を再生する能力によって異なり
ます。
VISTA 5 でビデオと写真を再生する
1. Downボタンを 3秒間押し続ける、またはファイルアイコンをタップして再生モードに入
ります。マイクロSDカードに大量のデータが含まれている場合は、ロードは1分間をか
かります。
2.ビデオまたは写 真ファイルをタップします。
3.次へ/戻るボタンをタップして、ビデオまたは写真ファイルを再生します。
VISTA 5でビデオ/写真を削除する
タッチスクリーンでビデオ/写真を削除する:
1. ファイルアイコンをタップして再生モードに入ります。マイクロSDカードに大量のデ
ータが含まれている場合は、ロードは1分間をかかります。
2. 削除したいビデオまたは写真ファイルをタップしてをタップします。
3. をタップすると、画面に「ファイルを削除しますか?キャンセル/確認」という提示が
表示されます。
4. 「確認」をタップして、選択したファイルが削除されます。
ボタンでビデオ/写真を削除する:
1. Downボタンを3秒間押し続けて再生モードに入ります。マイクロSDカードに大量のデ
ータが含まれている場合は、ロードは1分間をかかります。
2. Downボタンを 数 回 押して、削除し たいファイルを 見つけ ます シャッターボタンを 押し
て確認します。そしてシャッターボタンを3秒間押し続け、画面に「ファイルを削除しま
すか?キャンセル/確認」という提示が表示されます。
3. Downボタンを 押してからシャッターボタン を押します。選 択したファイルが 削除 され ま
す。
SDカードをフォーマットする
SDカードの良好な状態を保つために、定期的に再フォーマットしてください。再フォーマ
ットすると、すべてのファイルが削除されるので、最 初に写真やビデオをダウンロードして
ください。
1. Vista 5の電源を入れます。
2. 設定設置に入ります。
3. Up / Downボタンを 押して、「フォーマット」を 選択します。
4. OKボタンを 押 すと、SDカードが正常にフォーマットされます。
カメラを保護する
カメラの性能を最大限に使用するには、次のガイドラインに従ってください。
1. 最高のオーディオパフォーマンスを得るには、カメラを振るかマイクに吹きかけて、マ
イクの穴からゴミを取り除きます。
2. レンズをきれいにするには、柔らかい布で拭きます。レンズの周りに異物を入れないで
ください。
3. レンズに指を触れないでください。
4. カメラを落としたりぶつけたりしないでください。内部の部品が損傷する可能性があり
ます。
5. 損傷を受けないように、カメラを高温や強い日差しところに置かないでください。
電池寿命を最大化にする
記録中にバッテリーが電力不足になると、カメラはファイルを保存して電源をオフにしま
す。
バッテリの寿命を最大限に延ばすために、以下のことに従ってください。
•無線接続をオフにしてください。
•低いフレームレートと解像度で録画してください。
•スクリーンセーバーを設定ください。
155
156
Page 84

バッテリーの保管と取扱方法
カメラにはバッテリーを含む敏感な部品が含まれています。カメラを極端に低温または
高温の場所にさらさないでください。低温または高温の状態では、バッテリーの寿命が
一時的に短くなったり、正常に動作しなくなることがあります。カメラの上または内部に
結露が発生する可能性があるため、カメラを使用するときは温度や湿度の急激な変化を
避けてくだ さい。
電子レンジやヘアドライヤーなどの外部熱源でカメラやバッテリーを乾かさないでくだ
さい。カメラ内部の液体との接触によるカメラまたはバッテリーの損傷は、保証の対象外
です。
コイン、キー、ネックレスなどの金属製の物と一緒にバッテリーを保管しないでください。
電池の端子が金属製のものと接触すると、火災の原因となることがあります。
カメラに不正な変更をしないでください。カメラの性能や安全性に影響を与えたり、保証
が無効になる可能性があります。
警 告: カメラやバッテリーを落としたり、分解したり、開けたり、つぶしたり、曲げたり、変
形させたり、細断したり、電子レンジで焼却したり、塗装したりしないでください。
カメラのバッテリー開口部に異物を入れないでください。
破損したり、穴が開いたり、水で損傷した場合など、カメラやバッテリーが損傷している
場合は使用しないでください。バッテリーを分解したり穴を開けたりすると、爆発や火災
の原因となる可能性があります。
リモコン
撮影ボタン
ビデオボタン
生活防水のみ
ビデオ
ビデオを録画するには、カメラがビデオモードになっていることを確認してください。
録画を開始する:
グレー のビデ オボタンを 押し、カメラからビープ音 が1回 鳴り、カメラのライトが点滅し、
録画を開始します。
録画を停止する:
もう一度グレービデオボタンを 押し、カメラからビープ音が1 回鳴り、カメラの ライトが点
滅しなくなって、録画 を停止しま す。
写真
撮影するには、カメラが写真モードになっていることを確認します。
写真を撮る:
赤い撮影ボタンを押します。カメラからシャッター音が鳴ります。
157
158
Page 85

VISTA 5 のリモコン用 の CR2032バッテリー
1. 1.8 mmプラスドライバを使 用して、リモコンの背面カ バー にある4 本の ネジを外し、リ
モコンを開けます。
4. 「+」極を上に向けた状態で新しいバッテリーを取り付けます。
5. 4本のネジをPCBボードに取り付けます。
2. PCBボード上の他の4本のネジを外します。
3. 図のように、PCBボードを持ち上げてバッテリーを引き出します。
ご 注 意: 撮影ボタンとビデオボタンの機能が逆にならないように、PCBボードを回転さ
せないでください。
159
6. 4本のネジをカバーに取り付けます。
カメラの取り付け
カメラをヘルメット、ギア、装備に取り付けます。
160
Page 86

アフターサービス
弊社の製品についてご質問、ご意見がございましたら、下記のアドレスにEメールを送信
してください。こちらは全力を尽くして、お客様の問題を解決させていただきます。
E-メール: cs@dragontouch.com
公式サイト: www.dragontouch.com
日本語
161
162
 Loading...