

Page 1

USER
MANUAL
Vision 3 Action Camera
Page 2

37 - 40 42 - 44
01 - 22
25 - 28
33 - 36
29 - 32
日本語
CONTENTS
Page 3
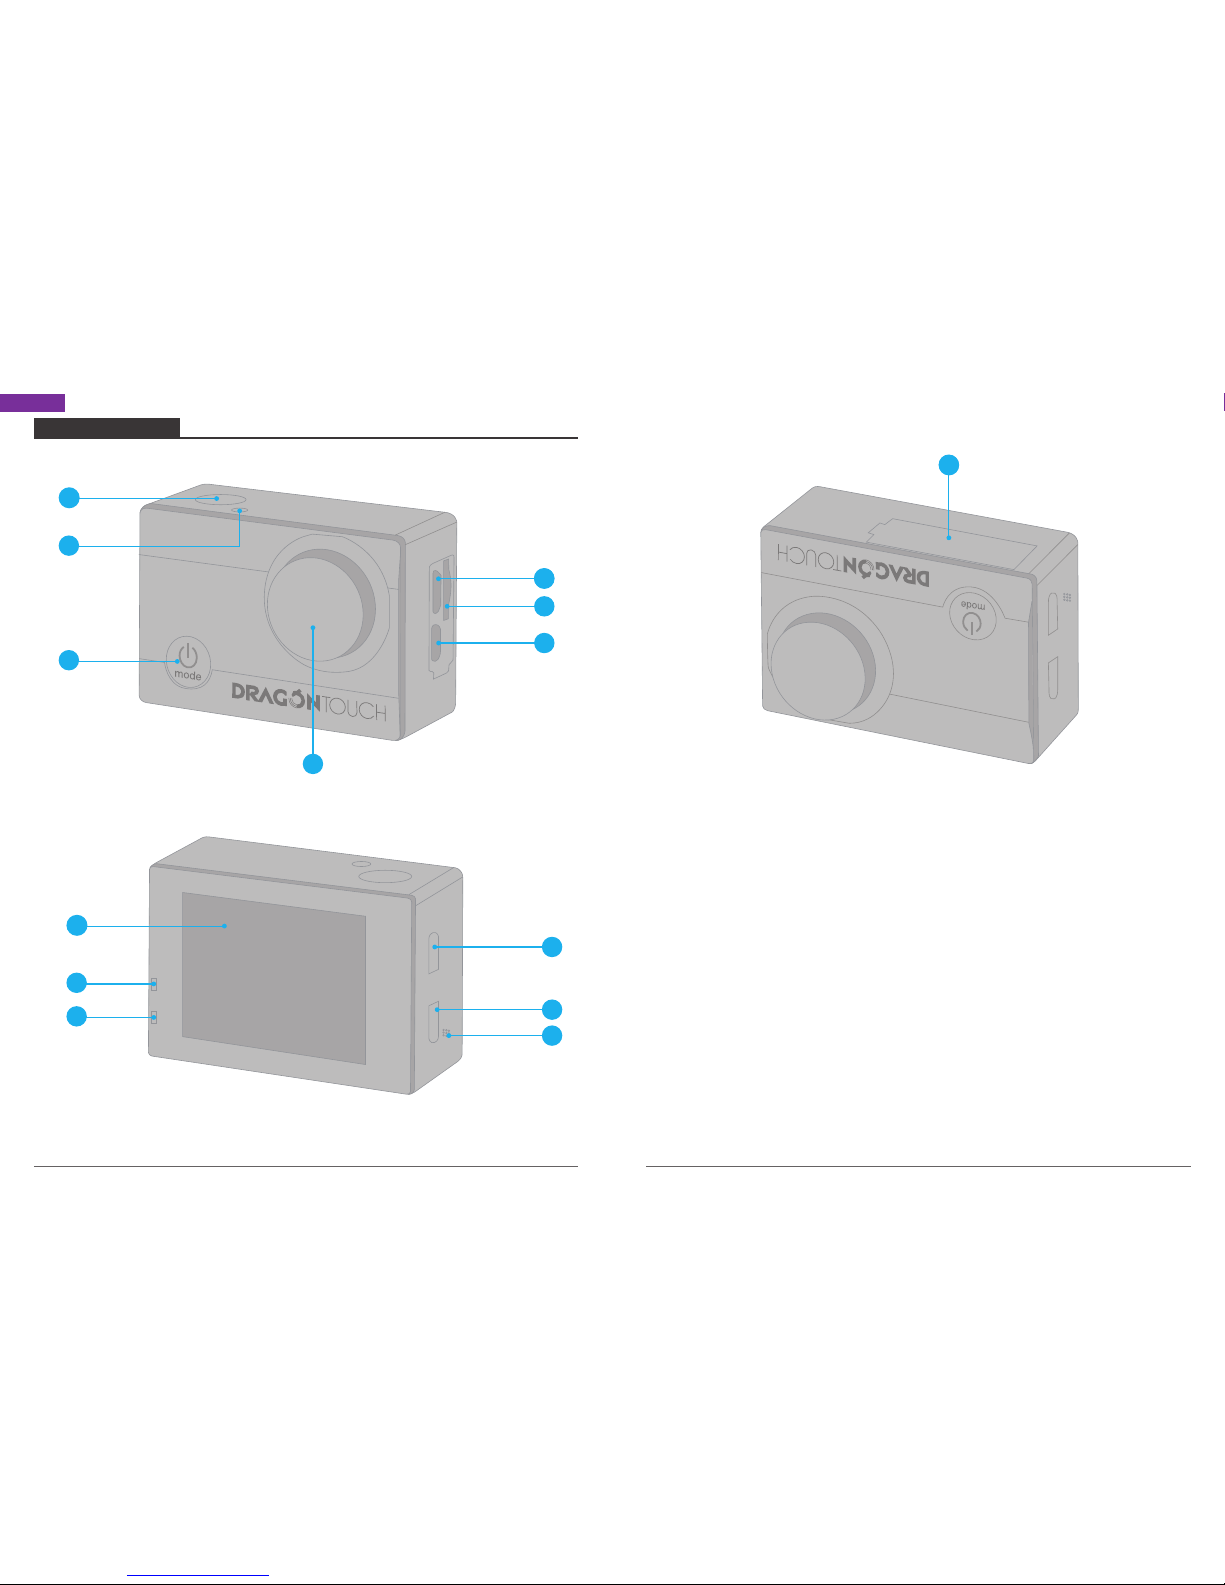
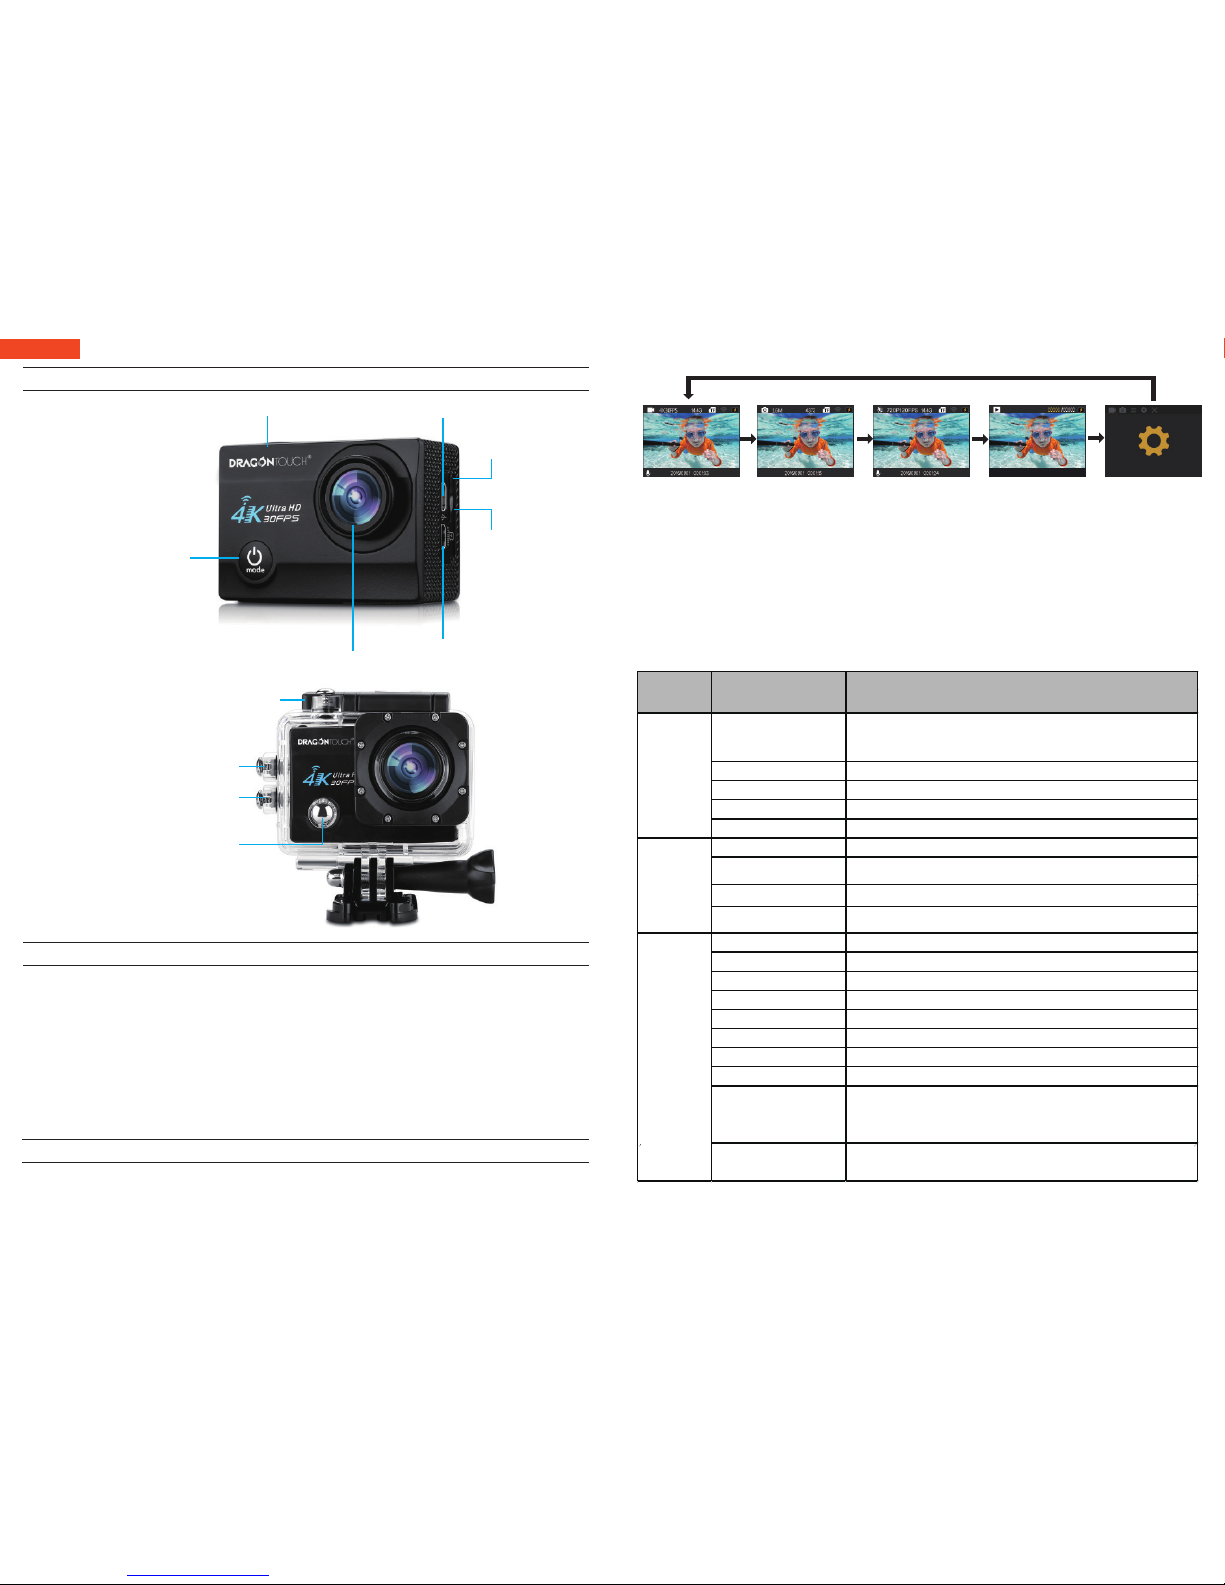
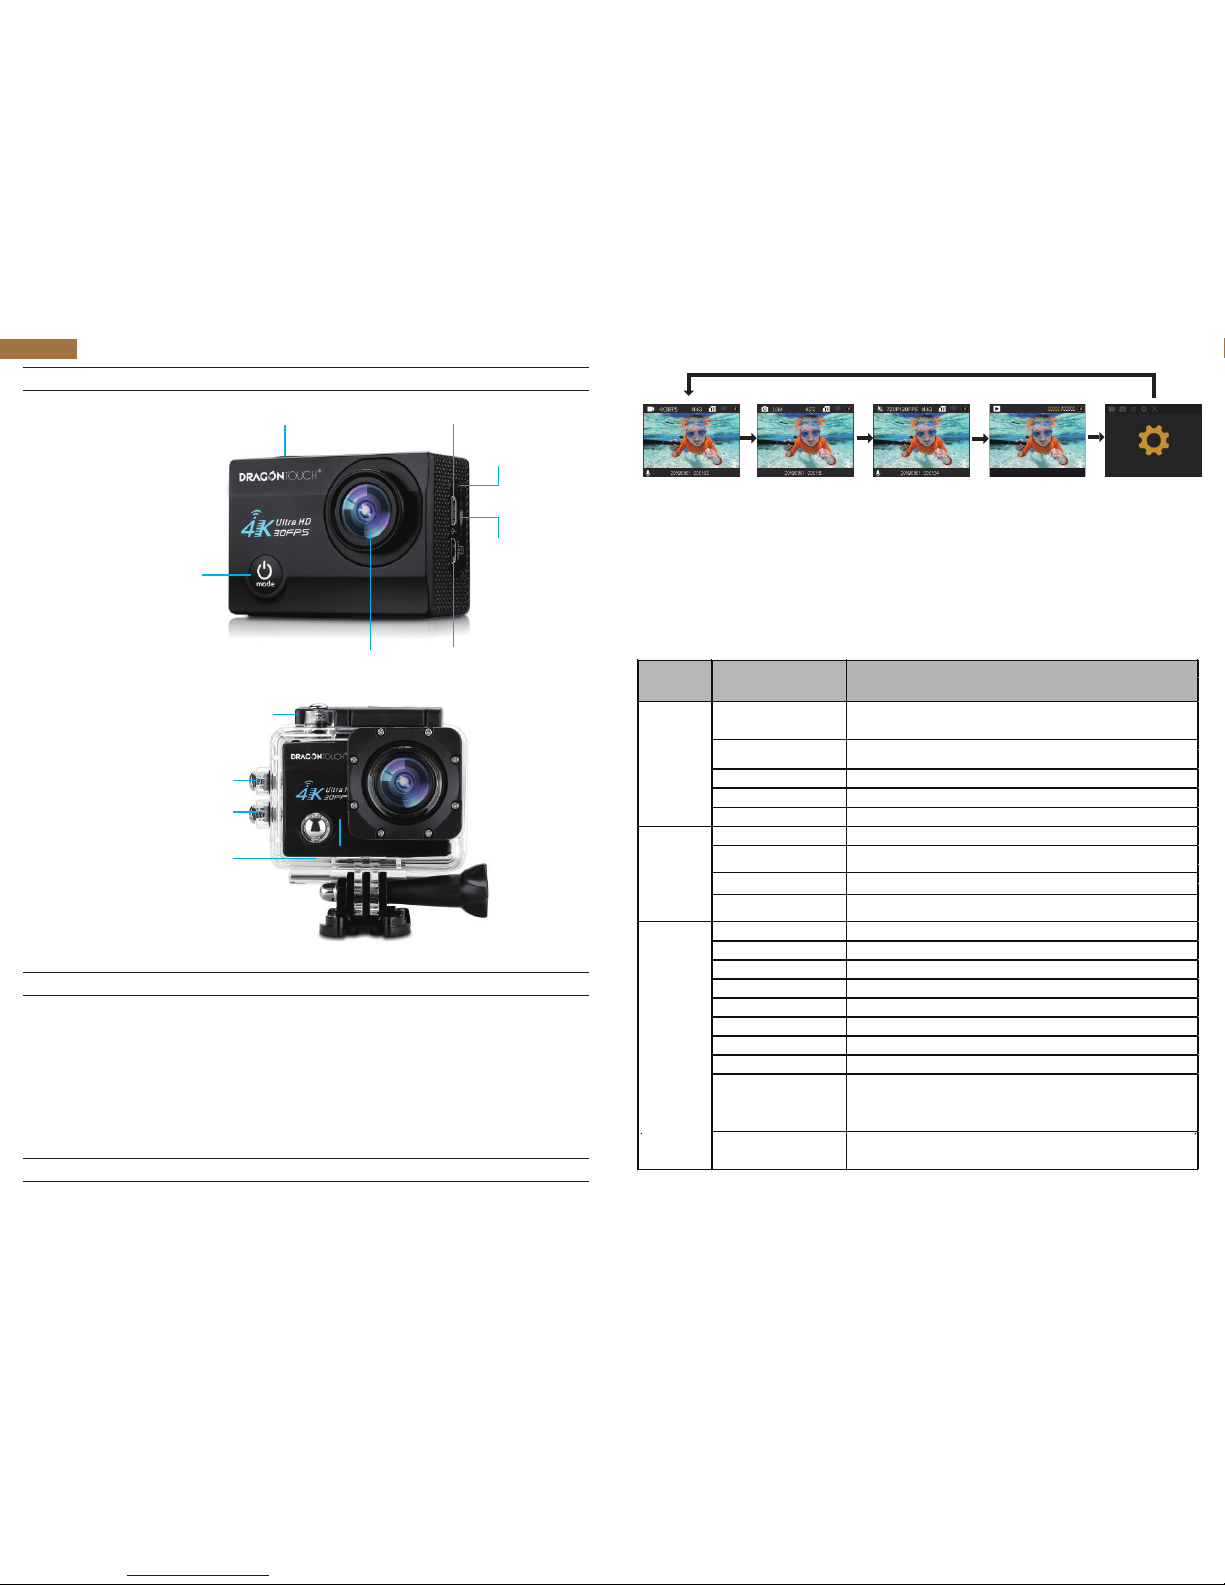
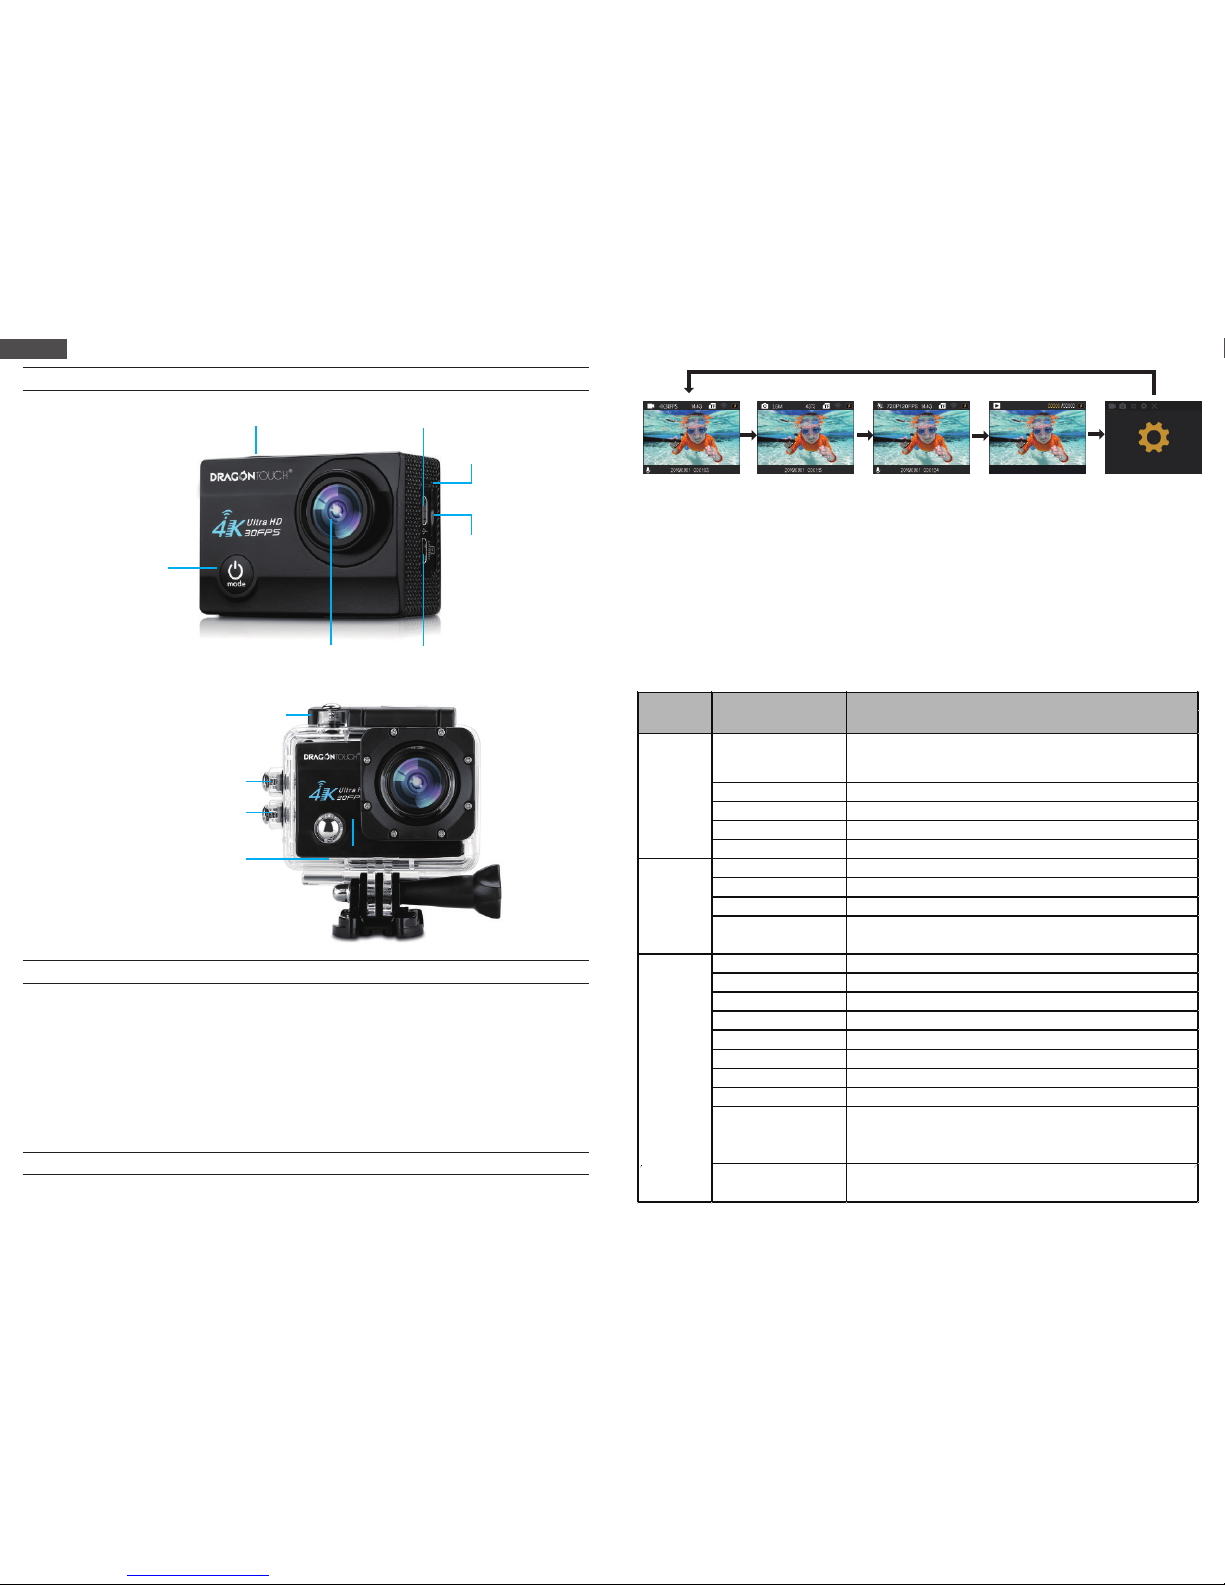
YOUR VISION 3
Note: Camera does not record sound when it is in the waterproof case.
01
1
2
3
5
144
6
11
13
12
9
10
7
8
1413
1. Shutter / Select Button
2. Working Indicator
3. Power / Mode / Exit Button
4. Micro USB Port
5. MicroSD Slot
6. Micro HDMI Port
7. Lens
8. Screen
9. Working Indicator
10. Charging Indicator
11. Up Button
12. Down Button
13. Speaker
14. Battery Door
02
English
Page 4
GETTING STARTED
Welcome to your new Vision 3. To capture video and photos, you need a micro SD card
(sold separately).
MICRO SD CARDS
Use brand name memory cards that meet these requirements:
• micro SD, micro SDHC, or micro SDXC
• Class 10 or UHS-I rating
• Capacity up to 64GB (FAT32)
Note:
1. Please format the micro SD card first in this camera before using. To keep your micro SD
card in good condition, reformat it on a regular basis. Reformatting erases all of your
content, so be sure to offload your photos and videos first.
2. FAT32 format Micro SD card stops recording when the storage of each file is over 4 GB
and starts to record again on a new file.
POWERING ON + OFF
To Power On:
Press and hold the Mode button for three seconds. The camera beeps while the camera
status light is on. When information appears on the LCD display or the camera status
screen, your camera is on.
To Power Off:
Press and hold the Mode button for three seconds. The camera beeps while the camera
status light is off.
SWITCHING MODE
To Switch Mode:
Turn on camera, press Mode button to switch mode.
To Exit Mode:
Press the Mode button to exit mode.
TURNING ON / OFF Wi-Fi
To turn on Wi-Fi
Turn on camera, press and hold Up button to turn on Wi-Fi. You can also enter Camera
Setting to turn on Wi-Fi.
To turn off Wi-Fi
Press Up button to turn off Wi-Fi.
Note: Camera does not record sound when it is in the waterproof case.
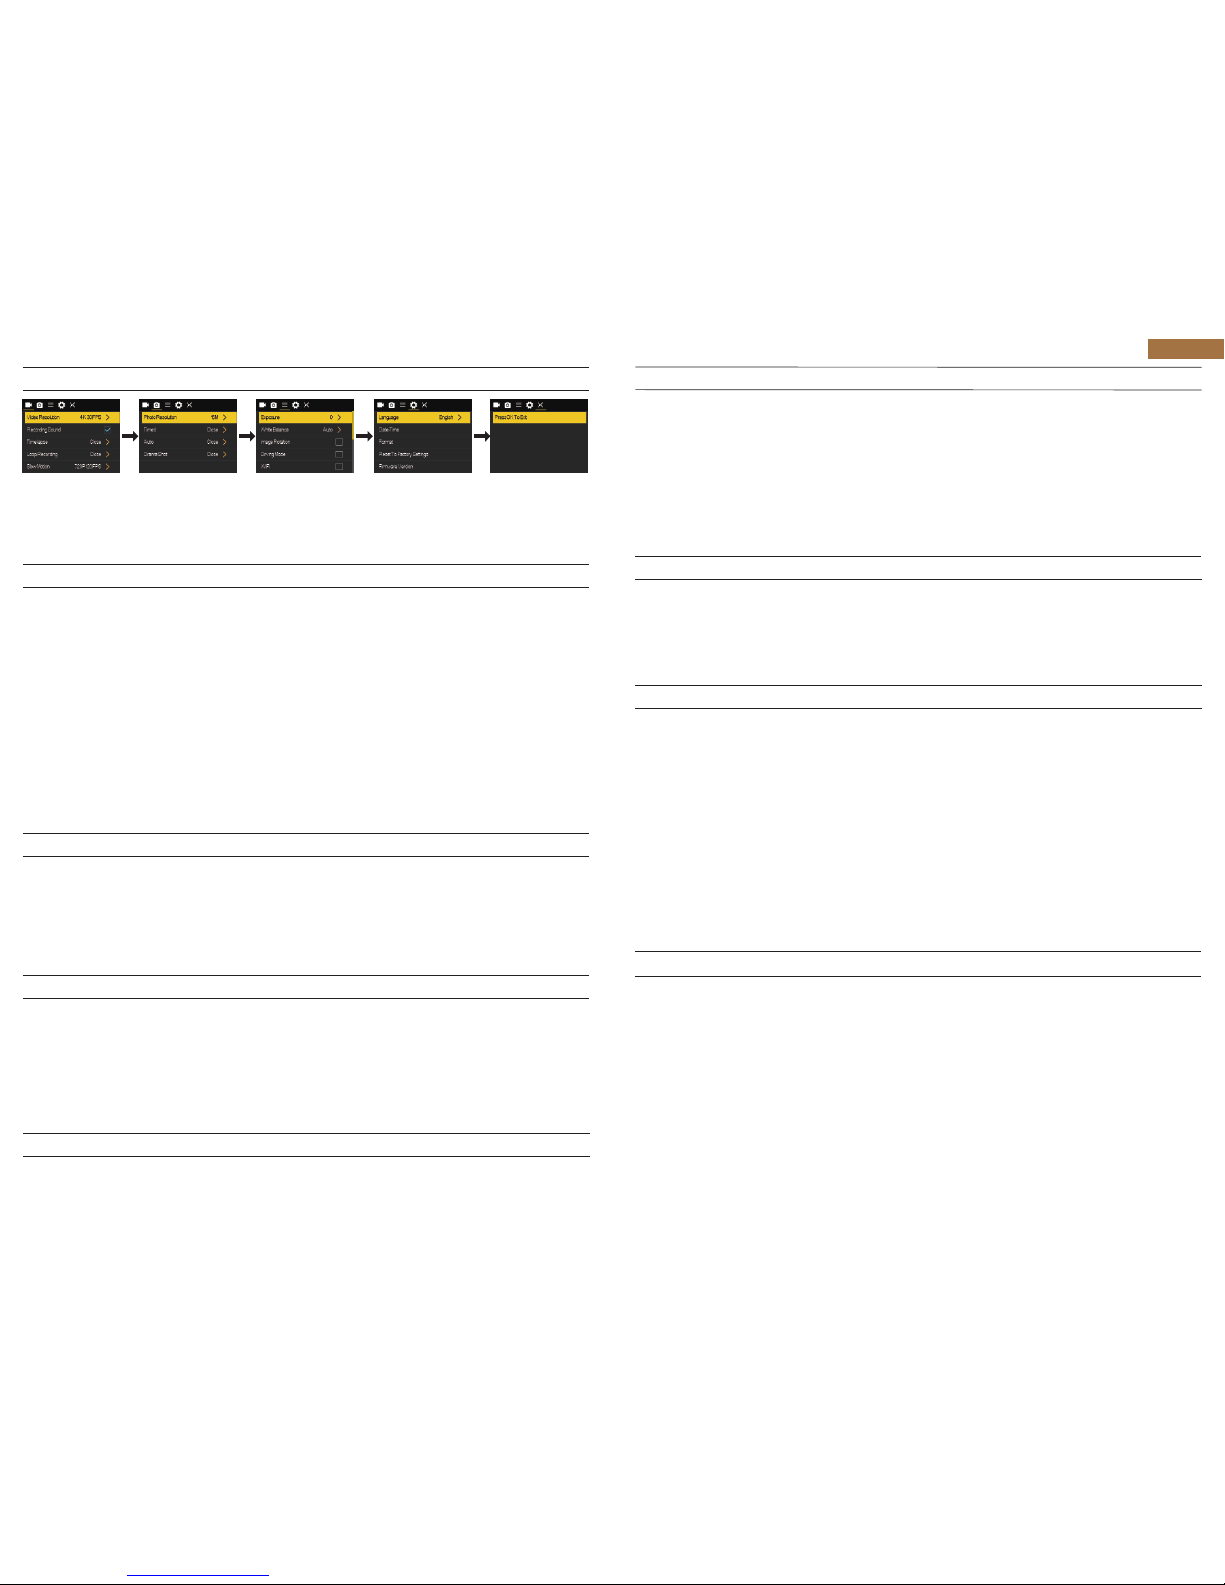
There are 8 modes: Video, Photo, Slow Motion, Playback, Video Setting, Photo Setting,
Camera Setting and General Setting.
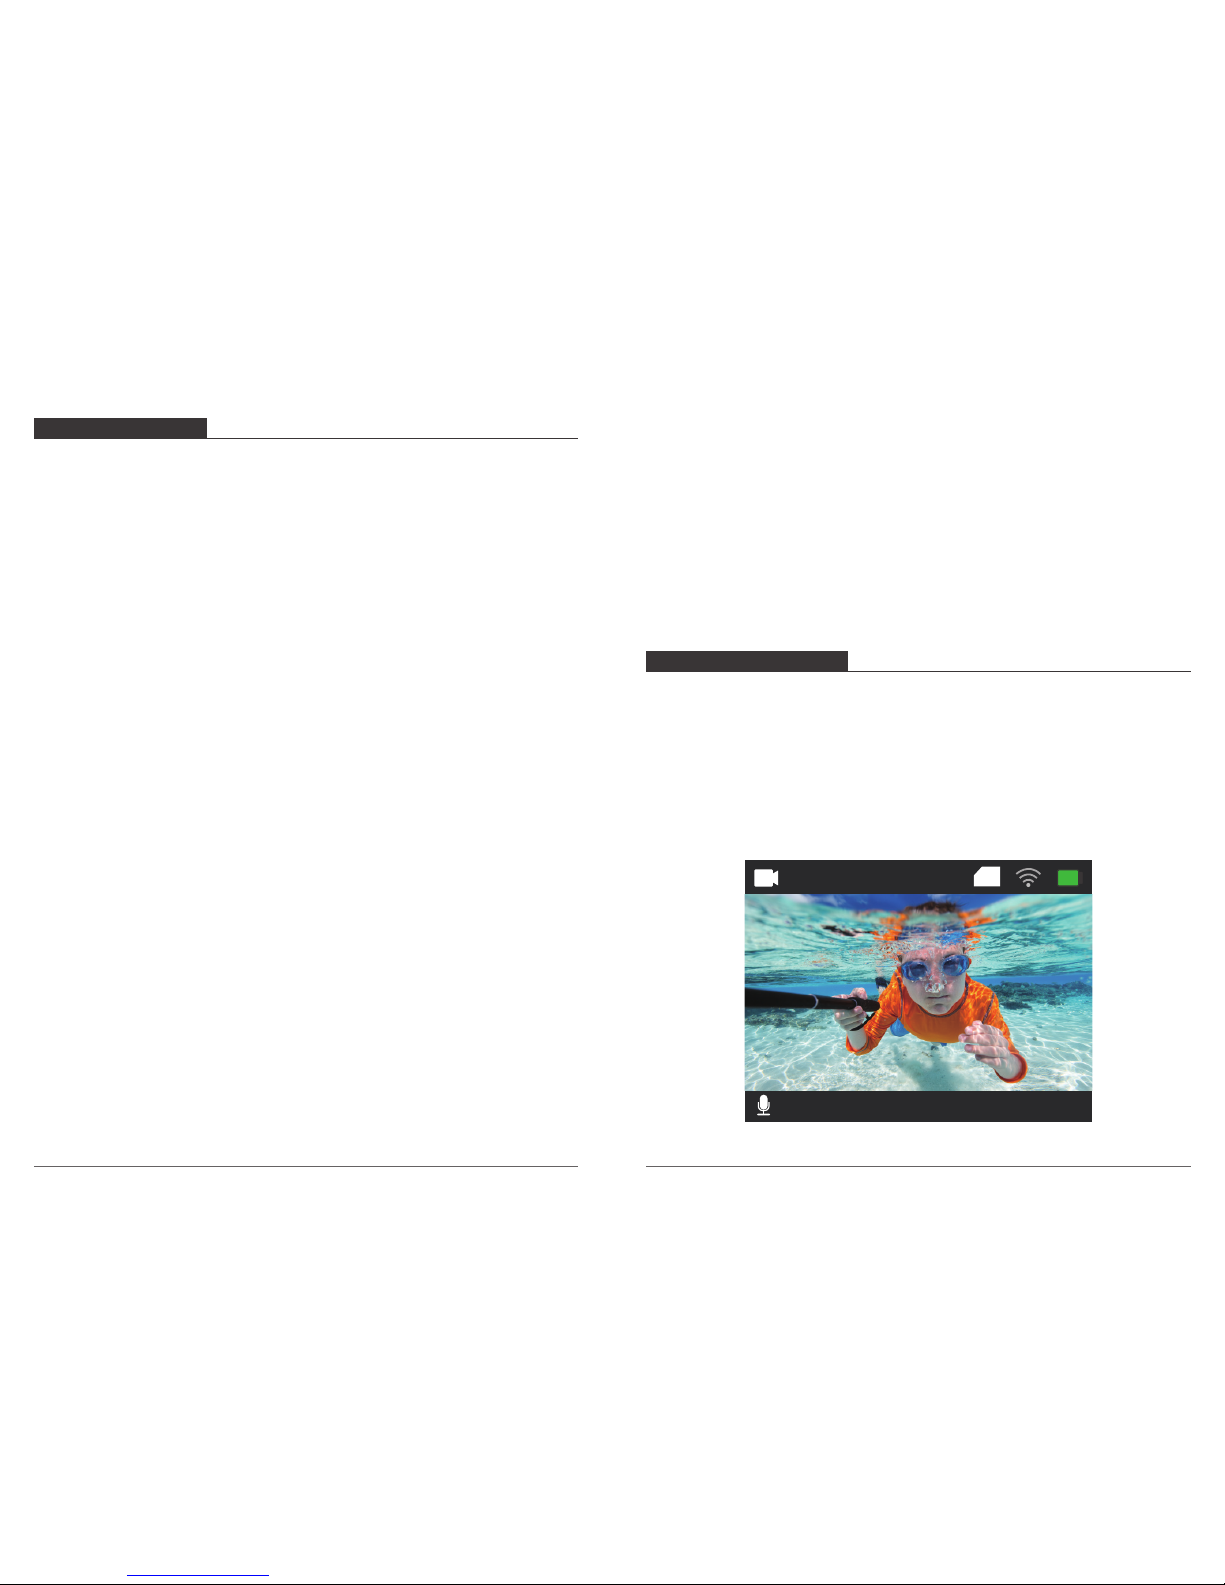
OVERVIEW OF MODES
4K30FPS
2018/10/01 10:09:23
TF
Video Mode
Video Mode is the default mode when you turn on the camera.
In Video Mode, press OK button, the camera starts recording video. Press OK button to
stop recording video.
03
04
Page 5
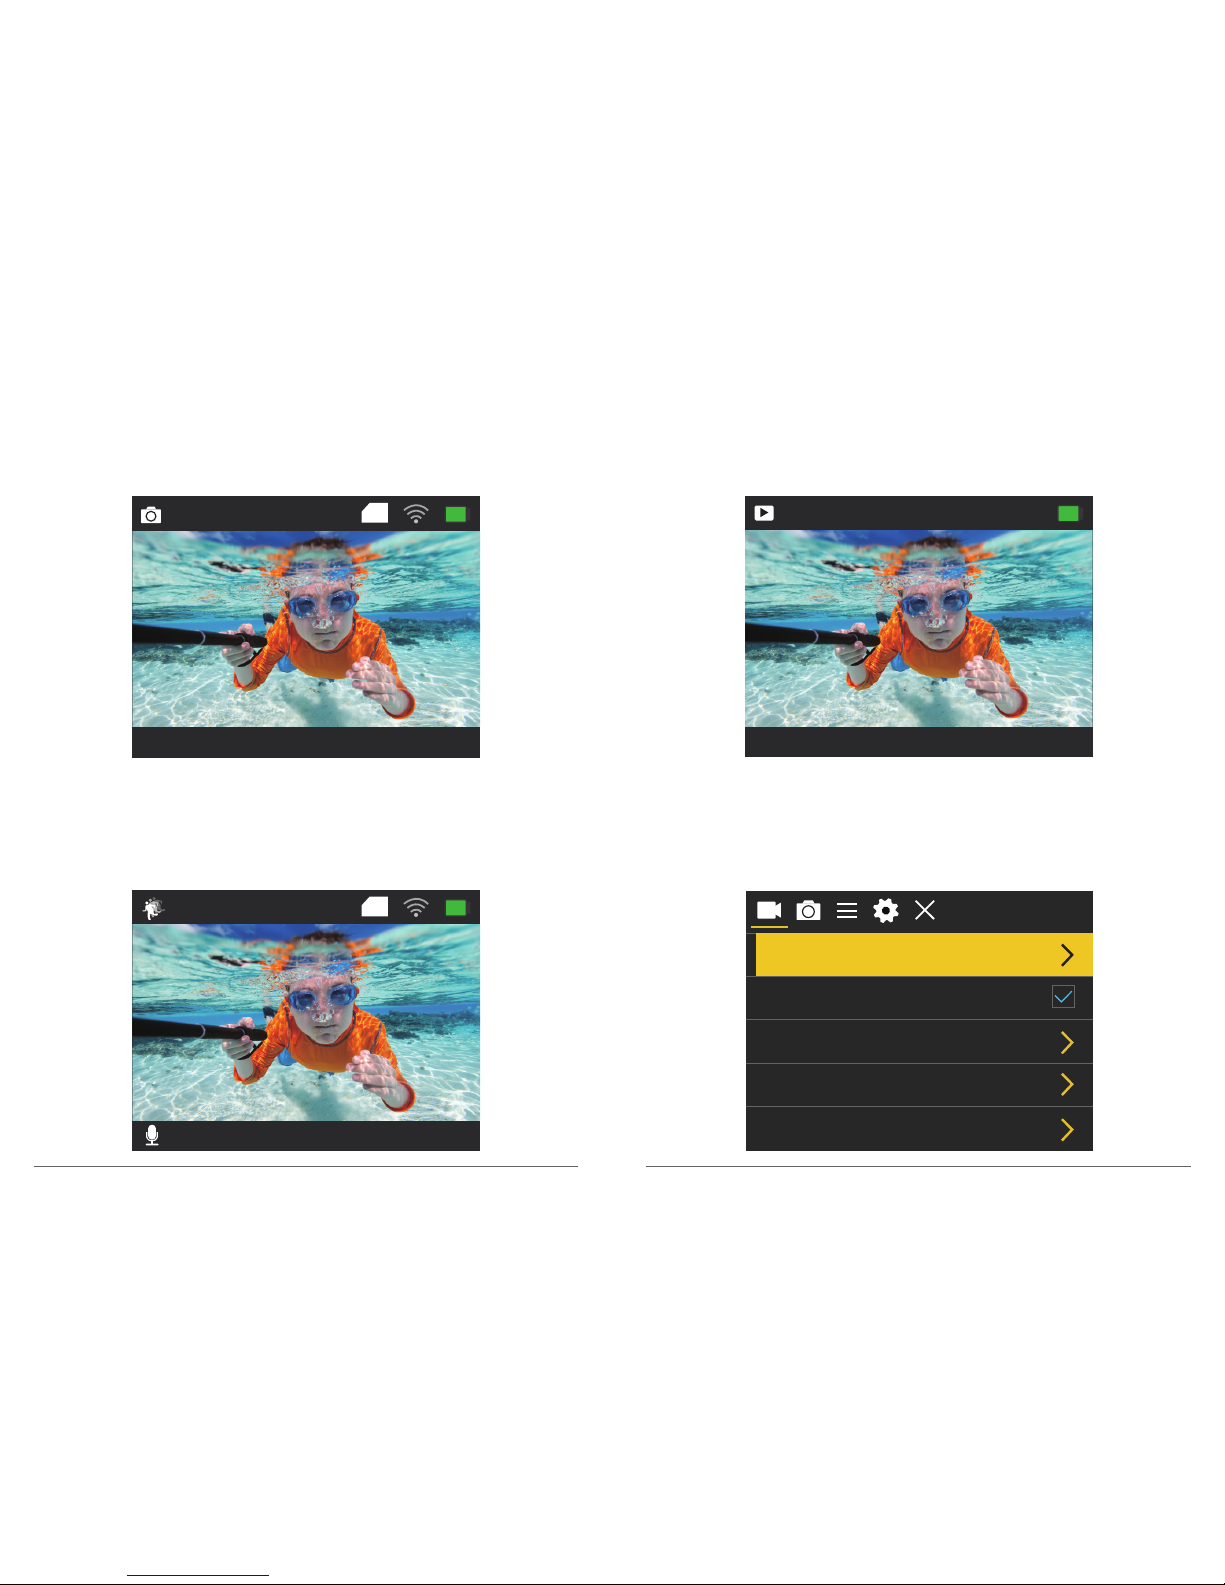
Photo Mode
Press Mode button once to switch to Photo Mode after you turn on camera.
In Photo Mode, press OK button, the camera takes a photo.
Slow Motion Mode
Press Mode button twice to switch to Slow Motion Mode after you turn on camera.
In Slow Motion Mode, press OK button, the camera starts recording slow motion video.
Press OK button to stop recording slow motion video.
16M 4373
2018/10/01 10:11:23
TF
720P120FPS 14.4G
2018/10/01 10:13:23
TF
Playback Mode
Press Mode button several times to switch to Playback Mode.
In Playback Mode, press the Up/ Down button to scroll through video or photo files.
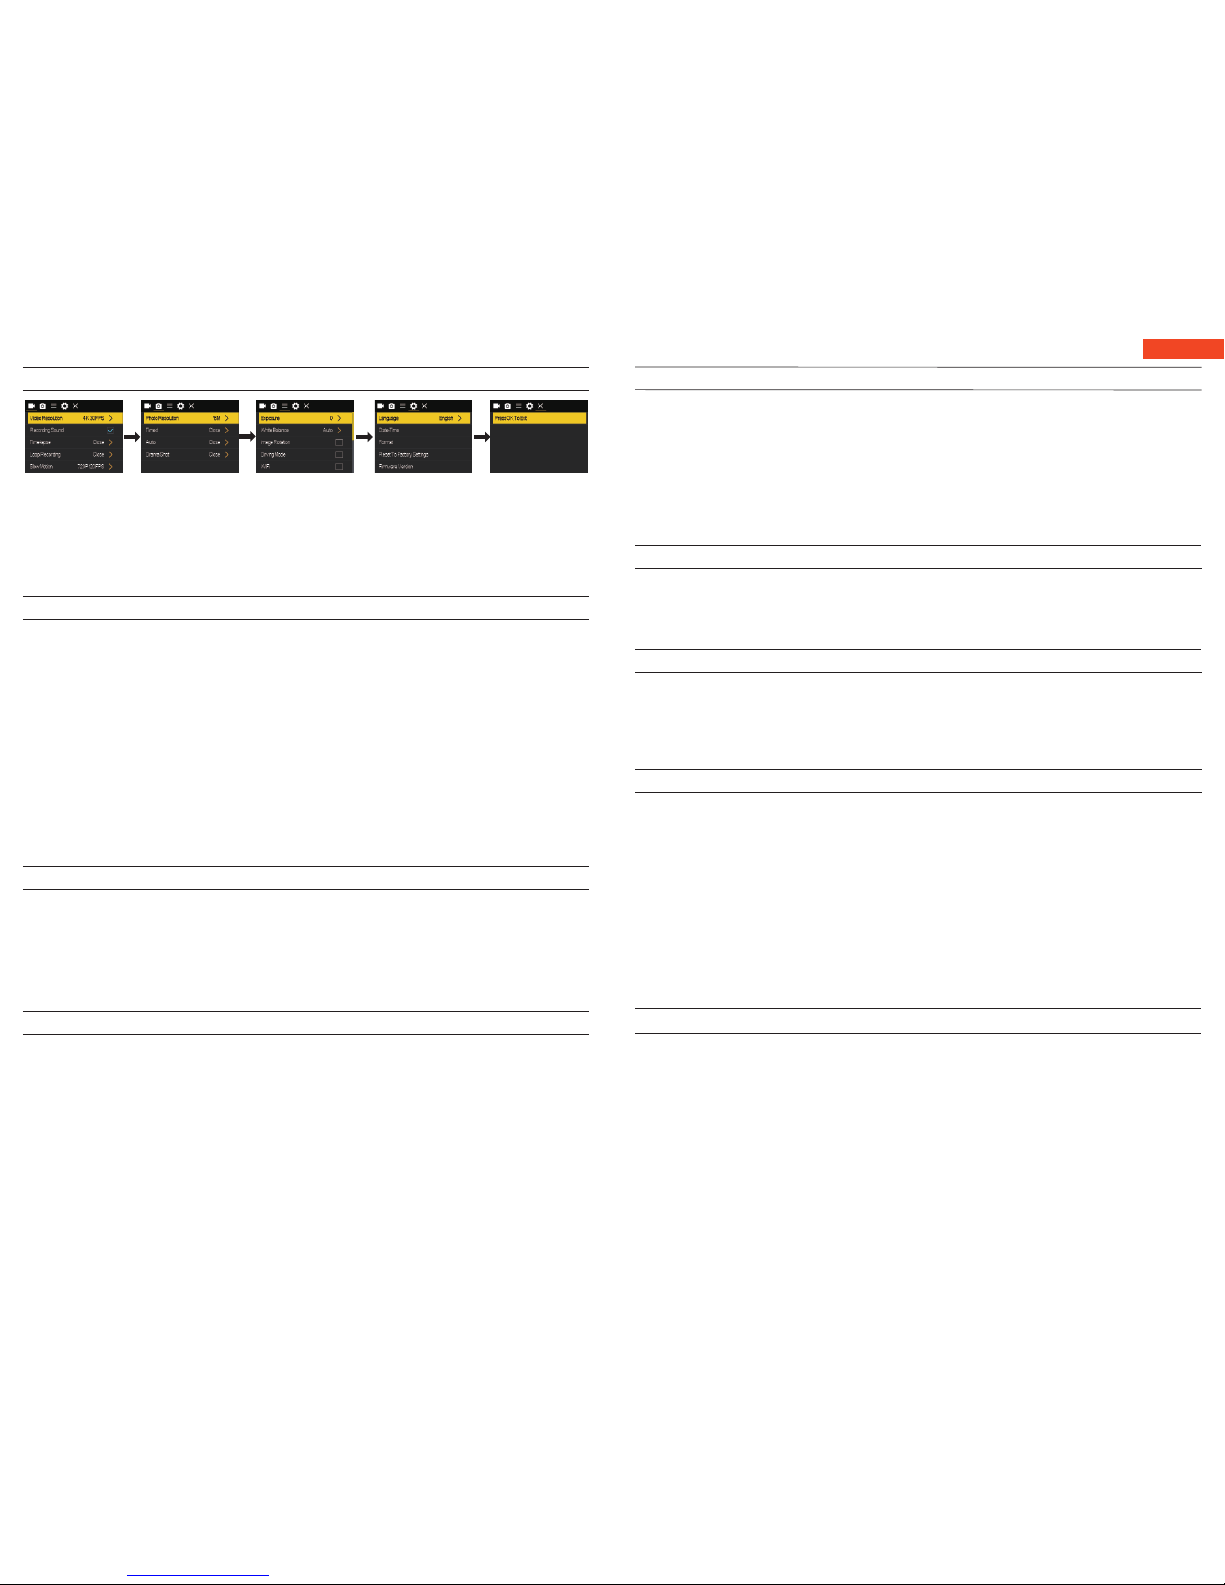
Video Setting Mode
Press Mode button several times to switch to Video Setting Mode. You can change camera
settings in this mode.
00001 /04372
2018/10/01 10:11:23
Video Resolution
Recording Sound
Time-lapse Close
Close
720P 120FPS
Loop Recording
Slow Motion
4K 30FPS
05
06
Page 6
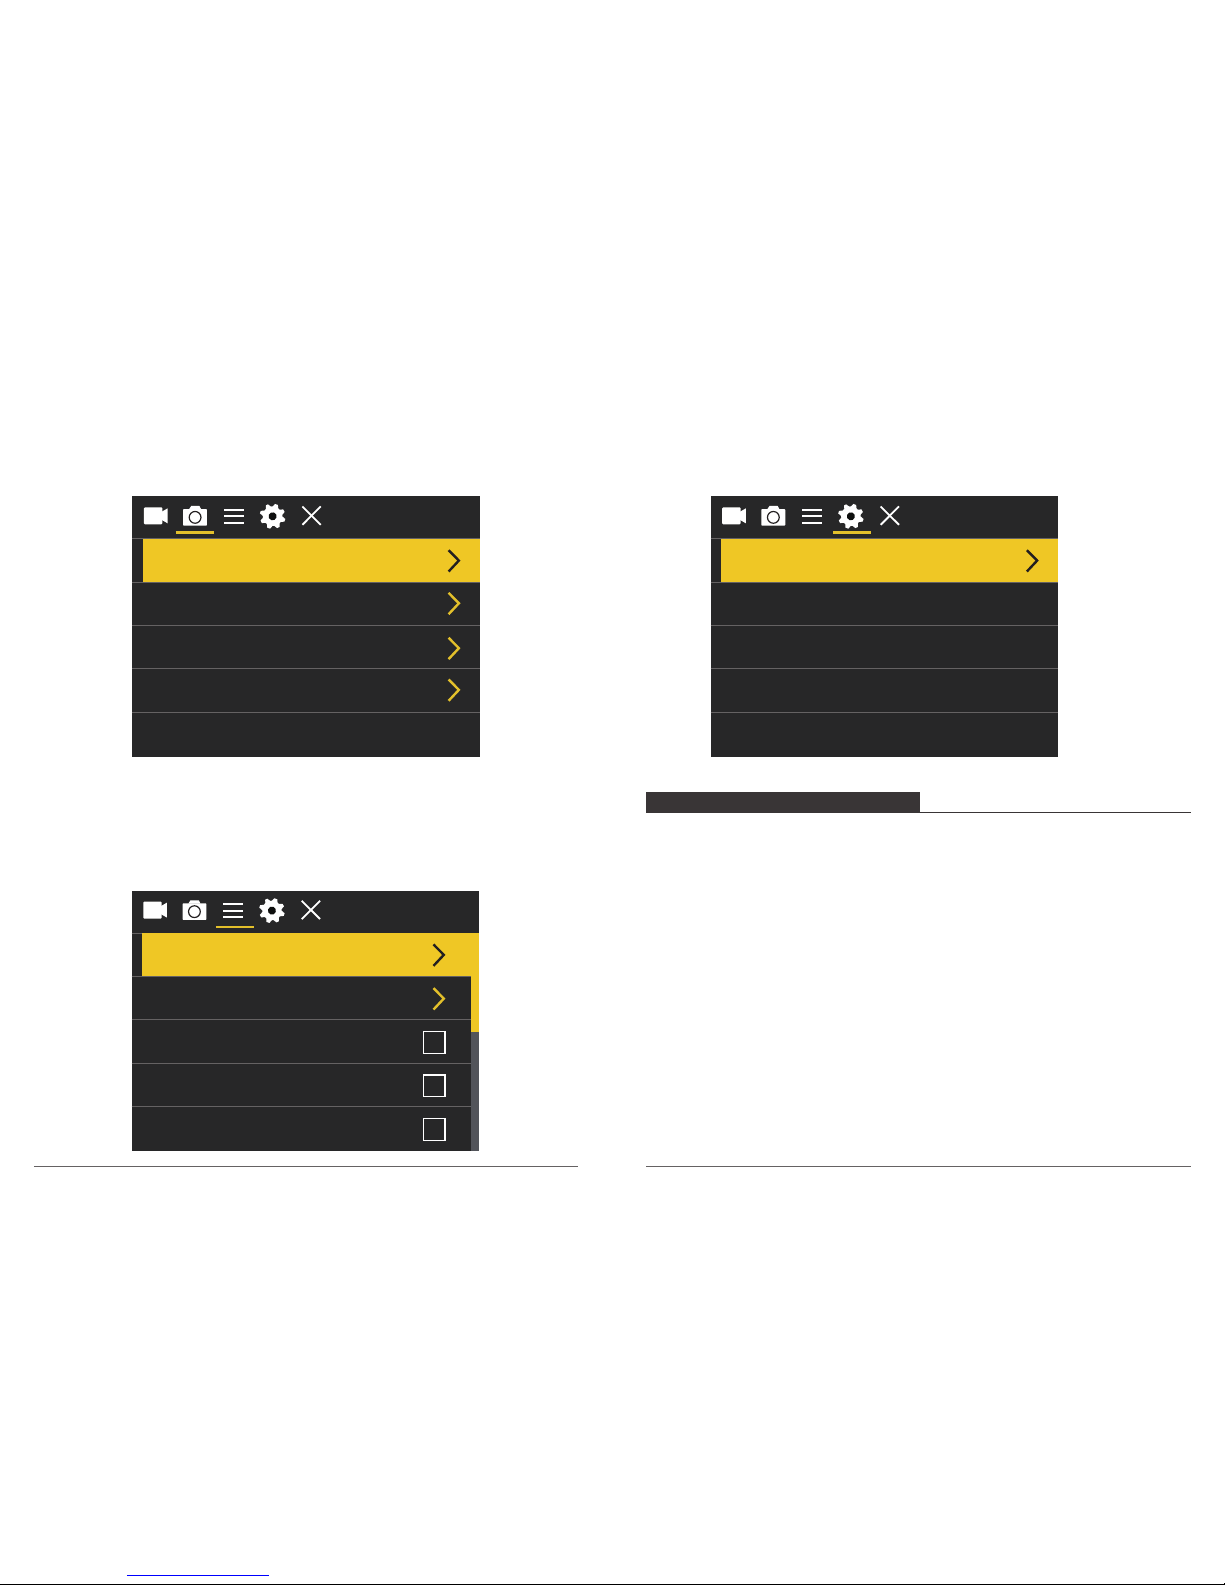
Photo Setting Mode
Press Mode button several times to switch to Photo Setting Mode. You can change camera
settings in this mode.
General Setting Mode
Press Mode button several times to switch to Camera Setting Mode. You can change
General settings in this mode.
Camera Setting Mode
Press Mode button several times to switch to Camera Setting Mode. You can change
camera settings in this mode.
Photo Resolution
Timed
Auto Close
Close
CloseDrama Shot
16M
Exposure
White Balance
Image Rotation
Auto
Driving Mode
WiFi
0
Language
Date-Time
Format
Reset To Factory Settings
Firmware Version
English
CUSTOMIZING YOUR VISION 3
Video Setting
1. Video Resolution: 4K 30FPS, 2.7K 30FPS, 1080P 60FPS, 1080P 30FPS, 720P 120FPS,
720P 60FPS, 720P 30FPS
Default setting is 1080P 60FPS.
2. Recording Sound: On / Off
Default setting is On.
Turn off Recording Sound, the camera does not record sound when you record video.
3. Time-lapse: Close / 0.5s / 1s / 2s / 5s / 10s / 30s / 60s
Default setting is Close.
Time Lapse Photo captures a series of photos at specified intervals. Use this mode to
capture photos of any activity, then choose the best ones later.
Note: Time Lapse Video is captured without audio.
07
08
Page 7

4. Loop Recording: Close / 2minutes / 3minutes / 5minutes
Default setting is Close.
Using Loop Recording, you can continuously record video, but save only the moments that
you want. For example, if you select a 5-minute interval, only the previous 5 minutes are
saved when you press the OK button to stop recording. If you record for 5 minutes and do
not press the OK button to stop recording and save, the camera records a new 5-minute
interval by recording over your previous 5 minutes of footage. When the micro SD card is
full, the new files will cover the old one if loop recording is on.
5. Slow Motion: 720P 120FPS, 1080P 60FPS
Default setting is 720P 120FPS.
Slow motion is an effect in film-making whereby time appears to be slowed down.
Note: Slow motion video is captured without audio.
Photo Setting
1. Photo Resolution: 16M / 12M / 8M / 5M / 2M
Default setting is 16M.
2. Timed: Close / 3S / 5S / 10S / 20S
Default setting is Close.
Timed gives a delay between pressing the OK release and the OK's firing. It is most
commonly used to let photographers to take a photo of themselves (often with family).
3. Auto: Close / 3S / 10S / 15S / 20S / 30S
Default setting is Close.
If you select 3S, this camera takes a photo every 3 seconds automatically.
4. DramaShot: Close, 3P/S, 5P/S, 10P/S
Default setting is Close.
Drama Shot (Burst Photo) captures up to 10 photos in 1 second, so it is perfect for
capturing fast-moving activities.
Camera Setting
1. Exposure: -3, -2, -1, 0, 1, 2, 3
Default setting is 0.
By default, your camera uses the entire image to determine the appropriate exposure level
However, Exposure lets you select an area that you want the camera to prioritize when
determining exposure. This setting is particularly useful in shots where an important region
might otherwise be over- or underexposed.
When you change this setting, the LCD display immediately shows you the effect on your
image. If you change modes, the camera returns to using the entire scene to determine
the correct level of exposure.
2. White Balance: Auto, Sunny, Cloudy, Incandescent Light, Fluorescent Light
Default setting is Auto.
White Balance lets you adjust the color temperature of videos and photos to optimize for
cool or warm lighting conditions. When you change this setting, the LCD display
immediately shows you the effect on your image.
3. WiFi: Off / On
Default setting is Off.
Note: You can also hold and press the Up button to turn on Wi-Fi in video or photo mode.
4. Image Rotation: Off / On
Default setting is Off.
This setting determines the orientation of your video or photos to help you prevent upside
down footage.
5.Driving Mode: Off / On
Default setting is Off.
If you turn on driving mode and connect camera with car cigarette lighter, the camera will
turn on automatically if you start your car and will turn off if you stop your car.
6. Light Source Frequency: Auto, 50Hz, 60Hz
Default setting is Auto.
09
10
Page 8

7. LED Indicator Light: Off / On
Default setting is On.
8. Auto Screensaver: 10s, 20s, 30s, Close
Default setting is 30s.
Turns off the LCD display after a period of inactivity to save battery life. To turn on the LCD
display again, press any button on the camera.
9. Auto Shutdown: 1minutes, 3minutes, 5minutes, Close
Default setting is 3minutes.
Powers off your Vision 3 after a period of inactivity to save battery life.
10. Time Watermark: Off / On
Default setting is On.
If you turn on Time Watermark, this camera adds date stamp to the video and photos you
take.
General Setting
1. Language: 简体中文, 繁體中文, English, 日本語, Pyckий, Deutsch, Français, Italiano,
Español, Polski, Nederlandse, Português, Turkey
Default setting is English.
2. Date-Time: YYYY-MM-DD HH-MM-SS
3. Format: Confirmation will be memory card format? Confirmation / Cancel
To keep your micro SD card in good condition, reformat it on a regular basis. Reformatting
erases all of your content, so be sure to offload your photos and videos first.
4. Reset To Factory Settings: Confirm Reset to Factory Settings? Confirmation / Cancel
This option resets all settings to their default values.
5. Firmware Version
Model: Vision3
Version: 20180203V24
Updated: 180203FXPSD
Manufacturer: DragonTouch
You can check the model, version, updated time and manufacturer of your Vision 3.
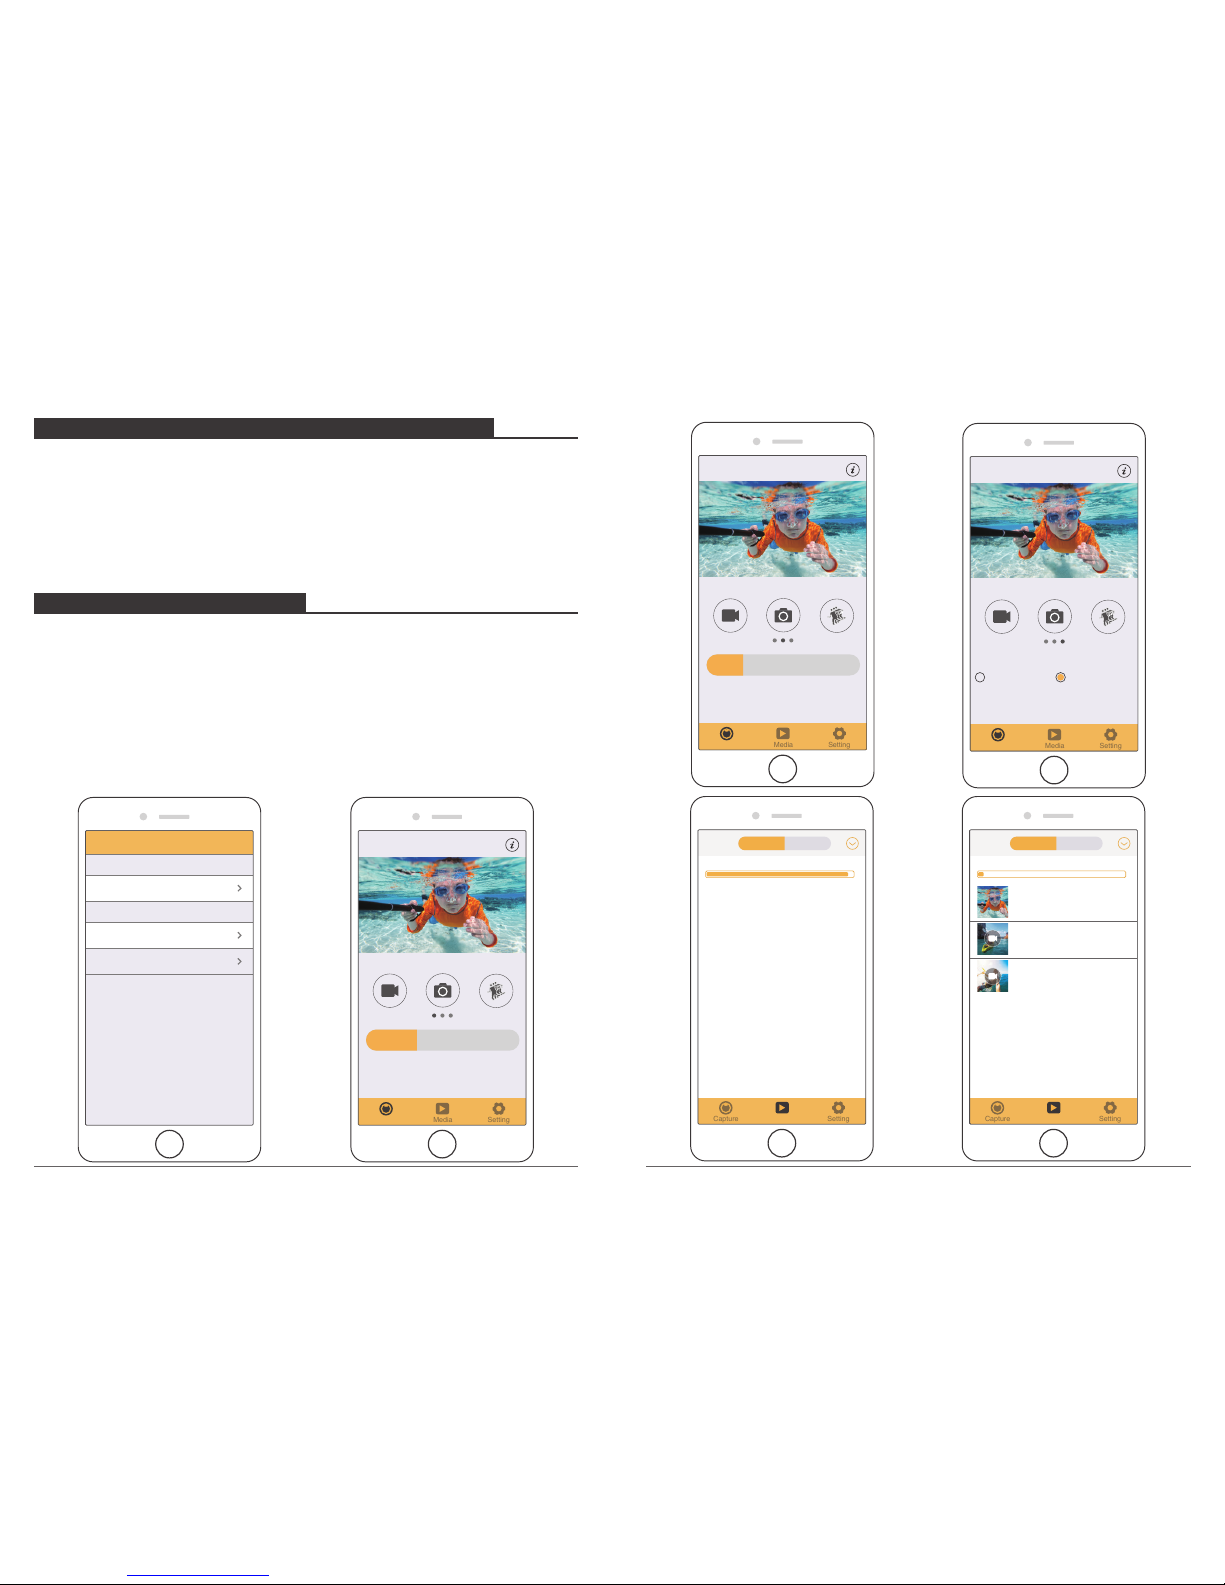
CONNECTING TO THE XDV APP
The XDV app lets you control your camera remotely using a smartphone or tablet.
Features include full camera control, live preview, playback, download, sharing of content
and setting camera.
1. Download XDV app from Google Play or Apple Store.
2. Turn on camera. Press and hold the UP Button for 3 seconds to turn on Wi-Fi.
3. Turn on Wi-Fi of your mobile device, connect to the Wi-Fi SSID "ActionCam".
4. Enter the password “1234567890”.
5. Open the XDV App on your phone or tablet.
Note: This camera does not support iPad tablet.
PLAYING BACK YOUR CONTENT
You can play back your content on the camera’s LCD display, your computer, TV, or
smartphone / tablet.
You can also play back content by inserting the micro SD card directly into a device, such
as a computer or compatible TV. With this method, playback resolution depends on the
resolution of the device and its ability to play back that resolution.
VIEWING VIDEOS AND PHOTOS ON YOUR Vision 3
1. Enter Playback mode. If your micro SD card contains a lot of content, it might take a
minute for it to load.
2. Press the Up / Down button to scroll through the video or photo files.
Note: This camera does not support MAC computer or iPad tablet.
11
12
Page 9
DELETING VIDEOS AND PHOTOS ON YOUR VISION 3
1. Enter Playback mode.
2. Press Up / Down button to scroll through the video or photo files.
3. Press and hold OK button for three seconds. The screen shows ‘’Delete this file?
Confirmation / Cancel.
4. Press Up button then OK button. The selected file will be deleted.
5. To exit Playback mode, press Mode button.
OFFLOADING YOUR CONTENT
OFFLOADING YOUR CONTENT TO A COMPUTER
To play back your video and photos on a computer, you must first transfer these files to a
computer. Transferring also frees up space on your micro SD card for new content.
To offload files to a computer using a card reader (sold separately) and your computer’s
file explorer, connect the card reader to the computer, then insert the micro SD card. You
can then transfer files to your computer or delete selected files on your card. You can also
offload files to a Windows computer using a USB cable.
Note: This camera does not support Mac computer.
Exit
Connected
Action Cam
Saved
Action Cam
connected
iCam-AKASO
offline
WIFI
Setting
Media
Capture
Normal
1080P 60FPS
XDV
Loop
Lapse
2018-10-11 12:20:56
Setting
Media
Capture
Normal
16M
XDV
Time Trail
Auto
2018-10-11 12:22:23
Setting
Media
Capture
720P 90/120FPS
720P 90/120FPS1080P 60FPS
XDV
2018-10-11 12:23:46
Setting
Media
Capture
Available:0.34G Total:11.74G
Phone Device
Setting
Media
Capture
Available:29.67G Total:28.74G
Phone Device
20181011_191059A.MP4
27.65M
20181011_194320A.jpg
557.46K
20181011_191046A.mp4
42.32M
13
14
Page 10

ADJUSTING THE ZOOM LEVEL
The Zoom function lets you adjust how close or far away the subject appears in your
photo. The default is no zoom. Zoom function is available in Video and Photo Mode.
Vision 3 can 4X zoom.
1. Turn on Vision 3.
2. Enter Video or Photo Mode.
3. Press and hold Up or Down button to adjust the zoom level.
REFORMATTING YOUR MICROSD CARD
To keep your micro SD card in good condition, reformat it on a regular basis. Reformatting
erases all of your content, so be sure to offload your photos and videos first.
1. Turn on Vision 3.
2. Enter Camera Setting.
3. Press UP / Down button to find the ‘Format’ option.
4. Press OK button, the screen shows ‘Confirmation will be memory card format?
Confirmation / Cancel.’
5. Press Up button then OK button, then you format your micro SD card successfully.
MAINTENANCE YOUR CAMERA
Follow these guidelines to get the best performance from your camera:
1. For best audio performance, shake the camera or blow on the mic to remove debris
from the microphone holes.
2. To clean the lens, wipe it with a soft, lint-free cloth. Do not insert foreign objects around
the lens.
3. Don’t touch the lens with fingers.
4. Keep the camera away from drops and bumps, which may cause damage to the parts
inside.
5. Keep the camera away from high temperature and strong sunshine to avoid being
damaged.
MAXIMIZING BATTERY LIFE
If the battery reaches 0% while recording, the camera saves the file and powers off.
To maximize battery life, follow these guidelines when possible:
• Turn off Wireless Connections
• Capture video at lower frame rates and resolutions
• Use Screen Saver setting.
OFFLOADING YOUR CONTENT TO SMARTPHONE OR TABLET
1. Open the ‘XDV’ app and tap ‘Action Cam’ .
2. Tap Media icon at the bottom of screen.
3. Tap ‘Device’ at the top of the screen.
4. Tap then tap to select the files you want to download.
5. Tap ‘Confirm’ at the right corner of the bottom screen.
Media
Setting
Media
Capture
Available:29.67G Total:28.74G
Phone Device
20181011_191059A.MP4
27.65M
20181011_194320A.jpg
557.46K
20181011_191046A.mp4
42.32M
Delete
Download
ALL 3 Selected Confirm
Available:29.67G Total:28.74G
Download
Cancel
20181011_191059A.MP4
27.65M
20181011_194320A.jpg
557.46K
20181011_191046A.mp4
42.32M
15
16
Page 11

BATTERY STORAGE AND HANDLING
The camera contains sensitive components, including the battery. Avoid exposing your
camera to very cold or very hot temperatures. Low or high temperature conditions may
temporarily shorten the battery life or cause the camera to temporarily stop working
properly. Avoid dramatic changes in temperature or humidity when using the camera, as
condensation may form on or within the camera.
Do not dry the camera or battery with an external heat source such as a microwave oven
or hair dryer. Damage to the camera or battery caused by contact with liquid inside the
camera is not covered under the warranty.
Do not store your battery with metal objects, such as coins, keys or necklaces. If the
battery terminals come in contact with metal objects, this may cause a fire.
Do not make any unauthorized alterations to the camera. Doing so may compromise
safety, regulator y compliance, performance, and may void the warranty.
WARNING: Do not drop, disassemble, open, crush, bend, deform, puncture, shred,
microwave, incinerate or paint the camera or battery. Do not insert foreign objects into the
battery opening on the camera. Do not use the camera or the battery if it has been
damaged - for example, if cracked, punctured or harmed by water. Disassembling or
puncturing the battery can cause an explosion or fire.
REMOTE
VIDEO
To record Video, verify the camera is in Video mode.
Photo Button
Video Button
Splashproof only, not waterproof
CR2032 BATTERY REPLACEMENT FOR VISION 4 REMOTE
1. Use a 1.8mm Phillips tip screwdriver to remove the 4 screws on the back cover of the
remote, allowing you to open it.
2. Remove another 4 screws on PCB board.
To start recording:
Press the Grey Video Button. The camera will emit one beep and the camera light will
flash while recording.
To stop recording:
Press the Grey Video Button again. The camera will emit one beep and the camera light
will stop flashing while recording.
PHOTO
To capture a photo, verify the camera is in Photo mode.
To take a photo:
Press the Red Photo Button. The camera will emit a camera shutter sound.
17
18
Page 12

3. Lift the PCB board and slide out the battery, as shown in the picture.
Note: Do NOT rotate the PCB board to avoid reversing the camera and video button functions.
4. Install the new battery, keeping the “+” pole facing up.
5. Install all 4 screws back onto the PCB board.
6. Install all 4 screws back into the cover.
Attach your camera to helmets, gear and equipment.
MOUNTING YOUR CAMERA
19
20
Page 13

CONTACT US
For any inquiries, issues or comments concerning our products, please send E-mail to
the address below, and we will respond as soon as possible.
E-mail: cs@tabletexpress.com
US customer service line: (301)670-7335
8am-5pm EST Monday-Friday (except holidays)
21
22
English
Page 14

MOUNTING YOUR CAMERA
ACCESSORIES
Attach your camera to helmets, gear and equipment.
23 24
Battery & Charger
Handle Bar/
Pople Mount
Mount 1
Mount 2
Mount 3
Mount 5
Clip 1 Clip 2 Helmet Mounts Lens Cloth Tethers
Mount 6
Mount 7
Bandages
Protective
Backdoor
USB Cable
Mount 4
Page 15

Schalten Sie die Kamera EIN und drücken Sie mehrmals die Strom / Modus-Taste, um durch die
Kamera-Modi und Einstellungen zu schalten. Die Modi erscheinen in der folgenden
Reihenfolge:
ZUM ANFANG
ÜBERSICHT
HALLO
Herzlichen Glückwunsch zu Ihrer neuen Kamera! Dieses Bedienerhandbuch hilft beim
Verständnis der Grundkenntnisse, wie man die unglaublichsten Momente des Lebens
aufzeichnen kann!
Zum EINSCHALTEN:
Drücken Sie die Strom / Modus-Taste.
Zum AUSSCHALTEN:
Drücken und halten Sie die Strom / Modus-Taste.
GRUNDKENNTNISSE
MicroSD Schlitz
Micro USB-Port
Langsame Bewegung Wiedergabe
Impostazioni
Video Foto
Shuttler/Auswahlstaste
25
26
EINSTELLUNGEN
Video: Video aufzeichnen
Foto: Ein Einzelbild aufnehmen
Langsame Bewegung: Eine Aktion für dramatisches Effekt machen.
Wiedergabe: Schauen Sie Ihr Video in einem schnellen Modus.
Impostazioni: Die Kamera Einstellungen für das Video Lösung, Video Modus,
Foto Lösung, Foto Modus, Belichtung, Sprache, uws. einrichten.
Strom-Taste
Mikrofon
Micro HDMI-PortLinse
Deutsch
Datum / Uhrzeit
Datum:Y / M / D Zeit:H, M, S
Drücken Sie die Nach unten und OK-Taste Zeit Auswahl
Sprache
English/German/French/Spanish/Italitan/Portuguese/
Chinese/Japanese/Russian/Korean
Video
Foto
1080P/60FPS, 1080P/30FPS, 720P/120FPS, 720P/60FPS,
720P/30FPS, 2.7K/30FPS, 4K/30FPS
Video Auflösung
Zyklus Rekord 2minutes, 3minutes, 5minutes, Close
Zeitraffer Abschalten, 0.5s , 1s, 2s , 5s, 10s, 30s, 60s
Langsame Bewegung 720P/120FPS, 1080P/60FPS
Ton vom Rekord Abschalten/Einschalten
Foto-Auflösung 16M/12M/8/M/5M/2M
In bestimmter Zeit
Fotografieren
Abschalten, 3S, 5S, 10S, 20S
Automatisches
Fotografieren
Abschalten, 3S, 10S, 15S, 20S, 30S
Abschalten, 3P/S , 5P/S, 10P/S
Burst Modus/Drama Schuss
Weißabgleich Auto, Sonnig, Bewölkt, Glühlicht, Fluoreszenzlicht
Belichtung 0/1/2/3/-3/-2/-1
Bildrotation
Abschalten/Einschalten
Fahrzeugmodus
Abschalten/Einschalten
WLAN
Abschalten/Einschalten
Automatische Ausschaltung
1minutes, 3minutes,5minu tes,Abschalten
Automatischer
Bildschirmschoner
Abschalten
10S, 20S, 30S
Zeit Wasserzeichen Abschalten/Einschalten
FunktionSektion Specifikation
Power / Mode Button
Power / Mode Button
Power / Mode Button
Power / Mode Button
Page 16

Drücken Sie die Auslöser / Auswahl-Taste, um das Auswahlmenü zu öffnen. Drücken Sie
mehrmals auf die Strom / Modus-Taste, um die Optionen anzuzeigen und drücken Sie die
Auslöser / Auswahl-Taste, um die gewünschte Option zu wählen. Oder benutzen Sie die Nach
oben/Wiedergabe oder Nach Unten/Wi-Fi-Taste, um die verschiedenen Optionen anzuzeigen.
Um Video aufzuzeichnen, prüfen Sie, ob die Kamera im Video-Modus ist. Falls das Video
Symbol nicht auf dem LCD Bildschirm Ihrer Kamera erscheint, drücken Sie mehrmals auf die
Strom / Modus-Taste, bis es erscheint.
Zum Beginn der Aufzeichnung:
Drücken Sie die Auslöser / Auswahl-Taste. Die Kamera gibt einen Piepton ab und die Kamera-
Status-Leuchte blinkt während der Aufzeichnung.
Zum Beenden der Aufzeichnung:
Drücken Sie die Auslöser / Auswahl-Taste. Die Kamera-Status-Leuchte blinkt nicht mehr und
die Kamera gibt einen Piepton ab, um das Ende der Aufzeichnung anzuzeigen.
Diese Kamera stoppt die Aufzeichnung automatisch, wenn die Batterie leer ist. Ihr Video wird
gespeichert, bevor sich die Kamera AUSSCHALTET.
VIDEO-MODUS
Um ein Foto aufzunehmen, prüfen Sie, ob die Kamera im Foto-Modus ist. Falls das Foto
Symbol auf dem LCD Bildschirm nicht erscheint, drücken Sie mehrmals auf die Strom /
Auswahl-Taste, bis es erscheint.
Ein Foto aufnehmen:
Drücken Sie die Auslöser / Auswahl-Taste. Die Kamera gibt einen Kamera-Auslöser-Ton ab.
FOTO-MODUS
Um eine Serie im Modus Langsame Bewegung und die Kamera im Modus Langsame
Bewegung zu erfassen. Wenn das Modus Langsame Bewegung im LCD Bildschirm von Ihrer
Kamera nicht zeigt, drücken Sie den Schlüssel Energie / Modus kontinuierlich, bis es wieder
scheint.
Eine Serie von Modus Langsame Bewegung machen:
Drücken Sie den Schlüssel Verschluss / OK Auswählen. Die Kamera wird emittieren, um das
Video auszulösen.
Langsame Bewegung Modus
WIEDERGABE
Videos und Fotos wiedergeben
1. Prüfen Sie, ob die Kamera in Kamera-Modi ist.
2. Drücken Sie die Nach oben / Wiedergabe-Taste, um das Wiedergabe-Menü zu öffnen.
3. Drücken Sie mehrmals die Strom/Modus-Taste, um im Video und Foto zu suchen.
4. Drücken Sie die Auslöser / Auswahl-Taste, um die gewünschte Option zu wählen.
5. Benutzen Sie die Nach oben/Wiedergabe-Taste oder die Nach unten / Wi-Fi-Taste, um die
verschiedenen Optionen zu suchen.
6. Drücken Sie die Auslöser / Auswahl-Taste.
7. Um zum Wiedergabe-Menü zurückzukehren, drücken Sie die Strom/Modus-Taste.
8. Zum Beenden, halten Sie die Nach oben / Wiedergabe-Taste für 2 Sekunden.
SPEICHER / MICRO SD-KARTE
Diese Kamera ist kompatibel mit 8 GB, 16 GB und 32 GB Kapazität microSD, microSDHC und
micro SDXC Speicherkarten. Sie müssen eine microSD Karte mit einer Geschwindigkeitsklasse
10 benutzen.
Wir empfehlen den Gebrauch von Marken-Speicherkarten für eine maximale Zuverlässigkeit
unter starken Vibrationsbedingungen.
Hinweis: Formatieren Sie die SD-Karte vor dem Foto
BATTERIE
Aufladen der Batterie
1. Verbinden Sie die Kamera mit einem Computer oder einem USB-Netzgerät.
2. Die Ladestatusleuchte ist EINGESCHALTET, während die Batterie geladen wird.
3. Die Ladestatusleuchte schaltet AUS, wenn die Batterie voll geladen ist.
* Ladedauer: 3-5 Stunden
27 28
KAMERA APP und WIFI
Verbinden mit der “XDV” App
Mit der “XDV” App kontrollieren Sie Ihre Kamera aus der Ferne mithilfe eines Smartphones
oder eines Tablets. Die Merkmale umfassen eine vollständige Kamerasteuerung, Live Vorschau,
Foto-Wiedergabe und Teilen von ausgewähltem Inhalt und mehr.
1. Laden Sie die “XDV” App auf Ihr Smartphone oder Tablet bei Google Play oder im Apple App
Store.
2. Drücken Sie die Strom / Modus-Taste, um die Kamera EINZUSCHALTEN.
3. Stellen Sie sicher, dass sich Ihre Kamera im Kamera- oder Videomodus befindet.
4. Halten Sie die Taste UP 3 Sekunden lang gedrückt, um WI-FI einzuschalten.
5. In Ihrem Smartphone oder Tablet Wifi-Einstellungen, verbinden Sie mit dem Netzwerk
namens "ActionCam".
6. Geben Sie das Kennwort „1234567890“ ein.
7. Öffnen Sie die SportLook App auf Ihrem Smartphone oder Tablet.
Deutsch
Kontaktieren Sie Uns
Bei Fragen, Problemen oder Kommentaren zu unseren Produkten senden Sie bitte ein E-Mail
an die untenstehende Adresse oder rufen Sie uns an. Wir werden so schnell wie möglich
antworten.
E-Mail: cs@akasotech.com
Page 17

ENCIENDA la cámara y pulse repetidamente el Botón de Encendido/Modo para navegar por los
ajustes de la cámara. Los modos aparecerán en el siguiente orden:
COMENZANDO
ESQUEMA
HOLA
¡Felicidades por su nueva cámara! ¡Este manual de usuario le ayudará a aprender los conceptos
básicos de capturar los momentos de la vida más increíbles!
Para ENCENDER:
Pulse el Botón de Encendido / Modo.
Para APAGAR:
Pulse y mantenga el Botón de Encendido / Modo.
INFORMACIÓN BÁSICA
En cámara lenta Reproducir
Ajustes
Vídeo Foto
29
30
Vídeo
Foto
Resolución de Vídeo
1080P/60FPS,1080P/ 30FPS,720P/120FP S,720P/60FPS,
720P/ 30FPS,2.7K/30FPS,4K/30FPS
FunctionSection Specifications
Grabación en bucle
2minutes, 3minutes,5minu tes,Close
Time Lapse Close, 0.5s , 1s, 2s , 5sv, 10s, 30s, 60s
En cámara lenta 720P 120FPS 1080P 60FPS
Grabando el sonido Close/Open
Resolución de la foto 16M/12M/8/M/5M/2M
Fotografía cronometrada Close, 3S, 5S, 10S,20S
Fotografía automática Close, 3S, 10S, 15S, 20, 30S
Close, 3P/S , 5P/ S, 10P/S
Modo de ráfaga / Disparo
de drama
Balance de blancos Auto, Sunny, Cloudy
Exposición 0/1/2/3/-3/-2/-1
Rotación de imagen Close/Open
Modo de conducción Close/Open
Modo WiFi Close/Open
Apagado automático 1minutes,
3minutes,5minutes,Close
Desconexión automática 1minutes,3minutes, 5minutes,Close
Marca de agua del tiempo
Close/Open
Fecha y Hora
Idioma
English/German/French/Spanish/ Italian/Portuguese/Chinese/
Japanese/Russian/Korean
Fecha: M / D/ Y
Hora: H, M, S Appuyez sur le Botón Abajo y OK
Time Selection
Vídeo: Grabar vídeo.
Foto: Tomar una sola foto.
En cámara lenta: Captura en cámara lenta la acción para efectos dramáticos.
Reproducir: Ver su video en modo rápido.
Ajustes: Ajuste la configuración de la cámara para la resolución de vídeo, el modo de vídeo, la
resolución de foto, el modo de foto, el idioma y más
Español
Micrófono
Ranura Micro SD
Puerto Micro USB
otón Encendido / Modo
Obturador / Botón de Selección
Lente Puerto Micro HDMI
Power / Mode Button
Power / Mode Button
Power / Mode Button
Power / Mode Button
Page 18

Pulse el Botón Obturador / Seleccionar para entrar en el menú de ajustes. Presione
repetidamente el Botón Encendido / Modo para navegar por las opciones y presione el Botón
Obturador / Seleccionar para elegir la opción que desee. O use los botones Arriba / Reproducir
o Abajo / Wifi para ver las distintas opciones.
AJUSTES
Para grabar un Vídeo, compruebe que la cámara está en Modo Vídeo. Si el icono de vídeo de
la pantalla LCD de su cámara no se muestra, pulse el Botón Encendido / Modo repetidamente
hasta que aparezca.
Para comenzar a grabar:
Pulse el Botón Obturador / Seleccionar. La cámara emitirá un bip y las Luces de Estado de la
Cámara parpadearán mientras graba.
Para parar de grabar:
Pulse el Botón Obturador / Seleccionar. Las Luces de Estado de la Cámara dejan de parpadear
y la cámara emite un bip para indicar que ha dejado de grabar.
Esta cámara deja de grabar automáticamente cuando se acaba la batería. Su Vídeo se guardará
antes de que la cámara se APAGUE.
MODO DE VÍDEO
Para tomar una Foto, compruebe que la cámara está en Modo Foto. Si el icono de Foto no
aparece en la pantalla LCD de su cámara, pulse el Botón Encendido / Modo repetidamente
hasta que aparezca.
Para tomar una foto:
Pulse el Botón Obturador / Seleccionar. La cámara emitirá un sonido de obturador.
MODO DE FOTO
Para capturar una serie en Cámara Lenta, compruebe que la cámara está en Modo De Cámara
Lenta.
Si no aparece el icono de Cámara Lenta en la pantalla LCD de la cámara, pulse repetidamente el
Botón de Encendido / Modo hasta que aparezca.
Para tomar una serie en Cámara Lenta:
Pulse el botón Obturador / Seleccionar OK. La cámara emitirá el obturador de la cámara del
vídeo.
Mode De En Cámara Lenta
REPRODUCIR
Reproducir Vídeos y Fotos
1. Compruebe que la cámara está en modos de Cámara.
2. Pulse el Botón Arriba / Reproducir para entrar en el menú Reproducir.
3. Pulse repetidamente el Botón Encendido / Modo para navegar en Vídeo y Foto.
4. Presione el Botón Obturador / Seleccionar para elegir la opción deseada.
5. Use el Botón Arriba / Reproducir o Abajo / Wi-Fi para navegar por las distintas opciones.
6. Pulse el Botón Obturador / Seleccionar.
7. Para volver al menú Reproducir, pulse el Botón Encendido / Modo.
8. Para salir, mantenga pulsado el Botón Arriba / Reproducir durante dos segundos.
ALMACENAMIENTO/TARJETAS MICRO SD
Esta cámara es compatible con tarjetas de memoria microSD, micro SDHC, y micro SDXC de
8GB, 16GB y 32 GB de capacidad. Debe usar una tarjeta micro SD con velocidad de transmisión
de Clase 10. Le recomendamos que use tarjetas de memoria de marca para mayor fiabilidad en
actividades de altas vibraciones.
BATERÍA
Cargar la batería:
1. Conecte la cámara a un ordenador o a una fuente de alimentación USB.
2. La Luz de Estado de Carga permanece ENCENDIDA mientras la batería se carga.
3. La luz de Estado de Carga se apagará cuando la batería este completamente cargada.
*Tiempo de carga: 3-5 horas
31
32
APLICACIÓN DE CÁMARA y WIFI
Conectando a la Aplicación “XDV”
La Aplicación “XDV” le permite controlar su cámara de forma remota utilizando un
smartphone o tableta. Características como control total de la cámara, vista previa en directo,
reproducción de fotos y compartir o seleccionar contenido y más.
1. Descargar la Aplicación iSmart DV a tu smartphone o tableta en Google Play o Apple App
Store.
2. Pulse el Botón Encendido/Modo para encender la cámara.
3. Asegúrese de que la cámara está en modos de Cámara.
4. Pulse el Botón Abajo / Wi-Fi para encender el Wi-Fi*.
5. En la configuración Wi-Fi de su smartphone o tableta, conéctese a la red denominada
" ActionCa".
6. Introduzca la contraseña “1234567890”.
7. Abra la Aplicación SportLook en su smartphone o tableta.
Español
Contacte con Nosotros
Para cualquier pregunta, incidencia o comentario sobre nuestros productos, por favor, envíe un
correoelectrónico a la siguiente dirección o llámenos. Responderemos lo antes posible.
Correo electrónico: cs@akasotech.com
Page 19
Allumez l’appareil photo et appuyez à plusieurs reprises sur le Bouton Power / Mode pour
naviguer dans les modes et paramètres de l’appareil photo. Les modes apparaitront dans
l’ordre suivant :
POUR COMMENCER
PRÉSENTATION
BONJOUR
Félicitations pour votre nouvel appareil photo ! Cette notice d’utilisation vous aidera à apprendre
les bases pour capturer les moments les plus incroyables de la vie !
Pour ALLUMER:
Appuyez sur le Bouton Power / Mode.
Pour ÉTEINDRE:
Appuyez sur le Bouton Power / Mode.
LES ESSENTIELS
Ralenti Playback
Paramètres
Vidéo Photo
33 34
Vidéo
Foto
Résolution Vidéo
1080P/60FPS,1080P/ 30FPS,720P/120FP S,720P/60FPS,
720P/ 30FPS,2.7K/30FPS,4K/30FPS
FunctionSection Specifications
Enregistrement en Boucle
2minutes, 3minutes,5minu tes,Close
Retardement Close, 0.5s , 1s, 2s , 5sv, 10s, 30s, 60s
Ralenti 720P 120FPS 1080P 60FPS
Enregistrement Sonore Close/Open
Résolution Photo 16M/12M/8/M/5M/2M
Photographie
Chromométrée
Close, 3S, 5S, 10S,20S
Photographie Automatique
Close, 3S, 10S, 15S, 20, 30S
Close, 3P/S , 5P/ S, 10P/S
Mode de rafale/
Trajectoire d’image
Balance blanche Auto, Sunny, Cloudy
Exposition 0/1/2/3/-3/-2/- 1
Rotation d’Image Close/Open
Mode de Conduite Close/Open
Mode de WIFI Close/Open
Arrêt Automatique 1minutes,
3minutes,5minutes,Close
Extinction Automatique 1minutes,3minutes, 5minutes,Close
Filigrane Horaire Close/Open
Date & Heure
Langues
English/German/French/Spanish/ Italian/Portuguese/Chinese/
Japanese/Russian/Korean
Date:M / D/ Y
Heure:H :M, S AM/PM Appuyez sur Bouton bas et OK
Video: Registra Video.
Photo: Scatta foto singola.
Ralenti: Capture d’effet dramatique.
PlayBack: Regardez votre vidéo en mode rapide.
Paramètres: Adjustez le réglage de la camera pour la résolution de vidéo, la résolution de
photo, le mode de photo, l’exposition, le langage et plus encore.
Time Selection
Français
Microphone
Fente MicroSD
Port Micro HDMI
Port Micro USB
Bouton Power / Mode
Obturateur / Sélection Bouton
Objectif
Power / Mode Button
Power / Mode Button
Power / Mode Button
Power / Mode Button
Page 20
Appuyez sur le Bouton Vitesse d’Obturation / Sélectionner pour entrer dans le menu des
paramètres.
Appuyez à plusieurs reprises sur le bouton Power / Mode pour naviguer à travers les options,
et appuyez sur le Bouton Vitesse d’Obturation / Sélectionner pour sélectionner l’option choisie.
Ou utilisez le Bouton Haut / Playback ou Bas / Wi-Fi pour naviguer à travers les différentes
options.
PARAMÈTRES
Pour enregistrer une vidéo, vérifiez que l’appareil photo est en mode Vidéo. Si l’icône Vidéo su
r l’écran LCD de votre appareil photo ne s’affiche pas, appuyez sur le Bouton Power / Mode à
plusieurs reprises jusqu’à son apparition.
Pour commencer à enregistrer :
Appuyez sur le Bouton Vitesse d’Obturation / Sélectionner. L’appareil photo émettra un bip et
la Lumière de l’Appareil Photo flashera durant l’enregistrement.
Pour arrêter l’enregistrement :
Appuyez sur le Bouton Vitesse d’Obturation / Sélectionner. La Lumière de l’Appareil Photo
cessera de flasher et l’appareil photo émettra un bip pour indiquer que l’enregistrement est
arrêté.
Cet appareil photo arrête automatiquement d’enregistrer lorsque la batterie est vide. Votre
Vidéo sera sauvegardée avant que l’appareil photo ne s’éteigne
MODE VIDÉO
Pour prendre une Photo, vérifiez que l’appareil photo est en mode Photo. Si l’icône Photo sur
l’écran LCD de votre appareil photo ne s’affiche pas, appuyez sur le Bouton Power / Mode à
plusieurs reprises jusqu’à son apparition.
Pour prendre une photo:
Appuyez sur le Bouton Vitesse d’Obturation / Sélectionner. L’appareil photo émettra un son
pour la vitesse d’obturation.
MODE PHOTO
Para capturar una serie en Cámara Lenta, compruebe que la cámara está en Modo De Cámara
Lenta.
Si no aparece el icono de Cámara Lenta en la pantalla LCD de la cámara, pulse repetidamente
el botón de Encendido/Modo hasta que aparezca.
Para tomar una serie en Cámara Lenta:
Pulse el botón Obturador / Seleccionar OK. La cámara emitirá el obturador de la cámara del
vídeo.
Mode De En Cámara Lenta
PLAYBACK
Revoir des Photos et des Vidéos:
1. Vérifiez que l’appareil photo est sur Modes Appareil Photo.
2. Appuyez sur le Bouton Haut / Playback pour entrer dans le menu Playback.
3. Pressez à plusieurs reprises le Bouton Power / Mode pour naviguer dans les Photos et Vidéos.
4. Appuyez sur le Bouton Vitesse d’Obturation / Sélectionner pour sélectionner l’option désirée.
5. Utilisez le Bouton Haut / Playback u Bas / Wi-Fi pour naviguer à travers les différentes options.
6. Appuyez sur le Bouton Vitesse d’Obturation / Sélectionner.
7. Pour retourner au menu Playback, appuyez sur le bouton Power / Mode.
8. Pour sortir, appuyez sur le Bouton Haut / Playback pendant deux secondes.
MÉMOIRE / CARTES MICROSD
Cet appareil photo est compatible avec les cartes mémoires microSD, microSDHC, et
microSDXC de capacité de 8GB, 16GB et 32GB. Vous devez utiliser une carte microSD avec une
Class 10 speed. Nous recommandons d’utiliser les cartes mémoires de marque pour une
fiabilité maximale lors d’activités à hautes vibrations.
BATTERIE
Recharger la Batterie:
1. Connectez l’appareil photo à un ordinateur ou une connexion USB.
2. La Lumière de Recharge reste sur ON lors de la recharge de la batterie.
3. La Lumière de Recharge s’éteint lorsque la batterie est pleine.
*Temps de Recharge: 3-5 heures
35 36
APP APPAREIL PHOTO ET WIFI
Connecter à l’App XDV
L’App “XDV” vous permet de contrôler votre appareil photo à distance avec un smartphone ou
unetablette. Elle inclut un contrôle total de l’appareil photo, l’aperçu live, la lecture de photo et
le partage de contenu sélectionné, et plus.
1. Téléchargez l’App iSmart DV sur votre smartphone ou tablette sur Google Play ou Apple App
Store.
2. Appuyez sur le Bouton Power / Mode pour allumer l’appareil photo.
3. Assurez-vous que l’appareil photo est sur les modes de l’appareil photo.
4. Appuyez sur le Bouton Bas / Wi-Fi pour allumer le Wi-Fi*.
5. Dans vos paramètres Wifi de votre smartphone ou tablette, connectez-vous au réseau appelé
"ActionCam".
6. Entrez le mot de passe “1234567890”.
7. Ouvrez l’App SportLook sur votre smartphone ou votre tablette.
Français
Contactez-Nous
Pour toute demande, problème, ou avis sur nos produits, nous vous prions d'adresser un email
ou de nous appeler aux coordonnées ci-dessous. Nous vous répondrons aussitôt que possible.
E-mail: cs@akasotech.com
Page 21
Accendere e premere ripetutamente il tasto Alimentazione / Modo per passare attraverso i
modi e le impostazioni della fotocamera. I modi appariranno nel seguente ordine:
PER COMINCIARE
PANORAMICA
CIAO
Congratulazioni per la tua nuova fotocamera! Questo manuale ti aiuterà a imparare le
funzionalità di base per catturare i più incredibili momenti della tua vita!
Per accendere:
Premere il tasto Alimentazione / Modo.
Per spegnere:
Premere e tenere premuto il Tasto Alimentazione / Modo.
FONDAMENTI
Movimento Lento Riproduzione
Impostazioni
Video Foto
Microfono
Porta Micro SD
Porta Micro USB
Tasto Alimentazione / Modo
Pulsante Scatto / Selezione
37 38
Vidéo
Foto
Risoluzione video
1080P/60FPS,1080P/ 30FPS,720P/120FP S,720P/60FPS,
720P/ 30FPS,2.7K/30FPS,4K/30FPS
FunctionSection Specifications
Registrazione in
ciclo continuo
2minutes, 3minutes,5minu tes,Close
Differita Close, 0.5s , 1s, 2s , 5sv, 10s, 30s, 60s
Movimento Lento 720P 120FPS 1080P 60FPS
Registrazione del suono Close/Open
Risoluzione Foto 16M/12M/8/M/5M/2M
Fotografia Temporizzata Close, 3S, 5S, 10S,20S
Fotografia Automatica Close, 3S, 10S, 15S, 20, 30S
Close, 3P/S , 5P/ S, 10P/S
Modalità Ripresa Continua
/Dramma Ripresa
Bilanciamento Bianco A uto, Sunny, Cloudy
Esposizione 0/1/2/3/-3/-2/-1
Rotazione Immagine Close/Open
Modalità Guida Close/Open
Modalità WiFi Close/Open
Spegnimento Auto 1minu tes,
3minutes,5minutes,Close
Chiusura Auto 1minutes,3minutes, 5minutes,Close
Tempo filigrana Close/Open
Data & Ora
Lingua
English/German/French/Spanish/ Italian/Portuguese/Chinese/
Japanese/Russian/Korean
Date:M / D/ Y
Ora:H :M, S AM/PM Premere il Tasto Giù e OK
Time Selection
Video: Registra Video.
Foto: Scatta foto singola.
Movimento Lento: Catturare azione di effetto drammatico.
Riproduzione: Guarda il video in una modalità rapida.
Impostazioni: Regolare l'impostazione della fotocamera per la risoluzione video, modalità
video, risoluzion foto, modalità foto, esposizione, lingua e altri
Italiano
Porta Micro HDMI
Obiettiv
Power / Mode Button
Power / Mode Button
Power / Mode Button
Power / Mode Button
Page 22
Premere il Tasto Scatto / Selezione per accedere al menu impostazioni. premere ripetutamente
il tasto Alimentazione / Modo per passare attraverso le opzioni e premere il Tasto Scatto /
Selezione per selezionare l’opzione desiderata. Oppure usare il Tasto Su/Riproduzione o Giù /
Wi-Fi per passare attraverso le varie opzioni.
IMPOSTAZIONI
Per registrare un Video, verificare che la videocamera sia in Modo Video. Se non appare l’icona
Video sullo schermo LCD della videocamera premere ripetutamente il Tasto Alimentazione /
Modo finché non appare.
Per avviare la Registrazione:
Premere il Tasto Scatto / Selezione. La videocamera emetterà un beep e le Luci di Stato della
Videocamera cominceranno a lampeggiare con la registrazione.
Per interrompere la Registrazione:
Premere il Tasto Scatto / Selezione. Le Luci di Stato della Videocamera smetteranno di
lampeggiare e la videocamera emetterà un beep per indicare che la registrazione è stata
interrotta.
Questa videocamera smette automaticamente di registrare quando la batteria è scarica. Il Video
verrà salvato prima che la videocamera si spenga.
MODO VIDEO
Per scattare una Foto, verificare che la fotocamera sia in Modo Foto. Se non appare l’icona Foto
sullo schermo LCD della fotocamera premere ripetutamente il Tasto Alimentazione / Modo
finché non appare.
Per scattare una foto:
Premere il Tasto Scatto / Selezione. La fotocamera emetterà il suono dello scatto.
MODO FOTO
Per catturare serie in Movimento Lento, verifica la fotocamera nella Modalità Movimento Lento.
Se l'icona Movimento Lento sullo schermo LCD con la vostra fotocamera non è visibile,
premere il pulsante di Accensione/Modalità più volte fino a quando non appare.
Per scattare una serie di Movimento Lento:
Premere il pulsante di Scatto / Selezione OK. La fotocamera emetterà fotocamera per scattare il
video.
MODO Movimento Lento
RIPRODUZIONE
Riproduzione di Video e Foto:
1. Controllare che la Fotocamera sia in Modi Fotocamera.
2. Premere e tenere premuto il Tasto Su / Riproduzione per accedere al menu Riproduzione.
3. Premere e tenere premuto il Tasto Su / Riproduzione per accedere al menu Riproduzione.
4. Premere il Tasto Scatto / Selezione per selezionare l’opzione desiderata.
5. Usare il Tasto Su / Riproduzione o Giù / Wi-Fi per passare attraverso le varie opzioni.
6. Premere il Tasto Scatto / Selezione.
7. Per tornare al Menu Riproduzione, premere il Tasto Alimentazione / Modo.
8. Per uscire, tenere premuto il Tasto Su / Riproduzione per due secondi.
ARCHIVIO / MICRO SD CARD
Questa fotocamera è compatibile con card di memoria microSD, microSDHC e microSDXC da
8GB, 16GB, e 32GB. Dovete usare un microSD card con una gamma di velocità Classe 10.
Raccomandiamo di usare card di memoria di marca, per la massima affidabilità in attività ad
alta-vibrazion.
BATTERIA
Ricarica della Batteria:
1. Collegare la fotocamera a un computer o a una banca di energia USB.
2. La Luce di Stato di Ricarica rimane ACCESA mentre la batteria si sta ricaricando.
3. La Luce di Stato di Ricarica si SPEGNE quando la batteria sarà completamente carica.
*Tempo di ricarica: 3-5 ore
39 40
APP FOTOCAMERA e WIFI
Collegamento alla App XDV
La App “XDV” vi permette di controllare la fotocamera a distanza usando uno smartphone o un
tablet. Le caratteristiche includono completo controllo della fotocamera, anteprima dal vivo,
riproduzione foto e condivisione del contenuto selezionato e altro ancora.
1. Scaricare la App SportLook sul proprio smartphone o tablet da Google Play o dall’Apple App
Store.
2. Premere il Tasto Alimentazione/Modo per accendere la fotocamera.
3. Controllare che la Fotocamera sia in Modi Fotocamera.
4. Premere il Tasto Giù/Wi-Fi per accedere il Wi-Fi.*
5. Nelle impostazioni dello smartphone o tablet Wifi, collegarsi alla rete denominata
“ActionCam”.
7. Aprire la App SportLook sul proprio smartphone o tablet.
Italiano
Contatto US
Per qualsiasi domanda, problemi o commenti riguardo i nostri prodotti, si prega di contattarci
mandando una mail all’indirizzo sottostante o telefonando al recapito indicato. Risponderemo
il prima possibile.
E-mail: cs@akasotech.com
Page 23
カメラの電源を入れ、連続して電源/モードボタンを押すと、カメラモードと設定が切り替わりま
す。モードは次の順に表示されます:
はじめ に
概要
こんに ちは 。
新しいカメラをお買い上げいただき、ありがとうございます!このユーザーマニュアルでは
人生の最も素晴らしい瞬間を保存する基本的な方法をお教えいたします!
電源を入れる:
電源/モードボタンを押します。
電源を切る:
電源/モードボタンを長押しします。
基礎
スローモーション 再生する 設定ビデオ 写真
41 42
ビデオ: ビデオの撮影
写真:単一写真の撮影
スローモーション:
劇的な効果を得るためのキャプチャ。
再生する:クイックモードで動画を表示する。
設定:
ビデオ解像度、ビデオモード、写真解像度、写真モード、露出、言語などのカメラ設定を調
整する。
セクション 機能
ビデオ
写真
仕様
ビデオ解像度
ループ録音
2分間、3分間、5分間、閉じる
時間の経過
スローモーション 720P / 120FPS 1080P/ 60FPS
録音 閉じる/ 開く
写真の解像度
タイミングのとれた写真 閉じる, 3s, 5s, 10s, 20s
オート写真 閉じる, 3s, 10s, 15s, 20s, 30s
バーストモード/ドラマ
ショット
閉じる, 3P/S , 5P/S, 10P/S
ホワイトバランス 自動、晴れ、曇り、白熱灯、蛍光灯
画像回転 閉じる/開く
運転モード 閉じる/開く
WIFI モード 閉じる/開く
オートパワーオフ 1分間、3分間、5分間、閉じる
オートシャットダウン 1分間、3分間、5分間、閉じる
時間透かし 閉じる/開く
日付:Y / M / D
時刻: H:M, S 付の下に、OKボタンを押します。
時間選択
日付時刻
暴露 0/1/2/3/-3/-2/-1
言語
English/German/French/Spanish/ Italian/Portuguese/Chinese/
Japanese/Russian/Korean
1080P/60FPS,1080P/ 30FPS,720P/120FP S,720P/60FPS,
720P/ 30FPS,2.7K/30FPS,4K/30FPS
閉じる, 0.5s , 1s, 2s , 5s, 10s, 30s, 60s
16M/12M/8/M/5M/2M
日本語
マイクロフォン
電源/モードボタン
シャッター/選択ボタン
マイクロS D スロット
マイクロU SB スロット
レンズ
マイクロHDMIスロット
Power / Mode Button
Power / Mode Button
Power / Mode Button
Power / Mode Button
Page 24

電源/モードボタンを押して、設定メニューに入ります。
電源 / モードボタン を繰り返し 押してオプ ションを切り替え、シャッター/セレクトボタンを押して希
望のオプションを選択します。
または、ダウン/Wi-Fiボタンを使用して、さまざまなオプションを切り替えることができます。
設定
ビデオを撮影するにはカメラがビデオモードになっていることを確認してください。ビデオアイコ
ンがカメラのLCD画面に表示されていない場合は、表示されるまで電源/モードボタンを押して
ください。
撮影を開始するには:
シャッター/選択ボタンを押します。カメラから1回ビーッという音がして、撮影中はカメラ状態ライ
トが点灯します。
撮影を停止するには:
シャッター/選択ボタンを押します。カメラ状態ライトが消え、撮影が停止されたことを通知するビ
ーッという音がカメラから1回します。
このカメラは充電がなくなると自動的に撮影を停止します。ビデオはカメラの電源が切れる前に保
存されます。
ビデオモード
写真を撮影するにはカメラが写真モードになっていることを確認してください。写真アイコンがカメ
ラのLCD画面に表示されていない場合は、表示されるまで電源/モードボタンを押してください。
写真を撮影するには:
シャッター/選択ボタンを押します。カメラからシャッター音が聞こえます。
写真モード
スローモーションシリーズをキャプチャするには、カメラがスローモーションモードであることを確
認します。カメラの液晶画面にスローモーションアイコンが表示されていない場合は、電源/モー
ドボ タンが 表示され るまで 繰り返し押しま す。
スローモーションシリーズを取るには:
シャッター/選択OKボタンを押します。カメラはビデオをシャッターで放します。
スローモーションモード
再生
ビデオや写真の再生
1.カメラが再生モードであることを確認します。
2.ダウン/Wifiボタンを繰り返し押して、ビデオと写真を繰り返します。
3.シャッター/選択OKボタンを押して、希望するオプションを選択します。
4.ダウン/WiFiボタンを使用して、さまざまなオプションを繰り返し表示します。
ストレ ー ジ
このカメラには容量が8GB、16GB、32GBのマイクロSD、マイクロSDHC、マイクロSDXCが使用可
能です。クラス10評価のマイクロSDカードを使用してください。振動の多い操作でも安心してご
利用いただけるよう有名なブランドのメモリーカードの使用をおすすめします。
このカメラは8Gから32GBまでのMicroSDカードに対応しています。
バッテリー
バッテリー の交換:
1.カメラをコンピューターまたはUSB電源に接続します。
2.バッテリーの充電中は充電状態ライトがオンになります。
3.バッテリーの充電が完了すると充電状態ライトがオフになります。
*充電時間:3-5時間
43 44
カメラアプリ
XDVアプリとの接続
XDVアプリでスマートフォンやタブレットを使ってカメラを遠隔から操作できるようになります。す
べてのカメラコントロールやライブプレビュー、写真再生、選択した内容の共有、その他の機能が
含まれます。
1.GooglePlayまたはAppleAppStoreからスマートフォンやタブレットにXDVアプリをダウンロ
ードします。
2.電源/モードボタンを押して、カメラの電源を入れます。
3. カメラがカメラモード になっていることを確認します。
4.カメラの電源を入れ、上キーを長(3秒間)押してWIFIを開きます。
5.スマートフォンやタブレットのWi-Fi設定で「ActionCam」とシリアル番号のネットワークに接続
します。
6.パスワードには「1234567890」と入力します。
7.iSmartDVアプリをスマートフォンやタブレットで開きます。
日本語
お問い合わせ
当社の製品に関するお問い合わせ、問題、コメントについては、下記アドレスまでEメールをお送り
いただくか、当社までお電話ください。私たちは可能な限り早く対応いたします。
E-mail: cs@akasotech.com
 Loading...