

Page 1

USER
MANUAL
Vision 2 Action Camera
Page 2

Your Vision2 Black
Getting Started
Overview of Modes
Customizing Your Vision 2
Connecting to The PPShow DV App
Playing Back Your Content
Deleting Videos and Photos on Your Vision 2
Offloading Your Content
Reformatting Your Microsd Card
Maintenance Your Camera
Maximizing Battery Life
Battery Storage and Handling
Remote
Mounting Your Camera
Contact US
1
3
4
8
11
12
12
12
14
15
15
15
17
18
20
CONTENTS
Page 3
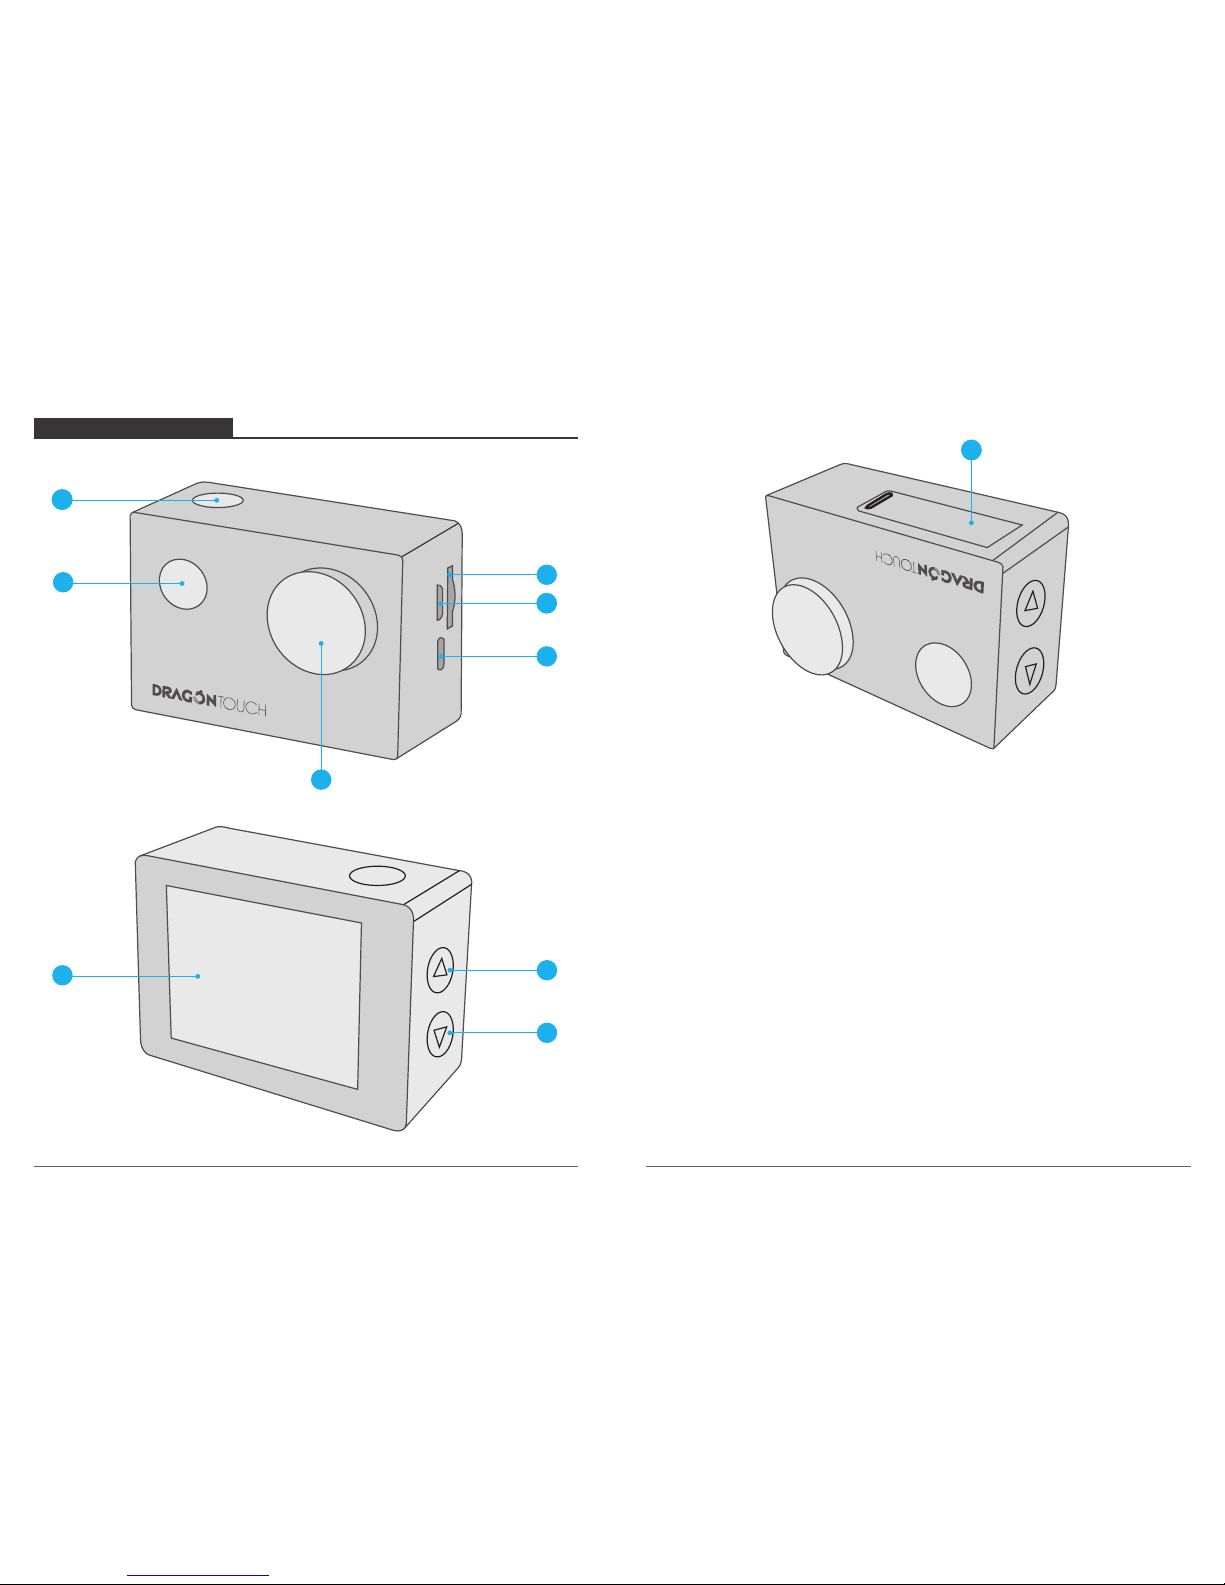
YOUR VISION2 BLACK
01
02
1
2
3
144
5
6
8
9
7
1410
1. Shutter / Select Button
2. Power / Mode / Exit Button
3. MicroSD Slot
4. Micro USB Port
5. Micro HDMI Port
6. Lens
7. Screen
8. Up / WiFi Button
9. Down Button
10. Battery Door
Page 4
GETTING STARTED
OVERVIEW OF MODES
Welcome to your Dragon Touch Vision 2. To capture video and photos, you need a micro
SD card (sold separately).
MICRO SD CARDS
Use brand name memory cards that meet these requirements:
• micro SD, micro SDHC, or micro SDXC
• Class 10 or UHS-I rating
• Capacity up to 32GB (FAT32)
Note: Please format the micro SD card first in this camera before using. To keep your micro
SD card in good condition, reformat it on a regular basis. Reformatting erases all of
your content, so be sure to offload your photos and videos first.
POWERING ON + OFF
To Power On:
Press and hold the Mode button for three seconds. The camera beeps while the camera
status light is on. When information appears on the LCD display or the camera status
screen, your camera is on.
To Power Off:
Press and hold the Mode button for three seconds. The camera beeps while the camera
status light is off.
SWITCHING MODE
To Switch Mode:
Turn on the camera, press Mode button to switch the mode.
EXITING MODE
To Exit Mode:
Press the Mode button to exit mode
TURNING ON / OFF Wi-Fi
To turn on Wi-Fi
Turn on camera, press Up button to turn on Wi-Fi.
To turn off Wi-Fi
Press Up button to turn off Wi-Fi.
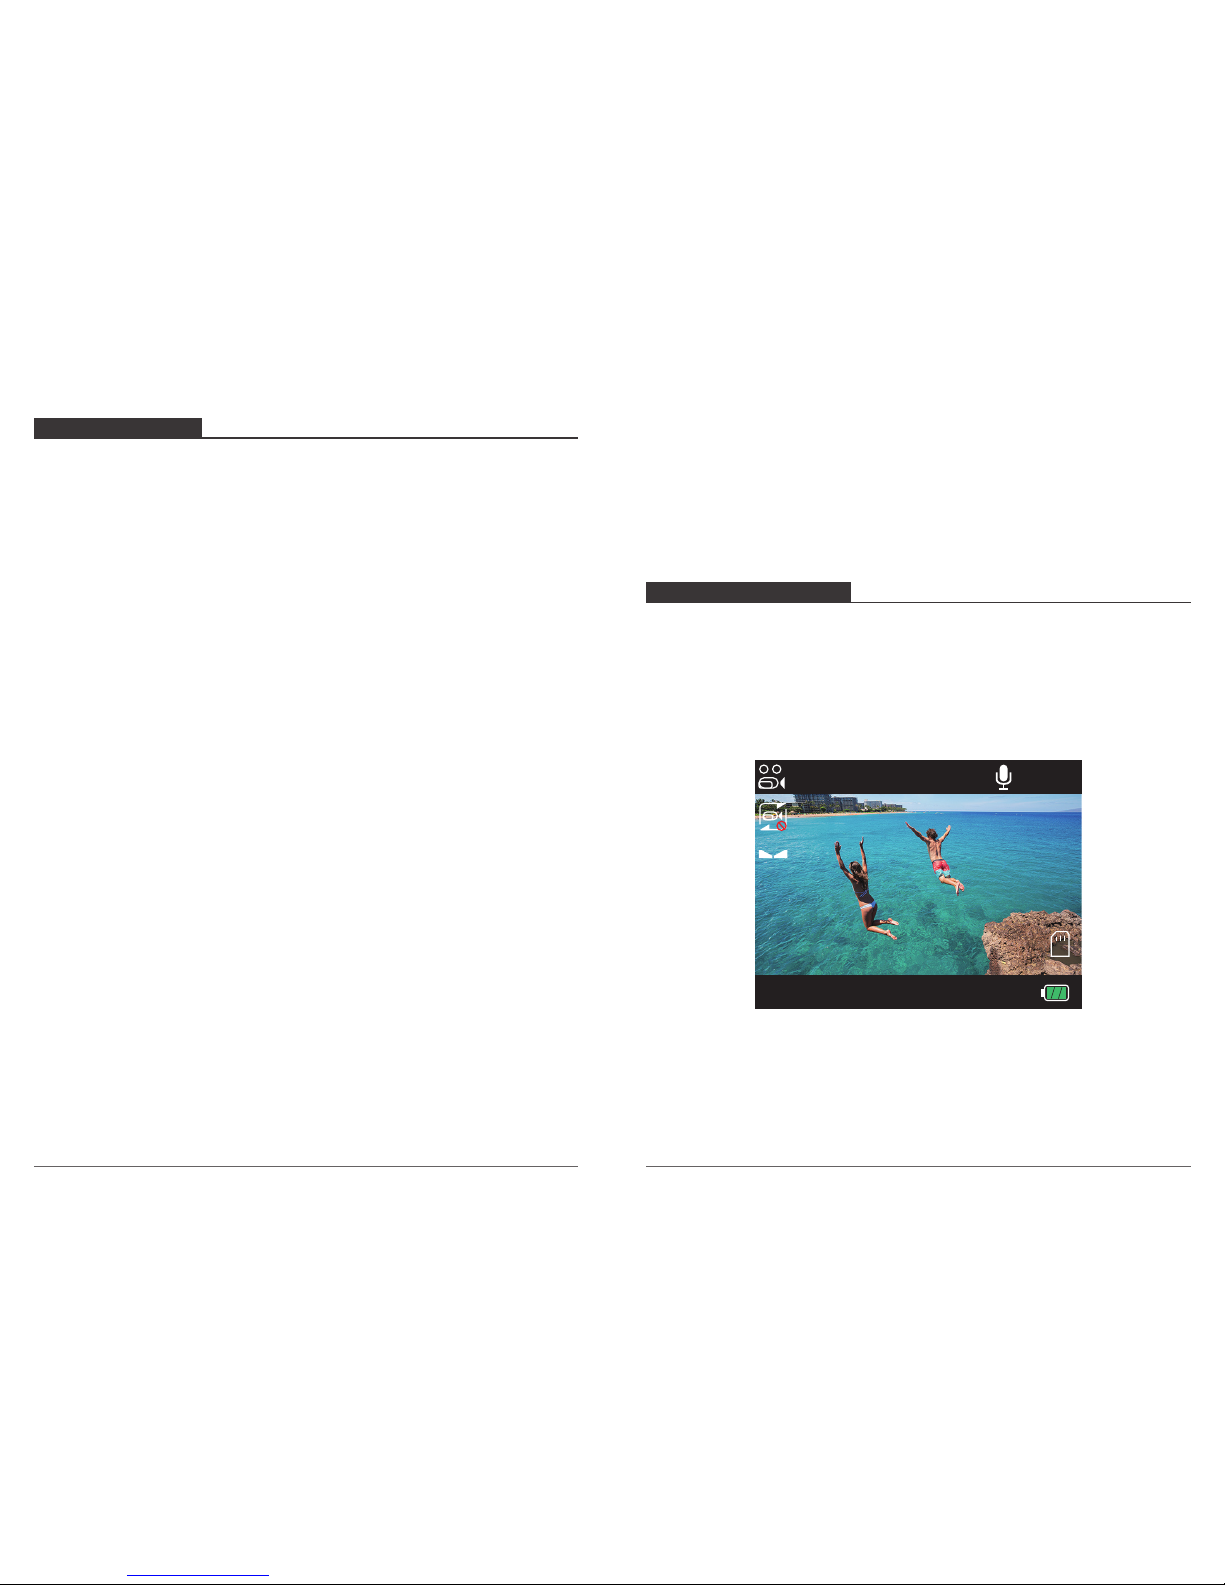
There are 5 modes: Video, Photo, Video Playback, Photo Playback and Setting.
VIDEO MODE
Video Mode is the default mode when you turn on the camera.
In Video Mode, press Shutter button, the camera starts recording video. Press Shutter
button to stop recording video.
03
04
A
EV
0.0
1080P
09/10/2018 09:36:38
00:19:51
Page 5
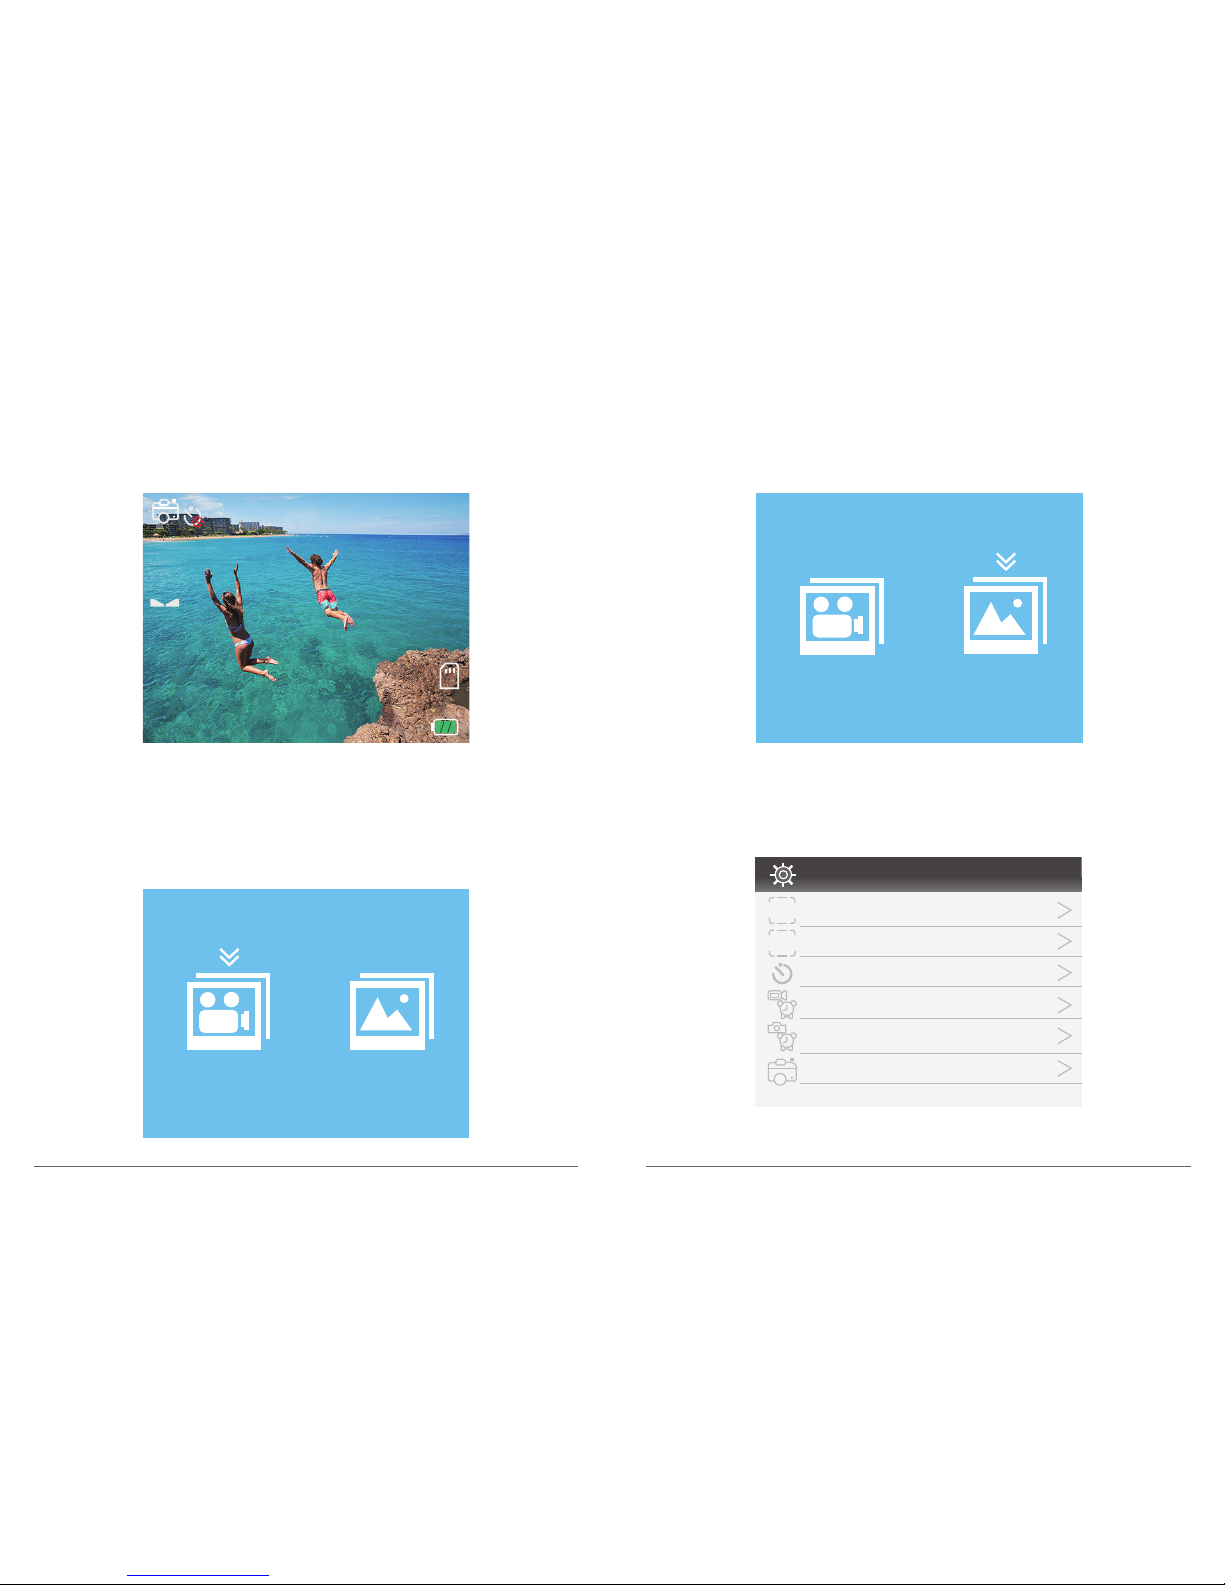
PHOTO MODE
Press Mode button once to switch to Photo Mode after you turn on camera.
In Photo Mode, press Shutter button, the camera takes a photo.
VIDEO PLAYBACK MODE
Press Mode button several times to switch to Video Playback Mode.
In Video Playback Mode, press the Up / Down button to scroll through the video files.
Press Shutter button to playback video.
PHOTO PLAYBACK MODE
Press Mode button several times to switch to Photo Playback Mode.
In Photo Playback Mode, press the Up/ Down button to playback Photo files.
SETTING MODE
Press Mode button several times to switch to Camera Setting Mode.
05
06
A
EV
0.0
12M
02169
ISO
AUTO
Video Playback
Photo playback
SIZE
SIZE
Setting
1/5
Video Resolution
Photo Resolution
Burst Photo
Time Lapse Video
Time Lapse Photo
Self Timer
Page 6

CUSTOMIZING YOUR VISION 2
1. Video Resolution: 1080P / 30FPS, 720P / 30FPS, 480P / 30FPS
Default setting is 1080P / 30FPS.
Note: When capturing video at high resolutions or high frame rates in warm ambient
temperatures, the camera may become warm and use more power.
2. Photo Resolution: 12M / 10M / 8M / 5M
Default setting is 12M.
3. Burst Photo: Off, 3P/ S, 5P/ S, 10P/ S
Default setting is off.
Burst captures up to 10 photos in 1 second, so it is perfect for capturing fast-moving
activities.
4. Time Lapse Video: Off / 1 Second / 2 Seconds / 5 Seconds / 10 Seconds / 30 Seconds
/ 1 Minute
Default setting is off.
Time Lapse Video creates video from frames captured at specific intervals. This option lets
you capture a time lapse event and immediately view or share it as a video. Time Lapse
Video is is captured without audio.
5. Time Lapse Photo: Off / 3S / 5S / 10S
Default setting is 3S.
Time Lapse Photo captures a series of photos at specified intervals. Use this mode to
capture photos of any activity, then choose the best ones later.
6. Self Timer: Off / 3S Timer / 5S Timer / 10S Timer / 20S Timer
Default setting is Off.
A Self Timer gives a delay between pressing the shutter release and the shutter's firing. It is
most commonly used to let photographers to take a photo of themselves (often with family).
7. Anti-Shaking: Off / On
Default setting is off.
This setting adjusts the footage to offset for motion during capture. The result is smoother
footage, especially in activities with relatively small but fast motion including cycling,
motorcycling, and handheld uses.
8. Upside Down: Off / On
Default setting is off.
This setting determines the orientation of your video or photos to help you prevent upside
down footage.
9. Loop Recording: Off / 1 Minute / 2 Minutes / 3 Minutes / 5 Minutes / 10 Minutes
Default setting is off.
Using Loop Recording, you can continuously record video, but save only the moments that
you want. For example, if you select a 5-minute interval, only the previous 5 minutes are
saved when you press the Shutter button to stop recording. If you record for 5 minutes and
do not press the Shutter button to stop recording and save, the camera records a new
5-minute interval by recording over your previous 5 minutes of footage. When the micro SD
card is full, the new files will cover the old one if loop recording is on.
10. Motion Detection: Off / On
Default setting is off.
Motion detection is the process of detecting a change in the position of an object relative to
its surroundings or a change in the surroundings relative to an object.
Turn on Motion Detection and camera, the camera records video automatically when it
detects a change in the position of an object relative to its surroundings.
11. Driving Mode: Off / On
Default setting is off.
If you turn on Driving Mode and connect camera with car cigarette lighter, the camera will
turn on automatically if you start your car and will turn off if you stop your car.
12. Language: English / Spanish / German / Italian / French / 简体中文 / 日本語
Default setting is English.
07
08
Page 7

13. Date Stamp: Off / On
Default setting is on.
Turn on Date Stamp, this camera adds date stamp to the videos you take.
14. Record Audio: Off / On
Default setting is on.
Turn off Record Audio, the camera does not record audio when you record video.
15. Screen Saver: Off / 1 Minute / 2 Minutes / 3 Minutes
Default setting is off.
Turns off the LCD display after a period of inactivity to save battery life. To turn on the LCD
display again, press any button on the camera.
16. Auto Power Off: Off / 3 Minutes / 5 Minutes / 10 Minutes
Default setting is off.
Powers off your Vision 2 after a period of inactivity to save battery life.
Note: Voice Control is not available when the camera is off. When using Voice Control,
consider selecting a higher time period (or Never) for Auto Power Off.
17. Beep Sound: Off / On
Default setting is on.
Sets the volume of your Vision 2's alerts.
18. OSD Mode: Off / On
Default setting is on.
OSD (On Screen Display) is a feature of action cameras that displays video or photo
resolution, date, time and setting data on the camera screen.
19. Exposure: +0.7 / +0.3 / +0.0 / -0.3 / -0.7 / -1.0 / -1.3 / -1.7 / -2.0
Default setting is + 0.0.
By default, your camera uses the entire image to determine the appropriate exposure level.
However, Exposure lets you select an area that you want the camera to prioritize when
determining exposure. This setting is particularly useful in shots where an important region
might otherwise be over- or underexposed.
When you change this setting, the LCD display immediately shows you the effect on your
image. If you change modes, the camera returns to using the entire scene to determine
the correct level of exposure.
20. White Balance: Auto / Daylight / Cloudy / Tungsten / Fluorescent
Default setting is Auto.
White Balance lets you adjust the color temperature of videos and photos to optimize for
cool or warm lighting conditions. When you change this setting, the LCD display
immediately shows you the effect on your image.
21. Frequency: 50Hz / 60Hz
Default setting is 50Hz.
22. WDR: Off / On
Default setting is on.
Wide Dynamic Range (WDR) retains a greater level of detail in the dark and bright areas of
an image. The result is a photo that is properly exposed for both of these extremes. This
setting is especially useful for scenes that are backlist or that have large bright regions and
a dark foreground. WDR is available only for the Photo capture mode.
23. Quality: Fine / Normal / Economy
Default setting is Normal.
24. Sharpness: Strong / Normal / Soft
Default setting is Normal.
Sharpness controls the quality of details captured in your video footage or photos. When
you change this setting, the touch display immediately shows you the effect on your image.
25. ISO: Auto / 100 / 200 / 400 / 800 / 1600
Default setting is Auto.
ISO determines the camera’s sensitivity to light, and creates a trade-off between brightness
and resulting image noise. Image noise refers to the degree of graininess in the image.
In low light, higher ISO values result in brighter images, but with greater image noise.
Lower values result in lower image noise, but darker images. When you change this setting,
the LCD display immediately shows you the effect on your image.
09 10
Page 8

26. Date / Time: MM/ DD/ YY
The date and time are automatically updated when you connect your camera to the
PPShow app. However, you can manually change these settings, if needed.
Note: If the battery is removed from the camera for an extended period of time, the date
and time will be reset automatically.
27. Format: All data will be deleted Cancel / OK
To keep your micro SD card in good condition, reformat it on a regular basis. Reformatting
erases all of your content, so be sure to offload your photos and videos first.
To reformat your card, press the mode button to enter camera setting, press Mode button
several time to enter Setting, press Up/Down to enter Format, then press Shutter button,
the screen shows ‘All data will be deleted> Cancel/OK’. Press Down button then Shutter
button.
28. Default Setting: Return menu setting to defaults Cancel / OK
This option resets all settings to their default values.
29. Version: 20180814 v1.0
You can check the model, version and updated time of your Vision 2.
CONNECTING TO THE PPSHOW APP
The PPShow app lets you control your camera remotely using a smartphone or tablet.
Features include full camera control, live preview, playback and sharing of content, and
camera software updates.
1. Download PPShow app to your mobile device from the Apple App Store or Google Play.
2. Turn on camera, press Up button to turn on Wi-Fi.
3. Turn on Wi-Fi of your mobile device, connect to the Wi-Fi SSID ‘DragonTouch_Vision2.
4. Enter the password: 1234567890.
5. Open the PPShow app.
Note: You can also press Up button to turn off Wi-Fi.
OFFLOADING YOUR CONTENT
OFFLOADING YOUR CONTENT TO A COMPUTER
1. To play back your video and photos on a computer, you must first transfer these files to
a computer. Transferring also frees up space on your micro SD card for new content.
2. To offload files to a computer using a card reader (sold separately) and your computer’s
file explorer, connect the card reader to the computer, then insert the micro SD card. You
can then transfer files to your computer or delete selected files on your card. Note that
you must use a card reader to offload photos or audio files.
DELETING VIDEOS AND PHOTOS ON YOUR VISION 2
1. Turn on camera. Press Mode button several times to enter video or photo playback
mode. If your micro SD card contains a lot of content, it might take a minute for it to
load.
2. Press the Up / Down button to scroll through the video or photo files.
3. Press and hold OK Button for three seconds. The screen shows ‘Delete?’ OK Cancel.
4. Press OK button. The selected file will be deleted.
3. To exit the Video or Photo Playback mode, press Mode button.
PLAYING BACK YOUR CONTENT
You can play back your content on the camera’s LCD display, your computer, T V, or
smartphone / tablet.
You can also play back content by inserting the micro SD card directly into a device, such
as a computer or compatible TV. With this method, playback resolution depends on the
resolution of the device and its ability to play back that resolution.
VIEWING VIDEOS AND PHOTOS ON YOUR VISION 2
1. Turn on camera. Press Mode button several times to enter video or photo playback
mode. If your micro SD card contains a lot of content, it might take a minute for it to load.
2. Press the Up / Down button to scroll through the video or photo files.
11
12
Page 9
REFORMATTING YOUR MICROSD CARD
To keep your micro SD card in good condition, reformat it on a regular basis. Reformatting
erases all of your content, so be sure to offload your photos and videos first.
1. Press and hold Mode button for 3 seconds to turn on Vision 2.
2. Press Mode button several times to enter Setting.
3. Press UP/ Down button to find the ‘Format’ option.
4. Press Shutter button, the screen shows ‘All data will be deleted > Cancel / OK.’
5. Press Down button then Shutter button. The screen shows ‘Please wait’. Then you format
your micro SD card successfully.
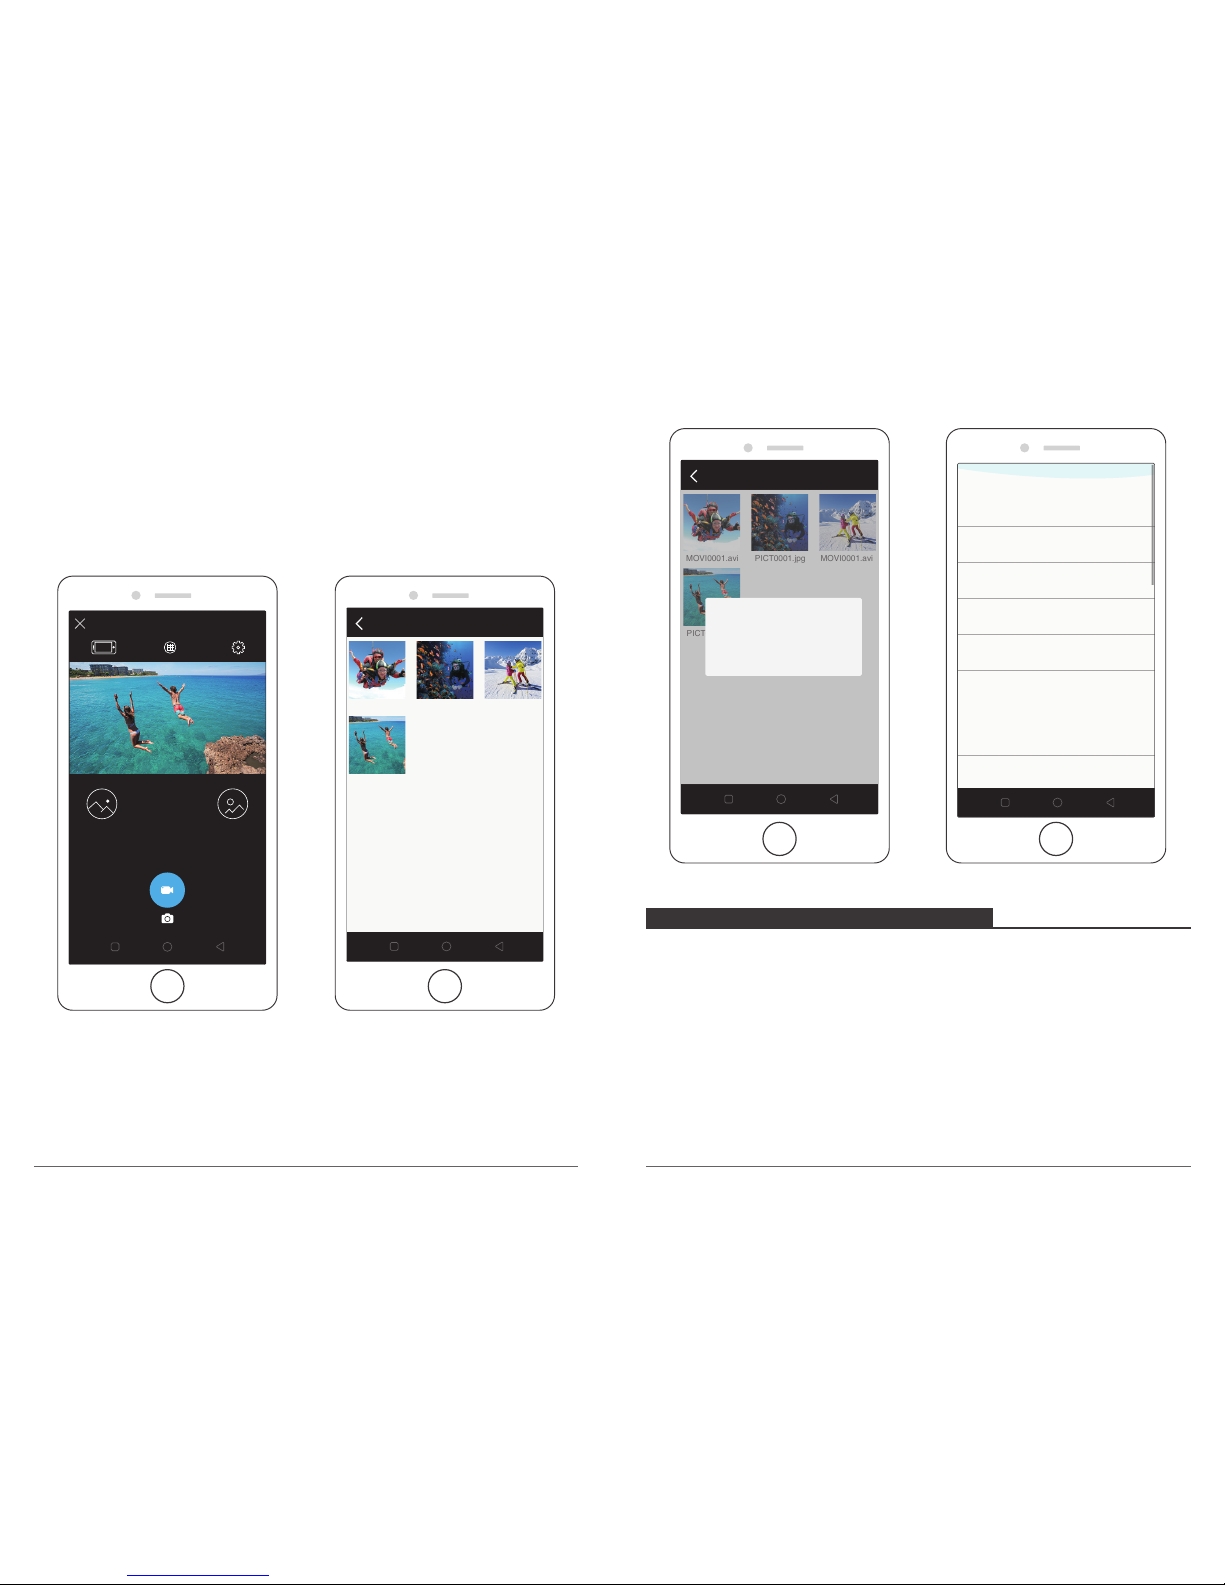
OFFLOADING YOUR CONTENT TO SMARTPHONE OR TABLET
1. Open the ‘PPShow’ app.
2. Tap the camera icon of the app. The screen shows ‘Connecting’.
3. Tap Album icon to enter file list.
4. Tap the video or photo you want to download.
5. Tap ‘Download’, the screen shows ‘Downloading’.
6. Download completed.
13
14
Picture
album
File
MOVI0001.avi MOVI0001.aviPICT0001.jpg
PICT0002.jpg
File
MOVI0001.avi MOVI0001.aviPICT0001.jpg
PICT0002.jpg
CANCEL
Download
Info
Record
Resolution
1080P/30FPS
Exposure
+0.0
Motion Detection
Off
Loop Recording
Off
WDR
On
Record AUdio
On
Resolution
12M
Capture
Quality
Normal
Page 10
MAINTENANCE YOUR CAMERA
Follow these guidelines to get the best performance from your camera:
1. For best audio performance, shake the camera or blow on the mic to remove debris
from the microphone holes.
2. To clean the lens, wipe it with a soft, lint-free cloth. Do not insert foreign objects around
the lens.
3. Don’t touch the lens with fingers.
4. Keep the camera away from drops and bumps, which may cause damage to the parts
inside.
5. Keep the camera away from high temperature and strong sunshine to avoid being
damaged.
MAXIMIZING BATTERY LIFE
If the battery reaches 0% while recording, the camera saves the file and powers off.
To maximize batter y life, follow these guidelines when possible:
• Turn off Wireless Connections
• Capture video at lower frame rates and resolutions
• Use Screen Saver setting.
BATTERY STORAGE AND HANDLING
• The camera contains sensitive components, including the battery. Avoid exposing your
camera to very cold or very hot temperatures. Low or high temperature conditions may
temporarily shorten the battery life or cause the camera to temporarily stop working
properly. Avoid dramatic changes in temperature or humidity when using the camera, as
condensation may form on or within the camera.
• Do not dry the camera or battery with an external heat source such as a microwave oven
or hair dryer. Damage to the camera or battery caused by contact with liquid inside the
camera is not covered under the warranty.
• Do not store your battery with metal objects, such as coins, keys or necklaces. If the
battery terminals come in contact with metal objects, this may cause a fire.
• Do not make any unauthorized alterations to the camera. Doing so may compromise
safety, regulatory compliance, performance, and may void the warranty.
WARNING: Do not drop, disassemble, open, crush, bend, deform, puncture, shred,
microwave, incinerate or paint the camera or battery. Do not insert foreign objects into the
battery opening on the camera. Do not use the camera or the battery if it has been
damaged—for example, if cracked, punctured or harmed by water. Disassembling or
puncturing the battery can cause an explosion or fire.
15
16
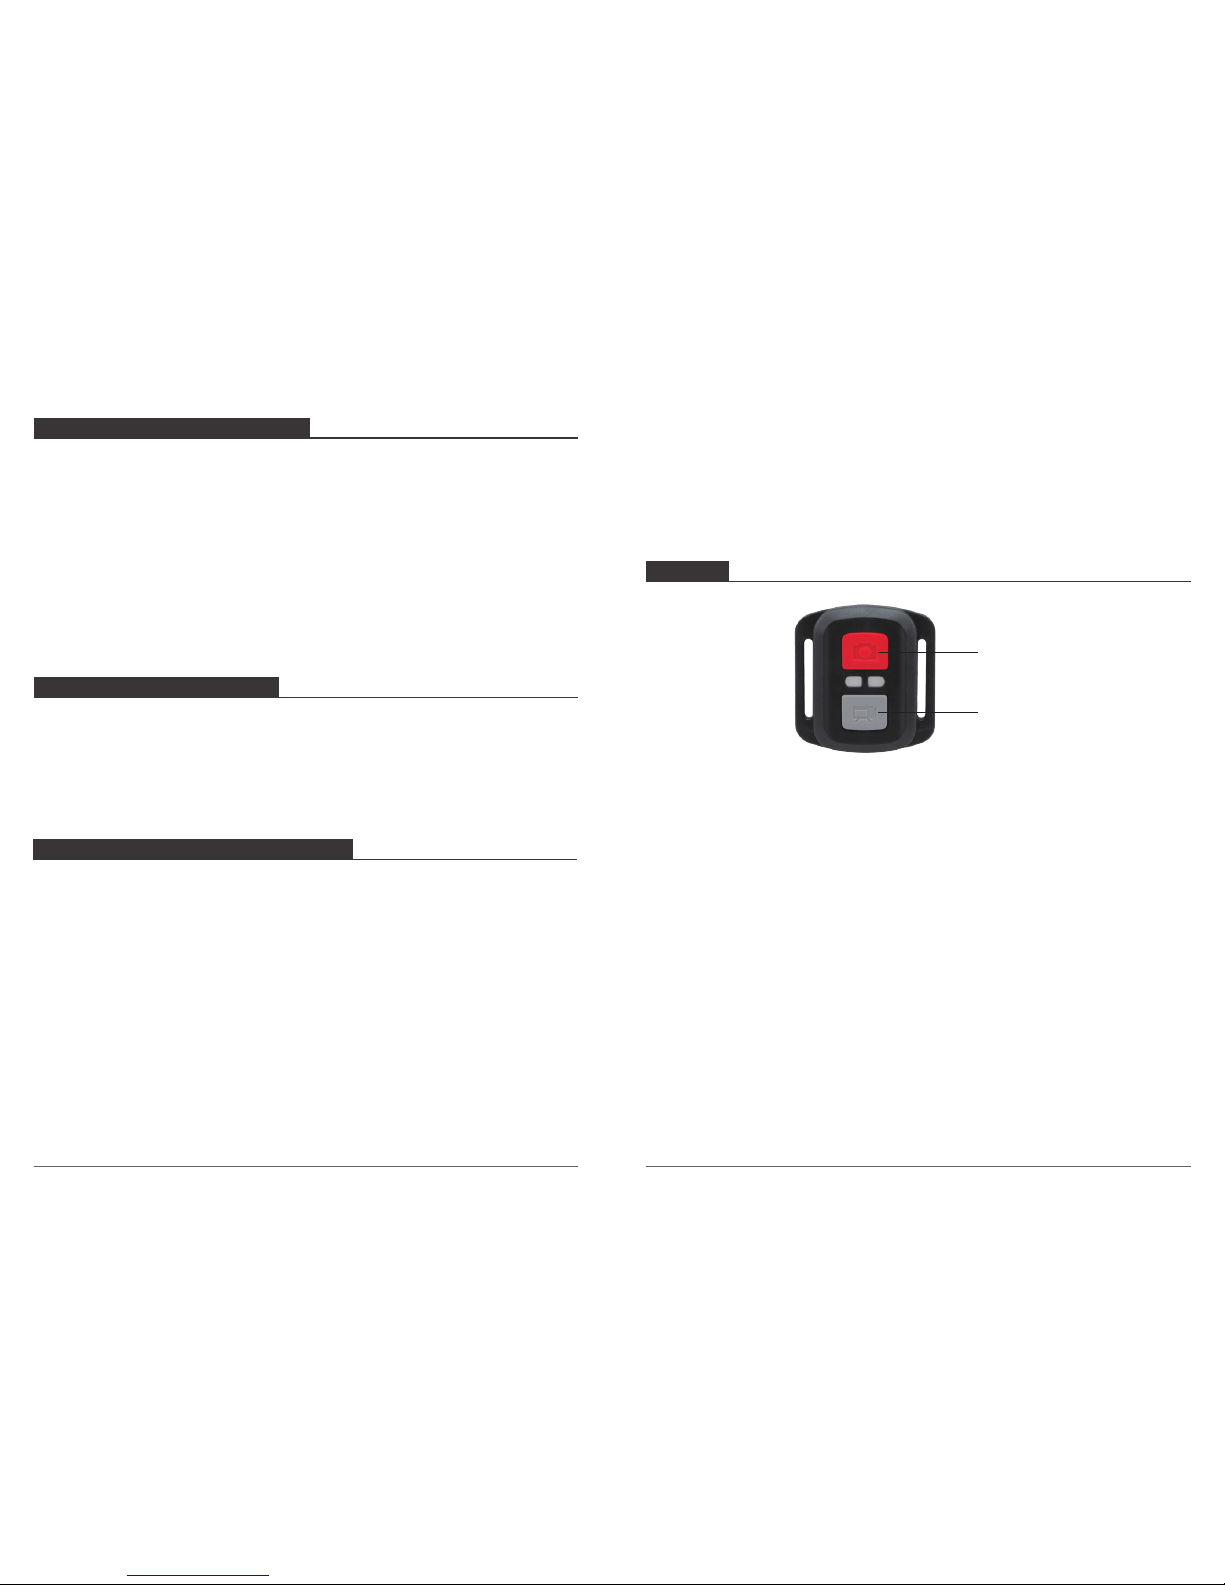
VIDEO
To record Video, verify the camera is in Video mode.
To start recording:
Press the Grey Video Button. The camera will emit one beep and the camera light will
flash while recording.
To stop recording:
Press the Grey Video Button again. The camera will emit one beep and the camera light
will stop flashing while recording.
REMOTE
Photo Button
Video Button
Splashproof only, not waterproof
PHOTO
To capture a photo, verify the camera is in Photo mode.
To take a photo:
Press the Red Photo Button. The camera will emit a camera shutter sound.
Page 11
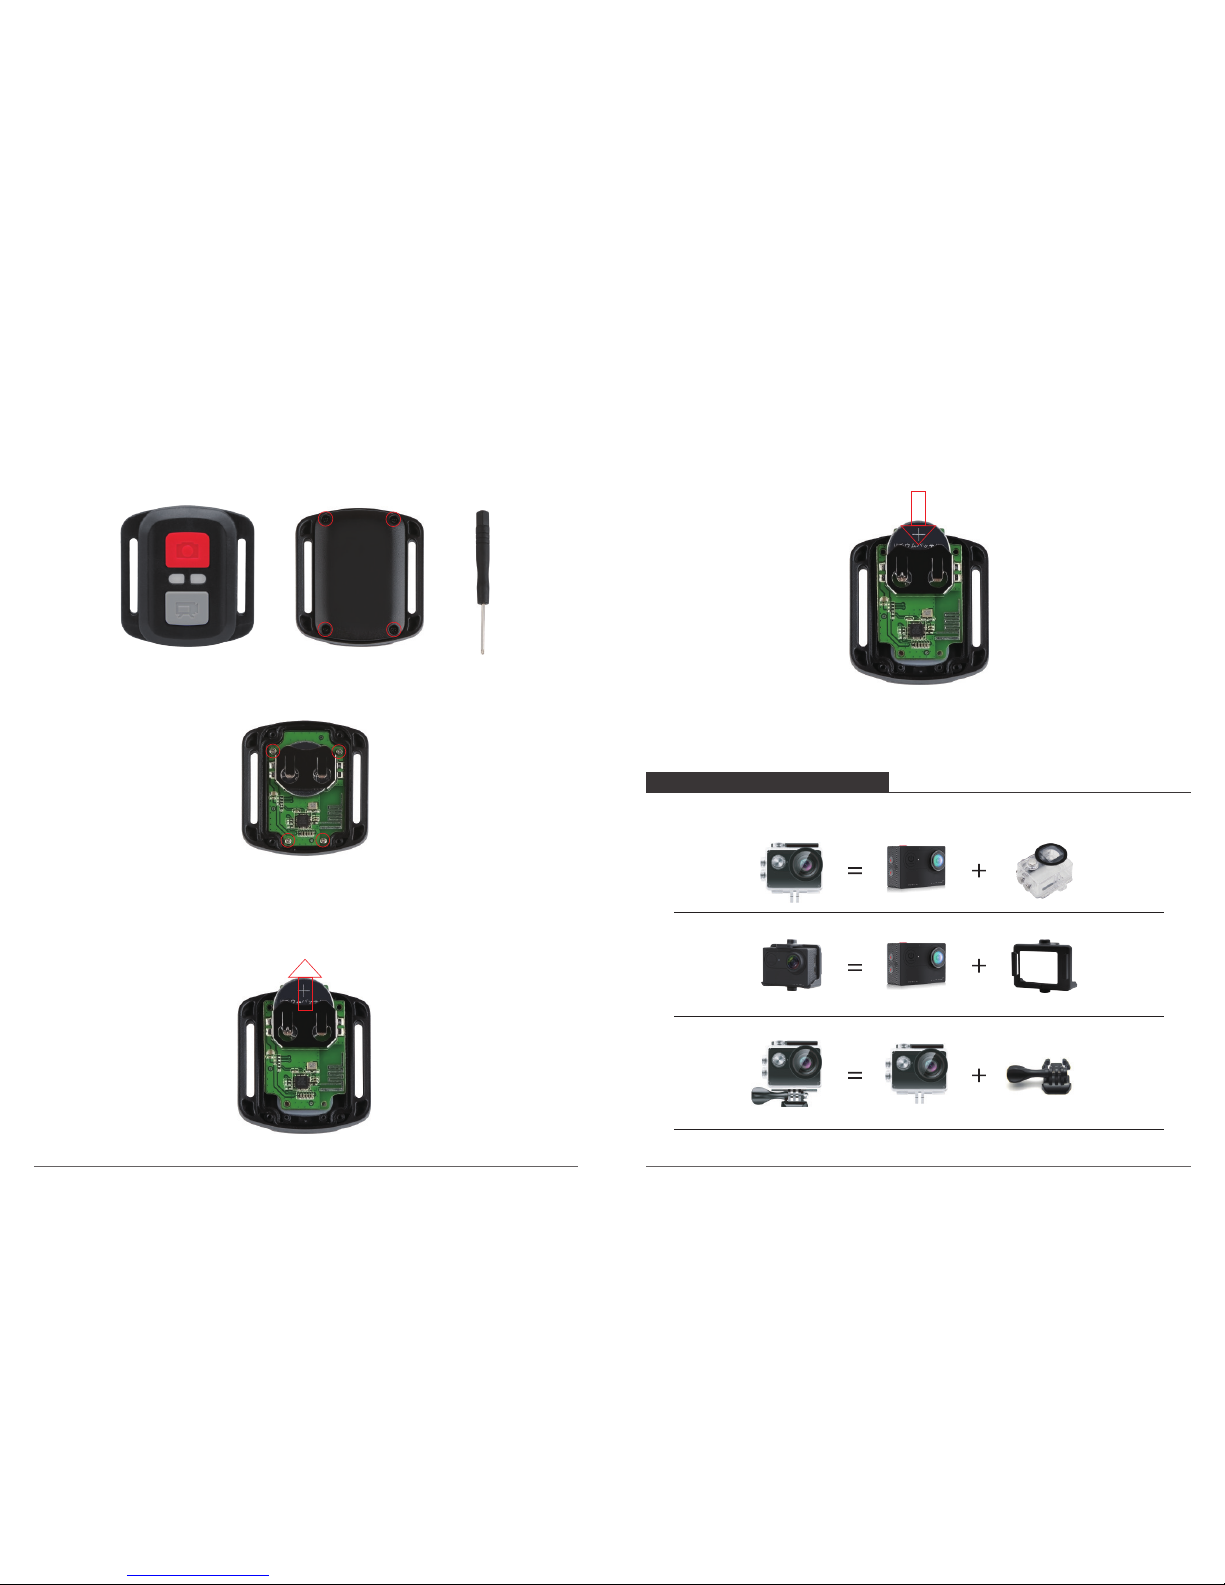
CR2032 BATTERY REPLACEMENT FOR VISION 2 REMOTE
1. Use a 1.8mm Phillips tip screwdriver to remove the 4 screws on the back cover of the
remote, allowing you to open it.
2. Remove another 4 screws on PCB board.
3. Lift the PCB board and slide out the battery, as shown in the picture.
Note: Do NOT rotate the PCB board to avoid reversing the camera and video button functions.
4. Install the new battery, keeping the “+” pole facing up.
5. Install all 4 screws back onto the PCB board.
6. Install all 4 screws back into the cover.
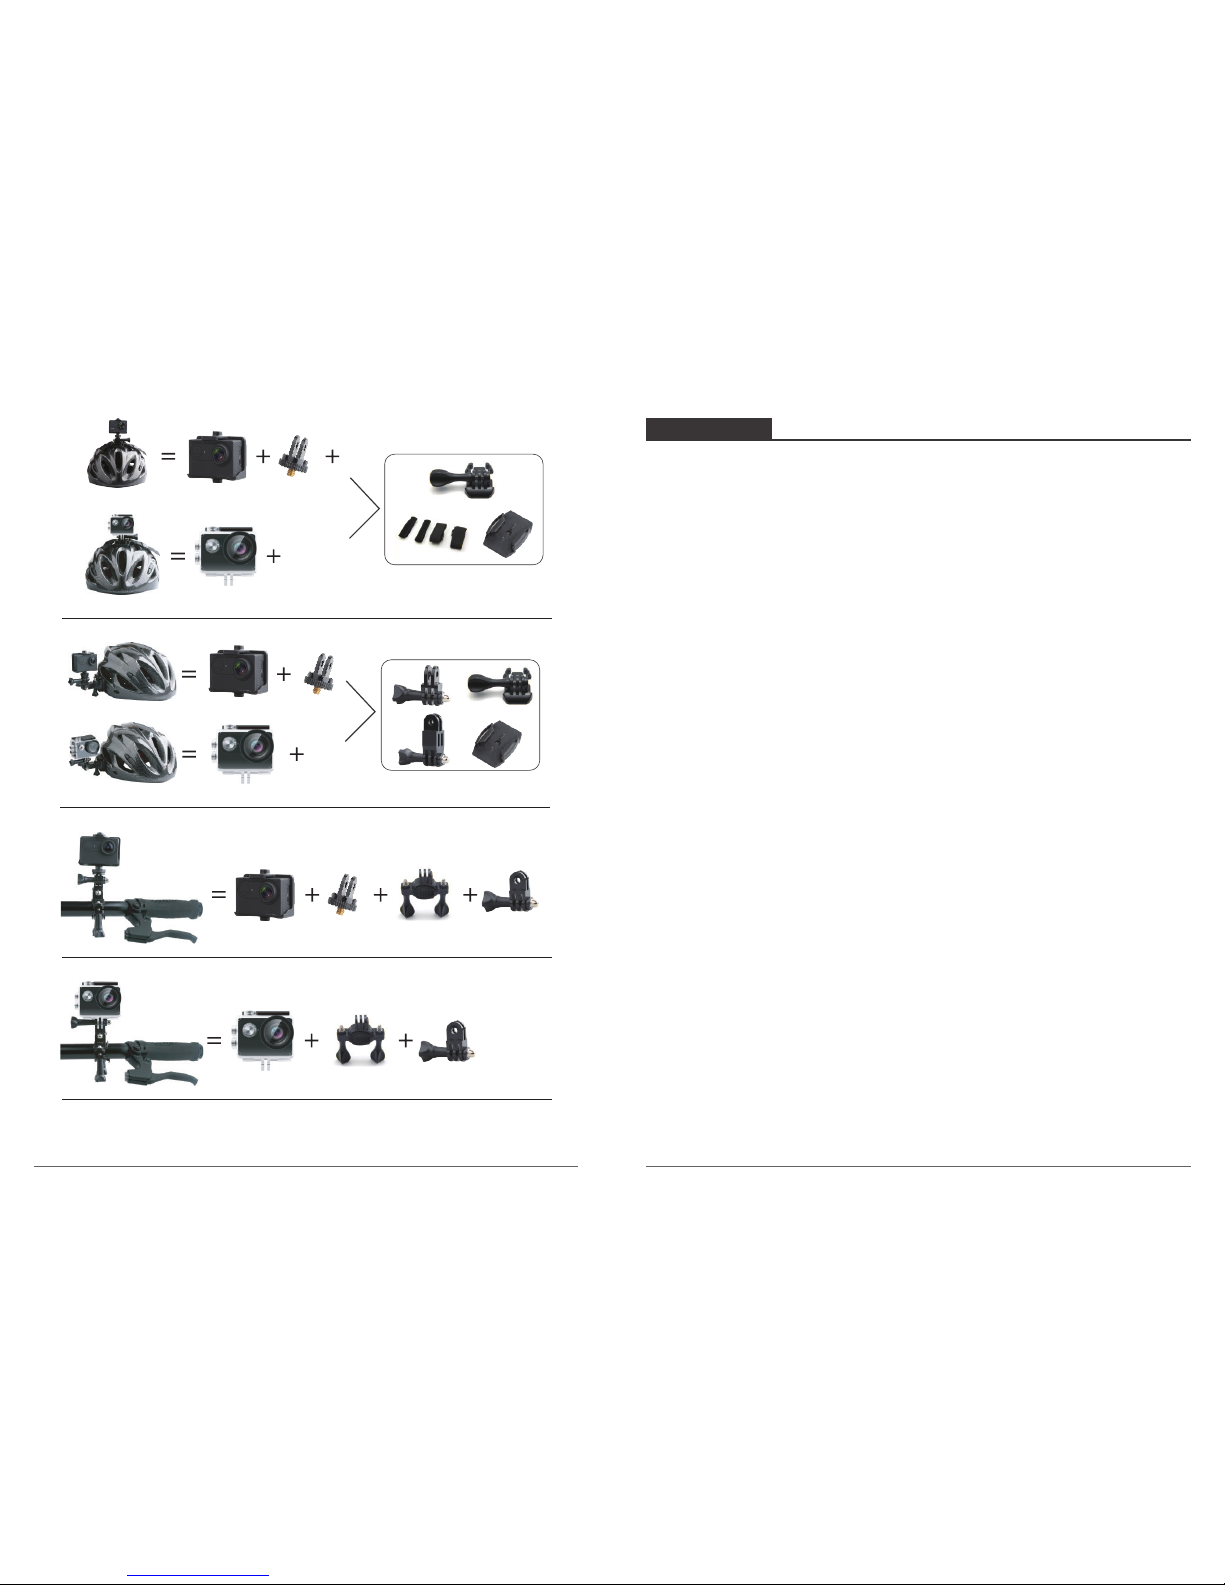
Attach your camera to helmets, gear and equipment.
MOUNTING YOUR CAMERA
17
18
Page 12
For any inquiries, issues or comments concerining our products, please send E-mail to the
address below or call us. We will respond as soon as possible.
E-mail: [email protected]
US customer service line: (301)670-7335
CONTACT US
19
20
 Loading...