

Dragonfly Trimaran 1000 Owner's Manual

Dragonfly 1000
Trimaran
Owner’s Manual
USCG Doc#1032257

TABLE OF CONTENTS
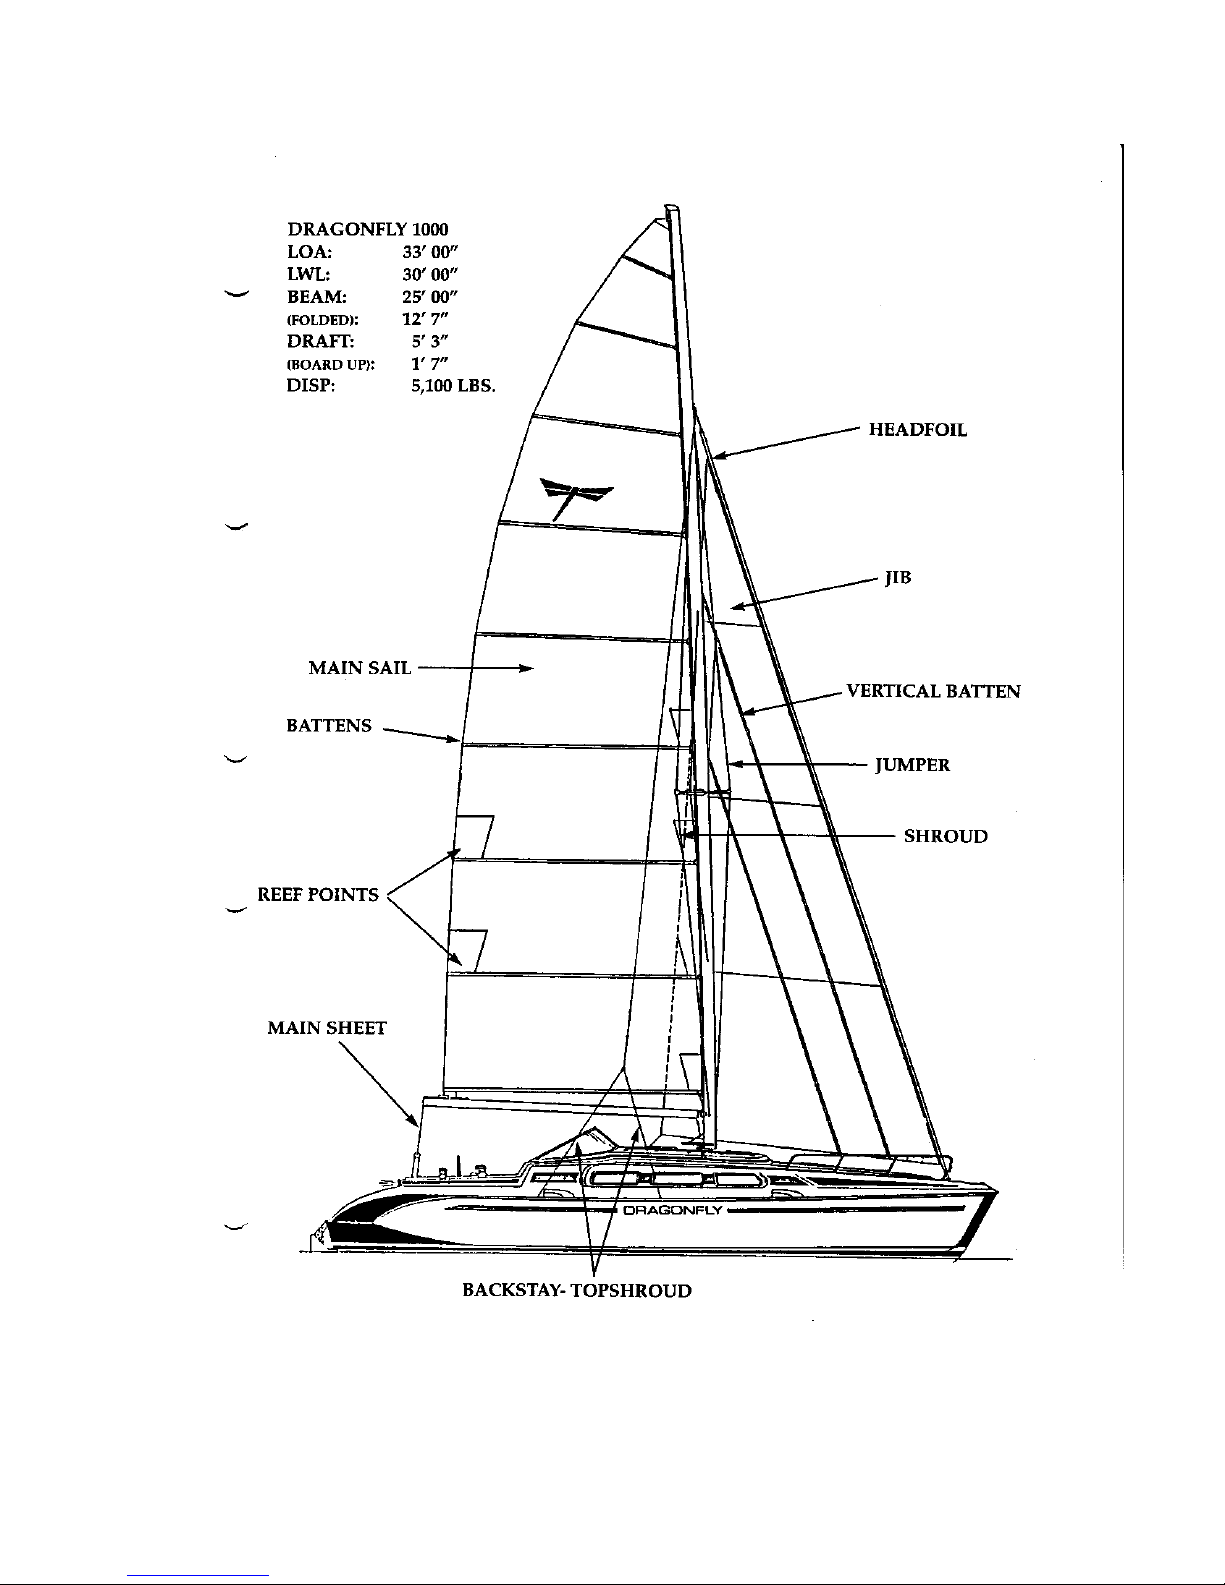
1. Diagram
a. Deck layout
b. Side view
2. Loading
a. Payload
b. Storage advise
3. Swing Wing System
a. Use, advice
4. Sail Handling
a. Main, Backstays, reefing
b. Genoa
c. Barberhauler
d. Hoisting the Genoa
e. Wind speed general
guidelines
5. Kick-up Centerboard and Rudder
a. Purpose
b. Use, Access
c. Diagrams
6. Electrical System
a. DC and AC systems
b. Charging
c. AC 110V shore power
d. General Advice
e. Diagram of system
7. Fresh Water system
a. Tank
b. Electric pump
c. Sinks
d. Shower
e. Water heater
f. Diagram of system
0
8. Waste System
a. Toilet
b. Y Valve
c. Holding Tank
d. Using the head
e. General tips
f. Diagram
9. Fuel System
a. Diagram
10. Interior
a. Galley
b. Cabin Heater
c. Lighting
d. Berths
11. Miscellaneous
a. Bilge pumps
b. Folding propeller
c. Stuffing box
d. Diagram
12. Launching and Storage
13. Maintenance
a. Rinse, Wash and Wax
b. Rig
c. Wood work
d. Engine
e. Manufacturers materials
f. Waterstay
g. Checklist
14. 1000 Specifications

1
2

2.
LOADING
There are two basic rules for loading multihulls:
1. Keep the boat as light as possible
2. Concentrate heavy items in the center of the boat.
It is important not to carry unnecessary gear. We recommend that you go through the
storage lockers several times per year to look for and remove unnecessary gear,
preventing the build-up of unnecessary weight.
The ama storage areas are ideal for big, bulky light items
such as fenders, sails, extra
life jackets etc. Heavy items must not be carded in the amas.
The maximum payload for the Dragonfly 1000 is 500kg. (1100 lb.). The maximum
payload in each ama is 100kg. (220lbs). Overloading the Dragonfly 1000 can effect
performance and safety.
3

3.
THE SWING WING SYSTEM
Operating The Swing Wing system:
Important
The unique swing-wing system is designed for use only in protected areas, such as
marinas, to fit into a normal slip (berth).
The sails must never be hoisted when the floats are folded in.
Always stow the sails before you start operating the swing-wing system.
Operating the swing-wing system:
Folding in the wings.
1. Pull out and prepare the endless swing-wing line. This line is found underneath
the cockpit coaming and exits the coaming through a stainless steal cover situated in
front of the big genoa winch. As already marked, the outhaul line, marked OUT is
used for swinging the ama out and the inner line marked IN is for folding the ama in.
2. Remove the big spinnaker pole brace, without stepping onto the aft trampoline.
Put the spinnaker pole into the stainless ring aft on the hull and secure it by fastening it
to the eyebolt on the aft beam near the centerhull. (This eyebolt is also used as a
lifting eye.)
3. Release the backstays on both sides.
4. Release the double-halyard stopper in the cockpit coaming.
5. Now crank the winch (3-4 turns of rope on the winch) on the AMA-IN line and the
amas fold in. No persons are allowed on the trampoline, the wings or the floats while
operating the swing-wing system.
Do not force the swing if you have too much resistance.
Checklist
• Double-halyard stopper open?
• Line kinked, fouled or twisted in coaming?
• Backstays released?
• Barberhauler lines released?
• Swing-wing line. Is there a kink? Is it fouled under the cockpit coaming?
• Double-check your steps. Never force.
4

5
Important
When almost folded
• Lift trampoline so it does not interfere between the nylon roller on the ama and
the underside of the wing.
• Also, the outhaul wire and the stainless block in the trampoline must not get in
between the underside of the wing and ama deck.
Once the boat is folded the trampoline can be left under the catwalk and the wings
where they naturally fold.
6. Once folded secure the ama with the small aluminum pole. (the mini spinnaker pole
brace) in the same pad eyes as the big spinnaker pole. (If you are in a hurry to fold the
boat do not worry about these until later when you have more time.)
7. When the folding procedure is done, lock the double-halyard stopper again before
releasing the downhaul form the winch. This line supports the forward part of the ama.
Once this is complete, pull the swing-wing control lines back down under the cockpit
coaming for out-of-the-way storage. Set both backstays set by hand.
8. Folding out is the same procedure, just reverse.
• Release the small spinnaker pole brace.
• Release the backstays.
• Release the double-halyard stopper in the cockpit coaming.
• Wrap swing-wing lines from the cockpit coaming marked OUT around the winch
and crank out.
• If the ama does not come out by itself then just push it with a foot while there is
tension on the outhaul line on the winch.
**NOTE**
If there is still unreasonable tension on the winch while swinging in or out STOP!
There’s something wrong! Go through the checklist.
NEVER force the Swing Wing process if you feel a lot of resistance. Retrace your
steps instead.
9. Prepare early when returning to harbor.
To fold the boat quickly, prepare the swing-wing IN line on the winch on both sides and
remove the big spinnaker pole brace. This way when you are ready to enter the
marina, all you have to do is release the double-halyard stopper and fold quickly.

6
4.
SAIL HANDLING
1. MAINSAIL: The main will require a lot of trimming if you want to get maximum
performance at all times. The mainsheet will be your key control for mainsail trimming
as the boat has many speed potentials in difference wind speeds. A general rule: The
leach of your main must always be straight no matter what the wind force. By standing
at the end of the boom in the cockpit and looking up the leach to the mast top you will
have the proper position to best judge the sail shape. From this position you will note
that the leach of the sail must not be twisted off unless the boat is being pressed to
hard.
2. MAINSAIL LUFF TENSION
: In light air you tighten the main halyard only until the
wrinkles in the sail are gone. In medium air the main halyard is tightened to remove
wrinkles and be sure the luff is straight. In heavy air the main halyard is tightened hard
to flatten the sail while at the same time the mainsheet should also be pulled in hard.
* If you are at anchor for a short time with the mainsail up, loosen the main halyard to
release the tension in the mainsail to quiet the boat.
3. MAINSHEET CAR
: Multihulls have a rule: The mainsheet car must never pass the
centerline of the boat to windward ... not even in light air. If the wind is increasing
when sailing up wind and you find the main has too much power, try sheeting the
traveler approximately 4-6" to leeward instead of slacking the mainsheet, therefore
hollowing the main. Of course, don't rule out easing off the sheet in heavy air as well
when you feel you are overpowered.
4. BACKSTAYS
: The combined top shroud-backstay has been developed for the
swing-wing system and to enable easy and quick trimming of the top shrouds. When
sailing, always set the backstays the same on both sides to obtain even tension on the
topshrouds.
1) Light wind, set them by hand without using a winch handle.
2) Medium wind, use the winch handle lightly to add tension.
3) Heavy wind, set the backstays on the self tailing winch as hard as you can,
turning the winch handle with only
one
hand.
**NOTE** Double-handed grinding on winch for backstay tension can be too
much strain on the rigging and the boat in general. Be careful not to "over
tension" the backstays. By following the simple rules above and limiting your
tensioning to the strength of one hand, you will have good control.
5. REEFING THE MAINSAIL: In order to reef the main release the main halyard to
allow the sail to drop to the selected reef point, we recommend that you mark the main
halyard for the reef one and reef two positions. Then winch in the reef line until the
reef points are 10" above the boom. It is not necessary to bring the reefing points on
the sail any closer to the boom. Doing so will only put excess tension on the reefing
lines. The reefing lines automatically reef the luff first and then the leach.
6. TRIMMING THE GENOA
: The genoa is the easiest sail to trim. Under normal
conditions the genoa car on the cabin top should be positioned aft on the track. If the
slot between the main and jib closes, move the genoa car aft. If the slot opens, pull
the genoa car forward. The genoa cars are operated from the double-halyard stopper
rope clutches on the cabin top marked outhaul.
Reefing the Genoa:
• Pull the genoa car forward so that when the genoa is reefed it will be in better
position for correct trim.
• For reef 1, the genoa car is placed approximately in the middle of the track.
• For reef 2, car is pulled almost all the way forward.
7. BARBERHAULER
: The barberhauler should not be used on the genoa when
sailing close-hauled. During all other points of sail you should treat the barberhauler
as you would a boom on a main. There are an infinite number of ways to trim the
genoa with the barberhauler. Enjoy!
8. HOISTING THE GENOA
: Before hoisting the genoa, make sure to roll some line
on the drum. Turn the headfoil clockwise until you have approx. 3 feet of line left in the
cockpit. This way you are able to unfurl genoa as soon as it is hoisted.
There is no genoa halyard on the Dragonfly 1000. You will find an S-hook attached to
a long white feeder line. This will be used to assist the spinnaker halyard in hoisting
the genoa and safely bringing the spinnaker halyard back down.
• Attach the genoa to the sliding headfoil fitting.
• Be sure to attach the release wire from the genoa onto the small wire strap on
the sliding headfoil fitting.
• Attach the spinnaker halyard to the upper closed end of the S-hook.
• Place the open end of the S-hook inside the open hole of the sliding headfoil
fitting.
• Hoist the spinnaker halyard while someone feeds the genoa sail into its track.
• When the halyard is all the way at the top of the headfoil, listen carefully for a
“click” letting you know the sliding headfoil fitting has just locked into place.
• Release the spinnaker halyard and try to pull down on the genoa to make sure
the lock on top is actually in place.
• Take the white feeder line and pull the S-hook attached to the spinnaker halyard
back down. (Sometimes you might have to step out a little to the side in order to
release the S-hook.)
7

To lower the genoa, pull the release wire that is in the luff of the genoa. This will
release the lock on top and allow the genoa to be pulled back down.
Genoa Battens: Once the genoa is hoisted, put in the Elvstrom vertical battens. Put
the battens into their corresponding pockets from the bottom, long one forward, short
one aft. Close them in by fastening the Velcro seal to the sail.
***DANGER***
When unpacking the rolled up battens for the first time, BE CAREFUL! They have a
tendency to explode out of their coiled position with great force.
8
 Loading...