

DRAGONFLY DF-SL-92-UW, DF-SL-106-UAW, DF-SL-145-UW, DF-SL-92-UAW, DF-SL-100-UW 92-145.pdf
...Page 1
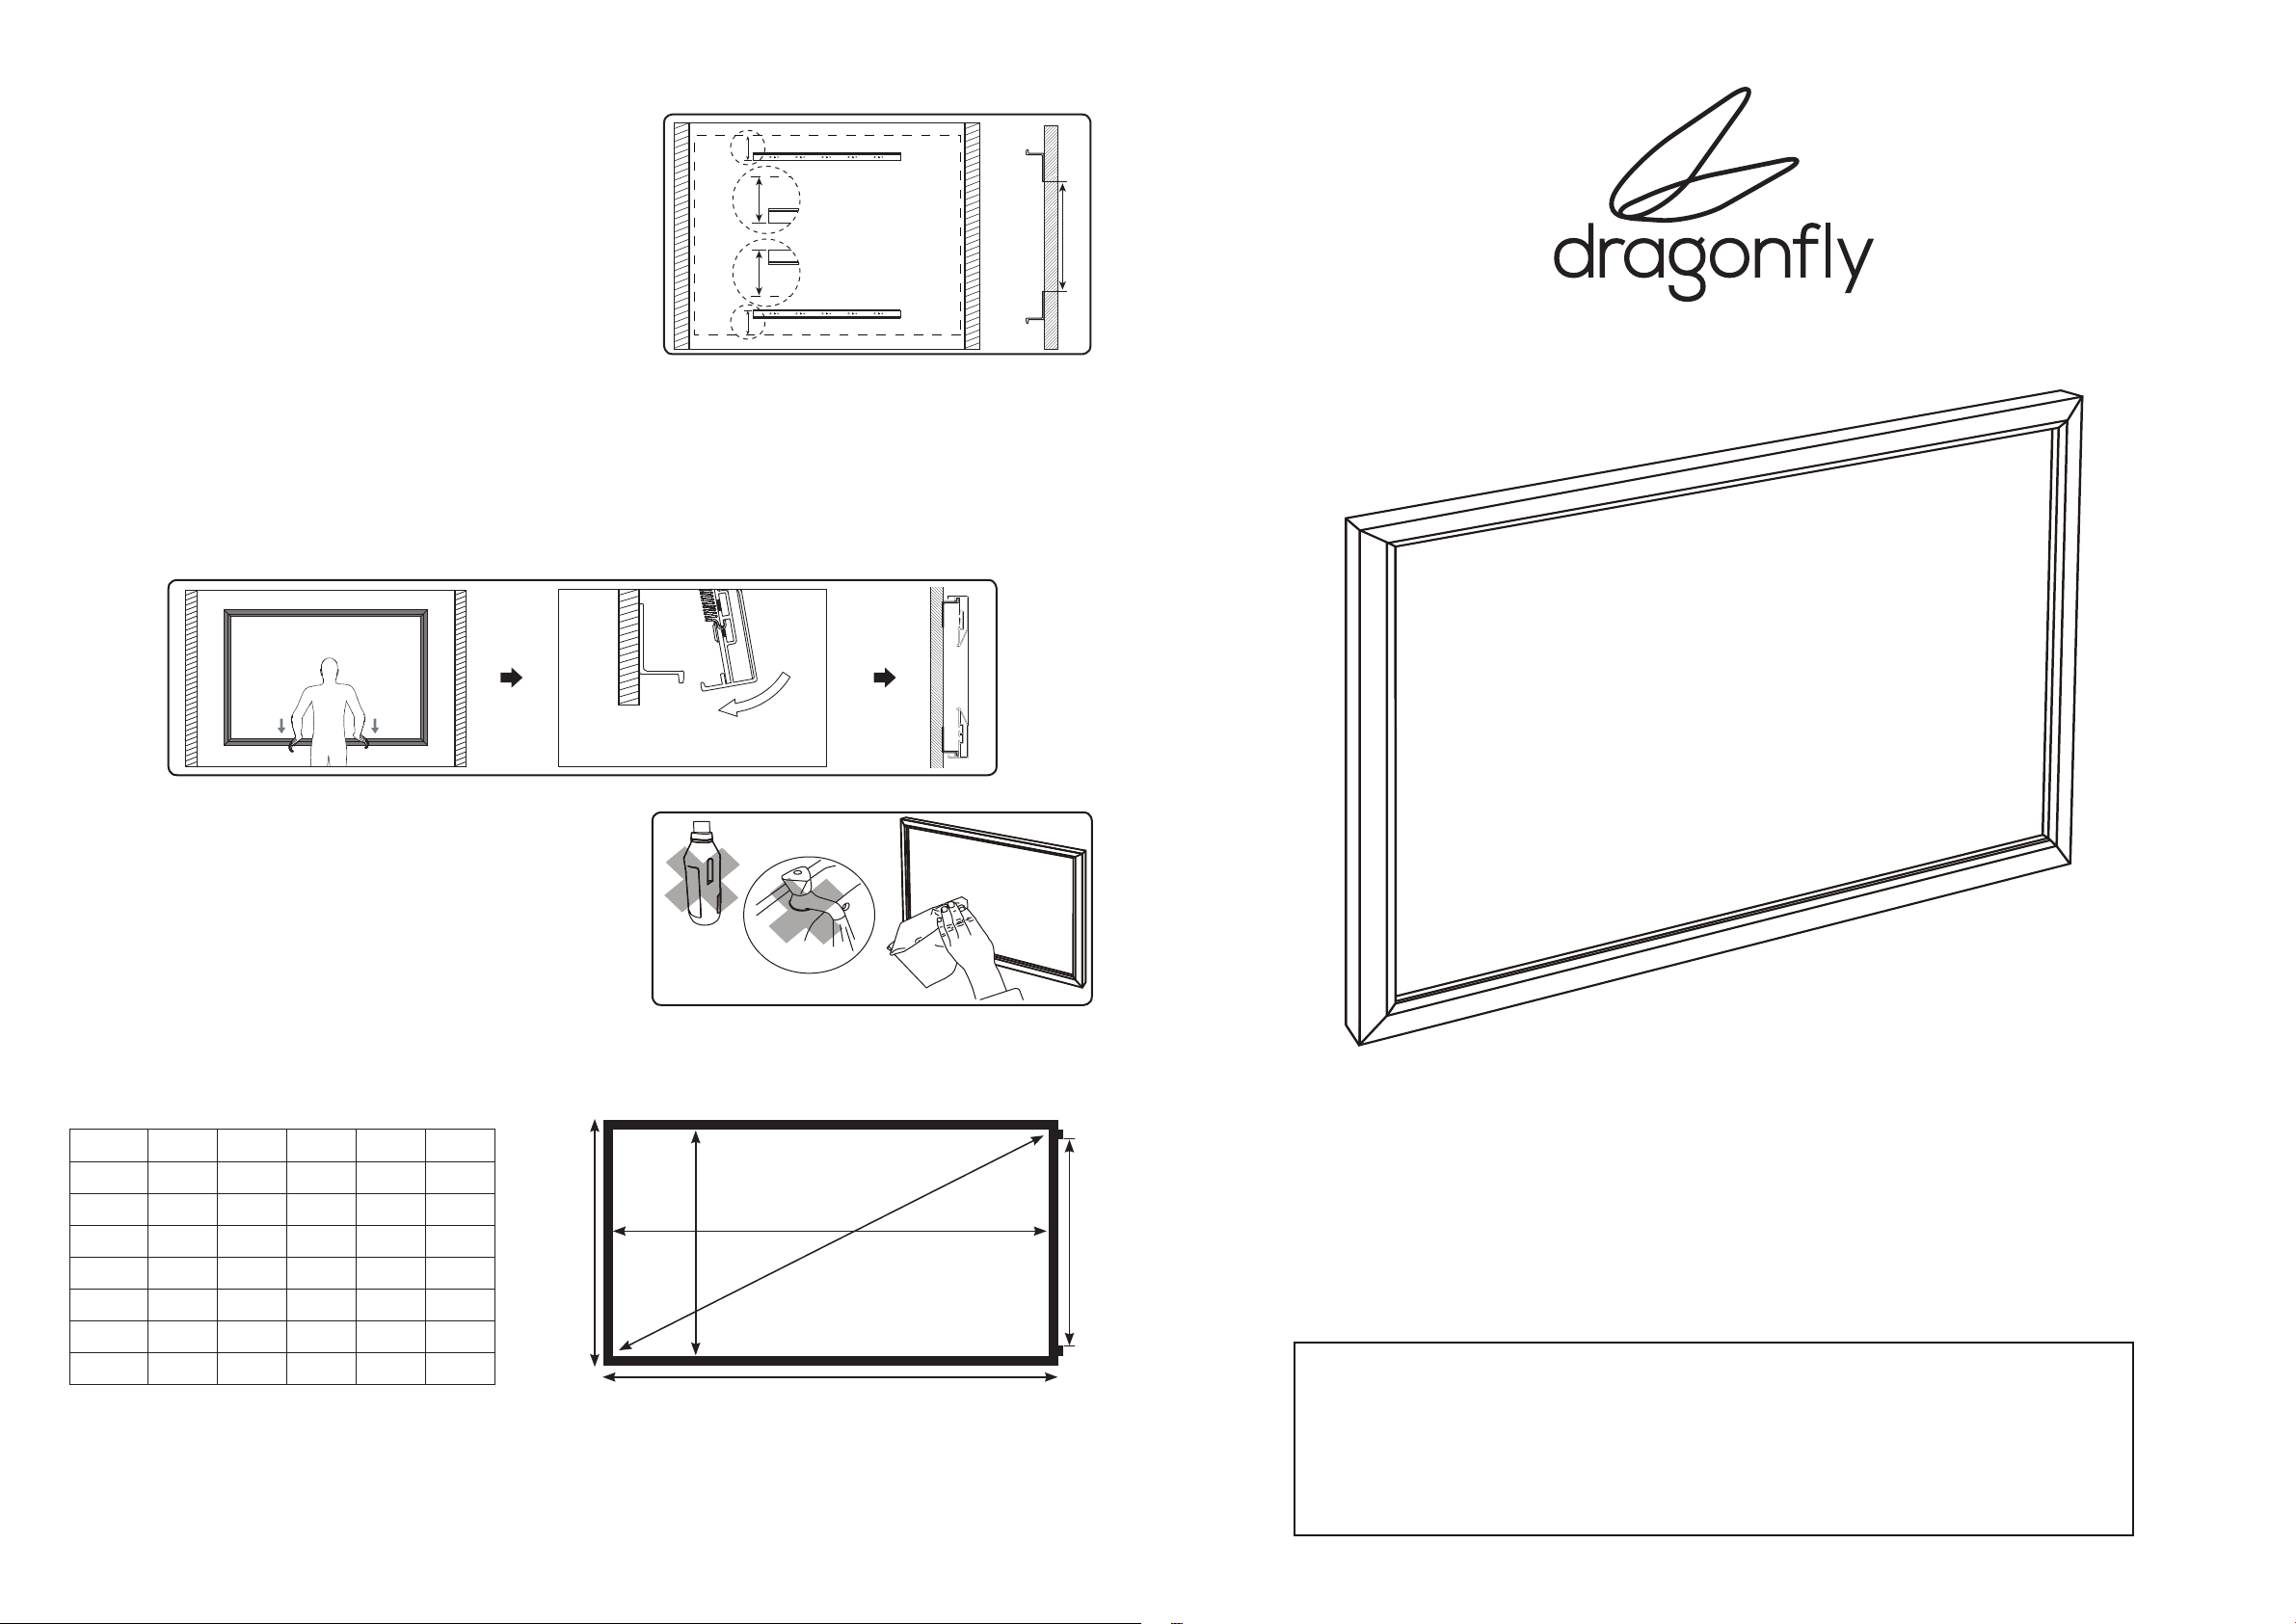
Step 4. Hang the Screen Assembly
F
1.89''
(48mm)
A level, measuring tape, and drill are helpful for this step.
A. Mark the center-line, top, and bottom of the screen, as
well as stud locations behind the screen, if applicable.
B. Position and mark the upper and lower bracket locations
as shown. See dimension F, below, for the distance
between the brackets.
C. Fasten the brackets to the wall. For drywall, make sure
the mounting screws hit the studs behind the wall. For
masonry, be sure to use the masonry anchors. Drills
needed:
• Drywall studs: 5/32" drill for pilot holes
• Masonry: 1/4" masonry drill bit for anchors
D. Hang the screen on the top bracket, slide the screen left or right to center it, then push down on the
bottom-center of the frame to flex the frame around the lower bracket.
E. To remove the screen, press down on the bottom-center of the frame and pull out.
Care and Cleaning
Clean the screen with a soft cloth only. DO NOT use soap,
water, harsh detergents, chemicals, distilled spirits or
petroleum-based chemicals to clean the screen. Doing so
may result in severe damage to the screen or the frame
coating.
Use a household vacuum cleaner with a brush or furniture
cleaning attachment to clean the felt frame material. Avoid
using excessive amounts of water on the felt.
Dimensions
Size (A) B C D E F*
92" 45.08'' 80.2'' 51.42'' 86.54''
100" 49.02'' 87.17'' 55.35'' 93.5''
106" 51.93'' 92.36'' 58.27'' 98.7''
110" 53.9'' 95.87'' 60.24'' 102.2''
120" 58.82'' 104.57'' 65.16'' 110.9''
133" 65.2" 116" 71.54" 122.24"
145" 71.1" 126.37" 77.3" 132.57"
*-Bottom of upper to top of lower mounting bracket.
Technical Support
p.866.838.5052
47.60"
51.52"
54.46"
56.42"
61.32"
67.69"
73.57"
D
B
E
A
INSTALLATION MANUAL
Dragonfly Fixed Projection Screens
C
F
IMPORTANT: BEFORE YOU BEGIN
• Wash your hands and clean the work area before starting.
• Do not use knives or sharp objects to open the packing boxes.
• To avoid a serious fire hazard, DO NOT install the screen over an electrical outlet
or switch.
Page 2
Fixed Projection Screen Manual Fixed Projection Screen Manual
Dragonfly Fixed Screen Assembly Instructions
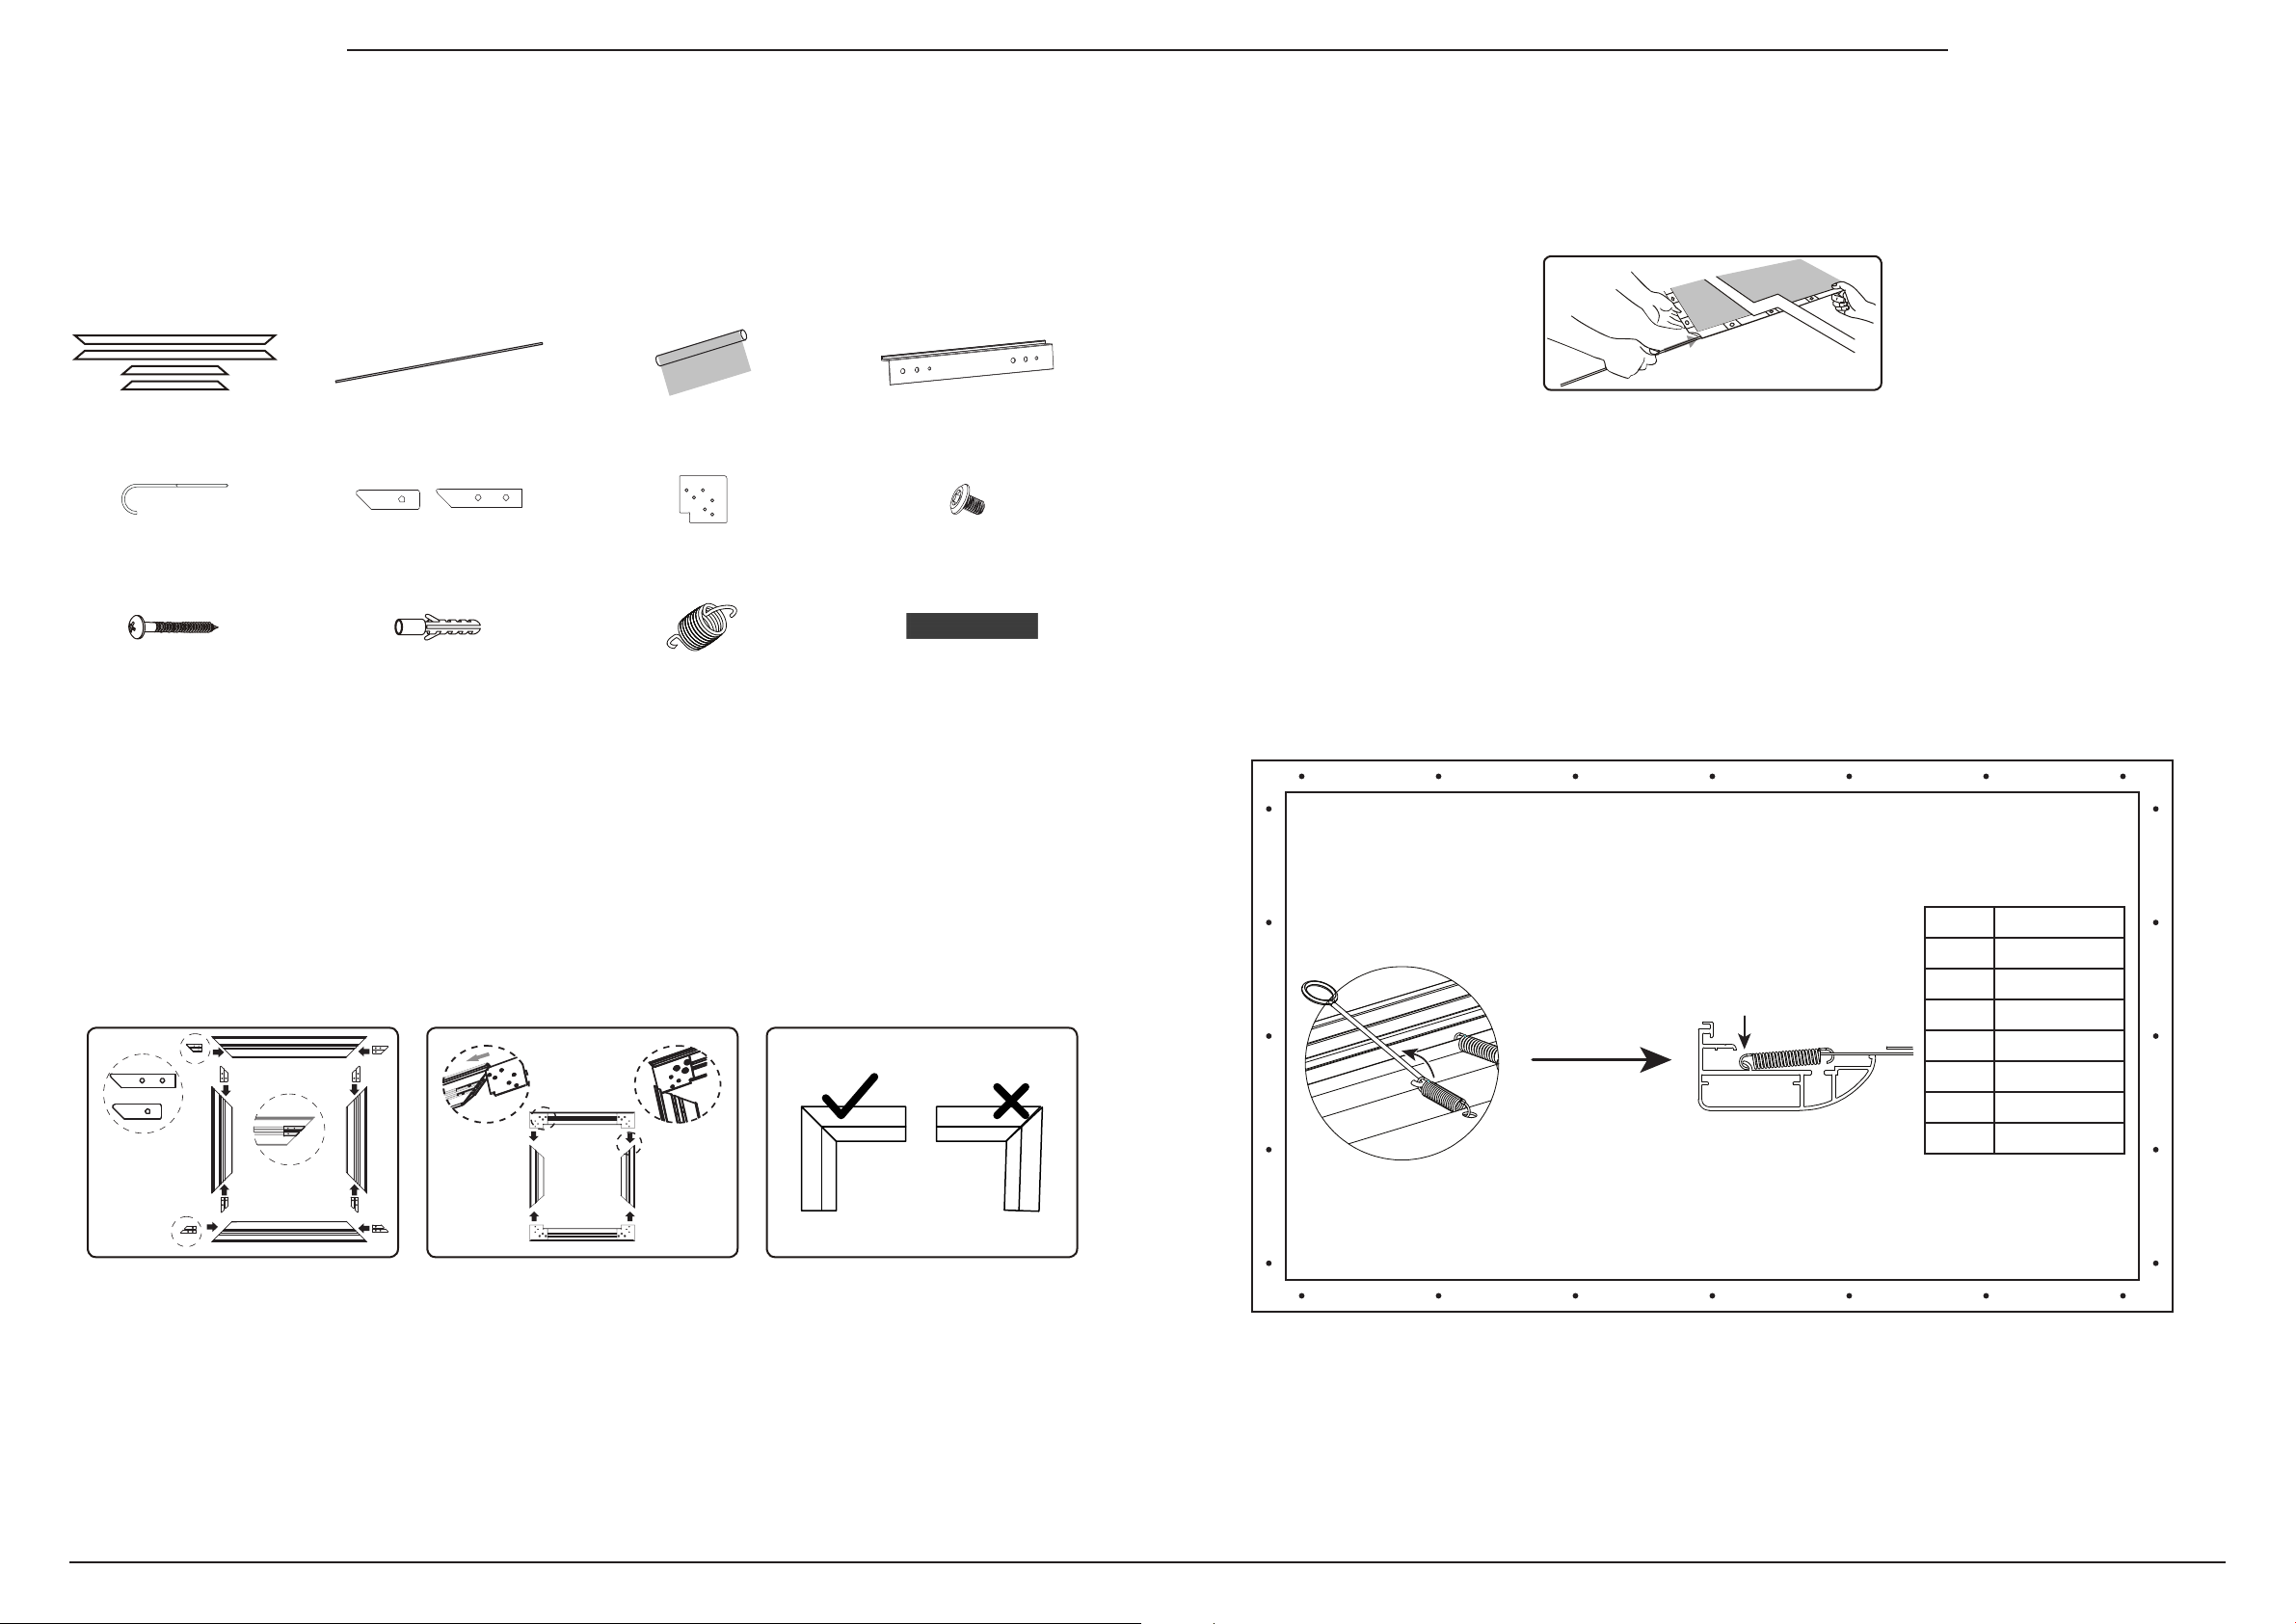
Step 1. Unpack the Screen
A. Lay out all the parts on a clean, flat surface.
B. To avoid stains or damage, do not unpack the screen material at this time.
Package Contents
Screen Frame
(2 Short, 2 Long)
Spring Tool (2)
M5 Wall Screws (18)
Screen Tension Rods
(2 Short, 2 Long)
Corner Bracket
Nut Plates (8ea.)
(90-145" only)
Masonry Anchors (18) Screen Material Springs
Screen
Material (1)
Corner Brackets (4)
(90-145" only)
Mounting Brackets
(1 upper, 1 lower)
Corner Bracket
Screws (24)
(90-145" only)
Scrim Cloth (1)
(AcoustiWeave only)
Step 3. Attach the Screen Material
A. Clean the work area to avoid staining the screen material. Begin with the assembled frame laying face-
down on a clean, soft surface.
B. Unpack the screen material and tension rods and lay the material down, centered in the frame.
C. Slide the tension rods into the loops on the edges of the material as shown.
D. Gather the spring tools and springs. Installation notes:
• On the spring, the large hook attaches to the tension rod installed in the screen material. The small
hook attaches to the frame.
• Hook the spring on the screen material, then to the frame.
• The springs should be hooked into the outermost channel in the back of the frame using the tool as
illustrated.
E. Using the spring tools, attach the spring in the center of each side first, then the corners, as shown below.
Once the first 12 springs are connected, work around the screen and attach the remainder, making sure
to keep the spring tension balanced.
Step 2. Assemble the Frame
A. Place all of the frame tubes face down on a flat, clean work surface and line up the ends to form the shape
of the finished screen.
B. 90-145" Models:
i. Insert the nut plates into the frame ends as shown. Use the corner brackets to align the holes correctly.
ii. Slide the corner brackets into the ends of the long frames and start a screw in each hole (threaded to
the nut plates). Leave the screws loose enough for the bracket to move freely.
iii. Slide the brackets into the short frame pieces, then thread the screws in until they are almost tight.
iv. Work around the frame tightening the screws in each corner until everything is square and tight.
8
7
Spring Installation
3 4
1
9
10
Size Spring Qty
92"
100"
106"
110"
120"
133"
145"
26
26
28
28
32
34
38
12
5
© 2017 Dragonfly 170321-1443
11
2
6
 Loading...