

Page 1

An Emergency Services Interactive Systems product
User Guide Manual
Version 3
Dragonfly Manual Version 3© Page 1
Page 2

END USER LICENSE AGREEMENT 5
DRAGONFLY™ SOFTWARE IS USED TO: 7
PRINTING 8
DISCLAIMER 8
MINIMUM INSTALLATION REQUIREMENTS 9
VERIFYING SYSTEM REQUIREMENTS 10
STARTING DRAGONFLY 11
UPDATING SOFTWARE 12
METHOD 1: 12
METHOD 2: 14
INCIDENT TAB 15
NEW ICON 15
OPEN ICON 15
BACKUP ICON 16
RESTORE ICON 16
PURGE ICON 16
ORG LIST ICON 17
ORG CHART ICON 17
COMPLEX ICON 17
STRUCTURE TAB ICON 18
PLANNING “P” TOOL ICON 18
FORMAT TOOLS 19
PRINT IAP TOOL 19
WEATHER TOOL ICON 20
MAP TOOL ICON 20
MIND MAP TOOL ICON 21
OP PERIOD ICON 21
CHART TOOL-MAP TOOLS 22
SALAMANDERLIVE COM™ ICON 22
SALAMANDER™ LEGACY TOOL ICONS 23
Dragonfly Manual Version 3© Page 2
Page 3

TRACK AND TAG ICONS 23
PRE-PLANNER TOOL ICON 24
SETUP TAB- PREFERENCES AND POSITION NAMES 25
POSITION NAMES 29
ROSTERS 30
ADD NEW RECORDS AND IMPORTING 32
EXPORTING ROSTERS 33
HELP TAB 33
DRAGONFLY 2010 NIMS ALL HAZARD ICS FORM SETS 34
FORMS TAB TOOL 35
FORMS-PLANNING “P” 37
COMPLETING THE ICS 201 INCIDENT BRIEFING FORM 38
COMPLETING THE ICS 202 INCIDENT OBJECTIVES FORM 42
COMPLETING THE ICS 203 ORGANIZATION ASSIGNMENT LIST FORM 43
COMPLETING THE ICS 204 ASSIGNMENT LIST 44
COMPLETING THE ICS 205 INCIDENT RADIO COMMUNICATION LIST 50
COMPLETING THE ICS 205A INCIDENT COMMUNICATION LIST 52
COMPLETING THE ICS 206 MEDICAL PLAN 53
COMPLETING THE ICS 207 INCIDENT ORGANIZATION CHART 55
COMPLETING THE ICS 208 SAFETY MESSAGE/PLAN 56
COMPLETING THE ICS 209 INCIDENT STATUS SUMMARY 57
COMPLETING THE ICS 210 RESOURCE STATUS CHANGE FORM 58
COMPLETING THE ICS 211 INCIDENT CHECK-IN LIST FORM 60
COMPLETING THE ICS 213 GENERAL MESSAGE FORM 61
COMPLETING THE ICS 213RR RESOURCE REQUEST MESSAGE 62
COMPLETING THE ICS 214 UNIT LOG FORM 63
COMPLETING THE ICS214-E ELECTRONIC UNIT LOG 64
COMPLETING THE ICS 215 OPERATIONAL PLANNING WORKSHEET 65
COMPLETING THE ICS 215A INCIDENT ACTION PLAN SAFETY ANALYSIS FORM 67
COMPLETING THE ICS 218 VEHICLE SUPPORT/EQUIPMENT INVENTORY FORM 68
COMPLETING THE ICS 230 DAILY MEETING SCHEDULE FORM 69
COMPLETING THE ICS 233 OPEN ACTION TRACKER FORM 70
APPENDIX A 71
Dragonfly Manual Version 3© Page 3
Page 4

CONNECTING DRAGONFLY™ TO SALAMANDERLIVE.COM™ 72
SALAMANDER™ LOCAL CONNECTION PREFERENCE SETTINGS 75
SALAMANDER™ LOCAL CONNECTION (RAPIDTAG™) 76
SALAMANDER™ LOCAL CONNECTION PREFERENCE SETTINGS-COMMAND 77
SALAMANDER™ LOCAL CONNECTION MOBILE EXPRESS™ 78
SALAMANDER™ LOCAL CONNECTION COMMAND IMPORT 79
SALAMANDER™ LOCAL CONNECTION (NETWORKED) 80
LOCAL CONNECTIONS (NETWORKED) RAPIDTAG™ 80
LOCAL CONNECTIONS (NETWORKED) MOBILE EXPRESS™ 83
SALAMANDER™ LOCAL CONNECTIONS (NETWORKED) COMMAND™ 86
SALAMANDERLIVE CONNECTION 87
Dragonfly Manual Version 3© Page 4
Page 5

End User License Agreement
LICENSE: ESIS Dragonfly™ grants a non-exclusive, non-transferable, non-assignable License to
you to use one copy of the supplied software (“Software”) on a single computer (the “Initial”
license), provided such use is not a contravention of United States export regulations or the
result of a distribution outside North America. For subsequent licenses (the “Additional” site
licenses), you may use as many copies of the supplied software that correspond to the number
of multiple licenses granted. “Use” on a computer occurs when it is loaded into the temporary
memory (i.e., RAM) or installed into the permanent memory (e.g., hard disk) of that computer.
OWNERSHIP: The Software, which is protected by United States copyright laws and
international treaty provisions, is owned by ESIS Dragonfly™ and/or its suppliers. You agree to
treat the Software and documentation as confidential information and in accordance with
United States copyright laws, international treaty, or other laws, which ever best protects ESIS’s
or its suppliers’ intellectual property rights. The right to “rent”, “sell”, “resell” or otherwise
transfer the Software or documentation in whole or part, either temporarily or permanently, is
prohibited unless authorized in writing from ESIS.
COPIES: Licensee may make one copy of the Software solely for backup or archival purposes, or
transfer the Software to a single hard disk or file-server of a multi-user or network system and
maintain the original Software for backup or archival purposes, provided Licensee reproduces
all notices protecting ESIS’s or its suppliers’ intellectual property rights. The Software, in whole
or part, or any authorized copy, may not be modified, altered, translated, decompiled,
disassembled, or reverse engineered, in whole or part. The Software cannot be transferred via
any media other than that on which it is supplied or on which its use is licensed.
TERMINATION: This License is effective until terminated. This License shall terminate
automatically without notice if the Licensee is in material breach of any of its terms. Should
this license terminate automatically or should Licensee terminate this license at any time,
Licensee shall destroy all existing copies of the Software and documentation.
LIMITED WARRANTY: TO THE EXTENT ALLOWED BY LOCAL LAW, THIS SOFTWARE IS PROVIDED
TO YOU "AS IS" WITHOUT WARRANTIES OR CONDITIONS OF ANY KIND, WHETHER ORAL OR
WRITTEN, EXPRESS OR IMPLIED. ESIS SPECIFICALLY DISCLAIMS ANY IMPLIED WARRANTIES OR
CONDITIONS OF MERCHANTABILITY, SATISFACTORY QUALITY, NONINFRINGEMENT, TITLE,
ACCURACY OF INFORMATIONAL CONTENT, AND FITNESS FOR A PARTICULAR PURPOSE. THE
ENTIRE RISK AS TO THE RESULTS AND PERFORMANCE OF THE SOFTWARE IS ASSUMED BY YOU.
NO ORAL OR WRITTEN INFORMATION OR ADVICE GIVEN BY ESIS OR ESIS'S AUTHORIZED
REPRESENTATIVES SHALL CREATE A WARRANTY. Some jurisdictions do not allow exclusions of
implied warranties or conditions, so the above exclusion may not apply to you to the extent
prohibited by such local laws. You may have other rights that vary from country to country,
state to state, or province to province.
LIMITED LIABILITY AND INDEMNIFICATION: EXCEPT TO THE EXTENT PROHIBITED BY LOCAL
LAW, IN NO EVENT WILL ESIS OR ITS DIRECTORS, OFFICERS, EMPLOYEES, AGENTS OR SUPPLIERS
BE LIABLE FOR DIRECT, INDIRECT, SPECIAL, INCIDENTAL, CONSEQUENTIAL, PUNITIVE, OR OTHER
Dragonfly Manual Version 3© Page 5
Page 6

DAMAGES (INCLUDING LOST PROFIT, LOST DATA, OR DOWNTIME COSTS), ARISING OUT OF THE
USE, INABILITY TO USE, OR THE RESULTS OF USE OF THE SOFTWARE, WHETHER BASED IN
WARRANTY, CONTRACT, TORT OR OTHER LEGAL THEORY, AND WHETHER OR NOT ESIS WAS
ADVISED OF THE POSSIBILITY OF SUCH DAMAGES.
Under no circumstances shall ESIS liability exceed the lower of the suggested list price of the
actual purchase price paid by you to use the Software, regardless of any form of the claim.
Your use of the Software is entirely at your own risk. Should the Software prove defective, you
assume the entire cost of all service, repair or correction. Some jurisdictions do not allow the
exclusion or limitation of liability for incidental or consequential damages, so the above
limitation may not apply to you to the extent prohibited by such local laws. You shall indemnify
and hold ESIS and its suppliers harmless from and against any claims or liability arising out of
the use, reproduction or distribution of the Software.
GENERAL TERMS: This License constitutes the entire agreement between the parties with
respect to the subject matter hereof and shall supersede all previous negotiations,
commitments, and writing. It shall not be released, discharged, changed or modified except by
an instrument in writing signed by a duly authorized officer of each of ESIS and Licensee. No
course of conduct, action or inaction on behalf of ESIS shall be deemed to be a waiver of any of
ESIS’s rights. This License shall be governed and construed in all respect in accordance with the
laws of the State of California, and the parties submit to the non-exclusive jurisdiction of the
federal and state courts of the State of California.
Dragonfly Manual Version 3© Page 6
Page 7

Introduction to Dragonfly™ Software
Dragonfly™ software is used to:
1. Create Pre-plans of critical infrastructure that captures and displays valuable
information of the following:
a. NFPA® 1620 Standard for Pre-Incident Planning.
b. LEPC Tier II mandatory reported chemicals and MSDS (Material Safety
Data Sheets).
2. Create Incident Action Plans and Event Actions Plans for the following NIMS
compliant “All Hazard” response plans:
a. Single/Multiple Incident and Events
b. Single/Multiple jurisdiction agencies
c. Area Command
d. Emergency Operation Center planning
e. HICS ( Hospital Incident Command System)
3. Create HSEEP (Homeland Security Exercise Evaluation Program) compliant
exercise planning, scheduling, and exercise activities.
4. Integration with Salamander TAG™ (01-TAG™, rapidTAG™ and
Salamanderlive.com™) TRACK™ (02-TRACK™, Mobile Express™, Mobile ICS™,
and Command™), and REPORT™ InterTRAX™) software tools through
synchronization and consolidation applications.
5. Display GIS information and incident resource locations through on-board tool
application.
6. Automated ICS Form production and completion.
Dragonfly™ software is setting the standard for Incident Action Planning throughout the
United States. This software was designed with the following objectives in mind.
Ease of use – Dragonfly™ software is based on Microsoft™ based operating system.
Much of the function and use of the software is intuitive for the user. Learning to
produce plans is a straight forward process that takes advantage of the user’s
knowledge of Incident Command System methodologies.
Survivability – Dragonfly™ in its current capacity, is designed to be installed in a
locally (single license/single device) environment. All plans and data are available to
the local user regardless of the presence of an internet connection (COMMS out).
Plans can be shared through file sharing or LAN (Local Area Network) allowing for
multiple licensed users to cooperatively work on the same plan in “near-real time”
environments.
Dragonfly Manual Version 3© Page 7
Page 8

Printing
Dragonfly™ software is capable of printing to any MS-Windows compatible printer.
Dragonfly™ allows the user to print documents as PDF (Portable Document File), MS-Word™
TIFF (Tagged Image File Format), or HTML (Hyper-text markup language).
Printing of Organization Charts can be sent to “plot” printers as long as drivers are installed
locally or networked.
For more information or support please contact
1-800-587-1490
www.dragonfly-360.com/contact
Disclaimer
ESIS Dragonfly™ has made its best efforts to make the Dragonfly™ reliable and defect-free;
however, any computerized system is subject to malfunction including operator error,
undetected system “bugs”, and power or communication outages.
ESIS Dragonfly™ cannot and does not warrant that the system will perform flawlessly at all
times and under all conditions.
Dragonfly Manual Version 3© Page 8
Page 9

Minimum System
Requirements
Processor
1.6 GHz or faster processor.
RAM
1 GB of RAM (1.5 GB if running on a virtual machine)
Integrated Video
Card
DirectX 9-capable video card running at 1024 x 768 or higher display
resolution.
Free Hard Disk
USB Ports
2
Supported Operation
Systems
Windows 7, 8,10
Supported
Architectures
Installation
permissions
C:Program Files Folder> <Emergency Services Interactive
Systems><DragonflyX>
Network information
There is a separate server program that acts as a hub for the
Dragonfly clients in “Collaborative Mode”. The server program by
default installs in the <Program Files Folder> in a sub folder
<Emergency Services Interactive Systems><Dragonfly Server>.
The collaborative module uses the computer's network IP address to
establish connection with other computers through the default port
1875. The user has the option to change the port before making the
connection.
Licensing and version
update process
The licensing process uses a registration tool that is located within
the program. The process captures information related to the name
of the computer that the installation has occurred on and the CPU
serial number upon completion of the registration event. After the
registration event a “.dat” file is created containing the license file
key.
Updating processes are accomplished through an internet
connection. The process contacts an external server and then a
version check is performed. A patch .exe is downloaded and
installed into the proper directory.
2. Installing Dragonfly™ Software
Minimum installation requirements
Dragonfly Manual Version 3© Page 9
Page 10

Verifying System Requirements
Verify the Operating
System and Service Pack
Click on “Start” and type “System Information” into the search box. Select the “System
Information” Icon.
*Cycle through the System Summary to compare against the “Minimum Installation
Requirements” list.
Dragonfly Manual Version 3© Page 10
Page 11
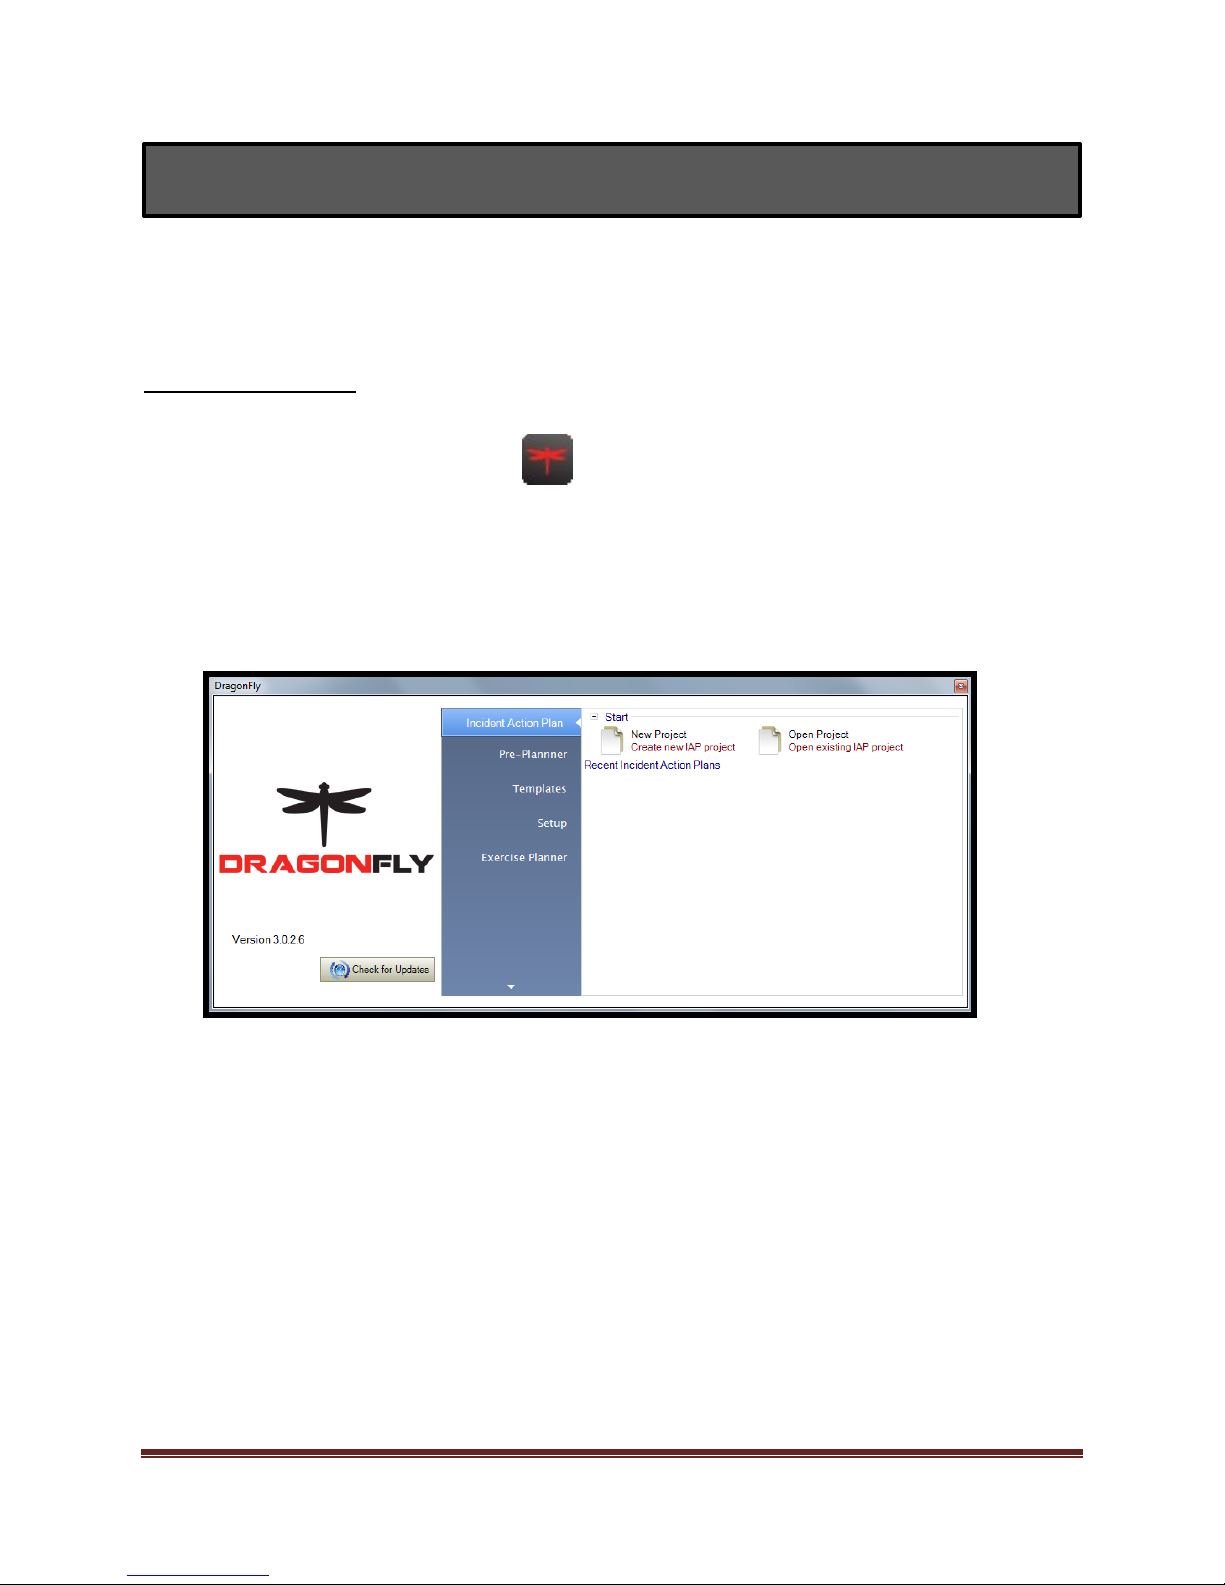
Double click on the Dragonfly Icon.
3. Dragonfly™ User Guide
- OR -
Click Start > All Programs > Emergency Services Interactive Systems > Dragonfly > Dragonfly
The Dragonfly start screen will appear shortly after.
The Dragonfly™ section of the User Guide provides you with a brief overview of the initial
startup of the program. This manual is designed to follow the training curriculum and exercises.
If at any time technical support is required, please contact Dragonfly Technical support.
Starting Dragonfly
OR
Dragonfly Manual Version 3© Page 11
Page 12
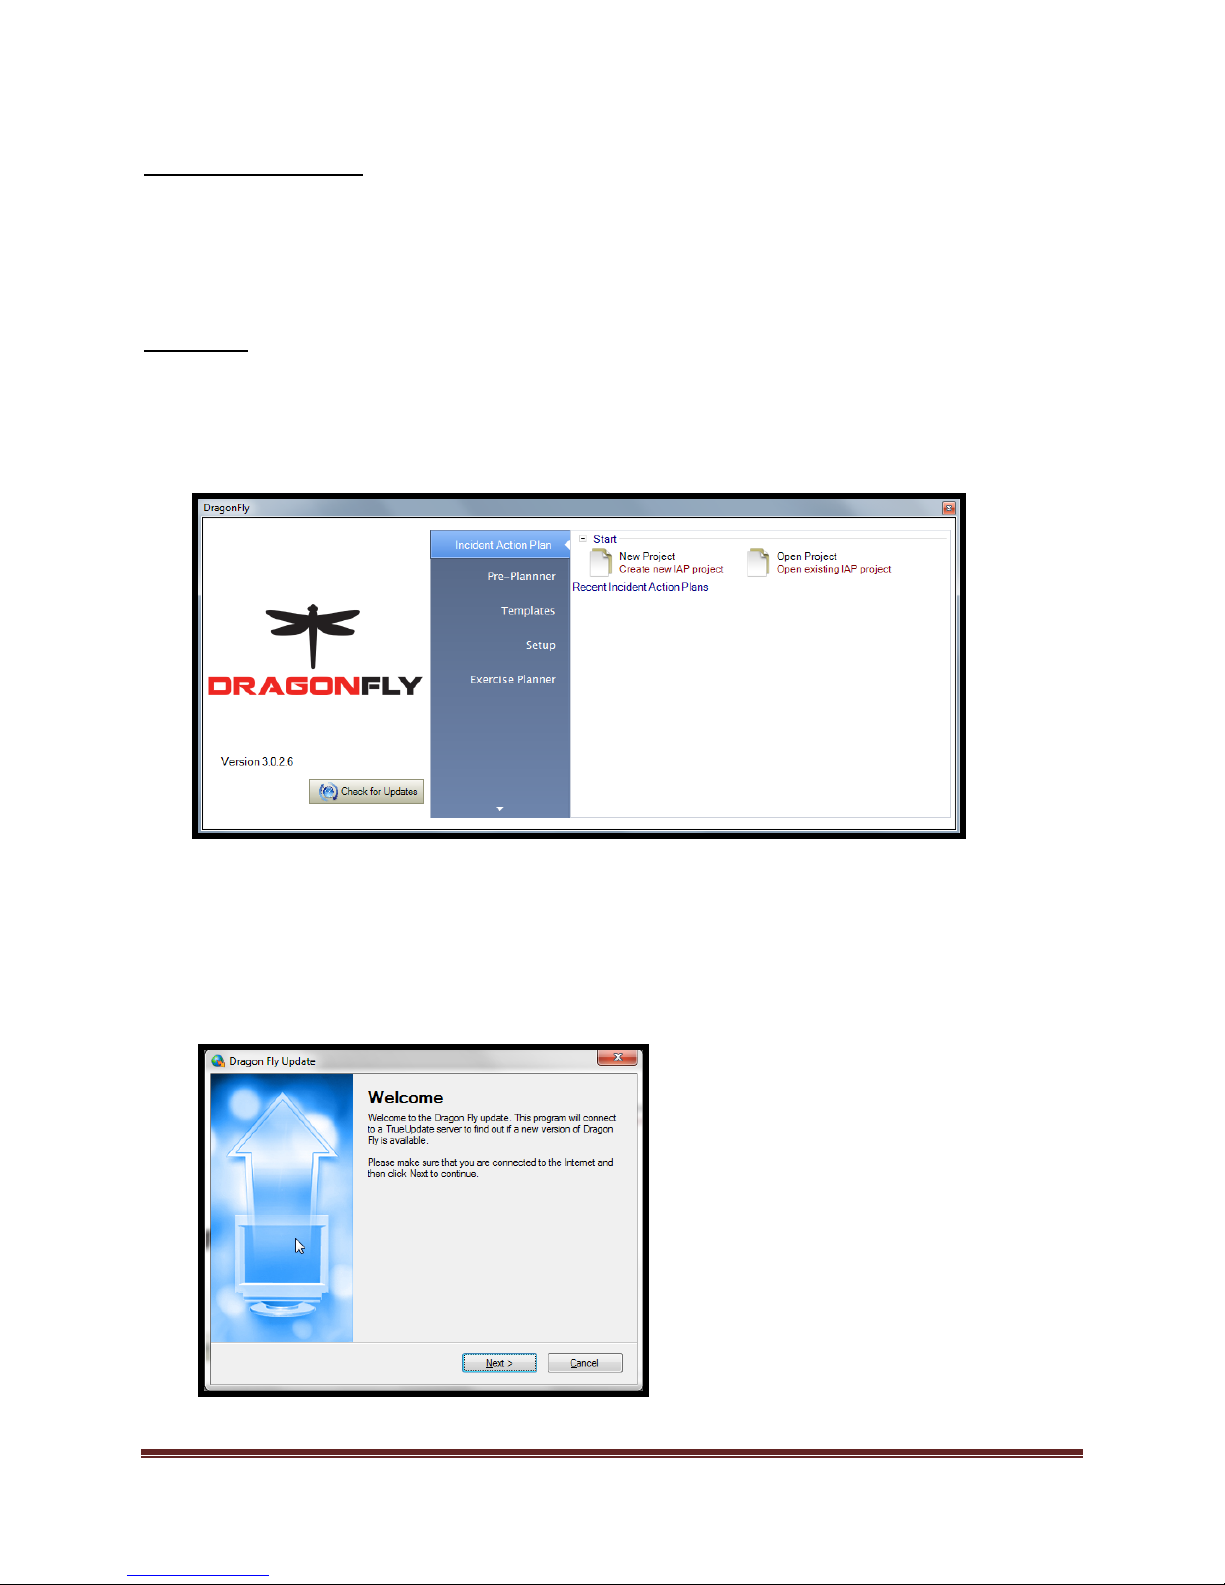
Updating Software
Read and follow the prompts.
Use the mouse to select the button. After the selection is made the following screen and
directions will be shown:
Start Dragonfly™ following the steps as previously described. Once the program has started, verify
an internet connection is available. Once verified, locate the “Check for updates” button on the
start screen.
A feature of Dragonfly™ is the ability for the user to check for updates to the program. An
internet connection is required.
There are 2 methods to “Update” the software.
Method 1:
Dragonfly Manual Version 3© Page 12
Page 13
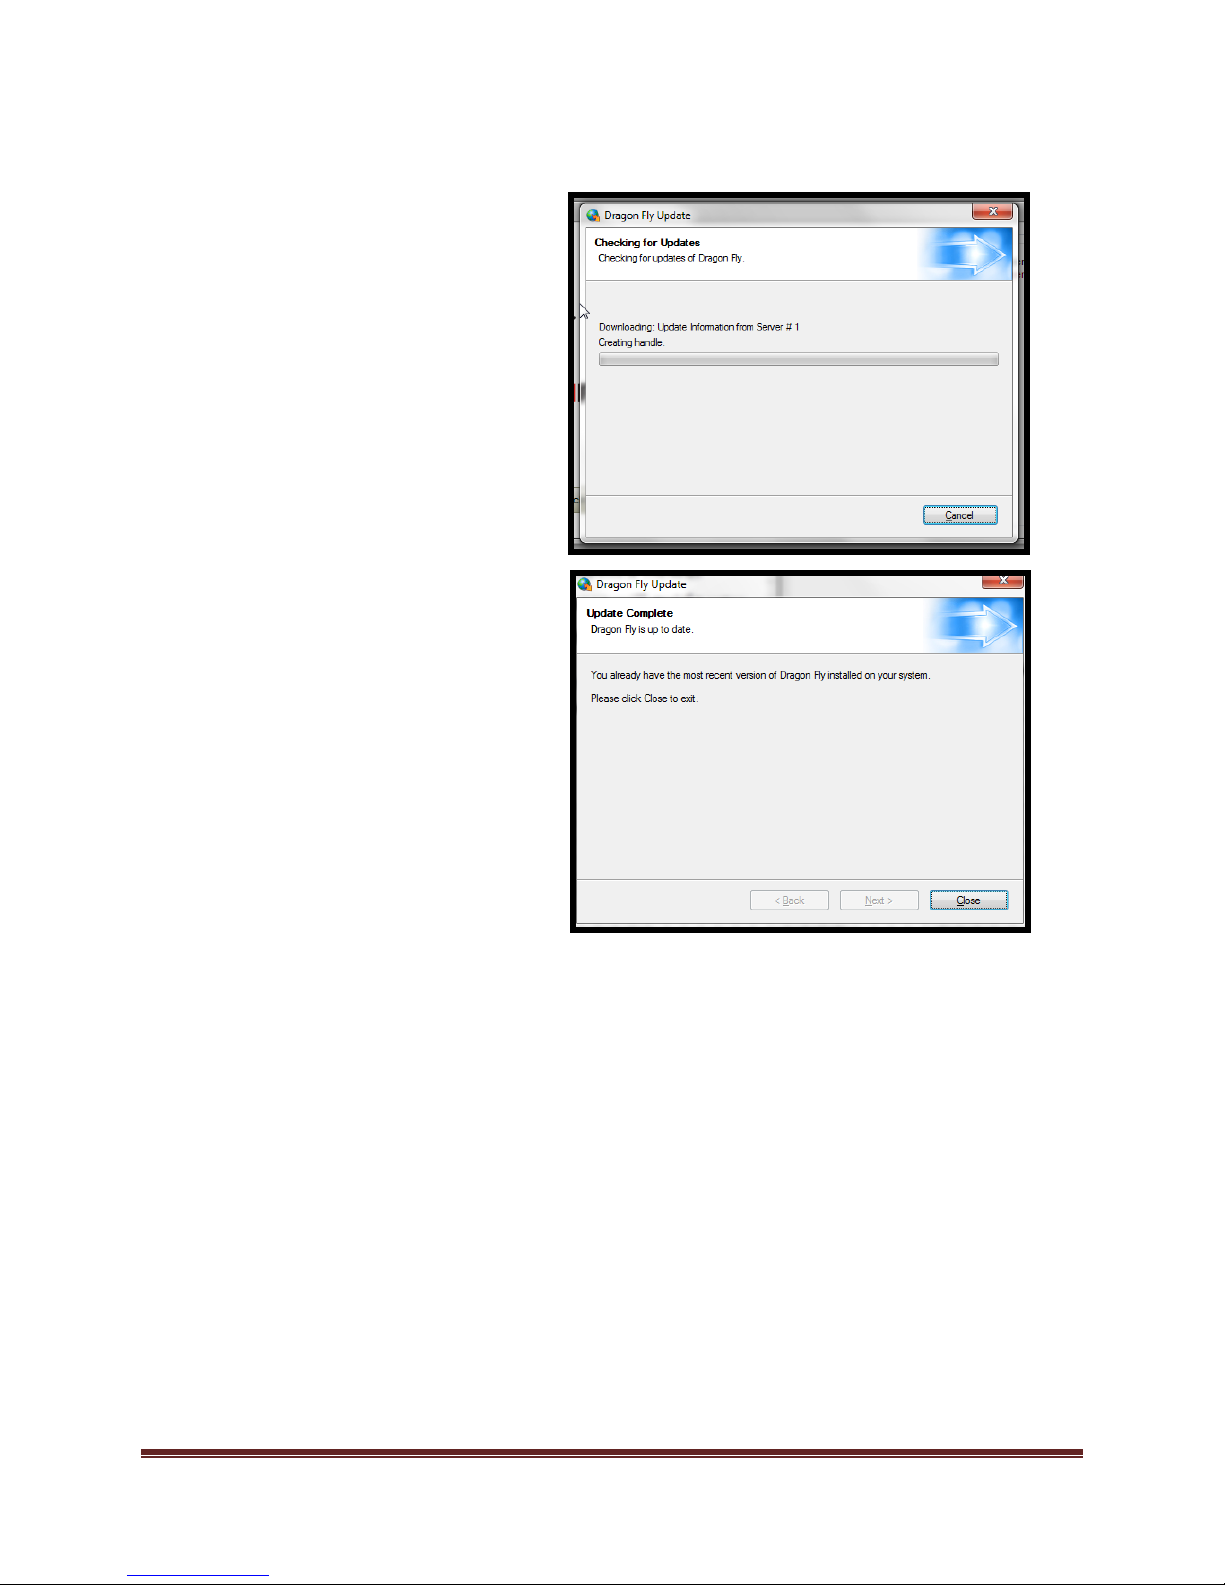
The software will contact the
Dragonfly™ server to download the
latest patch available. If the
software has the most current
version, the software will inform
you of such.
If the software detects a newer
version, the software will guide you
through the process of updating.
*If the software cannot update due
to security settings, contact
Dragonfly™ Technical Support
Dragonfly Manual Version 3© Page 13
Page 14
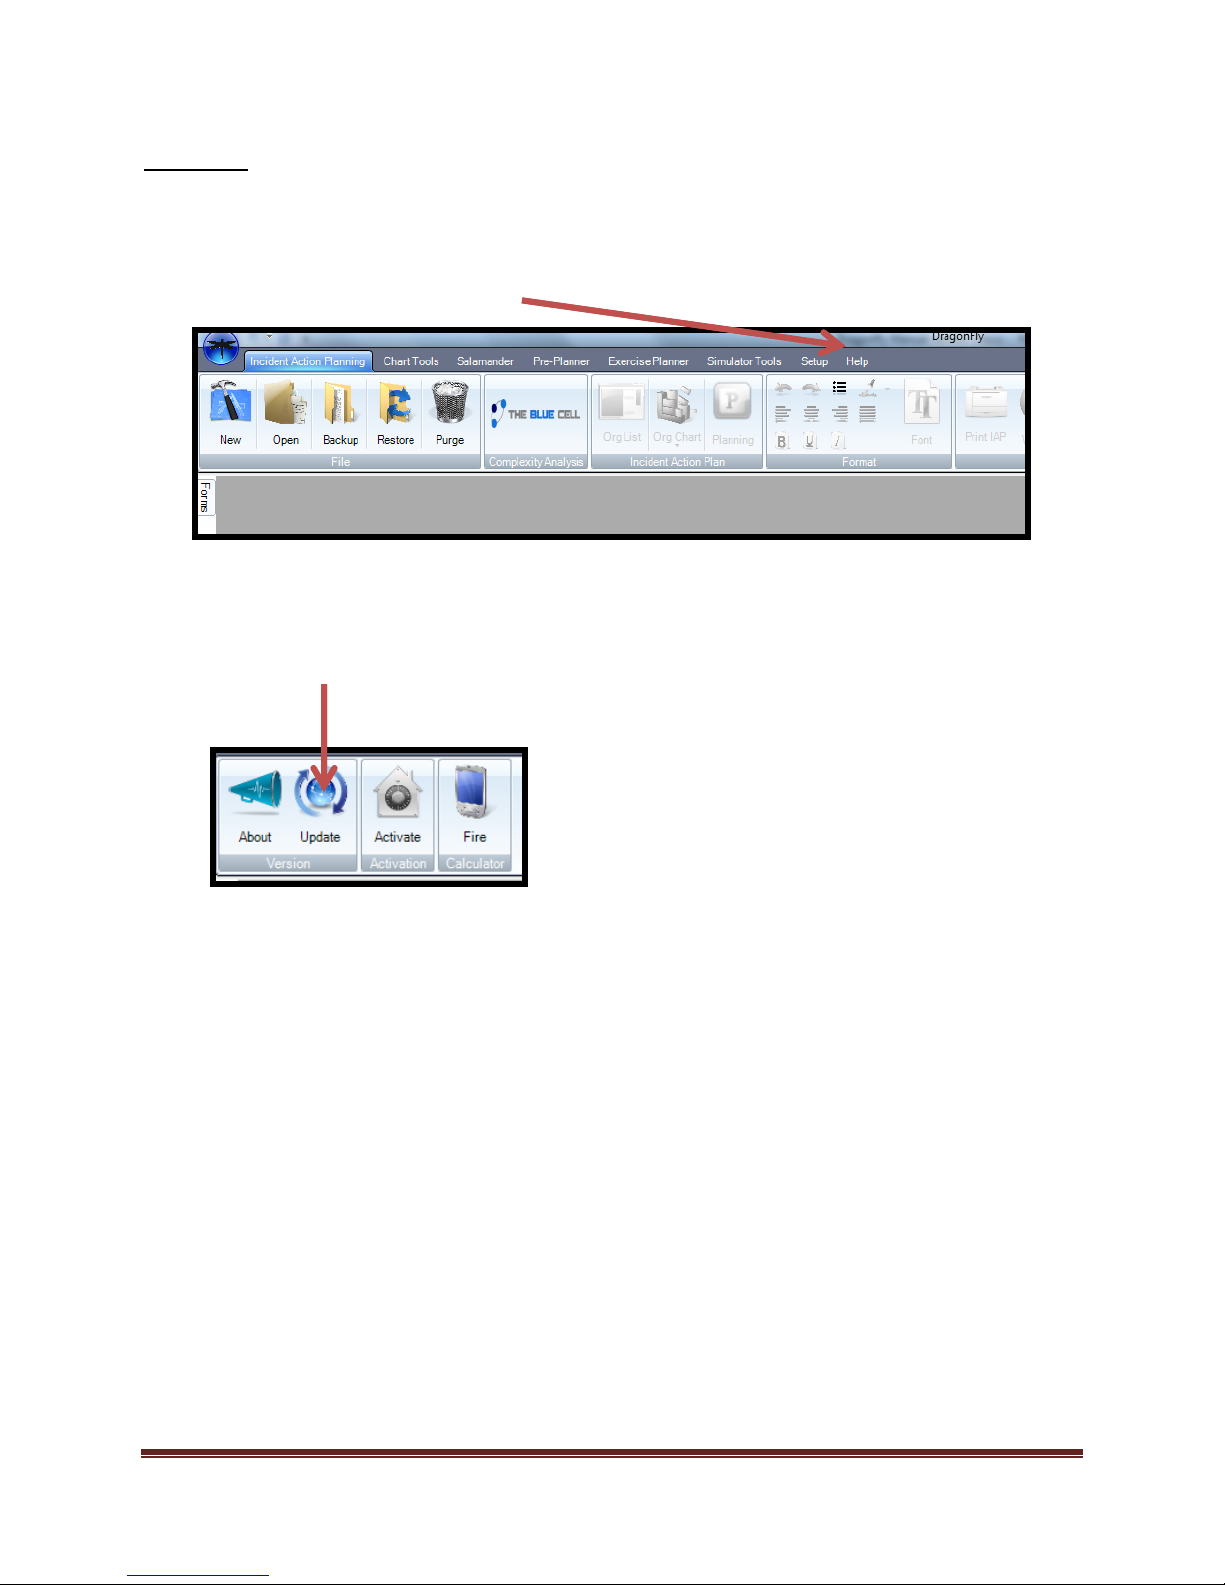
Method 2:
Updating can now be accomplished
following the same steps as
described in “Updating Method 1.”
This method is used if the user would prefer to check for updates from inside of the program.
Select the “Help” tab.
Select the “Update” tab.
Dragonfly Manual Version 3© Page 14
Page 15
4. Toolbars and Icons
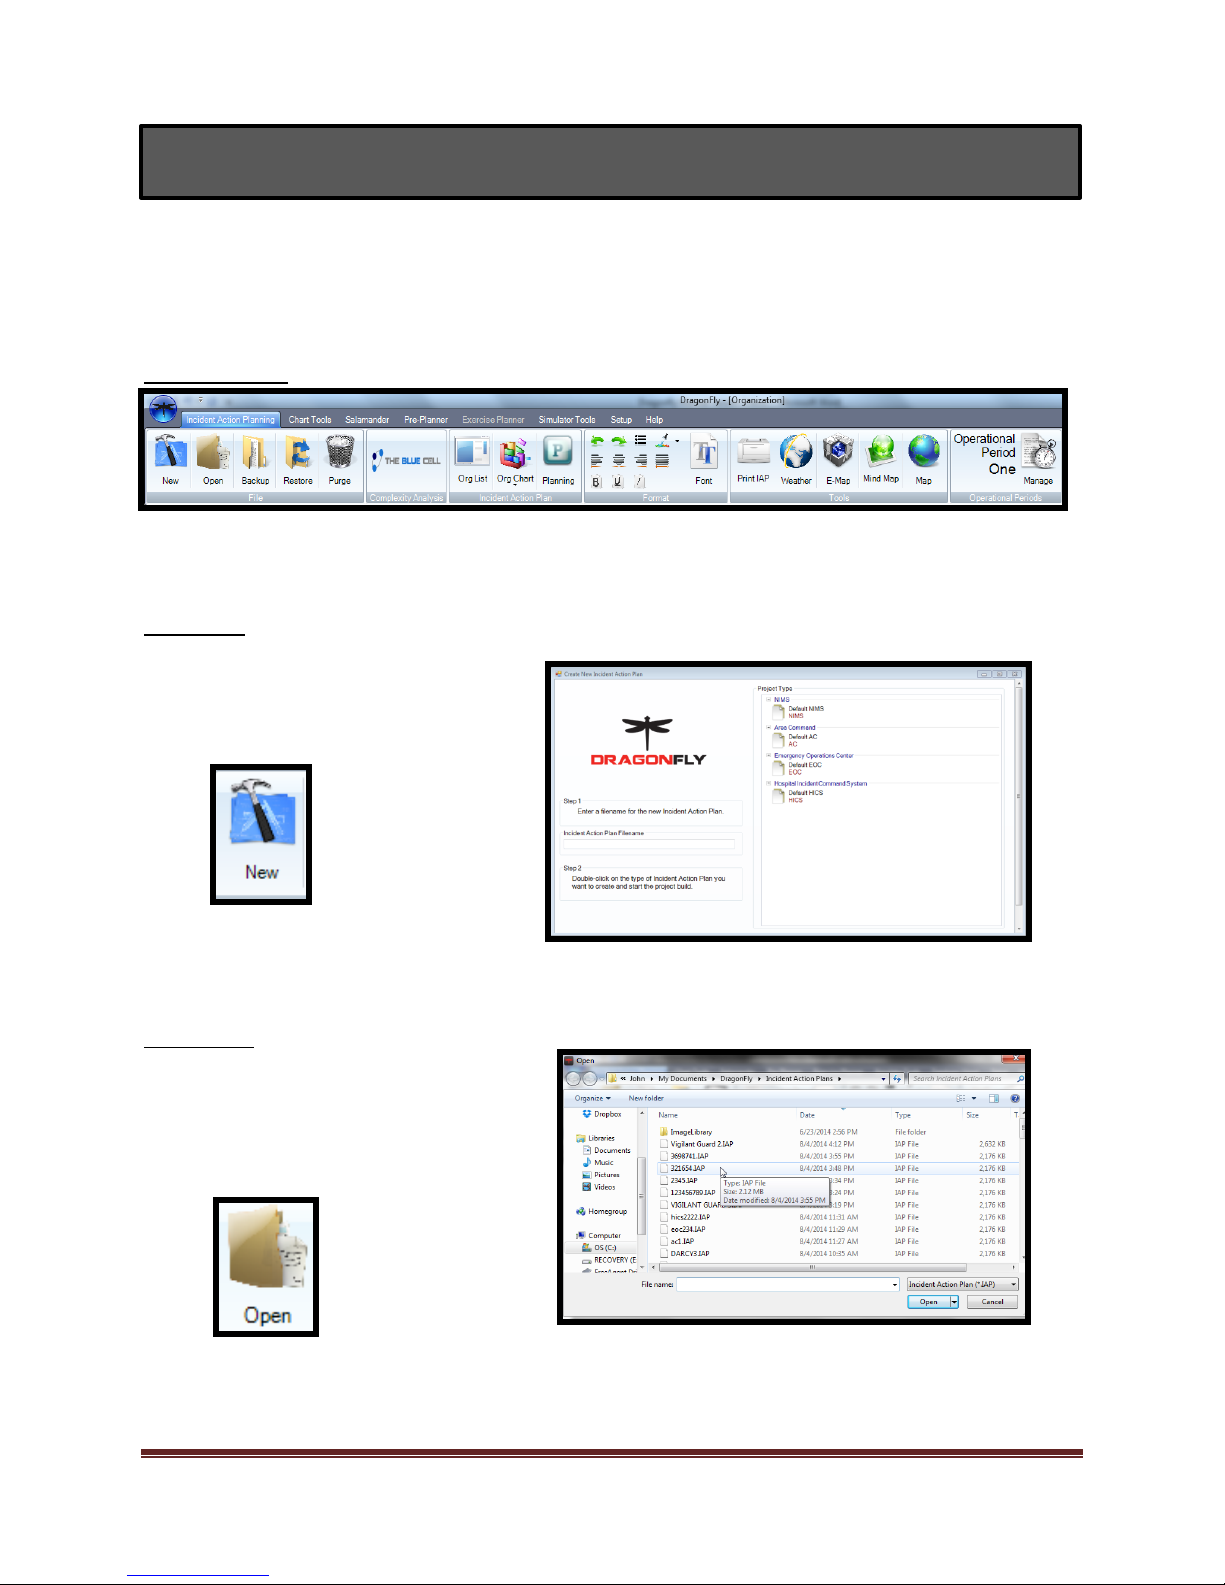
The “New” icon allows user to
start a new plan from within the
program.
The “Open” icon allows user to
open an existing plan located in a
default folder or location of
choice.
Dragonfly™ is designed for the Microsoft™ OS. This design allows the user to start using the
software in a short period of time. The icons are designed to visually describe to the user the
operation or function it represents. Here are the Toolbars and Icons to review.
Incident Tab
New Icon
Open Icon
Dragonfly Manual Version 3© Page 15
Page 16
Backup Icon
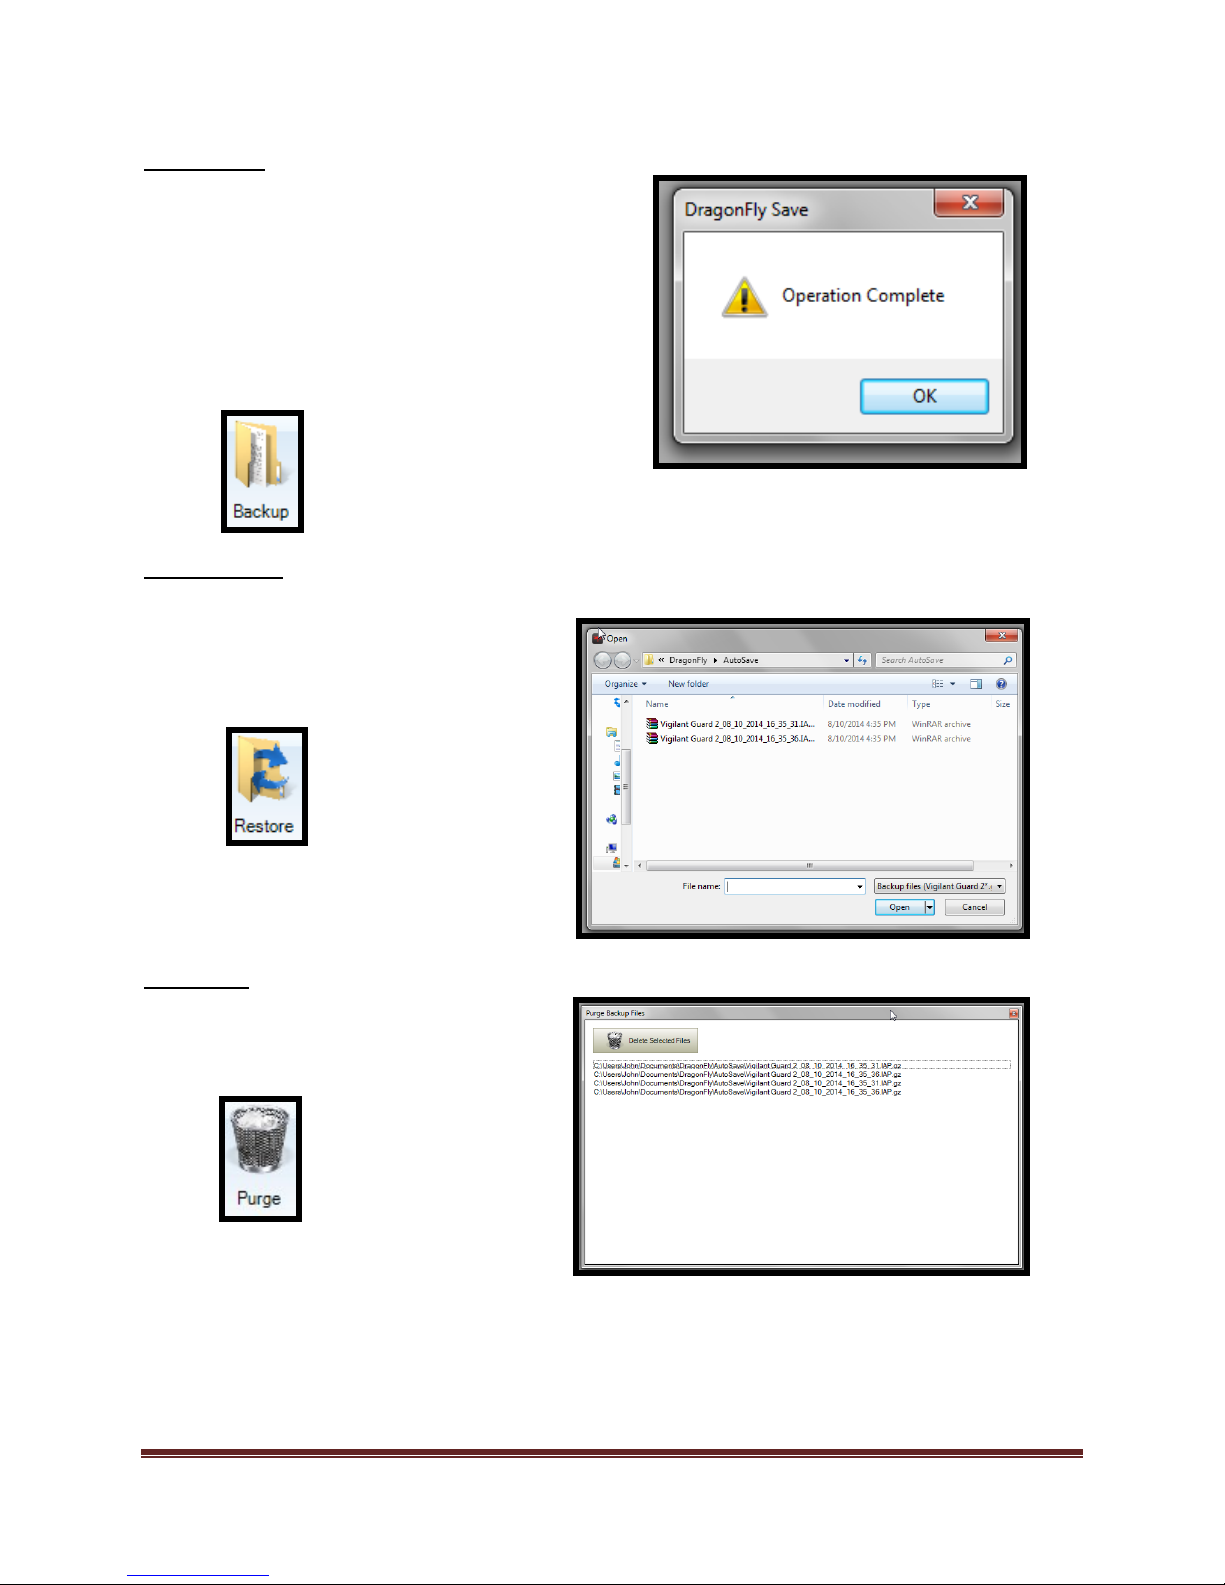
The “Backup” icon allows user
to create a “Backup” file. In the
case where there is more than
one operational period, the
backup won’t include the other
operational periods.
Back-up file location:
C:\Users\Admin\Documents\DragonFly\AutoSave
The “Restore” icon allows user to
restore from a set time point.
Select .zip files to restore.
The “Purge” icon allows the user
to remove/delete backed up files.
Restore Icon
Purge Icon
Dragonfly Manual Version 3© Page 16
Page 17
Org List Icon
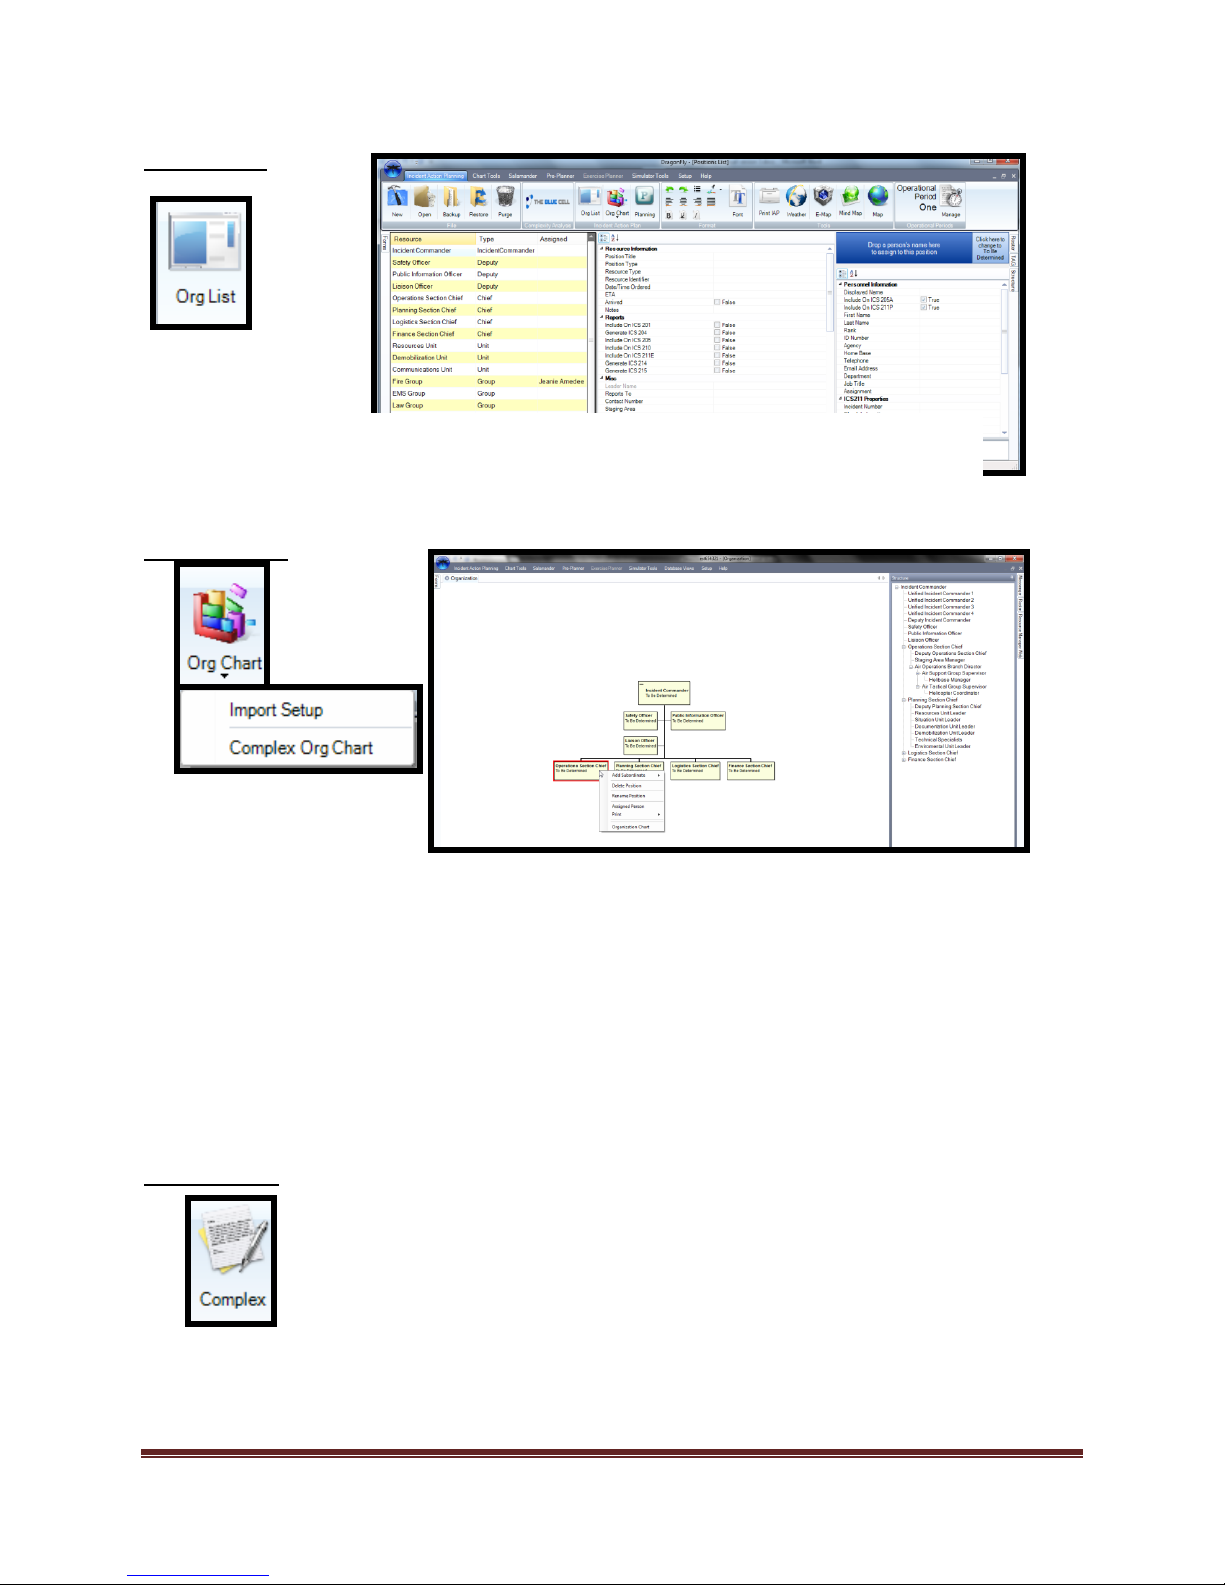
The “Org Chart” icon allows the user to add positions and build plans using an organization
chart. NIMS All Hazard positions are available. If tactical or custom positions are required, the Org
Chart tool can accommodate those needs as well.
The “Org Chart” icon also allows the user to join additional “Incident/Event Action Plans” to
existing files through the “Import Setup” command.
The “Complex Org Chart” command is used to display the joined plans in a separate view.
The “Complex” icon is used for creating and displaying incident complexes in “Area
Command” type planning scenarios.
The “Org List” icon allows the user to add/edit records using a multi-window interface to affect
updates and modifications across the plan.
Org Chart Icon
Complex Icon
Dragonfly Manual Version 3© Page 17
Page 18
Structure Tab Icon
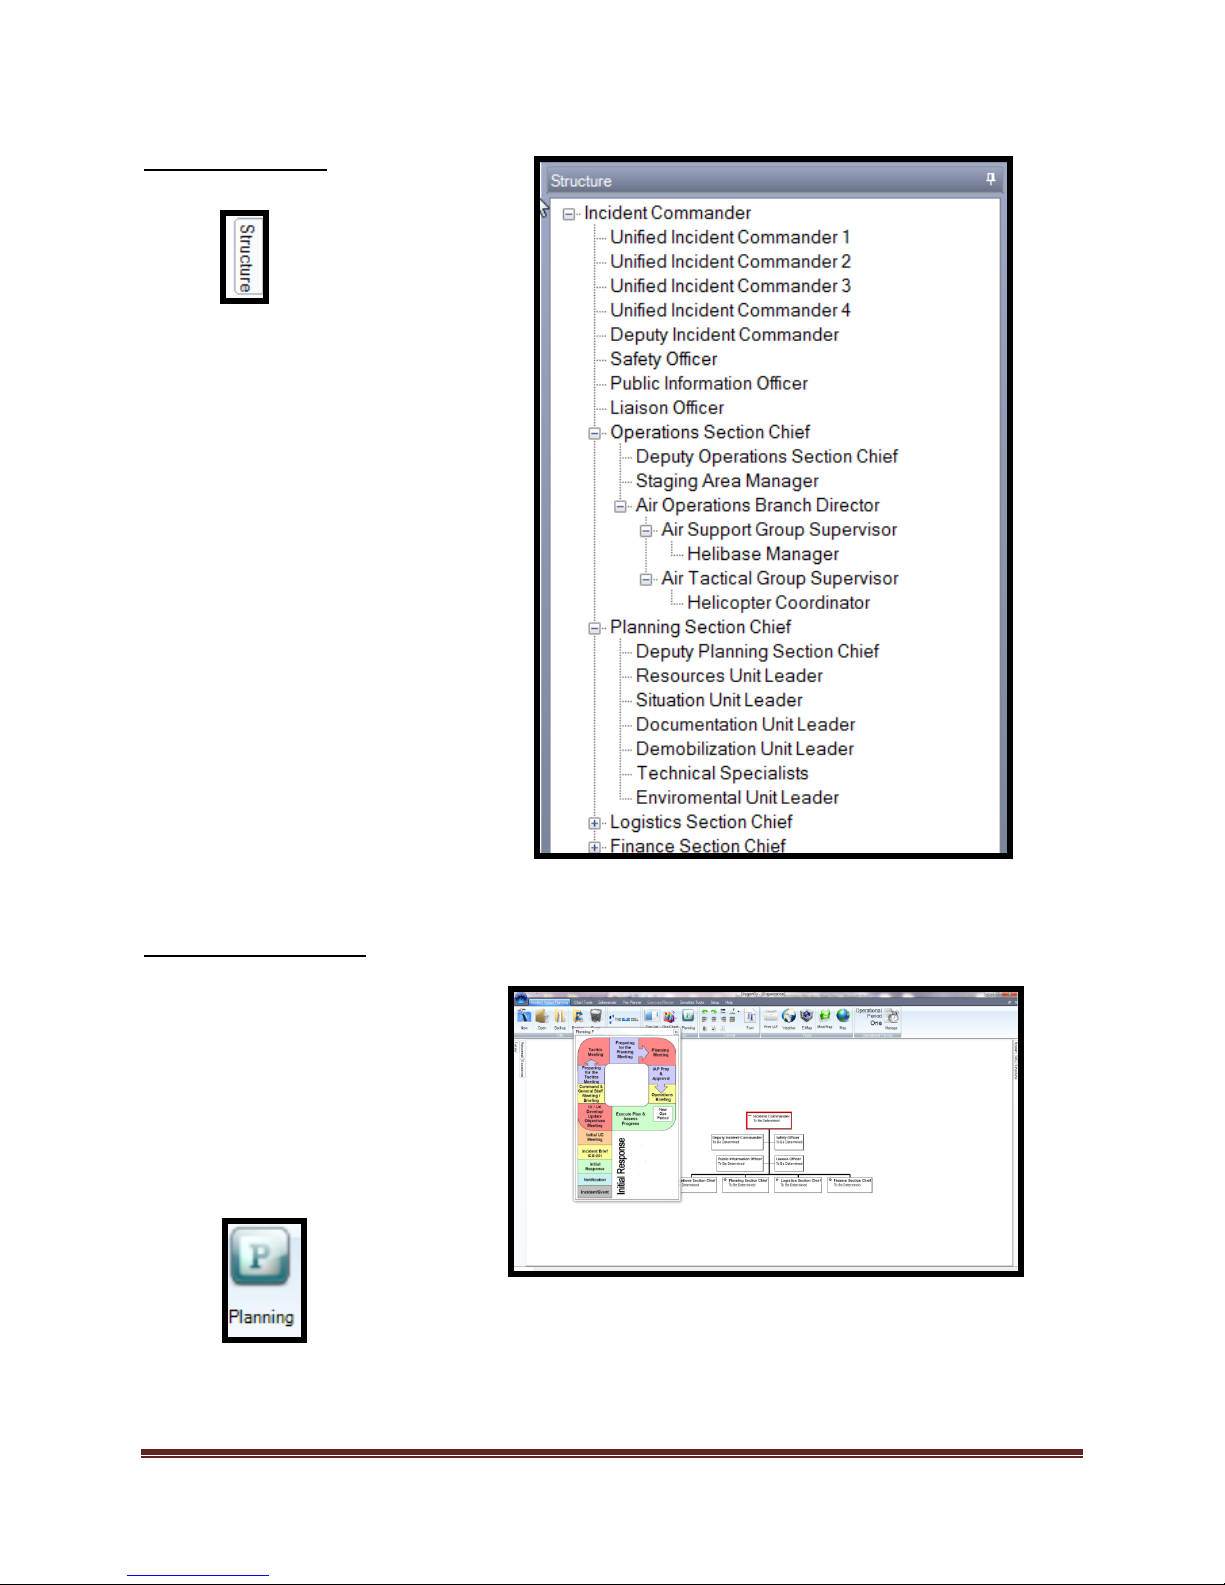
The “Structure Tab” is the
default tool to add positions to
the Organization Chart. It is
located on the right side of the
screen. Although it is available
throughout the program, the
positions are not applied
unless you have the Org chart
open.
The “Planning P” is used
within ICS as a tool to
coordinate meetings, planning
activities, and responsibilities.
This tool is connected to
various ICS forms within the
program.
Planning “P” Tool Icon
Dragonfly Manual Version 3© Page 18
Page 19

Format Tools
Format tools allow editing and font
changes for text in the ICS Forms
The Print Manager is
used to select which
forms will be printed for
the IAP. Plans can be
printed as a PDF, Word
document, TIFF, or
HTML document.
Print IAP allows production of the
complete IAP to include a cover page.
Print IAP Tool
Dragonfly Manual Version 3© Page 19
Page 20

Weather Tool Icon
Weather tool allows
the user to browse for a
weather report (internet
required)
E-Map allows the
user to build basic
maps
Map tool allows the user
to insert their
jurisdiction’s web based
GIS servers via URL.
E-Map
Map Tool Icon
Dragonfly Manual Version 3© Page 20
Page 21
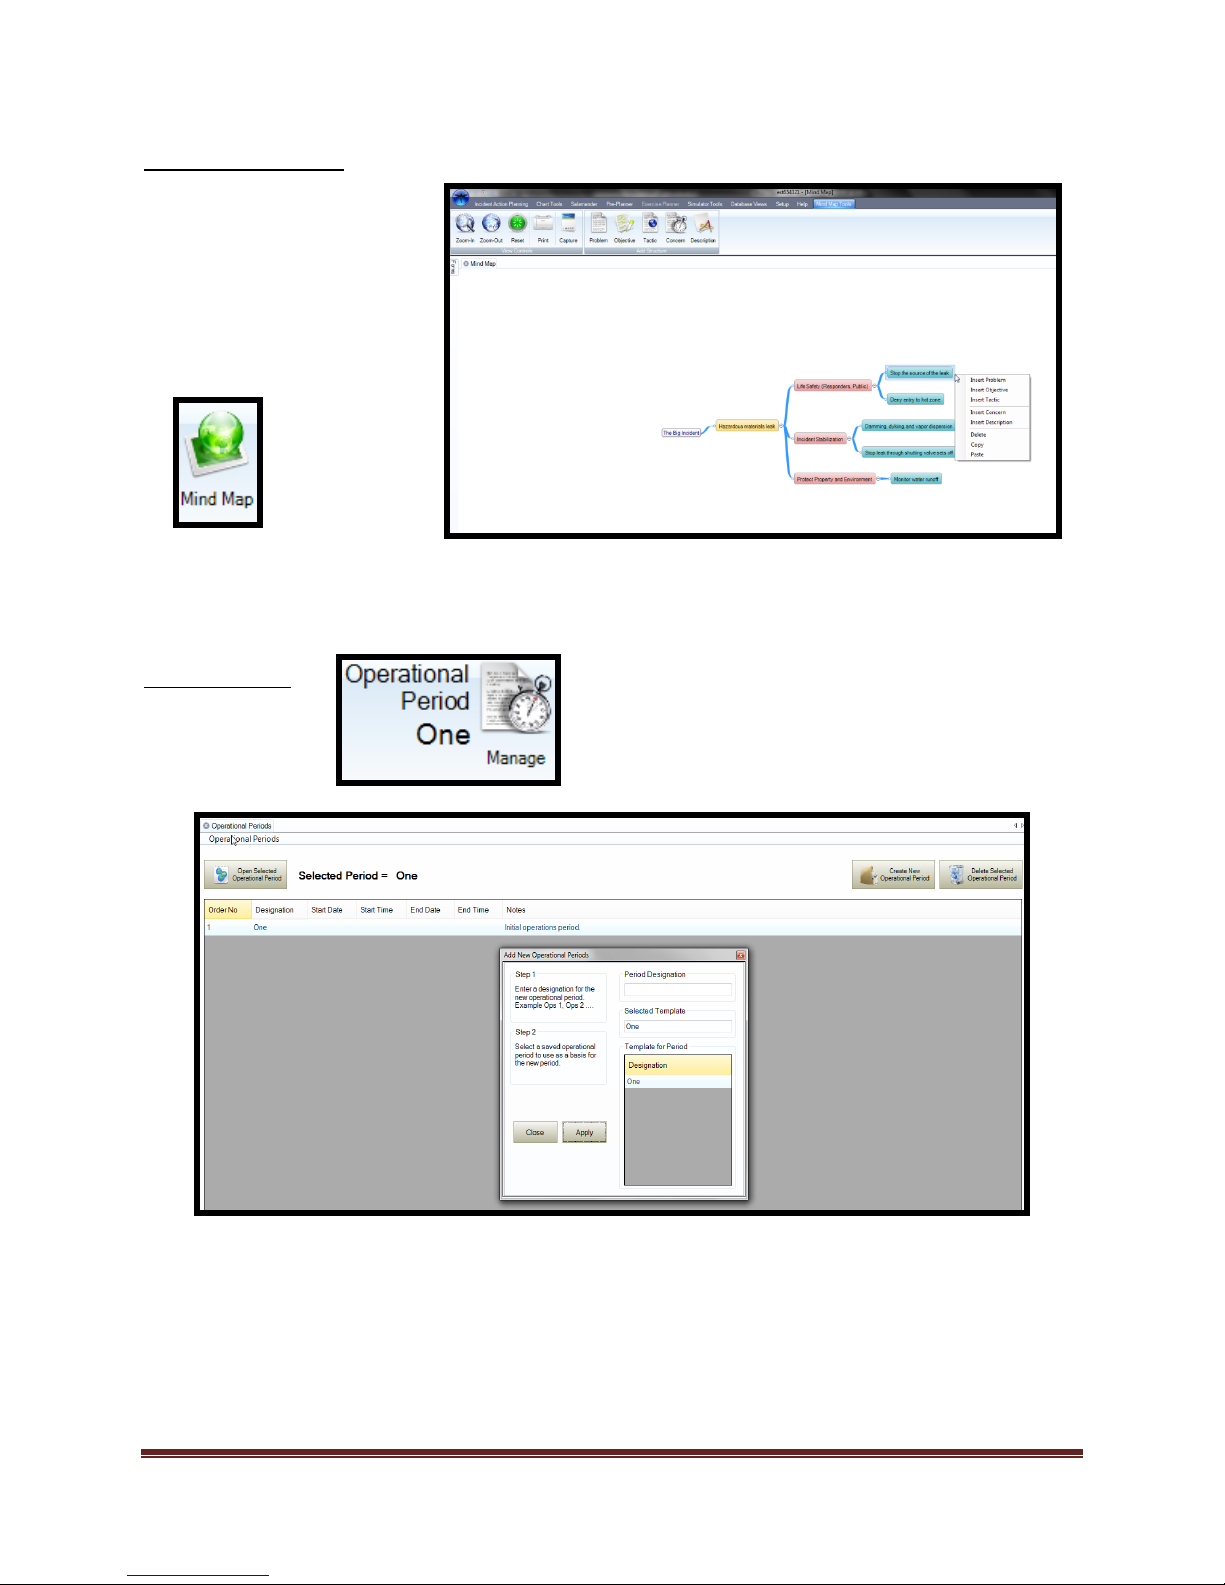
Mind Map Tool Icon
Mind Map tool is
used to facilitate
critical decision
making,
brainstorming, and
facilitate transfer of
information.
Operations Period tool allows the user to duplicate
“clone” operational periods within the plan.
Op Period Icon
Dragonfly Manual Version 3© Page 21
Page 22
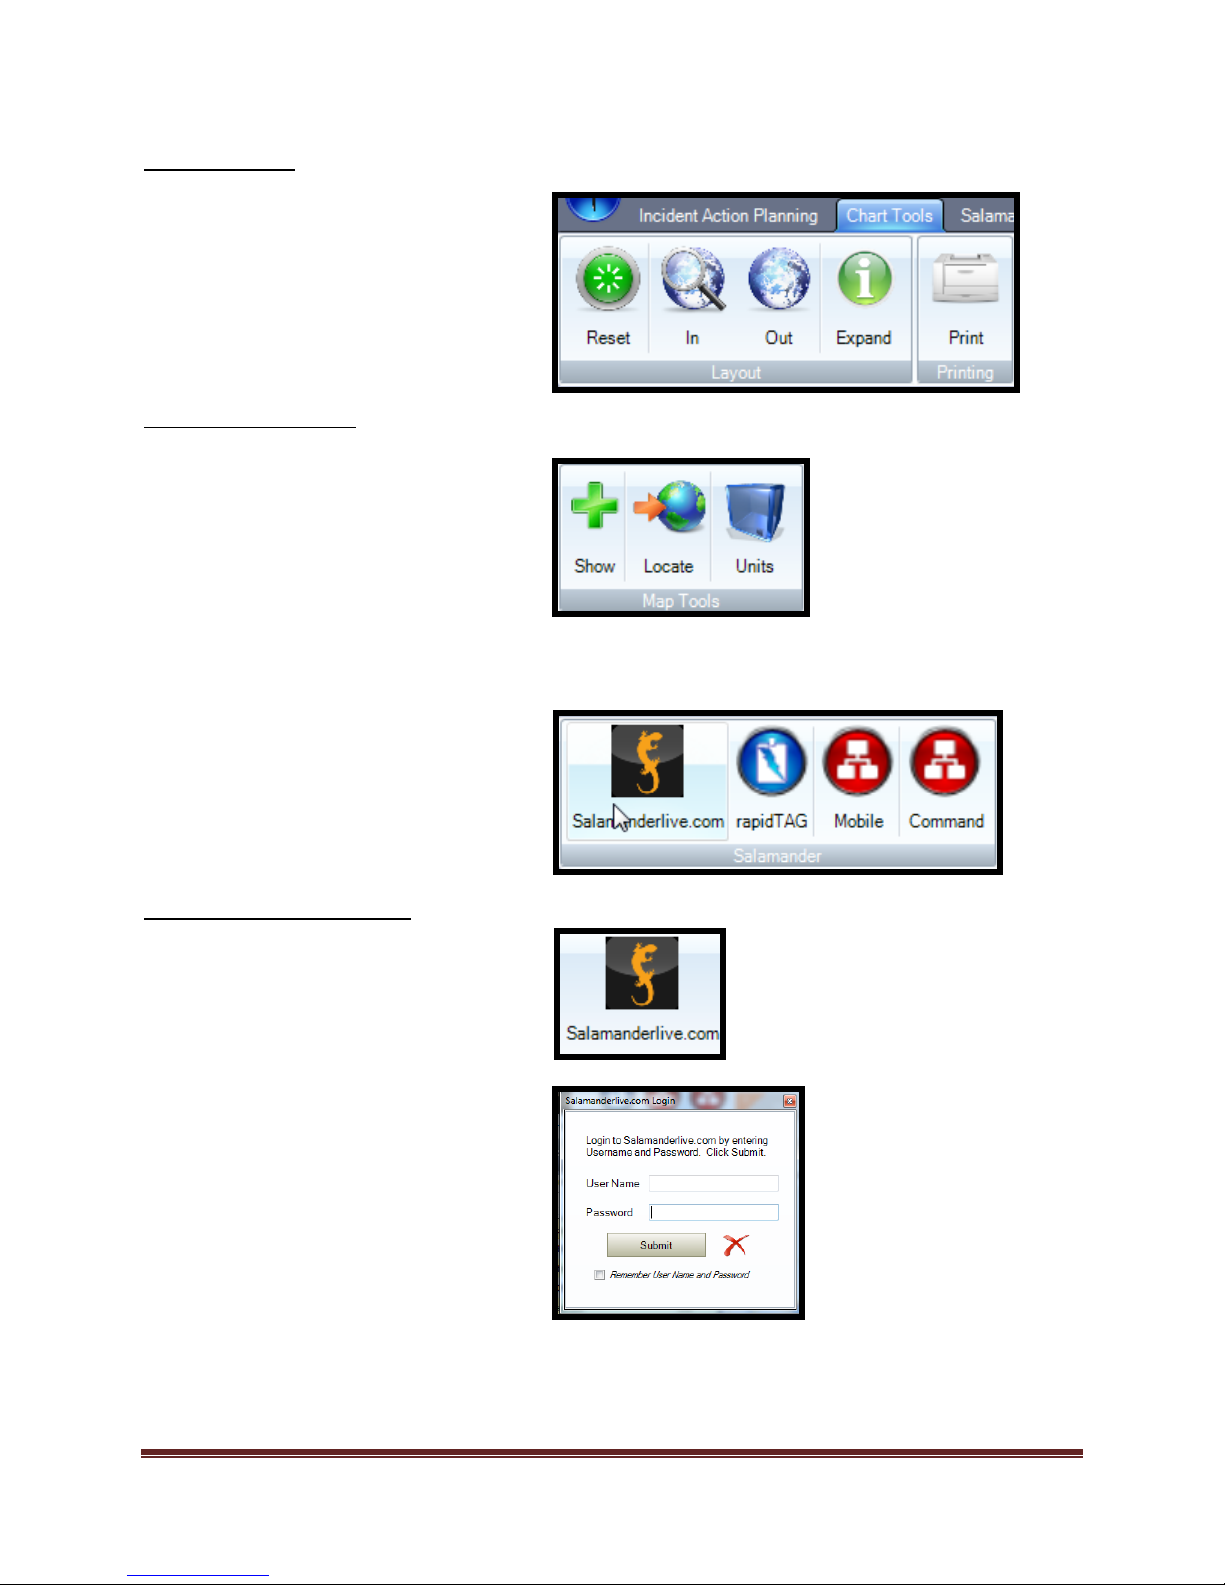
Chart Tool Icon
The Chart Tools allows the user
to manipulate the Organization
Chart display, printing, and scale.
Salamander tools are used to
import Salamander’s Responders
and Incident data.
This icon is used to access
“Salamanderlive.com” and login to
the web services available to
subscribed customers. Users must
have an internet connection and
active “Salamanderlive” account in
order to access the services.
The Map Tool allows the user to
manipulate the E-Map and
display resources on it.
Chart Tool-Map tools
Salamanderlive com™ Icon
Dragonfly Manual Version 3© Page 22
Page 23
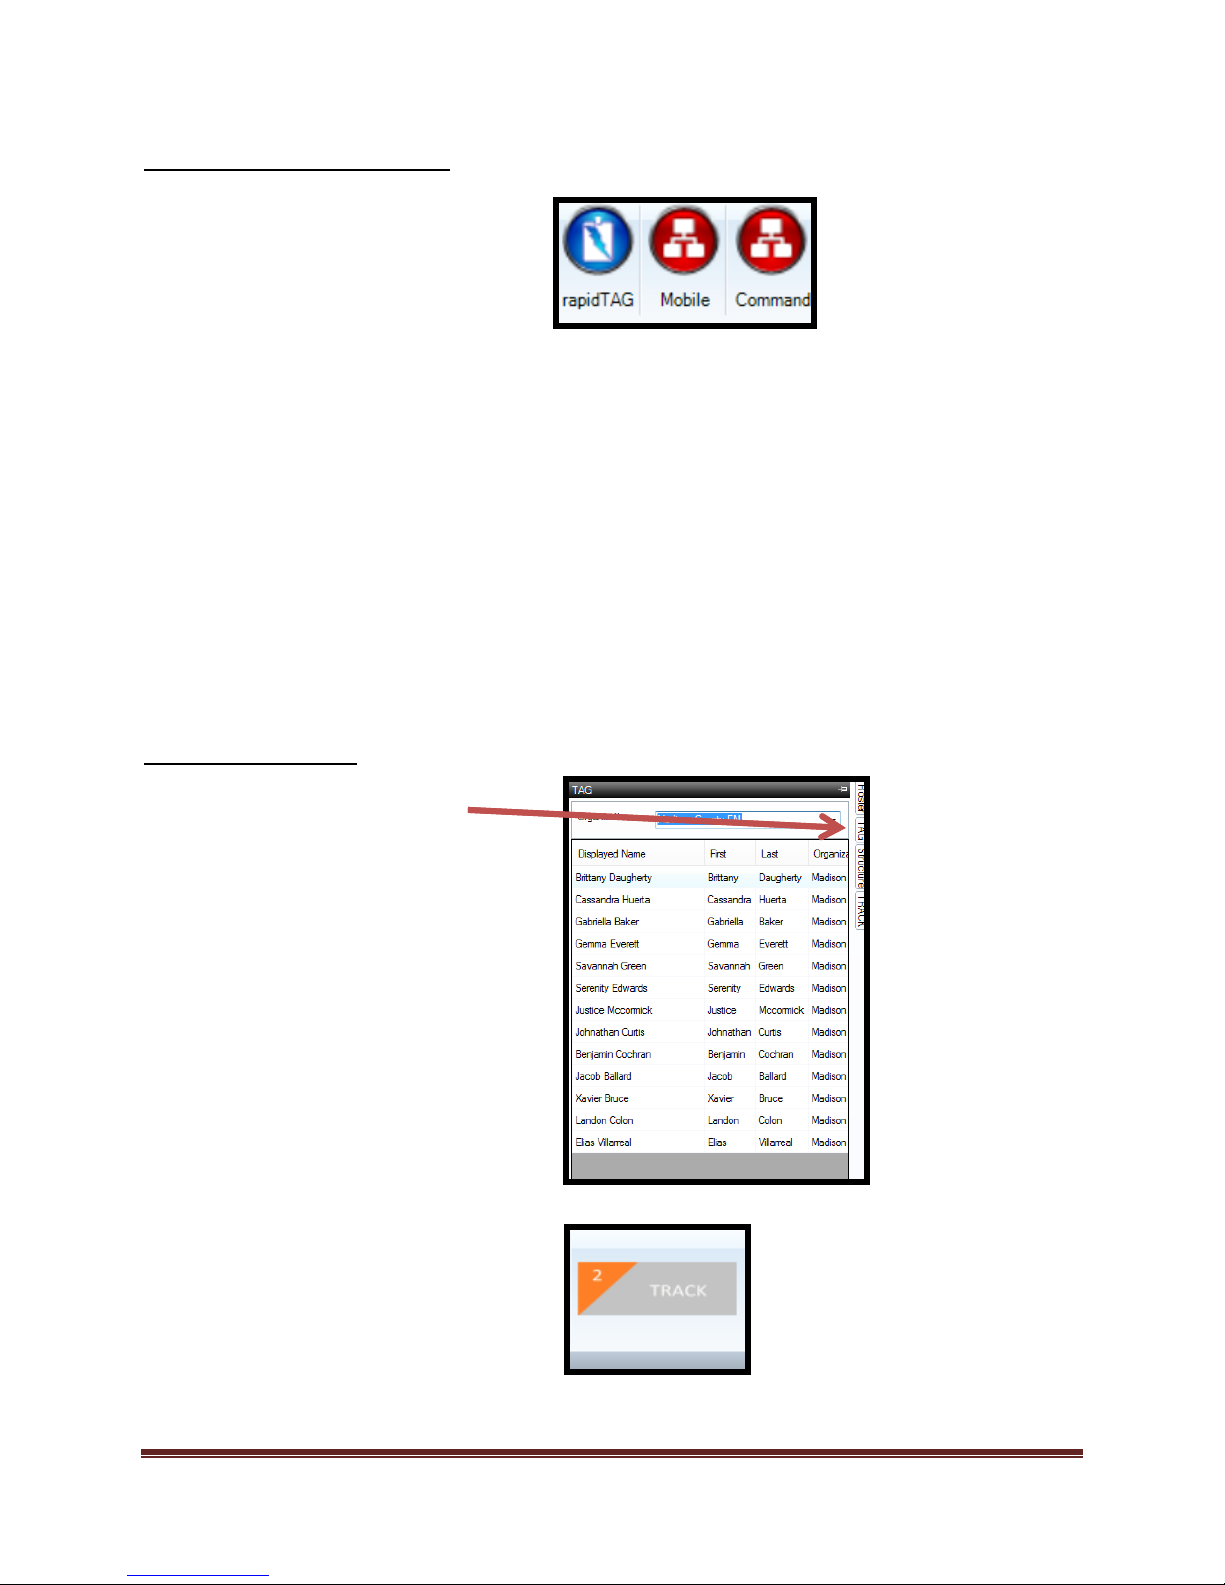
Salamander™ legacy tool icons
These icons are used to access
incident resources located in the
following legacy Salamander™
software tools:
1. rapidTAG
2. Mobile Express
3. Command
To learn how to connect Dragonfly
how to connect to your legacy
Salamander software tools see
“Appendix A: Salamander Local
Connection Preference Settings”
The “TAG” icon allows the user to
access the “Salamanderlive.com
TAG” services. From this tool the
user will select the organization that
resource is located under and add
them to rosters or assignments
within Dragonfly.
The “TRACK” icon allows the user to
access the “Salamanderlive.com
TRACK” services. From this tool the
user will select the incident and add
the resources and/or assignments to
the incident in Dragonfly.
TRACK and TAG icons
Dragonfly Manual Version 3© Page 23
Page 24
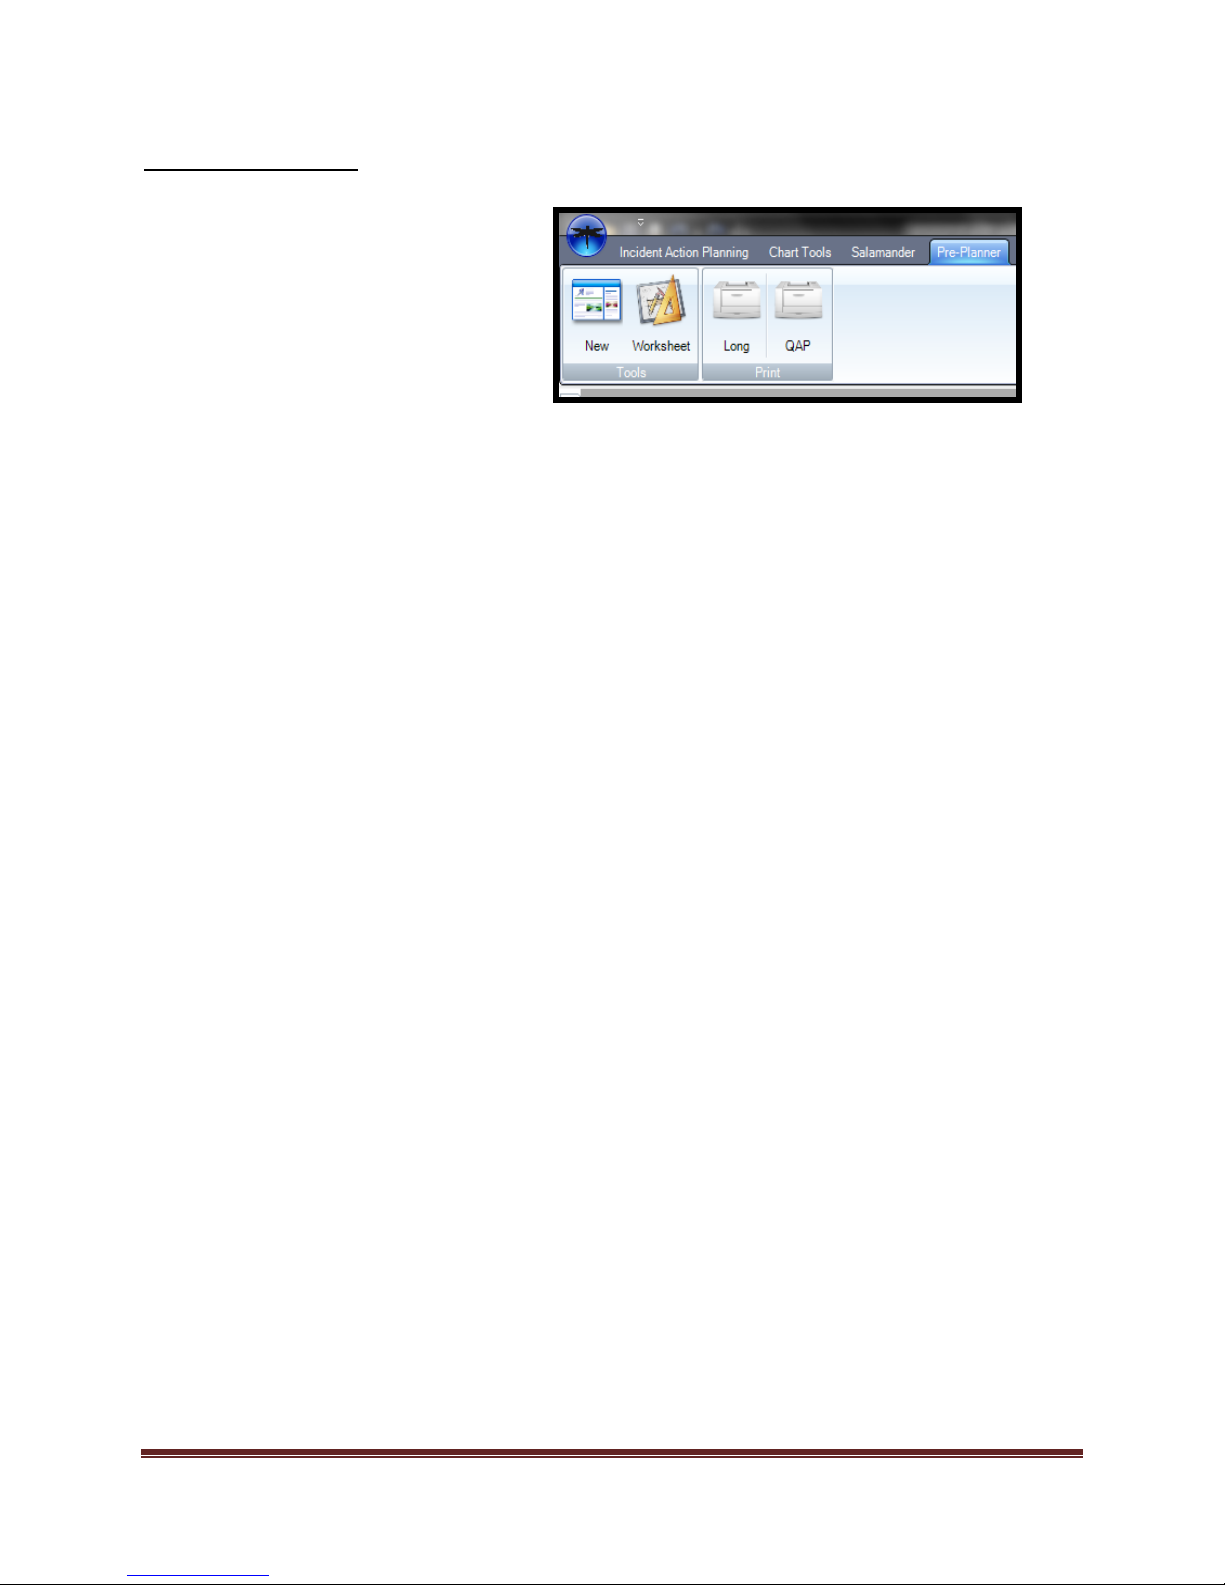
Pre-Planner Tool Icon
Pre-Planner tool is designed for
the user to capture data on
critical infrastructure. From the
Pre-plan, response plans can be
created.
Dragonfly Manual Version 3© Page 24
Page 25
Setup Tab- Preferences and Position Names
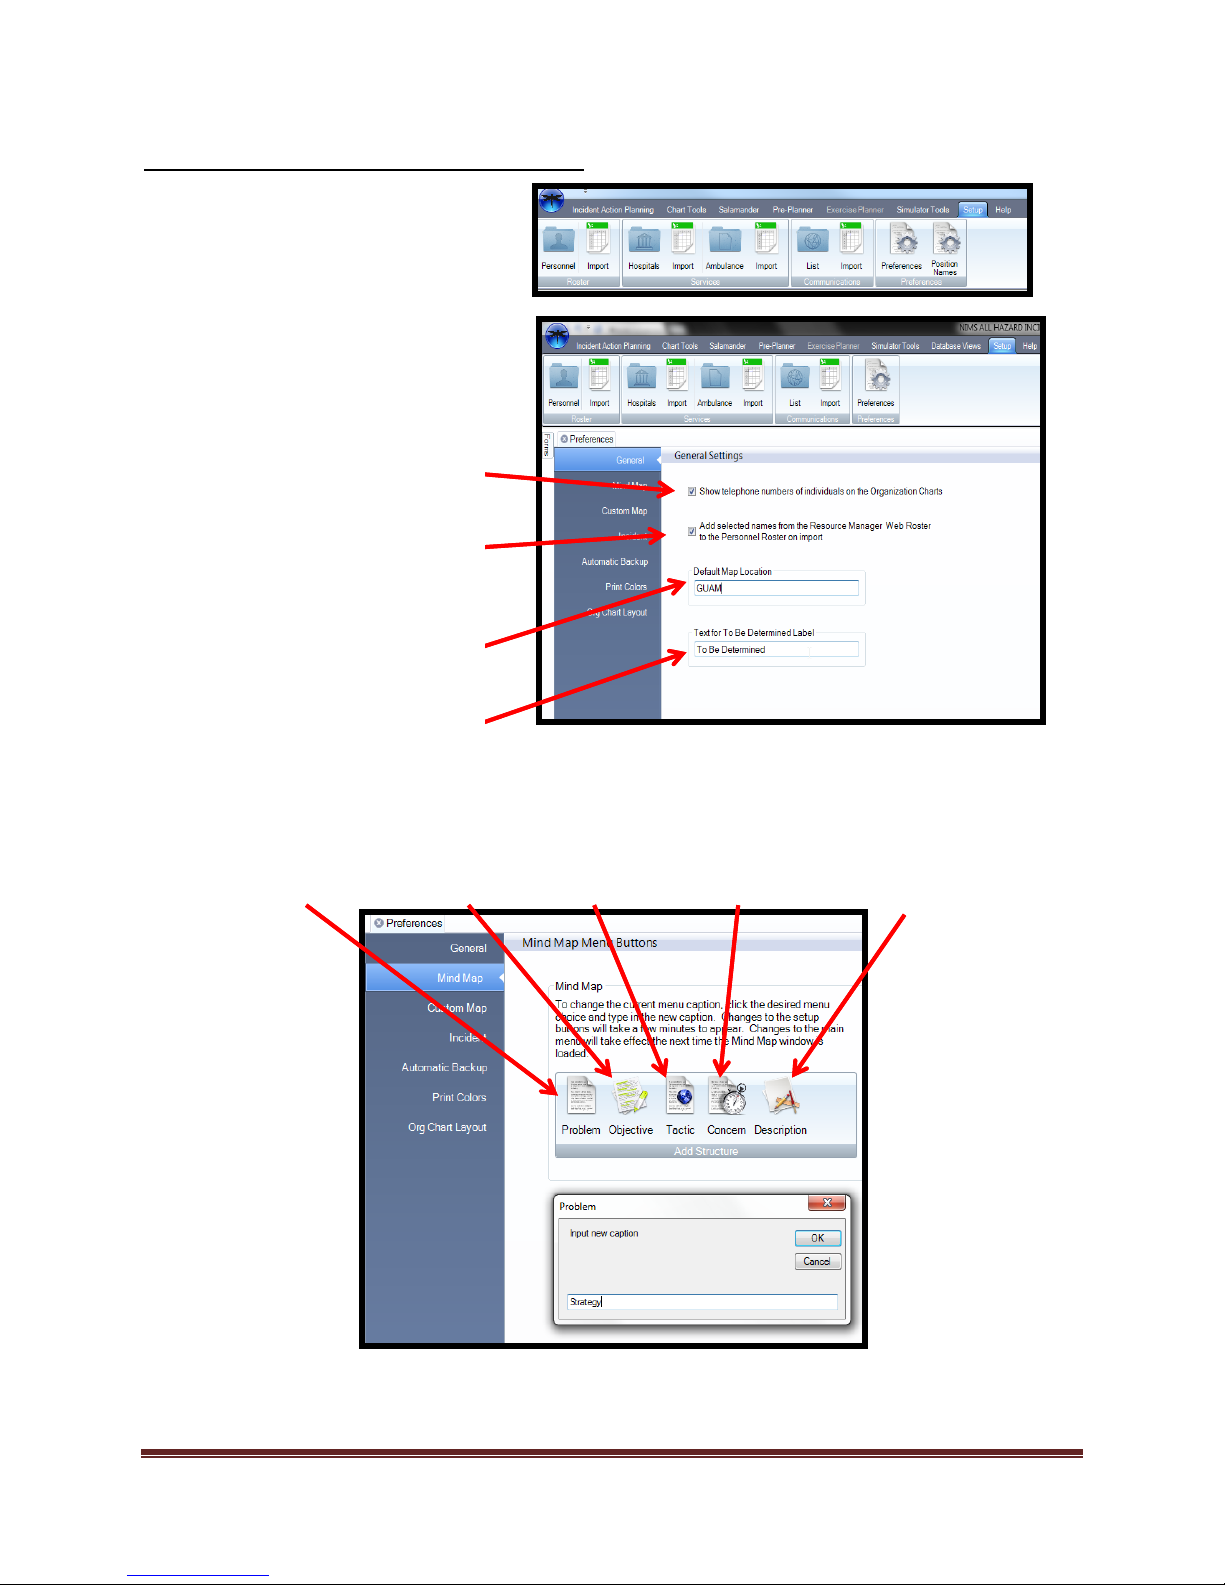
The Setup tab is where the user
can find Preferences, Position
names, and the Roster tools.
The Mind Map Settings allow the user to adjust the following Icon text statements:
Problem Objective Tactic Concern Description
The General Settings allow the
user to adjust the following
actions:
Allow phone numbers to be
visible on the Organizations Chart
Displays
Allow Resource Manager Web™
selected personnel to populate
rosters.
Allow the user to change default
E-Map starting point.
Allow custom text for “To Be
Determined Field”
The Mind Map tool Icons can be customized to fit your organizational needs. In this example, the word
“Strategy” is going to be used to replace the “Problem” icon. The changes are permanent until changed by
the user.
Dragonfly Manual Version 3© Page 25
Page 26
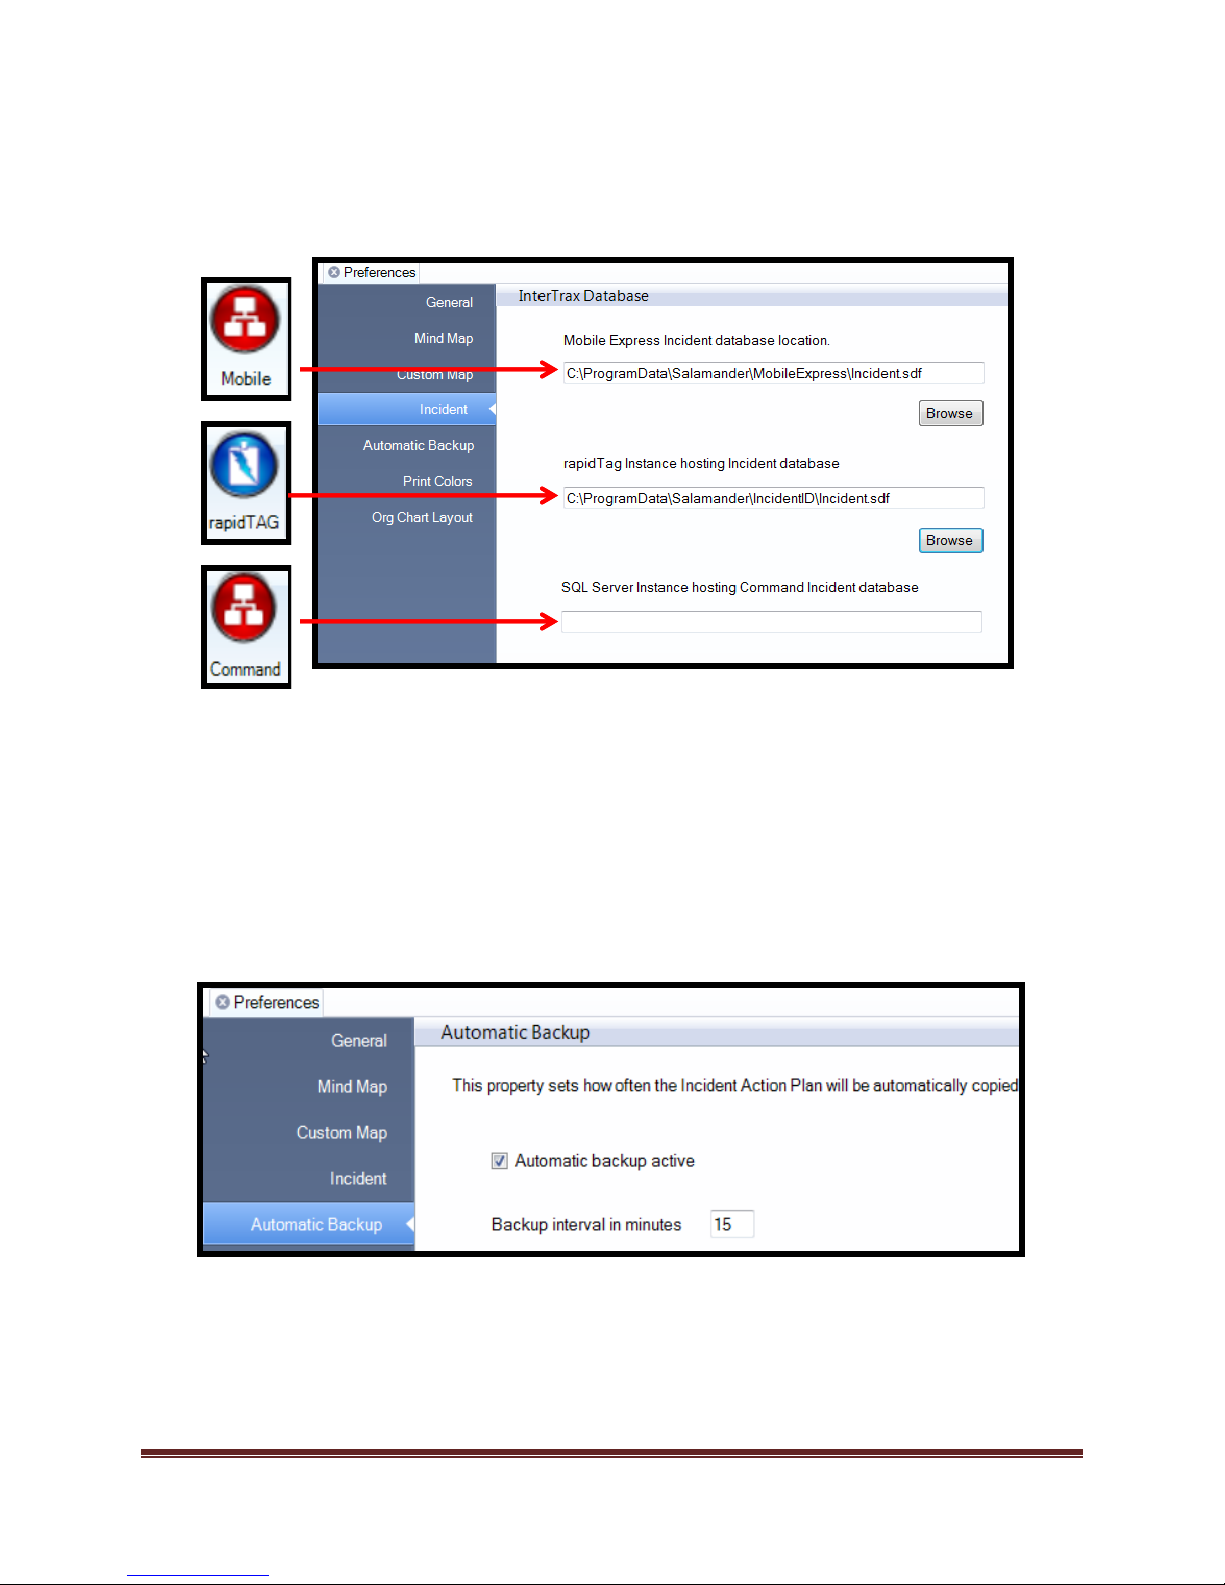
The interTRAX™ Database tool allows the user to adjust where Dragonfly™ imports data from the
following Salamander™ TAG™ and TRACK™ tools:
The “Automatic Backup” tool creates a .zip file that backs up the currently opened operational
period and saves it to a local folder generally found along this path:
C:\Users\Admin\Documents\DragonFly\AutoSave
*Note: The more information contained in the operational period, the more memory space will be
reserved for each .zip file. Management of the “Auto Save” folder is important as the local
machine may run out of disk space.
Dragonfly Manual Version 3© Page 26
Page 27
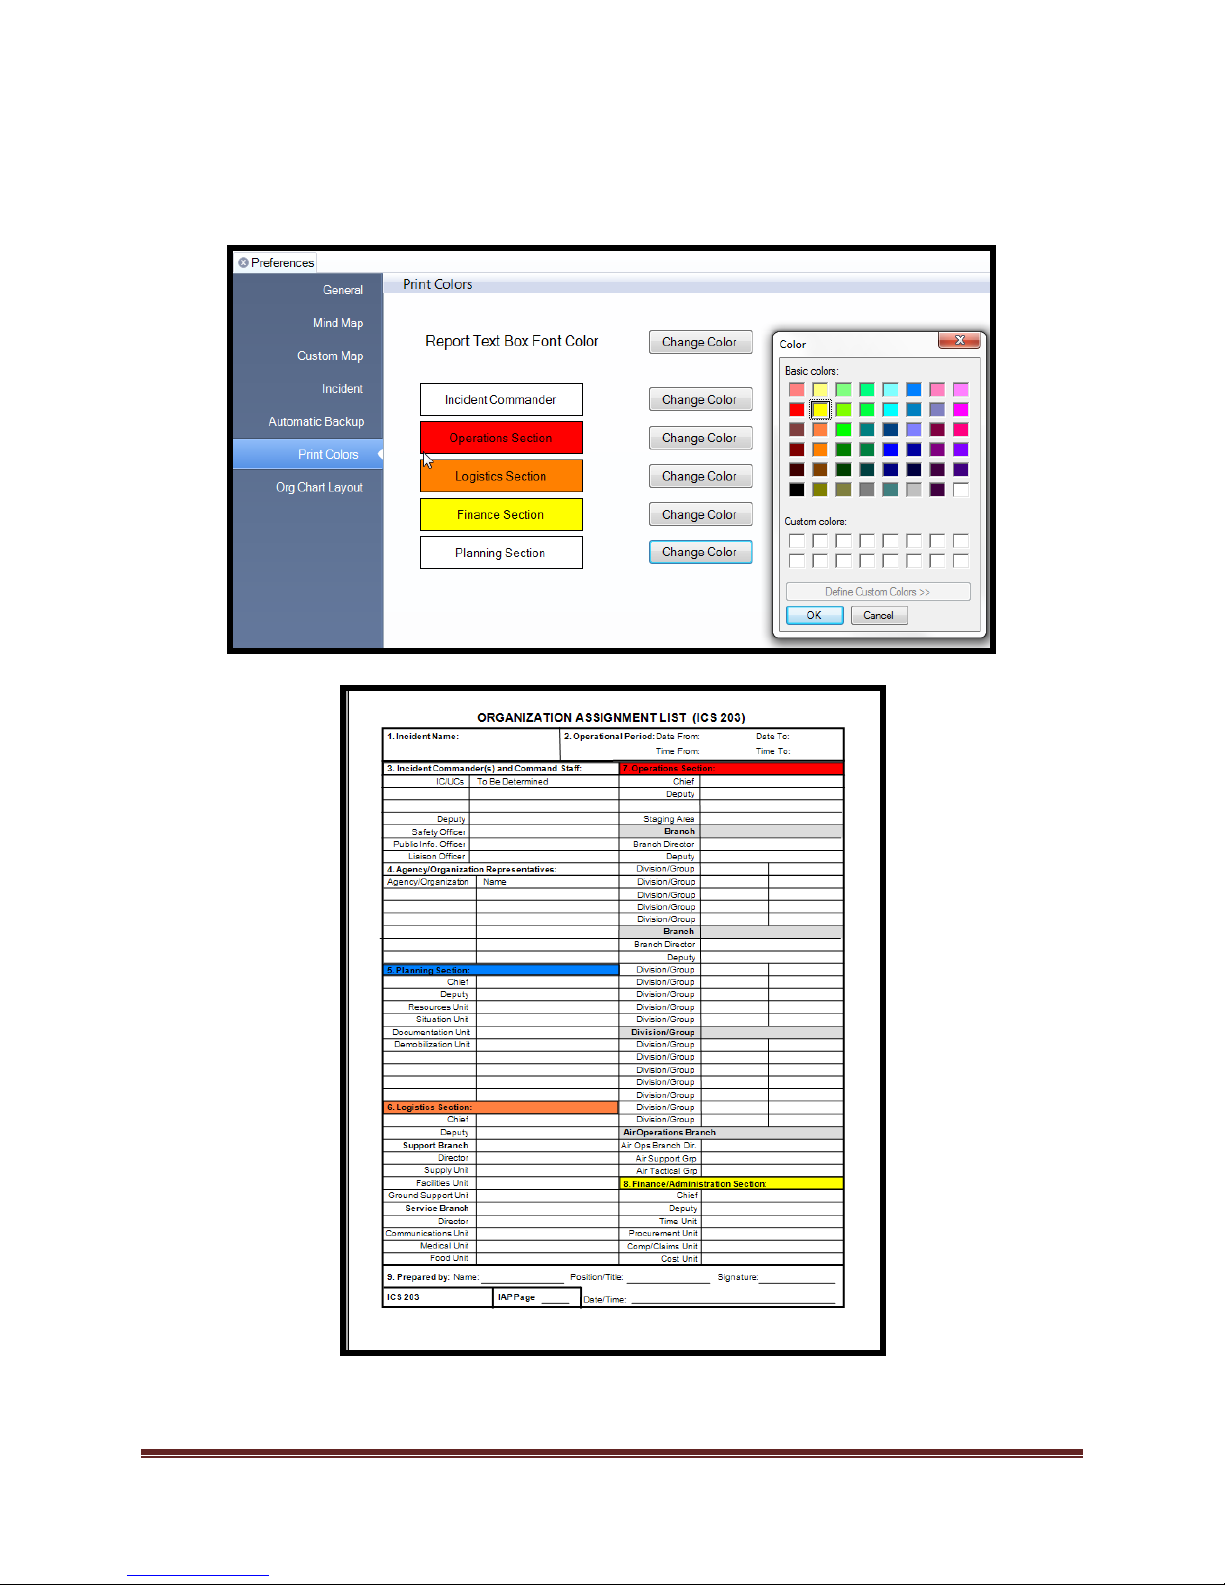
The Print Colors tool allows the user to adjust the font colors and “highlight” distinctions between
different sections of ICS forms and the Quick Command Start Page.
Dragonfly Manual Version 3© Page 27
Page 28
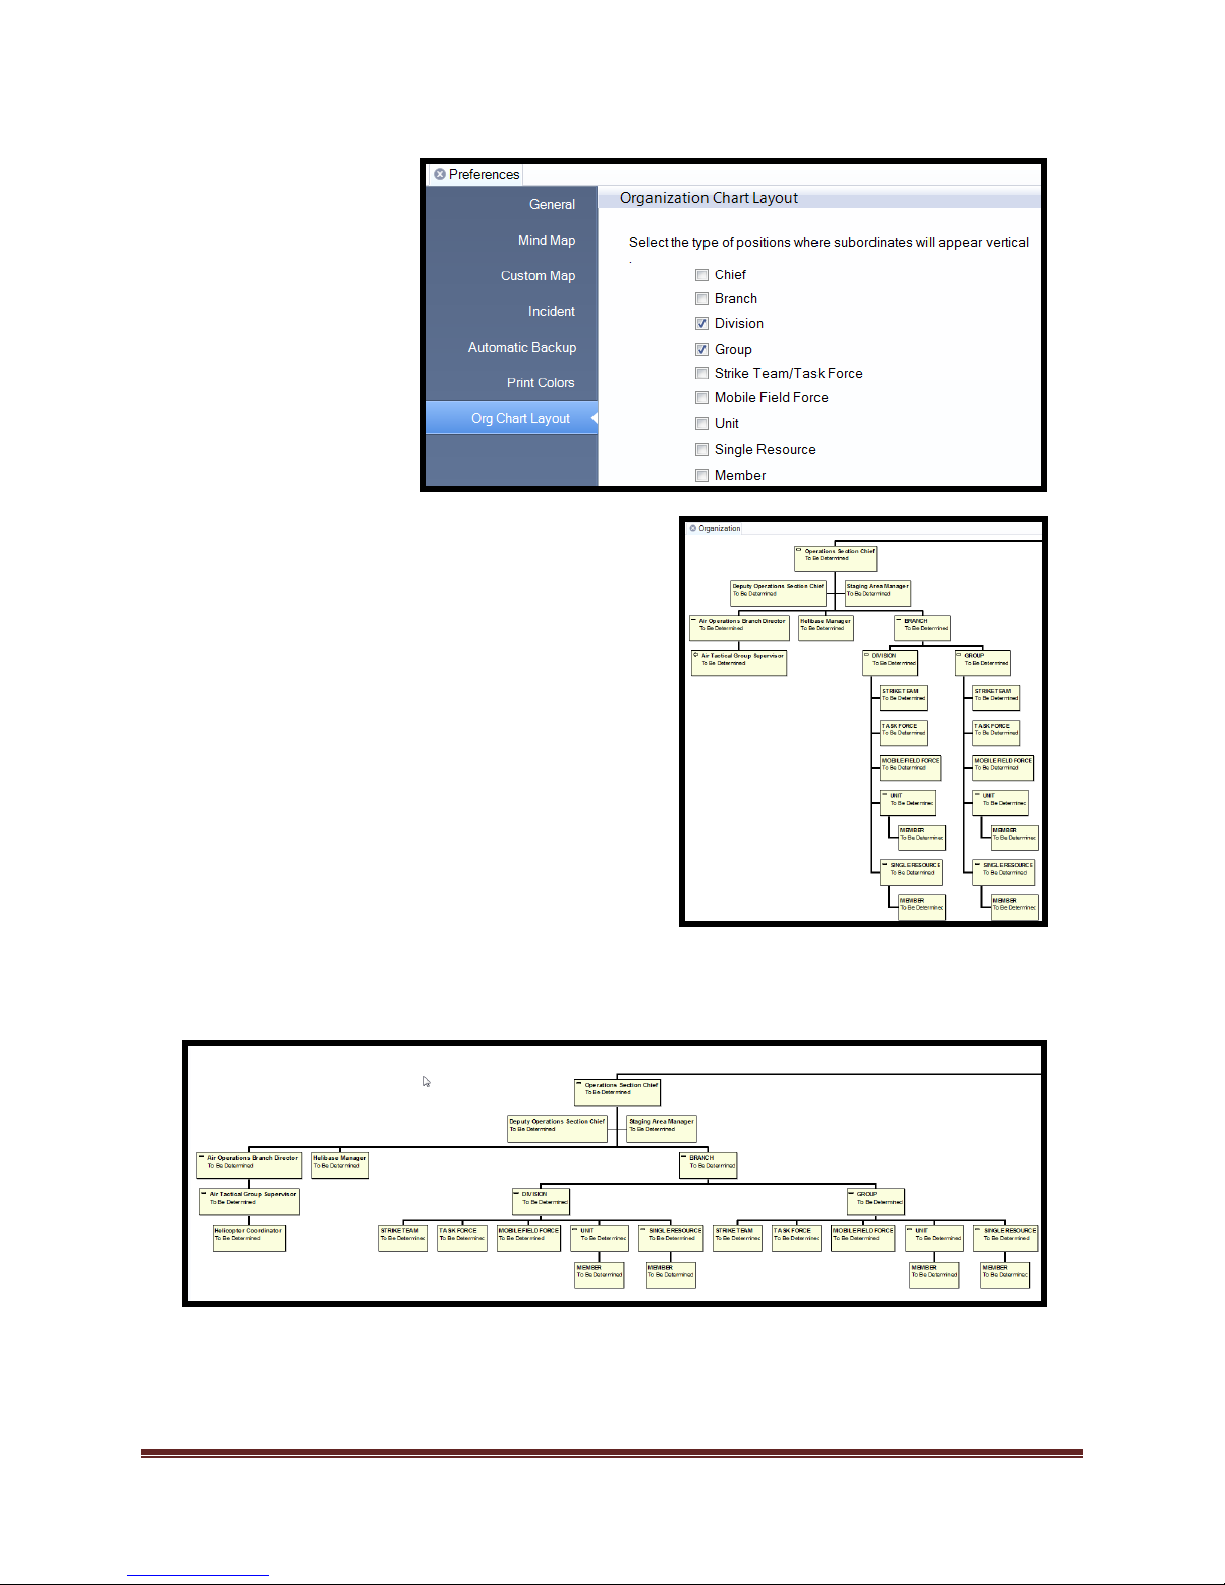
The Organization
Chart Layout tool
allows the user to
adjust the
Organization Chart
layout. The user can
toggle between
vertical and
horizontal
positioning.
Vertical (Division/Groups)
Horizontal (All positions)
Dragonfly Manual Version 3© Page 28
Page 29
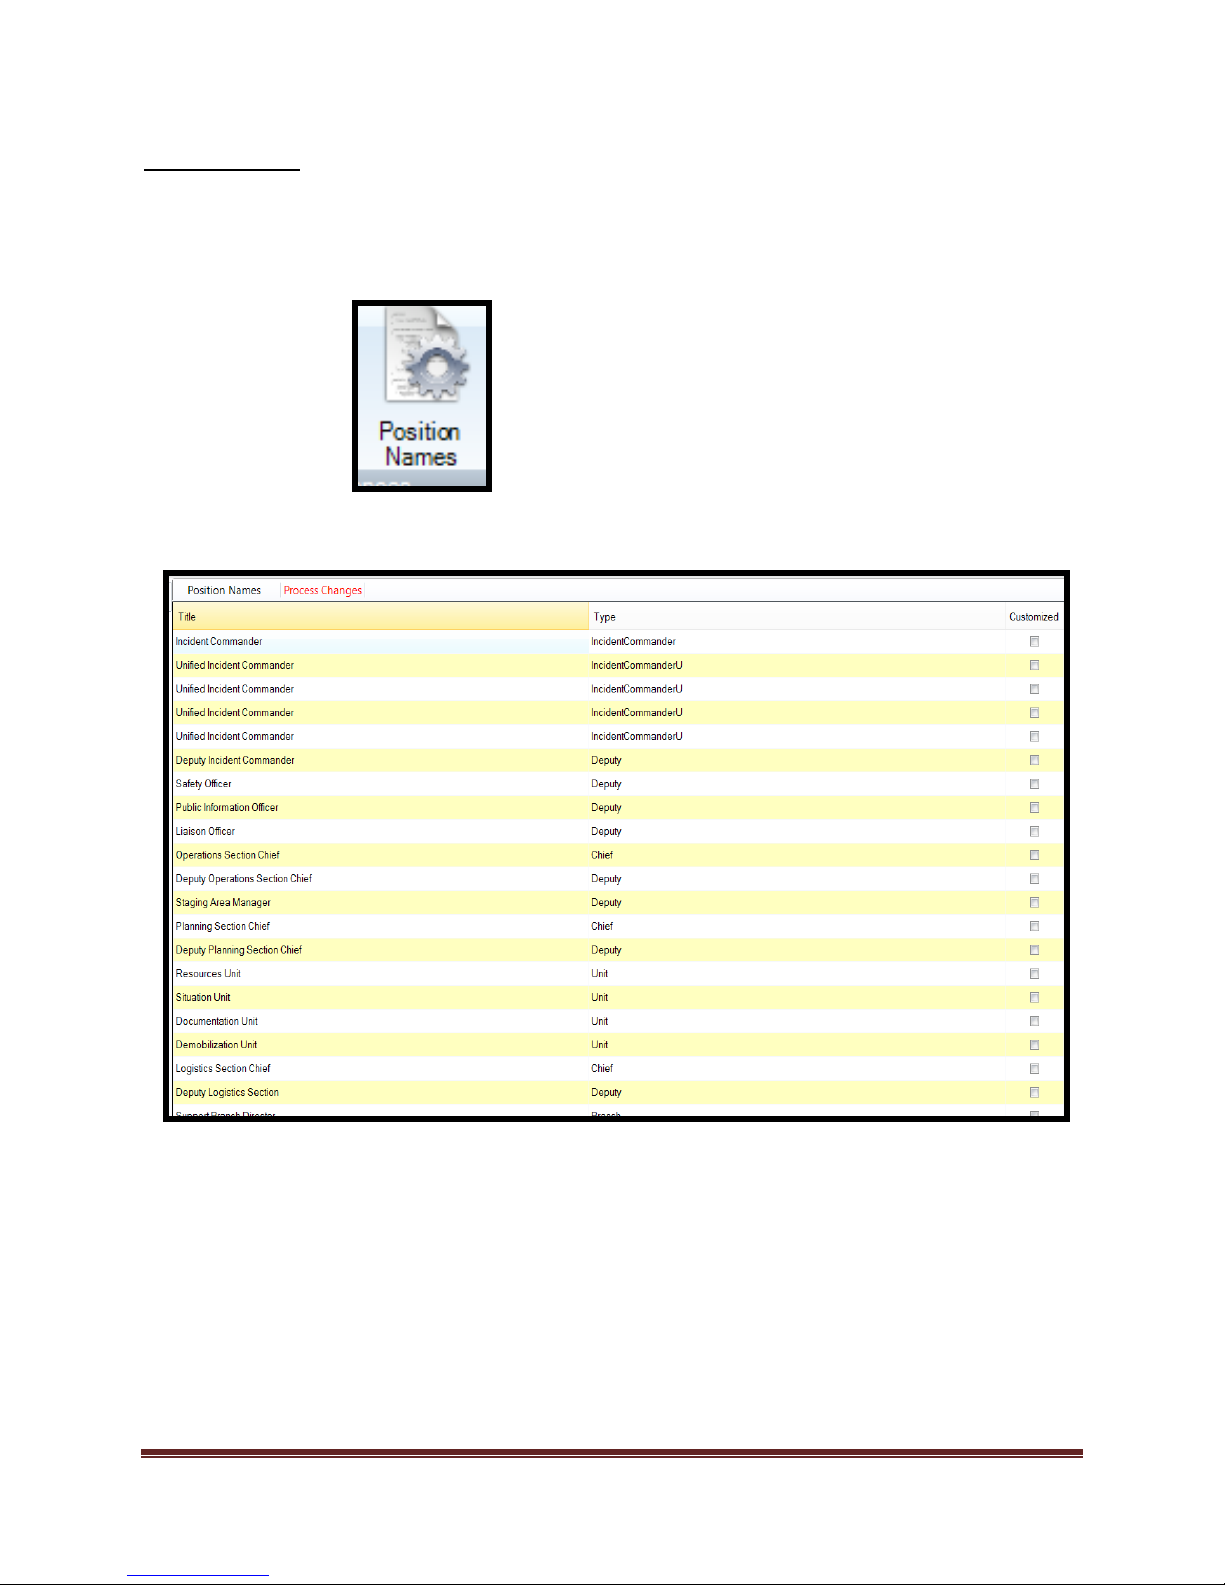
Position Names
Position Names allows the user to change the position or
assignment naming convention.
Dragonfly Manual Version 3© Page 29
Page 30
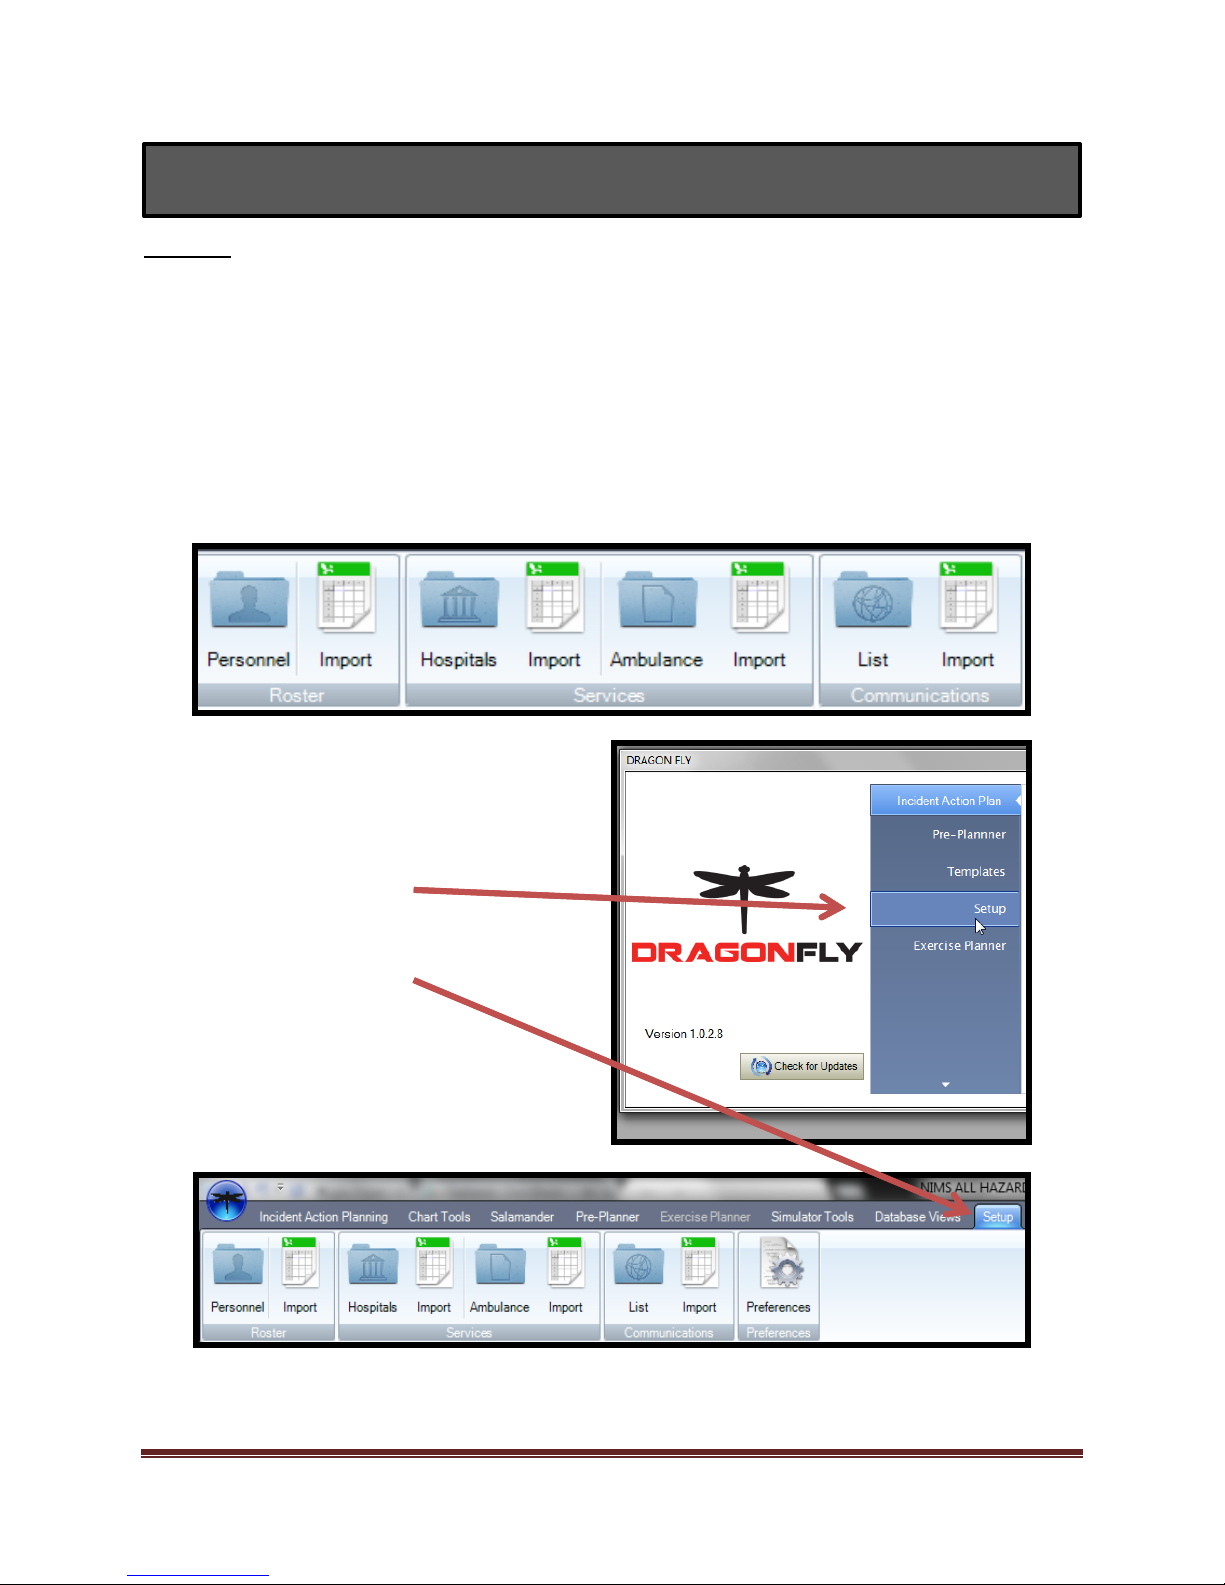
5. Rosters
The “Setup” tab is accessible from the start screen or the Setup tab from within the plan. The user
can add resources/facilities through a manual “Add Record” process or through importing of
data. The import tool uses .csv file format for importation of data. All records in the Roster are
available for all incidents. The data resides in the program until a user removes it.
*Note: When working in “cooperative” plan development rosters are not shared.
Rosters accessed from
Start screen
Rosters accessed from
Setup tab inside of
program.
Rosters
Rosters are used extensively in order to make the inclusion of personnel and facilities into your plan
efficient. The roster tool can be accessed from the “Setup” tab.
Dragonfly Manual Version 3© Page 30
Page 31
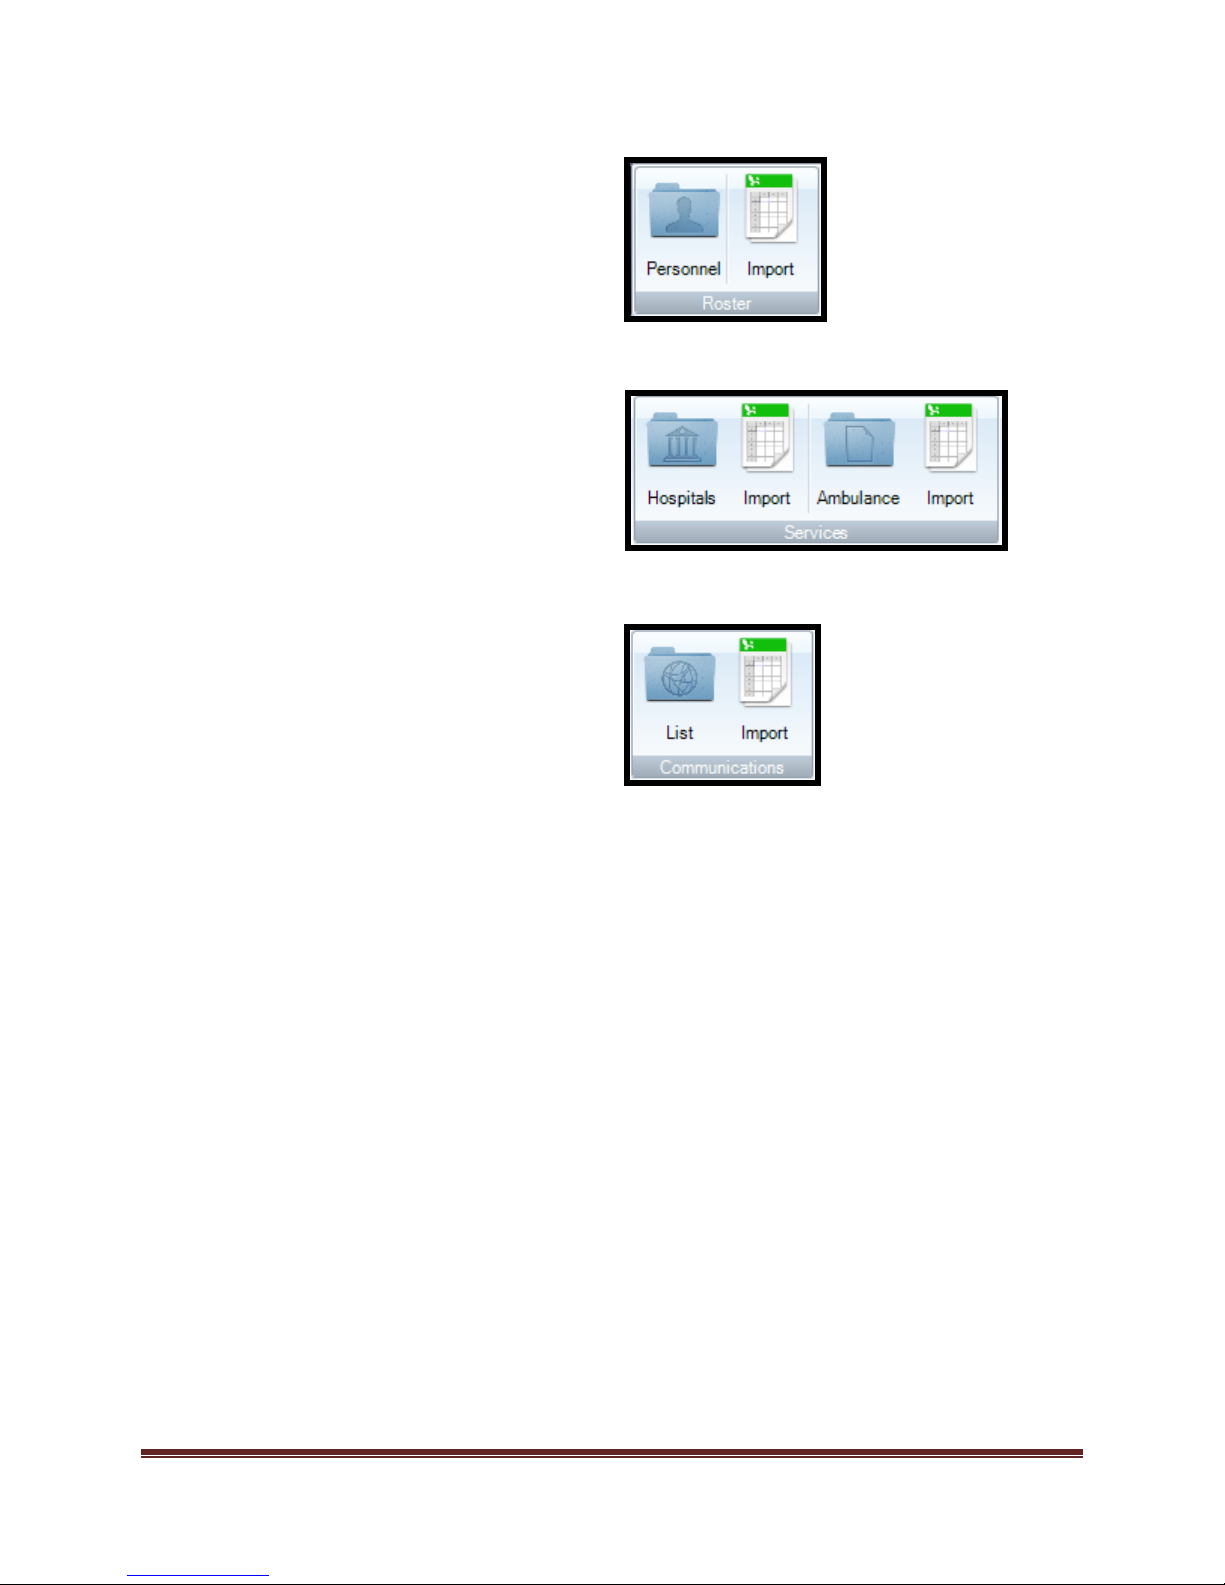
Roster Personnel Tool allows the user to
directly add/edit personnel resources in
the roster.
Roster Import tool allows the user to
directly import into the roster
Services Hospitals/Ambulances allows
the user to directly add/edit
facilities/equipment in the roster
Services Import tool allows the user to
directly import into the roster
Communications List tool allows the user
to directly add/edit radio frequencies in
the Library
Communications Import tool allows the
user to directly import into the roster
Dragonfly™ is designed to allow the “Rostering” of key information. This information can be
added to the software through single inputs or through imports. The process of completing either
function is completed in the same manner for the following rosters (libraries):
Personnel
Ambulances
Hospitals
Communications
These rosters can also be populated from multiple points inside of the software. Locations within
the program that allow roster population are the following:
ICS Forms
Org Chart Tool
o Personnel Tab>Add new person button.
Dragonfly Manual Version 3© Page 31
Page 32
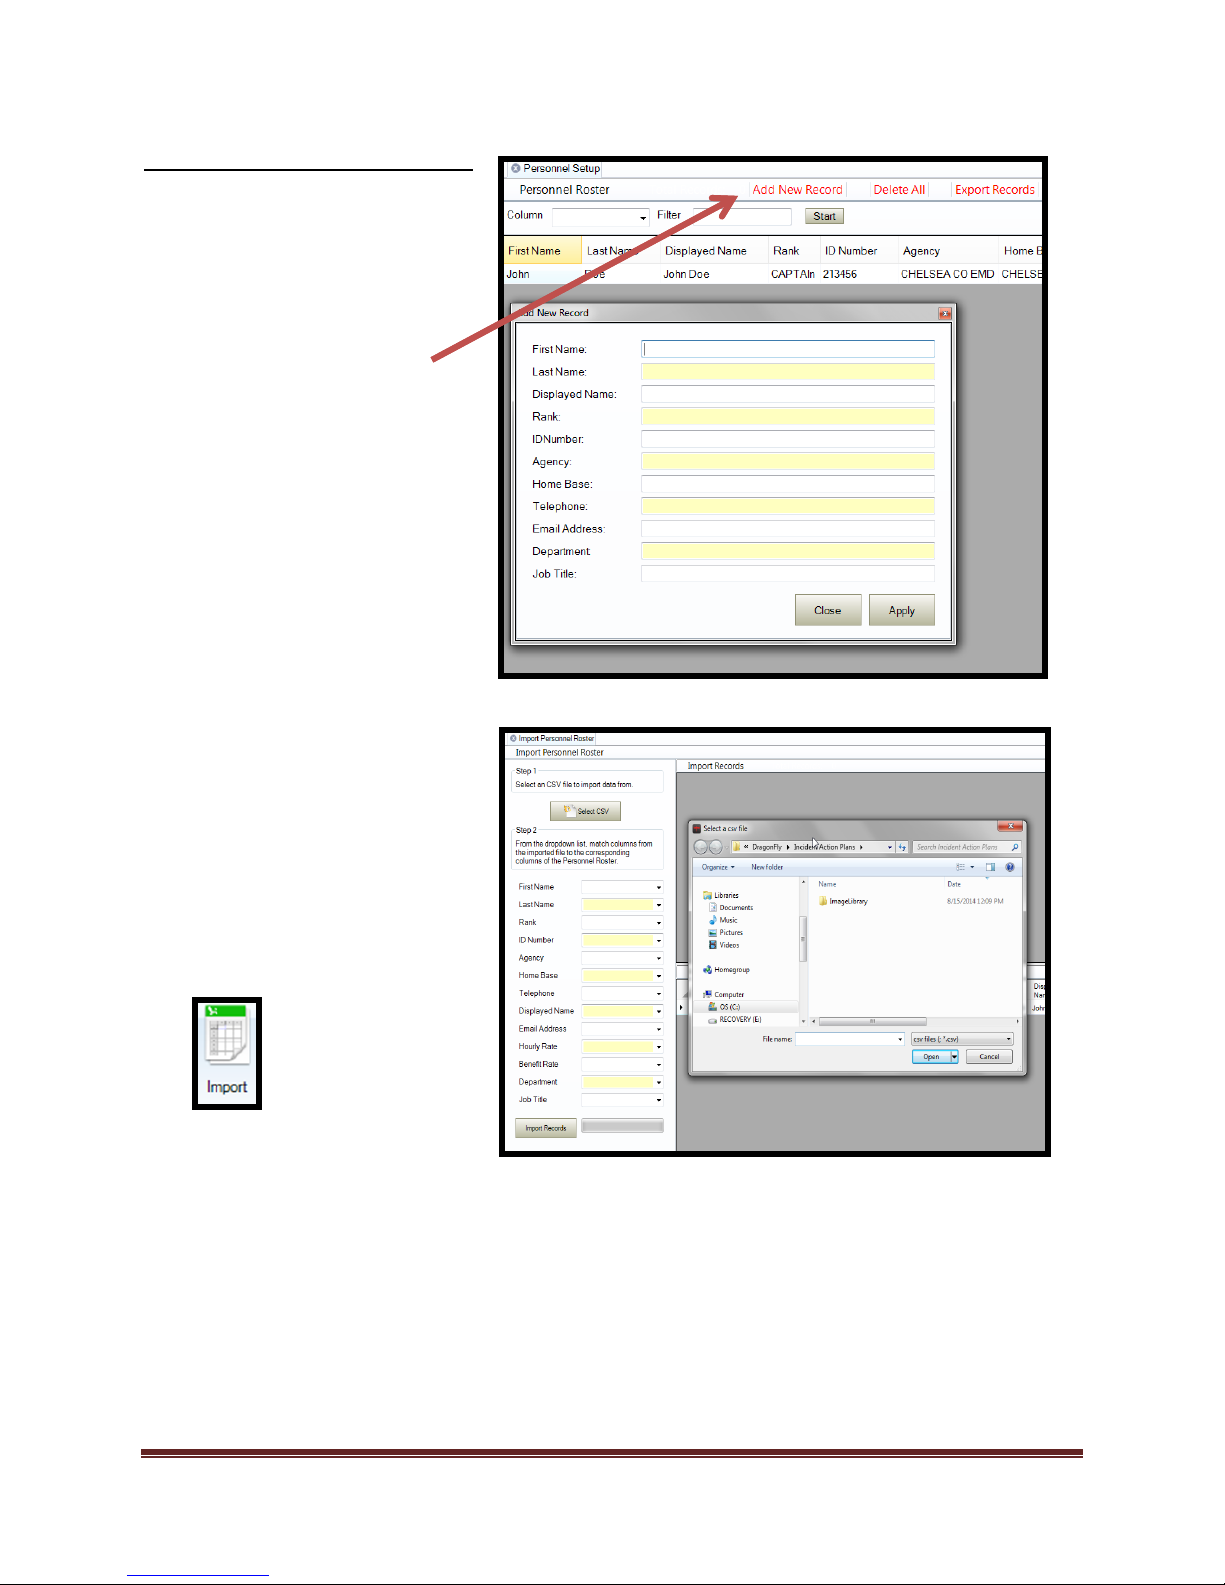
Add New Records and Importing
Add New Record tool is
accessed from the Personnel,
Ambulance, Hospital, and
Communications tab
Importing personnel,
ambulances, hospitals, and
communications can be
performed from the Import
tab. Importing is completed
through the use of .csv files
and field mapping. Simply
browse to the file location,
map the fields, and import.
Dragonfly Manual Version 3© Page 32
Page 33
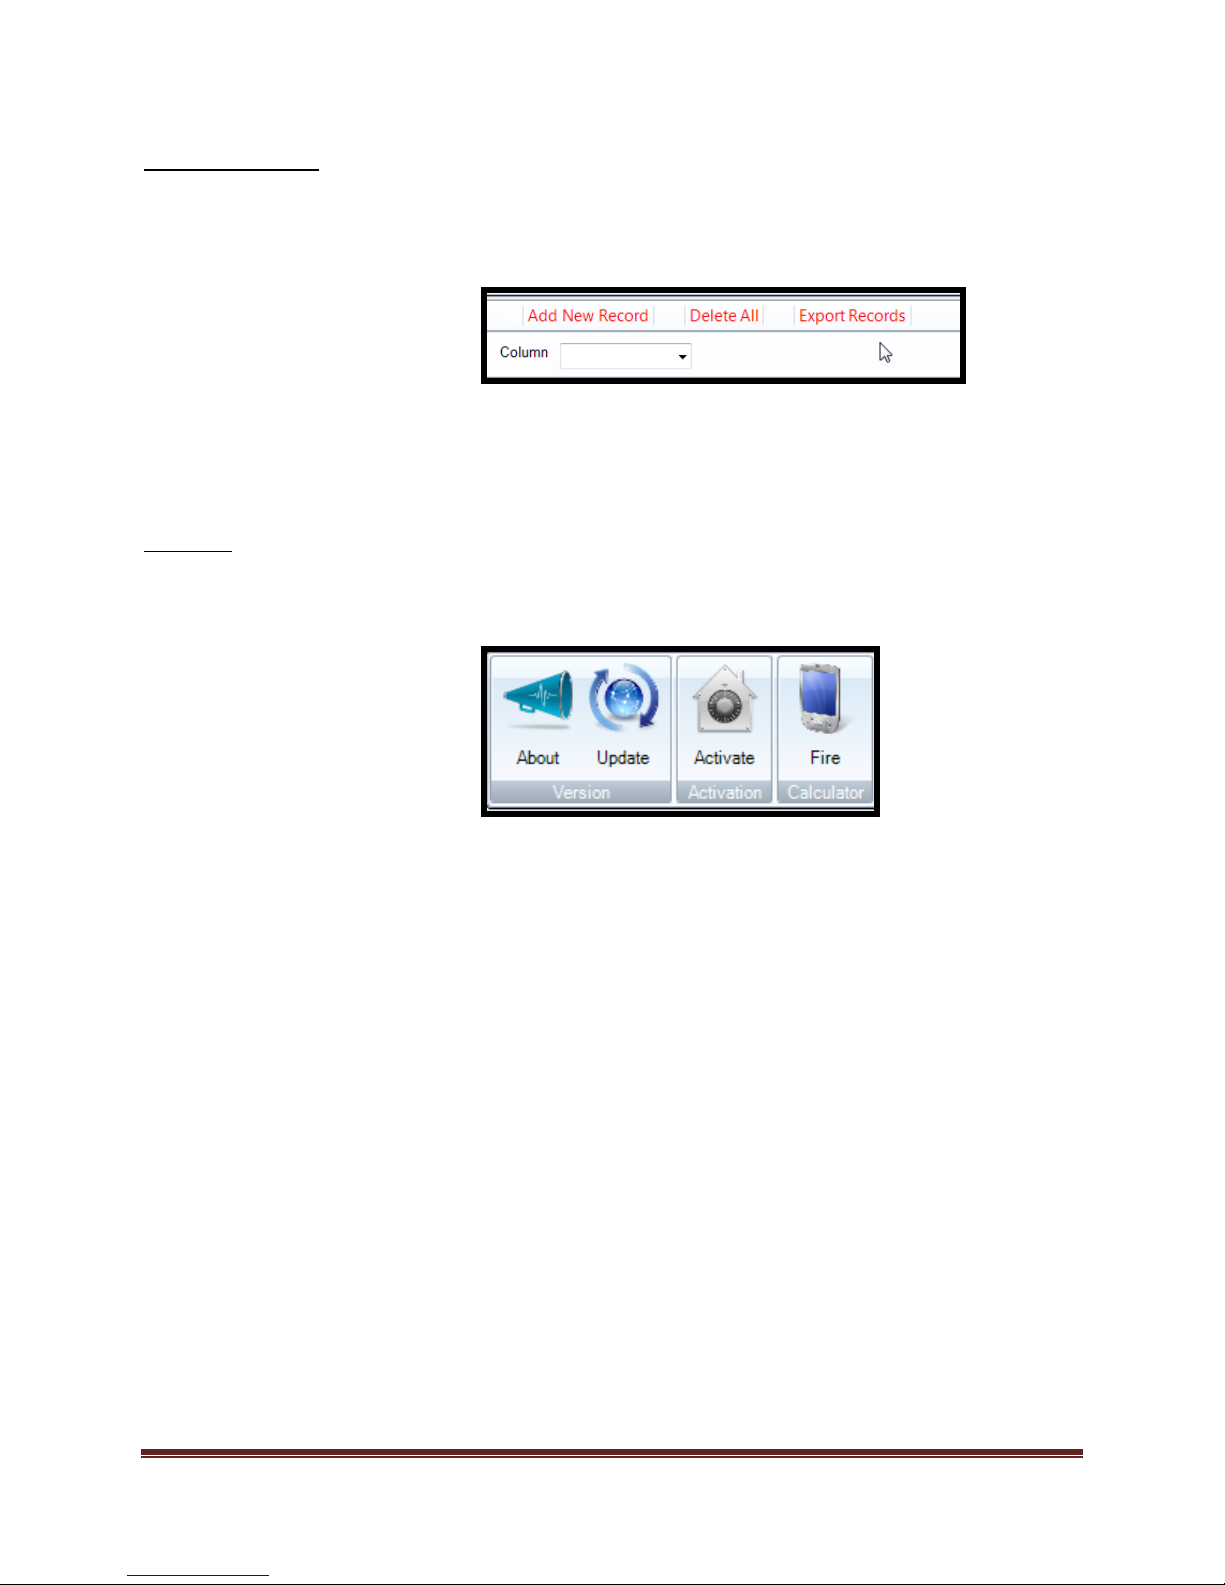
Exporting Rosters
Each Roster can be exported
to .csv file from the following
locations:
Personnel roster
Services roster
Communications
roster
Help tab allows the user to
perform the following:
Check the version
“About”
“Update” software
“Activate” software
Utilize the “Fire
Calculator”
Help Tab
Dragonfly Manual Version 3© Page 33
Page 34

In this section of the manual we will look at the various Incident Command Forms that are
available for the user. All forms reference the 2010 NIMS All Hazard ICS form sets. Forms can
be customized using the form editor that is not supplied with your software.
If you would like access to the form editor, please contact Dragonfly™ Technical Support
through www.dragonfly-360.com/contact.
In this manual, the forms will be presented in the following order:
Default NIMS ICS Forms
Area Command ICS Forms
Emergency Operations Center Forms
ICS 201-Incident Briefing
ICS 202-Incident Objectives
ICS 203-Organization Assignment list
ICS 204-Assignment List
ICS 205-Incident Radio Communications Plan
ICS 205a-Communications List
ICS 206-Medical Plan
ICS 207-Incident Organization Chart
ICS 208-Safety Message/Plan
ICS 209-Incidnet Status Summary
ICS 210-Resource Status Change
ICS 211-Incident Check-in List
ICS 213-General Message
ICS 213RR-Resource Request Message
ICS 214-Unit Log
ICS 215-Operational Planning Worksheet
ICS 215a-Incident Action Plan Safety Analysis
ICS 218-Support Vehicle Equipment Inventory
ICS 230-Daily Meeting Schedule
ICS 233-Incident Open Action Tracker
6. ICS FORMS
Dragonfly 2010 NIMS All Hazard ICS form sets
Dragonfly Manual Version 3© Page 34
Page 35
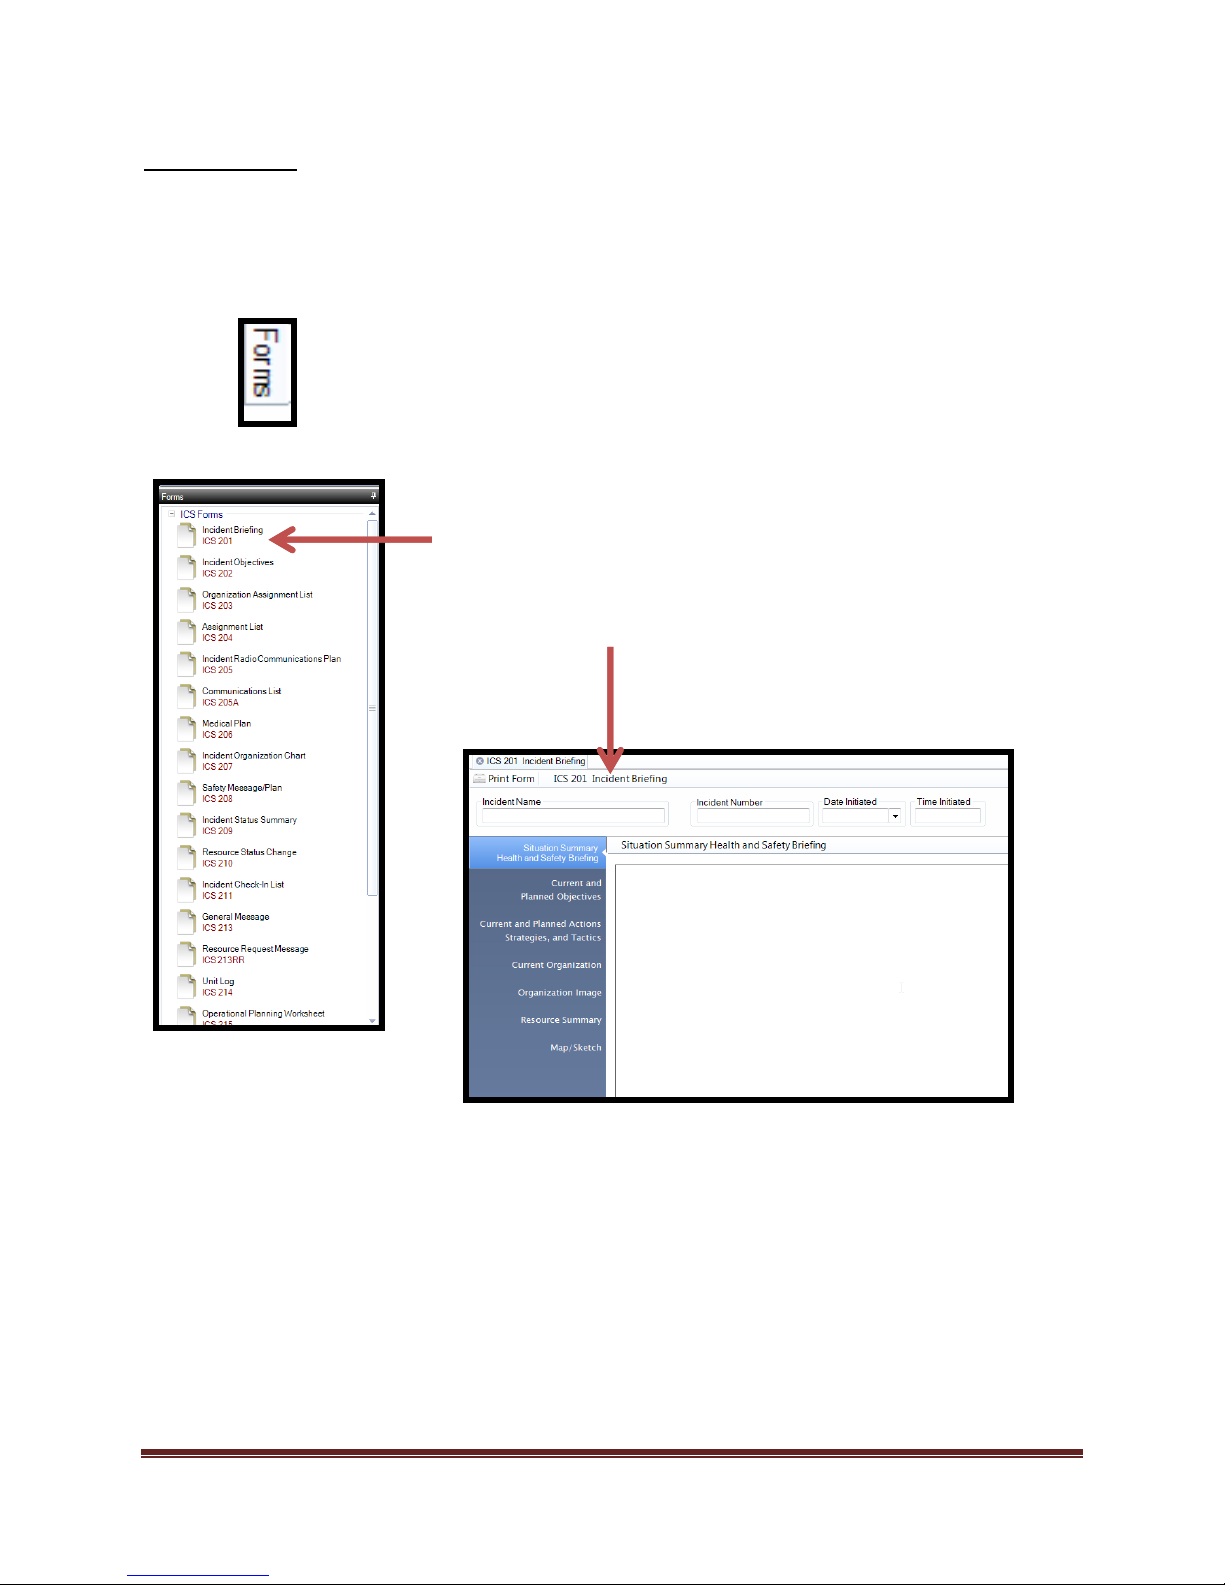
Forms Tab Tool
Accessing forms is
completed using
the “Forms tab
tool”
To enter data into a form; double click the desired form and it
will open the form in edit mode.
Once the form is open, select which portions of the form
requiring data.
*The “Forms tab” displays common ICS Forms from the FEMA 2010 All Hazard Type
Incidents list.
Dragonfly Manual Version 3© Page 35
Page 36
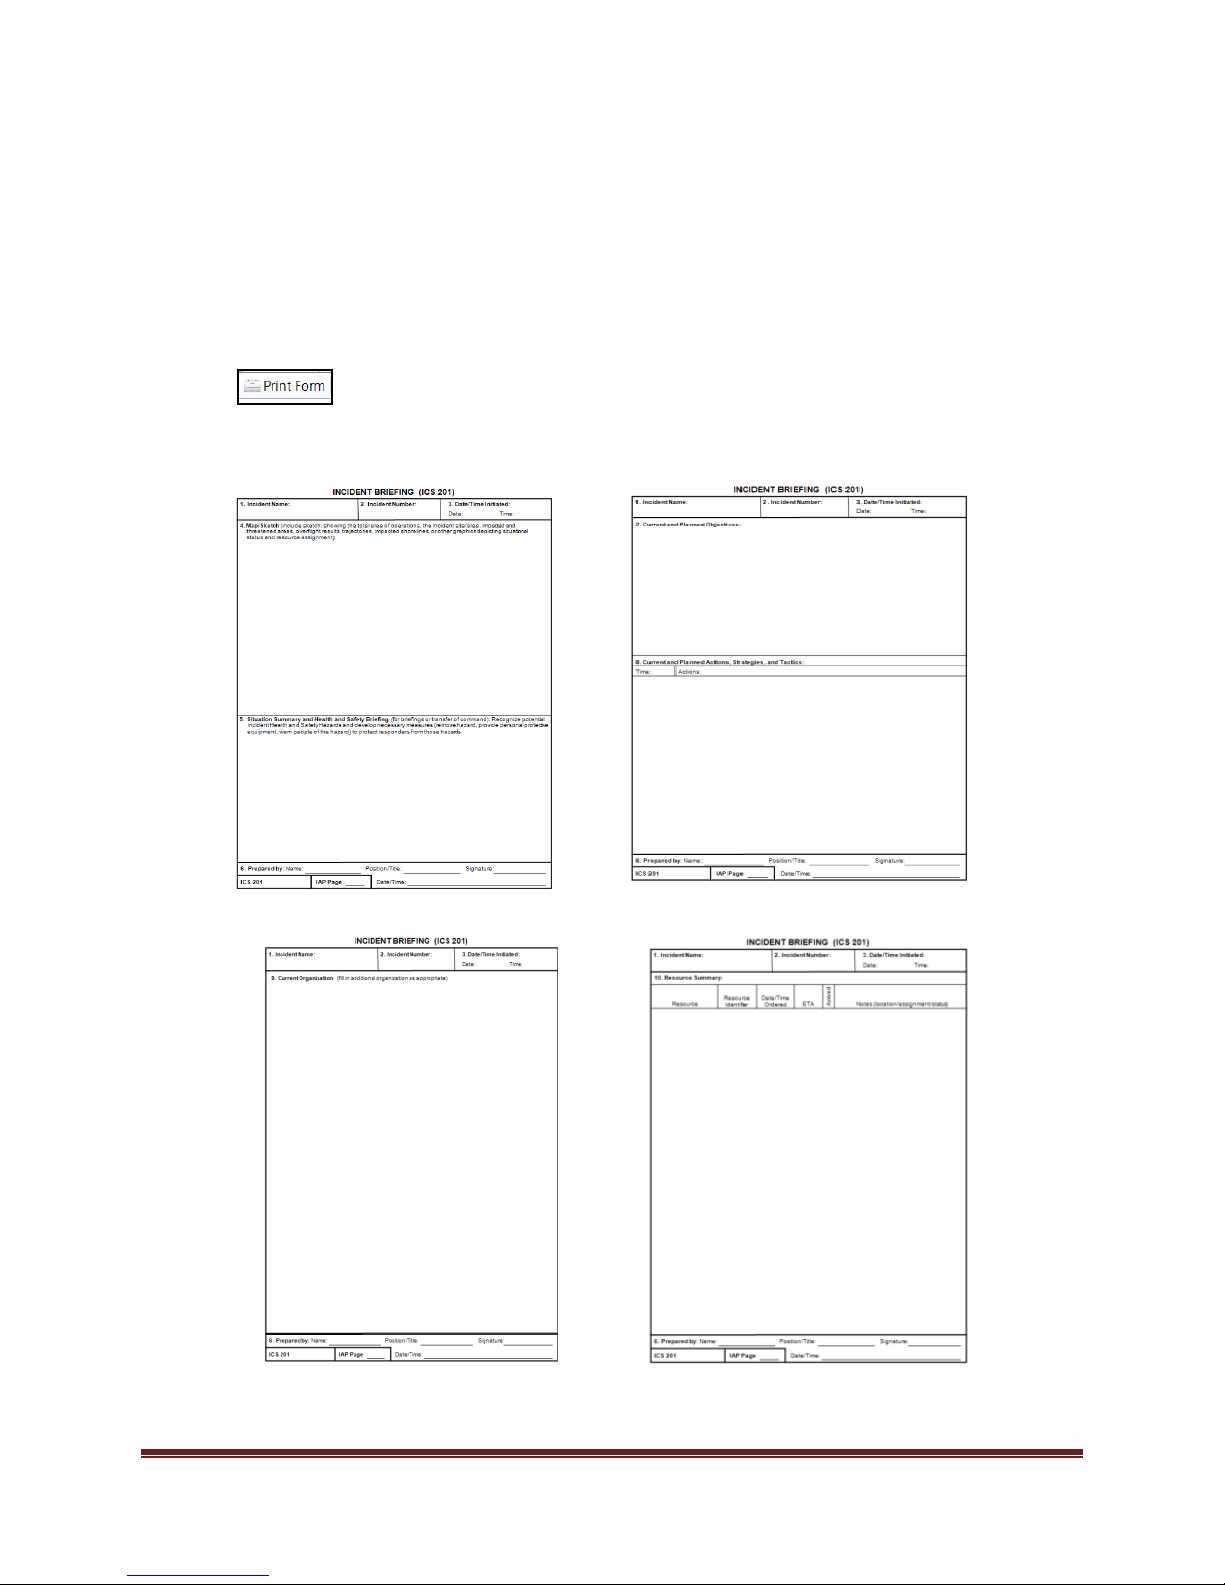
Printing forms: Forms can
be printed “blank” or can be
printed displaying required
data. Printing is completed
by pressing the Print Form
button.
( Example ICS 201)
Dragonfly Manual Version 3© Page 36
Page 37
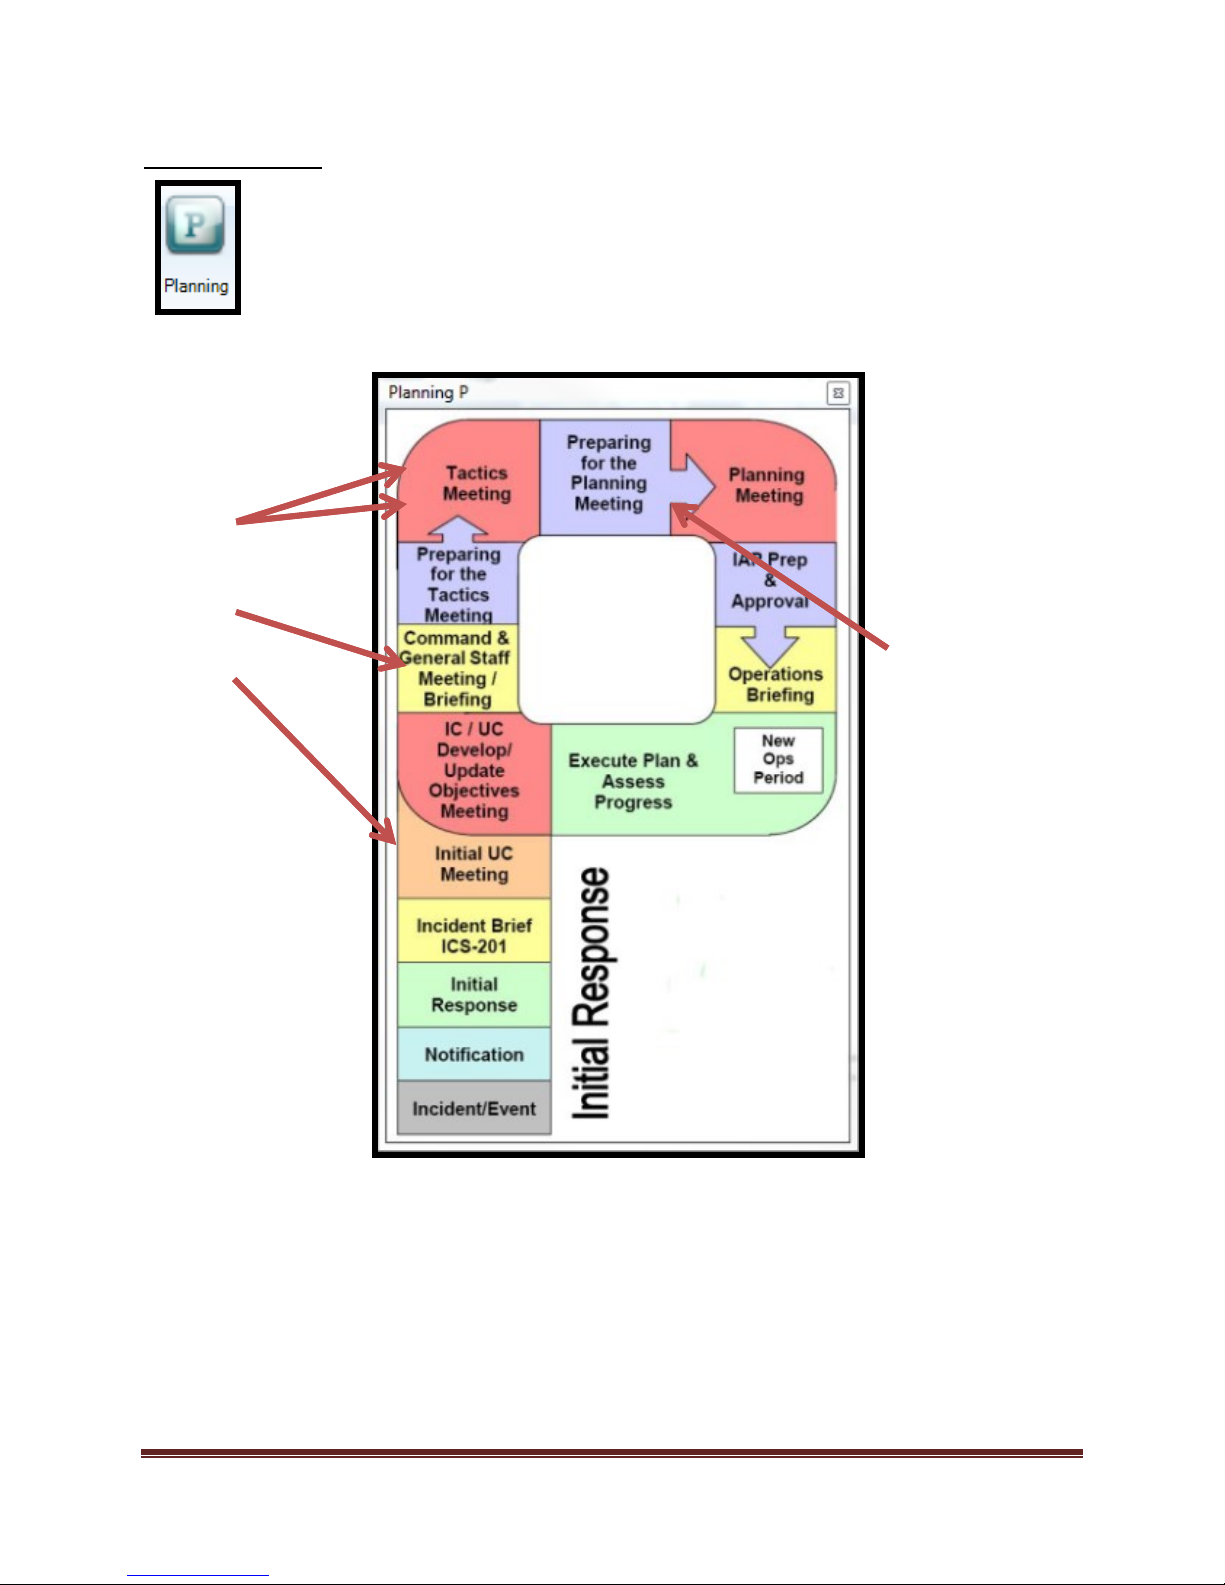
Forms-Planning “P”
The user can also access forms through the use of the “Planning P” Icon. The
described activities contained in the “P”; when selected, will allow the editing of the
corresponding form for the described activity.
Form editing point
locations within the
“Planning P”
ICS 215
ICS 215A
ICS 202
ICS 201
Form editing point
locations within the
“Planning P”
ICS 203
ICS 204
ICS 205
ICS 206
ICS 230
Dragonfly Manual Version 3© Page 37
Page 38
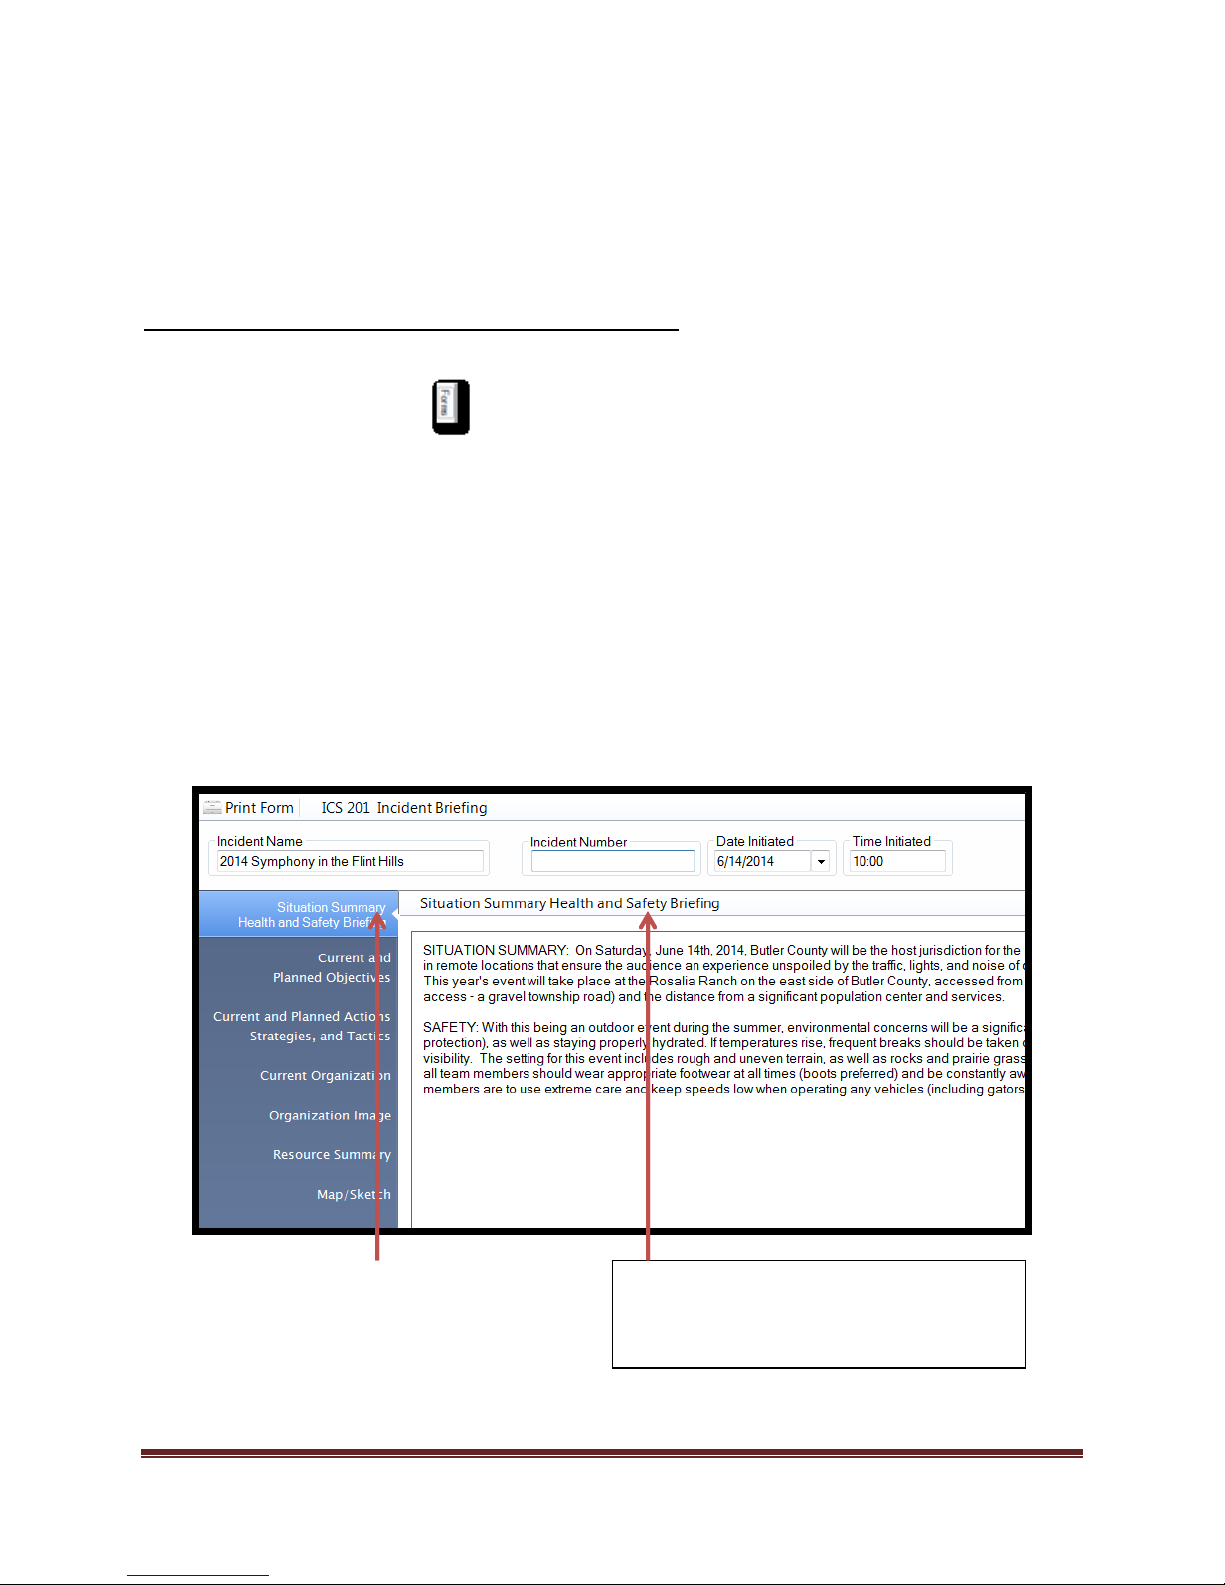
The forms contained in Dragonfly™ are designed to cross populate data onto related forms.
Steps for completing the form:
1. Select the Forms tab
2. Double click on the ICS 201 form. This will open the form for editing.*
3. Name the Incident.
4. Assign an Incident number if required/desired.
5. Set the initiation date.
6. Set the time initiated.
7. Select the Situation Summary Health and Safety Briefing and enter data in the text fields.
8. Select Current and Planned Objectives and enter data.
9. Select Current Organization and set image.
10. Select Organization Image and review the Organization chart for correctness.
11. Select Map/Sketch and import or add map.
*When a block is active and ready for
editing, a light blue highlight will appear.
Additionally, the block name will appear
directly above the field that is collecting the
data.
Additionally, certain data inputs that are created in one module/tool cause automatic updating
of related forms. When an edit occurs in one form or through the use of a module/tool, related
fields are also edited on the related form sets.
Completing the ICS 201 Incident Briefing Form
Dragonfly Manual Version 3© Page 38
Page 39
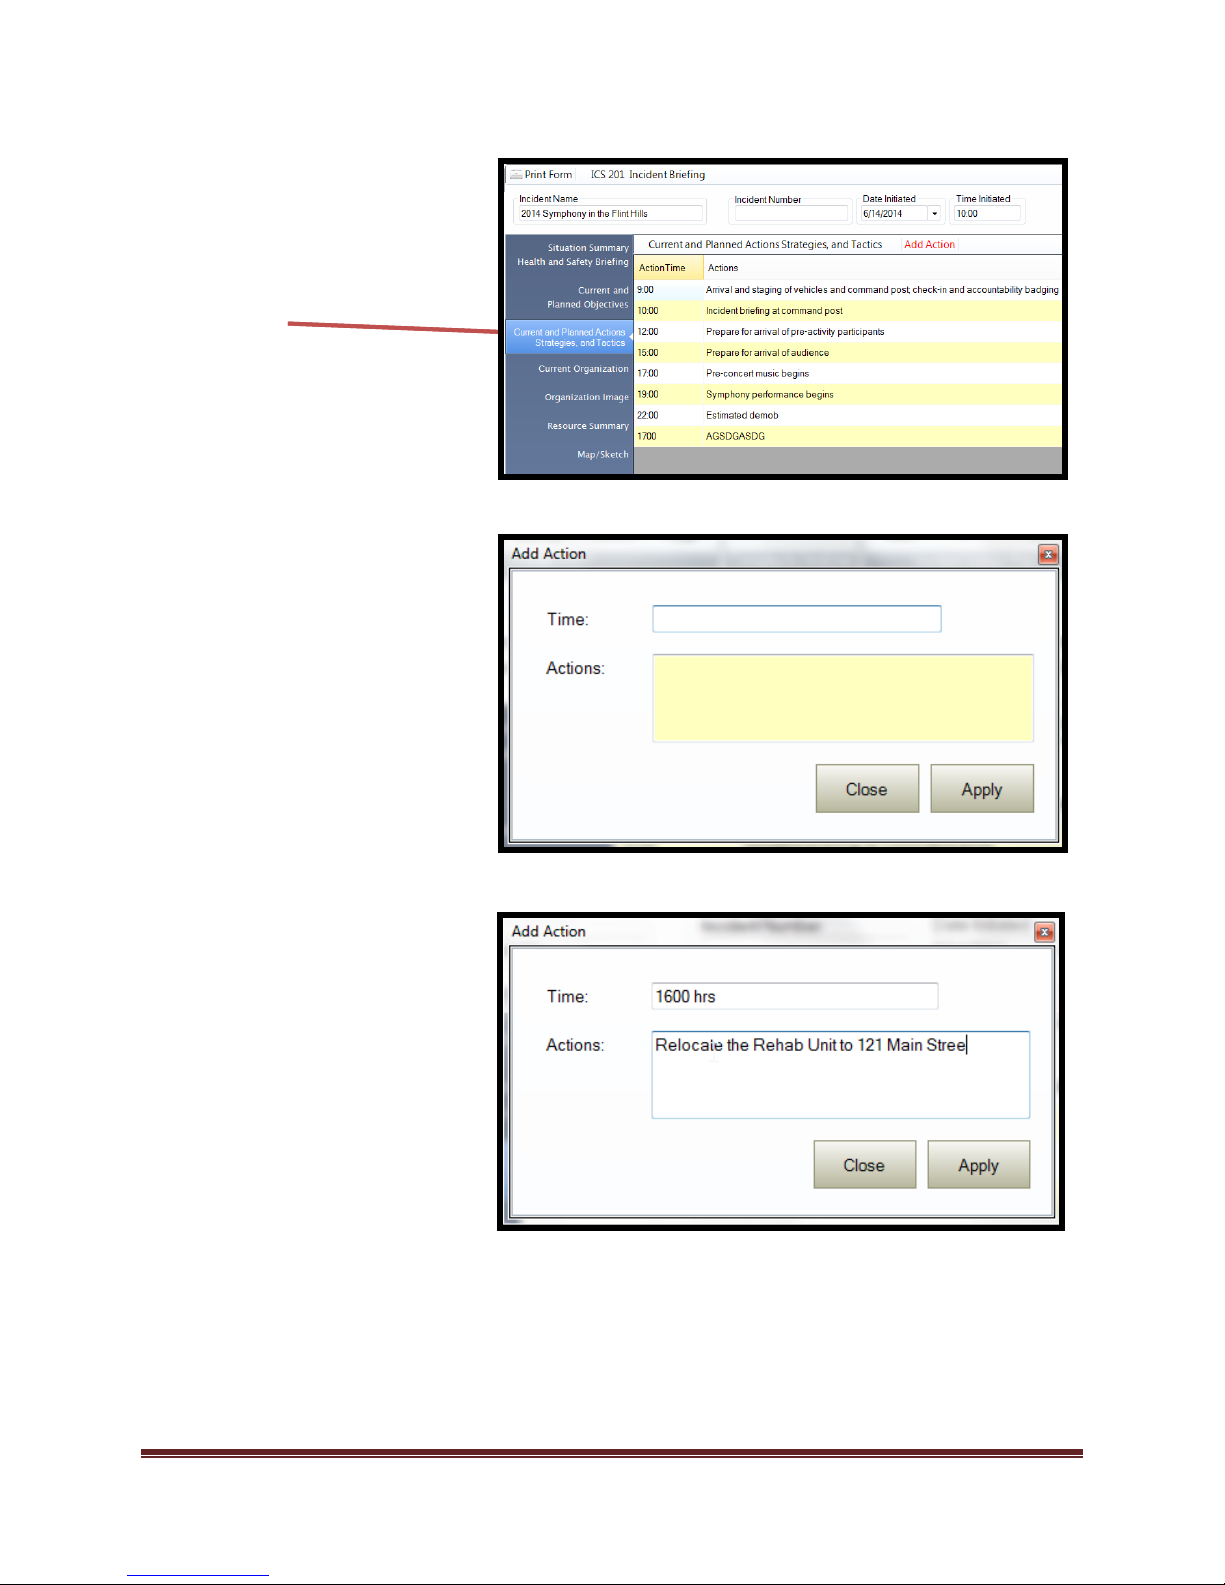
12. Setting Current Planned
Actions, Strategies, and
Tactics is completed by
clicking the “Add Action”
button.
13. The “Add Action” window
will open and allow the user
to enter the Actions desired.
14. Add the information that
you want displayed and click
“Apply” to commit data to
the form.
Dragonfly Manual Version 3© Page 39
Page 40
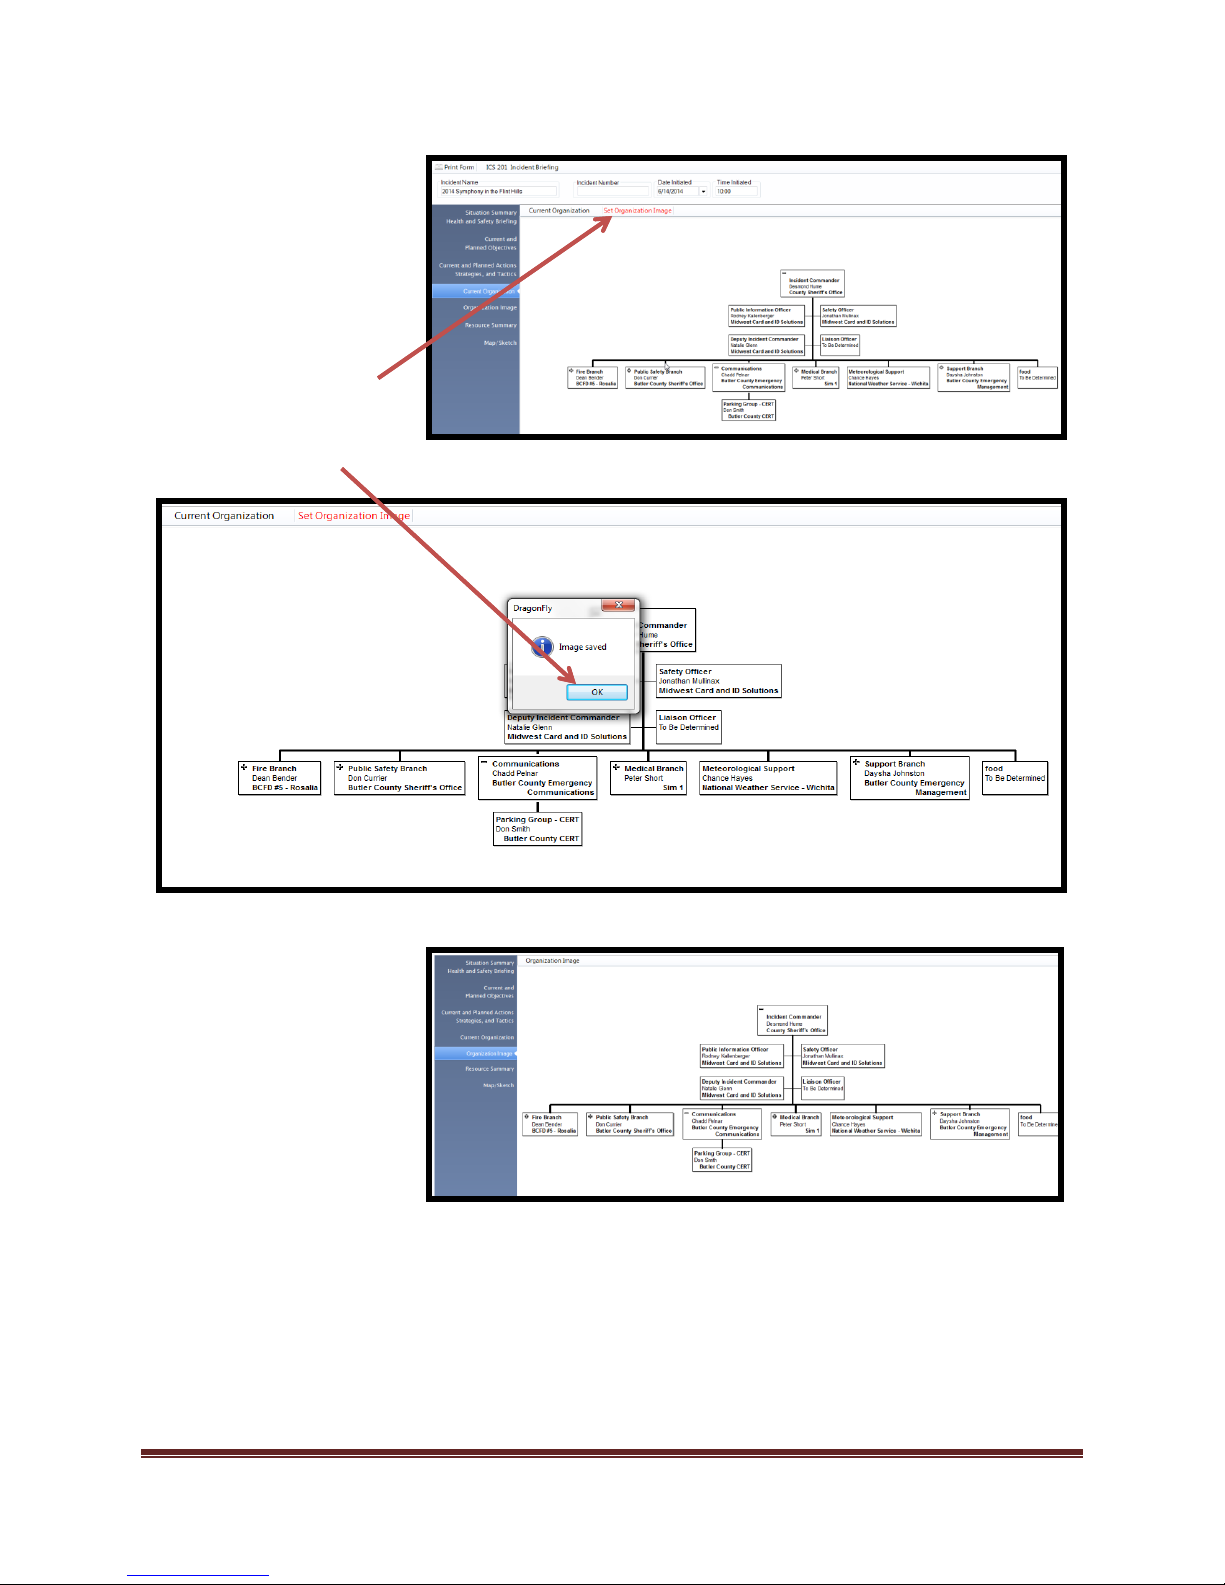
Setting the “Current
Organization” is a 4 step
process.
1. Adjust the desired
view.
2. Select -
“Set Organizational
Image”
3. Select “Ok” when
image is saved
4. Click on
“Organization Image”
Review the image to
verify correct display
Dragonfly Manual Version 3© Page 40
Page 41
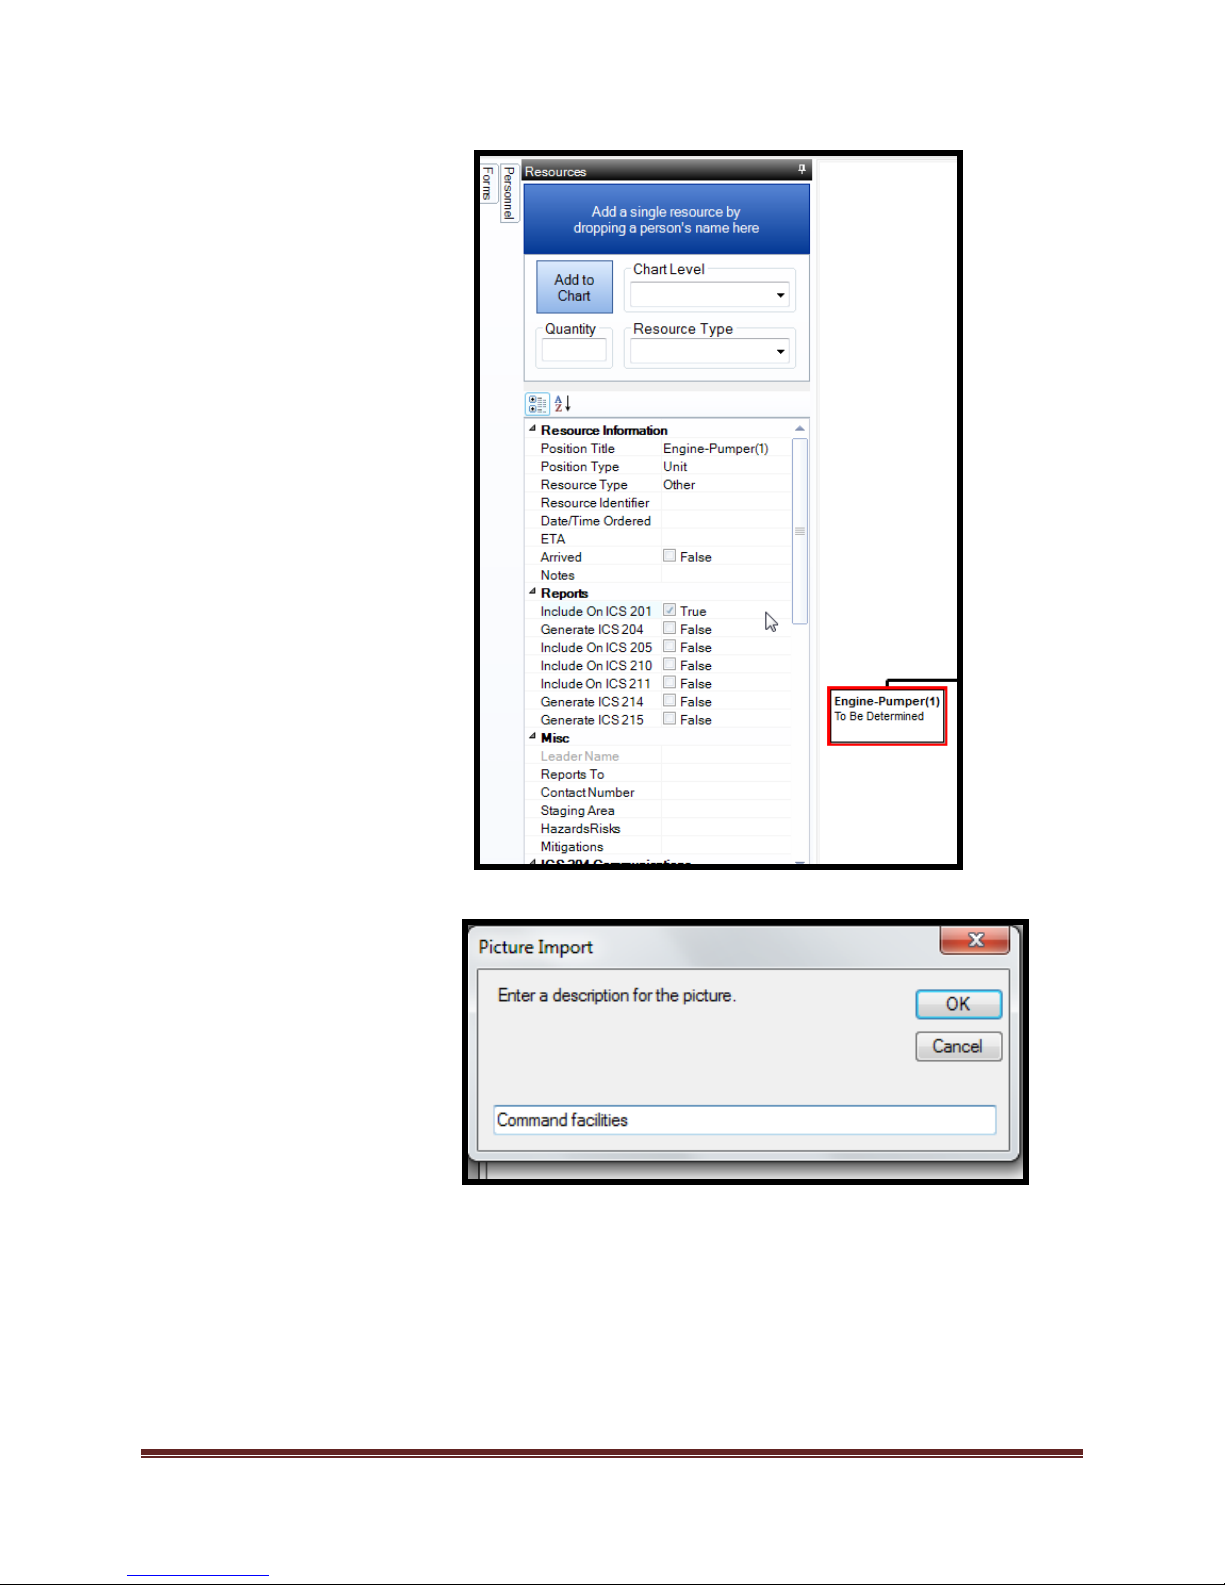
To add resources to the
“Resources Summary”, use
the following steps.
1. Select “Org Chart” Tool
2. Select “Resource Tab”
3. Select resource you want
to include on the
resource summary.
4. Locate and select
“Include in ICS 201”
To add a map(s)
5. Select “Map Sketch”
tool.
6. Select “Import/Map
Sketch” button.
7. Browse to the map you
want to add.
8. Open file and enter a
description for the map
9. Select “OK”
Dragonfly Manual Version 3© Page 41
Page 42
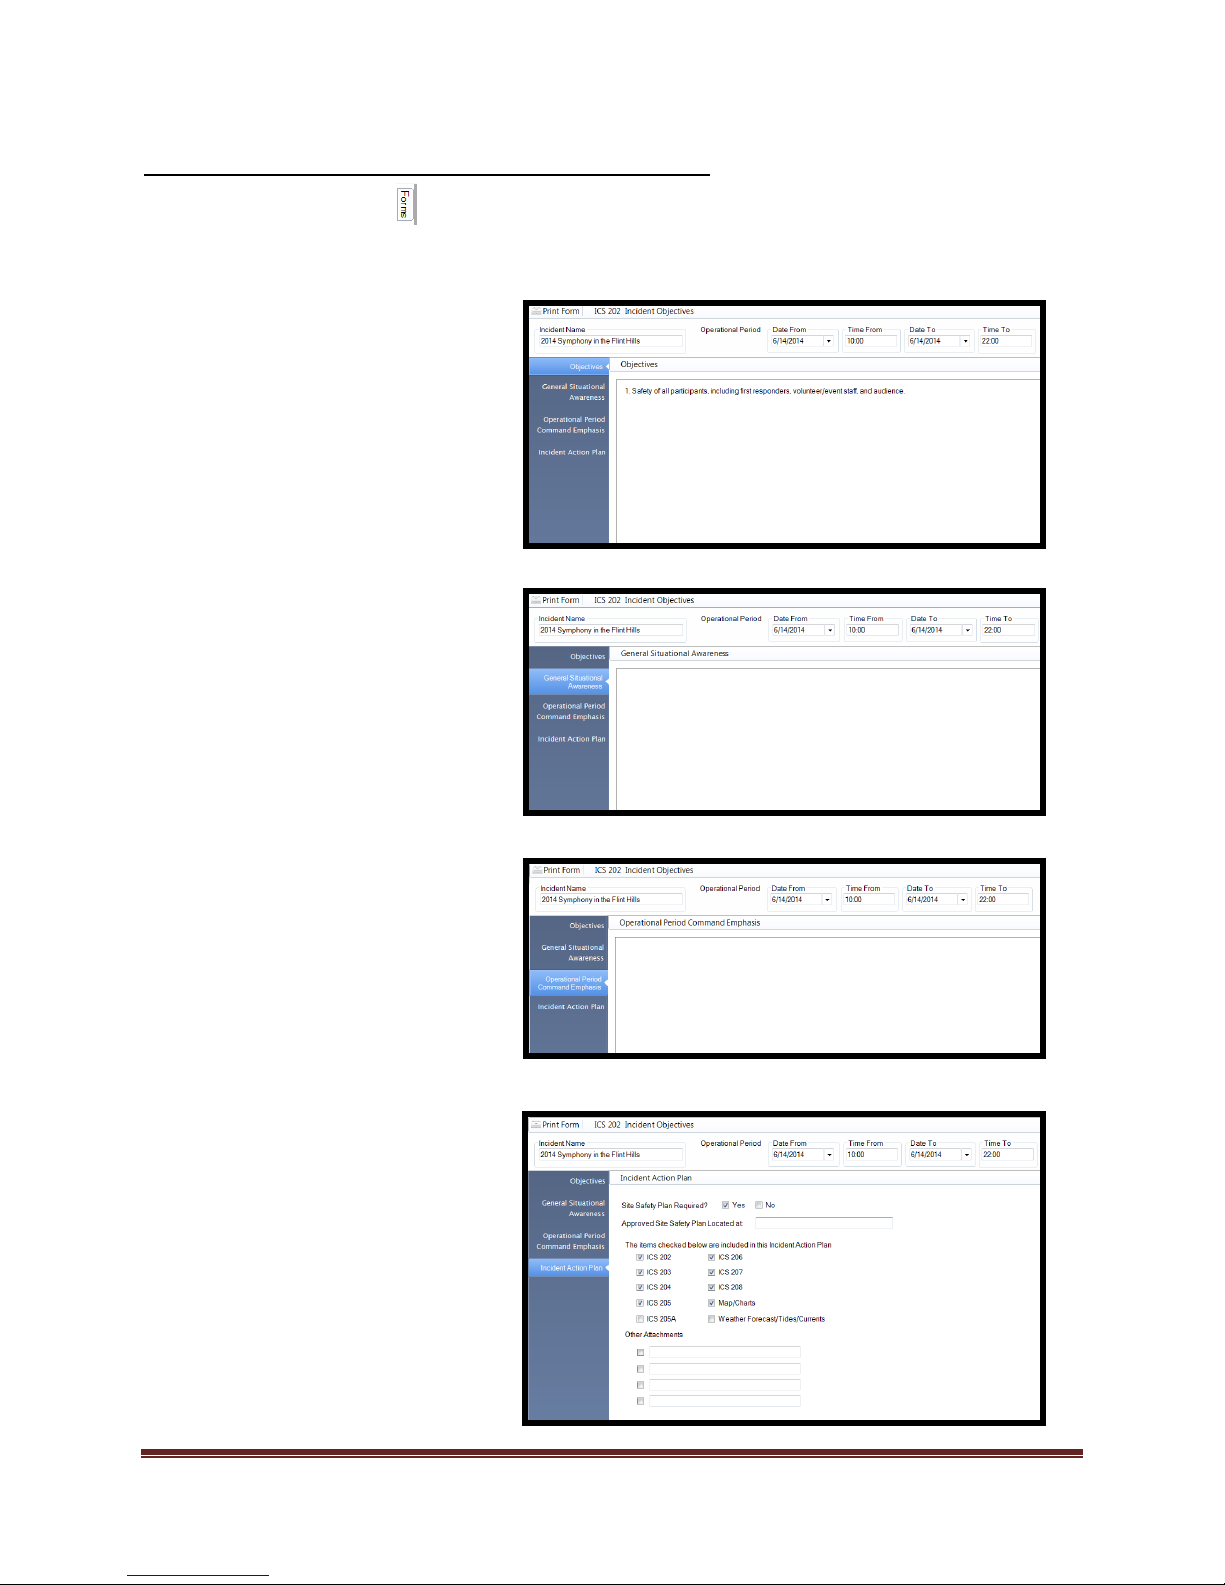
Completing the ICS 202 Incident Objectives Form
1. Add “Incident Name”
Set “Operational Period” if
desired.
Date From
Time From
Date To
Time From
2. Select “Objectives” block
and enter data into field
3. Select “General Situational
Awareness” and enter
desired statements.
4. Select “Operational
Period/Command Emphasis”
and enter data.
5. Select “Incident Action Plan”
and check boxes that are
needed for the IAP.
*Note: If the ICS 201 has been completed to include
“Incident Name”, that name will be present in every
“Incident Name” field across all forms.
Select the Forms tab
Double click on the ICS 202 form. This will open the form for editing.
There are 5 blocks/steps that allow editing within the ICS 202.
Dragonfly Manual Version 3© Page 42
Page 43
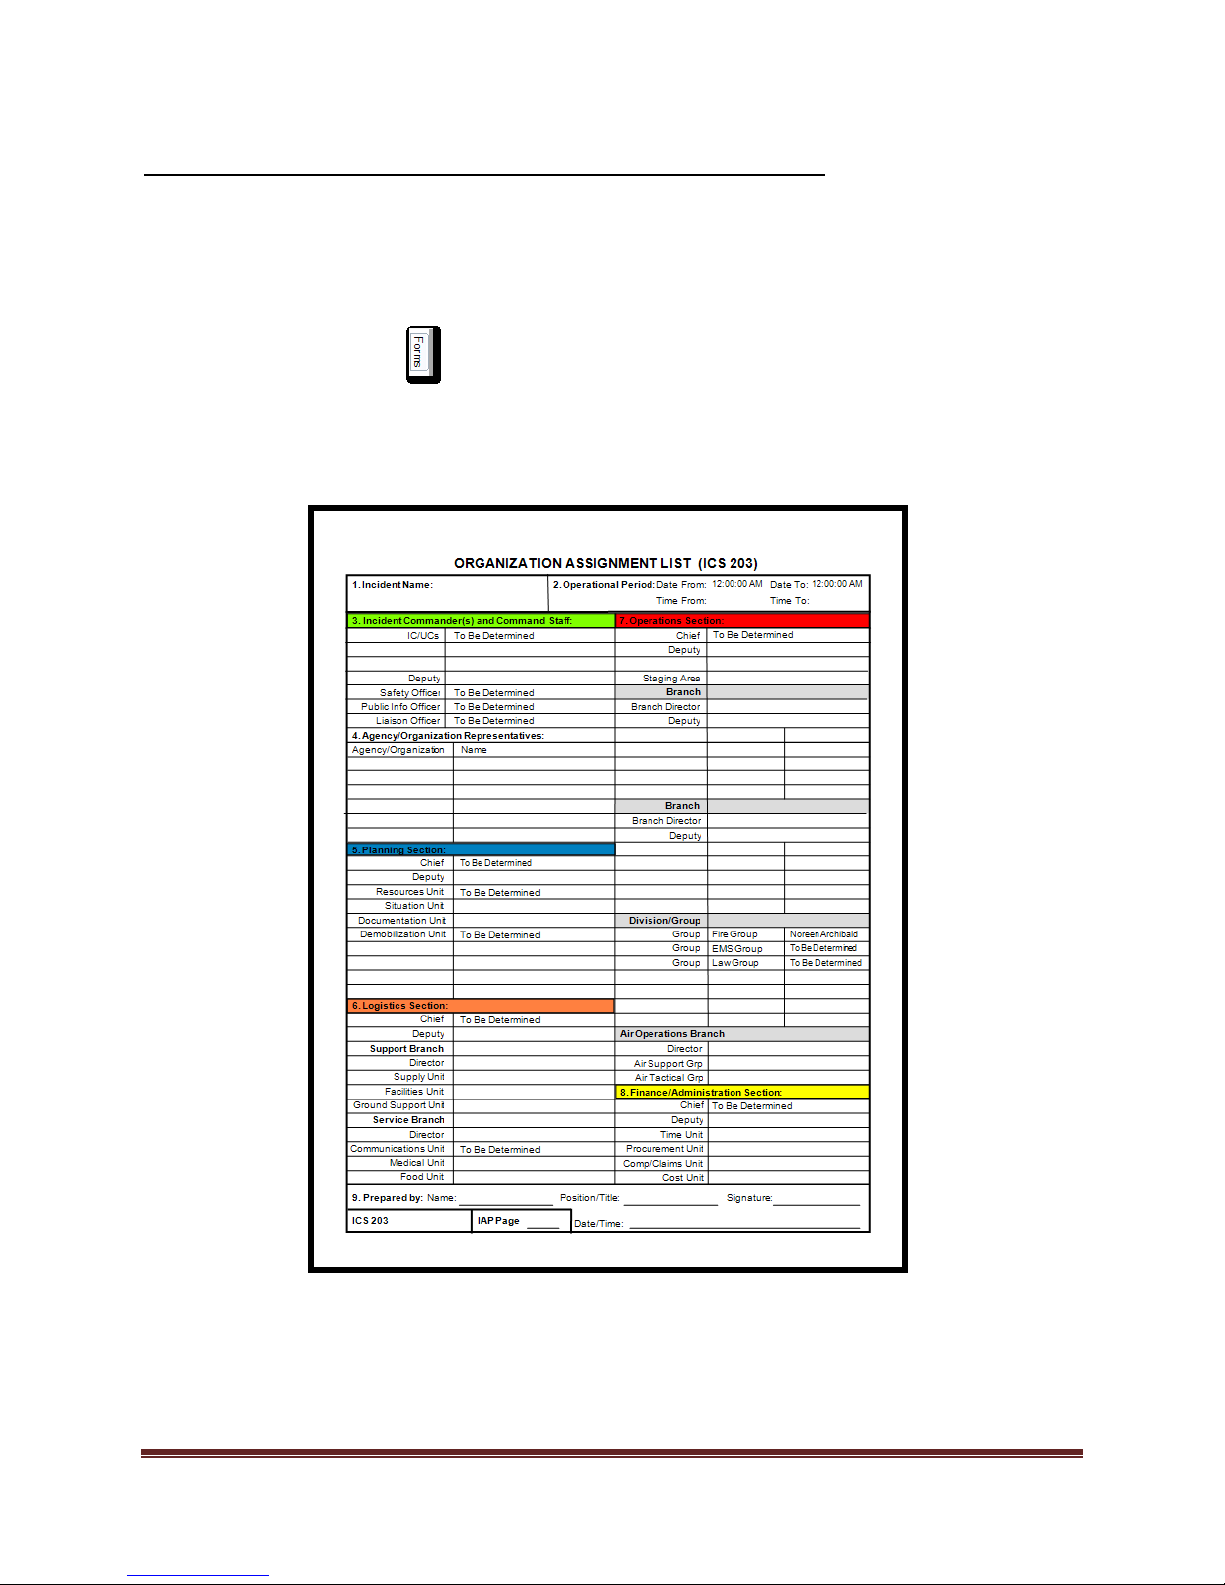
Completing the ICS 203 Organization Assignment List Form
1. Select the Forms tab
2. Double click on the ICS 203 form. This will open the form in print preview mode.
3. Verify data and make any necessary corrections.
Abstract-The ICS 203 form is designed to display Incident Assignments. This form is tied directly
to the Organization Chart tool and various other forms. This form receives all of its data from
the current organization chart and associated “Resource” tab. Editing of this form will be
completed through the use of said tools.
Dragonfly Manual Version 3© Page 43
Page 44
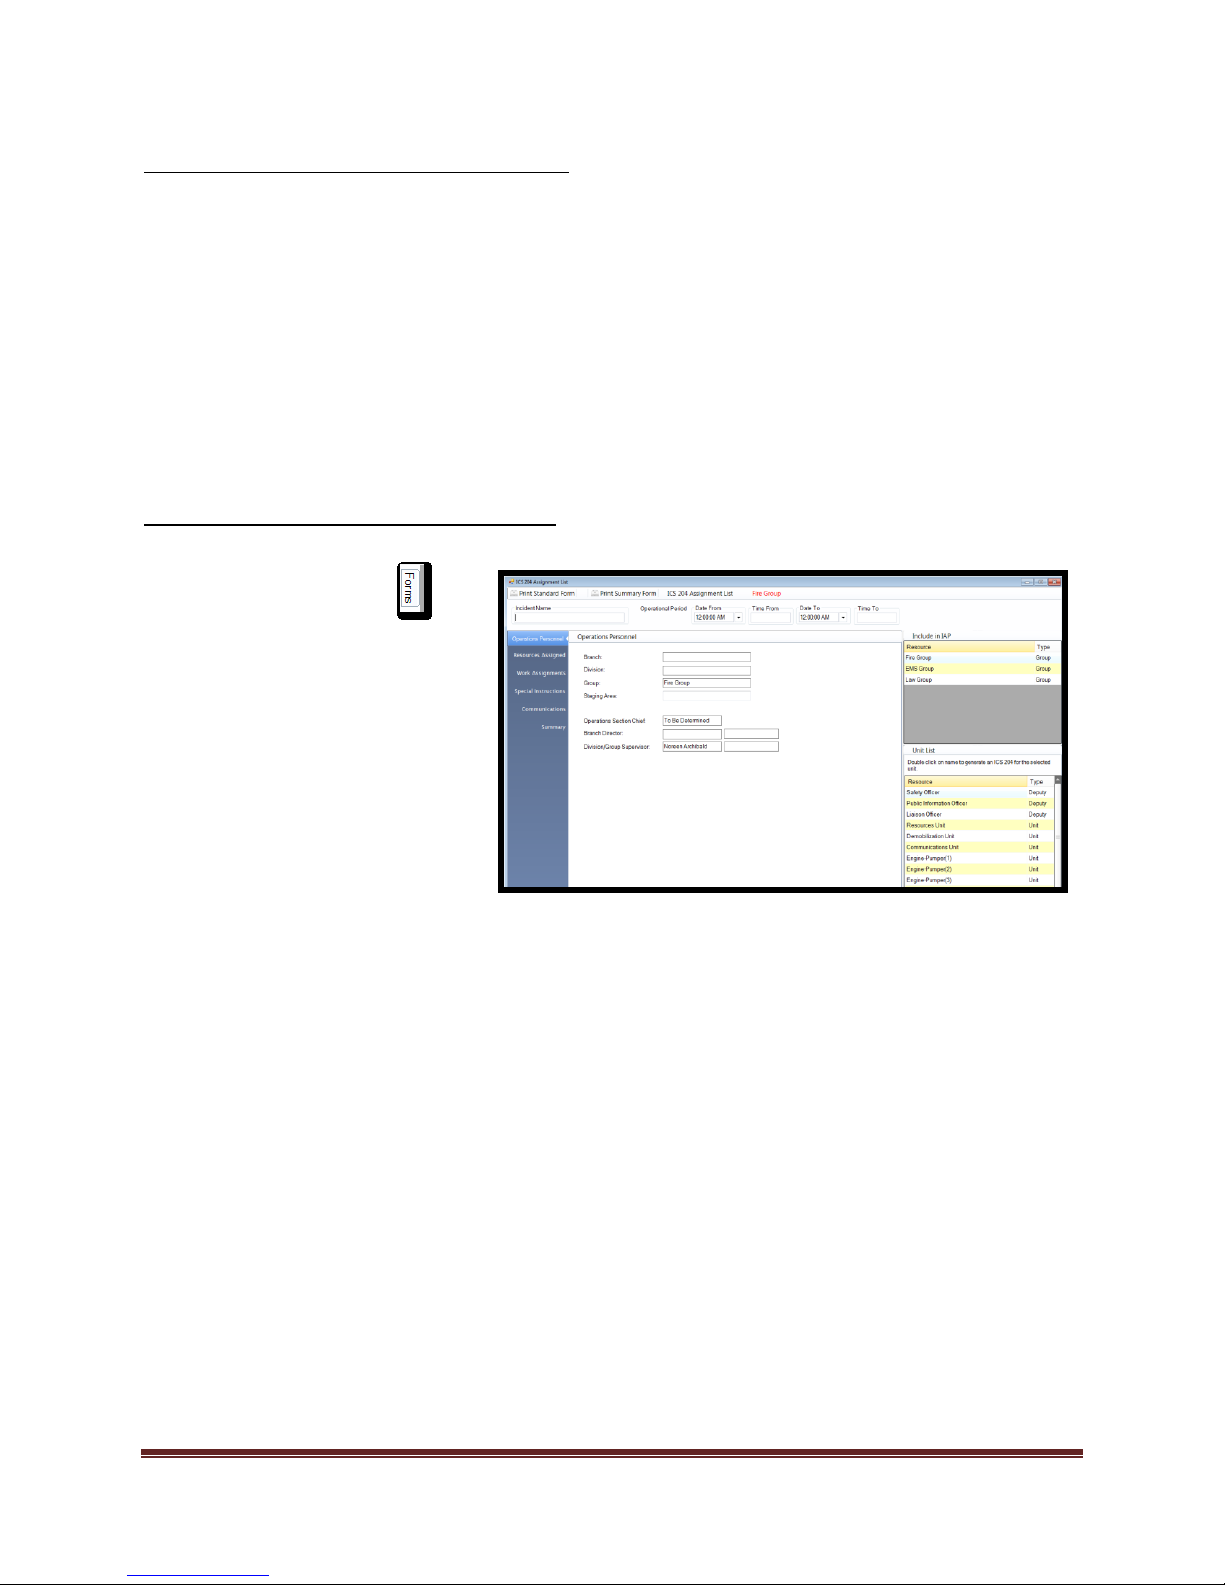
Completing the ICS 204 Assignment List
1. Select the Forms tab
2. Double click on the ICS 204
form. This will open the form
for editing.
3. Add/Verify “Incident Name”
and “Operational Period”.
4. Select the “Tactical” position
that you want to edit from the
“Include in IAP” window.
If position is not in the
“Include in IAP” window, it
is located in the “Unit list”
window.
Double click unit and it will
now appear in the
“Include in IAP” window.
The “Operations
Personnel” fields are auto
completed by the
program. Editing is not
allowed in these fields.
If a unit is added by
mistake, select delete on
your key board and select
“Yes” from the dialogue
box. This will remove the
unit from the IAP list but
not delete the position
from the plan.
Within Dragonfly™, the ICS 204 can be created for any position. Additionally, a “Summarized”
ICS 204 is available if required. The ICS 204 can be completed from four locations within
Dragonfly™.
ICS 204 Form tool
Organization Chart>right mouse click
Organization Chart>Resource tool tab.
ICS 215 Operational Planning Worksheet
The completion of the forms is nearly identical in either instance. There are slight differences.
These differences will be explained as the instructions are completed.
Completing the ICS 204 from “Forms” tab:
Dragonfly Manual Version 3© Page 44
Page 45
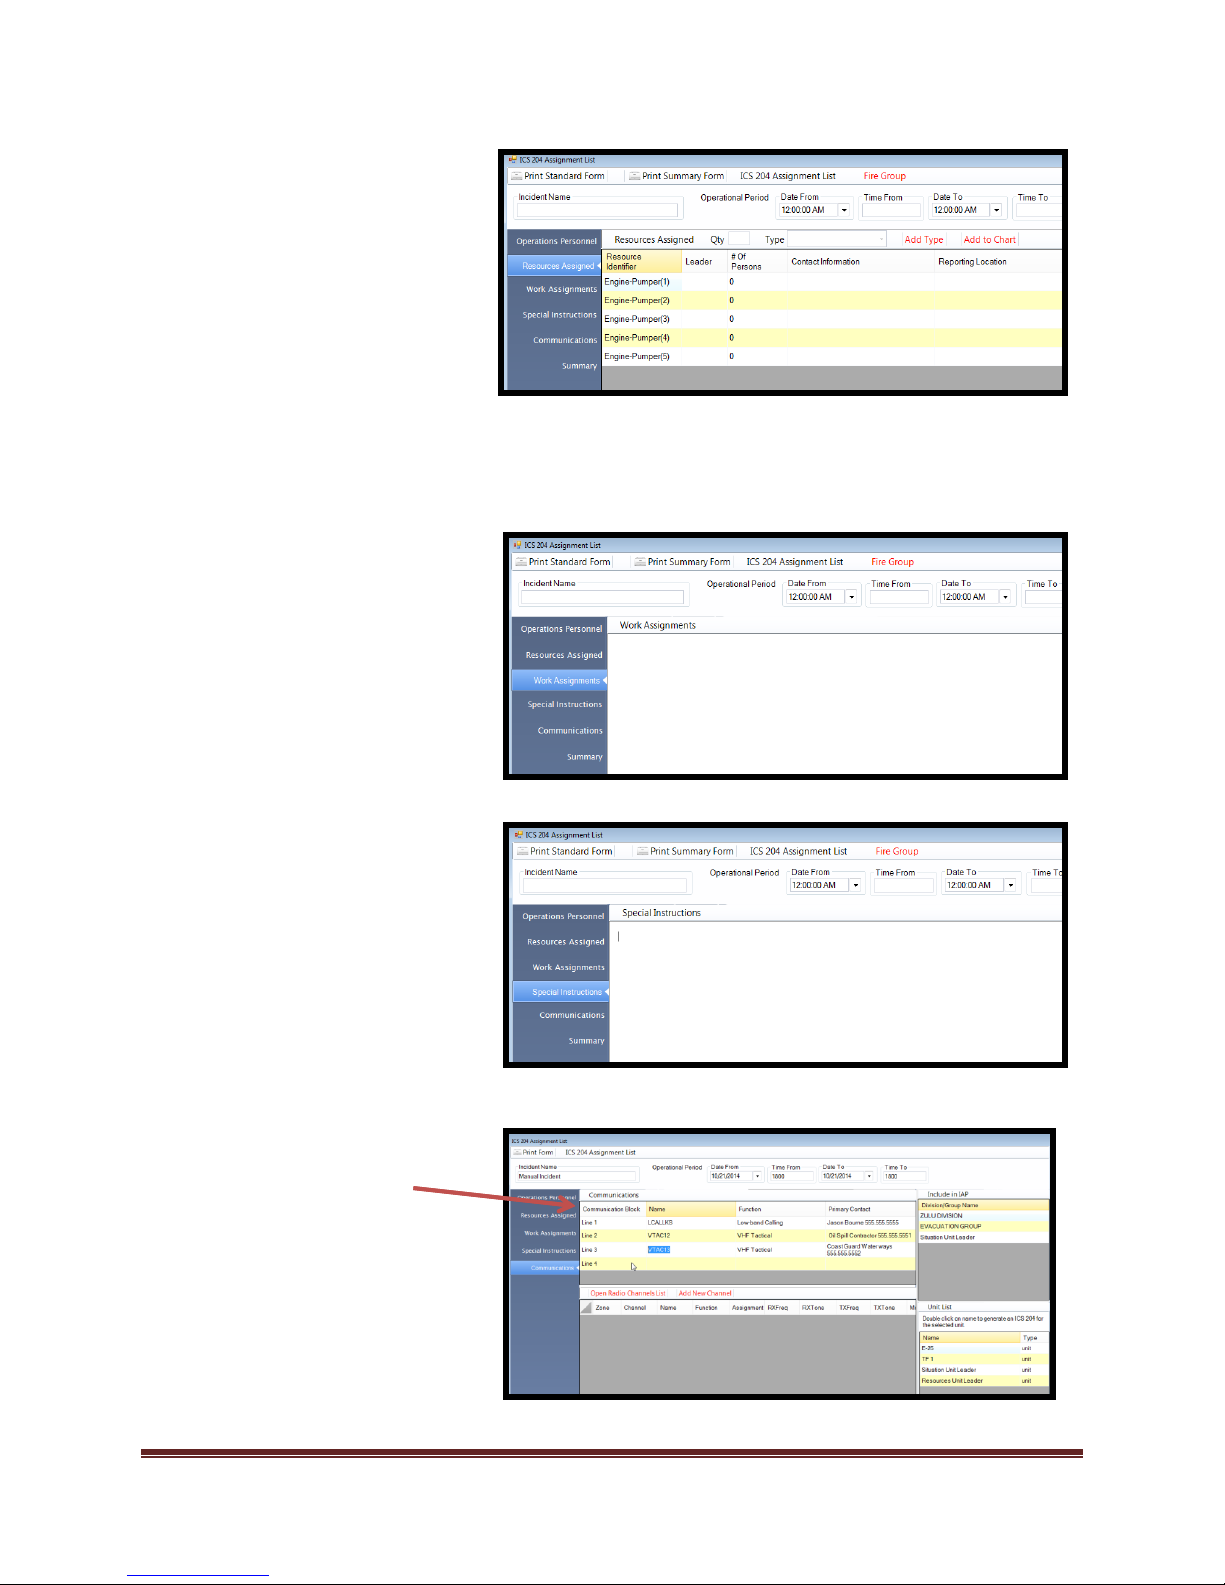
5. Select “Resources Assigned”
Resources will appear once
they have been added using
the “Resource tab” tool in the
Org Chart, through the ICS215
form tool, or by using the
resources built into the form.
*Resource totals take into
account the Supervisor and
resources of each position
below the Division/Group(s)
6. Select “Work Assignments”
and add desired information.
7. Select “Special Instructions” and
add desired information.
8. Select “Communications” and add
desired information.
Frequencies can be added
to the ICS 204 through
manual addition to the
“Communications Block”
Dragonfly Manual Version 3© Page 45
Page 46
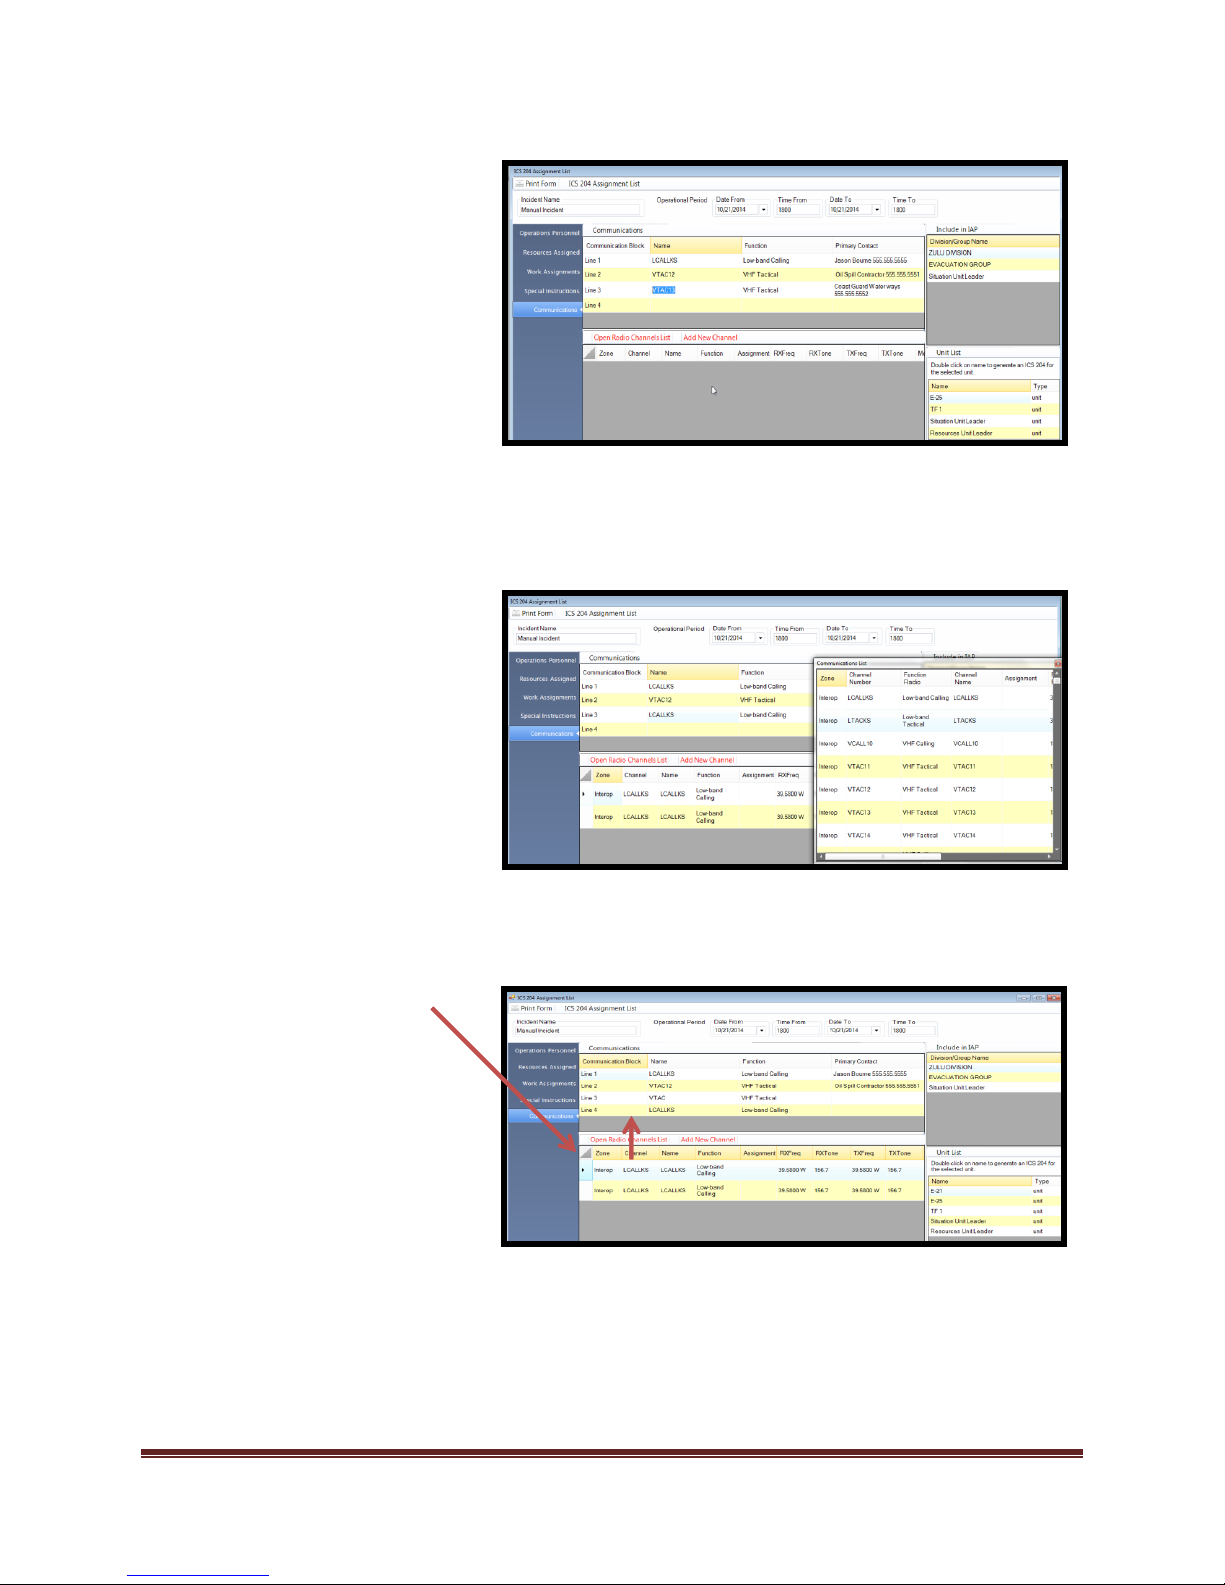
9. Frequencies can be added
through two methods using the
“ICS 205 interface tool” that is
built into the ICS 204. This tool
is directly connected to the ICS
205 form and “Communication
Library”
User can add frequencies
by accessing the “Open
Radio Channel List”
-OR-
User can add frequencies
by accessing the “Add New
Channel” tool
To use the “Open Radio Channel
List” frequencies must be available
in the “Communications List”. This
list is located in the “Setup” tab.
Adding frequencies to the ICS 204
from the “Communication List” is
completed by:
“Drag and Dropping” the
desired frequencies onto the
“ICS 205 interface tool”.
-THEN-
“Drag and Dropping”
frequency on to the desired
Communication Block
Repeat steps for all desired tactical
positions that you want to create
an ICS 204 for.
*By using the “ICS 205 interface
tool” within the ICS 204, the user
will have completed the ICS 205.
Dragonfly Manual Version 3© Page 46
Page 47
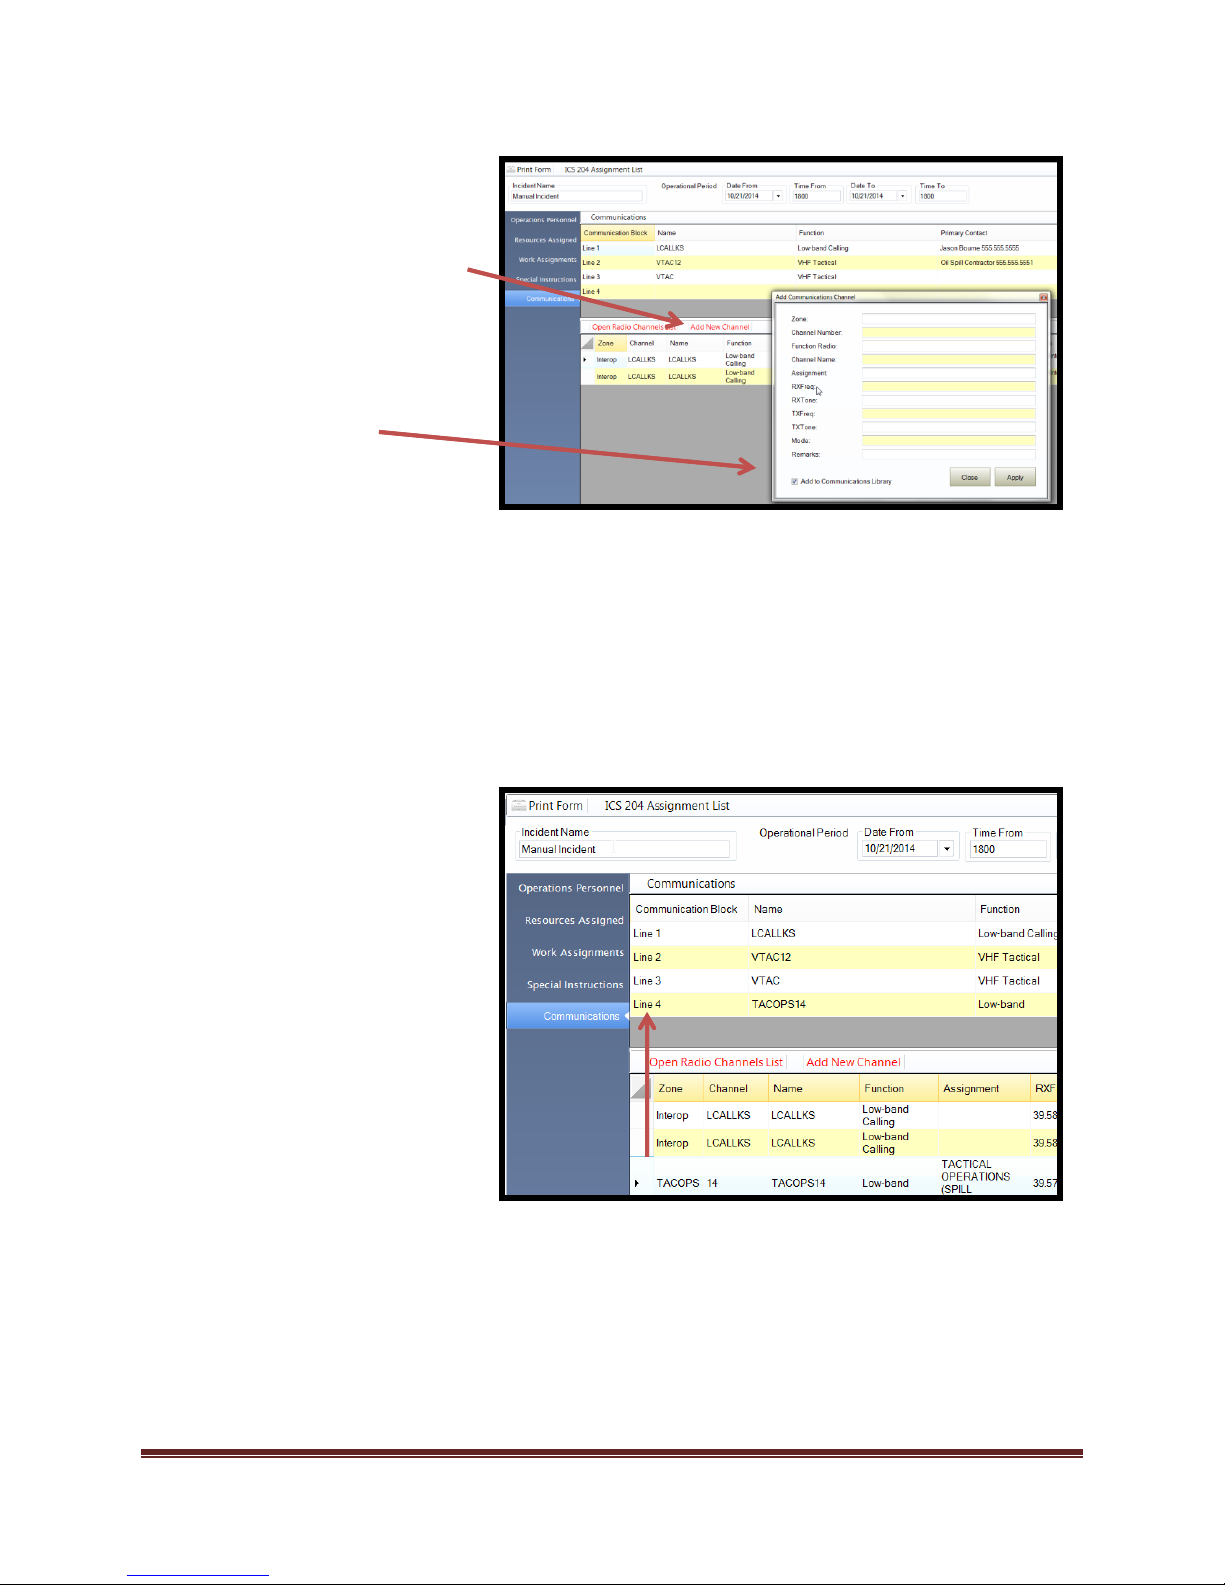
“Drag and Drop”
frequency onto the
“Communications Block”
from the “ICS 205
Interface tool” to the
“Communications block”
of the ICS 204
Adding a frequency by accessing
the “Add New Channel” tool
Select “Add New Channel”
The “Add Communication
Channel” will open.
Enter desired data into
data fields
Select “Add to
Communications Library”
checkbox if data is to be
stored in the
“Communications List”
Select “Apply” to commit
the data to the “ICS 205
Interface tool”
Dragonfly Manual Version 3© Page 47
Page 48
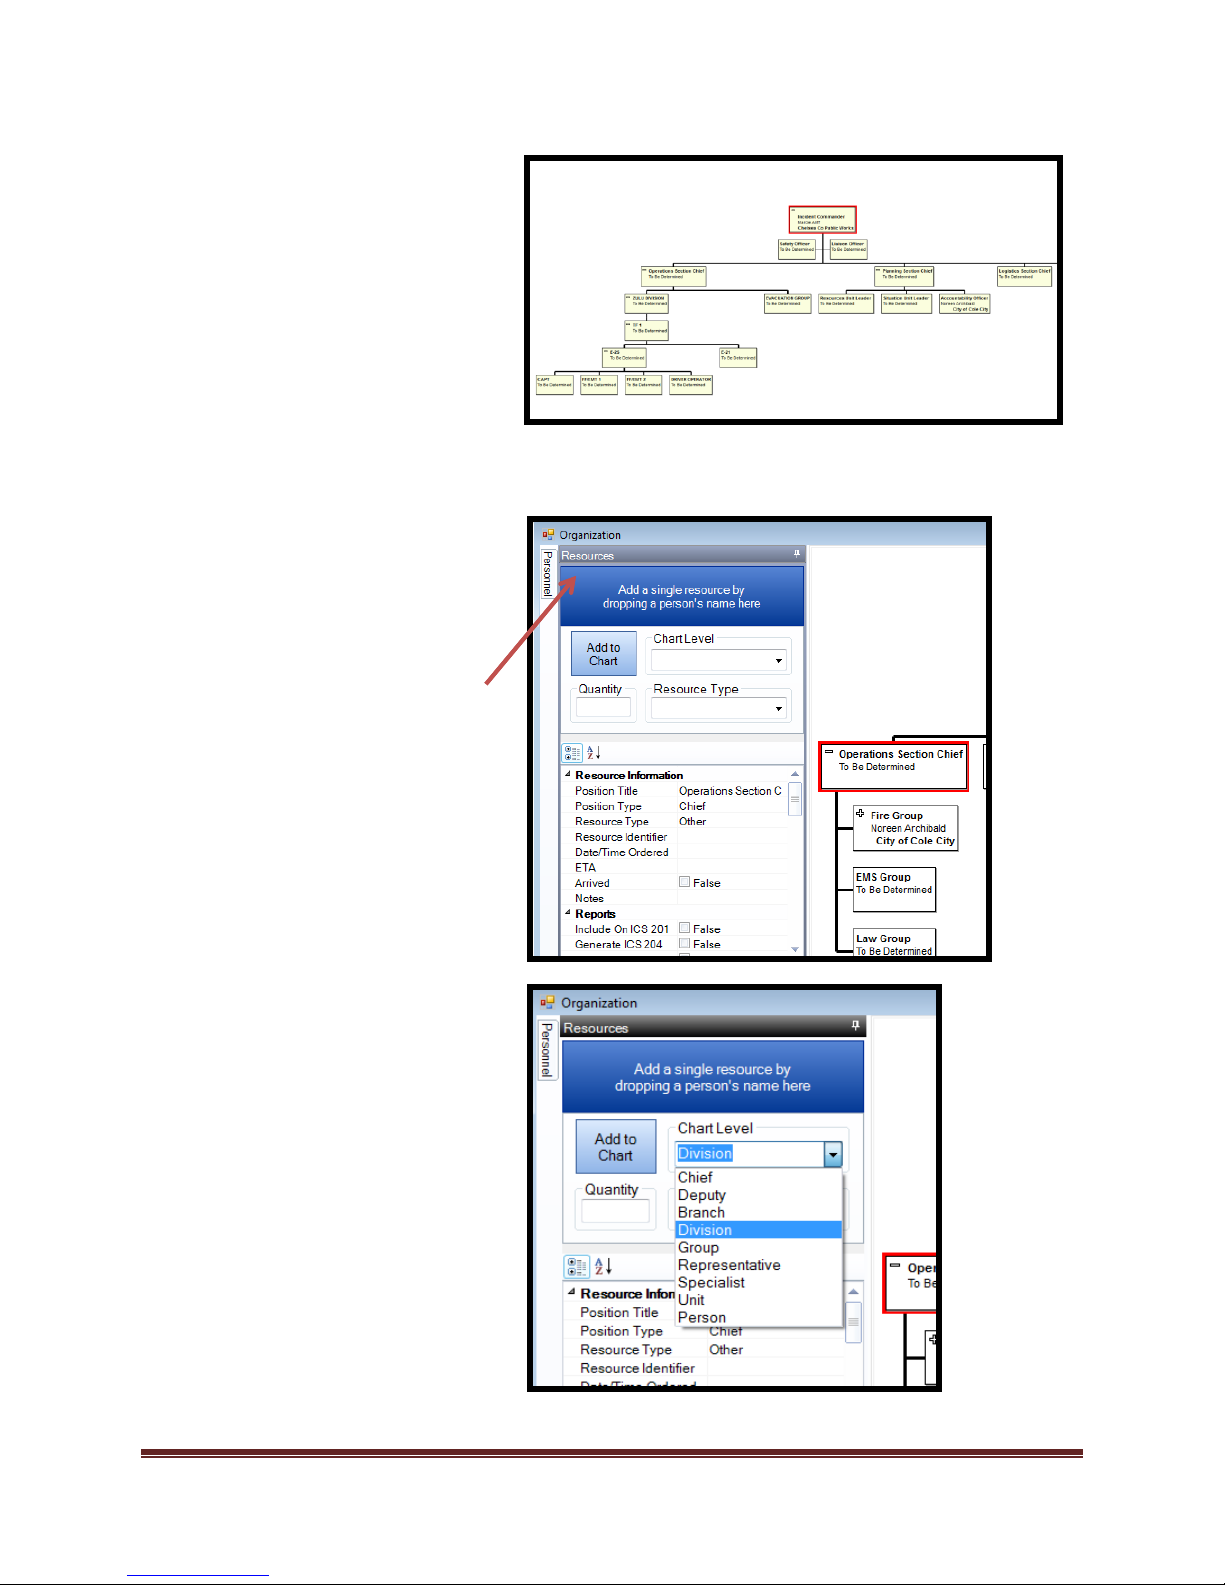
Creating the “ICS 204 Assignment
List” using the “Organization Chart
Resource tab” tool.
1. Select “Incident Action
Planning Tab
2. Select “Organization Chart
Tool”. The current organization
chart view opens.
3. Select the “Tactical” position
you want to create an ICS 204
for.
c. Select the “Resource Tab”
tool.
d. Select from the Chart level
the position desired
Dragonfly Manual Version 3© Page 48
Page 49
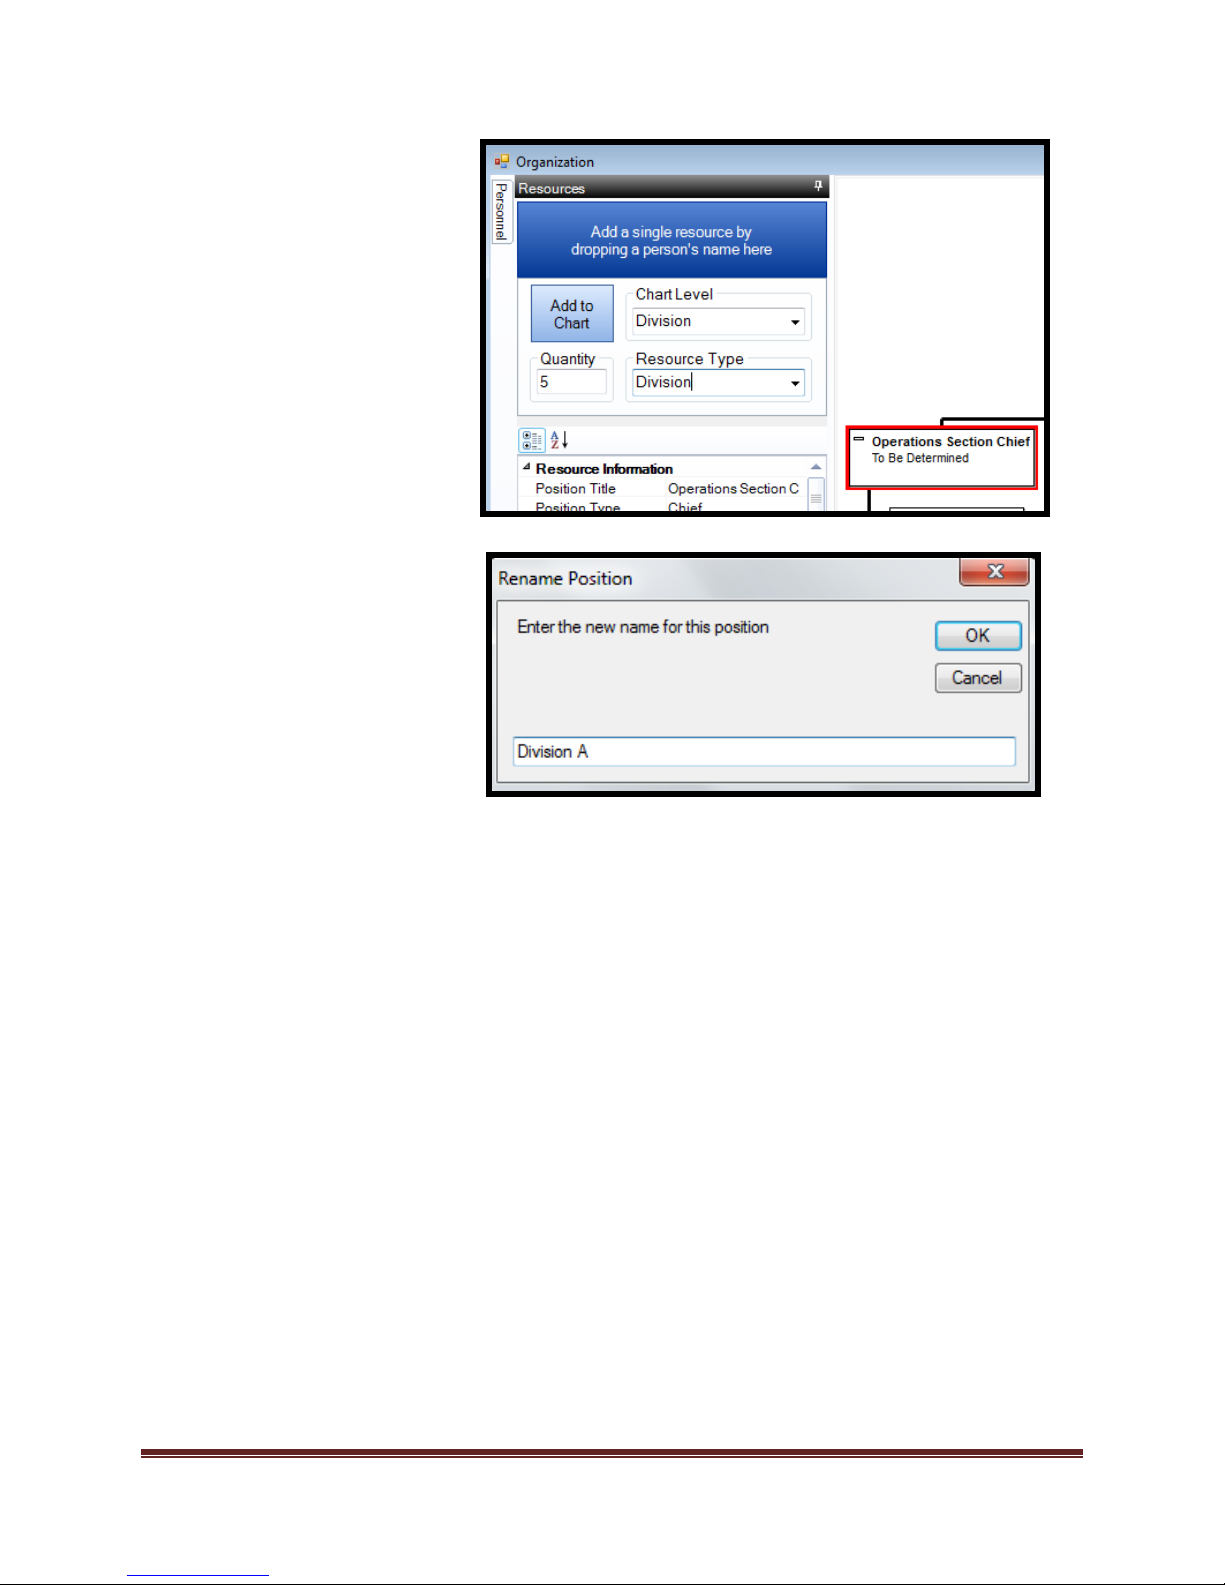
e. Enter the Quantity.
f. Enter the resource type.
g. Select “Add to Chart”
h. Verify placement of new
positions.
i. Right click on
assignment and select
“Rename position”.
j. Rename position
k. Select “ok”
Dragonfly Manual Version 3© Page 49
Page 50
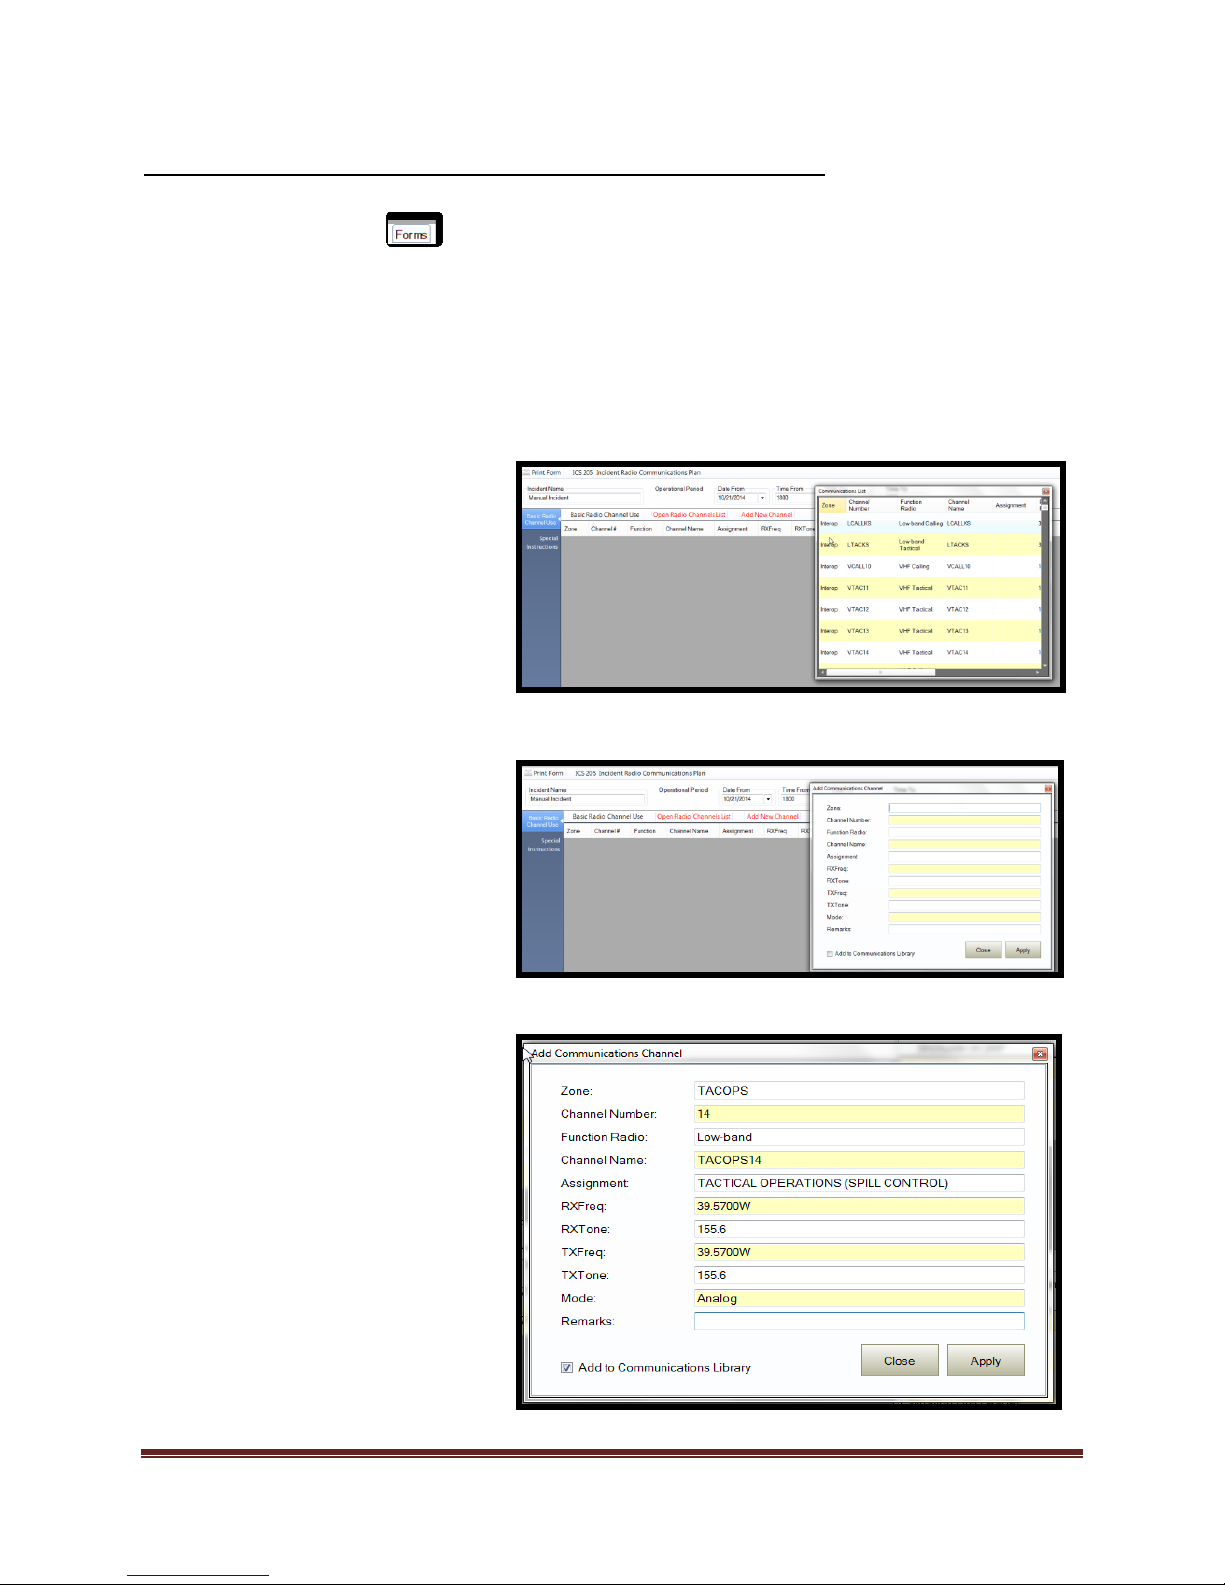
Completing the ICS 205 Incident Radio Communication List
1. “Open Radio Channel List” tool
method:
a. Select “Open Radio Channel
List”.
b. The “Communications List”
window will open.
c. “Drag and Drop” desired
frequency to ICS 205 form.
2. “Add New Channel” tool method:
a. Select “Add New Channel”
b. The “Add Communications
Channel” window will open
c. Add desired data into data
fields.
d. Select “Apply” to commit data
to the ICS 205.
e. Select “Add to
Communications Library”
check box if desired.
f. Frequency will be added to the
ICS 205.
To complete the ICS 205 complete the following steps:
1. Select the Forms tab
2. Double click on the ICS 205 form. This will open the form for editing.
3. Add/Verify “Incident Name” and “Operational Period”.
4. Select “Basic Radio Channel Use” block.
*Frequencies can be added by two methods:
“Open Radio Channel List” tool
“Add New Channel” tool.
Dragonfly Manual Version 3© Page 50
Page 51
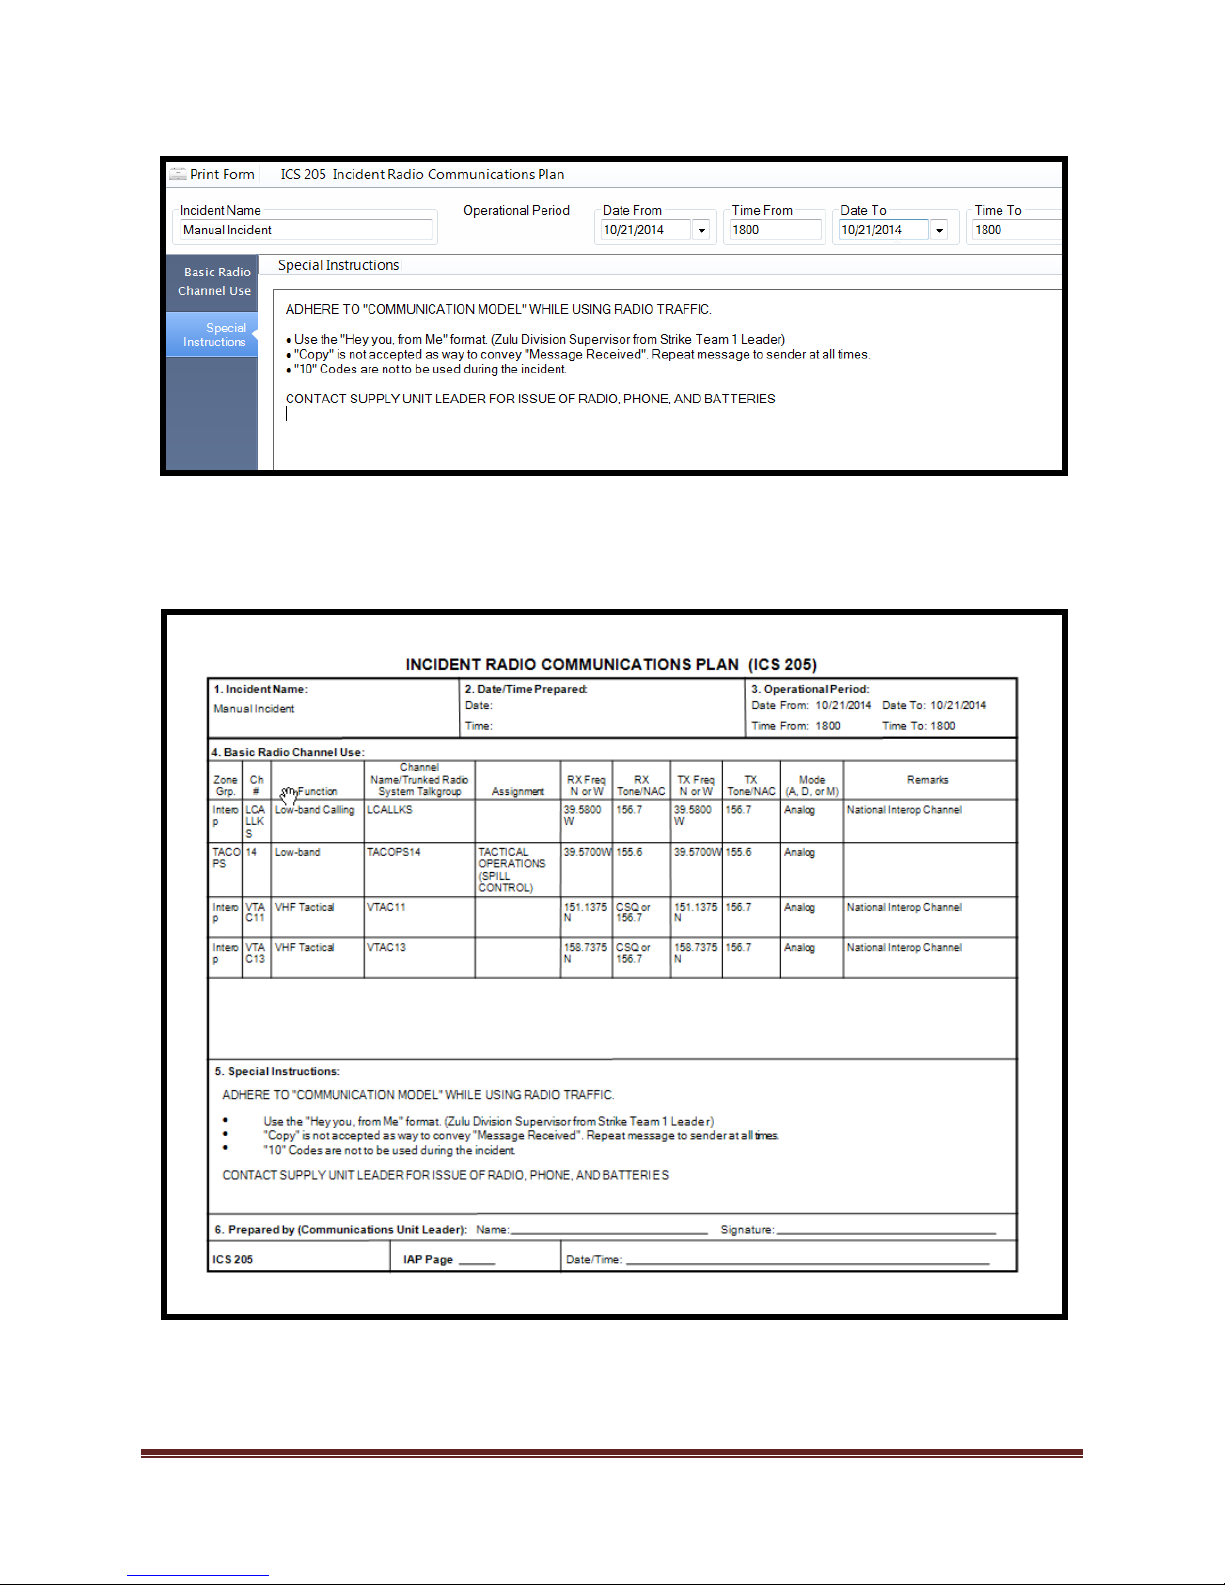
3. Select “Special Instructions” block and add desired data.
4. Select “Print Form” tab to review.
Dragonfly Manual Version 3© Page 51
Page 52
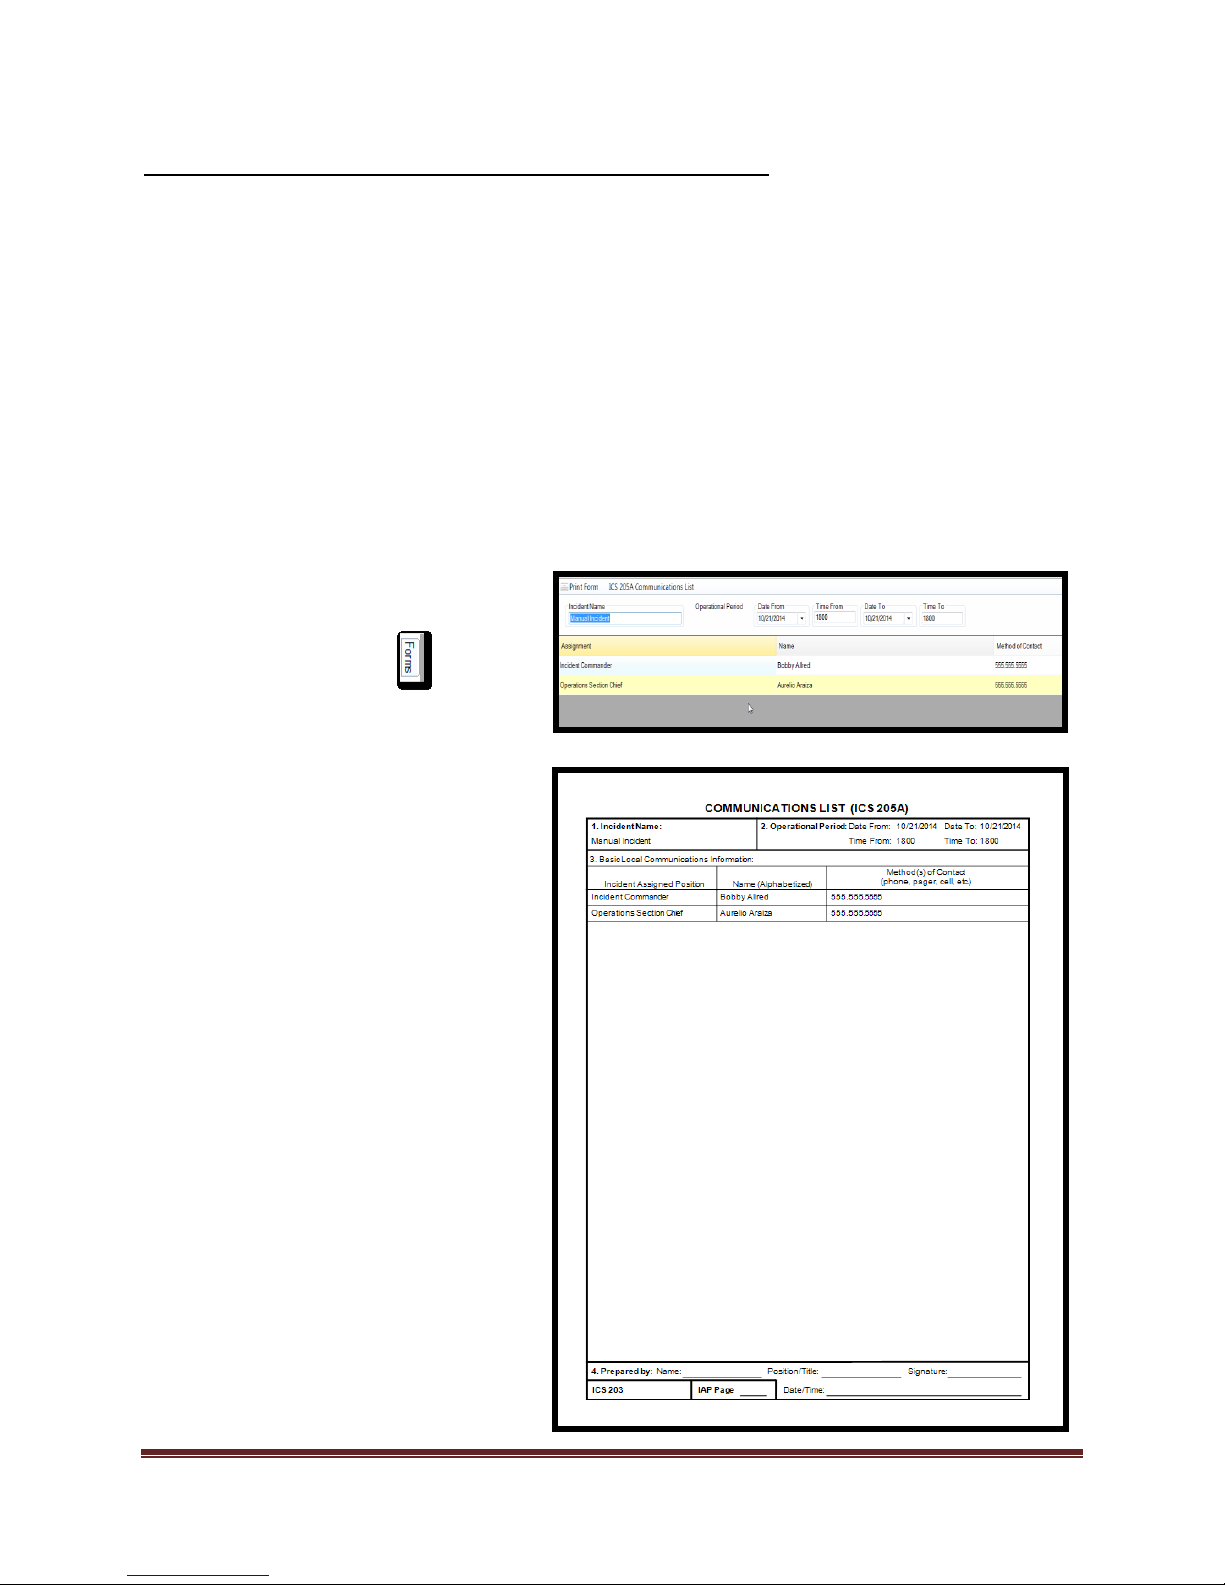
Completing the ICS 205A Incident Communication List
To complete the ICS 205A complete
the following steps:
1. Select the Forms tab
2. Double click on the ICS 205A
form. This will open the form for
editing.
3. Add/Verify “Incident Name” and
“Operational Period”.
4. Verify data on form and make
additions to the “Method of
Communication” field
5. Print form and review for
correctness.
Abstract: The ICS 205a is used to display contact information for personnel participating in the
Incident/Event. The ICS 205a will not display data until a positon has an “assigned resource” in
it. When a person is assigned the software will transfer/display the following:
1. Assignment
a. The data in this field is extracted from the ICS position that the individual is in.
2. Name
a. The data in this field is extracted from the Personnel Roster “Name” field or from
the “Displayed Name” field in the “Add New Person” tool.
3. Method of Contact
a. The data in this field is extracted from the personnel roster “Telephone” field or
from the “Telephone” field in the “Add New Person” tool.
Dragonfly Manual Version 3© Page 52
Page 53
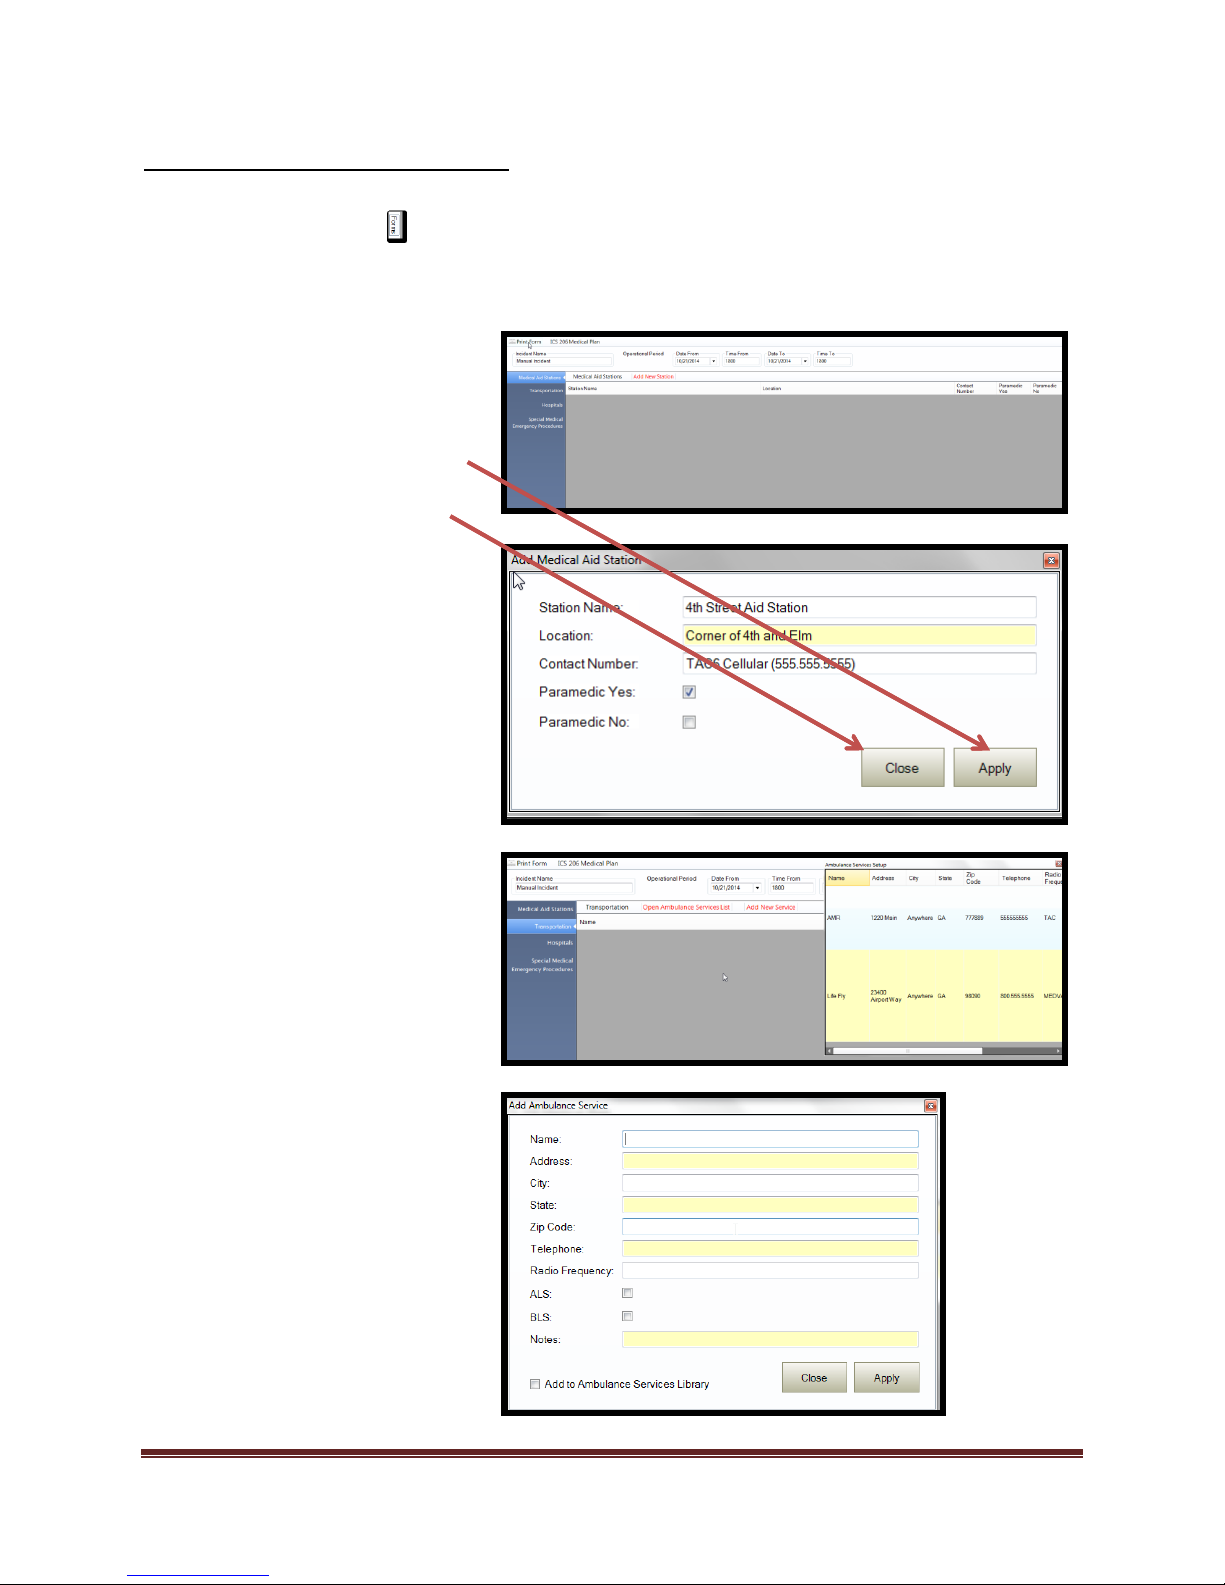
Completing the ICS 206 Medical Plan
1. Select the Forms tab
2. Double click on the ICS 206 form. This will open the form for editing.
3. Add/Verify “Incident Name” and “Operational Period”.
4. Select “Medical Aid Station”
block if desired.
a. Select “Add New Station”
b. Enter desired data into
fields.*
c. Select to “Apply” to add to
the ICS 206 form
d. Select “Close” to remove
tool.
*Data can be edited once added to
form from the form fields.
5. Select “Transportation” block
a. Select “Open Ambulance
Services List” is desired
b. “Drag and Drop” Service
to the “Name” column
-OR-
6. Select “Add New Service”.
c. Enter desired data into
“Add Ambulance Service”
window.
d. Select “Add to Ambulance
Services Library” if you
require the service to be
added to the library.
e. Select “Apply” to save
data.
f. “Select “Close” to exit
window.
To complete the ICS 206 following these steps:
Dragonfly Manual Version 3© Page 53
Page 54
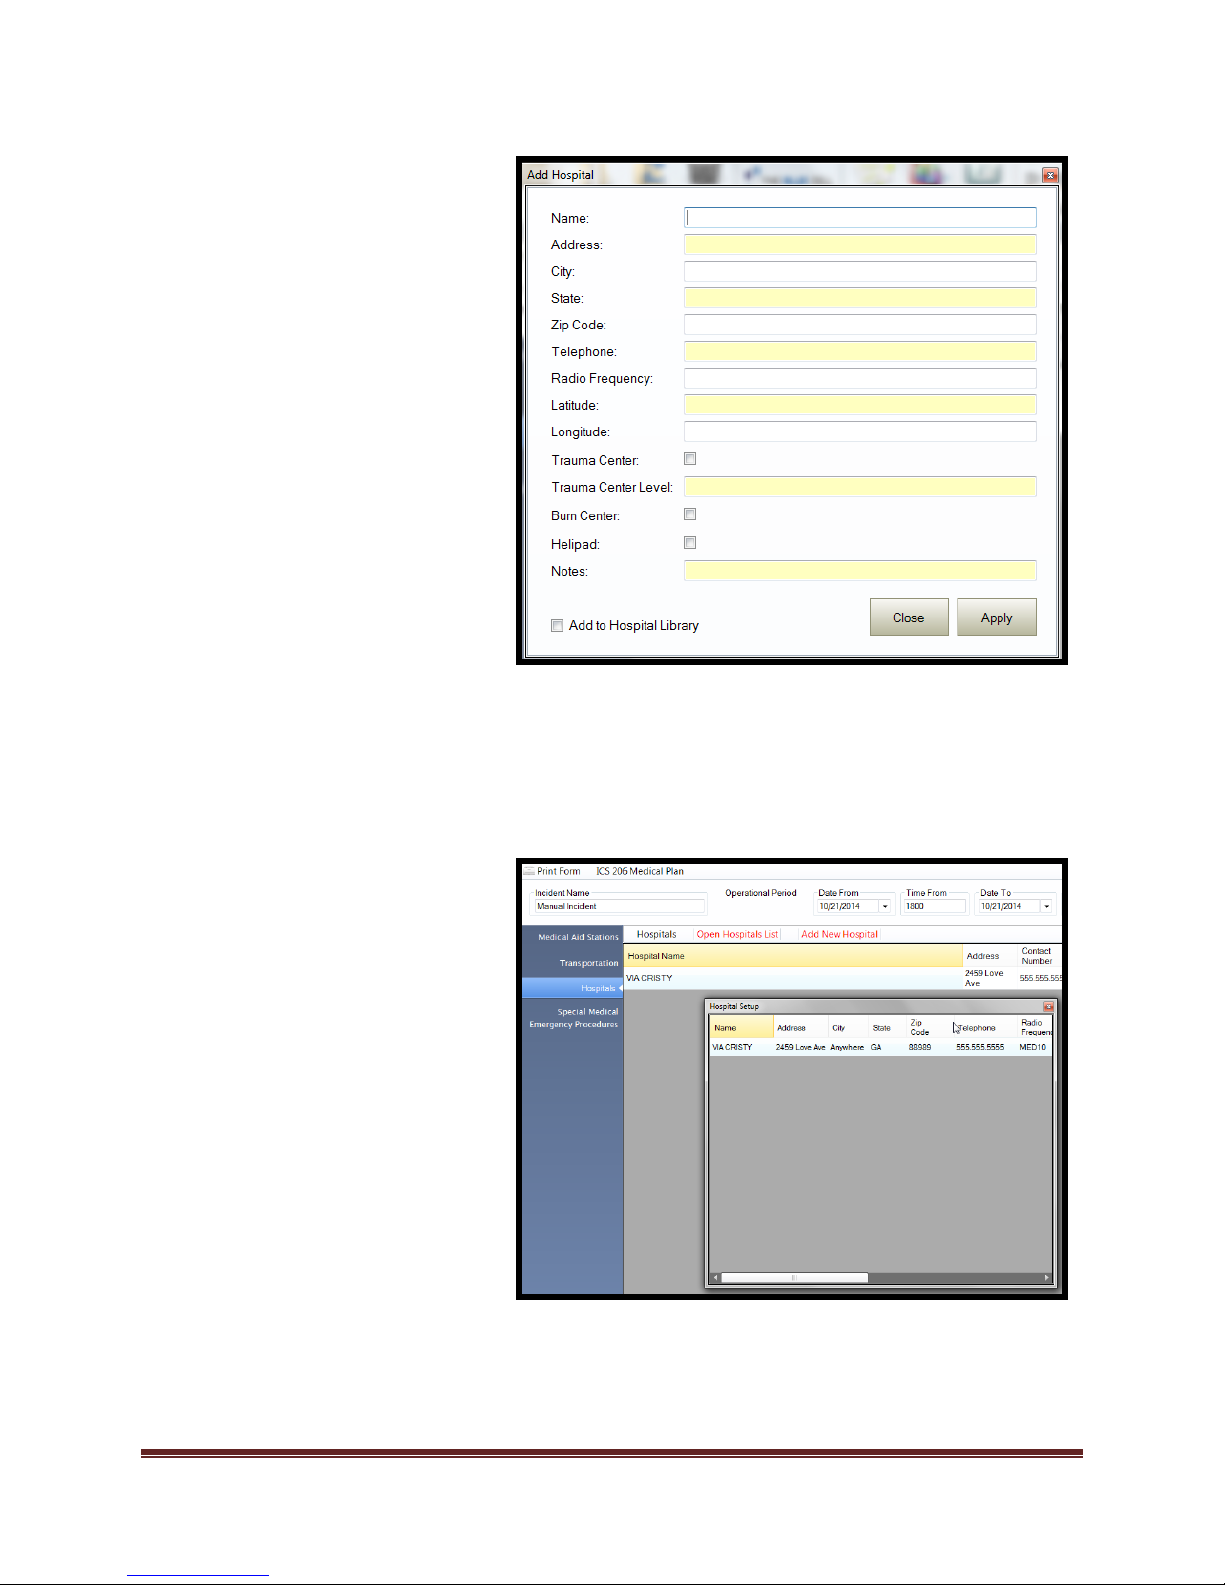
7. Select “Hospital” block if
desired.
a. Select “Open Hospital List”
b. “Drag and Drop” data into
“Name” field.
c. Select to “Apply” to add to
the ICS 206 form.
d. Select “Close” to remove
tool.
*Data can be edited once added to
form from the form fields.
-OR-
7. Select “Add New Hospital”.
a. Enter desired data into
“Add Hospital” window.
b. Select “Add to Hospital
Library” if you require the
service to be added to the
library.
c. Select “Apply” to save
data.
d. “Select “Close” to exit
window.
e. Select “Special Medical
Emergency Procedures”
and add desired data.
f. Select the check box to
include Air assets.
Dragonfly Manual Version 3© Page 54
Page 55
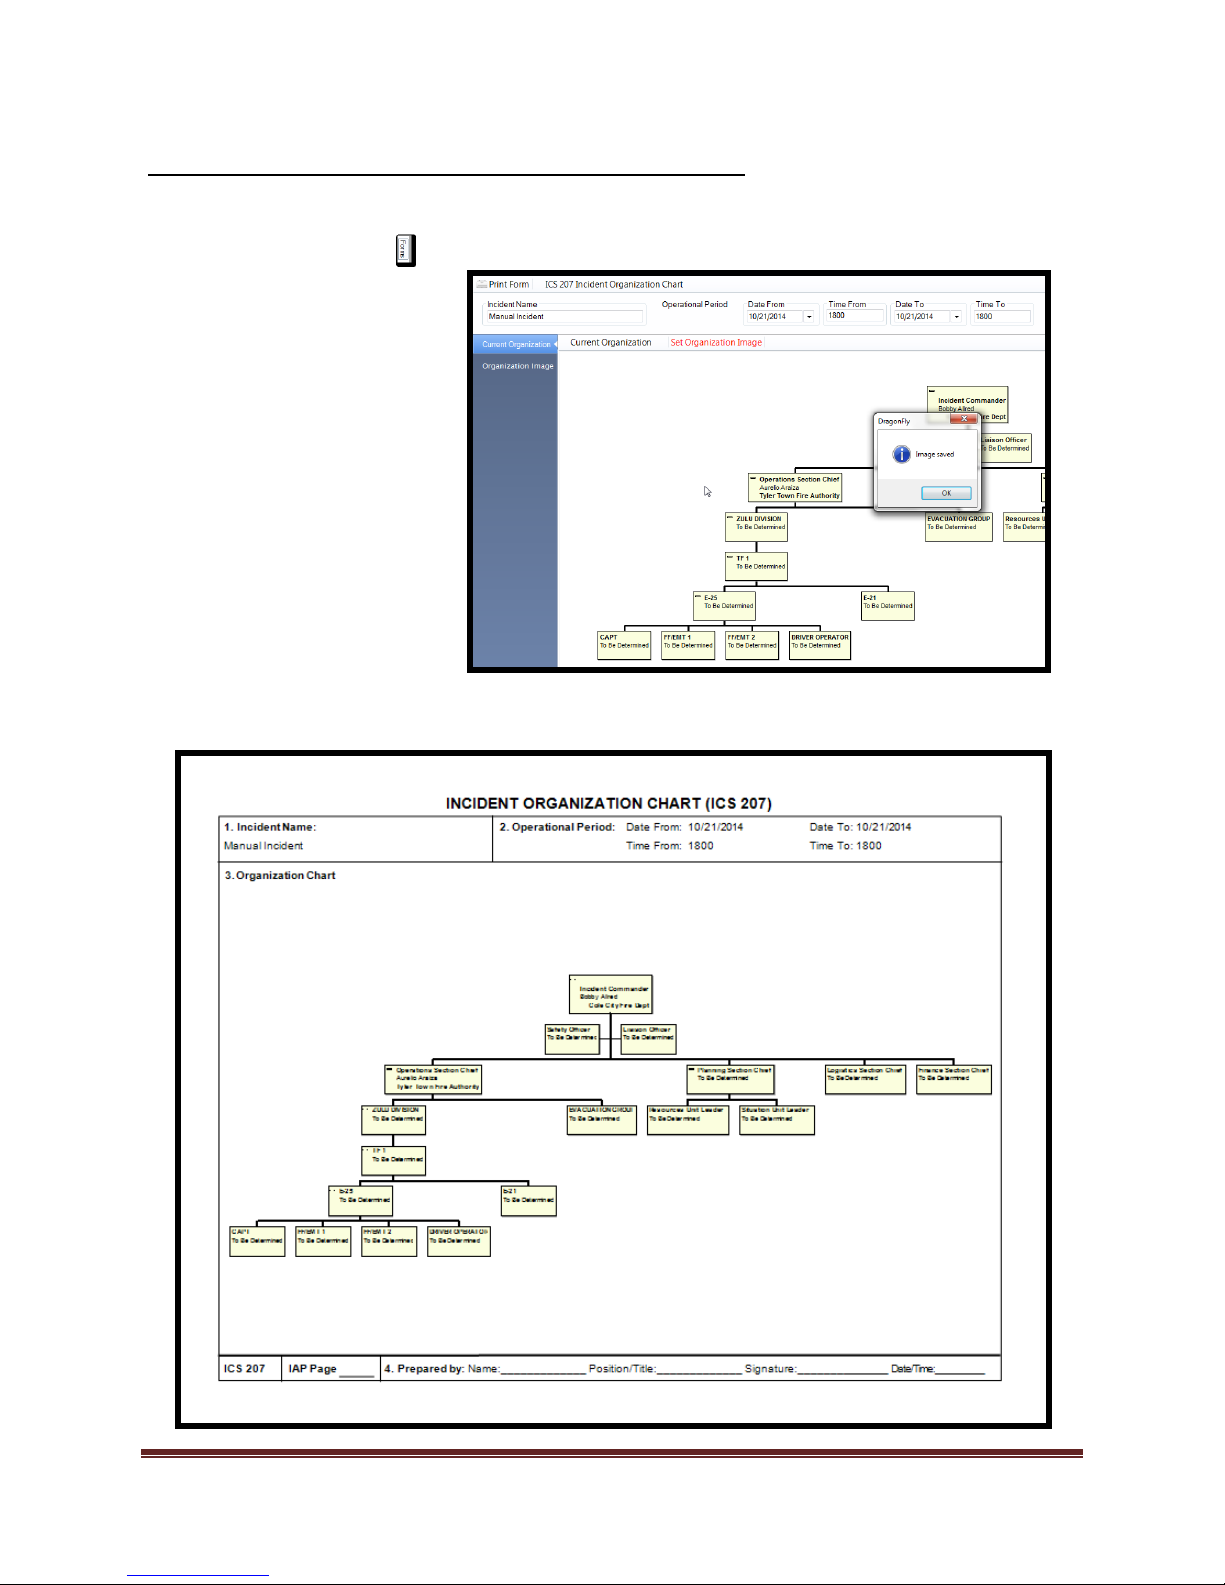
Completing the ICS 207 Incident Organization Chart
1. Select the Forms tab
2. Double click on the ICS
207 form. This will open
the form for editing.
3. Add/Verify “Incident
Name” and
“Operational Period”.
4. Adjust the Organization
chart to the desired lay
out.
5. Select “Set Organization
Image”.
6. Select “Organization
Image” to review the
captured image.
7. Print form.
To complete the ICS 207 follow these steps:
Dragonfly Manual Version 3© Page 55
Page 56
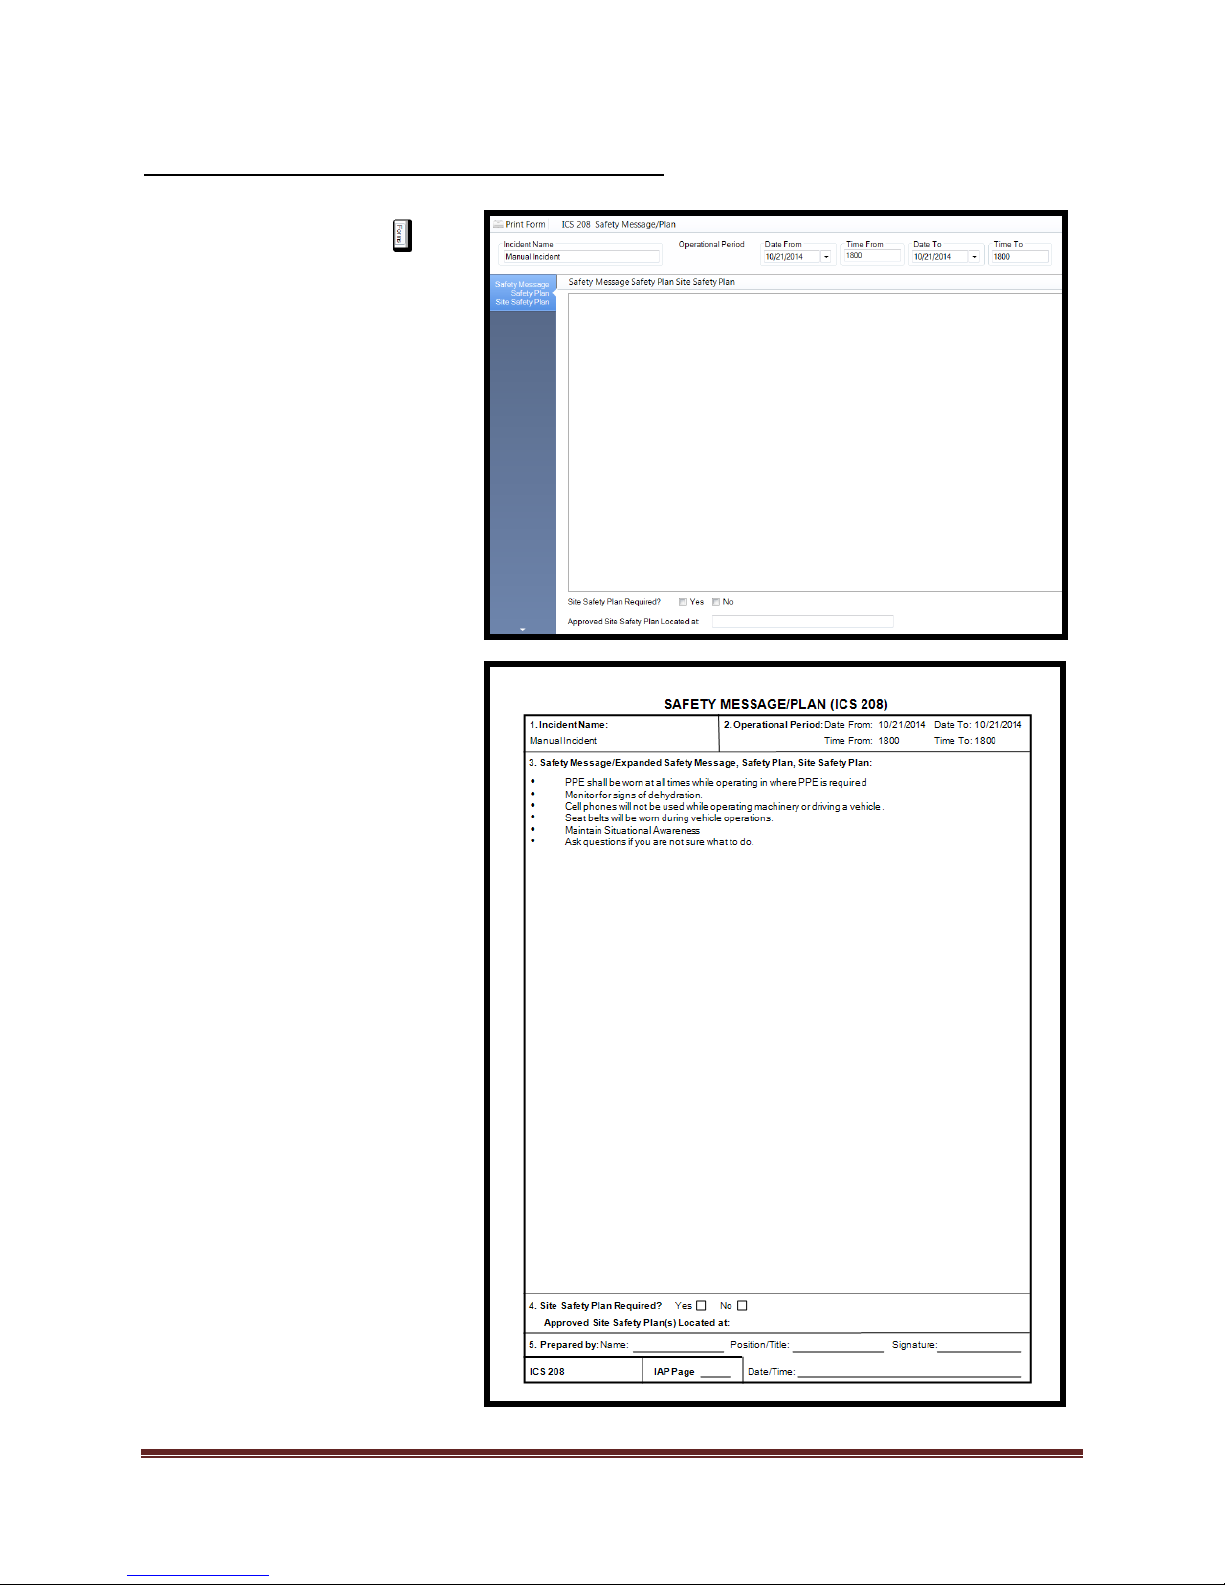
Completing the ICS 208 Safety Message/Plan
1) Select the Forms tab
2) Double click on the ICS 208
form. This will open the form
for editing.
3) Add/Verify “Incident Name”
and “Operational Period”.
4) Add desired data to the form
field and select additional
check boxes
5) Print form.
Dragonfly Manual Version 3© Page 56
Page 57
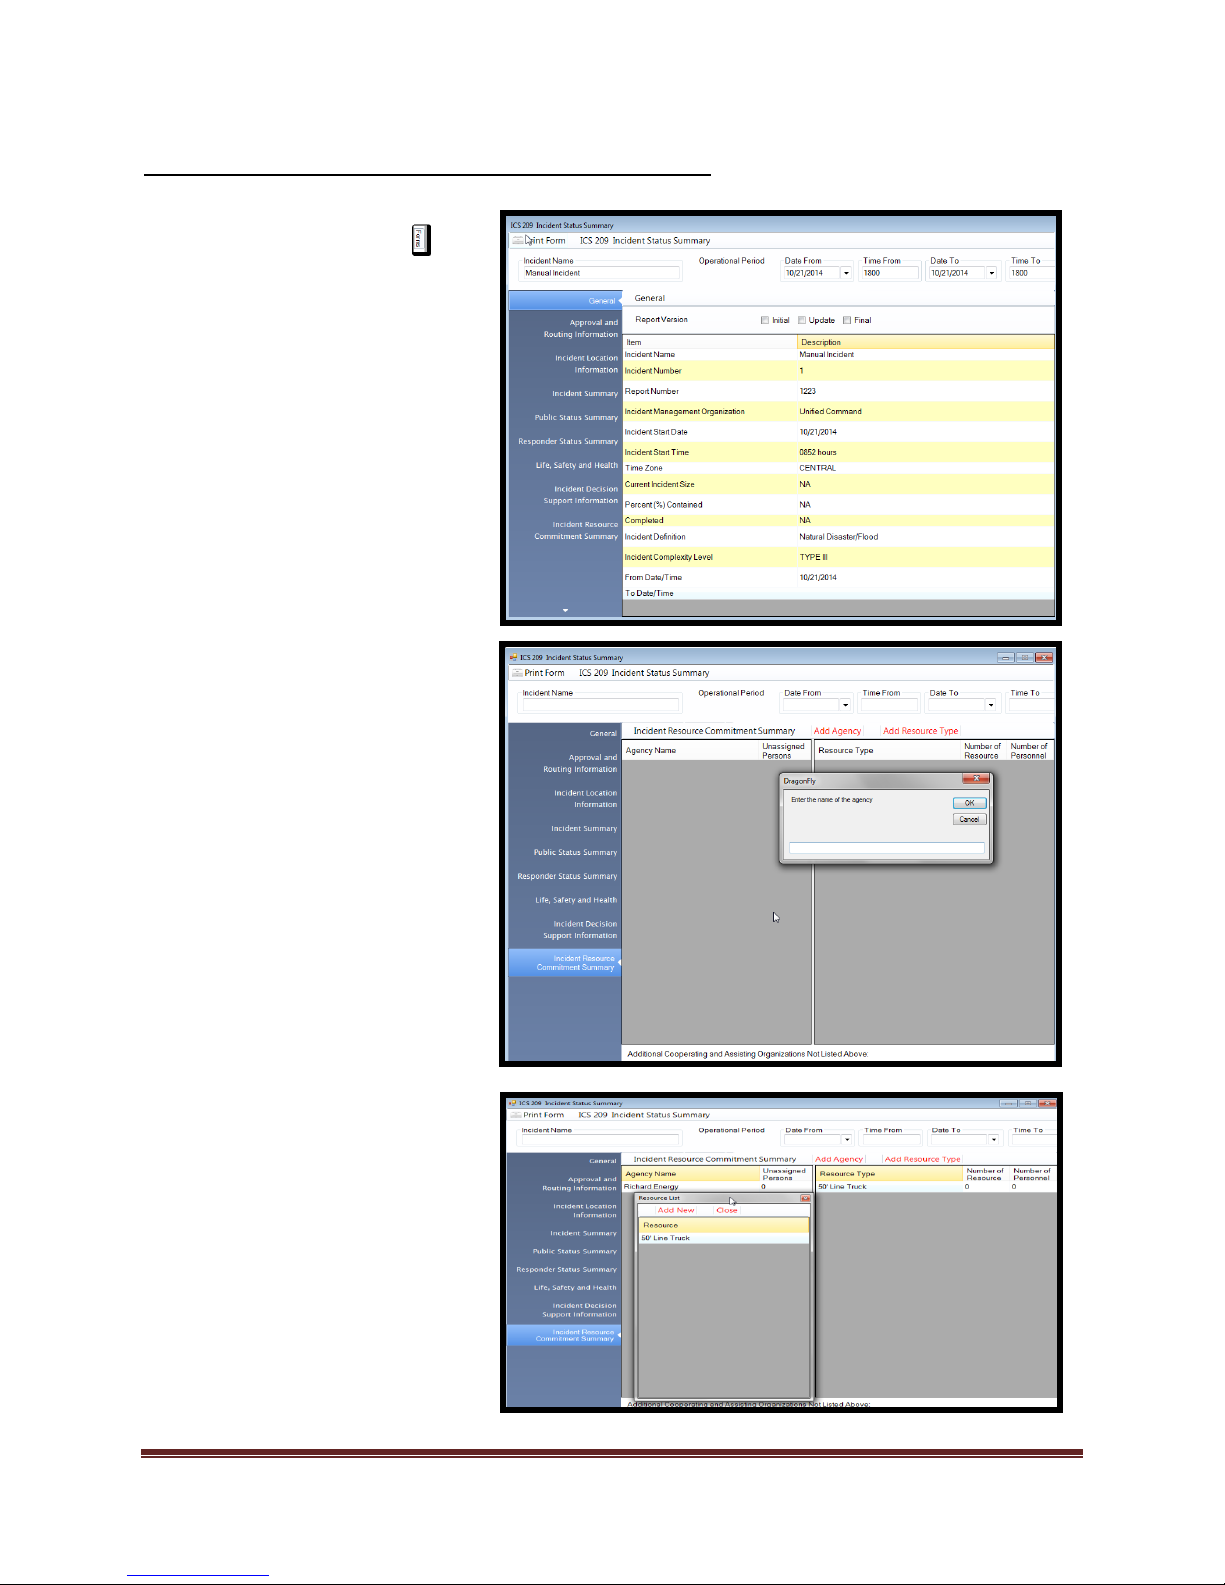
Completing the ICS 209 Incident Status Summary
1. Select the Forms tab
2. Double click on the ICS 209
form. This will open the form
for editing.
3. Add/Verify “Incident Name”
and “Operational Period”.
4. Select “General” block.
5. Select which version of the
report you are entering
a. Initial, Update, or Final
6. Select each information
block that you want to
update.
7. To complete the “Incident
Resource Commitment
Summary” perform the
following:
a. Select “Add Agency” and
enter the name of the
agency. Select “Ok”
b. Select an agency that
you want to add
resources to from the
list of agencies. Select
“Add Resource Type”,
select the resource
needed and “Drag and
Drop” under resource
type list.
8. Review data and print form.
Dragonfly Manual Version 3© Page 57
Page 58
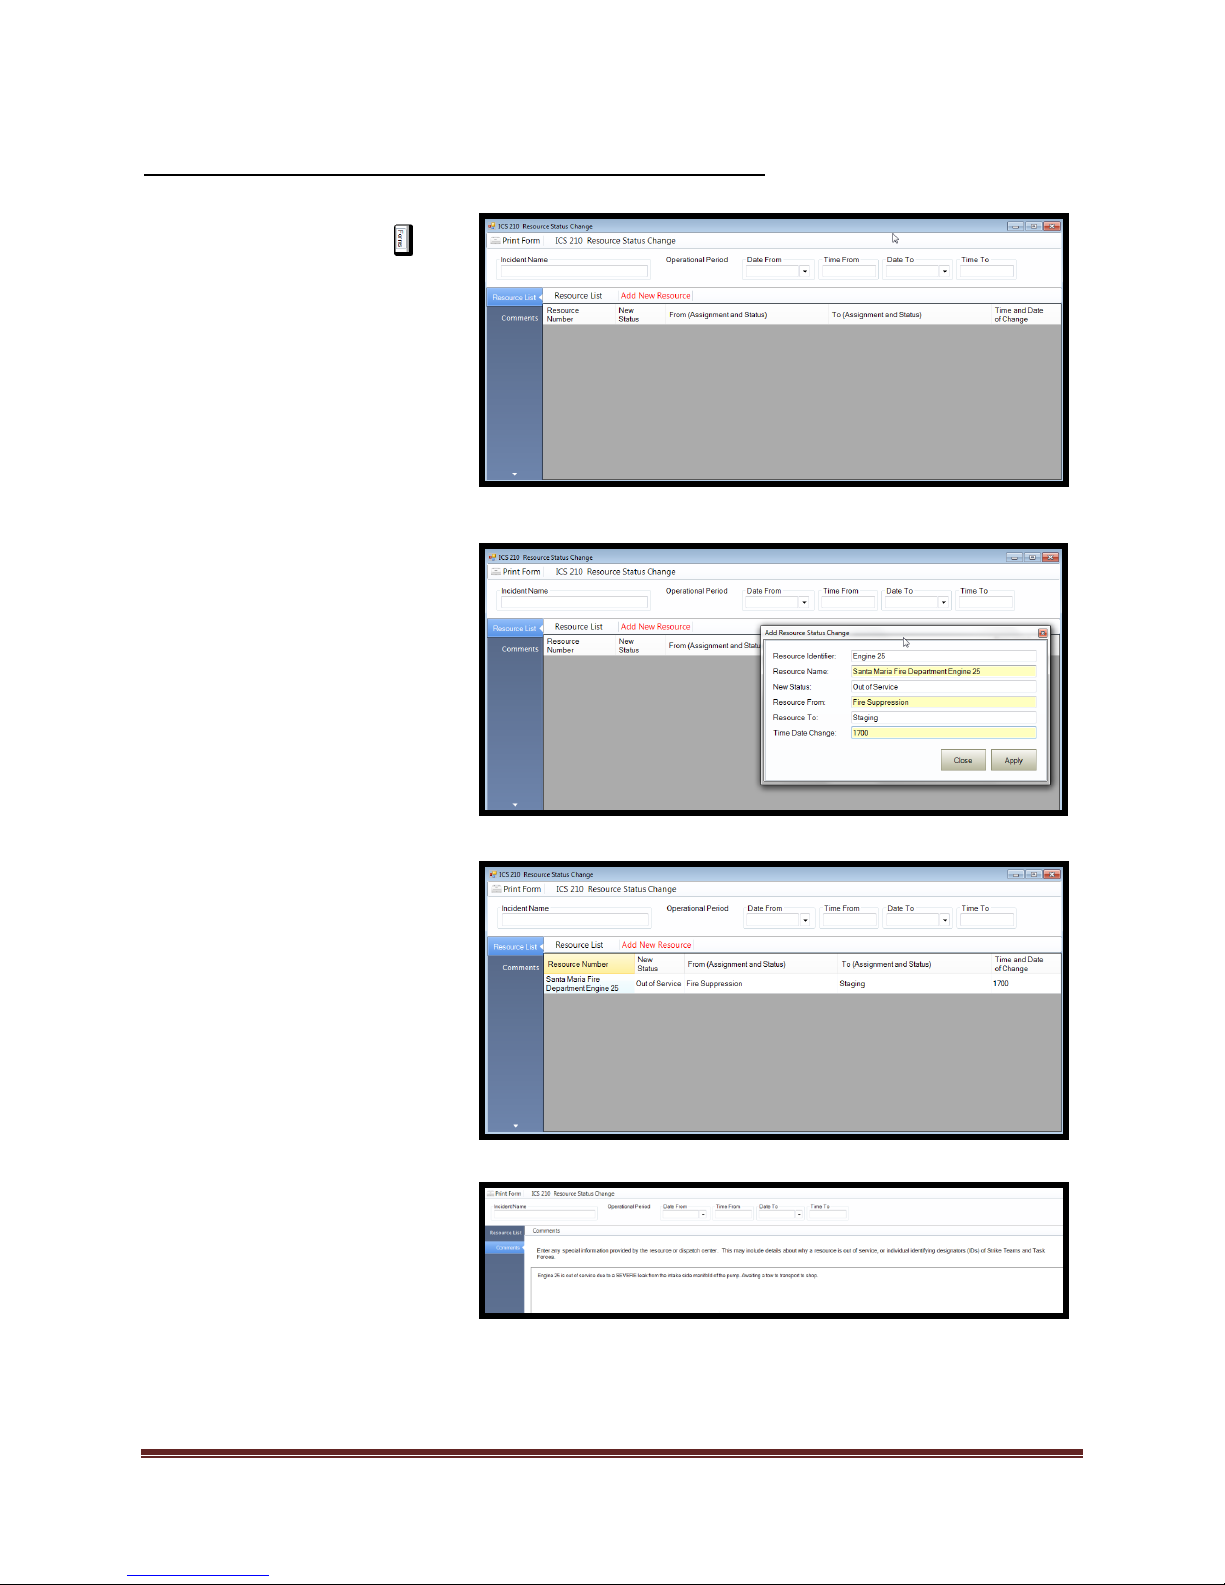
Completing the ICS 210 Resource Status Change Form
(1) Select the Forms tab
(2) Double click on the ICS 210
form. This will open the form
for editing.
(3) Add/Verify “Incident Name”
and “Operational Period”.
(4) Select “Resource List”
(5) Select “Add New Resource”
b) Enter data
c) Select “Apply”
d) Select “Close”
6) Select “Comments” and add
desired data.
7) Review for accuracy and
Print form.
Dragonfly Manual Version 3© Page 58
Page 59
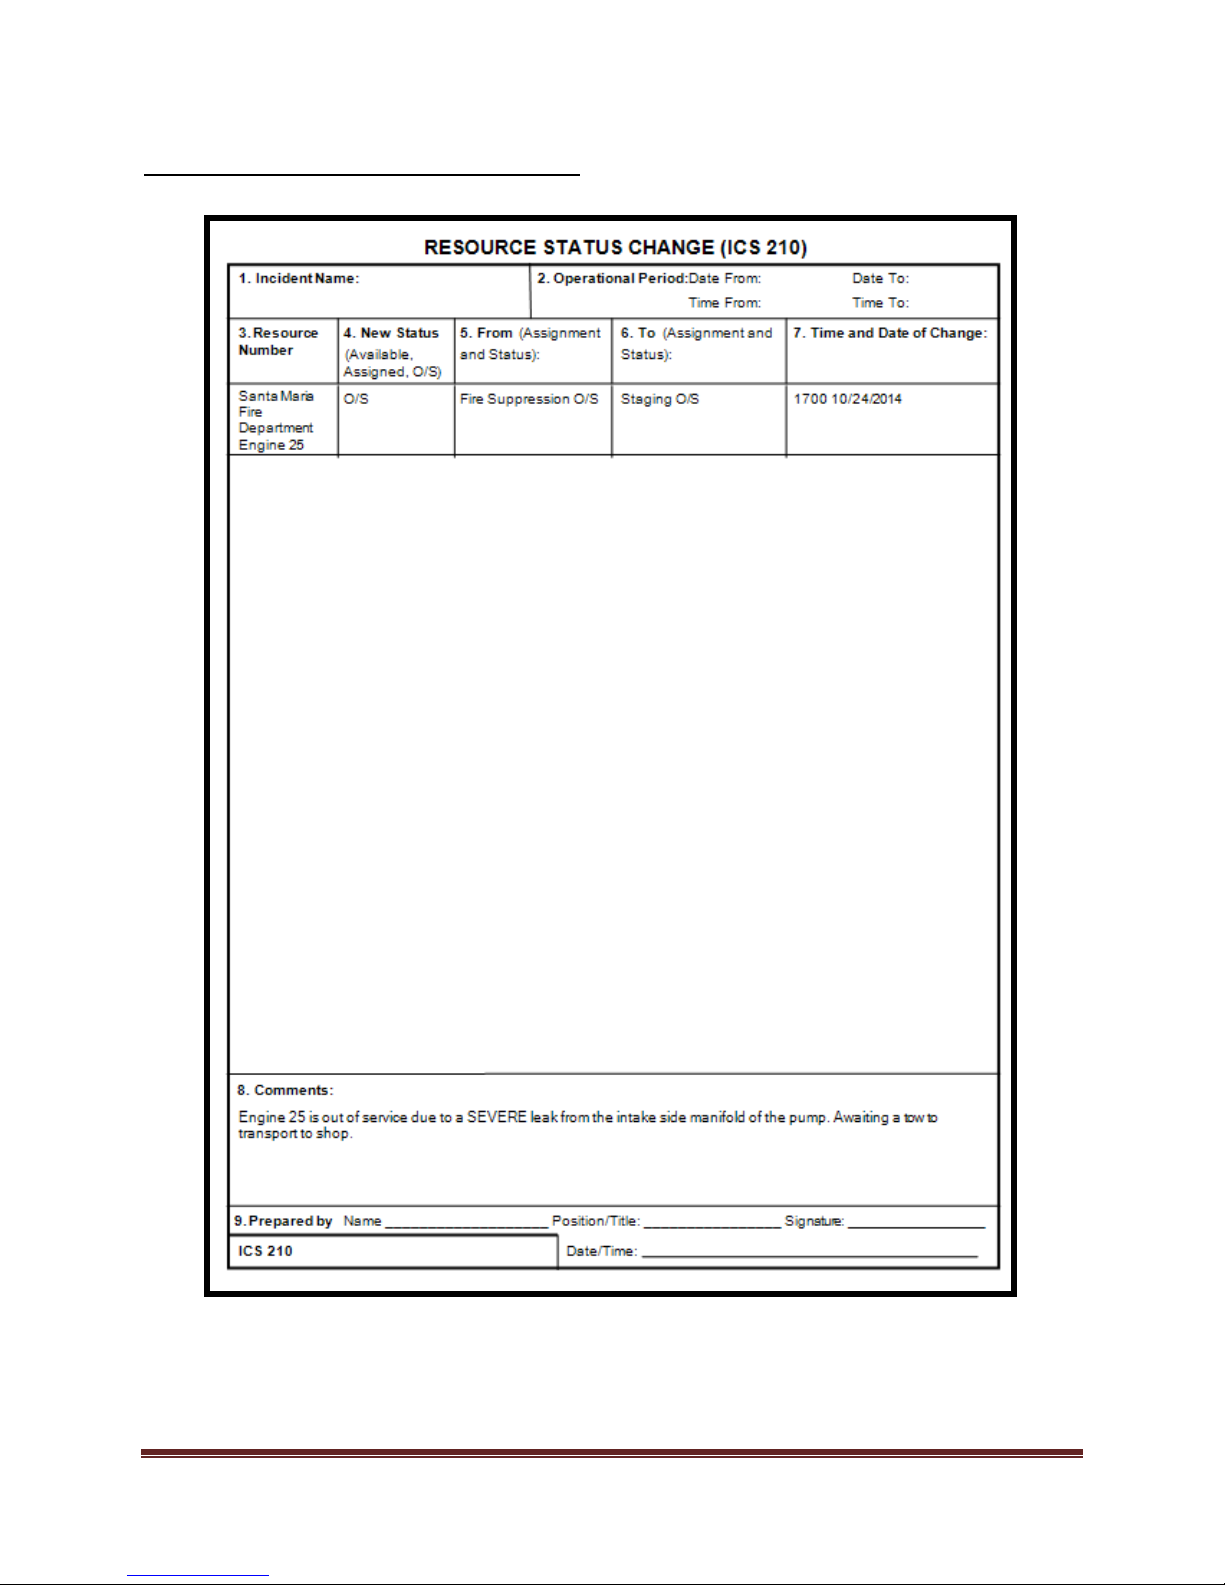
ICS 210 Resource Status Change Form
Dragonfly Manual Version 3© Page 59
Page 60
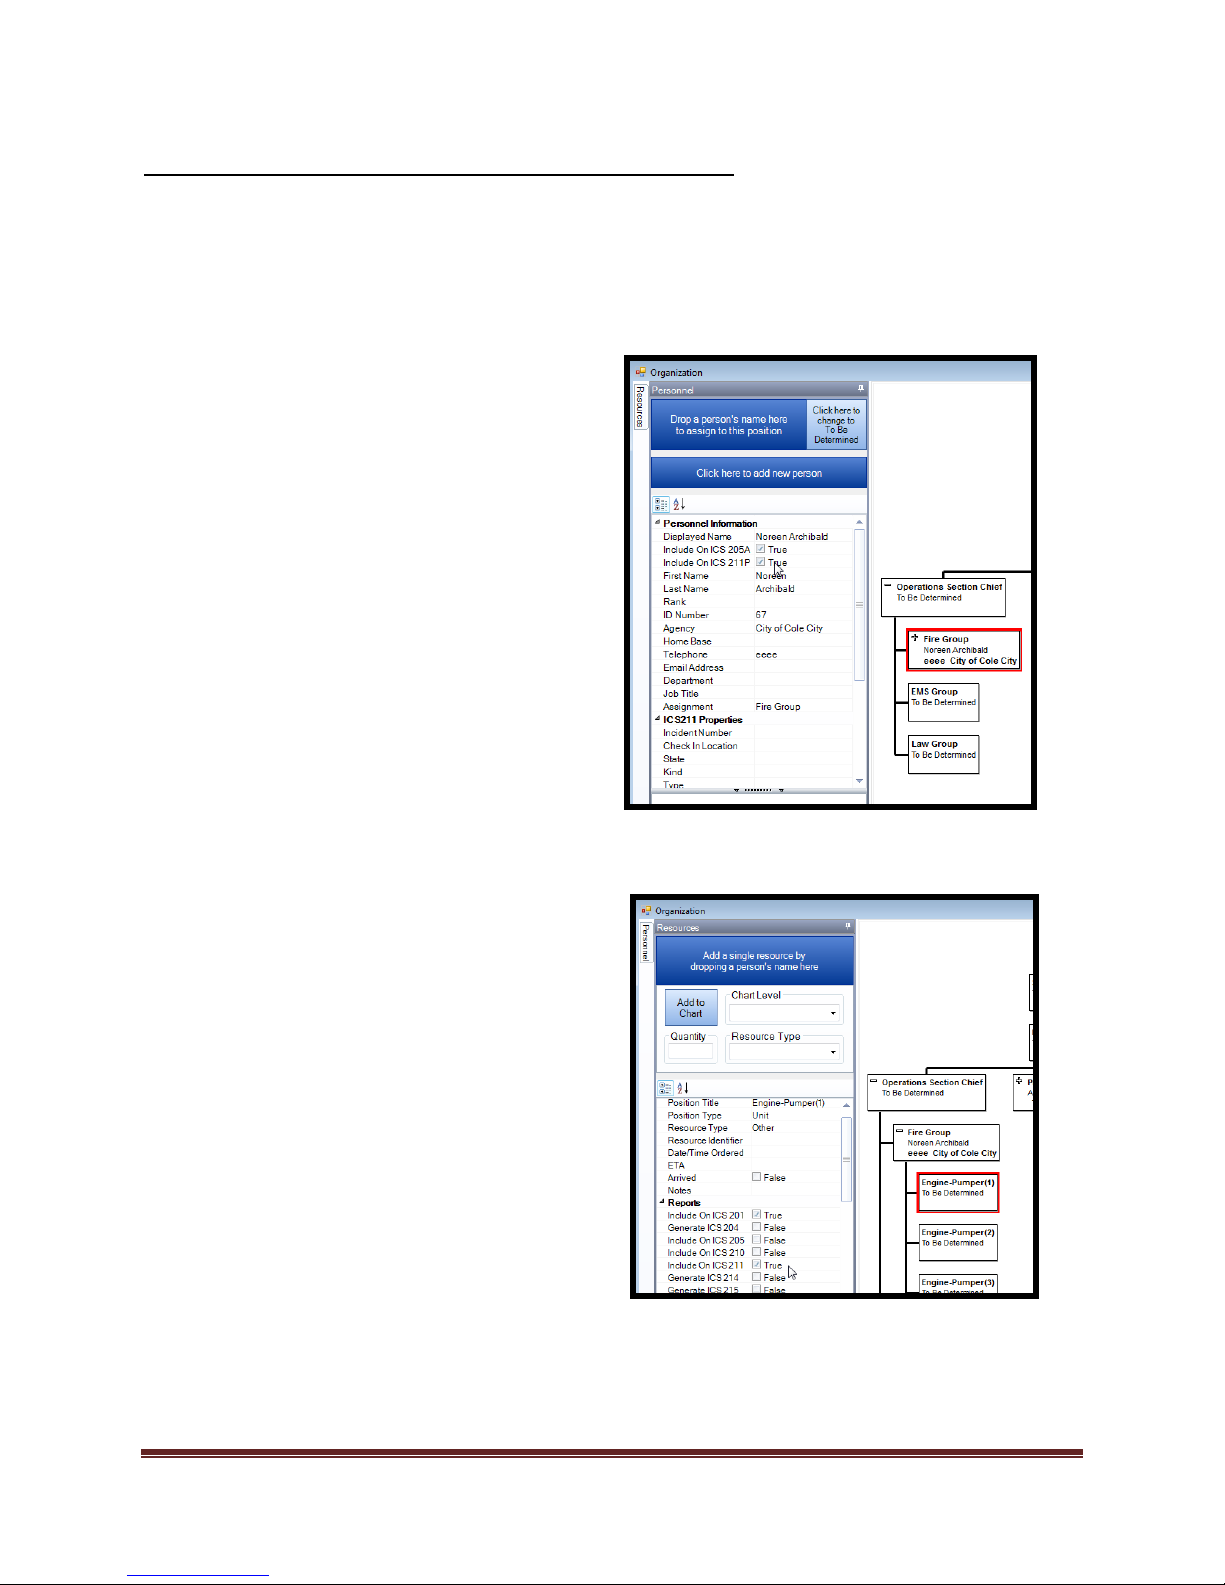
Completing the ICS 211 Incident Check-in List Form
1. ICS 211P-
a. Select the person from the
Organization Chart that you want
included on the ICS 211P.
b. Select the “Personnel Tab” tool.
c. Select the “Add to 211” check
box.
i. De-select to remove from
ICS211P
d. Add/edit additional data.
e. Select “Print Personnel Form” to
print form.
2. ICS 211E-
a. Select the equipment from the
Organization Chart that you want
included on the ICS211E.
b. Select the “Equipment Tab” tool.
c. Select the “Add to 211E” check
box.
i. De-select to remove from
ICS211P
d. Add/edit additional data.
e. Select “Print Equipment” form
*The ICS 211P (Personnel) is populated through selecting “Add to 211” from the “Personnel
Tab”
* The ICS 211E (Equipment) is populated through selecting “Add to 211E” from the “Resource
Tab” tool
Dragonfly Manual Version 3© Page 60
Page 61
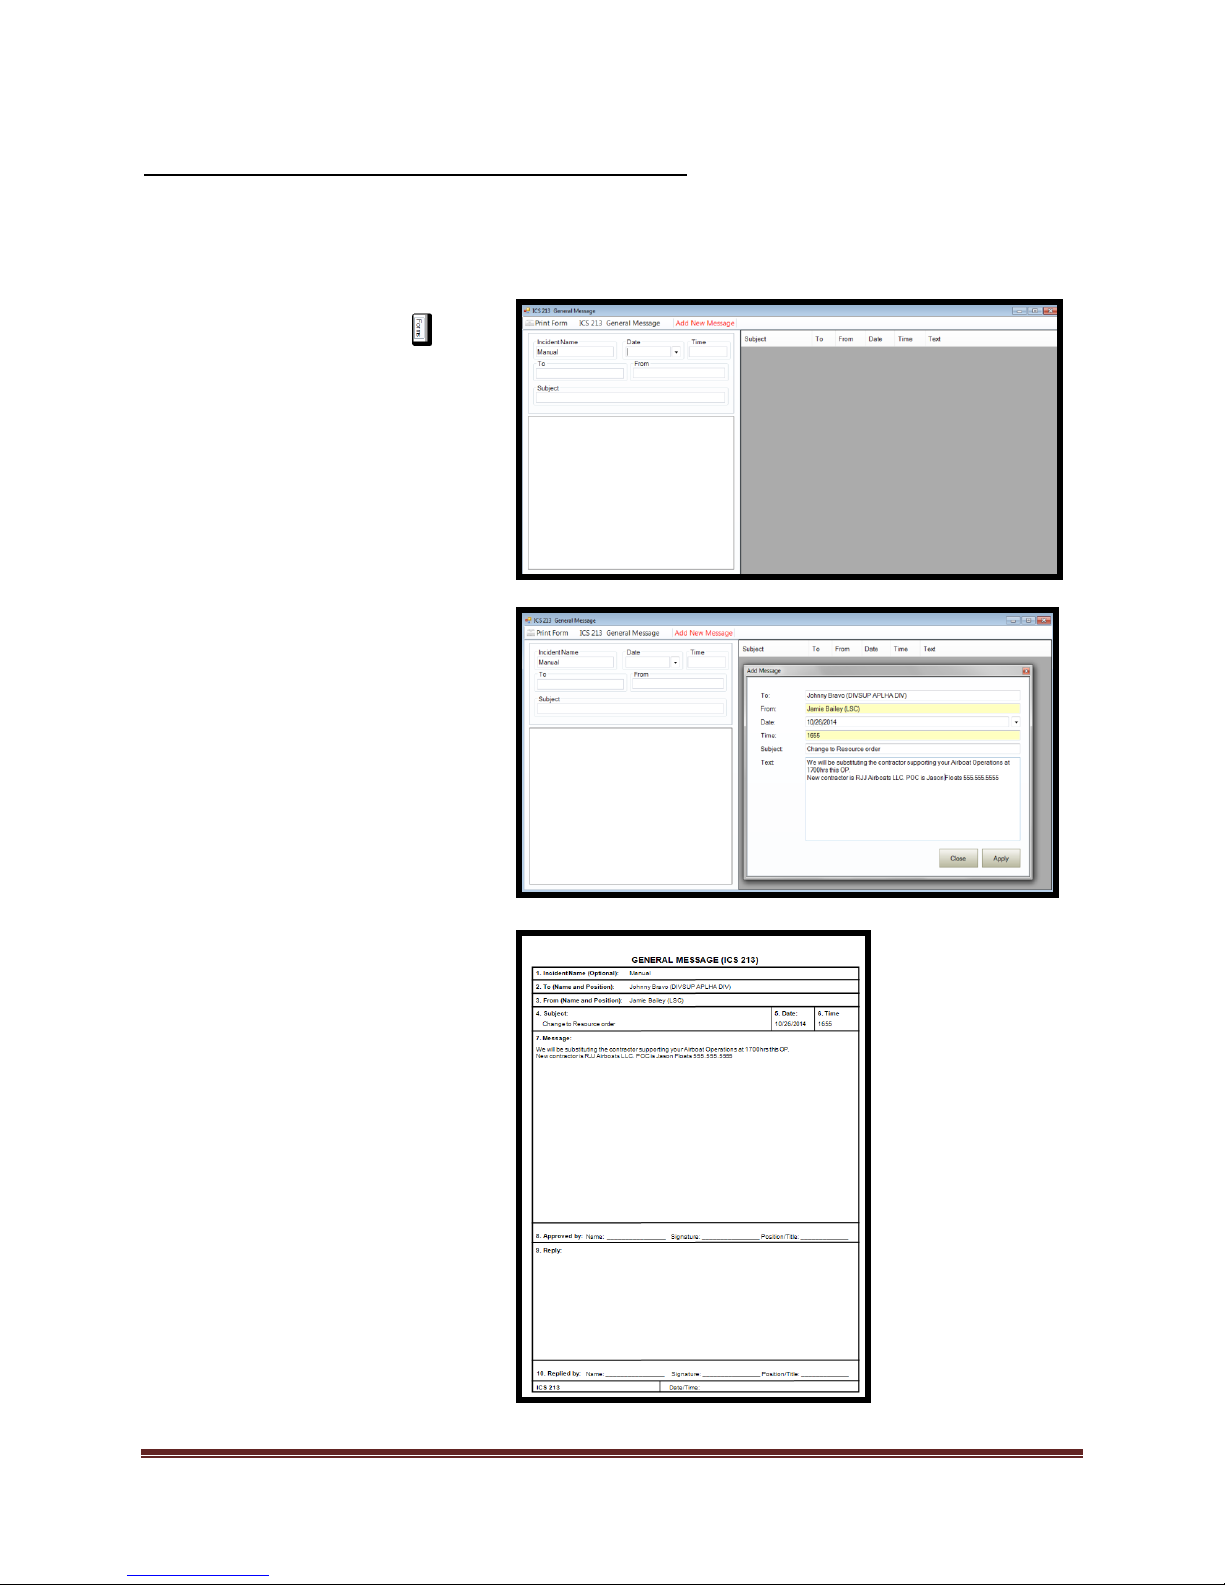
Completing the ICS 213 General Message Form
1. Select the Forms tab
2. Double click on the ICS 213
form. This will open the form
for editing.
3. For “Quick Print Mode”:
a. Add/verify “Incident Name,
Date and Time”.
b. Enter data into the “To”,
“From”, and “Subject” fields.
c. Enter message body
d. Print form and review
4. For “Index Mode”
a. Add/verify “Incident Name,
Date and Time”.
b. Select “Add New Message”
tool
c. Enter data into fields and
select “Apply” to save data.
d. Select “Close” to end record
creation.
5. Print form and review.
6. To print any of the messages
from the index, select the
message and print form.
*The ICS 213 can be produced in two options; “Quick Print Mode and Index Mode”
“Quick Print Mode” does not save data to record. “Index mode” saves all 203(s) to record,
allowing historical perspective of messages created.
Dragonfly Manual Version 3© Page 61
Page 62
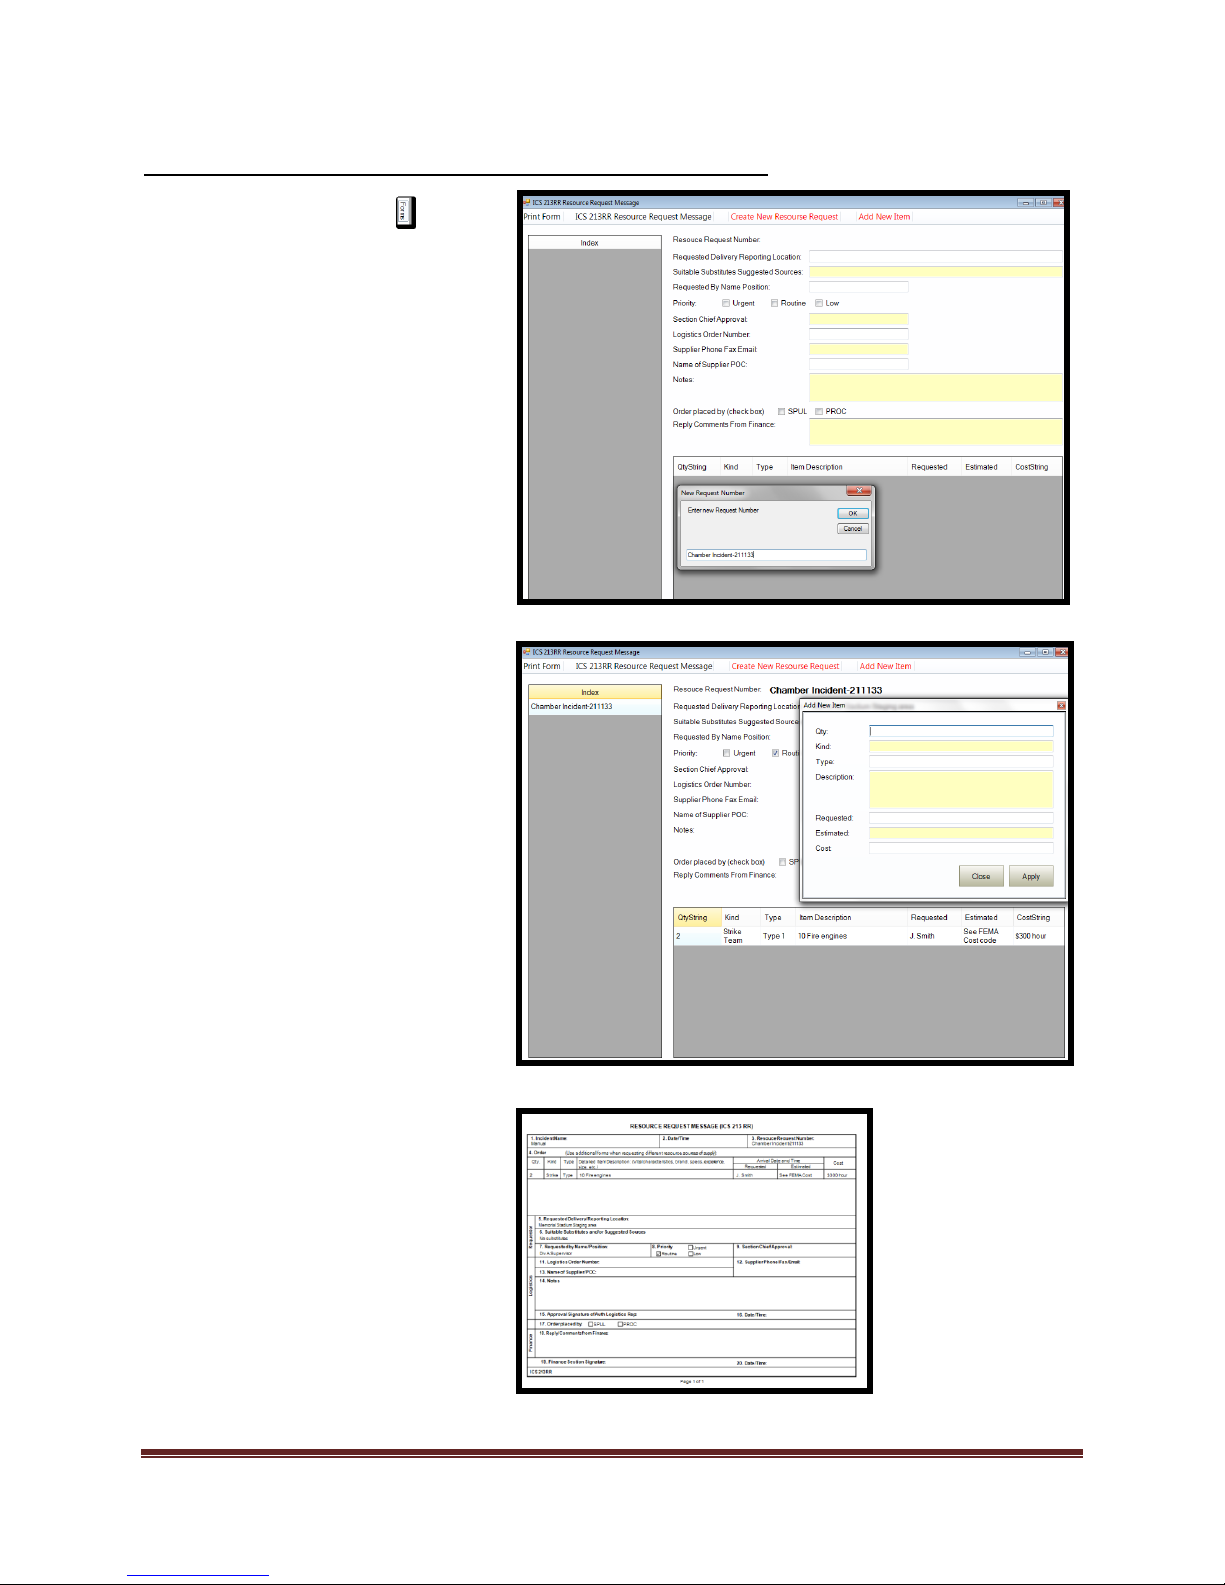
Completing the ICS 213RR Resource Request Message
1. Select the Forms tab
2. Double click on the ICS 213RR
form. This will open the form
for editing.
3. Select “Create New Resource
Request”
a. Enter new resource
request number.
b. Select “Ok”
4. Add data to the following fields
a. Locations
b. Substitutions
c. Requested by
d. Priority
e. Approval
f. Supplier contact
information
g. Supplier POC
h. Specific notes
5. Select “Add New Item”
a. Add data to fields and
select “Apply”
b. Item will be added to index
6. Logistics personnel fulfilling
request enter data in the
following fields:
a. Select who placed order
b. Finance comments
7. Print form and review
Dragonfly Manual Version 3© Page 62
Page 63
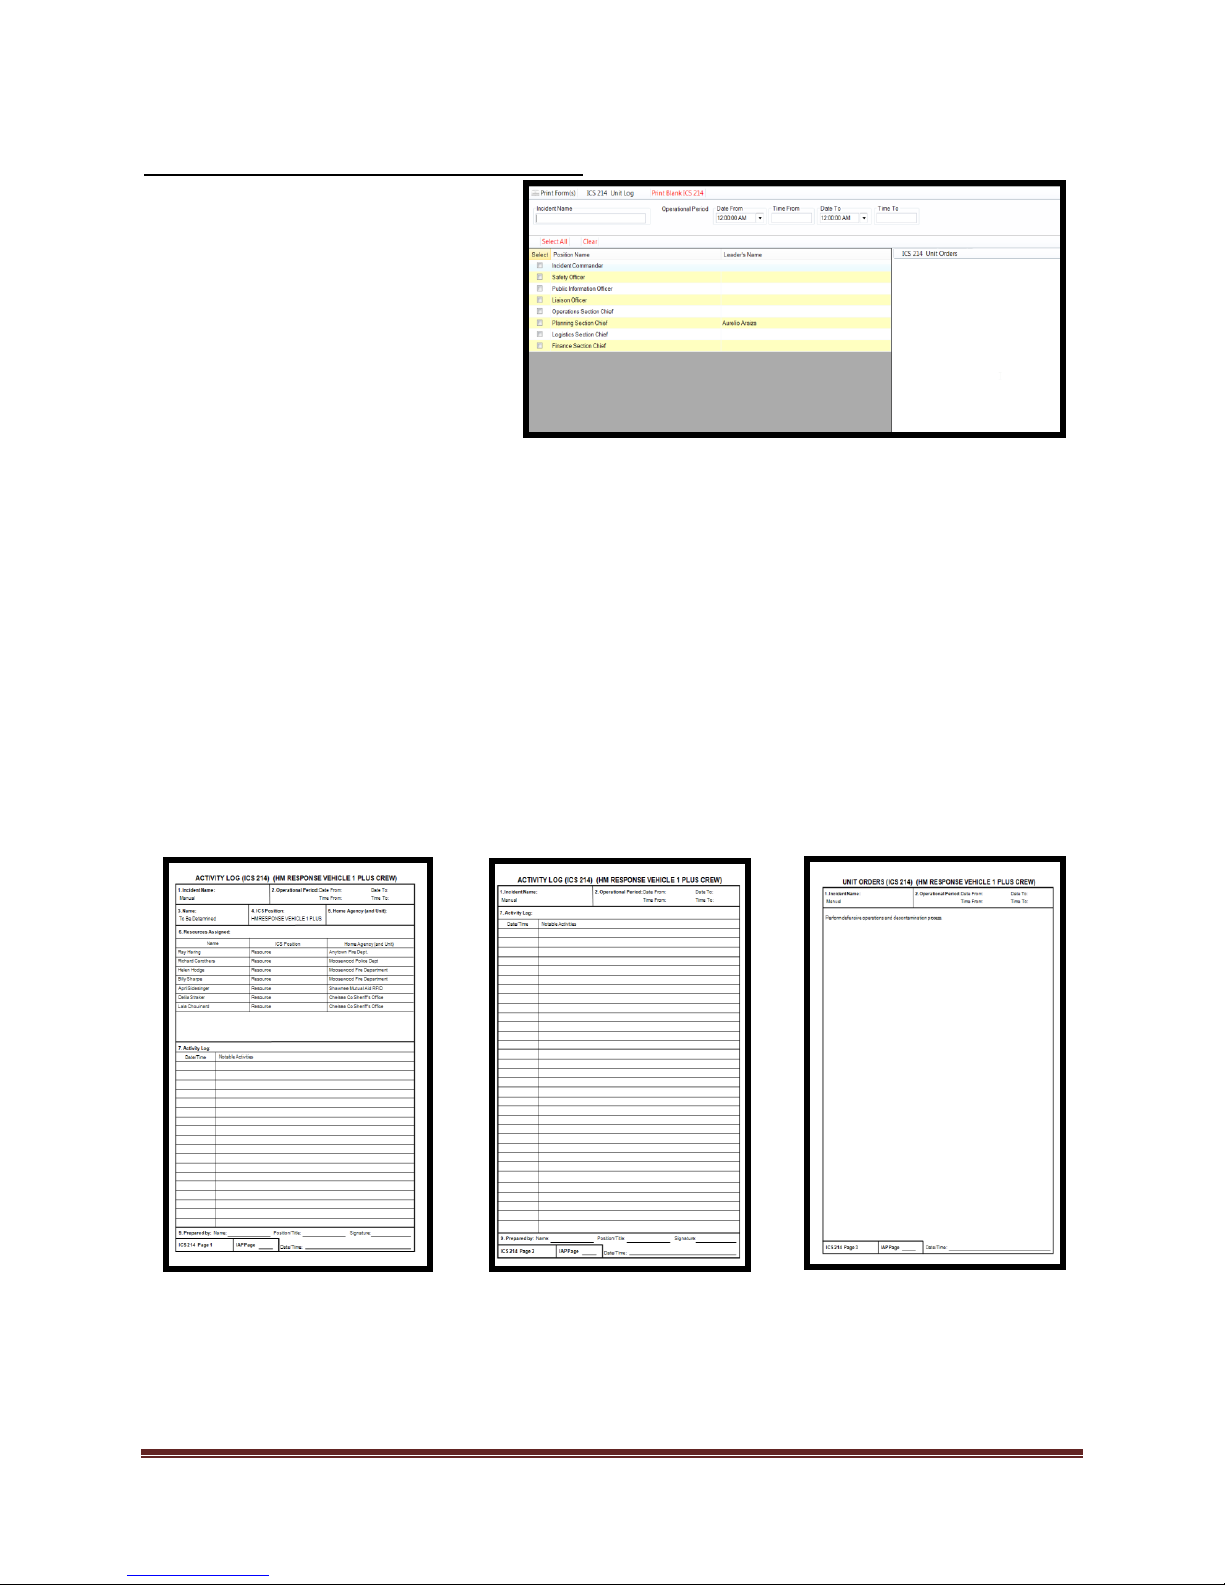
Completing the ICS 214 Unit Log Form
1. Select the personnel on the
Organization Chart that require
an ICS 211
2. Select “ICS 214 Unit Log”
checkbox in the “Resource Tab”
tool.
3. Select the “ICS214 Unit log”
form
a. Select position
checkbox
b. Edit Unit Orders
c. Print form.
*The ICS 214 is a three page form that can be used to issue “Unit Orders” or job expectations. Printing multiple
214(s) can lead to large amounts of paper consumption.
Dragonfly Manual Version 3© Page 63
Page 64
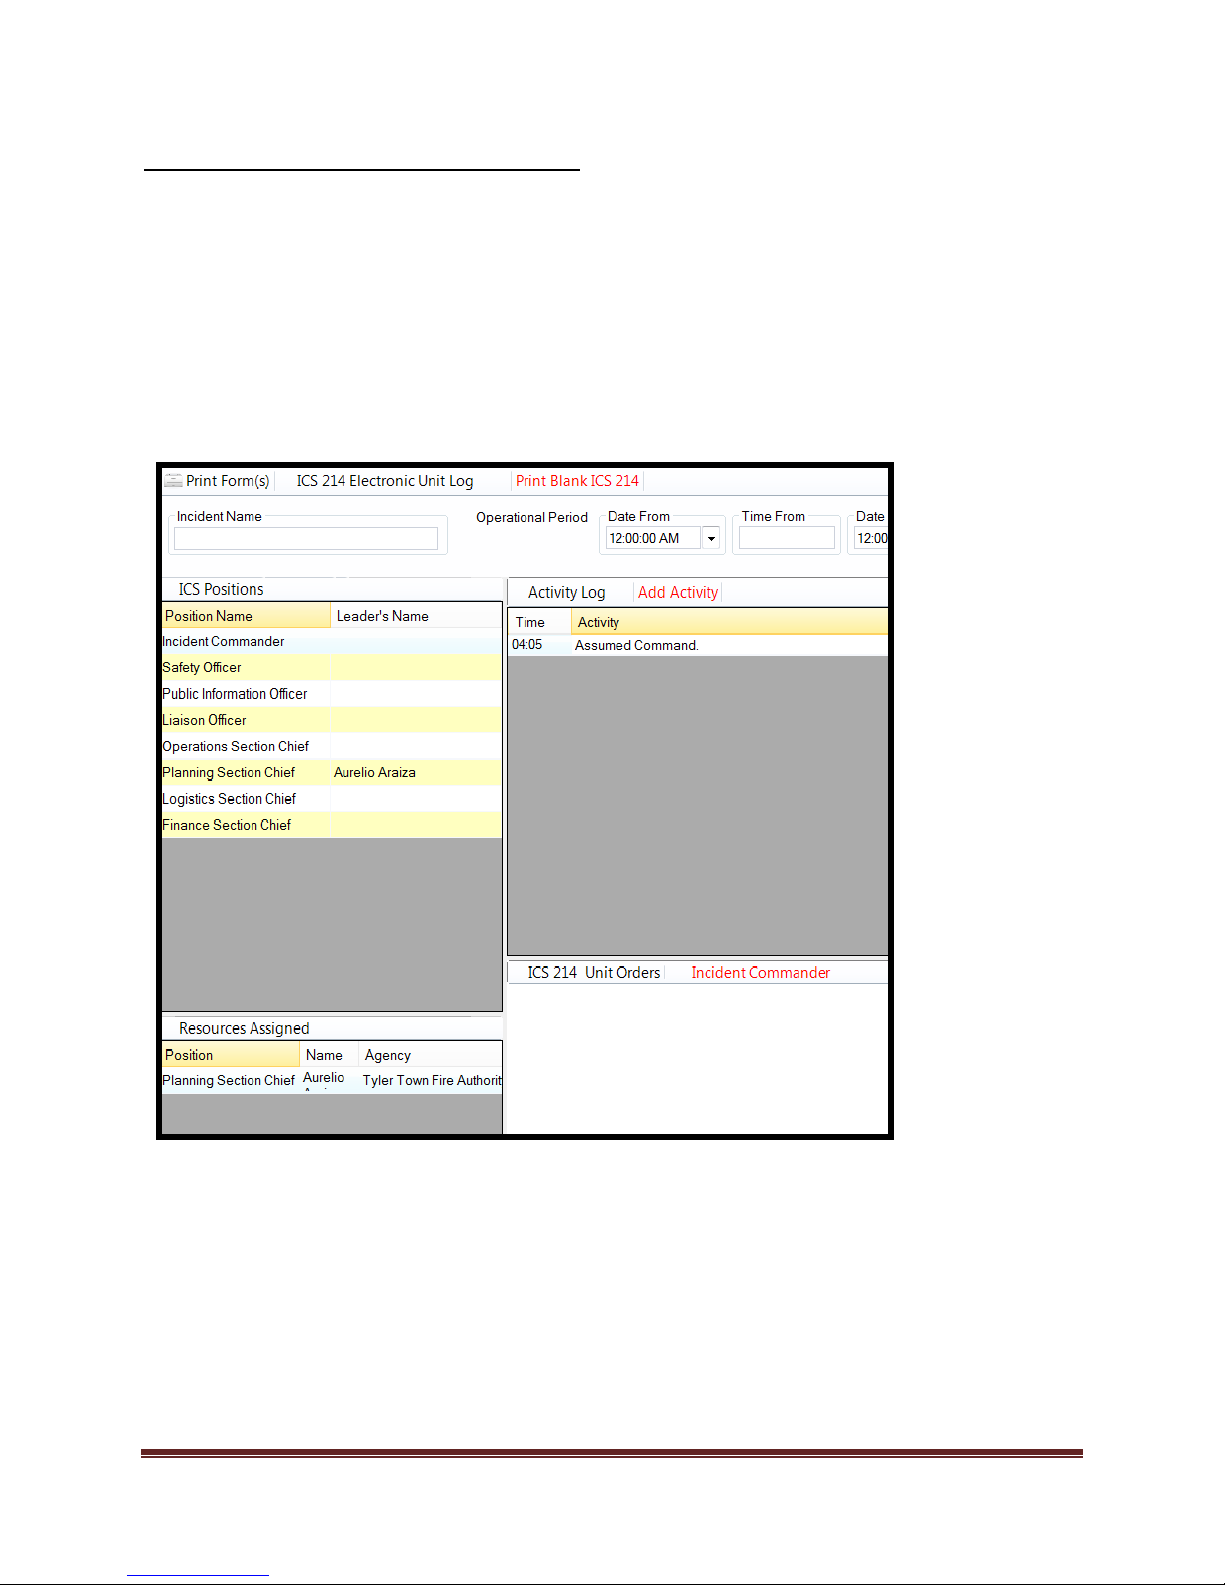
Completing the ICS214-E Electronic Unit Log
4. Select the personnel on the Organization Chart that require an ICS 211
5. Select “ICS 214-E Electronic Unit Log” checkbox in the “Resource Tab” tool.
6. Select the “ICS 214-E Electronic Unit Log” form
a. Select position checkbox
b. Edit entries
c. Print form.
Dragonfly Manual Version 3© Page 64
Page 65
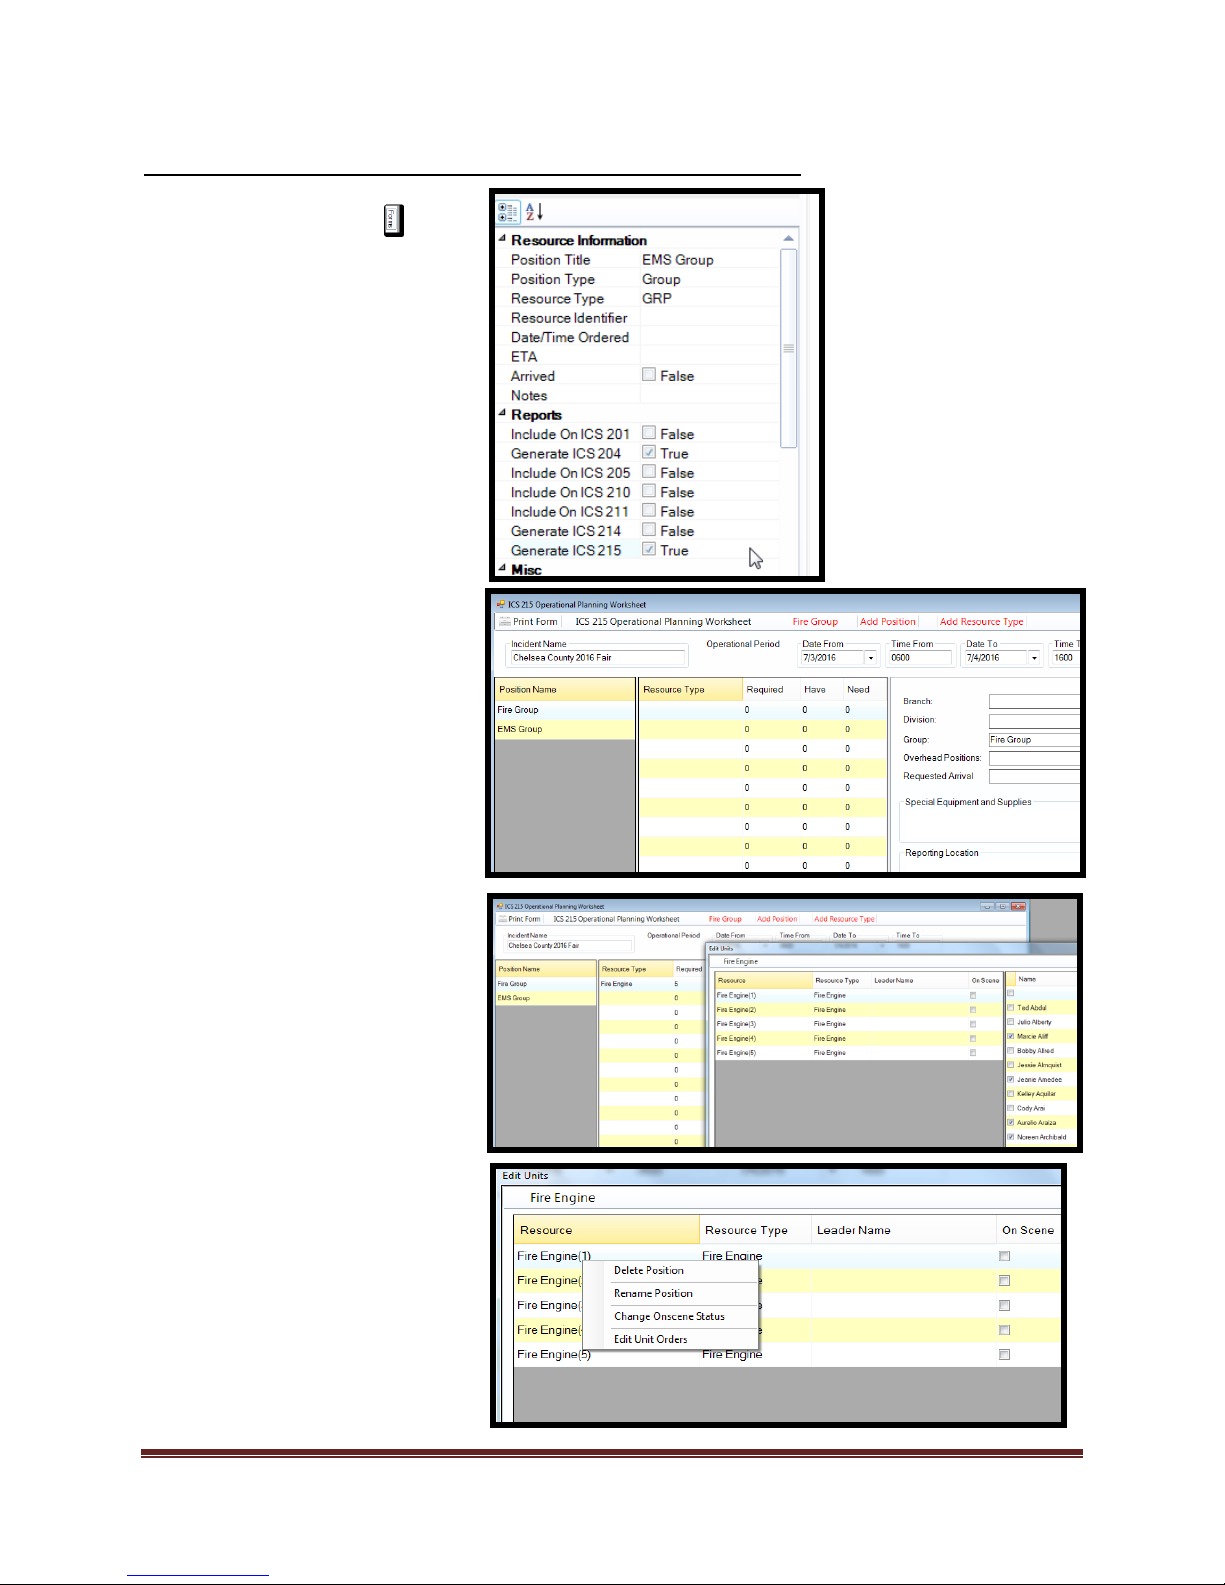
Completing the ICS 215 Operational Planning Worksheet
1. Select the Forms tab or
select assignment from
“Resource Tab” tool check
box
2. Double click on the ICS 215
form. This will open the form
for editing.
3. Add/Verify “Incident Name”
and “Operational Period”
information.
4. Select “Add Position” and
add positions.
5. Select “Apply” after each
record creation.
6. Select “Close” when
complete.
7. Select “Add Resource”
a. Enter resource
b. Select “Ok”
c. Select “Cancel” when
finished.
8. Highlight record you want to
add resources to.
a. Right click
b. “Select additional
units” to add
desired resource(s).
c. Place quantity and
select “Ok”.
Print form and review
To edit records
1) Highlight record
a) Right click
b) Make edits
c) Select ok.
*To delete record, right click
item and select “delete” item
Dragonfly Manual Version 3© Page 65
Page 66
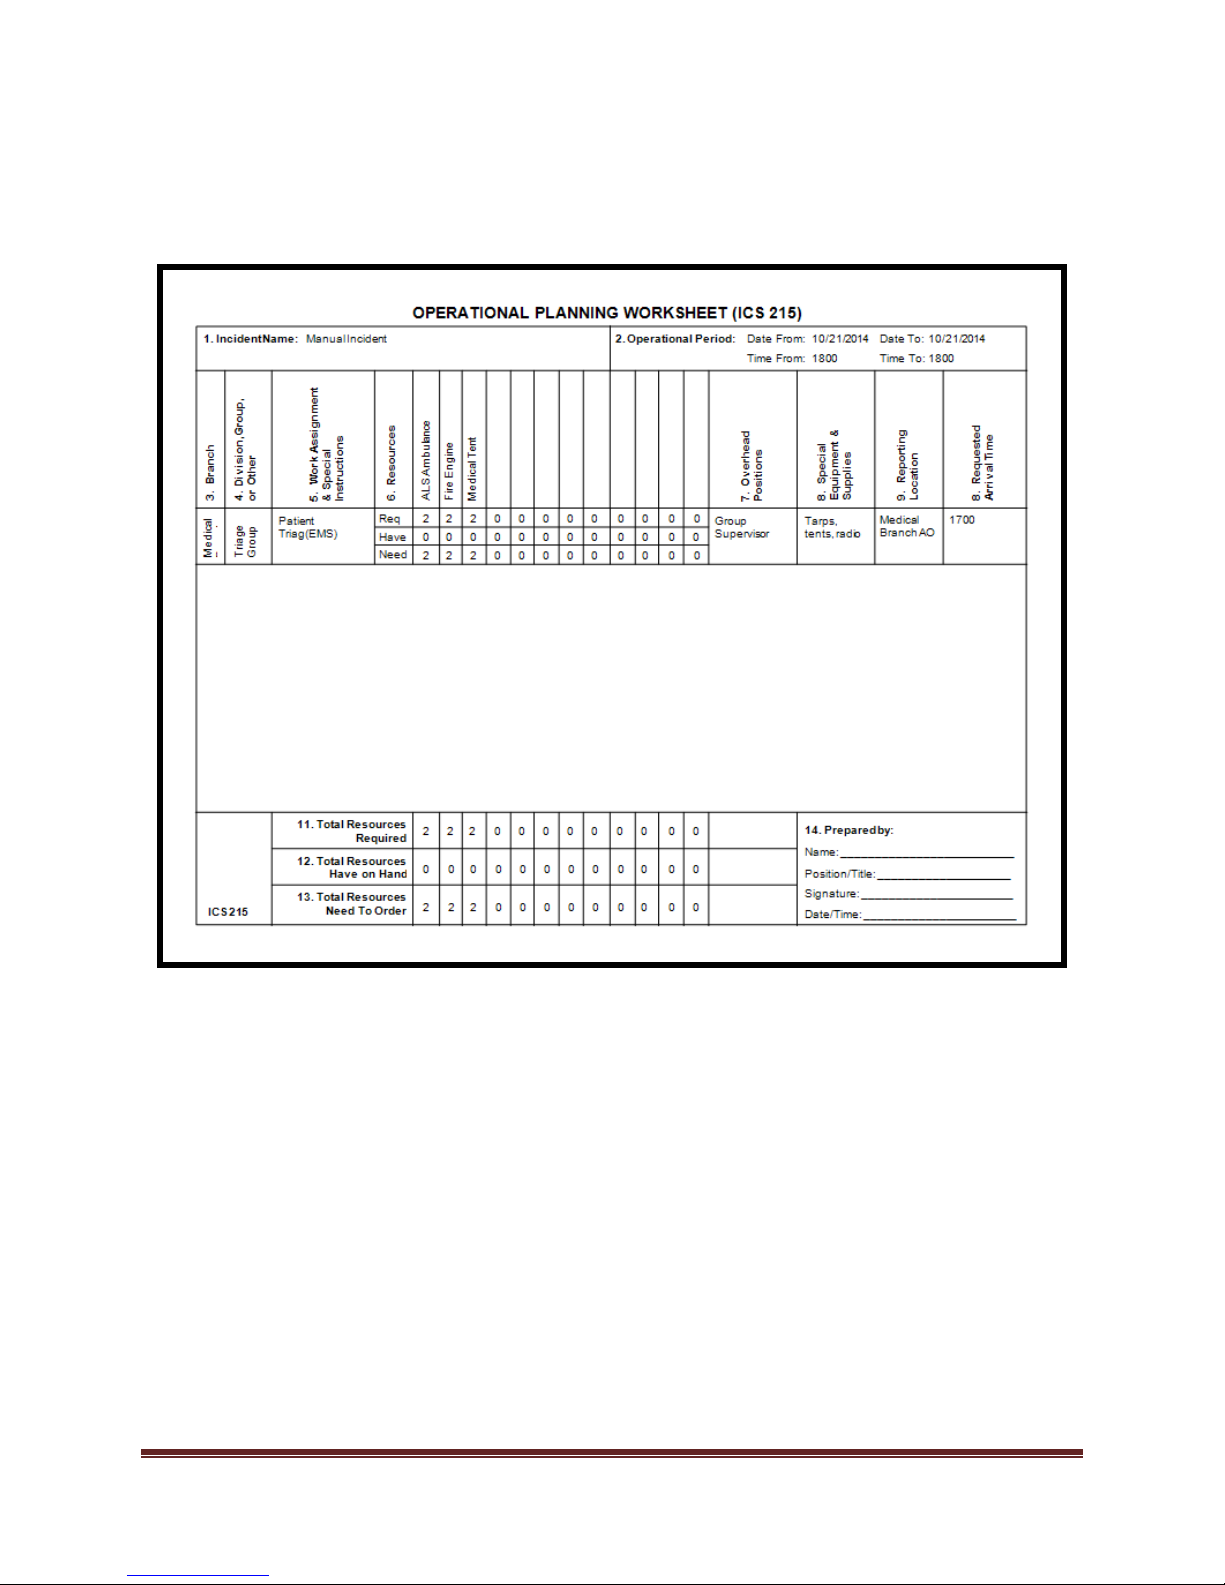
ICS 215 Operational Planning Worksheet is a planning worksheet traditionally. Dragonfly™
allows the user to reference the form to verify resource ordering and organizational structure
at any time. The ICS 215 can also be included in the IAP packet.
Dragonfly Manual Version 3© Page 66
Page 67
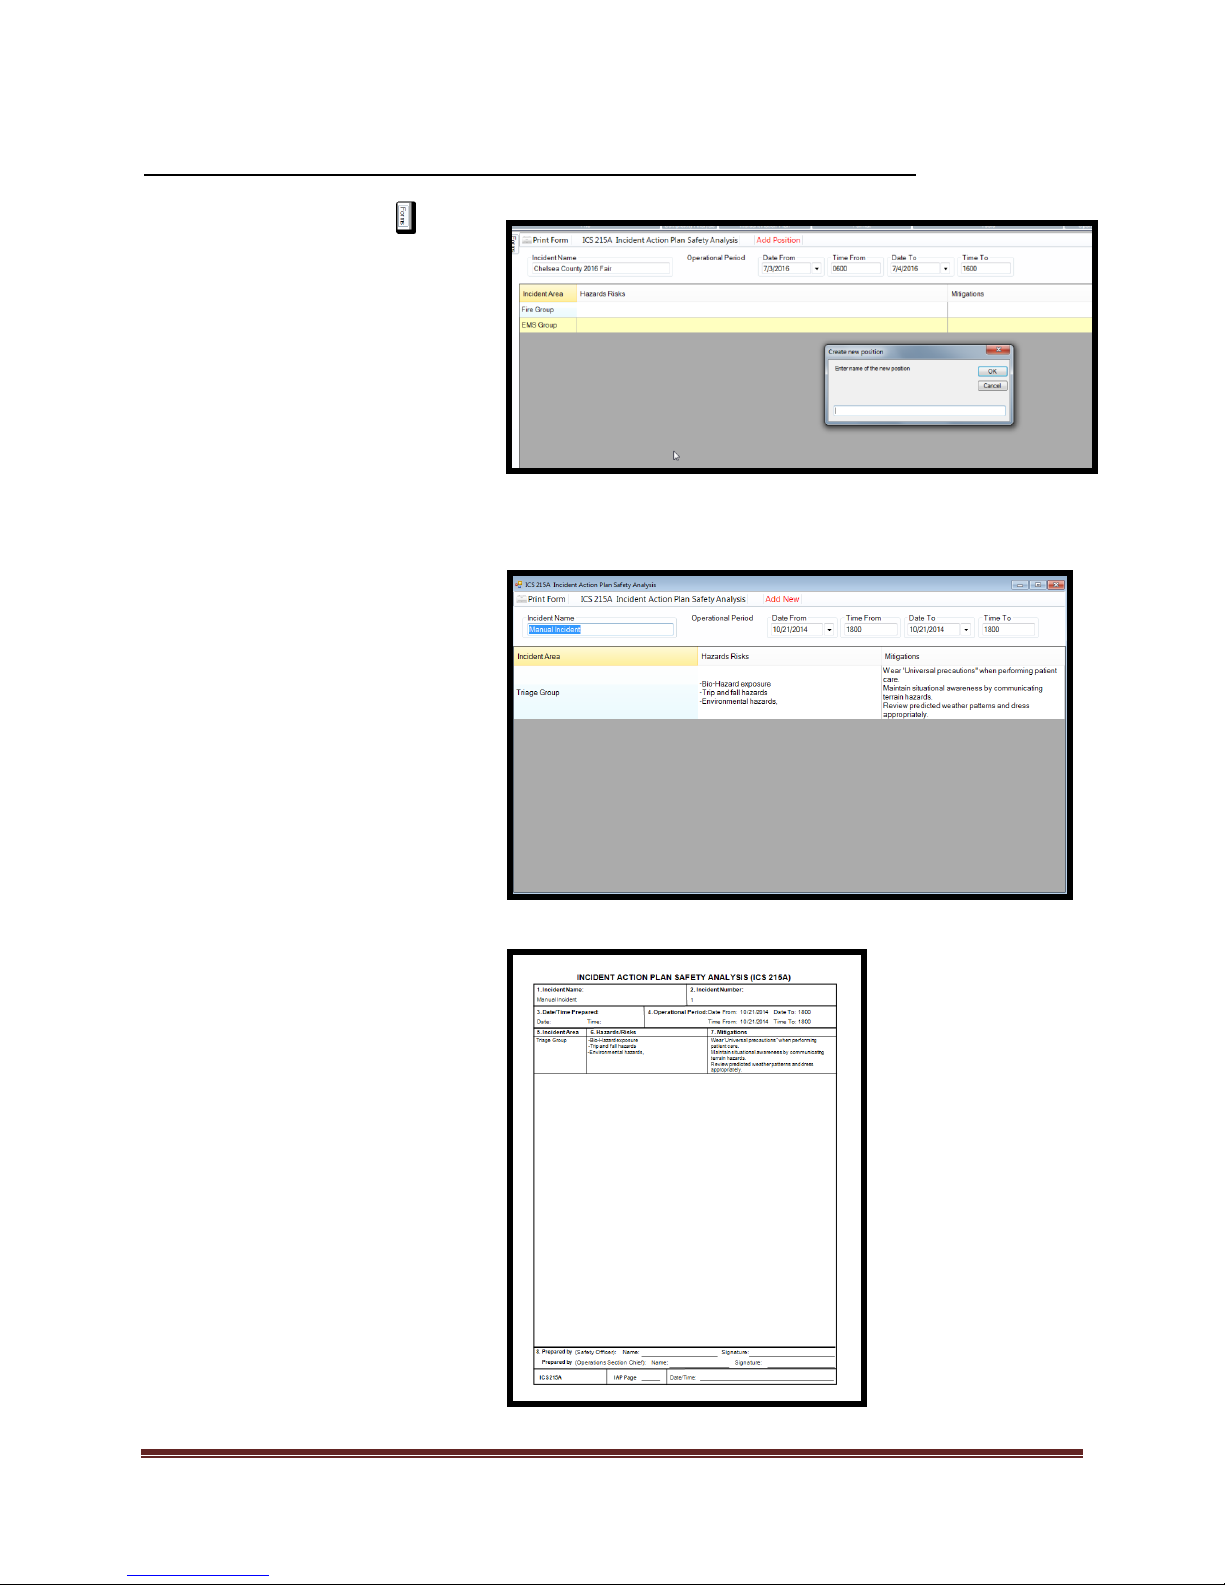
Completing the ICS 215a Incident Action Plan Safety Analysis Form
1. Select the Forms tab
2. Double click on the ICS 215a
form. This will open the form
for editing.
3. Add/Verify “Incident Name”
and “Operational Period”
information
4. Select “Add Position”
5. If 215 is completed “Incident
Area” will be populated
automatically.
6. Enter data into “Incident Area,
Hazards/Risks, and Mitigation”
fields.
7. Select “Apply”
8. Select “Close”
9. Print and review form.
*Editing of the data can be done at
any time by selecting the field
information and making desired
changes.
Dragonfly Manual Version 3© Page 67
Page 68
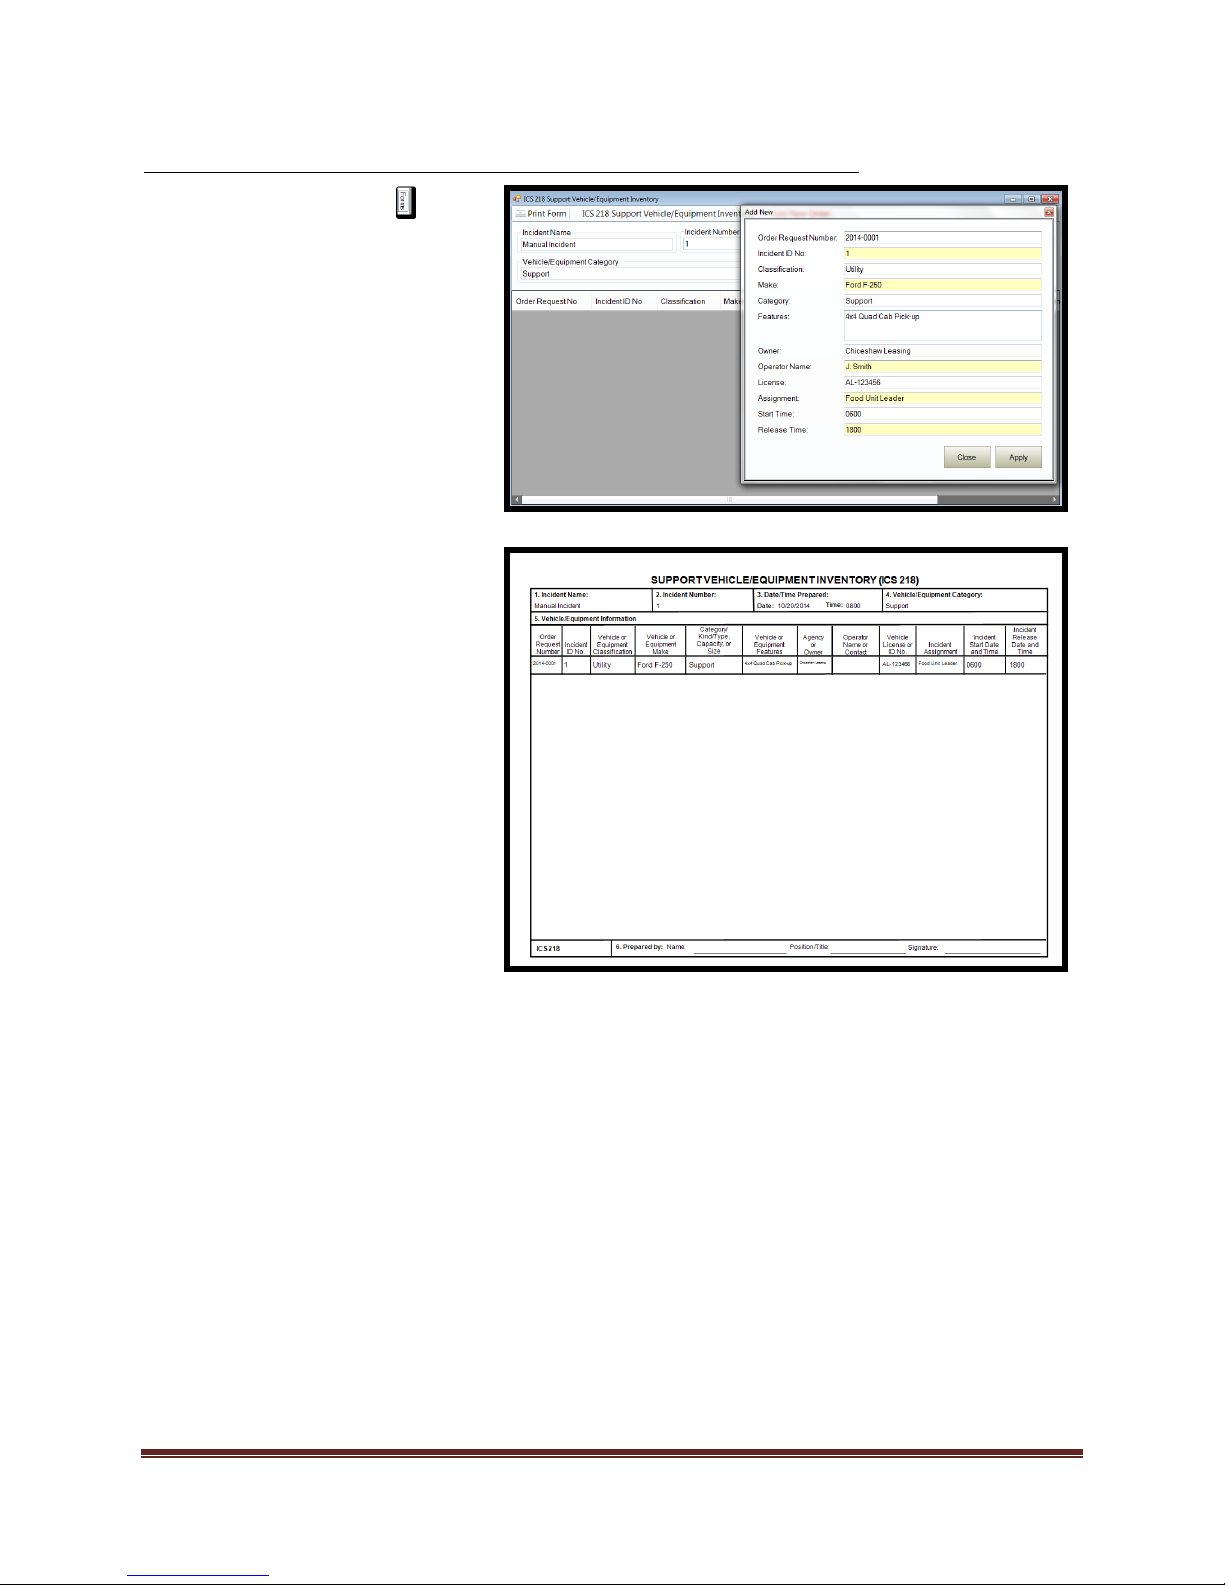
Completing the ICS 218 Vehicle Support/Equipment Inventory Form
1. Select the Forms tab
2. Double click on the ICS 218
form. This will open the form
for editing.
3. Add/Verify “Incident Name,
Date/Time Prepared, and
Vehicle/Equipment”
information.
4. Select “Add New Order”
a. Enter desired data into
fields.
b. Select “Apply” to commit
the data
c. Select “Close”
5. To print desired “Order” high
light record and “Print Form”.
*Multiple requests can be
managed with in one Incident
Action Plan
Dragonfly Manual Version 3© Page 68
Page 69
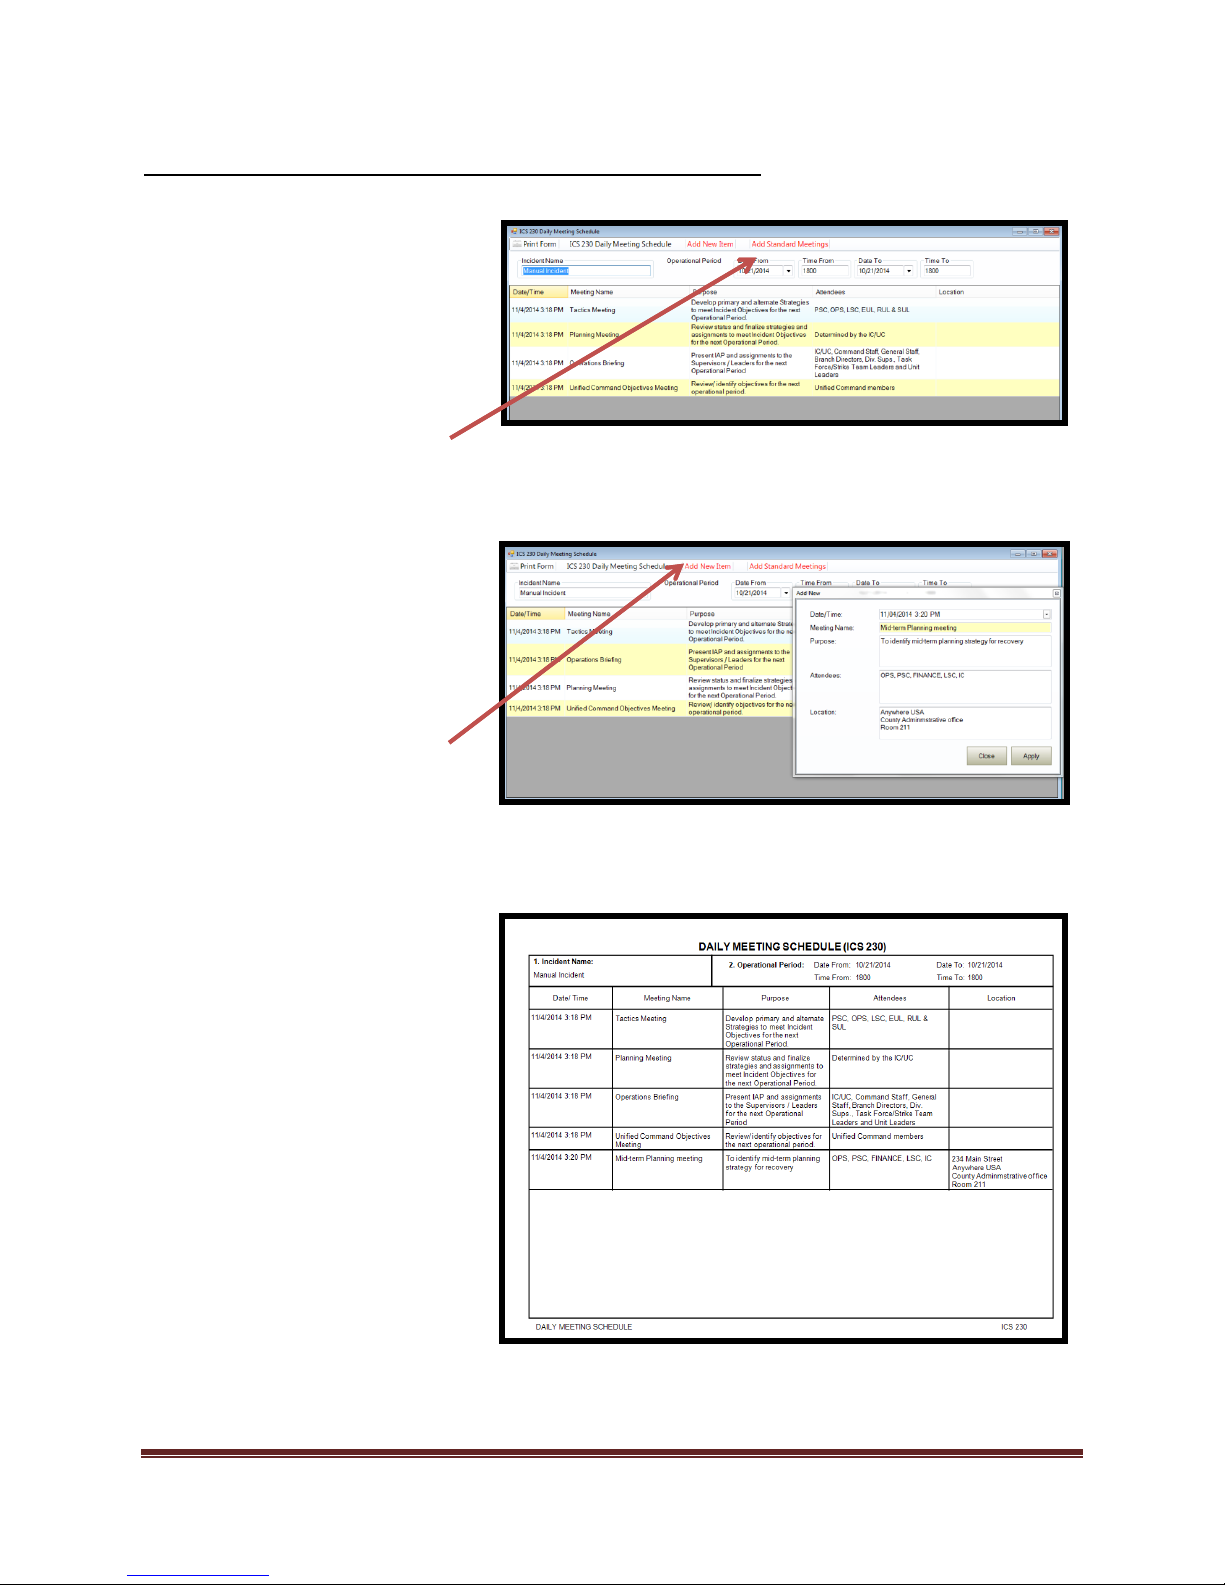
Completing the ICS 230 Daily Meeting Schedule Form
1. Select the Forms tab
2. Double click on the ICS 230
form. This will open the form
for editing.
3. Add/Verify “Incident Name and
Operational Period”
information.
4. To add a “Standard Meeting”
a. Select “Add Standard
Meetings”
b. The list will auto populate
c. Make desired changes to
times and dates and/or
add additional information
by “double clicking” into
the field that you want to
edit.
5. To add items to meeting forms:
a. Select “Add New Item”
b. Enter desired meeting
details.
c. Select “Apply”
d. Select “Close” when
finished adding items.
6. Print form and review.
*To delete item form list, highlight
the item and select “Delete” on
keyboard.
Dragonfly Manual Version 3© Page 69
Page 70
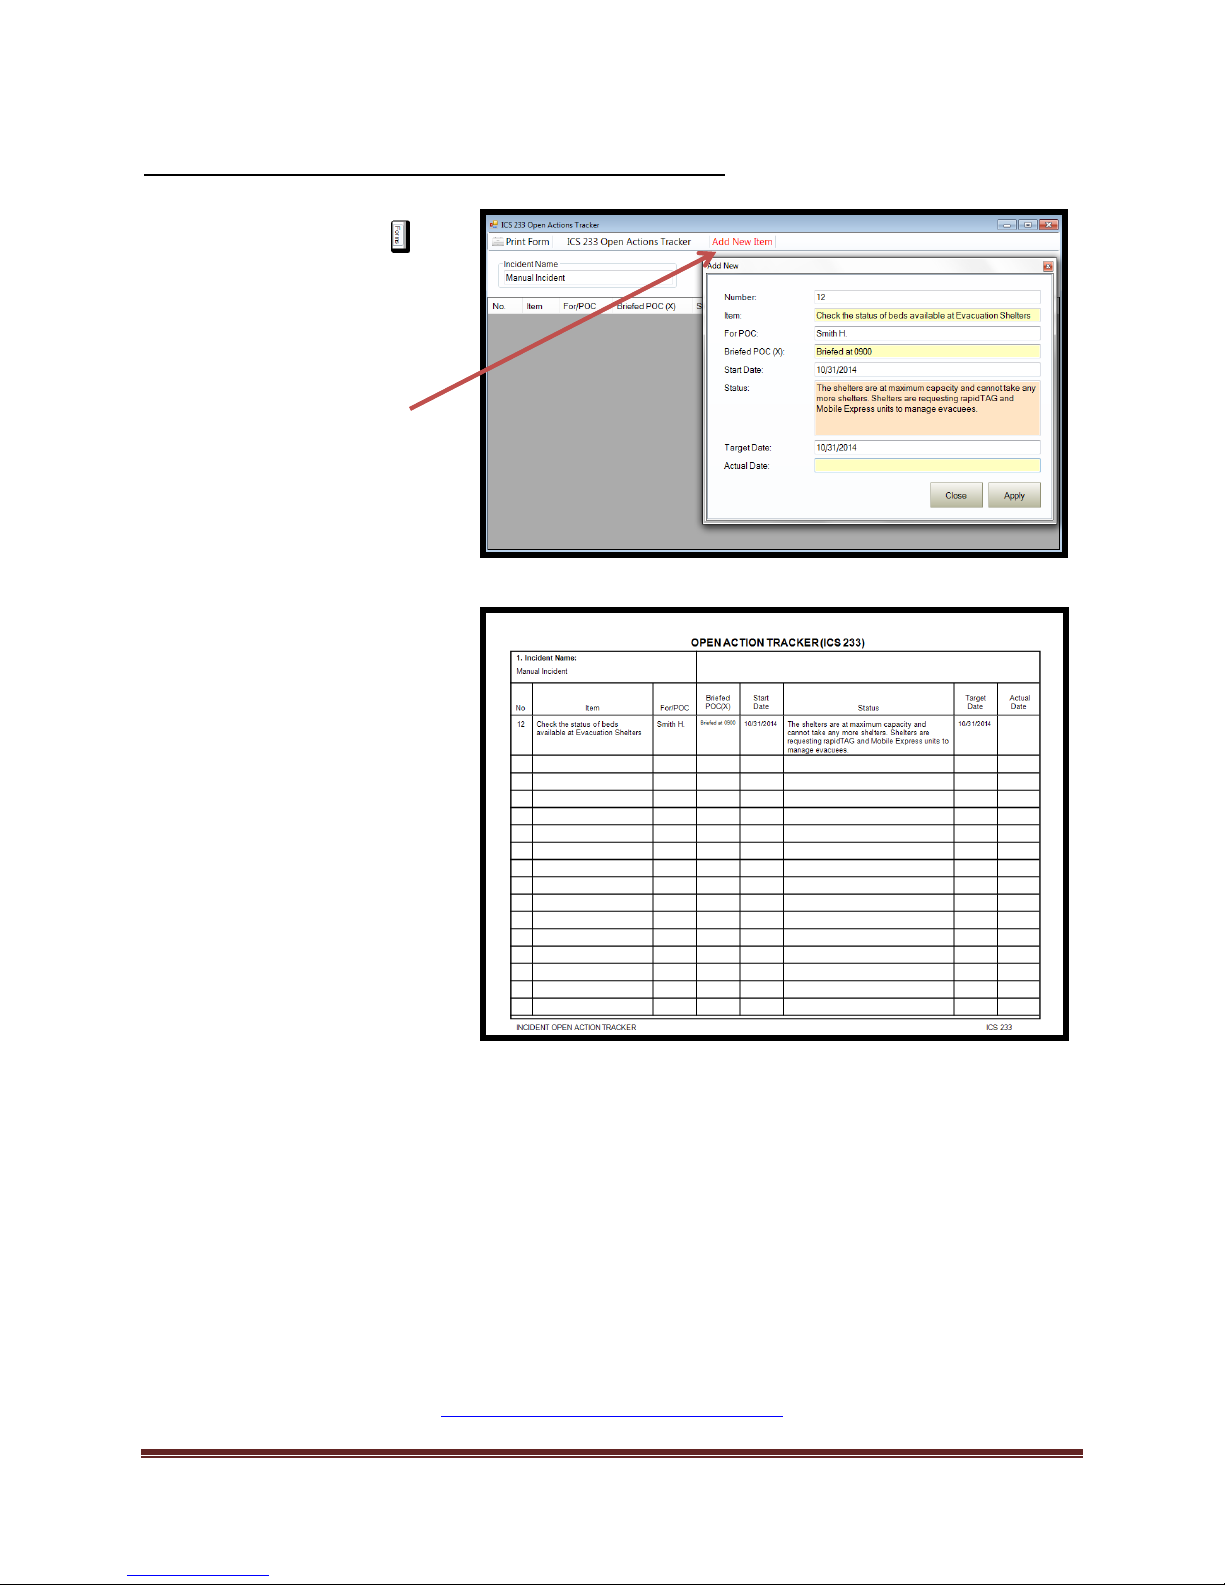
Completing the ICS 233 Open Action Tracker Form
1. Select the Forms tab
2. Double click on the ICS 230
form. This will open the form
for editing.
3. Add/Verify “Incident Name”
information.
4. Select “Add New Item”
5. Enter desired information
that you want tracked into
fields
6. Select “Apply”
7. Select “Close”
8. Print form to review
*To delete any Items, high-light
record and select “Delete” key
on keyboard.
This concludes the Default NIMS ICS Forms creation instructions. If you require custom forms or
specialized forms, please contact Dragonfly™ Technical Support.
http://dragonfly-360.com/contact/
Dragonfly Manual Version 3© Page 70
Page 71

Appendix A
Salamander™ Integration
Appendix A
Dragonfly™ and Salamander™ are complementary technologies that create a force
multiplication capacity for improving situational awareness.
This appendix will detail to the user how to accomplish the following integrations:
1. Connecting to Resource Manager Web™ (Server and SaaS)
2. Connecting to rapidTAG™
3. Connecting to Mobile Express™
4. Connecting to Command™
5. Connecting to interTRAX™
The connections from Dragonfly™ to a Salamander™ technology are designed to be straight
forward and supportable in various environments.
From this point on when discussing “connections”, the following definitions will be applicable:
1. Salamander™ Local connection- An instance when Dragonfly™ and one instance of the
following software are installed on the same computer.
a. rapidTAG™
b. Mobile Express™
c. Command™
2. Salamander™ Local connection (Networked) - An instance when Dragonfly™ and an
instance of the following software are not installed on the same computer.
a. rapidTAG™
b. Mobile Express™
c. Command™
3. Salamander™ interTRAX™ connection- An instance where Dragonfly™ makes a “direct”
connection to the “Incident” database located on the intertraxserver.com web
application.
4. Salamander™ Resource Manager Web™ connection- An instance where Dragonfly
makes a “direct” connection to the “Resource” database web application for the
following software:
a. Resource Manger Web Server™ 4.0 and greater.
b. Resource Manager Web SaaS™ 4.0 and greater.
Dragonfly Manual Version 3© Page 71
Page 72
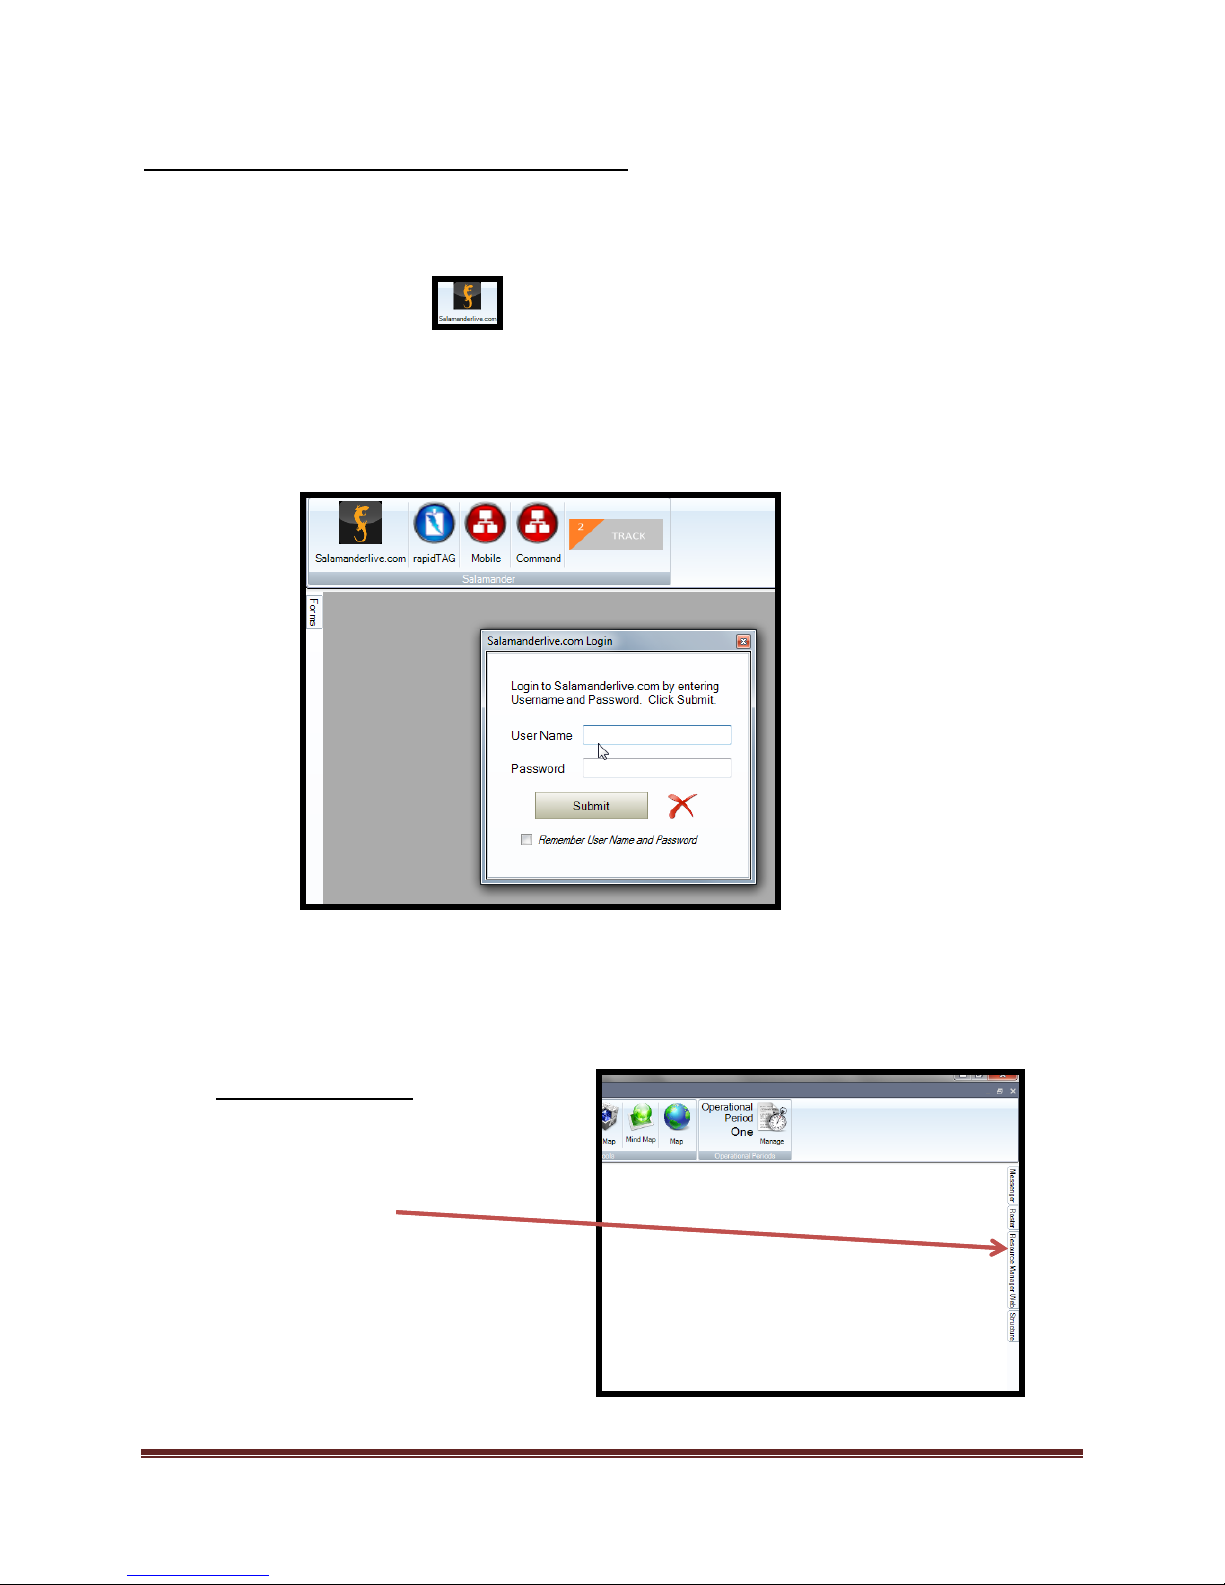
Connecting Dragonfly™ to Salamanderlive.com™
1. Start/Open an Incident
2. Select “Salamander” tab
3. Submit your “User Name and Password”
a. Select check box to remember your password and user name.
b. Select “Submit”
c. Login window will minimize when connection is live.
4. Open the tool or form that you want to add personnel to. ( Organization Chart tool, Personnel Tab
tool, or Org List tool)
Organization Chart Tool
1. Select the “TAG” slide tool.
e. Slide will appear as you
“hover” over it.
Connections to Salamanderlive.com™ require an internet connection and are only valid while
the Incident Action Plan is open. When the program closes, the connection to
Salamanderlive.com™ terminates.
Dragonfly Manual Version 3© Page 72
Page 73
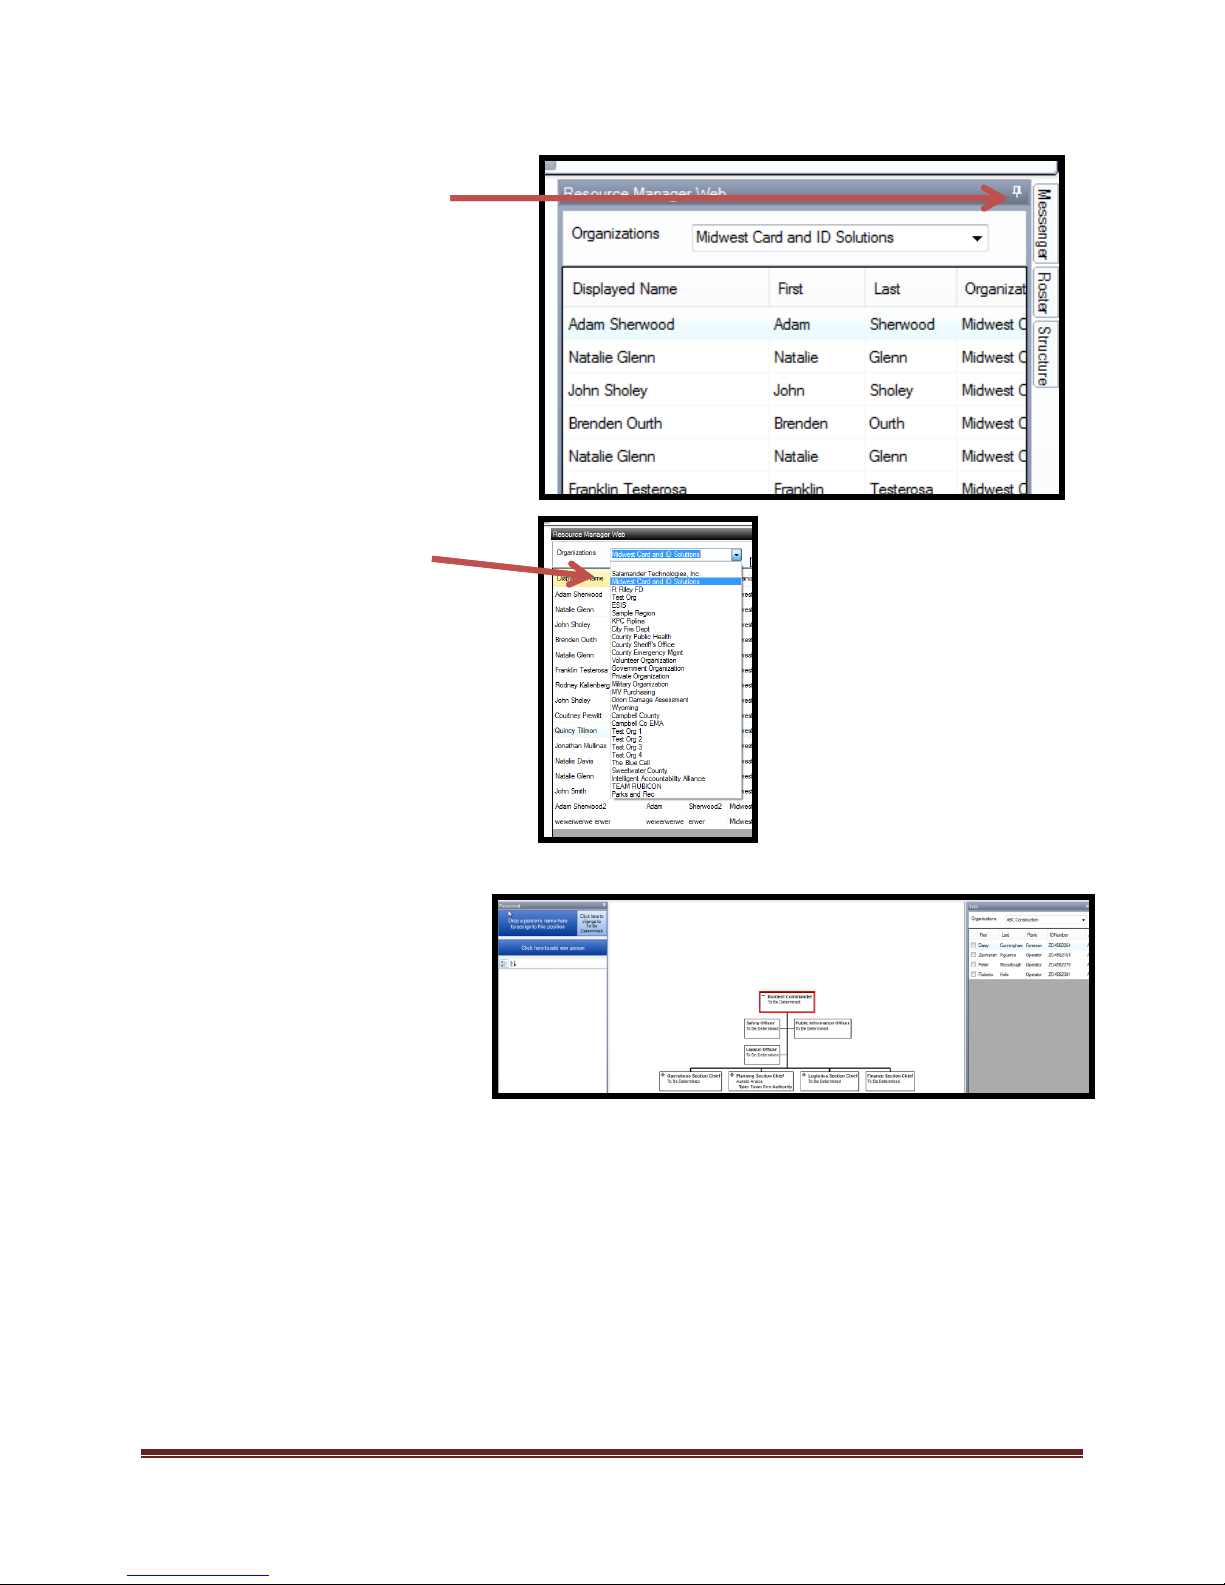
2. Select the position that you
want to assign a person to.
e. Open “Personnel” tab.
f. In the TAG slide tab
highlight the desired
person and “Drag and
Drop” the desired
person onto the “Drop a
person’s name here..”
box
“pinned” open by pressing the
“thumb tack” in the upper right
corner of the slide.
the person is located in.
Dragonfly Manual Version 3© Page 73
Page 74
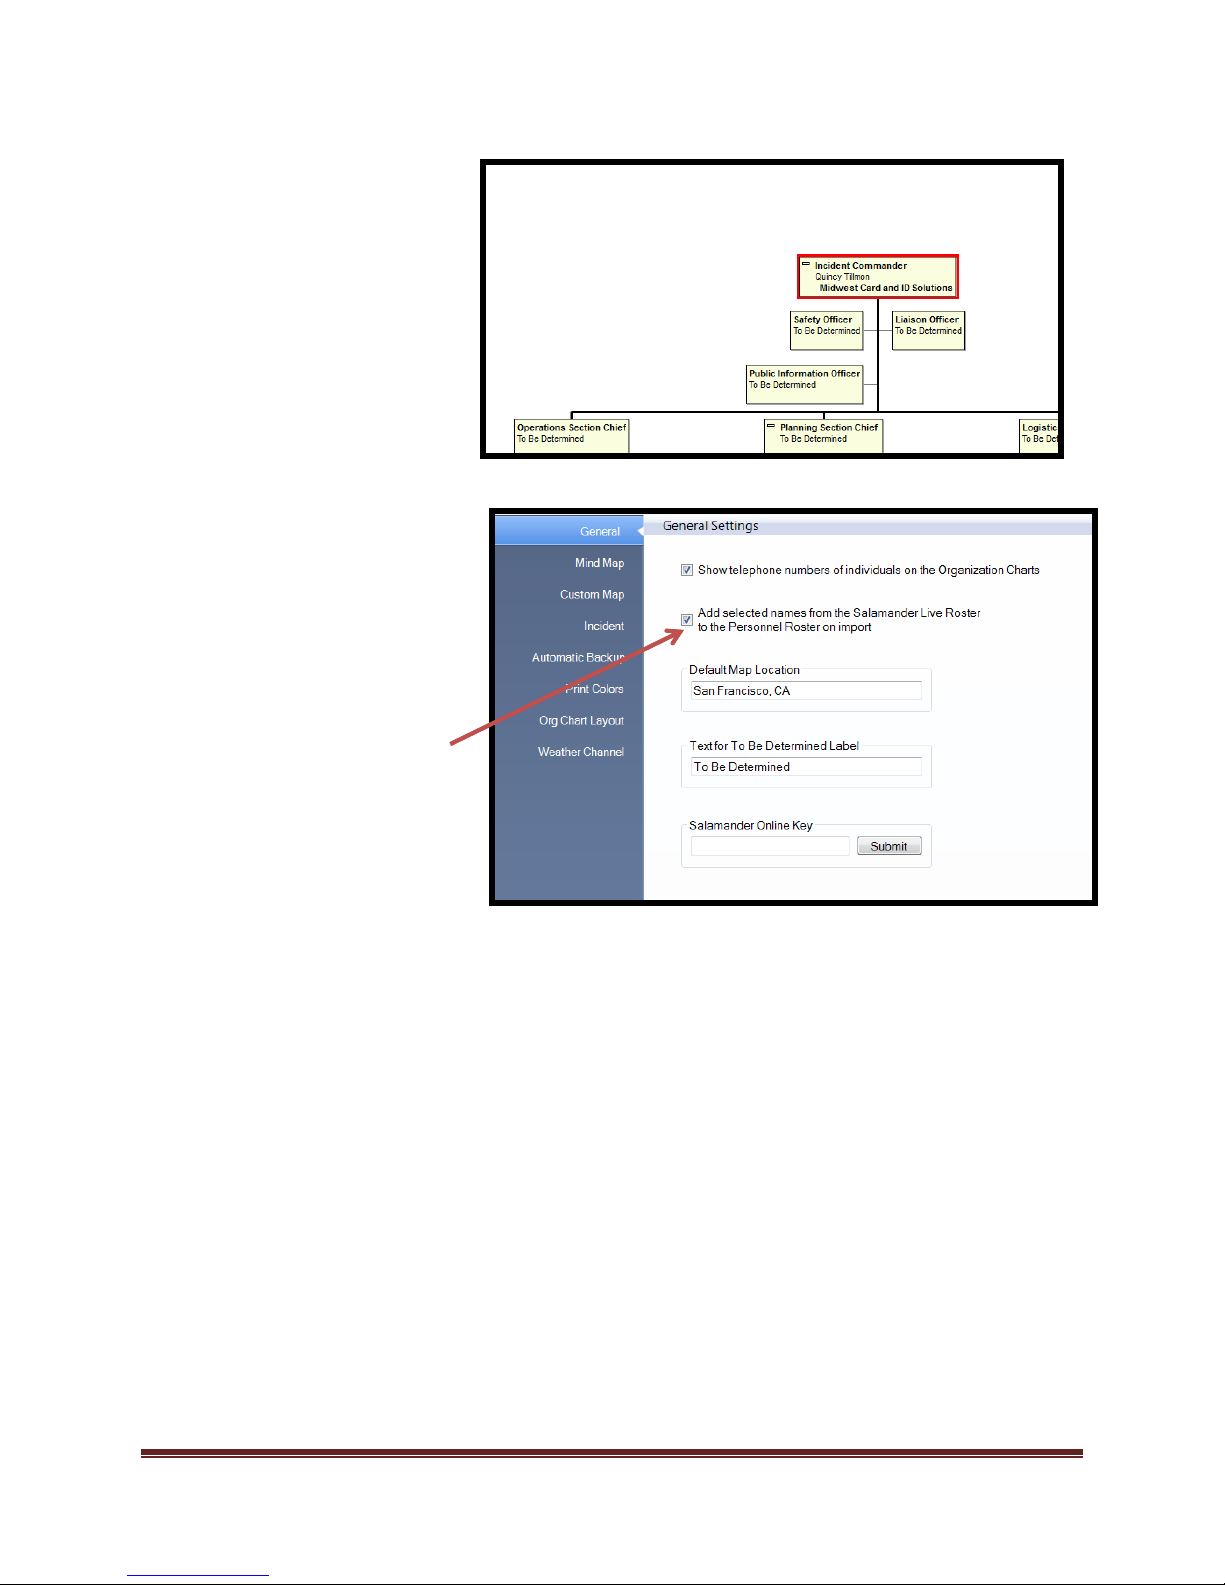
The option can be accessed by
selecting.
1. “Set-up” tab
2. “Preferences” icon
3. “General” block
4. Select “Add selected names
from Salamanderlive Roster
to the Personnel Roster on
import” check box.
The position should display the
person you selected.
*All imports will also populate the
“Personnel” roster if the option is
selected.
Dragonfly Manual Version 3© Page 74
Page 75
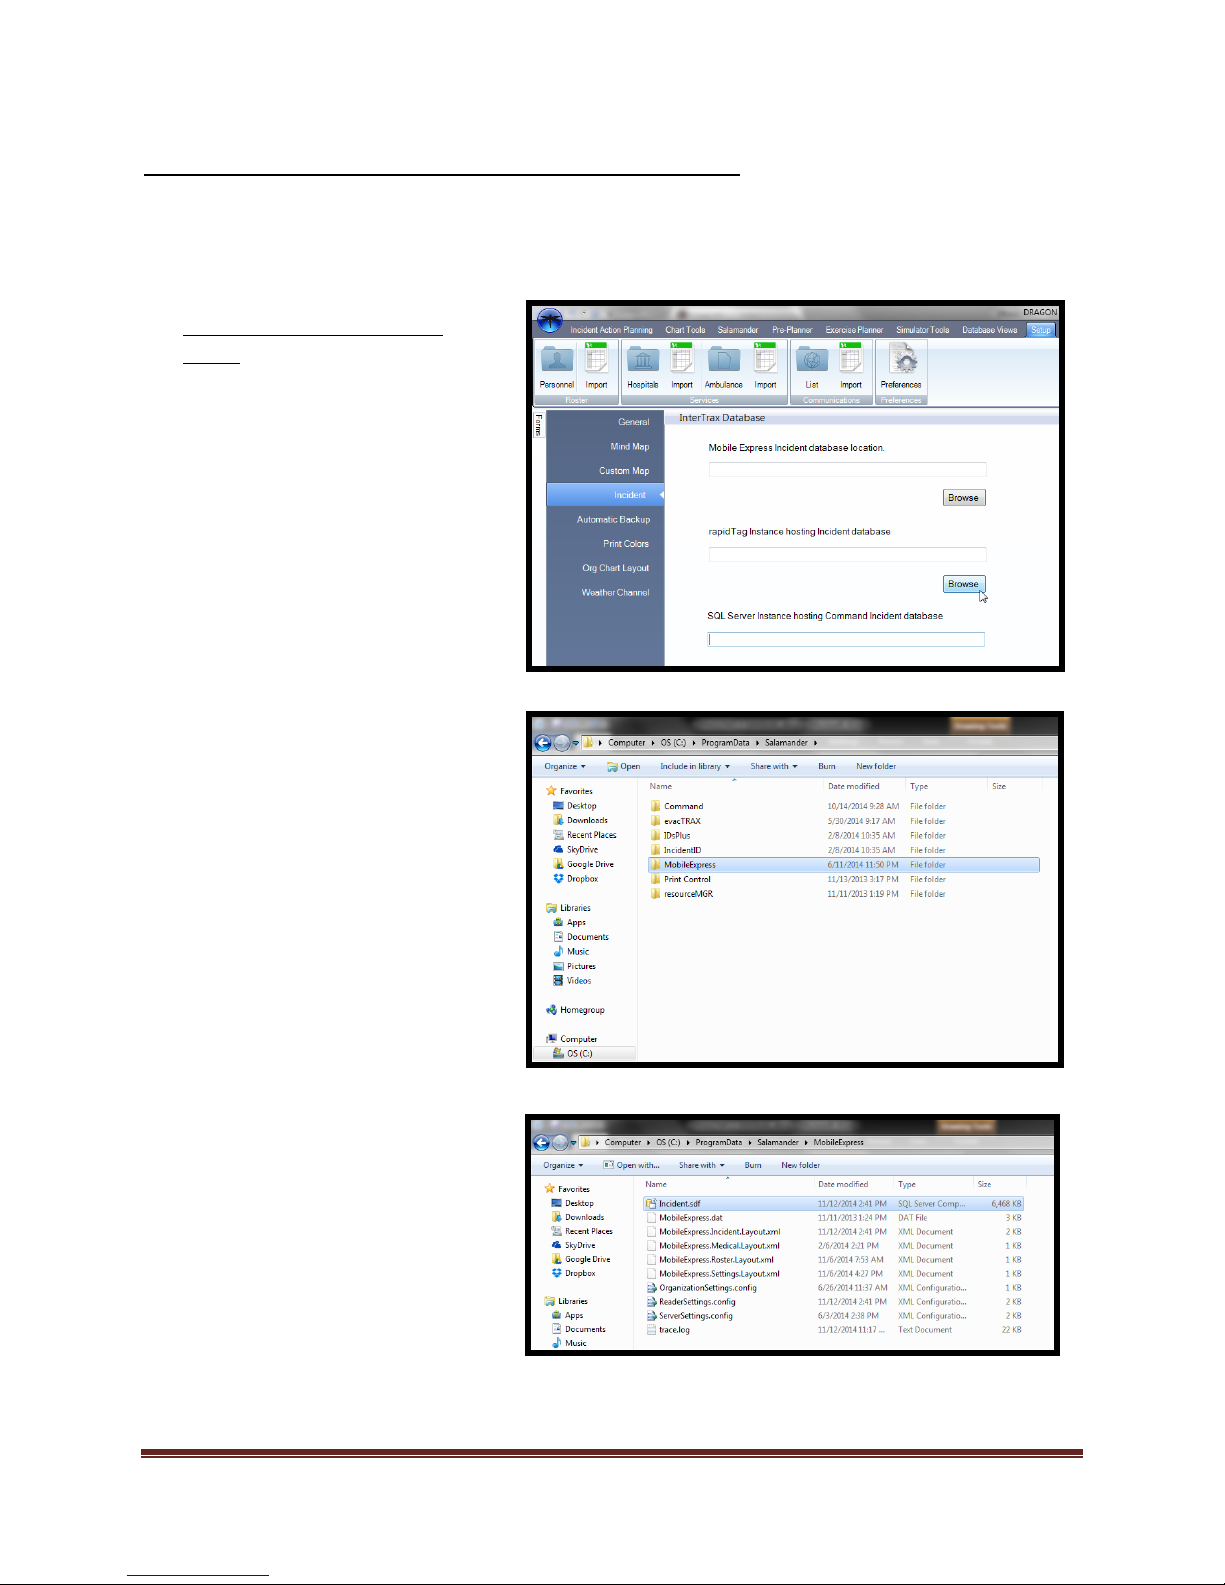
Salamander™ Local Connection Preference Settings
Mobile Express™ or rapidTAG™
setting
1. Navigate to “Set-up”
a. Select “Preferences”
b. Select “Incident” module.
c. Navigate to “Mobile
Express™ or rapidTAG™
Incident database location”
d. Select “Browse”
2. Navigate to the following folder:
“C:\ProgramData”
a. If the “ProgramData” folder
is not visible, contact your
“Administrator” and have
them make the folder visible
3. Locate the “Salamander” folder
and double click the folder.
a. Select “MobileExpress or
IncidentID” folder.
i. “IncidentID” should be
selected for rapidTAG.
b. Select “Incident.sdf”
You have now set the file path that
Dragonfly™ will use to import
incident data from a local
connection.
Next we will look at how a
Salamander Local connection is
created for Command™
Before a local connection is created between Salamander™ and Dragonfly™, the user will need
to configure preferences that point to a file path where the “Incident” database is located. To
set the path, perform the following:
Dragonfly Manual Version 3© Page 75
Page 76
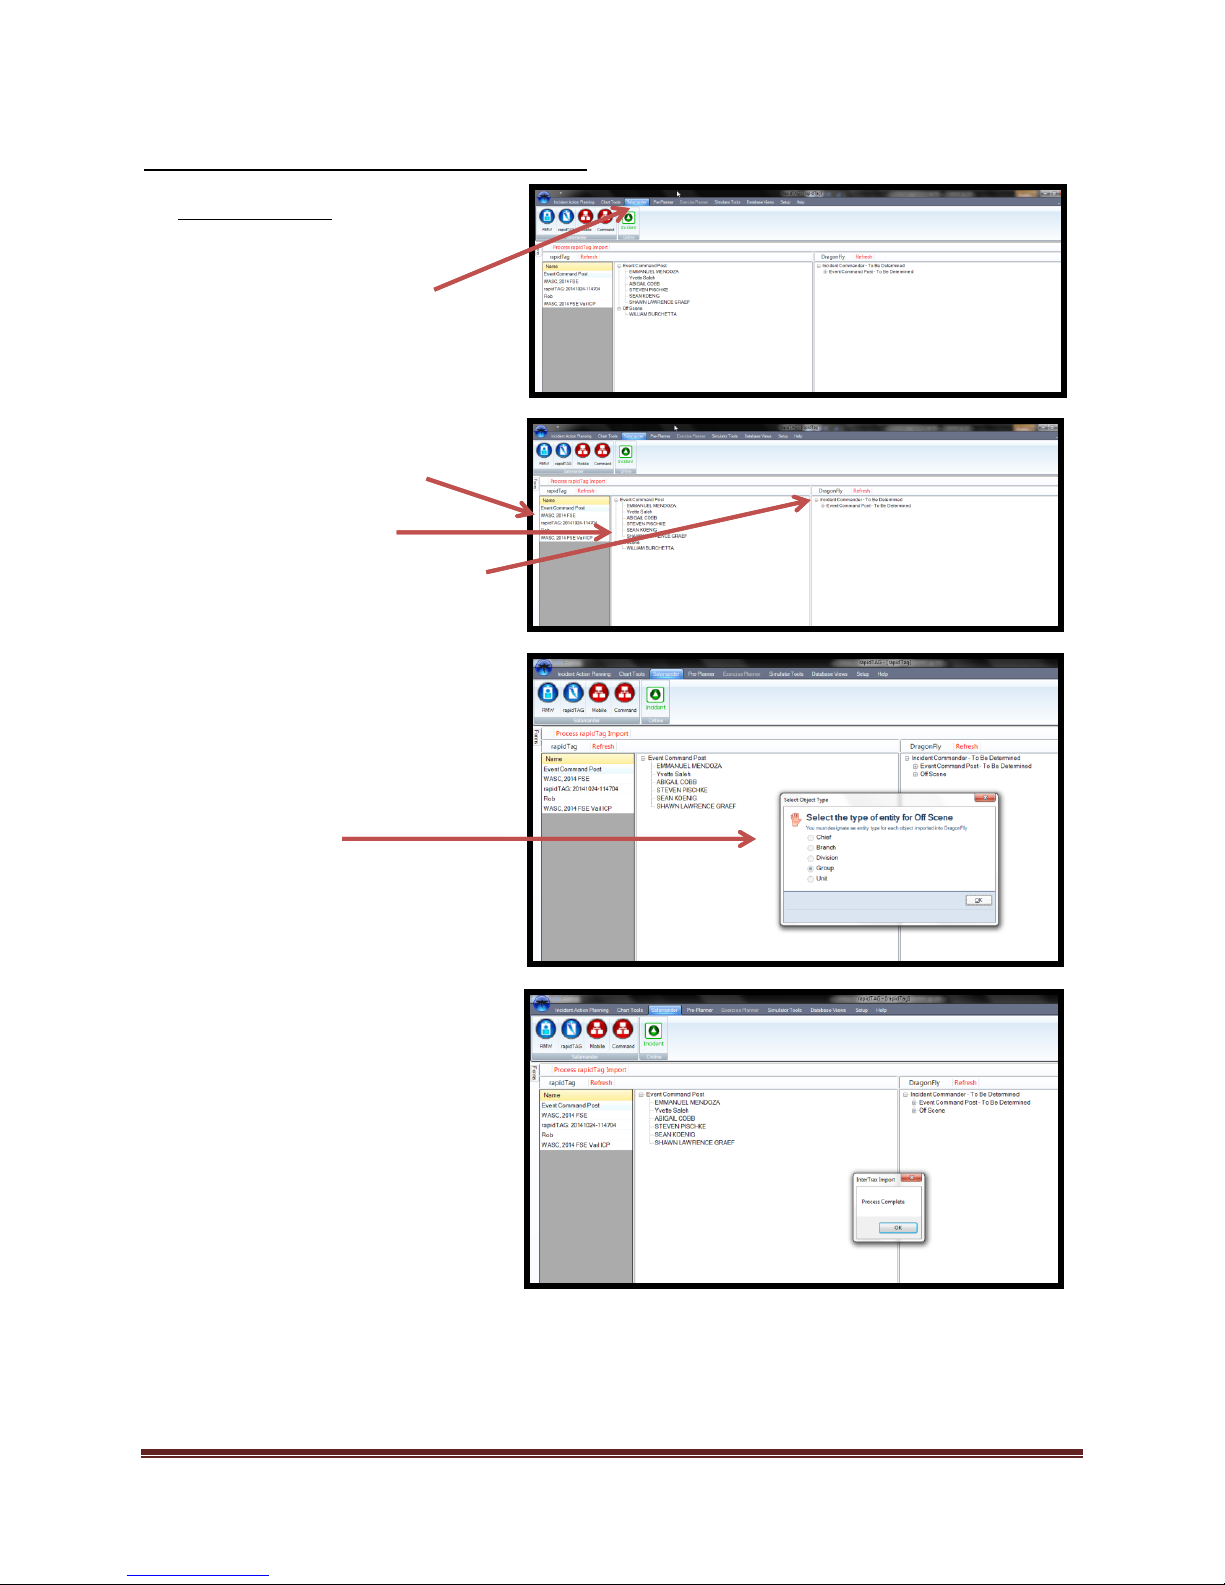
Salamander™ Local Connection (rapidTAG™)
rapidTAG™ Import
1. Start a “New Incident”.
2. Select “Salamander™” tab.
3. Select “rapidTAG™” icon.
4. Select the rapidTAG™ “Incident”
you want to import.
5. Select the assignment and
personnel for import.
6. “Drag and Drop” assignment and
personnel onto the desired ICS
position.
7. Select “Process rapidTAG
Import”
8. Set “Object type”.
a. Chief
b. Branch
c. Division
d. Group
e. Unit
9. Select “Ok” to finish import
Dragonfly Manual Version 3© Page 76
Page 77
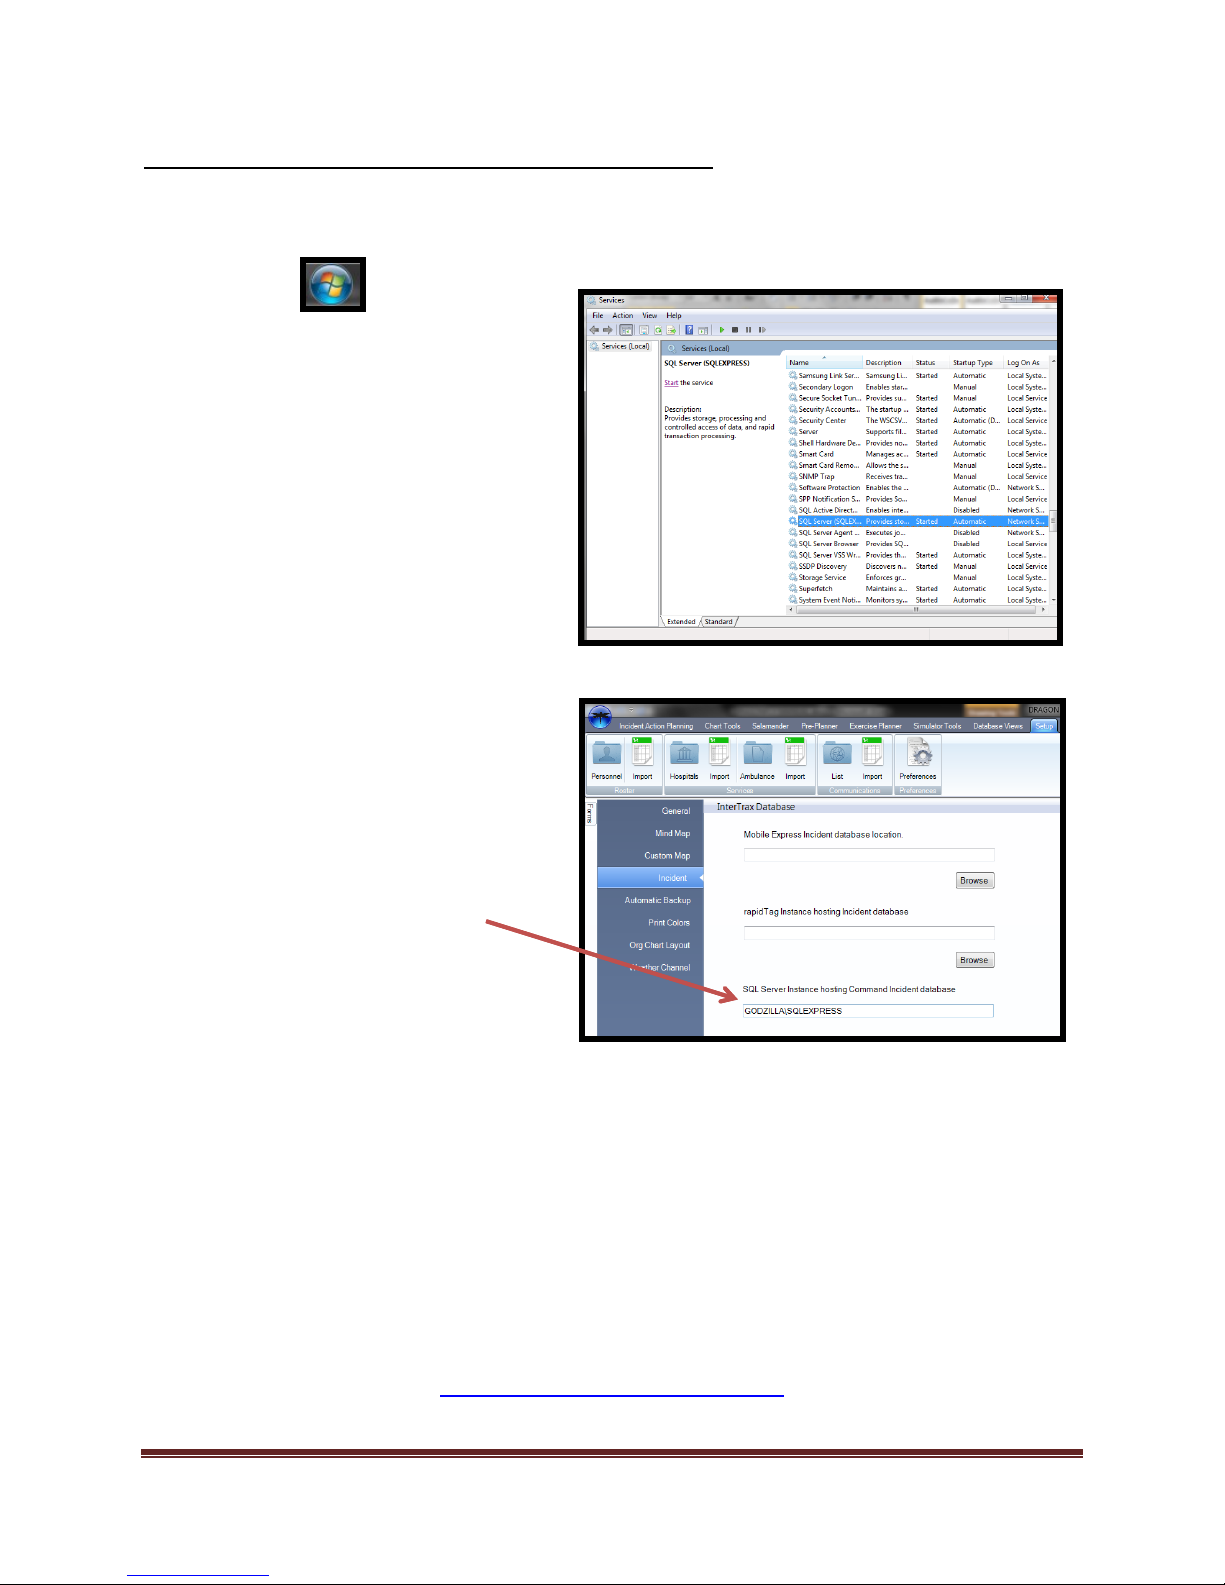
Salamander™ Local Connection Preference Settings-Command
1. Select button.
2. Navigate to the “Search programs and
files” bar
a. Type “Services” into the search
field.
b. Select “Services”
c. Navigate to “SQL Server
(SQLEXPRESS)”
d. Select “Start” to start the
service.
e. Wait a moment for the service
to start.
f. Close out any open “Service”
related window.
3. Start Dragonfly™
a. Navigate to “Setup”
b. Select “Preferences”
c. Select “Incident” module
d. Navigate to “SQL Server
Instance hosting Command
Incident database”
e. Type the computer name (ex.)
“LOCALPC\SQLEXPRESS”
In order for this connection to be performed the user must have “admin” privileges in order to
complete the connection.
Congratulations! You are now ready to import your Command™ incident data into your
If you need assistance please contact Dragonfly Technical Support
Dragonfly IAP.
www.dragonfly-360.com/contact/
Dragonfly Manual Version 3© Page 77
Page 78
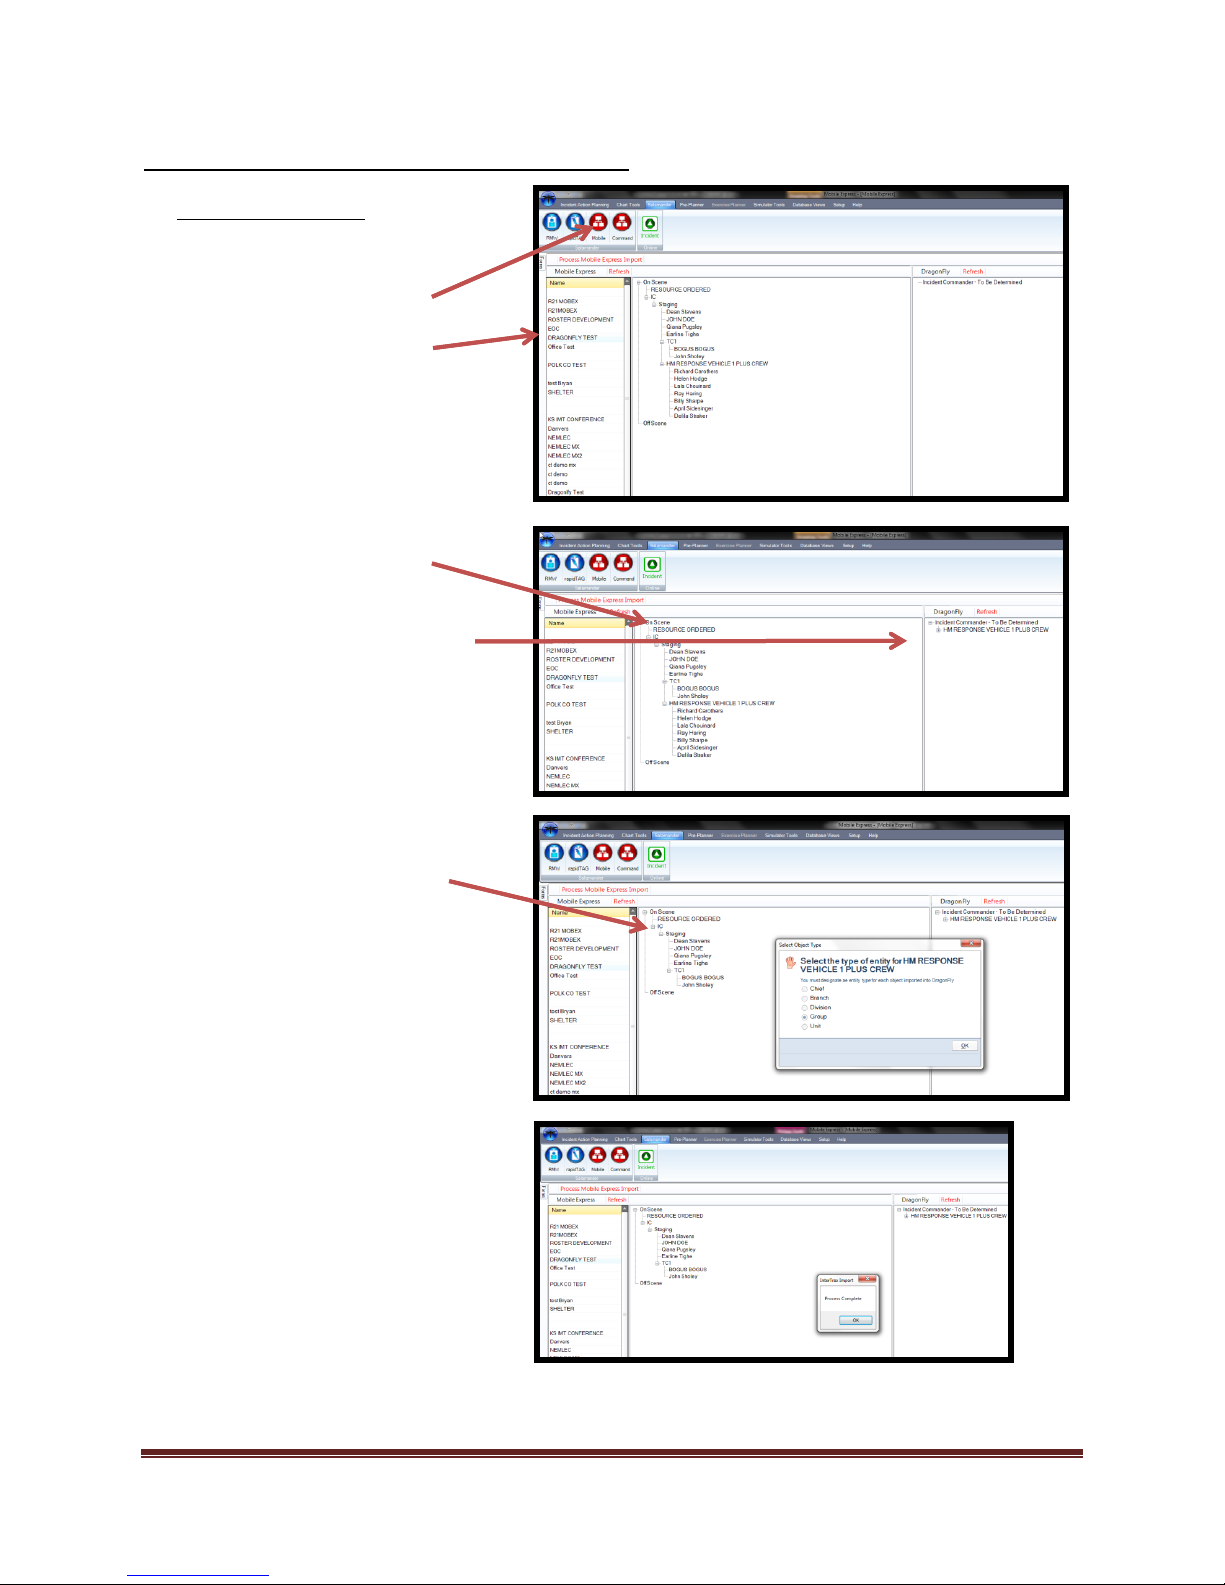
Salamander™ Local Connection Mobile Express™
Mobile Express Import
1. Start a “New Incident”.
2. Select “Salamander” icon.
3. Select “Mobile Express” icon.
4. Select the Mobile Express
“Incident” you want to import.
5. Select the assignment and
personnel for import.
6. “Drag and Drop” assignment and
personnel onto the desired ICS
position.
7. Select “Process Mobile Express
Import”
8. Set “Object type”.
a. Chief
b. Branch
c. Division
d. Group
e. Unit
Select “Ok” to finish import
Dragonfly Manual Version 3© Page 78
Page 79
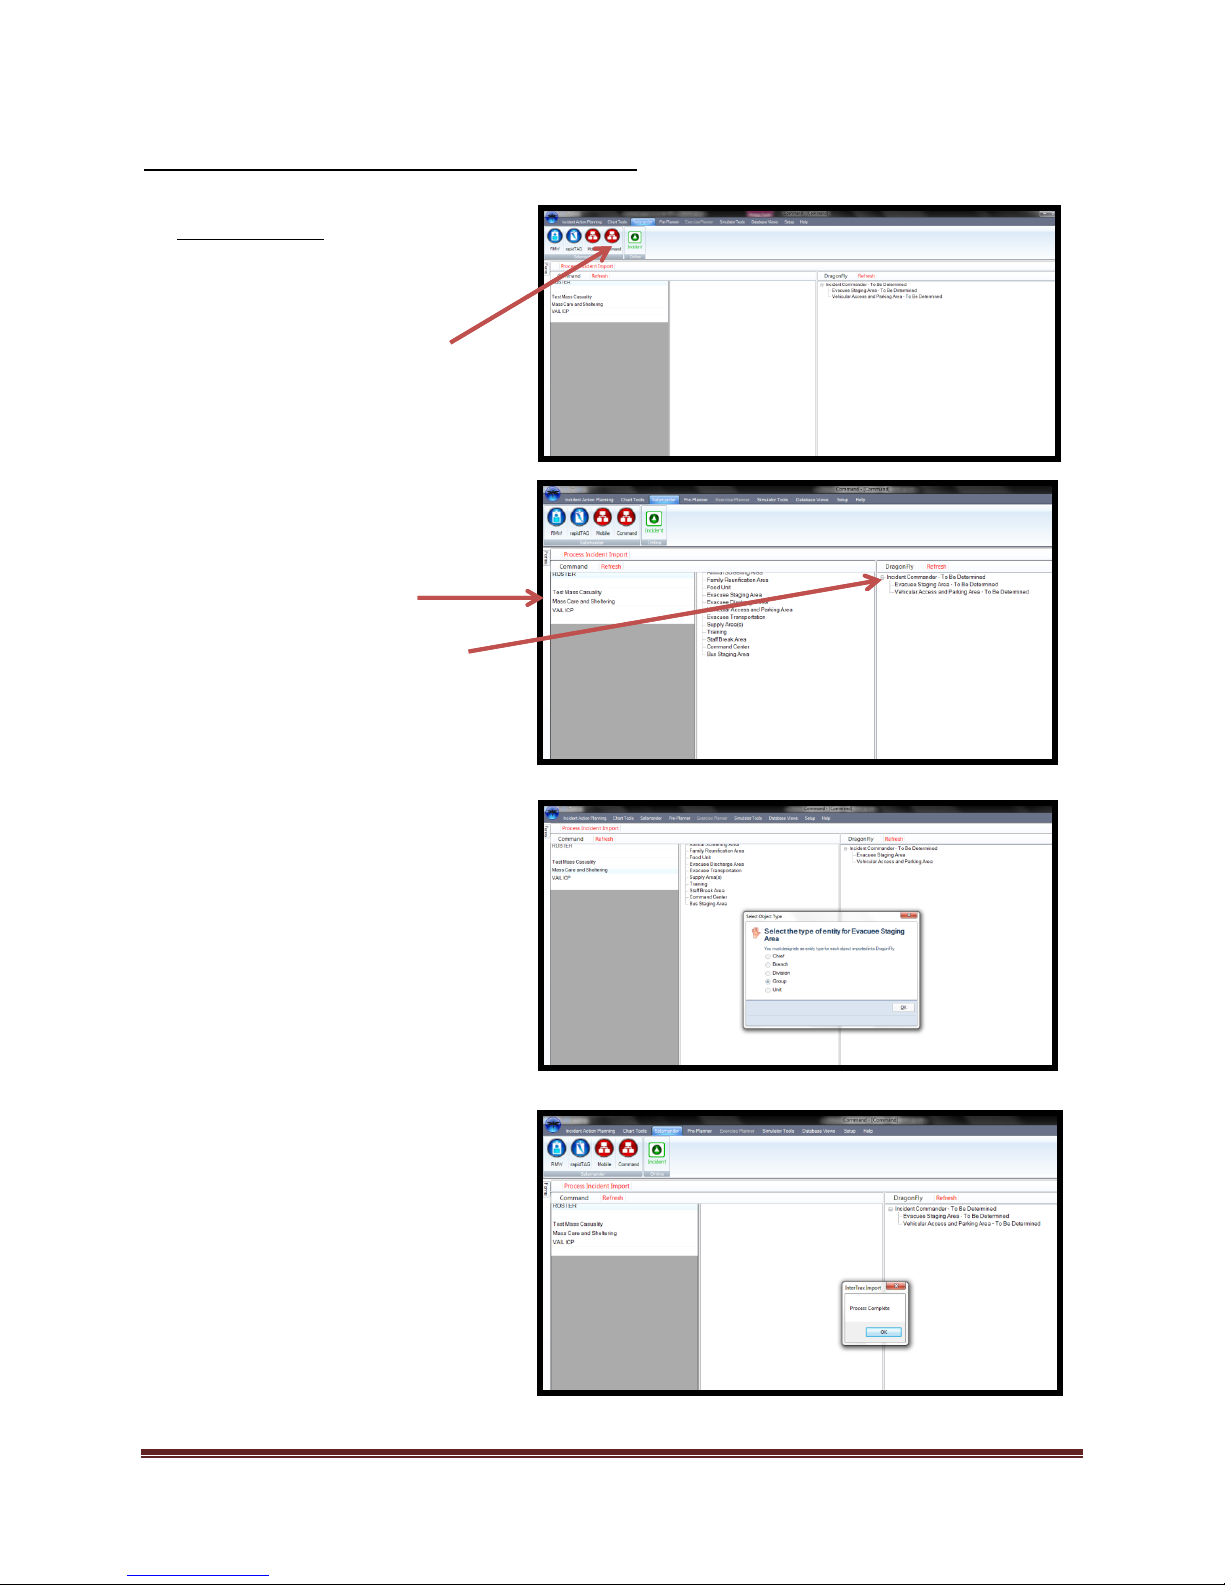
Salamander™ Local Connection Command Import
Command Import
1. Start a “New Incident”.
2. Select “Salamander” icon.
3. Select “Command” icon.
4. Select the Command “Incident” you
want to import.
5. Select the assignment and
personnel for import.
6. “Drag and Drop” assignment and
personnel onto the desired ICS
position.
7. Select “Process Command Import”
8. Set “Object type”.
a. Chief
b. Branch
c. Division
d. Group
e. Unit
9. Select “Ok” to finish import
Dragonfly Manual Version 3© Page 79
Page 80
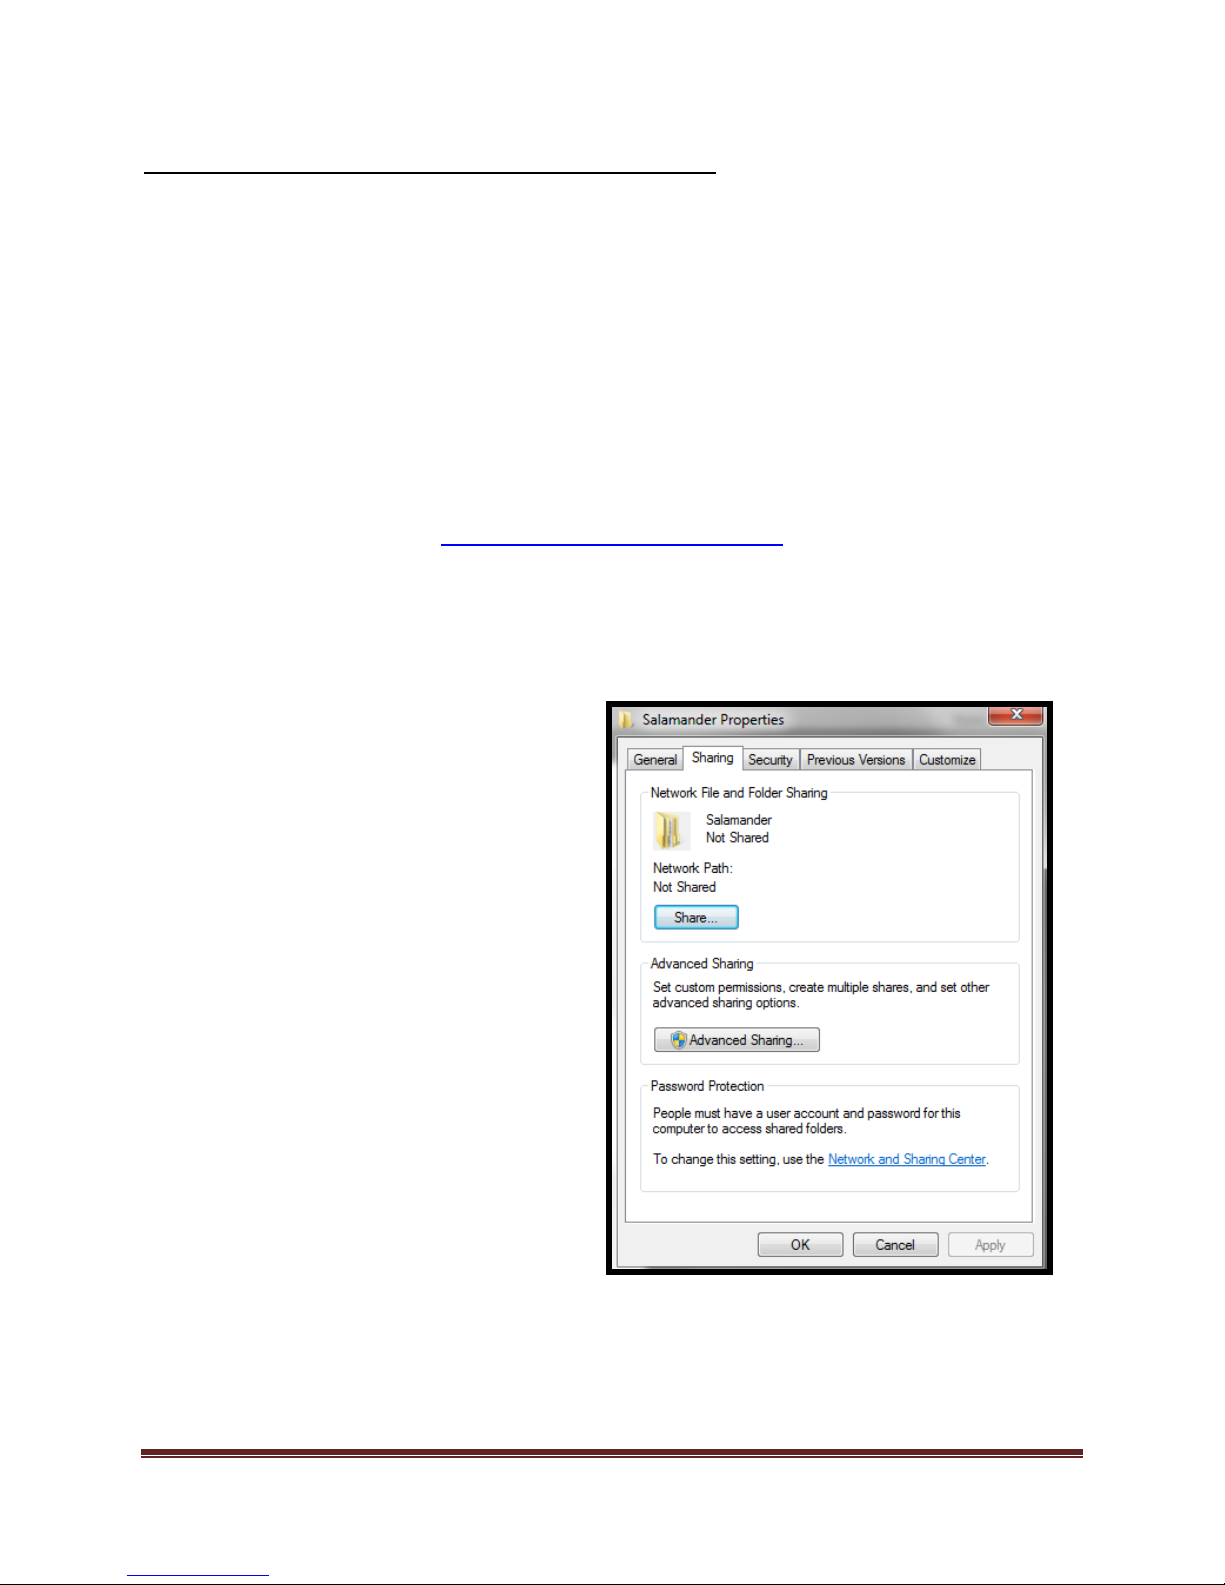
Salamander™ Local Connection (Networked)
1. Navigate to the following folder:
“C:\ProgramData”
a. If the “ProgramData” folder is
not visible, contact your
“Administrator” and have them
make the folder visible
2. Locate the “Salamander” folder and right
click the folder
a. Select “Properties”
b. Select “Sharing” tab
c. Select “Share”
The following configuration for importing of Salamander™ incident data should be used when
Dragonfly™ and an instance of the following software are not installed on the same computer.
a. rapidTAG™
b. Mobile Express™
c. Command™
The only difference between Salamander™ Local Connections and Salamander™ Local
Connections (Networked) is the location of the data and the file path labeling.
Your Dragonfly Technical Support staff should be contacted if you are going to use the
Salamander™ Local Connection (Networked) process.
http://dragonfly-360.com/contact/
Local Connections (Networked) rapidTAG™
To configure for Salamander™ Local Connections (Networked) for rapidTAG™, perform the
following for Window 7 operating systems:
Dragonfly Manual Version 3© Page 80
Page 81
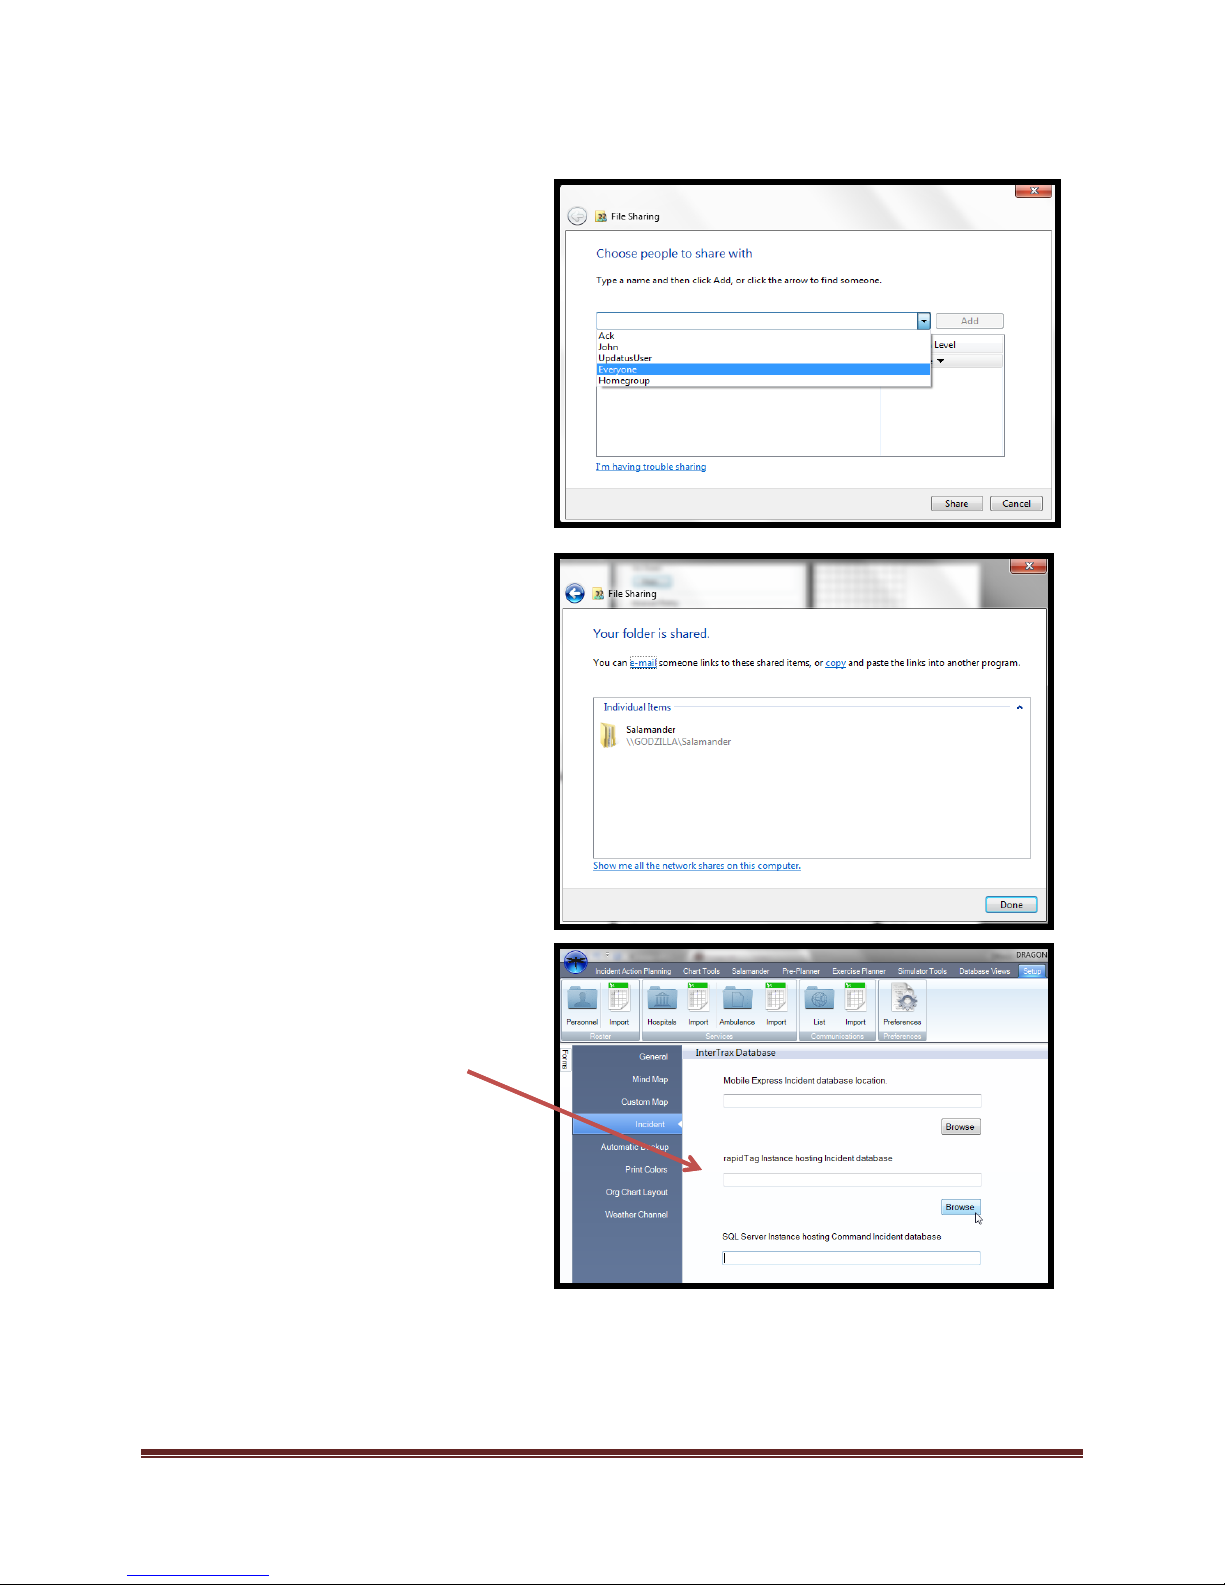
d. Select the drop down box and select
“Everyone”*
e. Select “Add”
f. Select “Share”
*By selecting “Everyone” anyone on the
network can access the database. Check
with your system Administrator if stronger
security settings for sharing are necessary.
3. Navigate to “Set-up”
a. Select “Preferences”
b. Select “Incident” module
c. Navigate to “rapiTAG™ instance
hosting Incident Database”
d. Select “Browse”
Dragonfly Manual Version 3© Page 81
Page 82
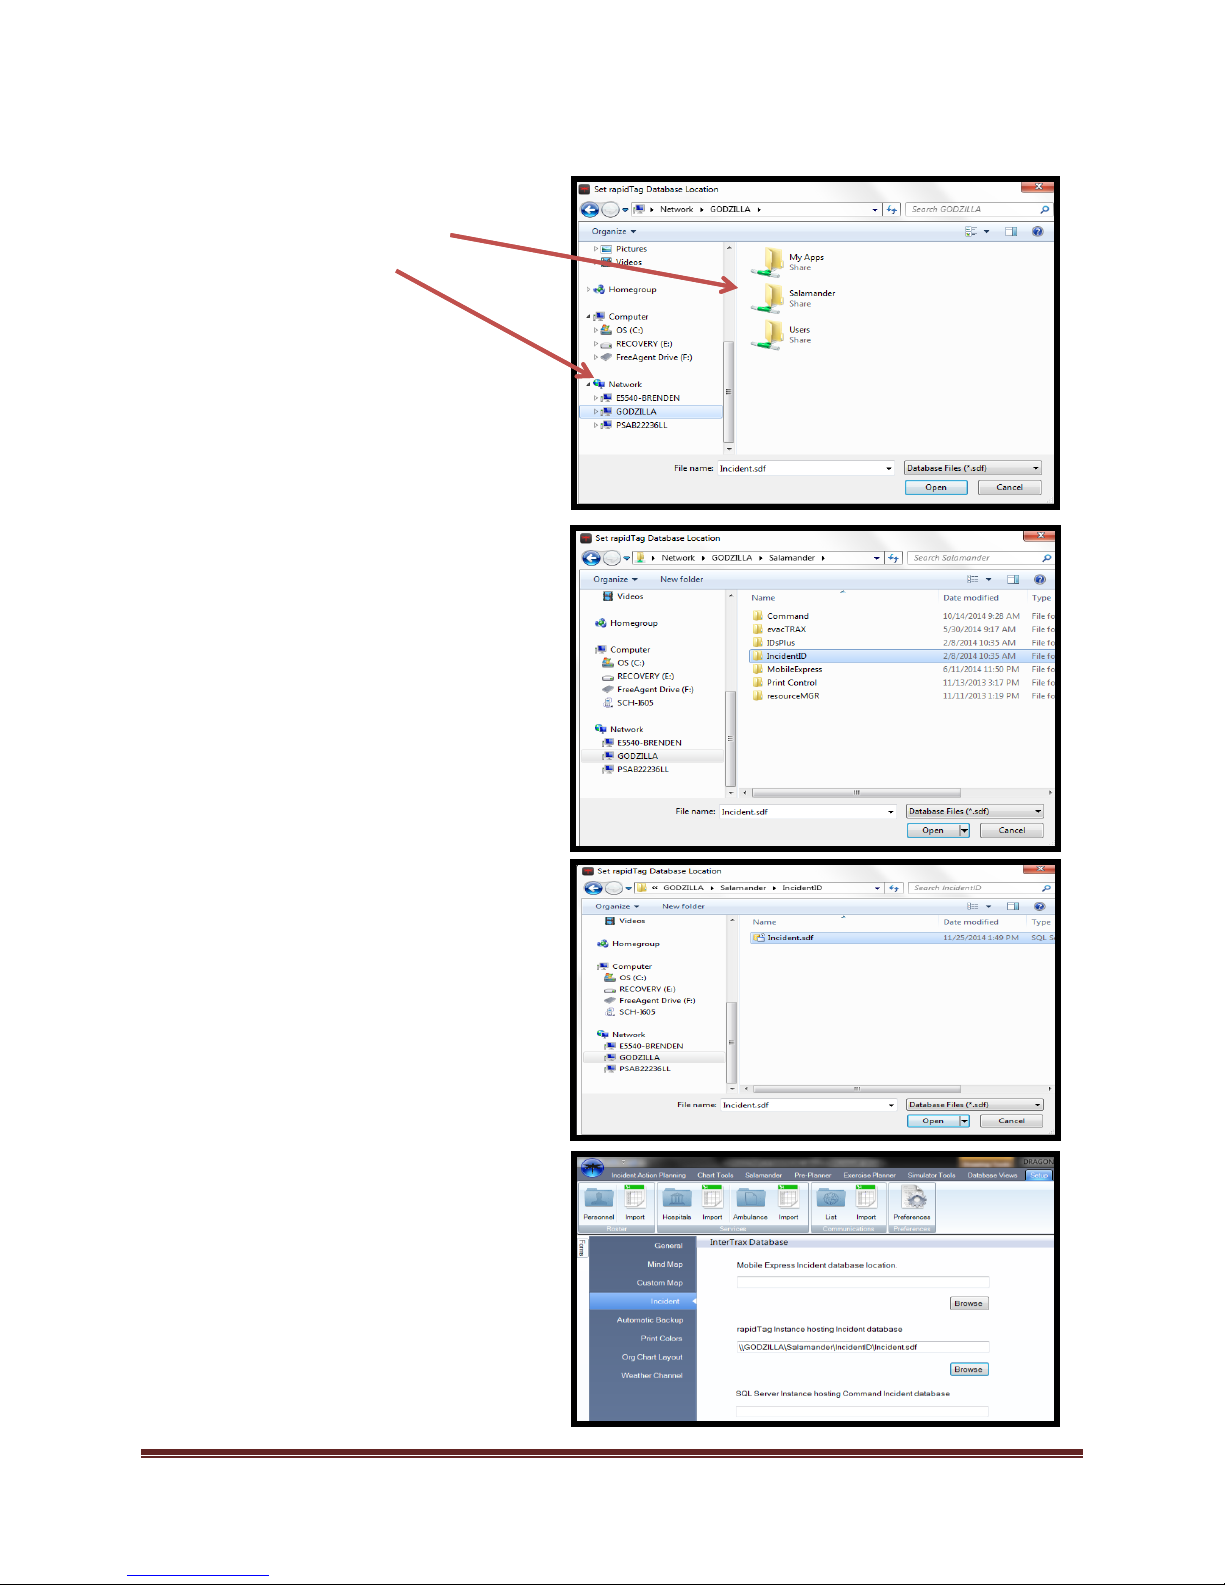
g. Select “Incident.sdf” file
h. Select “Open”
*File path is now set for importing
of data. If the “source” computer
name is changed, the file sharing
and pathways will need to be
updated. If the “source” computer
is not on the same network as the
Dragonfly™ software, the import
will fail. Now you are ready to
import.
Navigate to computer name that
the incident database in located
on. This is listed under “Network”
Dragonfly Manual Version 3© Page 82
Page 83
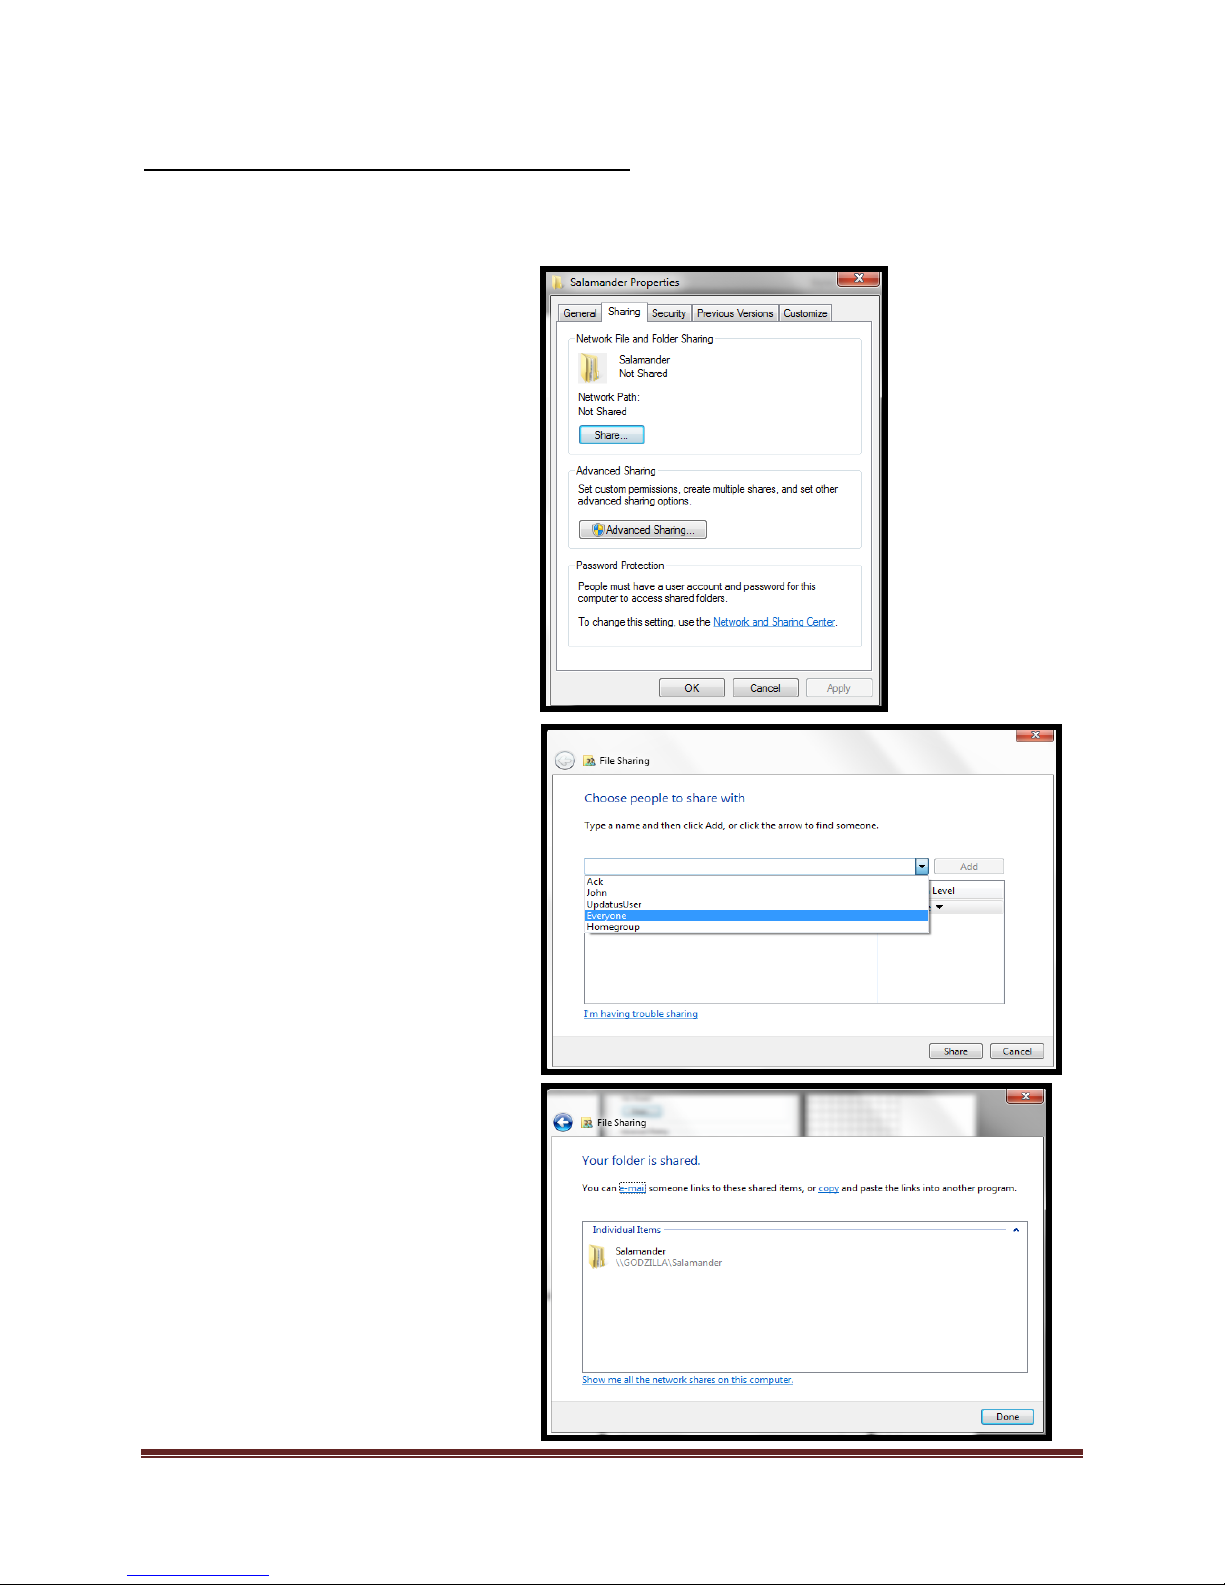
Local Connections (Networked) Mobile Express™
6. Select the drop down box and
select “Everyone”*
a. Select “Add”
b. Select “Share”
c. Sharing is complete
*By selecting “Everyone” anyone
on the network can access the
database. Check with your system
Administrator if stronger security
settings for sharing are
necessary.
4. Navigate to the following folder:
“C:\ProgramData”
a. If the “ProgramData”
folder is not visible,
contact your
“Administrator” and
have them make the
folder visible
5. Locate the “Salamander” folder
and right click the folder
a. Select “Properties”
b. Select “Sharing” tab
c. Select “Share” button
To Configure for Dragonfly to Mobile Express™ perform the following for Window 7 Operating
Systems:
Dragonfly Manual Version 3© Page 83
Page 84
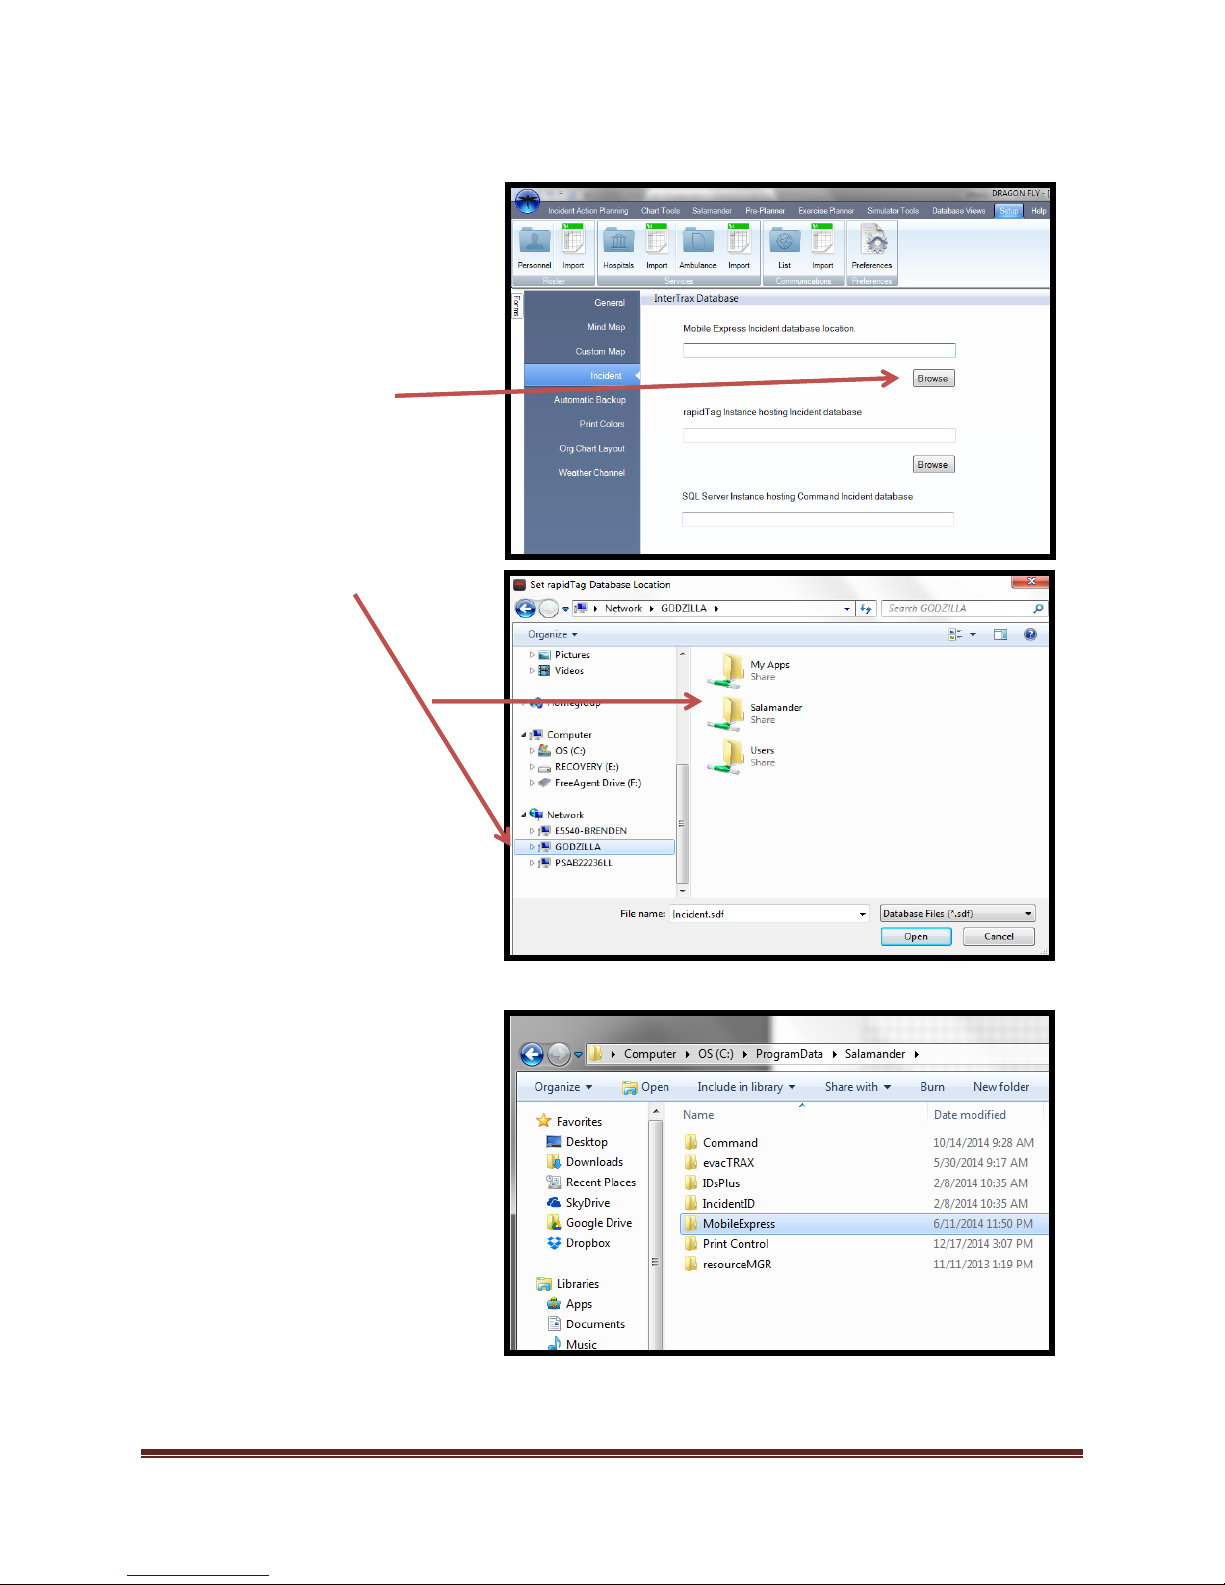
3. Navigate to “Set-up”
a. Select “Preferences”
b. Select “Incident” module
c. Navigate to “Mobile
Express™ instance hosting
Incident Database”
d. Select “Browse”
e. Navigate to computer
name that the incident
database in located on.
This is listed under
“Network”
f. Open “Salamander”
folder.
g. Select the “Mobile
Express™” folder
Dragonfly Manual Version 3© Page 84
Page 85
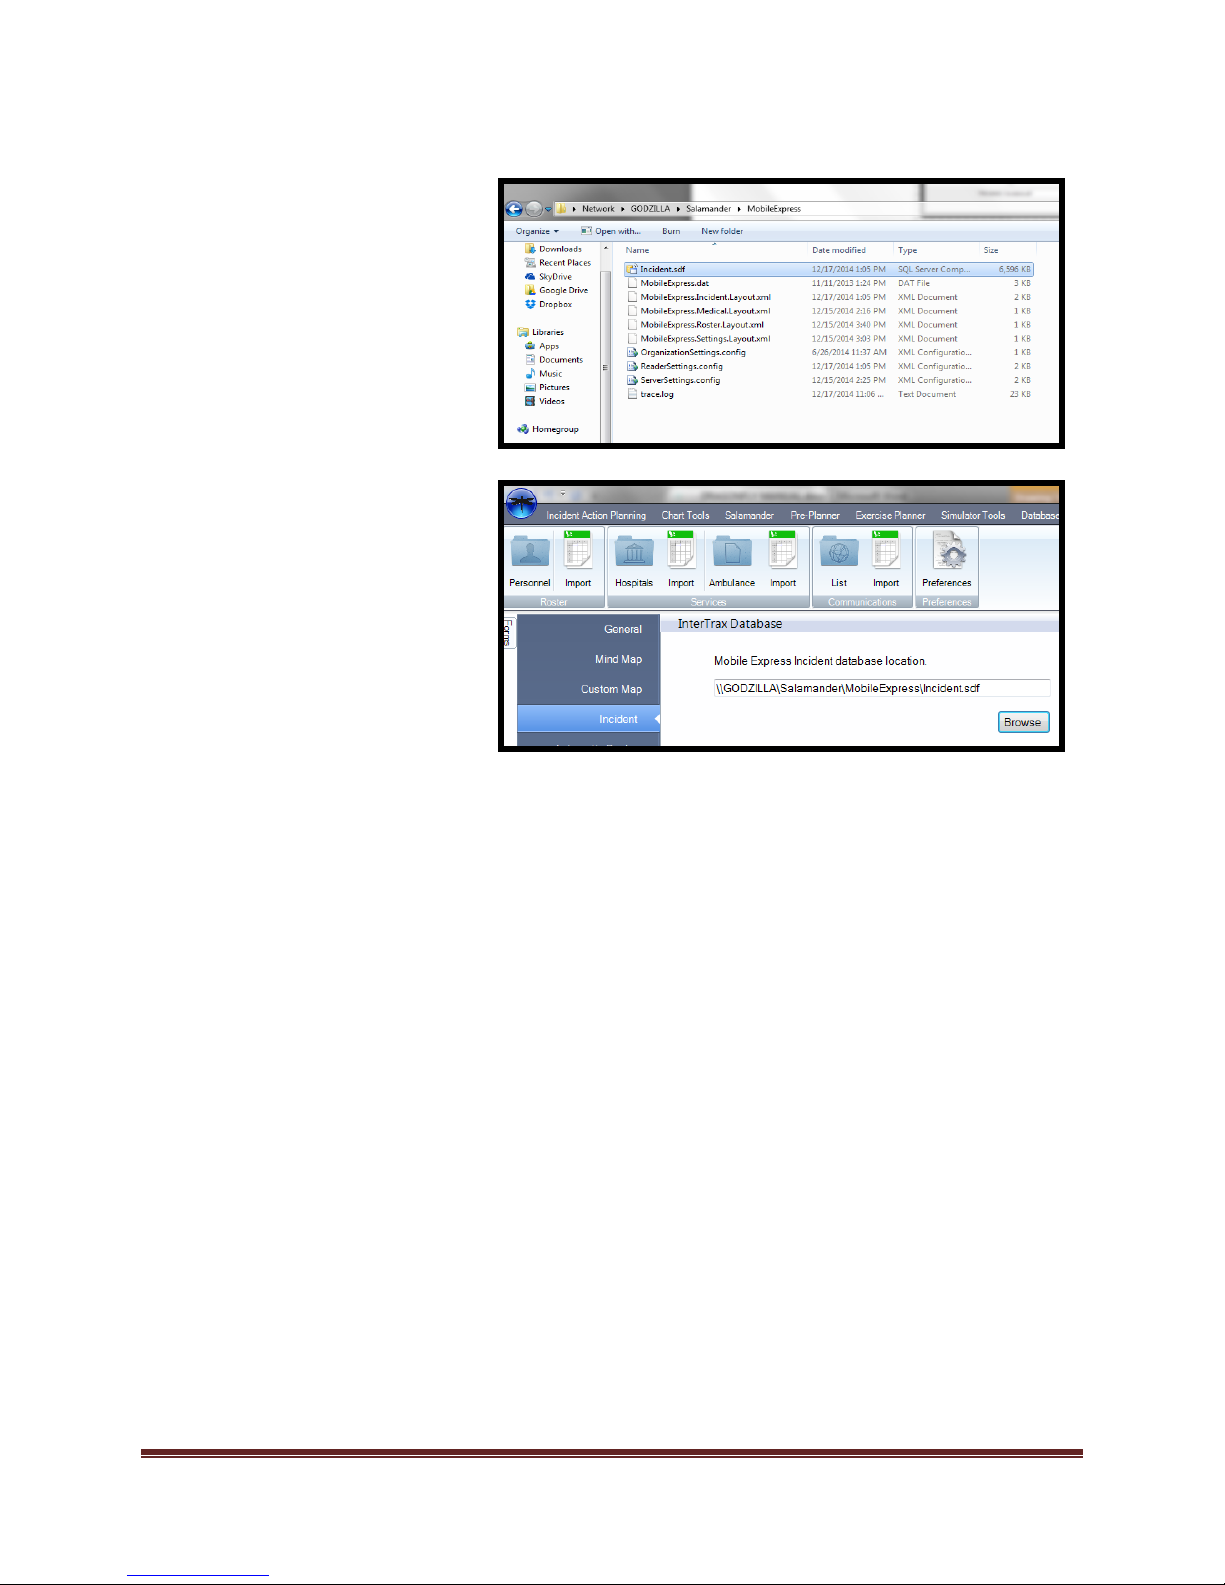
h. Select “Incident.sdf”
i. Select “Open”
*File path is now set for importing
of data. If the “source” computer
name is changed, the file sharing
and pathways will need to be
updated. If the “source” computer
is not on the same network as the
Dragonfly™ software, the import
will fail.
You are ready to import.
Dragonfly Manual Version 3© Page 85
Page 86

Salamander™ Local Connections (Networked) Command™
To Configure for Command ™Perform the Following for Window 7 Operating Systems:
On “Command” computer:
1. Open “Control Panel”, Select “Windows Firewall” and then select “Advanced Settings”.
a. On the left side, click “Inbound Rules” then select “New Rule”.
b. Select “Port” button and click “Next”
c. Select “UDP” button, select “Specific local ports” and add UDP ports 1443, 1444.
d. Click “Next” and make sure the “Domain, Private, and Public” boxes are checked
e. Click “Next”
f. Name the rule “Dragonfly pass through”. Click “Finish”
OR
g. Open “Control Panel”, select “Windows firewall”
h. On the left side, click “Turn windows firewall on or off”.
i. Turn the firewall “off ”
2. Next you will need to add a user that is the same on both computers. If it doesn't exist (it would be good
to use the current user on the Dragonfly computer).
a. Select “Windows” button, “Right” click on “Computer”, select “Manage”. This will open the
“Computer management” screen.
b. On the left side, expand “Local users and groups”.
c. On the left side, right click on “Users”.
d. Click "New user".
e. Fill out user name and password.
f. Log off current user and log on the new user.
g. Open Command (this will add the user to the SQL table and then you can login as).
On the “Dragonfly™” computer:
1. Add a user that is the same on both computers if it doesn't exist.
a. Select “Windows” button, “Right” click on “Computer”, select “Manage”. This will open the
“Computer management” screen.
b. On the left side, expand “Local users and groups”.
c. On the left side, right click on “Users”.
d. Click "New user".
e. Fill out user name and password.
f. Log off current user and log on the new user.
g. You need to be logged in as this user to use the connection.
2. Open Dragonfly™ and verify that the “Command computer, ProgramData folder, and Salamander folder is
shared.
a. Click on “Set up”.
b. Click on “Preferences”.
c. Click on “Incident”.
d. In the “SQL Server instance hosting Command Incident database” field, input the name of the
command computer followed by the SQL instance (Godzilla\SQLEXPRESS).
Dragonfly Manual Version 3© Page 86
Page 87
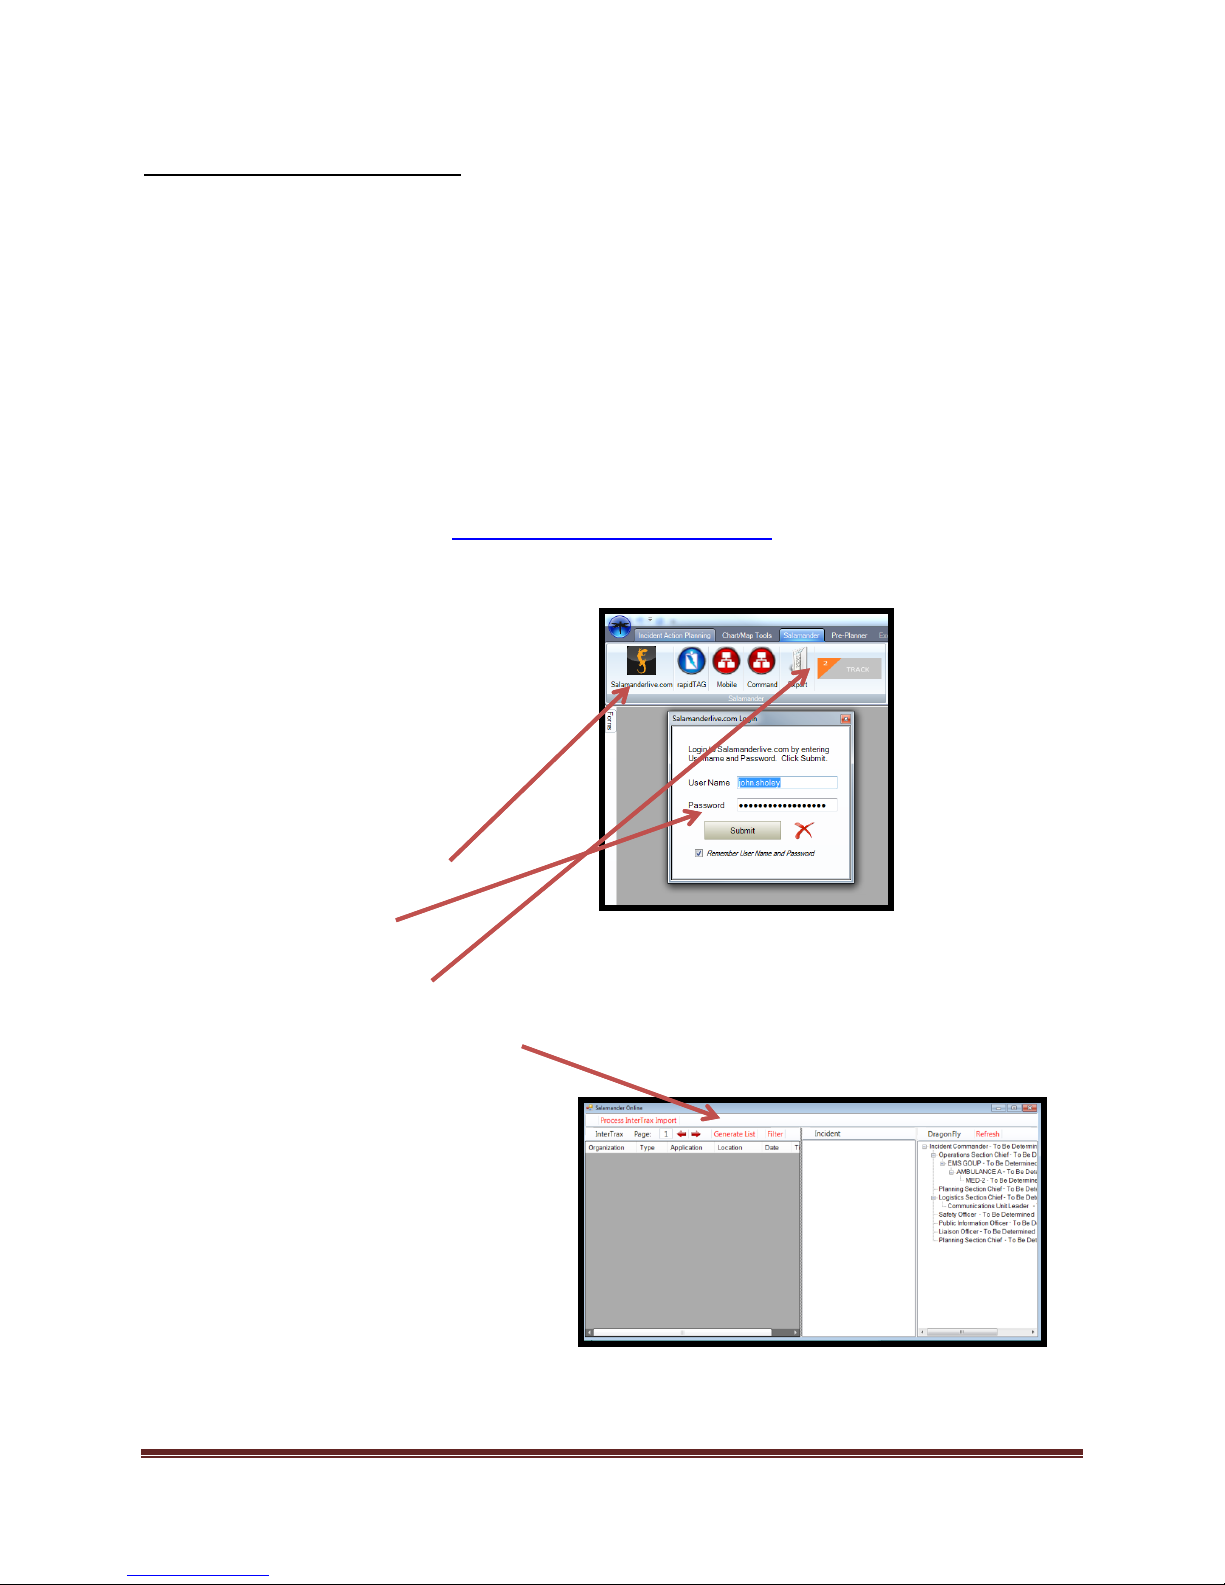
Salamanderlive Connection
To configure your copy of Dragonfly for
interTRAX connections perform the
following.
1. Contact your Dragonfly representative.
a. Representative will give you a
password that will unlock the
service.
2. Open or create a New Incident
3. Select “Salamander” tab.
4. Select the “salamanderlive.com” icon.
a. Enter your RMW “User ID and
Password”
b. Select “Submit”
5. Select the “Track” icon
6. Select “Generate list”
a. A list of incidents for the past
30 days will be populated.
b. Double click on the incident
that you want.
c. Select “assignments and
personnel”
d. Drag and drop onto Dragonfly
dashboard.
7. Select “Process interTRAX Import”
a. Set object types for each of the
assignments that you are
importing.
An instance where Dragonfly™ makes a “direct” connection to the “Incident” database located
on the salamanderlive.com web application.
The easiest and most flexible way to connect your copy of Dragonfly™ to incident related
Salamander information is through a Salamanderlive.com.
This connection can only be completed if an internet connection is available through the
Salamander™ software. Additionally, in order to use this direct connection the user must have a
Live Pass™ account and a Resource Manager license. Contact your Salamander re-seller or
Salamander Technologies direct representative for further information.
http://www.salamanderlive.com
Dragonfly Manual Version 3© Page 87
Page 88
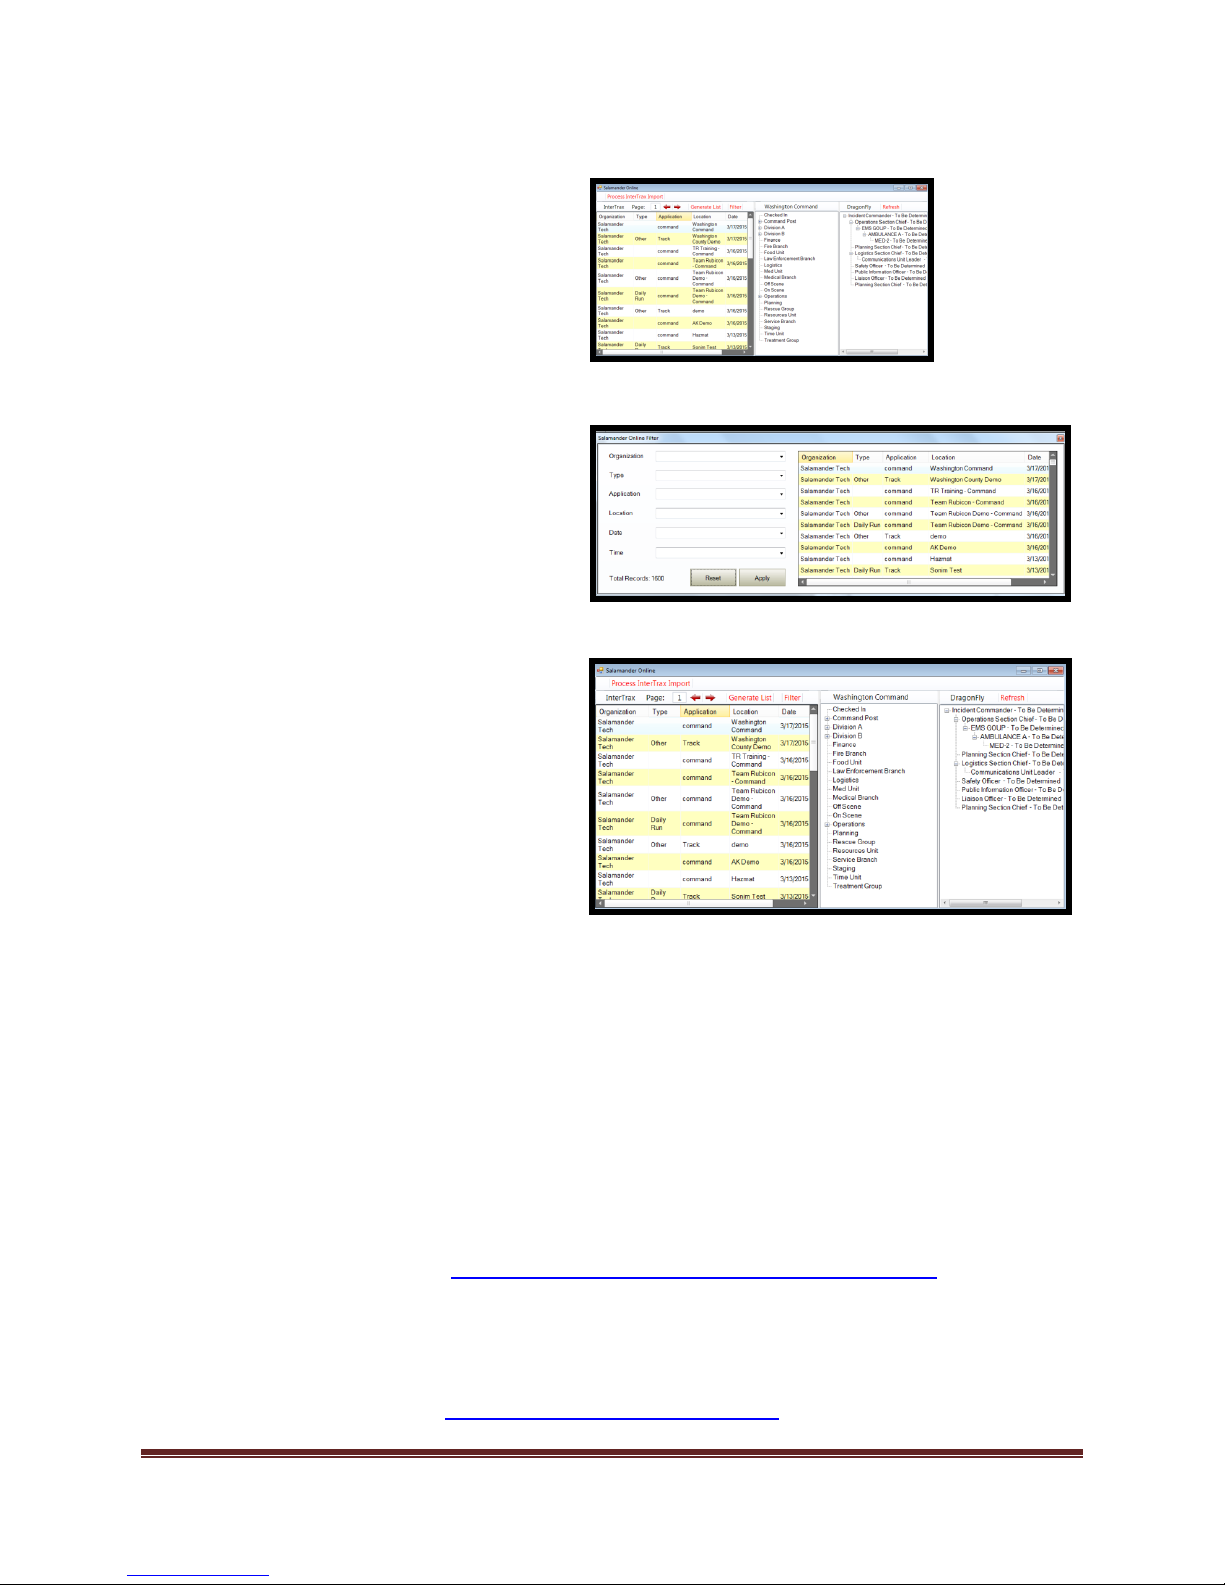
8. Make adjustments to the Organization
Chart with regard to personnel and
equipment.
-OR-
9. Select “Filter”
a. Set filters for your preferences.
10. Select incident
a. Select “assignments and
personnel”
b. Drag and drop onto Dragonfly
dashboard.
11. Select “Process interTRAX Import”
a. Set object types for each of the
assignments that you are
importing.
12. Make adjustments to the Organization
Chart with regard to personnel and
equipment.
As updates and patches are added to the software the manual will also be updated. Please look
Dragonfly Manual Version 3© Page 88
for the latest manual at www.dragonfly-360.com/information/documents
If you have any technical question please contact your Regional Technical Support Center by
visiting
www.dragonfly-360.com/contacts
 Loading...