

Page 1
www.dragino.com
LoRa Gateway User Manual ---Update:2017-02-21 1 / 44
LG01 LoRa Gateway User Manual
Document Version: 1.0
Firmware Version: IoT Mesh v3.4.0
Version
Description
Date
0.1
Initiate
2016-Oct-29
1.0
Release, Add ThingSpeak Examples
2016-Dec-9
Page 2

www.dragino.com
LoRa Gateway User Manual ---Update:2017-02-21 2 / 44
Index:
1 Introduction ............................................................................................................ 4
1.1 Overview ....................................................................................................... 4
1.2 What is LG01 ................................................................................................. 4
1.3 Specifications ................................................................................................ 4
1.4 Features ........................................................................................................ 6
1.5 System Structure .......................................................................................... 6
1.6 Applications .................................................................................................. 7
1.7 Hardware Variants ........................................................................................ 8
2 Quick Start Guide .................................................................................................... 9
2.1 Access and config LG01 ................................................................................ 9
2.2 Program microcontroller. ............................................................................ 10
2.2.1 Download and configure Arduino IDE.............................................. 10
2.2.2 Upload a sketch in the MCU............................................................. 12
2.3 Simple LoRa wireless example .................................................................... 14
2.3.1 Installing LoRa Library ...................................................................... 14
2.3.2 Upload LoRa Server Sketch .............................................................. 15
2.3.3 Upload LoRa Client Sketch ............................................................... 15
3 Typical Network Setup .......................................................................................... 16
3.1 Overview ..................................................................................................... 16
3.2 General WiFi AP Network ........................................................................... 17
3.3 WAN Port Internet Mode ........................................................................... 18
3.4 WiFi Client Mode ........................................................................................ 18
3.5 Mesh WiFi Network .................................................................................... 19
3.5.1 Mesh Gateway Set Up ...................................................................... 19
3.5.2 Mesh Client Set Up ........................................................................... 21
3.6 USB Dial Up Modem Set Up ....................................................................... 23
3.7 USB 3G/4G Ethernet Dongle ...................................................................... 24
4 Linux System.......................................................................................................... 25
4.1 SSH Access for Linux console ...................................................................... 25
4.2 Edit and Transfer files ................................................................................. 26
4.3 File System .................................................................................................. 26
4.4 Package maintain system............................................................................ 27
5 Bridge Library ........................................................................................................ 28
6 Advance Management .......................................................................................... 29
6.1 Reset Network or Reset to Factory Default ................................................ 29
7 Upgrade Firmware ................................................................................................ 30
7.1 Upgrade via Web UI .................................................................................... 30
7.2 Upgrade via Linux console .......................................................................... 30
Page 3

www.dragino.com
LoRa Gateway User Manual ---Update:2017-02-21 3 / 44
8 Auto-Provisioning .................................................................................................. 31
9 Advance Examples ................................................................................................ 31
9.1 Upstream: Get data from LoRa node and send to IoT server .................... 31
9.1.1 Set up hardware ............................................................................... 31
9.1.2 Set up IoT Server account ................................................................ 31
9.1.3 Upload sketches ............................................................................... 32
9.1.4 Check Result ..................................................................................... 32
9.2 Downstream: Get data from IoT Server and send to LoRa node ............... 33
9.2.1 Set up Hardware .............................................................................. 33
9.2.2 Set up talkback command ................................................................ 33
9.2.3 Upload sketches ............................................................................... 34
9.2.4 Check Result ..................................................................................... 34
9.3 Multiple Nodes examples ........................................................................... 35
9.4 More Examples ........................................................................................... 36
10 FAQ ................................................................................................................. 37
10.1 Why there is 433/868/915 version LoRa part? ....................................... 37
10.2 What is the frequency range of LG01 LoRa part? ................................... 37
10.3 How may nodes can the LG01 support? ................................................. 37
10.4 What kind of Server the LG01 can support? ........................................... 37
10.5 Can I make my own firmware for LG01? Where can I find the source
code of LG01? ...................................................................................................... 38
11 Trouble Shooting ............................................................................................ 39
11.1 I can’t download the Dragino profile in Arduino IDE. ............................. 39
11.2 Bridge between MCU and Linux module doesn’t work. ......................... 40
11.3 Arduino IDE doesn’t detect LG01 ............................................................ 40
11.4 I get kernel error when install new package, how to fix? ....................... 40
11.5 How to recover the LG01 if firmware crash ............................................ 41
12 Order Info ....................................................................................................... 42
13 Packing Info .................................................................................................... 42
14 Support........................................................................................................... 42
15 Reference ....................................................................................................... 44
Page 4
www.dragino.com
LoRa Gateway User Manual ---Update:2017-02-21 4 / 44
1 Introduction
1.1 Overview
1.2 What is LG01
The LG01 is an open source single channel LoRa Gateway. It lets you bridge LoRa wireless
network to an IP network base on WiFi, Ethernet, 3G or 4G cellular. LG01 runs on open source
embedded Linux system; it has USB host port and has full Ethernet and 802.11 b/g/n WiFi
capabilities. The USB host port can be used to connect cellular modules so LG01 is very flexible to
bridge LoRa Network to different kinds of network to fit user’s requirement.
1.3 Specifications
Hardware System:
Linux Part:
400Mhz ar9331 processor
64MB RAM
16MB Flash
MCU Part:
MCU: ATMega328P
Flash: 32KB
SRAM: 2KB
EEPROM: 1KB
Interface:
Power Input: 9 ~ 24v DC
2 x RJ45 ports
USB 2.0 Host port x 1
Internal USB 2.0 Host Interface x 1
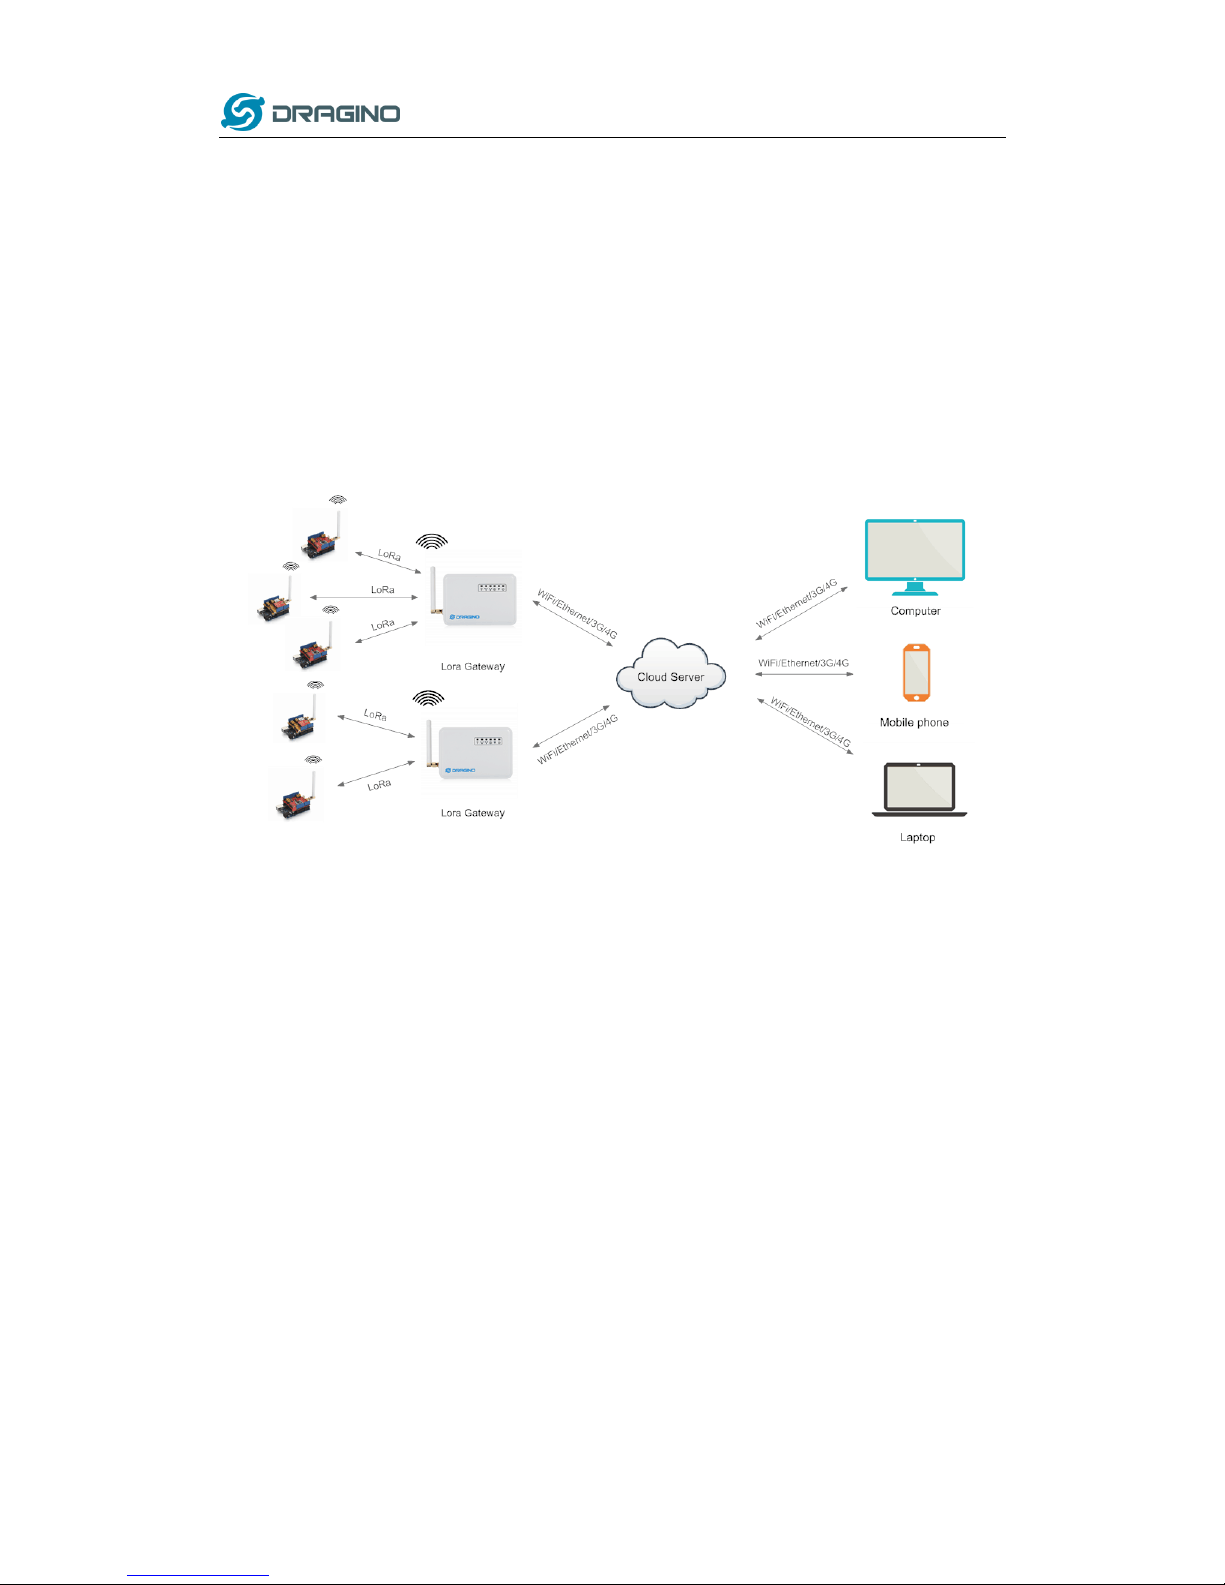
LG01 in an IoT Network
Page 5

www.dragino.com
LoRa Gateway User Manual ---Update:2017-02-21 5 / 44
WiFi Spec:
IEEE 802.11 b/g/n
Frenquency Band: 2.4 ~ 2.462GHz
Tx power:
11n tx power : mcs7/15: 11db mcs0 : 17db
11b tx power: 18db
11g 54M tx power: 12db
11g 6M tx power: 18db
Wifi Sensitivity
11g 54M : -71dbm
11n 20M : -67dbm
LoRa Spec:
Frequency Range:
Band 1 (HF): 862 ~ 1020 Mhz
Band 2 (LF): 410 ~ 528 Mhz
Band 3 (LF): 137 ~ 175 Mhz
168 dB maximum link budget.
+20 dBm - 100 mW constant RF output vs.
+14 dBm high efficiency PA.
Programmable bit rate up to 300 kbps.
High sensitivity: down to -148 dBm.
Bullet-proof front end: IIP3 = -12.5 dBm.
Excellent blocking immunity.
Low RX current of 10.3 mA, 200 nA register retention.
Fully integrated synthesizer with a resolution of 61 Hz.
FSK, GFSK, MSK, GMSK, LoRaTM and OOK modulation.
Built-in bit synchronizer for clock recovery.
Preamble detection.
127 dB Dynamic Range RSSI.
Automatic RF Sense and CAD with ultra-fast AFC.
Packet engine up to 256 bytes with CRC.
Built-in temperature sensor and low battery indicator.
Page 6
www.dragino.com
LoRa Gateway User Manual ---Update:2017-02-21 6 / 44
1.4 Features
Open source Linux (OpenWrt) inside. User can modify or compile the firmware with
custom features and own brand.
Low power consumption.
Compatible with Arduino IDE 1.5.4 or later, user can program, debug or upload sketch
to the MCU via Arduino IDE.
Managed by Web GUI, SSH via LAN or WiFi.
Software upgradable via network.
Auto-Provisioning.
Built-in web server.
Support internet connection via LAN port, WiFi or 3G /4G dongle.
Failsafe design provides robustly system.
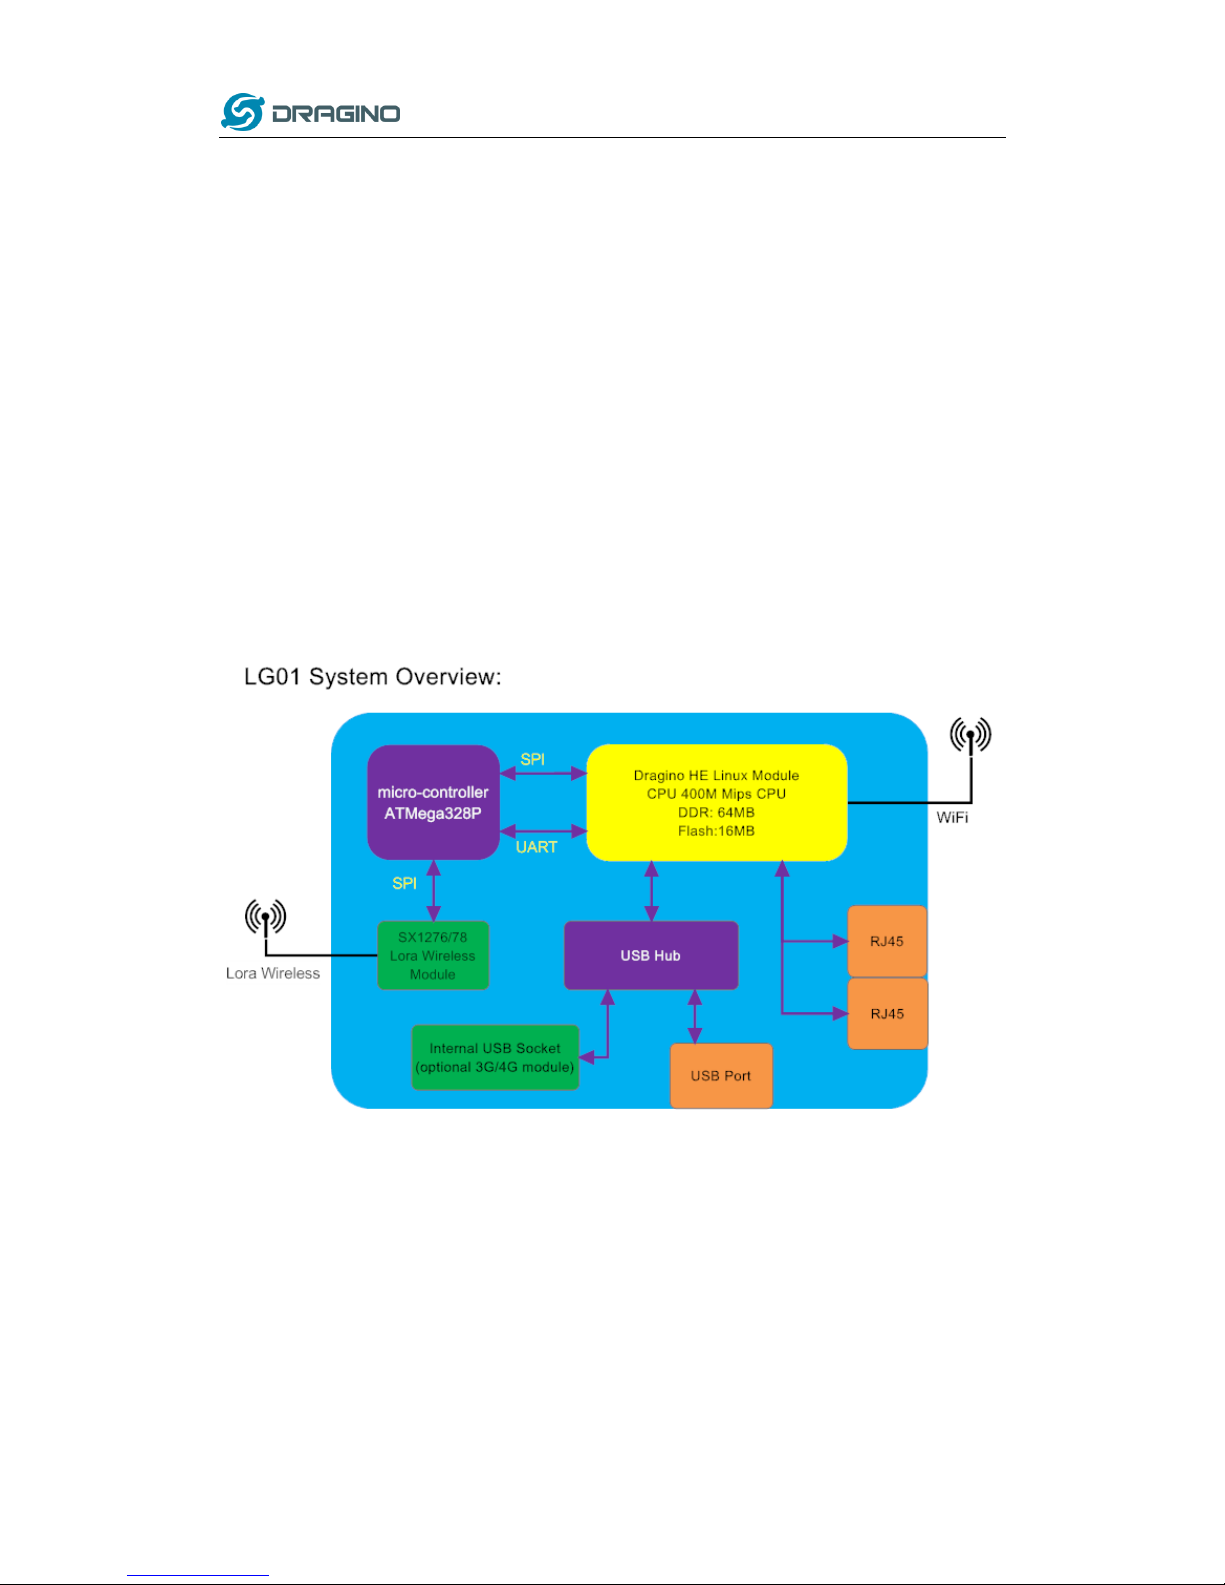
1.5 System Structure
Page 7
www.dragino.com
LoRa Gateway User Manual ---Update:2017-02-21 7 / 44
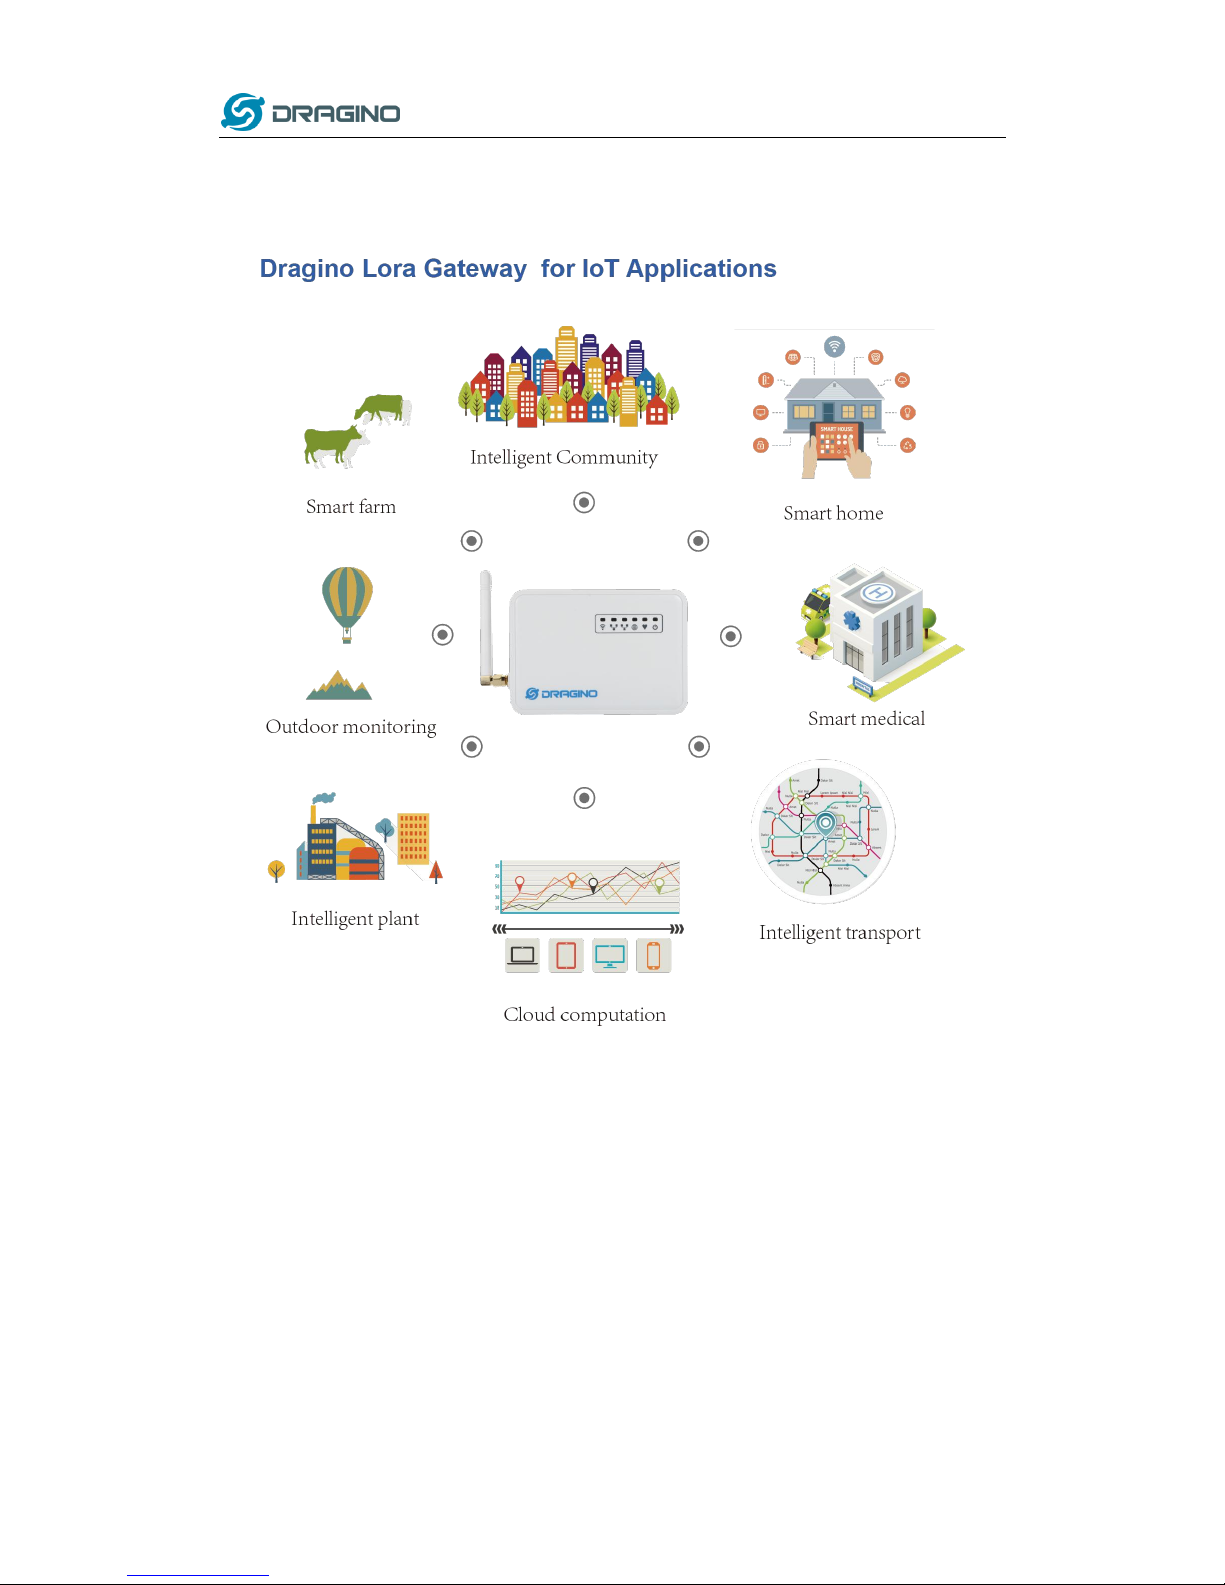
1.6 Applications
Page 8
www.dragino.com
LoRa Gateway User Manual ---Update:2017-02-21 8 / 44
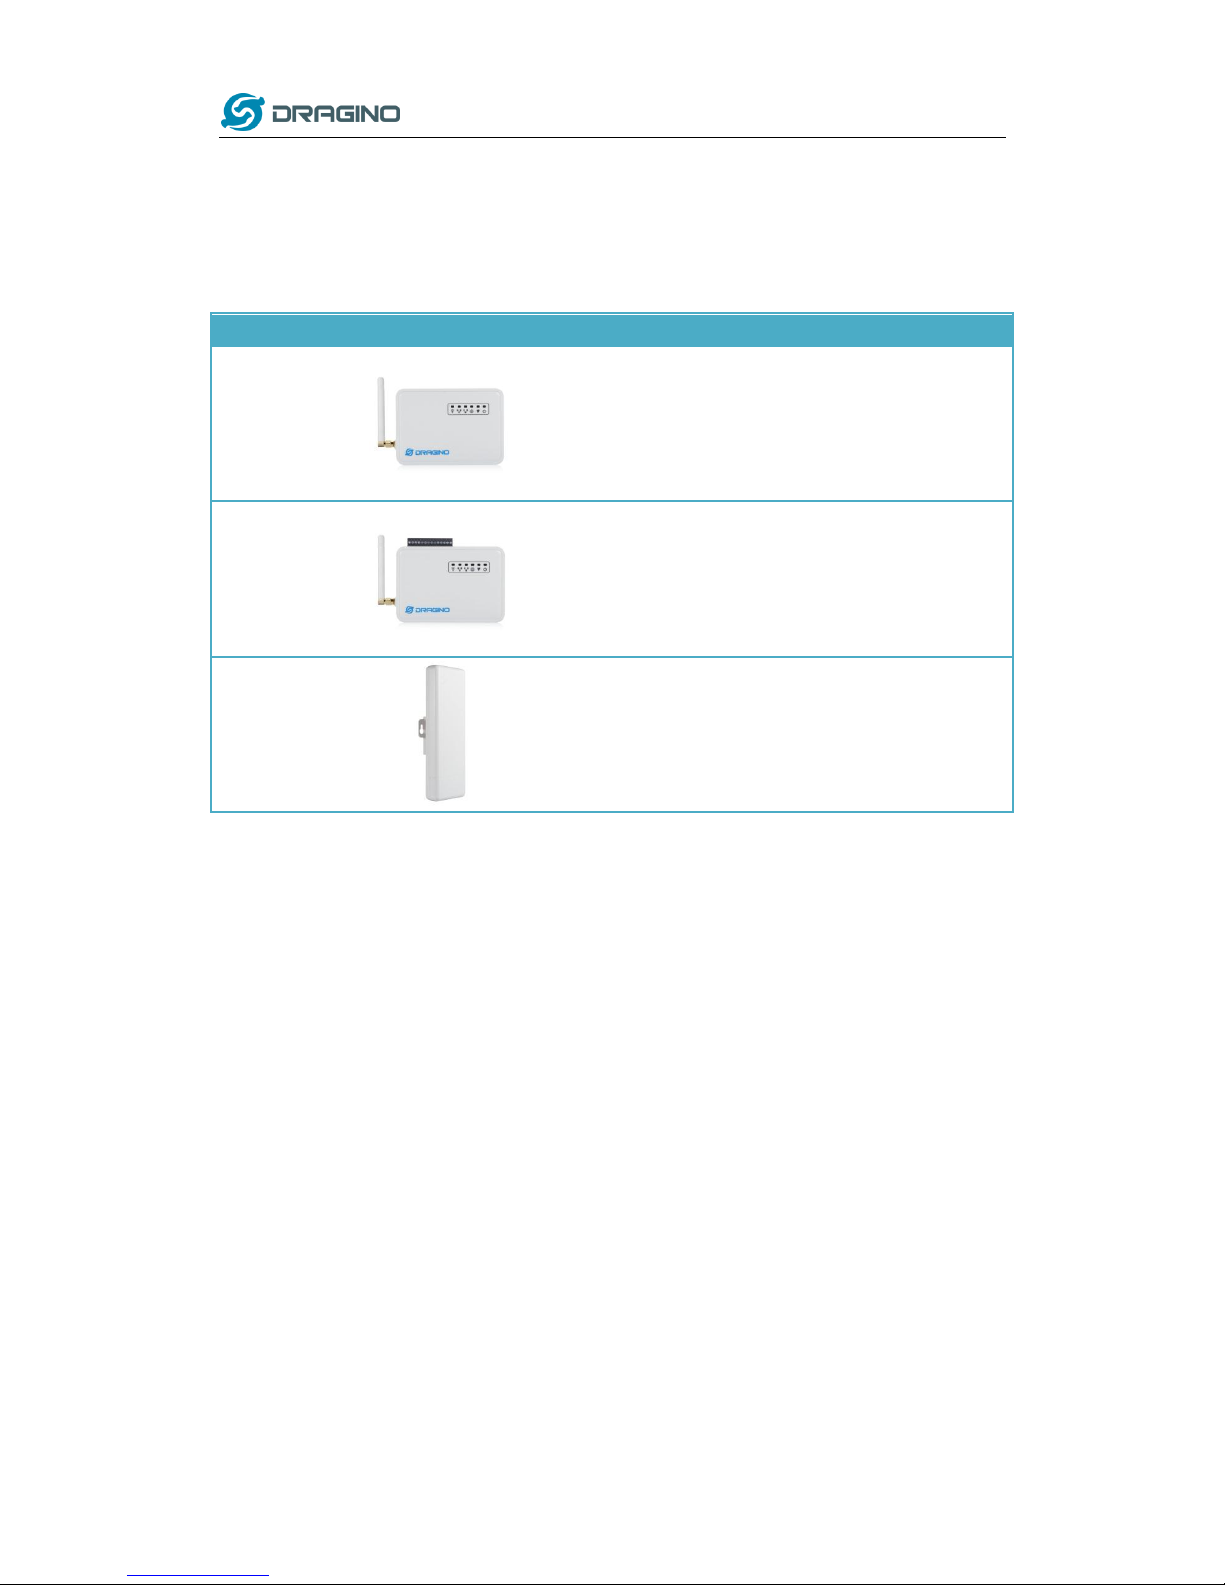
1.7 Hardware Variants
There are different LG01 variants for difference applications. Below table shows the difference
between these models.
Model
Photo
Description
LG01-P
The most general version can be used as a LoRa
Gateway.
LG01-S
Include screw terminal which can connect to external
sensors
OLG01
Our door version, this version doesn’t include LoRa
antenna, instead, it has a SMA connector, user can
connect it to a high gain LoRa antenna.
It can be powered by a passive PoE adapter.
Page 9
www.dragino.com
LoRa Gateway User Manual ---Update:2017-02-21 9 / 44
2 Quick Start Guide
2.1 Access and config LG01
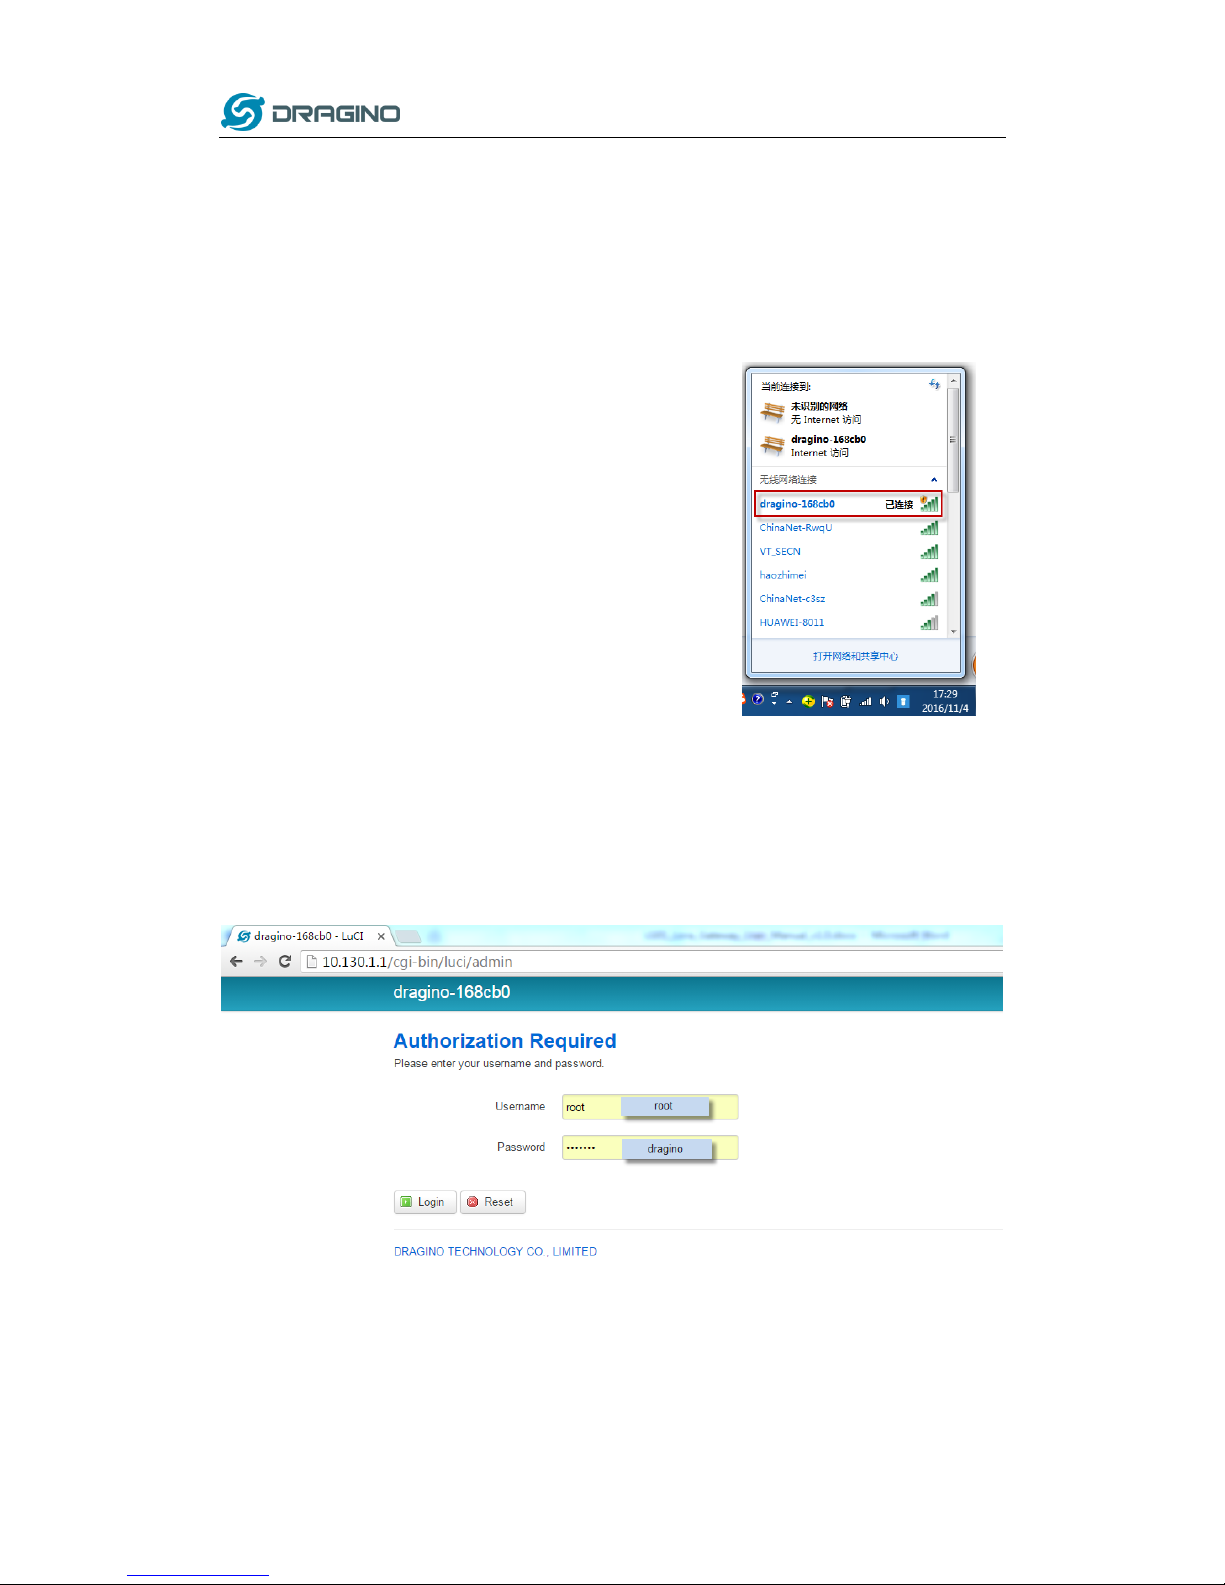
The LG01 is configured as a WiFi AP by factory default. User can access and configure the LG01
after connect to its WiFi network.
At the first boot of LG01, it will auto generate an unsecure
WiFi network call dragino2-xxxxxx
User can use the laptop to connect to this WiFi network. The
laptop will get an IP address 10.130.1.xxx and the LG01 has the
default IP 10.130.1.1
Open a browser in the laptop and type 10.130.1.1
User will see the login interface of LG01.
The account for Web Login is:
User Name: root
Password: dragino
Page 10
www.dragino.com
LoRa Gateway User Manual ---Update:2017-02-21 10 / 44
2.2 Program microcontroller.
The MCU (microcontroller) M328P is used to communicate with LoRa Radio part and Dragino
Linux module. The program language for the MCU is based on C and program tool is Arduino IDE.
Below the way shows how to do program it.
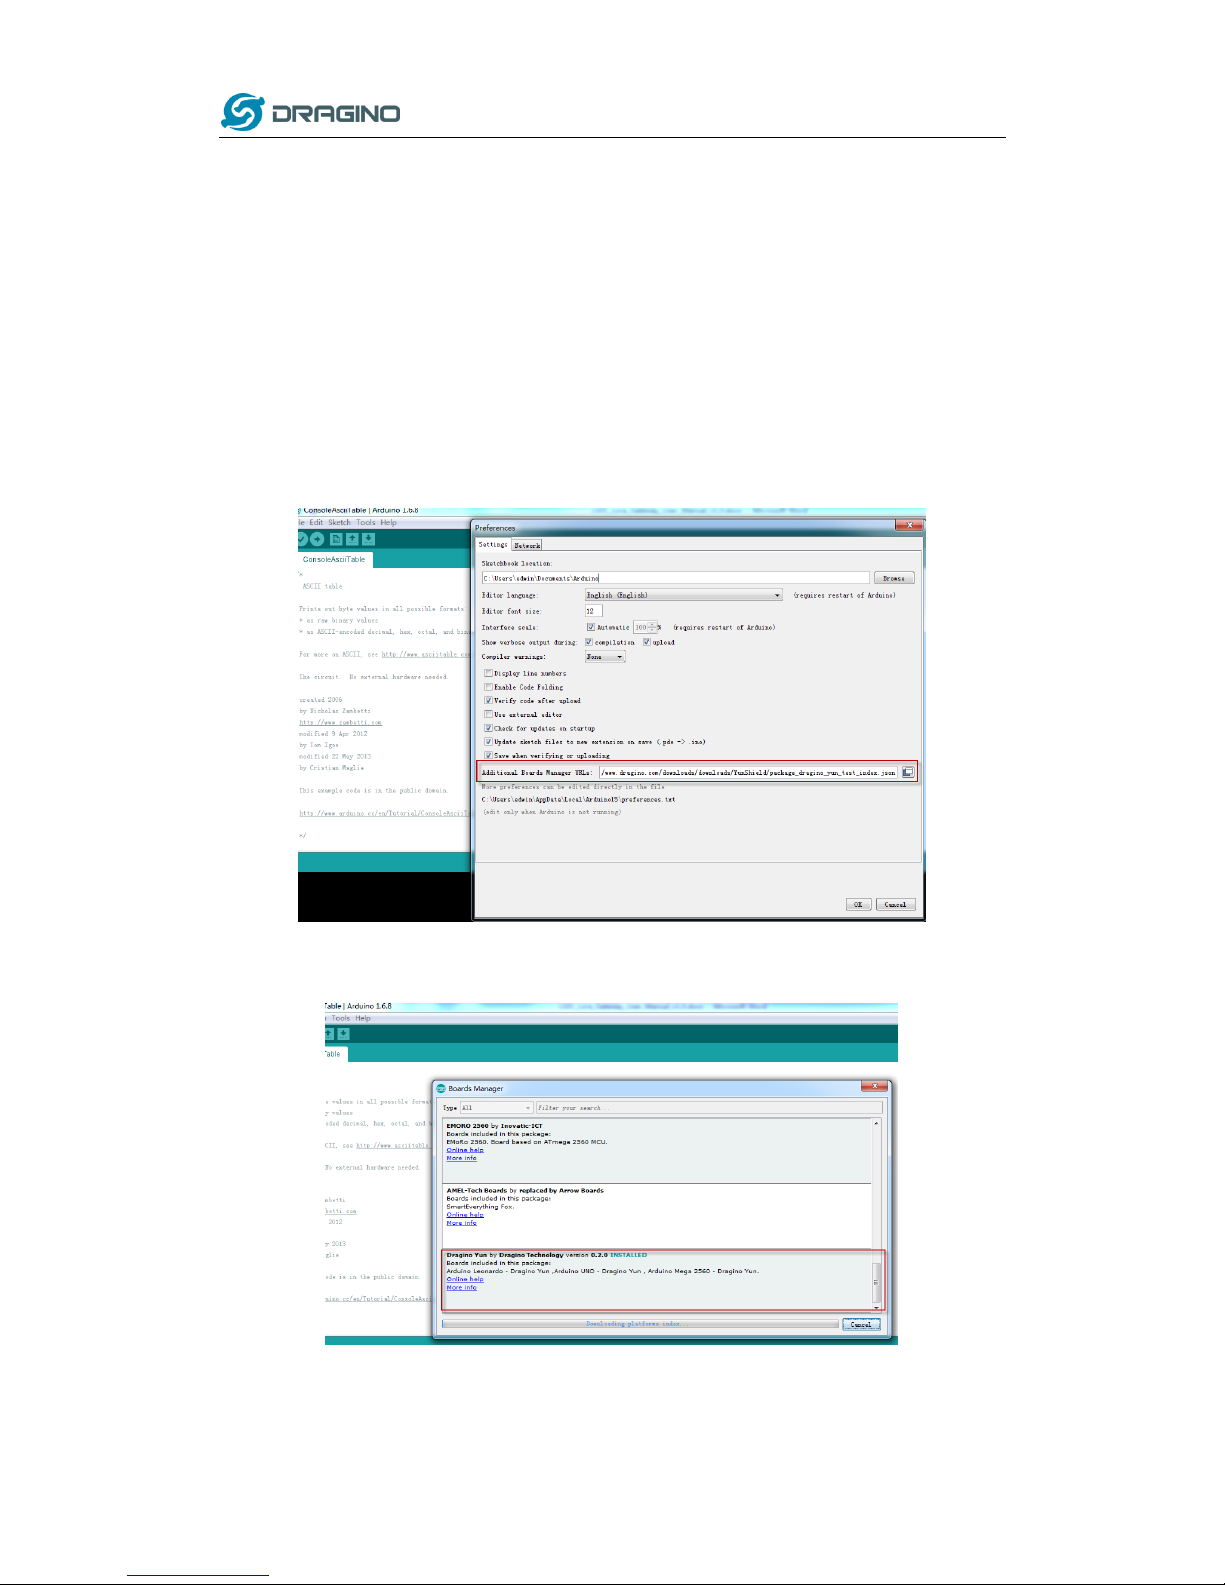
2.2.1 Download and configure Arduino IDE
Download the latest Arduino Software(IDE) from Arduino official site:
https://www.arduino.cc/en/Main/Software
Install the IDE in the PC, open it and click File --> Preference, add below URL
http://www.dragino.com/downloads/downloads/YunShield/package_dragino_yun_test_index.js
on in the Additional Boards Manager URLs.
Go to tools --> Boards --> Boards Manager, find Dragino boards info and install it.
Page 11
www.dragino.com
LoRa Gateway User Manual ---Update:2017-02-21 11 / 44
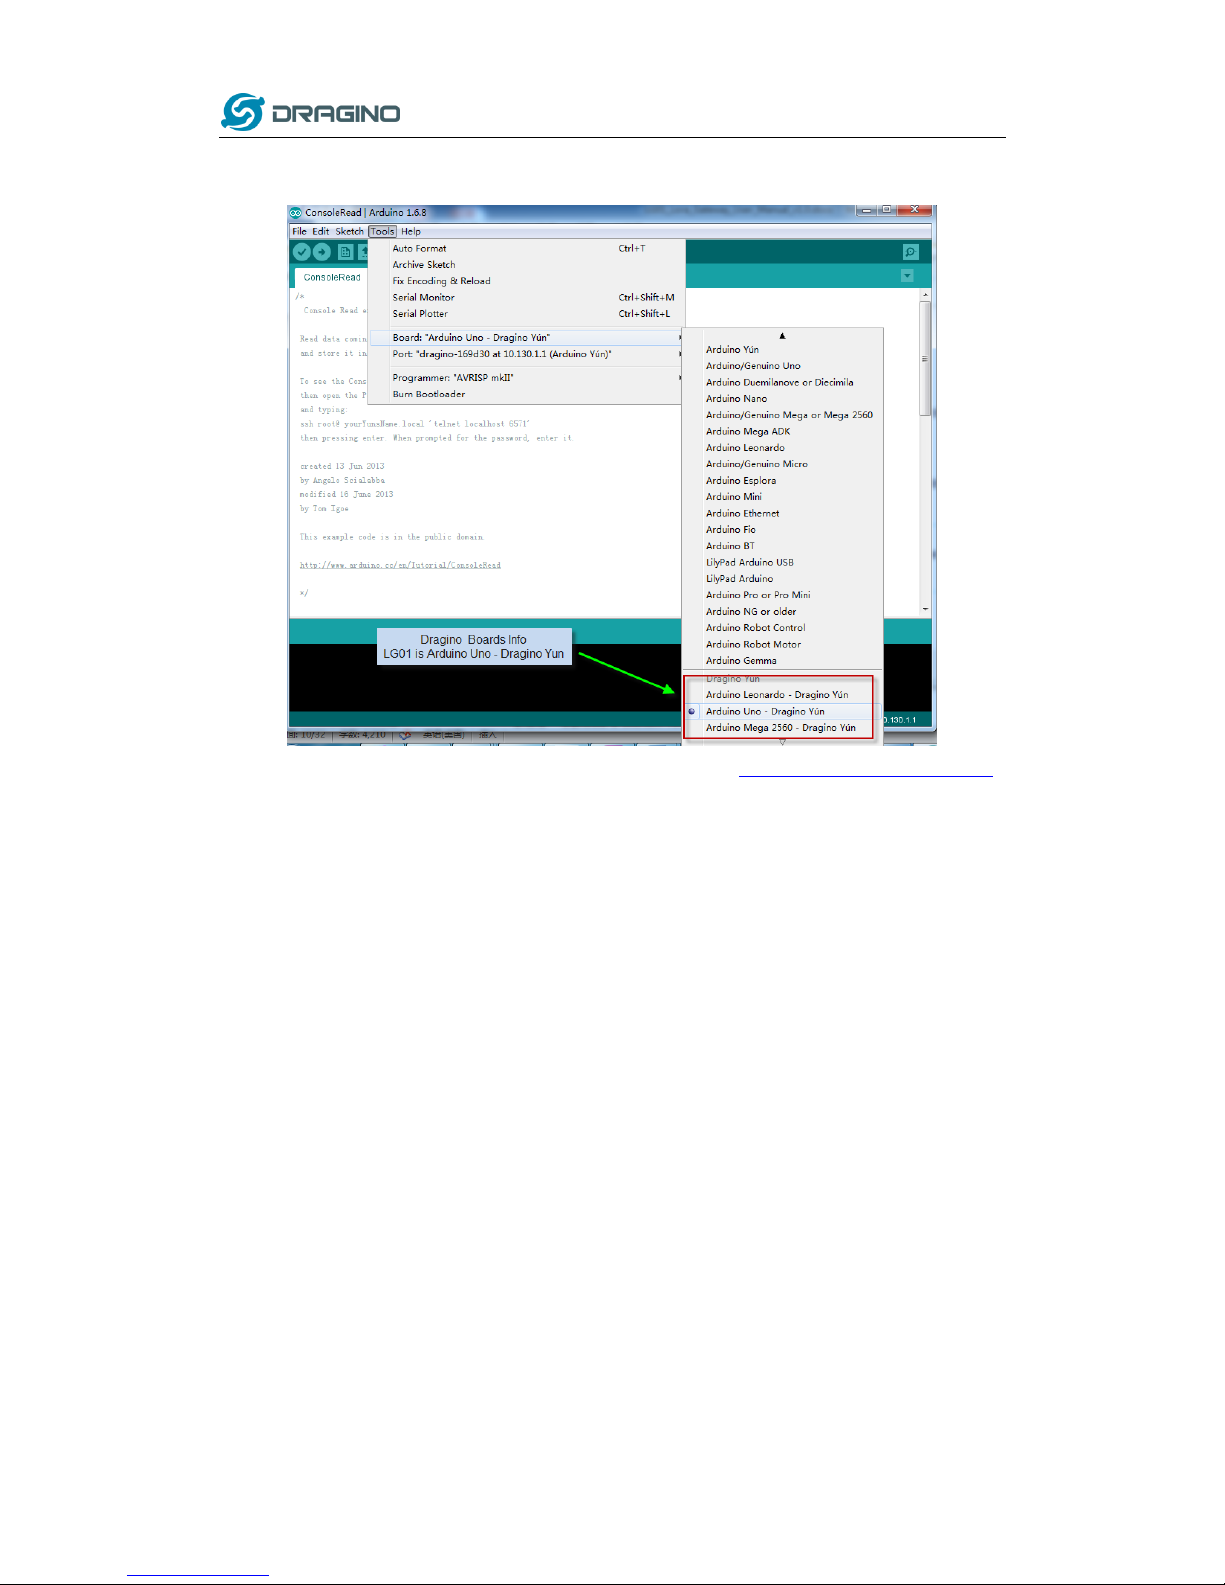
After install Dragino’s board info in the IDE, we can see the boards info from the IDE, as
below screenshot. For LG01, we should choose: Arduino Uno – Dragino Yun.
Note: If user has trouble to install via Board Manager. User can manually add the board profile.
Page 12
www.dragino.com
LoRa Gateway User Manual ---Update:2017-02-21 12 / 44
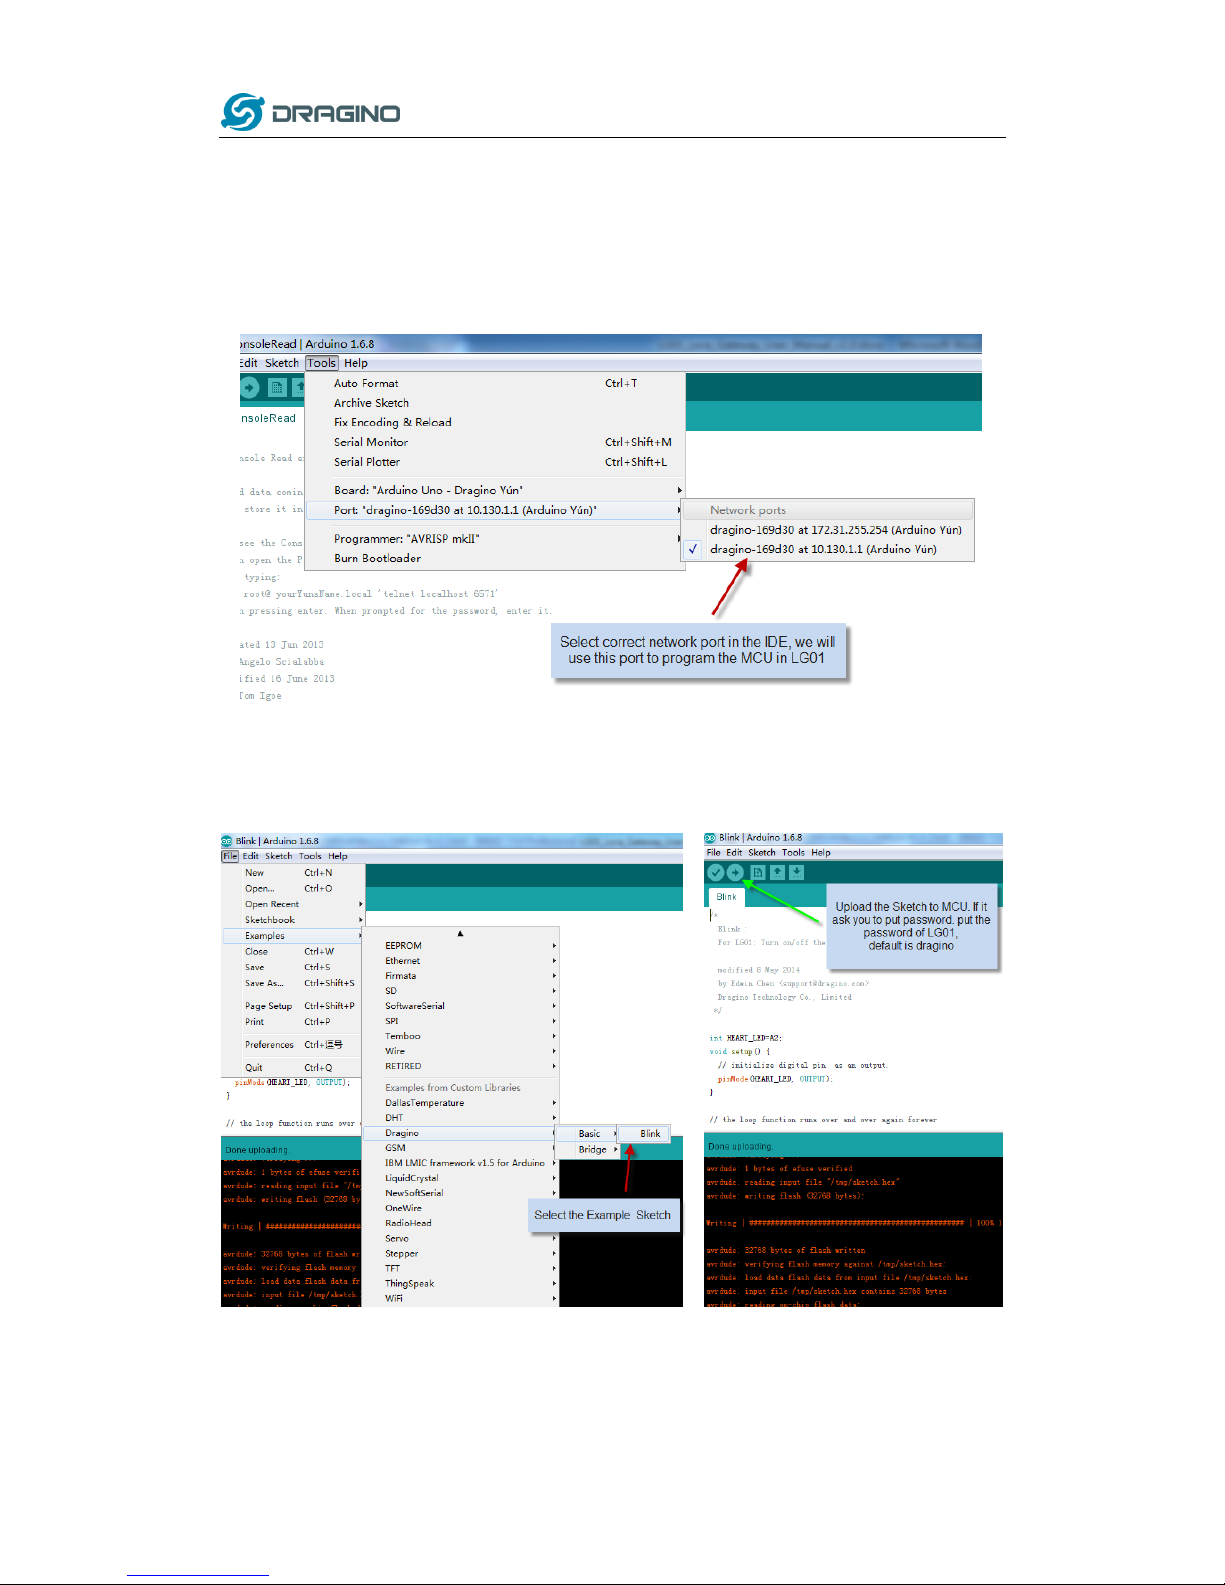
2.2.2 Upload a sketch in the MCU
For the very start, we can try to upload a simple sketch to the MCU and see how it works.
Make sure your computer and the LG01 is in the same network, if you already connect to
the LG01 WiFi SSID, then both devices are in the same WiFi network. In the IDE, select the
correct port as below screenshot.
Select the example from IDE --> File --> Examples --> Dragino --> Basic --> Blink
Click Upload to upload the sketch to LG01, the LG01 may ask you password to upload, if so,
type the password of LG01.
Page 13

www.dragino.com
LoRa Gateway User Manual ---Update:2017-02-21 13 / 44
Check result
The blink sketch will set the A2 pin of the MCU to periodically high and low. This pin
connects to the HEART LED of the LG01. So if successfully upload this sketch, user can see
the HEART LED turn on and turn off periodically.
Page 14
www.dragino.com
LoRa Gateway User Manual ---Update:2017-02-21 14 / 44
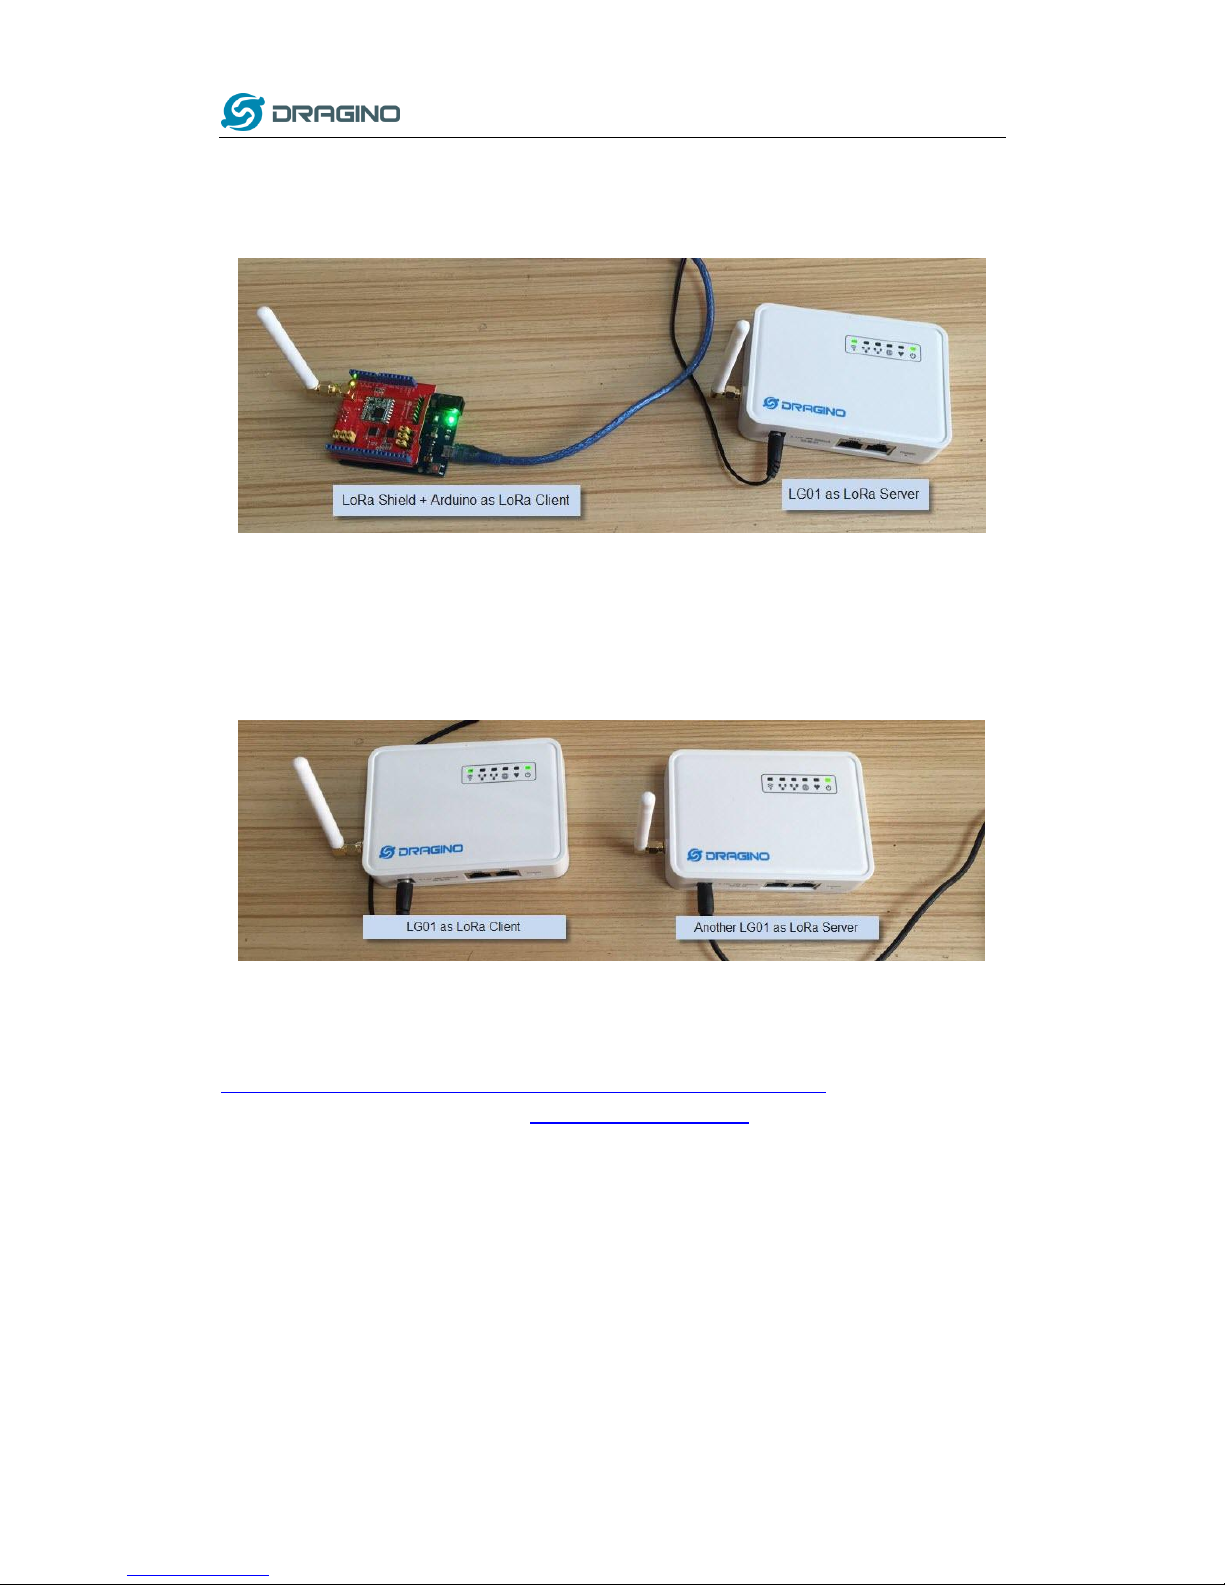
2.3 Simple LoRa wireless example
To test LoRa wireless, we at least need 2 devices support LoRa. In this example we will use below
devices:
LoRa Server: LG01 ; LoRa Client: LoRa Shield + Arduino Uno
Or
LoRa Server: LG01 ; LoRa Client: LG01
Above two combination will shows the same LoRa feature, we provide different devices examples
in LoRa Client which is for user convenient only.
2.3.1 Installing LoRa Library
The Library used here is Radiohead Library, Which can be download from
http://www.airspayce.com/mikem/arduino/RadioHead/RadioHead-1.63.zip . unzip it and put it in
the Arduino Library Folder. Reference: Installing Library in Arduino
Page 15

www.dragino.com
LoRa Gateway User Manual ---Update:2017-02-21 15 / 44
2.3.2 Upload LoRa Server Sketch
Select the example from:
IDE --> File --> Examples --> Dragino --> LoRa --> LoRa_Simple_Server_Yun
Upload this Sketch to the LG01, then open the serial monitor to monitor the LG01 status, as
below screenshot
2.3.3 Upload LoRa Client Sketch
For LoRa Shield + Arduino as LoRa Client:
Select the example from:
IDE --> File --> Examples --> Dragino --> LoRa --> LoRa_Simple_Client_Arduino
Upload it to Arduino board, and open the serial monitor , you will get as below screenshot.
For another LG01 as LoRa Client:
Method is same as above, but the example sketch is:
IDE --> File --> Examples --> Dragino --> LoRa --> LoRa_Simple_Client_Yun
Page 16

www.dragino.com
LoRa Gateway User Manual ---Update:2017-02-21 16 / 44
3 Typical Network Setup
3.1 Overview
LG01 support flexible network set up for different environment. This section describes the typical
network topology can be set in LG01. The typical network set up includes:
WAN Port Internet Mode
WiFi Client Mode
WiFi AP Mode
Mesh WiFi Network
USB Dial Up Mode
USB Ethernet Mode
Before setting network parameters, user can set up the Display Net Connection under Web -->
Network --> Internet Access for easily checking network status. LG01 will check the network
connection to the host and show the status in GLOBAL LED. The GLOBAL LED will blink if LG01
has network connection to that host.
The network settings are under the network section, in the follow section of this chapter, we will
show how to configure the LG01 for typically network usage.
Page 17

www.dragino.com
LoRa Gateway User Manual ---Update:2017-02-21 17 / 44
3.2 General WiFi AP Network
In the General AP Mode, LG01 gets internet access from its WAN port or USB 3G/4G/GPRS. LG01
itself acts as a WiFi Access Point and provide a WiFi AP network. LG01 shares the internet to its
AP network or LAN interface. Diagram is as below:
Set Up in Web UI for General WiFi AP mode
Network --> Internet Access:
Access Internet via WAN PORT or USB Modem
Network --> LAN and DHCP
Enable DHCP server in its LAN port
Network --> Access Point
Enable WiFi AP
Input SSID/ Encryption/ Passphrase
Network --> Mesh Network:
Disable WiFi Mesh Network
Page 18

www.dragino.com
LoRa Gateway User Manual ---Update:2017-02-21 18 / 44
3.3 WAN Port Internet Mode
The LG01 will use WAN port for internet connection. When connect LG01’s WAN port to router,
LG01 will get IP from router and have internet access. This is the default setting. It also shares the
internet to its LAN port and WiFi AP network for other devices.
3.4 WiFi Client Mode
In the WiFi Client Mode, Dragino acts as a WiFi client and gets DHCP from uplink router via WiFi.
It also shares the internet to its LAN port for other devices.
Set Up in Web UI
Network --> Internet Access:
Access Internet via WiFi Client
Way to Get IP: DHCP
Input correct SSID, Password and Encryption.
Network --> LAN and DHCP
Enable DHCP server in its LAN port
Network --> Access Point
Disable WiFi AP
Network -->Mesh Network
Disable WiFi Mesh Network
Page 19

www.dragino.com
LoRa Gateway User Manual ---Update:2017-02-21 19 / 44
3.5 Mesh WiFi Network
In the mesh network topology, user should choose the device to be a mesh gateway node or
mesh client node
Mesh Gateway: use WAN port or USB 3G/4G modem to get internet access from uplink router. It
also shares the internet to its Mesh Network for other Mesh Clients. The Mesh Gateway also acts
as a DHCP router for its mesh network.
Mesh Client: Connects to the Mesh Gateway via mesh network, it also bridge internet via the
LAN and WiFi AP interface.
3.5.1 Mesh Gateway Set Up
Network --> Internet Access
Access Internet via WAN PORT or USB Modem
Select Internet Connection Method for mesh gateway
Page 20

www.dragino.com
LoRa Gateway User Manual ---Update:2017-02-21 20 / 44
Network --> LAN and DHCP
Enable DHCP server in its LAN port
Set Gateway to 255.255.255.255
Network --> Access Point
Enable WiFi AP (not necessary), Can set same SSID in the mesh network
Network --> Mesh Network
Enable WiFi Mesh Network
Input Mesh Group //Note: Mesh Device within same group can communicate with each
other. Mesh Group is a translation for BSSID for easy configure and remember.
Page 21

www.dragino.com
LoRa Gateway User Manual ---Update:2017-02-21 21 / 44
3.5.2 Mesh Client Set Up
Network --> Internet Access
Access Internet set to Disable
Network --> LAN and DHCP
Disable DHCP server in its LAN port and
Set gateway point to mesh gateway.
Page 22

www.dragino.com
LoRa Gateway User Manual ---Update:2017-02-21 22 / 44
Network --> Access Point
Enable WiFi AP (not necessary,can use same SSID or difference SSID with other mesh node)
Network --> Mesh Network
Enable WiFi Mesh Network
Input Mesh Group //Note: Mesh Device within same group can communicate with each
other. Mesh Group is a translation for BSSID for easy configure and remember.
Page 23

www.dragino.com
LoRa Gateway User Manual ---Update:2017-02-21 23 / 44
3.6 USB Dial Up Modem Set Up
Dragino USB interface can be used for GPRS/3G/4G connections. Below are some set up
examples.
WCDMA set up example:
3G EV-DO/CDMA2000 Set Up Example for China Telecom:
Page 24

www.dragino.com
LoRa Gateway User Manual ---Update:2017-02-21 24 / 44
3.7 USB 3G/4G Ethernet Dongle
Some USB dongles are not using the dial up to connect internet. Instead, they appear as a
network interface and has built-in router feature. Huawei Hilink dongles are a typical of these.
When user plug such dongle into computer, it will auto connect to Internet and redirect to a web
interface, when plug such dongle into the MS14, a new interface will appear (typically eth2eth2
or usb0) by running command "ifconfig -a"
User can use the Web UI to configure use these dongle for internet connection direclty.
a new interface generate by USB Ethernet modem
Page 25

www.dragino.com
LoRa Gateway User Manual ---Update:2017-02-21 25 / 44
4 Linux System
The LG01 bases on OpenWrt Linux System. It is open source, and user are free to configure and
modify the inside Linux settings.
4.1 SSH Access for Linux console
User can access to the Linux console via SSH protocol. Make sure your PC and the LG01 is in the
same network, then use a SSH tool (such as putty) to access it. Below are screenshots:
IP address: IP address of LG01
Port: 22
User Name: root
Password: dragino (default)
After log in, you will be in the Linux console and type command here.
Page 26

www.dragino.com
LoRa Gateway User Manual ---Update:2017-02-21 26 / 44
4.2 Edit and Transfer files
The LG01 support SCP protocol and has a built SFTP server. There are many ways to edit and
transfer files using these two protocols. One of the easiest is through WinSCP utility. After access
via WinSCP to the device, use can use a FTP alike window to drag / drop files to the LG01 or Edit
the files directly in the windows. Screenshot is as below:
4.3 File System
The LG01 has a 16MB flash and a 64MB RAM. The /var and /tmp directory are in the RAM, that
means content in /tmp and /var will be erase after reboot the device. Other directories are in the
flash and will keep after reboot.
The Linux system use around 8MB ~10MB flash size which means there is not much room for
user to store data in the LG01 flash. User can use an external USB flash to extend the size for
storage.
Page 27

www.dragino.com
LoRa Gateway User Manual ---Update:2017-02-21 27 / 44
4.4 Package maintain system
LG01 uses OPKG package maintain system. There are more than 3000+ packages available in our
package server for user to install for their applications. For example, if user wants to add MQTT
support, they can install the related packages and configure LG01 to support MQTT
Below is some examples opkg command, more please refer OPKG package maintain system
In Linux Console run:
root@dragino-169d30:~# opkg update // to get the latest packages list
root@dragino-169d30:~# opkg list //shows the available packages
root@dragino-169d30:~# opkg install mosquitto-client // install MQTT client, it will auto install
the required packages.
Installing mosquitto-client (1.3.5-1) to root...
Downloading
http://downloads.openwrt.org/barrier_breaker/14.07/ar71xx/generic/packages/packages/mosquitto-client_1.3.5
-1_ar71xx.ipk.
Installing libcares (1.10.0-1) to root...
Downloading
http://downloads.openwrt.org/barrier_breaker/14.07/ar71xx/generic/packages/packages/libcares_1.10.0-1_ar7
1xx.ipk.
Installing libmosquitto (1.3.5-1) to root...
Downloading
http://downloads.openwrt.org/barrier_breaker/14.07/ar71xx/generic/packages/packages/libmosquitto_1.3.5-1_
ar71xx.ipk.
Configuring libcares.
Configuring libmosquitto.
Configuring mosquitto-client.
Page 28

www.dragino.com
LoRa Gateway User Manual ---Update:2017-02-21 28 / 44
5 Bridge Library
The bridge library is the most important part of LG01. Bridge library defines a mechanism how
the MCU talk to the CPU (ar9331). With the bridge library, the MCU can send data to CPU, get
commands result from CPU or call commands in CPU.
The bridge Library use UART port to communicate between MCU and ar9331. Below is the block
diagram shows the bridge connection between the Mega328P MCU and Linux.
Detail instruction of how to use the bridge library can be found in Arduino Bridge Library. Due
to hardware difference, there are some points when we read and use the Bridge Examples from
Arduino site:
We recommend user to tried the examples under Arduino IDE --> Files --> Examples -->
Dragino first.
When use the Bridge class, user need to call Bridge.begin(115200) in the sketch for LG01.
In the default bridge examples from Arudino IDE, it uses Serial class to print debug info. This
doesn’t work in LG01. Because the Serial Class will call Mega328P's hardware serial port , it
will be conflict with the Bridge Library. If user needs to print debug info, please use the
console class.
Page 29

www.dragino.com
LoRa Gateway User Manual ---Update:2017-02-21 29 / 44
6 Advance Management
6.1 Reset Network or Reset to Factory Default
LG01 provide ways for user to reset the device. When the Linux system is running, user can press
the toggle button to reset the device. the pressing time will determine which part is to be reset.
Pressing the toggle button, the GLOBAL LED will blink, release the button after 5 seconds,
device will reset the network setting and reboot (GLOBAL/LAN/WAN/WiFi blink once), other
settings will be kept.
Pressing the toggle button, the GLOBAL LED will blink, release the button after 30 seconds,
device will reset ALL the setting to factory default and reboot (GLOBAL/LAN/WAN/WiFi blink
once) .
Page 30

www.dragino.com
LoRa Gateway User Manual ---Update:2017-02-21 30 / 44
7 Upgrade Firmware
We keep improving the LG01 Linux side firmware for new features, bug fixes. The latest firmware
can be found on IoT Mesh Firmware, and the Change Log can be found here: Firmware Change
Log.
The file named as dragino2-IoT--xxxxx-squashfs-sysupgrade.bin is the upgrade Image. There are
different method to upgrade, as below:
7.1 Upgrade via Web UI
Go to the page: Web --> System --> Back Up and flash firmware, Select the image and click Flash
Image, the image will be uploaded to the device and then click Process Update to upgrade.
System will auto boot to the new firmware after upgrade.
7.2 Upgrade via Linux console
SCP the firmware to the system /var directory and then run
root@OpenWrt:~# /sbin/sysupgrade -n /var/Your_Image
note: it is important to transfer the image in the /var directory, otherwise it may exceed the flash
size.
Page 31

www.dragino.com
LoRa Gateway User Manual ---Update:2017-02-21 31 / 44
8 Auto-Provisioning
9 Advance Examples
9.1 Upstream: Get data from LoRa node and send to IoT server
9.1.1 Set up hardware
Set up the hardware as below, the LoRa node will get sensor data from DHT11 and send these
data to LoRa Gateway, when the Gateway get the data, it will pass the data to the IoT server.
9.1.2 Set up IoT Server account
We choose ThingSpeak as the IoT server here, first sign up an account in ThingSpeak, then goto
the Channels and create a Channel with Temperature and Humidity field.
After create the channel, user can see the Channel ID and API key in the Channel Page. They are
needed for upgrade data to this channel.
Page 32

www.dragino.com
LoRa Gateway User Manual ---Update:2017-02-21 32 / 44
9.1.3 Upload sketches
Step 1: Download the ThingSpeak Library and put it in the Arduino library directory.
Step 2: Select the example from:
IDE --> File --> Examples --> Dragino --> IoTServer --> ThingSpeak --> dht11_client
And upload this sketch to the LoRa Node
Step 3: Select the example from
IDE --> File --> Examples --> Dragino --> IoTServer --> ThingSpeak --> dht11_server
Replace the myChannelNumber & myWriteAPIKey to your info
And upload this sketch to the LoRa Gateway.
9.1.4 Check Result
Check Result in ThingSpeak as below
Page 33

www.dragino.com
LoRa Gateway User Manual ---Update:2017-02-21 33 / 44
9.2 Downstream: Get data from IoT Server and send to LoRa node
9.2.1 Set up Hardware
Set up the hardware as below, the LoRa Gateway will get command from IoT Server and then
send the command to LoRa node, the node control the relay state according to the receive
command.
9.2.2 Set up talkback command
Create a talkback command in ThingSpeak Apps. We can then find the talkback ID and talkback
API key here:
Page 34

www.dragino.com
LoRa Gateway User Manual ---Update:2017-02-21 34 / 44
9.2.3 Upload sketches
Step 1: Select the example from:
IDE --> File --> Examples --> Dragino --> IoTServer --> ThingSpeak --> DownstreamClient
And upload this sketch to the LoRa Node
Step 2: Select the example from
IDE --> File --> Examples --> Dragino --> IoTServer --> ThingSpeak --> DownstreamServer
Replace the talkback ID & talkbackAPIKey with your info
And upload this sketch to the LoRa Gateway.
9.2.4 Check Result
In the talkback APP page, send a command 1 or 0 to trigger the relay. You can see the result from
the console.
Page 35

www.dragino.com
LoRa Gateway User Manual ---Update:2017-02-21 35 / 44
9.3 Multiple Nodes examples
The example shows how the gateway can handle multiple nodes up to several hundreds. The
example can be found at IDE --> File --> Examples --> Dragino --> LoRa --> Concurrent
How it works:
This concurrent client sketch is working together with the concurrent gateway sketch. Before
using this sketch, please use the write_client_id sketch to write a client ID in the EEPROM.
Client ID is the unique id for each client in the LoRa network. write_gateway_id to gateway is not
necessary, if not write, gateway id will be 0XFF.
When the client boot, it will keep listening for the broadcast message from LoRa Gateway.
When the gateway sketch boot, it will broadcast a message to set up a LoRa Network. If it
gets broadcast message, client will send a join request message to gateway, when the join
request message arrive to gateway, the gateway will send back a join-ack message with
client id and add this client to the LoRa Network.
If the client gets its join-ack message for its join request, it will enter the mode to listen
the data-request message from gateway. In this mode, if client get a data-request
message for this client it will send back a data message to the gateway.
After client in data_request listening mode, if it has not receive any message from
gateway in a timeout, it will go back to the network set up mode to listen the broadcast
message.
Gateway will refresh the LoRa network periodically for adding new client or remove
unreachable client.
This example using the polling method between LoRa node and Gateway, it will minimize the
LoRa packets transfer on the air and avoid congestion. It is suitable for a not real time LoRa work.
Performance test in a room with 100 nodes and 1 gateway shows:
a) Gateway require about 1.5 minutes to set up this 100 nodes Network
b) Gateway takes about 2 minutes to do polling for these 100 nodes.
User can adjust the timing in the sketch from case by case.
Page 36

www.dragino.com
LoRa Gateway User Manual ---Update:2017-02-21 36 / 44
9.4 More Examples
Dragino keep updating examples in our wiki, more examples please refer the link:
Dragino Examples Catalog
Page 37

www.dragino.com
LoRa Gateway User Manual ---Update:2017-02-21 37 / 44
10 FAQ
10.1 Why there is 433/868/915 version LoRa part?
Different country has different rules for the ISM band for using the LoRa. Although the LoRa chip
can support a wide range of Frequency, we provide different version for best tune in the LoRa
part. That is why we provide different version of LoRa.
10.2 What is the frequency range of LG01 LoRa part?
The chip used in the LoRa part is:
Version
LoRa IC
Support Frequency
Best Tune Frequency
433
Semtech SX1278
Band2(LF): 410 ~525Mhz
Band3(LF): 137 ~175Mhz
433Mhz
868
Semtech SX1276
Band1(HF): 862 ~1020Mhz
868Mhz
915
Semtech SX1276
Band1(HF): 862 ~1020Mhz
915Mhz
User can set the LoRa within above frequency range in the software.
10.3 How may nodes can the LG01 support?
The maximum support end-node depends on how the communication (how often) between the
end-nodes and gateway. In a lab testing using the simple LoRa example, if the end nodes try to
send data to the gateway at every 5 minutes, there will be data lost after the network has 20~30
nodes due to Channel Collision.
If user want to reach more nodes, user can consider using the polling method to ensure that each
time will only have a LoRa signal transmit in the frequency. If the gateway uses polling method to
get data from the end node, it can support several hundred nodes or more. Examples can see:
Polling example for LoRa.
10.4 What kind of Server the LG01 can support?
The Linux side of LG01 is OpenWrt, it is open source and users can develop application over it.
Basically it can support most IoT servers if use the right API. We have examples for how to
connect some servers via typical protocol (MQTT,RESTful) for IoT, MQTT or RESTful. From this link:
IoT Server Examples.
Page 38

www.dragino.com
LoRa Gateway User Manual ---Update:2017-02-21 38 / 44
10.5 Can I make my own firmware for LG01? Where can I find the source code of
LG01?
Yes, User can make own firmware for LG01 for branding purpose or add customized application.
The LG01 source code and compile instruction can be found at:
https://github.com/dragino/openwrt-bb-1407
Page 39

www.dragino.com
LoRa Gateway User Manual ---Update:2017-02-21 39 / 44
11 Trouble Shooting
11.1 I can’t download the Dragino profile in Arduino IDE.
If IDE quite slowly while downloading the Dragino profile in board manager and stuck somewhere.
As show below, it is because your network has slow connection to some packages from Arduino
IDE.
To solve this, user can manually add Dragino profile. Below is the step:
1/ Download the profile from https://github.com/dragino/Arduino-Profile-Examples
2/ Unzip it and put the content under this directory:
C:\Users\xxx\AppData\Local\Arduino15\packages\Dragino\hardware\avr\0.1.0
Note: Different system may have different directory for Arduino15, if you can’t see
Dragino\hardware\avr\0.1.0, just create it in your Arduino15 directory.
The final directory content should as below.
Page 40

www.dragino.com
LoRa Gateway User Manual ---Update:2017-02-21 40 / 44
11.2 Bridge between MCU and Linux module doesn’t work.
Some possibilities:
1/ You have used the Serial class in MCU sketch, like Serial.begin(9600), The bridge library in
Mega328P use the same Serial interface. So if you have the Serial code in the sketch. They will
conflict and bridge doesn’t work.
2/ The IDE get mess in the serial setting when you compile other sketch . In this case, you can
close the IDE and open it again.
11.3 Arduino IDE doesn’t detect LG01
Check below points if this issue happens:
The Arduino IDE version is 1.5.4 or later
Your PC and Yun LG01 are in the same network.
Try to access the LG01 via Web or SSH, then check the IDE again.
If above still doesn’t work, SSH log in the LG01 and run: /etc/init.d/avahi-daemon restart to
restart the service so IDE can detect the LG01.
11.4 I get kernel error when install new package, how to fix?
In some case, when install package, it will generate kernel error such as below:
root@dragino-16c538:~# opkg install kmod-dragino2-si3217x_3.10.49+0.2-1_ar71xx.ipk
Installing kmod-dragino2-si3217x (3.10.49+0.2-1) to root...
Collected errors:
* satisfy_dependencies_for: Cannot satisfy the following dependencies for
kmod-dragino2-si3217x:
* kernel (= 3.10.49-1-4917516478a753314254643facdf360a) *
* opkg_install_cmd: Cannot install package kmod-dragino2-si3217x.
In this case, user can use the –force-depends option to install such package.
opkg install kmod-dragino2-si3217x_3.10.49+0.2-1_ar71xx.ipk --force-depends
Page 41

www.dragino.com
LoRa Gateway User Manual ---Update:2017-02-21 41 / 44
11.5 How to recover the LG01 if firmware crash
LG01 provide user a full control on its Linux system, it is possible that the device will brick and
can’t boot after improper modification in some booting files.
In this case, user can recover the whole Linux system by uploading a new firmware via Web
Failsafe mode.
Procedure is as below:
Use a RJ45 cable to connect the PC to LG01’s port directly.
Set the PC to ip 192.168.255.x, netmask 255.255.255.0
Pressing the toggle button and power on the device
All LEDs of the device will blink, release the toggle button after four blinks
All LEDs will then blink very fast once, this means device detect a network connection and
enter into the web-failsafe mode. Your PC should be able to ping 192.168.255.1 after device
enter this mode.
Open 192.168.255.1 in web broswer
Select a squashfs-sysupgrade type firmware and update firmware.
Page 42

www.dragino.com
LoRa Gateway User Manual ---Update:2017-02-21 42 / 44
12 Order Info
General Version:
LG01P-433: LoRa Gateway best tune to 433 MHz.
LG01P-868: LoRa Gateway best tuned to 868 MHz.
LG01P-915: LoRa Gateway best tuned to 915 MHz
Screw Terminal Version:
LG01S-433: LoRa Gateway best tune to 433 MHz.
LG01S-868: LoRa Gateway best tuned to 868 MHz.
LG01S-915: LoRa Gateway best tuned to 915 MHz.
Outdoor Version:
OLG01-433: LoRa Gateway best tune to 433 MHz.
OLG01-868: LoRa Gateway best tuned to 868 MHz.
OLG01-915: LoRa Gateway best tuned to 915 MHz.
13 Packing Info
Package Includes:
LG01P or LG01S LoRa Gateway x 1
Stick Antenna for LoRa RF part. Frequency is one of 433 or 868 or 915Mhz depends the
model ordered
Power Adapter: EU/AU/US type power adapter depends on country to be used
Packaging with environmental protection paper box
Dimension and weight:
Device Size: 12 x 8.5 x 3 cm
Device Weight: 150g
Package Size / pcs : 21.5 x 10 x 5 cm
Weight / pcs : 360g
Carton dimension: 45 x 31 x 34 cm. 36pcs per carton
Weight / carton : 12.5 kg
14 Support
Try to see if your questions already answered in the wiki.
Support is provided Monday to Friday, from 09:00 to 18:00 GMT+8. Due to different
timezones we cannot offer live support. However, your questions will be answered as soon
as possible in the before-mentioned schedule.
Provide as much information as possible regarding your enquiry (product models, accurately
describe your problem and steps to replicate it etc) and send a mail to
support@dragino.com
Page 43

www.dragino.com
LoRa Gateway User Manual ---Update:2017-02-21 43 / 44
Page 44

www.dragino.com
LoRa Gateway User Manual ---Update:2017-02-21 44 / 44
15 Reference
LG01 LoRa Gateway official wiki
More examples for LG01 LoRa Gateway
Source code for LG01 LoRa Gateway
https://github.com/dragino/openwrt-bb-1407
OpenWrt official Wiki
http://www.openwrt.org/
Arduino Official Site:
https://www.arduino.cc
Arduino bridge examples:
https://www.arduino.cc/en/Tutorial/Bridge
 Loading...