

Page 1
Page 2
Page 3
4. UK - Product information
This original installation instruction contains no construction documentation.
Remember to register your Draftbooster online www.draftbooster.co.uk/registration.
The following symbols are used in the instructions to draw attention to the risk of danger or damage to the product.
Prohibited symbol
Failure to observe instructions marked with the prohibited symbol may result in
extreme danger.
Danger symbol
Failure to observe instructions marked with the prohibited symbol is associated
with the risk of injury or material damage.
Disposal
No special precautions. The product should be discarded in accordance with national
regulation for disposal of electronic waste.
4.1 Package contents
1 pc. Draftbooster (DB7).
1 pc. wireless outlet with remote control and battery.
1 pc. adaptor (only DK).
1 pc. assemble kit.
1 pc. installation and operation instruction for the Draftbooster.
1 pc. installation and operation instruction for the remote control.
4.2 Function
Scope
The Draftbooster is a fan for mounting on top of the chimney. The Draftbooster is designed to
facilitate ignition and refueling. It is designed for wood burning stoves or closed inserts with a
nominal eect of maximum 8 kW. The Draftbooster comes with a exible ange, a 5-meter cord
prepared with plug, and an integrated isolation switch.
Function
The Draftbooster has been developed to solve draught problems by creating a mechanical draught
on chimneys with circular core and a maximum internal diameter of ø220 mm. The Draftbooster is
designed to withstand high temperatures associated with wood burning at a max. temperature of
250 °C and tolerates continuous operation on stoves and closed inserts.
The Draftbooster must always be on during start-up (lighting the re) and during refueling. When
the operating temperature in the replace, ue and chimney has reached a reasonable level and
thus created sucient draft, you may choose to switch o your Draftbooster. If you need extra
draw-out later, due to e.g. a change in weather, you simply turn on the Draftbooster again, leaving
it active as long as necessary.
Start/stop can be accomplished by:
- a wireless outlet (included)
- a regular outlet (possibly with switch.
Bad heating habits may result in problems, such as soot, chimney res, etc., which may damage the
Draftbooster.
More information
www.draftbooster.co.uk
WARNING
To avoid chimney res – the chimney must be swept before mounting the Draftbooster!
As the Draftbooster is part of a wood-red installation, please ensure that the design meets the
requirements of fresh air supply. It is always recommend to install a smoke alarm in connection with a
wood-red installation. Regardless of usage pattern, you must turn on your Draftbooster at least once
a month, allowing it to run for 5-10 minutes. Inspect and clean your Draftbooster installation at least
once a year. The manufacturer cannot be held responsible for water penetration into the chimney.
3120034-DB7-DK-SE-NO-UK-DE
30 • UK
Page 4
4.3 Warranty
The product is covered by national guarantee and warranty rules from the date of purchase. Replacement or repair of
the Draftbooster is handled at the exclusive discretion of the manufacturer, if a factory inspection detects a defect in
materials or manufacturing.
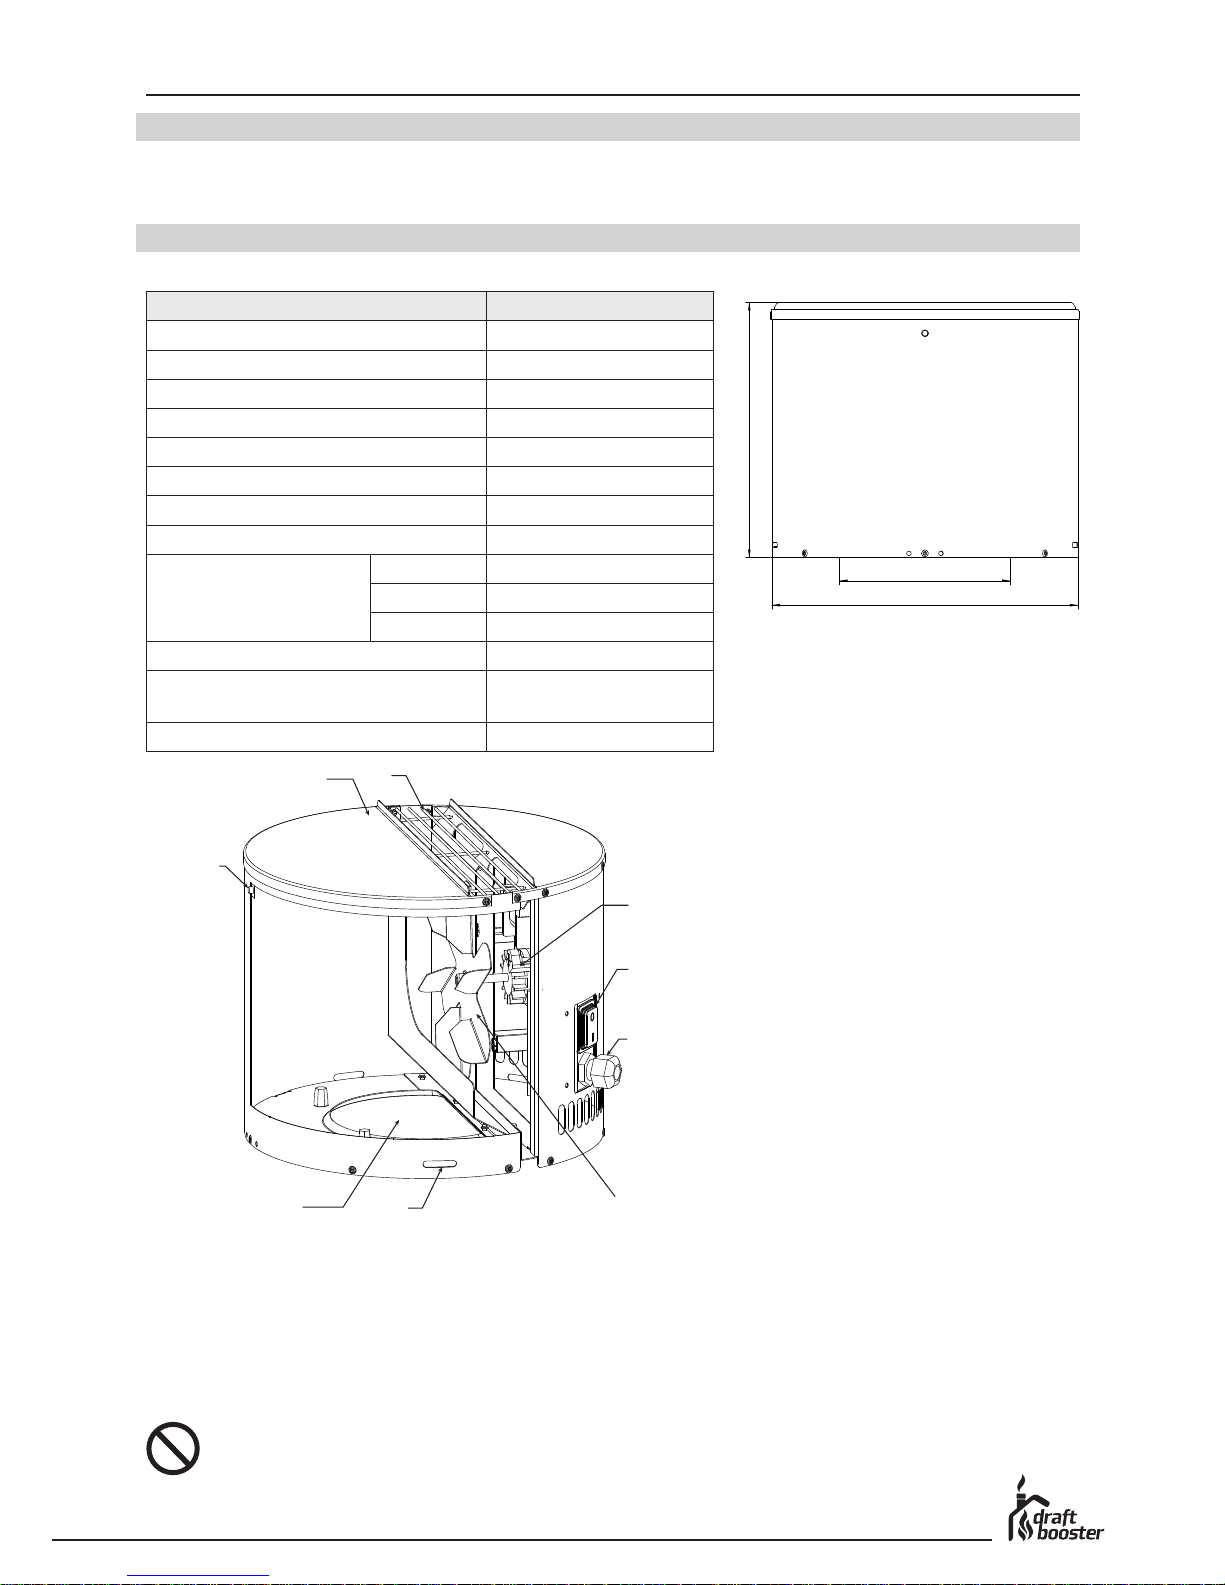
4.4 Specications and dimensions
Model Draftbooster - DB7x0x
Discharge Vertical
Motor Shaded pole, class H
Voltage V AC 1 x 230
Rev/m 2.000
Current Amp 0,27
Power consumption kW 0,036
IP 24D
Weight kg 3,2
Measurements A mm ø266
B mm 230
C mm ø140
Impedance protected Yes
Max. temperature during opera-
tion
° C 250
Max. temperature at standstill ° C 250
4.4.1 Precautions
1. Ensure sucient supply of fresh air in the room, where the stove is placed
2. Ensure rm support of the Draftbooster
3. Appropriate precautions must be taken in order to guarantee safe use of heat sources.
Requirements of supply air.
Required supply of fresh air must comply with local regulations.
Ensure sucient fresh air during combustion, otherwise it may result in faulty operation and
inadequate evacuation of deadly fumes.
A
C
B
1 Switch
2 Cable screw joint
3 Motor
4 Net / outlet
5 Vane
6 Lid
7 Locking mechanism of lid
8 Inlet air
9 Drainholes
1
2
98
5
6
4
3
7
3120034-DB7-DK-SE-NO-UK-DE
UK • 31
Page 5
4.5 Installation
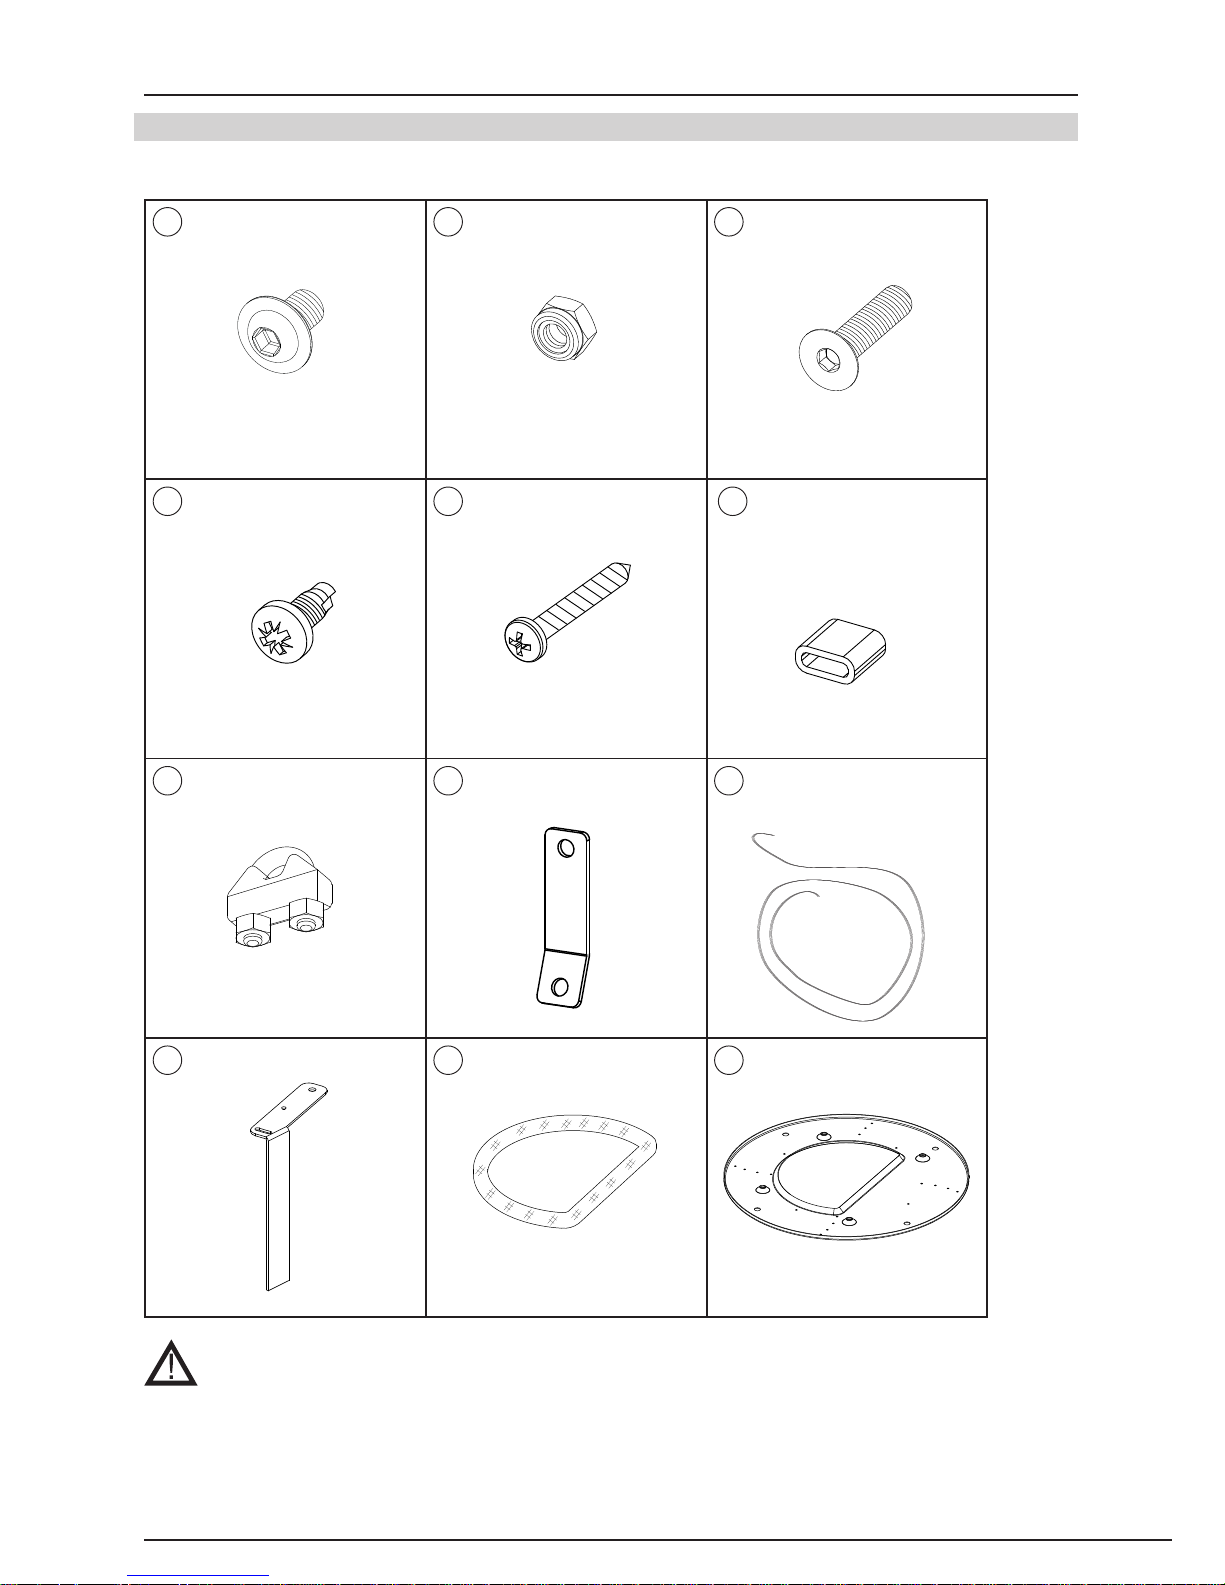
4.5.1 Assembly parts
1
4 x
2
4 x
3
4 x
4
4 x
5
1 x
6
2 x
7
1 x
8
1 x
9
1 x
10
4 x
11
1 x
12
1 x
Be aware of sharp and pointy parts.
3120034-DB7-DK-SE-NO-UK-DE
32 • UK
Page 6
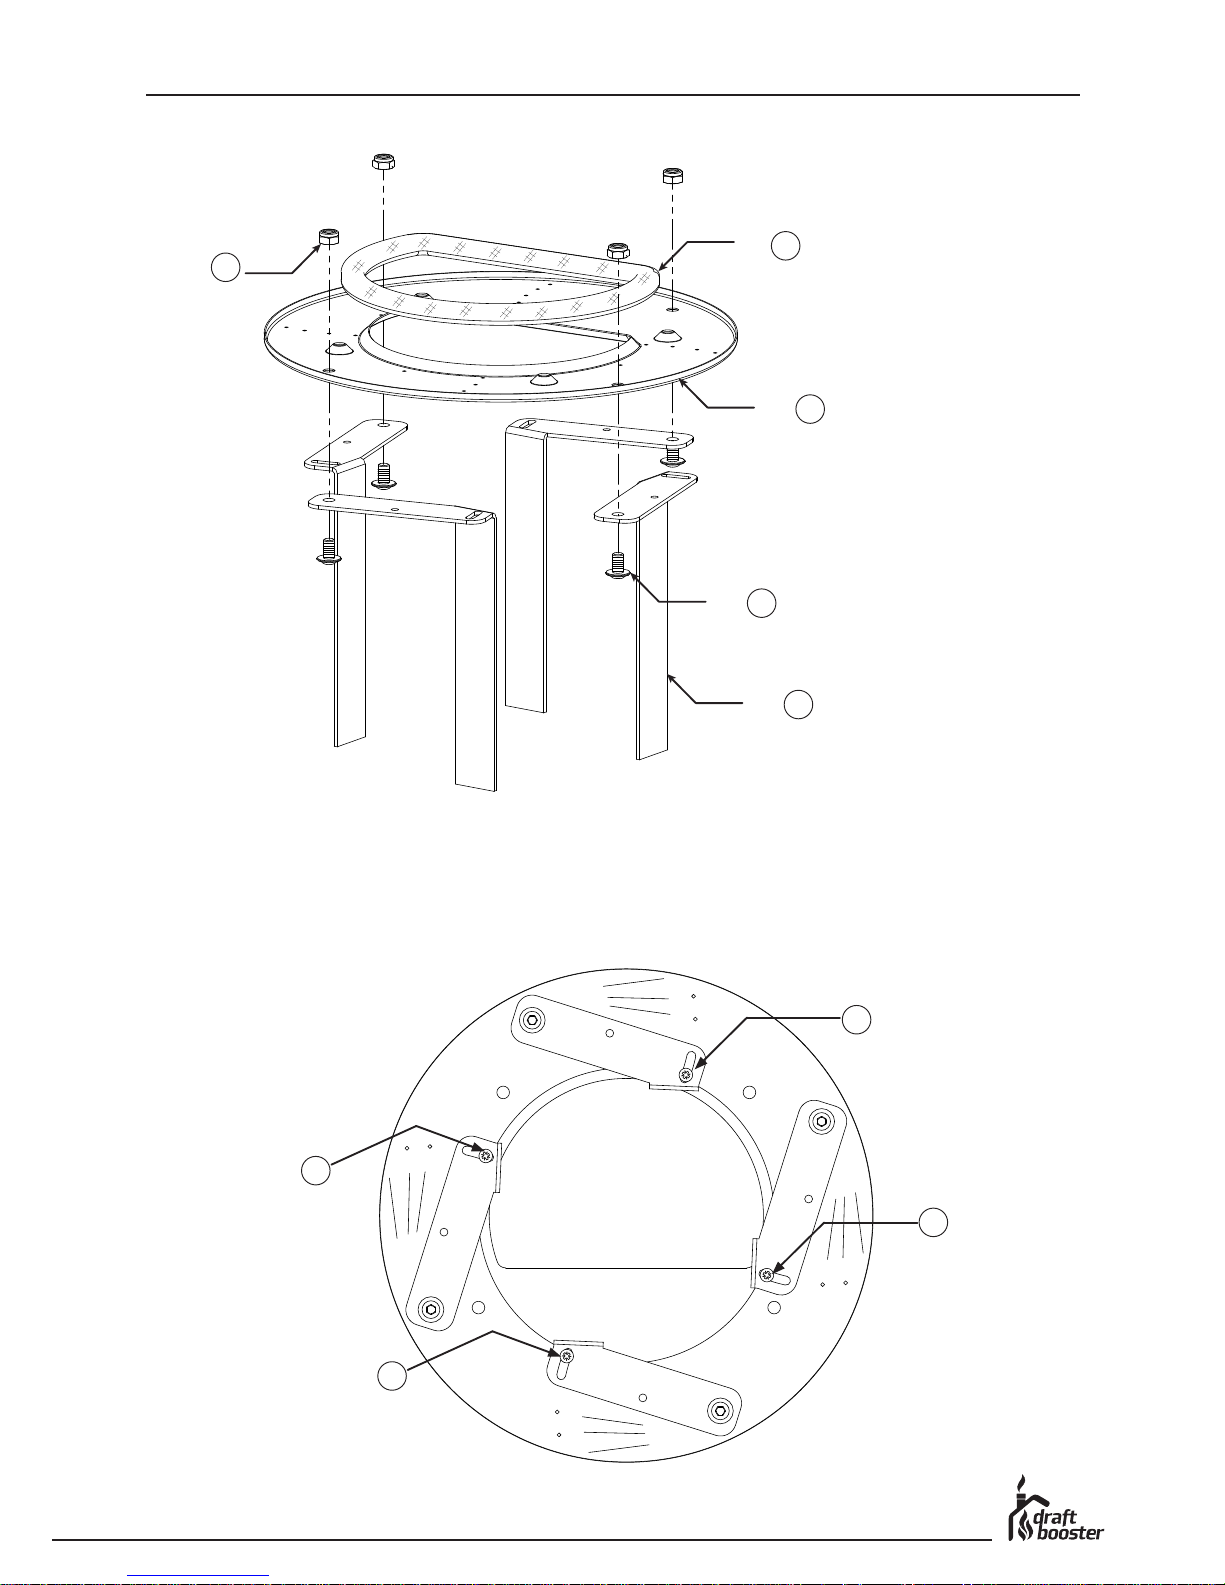
4.5.2 Assembling the bottom ange
10
4 x
12
1 x
11
1 x
1
4 x
2
4 x
4.5.3 Adjusting the exible ange
After assembling the bottom ange, adjust the ange legs to tting the inner diameter of your chimney and x the legs
in this position. The example below shows the setting for an inside chimney diameter of ø150 mm. The legs must be
fastened permanently in the adequate position with the 4 self-tapping screws.
4
4
4
4
150
180
200
220
3120034-DB7-DK-SE-NO-UK-DE
UK • 33
Page 7
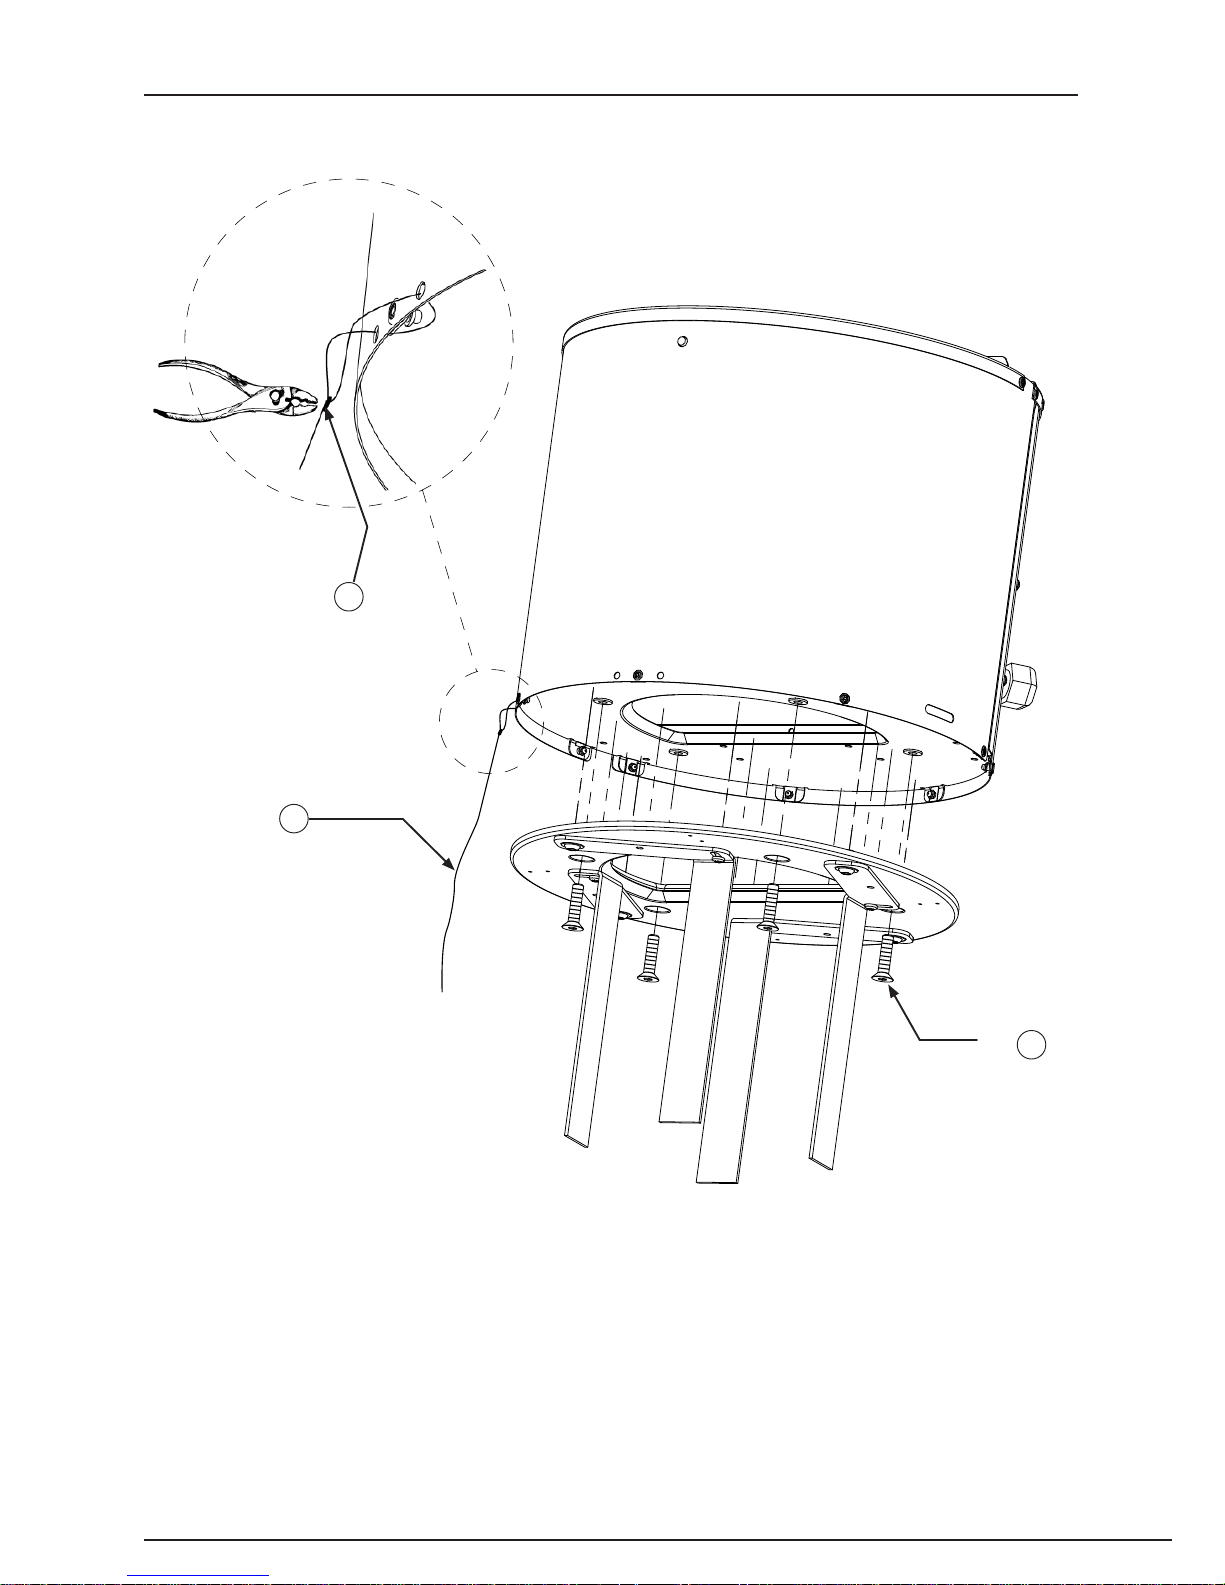
4.5.4 Installing the bottom ange and wire on the Draftbooster
3
4 x
9
6
3120034-DB7-DK-SE-NO-UK-DE
34 • UK
Page 8
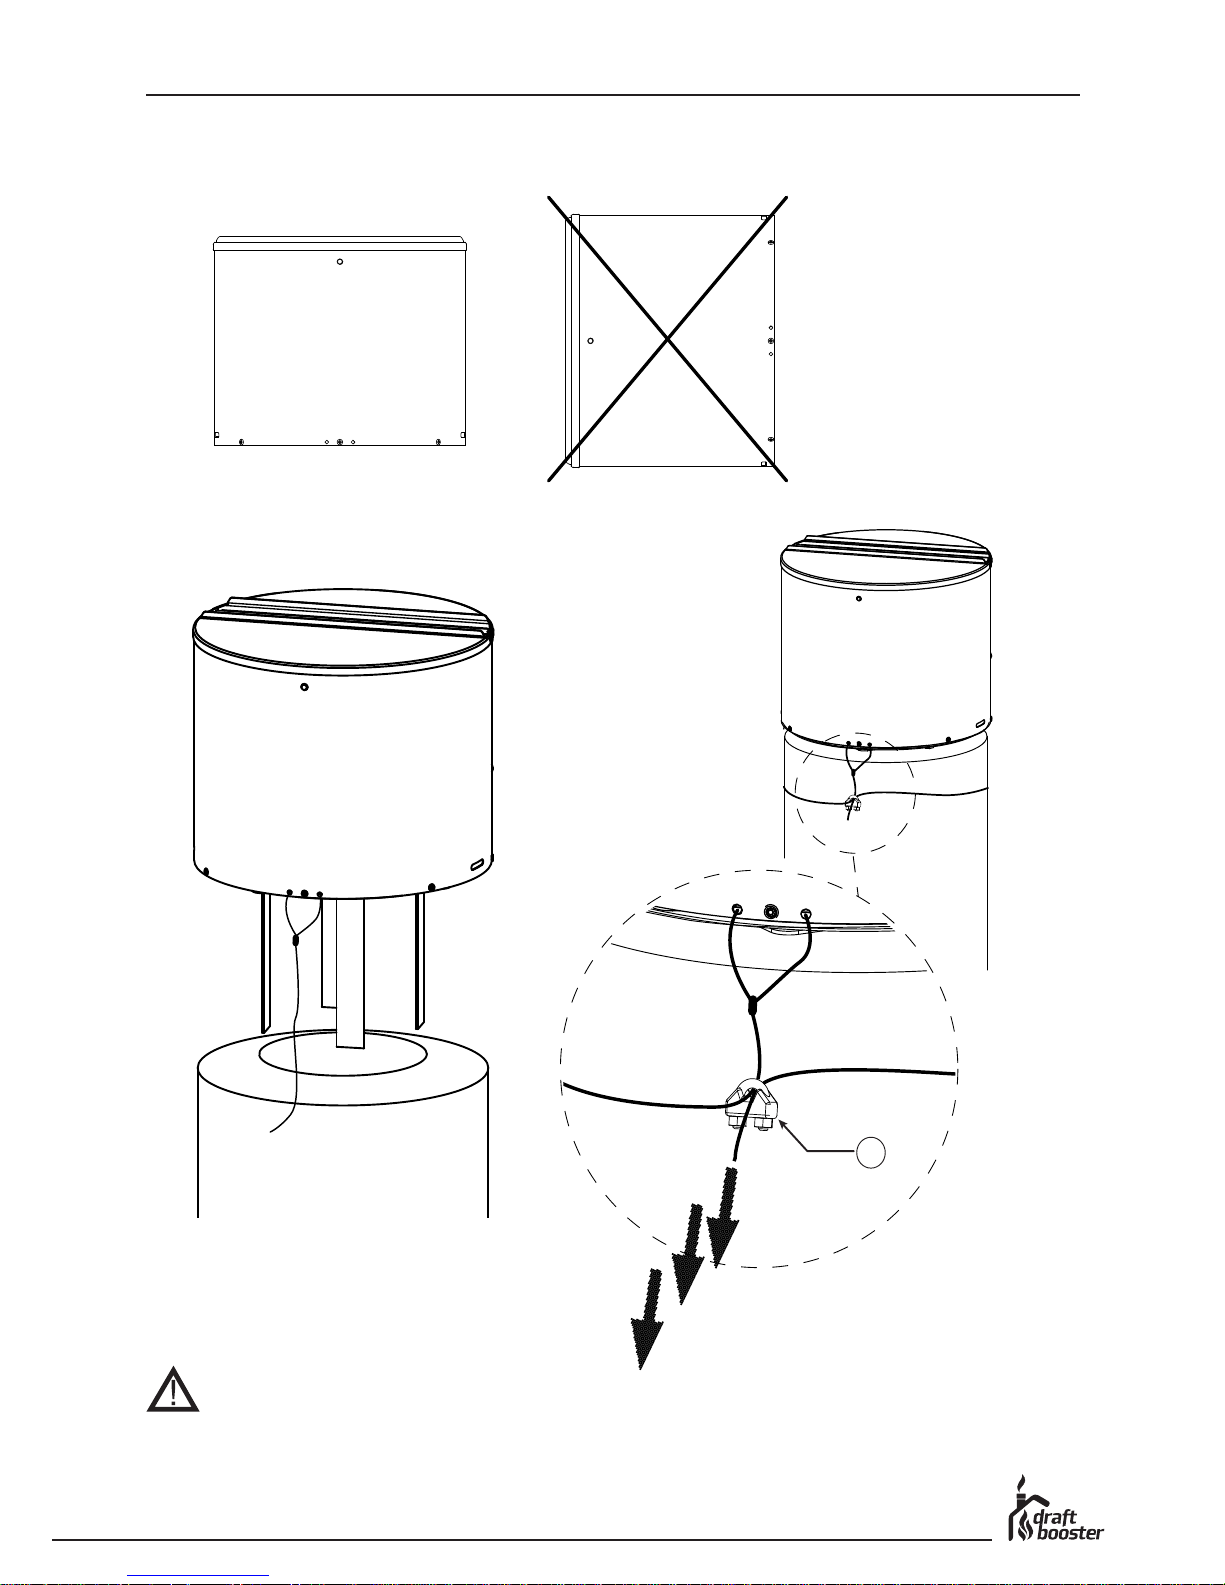
4.5.5 Placement
The Draftbooster must always be mounted in a vertical position. DO NOT INSTALL HORIZONTALLY!
4.5.6 Installing the Draftbooster on a steel chimney
NOTE
The supplied steel wire must always be securely fastened both to the Draftbooster and to the chimney.
Wrap the wire around the chimney and through the wire lock.Tighten the wire in a downward direction
and tighten the wire lock. The wire must be tight to secure that the Draftbooster stays on the chimney,
but not so tight that it makes the Draftbooster tilt.
7
3120034-DB7-DK-SE-NO-UK-DE
UK • 35
Page 9
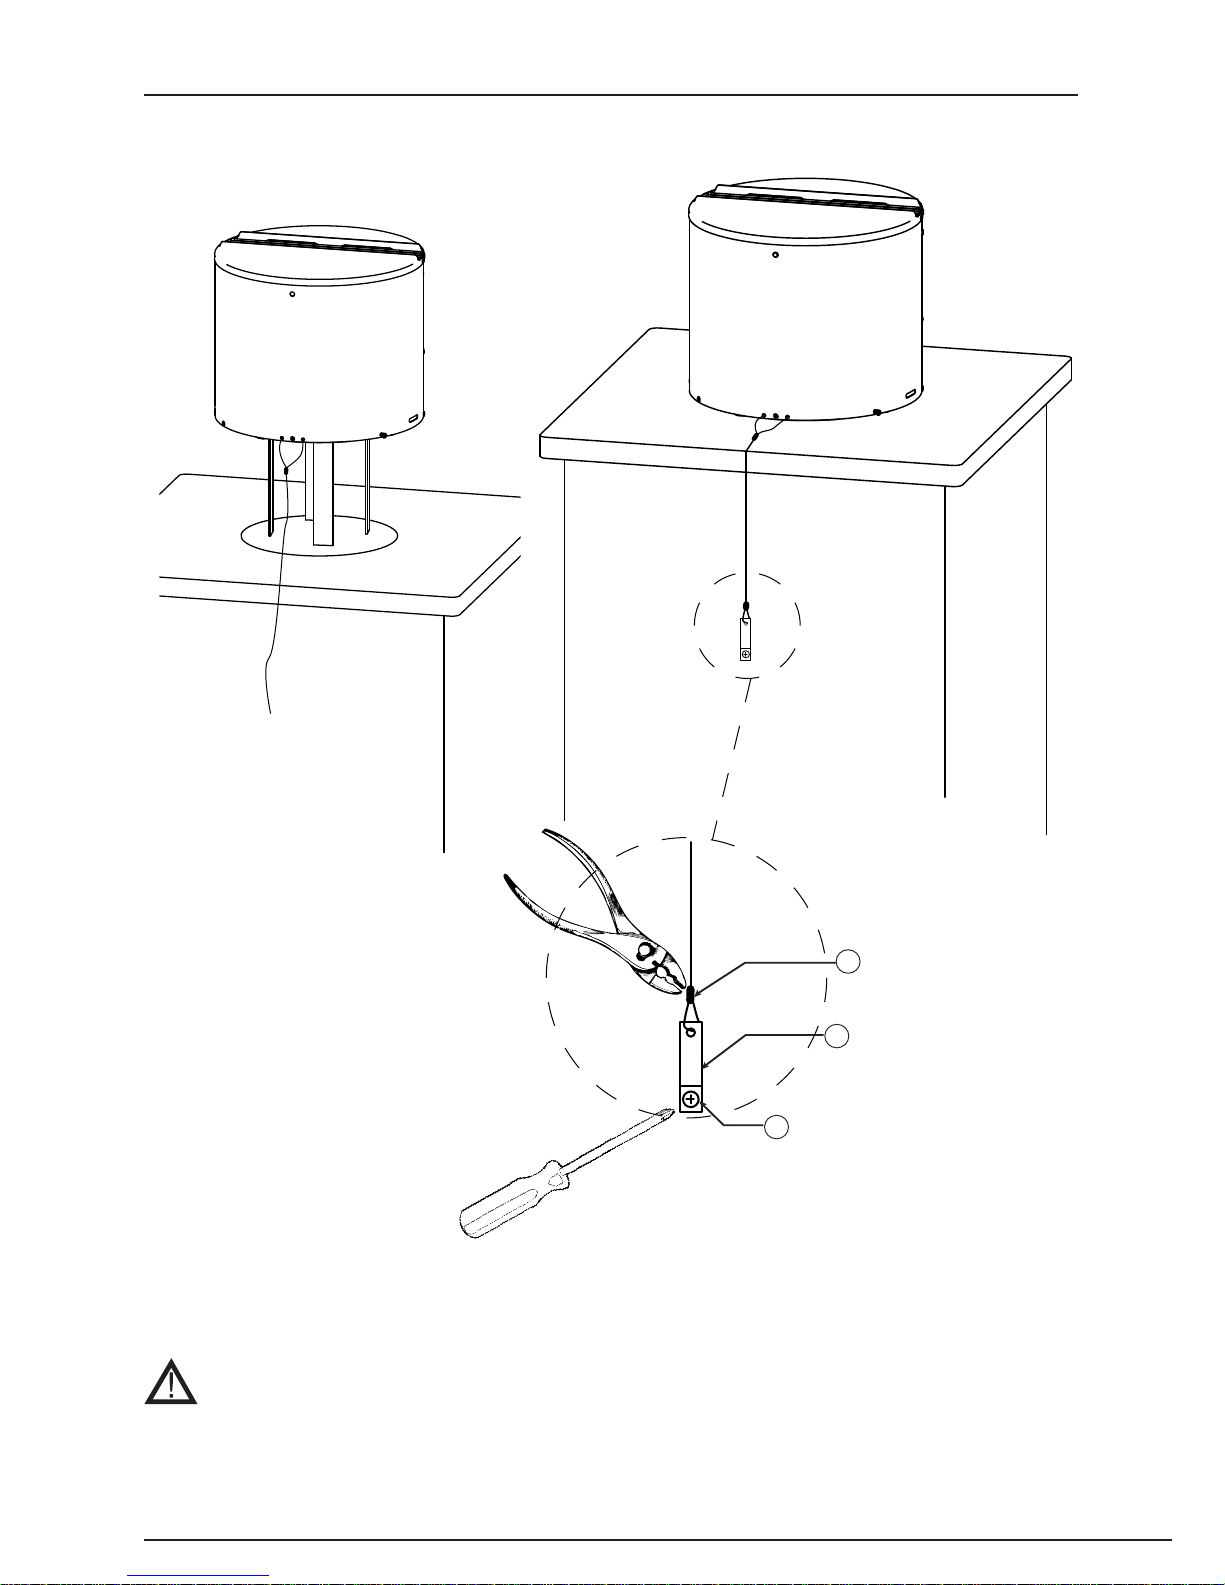
4.5.7 Installing the Draftbooster on a brick chimney
NOTE
The supplied steel wire must always be securely fastened both to the Draftbooster and to the chimney.
Begin by attaching the wire bracket to the chimney, tighten the loop, and clamp down the wire lock. The
wire is tightend in a downward direction - enough to secure that the Draftbooster stays on the chimney,
but not so tight that it makes the Draftbooster tilt.
8
6
5
3120034-DB7-DK-SE-NO-UK-DE
36 • UK
Page 10
4.6 Electrical wiring
The Draftbooster must always be connected to an outlet with a protective ground.
• The wireless outlet should be connected to an appropriately located wall outlet close to the oven and
chimney. The plug from the Draftbooster can now be connected and the Draftbooster can be controlled
by the on / o on the remote control. (Check that the Draftbooster can be switched on and o. If not the
distance between the wireless outlet and the remote control must be reduced
• If the wireless outlet is not used the plug from the Draftbooster can be pluged directly to a wall outlet.
Possibly with an on / o switch.
DANGER
If the need arises to replace the original Draftbooster cord, use a cord of the same type. Otherwise, the
insulation can melt or erode, exposing the cord itself.
4.7 Start-up
DANGER
Check the oven to make sure it is working properly, while the Draftbooster is running. Make sure that
no fumes are escaping into the room as this can lead to carbon monoxide poisoning.
1. Before lighting the re, turn on the Draftbooster (open the air intake completely on the stove)
2. Place the wood in the stove
3. Make sure that the Draftbooster is turned on, before you attempt lighting the re. Strike a match inside
the stove and keep it there, noting if the smoke from the match is being drawn towards the top of the
stove and out of the chimney*
4. Listen carefully as well. You should be able to hear the blade of the Draftbooster revolving**
5. Light the re and make sure that no smoke is escaping from the stove
6. Close the doors.
- Is smoke escaping from the closed stove?
- Close the air-intake of the stove
- Open the windows in the room where the oven is located to ventilate the room thoroughly
- If necessary, call for qualied assistance in order to remedy the problem
- If defects are detected, these must be repaired before using the Draftbooster and the stove again.
*/** NOTE: If the Draftbooster does not draw the smoke from the match towards the top of the stove, or if you cannot
hear the Draftbooster running, do not light the re. Consult the section troubleshooting (section 4.8.2 on page 38). If
this does not rectify the problem, call for qualied assistance.
CAUTION
Do not over-heat the stove. Small deposits of soot can kindle and start a chimney re, which may cause
dangerously high temperatures in the chimney.
If you have experienced a chimney re, you must ensure that the mechanical and electrical functioning
of the Draftbooster is checked. If defects are found, these must be repaired before further use of the
Draftbooster and the stove.
3120034-DB7-DK-SE-NO-UK-DE
UK • 37
Page 11
4.8 Maintenance and troubleshooting
The Draftbooster must be inspected at least once a year in connection with inspection of the chimney. Soot and other
deposits must be removed from the rotor blades and from the bottom of the motor housing.
WARNING
Do not open the Draftbooster, unless the power supply is switched o at the power switch.
The surface can be warm.
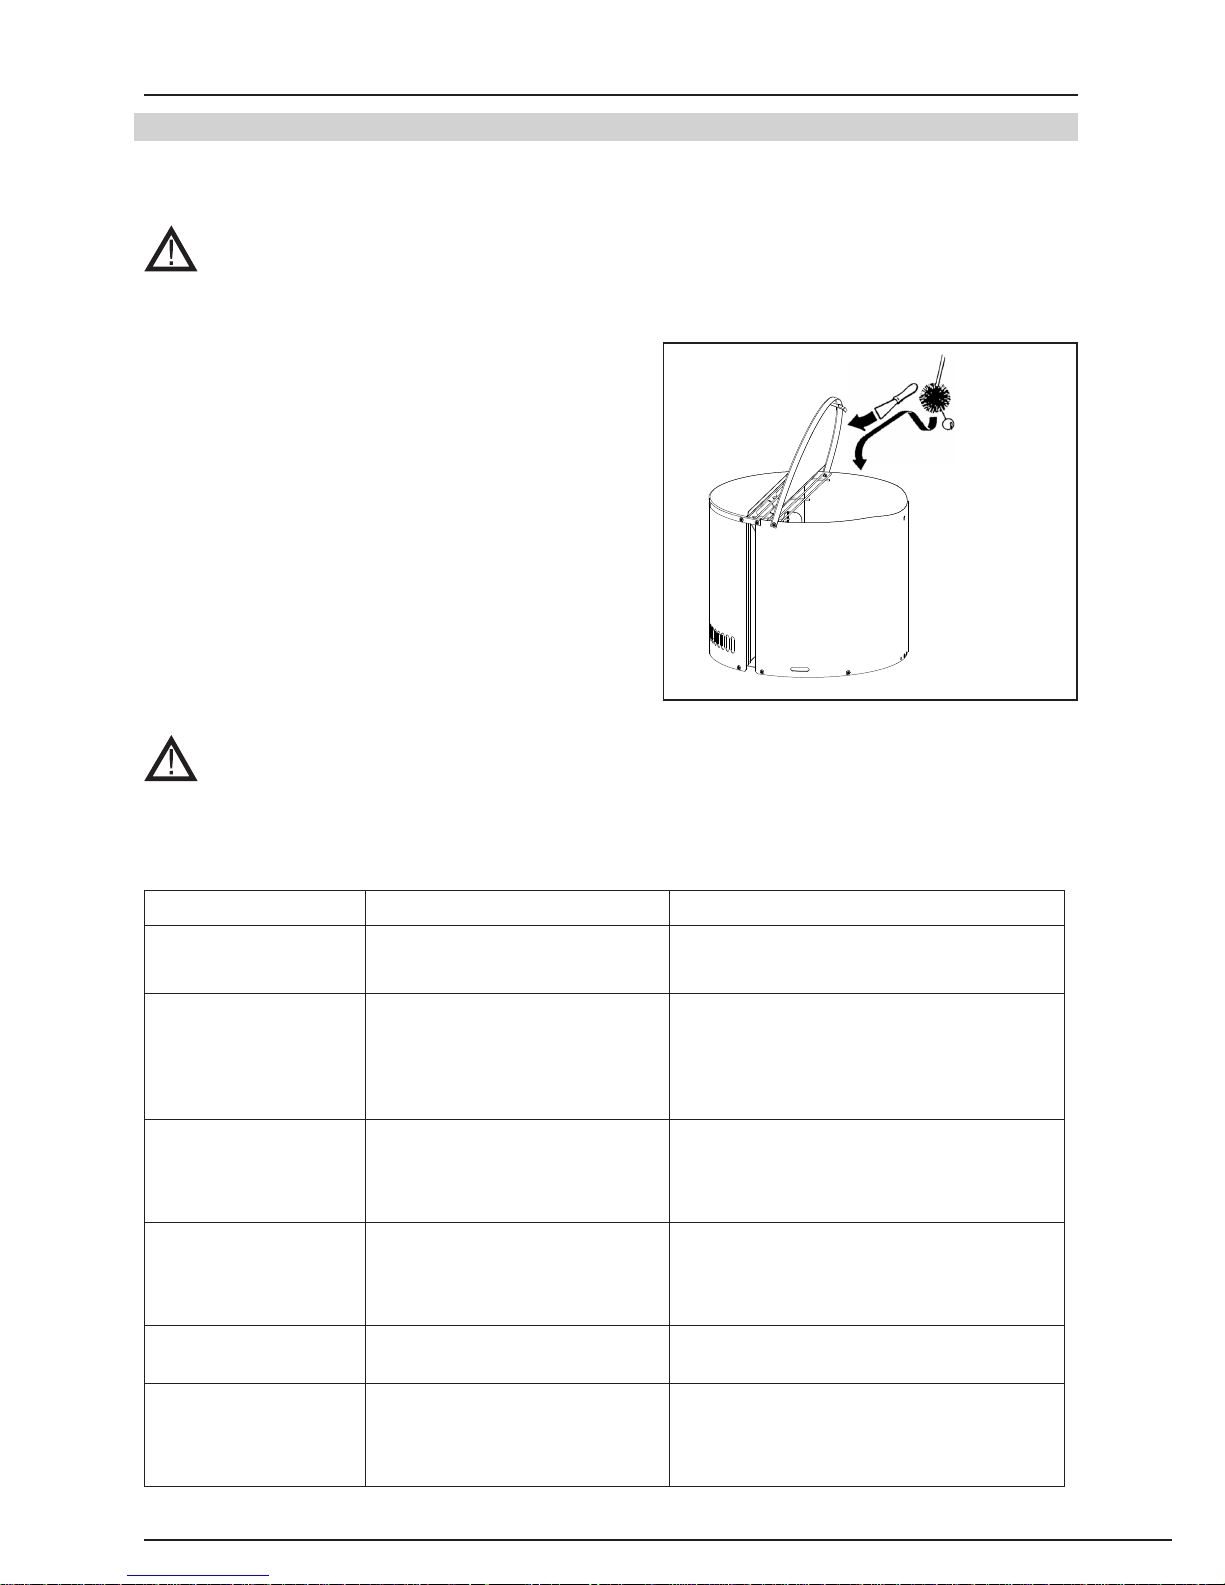
4.8.1 Cleaning intervals for the Draftbooster
It is extremely important that the Draftbooster be kept free of
soot and deposits. Soot is the primary cause of chimney res.
The Draftbooster must be cleaned and inspected at least once a
year.
The cleaning frequency depends on how often, the stove and
Draftbooster are used. Frequent use means frequent cleaning.
Regular use of the stove may require more frequent cleaning of
the Draftbooster.
NOTE
The Draftbooster must be cleaned by someone with professional knowledge.
When cleaning, you need to ensure that there is free passage for rainwater through all drainage holes.
The manufacturer cannot be held responsible for water penetration into the chimney.
4.8.2 Troubleshooting
Observation
Problem Solution
No power supply to the
Draftbooster
• The switch is o
• Poor electrical connections
• Check the switch
• Check and remedy the problem
The power supply to
the Draftbooster is on,
but it’s not working
• Poor electrical connections
• Worn-out battery in the remote
control
• No reaction when activating the
on / o on the remote control
• Check and remedy the problem with the
connections
• Change the battery
• Reduce the distance between the wireless
outlet and the remote control
The power supply to
the Draftbooster is connected, but it hums and
does not spin
• Soot may block the Draftbooster • Clean the Draftbooster
The Draftbooster seems
to be working ne, but
there is not enough
draft
• Too much false air is draged in • Inspect for leakage in the uerun and
chimney
The Draftbooster
vibrates
• The motor shaft may be bent • Replace the Draftbooster
There are audible
mechanical noises
• Foreign objects may have
become attached
• The motor bearings may be
worn-out
• Remove foreign objects
• Replace Draftbooster
3120034-DB7-DK-SE-NO-UK-DE
38 • UK
Page 12
Declaration of Conformity
DK: EU-Overensstemmelseserklæring
GB: Declaration of Conformity
DE: EU-Konformitätserklärung
FR: Déclaration de conformité de l’Union Européenne
NO: EU-Samsvarserklæring
PL: EUDeklaracjazgodności
NL: EU-Conformiteits verklaring
SE: EU-Överensstämmelsedeklaration
FI: EU-Vaatimustenmukaisuusvakuutus
IS: ESS-Samræmisstaðfesting
IT: Dichiarazione di Conformità Unione Europea
exodraft a/s
-
DANMARK
erklærer på eget ansvar, at følgende produkter:
hereby declares that the following products:
erklärt hierdurch auf eigene Verantwortung, daß folgende Produkte:
déclare, sous sa propre responsabilité, que les produits suivants:
erklærer på eget ansvar at følgende produkter:
niniejszym oświadcza, że następujące produkty:
veklaart dat onderstaande producten:
deklarerar på eget ansvar, att följande produkter:
vastaa siltä, että seuraava tuote:
Staðfesti à eigin àbyrgð, að eftirfarandi vörur:
dichiara con la presente che i seguenti prodotti:
DB7XXX
som er omfattet af denne erklæring, er i overensstemmelse med følgende
standarder:
were manufactured in conformity with the provisions of the following standards:
die von dieser Erklärung umfaßt sind, den folgenden Normen:
auxquels s’applique cette déclaration sont en conformité avec les normes
ci-contre:
som er omfattet av denne erklæring, er i samsvar med følgende standarder:
zostały wyprodukowane zgodnie z warunkami określonymi w następujących
normach:
zijn vervaardigd in overeenstemming met de voorschriften uit de hieronder
genoemde normen en standaards:
som omfattas av denna deklaration, överensstämmer m ota tämä selvitys
koskee, on seuraavien standardien mukainen:
sem eru meðtalin i staðfestingu Pessari, eru i fullu samræmi við eftirtalda
staðla:
sono stati fabbricati in conformità con le norme degli standard seguenti:
EN60335-1, EN60335-2-80, DS/EN ISO 12100: 2012
i.h.t bestemmelser i direktiv:
in accordance with
entsprechen gemäß den Bestimmungen der folgenden Richtlinien:
suivant les dispositions prévues aux directives:
i.h.t bestemmelser i direktiv:
zgodnie z:
en voldoen aan de volgende richtlijnen:
enligt bestämmelserna i följande direktiv:
seuraavien direktiivien määräysten mukaan:
med tilvisun til àkvarðana eftirlits:
in conformità con le direttive:
Maskindirektivet:
the Machinery Directive:
Richtlinie Maschinen:
Directive Machines:
Maskindirektivet:
Dyrektywą maszynową:
de machinerichtlijn:
Maskindirektivet
Konedirektiivi:
Vèlaeftirlitið:
Direttiva Macchinari:
2006/42/EF/-EEC/-EWG/-CEE
Lavspændingsdirektiv:
the Low Voltage Directive:
Niederspannungsrichtlinie:
Directive Basse Tension:
Lavspenningsdirektivet:
Dyrektywą Niskonapięciową
de laagspanningsrichtlijn:
Lågspänningsdirektivet:
Pienjännitedirektiivi:
Smáspennueftirlitið:
Direttiva Basso Voltaggio:
2006/95/EC
EMC-direktivet:
and the EMC Directive:
EMV-Richtlinie:
Directive Compatibilité Electromagnétique:
EMC-direktivet:
Dyrektywą EMC – kompatybilności elektromagnetycznej
en de EMC richtlijn:
EMC-direktivet:
EMC-direktiivi:
EMC-eftirlitið:
Direttiva Compatibilità Elettromagnetica:
2004/108/EC
Odense, 01.07.2015
Adm. direktør
Managing Director
Jørgen Andersen
Algemeen directeur
Geschäftsführender Direktor
Président Directeur Général
Dyrektor Zarządzający
Verkställande direktör
Toimitusjohtaja
Framkvemdastjori
Direttore Generale
Page 13

www.draft-booster.com
 Loading...