

Page 1
DR
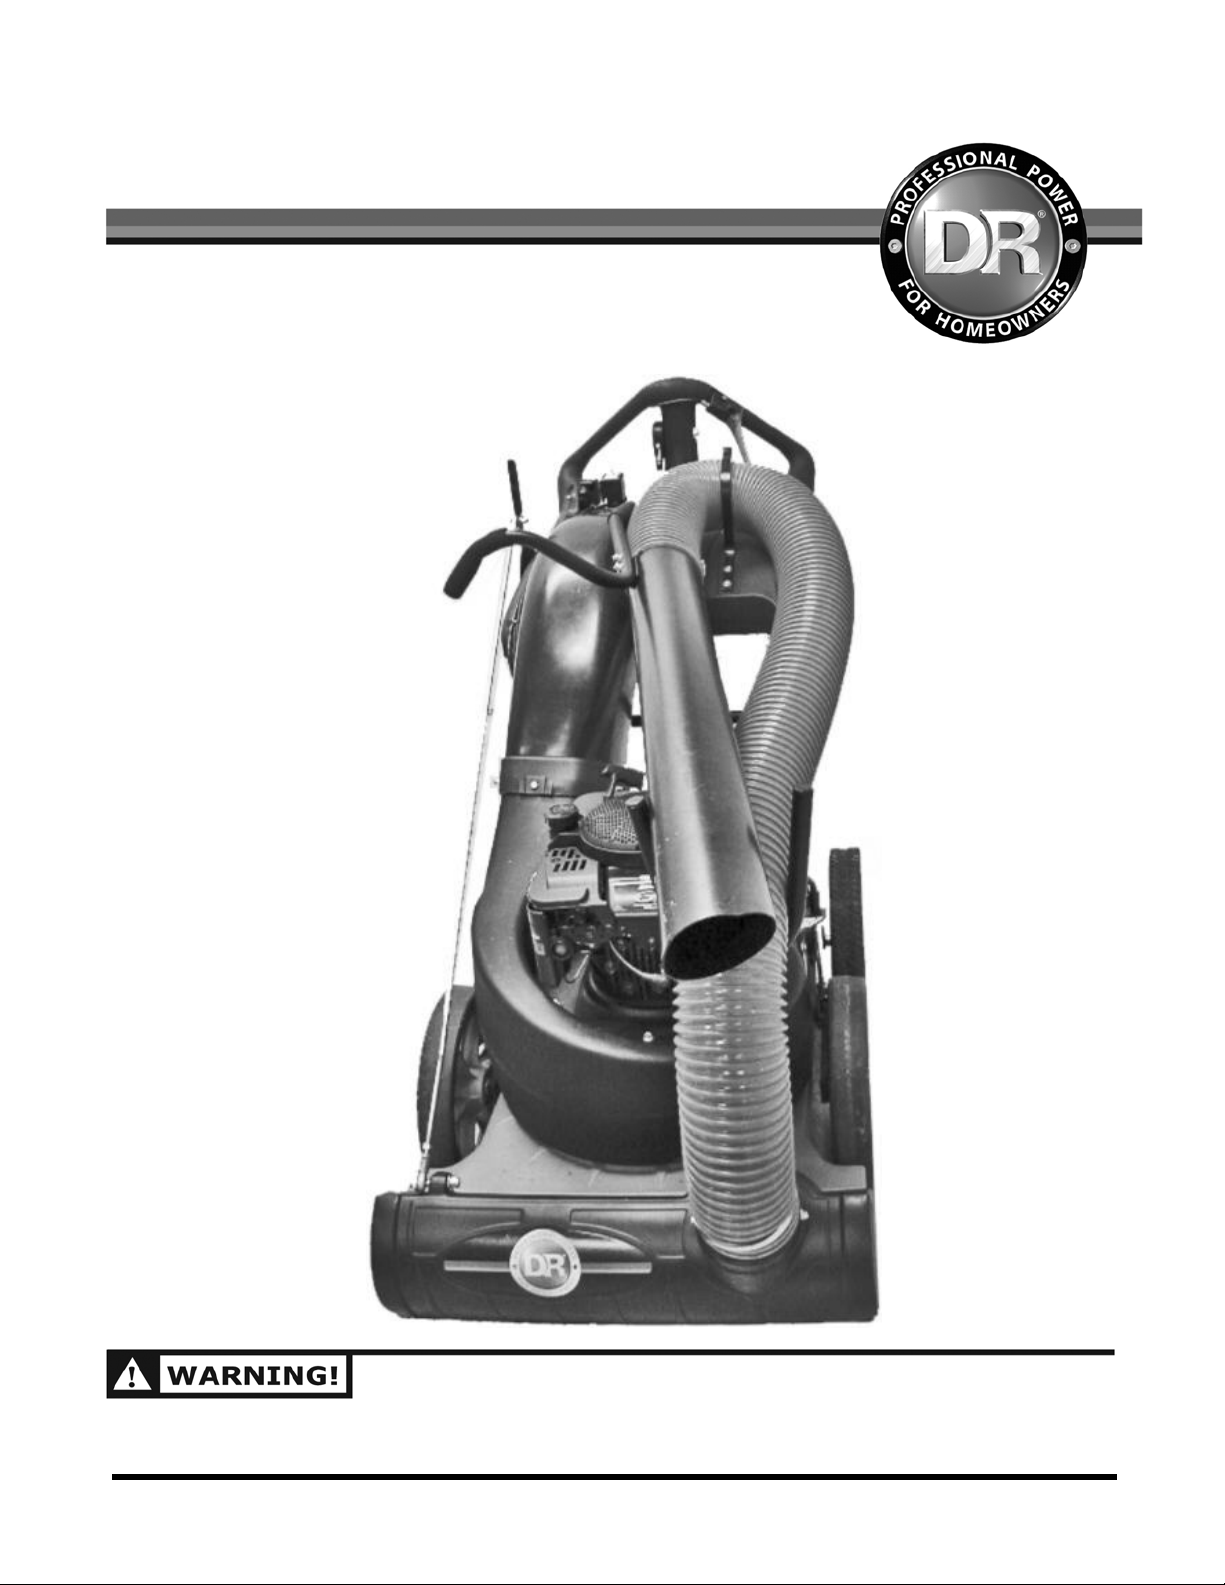
WALK-BEHIND LEAF & LAWN VACUUM
OPTIONAL VACUUM HOSE ACCESSORY
®
SAFETY & OPERATING INSTRUCTIONS
READ AND UNDERSTAND THIS MANUAL AND ALL INSTRUCTIONS
BEFORE USING YOUR NEW HOSE ACCESSORY.
Page 2

and congratulations on your purchase of a new DR WALK-BEHIND LEAF & LAWN VACUUM Optional OnBoard Vacuum Hose Accessory!
We have done our utmost to ensure that your DR WALK-BEHIND LEAF & LAWN VACUUM Optional OnBoard Vacuum Hose Accessory will be one of the most trouble-free and satisfying pieces of equipment you
have ever owned. Please let us know of any questions or problems you may have. We want to answer or
correct them as quickly as possible. When you do call, please have your order number handy. For technical
assistance, please call Toll-Free 1-800-DR-OWNER (376-9637) and one of our Technical Support
Representatives will be happy to help you. We also hope to hear from you on how much you like your new
helper.
In addition, please tell your friends about your new DR WALK-BEHIND LEAF & LAWN VACUUM Optional
On-Board Vacuum Hose Accessory! Having DR Owners spread the word about our products and our way of
doing business is the best advertising we can have, and the best way to help us provide even better service in
the years to come.
Thanks once again!
for all of us at
Country Home Products, Inc.
SALES MANAGER
COPYRIGHT
©2006 Country Home Products, Inc. All rights reserved.
®
DR
Power Equipment
A division of Country Home Products®
127 Meigs Road
Vergennes, VT 05491
Toll-free phone
Fax
: 1-802-877-1213
Web site:
ii DR® WALK-BEHIND LEAF & LAWN VACUUM Optional Accessory
www.dr-owner.com
: 1-800-DR-OWNER (376-9637)
Page 3

Table of Contents
CHAPTER 1............................................................................................................................. 1
INTRODUCING THE OPTIONAL ON-BOARD VACUUM HOSE ACCESSORY........... 1
Conventions used in this manual ................................................................................... 1
CHAPTER 2............................................................................................................................. 3
GENERAL SAFETY RULES............................................................................................... 3
CHAPTER 3............................................................................................................................. 5
DR WALK-BEHIND LEAF & LAWN VACUUM OPTIONAL ON-BOARD VACUUM
HOSE ACCESSORY ......................................................................................................... 5
Connecting the Optional On-Board Vacuum Hose (Kit No. 21815)............................. 5
Using the Optional On-Board Vacuum Hose................................................................. 8
CHAPTER 4............................................................................................................................. 9
PARTS LIST AND SCHEMATIC DIAGRAM .................................................................... 9
Parts List - Optional On-Board Vacuum Hose Assembly (Kit No. 21815).................... 9
Schematic Diagram - Optional On-Board Vacuum Hose Assembly (Kit No. 21815)... 9
CALL TOLL FREE 1-800-DR-OWNER iii
Page 4

iv DR® WALK-BEHIND LEAF & LAWN VACUUM Optional Accessory
Page 5

CHAPTER 1
INTRODUCING THE OPTIONAL ON-BOARD VACUUM HOSE
ACCESSORY
This manual will help you set up and safely operate your new DR WALK-BEHIND LEAF & LAWN VACUUM
Optional On-Board Vacuum Hose Accessory. Careful adherence to the safety and operating instructions in
this manual will ensure many years of productive use.
Please let us know of any questions you may have. We want to answer them as quickly as possible. When
you do call, please have your order number handy. For technical assistance, please call Toll-Free 1-800-DR-
OWNER (376-9637) and one of our Technical Support Representatives will be happy to help you.
Conventions used in this manual
THIS INDICATES A HAZARDOUS SITUATION, WHICH, IF NOT AVOIDED, COULD RESULT IN DEATH OR
SERIOUS INJURY.
THIS INDICATES A HAZARDOUS SITUATION, WHICH, IF NOT AVOIDED, COULD RESULT IN MINOR OR
MODERATE INJURY
.
THIS INFORMATION IS IMPORTANT IN THE PROPER USE OF YOUR MACHINE. FAILURE TO FOLLOW
THIS INSTRUCTION COULD RESULT IN DAMAGE TO YOUR MACHINE OR PROPERTY.
This is a helpful hint to guide you in getting the most out of your DR WALK-BEHIND LEAF & LAWN
Tip:
VACUUM Optional On-Board Vacuum Hose Accessory.
Tools Needed: This indicates you will need a special tool to perform a maintenance function on your
Optional Accessory.
NOTE: This information may be helpful to you.
If you are ever unsure about an action you are about to take, don’t do it, contact Country Home Products’
toll-free support at 1-800-DR-OWNER (376-9637) for help or information.
CALL TOLL FREE 1-800-DR-OWNER 1
Page 6

2 DR® WALK-BEHIND LEAF & LAWN VACUUM Optional Accessory
Page 7

CHAPTER 2
GENERAL SAFETY RULES
• READ THIS SAFETY AND OPERATING MANUAL BEFORE YOU USE THE DR WALK-BEHIND LEAF &
LAWN VACUUM OPTIONAL ON-BOARD VACUUM HOSE ACCESSORY. ALSO, REVIEW THE SAFETY AND
OPERATING MANUAL FOR YOUR VACUUM.
• INSPECT THE AREA WHERE YOU WILL BE WORKING. THE SITE MUST BE FREE OF POTENTIALLY
HAZARDOUS OBSTACLES (E.G., BRANCHES, LARGE STONES, OR OTHER LARGE OBJECTS).
• TURN OFF YOUR DR WALK-BEHIND LEAF & LAWN VACUUM ENGINE AND WAIT FIVE (5) MINUTES
FOR PARTS TO COOL BEFORE INSTALLING OR REMOVING THE ON-BOARD VACUUM HOSE
ACCESSORY.
• WEAR EYE PROTECTION WHENEVER THE ENGINE IS RUNNING.
CALL TOLL FREE 1-800-DR-OWNER 3
Page 8

4 DR® WALK-BEHIND LEAF & LAWN VACUUM Optional Accessory
Page 9

CHAPTER 3
DR WALK-BEHIND LEAF & LAWN VACUUM OPTIONAL ONBOARD VACUUM HOSE ACCESSORY
This chapter outlines a few simple steps you will need to follow to set up and use your new Optional OnBoard Vacuum Hose Accessory for your DR WALK-BEHIND LEAF & LAWN VACUUM. If you have any
questions at all, please feel free to contact our Customer Service Representatives at our toll free number:
1-800-DR-OWNER (376-9637).
Connecting the Optional On-Board Vacuum Hose (Kit No. 21815)
In addition to using your machine as a walk-behind vacuum, the Optional On-Board Vacuum Hose also
provides the constant availability for vacuuming flowerbeds, around trees and under bushes, and other hard
to reach places.
BEFORE PERFORMING THIS PROCEDURE, STOP THE ENGINE AND DISCONNECT THE SPARK PLUG WIRE.
NOTE: The design of the DR WALK-BEHIND LEAF
bottles, and small amounts of sand.
&
LAWN VACUUM is to vacuum debris mixed with cans,
The following instructions detail the steps required to assemble the On-Board Vacuum Hose Accessory and
the two (2) Hose Rest Brackets to the vacuum.
Parts Supplied:
(see Parts List on page 9)
Tools Needed:
• (2) 7/16" Wrench or Socket
• (2) 3/8" Wrench or Socket
• (2) 1/2" Wrench or Socket
• Blade Screw Driver
• Drill with 1/4" Bit
• Petroleum Jelly (optional)
CALL TOLL FREE 1-800-DR-OWNER 5
Page 10

Dimples in Top Shield
p
closest to Engine.
Figure 1a
Figure 2a
Remove
Bolt and Flat Washer on
top, Fender Washer and
Nut inside To
Figure 1b
Hose Rest
U-Bracket
Figure 2b
Shield.
Replace
Attach the On-Board Vacuum Hose Accessory to your DR
WALK-BEHIND LEAF & LAWN VACUUM using the
following steps:
1. Remove the Debris Bag Assembly and then drill two
(2) 1/4" holes through Dimples in the Top Shield that
coincide with the holes in the Top Shield Hose Rest
Bracket (Figure 1a).
BE SURE TO DRILL THE TWO DIMPLES NEAREST THE
ENGINE. THE OTHER TWO DIMPLES ARE FOR
ANOTHER APPLICATION AND USING THEM WILL MAKE
THE NOZZLE DOOR DIFFICULT TO USE.
2. Using the 7/16" Wrenches, install the Hose Rest
Bracket to the Top Shield using the two (2) 1/4" x 1"
Cap Screws, 1/4" Flat Washers, 1/4" Fender Washers
and 1/4" Lock Nuts provided (Figure 1b).
3. To install the Hose Rest U-Bracket to the Engine, first
remove the two (2) Self-Tapping Screws (Figure 2a).
Then attach the Bracket using two (2) new 1/4"-20 x
1" Self-Tapping Screws with 1/4" Flat Washers
provided, into the holes where the original screws
were removed (Figure 2b).
Figure 3a
Hose Clamp
Cover
Nozzle
Remove
(2 places)
Swivel Adapter
4. Remove the Cover from the front of the Nozzle Door by
removing the two (2) Self-Tapping Screws (Figure 3a)
and insert the Swivel Adapter, aligning the Bolt Holes in
the Adapter with the holes in Nozzle Door (Figure 3b).
5. Insert two (2) 10-24 x 3/4" Cap Screws with #10 Flat
Washers (from the inside) through the aligned holes
and install a #10 Flat Washer and 10-24 Lock Nut on
each screw (Figure 3b). Tighten the hardware.
6. Attach the Vacuum Hose to the Swivel Adapter by
slipping the 6" Hose Clamp over the end of the Hose
Bolt from inside
Figure 3b
and then slipping the Hose over end of the Swivel
Adapter (Figure 4). Tighten the Hose Clamp.
Tighten
Figure 4
6 DR® WALK-BEHIND LEAF & LAWN VACUUM Optional Accessory
Page 11

7. Place the Hose Handle Bracket over the pre-drilled mounting holes in the Nozzle (Figure 5a), then
install the two (2) 1/4"-20 x 3/4" Button Head Screws with Fender Washers up through the aligned
holes and through the Handle Bracket (Figure 5a).
8. Place the Hose Handle on the Screws just installed (Figure 5b) and install a 1/4" Flat Washer and 1/4"
Lock Nut on each Screw but do not tighten at this time.
9. Slip a Hose Clamp over the end of the Hose and then slip the Hose onto the Nozzle and push it up
against the Handle Bracket so that the Hose is under the Handle (Figure 6).
Tip: Lubricating the Nozzle end with petroleum jelly will help to slide the Nozzle into the Hose.
10. Slide the Hose Clamp up under the Handle and tighten the clamp (Figure 6) and the remaining
hardware.
11. Reconnect the spark plug wire.
Hose Handle
Bracket
Bolt up
through
Curved End Up
and Facing
Forward
Pre-Drilled Holes
Nozzle
Figure 5a Figure 5b
Hose on Nozzle
up against Bracket
Washer and
Nozzle
Lock Nut
Hose Handle
Hose Clamp
Tighten
Nozzle
CALL TOLL FREE 1-800-DR-OWNER 7
Figure 6
Page 12

Using the Optional On-Board Vacuum Hose
1. Start the Engine, and adjust the Throttle to Fast.
2. Remove the Nozzle from the Stored position (Figure 7) and
Stored Position
• IF THE VACUUM HOSE BECOMES CLOGGED WITH DEBRIS,
• WEAR EYE PROTECTION WHENEVER THE ENGINE IS RUNNING.
Figure 7
BE SURE TO USE CARE NOT TO ALLOW THE NOZZLE OPENING TO COME IN FULL CONTACT WITH THE
GROUND WHILE VACUUMING. DIRT, STONES AND OTHER SOLID OBJECTS MAY BE PICKED UP AND
INGESTED INTO THE IMPELLER ASSEMBLY.
then close the Nozzle Door.
3. While holding the Vacuum Nozzle just above the ground at
an angle, sweep the area side to side that you wish to vacuum
(Figure 8).
STOP THE ENGINE AND DISCONNECT THE SPARK PLUG
WIRE BEFORE ATTEMPTING TO CLEAR THE BLOCKAGE.
Tip: Hold the Vacuum Nozzle at a slight angle to the ground
so that it does not suck right down on the ground. This
allows air to continue to flow into the Nozzle while you
are vacuuming (Figure 8).
Tip: When vacuuming leaves off mulched areas, hold the
Sweep nozzle
side to side
Vacuum with nozzle at an angle
Figure 8
Hold Down Branch with Boot
Tip: When vacuuming in an area with loose brush, twigs, and
Tip: Avoid dragging the Vacuum Hose over curbs,
Small Branch
Tip: Also, avoid dragging the Vacuum Hose over asphalt,
Figure 9
8 DR® WALK-BEHIND LEAF & LAWN VACUUM Optional Accessory
nozzle just above the leaves and lower it slowly to
determine the height that will pickup the leaves and not
the mulch.
branches, step on them to hold them down so as not to
ingest them into the vacuum nozzle (Figure 9). These
types of materials may clog or puncture the vacuum
hose. Once you have cleared the area of leaves, pick up
the twigs and sticks that you uncovered during
vacuuming.
stonewalls, or piles of cut branches. The hose is tough,
but can puncture on sharp objects.
concrete, curbs, or brick patios. The hose is tough, but
can abrade on these surfaces.
Page 13

CHAPTER 4
PARTS LIST AND SCHEMATIC DIAGRAM
Parts List - Optional On-Board Vacuum Hose Assembly (Kit No. 21815)
NOTE: Part numbers listed are available through Country Home Products.
Ref# Part# Description
Ref# Part# Description
01 21801 Nozzle, PVC, 5" x 40" long
02 21802 Bracket, Handle
03 22254 Plug, Tube, Insert, 1"
04 22255 Grip, Handle, 1" x 5.5"
05 22256 Handle
06 22257 Hose, 5" x 87"
07 22258 Clamp, Hose, 6"
08 22259 Tube, 5" Steel Hose Swivel Adapter
09 22260 Cap, Hose, 5", Trimmed Out
10 22261 Bracket, Hose Rest, Engine Mounted
11 22262 Bracket, Hose Rest, Top Shield
Mounted
12 21924 Washer, 1/4", SAE, ZP
13 22263 Screw, Button Head, 1/4"-20 x 3/4"
14 21923 Washer, 1/4", FC, ZP
15 21872 Nut, Lock, Nylon, 1/4"-20 UNC
16 21922 Washer, #10, SAE, ZP
17 21873 Nut, Lock, Nylon, 10-24 UNF
18 22264 Screw, Cap, 10-24 x 3/4", HWH, ZP
19 21929 Washer, Fender, 1/4", ZP
20 22265 Screw, 1/4"-20 x 3/4", HWH
21 21897 Screw, Cap, 1/4"-20 x 1", HCS, ZP
Schematic Diagram - Optional On-Board Vacuum Hose Assembly (Kit No. 21815)
060614
CALL TOLL FREE 1-800-DR-OWNER 9
Page 14

NOTES
10 DR® WALK-BEHIND LEAF & LAWN VACUUM Optional Accessory
Page 15

NOTES
CALL TOLL FREE 1-800-DR-OWNER 11
Page 16

Daily Checklist for the DR WALK-BEHIND LEAF & LAWN VACUUM
To help maintain your DR WALK-BEHIND LEAF & LAWN VACUUM for optimum performance, we
recommend you follow this checklist each time you use your machine.
[ ] OIL: With the machine on a level surface, remove the oil fill cap and check the oil level.
Fill the reservoir according to the dipstick with SAE 30 HD motor oil.
[ ] GAS: Fill the gas tank with fresh, unleaded gasoline.
[ ] ENGINE: It is very important to keep the engine clean. Remove dirt and other debris from the
engine cooling fins and debris guard. A dirty engine retains heat and can cause damage
to internal engine components.
[ ] HARDWARE: Check all nuts and bolts to be sure that the components are secure.
[ ] FRAME: Check all welds to be sure that the frame is in tact and secure.
[ ] DEBRIS BAG: Make sure that the Debris Bag is securely fastened to the Top Shield Assembly and
the Bag Presence Interlock Switch is engaged.
[ ] NOZZLE and IMPELLER: Make sure that the Nozzle and Impeller are free of accumulated debris.
[ ] VACUUM HOSE: Make sure that the Hose Clamps, Hose Handle and Hose Rest Brackets are
tight.
COUNTRY HOME PRODUCTS, Inc.
MEIGS ROAD, P.O. BOX 25, VERGENNES, VERMONT 05491
1-800-DR-OWNER (376-9637) • www.dr-owner.com ©2006 CHP, Inc. 215021A
 Loading...