

Page 1
D
R
1 3 6 5 7
A
A
6
A
LEAF AND LAWN VACUUM
Universal Deck Adapter Kit# 35155 and 35156
®
These instructions explain how to install the DR Power Equipment Universal
Deck Adapter. Refer to your DR Leaf and Lawn Vacuum Safety and Operating
Instruction manual for information on attaching the DR Leaf and Lawn Vacuum
to the Universal Deck Adapter. Please keep these instructions with your Leaf
and Lawn Vacuum Safety and Operating Manual for future reference.
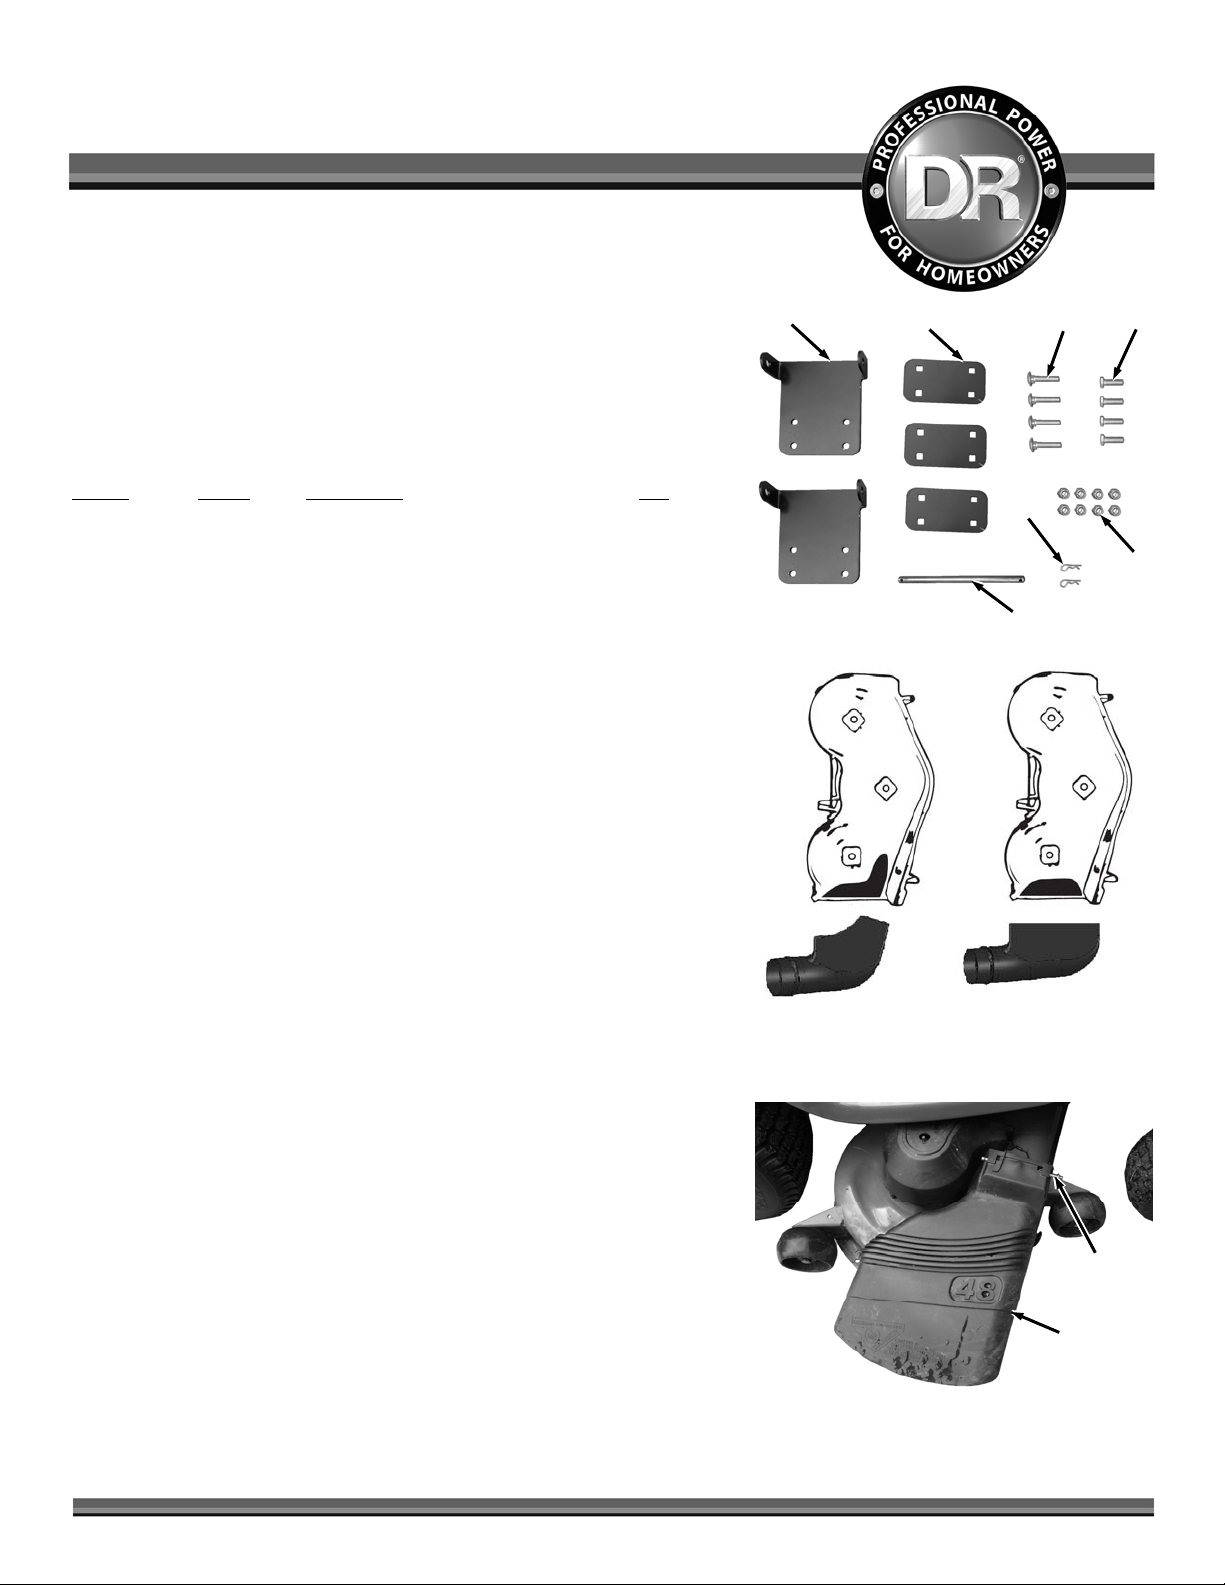
Parts Supplied (Figure 1):
Item #
Part # Description Qty
1 ...................... 35201 .......... Bracket, Deck Boot .................................... 2
2 ...................... 35202 .......... Plate, Deck Boot ........................................ 3
3 ...................... 10913 .......... Bolt, Carr, 5/16-18 X 1.5", ZP ................... 4
4 ...................... 11158 .......... Bolt, HCS, 5/16-18 X 1", GR5, ZP ............ 4
5 ...................... 11076 .......... Nut, Nylon Lock, 5/16-18, ZP ................... 8
6 ...................... 33787 .......... Pin, Cotter, Hair, 1/4"-3/8"....................... 4
7 ...................... 35203 .......... Pin, Bracket, Deck Boot ............................ 1
* ...................... 35019 .......... Adapter, Deck, Standard (kit 35155) ........ 1
* ...................... 35020 .......... Adapter, Deck, Angled (kit 35156) ........... 1
* Shown in Figure 2
Compare the contents of the Shipping Box with the “Parts Supplied” list above.
If you have any questions please contact us at www.DRpower.com or call 1-800DR-OWNER (376-9637) for assistance.
Tools and Supplies Needed:
Tools needed for removing Discharge Chute (see mower user manual)
Marking Tool (Marker or Marking Pencil)
Drill and 5/16" Drill Bit
Jig Saw
Two 1/2" Wrenches
Note: Your Deck Adapter is one of two styles available from DR Power Equipment
(Figure 2). The method of fitting each Adapter to your Mower Deck is
similar. The Angled Deck Adapter is used for these instructions.
Figure 1
ngled
Cutout
ngled Deck Adapter
Kit# 3515
Figure 2
2
Standard Deck
dapter KIT# 35155
4
Standard
Cutout
1. Refer to your Mower’s Manual to remove the Discharge Chute from your
Mower (Figure 3).
Hinge Pin
Mower
Discharge
Chute
Figure 3
CONTACT US AT www.DRpower.com 1
Page 2
A
A
Figure 4
J
w
Deck
dapter
Transferred
Pattern
Mower Deck Opening
Deck Adapter
Marker
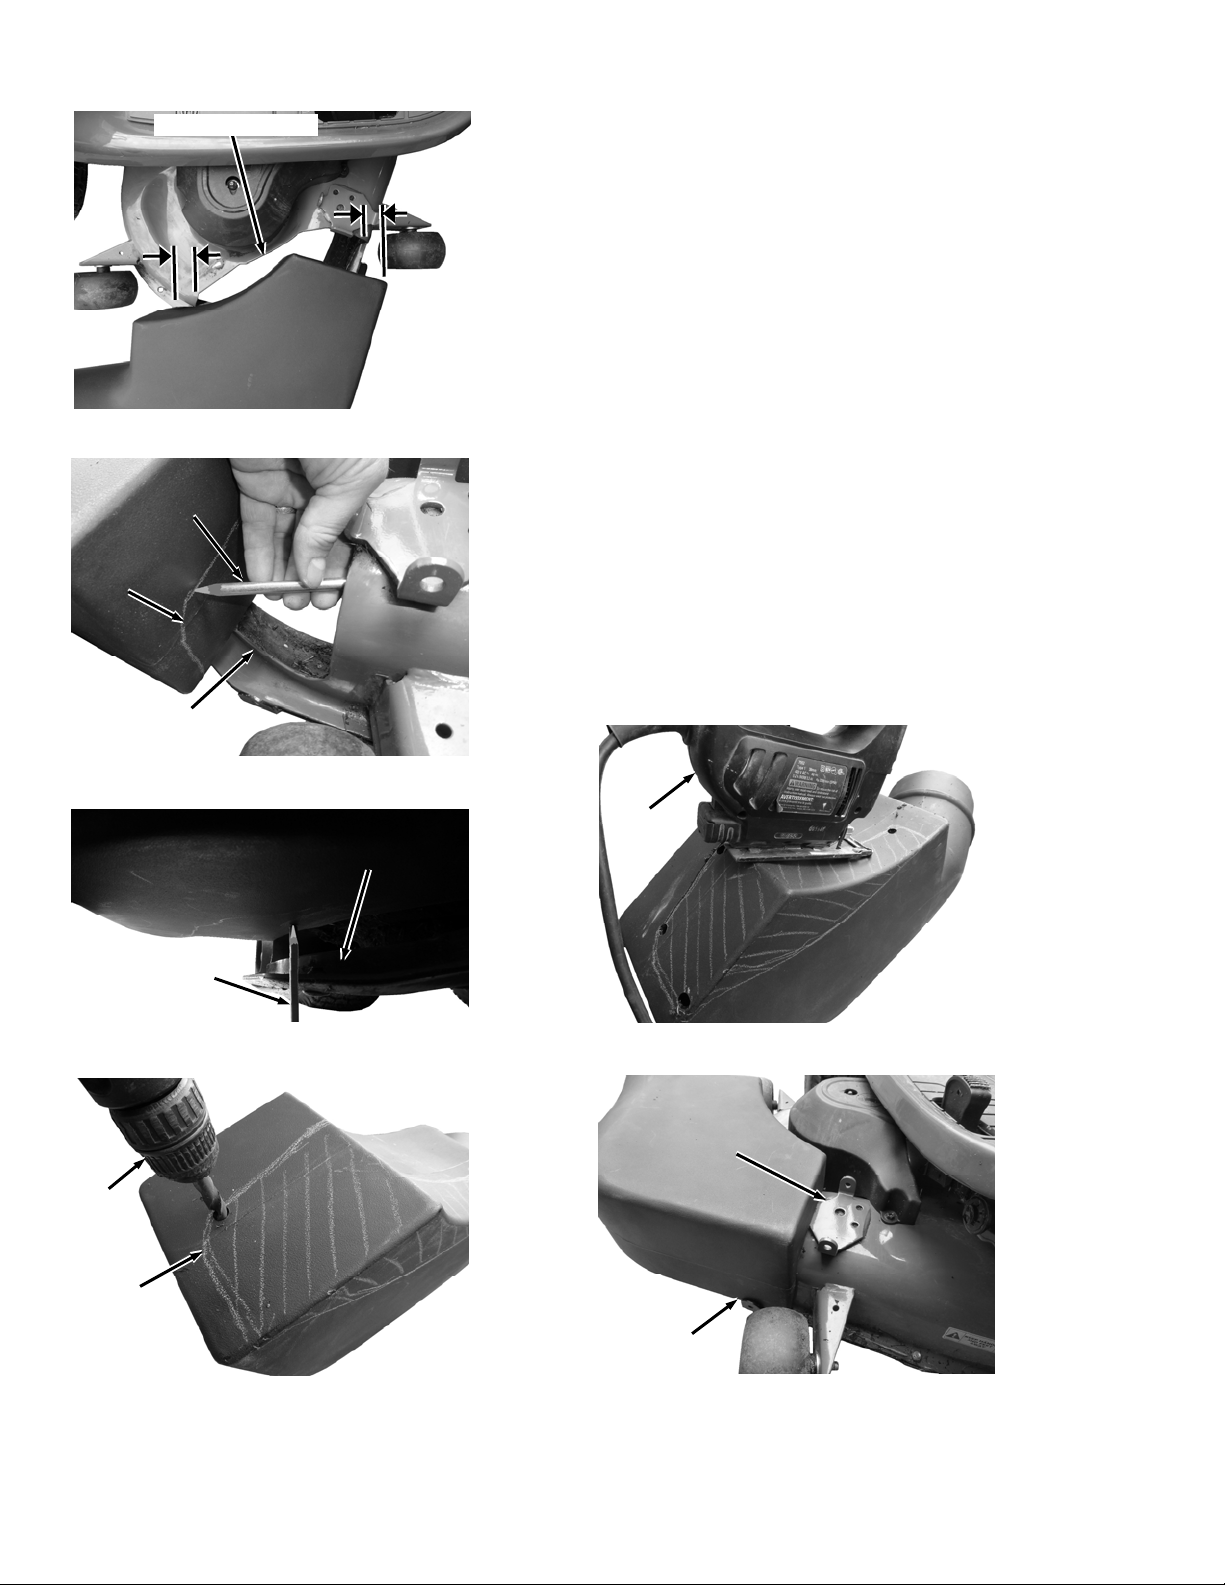
2. Position the Deck Adapter centered with the Deck opening and resting on
the Bottom Rail (Figure 4). There should be the about the same distance from
the corners of the Deck Adapter to the front and rear edges of the Deck
opening.
3. Use a Marker or Marking Pencil to slide along the inside of the Deck
opening to guide you as you mark the Deck Adapter (Figure 5). Make sure you
keep the Marker pointing straight out from the Deck.
4. Make a similar marker line at the portion of the cutout under the Deck
Adapter at the bottom rail of the Deck opening (Figure 6).
5. Drill holes at the sharp bends along the Marker line that would make it
difficult to turn the Jig Saw (Figure 7).
6. Start at one of the holes and cut along the Marker line with a Jig Saw until
the piece can be removed (Figure 8).
7. Continue positioning, checking, marking and cutting the Deck Adapter until
you can place it over the flange of the Hinge Bracket and the bottom rests on
the Deck opening Rail (Figure 9).
Note: Take your time to ensure you do not cut too much at a time but do not worry
if there are some gaps because the DR Leaf and Lawn Vacuum will still work
effectively.
Bottom Rail of
Deck Opening
Figure 5
Bottom of
Deck Adapter
Figure 6
Drill
Cut Line
Marker
Bottom Rail of
Deck Opening
rea to be
Removed
ig Sa
Figure 8
Deck
Bracket
Deck Adapter
Resting On
Bottom Rail
Figure 7
Figure 9
Page 3

Note: Make sure the end of the Deck Adapter where the Hose will attach is not
A
r
hitting the Mower Scalping Wheels etc. It should point out a bit from the
side to avoid contact with Mower parts (Figure 10).
8. Place the Hinge Bracket onto the Deck Adapter with the Pin holes facing
down and slide a Pin from the Kit through the Hinge Bracket and the Bracket
on the Mower Deck (Figure 11).
Clearance
Note: If the Hinge Bracket is too high so it does not rest flat on the Deck Adapter
there are two extra Plates in the Kit that can be installed under the Hinge
Bracket to lift it up. If the Deck Adapter is higher than the Hinge Bracket
then you will need to make the Deck Adapter cutout a litter taller.
Note: We have provided an extra Hinge Bracket in case your Deck does not have an
adequate Bracket. Remove the existing Bracket and replace as necessary.
The Hex Head Bolts in your Kit are for mounting the Bracket to your Deck.
9. Mark the hole locations of the Hinge Bracket onto the Deck Adapter.
10. Drill the holes into the Deck Adapter (Figure 12).
11. Install a Deck Boot Plate inside the Deck Adapter using the Carriage Bolts
provided (Figure 13).
12. Secure the Hinge Bracket to the Deck Adapter with Locknuts using a 1/2"
Wrench (Figure 14).
13. Install the Deck Adapter to the Mower with the Pin and Hitch Clips (Figure
15).
Locknuts
Figure 10
Hinge
Bracket
Figure 11
Deck
dapte
Fit at Rear
of Adapter
Pin From
Kit
Drill
Hinge Bracket
Holes
Hinge Bracket
Figure 14
Figure 12
Backer
Hitch Clips
Hinge Pin
Figure 15
Figure 13
CONTACT US AT www.DRpower.com 3
Carriage Bolts
Plate
Page 4

If you have any questions please contact us at www.DRpower.com or call 1-800-DR-OWNER (376-9637) for assistance.
75 MEIGS ROAD, P.O. BOX 25, VERGENNES, VERMONT 05491
©2014 Country Home Products, Inc. All rights reserved 352041
 Loading...