

Page 1
DR
SAFETY & OPERATING INSTRUCTIONS
®
R225, R300 and R390 ENGINES
Read and understand this manual and all instructions before operating the DR R225, R300 and R390 ENGINES.
Original Language
DR Power Equipment
Toll-free phone: 1-800-DR-OWNER (376-9637)
Fax: 1-802-877-1213
Website: www.DRpower.com
Page 2
Table of Contents
I: Safety Precautions .............................................................................................................................................................................. 3
II: Parts Description .............................................................................................................................................................................. 4
III: Pre-Operation Inspection ................................................................................................................................................................ 5
IV. Starting the Engine .......................................................................................................................................................................... 8
V. Stopping the Engine ......................................................................................................................................................................... 11
VI. Exhaust Control System ................................................................................................................................................................... 13
VII: Maintenance ................................................................................................................................................................................... 14
VIII. Transport and Storage .................................................................................................................................................................. 17
IX: Troubleshooting ............................................................................................................................................................................... 18
X. Specifications .................................................................................................................................................................................... 22
XI. Electrical Diagrams .......................................................................................................................................................................... 23
Conventions used in this manual
This indicates a hazardous situation, which, if not avoided, could result in death or serious injury.
This indicates a hazardous situation, which, if not avoided, could result in minor or moderate injury.
This information is important in the proper use of your machine. Failure to follow this instruction could result in damage to
your machine or property.
Additional Information and Potential Changes
DR Power Equipment reserves the right to discontinue, change, and improve its products at any time without notice or
obligation to the purchaser. The descriptions and specifications contained in this manual were in effect at printing.
Equipment described within this manual may be optional. Some illustrations may not be applicable to your Engine.
2 DR
®
R225, R300 and R390 Engines
Page 3
I: Safety Precautions
There is a possibility of voiding the warranty and personal or equipment damage if instructions are not followed.
Please pay special attention to the following:
1. Operate the engine according to the recommendations in your owner's manual. Do not overload, overrun the engine or
run it with low load and at low speed for a long period of time.
2. Use regulated 87 octane brand of gas. The fuel should be fully deposited and filtrated before use. Keep the fuel filler clean
to prevent contamination.
3. Change the oil periodically as described in the “Maintenance” section of this manual.
4. Periodically check the installation, connection and the tightness of the mounting hardware. Tighten when necessary.
5. Periodically clean the air filter; change it as indicated in the “Maintenance” section.
6. This gasoline engine is air-cooled, so clean the cooling fins, recoil cover and air intake to allow the engine cool normally.
7. The operator should be familiar with the working principle and structure of this gasoline engine, knowing how to make an
emergency stop when needed. Do not allow anyone without training to operate the engine. Perform periodical
maintenance per the “Maintenance” section. Fix all operation problems immediately. Do not run the engine if it is not
operating properly.
8. Only operate the engine in a well-ventilated place, keep it at least one meter away from building walls or other equipment,
keep engine away from inflammables such as gasoline, matches and so on to avoid possibility of fire.
9. Refuel in a well-ventilated area with the engine stopped, do not smoke and do not allow flames or sparks in the refueling
area.
10. Do not overfill the fuel tank to avoid fuel spilling out. If there is spilled fuel around, be sure to clean it thoroughly before
starting.
11. Do not run the engine inside buildings or enclosure areas.
12. The exhaust muffler is very hot during running the engine and even after the engine stops. Never touch it, or you may get
burns. Do not transport or store the engine until it has cooled down entirely.
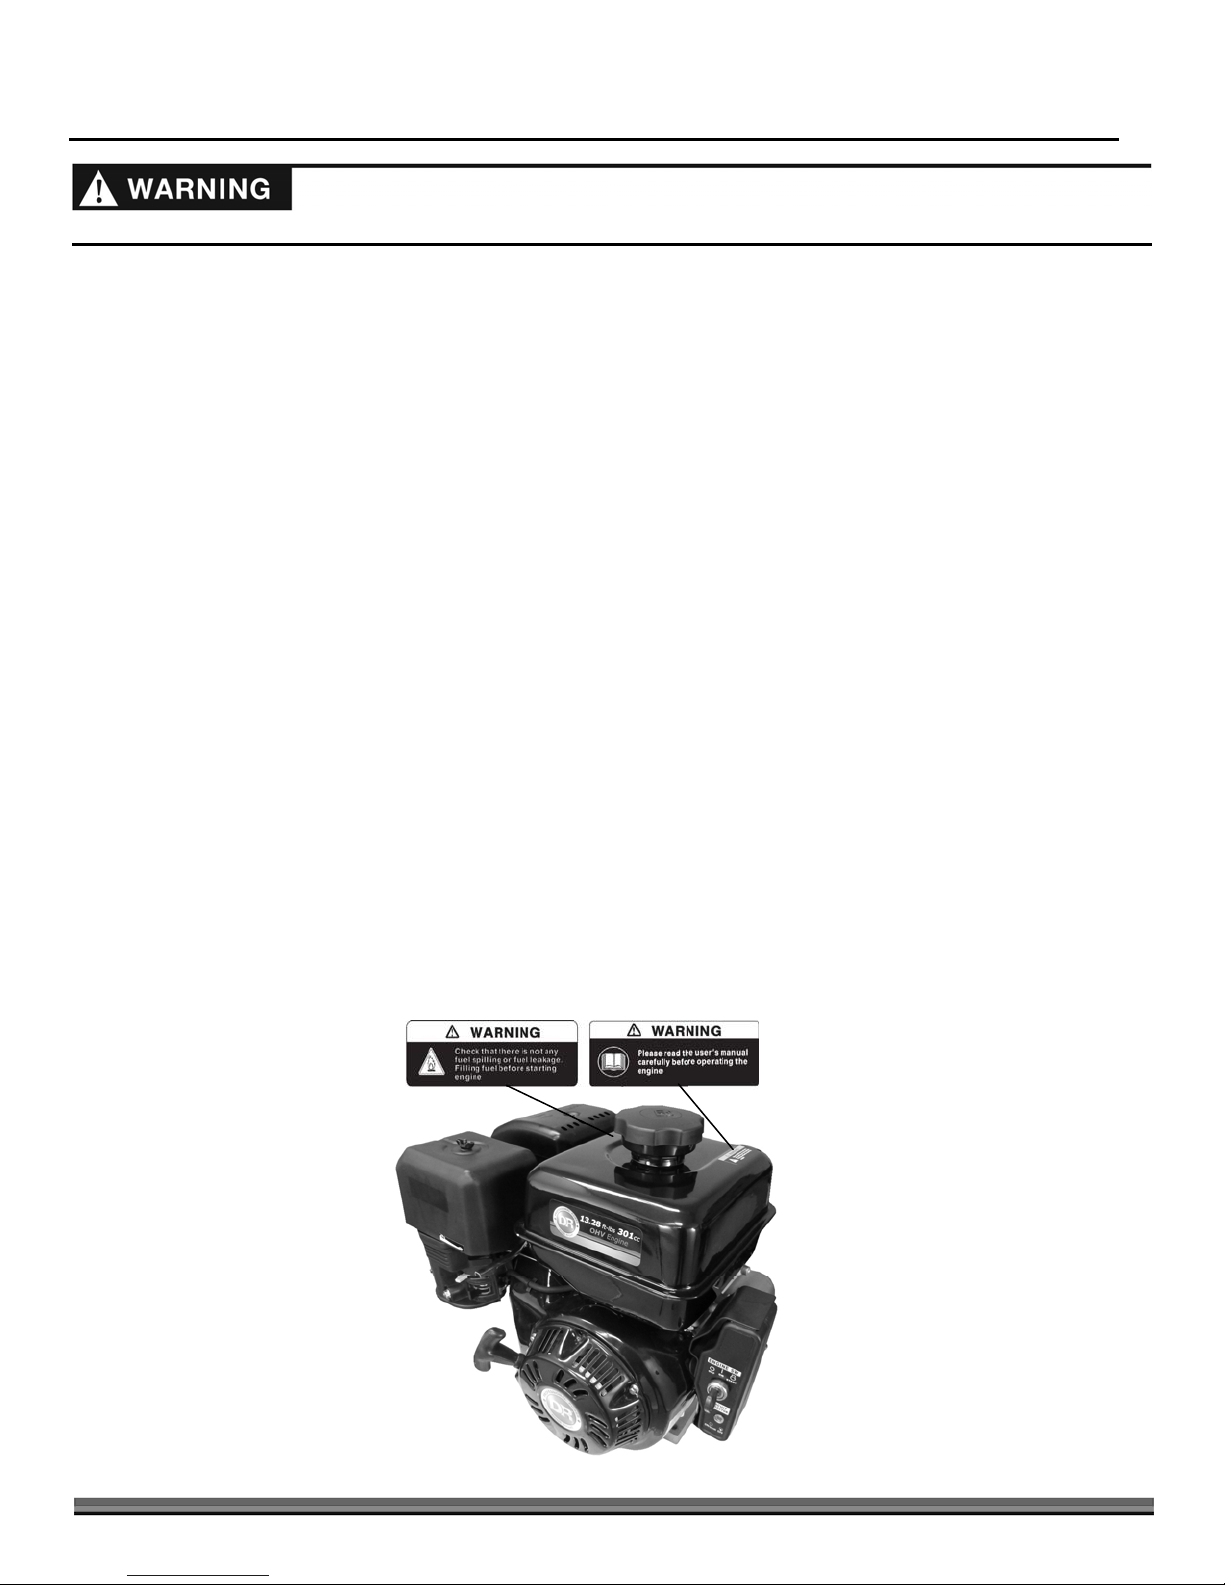
13. Safe warning label:
Please carefully read warning labels before operating. DR Power Equipment is not responsible if a person is hurt, or
equipment becomes damaged due to disregarding warning labels.
CONTACT US AT www.DRpower.com 3
Page 4
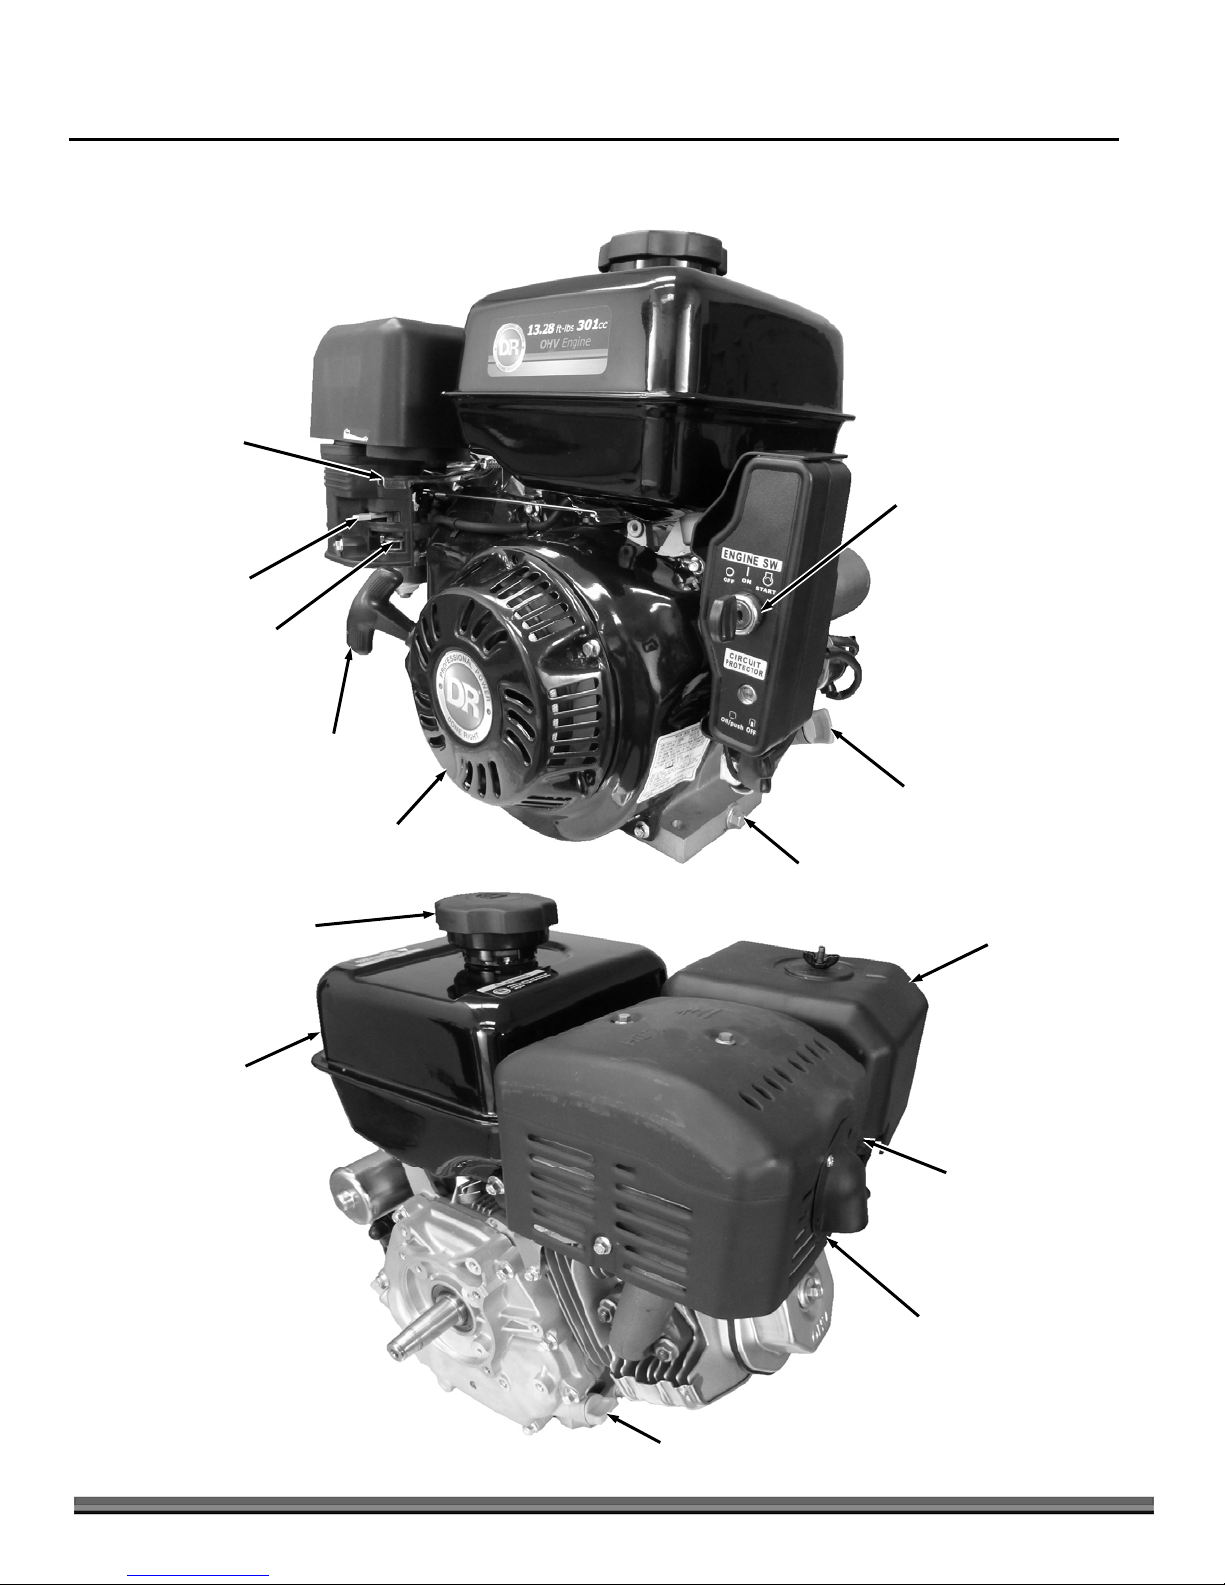
II: Parts Description
Air
r
Throttle
Lever
Choke Lever
Fuel Shutoff
Engine Switch
Fuel Tank Cap
Fuel Tank
Starter
Handle
Oil Dipstick
Recoil Starter
Oil Drain
Plug
Cleane
Spark
Plug
4 DR
®
R225, R300 and R390 Engines
Muffler
Oil Plug
Page 5
III: Pre-Operation Inspection
1. ENGINE OIL
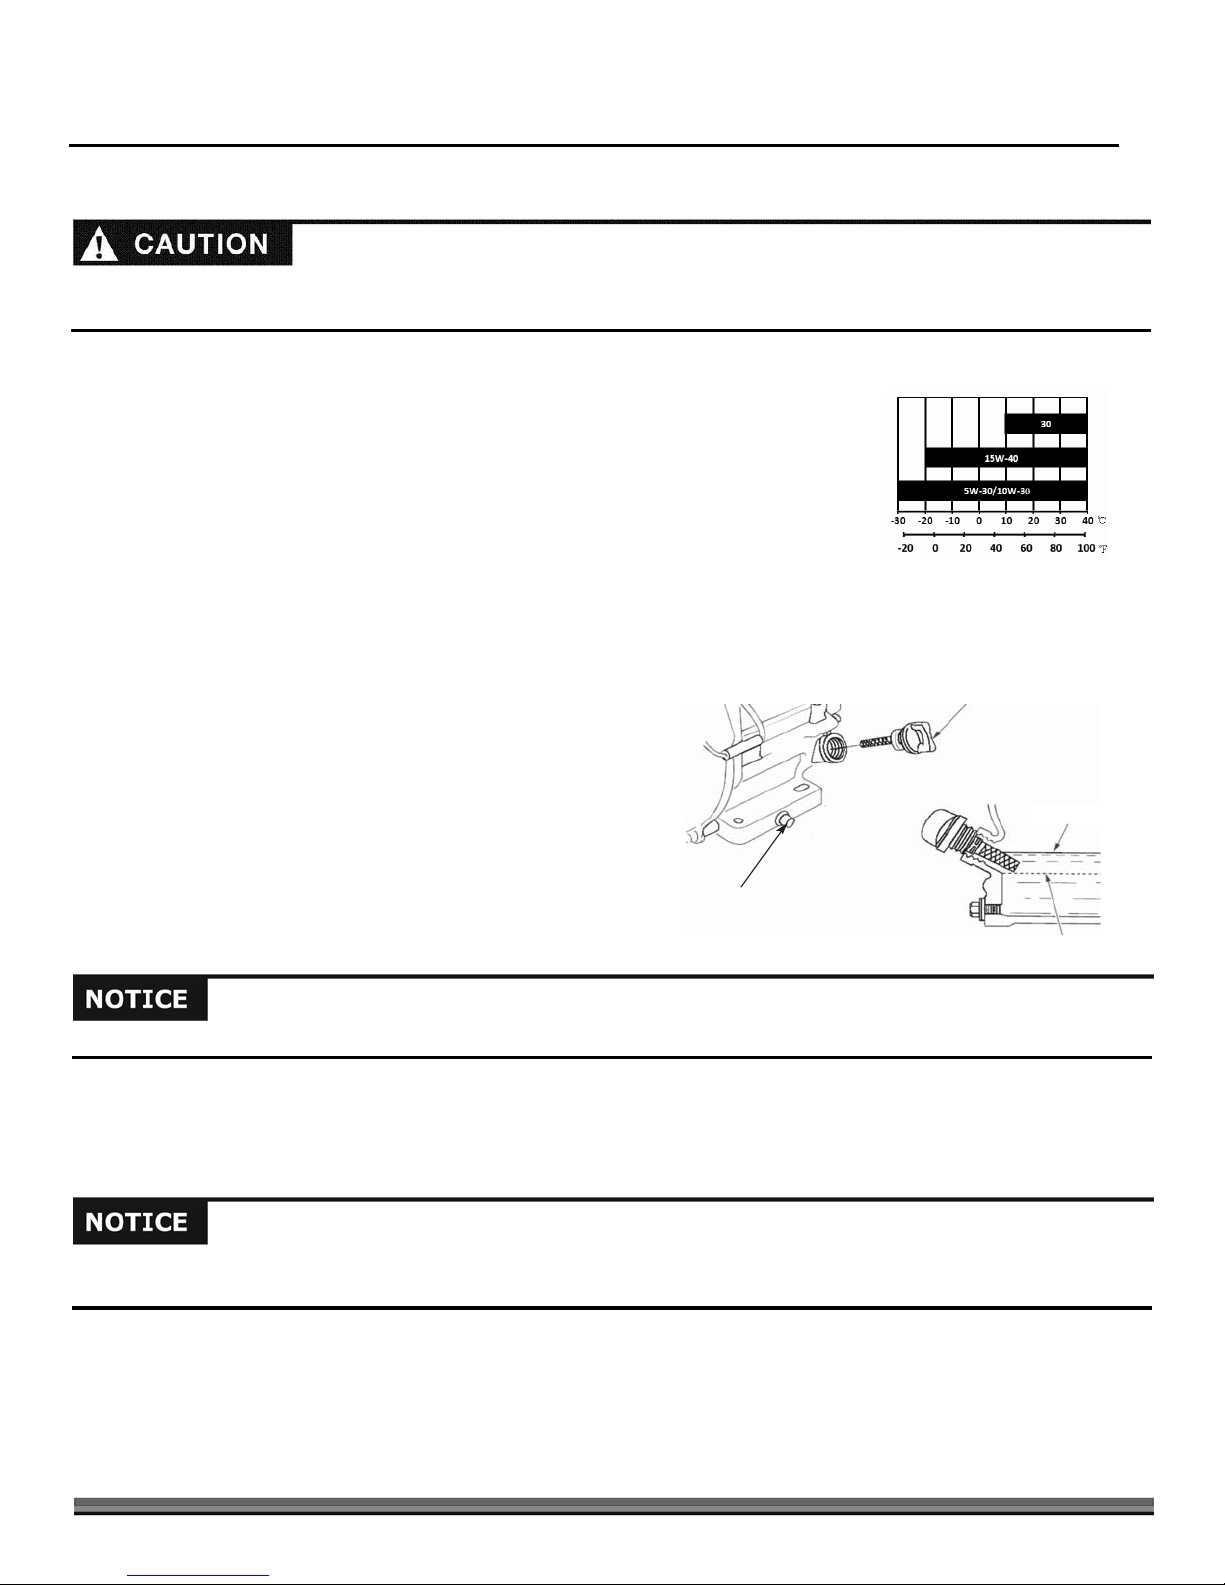
Use 4-stroke engine oil, API service classification SJ class or equivalent. Check the API service label on the oil container to be sure
it includes the letters SJ class or equivalent.
SAE 10W-30 is recommended for general use. Other viscosities shown in the chart may be used
when the average temperature in your area is within the indicated range.
Oil level check
1. Remove the dipstick and clean it with a rag.
2. Reinsert the dipstick into the oil filling hole without screwing it in. Pull the dipstick out and
check oil level.
3. If the oil level is too low, add the recommended engine oil up to the oil filling neck.
4. Reinstall the dipstick.
R225 Oil Capacity = .5 qt/16 oz (0.5L)
R300 and R390 Oil Capacity = 1.16 qt/37 oz (1.1L)
Drain Plug
SAE Viscosity Grades
Environment Temperature
Oil Dipstick
Oil Upper Level
Oil Lower Level
Running the engine with insufficient engine oil may damage the engine severely and would not be covered under warranty.
2. AIR CLEANER
Remove the air cleaner cover and check the air filter to make sure it is clean and not damaged. Clean or replace it as necessary
(see the “Maintenance” section for maintenance of the air filter).
Never run the engine without the air filter and cover installed or damage to the engine could result. Damage to the engine
by not having the air filter and cover installed is not covered under warranty.
CONTACT US AT www.DRpower.com 5
Page 6
3. FUEL RECOMMENDATION
1. Remove the fuel tank cap and check the fuel level.
2. If the level is too low, refuel the tank to the recommended level. Remember to never fill fuel over the fuel filler shoulder.
Gasoline is extremely flammable and is explosive under certain conditions.
Only add fuel in a well-ventilation area with the engine stopped. Do not smoke and do not allow flames or sparks in the area
where gasoline is stored or where the fuel tank is refueled.
Do not overfill the fuel tank (there should be no fuel in the filling neck). After refueling, make sure the fuel tank cap is installed
securely.
Be careful not to spill fuel when refueling. Spilled fuel or fuel vapor may ignite. If any fuel is spilled, make sure the area
cleaned up and is dry before starting the engine.
Avoid repeated or prolonged contact with skin or breathing of fuel vapor. Keep out of reach of children.
Fuel Filler Shoulder
Maximum
Fuel Level
Fuel Filler
R225 Fuel Tank Capacity = .9 gal/3.6 qt (3.4L)
R300 and R390 Fuel Tank Capacity = 1.72 gal/6.9 qt (6.5L)
Fuel may damage paint and plastic. Be careful not to spill fuel when refueling. Any damage due to fuel spilling is not covered
under warranty.
It is normal to hear a "light knocking" sound when the engine is overloaded. Do not be concerned if this occurs. If "knocking"
or sounds occur at a steady speed under normal load, change the brand of gasoline; if the sounds continue, consult your
dealer for help.
If you continue to run the engine with a "Knocking" sound during normal operation, it will damage the engine.
Continuing to use the engine with "Knocking" sounds from misusing will void the engine warranty.
6 DR
®
R225, R300 and R390 Engines
Page 7
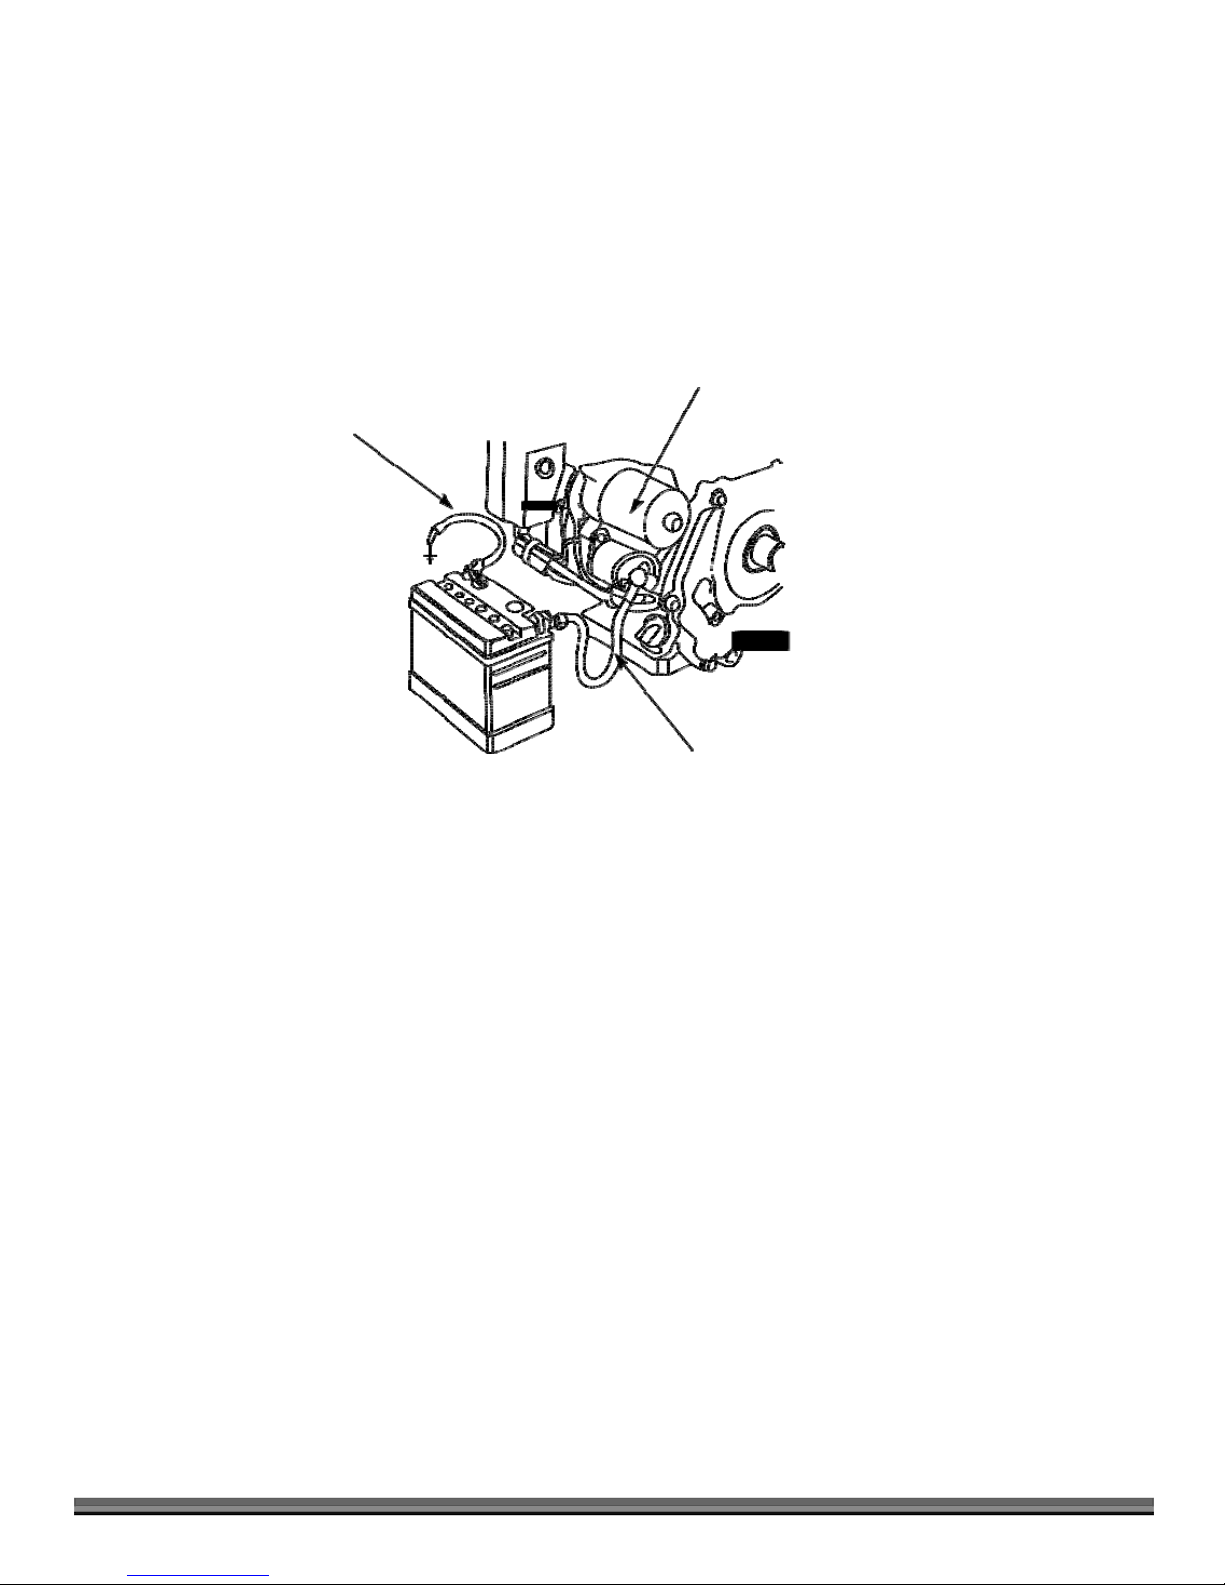
4. BATTERY CONNECTION
Use a 12V battery with your DR Engine.
Connect the battery’s positive (+) lead to the start relay terminal and connect it’s negative (-) lead to the engine mounting
Bolt, base screw or other grounding point with the engine (See the following picture).
Check the battery's connecting point; make sure that it is tight and not rusted. If rusted, clean and connect.
Start Relay
Negative
(-) Wire
Positive
(+) Wire
CONTACT US AT www.DRpower.com 7
Page 8

IV. Starting the Engine
ON
r
ON
OFF
Choke Lever
CLOSE
Fuel Shutoff
OPEN
1. Turn the fuel Shutoff to the “ON” (OPEN) position.
2. Turn the choke lever to the “CLOSE” (CHOKE) position. If the engine is hot from
use, don’t close the choke.
3. Move throttle lever to the left a little.
Throttle Leve
High Speed
Manual Engine Switch
Low Speed
4. Starting the engine – Manual Start
a. Turn the engine switch to the “ON” (START) position.
OFF
8 DR
®
R225, R300 and R390 Engines
Page 9

b. Pull the recoil starter grip lightly until resistance is felt, then pull briskly.
Recoil Starter
Grip
Don’t allow the recoil starter grip to snap back against the engine. Return it gently to prevent damage to the starter
5. Starting the engine – Electric Start
a. Turn the engine switch to the “START” position and hold it there until the
engine starts.
b. When the engine starts, allow the engine switch to return to the “ON” position.
Engine Switch
Do not use the starter for more than 5 seconds or starter motor damage may occur. If the engine fails to start, release the switch
and wait 10 seconds before operating the starter again.
6. Once the engine is running push the choke lever to the “OPEN” position.
Choke Lever
OPEN
CLOSE
CONTACT US AT www.DRpower.com 9
Page 10

Throttle Leve
r
High Speed
To run the engine, move the throttle lever to proper position to run at the required
speed.
Low Speed
10 DR
®
R225, R300 and R390 Engines
Page 11

V. Stopping the Engine
ON
r
ON
In an emergency, rotate the engine switch to the “OFF” position.
In normal non emergency conditions, please do as follows:
1. Push the throttle lever to the right to the low speed position.
Throttle Leve
High Speed
Low Speed
2. Rotate the engine switch to the “OFF” position.
Fuel Shutoff
OFF
3. Set the fuel shutoff to “OFF” position.
Engine Switch
(Manual Start)
OFF
Engine Switch
(Electric Start)
Never stop the engine at high speed under heavy load unless there is an emergency because engine could be damaged.
CONTACT US AT www.DRpower.com 11
Page 12

Low Engine Oil Shutoff
The engine oil shutoff is specially designed to protect the engine when the engine oil in the crankcase is too low. Once the
engine oil level gets lower than the limit line, the low engine oil shutoff system will stall the engine automatically while the
engine switch is still at “ON” position.
If the engine will not start, check the engine oil level first before going to other check items.
BREAKER (Electric-start models)
The breaker will cut off automatically to protect the charging circuit of the battery in
Breaker
the case that a short circuit or incorrect connection of the battery poles occurs.
The green indicator in the breaker will pop out and the circuit will be cut off. After
finding troubleshooting and fixing the problem, depress the breaker button to turn
the breaker on.
High Altitude Kit for EPAIII Engines
3000ft to 6000ft or 6000ft to 8000ft of elevation
At high altitude, the standard carburetor air-fuel mixture will be too rich. Performance will decrease and fuel consumption will
increase. A very rich mixture will also foul the spark plug and cause hard starting. Operation at an altitude that differs from
that at which this engine was certified, for extended periods of time, may increase emissions.
The fuel system on this Engine or Equipment may be influenced by operation at higher altitudes. Proper operation can be
ensured by installing an altitude kit when required. See the table below to determine when an altitude kit is required.
Operating this engine without the proper altitude kit installed may increase the engine’s emissions and decrease fuel
economy and performance. Kits may be obtained from DR Power Equipment, and should be installed by a qualified individual.
Fuel Altitude Range* Kit Part Number
Gasoline 0 – 3000 ft Not Required
3000 – 6000 ft Altitude kit 1#
6000 – 8000 ft Altitude kit 2#
Engine, Generator Set, Pressure Washer, Walk-Behind
Compressor, Pump, Tiller
*Elevation above sea level.
etc.
Lawnmower,
This high altitude jet is to be used at elevations above 3000 feet.
At elevations above 8000 feet, the engine may experience decreased performance, even with the high altitude kit.
To prevent serious injury from fire follow the kit procedures in a well-ventilated area away from ignition sources. If the engine is
hot from use, shut the engine off and wait for it to cool before proceeding.
The warranty may be void if necessary adjustments are not made for high altitude use by installing a high altitude kit.
If a carburetor is replaced, the proper high altitude kit jet will need to be installed into the replacement carburetor.
12 DR
®
R225, R300 and R390 Engines
Page 13

VI. Exhaust Control System
With the engine running carbon monoxide, nitrogen oxide and hydrocarbons are produced and in certain conditions, nitrogen
oxide and hydrocarbon will react chemically with each other to make smoke while carbon monoxide is toxic, so proper
maintenance to control these dangers is very important.
To keep the exhaust of your engine within the standard exhaust emission, pay attention to the following:
1. Maintenance
Maintain the engine periodically in accordance with the maintenance schedule in the “Maintenance” section. The
maintenance schedule is based on normal use in normal conditions, if using under heavy load, dusty or wet circumstances or
in high temperature, service of the engine should be done more often.
2. Problems affecting exhaust emissions
Difficult starting or difficult stopping.
Unstable idling speed.
Exhausting of black smoke or consuming too much fuel.
Poor ignition, sparks or backfire.
Premature ignition.
If you are experiencing any of above problems, contact DR Power Equipment for help.
CONTACT US AT www.DRpower.com 13
Page 14

VII: Maintenance
The engine must be properly maintained to ensure safe operation, economy and trouble-free, as well as eco-friendly.
In order to keep your gasoline engine in good working condition, it must be periodically serviced. The following maintenance
schedule and routine inspection procedures must be carefully followed.
Frequency
Items
Engine oil Check- Refill
Replace
Air filter element Check
Clean
Replace
Spark Plug Check - adjust
Spark arrester Clean
Idling ( if
Check - adjust
Each Time Before
use
√
√
First month or first
20hrs of operation
√ √
√
Every 3 months or
every 50hrs of
operation
√
√
Every year or every
100 hrs of
operation
√﹡
√
equipped)﹡﹡
Valve clearance
Check-adjust
√
﹡﹡
Fuel tank & fuel
Clean
√
filter ﹡﹡
Fuel line Check Every 2 years( change if necessary)
﹡ These items should be replaced as needed.
﹡﹡ These items should be maintained and repaired by our authorized dealer, unless the owner has appropriate tools and is
proficient with mechanical maintenance.
If the gasoline engine is frequently operating under high temperature or heavy load, change the oil every 25 hours.
If the engine is frequently operating under dusty or other severe circumstances, clean the air filter element every 10 hours; If
necessary, change the air filter element every 25 hours.
Perform maintenance according to which one come first, period (month, year) or the exact time (hours).
Stop the engine before servicing. Put the engine on a level surface and remove the spark plug cap to prevent the engine from
starting. Never run your engine in a poorly ventilated room or other enclosed area, be sure to keep good ventilation in working
area. The exhaust from the engine may contain poisonous gases, inhalation can cause shock, unconsciousness and even death.
14 DR
®
R225, R300 and R390 Engines
Page 15

2. MAINTENANCE METHOD
Oil Dipstick
1) Replacement of engine oil (see “Oil Level Check” in Chapter IV to check oil level)
Drain Plug
The oil will drain more rapidly and completely when the engine is warm.
(1) Remove the oil filler cap and drain plug to drain engine oil thoroughly.
(2) Reinstall the drain plug and screw in securely.
(3) Fill with the specified engine oil up to the upper level mark.
Do not dump oil containers or discarded engine oil into rubbish boxes or onto the ground. For the sake of environmental
protection, we suggest you take in discarded engine oil with a closed container and bring to local recycling station.
(3) Reinstall the oil filler cap.
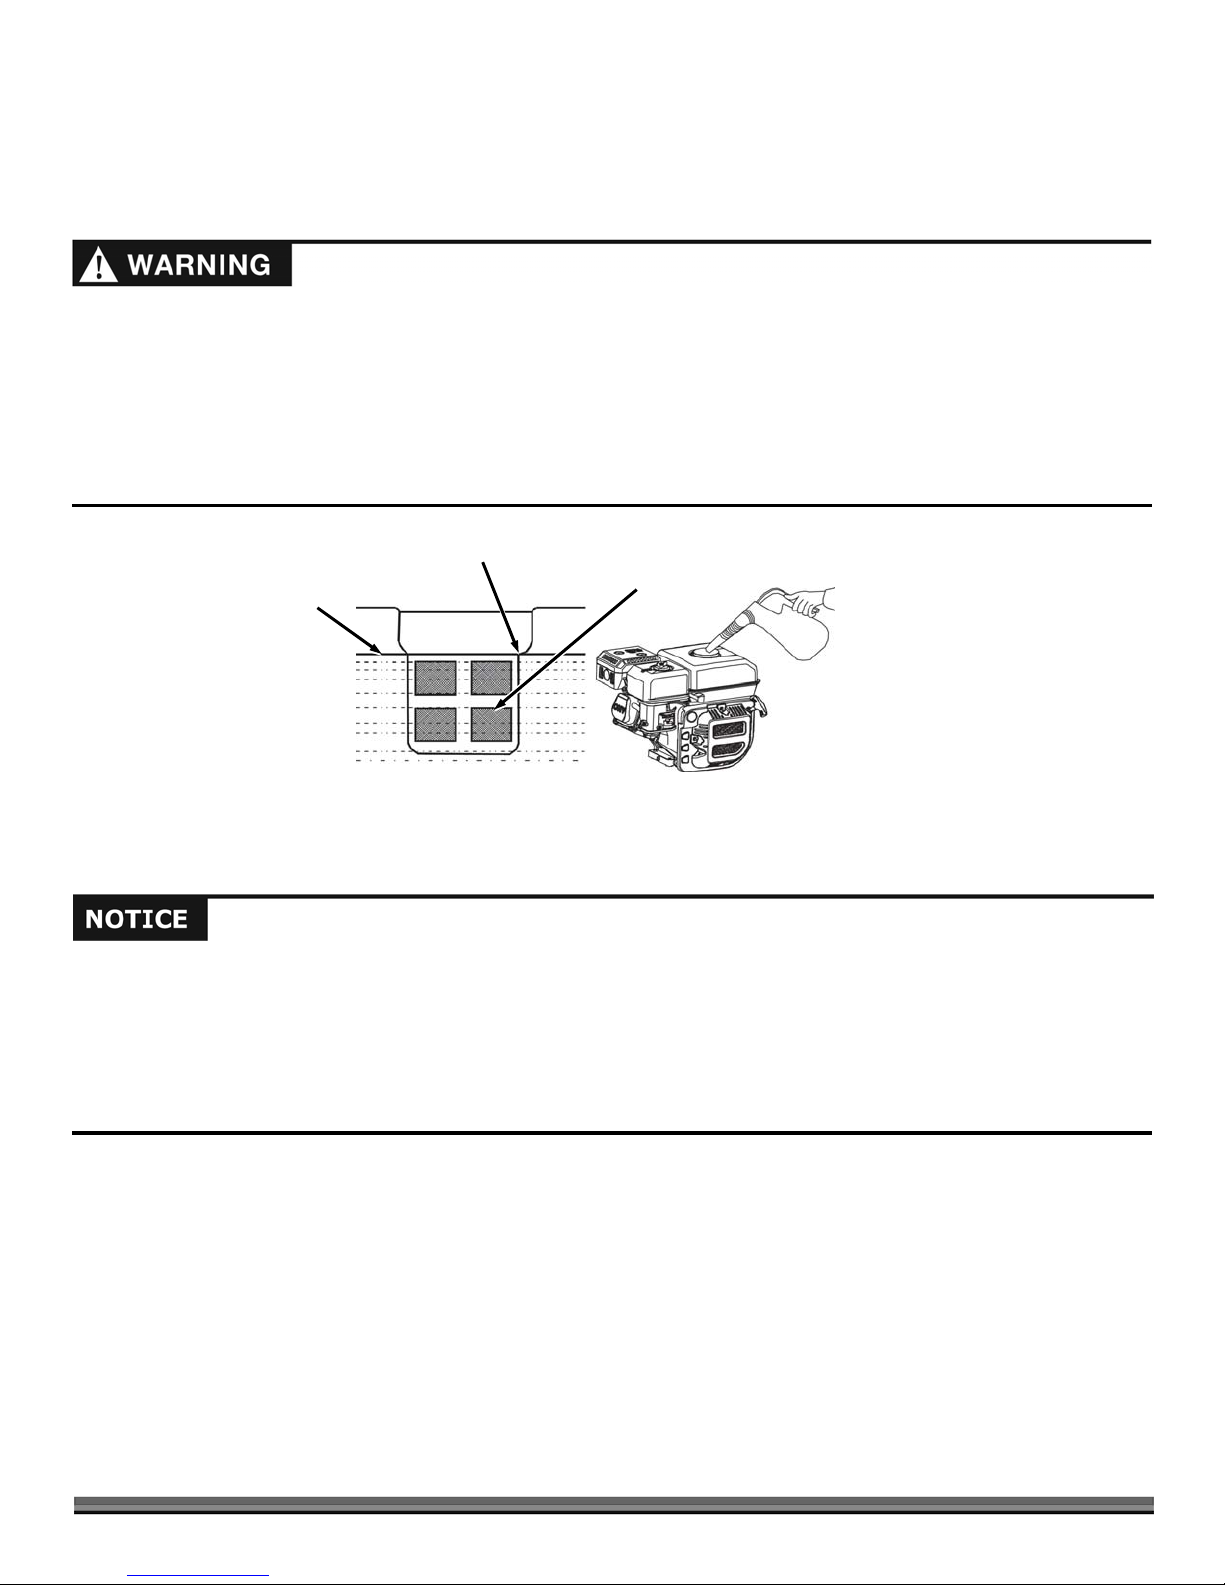
2) Maintenance of air filter
A dirty air filter can restrict air flowing into the carburetor. To keep the carburetor in good working condition, please service
the air filter periodically (clean air filter element after 20h of use). If the engine is being operated in an extremely dusty area,
clean the filter more often.
Never clean the air cleaner filter with gasoline or low flash-point detergents, or explosion may happen.
Washer
Never run the engine without an air filter because dirt and dust entering the engine can speed up engine wear and cause damage.
(1) Remove the wing nut from the filter cover and remove the cover.
(2) Remove the wing nut from air filter and pull the air filter with pre-cleaner from
Wing Nut
the threaded stud.
(3) Pull the pre-cleaner off the paper filter assembly and shake the dirt from the
foam pre cleaner and from the paper filter.
Note: If the foam Pre-cleaner or paper filter is too dirty to clean (clogged) or
Filter Cover
damaged you must replace the filter with a new filter.
(4) Clean the air filter cover and inner surface with wet cloth, be careful not to allow
the dust to enter into the carburetor.
(5) Reinstall the air filter with pre-cleaner and secure with the wing nut.
(6) Reinstall the filter cover and secure with the wing nut.
Wing Nut
Pre-Cleaner
and Filter
CONTACT US AT www.DRpower.com 15
Page 16

3) Spark plug
Spark plug type: See specification section X.
To ensure the engine will run normally, the spark plug gap must be correct and make sure there
are no deposits around the spark plug.
(1) Remove the spark plug cap.
(2) Clear away dirt from around the spark plug base.
(3) Only remove the spark plug with a spark plug wrench.
(4) Visually check the spark plug. Clean with a steel brush. If the insulator is damaged, replace
the spark plug.
(5) Measure the spark plug clearance with a feeler gage. The clearance should be .028" ~.032"
(0.7~0.8mm) If adjustment is necessary, bend the side electrode carefully.
(6) Check if the spark plug gasket is in good conditions. Screw in the spark plug as far as you can
by hand to prevent thread damage.
(7) Tighten the spark plug with a spark plug wrench and compress the gasket.
-- If a new spark plug is used, turn it 1/2 turn after compressing the gasket.
-- If reinstalling the used spark plug, turn it 1/8-1/4 turns after compressing the gasket.
Don’t touch the muffler when the engine is running to avoid burns.
The spark plug must be tightened securely or it may become very hot and damage the engine.
16 DR
®
R225, R300 and R390 Engines
Page 17

VIII. Transport and Storage
Transport with the fuel shutoff turned to the “OFF” position. Transport or store the engine when it is cool to avoid getting
burns or causing fire.
Do not excessively tilt the engine because fuel will spill. Spilled fuel or fuel vapor may ignite to cause fire.
Fuel is extremely flammable and explosive under certain conditions. Keep smoke, fire and spark away from operating site.
If the engine is not kept in use for a long period of time, be sure to store it properly.
1. Make sure the storage area is dry and free of dust.
2. Turn the fuel shutoff to the “OFF” position and set a proper container under the carburetor.
3. Remove the carburetor drain plug to remove the fuel in the carburetor float bowl.
4. Open the fuel shutoff to completely drain gasoline out of the fuel tank.
5. Reinstall the carburetor drain plug and tighten it.
6. Remove the oil drain plug, drain the oil out of the engine and reinstall the oil drain plug.
Carburetor Drain Plug
7. Remove the spark plug. Add about a spoon-full of fresh engine oil onto the cylinder. Crank the
engine with the pull cord to distribute engine oil evenly. Reinstall the spark plug.
8. Cover the engine to protect dust entering.
Please maintain according to following table when reusing after storing.
Storing time Maintaining procedure is recommended in order to prevent starting difficulty.
1 month No maintenance needed.
1-2 month Drain the used gasoline out and add the fresh gasoline
2 months to 1 year Drain the used gasoline out and add the fresh gasoline
Drain the gasoline out of the carburetor cup. Drain the gasoline out of the sediment bowl.
More than 1 year Drain the used gasoline out and add the fresh gasoline
Drain the gasoline out of the carburetor cup. Drain the gasoline out of the sediment bowl.
After removing from storage, first drain the used gasoline into approved container and don’t start before
adding fresh gasoline.
Remove the carburetor drain plug and completely drain the gasoline out of the carburetor to an approved container and
replace the drain plug. Remove the sediment bowl after closing fuel shutoff and completely pour the gasoline out the sediment
bowl. Finally reinstall the sediment bowl and screw it down.
CONTACT US AT www.DRpower.com 17
Page 18

IX: Troubleshooting
f
gg
q
pp
y
y
q
y
1. ENGINE STARTING DIFFICULTLY:
TROUBLE CAUSE REMEDY
There is not enough fuel in fuel tank and fuel shutof
is closed.
Air vent in the fuel filler cap is clogged Dredge air vent.
Fuel shutoff is clogged Clean first and then dredge
Improper or clogged main fuel flow hole. Readjust or clean, blow to get through.
Fill fuel, open fuel shutoff.
Needle valve is not closed properly or start hole is
clo
ed.
Float is damaged or sticking. Repair float
Fuel supply is not smooth or
no fuel supply.
Dismantle needle valve and repair, clean, blow to get
through.
Fuel is too filthy or deteriorated Replace
There is water in fuel. Replace
Too much fuel in engine Drain extra fuel, dry up spark plug electrodes.
Wrong fuel brand Select proper fuel brand corresponding with the
Fuel supply is
Normal spark plug spark
Something wrong with the fuel system.
normal.
Too much carbon deposit and dirt around
re
uirements.
Clear away.
electrodes.
Electrodes are burn damaged seriously or insulators
Replace spark plug.
damaged.
Normal high –
tension line
Improper electrodes gap. Adjust to proper value.
Normal high-
tension line spark
High–tension line is damaged. Replace
Ignition coil is damaged. Replace
Magneto loses magnetism. Replace
Abnormal gap between ignition coil and flywheel. Adjust gap
Normal cylinder compression
Normal fuel supply system.
High-tension line
not normal
Normal spark
plug
TROUBLE CAUSE REMEDY
Piston ring is worn to or even over its wear limit Replace
Piston ring is broken. Replace
Piston ring is sticking. Clear up carbon fouling.
Spark plug is not installed tight or without a gasket. Tighten with a gasket installed.
stem.
s
l
Air leakage between cylinder block and cylinder head. Check cylinder gasket, and the flatness of the surface
Air leakage in the valves Check valve clearance and tightness. Repair if
Abnormal cylinder compression.
Normal spark plug.
Normal fuel su
If engine will still not start, contact DR Power Equipment.
18 DR
®
R225, R300 and R390 Engines
where cylinder block contacts the cylinder head
Tighten cylinder head bolts in proper order to proper
tor
ue.
necessar
.
Page 19

y
ole clogged.
r
Rep
y
Rep
When testing the spark plug, never hold the high- voltage wire of the spark plug with a wet hand.
Make sure there is no spilled fuel outside the engine and that the spark plug isn’t dipped with fuel.
To prevent fire, keep sparks far away from the spark plug mounting hole.
2. INSUFFICIENT ENGINE POWER OUTPUT:
TROUBLE CAUSE REMEDY
Air in fuel line or fuel line clogged
Main oil flow hole is not adjusted properl
In carburetor, needle valve hole and main oil flow
h
Fuel shutoff is clogged up. Clean, replace damaged part
Too much carbon deposit in combusting chamber. Clear away
Too much carbon fouling in muffler and exhaust
pipe.
Air filter is clogged up. Clean air filter pape
Fuel supply system
Intake pipe is leaking Repair or replace
Piston or cylinder or piston ring is worn
Air leakage from the surface where the cylinder block
contacts the c
Too big or too small valve clearance. Readjust
When increasing throttle, speed increases
slow or speed decrease and engine stops
running
Valve tightness is poor. Repair
Poor
compression
linder head.
Exhaust air or dredge fuel line
Readjust
Clean and blow to get through
Clear away
element
lace worn parts
Replace cylinder gasket
3. ENGINE NOT RUNNING SMOOTHLY:
TROUBLE CAUSE REMEDY
Piston, cylinder or piston ring is worn excessively. Replace worn parts
Piston pin and piston pin hole are worn excessively. Replace piston or piston pin
Knocking sound
Abnormal
combustion
Spark
lacking
Tie rod small head is worn excessively.
Roller bearing for crankshaft main shaft is worn. Replace roller bearing
Engine is too hot Troubleshoot reasons for hot engine
Too much carbon deposit in combustion chamber Clear away
Improper gasoline brand or low gasoline quality Replace with qualified gasoline
There is water in float chamber Clean
improper spark plug electrodes clearance Adjust
Something wrong with induced coil or related parts Check and replace damaged parts
lace tie rod
CONTACT US AT www.DRpower.com 19
Page 20

4. ENGINE SUDDENLY STOPS RUNNING:
g
TROUBLE CAUSE REMEDY
Fuel tank is empty Refill fuel tank
Carburetor is clogged Check fuel line and dredge
Float is leaking Repair
Needle valve is sticking Dismantle float chamber and free up needle valve
Fuel supply
system
Spark plug is damaged, or short- circuited by carbon
Replace spark plug
deposit
Side electrode of spark plug is dropped out Replace spark plug
High-tension wire is dropped out Weld on
Ignition coil is punctured or short-circuited Replace ignition coil
Engine kill wire is touching (grounding) Locate ground and insulate
Ignition system
Cylinder is seriously scored and valve dropped out Repair or replace damaged parts
Stops suddenly when running.
Engine
internal
5. ENGINE IS OVERHEATING
TROUBLE CAUSE REMEDY
Insufficient oil Refill engine oil to proper level
Exhaust pipe blocked up Clean exhaust pipe
Shroud leaking Repair damaged part
Cooling fins blocked by foreign matter Clear cooling fins
Cooling fan loose and not working Repair cooling fan
Connection rod deformation causing piston and cylinder
bushin
side wear
Cylinder or piston or piston ring is worn and is creating
Replace connection rod
Replace the worn parts
heat between cylinder and crankcase
Improper adjustment of engine governor causing high
Readjust engine governor
speed.
Gasoline Engine Is Overheating.
Crankshaft main bearing burnt out Replace main bearing
20 DR
®
R225, R300 and R390 Engines
Page 21

6. ABNORMAL NOISES WHEN ENGINE IS RUNNING
TROUBLE CAUSE REMEDY
Piston, piston ring or cylinder is worn Replace the worn part
Connection rod or piston pin and piston pin hole are worn Replace the worn part
Crankshaft main neck is worn Replace bearing
Beating sound
Piston ring is broken Replace piston ring
Too much carbon deposit in combustion chamber Clear away carbon deposit
Too small electrode clearance of spark plug Adjust electrode clearance properly
Too much fuel supplied to engine Check relative parts such as carburetor
Improper fuel brand Replace fuel
Metal beating sound
when abnormal
Other
problems
Engine is overheated Find the cause for overheating and eliminate it
combustion occurs
Improper valve clearance Readjust valve clearance properly
Flywheel is not connected with crankshaft tightly Connect tightly
CONTACT US AT www.DRpower.com 21
Page 22

X. Specifications
Model R225 R300 R390
L×W×H
Dry Weight
Gasoline Engine Type
Displacement
Compression Ratio
Bore × Stroke
Maximum Output Power
Maximum Torque
Cooling System
Ignition System
Spark Plug
Spark Plug Clearance
Lubrication System
PTO Shaft Rotation
Manual Start
15.4x 12.6x14.2 in.
(390×320×360mm)
Electric Start
17.9x12.6x14.2 in.
(455×320×360mm)
Manual Start – 57.3 lb. (16kg)
Electric Start – 40.6 ib. (18.4kg)
4-Stroke, OHV, Single Cylinder 4-Stroke, OHV, Single
223ml 301ml 389ml
8.4:1 8.2:1 8.0:1
70×58mm 80×60mm 88×64mm
4.3kW
3,600r/min
13N·m
2,500r/min
Forced Air-cooled Forced Air-Cooled Forced Air-Cooled
Transistorized Magneto Ignition
(TCI)
BP6ES(NGK)/F6RTC(NHSP)/F6TC/
F7RTC/F7TC
.028"-.032" (0.7- 0.8mm) .028"-.032" (0.7- 0.8mm) .028"-.032" (0.7- 0.8mm)
Forced Splash Forced Splash Forced Splash
Counterclockwise Counterclockwise Counterclockwise
Manual Start
18.1x15.4x17.7 in.
(460×390×450mm)
Electric Start
20.5x15.4x17.7 in.
(520×390×450mm)
57.3 lb. (26kg) 70.5 lb. (32kg)
Cylinder
6.0kW
3,600r/min
18N·m
2,500r/min
Transistorized Magneto
Ignition(TCI)
F6TC BP6ES (NGK) / F6RTC
Manual Start
18.9x15.4x18.1 in.
(480×390×460mm)
Electric Start
21.3x15.4x18.1 in.
(540×390×460mm)
4-Stroke, OHV, Single
Cylinder
7.6kW
3,600r/min
23N·m
2,500r/min
Transistorized Magneto
Ignition(TCI)
(NHSP)
22 DR
®
R225, R300 and R390 Engines
Page 23

XI. Electrical Diagrams
W W
W W
1. Electric Start Engine with Oil Protection System
IG E ST BAT
OFF
ON
O
O
START O
Changing Coil
O
Starting Motor
W
Rectifier
Bl BLACK
Y YELLOW R RED
W WHITE G GREEN
Starting Relay
Bl/W
Protector
Br BROWN
W
Battery
Spark Plug
Bl
Oil Sensor
Ignition Coil
Bl/R
Y
Br
Engine Switch
Circuit Breaker
Y
Bl
Y
Oil Protector
Controlling Box
Bl
CONTACT US AT www.DRpower.com 23
Page 24

2. Manual Start Engine with Oil Protection System
Bl BLACK
Y YELLOW
G GREEN
Spark Plug
Y
Ignition Coil
Engine Switch
Bl
Y
Oil Sensor
Y
Oil Protector
Bl
24 DR
®
R225, R300 and R390 Engines
Page 25

Country Home Products, Inc (CHP) Engine Owner Warranty Policy
Terms and Conditions
The DR R225, R300 and R390 ENGINES are warranted for two (2) years against defects in materials or workmanship when put to ordinary
and normal consumer use; one (1) year for commercial use.
For the purposes of all the above warranties, “ordinary and normal consumer use” refers to non-commercial residential use and does not
include misuse, accidents or damage due to inadequate maintenance.
DR Power Equipment certifies that the DR
used. DR Power Equipment however, limits the implied warranties of merchantability and fitness in duration to a period of two (2) years in
consumer use, one (1) year for commercial use.
The 2-Year Limited Warranty on the DR R225, R300 and R390 ENGINES starts on the date the machine ships from our factory. The 2-Year
Limited Warranty is applicable only to the original owner.
The warranty holder is responsible for the performance of the required maintenance as defined by the manufacturer's owner's manuals. The
warranty holder is responsible for replacement of normally wearing parts such as the Air Filter and Spark Plug. Accessories to the machine
are not covered by this warranty.
During the warranty period, the warranty holder is responsible for the engine transportation charges, if required. During the warranty
period, warranty parts will be shipped by standard method at no charge to the warranty holder. Expedited shipping of warranty parts is the
responsibility of the warranty holder.
SOME STATES DO NOT ALLOW LIMITATIONS ON THE LENGTH OF IMPLIED WARRANTIES, SO THE ABOVE LIMITATIONS MAY NOT
APPLY TO YOU.
DR Power Equipment shall not be liable under any circumstances for any incidental or consequential damages or expenses of any kind,
including, but not limited to, cost of equipment rentals, loss of profit, or cost of hiring services to perform tasks normally performed by the
DR R225, R300 and R390 ENGINES.
R225, R300 and R390 ENGINES are fit for ordinary purposes for which a product of this type is
SOME STATES DO NOT ALLOW THE EXCLUSION OR LIMITATION OF INCIDENTAL OR CONSEQUENTIAL DAMAGES, SO THE ABOVE
LIMITATIONS MAY NOT APPLY TO YOU.
THIS WARRANTY GIVES YOU SPECIFIC LEGAL RIGHTS, AND YOU ALSO HAVE OTHER RIGHTS, WHICH VARY FROM STATE TO
STATE.
This Engine is manufactured for CHP by Chongqing Rato Power Manufacturing Corporation (RATO). If you have any questions
please visit www.DRPower.com or call 1-800-DR-OWNER (376-9637).
Combined Exhaust and Evaporative Emissions Control Warranty Statement
YOUR WARRANTY RIGHTS AND OBLIGATIONS
The California Air Resources Board, the United States Environmental Protection Agency and Chongqing Rato Power
Manufacturing Corporation (RATO), are pleased to explain the emission control system warranty on your 2014-2015 model
year small off-road engine/equipment. In the United States and California, new small off-road engine/equipments must be
designed, built and equipped to meet the State's stringent anti smog standards. RATO must warrant the emission control
system on your small off-road engine/equipment for the periods of time listed below provided there has been no abuse,
neglect or improper maintenance of your small off-road engine/equipment.
Your emission control system may include parts such as the carburetor or fuel injection system, the ignition system, catalytic
converter, fuel tanks, fuel lines, fuel caps, valves, canisters, filters, vapor hoses, clamps, connectors, belts, and other
associated components. For engines less than or equal to 80 cc, only the fuel tank is subject to the evaporative emission
control warranty requirements of this section. (California only)
Where a warrantable condition exists, RATO will repair your small off-road engine/equipment at no cost to you including
diagnosis, parts and labor.
MANUFACTURER'S WARRANTY COVERAGE:
CONTACT US AT www.DRpower.com 25
Page 26

This emissions control system is warranted for two years. If any emission-related part on your small off-road
engine/equipment is defective, the part will be repaired or replaced by RATO.
OWNER'S WARRANTY RESPONSIBILITIES:
As the small off-road engine/equipment owner, you are responsible for the performance of the required maintenance listed in
your owner's manual. RATO recommends that you retain all receipts covering maintenance on your small off-road
engine/equipment, but RATO cannot deny warranty solely for the lack of receipts or for your failure to ensure the performance
of all scheduled maintenance.
As the small off-road engine/equipment owner, you should however be aware that RATO may deny you warranty coverage if
your small off-road engine/equipment or a part has failed due to abuse, neglect, improper maintenance or unapproved
modifications.
You are responsible for presenting your small off-road engine/equipment to a RATO distribution center as soon as a problem
exists. The warranty repairs should be completed in a reasonable amount of time, not to exceed 30 days.
If you have any questions regarding your warranty rights and responsibilities, you should contact Great Lakes Technologies,
LLC at 1-855-206-5286 or E-mail: service@rato-na.com.
DEFECTS WARRANTY REQUIREMENTS:
(a) The warranty period begins on the date the engine/equipment is delivered to an ultimate purchaser.
(b) General Emissions Warranty Coverage. RATO warrants to the ultimate purchaser and each subsequent owner that the
engine/equipment is:
(1) Designed, built, and equipped so as to conform with all applicable regulations adopted by the Air Resources Board; and
(2) Free from defects in materials and workmanship that causes the failure of a warranted part for a period of two years.
(c) The warranty on emissions-related parts will be interpreted as follows:
(1) Any warranted part that is not scheduled for replacement as required maintenance in the written instructions required by
subsection (d) must be warranted for the warranty period defined in Subsection (b)(2). If any such part fails during the period
of warranty coverage, it must be repaired or replaced by RATO according to Subsection (4) below. Any such part repaired or
replaced under the warranty must be warranted for the remaining warranty period.
(2) Any warranted part that is scheduled only for regular inspection in the written instructions required by subsection (d)
must be warranted for the warranty period defined in Subsection (b)(2). A statement in such written instructions to the effect
of “repair or replace as necessary” will not reduce the period of warranty coverage. Any such part repaired or replaced under
warranty must be warranted for the remaining warranty period.
(3) Any warranted part that is scheduled for replacement as required maintenance in the written instructions required by
subsection (d) must be warranted for the period of time prior to the first scheduled replacement point for that part. If the part
fails prior to the first scheduled replacement, the part must be repaired or replaced by RATO according to Subsection (4)
below. Any such part repaired or replaced under warranty must be warranted for the remainder of the period prior to the first
scheduled replacement point for the part.
(4) Repair or replacement of any warranted part under the warranty must be performed at no charge to the owner at a
warranty station.
(5) Notwithstanding the provisions of Subsection (4) above, warranty services or repairs must be provided at all RATO
distribution centers that are franchised to service the subject engine/equipments.
(6) The owner must not be charged for diagnostic labor that leads to the determination that a warranted part is in fact
defective, provided that such diagnostic work is performed at a warranty station.
(7) RATO is liable for damages to other engine/equipment components proximately caused by a failure under warranty of any
warranted part.
(8) Throughout the emissions warranty period defined in Subsection (b)(2), RATO must maintain a supply of warranted parts
sufficient to meet the expected demand for such parts.
(9) Any replacement part may be used in the performance of any warranty maintenance or repairs and must be provided
without charge to the owner. Such use will not reduce the warranty obligations of RATO.
(10) Add-on or modified parts that are not exempted by the Air Resources Board may not be used. The use of any nonexempted add-on or modified parts will be grounds for disallowing a warranty claim. RATO will not be liable to warrant
failures of warranted parts caused by the use of a non-exempted add-on or modified part.
26 DR
®
R225, R300 and R390 Engines
Page 27

(11) RATO issuing the warranty shall provide any documents that describe that manufacturer's warranty procedures or
policies within five working days of request by the Air Resources Board.
(d) Emission Warranty Parts List for exhaust (for all displacements).
(1) Fuel Metering System
(i) Carburetor and internal parts (and/or pressure regulator or fuel injection system).
(ii) Air/fuel ratio feedback and control system.
(iii) Cold start enrichment system.
(2) Air Induction System
(i) Controlled hot air intake system.
(ii) Intake manifold.
(iii) Air filter.
(3) Ignition System
(i) Spark Plugs.
(ii) Magneto or electronic ignition system.
(iii) Spark advance/retard system.
(4) Exhaust Gas Recirculation (EGR) System
(i) EGR valve body, and carburetor spacer if applicable.
(ii) EGR rate feedback and control system.
(5) Air Injection System
(i) Air pump or pulse valve.
(ii) Valves affecting distribution of flow.
(iii) Distribution manifold.
(6) Catalyst or Thermal Reactor System
(i) Catalytic converter.
(ii) Thermal reactor.
(iii) Exhaust manifold.
(7) Particulate Controls
(i) Traps, filters, precipitators, and any other device used to capture particulate emissions.
(8) Miscellaneous Items Used in Above Systems
(i) Electronic controls.
(ii) Vacuum, temperature, and time sensitive valves and switches.
(e) Emission Warranty Parts List for Evap less than or equal to 80cc.
(i) Fuel Tank.
(f) Emission Warranty Parts List for Evap greater than 80cc.
(1) Fuel Metering System
(i) Fuel Tank.
(2) Miscellaneous Items Used in Above Systems
(i) Fuel caps, valves, canisters, filters, vapor, hoses, clamps, connectors, belts, and and assemblies.
RATO will furnish with each new engine/equipment written instructions for the maintenance and use of the
engine/equipment by the owner.
CONTACT US AT www.DRpower.com 27
Page 28

75 MEIGS ROAD, P.O. BOX 25, VERGENNES, VERMONT 05491
©2014 Country Home Products, Inc. All rights reserved 350431A
 Loading...