

Page 1
Dräger Alcotest® 9510 Standard IR
Dräger Alcotest
®
9510 Standard IR / EC
de
Gebrauchsanweisung
4
en
Instructions for Use
16
Page 2

Page 3
001238
7
6
5
3
2
1
4
8910
11
18 17 16 15 14 13 12
2
19
23
22 21
20
A
B
24(1)
24(2)
24(4)
24(3)
Page 4

4 Dräger Alcotest 9510 Standard IR / EC
Inhalt
Inhalt
1 Zu Ihrer Sicherheit . . . . . . . . . . . . . . . . . . . . . . . . .5
1.1 Allgemeine Sicherheitshinweise . . . . . . . . . . . . . . . .5
1.2 Bedeutung der Warnzeichen . . . . . . . . . . . . . . . . . .5
2 Beschreibung . . . . . . . . . . . . . . . . . . . . . . . . . . . . .5
2.1 Produktübersicht . . . . . . . . . . . . . . . . . . . . . . . . . . . .5
2.1.1 Frontansicht (siehe Ausklapper) . . . . . . . . . . . . . . . . 5
2.1.2 Seitenansicht (siehe Ausklapper) . . . . . . . . . . . . . . .5
2.1.3 Rückansicht (siehe Ausklapper) . . . . . . . . . . . . . . . . 5
2.2 Funktionsbeschreibung . . . . . . . . . . . . . . . . . . . . . .5
2.3 Verwendungszweck . . . . . . . . . . . . . . . . . . . . . . . . .6
3 Gebrauch . . . . . . . . . . . . . . . . . . . . . . . . . . . . . . . . .6
3.1 Voraussetzungen für den Gebrauch . . . . . . . . . . . . . 6
3.2 Vorbereitungen für den Gebrauch . . . . . . . . . . . . . .6
3.2.1 Gerät aufstellen . . . . . . . . . . . . . . . . . . . . . . . . . . . .6
3.2.2 Stationäre Verwendung mit Netzanschluss . . . . . . . 6
3.2.3 Mobiler Einsatz mit 12-Volt-Batterie . . . . . . . . . . . . .6
3.2.4 Energiesparmodus . . . . . . . . . . . . . . . . . . . . . . . . . .6
3.2.5 Sprachen ins Gerät nachladen . . . . . . . . . . . . . . . . .7
3.3 Interaktion mit dem Gerät . . . . . . . . . . . . . . . . . . . . .7
3.3.1 Bildschirm (Touchscreen) . . . . . . . . . . . . . . . . . . . . .7
3.3.2 Bildschirm-Ruhezustand . . . . . . . . . . . . . . . . . . . . . . 7
3.3.3 Gerät ausschalten . . . . . . . . . . . . . . . . . . . . . . . . . .7
4 Messung durchführen . . . . . . . . . . . . . . . . . . . . . .8
4.1 Voraussetzungen . . . . . . . . . . . . . . . . . . . . . . . . . . .8
4.2 Messung auslösen . . . . . . . . . . . . . . . . . . . . . . . . . .8
4.2.1 Eingabe der Probandendaten . . . . . . . . . . . . . . . . . . 8
4.2.2 Abgabe der Atemprobe . . . . . . . . . . . . . . . . . . . . . .9
4.2.3 Ende des Messzyklus . . . . . . . . . . . . . . . . . . . . . . . .9
4.2.4 Zusätzliches Messprotokoll ausdrucken . . . . . . . . . . 9
4.3 Fehler während des Messablaufes . . . . . . . . . . . . . . 9
5 Messprotokoll (Beispiele) . . . . . . . . . . . . . . . . . .10
5.1 Erläuterung zum Messprotokoll . . . . . . . . . . . . . . .10
5.2 Sommerzeit / Winterzeit umstellen . . . . . . . . . . . . . 10
6 Menü . . . . . . . . . . . . . . . . . . . . . . . . . . . . . . . . . . .11
6.1 Menü » Information « . . . . . . . . . . . . . . . . . . . . . . .11
6.2 Menü » Einstellungen « . . . . . . . . . . . . . . . . . . . . .11
6.2.1 Untermenü » Bildschirm « . . . . . . . . . . . . . . . . . . .11
6.2.2 Untermenü » Drucker « . . . . . . . . . . . . . . . . . . . . .11
6.2.3 Untermenü » Ton « . . . . . . . . . . . . . . . . . . . . . . . . .11
6.2.4 Untermenü » Fehlerspeicher « . . . . . . . . . . . . . . . .11
6.2.5 Untermenü » Sprache « . . . . . . . . . . . . . . . . . . . . .11
6.2.6 Untermenü » Eingabe Standortanzeige « . . . . . . .12
6.2.7 Untermenü » Auswahl Standortanzeige « . . . . . . .12
6.2.8 Untermenü » Dateneingabe « . . . . . . . . . . . . . . . .12
6.2.9 Untermenü » Datum und Uhrzeit « . . . . . . . . . . . . . 12
6.3 Menü » Wartung « . . . . . . . . . . . . . . . . . . . . . . . . .12
6.3.1 Untermenü » Einheiten umstellen « . . . . . . . . . . . .12
6.3.2 Untermenü » Kontrollmodus « . . . . . . . . . . . . . . . . 12
7 Störungsbeseitigung . . . . . . . . . . . . . . . . . . . . . . 13
8 Wartung . . . . . . . . . . . . . . . . . . . . . . . . . . . . . . . . .14
8.1 Inspektion . . . . . . . . . . . . . . . . . . . . . . . . . . . . . . . .14
8.2 Instandhaltungsintervalle . . . . . . . . . . . . . . . . . . . .14
8.2.1 Papierrolle einsetzen . . . . . . . . . . . . . . . . . . . . . . .14
8.2.2 Sicherungen auswechseln . . . . . . . . . . . . . . . . . . .14
8.3 Gerät reinigen . . . . . . . . . . . . . . . . . . . . . . . . . . . . .14
9 Transport . . . . . . . . . . . . . . . . . . . . . . . . . . . . . . . .14
10 Lagerung . . . . . . . . . . . . . . . . . . . . . . . . . . . . . . . .14
11 Entsorgung . . . . . . . . . . . . . . . . . . . . . . . . . . . . . .14
12 Technische Daten . . . . . . . . . . . . . . . . . . . . . . . . .15
13 Bestellliste . . . . . . . . . . . . . . . . . . . . . . . . . . . . . . .15
Page 5
Zu Ihrer Sicherheit
Dräger Alcotest 9510 Standard IR / EC 5
1 Zu Ihrer Sicherheit
1.1 Allgemeine Sicherheitshinweise
Vor Gebrauch des Produkts die Gebrauchsanweisung auf-
merksam lesen.
Gebrauchsanweisung genau beachten. Der Anwender
muss die Anweisungen vollständig verstehen und den Anweisungen genau Folge leisten. Das Produkt darf nur entsprechend dem Verwendungszweck verwendet werden.
Gebrauchsanweisung nicht entsorgen. Aufbewahrung und
ordnungsgemäße Verwendung durch die Nutzer sicherstellen.
Nur geschultes und fachkundiges Personal darf dieses
Produkt verwenden.
Lokale und nationale Richtlinien, die dieses Produkt betref-
fen, befolgen.
Nur geschultes und fachkundiges Personal darf das Pro-
dukt überprüfen, reparieren und instand halten. Dräger
empfiehlt, einen Service-Vertrag mit Dräger abzuschließen
und alle Instandhaltungsarbeiten durch Dräger durchführen zu lassen.
Für Instandhaltungsarbeiten nur Original-Dräger-Teile und
-Zubehör verwenden. Sonst könnte die korrekte Funktion
des Produkts beeinträchtigt werden.
Fehlerhafte oder unvollständige Produkte nicht verwen-
den. Keine Änderungen am Produkt vornehmen.
Dräger bei Fehlern oder Ausfällen vom Produkt oder von
Produktteilen informieren.
Kein Betrieb in explosionsgefährdeten Bereichen
Das Gerät ist nicht für den Betrieb in explosionsgefährdeten
Bereichen zugelassen oder zertifiziert.
Gefahrlose Kopplung mit elektrischen Geräten
Elektrische Kopplung mit Geräten, die nicht in dieser Gebrauchsanweisung erwähnt sind, nur nach Rückfrage bei den
Herstellern oder einem Fachmann vornehmen.
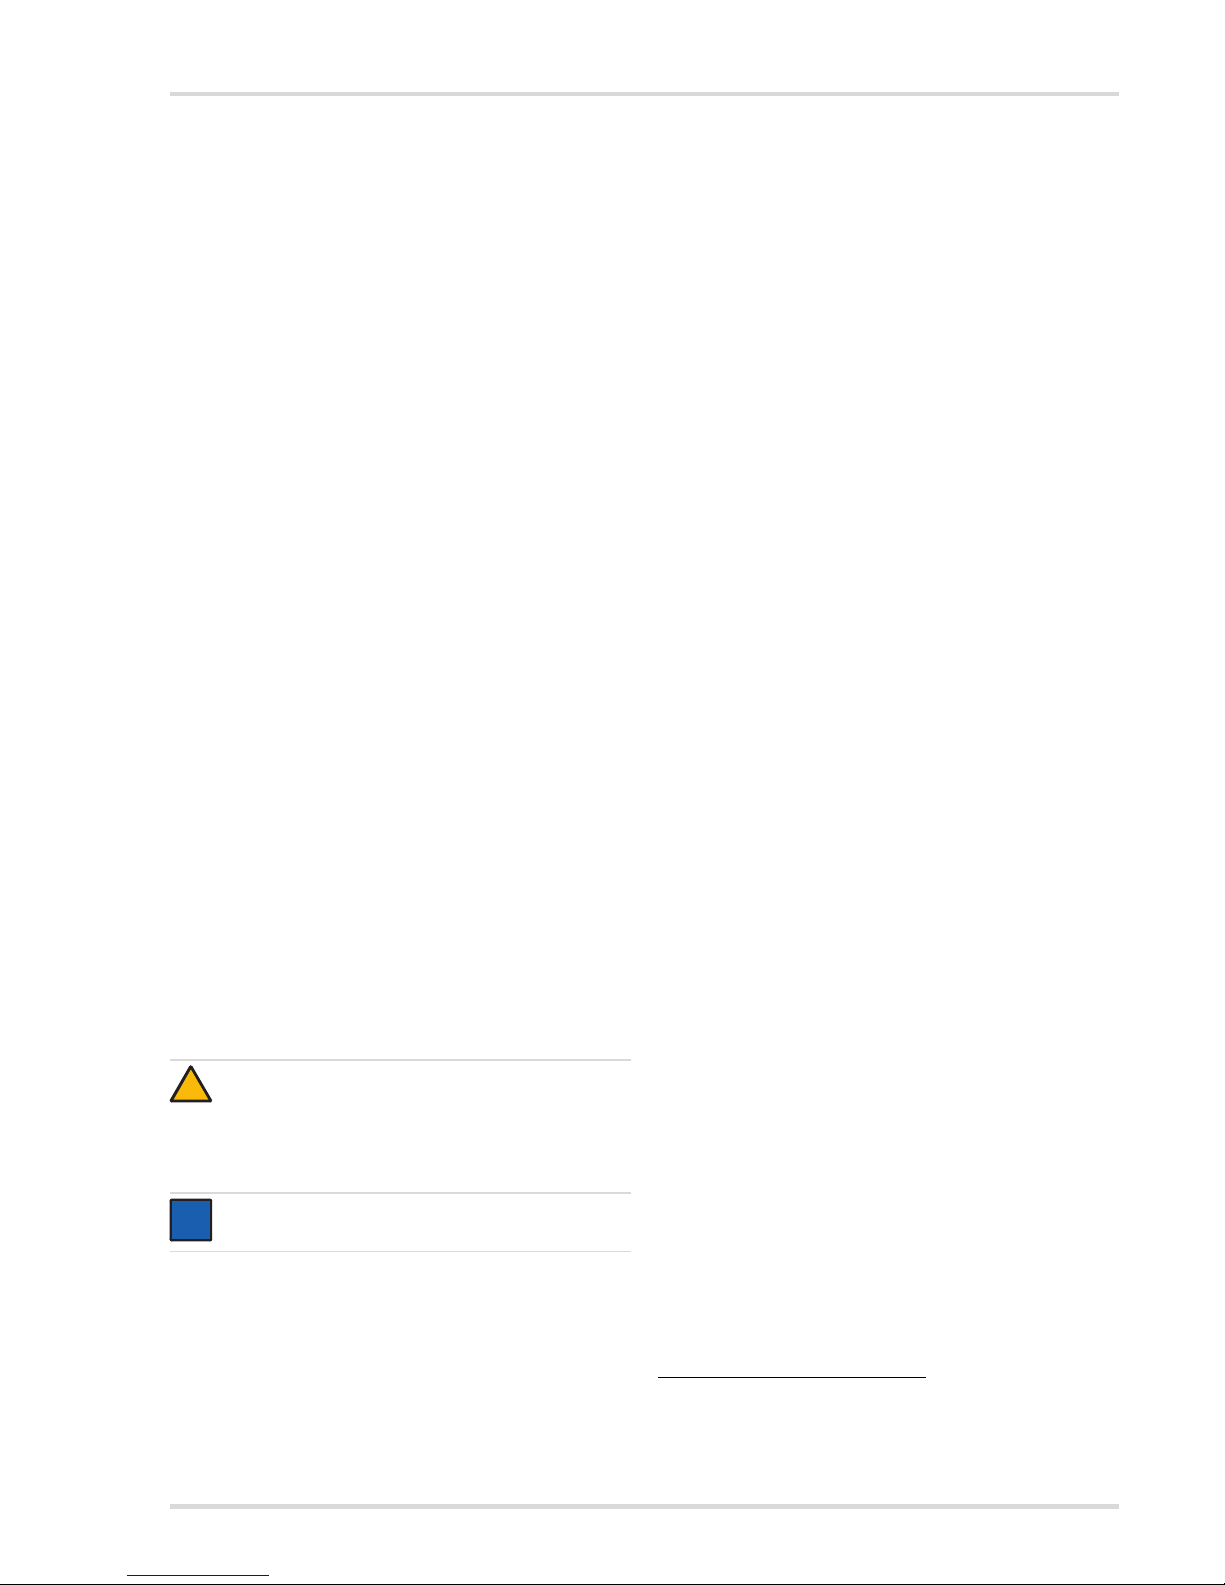
1.2 Bedeutung der Warnzeichen
Die folgenden Warnzeichen werden in diesem Dokument verwendet, um die zugehörigen Warntexte zu kennzeichnen und
hervorzuheben, die eine erhöhte Aufmerksamkeit seitens des
Anwenders erfordern. Die Bedeutungen der Warnzeichen sind
wie folgt definiert:
2 Beschreibung
2.1 Produktübersicht
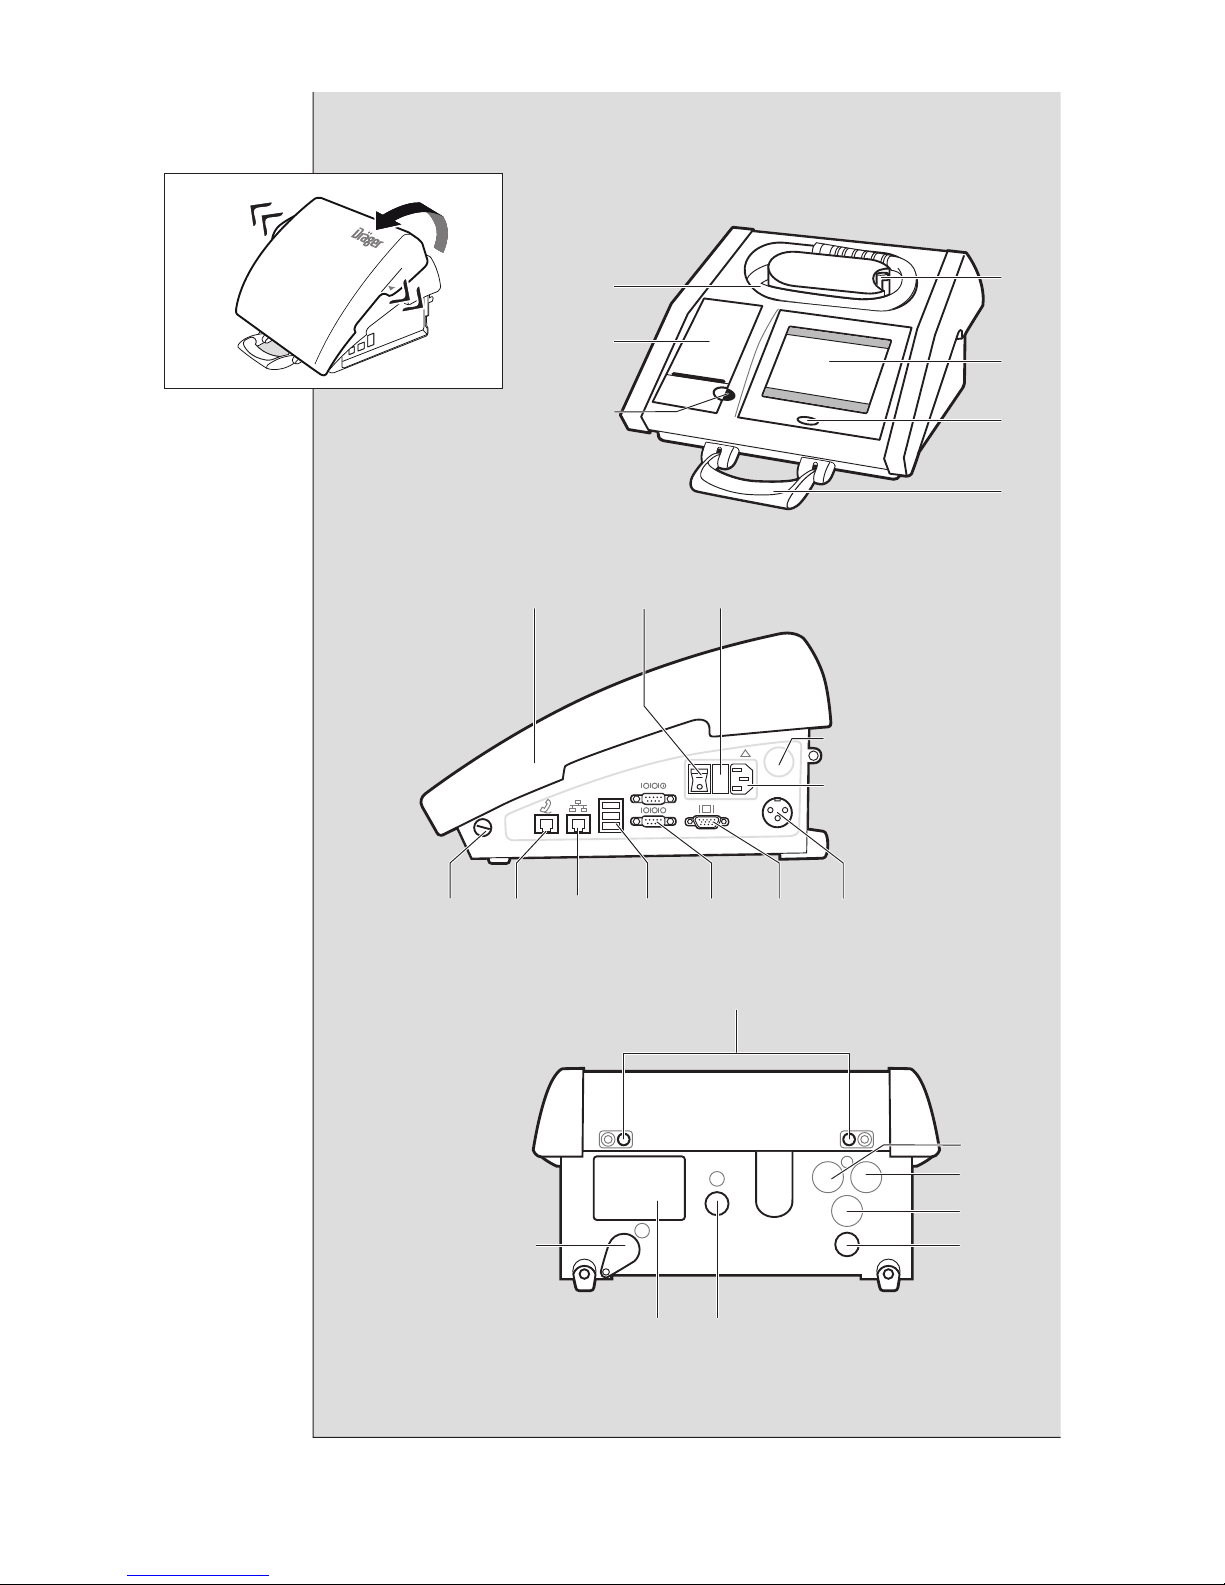
2.1.1 Frontansicht (siehe Ausklapper)
1 Eingabestift (für Touchscreen)
2 Bildschirm (Touchscreen)
3 Starttaste
4 Tragegriff
5 Entriegelungstaste der Druckerklappe
6 Thermodrucker mit Fach für Thermopapierrolle
7 Beheizter Atemschlauch in Ablagemulde
2.1.2 Seitenansicht (siehe Ausklapper)
8 Abnehmbarer Deckel
9 Netzschalter I/0 (Ein/Aus)
10 Hauptsicherung
11 Netzanschlussbuchse
12 Kfz-Anschluss (12 Volt Gleichstrom)
13 Monitoranschluss (nicht unterstützt)
14 RS 232-Schnittstelle, 2x
15 USB-Anschlüsse, 3x
16 Netzwerkanschluss (je nach Variante)
17 Modemanschluss (je nach Variante)
18 Gehäuseschraube
2.1.3 Rückansicht (siehe Ausklapper)
19 Gehäuseschraube
20 Gasauslass (Pumpe)
21 Servicepunkt der Küvette
22 Typenschild
23 Siegelplatte
24 Kalibriergasanschluss 1 bis 4 (je nach Variante)
2.2 Funktionsbeschreibung
Das Alcotest 9510
® 1
führt für die Bestimmung der Atemalkoholkonzentration einen Messzyklus mit einer einzelnen Atemprobe durch.
Bei der Abgabe der Atemprobe wird mit einem Mundstück bei
forcierter Exspiration Atemluft in das Messgerät geführt.
Für die Konzentrationsbestimmung kommt ein infrarotoptischer Sensor
2
(Alcotest 9510 Standard IR) oder eine Kombination aus einem infrarotoptischen und einem
elektrochemischen Sensor
3
(Alcotest 9510 Standard IR / EC)
mit unterschiedlicher analytischer Spezifität zur Anwendung.
Die notwendigen Handlungen des Bedieners und des Proban-
den werden durch kurze Mitteilungen und Anweisungen auf
dem Bildschirm (dient auch als Touchscreen) des Gerätes angezeigt.
Erst wenn alle Teilschritte der Atemalkoholmessung korrekt
durchgeführt sind und keines der internen Prüfkriterien außerhalb der Toleranz liegt, wird das Endergebnis der Atemalkoholmessung angezeigt und ein Protokoll mit dem integrierten
Thermodrucker ausgegeben.
Die Bedienschritte an dem Alcotest 9510 werden optisch und
akustisch unterstützt. Anweisungen an den Bediener erfolgen
in Volltextmeldungen auf dem Bildschirm.
VORSICHT
Hinweis auf eine potenzielle Gefahrensituation. Wenn
diese nicht vermieden wird, können Verletzungen oder
Schädigungen am Produkt oder der Umwelt eintreten.
Kann auch als Warnung vor unsachgemäßem Gebrauch verwendet werden.
HINWEIS
Zusätzliche Information zum Einsatz des Produkts.
!
i
i
1 Alcotest® ist eine registrierte Marke von Dräger
2 IR-Sensor = Infrarotsensor
3 EC-Sensor = Elektrochemischer Sensor
Page 6

6 Dräger Alcotest 9510 Standard IR / EC
Gebrauch
2.3 Verwendungszweck
Das Dräger Alcotest 9510 Standard IR und das Dräger Alcotest
9510 Standard IR / EC sind evidentielle AtemalkoholMessgeräte, die automatisch die Atemalkoholkonzentration
(Ethanol-Masse pro Ausatemvolumen, AAK) in der Ausatemluft analysieren.
3Gebrauch
3.1 Voraussetzungen für den Gebrauch
Die folgenden Zubehörteile sind für den Betrieb der
Alcotest 9510 Standard-Geräte erforderlich. Vor dem Aufstellen des Geräts überprüfen, ob alle genannten Teile vorhanden
sind:
Mundstücke
Druckerpapier (Thermopapierrolle)
Netzkabel (für die stationäre Verwendung mit Netzan-
schluss)
Kfz-Anschlusskabel (für den mobilen Einsatz mit einer 12-
Volt-Versorgung)
externe Tastatur (optional)
Externe Tastatur
An das Gerät kann über einen der USB-Anschlüsse eine externe Tastatur (QWERTY) angeschlossen werden. Diese wird
verwendet um:
die Bediener- und Probandendaten einzugeben
Text und Zahlen (wie z. B. den Standort oder das Datum)
einzugeben
Die Bedienung kann über die angeschlossene Tastatur oder
über den berührungsempfindlichen Bildschirm (Touchscreen)
erfolgen. Mit den Kontrolltasten der Tastatur kann zwischen
den unterschiedlichen Anzeigen und Bedienelementen navigiert werden.
Zur Eingabe der Daten darf nur die in der Zubehörliste aufgeführte Tastatur verwendet werden, siehe Kapitel 13 auf
Seite 15. Jede andere Tastatur muss vor der Verwendung von
Dräger freigegeben werden.
3.2 Vorbereitungen für den Gebrauch
3.2.1 Gerät aufstellen
Den Aufstellort so wählen, dass der Gasauslass auf der Rückseite des Gerätes nicht versperrt ist und direkte Sonneneinstrahlung auf das Gerät vermieden wird.
1. Das Gerät auf ebener und fester Unterlage aufstellen. Auf
genügend Platz für Zubehör achten (Tastatur, etc.).
2. Deckel des Geräts an den Markierungen leicht auseinan-
derziehen und abnehmen (siehe Ausklapper, B).
3. Prüfen, ob sich eine Papierrolle im Thermodrucker befin-
det. Ggf. neue Papierrolle einlegen, siehe Kapitel 8.2.1 auf
Seite 14.
3.2.2 Stationäre Verwendung mit Netzanschluss
1. Netzspannungsangabe auf dem Typenschild überprüfen.
2. Netzschalter (siehe Ausklapper, 9), auf "0" stellen.
3. Tastatur anschließen, falls ein Betrieb mit Tastatur vorgesehen ist.
4. Netzkabel anschließen.
5. Netzschalter auf "I" stellen.
Das Gerät beginnt mit der Warmlaufphase.
3.2.3 Mobiler Einsatz mit 12-Volt-Batterie
Bei Batteriebetrieb (Kfz-Anschluss (12 V Gleichstrom)) benötigt das Gerät eine Gleichspannung von mindestens 10,5 V
Gleichstrom. Bei zu niedriger Eingangsspannung schaltet sich
das Gerät ab. Eine Tiefentladung der Batterie (z. B. Kfz-Batterie) ist dadurch ausgeschlossen.
1. Tastatur anschließen, falls ein Betrieb mit Tastatur vorgesehen ist.
2. 12-V-Anschlusskabel anschließen (siehe Ausklapper, 12)
und sichern.
3. Stecker des 12-V-Anschlusskabels in 12-V-Steckdose des
Kfz oder in die Zigarettenanzünderbuchse (mit Adapter)
stecken.
4. Netzschalter am 12-V-Anschlusskabel auf "I" stellen.
Das Gerät beginnt mit der Warmlaufphase.
3.2.4 Energiesparmodus
Wenn nach 15 Minuten keine
Messung durchgeführt wurde,
schaltet das Gerät in den Energiesparmodus.
Durch Drücken der Starttas-
te kann die Messbereitschaft nach ca. 5 Minuten
wieder hergestellt werden.
VORSICHT
Es dürfen nur Batterien angeschlossen werden oder
Gleichspannungsnetzgeräte mit Netztrennung (zum
Beispiel nach VDE 0551). Wird dies nicht beachtet,
besteht die Gefahr einer Beschädigung des Geräts.
HINWEIS
Um den mobilen Einsatz des Alcotest 9510 sicherzustellen, für einen guten Ladezustand der Kfz-Batterie
sorgen oder eine Zusatzbatterie bereitstellen.
HINWEIS
Der Netzschalter am Gehäuse ist bei 12-V-Betrieb
nicht aktiv.
!
i
i
i
i
Alcotest 9510
hh:mm
TT.MM.JJJJ
Menü
STANDBY
00833037_de.eps
LUEBECK
Herunterfahren
GRÜNEN STARTKNOPF DRÜCKEN
Page 7
Gebrauch
Dräger Alcotest 9510 Standard IR / EC 7
3.2.5 Sprachen ins Gerät nachladen
Das Gerät bietet die Möglichkeit, verfügbare Sprachdateien
nachträglich ins Gerät zu laden, um Anzeigetexte sowie
Menüdialoge in der betreffenden Sprache anzuzeigen.
1. USB-Stick mit Sprachdatei(en) einstecken (siehe Ausklapper, 15).
Der Dialog zum Nachladen von Sprachen wird automatisch
angezeigt.
2. Sprache(n) auswählen (Language 2 und/oder 3).
Es können bis zu 2 Sprachen gleichzeitig nachgeladen
werden. Mit einem Stern gekennzeichnete Sprachen sind
bereits installiert. Die erste Sprache Language 1 (z. B.
Englisch) ist fest definiert und kann nicht verändert werden
(grau hinterlegt).
3. Bestätigen auswählen.
Do you want to start language update (Wollen Sie die
Sprachen aktualisieren?) wird angezeigt.
4. Mit Ja bestätigen, um Ladevorgang zu starten.
5. Nach erfolgreichem Ladevorgang wird Language update
successful (Sprachen erfolgreich aktualisiert) angezeigt.
6. Mit OK bestätigen.
Das Gerät kehrt zum Ausgangsbildschirm zurück.
7. USB-Stick entfernen.
8. Spracheinstellung unter Einstellungen > Sprache auf die
gewünschte Sprache ändern (siehe Kapitel 6.2.5 auf
Seite 11)
3.3 Interaktion mit dem Gerät
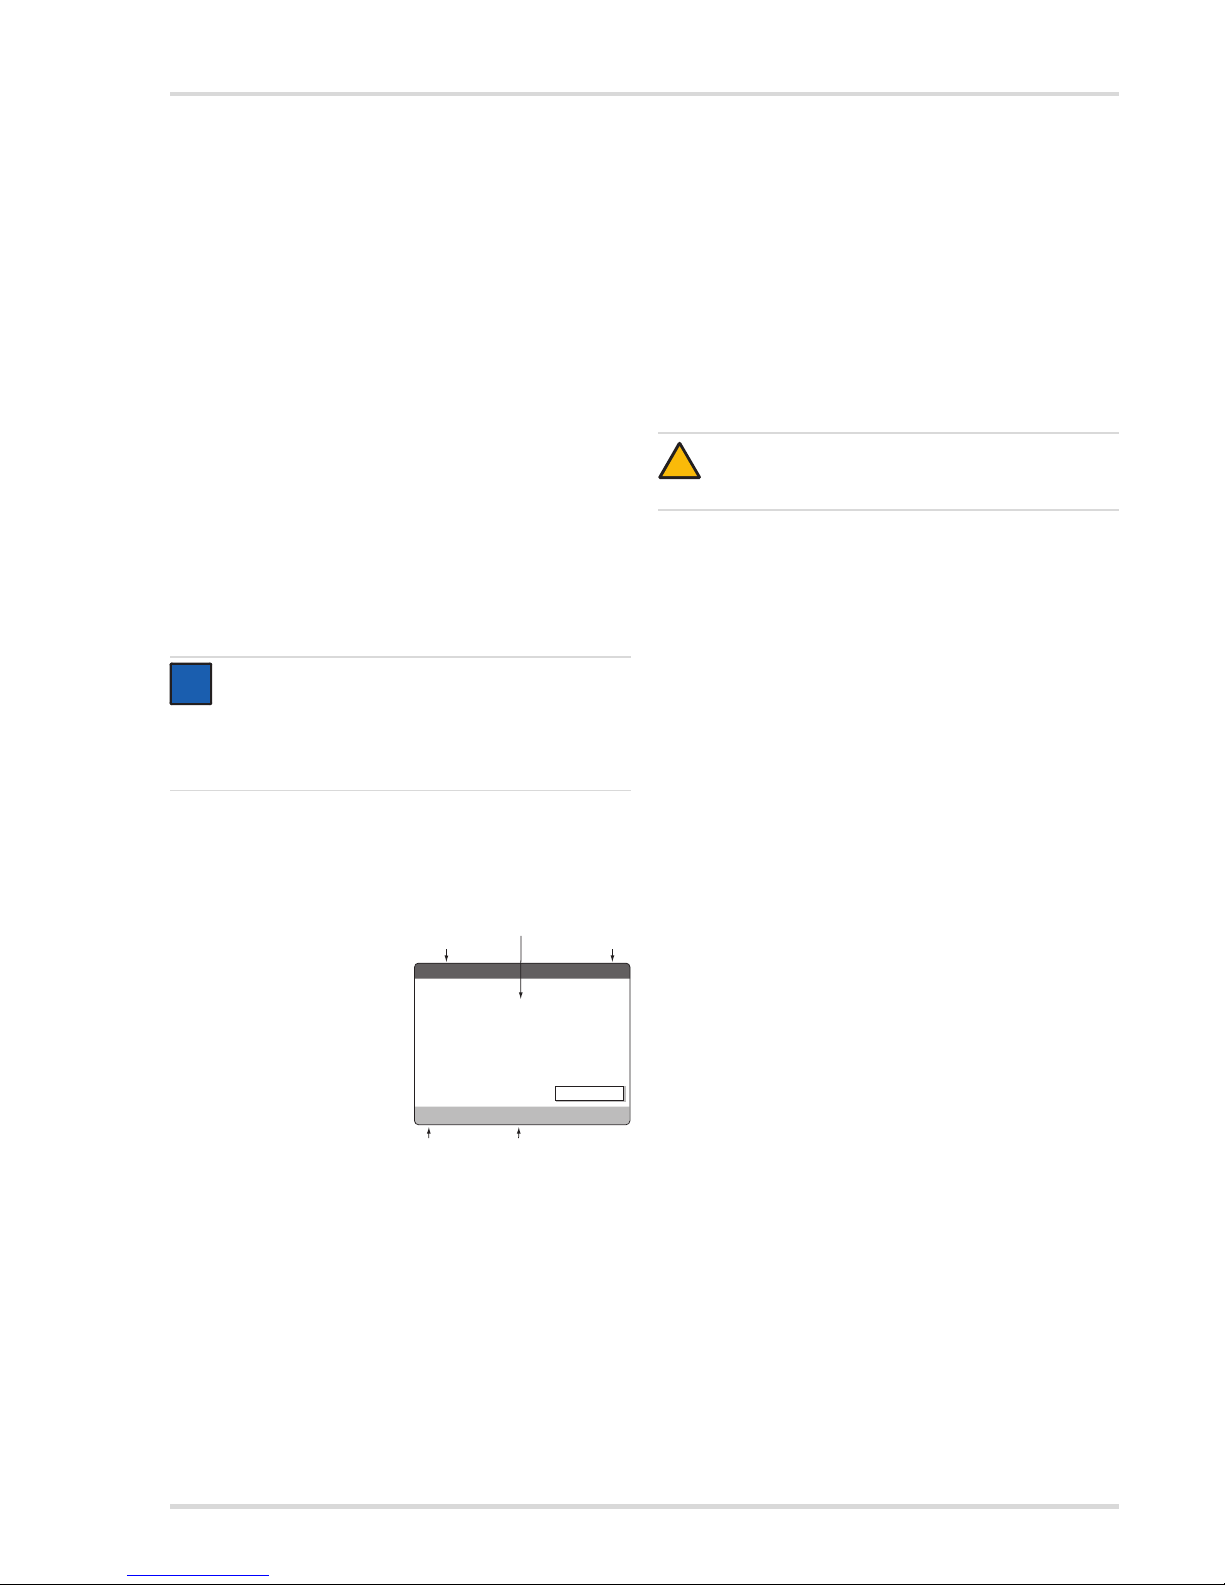
3.3.1 Bildschirm (Touchscreen)
Nachdem das Gerät eingeschaltet wurde, sind folgende
Informationen auf dem Bildschirm zu sehen.
Nach dem Einschalten führt das Gerät einen Selbsttest durch,
der ca. 30 Sekunden dauert. Nach dem Selbsttest und der
Warmlaufphase ist das Gerät automatisch betriebsbereit. Das
Gerät ist jetzt für eine Messung bereit und der Bediener kann
eine Probemessung durchführen.
3.3.2 Bildschirm-Ruhezustand
Wenn für 30 Minuten keine Interaktion mit dem Gerät stattfand, wird der Bildschirm dunkel.
Um den Bildschirm zu aktivieren:
Bildschirm berühren.
oder
Starttaste drücken.
Es wird eine Messung bzw. die Warmlaufphase gestartet je
nachdem, ob sich das Gerät im Standby-Modus befindet oder
nicht, und der Bildschirm wird aktiviert.
3.3.3 Gerät ausschalten
1. Auf dem Bildschirm Herunterfahren betätigen.
Eine Meldung zur Bestätigung des Herunterfahrens wird
angezeigt.
2. Meldung mit Ja bestätigen.
Meldung Bitte schalten Sie das Instrument ab wird an-
gezeigt.
3. Gerät ausschalten:
a. Bei stationärem Betrieb:
Netzschalter auf "0" schalten.
b. Bei mobilem Einsatz:
Schalter am Kfz-Anschluss (12 V Gleichstrom) auf
"0" schalten.
HINWEIS
Im Gerät selbst sind max. 3 Sprachen gleichzeitig verfügbar/auswählbar.
Um verfügbare Sprachdateien zu erhalten bitte an Dräger wenden.
1 Gerätetyp / Gerätename
2 Gegenwärtiger Zustand
des Geräts (Anzeige)
3 Angaben über den Standort
(konfigurierbar)
4 Datums- und Zeitangabe
5 Schaltfläche zum Öffnen
des Hauptmenüs
i
i
Alcotest 9510
hh:mm
TT.MM.JJJJ
Menü
WARMLAUFPHASE
01033037_de.eps
5
4
3
2
1
LUEBECK
Herunterfahren
VORSICHT
Um Geräteschäden zu vermeiden, das Gerät immer
mit der Funktion Herunterfahren ausschalten.
!
Page 8
8 Dräger Alcotest 9510 Standard IR / EC
Messung durchführen
4 Messung durchführen
4.1 Voraussetzungen
Die Messungen der Atemalkoholkonzentration mit dem Alcotest 9510 dürfen nur von dazu an dem Gerät ausgebildeten
Personen durchgeführt werden.
Die Einhaltung der zulässigen Umgebungsbedingungen (siehe Kapitel 12 auf Seite 15) sicherstellen.
Warte- und Kontrollzeit vor der Messung
Grundsätzlich gilt für die Durchführung der Atemalkoholmessungen:
Eine Wartezeit von 20 Minuten, nach der letzten Aufnahme
von alkoholischen Getränken bis zum Starten der Messung, einhalten.
In einem Zeitraum von mindestens 10 Minuten vor der
Messung muss nachweislich die Aufnahme von Substanzen durch Mund oder Nase ausgeschlossen sein (Kontrollzeit).
Restalkohol im Mund kann die Messung verfälschen.
Auch bei aromatischen Getränken (z. B. Fruchtsaft), alko-
holischen Mundsprays, medizinischen Säften und Tropfen
und nach Aufstoßen und Erbrechen können Verfälschungen auftreten.
Eine Mundspülung mit Wasser oder nichtalkoholischen
Getränken ersetzt die Warte- und Kontrollzeit nicht!
4.2 Messung auslösen
1. Starttaste drücken, um den Messvorgang auszulösen.
Falls sich das Gerät im Energiesparmodus (STANDBY
wird angezeigt) befindet nach der Warmlaufphase nochmals die Starttaste drücken, um die Messung zu starten.
Vor der Messung erfolgt je nach Geräteeinstellung die Ein-
gabe der Probandendaten.
Der Beginn der Messung wird durch die Meldung MES-
SUNG WIRD VORBEREITET angezeigt.
Die Eingabe entsprechender Daten jeweils mit Weiter oder
Abbruch beenden.
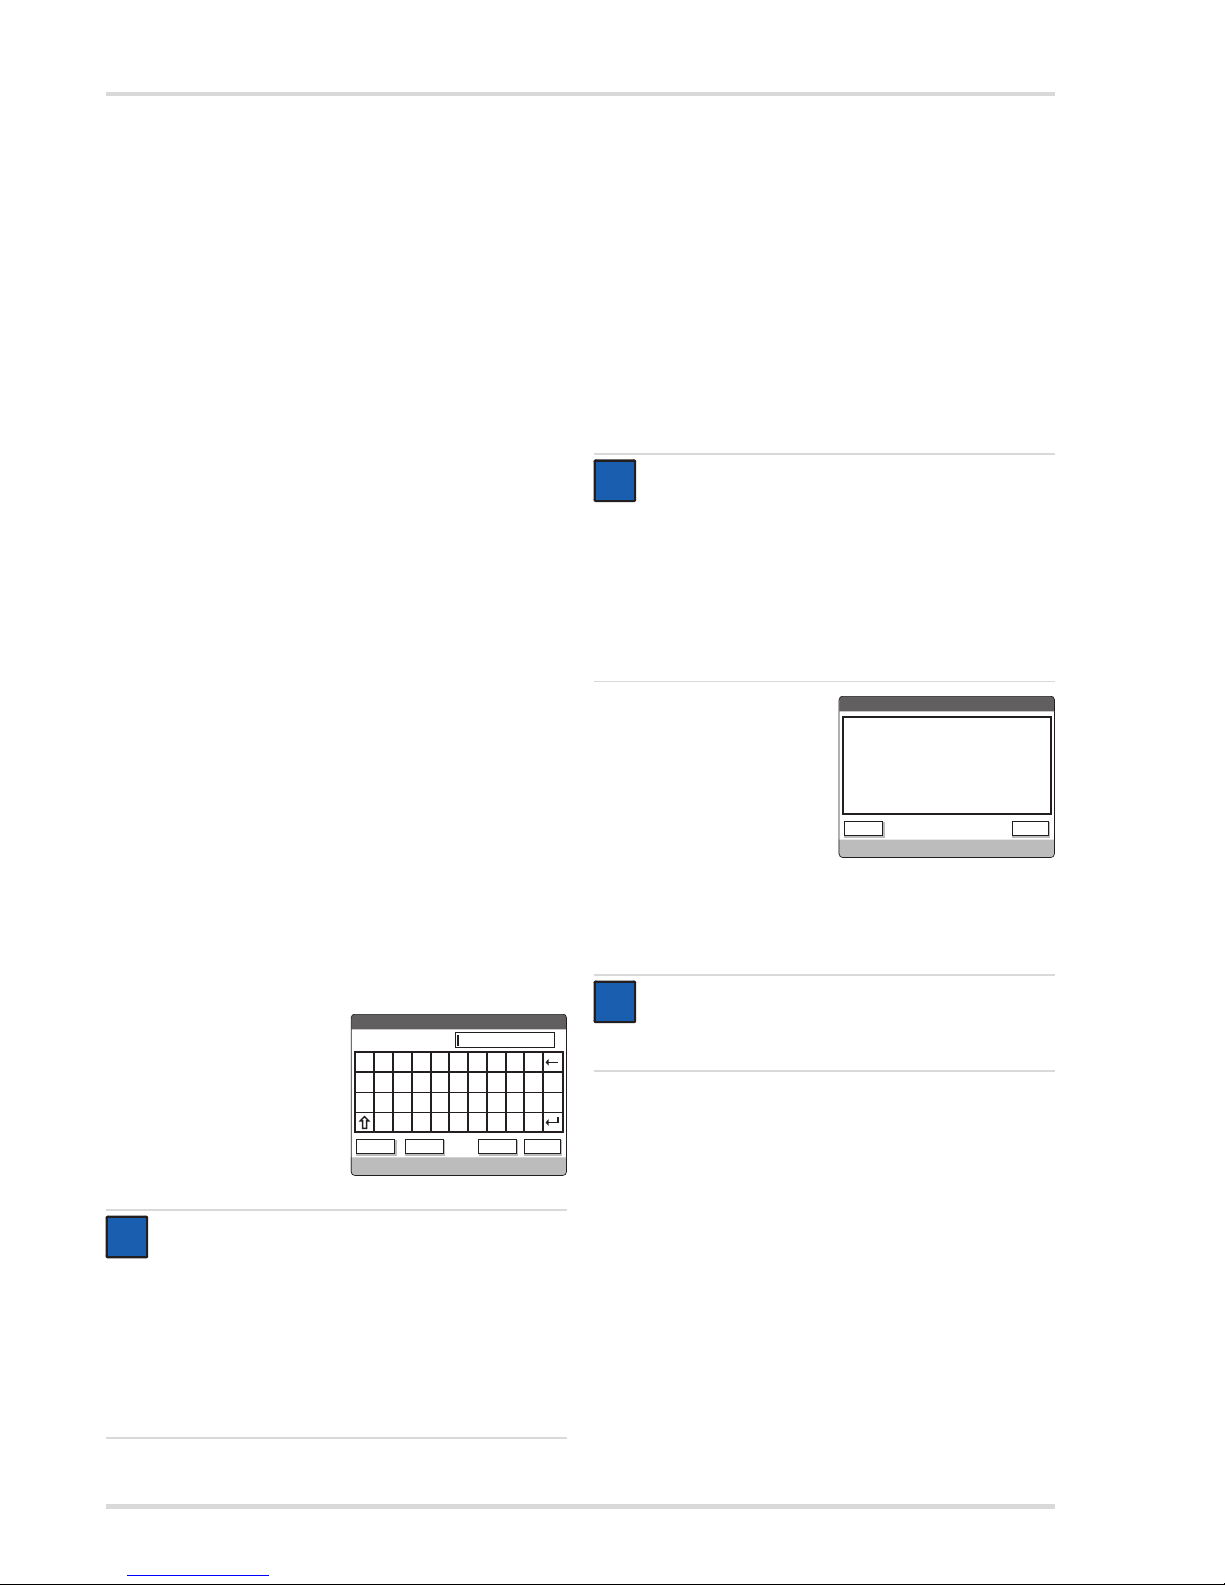
4.2.1 Eingabe der Probandendaten
In der Abbildung ist die Eingabe über die virtuelle Tastatur
dargestellt. Bei Verwendung einer externen Tastatur ist die
Eingabe entsprechend der Tastatur vorzunehmen. Mit kann
zwischen Groß- und Kleinschreibung gewechselt werden.
Die Eingabeaufforderung NAME BEDIENER/IN wird angezeigt.
1. Den Namen des Bedieners eingeben und mit Weiter be-
stätigen.
Die Eingabeaufforderung NAME PROBAND wird angezeigt.
2. Den Namen des Probanden eingeben und mit Weiter be-
stätigen.
Die Eingabeaufforderung VORNAME PROBAND wird angezeigt.
3. Den Vornamen des Probanden eingeben und mit Weiter
bestätigen.
Die Eingabeaufforderung GEBURTSDATUM PROBAND wird
angezeigt.
4. Die Ziffern für den Geburtstag (TT), den Geburtsmonat
(MM) und das Geburtsjahr (JJJJ) eingeben und mit Fertig
bestätigen.
Eine Zusammenfassung der
eingegebenen Daten wird angezeigt. Durch Doppelklicken
auf die einzelnen Einträge können diese nochmals bearbeitet
werden.
5. Mit Weiter die Eingaben der Probandendaten bestätigen.
Der Messvorgang beginnt direkt nach der Bestätigung. Ein
Zurückblättern oder Ändern in vorherigen Eingaben ist
nicht mehr möglich.
Der Messablauf wird fortgesetzt.
SPÜLEN MIT UMGEBUNGSLUFT wird angezeigt.
Das Messsystem wird mit Umgebungsluft gespült. Anschließend wird die Bestimmung des internen Bezugspunkts durchgeführt, BESTIMMUNG NULLWERT wird
angezeigt.
Nur beim Alcotest 9510 Standard IR / EC schließt sich eine
Prüfung der Umgebungsluft auf alkoholische Dämpfe mit
dem EC-Sensor an, PRÜFUNG UMGEBUNGSLUFT wird
angezeigt.
Wenn bei dieser Prüfung Einflüsse durch die Umgebungsluft ausgeschlossen werden können, fordert das Gerät zur
Abgabe einer Atemprobe auf. Die Zeitangabe im unteren
Bereich gibt die Zeit an, in der die Abgabe der Atemprobe
gestartet werden muss.
HINWEIS
Erfolgt innerhalb von 10 Minuten keine Eingabe, wird
die Meldung ZEIT FÜR DATENEINGABE ABGELAU-
FEN angezeigt, und das Gerät geht zurück auf BEREIT.
Für einen Namen können bis zu 24 Buchstaben eingegeben werden. Bei Namen mit mehr als 24 Buchstaben/Zeichen wird an der 24. Stelle das letzte
Eingabezeichen angenommen. Die Eingabe wird mit
Weiter beendet.
NAME BEDIENER/IN
FertigWeiterZurückAbbruch
04333037_de.eps
Alcotest 9510
hh:mm
TT.MM.JJJJ
1
Q
A
2
W
S
Z
3
E
D
X
4
R
F
C
5
T
G
V
6
Y
H
B
7
U
J
N
8
I
K
M
9
O
L
-
0
P
,
:
+
LUEBECK
i
i
HINWEIS
Bei der Eingabe nicht sinnvoller Datumsangaben wird
nach dem Wählen der Taste Zusamm. die Übernahme der Daten verweigert und erneut zu einer Datumseingabe aufgefordert.
Bis zu diesem Zeitpunkt können alle vorherigen Eingaben mit Zurück wieder auf den Bildschirm zurückgerufen werden. Die Eingaben können entweder durch
Neueingabe verändert oder durch Fertig bestätigt
werden.
HINWEIS
Falls die externe Tastatur verwendet wird, ist der Abschluss der Dateneingabe auch durch die Tasteneingabe [ alt ] + [ s ] möglich.
i
i
WeiterAbbruch
02533037_de.eps
Alcotest 9510
hh:mm
TT.MM.JJJJ
NAME BEDIENER/IN:
KLEIN
NAME PROBAND:
Mustermann
VORNAME PROBAND:
Manfred
GEBURTSDATUM PROBAND:
18.09.1956
LUEBECK
i
i
Page 9

Messung durchführen
Dräger Alcotest 9510 Standard IR / EC 9
6. Die Verpackung eines neuen Mundstücks öffnen, den
Atemschlauch aus der Ablagemulde herausnehmen und
das Mundstück unter Verwendung der Verpackung ohne
Hautkontakt in den Handgriff am Ende des Atemschlauches einsetzen.
4.2.2 Abgabe der Atemprobe
Das Bedienpersonal hat sicherzustellen, dass die Wartezeit
eingehalten wurde und, dass der Proband in der Kontrollzeit
(mindestens 10 Minuten) vor Abgabe der Atemprobe der Proband keinerlei Substanzen durch Mund oder Nase aufgenommen hat.
Mit Beginn der Anzeige ATEMPROBE ABGEBEN ist das Gerät für 3 Minuten bereit für eine Atemprobe. In diesem Zeitraum
muss der Proband zur Abgabe der Atemprobe ansetzen.
1. Den Probanden auffordern,
ruhig einzuatmen und kontinuierlich und gleichmäßig
die Atemprobe durch das
Mundstück abzugeben, bis
der untere Balken auf dem
Bildschirm bis mindestens
zur Hälfte gefüllt ist.
Bei Abgabe der Atemprobe wird der Fortschritt der Abgabe
durch einen sich füllenden Balken angezeigt.
Die Länge des noch zu füllenden Balkens ist ein Anhaltspunkt für das noch abzugebende Volumen bis zum Erreichen des Mindestvolumens.
Auch wenn der Balken vollständig gefüllt ist, kann die Abgabe der Atemprobe fortgesetzt werden. Die Messung wird
hierdurch nicht beeinträchtigt.
Am Ende der Atemprobe
Bei Unterschreitung des Mindestflusses der Atemluft wird
STOPP angezeigt.
2. Abgabe der Atemprobe sofort beenden.
Ein Wiederansetzen (Nachatmen) ist unbedingt zu vermeiden, die Messung wird dann abgebrochen.
Sind die Anforderungen an die Abgabe der Atemprobe bezüglich Dauer, Volumen und Kontinuität erfüllt, wird
MUNDSTÜCK ABZIEHEN angezeigt.
3. Mundstück unter Verwendung der Mundstückverpackung
aus dem Handgriff am Ende des Atemschlauches ziehen
und entsorgen.
4. Atemschlauch in die Ablagemulde zurück oder seitlich am
Gerät ablegen.
Das Messsystem wird wieder mit Umgebungsluft gespült
und ein weiterer interner Abgleich durchgeführt.
SPÜLEN MIT UMGEBUNGSLUFT und BESTIMMUNG
NULLWERT wird nacheinander angezeigt.
Falls alle Randbedingungen des Ablaufes eingehalten wurden, wird das
Endergebnis in der eingestellten Einheit auf dem
Bildschirm angezeigt.
Der Ausdruck des Messprotokolls beginnt.
4.2.3 Ende des Messzyklus
Nach Ende des Ausdruckvorgangs wird STARTBEREIT an-
gezeigt.
Die Betriebsbereitschaft für
den nächsten Messzyklus ist
wieder hergestellt.
4.2.4 Zusätzliches Messprotokoll ausdrucken
Kopie auswählen, um zu einem späteren Zeitpunkt, eine
Kopie des letzten Messprotokolls auszudrucken.
Ein nachträglich erzeugtes Messprotokoll enthält alle Daten
der letzten Messung.
4.3 Fehler während des Messablaufes
Werden Fehler im Messablauf erkannt, werden diese auf der
Anzeige angegeben und, je nach Art des Fehlers, muss die
Abgabe der Atemprobe wiederholt werden, bzw. der Messzyklus wird vollständig abgebrochen.
ATEMVOLUMEN ZU KLEIN
Das Volumen der abgegebenen Atemprobe ist zu klein. Bei
Atemproben, die sowohl ein zu geringes Ausatemvolumen als
auch eine zu kurze Ausatemdauer aufweisen, wird die Fehlermeldung bezüglich des Ausatemvolumens angegeben.
Die Abgabe der Atemprobe muss wiederholt werden. (Insgesamt sind 3 Fehlversuche bei einem Messvorgang erlaubt.)
TEST WIRD WIEDERHOLT
Wiederholung einer Atemprobe. In identischer Weise wird der
Messzyklus fortgesetzt, wenn z. B. aufgrund einer zu kurzen
Abgabe der Atemprobe (weniger als 3 Sekunden) diese Meldung angezeigt wird.
PRÜFE ATEMSCHLAUCH
Der kontrollierte Durchfluss beim Spülen ist zu gering. Immer
sicherstellen, dass der Lufteintritt in den Atemschlauch beim
Spülen nicht verdeckt ist.
TEST ABGEBROCHEN
Nach einem vierten Fehlversuch wird der Messzyklus beendet
und eine entsprechende Meldung der Ursache des letzten
Fehlversuchs auf dem Drucker mit dem Protokoll ausgegeben.
MUNDRESTALKOHOL
Aus dem Konzentrations-Zeit-Profil der Atemprobe wurde die
Anwesenheit von Mundrestalkohol erkannt. Der Messzyklus
wird sofort abgebrochen und ein Protokoll mit entsprechender
Angabe ausgedruckt.
MESSBEREITSCHAFT ABGELAUFEN
Falls nach dem Beginn der Aufforderung nicht innerhalb von
3 Minuten mit der Abgabe einer Atemprobe begonnen, wird
HINWEIS
Messergebnisse unter 0,03 mg/L bzw. 0,05 ‰ werden
als 0,00 mg/L bzw. ‰ ausgegeben. Bei anderen Messeinheiten gelten entsprechende Anzeigegrenzen.
Alcotest 9510
hh:mm
TT.MM.JJJJ
ATEMPROBE ABGEBEN
10
10
20
30
Durchfluss [L/m]
0.15
0.30
0.45
AAK [mg/L]
[t/s]50
03233037_de.eps
LUEBECK
Alcotest 9510
hh:mm
TT.MM.JJJJ
MESSERGEBNIS
0.00 mg/L
02933037_de.eps
LUEBECK
i
i
HINWEIS
Ein zusätzliches Messprotokoll kann nur gedruckt werden, wenn noch keine neue Messung gestartet wurde
und wenn das Gerät nicht ausgeschaltet wurde.
Alcotest 9510
hh:mm
TT.MM.JJJJ
Menü
STARTBEREIT
03033037_de.eps
GRÜNEN STARTKNOPF DRÜCKEN
Kopie
LUEBECK
Herunterfahren
i
i
Page 10

10 Dräger Alcotest 9510 Standard IR / EC
Messprotokoll (Beispiele)
der Messzyklus abgebrochen. Ein Protokoll mit entsprechender Angabe wird ausgedruckt.
5 Messprotokoll (Beispiele)
5.1 Erläuterung zum Messprotokoll
Die Angaben im oberen Teil des Messprotokolls erlauben die
eindeutige Identifikation des Messgeräts, mit dem die Messung durchgeführt und das Messprotokoll erzeugt wurde.
Seriennummer
Eindeutige Angabe (4 Buchstaben, 4 Ziffern), die genau einem Gerät zugeordnet ist.
Probenummer
Anzahl der Messungen mit Messprotokollausgabe nach
dem letzten Service, bei dem der Zähler zurückgesetzt
wurde.
Kalibriernummer
Kontrollziffer, die sich bei Justierung des Geräts erhöht.
Die übrigen Angaben auf dem Messprotokoll sind selbsterklärend.
5.2 Sommerzeit / Winterzeit umstellen
Die jeweils eingestellte Zeit im Gerät wird durch den Zusatzbuchstaben an der Zeitangabe kenntlich gemacht.
S = Sommerzeit
W = Winterzeit
Das Gerät stellt automatisch auf Winter- bzw. Sommerzeit um.
Es ist keine Umstellung vom Anwender nötig.
(Beispiel:
Alcotest 9510 Standard IR/EC
normale Messung)
(Beispiel:
Alcotest 9510 Standard IR/
EC
Abbruch des Messzyklus)
**************************************
012345678901234567890123
**************************************
ALCOTEST 9510 IR / EC
SERIENNUMMER: ARXN-0002
PROBENNUMMER: 00063
KALIBRIERNR.: 00001
SW-VERS.: 8319523 3.2
DATUM: 15.08.2013
UHRZEIT START: 18:08 S
ENDE: 18:11 S
**************************************
DIENSTSTELLE:
LUEBECK
-------------------------------------------**************************************
NAME PROBAND:
Mustermann
-------------------------------------------VORNAME PROBAND:
Manfred
-------------------------------------------GEBURTSDATUM:
18.09.1956
-------------------------------------------**************************************
PROBANDENTEST
FEHLVERSUCHE : 0
ATE MVO LUM EN : 3,0 L
ATEMZEIT : 13,8 s
ERGEBNIS : 0,00
**************************************
* MESSERGEBNIS *
* *
* 0,00 mg/L *
* *
**************************************
NAME BEDIENER/IN:
KLEIN
-------------------------------------------UNTERSCHRIFT BEDIENER/IN
-------------------------------------------**************************************
012345678901234567890123
**************************************
**************************************
012345678901234567890123
**************************************
ALCOTEST 9510 IR / EC
SERIENNUMMER: ARXN-0002
PROBENNUMMER: 00064
KALIBRIERNR.: 00001
SW-VERS.: 8319523 3.2
DATUM: 15.08.2013
UHRZEIT START: 19:10 S
ENDE: --:-- S
**************************************
DIENSTSTELLE:
LUEBECK
-------------------------------------------**************************************
NAME PROBAND:
Mustermann
-------------------------------------------VORNAME PROBAND:
Manfred
-------------------------------------------GEBURTSDATUM:
18.09.1956
-------------------------------------------**************************************
PROBANDENTEST
FEHLVERSUCHE : 4
ATEMVOLUMEN : 0,5 L
ATEMZEIT : 5,8 s
ERGEBNIS : ---**************************************
* MESSERGEBNIS *
* *
* ATEMVOLUMEN ZU KLEIN *
* *
**************************************
NAME BEDIENER/IN:
KLEIN
-------------------------------------------UNTERSCHRIFT BEDIENER/IN
-------------------------------------------**************************************
012345678901234567890123
**************************************
Page 11

Menü
Dräger Alcotest 9510 Standard IR / EC 11
6Menü
Zur Auswahl der Menüoptionen die Touchscreen-Funktion
des Bildschirms mit Hilfe des beiliegenden Eingabestifts
nutzen.
Ist zur Dateneingabe keine externe Tastatur angeschlos-
sen, wird auf dem Bildschirm automatisch eine virtuelle
Tastatur angezeigt, an der mit dem Eingabestift gearbeitet
werden kann.
Mit der Menütaste in der Startleiste können folgende Me-
nüs direkt angewählt werden:
Information
Einstellungen
Wartung
Einstellungen und Änderungen in den Menüs mit Bestäti-
gen übernehmen. Die Rückkehr ins Menü erfolgt automatisch.
6.1 Menü » Information «
Das Menü zeigt Informationen
über die installierte Softwareversion (hier beispielhaft
dargestellt).
Bei Kontakt mit dem DrägerService sollte immer die Software-Versionsnummer
angegeben werden.
6.2 Menü » Einstellungen «
In diesem Menü kann der
Standort, die Uhrzeit, die Sprache etc. ausgewählt oder eingestellt werden.
Um eine Option auszuwählen:
Gewünschten Eintrag mit
dem Eingabestift doppelklicken
oder
Gewünschten Eintrag mit den Pfeiltasten der Tastatur aus-
wählen und mit Enter bestätigen.
6.2.1 Untermenü » Bildschirm «
In diesem Untermenü kann die
Bildschirmdarstellung um 180°
gedreht werden.
1. Kontrollkästchen Bild-
schirm 180° drehen aktivieren oder deaktivieren.
2. Eingabe mit Bestätigen
übernehmen. Die Rückkehr
ins Menü erfolgt automatisch.
6.2.2 Untermenü » Drucker «
In diesem Untermenü wird ausgewählt, ob an dem internen
oder einem externen Drucker
das Protokoll gedruckt wird.
Der interne Drucker ist immer
aktiviert.
Bei entsprechender Konfiguration des Geräts ist die Anzahl
der Messprotokolle fest auf 1 Kopie (Grundeinstellung) gesetzt
oder es kann zwischen 1 und 5 Kopien ausgewählt werden.
Eingabe mit Bestätigen übernehmen. Die Rückkehr ins Menü
erfolgt automatisch.
6.2.3 Untermenü » Ton «
In diesem Untermenü kann die Lautstärke und Frequenz des
akustischen Signals während der Atemabgabe ausgewählt
werden.
6.2.4 Untermenü » Fehlerspeicher «
In diesem Untermenü werden
aufgetretene Fehler während
des Betriebes gespeichert.
Dokumentiert werden:
Uhrzeit
Fehlercode
Fehler sind in diesem Sinne
Betriebszustände, die keinen
weiteren Betrieb des Geräts
zulassen.
6.2.5 Untermenü » Sprache «
In diesem Untermenü kann eine der angebotenen Sprachen
ausgewählt werden.
In dem Gerät sind in den
Grundeinstellungen Englisch
und Deutsch als Sprachen verfügbar. Weitere Sprachen auf
Anfrage.
1. Gewünschte Sprache im Auswahlfenster markieren.
2. Auswahl mit Bestätigen übernehmen.
Die ausgewählte Sprache wird geladen. Der Rückschritt
ins Menü erfolgt anschließend automatisch.
VORSICHT
Touchscreen nur mit dem Eingabestift bedienen. Andere Werkzeuge (z. B. Kugelschreiber) können den
Touchscreen irreversibel beschädigen.
HINWEIS
Werden die Untermenüs nur zur Überprüfung der Einstellungen ausgewählt, Kreuz X oben rechts am Bildschirmrand oder Schließen wählen, um ins Menüs
zurückzukehren.
!
i
i
Alcotest 9510
Menü
Über
X
M16 Version/Sach-Nr.:
M16 Prüfsumme:
WinCE Version/Sach-Nr.:
WinCE Prüfsumme:
WinCE Image Version:
Konfiguration/Prüfsumme:
2.3 / 8319523
0x118C
2.2 / 8319522
0x2745
1.1
0104 / 0x5585
Drucken Schließen
01133037_de.eps
Einstellungen
Menü
X
Bildschirm
Drucker
Ton
Fehlerspeicher
Sprache
Eingabe Standortanzeige
Auswahl Standortanzeige
Dateneingabe
Datum und Uhrzeit
01333037_de.eps
Einstellungen
Menü
Bildschirm
Save
X
Bildschirm 180° drehen
SchließenBestätigen
04233037_de.eps
Einstellungen
Menü
Drucker
intern
Save
extern
X
Drucker
Anzahl
Anzahl
SchließenBestätigen
1
1
01433037_de.eps
Einstellungen
Datum/Zeit Fehler
Fehlerspeicher
X
15.10.2007 13:32:38
02.10.2007 12:10:12
02.10.2007 11:49:47
28.09.2007 09:30:39
108
107
109
107
01533037_de.eps
Menü
Schließen
Einstellungen
Menü
Sprache
Save
X
Sprache:
SchließenBestätigen
01633037_de.eps
Deutsch
Page 12

12 Dräger Alcotest 9510 Standard IR / EC
Menü
6.2.6 Untermenü » Eingabe Standortanzeige «
In diesem Untermenü können
weitere Standorte angelegt
werden, die bei der Durchführung von Messungen ausgewählt werden können. Sie
werden auf dem Bildschirm angezeigt und auf dem Messprotokoll mit ausgedruckt.
1. Gewünschtes Standortfeld anwählen.
2. Standort eingeben.
3. Eingabe mit Bestätigen übernehmen. Die Rückkehr ins
Menü erfolgt automatisch.
Die maximale Länge der Eingaben beträgt 17 Buchstaben. Es
können maximal 10 Standorte eingegeben werden.
6.2.7 Untermenü » Auswahl Standortanzeige «
In diesem Untermenü kann der
Standort ausgewählt werden,
der in der zweiten Zeile auf
dem Bildschirm angezeigt wird.
1. Gewünschten Standort anwählen.
Der angewählte Standort
wird durch einen Markierungsbalken hervorgehoben.
2. Eingabe mit Bestätigen übernehmen. Die Rückkehr ins
Menü erfolgt automatisch.
Der ausgewählte Standort erscheint auf dem Bildschirm
und wird im Messprotokoll mit ausgedruckt.
6.2.8 Untermenü » Dateneingabe «
In diesem Untermenü kann die
Aufforderung der Dateneingabe während des Messvorgangs
aktiviert oder deaktiviert werden. In der Grundeinstellung ist
die Dateneingabe aktiviert.
1. Kontrollkästchen Eingabe
der Benutzer-/Probandendaten aktivieren oder
deaktivieren.
2. Eingabe mit Bestätigen übernehmen. Die Rückkehr ins
Menü erfolgt automatisch.
6.2.9 Untermenü » Datum und Uhrzeit «
In diesem Untermenü können
das Datum und die Uhrzeit eingestellt werden.
1. Nacheinander die Uhrzeit
und das Datum einstellen.
2. Eingabe mit Bestätigen
übernehmen. Die Rückkehr
ins Menü erfolgt automatisch.
Zusätzlich können kleine Gangunterschiede der internen Uhr
ausgeglichen werden:
Mit + wird die aktuelle Uhrzeit um eine Minute vorgestellt.
Mit - wird die aktuelle Uhrzeit um eine Minute zurückge-
stellt.
6.3 Menü » Wartung «
In diesem Menü können Einstellungen erfolgen, die eine genauere Analyse der Messergebnisse erlaubt. Die Einstellungen, die in diesem Menü vorgenommen werden, werden nach
dem Ausschalten des Geräts zum Teil wieder auf die Grundwerte zurückgesetzt. Die Verwendung dieses Menüs ist für geschulte Service-Techniker zulässig.
6.3.1 Untermenü » Einheiten umstellen «
In diesem Untermenü kann die Messeinheit, in der die Atemalkoholkonzentration angegeben werden kann für den Normalmodus (ist nach Anschalten des Geräts aktiv) und den
Kontrollmodus ausgewählt werden.
Folgende Einheiten stehen zur Verfügung:
µg/l
mg/l
µg/100 ml
g/l
‰
%
g/210 l
Die Umrechnung zwischen den Angaben in Atemalkoholeinheiten und Blutalkoholeinheiten erfolgt mit einem Blut-/Atemverhältnis von 2100:1.
Die Einstellung der Einheit bleibt auch nach dem Ausschalten
erhalten.
6.3.2 Untermenü » Kontrollmodus «
In diesem Untermenü kann der Kontrollmodus aktiviert und
eine Testgasart für Messungen ausgewählt werden.
Diese Einstellung ist für das Arbeiten im Labor hilfreich. Im
Kontrollmodus ist die Auflösung der Angabe des Messergebnisses um eine Dezimalstelle erhöht.
Zudem kann mit der Aktivierung des Laborprotokolls zu einer
Messung eine Ausgabe von Rohdaten der Sensoren bei der
Messung erfolgen.
Einstellungen
Eingabe Standortanzeige
X
Standort 1
Standort 2
Standort 3
Standort 4
01733037_de.eps
Menü
SchließenBestätigen
LUEBECK
BERLIN
HAMBURG
Einstellungen
Auswahl Standortanzeige
X
Bitte Standortanzeige auswählen:
01833037_de.eps
Menü
SchließenBestätigen
Standort (default)
LUEBECK
BERLIN
HAMBURG
Revalstrasse
KLINIK
Einstellungen
Menü
Dateneingabe
Save
X
Eingabe der Benutzer-/Probandendaten
SchließenBestätigen
01933037_de.eps
Einstellungen
Menü
Datum und Uhrzeit
Save
X
Zeit Offset
Datum setzen
Zeit setzen
SchließenBestätigen
14:31:27
-
min + 1 h 0
17.10.2013
02033037_de.eps
HINWEIS
Die aktuelle Uhrzeit kann innerhalb von 24 Stunden
um +/- 1 Minute verstellt werden.
HINWEIS
Beide Einstellungen werden nach dem Ausschalten
des Geräts wieder deaktiviert.
i
i
i
i
Page 13

Störungsbeseitigung
Dräger Alcotest 9510 Standard IR / EC 13
7 Störungsbeseitigung
Meldungen, die vom Windows-CE-Betriebssystem erzeugt werden
(Es werden normalerweise Volltextmeldungen generiert, zum Teil mit Auswahlmöglichkeiten für weiteres Vorgehen).
Fehler
» Bildschirmanzeige « (Druckertext)
Ursache Abhilfe
Keine Funktion nach Anschalten. Sicherungen defekt. Die Sicherungen prüfen, ggf. erneuern,
siehe Seite 14.
Stromversorgung unzureichend. Stromversorgung prüfen.
» NULLTEST FEHLER «
(NULLWERTFEHLER)
Nullabgleich fehlerhaft. Für alkoholfreie und saubere Umge-
bungsluft sorgen. Prüfraum lüften.
» MUNDRESTALKOHOL «
(MUNDRESTALKOHOL)
Restalkohol im Mund des Probanden.
Proband hat unmittelbar vor dem Test Alkohol zu sich genommen bzw. aufgestoßen.
Ursache abstellen. Messung nach einer
Wartezeit wiederholen.
Kontrollzeit beachten.
» ATEMVOLUMEN ZU KLEIN «
(ATEMVOLUMEN ZU KLEIN)
Das abgegebene Volumen ist kleiner als
das geforderte Mindestvolumen.
Das Gerät fordert automatisch zu einer
Wiederholung der Atemprobe auf.
» ATEMZEIT ZU KURZ «
(ATEMZEIT ZU KURZ)
Die Dauer der Abgabe der Atemprobe ist
kleiner als das geforderte Mindestvolumen.
Das Gerät fordert automatisch zu einer
Wiederholung der Atemprobe auf
» ATEMPROBE NICHT ZULÄSSIG «
(ATEMABGABE UNZULÄSSIG)
Abgabe der Atemprobe zu einem nicht
erlaubten Zeitpunkt; keine Messbereitschaft (Nachblasen).
Probanden auf korrekte Abgabe der
Atemprobe hinweisen. Neue Messung
starten.
» MESSBEREITSCHAFT
ABGELAUFEN «
(MESSBEREIT. ABGELAUFEN)
Messbereitschaft von 3 Minuten ist abgelaufen. Atemprobe wurde in dieser Zeit
nicht begonnen.
Neue Messung starten.
» ALKOHOL IN DER UMGEBUNG «
(ALKOHOL IN UMGEBUNG)
Kontamination der Umgebungsluft wurde festgestellt.
Für alkoholfreie und saubere Umgebungsluft sorgen. Prüfraum lüften.
» PRÜFE ATEMSCHLAUCH «
Zum Spülen des Messsystems notwendiges Spülvolumen nicht erreicht.
Einlass des Atemschlauches prüfen.
Falls keine Auffälligkeit: erneut Messung
starten.
Tritt Fehler wieder auf: DrägerService informieren.
» ZEIT FÜR DATENEINGABE
ABGELAUFEN «
(EINGABEZEIT ABGEL.)
Trotz Aufforderung keine Dateneingabe
innerhalb von 10 Minuten erfolgt.
Neue Messung starten.
Daten bei Aufforderung eingeben.
» INTERFERENZ «
(INTERFERENZ)
Die beiden unabhängigen Messsysteme
haben eine unzulässige Beeinflussung
der Messwerte durch Fremdsubstanzen
im Atem detektiert.
Ursache dieser Beeinflussung identifizieren, wenn möglich abstellen.
Eventuell andere, beweissichernde
Maßnahmen auslösen.
Folgende Fehler werden in Englisch mit
Fehlernummer und Textmeldung auf dem
Bildschirm angezeigt:
» FEHLER [XXX] ..
..MAIN-SYSTEM «
..IR-SYSTEM «
..EC-SYSTEM «
..FLOW-SYSTEM «
..PRESSURE-SYS «
..HEATER SYSTEM «
Beispiel:
ERROR [118] HEATER SYSTEM
Auf den Drucker wird jeweils die Fehlernummer und die Textmeldung gedruckt.
Beispiel:
Error [118] HEATER SYSTEM
Instrument defekt
(XXX = Ziffer, die den Fehler spezifiziert)
Instrument blockiert automatisch beim
Erkennen des Fehlers alle Messabläufe.
Die Soll-Temperatur für den Sensor bzw.
den Schlauch ist nicht erreicht.
Gerät ausschalten.
Prüfen, ob nach Wiedereinschalten der
Fehler erneut auftaucht.
Wenn ja: DrägerService informieren. Gerät zur Instandhaltung geben.
Einhaltung der Umgebungsbedingungen
sicherstellen. Gerät ausschalten, eventuell mit dem Gerätedeckel abdecken
und wieder einschalten. Wenn nach Wiedereinschalten Fehler wieder auftaucht,
DrägerService informieren.
Fehler / Bildschirm Ursache Abhilfe
Gerät ist nicht betriebsbereit!
Servicefunktion ist nicht möglich.
Ausgewählte Aktion ist nur möglich,
wenn Gerät » BEREIT « ist.
Warten, bis Betriebsbereitschaft hergestellt ist.
Page 14

14 Dräger Alcotest 9510 Standard IR / EC
Wartung
8 Wartung
8.1 Inspektion
Inspektionen des Geräts sind von fachkundigen Personen,
z. B. von Dräger oder durch von Dräger autorisierte Personen
durchzuführen.
8.2 Instandhaltungsintervalle
8.2.1 Papierrolle einsetzen
Das Gerät prüft nach Auslösen einer Messung, ob noch ausreichend Papier vorhanden ist. Nicht ausreichender Papiervorrat wird mit der Meldung KEIN DRUCKERPAPIER angezeigt.
Wenn der rote Streifen auf dem Messprotokoll sichtbar wird, ist
eine neue Papierrolle einzusetzen.
1. Zum Öffnen der Druckerklappe die schwarze Entriegelungstaste drücken und die Klappe öffnen.
2. Neue Papierrolle einsetzen.
3. Um eine lange Lagerfähigkeit der gedruckten Messprotokolle zu erreichen, ist es dringend empfohlen das Thermopapier zu nutzen, das von Dräger angeboten wird (siehe
Kapitel 13 auf Seite 15).
8.2.2 Sicherungen auswechseln
1. Gerät von der Stromversorgung trennen.
2. Verriegelung des Sicherungshalters zusammendrücken
und den Sicherungshalter herausziehen.
3. Alte Sicherungen durch neue ersetzen.
4. Nur die vorgeschriebenen Sicherungen verwenden (siehe
Kapitel 13 auf Seite 15).
5. Sicherungshalter wieder einsetzen.
8.3 Gerät reinigen
1. Gerät von der elektrischen Versorgung trennen.
2. Oberflächen von Gerät und Schlauch mit einem feuchten
Tuch abwischen.
3. Mit einem trockenen Tuch gründlich trockenwischen.
Keine alkoholhaltigen Reinigungsmittel verwenden!
Keine Flüssigkeiten in den Schlauch gelangen lassen!
9 Transport
Beim Transport des Geräts die für den Transport empfind-
licher, elektronischer Geräte üblichen Vorsichtsmaßnahmen einhalten.
Übermäßige mechanische Spannungen, Stöße und Vibra-
tionen beim Transport vermeiden.
10 Lagerung
Das Gerät in trockenen Räumen lagern. Umgebungsbedin-
gungen für Lagerung, siehe Kapitel 12 auf Seite 15.
11 Entsorgung
Empfohlen: 6 Monate
Maximal: 12 Monate
14223875.eps
Dieses Produkt darf nicht als Siedlungsabfall entsorgt
werden. Es ist daher mit dem nebenstehenden Symbol
gekennzeichnet.
Dräger nimmt dieses Produkt kostenlos zurück. Informationen dazu geben die nationalen Vertriebsorganisationen und Dräger.
2
14323875.eps
Page 15

Technische Daten
Dräger Alcotest 9510 Standard IR / EC 15
12 Technische Daten
13 Bestellliste
Umgebungsbedingungen
Betrieb
Temperaturbereich 0 bis 40 °C
Feuchtigkeit 30 bis 90 % relative Feuchtig-
keit
Umgebungsdruck 850 bis 1060 hPa
Einsatzhöhe max. 3000 m
Lagerung
Temperaturbereich –20 bis 70 °C (>40 °C nur für
einige Stunden)
Feuchtigkeit 10 bis 90 % relative Feuchtig-
keit
Umgebungsdruck 700 bis 1300 hPa
Messsystem
Messbereich
Atemalkoholkonzentration 0 bis 3 mg/l
0 bis 300 µg/100 ml
0 bis 3000 µg/l
(Ethanol-Masse pro Ausatem-
volumen bei 34 °C und
1013 hPa)
Blutalkoholkonzentration 0 bis 6 ‰
0 bis 6 g/l
0 bis 0,6 %
(Ethanol-Masse pro Blutvolu-
men bei 20 °C und 1013 hPa.
Bei der Angabe dieser Daten
wird ein Umrechnungsfaktor
von 2100 zwischen Atem- und
Blutalkoholkonzentrationsan-
gaben verwendet.)
Auflösung Endergebnis 0,01 mg/l
1 µg/100 ml
10 µg/l
0,01 ‰
0,01 g/l
0,001 %
Dauer einer Messung
(typisch)
3 Minuten
Ausatemdauer >3 Sekunden
Ausatemvolumen >1,5 l
Wiederholpräzision: Standardabweichung
0 bis 0,4 mg/l < 0,007 mg/l
über 0,4 bis 2,0 mg/l kleiner als 1,75 % relativ
über 2,0 mg/l kleiner als 6 % relativ
Kalibrierintervall abhängig von der geforderten
Messgenauigkeit
empfohlen: 6 Monate;
maximal: 12 Monate
Charakteristische
Betriebsdaten
Versorgungsspannung
Netzbetrieb 110 bis 240 V, 50 bis 60 Hz
12-V-Betrieb 10,5 bis 15,5 V DC
Leistungsaufnahme
Während der
Aufwärmphase
ca. 70 W
Im Standby-Betrieb <15 W
Hauptsicherung TH/250 V; 0,63 A, 2 Stück
Thermodrucker Thermodrucker mit Spezialpa-
pier, 58 mm breit
Zeitangabe Tag/Monat/Jahr
Stunde: Minute
Sommer-, Winterzeit
Aufwärmphase kleiner 15 Minuten bei Raum-
temperatur
Abmessungen ca. 325 mm x 250 mm x
55/185 mm (B x H x T)
Gewicht (ohne Tastatur) 6,9 kg
CE-Kennzeichnung Elektromagnetische Verträg-
lichkeit (Richtlinie 89/336/
EWG)
Niederspannungsrichtline
(Richtlinie 72/23/EWG)
Benennung und Beschreibung
Bestellnr.
Dräger Alcotest 9510 Standard IR 83 19 460
Dräger Alcotest 9510 Standard IR / EC 83 19 470
Verbrauchsmaterial und Zubehör
Tastatur - Mini QWERTY (USB) 83 19 441
Tragetasche 83 19 155
12-V-Kabel (mit EIN/AUS Schalter) 83 12 641
Druckerpapier (5 Rollen, 7 Jahre lagerfähig) 83 19 002
Druckerpapier (5 Rollen, 25 Jahre lagerfähig) 83 18 461
Mundstück mit Rückschlagventil (25 Stück) 68 05 703
Sicherung, TH 250, 0,63 A 18 92 979
Eingabestift (3 Stück) 83 18 402
Netzkabel (zertifiziert nach EN 60950) 83 24 658
Abnehmbarer Deckel 83 18 479
Bildschirmschutzfolien 83 20 999
Page 16

16 Dräger Alcotest 9510 Standard IR / EC
Content
Content
1 For your safety . . . . . . . . . . . . . . . . . . . . . . . . . . . 17
1.1 General safety notes . . . . . . . . . . . . . . . . . . . . . . .17
1.2 Meaning of the alert icons . . . . . . . . . . . . . . . . . . .17
2 Description . . . . . . . . . . . . . . . . . . . . . . . . . . . . . .17
2.1 Product overview . . . . . . . . . . . . . . . . . . . . . . . . . .17
2.1.1 Front view (see fold-out) . . . . . . . . . . . . . . . . . . . . . 17
2.1.2 Side view (see fold-out) . . . . . . . . . . . . . . . . . . . . .17
2.1.3 Rear view (see fold-out) . . . . . . . . . . . . . . . . . . . . .17
2.2 Feature description . . . . . . . . . . . . . . . . . . . . . . . . .17
2.3 Intended use . . . . . . . . . . . . . . . . . . . . . . . . . . . . . .18
3 Use . . . . . . . . . . . . . . . . . . . . . . . . . . . . . . . . . . . . .18
3.1 Prerequisites . . . . . . . . . . . . . . . . . . . . . . . . . . . . . .18
3.2 Preparation for use . . . . . . . . . . . . . . . . . . . . . . . . .18
3.2.1 Positioning the instrument . . . . . . . . . . . . . . . . . . .18
3.2.2 Stationary use with mains connection . . . . . . . . . .18
3.2.3 Mobile use with 12 Volt battery . . . . . . . . . . . . . . . .18
3.2.4 Energy saving mode . . . . . . . . . . . . . . . . . . . . . . . .18
3.2.5 Adding languages for the instrument . . . . . . . . . . . 19
3.3 Interaction with the instrument . . . . . . . . . . . . . . . .19
3.3.1 Display (touchscreen) . . . . . . . . . . . . . . . . . . . . . . .19
3.3.2 Display idle time . . . . . . . . . . . . . . . . . . . . . . . . . . .19
3.3.3 Switching off the instrument . . . . . . . . . . . . . . . . . . 19
4 Making measurement . . . . . . . . . . . . . . . . . . . . . . 20
4.1 Requirements . . . . . . . . . . . . . . . . . . . . . . . . . . . . .20
4.2 Starting measurement . . . . . . . . . . . . . . . . . . . . . .20
4.2.1 Entering data of person being tested . . . . . . . . . . .20
4.2.2 Providing a breath sample . . . . . . . . . . . . . . . . . . .21
4.2.3 Finishing the measuring cycle . . . . . . . . . . . . . . . .21
4.2.4 Printing an additional measurement protocol . . . . .21
4.3 Errors during the measuring process . . . . . . . . . . .21
5 Measuring report (examples) . . . . . . . . . . . . . . . .22
5.1 Explanations concerning the measuring report . . .22
5.2 Summer time/Winter time change-over . . . . . . . . .22
6 Menu . . . . . . . . . . . . . . . . . . . . . . . . . . . . . . . . . . .23
6.1 Menu » Information « . . . . . . . . . . . . . . . . . . . . . . .23
6.2 Menu » Settings « . . . . . . . . . . . . . . . . . . . . . . . . . .23
6.2.1 Submenu » Display « . . . . . . . . . . . . . . . . . . . . . . .23
6.2.2 Submenu » Printer « . . . . . . . . . . . . . . . . . . . . . . . .23
6.2.3 Submenu » Sound « . . . . . . . . . . . . . . . . . . . . . . . .23
6.2.4 Submenu » Show Errorlogger « . . . . . . . . . . . . . . .23
6.2.5 Submenu » Language « . . . . . . . . . . . . . . . . . . . . .23
6.2.6 Submenu » Location Database « . . . . . . . . . . . . . . 24
6.2.7 Submenu » Change Current Location « . . . . . . . .24
6.2.8 Submenu » Data Entry « . . . . . . . . . . . . . . . . . . . .24
6.2.9 Submenu » Set Date and Time « . . . . . . . . . . . . . .24
6.3 Menu » Maintenance « . . . . . . . . . . . . . . . . . . . . . .24
6.3.1 Submenu » Subject Test Settings « . . . . . . . . . . . .24
6.3.2 Submenu » Control Mode « . . . . . . . . . . . . . . . . . .24
7 Troubleshooting . . . . . . . . . . . . . . . . . . . . . . . . . .25
8 Maintenance . . . . . . . . . . . . . . . . . . . . . . . . . . . . .26
8.1 Inspection . . . . . . . . . . . . . . . . . . . . . . . . . . . . . . . .26
8.2 Maintenance intervals . . . . . . . . . . . . . . . . . . . . . . .26
8.2.1 Inserting paper roll . . . . . . . . . . . . . . . . . . . . . . . . .26
8.2.2 Replacing fuses . . . . . . . . . . . . . . . . . . . . . . . . . . .26
8.3 Cleaning the instrument . . . . . . . . . . . . . . . . . . . . .26
9 Transport . . . . . . . . . . . . . . . . . . . . . . . . . . . . . . . .26
10 Storage . . . . . . . . . . . . . . . . . . . . . . . . . . . . . . . . .26
11 Disposal . . . . . . . . . . . . . . . . . . . . . . . . . . . . . . . . .26
12 Technical data . . . . . . . . . . . . . . . . . . . . . . . . . . . .27
13 Order list . . . . . . . . . . . . . . . . . . . . . . . . . . . . . . . .27
Page 17

For your safety
Dräger Alcotest 9510 Standard IR / EC 17
1 For your safety
1.1 General safety notes
Before using this product, carefully read the Instructions for
Use.
Strictly follow the Instructions for Use. The user must fully
understand and strictly observe the instructions. Use the
product only for the purposes specified in the Intended use
section of this document.
Do not dispose of the Instructions for Use. Ensure that they
are retained and appropriately used by the product user.
Only trained and competent users are permitted to use this
product.
Comply with all local and national rules and regulations
associated with this product.
Only trained and competent personnel are permitted to
inspect, repair and service the product. Dräger recommend
a Dräger service contract for all maintenance activities and
that all repairs are carried out by Dräger.
Use only genuine Dräger spare parts and accessories, or
the proper functioning of the product may be impaired.
Do not use a faulty or incomplete product. Do not modify
the product.
Notify Dräger in the event of any component fault or failure.
Do not operate in potentially explosive areas
This device is neither approved nor certified for use in areas
where combustible or explosive gas mixtures are likely to
occur.
Safe coupling with electrical devices
Electrical connections to devices which are not listed in these
Instructions for Use should only be made following
consultation with the respective manufacturers or an expert.
1.2 Meaning of the alert icons
The following alert icons are used in this document to provide
and highlight areas of the associated text that require a greater
awareness by the user. A definition of the meaning of each
icon is as follows:
2 Description
2.1 Product overview
2.1.1 Front view (see fold-out)
1 Stylus (for touchscreen)
2 Display (touchscreen)
3 Start button
4 Transport handle
5 Unlocking button of the printer flap
6 Thermal printer with compartment for thermal paper
7 Heated breath hose in storage tray
2.1.2 Side view (see fold-out)
8 Removable cover
9 Mains switch I/0 (On/Off)
10 Main fuse
11 Mains inlet
12 Vehicle connection (12 Volt DC)
13 Monitor connector (optional)
14 RS 232 interface, 2x
15 USB ports, 3x
16 Mains connection (dependent on version)
17 Modem connection (dependent on version)
18 Sealable screw
2.1.3 Rear view (see fold-out)
19 Sealable screw
20 Exhaust (Pump)
21 Service connector of cuvette
22 Model plate
23 Sealing plate
24 Calibration gas connection 1 to 4 (dependent on version)
2.2 Feature description
The Alcotest 9510
® 1
performs a measuring cycle with a single
breath sample to determine the breath alcohol concentration.
During the delivery of the breath sample by forced expiration
the exhaled air is blown through a mouthpiece into the
instrument.
For the determination of concentrations an infrared optical
sensor
2
(Alcotest 9510 Standard IR) or a combination of
infrared optical and electrochemical sensor
3
(Alcotest 9510
Standard IR / EC) with varying analytical specificity is used.
The necessary operator and test subject actions are indicated
by brief messages and instructions on the instrument display
(also used as touchscreen).
Only if all the individual steps of the breath alcohol
determination are performed correctly and none of the internal
test criteria are outside the admitted tolerance, will the final
result of the breath alcohol measurement be indicated. A
protocol is printed on the integrated thermal printer.
The operating steps to be executed on the Alcotest 9510 are
supported optically and acoustically. Operator instructions are
issued as full text messages on the display.
CAUTION
Indicates a potentially hazardous situation which, if not
avoided, could result in physical injury, or damage to
the product or environment. It may also be used to
alert against unsafe practices.
NOTICE
Indicates additional information on how to use the
product.
!
i
i
1 Alcotest® is a registered trademark of Dräger
2 IR sensor = infrared sensor
3 EC sensor = electrochemical sensor
Page 18

18 Dräger Alcotest 9510 Standard IR / EC
Use
2.3 Intended use
The Dräger Alcotest 9510 Standard IR and the Dräger Alcotest
9510 Standard IR / EC are evidential breath alcohol measuring
instruments which automatically analyse the breath alcohol
concentration (ethanol mass per expiration volume, BAC) in
the expired air.
3Use
3.1 Prerequisites
The following accessories are required for operating the
Alcotest 9510 Standard instruments. Before positioning the
instrument, check if all parts are present:
Mouthpieces
Printer paper (thermal paper)
Mains cable (for stationary use with mains connection)
Vehicle connection cable (for mobile use with a 12 Volt
supply)
External keyboard (optional)
External Keypad
A USB keypad (QWERTY) can be connected to the instrument
via one of the USB ports. The keypad is used for:
Entering data of the person being tested and the operator
for the protocol
Entering text and numbers (like e. g. location or date)
The instrument can be used with the connected keypad or the
touch-sensitive screen (touch screen). You can switch
between the different displays and control elements with the
control keys of the keypad.
Only a keypad listed as an accessory should be used for
entering data, see Section 13 on Page 27. Any other keyboard
must be approved by Dräger prior to use.
3.2 Preparation for use
3.2.1 Positioning the instrument
Select the installation location in such a way that the gas outlet
at the rear of the instrument is not obstructed and the
instrument is not exposed to direct sunlight.
1. Place the instrument on an even and solid surface. Make
sure that there is enough space for the accessories
(keypad, etc.).
2. Lightly pull apart the instrument lid at the markings and
remove it (see fold-out, B).
3. Check if a paper roll is in the thermal printer, see Section
8.2.1 on Page 26.
3.2.2 Stationary use with mains connection
1. Check the mains voltage specification on the type plate
2. Move mains switch (see fold-out, 9), to "0".
3. Connect the keypad, if keypad operation is planned.
4. Connect the mains cable.
5. Move mains switch to "I".
The instrument starts the warming-up phase.
3.2.3 Mobile use with 12 Volt battery
For battery operation (vehicle connection (12 V DC)) the
instrument requires a direct voltage of at least 10.5 V DC.
When the input voltage is too low, the instrument is switched
off. This prevents deep discharge of the supply battery (e.g.
car battery).
1. Connect the keypad, if keypad operation is planned.
2. Connect the 12 V connection cable (see fold-out, 12) and
secure it.
3. Plug the connector of the 12 V connection cable into the 12
V socket of the vehicle or the cigarette lighter socket (with
adaptor).
4. Move the mains switch at the 12 V connection cable to "I".
The instrument starts the warming-up phase.
3.2.4 Energy saving mode
If no measurement has been
performed after 15 minutes, the
instrument switches to energy
saving mode.
By pressing the start button,
readiness for measuring
can be restored after
approx. 5 minutes.
CAUTION
Only batteries or DC power supply units with isolator
(e.g. according to VDE 0551) may be connected. If this
is not adhered to, the instrument may be damaged.
NOTICE
To ensure the mobile use of the Alcotest 9510, ensure
that the vehicle battery is well charged or provide an
additional battery.
NOTICE
The mains switch at the housing is disabled during 12
V operation.
!
i
i
i
i
LUEBECK
Alcotest 9510
hh:mm
LUEBECK DD.MM.YYYY
Menu
STANDBY
00823875_en.eps
Shutdown
PRESS GREEN BUTTON TO START A NEW TEST
LUEBECK
Page 19

Use
Dräger Alcotest 9510 Standard IR / EC 19
3.2.5 Adding languages for the instrument
The instrument offers the option to load available language
files to the instrument at a later date for displaying display texts
and menu dialogues in the respective language.
1. Insert the USB stick with the language file(s) (see fold-out,
15).
The dialogue for adding languages is automatically shown.
2. Select language(s) (language 2 and/or 3).
Up to 2 languages can be added simultaneously.
Languages identified with a star have already been
installed. The first language Language 1 (e. g. English) is
permanently defined and cannot be modified (on grey
background).
3. Select Confirm .
Do you want to start language update is displayed.
4. Confirm with YES to start the loading process.
5. After successful loading, Language update successful is
displayed.
6. Confirm with OK.
The instrument returns to the welcome screen.
7. Remove the USB stick.
8. Change language configuration at Settings > Language
to the desired language (see Section 6.2.5 on Page 23)
3.3 Interaction with the instrument
3.3.1 Display (touchscreen)
Once the instrument has been
switched on, it indicates the
following information on the
screen.
After power up the instrument first performs a self-test which
takes about 30 seconds. After the self-test and the warming-up
phase, the instrument is automatically ready for operation. The
instrument is now ready for measurement and the operator can
perform a test measurement.
3.3.2 Display idle time
If no interaction with the instrument occurs for 30 minutes, the
screen is dimmed.
To activate the display:
Touch the display.
or
Press the start button.
Either a measurement or the warm-up phase is started,
depending on whether the instrument was in standby mode or
not, and the screen is activated.
3.3.3 Switching off the instrument
1. Actuate Shutdown on the display.
A message is displayed to confirm the shut down.
2. Confirm the message with YES.
The message Please turn off the device. is displayed.
3. Switching off the instrument:
a. Fixed operation:
Move the mains switch to "0" .
b. For mobile use:
Move the switch at the vehicle connection (12 V DC) to
"0".
NOTICE
Max. 3 languages are available/can be selected
simultaneously in the instrument.
To obtain available language files, please contact
Dräger.
1 instrument type /
instrument name
2 Current instrument status
(display)
3 Information about the
location (configurable)
4 Date and time
5 Button for opening the main
menu
i
i
Alcotest 9510
hh:mm
DD.MM.YYYY
Menu
WARMING UP
01023875_en.ep
5
4
3
2
1
LUEBECK
Shutdown
CAUTION
To prevent damaging the instrument, always switch off
the instrument using the Shutdown function.
!
Page 20

20 Dräger Alcotest 9510 Standard IR / EC
Making measurement
4 Making measurement
4.1 Requirements
Measurements of breath alcohol concentration with the
Alcotest 9510 may only be carried out by persons trained on
the instrument.
Ensure that the permissible ambient conditions (see Section
12 on Page 27) are met.
Waiting and control time before measurement
Basically, the following has to be considered for breath alcohol
measurement:
Observe a waiting time of 20 minutes after the last
consumption of alcoholic beverages before starting the
measurement.
It must be ensured that during a time period of at least
10 minutes before the measurement no substances are
taken in through the mouth or nose (control time).
Alcohol residues that are still in the mouth may cause
incorrect measuring values.
This may also occur by aromatic drinks (e.g. fruit juices),
alcoholic mouth sprays, medicines and drops, as well as by
burping and vomiting.
Rinsing the mouth with water or non-alcoholic beverages
does not replace the waiting or control time!
4.2 Starting measurement
1. Press the start button to trigger the measuring process.
If the instrument is in energy saving mode (STANDBY is
displayed), press the start button again after the warmingup phase to start the measurement.
Dependent on the instrument configuration the test subject
data are entered prior to the measurement.
The start of the measurement is indicated by the message
PREPARING TEST.
Complete each entry of corresponding data with Next or
Reset.
4.2.1 Entering data of person being tested
The figure shows the entry via
the virtual keyboard. When
using an external keypad, the
entries must be made
correspondingly via this
keypad. With it is possible to
change between small and
capital letters.
The entry prompt NAME OPERATOR is displayed.
1. Enter the operator name and confirm with Next.
The entry prompt SUBJECT'S FAMILY NAME is displayed.
2. Enter the test subject name and confirm with Next.
The entry prompt SUBJECT'S FIRST NAME is displayed.
3. Enter the first name of the test subject and confirm with
Next.
The entry prompt SUBJECT'S DATE OF BIRTH is displayed.
4. Enter the digits for the date of birth (DD), month of birth
(MM) and year of birth (YYYY) and confirm with Done.
A summary of the data entered
is displayed. By double click on
the individual entries these can
be edited again.
5. Confirm the entry of test subject data with Next. The
measuring process starts immediately after the
confirmation. Scrolling back through or modifying previous
entries no longer possible.
The measuring process is continued.
PURGING is displayed.
The measuring system is purged with ambient air. Next the
internal reference point is determined, BLANK CHECK is
displayed.
Only in the Alcotest 9510 Standard IR / EC this is followed
by a test of the ambient air for alcoholic vapours using the
EC sensor, ENVIRONMENT CHECK is displayed.
If interference from the ambient air can be precluded during
this test, the device prompts for providing a breath sample.
The time displayed in the bottom section indicates the time
at which provision of the breath sample must be started.
6. Open the packaging of a new mouthpiece, take the breath
hose out of the storage tray and insert the mouthpiece
without skin contact into the handle at the end of the breath
hose by using the packaging.
NOTICE
If no entry is made within 10 minutes, the message
DATA INPUT TIMEOUT is displayed and the
instrument returns to READY.
Up to 24 letters can be entered for a name. For names
with more letters/characters the last character The
entry is concluded with Next.
OPERATOR'S FAMILY NAME
DoneNextPrev.Reset
04323875_en.eps
Alcotest 9510
hh:mm
LUEBECK DD.MM.YYYY
1
Q
A
2
W
S
Z
3
E
D
X
4
R
F
C
5
T
G
V
6
Y
H
B
7
U
J
N
8
I
K
M
9
O
L
-
0
P
,
:
+
LUEBECK
i
i
NOTICE
If implausible dates are entered, data acceptance is
refused after selecting the button Summary and a
fresh date entry is requested.
Up to this time all previous entries can be recalled on
the display with Prev.. The entries can either be
modified by new entries or confirmed with Done.
NOTICE
If the external keyboard is being used, the data entry
can also be completed by entering the key
combination [ alt ] + [ s ].
i
i
SaveReset
02523875_en.eps
Alcotest 9510
hh:mm
LUEBECK DD.MM.YYYY
OPERATOR
Klein
SUBJECT'S FAMILY NAME
Smith
SUBJECT'S FIRST NAME
Paul
SUBJECT'S DATE OF BIRTH
18.09.1956
LUEBECK
i
i
Page 21

Making measurement
Dräger Alcotest 9510 Standard IR / EC 21
4.2.2 Providing a breath sample
The operators of the instrument must ensure that the person
being tested has not taken in any substances through the
mouth or nose during the control time (at least 10 minutes)
before the delivery of the breath sample.
With the start of the indication PLEASE BLOW the display is
ready for a breath sample for 3 minutes. Within this time period
the person being tested has to deliver a breath sample.
1. Ask the test subject to
breathe in calmly and
expire the breath sample
continuously and evenly
into the mouthpiece until
the bottom bar on the
display is filled at least half.
During the delivery of the breath sample the progress is
indicated by the bargraph being filled.
The remaining length of the bargraph to be filled is a
measure of the volume still required before reaching the
minimum volume.
It is, however, possible to continue the delivery of the
breath sample when the bargraph is already filled
completely. This does not affect the measurement.
At the end of the breath sample
If the minimum breath flow is fallen below, STOP BLOWING is
displayed.
2. Stop the provision of the breath sample immediately.
Restarting (second breath) must always be avoided or the
measurement will be cancelled.
If the requirements for providing the breath sample are met
with regard to duration, volume and continuity, REMOVE
MOUTHPIECE is displayed.
3. Pull the mouthpiece from the handle at the end of the
breathing hose with the aid of the mouthpiece packaging
and dispose of it.
4. Place the breathing hose back into the storage tray or on
the side of the instrument.
The measuring system is purged with ambient air again
and another internal calibration takes place.
PURGING and BLANK CHECK are displayed
consecutively.
If all framework conditions
of the process were met,
the final result is displayed
in the configured unit on the
display.
Printing of the protocol is started.
4.2.3 Finishing the measuring cycle
After completing the printing
process READY is displayed.
Readiness for operation is reestablished for the next
measuring cycle.
4.2.4 Printing an additional measurement protocol
Select Print Last Test, to print a copy of the last measuring
report at a later date.
A measuring report generated at a later date includes all data
of the last measurement.
4.3 Errors during the measuring process
If errors are detected during the measuring process, these are
indicated on the display and, dependent on the kind of error,
the provision of the breath sample must be repeated or the
measuring cycle is cancelled completely.
MINIMUM VOLUME NOT ACHIEVED
The volume of the breath sample provided is too small. For
breath samples with both too small exhalation volume and too
short exhalation time, the error message concerning the
breath volume is shown.
The breath sample must be delivered again. (A total of 3
unsuccessful attempts per measuring cycle is permissible.)
TEST REPEATED
Repeating a breath sample: The measuring cycle is continued
in an identical manner if this message is displayed e. g. due to
the provision of the breath sample being too short (less than
3 seconds).
CHECK AIRWAY
The controlled flow during purging is too low. Always make
sure that the air inlet into the breathing hose is not covered
during purging.
TEST ABORTED
After a fourth unsuccessful attempt the measuring cycle is
terminated and a corresponding message for the cause of the
last unsuccessful attempt is issued with the report on the
printer.
MOUTH ALCOHOL
The presence of residual mouth alcohol was detected from the
concentration/'time profile of the breath sample. The
measuring cycle is immediately cancelled and a protocol with
the corresponding information is printed.
READINESS TO BLOW EXPIRED
If after the start of the prompt the provision of a breath sample
is not started within 3 minutes, the measuring cycle is
cancelled. A protocol with the corresponding information is
printed.
NOTICE
Measuring results below 0.03 mg/L or 0.05 ‰ are
output as 0.00 mg/L or ‰. For other measurement
units corresponding display limits are valid.
Alcotest 9510
hh:mm
LUEBECK 17.08.2013
PLEASE BLOW
10
10
20
30
Flow [L/m]
0.15
0.30
0.45
BAC [mg/L]
LUEBECK
Time [s]50
03223875_en.eps
Alcotest 9510
hh:mm
LUEBECK DD.MM.YYYY
ENDRESULT
0.00 mg/L
02923875_en.eps
LUEBECK
i
i
NOTICE
An additional measuring report can only be printed if
no new measurement has been started yet and the
instrument has not been switched off.
Alcotest 9510
hh:mm
LUEBECK DD.MM.YYYY
Menu
READY
03023875_en.eps
Print Last Test
Shutdown
LUEBECK
i
i
Page 22

22 Dräger Alcotest 9510 Standard IR / EC
Measuring report (examples)
5 Measuring report (examples)
5.1 Explanations concerning the measuring
report
The details in the top part of the measuring report facilitate the
unique identification of the measuring instrument with which
the measurement was carried out and the report generated.
Serial number
Unique information (4 letters, 4 digits) assigned to exactly
one instrument.
Sample number
Number of measurements with measuring report issue
since the last service during which the counter was reset.
Calibration number
Control digit incremented with the adjustment of the
instrument.
The remaining details on the measuring report are selfexplanatory.
5.2 Summer time/Winter time change-over
The time set in the instrument is indicated with the current time
by an additional character.
S = summer time
W = winter time
The Alcotest 9510 Standard IR + EC automatically changes
over from winter to summer time and vice versa. No user
interaction is required.
(Example:
Alcotest 9510 Standard IR/EC
normal measurement)
(Example:
Alcotest 9510 Standard IR/
EC measuring cycle
cancellation)
**************************************
012345678901234567890123
**************************************
ALCOTEST 9510 IR / EC
SERIAL NO.: ARXN-0002
TEST NO.: 00063
CALIBR. NO.: 00001
SW-VERS.: 8319523 3.2
DATE: 15.08.2013
TIME RUN: 18:08 S
STOP TIME:18:11:00 S
**************************************
TEST LOCATION:
LUEBECK
-------------------------------------------**************************************
SUBJECT'S FAMILY NAME:
Mustermann
-------------------------------------------SUBJECT'S FIRST NAME:
Manfred
-------------------------------------------DATE OF BIRTH:
18.09.1956
-------------------------------------------**************************************
SUBJECT MEASUREMENT
FAILED BLOWINGS : 0
BLOWING VOLUME : 3.0 L
BLOWING TIME : 13.8 s
RESULT : 0,00
**************************************
*FINAL RESULT *
* *
* 0.00 mg/L *
* *
**************************************
NAME OPERATOR:
KLEIN
-------------------------------------------SI GNAT URE OPERAT OR
-------------------------------------------**************************************
012345678901234567890123
**************************************
**************************************
012345678901234567890123
**************************************
ALCOTEST 9510 IR / EC
SERIAL NO.: ARXN-0002
TEST NO.: 00064
CALIBR. NO.: 00001
SW-VERS.: 8319523 3.2
DATE: 15.08.2013
TIME RUN: 19:10 S
STOP TIME: --:-- S
**************************************
TEST LOCATION:
LUEBECK
-------------------------------------------**************************************
SUBJECT'S FAMILY NAME:
Mustermann
-------------------------------------------SUBJECT'S FIRST NAME:
Manfred
-------------------------------------------DATE OF BIRTH:
18.09.1956
-------------------------------------------**************************************
SUBJECT MEASUREMENT
FAILED BLOWINGS : 4
BLOWING VOLUME : 0.5 L
BLOWING TIME : 5.8 s
RESULT : ---**************************************
* FINAL RESULT *
* *
* MINIMUM VOLUME NOT
ACHIEVED*
* *
**************************************
NAME OPERATOR:
KLEIN
-------------------------------------------SIGNATURE OPERATOR
-------------------------------------------**************************************
012345678901234567890123
**************************************
Page 23

Menu
Dräger Alcotest 9510 Standard IR / EC 23
6Menu
To select the menu options use the touchscreen function of
the display with the aid of the stylus supplied.
If no external keyboard has been connected for data entry,
a virtual keyboard is automatically shown on the display
which can be used with the stylus.
Using the menu button in the start bar the following menus
can be selected directly:
Information
Settings
Maintenance
Accept configurations and changes in the menus with
Confirm. The return to the menu is automatic.
6.1 Menu » Information «
The menu shows information
about the installed software
version (here only shown as an
example).
When contacting
DrägerService the software
version should always be
stated.
6.2 Menu » Settings «
In this menu the location, time,
language etc. can be selected
or configured.
To select an option:
Double click on the desired
entry with the stylus
or
Select the desired entry
with the arrow keys of the
keyboard and confirm with Enter.
6.2.1 Submenu » Display «
In this submenu, the display
can be rotated by 180°.
1. Enable or disable the
checkbox Rotate display.
2. Accept the entry with
Confirm. The return to the
menu is automatic.
6.2.2 Submenu » Printer «
In this submenu the selection is
made whether the report is
printed using the internal or the
external printer. The internal
printer is always activated.
Dependent on the instrument configuration the number of
measuring reports is permanently set to 1 copy (default) or a
selection can be made between 1 and 5 copies.
Accept the entry with Confirm. The return to the menu is
automatic.
6.2.3 Submenu » Sound «
In this menu you can adjust the volume and frequency of the
acoustic signal when breathing into the instrument.
6.2.4 Submenu » Show Errorlogger «
In this submenu the errors
which occurred during
operation are stored.
The following are documented:
Time
Error code
Errors in this sense are
operating states which impede
any further operation of the
instrument.
6.2.5 Submenu » Language «
In this submenu one of the
available languages can be
selected.
By default English and German
are available as languages on
the instrument. Optionally,
other languages can be added.
1. Highlight the desired language in the selection window.
2. Accept the selection with Confirm.
The selected language is loaded. You will then
automatically return to the menu.
CAUTION
Only use the touchscreen with the stylus. Other tools
(e.g. ball point pen) might irreversibly damage the
touchscreen.
NOTICE
If the submenus are only selected to check the
configurations, select the cross X at the top right of the
display margin or Close to return to the menu.
!
i
i
Alcotest 9510
Menu
About
X
M16 Version/PartNo:
M16 Checksum:
WinCE Version/PartNo:
WinCE Checksum:
WinCE Image Version:
ConfigFile Rev/Checksum:
2.3 / 8319523
0x118C
2.2 / 8319522
0x2745
1.1
0104 / 0x5585
Print Close
01123875_en.eps
Settings
Menu
X
Display
Printer
Sound
Show Errorlogger
Language
Location Database
Change current location
Data Entry
Set date and time
01323875_en.eps
Settings
Menu
Display
Save
X
Rotate display
CloseConfirm
04223875_en.eps
Settings
Menu
Printer
internal
Save
external
X
On
Copies
Copies
CloseConfirm
1
1
01423875_en.eps
Settings
Date/Time Error
Show Errorlogger
X
15.10.2007 13:32:38
02.10.2007 12:10:12
02.10.2007 11:49:47
28.09.2007 09:30:39
108
107
109
107
01523875_en.eps
Menu
Close
Settings
Menu
Language
Save
X
Language:
CloseConfirm
01623875_en.eps
English
Page 24

24 Dräger Alcotest 9510 Standard IR / EC
Menu
6.2.6 Submenu » Location Database «
In this submenu additional
locations can be created for
selection when performing
measurements. They are
shown on the screen and
printed on the measurement
protocol.
1. Select the desired location field.
2. Enter the location.
3. Accept the entry with Confirm. The return to the menu is
automatic.
The maximum admissible length of an entry is 17 characters.
A maximum of 10 locations can be entered.
6.2.7 Submenu » Change Current Location «
In this submenu, you can select
the location, which is to be
indicated in the second line of
the display.
1. Select the desired location.
The selected location is
highlighted by a selection
marker.
2. Accept the entry with
Confirm. Return to the
menu is automatic.
The selected location appears on the display and is
included when printing the measuring report.
6.2.8 Submenu » Data Entry «
In this submenu it is possible to
enable or disable the data entry
prompt during the measuring
process. In the basic setting,
the data input is activated.
1. Enable or disable the
checkbox input of user/
subject data.
2. Accept the entry with
Confirm. The return to the
menu is automatic.
6.2.9 Submenu » Set Date and Time «
In this submenu, you can set
the date and time.
1. Set the time and date
consecutively.
2. Accept the entry with
Confirm. The return to the
menu is automatic.
Small discrepancies of the
internal clock can also be
compensated:
With + the current time is advanced by one minute.
With - the current time is retarded by one minute.
6.3 Menu » Maintenance «
In this menu you can choose settings that allow a more
accurate analysis of the measurement results. Some of the
settings made in this menu will be set to default once the
instrument is switched off. The use of this menu is permitted for
trained service engineers.
6.3.1 Submenu » Subject Test Settings «
In this submenu you can set the measuring unit in which the
breath alcohol concentration will be displayed during normal
mode (active after power-on) and control mode.
The following units are available:
µg/l
mg/l
µg/100 ml
g/l
‰
%
g/210 l
When giving this data a conversion factor of 2100 between
breath and blood alcohol concentration is used.
The setting of the unit remains the same even after the
instrument is switched off.
6.3.2 Submenu » Control Mode «
In this submenu the control mode can be enabled and a test
gas type selected for measurements.
This setting is useful for work in the laboratory. In control mode,
the resolution of the measurement result is shown one decimal
point higher.
By enabling the Lab report it is also possible to output sensor
raw data for a measurement.
Settings
Location Database
X
Location 1
Location 2
Location 3
Location 4
01723875_en.eps
Menu
CloseConfirm
LUEBECK
BERLIN
HAMBURG
Settings
Change Current Location
X
Please select current location:
01823875_en.eps
Menu
CloseConfirm
Location (default)
LUEBECK
BERLIN
HAMBURG
Revalstrasse
KLINIK
Settings
Menu
Service Settings
Save
X
input of user/subject data
CloseConfirm
01923875_en.eps
Settings
Menu
Set Date and Time
Save
X
Time Offset
Set Date
Set Time
CloseConfirm
14:31:27
-
min + 1 h 0
17.10.2013
02033037_en.ep
NOTICE
The current time can be changed by +/- 1 minute within
24 hours.
NOTICE
Both settings will be deactivated after the instrument is
switched off.
i
i
i
i
Page 25

Troubleshooting
Dräger Alcotest 9510 Standard IR / EC 25
7 Troubleshooting
Messages generated by the Windows CE operating system
(Usually full text messages are generated, in parts with options allowing to select further actions).
Fault
» display « (Printer Text)
Cause Remedy
No function after power-on Fuses defective. Check the fuses, replace if required, see
page 26.
Power supply insufficient. Check power supply.
» ZERO TEST INCORRECT «
(BLANK CHECK INCORRECT)
Zero adjustment incorrect. Ensure that ambient air is clean and free
of alcohol. Air the test room.
» MOUTH ALCOHOL «
(MOUTH ALCOHOL)
Residual alcohol in the mouth of the
person being tested. Person has drunk
alcohol directly before test or has
burped.
Remedy cause. Repeat measurement
after waiting time.
Observe control time.
» MINIMUM VOLUME NOT ACHIEVED «
(MINIMUM VOLUME NOT ACHIEVED)
The supplied volume is smaller than the
minimum volume required.
The instrument automatically requests to
repeat the breath sample.
»BLOWINGTIME TOO SHORT«
(BLOWINGTIME TOO SHORT)
The time for which the breath sample is
delivered is shorter than the minimum
requested.
The instrument automatically requests to
repeat the breath sample.
» NOT ALLOWED «
(NOT ALLOWED)
Breath sample delivery at a not permitted
time, instrument not ready for
measurement (reblow).
Instruct person being tested for correct
delivery of breath sample. Start new
measurement.
» READINESS TO BLOW EXPIRED «
(READINESS TO BLOW EXP)
Readiness for measurement of 3
minutes has expired. Breath sample
delivery has not started within this time
window.
Start new measurement.
» ALCOHOL IN THE ENVIRONMENT «
(ALCOHOL IN ENVIRONMENT)
Contamination of ambient air detected. Ensure that ambient air is clean and free
of alcohol. Air the test room.
» CHECK AIRWAY «
Necessary volume for purging the
measuring system not reached.
Check breathing hose inlet. If no
abnormalities are found: restart
measurement.
If fault occurs again: inform Dräger
Safety.
» DATA INPUT TIMEOUT «
(DATA INPUT TIMEOUT)
No data input within 10 minutes despite
prompt.
Start new measurement.
Enter data when prompted to do so.
» INTERFERENCE «
(INTERFERENCE)
The two independent measuring
systems have detected an impermissible
influence on the measuring values by
foreign substances in the breath.
Identify cause of the influence, remedy if
possible.
If required initiate other evidential
measures.
The following errors are indicated on the
screen in English language with an error
code and a text message:
» ERROR [XXX] ..
..MAIN-SYSTEM «
..IR-SYSTEM «
..EC-SYSTEM «
..FLOW-SYSTEM «
..PRESSURE-SYS «
..HEATER SYSTEM «
Example:
ERROR [118] HEATER SYSTEM
The error code and the text message are
printed on the printer.
Example:
Error [118] HEATER SYSTEM
Instrument defective
(XXX = code specifying the error))
Instrument blocks automatically all
measurement cycles when detecting this
error.
The set temperature for the sensor or
hose is not reached.
Switch off instrument.
Check whether the error re-occurs after
switching on again.
If yes: inform Dräger Safety. Submit
instrument for repair.
Ensure compliance with the ambient
conditions. Switch off instrument, if
required put on instrument cover and
switch on again. If the error should
reoccur upon switch-on, inform Dräger
Safety.
Fault / Display Cause Remedy
Instrument not ready for operation.
Service function is not possible.
Selected action is only possible when
instrument is » READY «.
Wait until readiness for operation is
established.
Page 26

26 Dräger Alcotest 9510 Standard IR / EC
Maintenance
8 Maintenance
8.1 Inspection
Instrument inspections must be carried out by competent
persons, e. g. Dräger or persons authorised by Dräger.
8.2 Maintenance intervals
8.2.1 Inserting paper roll
When a measurement is started, the Alcotest 9510 Standard
checks whether sufficient paper is in the printer. Insufficient
paper remaining is indicated by the message NO PRINTER
PAPER.
When the red strip appears on the print-out, a new paper roll
has to be inserted.
1. In order to be able to open the printer flap, press the black
unlocking button and open the flap.
2. Insert new paper roll.
3. To achieve a long storage capability of the printed
measuring reports, it is highly recommended to use the
thermal paper offered by Dräger (see Section 13 on Page
27).
8.2.2 Replacing fuses
1. Disconnect the instrument from the power supply.
2. Press the fuse holder lock together and pull out the fuse
holder.
3. Replace the old fuses with new ones.
4. Only use the specified fuses (see Section 13 on Page 27).
5. Re-insert the fuse holder.
8.3 Cleaning the instrument
1. Disconnect the instrument from the power supply.
2. Wipe the surfaces of the instrument and the hose clean
using a damp cloth.
3. Dry thoroughly with a dry cloth.
Do not use any cleaning agents containing alcohol!
Do not allow any liquid to ingress into the hose!
9 Transport
During instrument transport adhere to the usual
precautions for the transport of sensitive electronic
devices.
Avoid excessive mechanical strain, shocks, and vibrations
when transporting the instrument.
10 Storage
Store the instrument in dry rooms. Ambient conditions for
storage, see Section 12 on Page 27.
11 Disposal
Recommended: 6 months
Maximum: 12 months
14223875.eps
This product must not be disposed of as municipal
waste. This is indicated by the adjacent icon.
You can return this product to Dräger free of charge.
For information please contact the national marketing
organisations and Dräger.
2
14323875.eps
Page 27

Technical data
Dräger Alcotest 9510 Standard IR / EC 27
12 Technical data
13 Order list
Ambient conditions
Operational characteristics
Temperature range 0 to 40 °C
Humidity 30 to 90 % relative humidity
Ambient pressure 850 to 1060 hPa
Operating altitude max. 3000 m
Storage
Temperature range –20 to 70 °C (>40 °C only for
some hours)
Humidity 10 to 90 % relative humidity
Ambient pressure 700 to 1300 hPa
Measuring system
Measuring range
Breath alcohol concentration 0 to 3 mg/l
0 to 300 µg/100 ml
0 to 3000 µg/l
(Ethanol mass per breath
volume at 34 °C and
1013 hPa.)
Blood alcohol concentration 0 to 6 ‰
0 to 6 g/l
0 to 0.6 %
(ethanol mass per blood
volume at 20 °C and
1013 hPa. When giving this
data a conversion factor of
2100 between breath and
blood alcohol concentration is
used.)
Resolution final result 0,01 mg/l
1 µg/100 ml
10 µg/l
0,01 ‰
0,01 g/l
0,001 %
Measurement duration
(typical)
3 minutes
Blowing time >3 seconds
Respiratory volume >1.5 l
Repeatability: Standard deviation
0 to 0.4 mg/l < 0.007 mg/l
above 0.4 to 2.0 mg/l Less than 1.75 % relative
above 2.0 mg/l Less than 6 % relative
Calibration interval Depends on required accuracy
Recommended: 6 months;
max.: 12 months
Typical operating data
Supply voltage
Mains operation 110 to 240 V, 50 to 60 Hz
12 V operation 10.5 to 15.5 V DC
Power consumption
During the
warming-up phase
approx. 70 W
in standby mode <15 W
Main fuse TH/250 V; 0,63 A, 2 off
Thermal printer Thermal printer with special
paper, 58 mm wide
Time indication Day/Month/Year
Hours: Minute
Summer time/winter time
Warm-up phase less than 15 minutes at room
temperature
Dimensions approx. 325 mm x 250 mm x
55/185 mm (W x H x D)
Weight (without keypad) 6,9 kg
CE markings Electromagnetic compatibility
(Directive 89/336/EEC)
Low Voltage Directive
(Directive 72/23/EEC)
Designation
Order no.
Dräger Alcotest 9510 Standard IR 83 19 460
Dräger Alcotest 9510 Standard IR / EC 83 19 470
Consumables and accessories
Keypad - Mini QWERTY (USB) 83 19 441
Carrying bag 83 19 155
12 V cable (with ON/OFF switch) 83 12 641
Printer paper (5 rolls, storable for 7 years) 83 19 002
Printer paper (5 rolls, storable for 25 years) 83 18 461
Mouthpiece with non-return valve (25 pieces) 68 05 703
Fuse, TH 250, 0.63 A 18 92 979
Stylus (3 off) 83 18 402
Mains cable (certified according to EN 60950) 83 24 658
Removable cover 83 18 479
Screen protection foils 83 20 999
Page 28

Page 29

Page 30

Dräger Safety AG & Co. KGaA
Revalstraße 1
23560 Lübeck, Germany
Tel +49 451 882 0
Fax +49 451 882 20 80
www.draeger.com
90 23 875 - GA 4756.101 de/en
© Dräger Safety AG & Co. KGaA
Edition 03 - January 2014 (Edition 01 - November 2007)
Subject to alteration
 Loading...