

Page 1
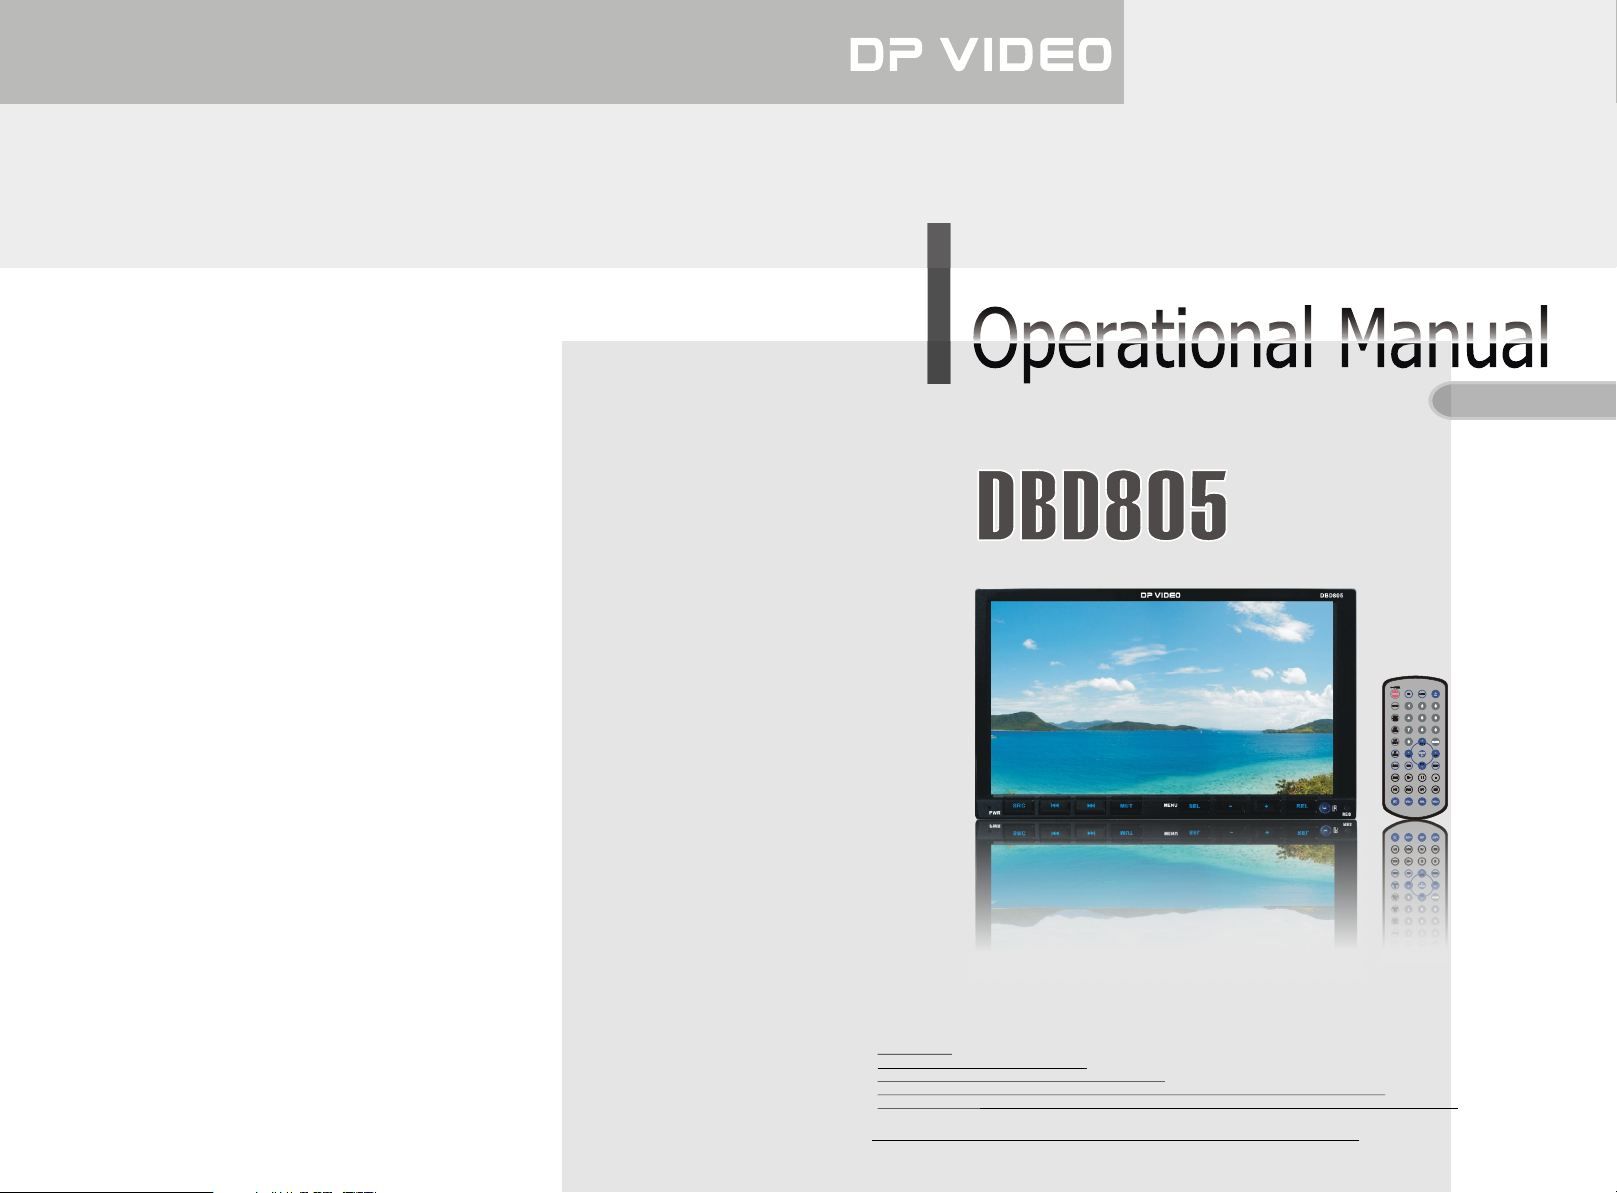
MOTORIZED IN-DASH MONITOR/DVD
English Version
Warning:
Professional installation is required
Watching TV while driving is illegal in most states.
There is a safety feature on this device which enables viewing videos only when Parked.
All other features
Please contact an authorized installer for Professional Installation
may still be used while driving, such as audio and radio but must be done with care.
.
Page 2
00
Please read through these operation instructions so you will know how to
operate your model properly. After reading please keep this booklet in safe
place for future reference.
Contents
Additional Information
Simple Troubleshooting Guide
The following checklist might help to solve the problems which you meet when using
the unit. Please double check and make sure that the connections and the operating procedures
are done properly before using the checklist .below
09
1
1
Before You Start
Important Safeguards 4
About this manual 4
Precautions 5
Maintenance 6
Location & function of the controls 7
Remote control 9
Specifications 11
2
Installation
Wiring Connections 12
Install the Unit 13
Detach the Unit 14
3
Common Operations
To Select Source by Menu 15
Reset the Unit 15
Turning the Unit On/Off 15
Volume Control 15
Setting the Sound Characteristics 15
EQ Setting 16
Turning Loudness On/Off 16
Eject a Disc 16
Insert a SD Card 16
Infrared Sensor 16
Mute Function 16
Night mode 16
Mode Selector 16
Angle Setting 16
5
4
Main Menu
Main Menu Setup 17
Video Adjust 17
Audio Adjust 18
Source Setup 18
System Adjust 18
5
5
DVD/VCD/MP4
DVD/VCD/MP4 Setup 22
DVD/VCD/MP4 Play 22
Quickly Selecting Tracks 22
Number Buttons 22
Pause the Playback 22
Stop the Playback 22
Play tracks at Random 23
Repeat Playing 23
Skip backward/forward/F.F/REW the
Playback 23
System Switch 23
Slow Motion Playback 23
Increase Picture Size 23
On Screen Display 23
Setting the Playback Time 24
Changing Audio Language 24
Changing the Subtitle Language 24
Changing the Viewing Angle 25
Selecting Channel 25
Program Playing 25
Playing PBC(Menu) 25
Selecting Menu 26
DVD Setup Menu 26
Problem
No power.
Some errors occur in
LCD or no function
pressing the button.
Unable to receive stations.
CDs cannot be loaded.
Sound skips.
Note:
If any of the problem persist after check list had been made, consult your nearest service dealer. Never
attempt to disassemble your unit by yourself.
the
when
Cause/Solution
.
Check and make sure whether the fuse is blown,
replace with the proper value if necessary.
.
Press RESET button.
.
Check and make sure whether the antenna is
inserted or the antenna is properly connected, if
not, insert the antenna or connect it properly.
.
A CD is loaded in the mechanism.
.
The CD is dirty or damaged.
Due to continuous product improvement, the operations
are subject to change.
2
39
Page 3
08
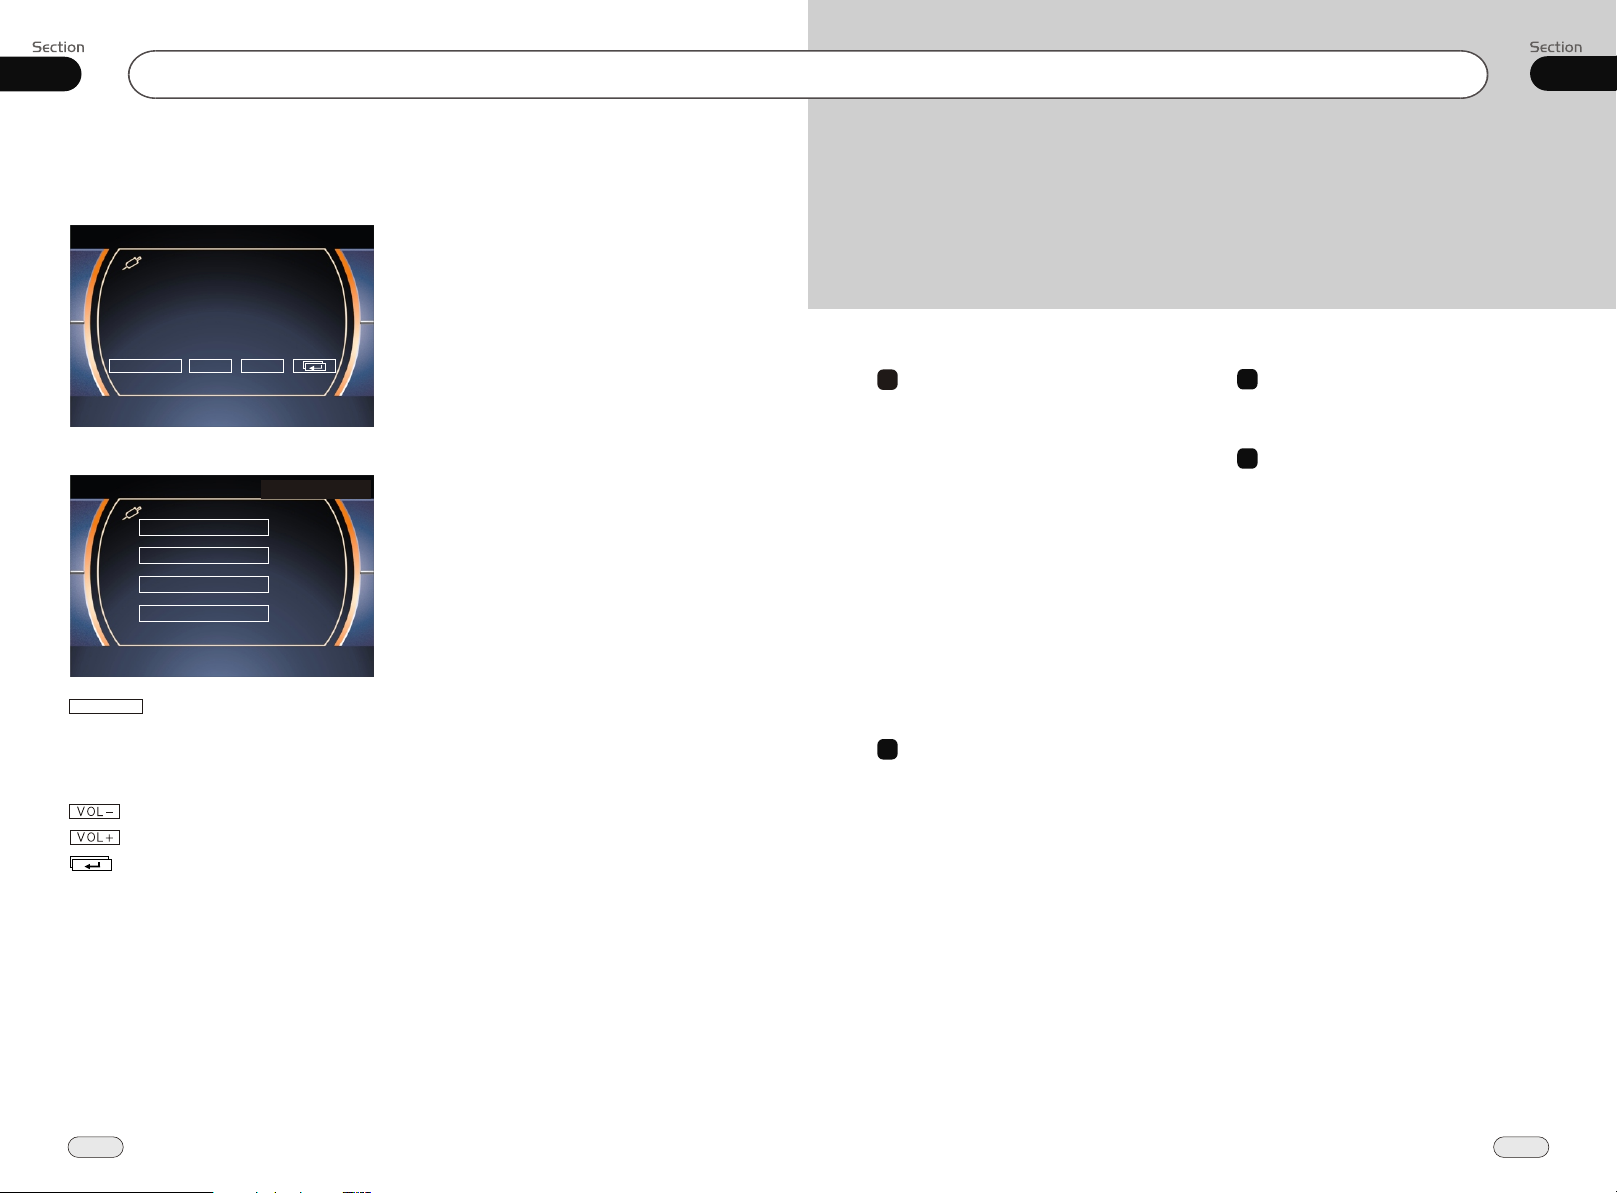
AUX
AUX Touch Screen Menu
Press SRC to switch to the AUX mode:
Contents
00
AUX SET
In AUX mode, select AUX SET:
AUDIO ADJUST
VIDEO ADJUST
VIDEO FORMAT
EXIT
AUX SET
For more details to adjust AUDIO, VIDEO
and SYSTEM (Auto 1: PAL, NTSC, SECAM),
(Auto 2: P-M, P-N). To adjust AUDIO and
VIDEO please refer to pages 17 to 18.
To decrease the volume
To increase the volume
Mode selector
VOL+VOL-
6
CD/MP3/SD/USB
CD/MP3/SD/USB Setup 33
CD/MP3/SD/USB Play 33
Quickly Selecting Tracks 34
Repeat Playing 34
Number Buttons 34
Selecting Track 34
Stop Play 34
Playing Tracks at Random 34
Pause the Playback 35
Skip backward/forward/F.F/REW
the Playback 35
On Screen Display 35
Program Playing 35
Eject SD Card 35
Eject USB 35
7
Tuner
Listening to the Radio 36
Band Selector 36
Manual/Automatic Tuning 36
DX/LOC Selector 36
Selecting The stored Station 36
MO/ST Selector 37
Scanning/Storing Stations
Automatically 37
On Screen Display 37
Goto FREQ 37
Number Buttons 37
8
AUX
AUX Touch Screen Menu 38
9
Additional Information
Simple Troubleshooting Guide 39
38
3
Page 4
Before You Start
Tuner
07
IMPORTANT SAFEGUARDS
Be sure to connect the color coded leads
1
according to the diagram. Incorrect con-
2
3
4
5
6
7
8
9
10
11
nections may cause the unit to malfunction or damage the vehicle s electrical system.
Be sure to connect the speaker (-) leads
to the speaker (-) terminal. Never connect the left and right channel speaker cables each other or to the vehicle body.
Make sure all the connections are completely correct before turning on your unit.
When replacing the fuse(s), the replacement must be of the same amperage as
shown on the fuse holder.
Do not block vents or radiator panels. Blocking them will cause heat to build up
inside and may result in fire.
To avoid distracting the driver, nstall the unit in an apt place.
Use the unit with the engine running,
otherwise it will drain the battery
cause
the electric energy of battery was
used up.
Please do not use the unit in extreme temperature; also avoid humidity and direct
sunlight.
Keep credit cards, watches, and other magnetized objects away from the unit.
Placing your phone near the unit may disrupt the video frequency.
Keep the remote away from extreme temperatures and direct sunlight.
,
please i
, be-
About this manual
This unit features a number of sophisticated functions ensuring superior
operation. All the functions have been
designed for the easiest possible use,
but many are not self-explanatory. This
manual will help you understand the
functions and operations of the unit.
This manual mainly explains remote
control operation. However, in
addition to the functions operated by
the remote control, there are functions
that can be operated by the buttons on
the main unit.
MO/ST Selector
During radio status, you can press ST
button on the remote control MONO
mode or STEREO
mode.
Stereo reception is charged when STEREO
appears.
It is switched to MONO mode when MONO
appears.
Note:
It is only valid on remote control.
*
Switch to MONO to improve sound quality
*
when the signal is week.
It is only valid in FM tuning.
*
6
to select
Scanning/Storing Stations
Automatically
During radio status, briefly press AMS
button on the remote control to scan each
of your stored seconds. You can
the number that cor
press responds to the
station 6
station on the remote control to tune to that
station.
When you press and hold AMS for
more than 2 seconds, automatic memory storing The
it will activate the
function.
radio automatically selects and
has it stored in any one of Number
Buttons (from1 to 6).
Note:
* The unit can store up to 6 stations on each
band setting.
* Pressing on the monitor performs the
same function as the AMS button.
7
4
a station
23
the
4
button
On Screen Display
During radio status, press OSD to display
the edition information. The preset frequency
displays as the default setting.
Note:
It is only valid on remote control.
*
8
Goto FREQ
2
Press GOTO, and the monitor shows:
FREQ, then press the Number to input the
valid frequency, then the TV program will
be played.
Note:
It is only valid on remote control.
*
It is only valid when GOTO FREQ is on in
*
main menu.
Number Buttons
During radio status, press Number Buttons
to receive the stored stations.
During radio status, Number Buttons
(from 1 to 6) can help you yo-
23
ur favorite station. You can follow the
as below:
1
When receiving a station,press and hold
any one of the Number Buttons
(from 1 to 6) until the number app-
ears on the LCD, which indicates that
station is already stored in the corresponding number button.
2
Press and hold AMS button to receive
4
stations automatically, and store them in
1 to 6 number respectively.
3
While listening to a station, press and
hold a number for more than 2 seconds
to store the station to that number.
Note:
Pressing in the monitor performs the same
*
function.
5
store
steps
37
Page 5
07
Tuner
Before You Start
01
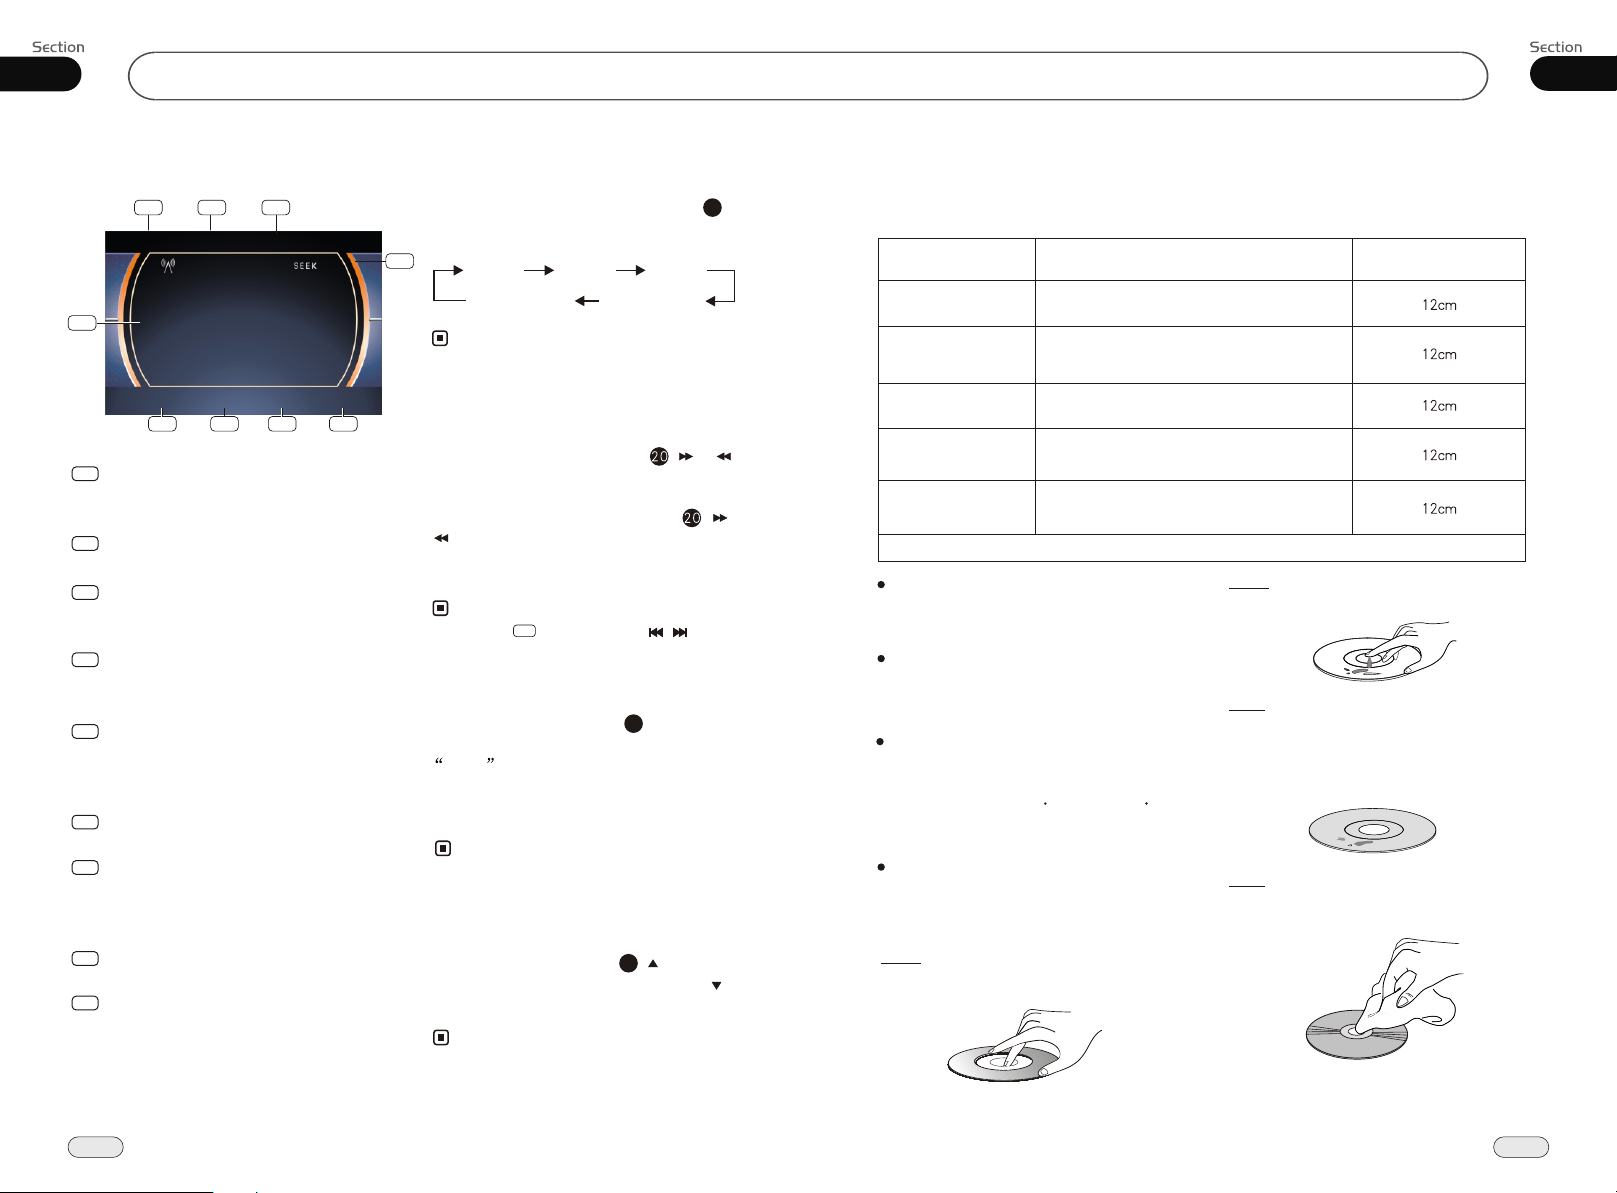
Listening to the radio
1
FM1 P . CH:1 87.50MHz
5
BAND
1
Band Indicator
2
87.50M
90.10M
98.10M
6 7 8 9
Shows which band the radio is tuned
to.
2
Preset Number Indicator
Shows what preset has been selected.
Frequency Indicator
3
Shows which frequency the tuner is
tuned.
SEEK+/SEEK-
4
Briefly press to tune by the presettable
range, press and hold to tune automatically.
The 6 stations of the current band.
5
Briefly press to select station, hold and
press to save the current station to one
of the 6 stations.
6
BAND
To select the bands.
7
AMS
Briefly press to scan the current station,
press and hold to search the stored station
automatically.
8
MENU
Press it to enter MAIN MENU.
9
SRC
Press this button to select the signal
source.
3
-
106.10M
107.90M
87.50M
AMS MENU
+
SRC
Band Selector
During radio status, repeatedly press
BAND button to select bands in
lowing order:
fol
4
MW2(AM2) MW1(AM1)
Note:
* Pressing BAND on the monitor performs the
same function.
the
FM1
FM2
(For Two Bands)
3
FM3
Manual/Automatic Tuning
Manual Tuning: Briefly press (
button on the remote control to select a
different station.
Automatic Tuning: ress and
automatically searches
) button the radio
a station or respectively
downward upward
P hold ( or
and plays when it finds a station.
Note:
Pressing in the monitor or / on the main
*
unit also performs the same function.
4
or )
DX/LOC Selector
During radio status, press LOC button
to select or weak station reception.strong
LOC appears on the display and only
local stations are available. when it disappears
both distant and local station can be
received.
Note:
The function is only valid on remote control.
*
The function is invalid in AM tuning.
*
5
Selecting the Stored Station
During radio status, press button to
select the stored station upward, press to
select downward.the stored station
Note:
The function is only valid on remote control.
*
27
PRECAUTIONS
This unit can play the following discs only:
Type of disc
DVD
VCD
CD
MP3
MPEG-4
NOTE: The unit is compatible with VCD1.0/1.1/2.0/3.0 version and DVCD disc.
Do not attempt to modify the unit,
modifying the unit may cause an
accident.
Stop the vehicle before carrying
out any operation that could
interfere with your driving.
Do not work in extremely high or
low temperature. Be sure the
temperature inside the vehicle
is between +60 C and -10 C
before turning on your unit .
To enjoy optimum sound and
images while playing, handle the
discs as follows:
Handle the disc by its edge to keep
the disc clean, and do not touch the surface.
Recorded material
Sound and moving
pictures
Sound and moving
pictures
Sound only
Sound only
Sound and moving
pictures
Do not use your CDs with paste residue
or ink attached.
Do not use CDs with labels or stickers
attached, which may leave a sticky residue
while beginning to peel off.
(Shown as the picture)
Clean the discs with an optional cleaning cloth. Wipe each disc from the center out.
(Shown as the picture)
Size of disc
36
5
Page 6
01
Before You Start
CD/MP3/SD/USB
06
Maintenance
Replacing the Fuse
Make sure the amperage matches the
specified value when replacing the fuses. If the fuse is blown, check the power connection and replace with a new one. If the same problem occurs,
it would be subjected to the malfunction. In such cases, please consult
to the nearest service dealer.
!
Warning
Never use the fuse with the rated
amperage more than that supplied to
your unit, otherwise it will damage the
unit.
Replacing the Battery
When the range of the remote control
becomes short or stops functioning,
please replace the battery with a new
one (CR2025). Check the polarity
when replacing.
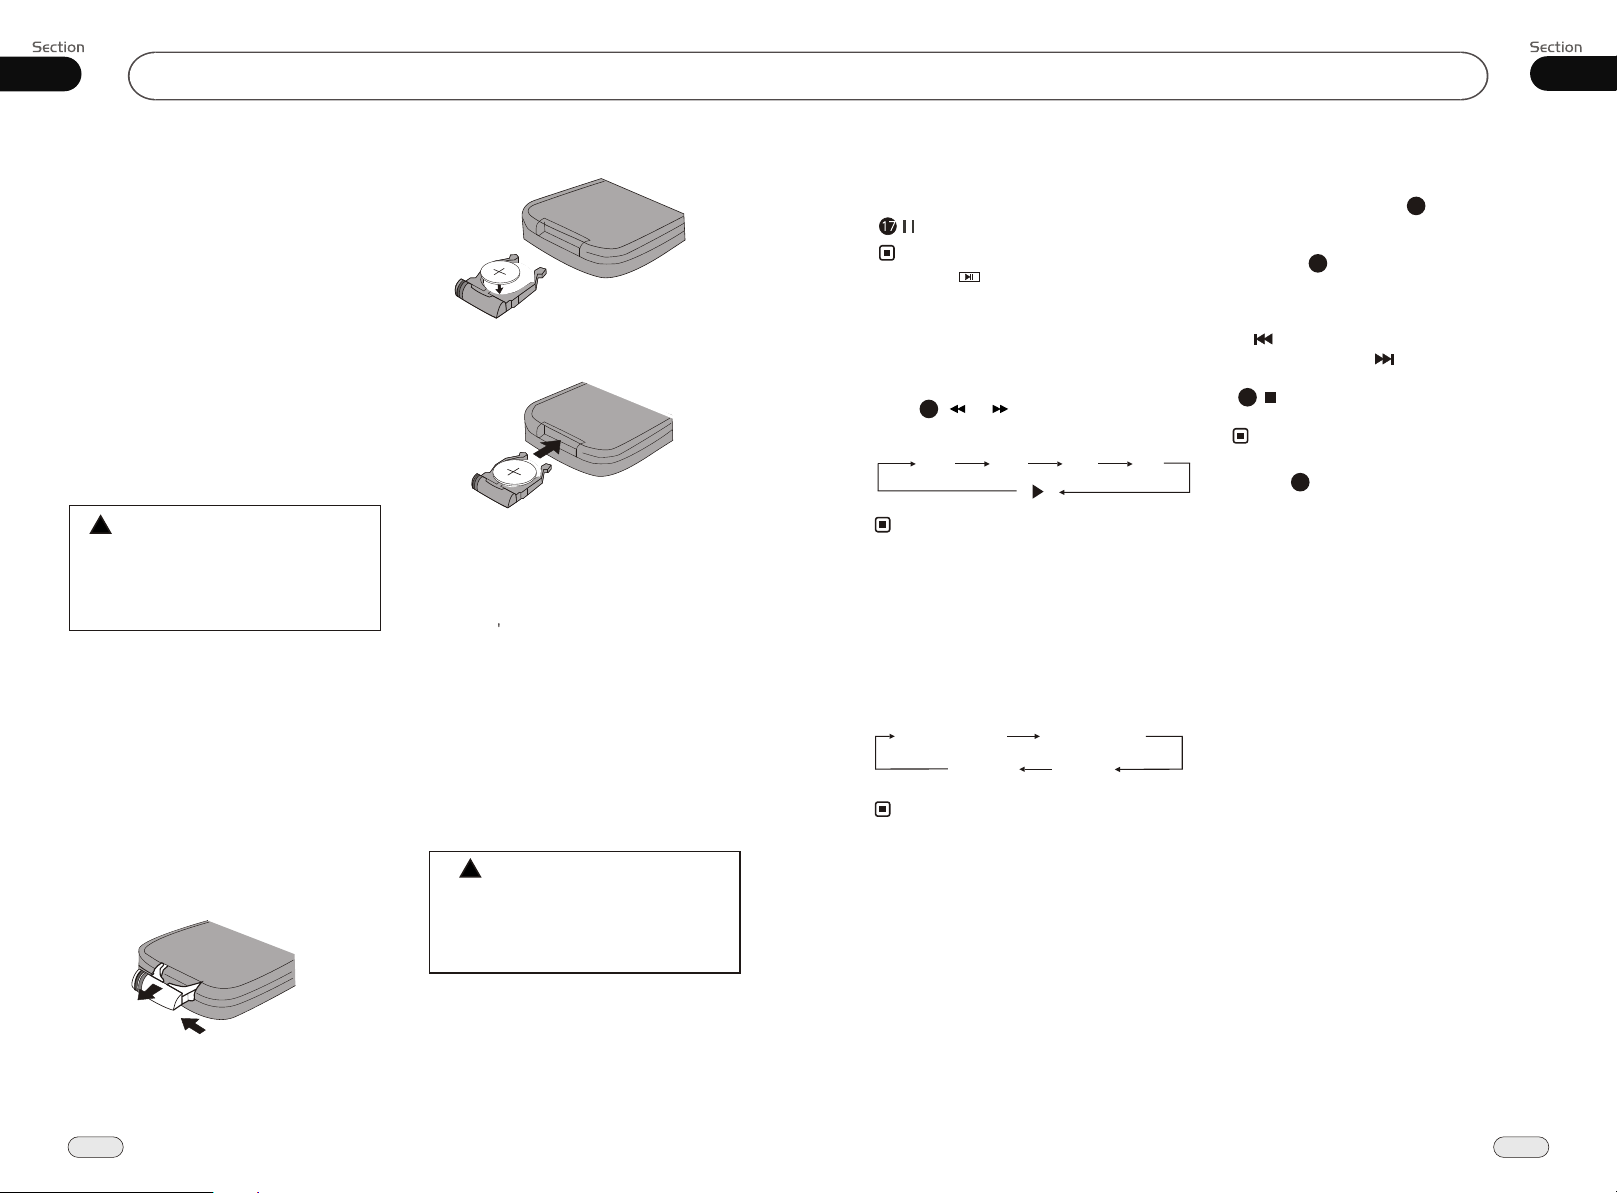
Gently pull out the Battery Holder while
pressing the Stopper.
Insert the Battery Holder into the Remote
Control.
Precautions on Using Lithium
Battery
Always keep the lithium battery beyond
children s reach. In case
swallowed, see a doctor immediately.
Clean the battery with a dry cloth
to maximize connectivity.
Check the polarity when loading the
battery.
To prevent short circuit, do not use
metal tweezer to clip the battery.
!
Warning !
Improper handling of the battery
may lead to malfunction or damage
of the battery. It cannot be charged,
disassembled or thrown into a fire.
Pause the Playback
During CD/MP3/SD/USB playback, Press
to switch between play and pause.
Note:
* Pressing in the monitor performs the same
function.
Skip backward/forward/F.F
/REW the playback
Press ( or ) on remote control to
20
perform fast forward or rewind.
2 X 4 X 8 X 16X
Note:
* This function is operated by using the remote
control.
On Screen Display
During CD status, pressing the OSD button
displays :
Single elapsed
Total
remain
Note:
* This function is operated by using the remote
control.
Single remain
Total
elapsed
Program Playing
During CD mode, press PROG, the TFT
displays the program menu. Press NUMBER
BUTTONS to select the track Number and
then press to move the cursor to START,
press ENTER to start program playing;
move the cursor to EXIT and press ENTER
to exit the program playing. Move the cursor
to and press ENTER to the previous page;
move the cursor to and press ENTER to
the next page. During this process, press
to cancel the program playing.
18
*
* Press CLEAR to clear the mistake input.
¼òµ¥¹ÊÕÏÅųýÖ¸ÄÏ
Eject SD Card
Push SD card to eject it.
During SD playing mode, to eject SD card
to switch to Disc mode; if there is no disc in
the main unit, it will switch to USB mode,
or else, it will switch to Radio mode.
During other modes, to eject SD card to keep
the previous mode.
¼òµ¥¹ÊÕÏÅųýÖ¸ÄÏ
Eject USB
Pull USB to eject it.
During USB playing mode, to eject USB to
switch to Disc mode; if there is no disc in
the main unit, it will switch to SD Card mode,
or else, it will switch to Radio mode.
During other modes, to eject USB to keep
the previous mode.
27
Note:
The function is only valid on remote control.
22
13
Put the button-type battery with mark(+)
upward into the Battery Holder.
6
35
Page 7
06
CD/MP3/SD/USB
Before You Start
01
Quickly Selecting Tracks
During MP3/SD/USB playback, press
to play previous track, press to play
next track.
During CD playback, first press to
return to the beginning of the current track,
press again within 3 seconds to play
21
previous track , press to play next track .
Note:
* Pressing / button on the main unit or
and in the monitor perform the
same function.
* In CD/MP3/SD/USB mode, you can press
track s Number or name to play.
4
21
21
21
21
Repeat Playing
During CD/MP3/SD/USB playback, press
15
replay the current track, press
RPT to
it again to cancel this function.
Note:
* This function is operated by using the remote
control.
* The default setting is MENU Repeat.
Number Buttons
Press one of Number Buttons(0~9) to
select a track to play automatically.
Note:
* Press track region and the screen shows the
number keys, touch the number to select tracks.
* Press CLEAR to clear the mistake input.
23
22
Selecting Track
During CD playback, first press GOTO,
and TFT shows : disc go to:--:--,press your
desired time of the playback by using number buttons.
Second press GOTO button, track go to:--:--
appears on TFT, also input your desired
numbers to play the current time of your
selection.
During MP3/SD/USB mode, first press
GOTO and the TFT shows:---. Then press
NUMBER BUTTONS to input the MP3/SD
track s Number to play it; secondly press
GOTO button, and the TFT shows : --:--,
now input the desired time to play the
current track at this point.
Note:
* This function is operated by using the remote
control.
* Press CLEAR to clear the mistake input.
Stop Play
During CD/MP3/SD/USB playback, Press
to stop the playback.
* Pressing in the monitor perform the same
function.
22
¼òµ¥¹ÊÕÏÅųýÖ¸ÄÏ
18
Note:
2
2
Playing Tracks at Random
During CD/MP3/SD/USB playback,
16
RDM button on the remote control to
any track at
play random under the directory
which you select. P return to
normal playing.
Note:
* This function is operated by using the remote
control.
ress it again to
press
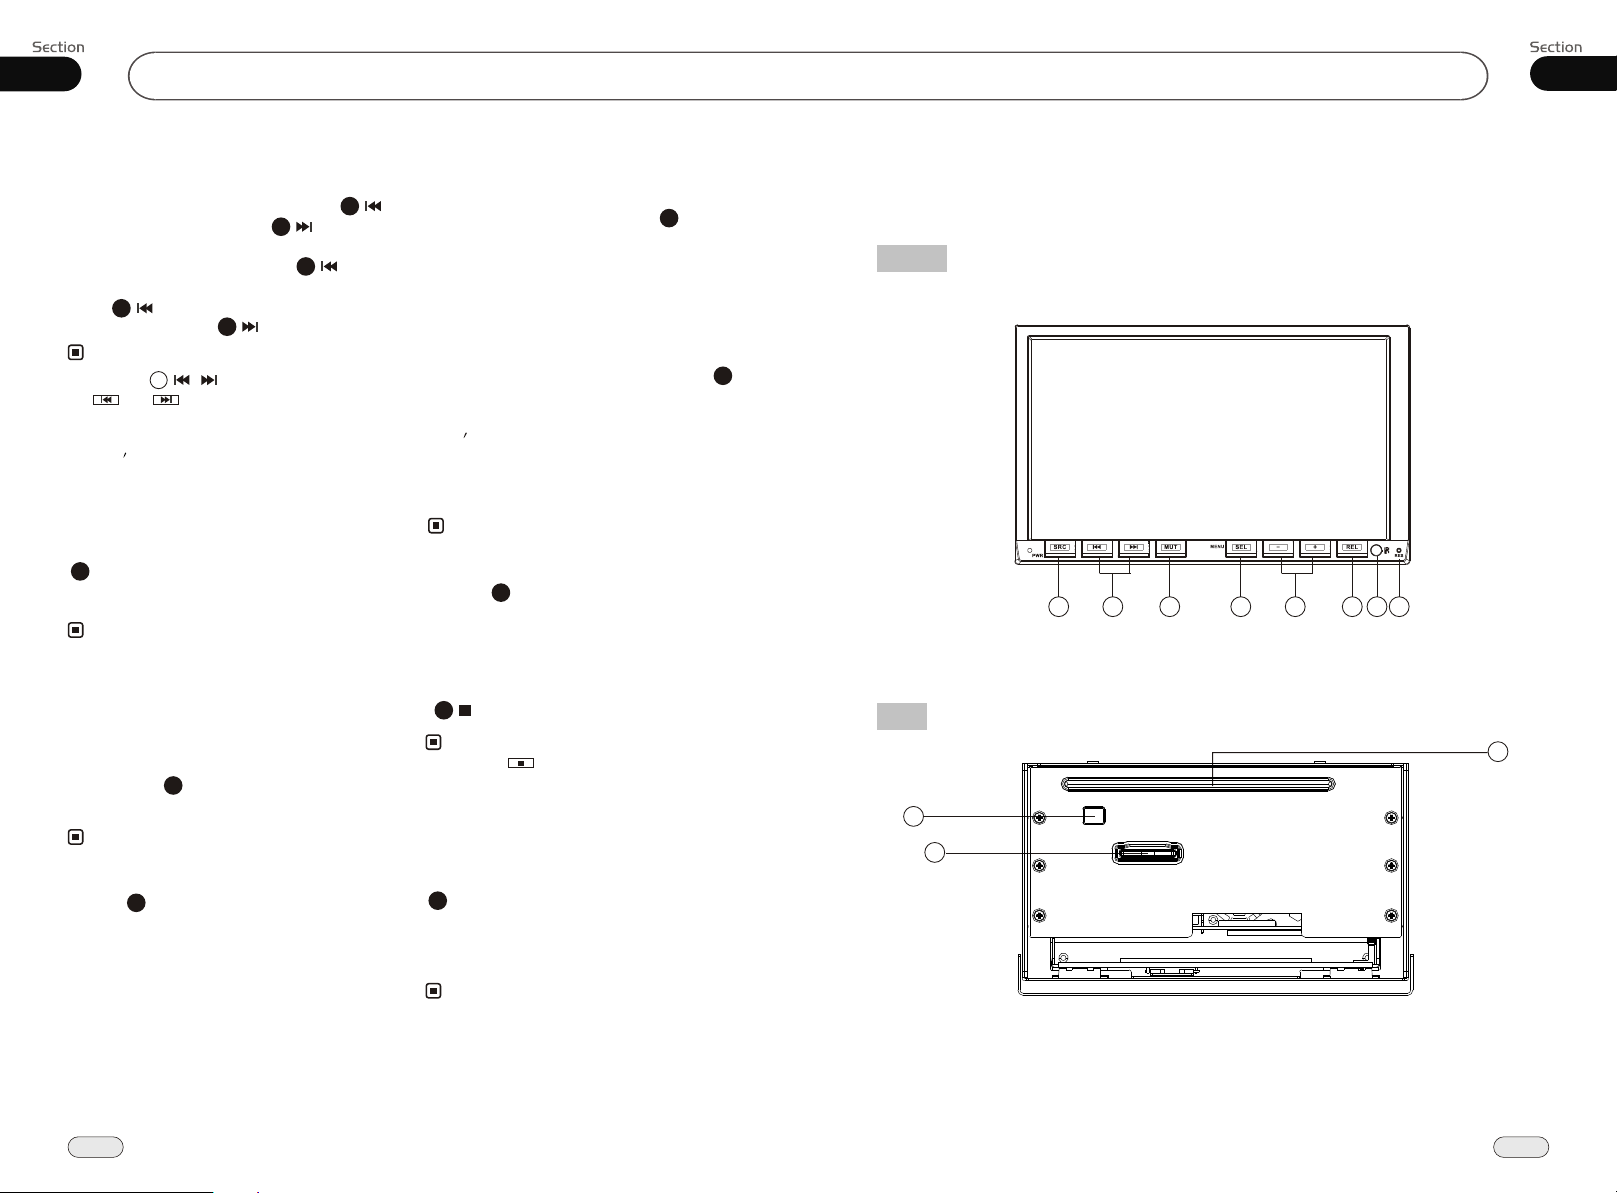
Location of the Controls
FRONT
1 457 8
Back
9
11
3
2
6
10
34
7
Page 8
01
Before You Start
CD/MP3/SD/USB
06
SRC/PWR
During waiting mode, press it to turn on the
unit. During working mode, Briefly press it
to select radio mode or playback mode, press
and hold it to turn the unit off.
[ ]/[ ]([Adjust frequency backward/
Previous]/[Adjust frequency forward/
Next Track])
MUT Button
Briefly press it to mute, press and hold it to
enter night mode.
REMOTE (Infrared Sensor)
SEL/MENU Button
Briefly press it to select functions , press and
hold it to enter the MAIN MENU.
+/- Button
Press it to decrease or increase the volume,
and to adjust the numerical value of other
functions with pressing SEL Botton.
After pressing REL, press +/- to adjust the angle
of TFT.
REL Button
Briefly press it to slidedown the monitor, then
you can insert or eject a disc or a SD card.
Press and hold it, the monitor shows ANGLE,
then press +/- to adjust angle.
RES Button
Press it to set the unit to initial status.
(Eject) Button
Press it to eject a disc.
Disc Loading Slot
Press REL first before you load the disc.
Common SD Card Slot
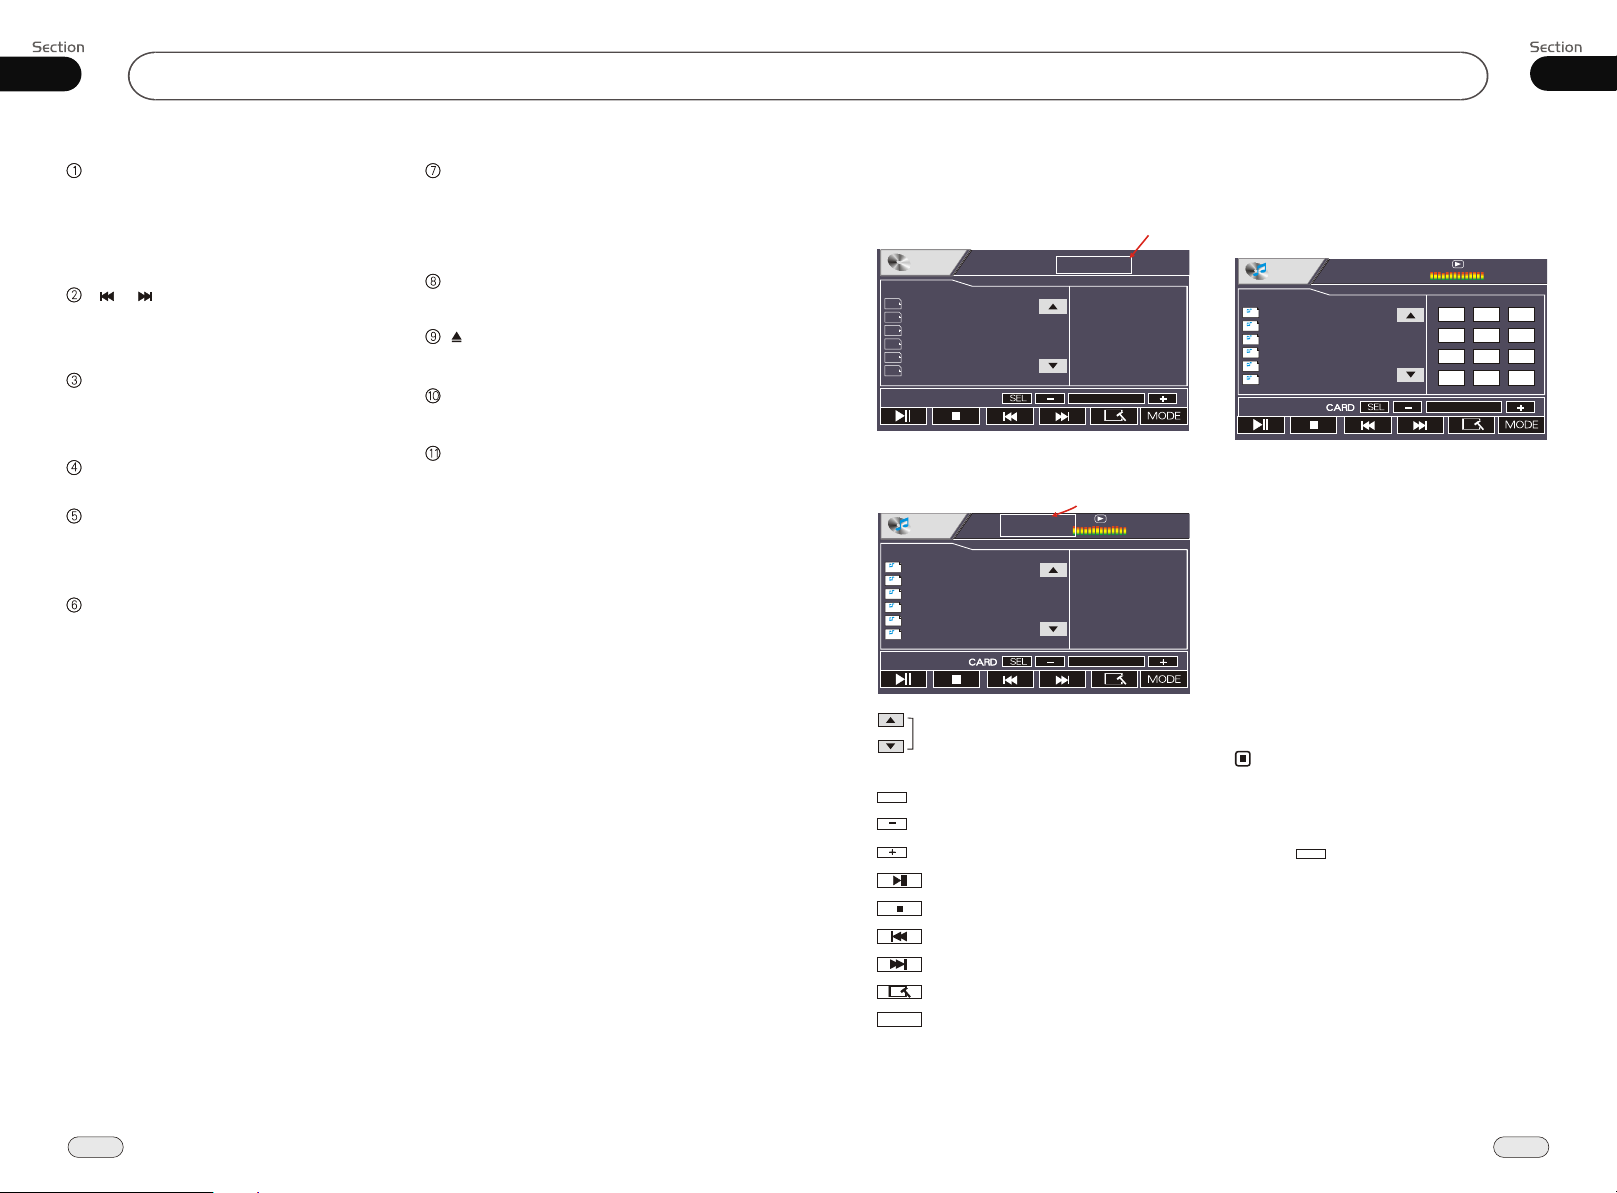
CD/MP3/SD/USB Setup
During CD playback, touching the screen
shows the following menu:
CD
CD
CD
CD
CD
CD
CD
01 Track
02 Track
03 Track
04 Track
05 Track
06 Track
01:18
During MP3/SD/USB playback, touching the
screen shows the following menu:
Track region
00:00
MP3
MP3
Demo
amour
MP3
MP3
Automatic
Be natural_s_e
MP3
Can you celebr
MP3
clon_bing bing
MP3
Scan the tracks
CARDCARD
To show SD card or USB
SELSEL
Sound characteristics
Decrease volume level, adjust some items
Increase volume level, adjust some items
Play/pause
Stop
Previous track
Next track
DVD setup menu
MODE
Mode selector
001/105
00:00
Track region
Track 03/16
Track Region:
Press this region and the screen
shows the following menu:
number keys appears, touch the
number to select tracks.
Touch the " X " to exit this menu.
00:00
MP3
MP3
Demo
amour
MP3
MP3
Automatic
Be natural_s_e
MP3
Can you celebr
MP3
clon_bing bing
MP3
001/105
00:00
1
4
7 8
--
3
2
5
6
9
0
X
CD/MP3/SD/USB Play
Insert a CD/MP3 disc into the slot, the unit
will play automatically.
Press REL after turning the unit on, then
insert a SD card when the TFT slanted and
the programs in the card will be played.
From the back of the main unit insert the
USB and programs in the USB will be played.
If there is a disc, USB or SD Card loaded,
press SOURCE on the remote control or
back to MENU to select corresponding
mode to play.
Note:
Press SRC on the main unit to switch to DVD
*
mode. When SD card and USB were inserted
into, press this key again and again to switch
among USB, SD card and disc.
MODE
Press to turn to mode switch.
*
Bit rate not more than 320kbps.
*
Supports ID3V1.
*
8
33
Page 9
05
DVD/VCD/MP4
Before You Start
01
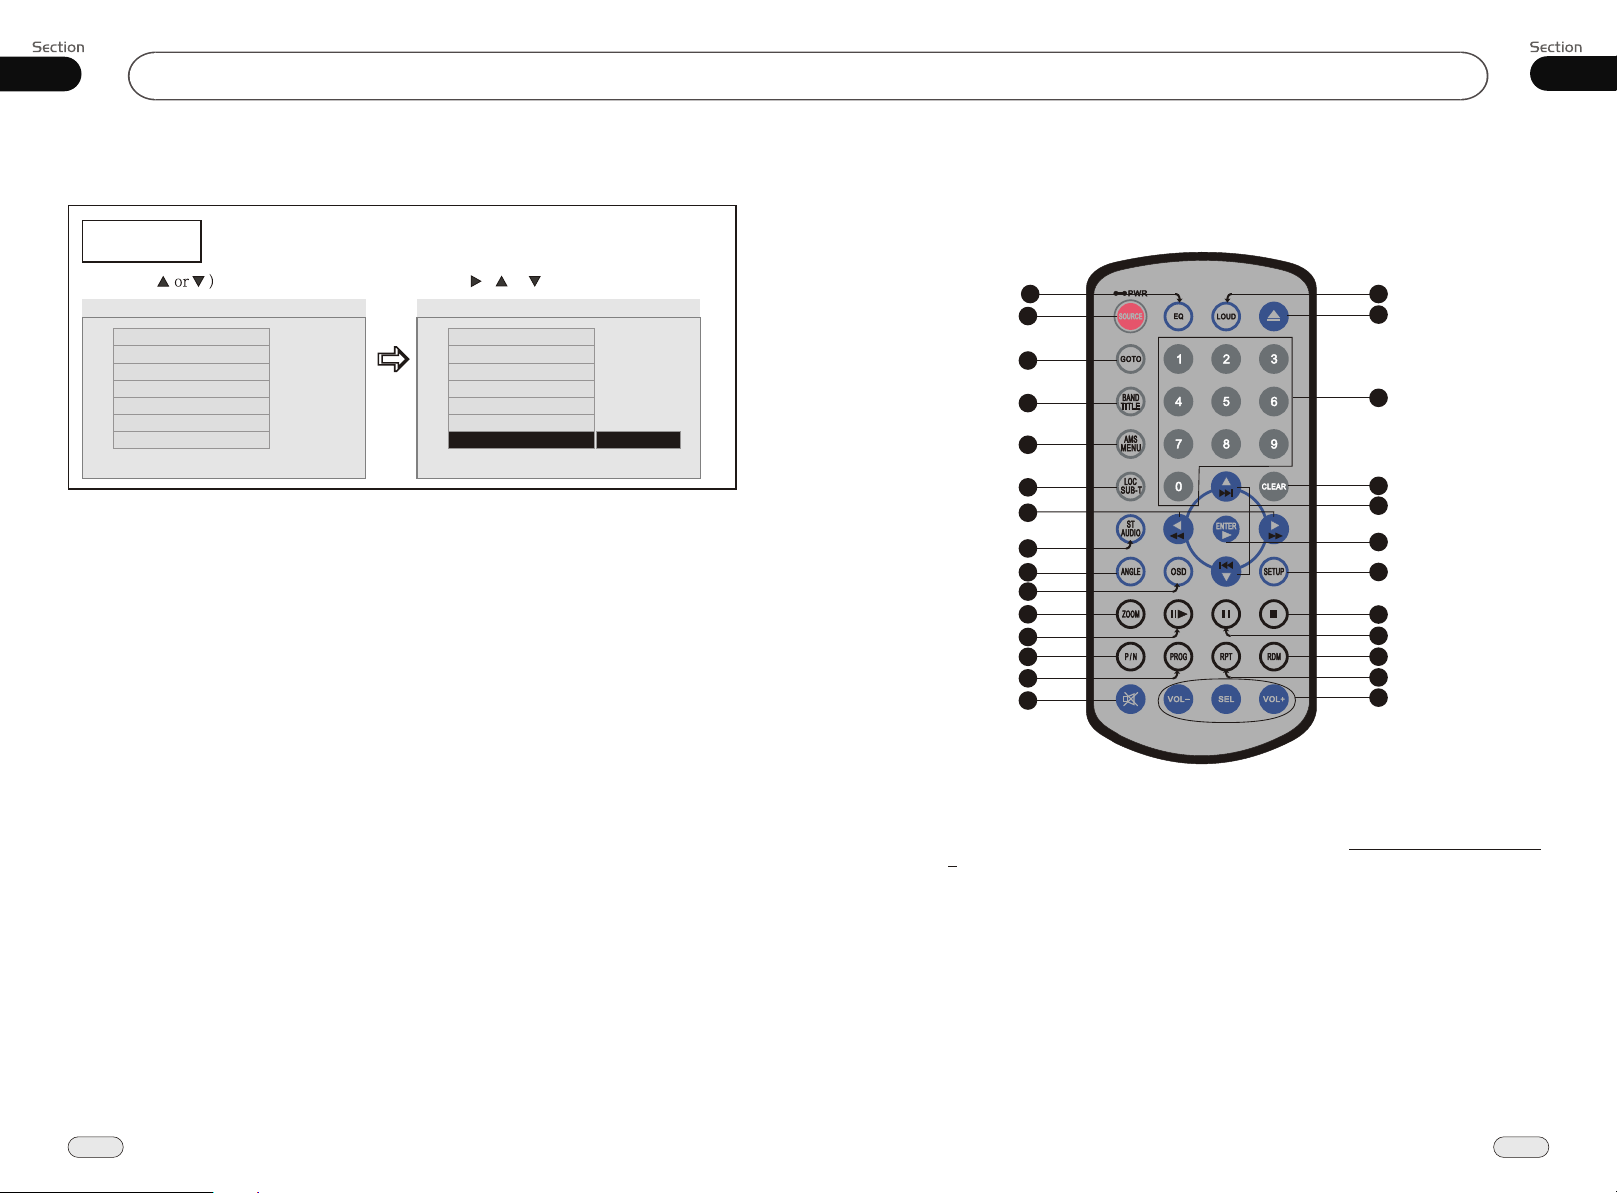
---Preferences page--
Default
(Press
TV Type
Audio
Subtitles
DVD Menu
Parental
Change PSW
Default
Go to language page
Example showing how to set load factory setting:
--Preference Page--
Auto
Eng
Eng
Eng
(Press , or , then press ENTER)
--Preference Page--
TV Type
Audio
Subtitles
DVD Menu
Parental
Change PSW
Default
Reset to the factory settings
Auto
Eng
Eng
Eng
Reset
Remote Control
26
1
2
3
4
5
20
6
7
8
9
10
11
13
12
25
24
23
22
21
27
19
18
17
16
15
14
32
Tips:
For more information as to replacing battery, please refer to Replacing the Battery
on page 6.
9
Page 10
01
Before You Start
DVD/VCD/MP4
05
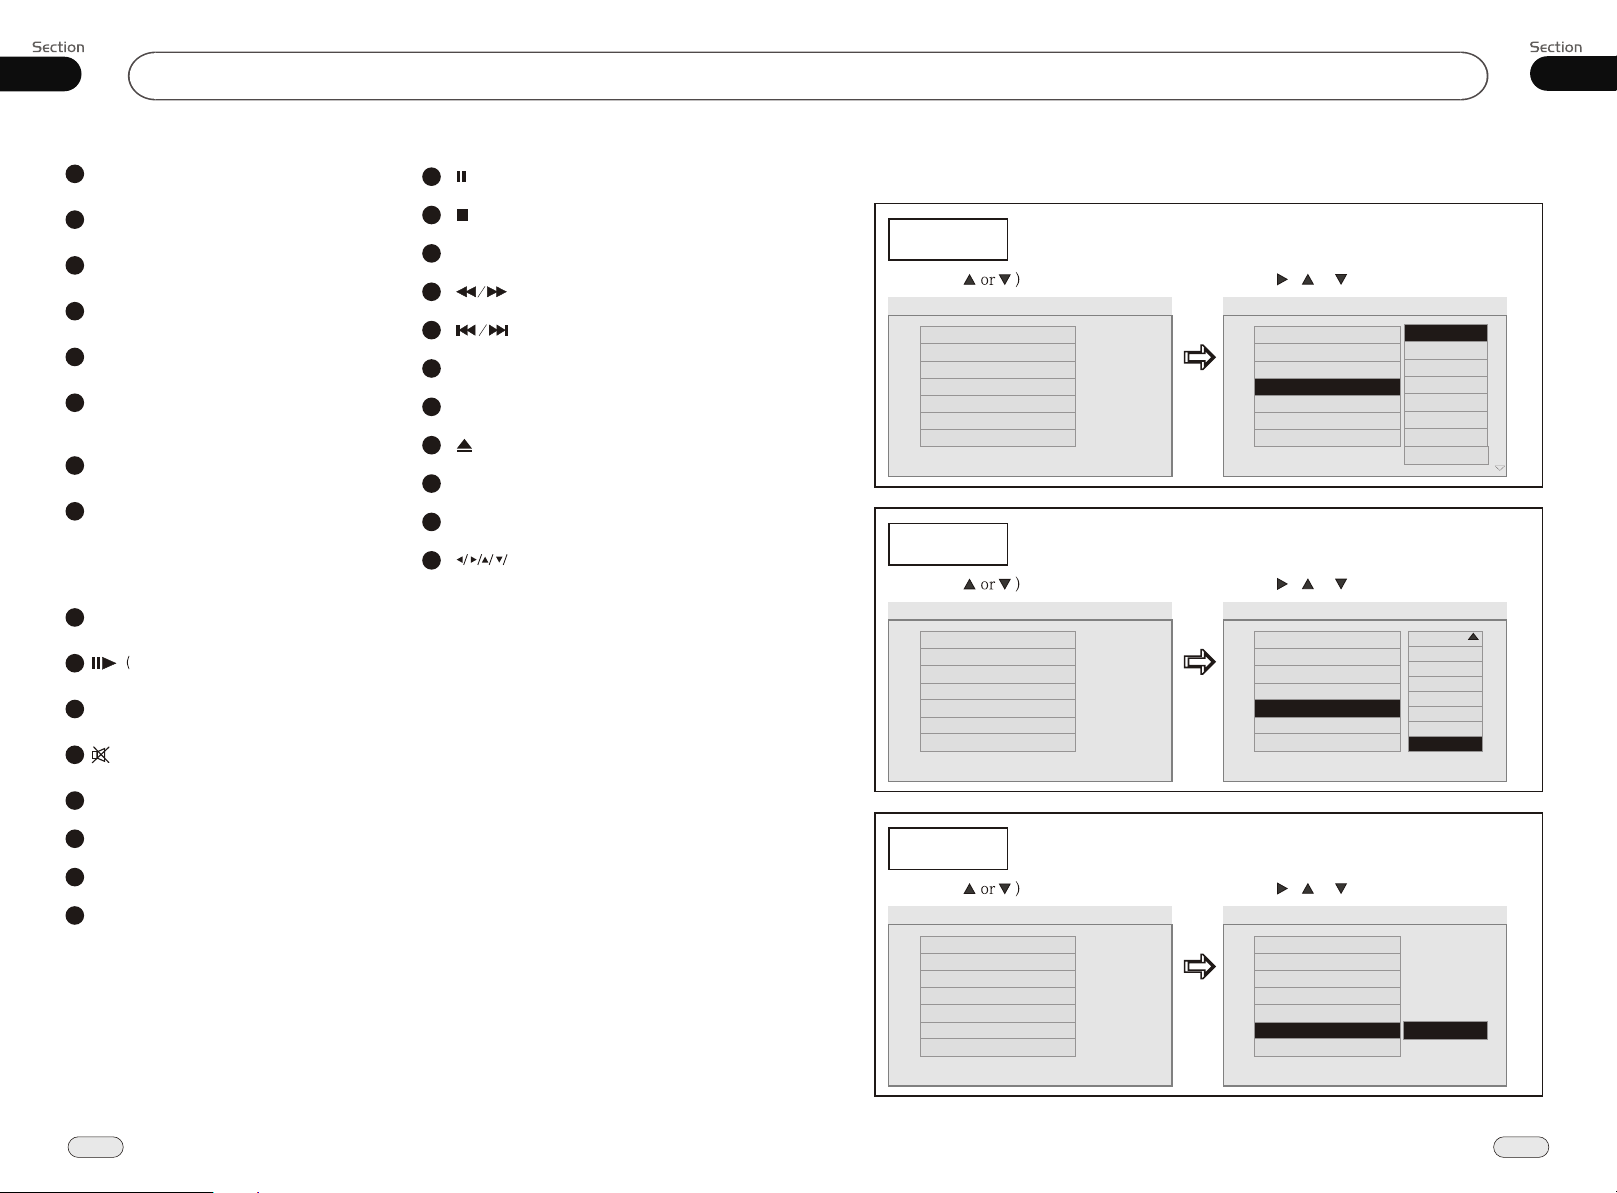
1
SOURCE/PWR
GOTO (playing time/track)
2
3
BAND/TITLE
4
AMS/MENU
5
LOC/SUB -T
6
ST/AUDIO (mono or stereo/language or
channel selector)
7
ANGLE
8
OSD
Briefly press it to show the current infor-
mation. Hold and press it to show the
current setting information.
9
ZOOM (zoom in or zoom out)
10
11
12
13
14
15
16
Slow Forward/Rewind)
P/N( system adjusting)
Mute
PROG(Program playing)
30
VOL+/VOL-/SEL
RPT(Repeat Playing)
RDM (Playing Tracks at Random)
(Pause/Play)
17
(Stop Playing)
18
19
SETUP
20
21
22
23
24
25
26
27
(F.R/F.F)
(Previous/Next Track)
CLEAR
0~9 (Number) Buttons
(Eject Button)
LOUD (loudness)
EQ (equalizer) Button
ENTER
ENTER)
(Left/Right/Up/Down
---Preferences page--
DVD Menu
(Press
TV Type
Audio
Subtitles
DVD Menu
Parental
Change PSW
Default
Go to language page
Parental
(Press
TV Type
Audio
Subtitles
DVD Menu
Parental
Change PSW
Default
Go to language page
Change PSW
(Press
TV Type
Audio
Subtitles
DVD Menu
Parental
Change PSW
Default
Go to language page
Example showing how to set Disc Menu Language:
--Preference Page--
Auto
Eng
Eng
Eng
Example showing how to set parental control:
--Preference Page--
Auto
Eng
Eng
Eng
Example showing how to set password, and the default pas sword is 8888.
--Preference Page--
Auto
Eng
Eng
Eng
(Press , or , then press ENTER)
--Preference Page--
TV Type
Audio
Subtitles
DVD Menu
Parental
Change PSW
Default
Set the DVD menu langua ge
Auto
Eng
Eng
Eng
English
French
Spanish
Chinese
Japanese
Korean
Russian
Others
(Press , or , then press ENTER)
--Preference Page--
G
TV Type
Audio
Subtitles
DVD Menu
Parental
Change PSW
Default
Set parental control
Auto
Eng
Eng
Eng
2
3
4
5
6
7
8
Off
PG
PG 13
PGR
R
NC 17
Adult
(Press , or , then press ENTER)
--Preference Page--
TV Type
Audio
Subtitles
DVD Menu
Parental
Change PSW
Default
Change the password
Auto
Eng
Eng
Eng
Change
10
31
Page 11
05
DVD/VCD/MP4
Before You Start
01
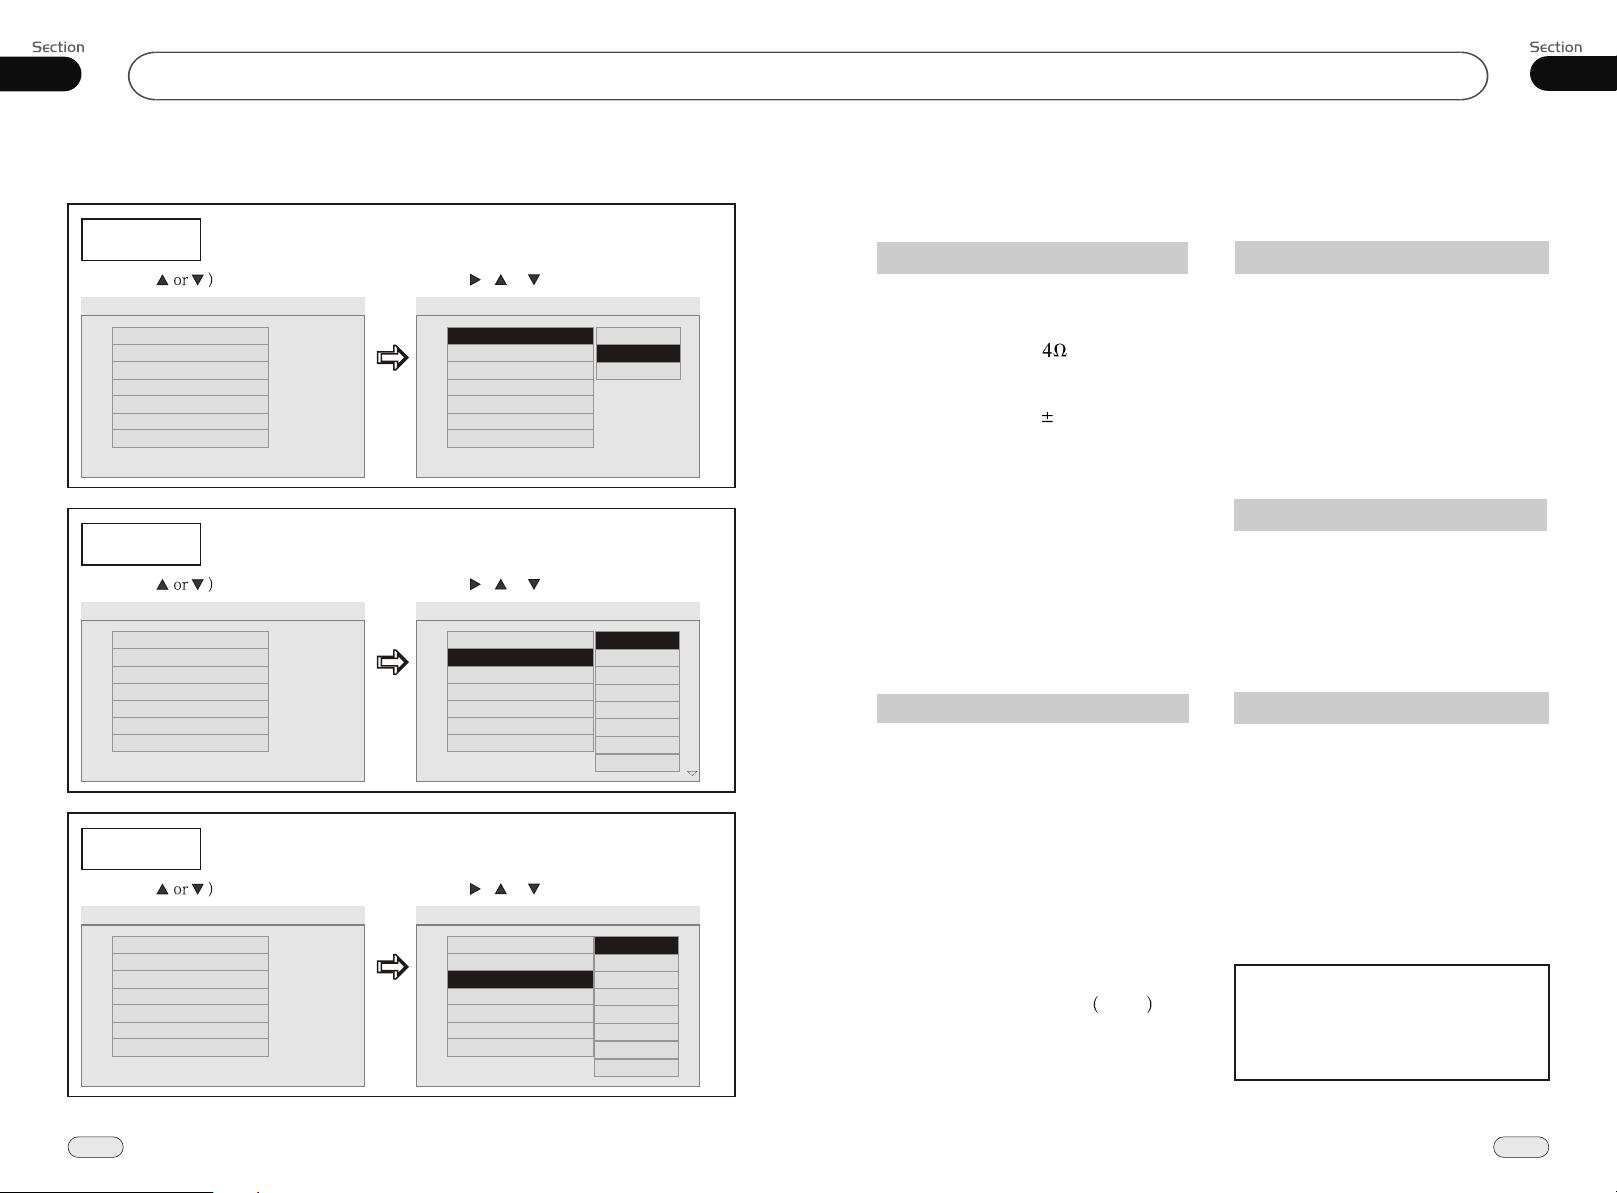
---Preference page---
TV Type
(Press
TV Type
Audio
Subtitles
DVD Menu
Parental
Change PSW
Default
Go to language page
Audio
(Press
TV Type
Audio
Subtitles
DVD Menu
Parental
Change PSW
Default
Go to language page
Subtitles
(Press
TV Type
Audio
Subtitles
DVD Menu
Parental
Change PSW
Default
Go to language page
Example showing how to set TV type:
--Preference Page--
Auto
Eng
Eng
Eng
Example showing how to set Audio language:
--Preference Page--
Auto
Eng
Eng
Eng
Example showing how to set subtitle language:
--Preference Page--
Auto
Eng
Eng
Eng
(Press , or , then press ENTER)
--Preference Page--
TV Type
Audio
Subtitles
DVD Menu
Parental
Change PSW
Default
Select the TV system
(Press , or , then press ENTER)
TV Type
Audio
Subtitles
DVD Menu
Parental
Change PSW
Default
Set the audio Language
(Press , or , then press ENTER)
TV Type
Audio
Subtitles
DVD Menu
Parental
Change PSW
Default
Set the subtitles Language
Auto
Eng
Eng
Eng
--Preference Page--
Auto
Eng
Eng
Eng
--Preference Page--
Auto
Eng
Eng
Eng
PAL
Auto
NTSC
English
French
Spanish
Chinese
Japanese
Korean
Russian
Others
English
French
Spanish
Chinese
Japanese
Korean
Russian
Others
Specifications
General
Power Requirement
Load Impedance
Max.Power Output
Tone Controls
Dimensions
Mounting
Dimensions
FM Section
Tuning Range
(Optional)
IF Range
Usable Sensitivity
(-30dB)
Signal-to-noise Ratio
Stereo Separation
Frequency Response
14.4V DC
(11-16V allowable)
45W X 4
7dB
Bass 100Hz
Treble 10KHz
Approx.184 x 178 x100
(d/w/h)
mm
Approx.164 x183x112
(d/w/h)
mm
Approx.3.5kgWeight
87.5-108(MHz)
(Europe)
87.5-107.9(MHz)
(U.S.A.)
10.7MHz
10dBuV
60dB
30dB 1KHz
40-12KHz
AM Tuner Section
Frequency Range
(Optional)
IF Range
Usable Sensitivity
(-20dB)
522-1620(KHz)
(Europe)
530-1710 (KHz)
(U.S.A.)
450KHz
28dBuV
VCD/CD Player Section
VCD Signal System
Signal-to-noise Ratio
Distortion
AUTO/PAL/NTSC
60dB
60dB(1KHz)Separation
0.3%
DVD Player Section
DVD Signal System
Number of channel 2 channels
Frequency Response
Dynamic Range
Signal-to-Noise Ratio
Note:
Due to continuous product improve-
ment, specifications and design are
subject to change without prior notice.
AUTO/PAL/NTSC
40Hz to 16KHz
60dB
60dB
30
11
Page 12
02
Installation
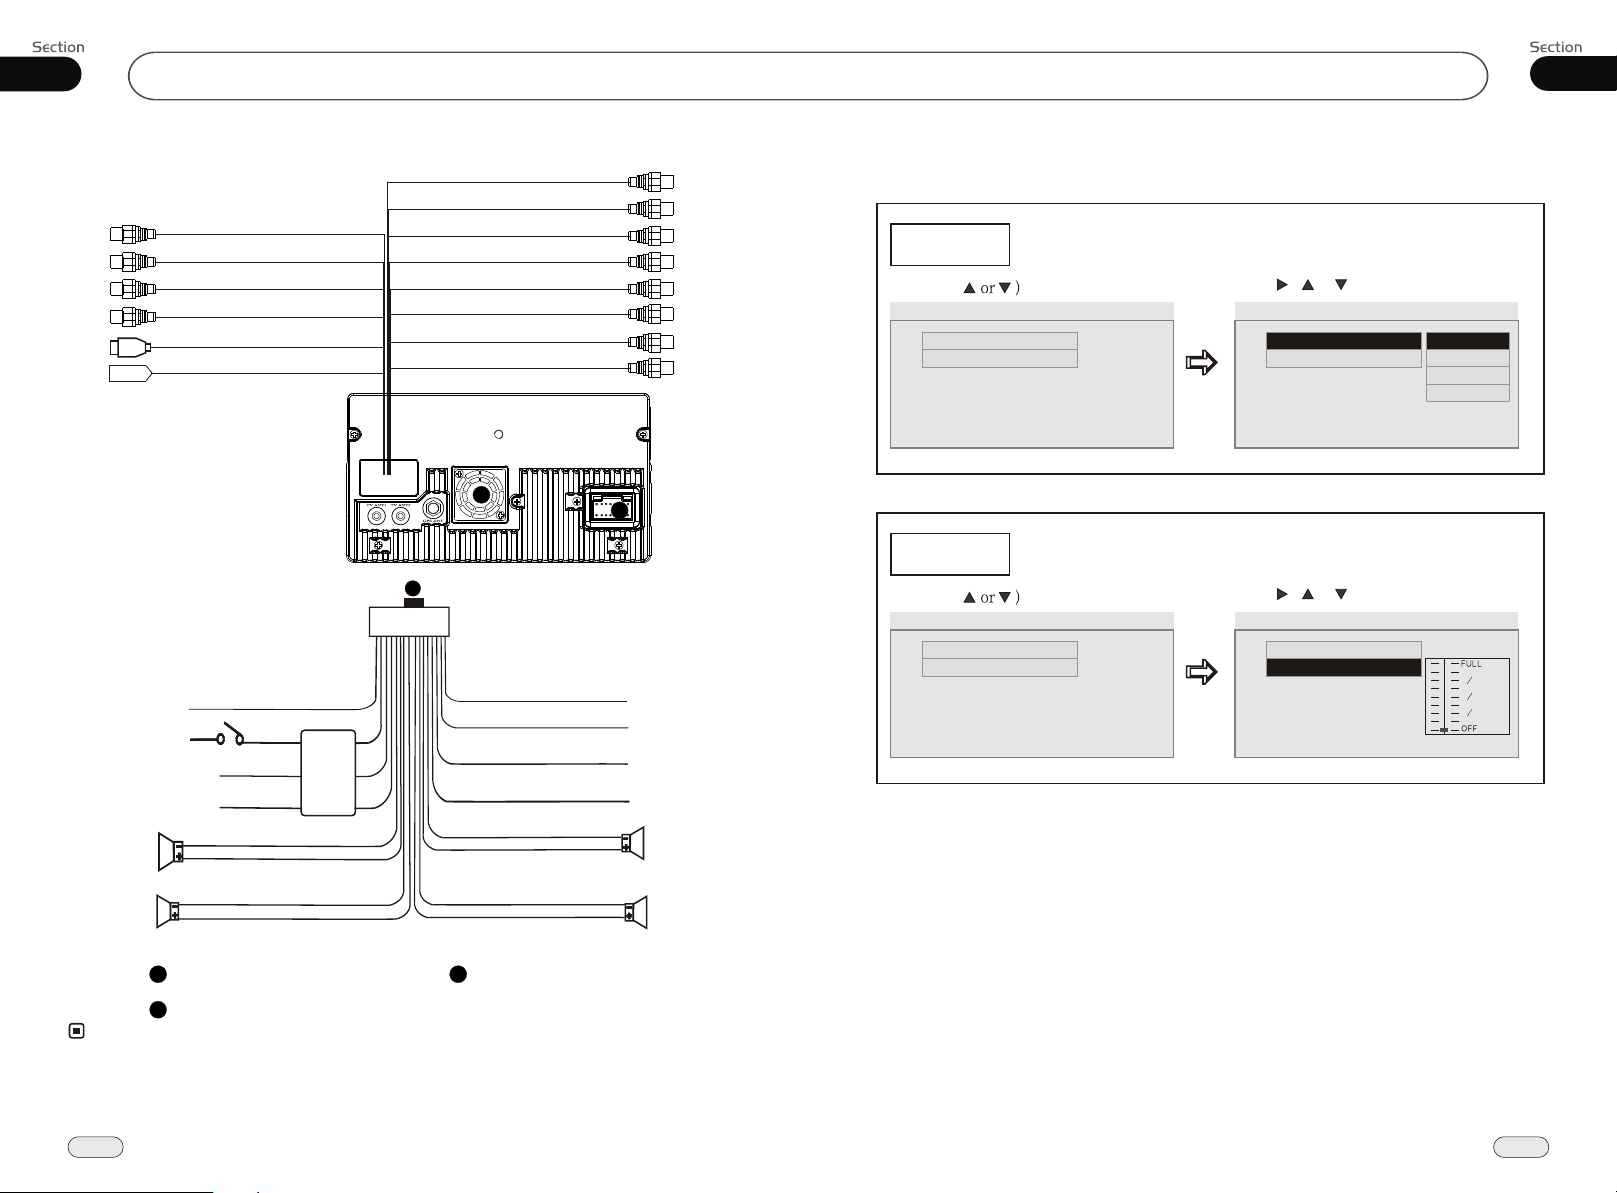
Wiring Connection
Subwoofer
Reverse Signal In
AUX Video In
AUX Audio In
USB
Antenna
(Brown line with
brown head)
(Brown line with
yellow head)
(Black line with
yellow head)
(Black line with
red & white head)
Black
Black
Rear Monitor 2
Rear Zone Out 2/R
Rear Zone Out 2/L
Rear Monitor 1
Rear Zone Out 1/R
Rear Zone Out 1/L
Rear RCA L/R
Front RCA L/R
(Light Grey line with
yellow head)
(Light Grey line with
red head)
(Light Grey line with
white head)
(Light Grey line with
yellow head)
(Light Grey line with
red head)
(Light Grey line with
white head)
(Light Grey line with
red & white head)
(Dark Grey line with
red & white head)
DVD/VCD/MP4
--Dual mono/DRC Setup--
Dual Mono
(Press
--Dual mono/DRC Setup--
Dual Mono
Dynamic
Example showing how to set stereo mode:
(Press , or , then press ENTER)
--Dual mono/DRC Setup--
Dual Mono
Dynamic
Stereo
L-Mono
R-Mono
Mix-Mono
05
Reverse Gear
Ignition Key
Rear L
Speaker
Front L
Speaker
Orange
Red
Battery +
Ground
Yellow
Black
Green/Black
Green
White/Black
White
Output Plug(Male)
Output Socket(Female)
2
FILTER
&FUSE
BOX
3
1
Black
Brown
Pink
Blue
Violet/Black
Violet
Grey/Black
Grey
31
Fan Window
2
Ground
Parking Brake
Lamp In
Antenna
Power +
Rear R
Speaker
Front R
Speaker
Note:
The brown wire is connected with brake signal; for safety, the programs can be seen on the monitor
*
after braking the car, but the menu and RCA output are free of it.
If you do not want to use this function, connect it with the negative pole.
Do not connect the pink wire to the battery, otherwise it will use up the power of battery.
Dual mono/DRC setup
Dynamic
(Press
Dual Mono
Dynamic
Dual mono/DRC setup
Dual Mono Setup
Example showing how to set dynamic range compression:
(Press , or , then press ENTER)
--Dual mono/DRC Setup----Dual mono/DRC Setup--
Dual Mono
Dynamic
Deactivate DRC
3 4
1 2
1 4
12
29
Page 13
05
DVD/VCD/MP4
Installation
02
--General Setup Page--
Captions
(Press
Tv Display
Angle Mark
Osd Lang
Captions
Screen Saver
Logo Type Def
Go To General Setup Page
Screen Saver
(Press
Tv Display
Angle Mark
Osd Lang
Captions Captions
Screen Saver
Logo Type Def Logo Type Def
Go To General Setup Page
Logo Type
(Press
Tv Display
Angle Mark
Osd Lang
Captions
Screen Saver
Logo Type Def
Go To General Setup Page
Example showing how to set captions on/off:
--General Setup Page--
Wide
On
Eng
Off
On
Example showing how to set Screen Saver on/off:
--General Setup Page--
Wide
On
Eng
Off
On
Example showing how to set Logo Type:
--General Setup Page--
Wide
On
Eng
Off
(Press , or , then press ENTER)
--General Setup Page--
Tv Display
Angle Mark
Osd Lang
Captions
Screen Saver On
Logo Type Def
SPDIF
Wide
On
Eng
Off
On
Off
(Press , or , then press ENTER)
--General Setup Page--
Tv Display
Angle Mark
Osd Lang
Screen Saver
Screen Saver
Wide
On
Eng
Off
On
On
Off
(Press , or , then press ENTER)
--General Setup Page--
Tv Display
Angle Mark
Osd Lang
Captions
Screen Saver
Logo Type Def
Logo Type
Wide
On
Eng
Off
On
Default
Captured
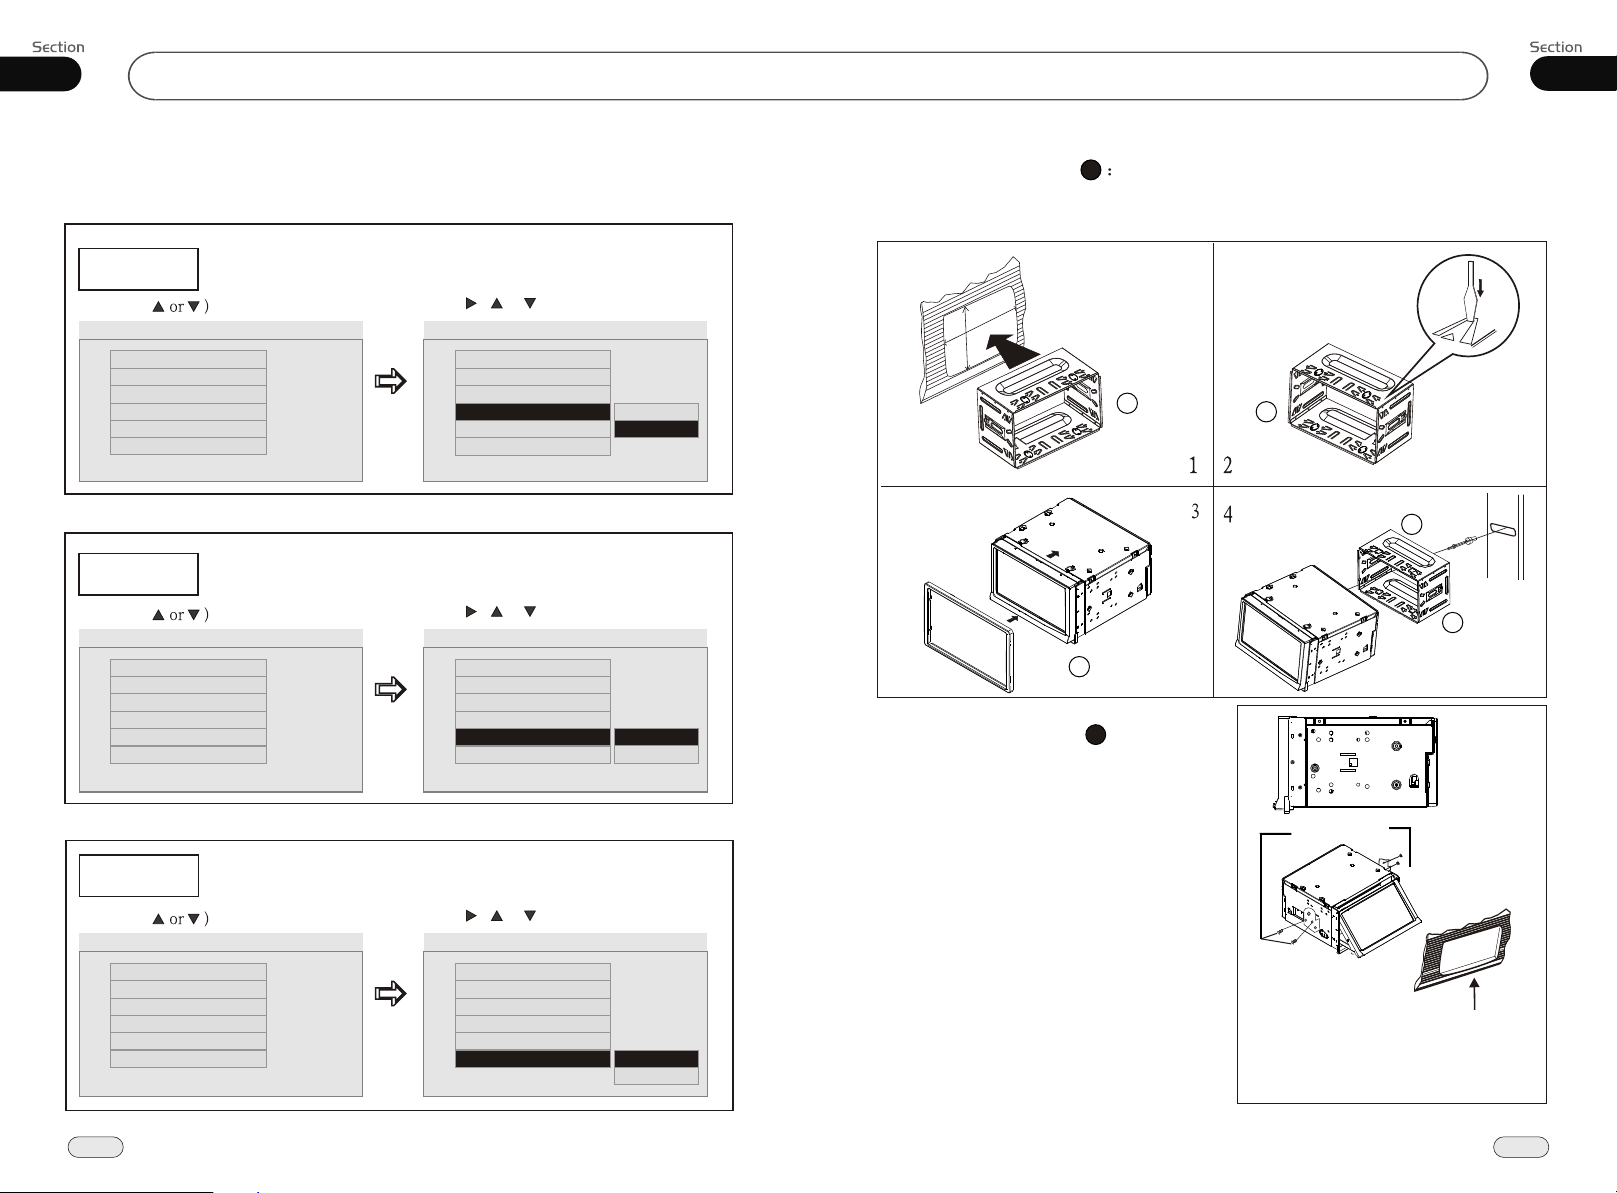
Installation Method DIN Front-Mount
11
Bend these claws
outward for a tight fit,
if necessary.
183183
112112
1
1
To support the unit
Push in the unit
5
Installation Method
2
Installation using the screw holes at
sides of the unit.the
Select a position where the screw holes of
the mounting bracket lied with the car and
screw holes become aligned
the of the main unit
(are tighten the screws (see
fitted), and at 2 pla-
ces on each fasten them to the car.
supp
side). And then
Bracket supplied
to your car
Fire Wall
2
Dashboard or
Console
1
28
13
Page 14
02
Installation
DVD/VCD/MP4
05
Detach the Unit
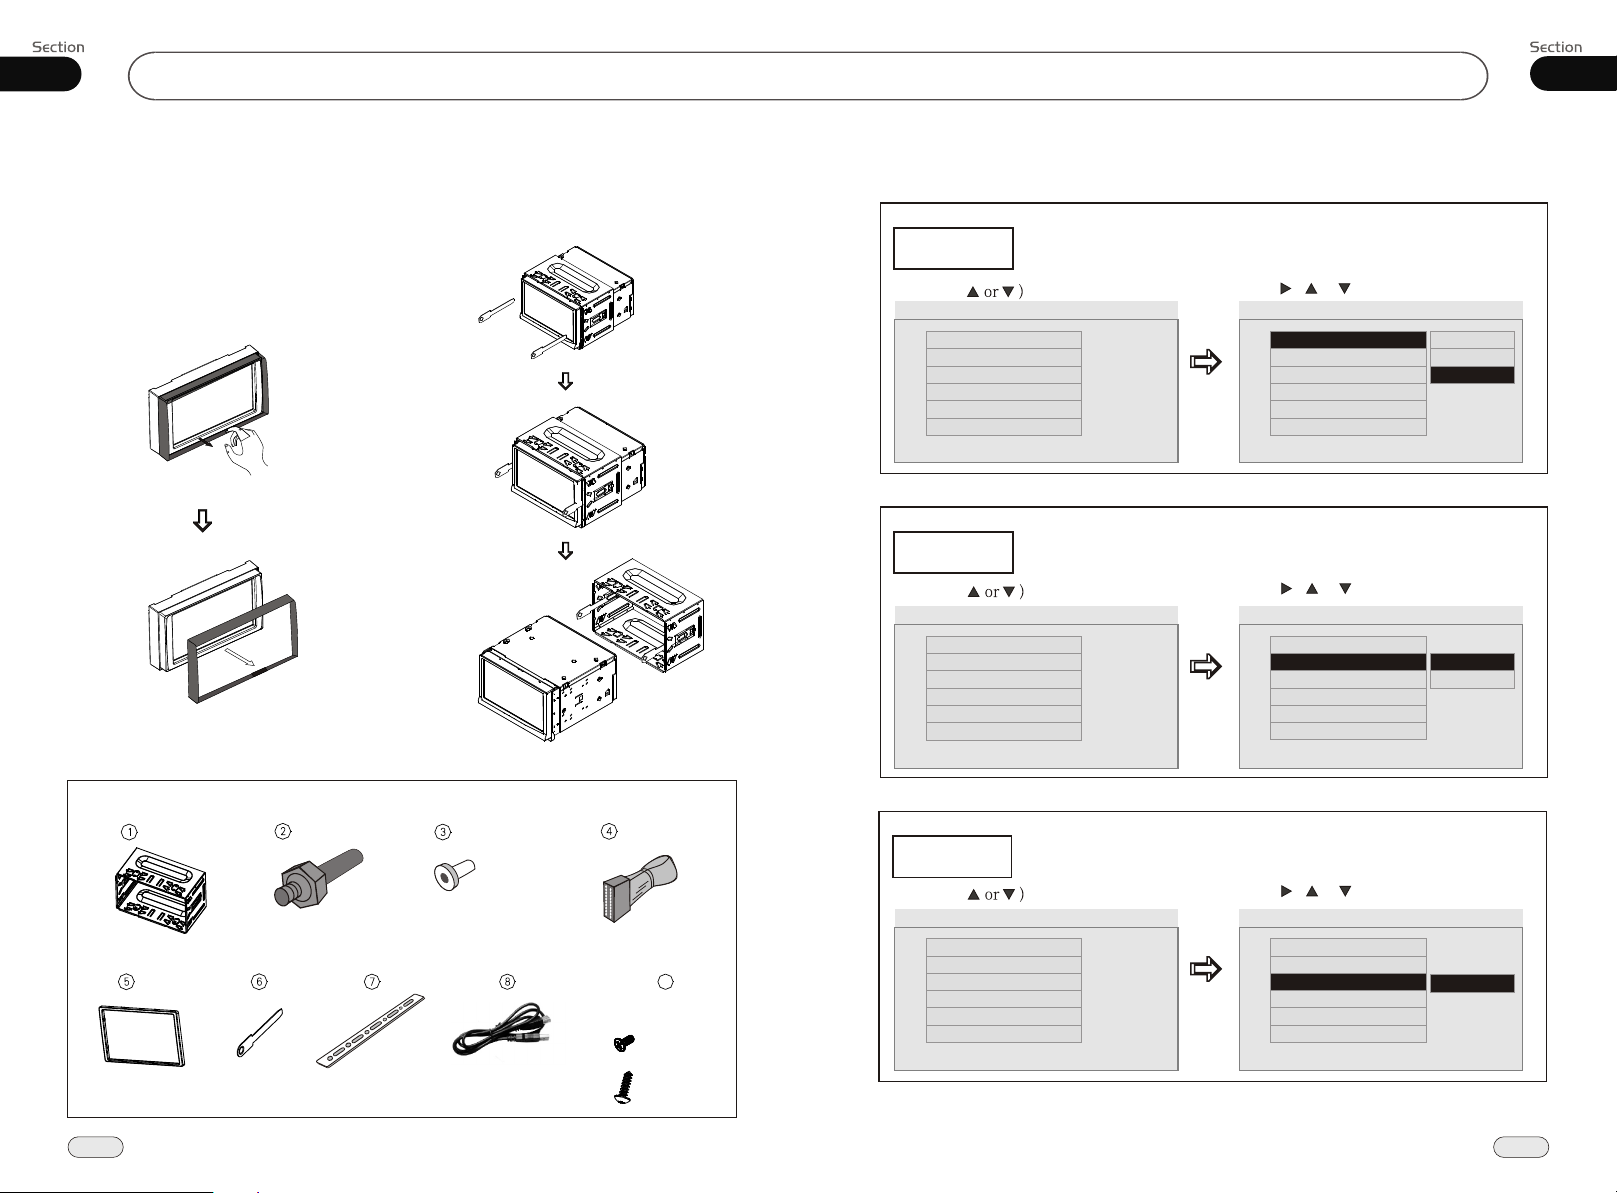
Detach the front panel before disassembling the unit.
1.Take out the Outer Trim Frame.
Main Parts List
2.Insert the keys supplied to the unit at
both sides of the unit (shown as illustrated)
until they click. Pulling the keys makes it
possible to remove the unit from the dashboard.
--General Setup Page--
TV Display
(Press
Tv Display
Angle Mark
Osd Lang
Captions
Screen Saver
Logo Type Def
Go To General Setup Page Set TV Display mode
Angle Mark
(Press
Angle Mark
Osd Lang
Captions
Screen Saver
Logo Type Def
Go To General Setup Page Set Angle Mark
Example showing how to set TV Display mode:
--General Setup Page--
Wide
On
Eng
Off
On
Example showing how to set picture mode:
--General Setup Page--
Wide
On
Eng
Off
On
(Press , or , then press ENTER)
Tv Display
Angle Mark
Osd Lang
Captions
Screen Saver
(Press , or , then press ENTER)
TV DisplayTv Display
Tv Display
Angle Mark
OSD Lang
Osd Lang
Captions
Captions
Screen Saver
Logo Type Def
--General Setup Page--
Wide
On
Eng
Off
On
Def Logo Type
--General Setup Page--
--General Setup Page--
Wide
On
Eng
Off
On
Normal/PS
Normal/LB
Wide
On
Off
Mounting Sleeve x1 Rear Mounting Bolt x1
Outer Trim Frame x 1
14
Keys x 2
Steel Bar x 1
Harness Rubber x1
USB Connecting Wire
Connecting Wire x1
9
M 5 x 5
4 Screws
M 5 x 20
5 Screws
OSD Lang
Example showing how to set language mode:
(Press
--General Setup Page-- --General Setup Page--
Tv Display
Angle Mark
Osd Lang
Captions
Screen Saver On
Logo Type Def
Logo Type Def
Go To General Setup Page
Wide
On
Eng
Off
(Press , or , then press ENTER)
TV Display
Tv Display
Angle Mark
Angle Mark
OSD Lang
Osd Lang
Captions
Captions
Screen Saver
Screen Saver On
Logo Type Def
Set OSD Language
Set OSD Language
Wide
On
On
Eng
Eng
Off
Off
On
English
English
27
Page 15
05
DVD/VCD/MP4
Common Operations
03
Selecting MENU
1
Selecting Menu: During DVD status,
4
press MENU to return to the root
menu, all of the chapters will appear
on monitor. You can press or
button to select your desired chapter.
2
Selecting Title: During DVD status,
3
press TITLE to return the title menu,
all of the titles will appear on monitor.
You also can press or button to
select your desired chapter.
Note:
Under DVD menu, touch the screen to select
*
items.
If the touch menu options invalid or the disc
*
does not support touch-TITLE, that is the
27
same as bottons on the remote control will
display on the screen. Press to left, press
to right, press to up, press to down
and press to ENTER.
27
23
27
23
DVD SETUP MENU
Press SETUP on remote control or MENU
on the main unit or in the monitor, main
menu and sub-menu will appear on TFT,
pressing [ ][ ][ ][ ] on the remote
control to select your desired items, then
press ENTER.
Press to the pervious one, press SETUP
or press [ ][ ][ ][ ] to move the cursor
on , then press ENTER to exit the
menu setup.
Notes:
* The selections are the preferred options that
will be chosen if they are available on a disc.
If the disc that is inserted does not have the
preferred option then the discs own prefer ence will be used.
* Regarding SETUP MENU, please refer to
the following pages for more details.
* Some functions varies depending on the types
of models or formats of the disc.
* To touch the screen to select menu, touch it
again to select the item.
27
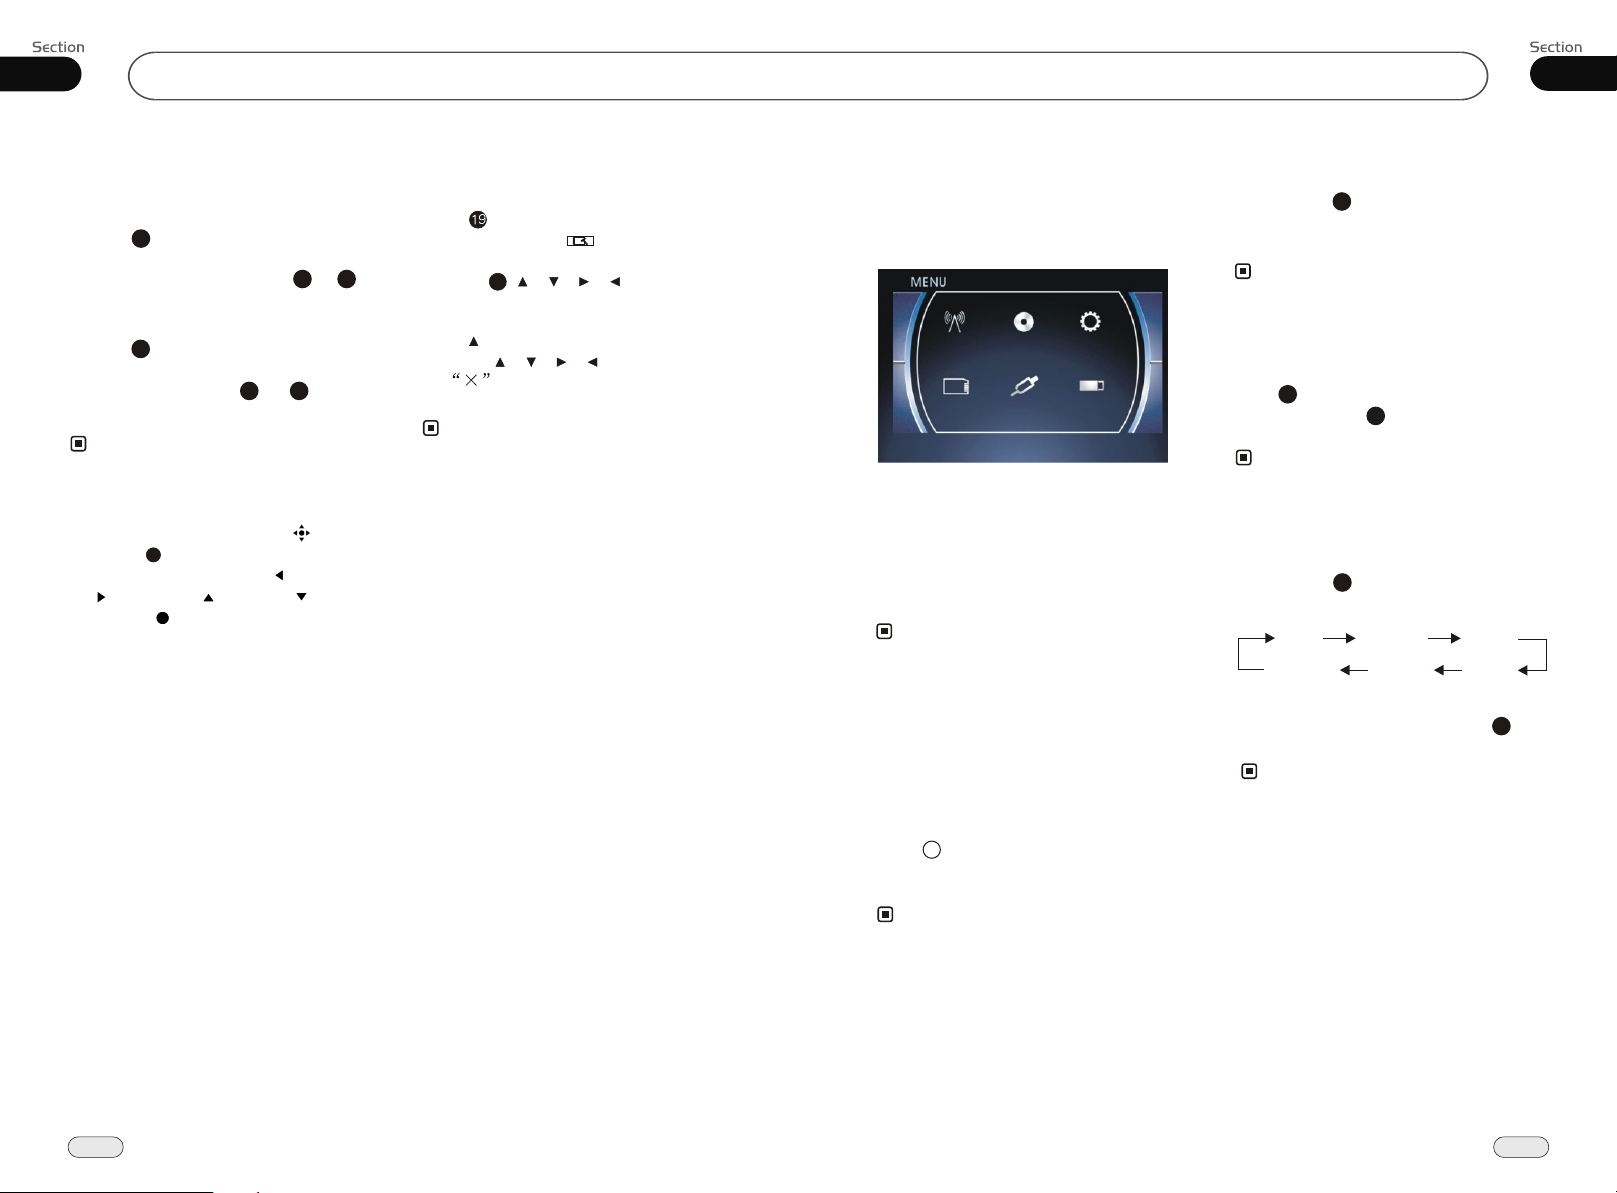
To Select Source by Menu
In any mode(except for DVD, SD, USB
mode), pressing SRC, then BACK in the
monitor will show the following display:
RADIO DVD
SD
AUX
SET
USB
Press it to select your desired item, and press
SET to enter into the main menu.
If you want to use navigation, press NAVI; if it
did not enter into that function, the unit dose
not support it.
In any mode, press BACK to return to the
previous mode.
Note:
* If the font display in cyan, that means this
function is null.
Reset the Unit
You may need to reset the unit if operating
for the first time or after replacing the car
battery.
Release the front panel at first, and then
8
press RES button in the panel w
a pointed point pen)
to set
Note:
* When ome errors occur on the
button to resume to normal,
it will
your stored functions.
* This function can only be operated by the
main unit.
object, (such as a ball
the unit to initial status.
s display, you can
also press RESET
and erase the clock settings and some of
ith
Turning the Unit On/Off
Briefly press PWR button to turn on the
unit, press it again, the unit is still in
waiting status. Press and hold to turn off.
Note:
* Pressing PWR button on the main unit also
performs the same function.
1
the
Volume Control
Press VOL+ button to increase sou-
14
nd level and press VOL- button to decr ease sound level.
the
Note:
* Press +/- on the main unit or VOL+/- in the
monitor also performs the same function.
Setting the Sound Characteristics
Briefly press SEL button to select the
14
14
mode in the following order:desired
VOL
SUBWF
BALAN
TREBL
After selecting the desired mode, you
adjust the current level by pressing
buttons
.
Note:
* Press +/- or SEL button on the main unit also
performs the same function.
the
FADE
BASS
14
can
VOL
26
15
Page 16
03
Common Operations
DVD/VCD/MP4
05
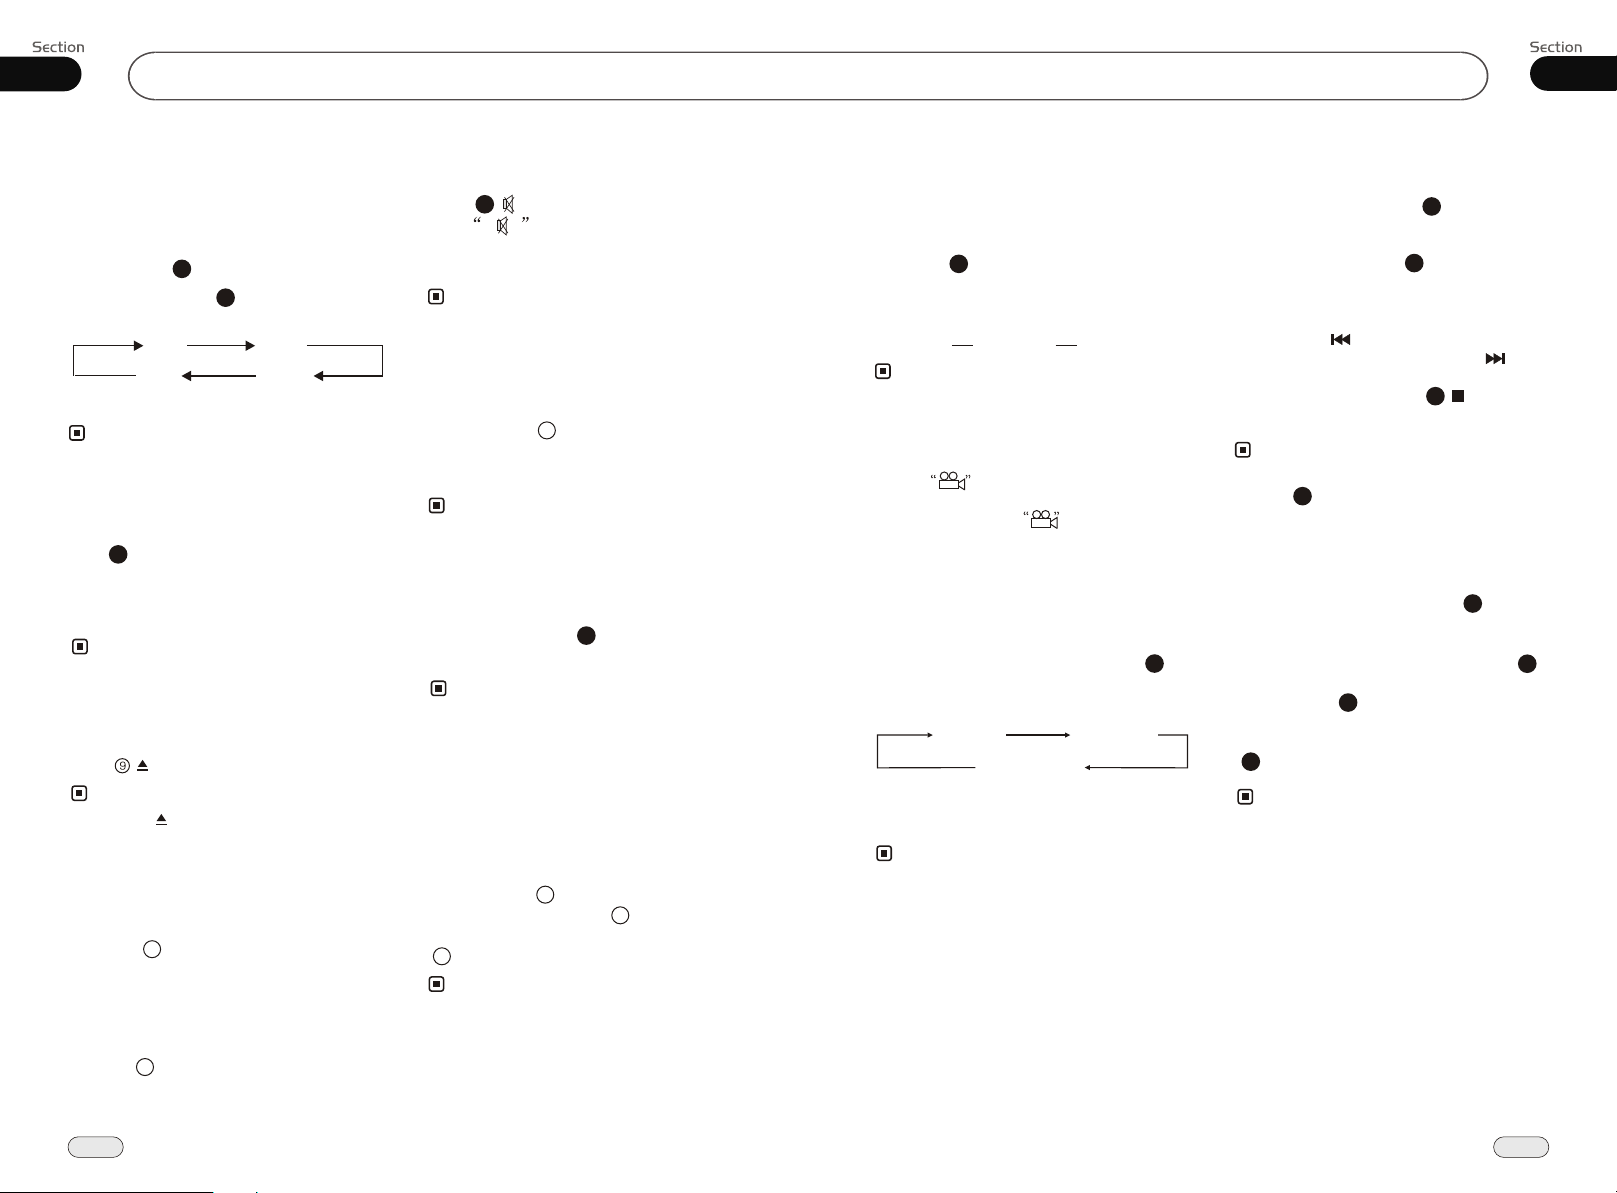
EQ Setting
While listening to different types of music, you can select preset equalizers that
will enhance your sound quality by
pressing the EQ button.
Repeatedly pressing button chooses
the following modes:
The default setting is OFF.
Note:
* This function is only valid on remote control .
¼òµ¥¹ÊÕÏÅųýÖ¸ÄÏ
Turning Loudness On/Off
25
Press activate loud function.
You can this button to increase the low
fre tivi
quency, which can improve sensi ty for
your
ears. Press it again to quit this function.
Note:
* This function is only valid on remote control .
¼òµ¥¹ÊÕÏÅųýÖ¸ÄÏ
Eject a Disc
Press button to eject or insert a disc.
Note:
* Pressing on the remote control also performs
the same function.
¼òµ¥¹ÊÕÏÅųýÖ¸ÄÏ
Insert a SD Card
Common SD Card: insert a common SD
card into SD slot and the files stored on
the card will be played.
26
26
3
POP
OFF
LOUD button
press
11
EQ
CLAS
ROCK
Infrared Sensor:
Receptor on the main unit for the card
remote control.
4
Mute Function
12
Press button to mute the unit.
And appears on the LCD.
Press it again to return to previous volume
level.
Note:
Pressing MUT on the main unit also
*
performs the same function.
¼òµ¥¹ÊÕÏÅųýÖ¸ÄÏ
Night Mode
Press and hold MUT button to enter
the night mode, and press it again to switch
to back to the normal mode.
Note:
* This function is operated by the main unit only.
Mode Selector
Repeatedly pressing SOURCE button
select the different modes available.
Note:
* Pressing SRC on the main unit also
performs the same function.
Angle Setting
Because of the unit character, the display is
different from the different angle. You can
adjust the desired angle.
Press and hold REL till ANGLE appears
in the monitor, the press + to adjust
monitor backward by definite angle, press
6
6 - to adjust it forward.
Notes:
* when adjusting the monitor angle, please press
this button, or the monitor would be broken.
* This function is operated by the main unit only.
Changing the viewing angle
(Multi-angle)
With DVDs featuring multi-angle (scenes
shot from multiple angles) recordings, you
can press ANGLE to switch among vie-
wing angles during playback.
Selection options switch as follows:
ANGLE 1 ANGLE 2
* This function is operated by using remote
3
1
7
6
control.
* This function only operates with DVDs featu ring multi-angle recordings.
* The mark on a DVD's package indic ates it features multi-angle scenes.
The number in the mark indicates the
number of angles from which scenes were shot.
* It is invalid to pressing ANGLE during fast
forward/fast reverse or pause.
Selecting Channel
During VCD status, repeatedly press
AUDIO button to select the following
channel:
Select the corresponding channel to set
the different sound characteristics.
*
7
ANGLE 3......
Notes:
the
3
3
6
Stereo
Mono Right
Note:
This function is operated by using the remote
control only.
Mono Left
Program Playing
During VCD mode, press PROG, the
TFT displays the program menu. Press
NUMBER BUTTONS to select the track
Number and then press to move the cursor
to START, press ENTER to start program
playing; move the cursor to EXIT and press
ENTER to exit the program playing. Move
the cursor to and press ENTER to the
previous page; move the cursor to and
press ENTER to the next page.
During this process, press to cancel
the program playing.
Note:
The function is only valid on remote control.
*
22
* Press CLEAR to clear the mistake input.
13
27
18
Playing PBC (Menu)
During VCD status, first press TITLE,
PBC playback starts and the menu of entire
disc appears on the monitor, and then you
can select your favorite track by using
Number Buttons. When a track is playing,
you can to return to
menu
if you would like to end the track and
select others. To cancel PBC playing, press
3
TITLE
button again.
Note:
This function is operated by using the remote
*
control.
PBC playing confirms to version 2.0 of VCD
*
and SVCD disc only.
4
press MENU the
3
23
16
25
Page 17
05
DVD/VCD/MP4
Main Menu
04
During VCD status, pressing OSD will
display the following:
Single elapsed
Display off
Total
remain
Single remain
Total
elapsed
During MP4 status, pressing OSD will
display the following:
Single
elapsed
Note:
* This function is operated by using the remote
control.
Single
remain
Display off
Setting the Playback Time
During DVD mode, press GOTO button
to set the playing time, when the TFT dis-
title
play : /chapter/audio/subtitle/angle
/title time/chapter time/repeat/time disp.
Press [ ][ ] to select the options, press
27
ENTER to set the status. Then press NUMBER BUTTONS or [ ][ ] to set
the current status.
During VCD mode, press GOTO button
to set the playing time, when the TFT dis-
track
play : /disc time/track time/repeat
/time disp. Press [ ][ ] to select the
options, press ENTER to set the status.
Then press NUMBER BUTTONS or
23
[ ][ ] to set the current status.
During MP4 playback, first press GOTO,
and monitor shows : ---, press your desired
track by using number buttons and press EN-
TER to set the status. Second press GOTO
button, and the monitor shows: -:--:--, input
your desired time, then press ENTER.
Note:
* This function is operated by using remote
control.
* Press CLEAR to clear the mistake input.
22
2
27
2
2
the
Changing audio language
(Multi-audio)
DVDs can provide audio playback with
different languages. With DVDs featuring
multi-audio recordings, you can press
6
AUDIO to switch between language and
audio systems during playback.
Selection options switch as follows:
AUDIO 1 AUDIO 2 AUDIO 3......
Note:
* This function is operated by using remote
control.
* This function only operates with DVDs fea turing multi-audio recordings.
* The number in the mark on a DVD's
package indicates the number of recorded
languages/audio systems.
2
the
Changing the subtitle language
(Multi-subtitle)
With DVDs featuring multi-language subtitle
recordings, you can press SUB-T to switch
between subtitle languages during playback.
Selection options switch as follows:
Subtitles 1
Note:
* This function is operated by using remote
control.
* The number in the mark on a DVD's
package indicates the number of recorded
subtitle languages.
Subtitles 2
5
......
Subtitles OFF
the
2
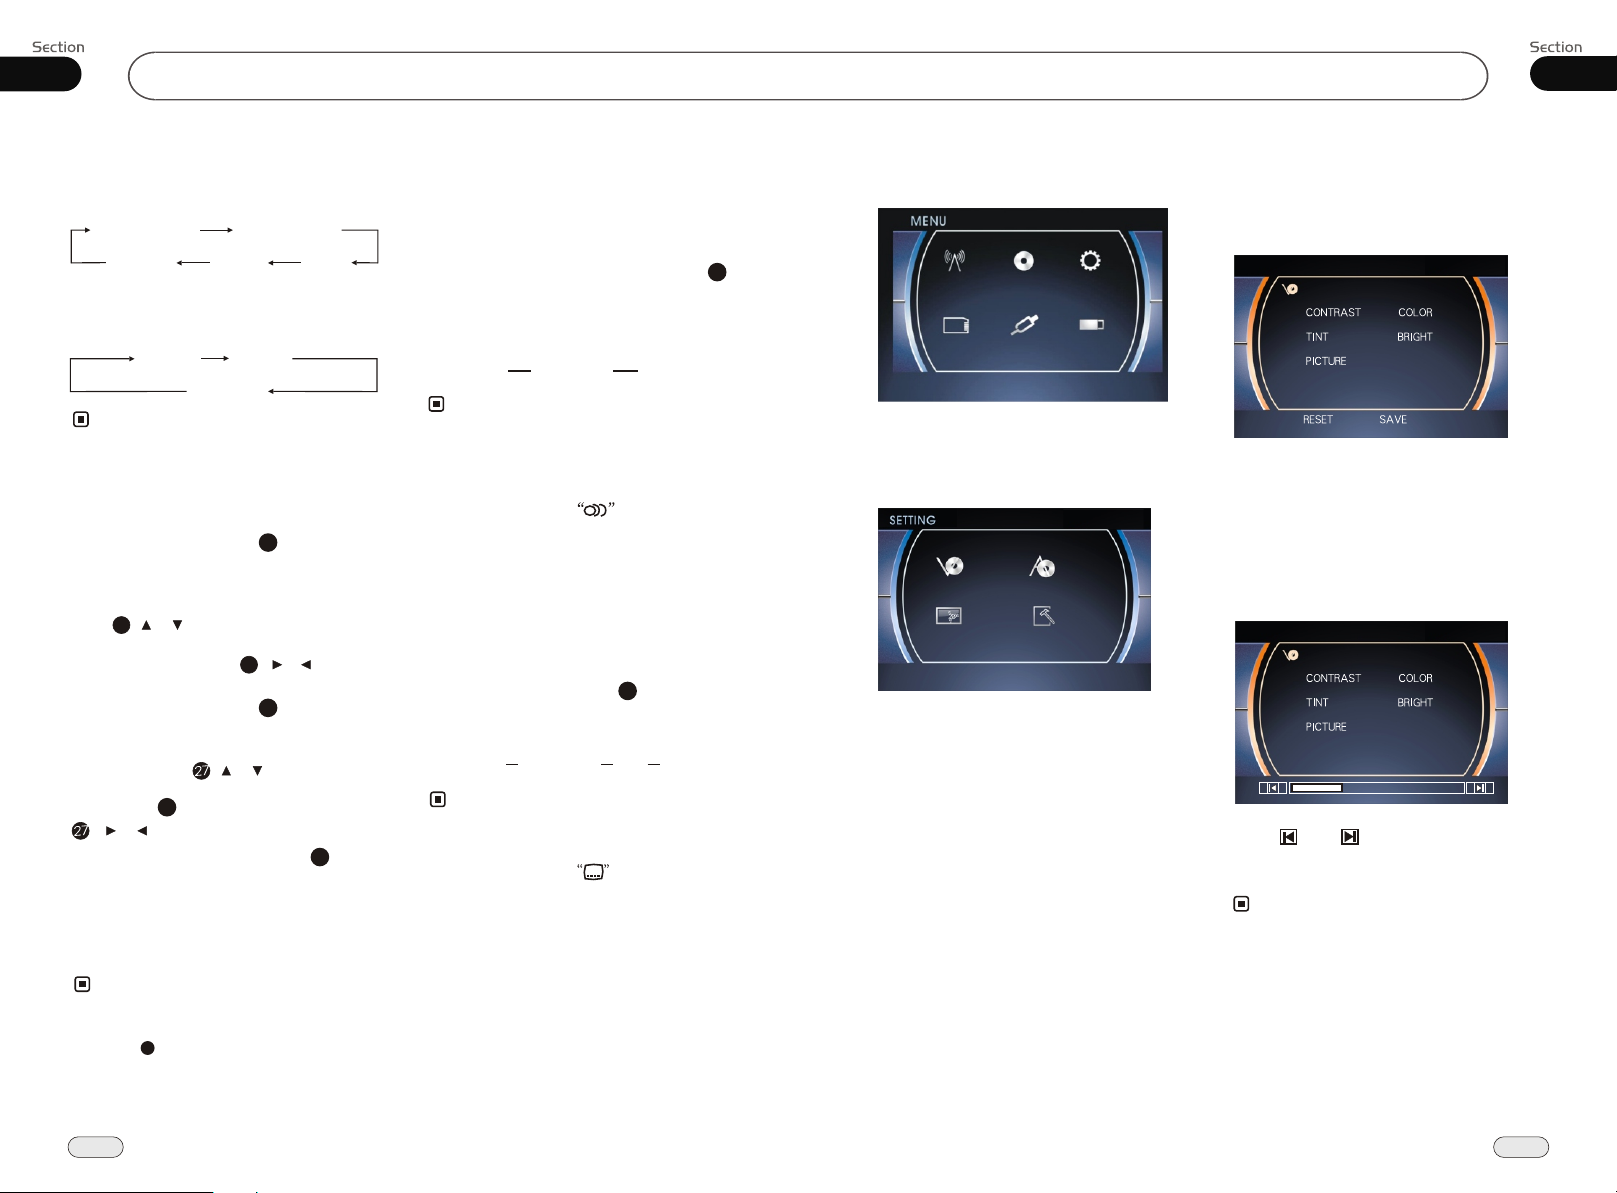
Set up Main Menu
RADIO DVD
SD
AUX
Press SET in the monitor or MENU on the
main unit, or hold and press SETUP on the
remote control to enter the menu as follows:
VIDEO
SOURCE
This menu includes AUDIO,
VIDEO,
SOURCE, SYSTEM, EXIT. Press them in
the monitor to set the desired status.
SET
USB
AUDIO
SYSTEM
EXIT
1.Video Adjust
After selecting VIDEO, the sub menu will
appear as follows:
EXIT
In this menu you can adjust CONTRAST,
COLOR, TINT, BRIGHT, PICTURE.
Picture Adjust
Press PICTURE in this menu, it will appear
as follows:
SHARP 20
Press and to adjust the size, then
press SAVE to save the setup, press EXIT
to exit this menu.
Note:
* Adjusting the other options perform the same
operation.
24
17
Page 18
04
Main MenuMain Menu
DVD/VCD/MP4
05
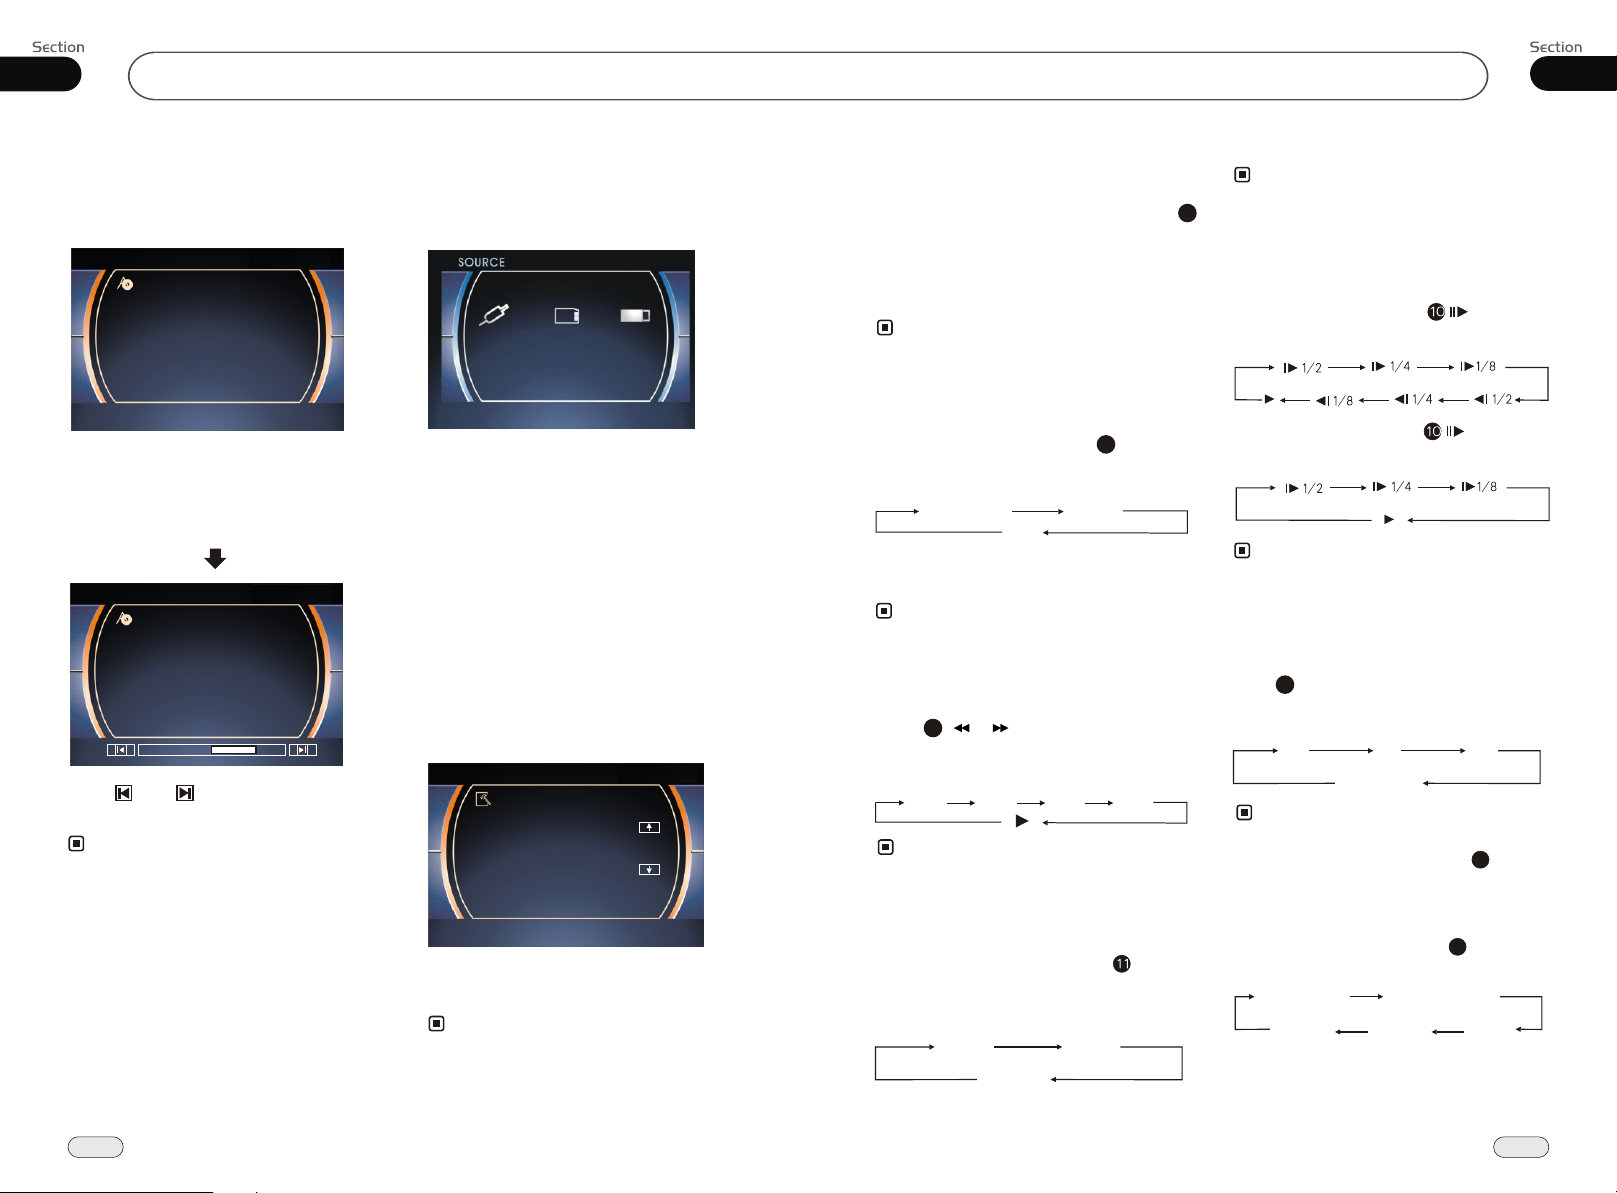
2.Audio Adjust
After selecting AUDIO, the sub menu will
appear as follows:
VOLUME
BALANCE
BASS
You can adjust VOLUME, SUBWOOF,
BALANCE, FAD, BASS, TREBLE. For
example, press FAD, the setting menu will
appear as follow:
VOLUME
BALANCE
BASS
Press and to adjust the desired FAD
level, press EXIT to exit this menu.
Note:
* Adjusting the other options perform the same
operation.
SUBWOOF
FAD
TREBLE
EXIT
SUBWOOF
FAD
TREBLE
FADE F4
3.Source Adjust
In the main menu, press SOURCE in the
monitor, the sub menu will appear as follows:
AUX ON SD ON
USB ON
You can adjust above items to ON or OFF,
press the corresponding button to set.
If one of them was set OFF, that function
is null. For example, to set the AUX OFF,
press SOURCE can not activate AUX function. But can not set the current playback
OFF.
If this function can not be set "ON", then this
model does not support that function.
4.System Adjust
After selecting SYSTEM, the sub menu will
appear as follows:
CLOCK SYS
KEY BEEP
MONI FLEX
Playing Tracks at Random
During DVD/VCD/MP4 playback,
RDM button on the remote control to play
any track at
which you select. P return to
random under the directory
ress it again to
normal playing.
Note:
* This function is operated by using the remote
control.
press
Repeat Playing
During DVD playback, press
the remote control to perform replay
function as followings:
Chapter
Off
During VCD/MP4 playback, press RPT
on the remote control to TRACK REPEAT.
Note:
* This function is only valid on remote control.
15
Title
RPT on
ing
Skip backward/forward/F.F
/REW the playback
20
Press ( or ) on remote control to
perform fast forward or rewind.
Each pressing will change as follow:
4X
Note:
* This function is only valid on remote control.
8 X
16X 2X
Note:
The function can be operated by selecting the
*
16
DVD MENU SETUP.
Slow motion playback
During DVD mode, press to play in
slow motion. The speeds are as follow:
During VCD mode, press to play in
slow motion. The speeds are as follow:
Note:
The function is only valid on remote control.
*
Increase the size of picture
The sizes are as follows, each time you
press ZOOM it will increase in size
9
until the maximum size is reached.
2X 3X 4X
No Change
Note:
The function is only valid on remote control.
*
To remove the image by pressing button.
*
27
EXIT
In this menu you can adjust CLOCK
SYSTEM, KEY BEEP and so on.
Note:
* If the item display in sky-blue, then it can not
be set up.
18
System Switch
During DVD/VCD mode, Press P/N on
remote control to set the TV standard to PAL
or NTSC or AUTO system.
AUTO
PAL
NTSC
On Screen Display
During DVD status, pressing OSD button
displays the following:
Title elapsed
Display off
Chapter
remaining
8
Title remaining
Chapter
elapsed
23
Page 19
05
DVD/VCD/MP4
Main Menu
04
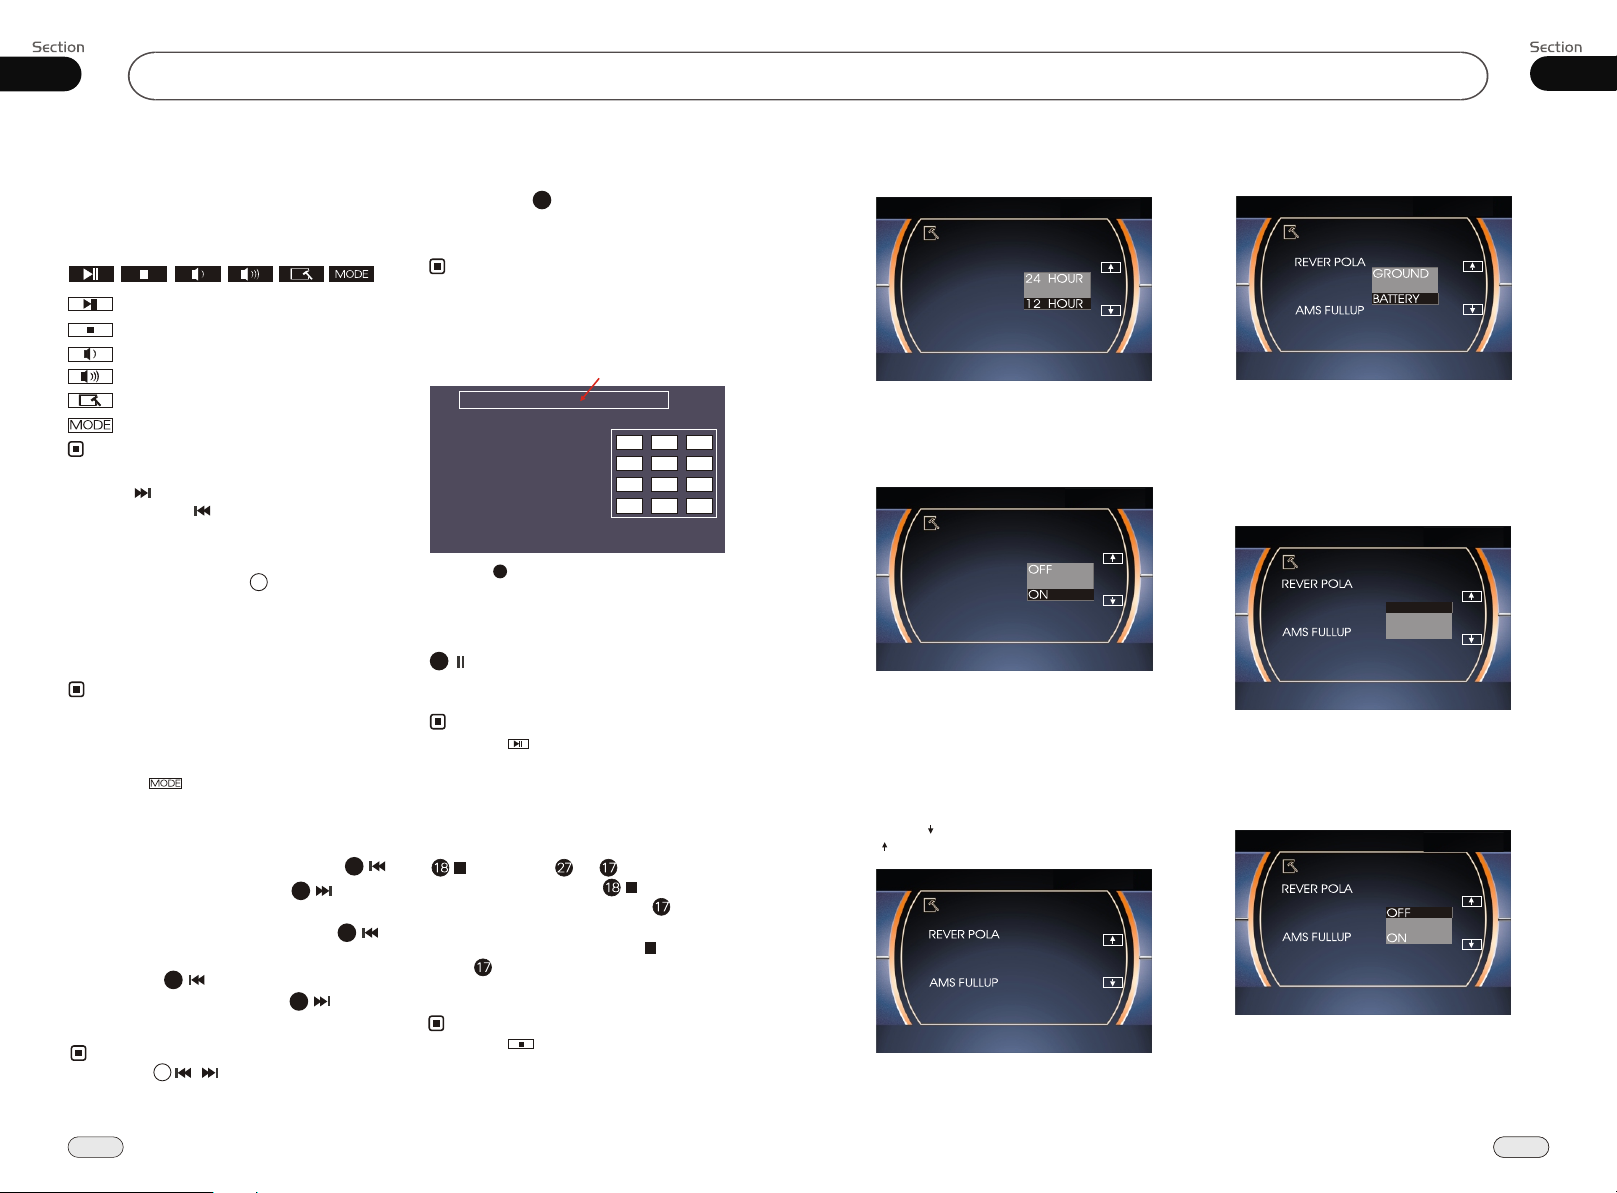
DVD/VCD/MP4 Setup
During DVD/VCD/MP4 playback, touching
the screen displays the following menu at
the bottom:
Play/pause
Stop
Decrease volume level
Increase volume level
DVD setup menu
Mode selector
Note:
* Press right corner repeatedly to play the next
track( shows), press left corner to play the
previous track( shows).
DVD/VCD/MP4 Play
Insert a disc into the slot , the unit will
automatically switch on, if a disc is loaded,
press SOURCE to start the playback. If the
unit is in other mode, press DVD to switch
to disc play.
Note:
Press SRC on the main unit to switch to DVD
*
mode. When SD card and USB were inserted
into, press this key again and again to switch
among USB, SD card and disc.
Pressing in the monitor perform the same
*
function.
14
Quickly Selecting Tracks
During DVD/MP4 playback, press
to play previous track, press to play
21
21
next track.
During VCD playback, first press
21
to return to the beginning of the current
track, press again within 3 seconds
to play previous track ,press to play
21
21
next track .
Note:
* Pressing / on the main unit or press
left/right twice continuously in the monitor
also perform the same function.
22
4
Number Buttons
Press one of Number Buttons(0~9)
23
to select a track, it will be played automatically.
Note:
Press this region and the screen shows the
*
following menu: number keys appears, touch
the number to select tracks.
Touch the " X " to exit this menu.
Track region
1
4
7 8
--
* Press CLEAR to clear the mistake input.
22
3
2
5
6
9
0
X
Pause the Playback
During DVD/VCD/MP4 playback, press
17
to switch between play and pause;
During stop mode, press this button to
resume playback mode.
Note:
* Pressing in the monitor performs the same
function.
Stop the playback
During DVD/VCD playback, first press
, then press or on the remote
control to replay; press twice to stop
playing completely, then press to return
to the beginning of the current track.
During MP4 playback, press first, then
press to return to the beginning of the
current track.
Note:
* Pressing in the monitor perform the same
function.
Clock System
CLOCK SYS
KEY BEEP
MONI FLEX
EXIT
Press CLOCK SYSTEM in the monitor to
set 12 HOUR or 24 HOUR in this menu.
Key Beep
CLOCK SYS
KEY BEEP
MONI FLEX
EXIT
In this menu you can adjust KEY BEEP,
press it in the monitor and select ON or OFF,
the default setting is ON, it means when you
press the keys, they will make a sound.
Next Setup
Press to display the following menu, press
to return the previous menu.
LAMP SEL
EXIT
Reverse Pola
LAMP SEL
EXIT
Setting REVERSE POLA in this menu.
The signal is +12V when you back a car,
please press BATTERY in the monitor; if
the signal is 0V, please press GROUND.
Lamp SEL
LAMP SEL
In this menu you can adjust LAMP SEL,
press it in the monitor and select ON or OFF,
the default setting is ON.
OFF
ON
EXIT
AMS Fullup
LAMP SEL
EXIT
Use this menu to set the different AMS
modes. When the stations are full, if the
setup is ON, it will not tune continually;
If you select OFF, it will search new station to replace the presettable one.
19
19
Page 20
04
Main Menu
Main Menu
04
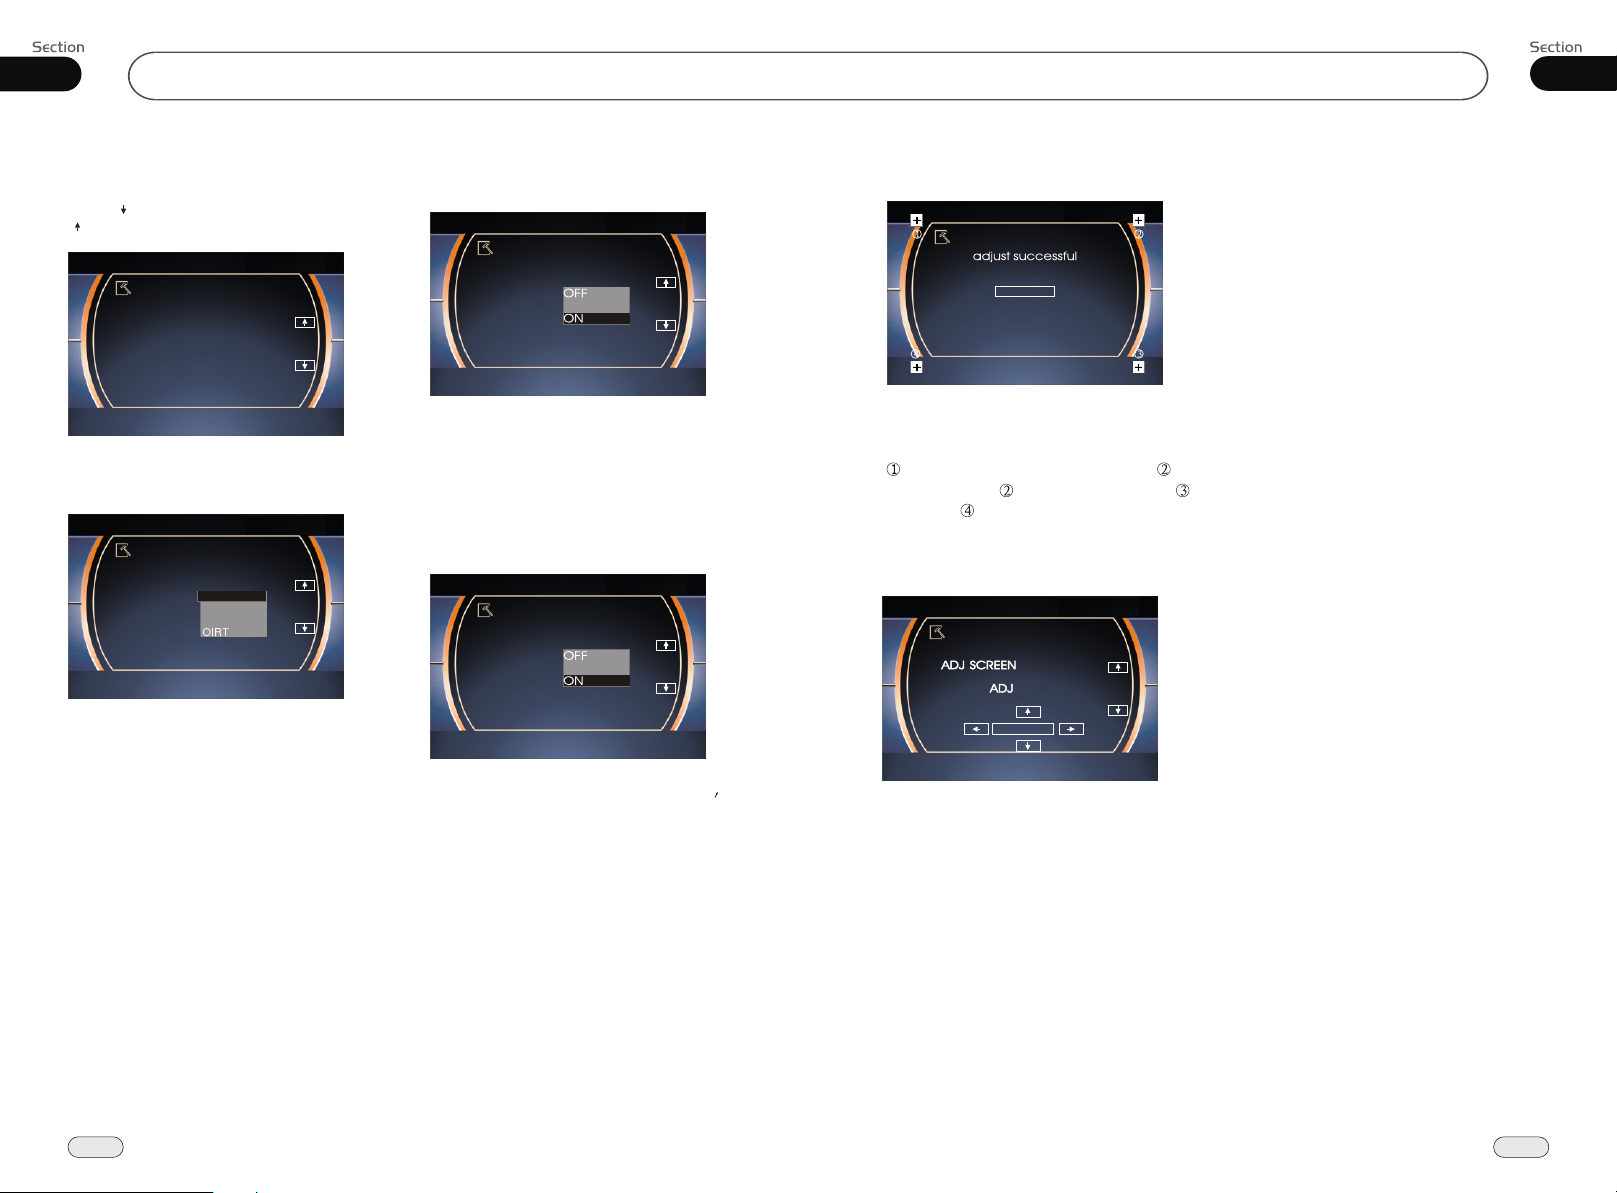
Next Setup
Press to display the following menu, press
to return the previous menu.
LOCAL AREA
LOCAL
GOTO FREQ
EXIT
Local Area
LOCAL AREA
LOCAL
GOTO FREQ
You can select EUROPE or USA or OIRT
to search the stations quickly by your
current area.
U.S.A
EUROPE
EXITEXIT
Local
LOCAL AREA
LOCAL
GOTO FREQ
EXIT
When LOCAL is set as ON, the local stations
with strong signals will be received. If it is
set to OFF, distant stations with weak
signals will also be received.
Goto FREQ
LOCAL AREA
LOCAL
GOTO FREQ
EXITEXIT
To select ON, you can using GOTO button
on the remote control to select a station s
frequency directly in radio mode.
Adjust Screen
ADJUST MENUADJUST MENU
SAVE
Press ADJ SCREEN to display the above
menu,there is a square button in the top
left corner . Press the square button at place
,then the button will move to place ,
press it at place , it will move to place ,
then place , press SAVE at last.
Clock Adjust
CLOCKCLOCK
00:00:00
EXIT
Press CLOCK ADJ in the monitor to
adjust the clock.
20
21
 Loading...