

Page 1
USER’S MANUAL
Microphone Windshield and Shock Mount
pat. pend.
MANUAL WINDPAC-2 29/04/05 10:23 Side 1
Page 2
3
CONTENTS
WINDPAC 4
WINDPAC Shock Mount 4
WINDPAC Windshield 6
RainCover 8
Specifications 9
Service & Repair 10
Warranty 10
USER’S MANUAL
Microphone Windshield and Shock Mount
pat. pend.
MANUAL WINDPAC-2 29/04/05 10:23 Side 2
Page 3
Damping adjustment
The shock mount is suspended on eight
rubber straps - four in the back (near the
ring) and four in the front. Depending
on the length and weight of the micro-
phone(s) chosen, the rubber straps can
be adjusted for optimal damping effect.
The four support pins on the holder
have three pegs each at the front and
the back. Placing the rubber straps in
different positions on the pegs will
adjust the damping effect accordingly.
As a general rule, the optimal damping
effect is reached when the micro-
phone(s) are relatively parallel to the
support pins.
Cable placement
The mono cable, supplied with the
WINDPAC, is a specially constructed,
thin lightweight, miniature XLR right-
angle cable with right-angle connector.
It has been designed for space saving
efficiency while minimizing mechanical
noise to maintain the function of the
shock mount.
First, mount the right-angle cable in the
molded opening at the base of the
shock mount ring. Then, plug the con-
nector in to the microphone. A Velcro
strap with rubber backing is found on
the output connector, to attach the
cable to the boom or stand, reducing
the risk of noise between these units.
54
WINDPAC
Ultra lightweight, multi-mic compatible, wind-resistant and collapsible the
DPA WINDPAC provides an optimal solution for location sound recording.
The two versions of WINDPAC include the following standard
components:
WINDPAC-L
Shock Mount
Windshield, Large
Mono cable
Belt Pouch
Rubber Suspension Kit
RainCover, Large
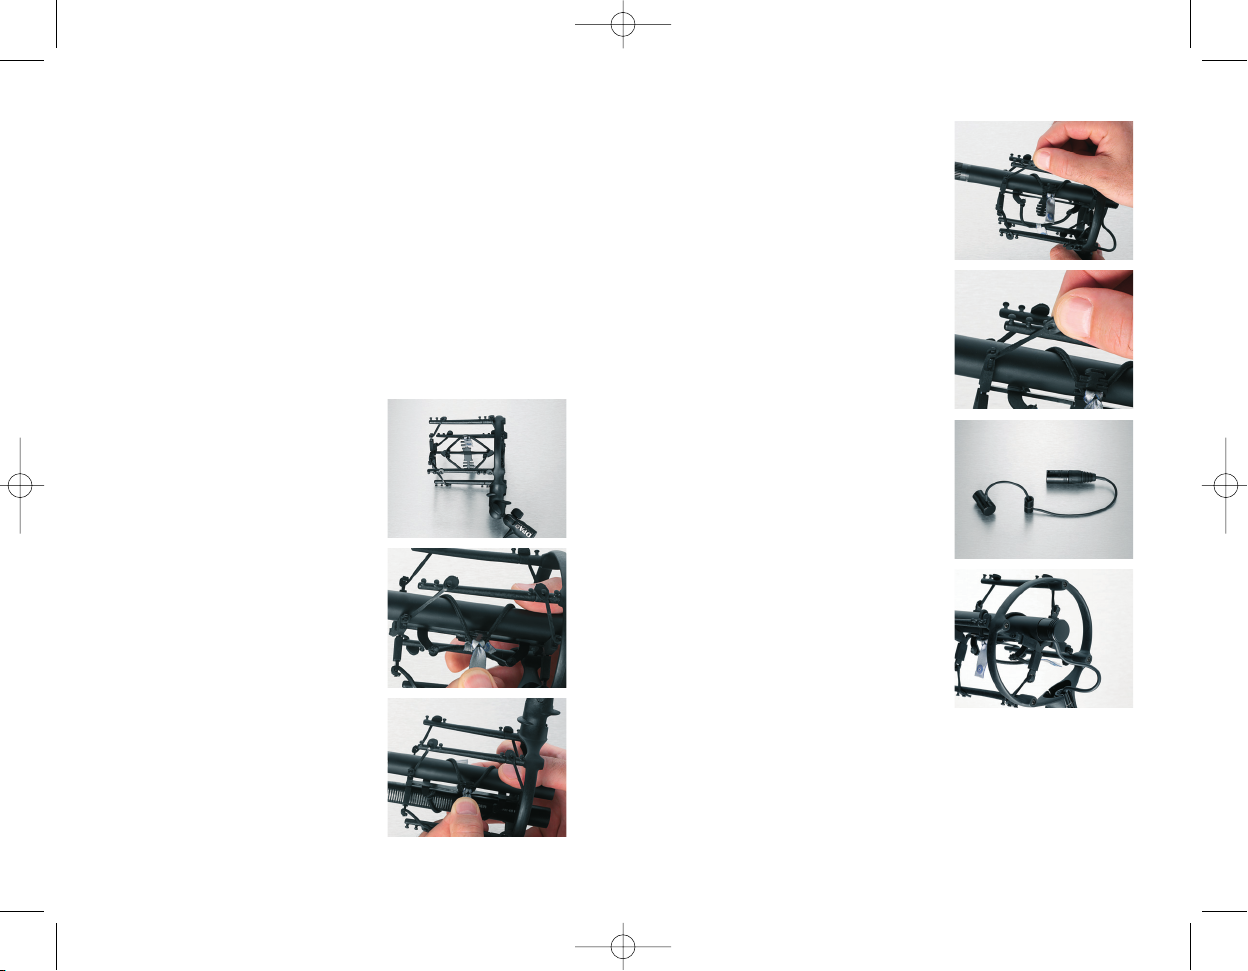
WINDPAC SHOCK MOUNT
The shock mount is a universal micro-
phone holder with adjustable rubber
straps to provide effective damping
characteristics.
Mounting microphones
To mount a microphone, simply place it
on the shock mount cradle and hold it in
place with your thumb. Meanwhile, with
the other hand, take the cloth band on
the elastic strap and stretch it across
the microphone body. Secure the elas-
tic strap in one of the notches on the
opposite side of the cradle, to best fit
your microphone.
A second microphone may be mounted
on the opposite side of the shock mount
by simply turning the unit upside down
and repeating the above procedure.
Note: The shock mount cradle can be
reversed to make the above mounting
procedure easy for both right- and lefthanded preferences. Simply dismantle
the eight rubber straps, remove the
cradle and replace it in reverse.
WINDPAC-M
Shock Mount
Windshield, Medium
Mono cable
Belt Pouch
Rubber Suspension Kit
RainCover, Medium
MANUAL WINDPAC-2 29/04/05 10:23 Side 4
Page 4

place after inser ting the shock
mount with microphone(s).
Inserting the shock mount
To place the shock mount in the wind-
shield, simply turn both locking pins to
the open position and pull open the rear
cover (See D). Insert the shock mount
in to the opening. The top of the shock
mount ring fits snugly in to the two
slots at the top of the back ring of
the windshield (See E). Close the
cover again and turn the locking pins
to the locked position. Finally, lock the
sides of the lid by simply snapping them
in to the side locks. (See F).
When not in use, the windshield is con-
veniently collapsible with an easy twist
and gentle push movement. Collapsed
and replaced in the belt pouch, the
windshield is easy to transport and
carry (See G).This sof t flexibility pro-
hibits the unit from being crushed or
broken. (See H).
7
Note: A specially designed right-angle
stereo cable (2 female XLR to male 5pin XLR) is available separately and
should be mounted in the same way,
connecting to the two microphones
instead of one. (See A).
If the stereo cable is mounted, but you
are using just one microphone, the
extra cable can be secured in the thin
notch on the holder. (See B).
Handle adjustment and use
The shock mount with microphone(s)
can be used as a separate “pistol grip”
recording device or it can be mounted
on a boom pole. The bottom of the
handle is fitted with a standard 3/8"
thread.
There are two tightening screws on
the handle for positioning the shock
mount at almost any angle - side to
side and front to back - even in the
most difficult booming situations.
(See C).
WINDSHIELD
The large windshield fits microphones
with lengths up to 41 cm (16.1 in) and the
medium windshield fits microphones wi th
lengths up to 30 cm (11.8 in).
The windshield is designed and con-
structed to avoid any risk of mechanical
noise from the unit itself. It consists of
a light stainless steel frame covered
with a finely meshed filter-like polyester
material. The material effectively shuts
out the wind while maintaining essen-
tially transparent acoustical properties.
The material is sewn on to the steel
frame in long seams to sustain a tight
fit. The rear cover is made with the
same material and snaps securely in to
6
A
B
C
D
E
F
H
G
MANUAL WINDPAC-2 29/04/05 10:23 Side 6
Page 5

SPECIFICATIONS
Windshield
Material: Polyester
Windshield, Large (for microphones up to 41 cm (16.1 in):
Length: 54 cm (21.3 in)
Weight: 175 g (6.2 oz)
Diameter: 21 cm (8.3 in)
Windshield, Medium (for microphones up to 30 cm (11.8 in):
Length: 39 cm (15.4 in)
Weight: 150 g (5.3 oz)
Diameter: 21 cm (8.3 in)
RainCover
Material: Polyester
RainCover, Large: Weight (dry): 43 g (1.5 oz)
RainCover, Medium: Weight (dry): 34 g (1.2 oz)
Shock Mount
Width: 11.5 cm (4.5 in)
Height: 20 cm (7.9 in)
Length: 11.5 cm (4.5 in)
Weight: 120 g (4.2 oz)
Accessories available for WINDPAC
DAO0141 WINDPAC cable, Mono-XLR
DAO0142 WINDPAC cable, Stereo - 2 x XLR
DAO0145 WINDPAC cable, Stereo - 5-pin
DAO0147 WINDPAC cable, Stereo - 7-pin
WWS4000-M WINDPAC Windshield, Medium
WWS4000-L WINDPAC Windshield, Large
DDS4000 Rubber Suspension Kit
WSM4000 WINDPAC Shock Mount
WBP4000 WINDPAC Belt pouch
WXP4000 WINDPAC Pouch
WRC4000-M WINDPAC RainCover, Medium
WRC4000-L WINDPAC RainCover, Large
9
RainCover
A RainCover is delivered with the WINDPAC Windshield System for
use when it is raining. The windshield itself is water resistant as it is
treated with a fine coating of protective chemical. However, for
extended rainy outdoor use the RainCover will protect the windshield
and the microphone.
The RainCover is made of a lightweight foam material which is easily
pulled over the windshield with an opening at the bottom for the
water to run out. It breaks the heavy rain drops and lets them run
through to the windshield, along its side and out through the opening
at the bottom of the RainCover. In addition, the RainCover absorbs
the sound of the drop. Because of the characteristics of the RainCover
it does not cause any significant distortion to the recorded sound.
When it is not required anymore, it is easy to wring the water from
the RainCover and hang it to dry.
The RainCover comes with the WINDPAC Windshield System and can
also be purchased separately.
Cleaning and care
If the windshield becomes soiled, it can be wiped clean with a damp
cloth and mild liquid soap.
If the RainCover becomes soiled, it may be machine-washed in warm
water. Extra protection can be taken by using a lingerie bag. To avoid
any possible build up of mold or mildew, ensure that the windshield
and RainCover are completely dry before storing.
8
MANUAL WINDPAC-2 29/04/05 10:23 Side 8
Page 6

SERVICE & REPAIR
Products from DPA Microphones are extremely stable, and there
should not be any significant change in the specifications with time
and use. If, however, you are not totally satisfied with the characteristics
exhibited by these products, contact your nearest DPA Microphones
representative for further details of service and t he repair facilities
that are available. Please contact DPA Microphones for your nearest
representative on:
TEL: + 45 48 14 28 28
FAX: + 45 48 14 27 00
You can also get in touch with DPA Microphones at:
info@dpamicrophones.com
or visit our websites at:
www.dpamicrophones.com
www.windpac.com
WARRANTY
All products from DPA Microphones are covered by a two-year limited
warranty on both mechanical functionality and documented specifi-
cations as long as the items are not mistreated, abused or modified
in any way. In case of a warranty claim your invoice is your warranty
registration.
10
© 2005, DPA Microphones A/S Product features and specifications are subject to change without notice.
MANUAL WINDPAC-2 29/04/05 10:23 Side 10
Page 7

DPA Microphones A/S
Gydevang 42-44
DK-3450 Alleroed, Denmark
Tel: +45 4814 2828
Fax: +45 4814 2700
info@dpamicrophones.com
www.dpamicrophones.com
www.windpac.com
DPIWINDPAC-2
MANUAL WINDPAC-2 29/04/05 10:23 Side 12
 Loading...