

Page 1

DOUGH SHEETER
DL12S & DL18S
IMPORTANT SAFETY INSTRUCTIONS
SAVE THESE INSTRUCTIONS
TABLE OF CONTENTS
SECTION « A » DESCRIPTION PAGE
Introduction. . . . . . . . . . . . . . . . . . . . . . . . . . . . . . . . . . . . . . . . . . . . . . . . . A1
Shipping . . . . . . . . . . . . . . . . . . . . . . . . . . . . . . . . . . . . . . . . . . . . . . . . . . . A2
Warnings . . . . . . . . . . . . . . . . . . . . . . . . . . . . . . . . . . . . . . . . . . . . . . . . . . . A3
Operation . . . . . . . . . . . . . . . . . . . . . . . . . . . . . . . . . . . . . . . . . . . . . . . . . . . A4
Maintenance and cleaning . . . . . . . . . . . . . . . . . . . . . . . . . . . . . . . . . . . . . . A4
Foot Pedal . . . . . . . . . . . . . . . . . . . . . . . . . . . . . . . . . . . . . . . . . . . . . . . . . . A5
For more information, please call our office: . . . . . . . . . . . . . . . . . . . . . . . A6
SECTION « B » DIMENSIONS
DL12S 3D DRAWING . . . . . . . . . . . . . . . . . . . . . . . . . . . . . . . . . . . . . . . B1
DL12S FRONT & SIDE . . . . . . . . . . . . . . . . . . . . . . . . . . . . . . . . . . . . . . B2
DL18S 3D DRAWING . . . . . . . . . . . . . . . . . . . . . . . . . . . . . . . . . . . . . . . B3
DL18S- FRONT & SIDE . . . . . . . . . . . . . . . . . . . . . . . . . . . . . . . . . . . . . B4
SECTION « E » COMPONENT PARTS
DL12S- COMPONENT PARTS . . . . . . . . . . . . . . . . . . . . . . . . . . . . . . . E1
DL18S- COMPONENT PARTS . . . . . . . . . . . . . . . . . . . . . . . . . . . . . . . E3
Warranty . . . . . . . . . . . . . . . . . . . . . . . . . . . . . . . . . . . . . . . . . . . . . . . . . . .
DL12S&DL18S-A.DOC Rev. 05/2007
Page 2

A1
CAUTION
READ ALL INSTRUCTIONS
INTRODUCTION
This dough sheeter is manufactured with first quality material by experienced technicians. Proper
installation and maintenance will guarantee a reliable service for years to come.
A nameplate specifies the model number, serial number, voltage, amperage, frequency and
manufacturing date.
Drawings, electrical diagram and replacement part numbers are included in this manual.
WARNING
DOYON is not responsible for damages to the property or the equipment caused
by personnel who is not certified by known organisations.
Page 3

A2
SHIPPING
For your safety, this equipment has been verified by qualified technicians and carefully crated before
shipment. The freight company assumes full responsibility concerning the delivery in good condition
of the equipment in accepting to transport it.
IMPORTANT
RECEPTION OF THE MERCHANDISE
Take care to verify that the received equipment is not damaged before signing the delivery receipt. If
a damage or a lost part is noticed, write it clearly on the receipt. If it is noticed after the carrier has
left, contact immediately the freight company in order for them to their inspection.
We do not assume the responsibility for damages or losses that may occur during transportation.
IN GENERAL
Take off the packaging material with care. Take off all the material used for packing and
accessories.
This equipment can be plugged on any network offering a protection of 15 amps.
INSTALLATION WARNINGS
INSTALLATION AND SERVICE
The dough sheeter must be connected to the utility and electrically grounded in conformity to the
effective local regulations. If these are not established, the dough sheeter must be connected
according to the National Electrical Code (NFPA 70-XX). This equipment has a male plug that
meets those requirements.
Page 4

A3
IMPORTANT SAFEGUARDS
Read all instructions.
To protect against electrical shock, do not immerse cord, plugs, portable appliance in water or
other liquids.
Remove plug from the outlet when the appliance is not in use, before putting on or taking off
parts, and before cleaning.
Do not use outdoors.
Do not let cord hang over edge of table or counter or touch hot surfaces.
Do not operate any appliance with a damaged cord or plug or after the appliance malfunctions
or is dropped or damaged in any manner. Return appliance to the nearest authorized service
facility for examination, repair or electrical or mechanical adjustment.
The use of accessory attachments not recommended by the appliance manufacturer may cause
injuries.
Do not place on or near a hot gas or electric burner or in a heated oven.
Always check if the control switch is OFF before plugging cord into wall outlet. To disconnect,
turn the control switch to OFF, then remove plug from wall outlet.
Do not use appliance for other than intended use.
Avoid contacting moving parts.
Save these instructions.
Page 5

A4
DL12S OPERATION
1 Press the green button to start the machine. (A pilot light will light up when the machine is on.)
2 Adjust the opening of the roller to obtain the desired dough thickness.
3 Put some flour in the chute and on the rollers to prevent the dough from sticking on the rollers.
4 Flatten the dough ball with your hands before.
5 Cover the dough with flour.
6 Put the dough in the chute.
7 When the dough comes out of the rollers, finish it manually at desired size, or do a second pass
in the roller to have a round shape if needed.
8 To stop the machine, press the red button.
DL18S OPERATION
1 Press the green button to start the machine. (A pilot light will light up when the machine is on.)
2 Adjust the opening of the roller to obtain the desired dough thickness.
3 Put some flour in the chute and on the rollers to prevent the dough from sticking on the rollers.
4 Flatten the dough ball with the hands before.
5 Cover the dough with flour.
6 Put the dough in the chute.
7 When the dough comes out of the first set of rollers, guide the dough with your hand to the second
set of rollers to obtain a round shape when the dough comes out of the second set of rollers.
8 When the dough comes out, finish it manually at desired size, if needed.
9 To stop the machine press the red button.
WARNING
Never remove the safety guard on the machine. Never try to push or remove the dough from
the rollers with your hands. Always turn off the power on the machine before cleaning or
trying to take out some dough.
MAINTENANCE AND CLEANING
Remove the plastic security cover on the rollers to clean the rollers.
Clean the machine with a brush or a vacuum to take out the excess flour. Remove stain with soap
and water.
Page 6
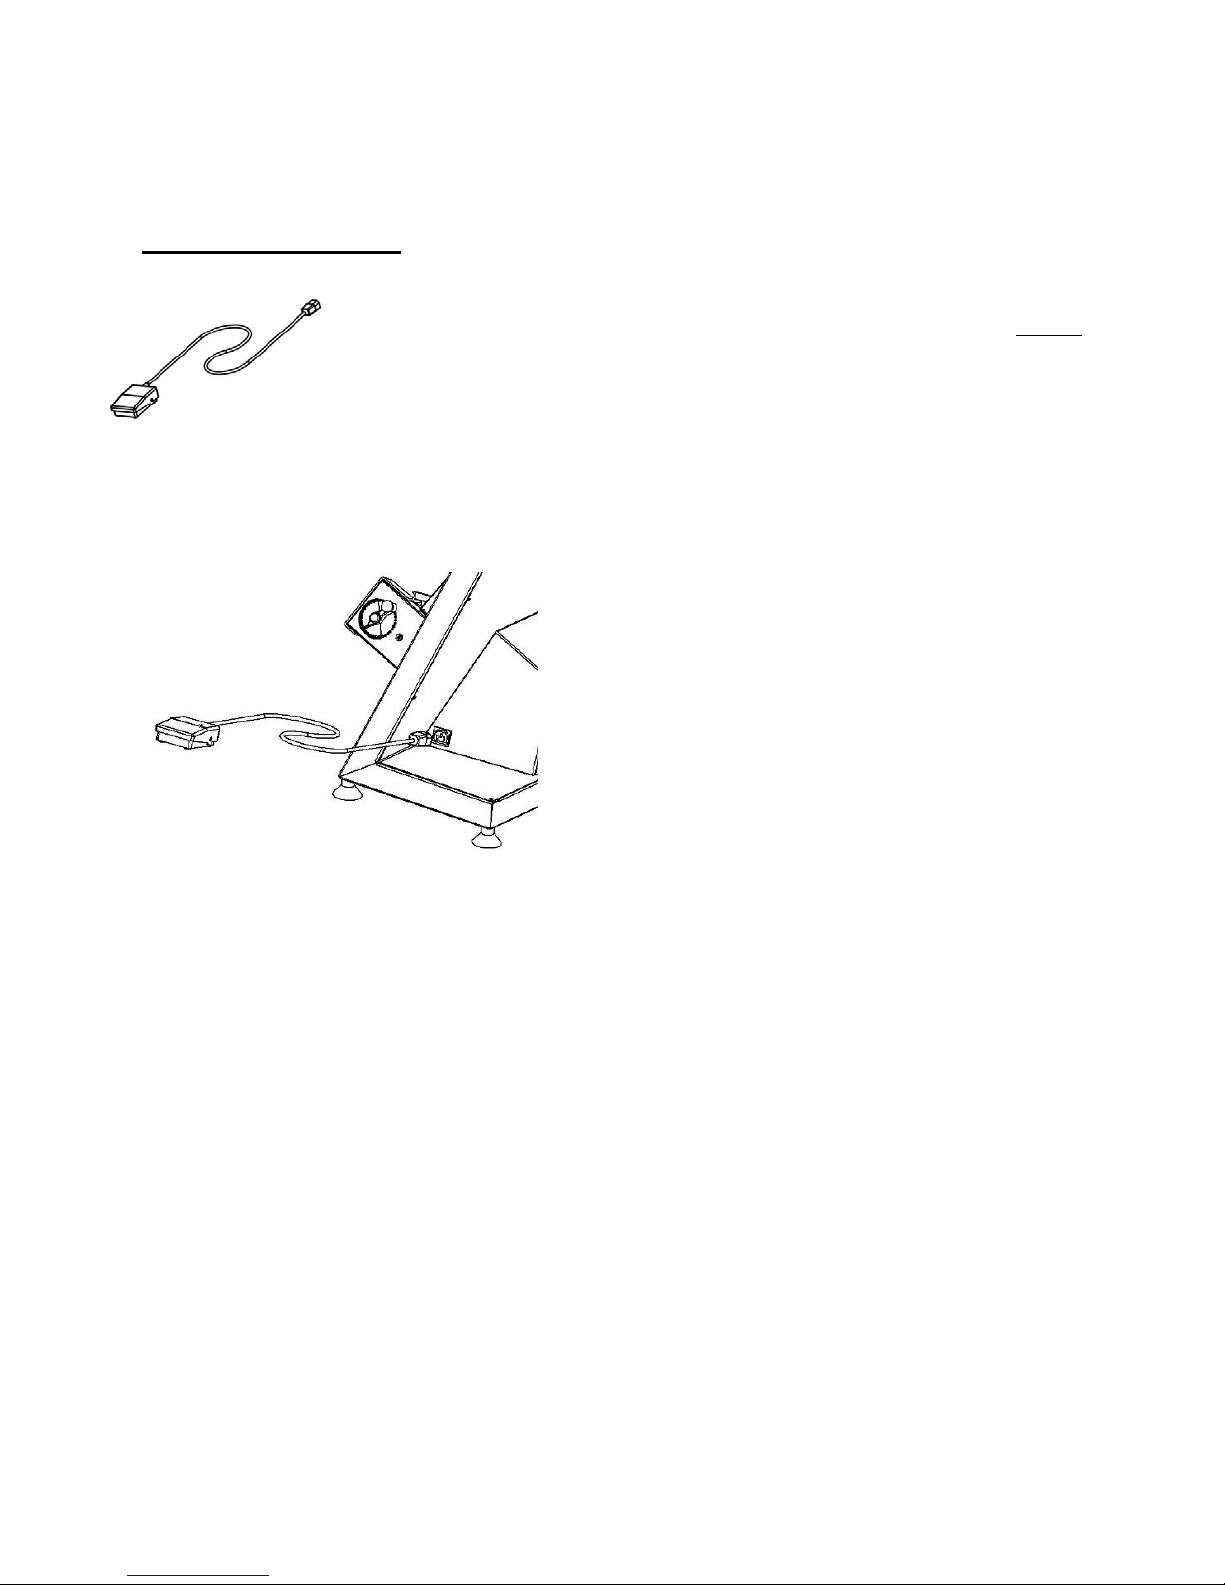
FOOT PEDAL ( optional)
The pedal connects by a special non-invertible tri-polar connector to the
electric/electronic circuit (low voltage) of the rolling machine.
After connecting the pedal control to the rolling machine, it is always
necessary to press the green start button to confirm the operation. The
machine is now ready and when the pedal is pressed one gives the start
command to release the stop. The socket next to the machine has been
positioned to protect it from blows; disconnection of the plug from the
socket during operation will cause the machine to stop.
A5
Page 7

A6
FOR MORE INFORMATION,
PLEASE CONTACT OUR OFFICE:
DOYON EQUIPMENT INC.
1255, rue Principale
Linière, Qc, Canada G0M 1J0
Tel. : 1 (418) 685-3431
Canada : 1 (800) 463-1636
U.S. : 1 (800) 463-4273
FAX : 1 (418) 685-3948
Internet: http://www.doyon.qc.ca
E-Mail : doyon@doyon.qc.ca
Page 8

SECTION
B
DIMENSIONS
Page 9

B1
DL12S
G:\ACAD10\DL12\DL12S.dft
Page 10

15
B2
DL12S
16 7/8
13
12 1/8
18 1/8
17 5/8
G:\ACAD10\DL12\DL12S.dft
Page 11

B3
DL18S
G:\ACAD10\DL18\DL18S.dft
Page 12

B4
DL18S
13 1/2
17 3/8
20 1/2
29 5/8
26 1/4
21 1/4
G:\ACAD10\DL18\DL18S.dft
Page 13

SECTION
E
COMPONENT PARTS
Page 14

E1
DL12S
Page 15

E2
DL12S
No. CODE DESCRIPTION QTY
1 PC/10-0011-1 ROLLER ASSEMBLY 1
2 PC/10-0118 FRAME BODY 1
3 PC/10-0030 TOP MOTOR SUPPORT 1
4 PC/10-0120-2 STAINLESS STEEL CHUTE 1
5 PC/10-0390 BACK LID 1
6 PC/10-0157 DRIVING BELT 1
7 PC/10-0046 RUBBER LEGS 4
8 PC/10-0045 USA CAPACITOR 16 uF 250VOLTS 1
OR PC/10-0045 CAPACITOR 8 uF 400VOLTS 1
9 PC/10-0073-N MOTOR 120 VOLTS 60 HZ 1
OR PC/10-0073-M MOTOR 240 VOLTS 50 HZ 1
10 MP/100113/USA 120 VOLTS 60Hz POWER SWITCH 1
OR MP/100113 240 VOLTS 50Hz POWER SWITCH 1
11 PC/10-0310 CAUTION BEFORE CLEANING 1
12 PC/10-0213-3 PLASTIC PROTECTOR 1
13 PC/10-0041 BOTTOM MOTOR SUPPORT 1
Page 16

E3
ROLLER DL12S
Page 17

E4
ROLLER DL12S
No. CODE DESCRIPTION QTY
1 PC/10-0013 ROLLER HOLDER 1
2 PC/10-0052-2 BACK ROLLER SCRAPER SPRING SX 1
AND PC/10-0052-1 FRONT ROLLER SCRAPER SPRING DX 1
3 PC/10-0020-I ROLLER GEAR BOX 1
4 PC/10-0024 ECCENTRIC 1
5 PC/10-0024-1 FRONT ROLLER COUPLING 1
6 PC/10-0018 BACK ROLLER INSIDE SHAFT 1
7 PC/10-0019 FRONT ROLLER INSIDE SHAFT 1
8 PC/10-0035 BACK ROLLER DL12S 1
9 PC/10-0036 FRONT ROLLER DL12S 1
10 PC/10-0026 FRONT ROLLER SCRAPER DL12S 1
11 PC/10-0025 BACK ROLLER SCRAPER DL12S 1
12 PC/10-0040 PULLEY 1
13 PC/10-0022-1 ROLLER OPENING ADJUSTMENT LEVER 1
Page 18

E5
DL18S
Page 19

E6
DL18S
No. CODE DESCRIPTION QTY
1 MP/100112 CLEAR RUBBER POWER SWITCH COVER 2
2 PC/10-0011-2 BOTTOM ROLLER ASSEMBLY 1
3 PC/10-0012-2 TOP ROLLER ASSEMBLY 1
4 PC/10-0074 FRAME BODY 1
5 PC/10-0082 CENTER DOUGH SLIDER 1
6 PC/10-0083-1 TOP DOUGH SLIDER 1
7 PC/10-0076-1 BACK LID 1
8 PC/10-0072 BOTTOM ROLLER PLASTIC COVER 1
9 PC/10-0071 TOP ROLLER PLASTIC COVER 1
10 PC/10-0090 DRIVING BELT 1
11 PC/10-0030 TOP MOTOR SUPPORT 1
12 MP/100111 GREEN START BUTTON 1
13 MP/100110 RED STOP BUTTON 1
14 PC/10-0046 FOOT PEDAL SWITCH OUTLET 1
15 PC/10-0046 RUBBER LEGS 4
16 PC/10-0310 CAUTION BEFORE CLEANING 2
17 PC/10-0385 CONTROL BOARD 120 Volts 60Hz 1
OR PC/10-0380 CONTROL BOARD 240 Volts 50Hz 1
18 PC/10-0073-N MOTOR 120 Volts 60Hz 1
OR PC/10-0073-M MOTOR 240 Volts 50Hz 1
19 PC/10-0045-USA CAPACITOR 16 Uf 250 volts for 120 volts motor 1
OR PC/10-0045 CAPACITOR 8 Uf 400 volts for 240 volts motor 1
20 PC/10-0079 BOTTOM MOTOR SUPPORT 1
Page 20

E7
SUPERIOR ROLLER DL18S
Page 21

E8
SUPERIOR ROLLER DL18S
No. CODE DESCRIPTION QTÉ
1 PC/10-0020-S DL18S SUPERIOR ROLLER GEAR BOX 1
2 PC/10-0014 DL18S SUPERIOR ROLLER HOLDER 1
3 PC/10-0024 ECCENTRIC 1
4 PC/10-0024-1 SUPERIOR ECCENTRIC SHAFT COUPLING 1
5 PC/10-0022-1 ROLLER OPENING ADJUSTMENT LEVER 1
6 PC/10-0040 PULLEY 1
7 PC/10-0066 SUPERIOR ROLLER INSIDE SHAFT DL18S 1
8 PC/10-0064 SUPERIOR ECCENTRIC INSIDE SHAFT DL18S 1
9 PC/10-0068 SUPERIOR FRONT ROLLER DL18S 1
10 PC/10-0067 SUPERIOR BACK ROLLER 1
Page 22

E9
INFERIOR ROLLER DL18S
Page 23

E10
INFERIOR ROLLER DL18S
No. CODE DESCRIPTION QTY
1 PC/10-0013 INFERIOR ROLLER HOLDER 1
2 PC/10-0052-2 INFERIOR BACK ROLLER SCRAPER SPRING 1
AND PC/10-0052-1 INFERIOR FRONT ROLLER SCRAPER SPRING 1
3 PC/10-0020-I ROLLER GEAR BOX 1
4 PC/10-0024 ECCENTRIC 1
5 PC/10-0024-1 INFERIOR ECCENTRIC SHAFT COUPLING 1
6 PC/10-0065 INFERIOR BACK ROLLER INSIDE SHAFT DL18S 1
7 PC/10-0063 INFERIOR ECCENTRIC INSIDE SHAFT DL18S 1
8 PC/10-0069 INFERIOR BACK ROLLER DL18S 1
9 PC/10-0070 INFERIOR FRONT ROLLER DL18S 1
10 PC/10-0081 INFERIOR FRONT ROLLER SCRAPER DL18S 1
11 PC/10-0080 INFERIOR BACK ROLLER SCRAPER DL18S 1
12 PC/10-0040 PULLEY 1
13 PC/10-0022-1 ROLLER OPENING ADJUSTMENT LEVER 1
Page 24

LIMITED WARRANTY
(Continental United States Of America And Canada only)
Doyon Equipment Inc. guarantees to the original purchaser only that its product
are free of defects in material and workmanship, under normal use.
This warranty does not cover any light bulbs, thermostat calibration or defects due
to or resulting from handling, abuse, misuse, nor shall it extend to any unit from
which the serial number has been removed or altered, or modifications made by
unauthorized service personnel or damage by flood, fire or other acts of God. Nor
will this warranty apply as regards to the immersion element damaged by hard
water.
The extent of the manufacturer’s obligation under this warranty shall be limited to
the replacement or repair of defective parts within the warranty period. The
decision of the acceptance of the warranty will be made by Doyon Equipment
service department, which decision will be final.
The purchaser is responsible for having the equipment properly installed, operated
under normal conditions with proper supervision and to perform periodic
preventive maintenance.
If any parts are proven defective during the period of one year from date of
purchase, Doyon Equipment Inc. hereby guarantees to replace, without charge,
F.O.B. Linière, Quebec, Canada, such part or parts.
Doyon Equipment Inc will pay the reasonable labor charges in connection with
the replacement parts occurring within one year from purchase date. Travel over
50 miles, holiday or overtime charges are not covered. After one year from
purchase date, all labor and transportation charges in connection with replacement
parts will be the purchaser’s responsibility.
Doyon Equipment Inc. does hereby exclude and shall not be liable to purchaser
for any consequential or incidental damages including, but not limited to, damages
to property, damages for loss of use, loss of time, loss of profits or income,
resulting from any breach or warranty.
In no case, shall this warranty apply outside Canada and continental United States
unless the purchaser has a written agreement from Doyon Equipment Inc.
 Loading...