

Page 1
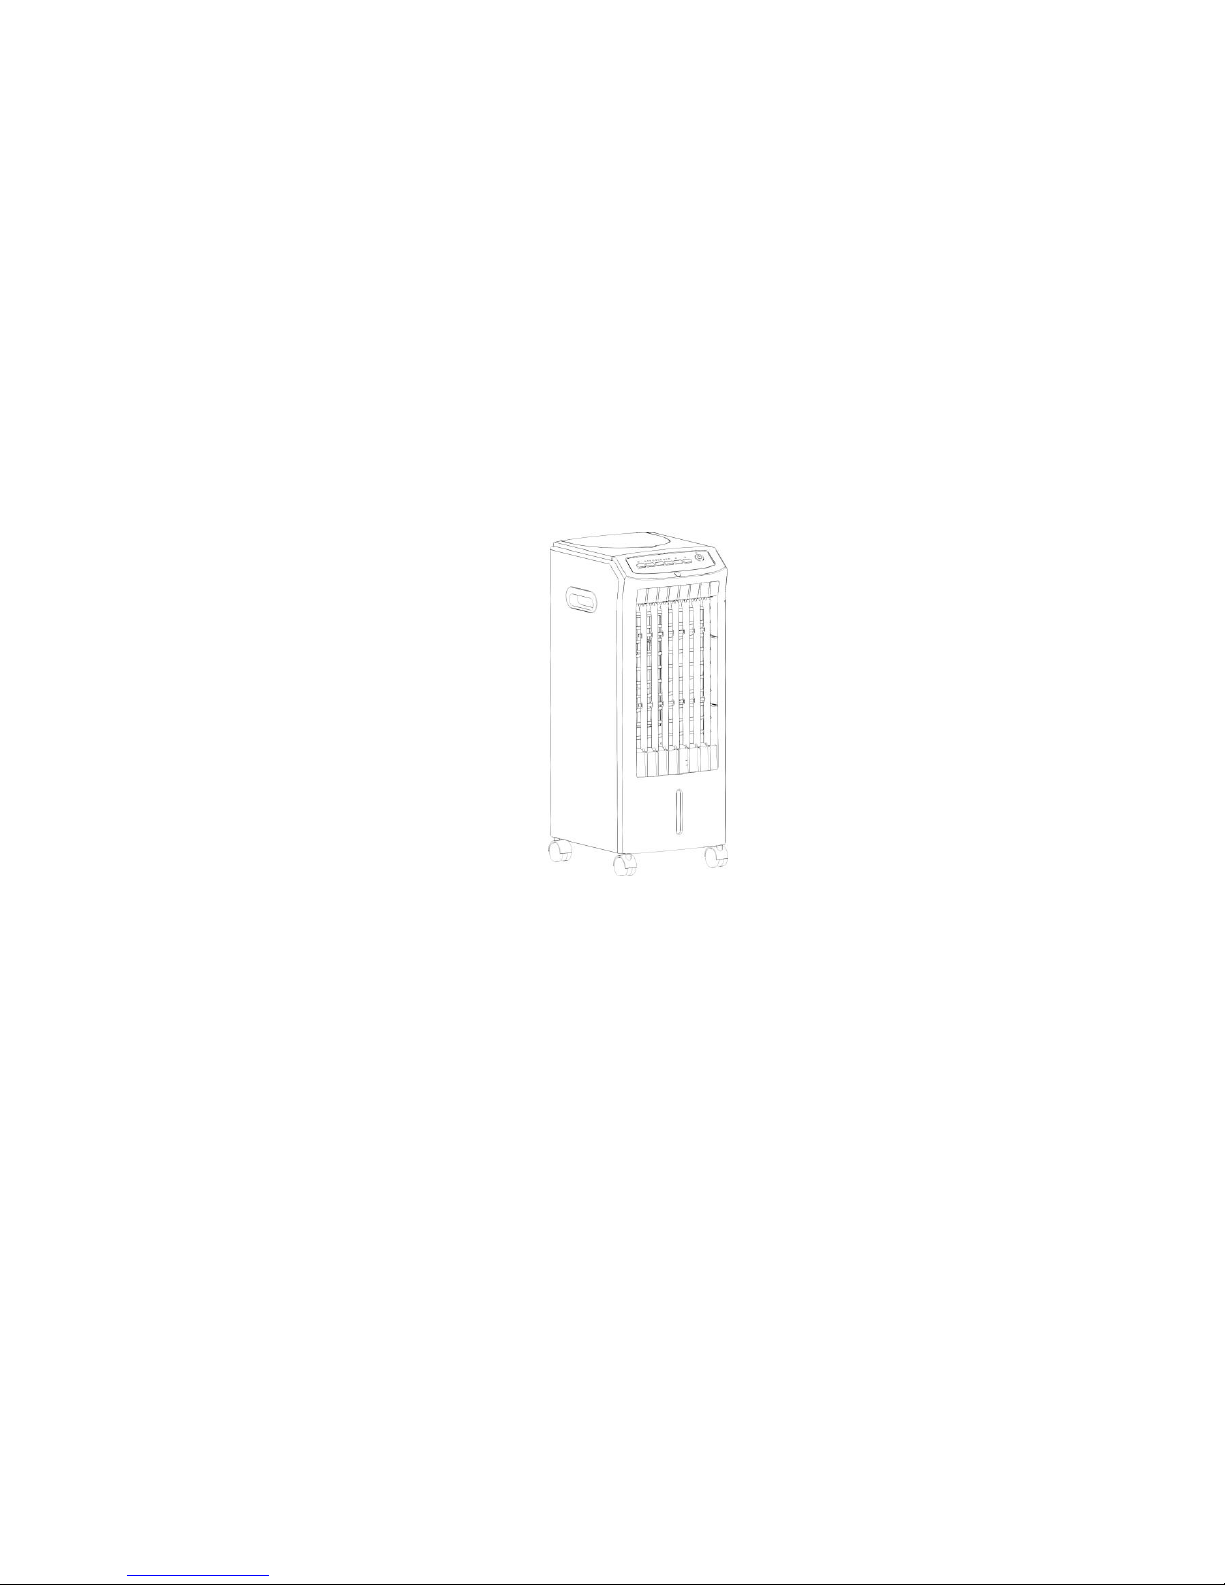
AIR COOLER
OPERATING INSTRUCTIONS
MODEL NO: ARC-30
ARC-30
Instruction Manual
Important safety instructions: read carefully and keep for future reference.
IMPORTANT SAFEGUARDS
When using an electrical appliance, basic safety precautions should always be observed,
including the following:
Page 2

READ ALL INSTRUCTIONS BEFORE USING
WARNING: To reduce the risk of fire, electrical shock, or injury to person:
1. The product is for household use only.
2. Connect the appliance to single-phase AC supply of the voltage specified on the rating
label.
3. Always turn the product to the OFF position and unplug it from the electrical outlet when
not in use.
4. Extreme caution is necessary when the appliance is used by or near children, invalids or
elderly person.
5. Do not run cord under carpeting and do not cover cord with throw rugs, runners or the
like. Arrange cord away from traffic area and where it will not be tripped over.
6. Do not operate the appliance with a damaged cord or plug, or after the unit malfunctions,
has been dropped, or damaged in any manner.
7. If the supply cord is damaged, it must be replaced by the manufacturer or its service
agent or a similarly qualified person to avoid a hazard.
8. Use the appliance in a well-ventilated area. While using, distance of no less than 20cm
should be kept away from wall or corner to ensure the air intakes or exhaust openings
should not be blocked unexpectedly. The unit must not be located immediately below or
besides a curtain or the likes.
9. Do not insert or allow fingers or any other objects into grill to avoid a mechanical danger
when in use. Do not block air intakes or exhaust openings in any manner.
10. Adequate clean water should be put into the tank within the water level limits as shown
by the water level indicator. Make sure that you DO NOT add water whilst the power is on.
11. If you want to move the product whilst water is in the tank, unplug it and push it slowly
and very lightly on the side of the unit to avoid water spillage. The best method would be to
drain the unit using the valve at the bottom of the unit.
12. Please keep the ice crystals box provided away from children, as it is a chemical based
substance that is harmful if swallowed. Also make sure that the ice pack is not placed in
direct sunshine. The ice crystal can be used over 5 years. When scrapping the appliance,
follow the regulations concerning the disposal of ice crystals.
13. Use the appliance on flat, dry floor only.
14. This appliance is not intended for use by persons (including children) with reduced
physical, sensory or mental capabilities, or lack of experience and knowledge, unless they
have been given supervision or instruction concerning use of the appliance by a person
responsible for their safety.
15. Children should be supervised to ensure that they do not play with the appliance.
FOR HOUSEHOLD USE ONLY SAVE THESE INSTRUCTIONS
Page 3
O
SPECIFICATIONS
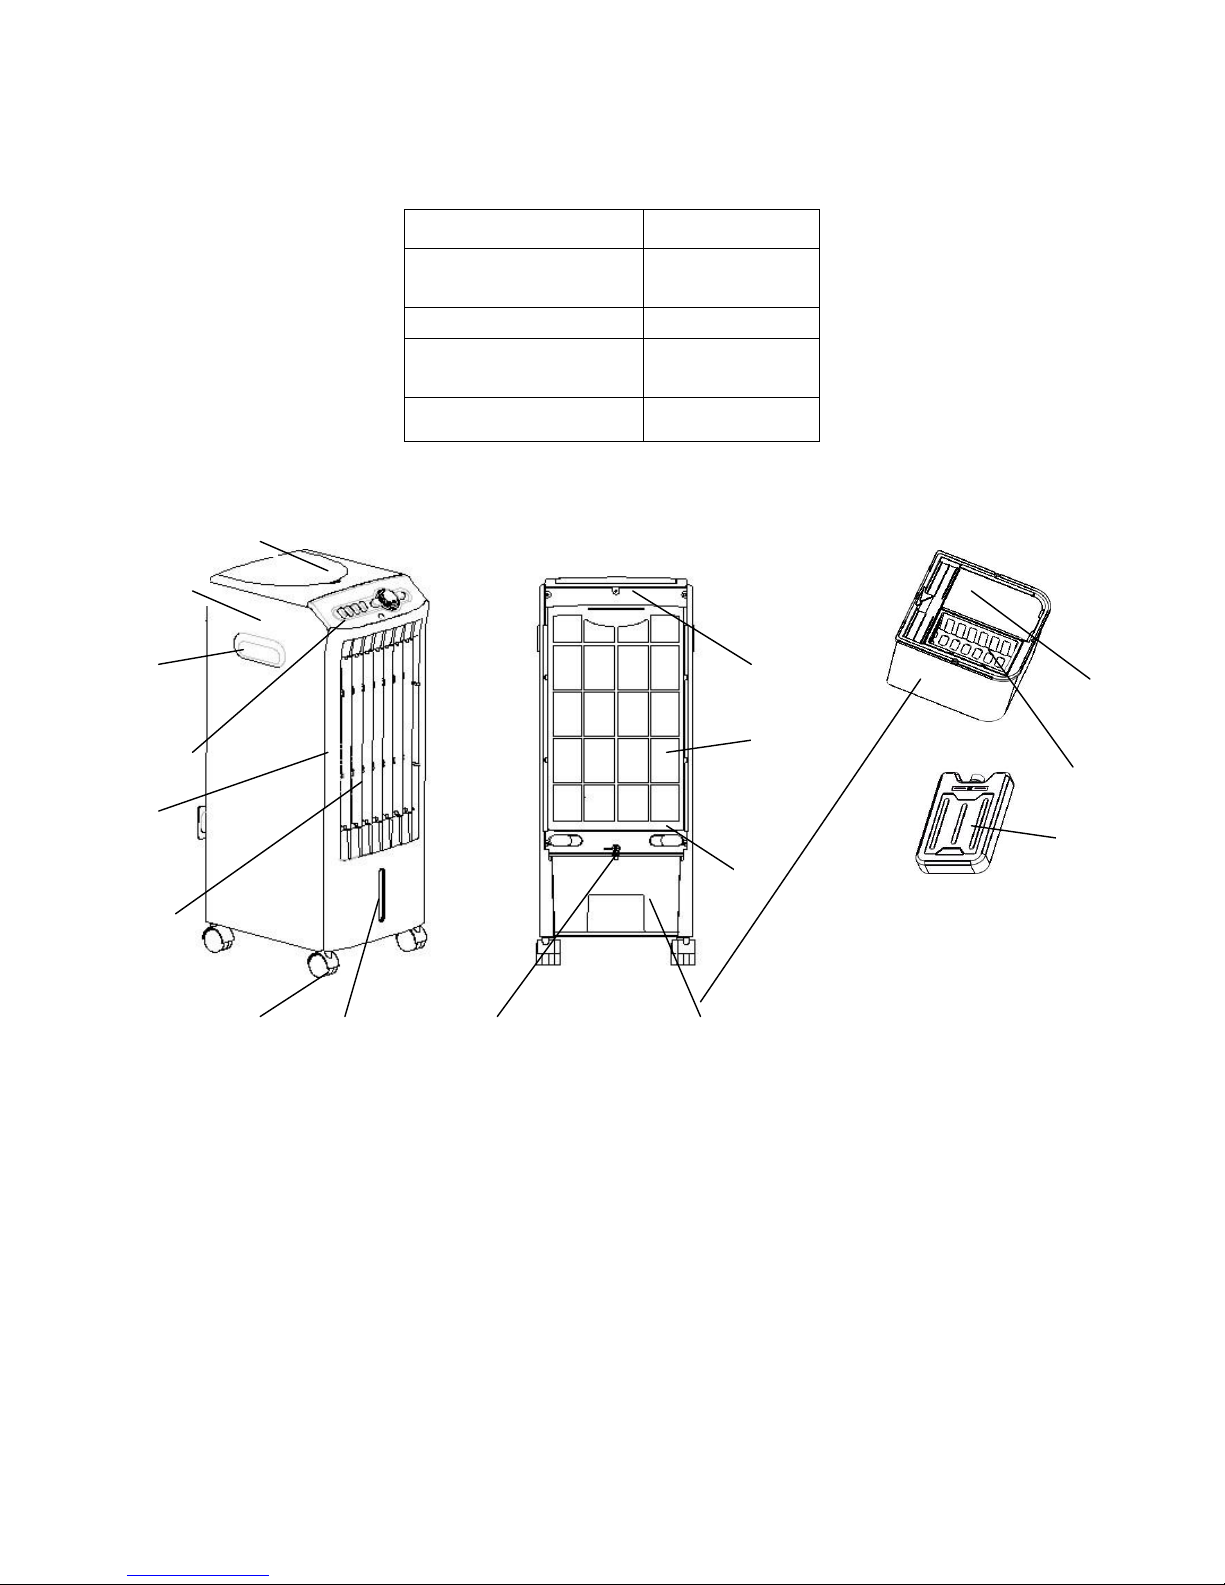
STRUCTURE AND PARTS
Model No
LG04-11DR
Rated Voltage &
Frequency
220-240V~
50/60Hz
Rated Power
65W
Capacity of water
tank
8.0L
Water consumption
1.0L/h
N
B C E H G A D F I J K L M
P
Page 4
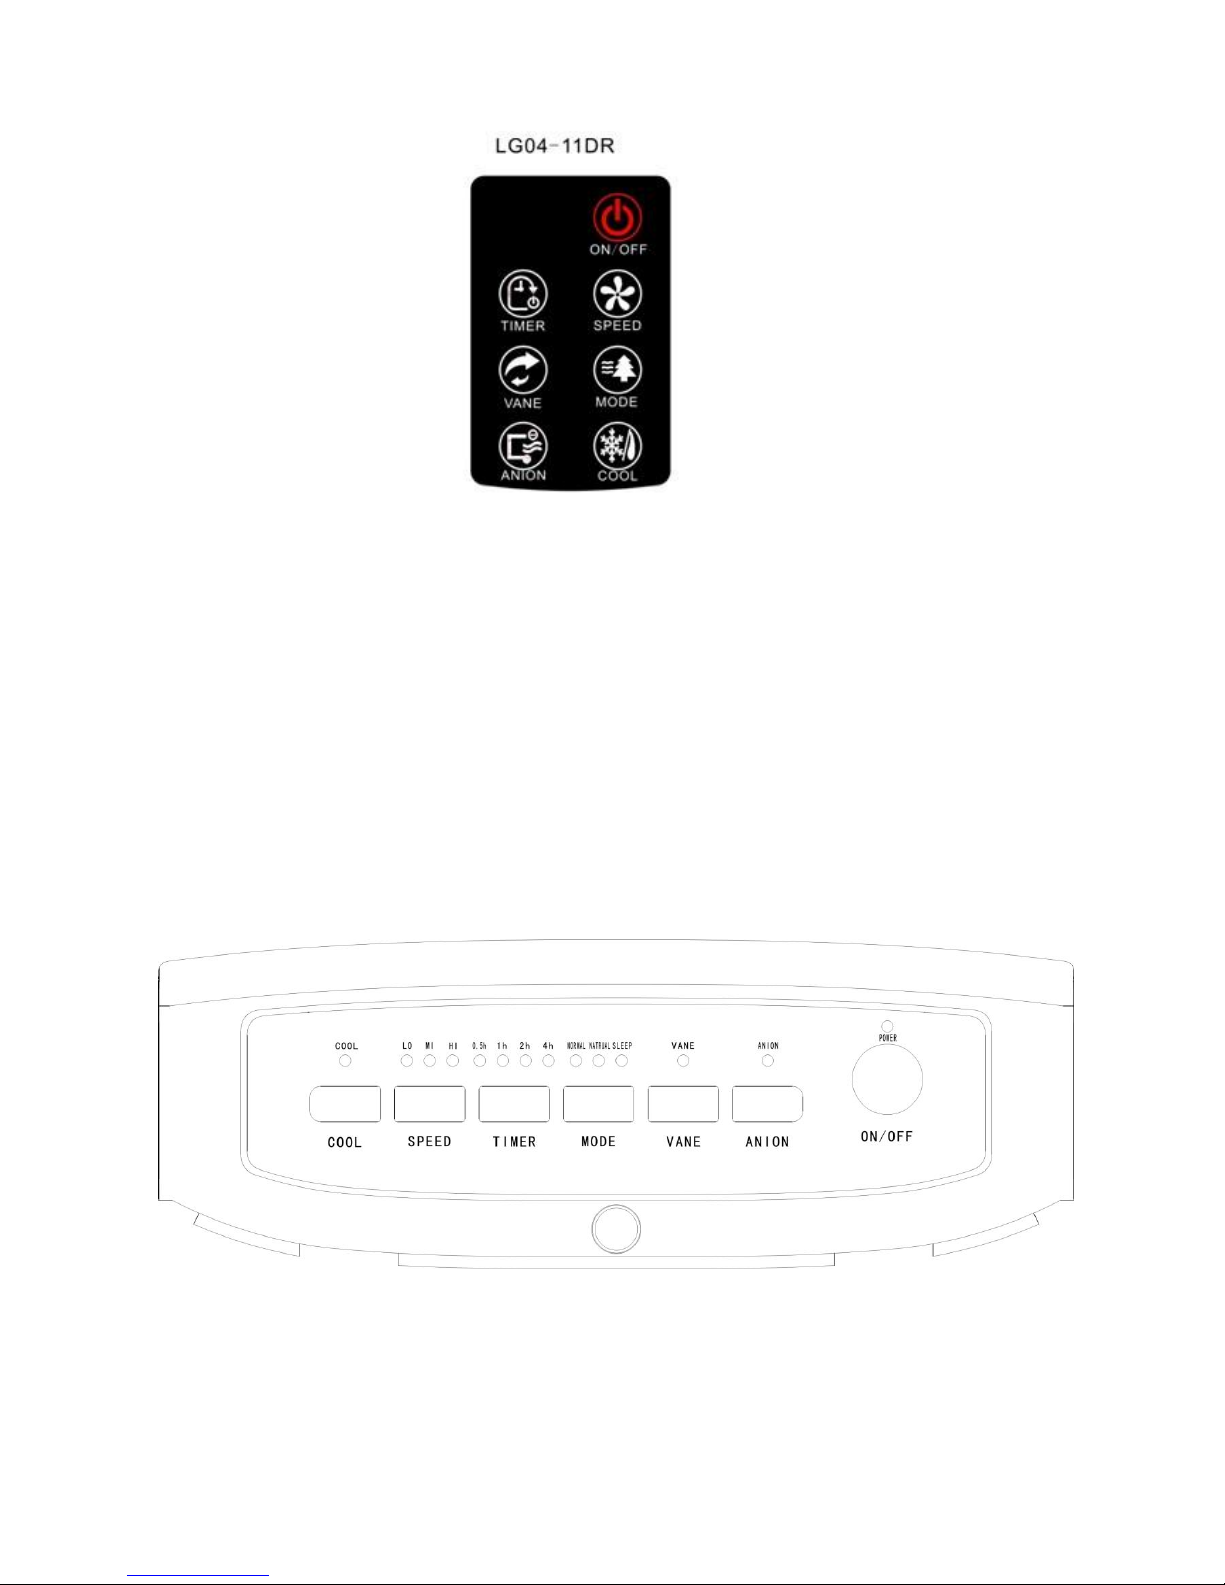
Control panel:
LG04-11DR:
A-Upper board B-Lateral board C- Handle
D-Control panel E-Front board F-Louver frame
G-Castor wheel H- Water indicate window I- Rear board
J- Dust-proof bracket K- Cord bobbin L- Water tank
M- Small knob N-Water tank cover O- Ice basket
P- Ice crystals box
Page 5
INSTRUCTIONS FOR USE
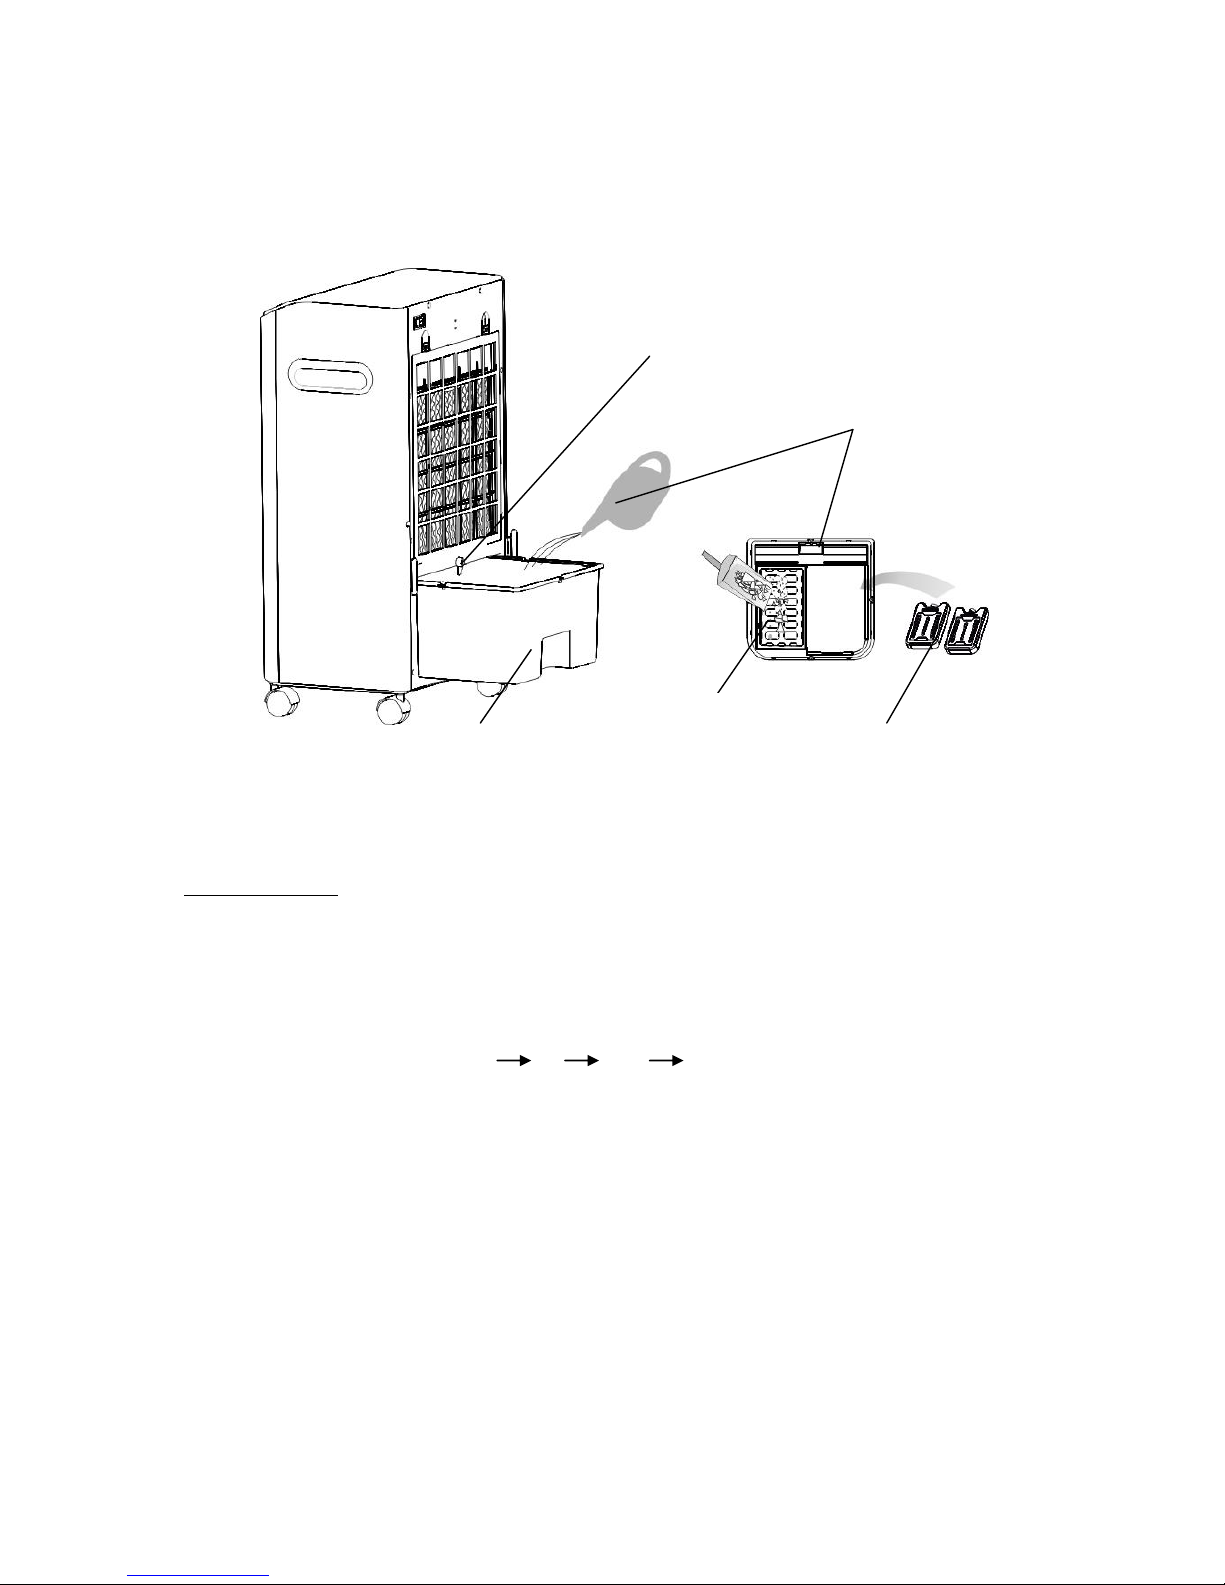
1. When using the appliance, make sure that it is on a flat and stable surface. Damage
may occur if it is placed on an incline or decline. If you need cooler more, add ice block
into upper water slot, see following image:
1.Rotate the Small knob updown.
2.Pull out the water tank
Note: the ice box should be far way from children to avoid eating
2. Insert the plug directly into a standard AC socket-outlet. Be sure plug fits tightly into outlet.
Now the power pilot light will light on.
3. ON/OFF button
Press the button ON/OFF to start the fan
Note: the default fan speed and fan mode is Medium and Normal when press ON/OFF one
time.
4. SPEED button
Press the SPEED button to set the desired fan speed (Low/ Medium/ High).
As per the following sequence: MI HI Lo MI. The fan speed selecting can be
circulated and the speed pilot lamp will be on during the fan operating.
5. VANE button
If you want to enlarge blast area in your room, press the vane button, the fan will blast your
room in large scope; the vane light will be illuminated. To stop vane, just press the vane
button again, the vane pilot light will go out. Moving the horizontal louvers either up or down
can make further wind direction enhancements.
6. TIMER button
Set the time by pressing the timer button to select a desired timing level as follow, the range
is between 0.5-7.5 hours. The pilot light corresponding to the selected timing level will be
illuminated.
7. MODE button
The default setting is Normal wind, and then you can press the button Mode again to
choose your desired wind mode as per the following sequence:
4.Put ices into ice basket
3.Add the water from here into water tank
5.Put the ice box also into water
Page 6
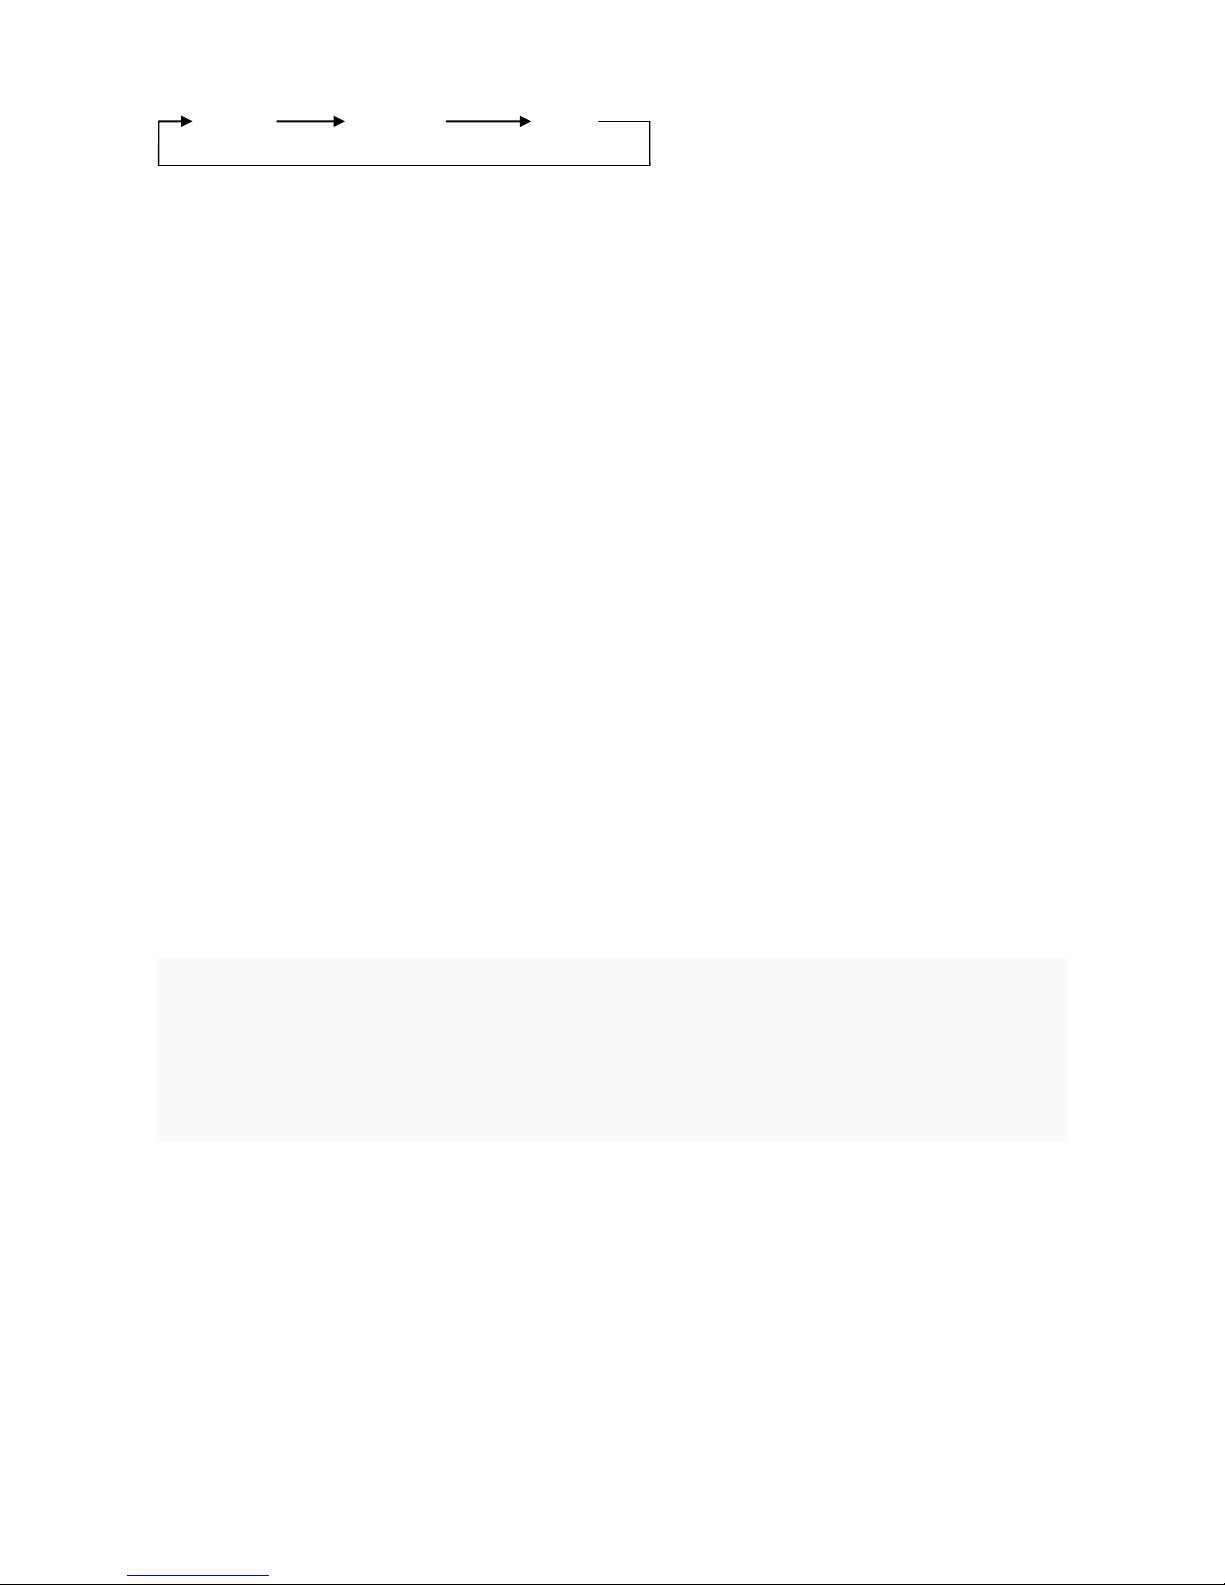
NORMAL NATURAL SLEEP
The wind mode selecting can be circulated and the wind mode pilot lamp will be on during
the fan mode in operating.
8. COOL button
Please noted that the COOL LAMP will flashing when you press the Cool button if
there is no or lacked water in water tank.
8-1 Before operating the unit in Cool mode, make sure the escape valve for the water tank
is properly fixed. Then proceed to add clean water into the water tank. While adding the
water, make sure that you keep an eye on the water level indicator to make sure that you do
not OVER or UNDER FILL the unit. Press the button Cool after you have added the water
and the unit should commence to blow cooler air. The cool light will light on at the same
time. When you press the button Cool again, it will stop working, the cool light will also go
out.
8-2 If you find that the air after Step 1) is still not cool enough, you can add additional ice
block into the water tank directly by opening the water tank cover. Be sure not to exceed the
icebox capacity otherwise damage to the unit or electric shock may occur.
8-3 If you wish to use an Ice box instead of ice block, just place it directly into the tank by
opening the water door. It will be good cooling efficiency if you place it in your refrigerator
and let the ice pack freeze for 1 to 2 hours.
8-4 You may complete pull out water tank, then replace water in the water tank or clean
water tank,
8-5 Under the cooling work condition, the appliance will delay 5 minutes to stop working
when you shut off the unit or timing finished, during the extended period, the timer pilot
lamp is flashed.
9. ION button
To gain fresh air in your room, just press ION button and the build-in ionizer will operate.
10.SAVEENERGY button
Press the "SAVEENERGY " button once TO shut or open all indicators.
11.The function of above item can be carried out with your remote control by pressing the
corresponding function button. The remote control can work with a distance of within 5
meters and an angle about 20 degrees.
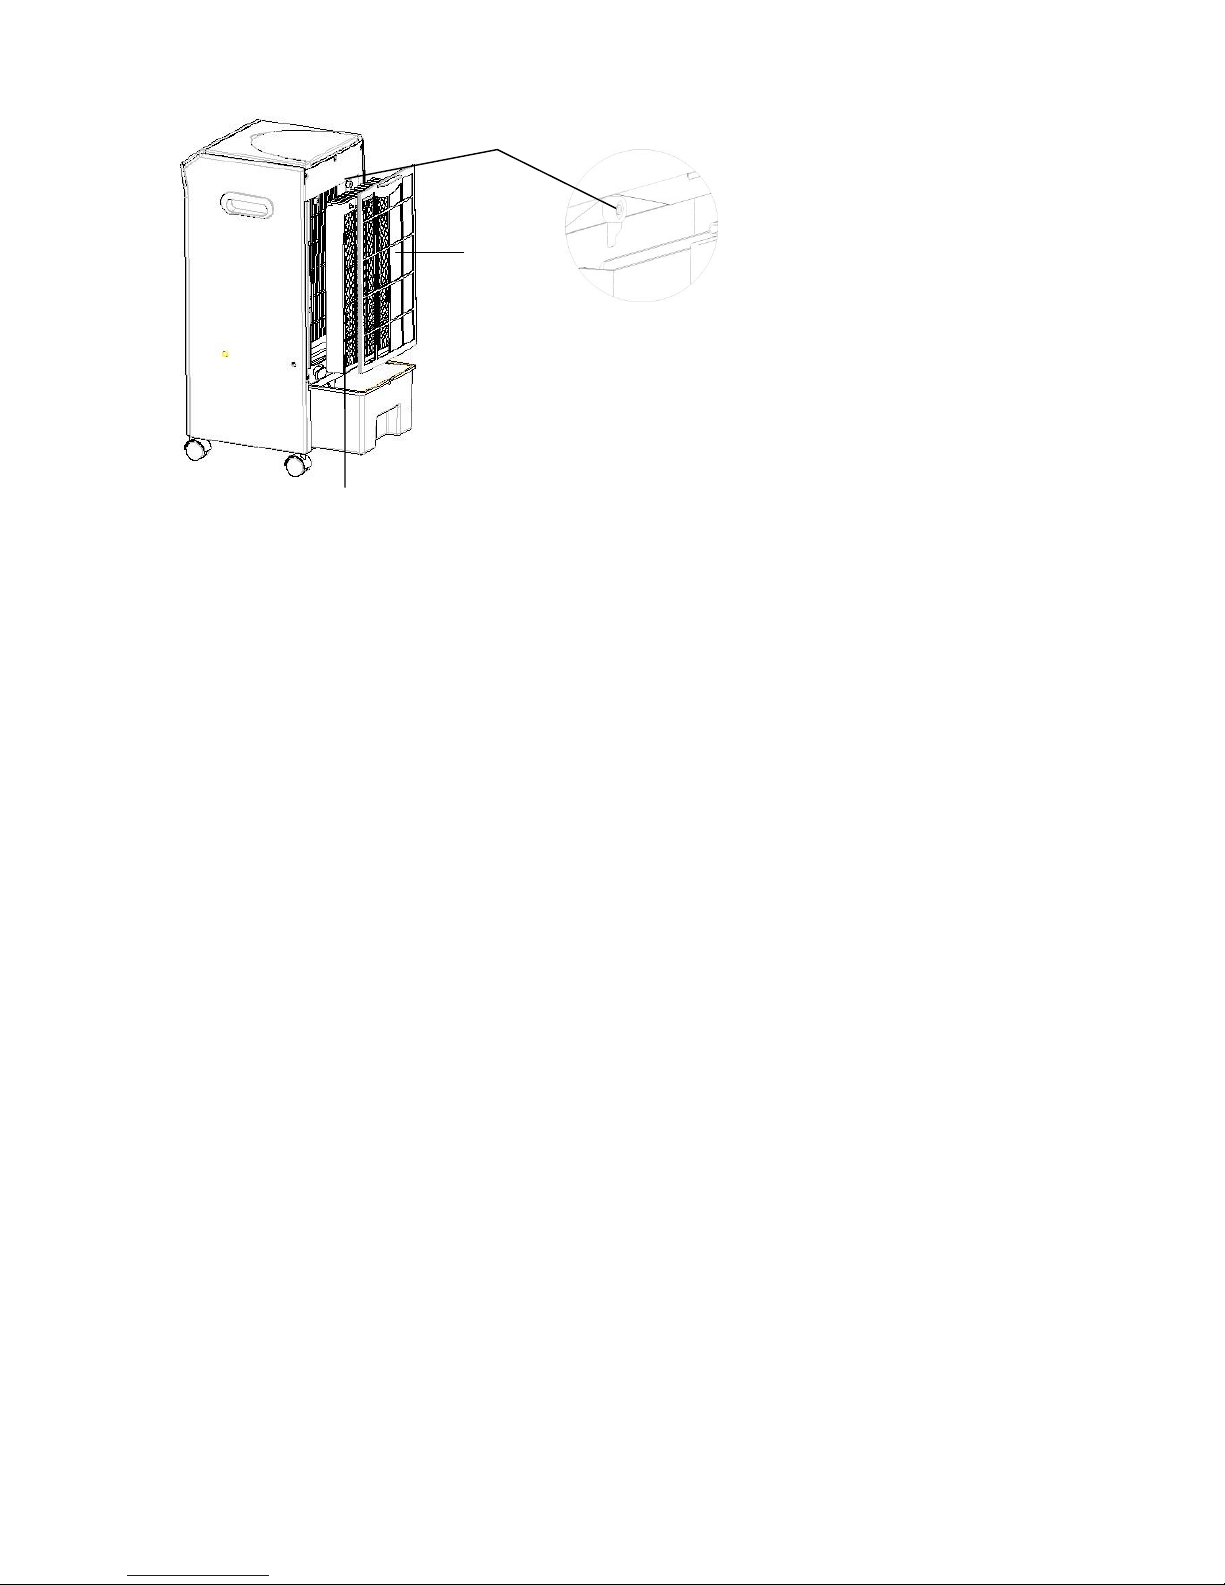
12. How to knock down the dust-proof bracket and honeycomb filter
Page 7
2
1
3
13. To turn off the unit just press the button OFF.
14. To completely shut the unit off, turn all the controls to OFF, and remove plug from the
socket-outlet.
MAINTENANCE
1. Always remove the plug from the socket-outlet and allow the fan blower to stop acting
before clean it.
2. Clean the external surfaces of the unit with a soft damp (not dripping wet) cloth.
WARNING:
Do not immerse the unit in water.
Do not use any cleaning chemicals such as detergents and abrasives.
Do not allow the interior (special for the PCB) to get wet as this could create a
hazard.
3. After extended periods of use, be sure to replace the water in the tank with fresh clean
water at least weekly. Also remember to clean the filter by unscrewing the filter and
removing the filter cradle. It should be cleaned in a mild soapy solution and then left to dry
before replacing the filter.
4. When the unit is not in use, make sure that it is unplugged from the wall socket, water is
drained thoroughly and it is placed back into its original box for storage until later use.
5. In case of malfunction or doubt, do not try to repair the fan yourself, it may result in a fire
hazard or electric shock.
1. Pull out the dust-proof bracket
2. Rotate the filter knobs outwards like
up photo
3. Take up the honeycomb filter
 Loading...