

Page 1
Please Read! Read all Cautions, Warnings and Notes within installation instructions and on bags. If you are unsure
about securing the bag, please contact us at 1-800-558-7755 ext. 123.
Monday through Friday 8:00am - 4:30 pm C.S.T.
DOWCO Inc.
4230 Clipper Dr.
Manitowoc, WI 54220 USA
Phone: 1-800-558-7755
Fax: 920-682-5891
email: feedback@dowco-inc.com
I-Sheet 00754
Revised 06/20/07
Page 1
Printed in China
MLS-MB
Main Bag
MLS-RB
Roll Bag
MLS-GB
Garment Bag
MLS-CB
Commuter Briefcase
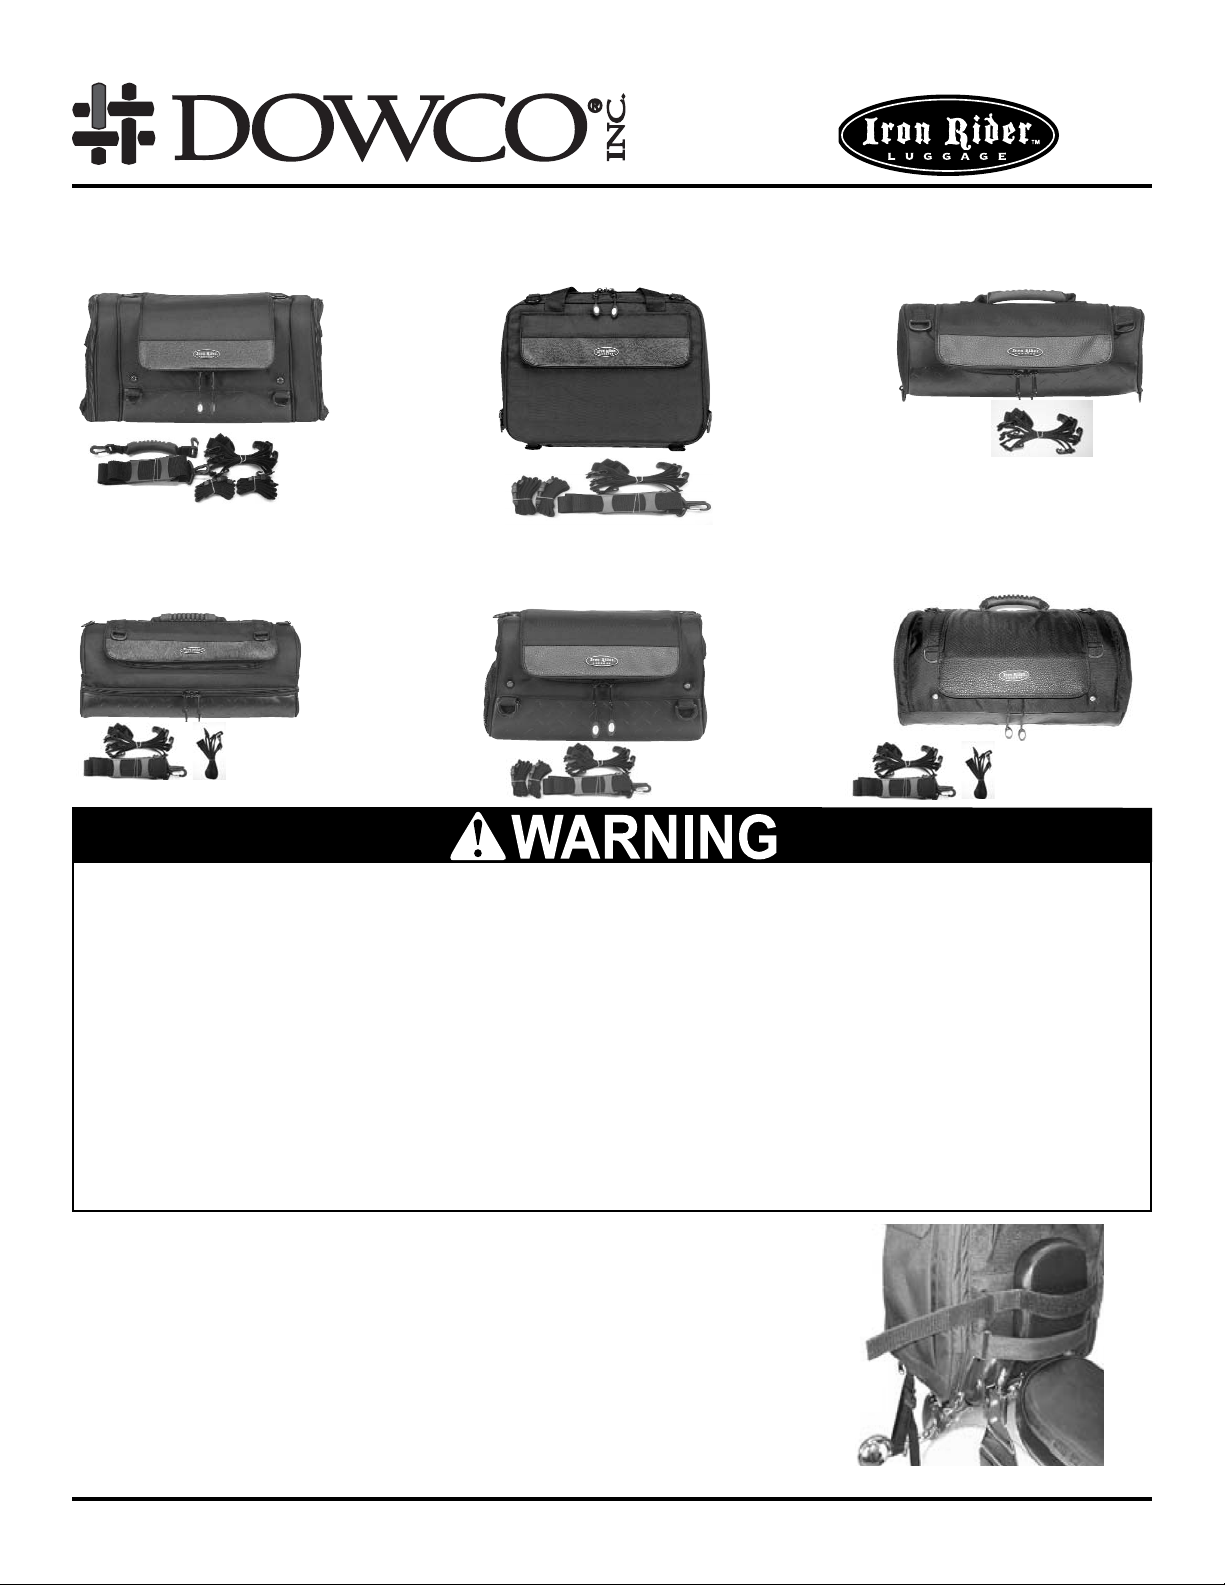
Installation Instructions For Single Mount Bags:
1. Separate the velcro strap(s) on the back side of the luggage. Lower
the bag onto the luggage rack keeping straps on opposite sides of
the Sissy Bar/Backrest (Fig.1)
2. Be sure the bag is centered and sitting firmly on the luggage rack.
Tighten the velcro straps around the backrest. Fasten velcro straps
to secure the bag.
Note:An additional strap assembly has been provided to aid in
Fig. 1
* Recommended for use with a sissy bar/backrest and luggage rack combination which is perma-
nently attached to the motorcycle. Mount the bag at this location ONLY.
* Do not exceed the manufacturer’s recommended load capacity of the luggage rack or motor-
cycle.
* Consult owner’s manual for tire inflation pressures and gross axle weight rating. Failure to follow
recommended weight loading capacities may affect handling. This may result in injury or property
damage.
* Secure the bag to the vehicle so the bag will not shift during operation.
* Verify that straps do not obstruct exhaust system, reflectors, turn signals, or tail lamp.
* Allowing straps to hang loose may cause damage to packs and/or painted finishes. Hanging
straps may become entangled in the wheel or drive chain or belt resulting in serious personal
injury and/or property damage.
MLS-OB
Overnight Bag
MLS-LRB
Large Roll Bag
Page 2
4. Locate the zippers on either side at the bottom of the
bag. (Commuter Bag buckles are not contained within a
zippered pocket.) Unzip and pull out the two short straps
with buckles (see Fig. 4). Locate the mounting strap kit
included with the bag. Connect the long mounting straps
to the short straps that are attached to the bag. These
straps use side release buckles to offer quick attachment
and release.
5. Loop the long mounting straps (on both sides of the bag)
around the directional indicator bar (or similar sturdy
mounting area), and connect the final side release buckles (see Fig. 5). Be sure the buckle has “snapped” into
place, and the connection is secure.
6. Pull the slack out of the loose end of the strap to tighten.
Excess strap material should be knotted or removed and
end sealed to prevent unravelling. Ensure that your bag
is securely mounted.
7. Periodically check each bag to ensure attachment is
secure as straps may loosen during riding.
Allowing straps to hang loose may cause damage to packs and/or painted
finishes. Hanging straps may become entangled in the wheel or drive chain
or belt resulting in serious personal injury and/or property damage.
DOWCO Inc.
4230 Clipper Dr.
Manitowoc, WI 54220 USA
Phone: 1-800-558-7755
Fax: 920-682-5891
email: feedback@dowco-inc.com
I-Sheet 00754
Revised 06/20/07
Page 2
Printed in China
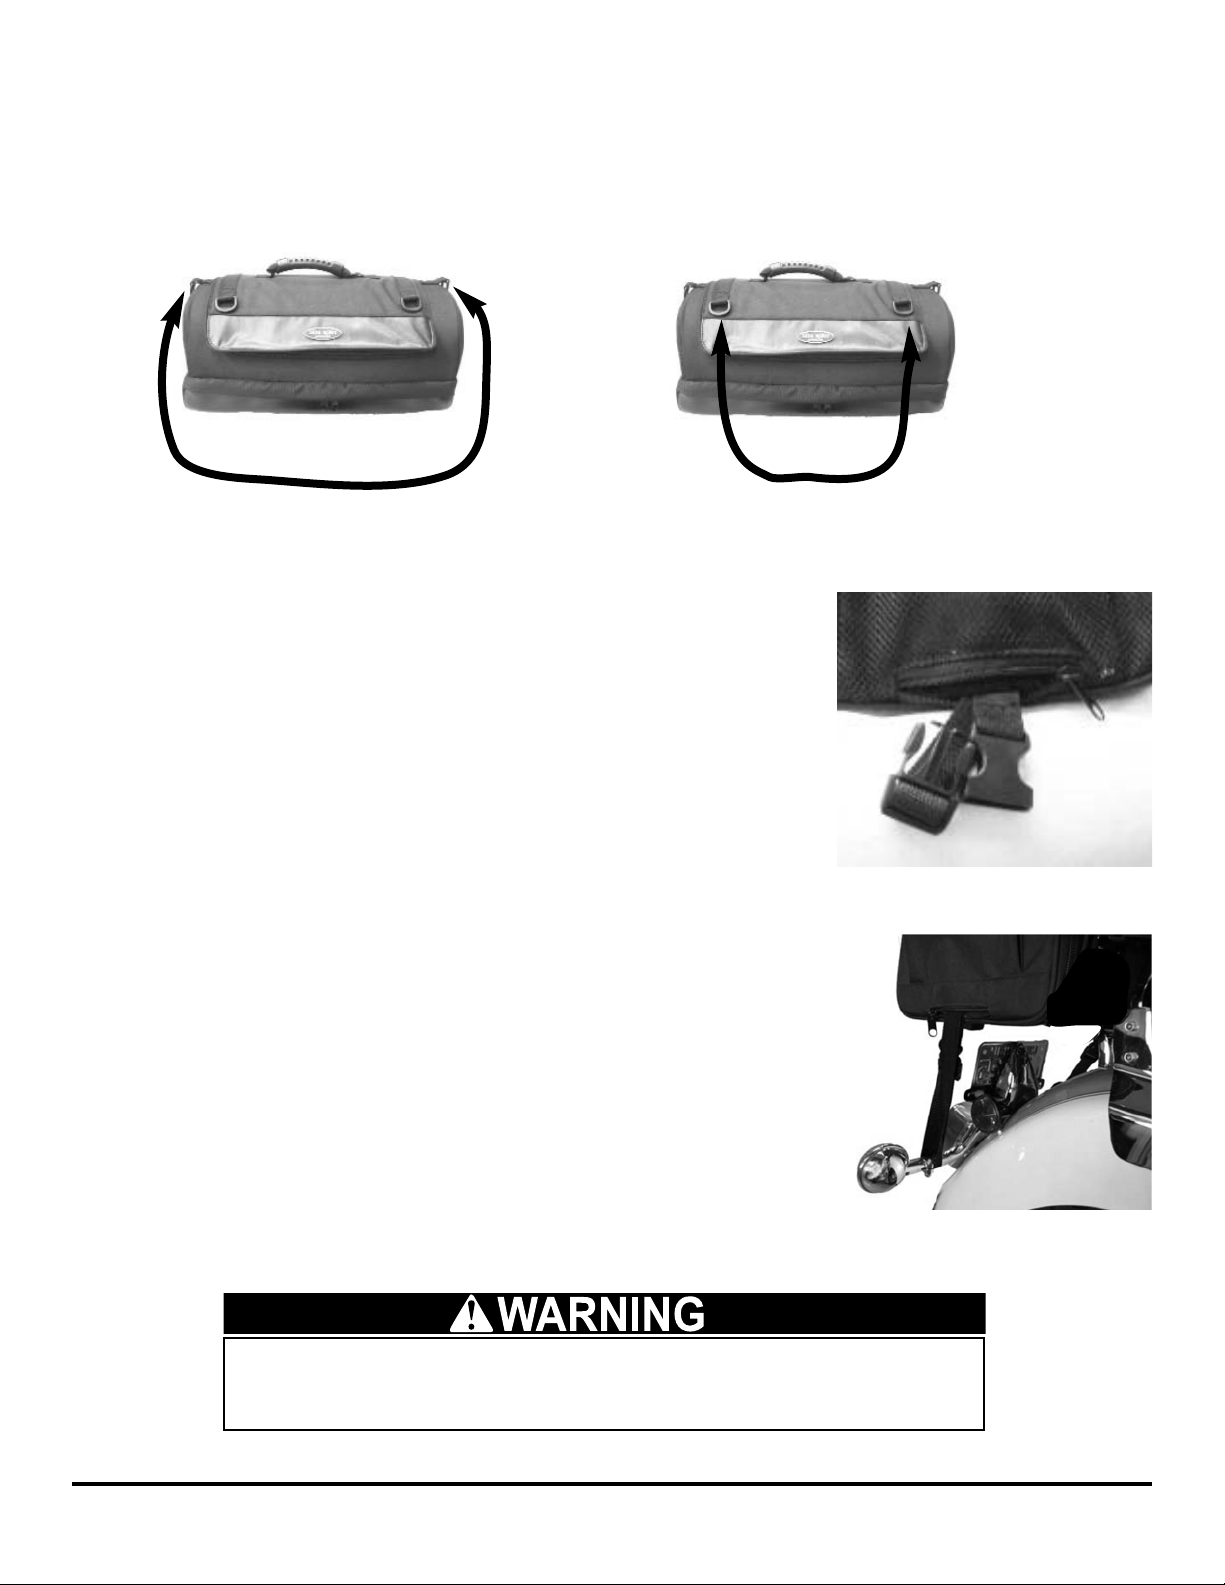
Garment Bag only
2a. Connect straps to sides of bag - Hook to one D-ring (Fig. 8). Go under the luggage rack. Secure
to D-ring on opposite side. Pull tight. (Fig.2)
Connect straps to front of bag - Hook to one D-ring (Fig.8). Position down front of bag and under
the luggage rack where accessible and up the other side to opposite D-ring. Pull tight. (Fig. 3)
3. This will complete installation of the Garment Bag and Roll Bag. For completing the installation of
the Main, Overnight, and Commuter Bags continue to Step 4.
Fig. 2
Fig. 3
Fig. 4
Fig. 5
Page 3

DOWCO Inc.
4230 Clipper Dr.
Manitowoc, WI 54220 USA
Phone: 1-800-558-7755
Fax: 920-682-5891
email: feedback@dowco-inc.com
I-Sheet 00754
Revised 06/20/07
Page 3
Printed in China
Sides of the Main Bag are expandable to allow extra storage. To
use, unzip and pull out the side panel. Repositioning of the bag
may be necessary to balance the load.
When using one or more of the side pockets,
make certain that the load is properly balanced
on both sides of the bag to prevent unwanted
shifting during vehicle operation.
Various Bag Features:
Rain cover - provided with each of the bags in this luggage
system. To apply, place cover over the bag and pull shock
cord tight (Fig. 10)
Note: Rain cover for Main Bag (MLS-MB) is designed for
use on multiple stacked bags. Any excess material
should be tucked inside of rain cover to prevent
wind damage to cover.
Side Mounted Net Pockets
1. Secure Main Bag or Overnight Bag to luggage rack or pillion as previously instructed.
2. Locate 4 piece connecting strap kit included with every bag (Fig. 6).
3. Connect clip on one end of connecting strap to D-ring on base bag (Fig. 7). Connect opposite
connecting strap clip to adjacent D-ring on upper bag (Fig 8). Repeat until all (4) straps are
installed. (Two (2) straps in front and two (2) straps on the back.)
4. Tighten all four straps until luggage is secured tightly together. (Fig. 9).
NOTE: This luggage is designed to be stacked with the same or other components of the
Motorcycle luggage system. When stacking luggage, the base bag must
be either the Main
Bag (MLS-MB) or Overnight Bag (MLS-OB).
Installation Instructions For Adding Additional Luggage Components:
Fig. 9
Fig. 8
Fig. 7
Fig. 6
Fig. 10
Page 4

DOWCO Inc.
4230 Clipper Dr.
Manitowoc, WI 54220 USA
Phone: 1-800-558-7755
Fax: 920-682-5891
email: feedback@dowco-inc.com
I-Sheet 00754
Revised 06/20/07
Page 4
Printed in China
Care & Cleaning: Use mild household detergent and soft brush to remove dirt or road grime. Rinse
thoroughly and dry before using. Do not put in washer or dryer, dry cleaning is not recommended.
* Commuter Bag (MLS-CB), is designed to be attached on top of the Main Bag only. Commuter Bag must lie flat when attached to
MLS system. Additional MLS bags may be placed on top. Image is presented solely for configuration identification purposes only.
MLS-MB MLS-CB MLS-OB MLS-GB MLS-RB MLS-LRB
(1) Rain Cover (1) Rain Cover (1) Rain Cover (1) Rain Cover (1) Rain Cover (1) Rain Cover
(1) Shoulder Strap (1) Shoulder Strap (1) Shoulder Strap (1) Shoulder Strap (4) Short Straps (1) Shoulder Strap
(4) Short Straps (4) Short Straps (4) Short Straps (4) Short Straps (4) Short Straps
(2) Long Straps (2) Long Straps (2) Long Straps (1) Long Strap (1) Long Strap
(1) Carry Handle
Iron Rider
TM
Possible Luggage Configurations
*
*
*
*
*
*
MLS-MB
Main Bag
15”w x 11” h x 11” d
MLS-CB
Commuter Briefcase
17.5”w x 13”h x 5.5”d
MLS-GB
Garment Bag
18”w x 9”h x 11” d
MLS-RB
Roll Bag
14”w x 6.5”h x 10.5” d
MLS-LRB
Large Roll Bag
18”w x 10”h x 10.5” d
MLS-OB
Overnight Bag
14” w x8.5”h x10.5” d
RB
OB
GB
MB
CB
MB
MB
CB
LRB
LRB
CB
LRB
CB
LRB
MB
OB
MB
RB
MB
RB
MB
MB
LRB
LRB
LRB
MB
RB
LRB
MB
OB
OB
RB
OB
MB
RB
GB
MB
RB
LRB
LRB
RB
LRB
RB
OB
LRB
RB
OB
OB
MB
MB
GB
MB
MB
RB
MB
CB
MB
MB
CB
MB
BG
MB
CB
MB
 Loading...