

Page 1
U S / C A N A D A . I NSTA L LATI ON I NFOR MATIO N . RESI DENT IAL
insta l l ation recommendat i o n s f o r
WE AT HE R M AT E™
WE AT HE R B A R RI ER S OLU TI O N S
These instructions describe how to install WEATHERMATE™
Weather Barrier Solutions for exceptional exterior water
management. The fi gures show a wood frame wall
with OSB and WEATHERMATE
™
Plus Housewrap.
For information on fl ashing windows and doors installed
in other types of wall assemblies, visit
www.insulateyourhome.com, contact your Dow
representative or call 866-583-BLUE (2583).
Figure 1b
Figure 1e Figure 1f
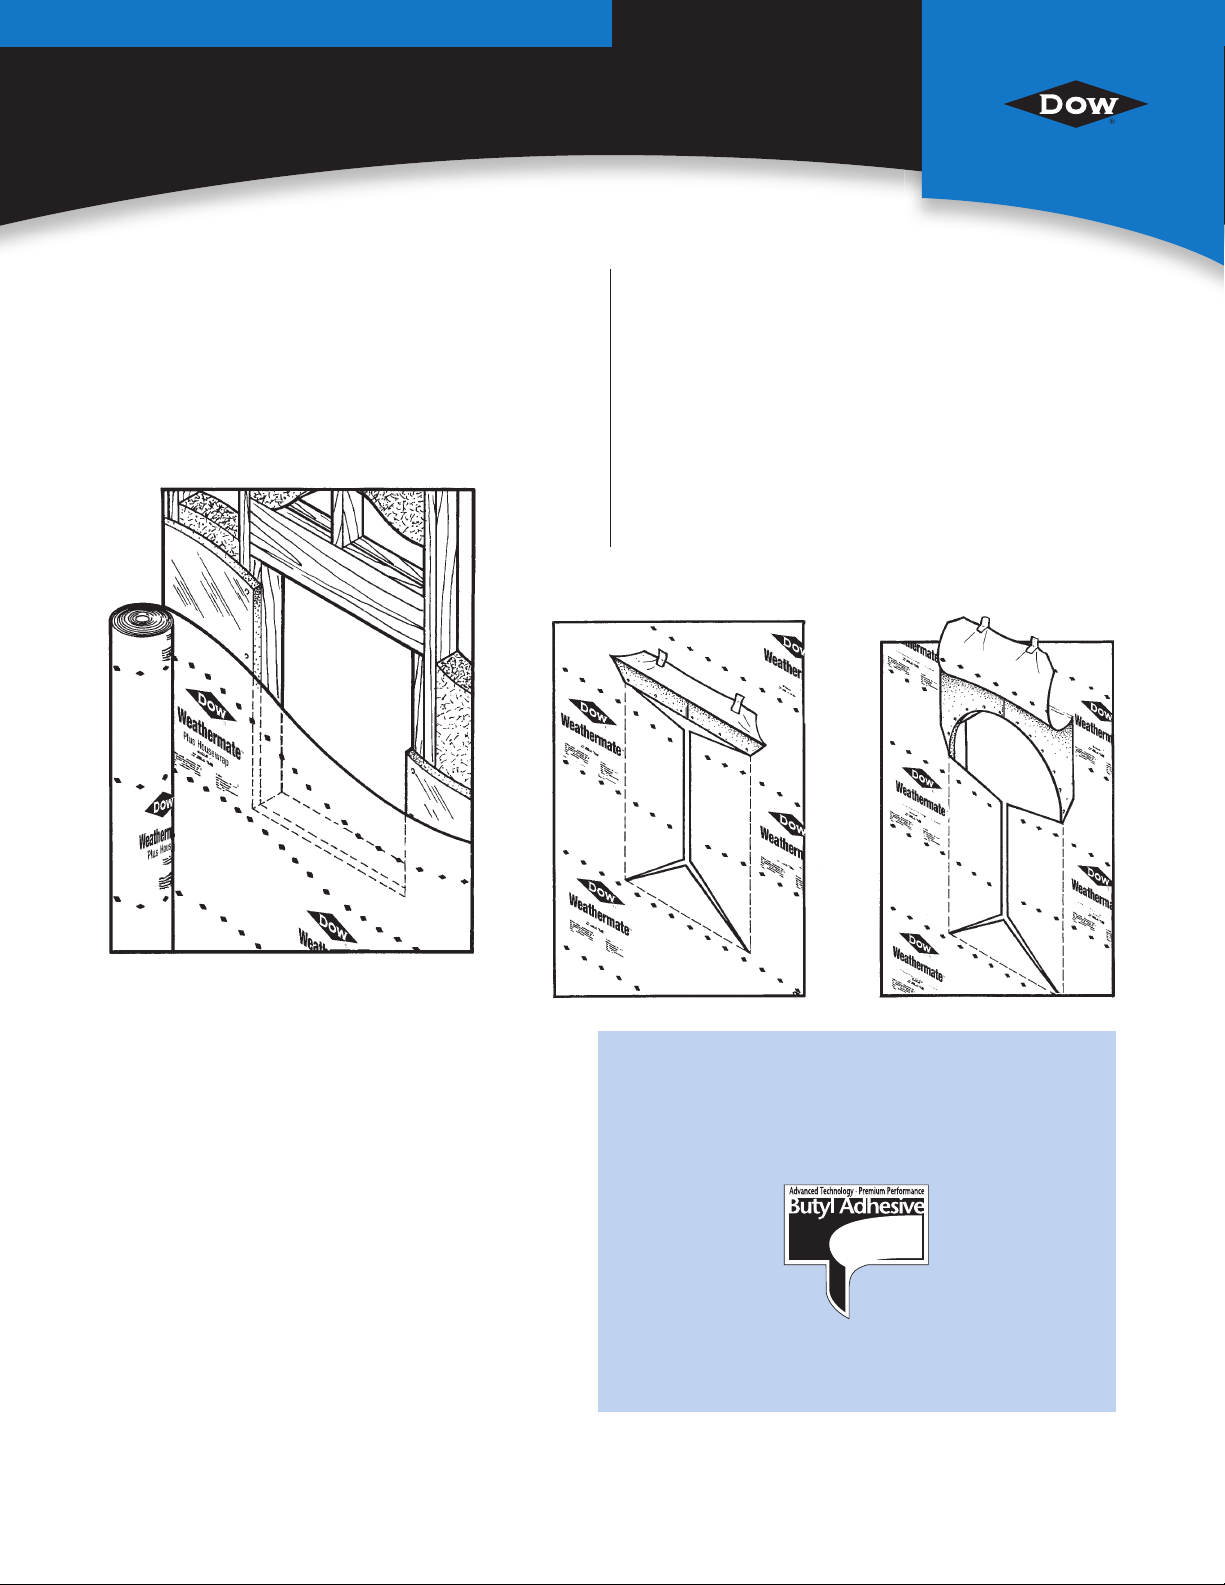
1. INSTALL SHEATHING AND HOUSEWRAP
a. Install sheathing.
b. Install housewrap over sheathing and over rough window
and door openings according to product installation
instructions.
c. At each window and door opening, make an inverted “Y”
cut in the housewrap.
d. Fasten bottom and side fl aps to the inside face of the
framing.
e. At each corner of rectangular header, make a 6" (15 cm)
cut at a 45-degree angle. Pull up housewrap fl ap and
temporarily secure with WEATHERMATE
™
Construction
Tape.
f. For curved windows and doors, cut as shown.
®™Trademark of The Dow Chemical Company (“Dow”) or an affi liated company of Dow
*Consult the instructions and Material Safety Data Sheet carefully before use.
For excellent protection against air infi ltration and moisture
intrusion, count on WEATHERMATE
Solutions from Dow:
• WEATHERMATE
• WEATHERMATE
• WEATHERMATE
• WEATHERMATE
• GREAT STUFF PRO
Sealant*
• STYROFOAM
™
housewraps
™
Construction Tape
™
Sill Pan
™
Straight and/or Flexible Flashing
™
Window & Door Insulating Foam
™
Brand Extruded Polystyrene Foam
™
Weather Barrier
Insulation and Dow polyisocyanurate insulation
Page 2
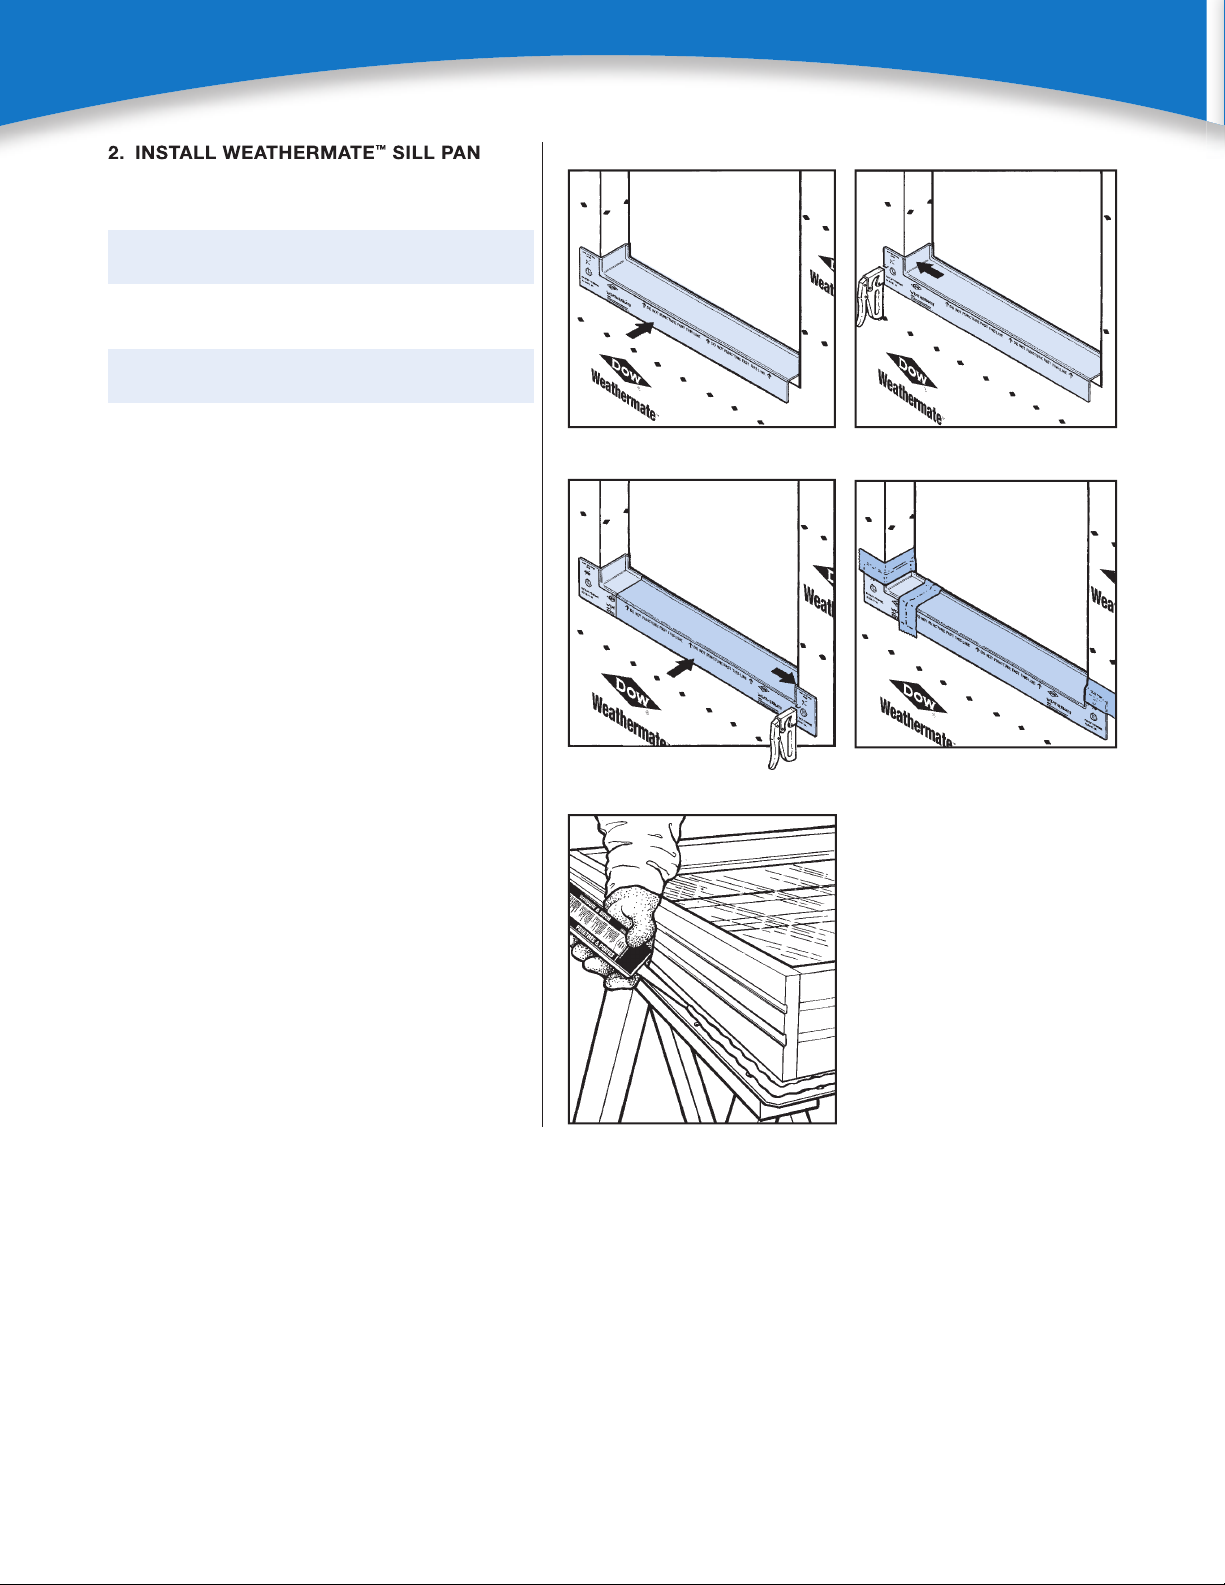
2. INSTALL WEATHERMATE™ SILL PAN
a. Position one corner piece along the base of
window rough opening, lapping over waterresistive barrier.
NOTE: WEATHERMATE™ Sill Pan is suitable for
use in window sills only.
b. Press fi rmly against corner of window opening.
Nail or staple in place, following embossed
instructions on product.
NOTE: WEATHERMATE™ Sill Pan works best
when the sill is sloped to the exterior.
c. Position second piece, overlapping fi rst piece
with a minimum overlap of 2" (5 cm). Press
second piece fi rmly into corner of window
opening. Nail or staple in place, following
embossed instructions on product.
d. For window openings wider than 5' (1.5 m),
install WEATHERMATE
™
Sill Pan in corners,
then cut the corner off a third piece, taking care
not to damage backdam. Center this straight
length over the two corner pieces, overlapping
each piece a minimum of 2" (5 cm).
e. Seal overlap seam and top edge of corner
pieces with WEATHERMATE
™
Flashing, as
shown.
f. If shims are necessary when installing the
window, place them under WEATHERMATE
™
Sill Pan.
Figure 2a Figure 2b
Figure 2c Figure 2e
3. INSTALL WINDOW/DOOR AND FLASH
JAMBS
a. Apply a continuous bead of compatible sealant
to the back side of the mounting fl ange, along
the header and sides of the window/door. Install
windows and doors plumb, level and square,
according to manufacturer recommendations.
b. Ensure substrate surface is clean, dry and free
of grease, dust or debris. A spray adhesive,
such as 3M Hi-Strength 90, is recommended
if applying WEATHERMATE
™
Flashings directly
to OSB or other surfaces where additional
adhesion may be required.
c. Remove release liner and apply
WEATHERMATE
jambs, overlapping WEATHERMATE
™
Straight Flashing along
™
Sill Pan or
other sill fl ashing.
Figure 3a
®™Trademark of The Dow Chemical Company (“Dow”) or an affi liated company of Dow
2
Page 3

4. FLASH HEADER
Figure 4a Figure 4b
Figure 4d
Figure 4
Figure 5
®™Trademark of The Dow Chemical Company (“Dow”) or an affi liated company of Dow
4. FLASH HEADER
Rectangular Windows and Doors
a. Install WEATHERMATE
™
Straight Flashing along
header, overlapping and extending past jamb
fl ashings. Tape head fl ashing with 2-7/8" (7 cm)
WEATHERMATE
b. Fold housewrap fl ap down and secure with
WEATHERMATE
™
Construction Tape.
™
Construction Tape.
Curved Windows and Doors
c. For curved windows/doors, cut a piece of
WEATHERMATE
™
Flexible Flashing 1' (30 cm)
longer than the arc length of the header.
d. Install along header. Do not stretch fl ashing.
Header fl ashing should overlap jamb fl ashings
by a minimum of 6" (15 cm). If necessary,
secure outer edges of WEATHERMATE
™
Flexible Flashing with plastic cap nails to hold in
place.
e. Fold housewrap fl ap down and secure with
e
WEATHERMATE
™
Construction Tape.
5. AIR SEAL INTERIOR WINDOW/DOOR
PERIMETER
To further reduce air infi ltration, seal around entire
interior window perimeter with GREAT STUFF
™
PRO
Window & Door Insulating Foam Sealant.
Seal only around top and sides of interior door
perimeter. GREAT STUFF PRO
™
Window & Door
Sealant features a minimal-expanding, pliable
formulation that won’t bow windows and doors,
when properly applied.
Safety and Conditions of Use
• Read the label and Material Safety Data Sheet
carefully before use.
• GREAT STUFF PRO
™
Window & Door Insulating
Foam Sealant contains isocyanate and a
fl ammable blowing agent. Vapor may travel to
other rooms. Ensure adequate ventilation. Shut
off all pilot lights and extinguish open fl ames;
eliminate all sources of ignition before use. Do
not smoke or use lighters or matches while
dispensing foam.
• Do not breathe vapor or mist. Use in wellventilated areas or wear proper respiratory
protection. Isocyanate is irritating to the eyes,
skin and respiratory system, and may cause
sensitization by inhalation or skin contact.
• GREAT STUFF PRO
™
foam is very sticky and will
adhere to most surfaces and skin. Do not get foam on
skin. Wear long sleeves, gloves, and goggles or
safety glasses. Cured foam must be mechanically
removed or allowed to wear off in time.
• The contents are under pressure. The can
may burst if left in areas susceptible to high
temperatures, such as motor vehicles, or near
radiators, stoves or other sources of heat. Do
not place can in hot water. Do not puncture,
incinerate or store at temperatures above 120ºF
(49ºC).
• GREAT STUFF PRO
™
products should not
be used around heaters, furnaces, fi replaces,
recessed lighting fi xtures or other applications
where the foam may come in contact with heatconducting surfaces. GREAT STUFF PRO
™
foam
is combustible and will burn if exposed to open
fl ame or sparks from high-energy sources. Do not
expose to temperatures above 240ºF (116ºC).
3
Page 4

Form No. 179-07305X-0410P&M
178-01084-0410P&M
SILL PAN OPTION 2
To create a sill pan with backdam using
WEATHERMATE
™
Flexible Flashing:
a. Cut a length of fl ashing 1' (30 cm) longer than
the width of the window.
b. Before removing release liner, fold the fl ashing
lengthwise about 1" to 1-1/2" (2.5 cm to 3.8 cm)
from the edge, to form a crease. Next, fold 3/8"
to 3/4" (1 cm to 1.9 cm) of material back up to
form a second crease. The peak that is formed
will serve as the backdam, thus providing
positive water drainage to the exterior.
c. Peel the release liner from the long edge to
the fi rst crease. Position the fl ashing along the
bottom and 6" (15 cm) up sides of the rough
opening, but do not affi x fi rmly. Continue
peeling the release paper to the second crease.
Press sides of peak together to bond. Peel the
remainder of the release paper and position the
fl ashing on the sill.
d. Do not stretch the fl ashing. When the fl ashing
is positioned correctly, press fi rmly, working
from the center to corners and up the jamb,
removing air pockets as you work.
e. Secure outer edges of fl ashing with plastic cap
nails to hold in place.
WEATHERMATE™ Flexible Flashing used as
sill pan with backdam
NOTICE: No freedom from any patent owned by Dow or others is to be inferred. Because us e conditions an d applicable law s may differ from one location to anoth er and may cha nge with time, Customer is respo nsible for
determining whether products and t he information in this documen t are appropriate for Customer’s use and fo r ensuring tha t Customer’s workplace and disposal practices are in compl iance with appl icable laws and other
government en actments. The product sh own in this literature may not be available for sale and/or available in all geographies where Dow is repre sented. The claims made may not have been approved fo r use in all countries
or regions. Dow assumes no obl igation or liability for the info rmation in this document. Ref erences to “Dow” or the “Company” mean The Dow Chemical Company and its conso lidated subsidiaries unl ess otherwise expressly
noted. NO WARRA NTIES ARE GIVEN; ALL IMPLIED WARRANTI ES OF MERCHANTABILITY OR F ITNESS FOR A PARTICULAR PU RPOSE ARE EXPRESS LY EXCLUDED.
NOTICE: Changes to the Interna tional Residential Code require the installat ion of a water-resistive barrier (WRB) within most exterior wall assembl ies in residential construction. The followi ng Dow insulated sheathing products
qualify as a WRB when installe d according to the installation instr uctions developed for “insta llation of foam sheathing as a water-resistive barrier”: STYROFOAM™ DURAMATE™ Plus, STYRO FOAM™ Residential Sheathi ng,
STYROFOAM™ Tongue and G roove, STYROFOAM™ S quare Edge, STYROFOA M™ Residing Board, DOW™ High Performa nce Underlayment, THERMAX™ Sheathin g, STYROFOAM SIS™ , TUFF-R™ and Supe r TUFF-R™
and therefore do not requ ire the use of a building pape r or a housewrap as a WRB. Whe n a WRB is not needed, these Dow foam sheathings may be installed according to st andard installation ins tructions for foam shea thing
from Dow. Be sure products and inst allation instructions me et code requirements for your particular location. Note: WEATHERMATE™ and WEATHERMATE™ Pl us house wraps ha ve already qualifi ed as water-resistiv e
alternative s to the prescribed felt (see Evaluat ion Reports NER-5 93 and NER-640 fo r approved alterna tive).
COMBUSTIBLE: GREAT STUFF PRO™ Window & Door Insulating Foam Seala nt is combustible and will burn if exposed to open fl ame or sparks from high-en ergy sources. Do not expose to temperatures above 240°F (116ºC).
For more infor mation, consult MS DS, call Dow at 8 66-583-BLUE (2583) or contact your local building ins pector. In an emergency, call 989-6 36-4400 in the U. S. or 519-339-3711 in Canada.
GREAT STUFF PRO™ Window & Door I nsulating Foam Sealant contains isocyanate an d a fl ammable blow ing agent. Read the label and Material Safety Data Sheet carefully before use. Eliminate all sources of ign ition before
use. Wear gloves, and goggles or sa fety glasses. Provi de adequate ventil ation or wear prope r respiratory protect ion. Contents und er pressure.
WEATHERMATE™ housewraps are a s econdary defense against bulk water intrusion. The e xterior fi ni sh is the primary water barrier.
WEATHERMATE™ Sill Pan works b est when the sill is sloped to the exterior.
Building an d/or constructio n practices unre lated to buildi ng materials c ould greatly affec t moisture and the potential f or mold format ion. No materia l supplier inc luding Dow can give assurance that mold will not develo p in
any specifi c system.
www.insulateyourhome.com
FOR TECHNICAL INFORMATION: 866-583-BLUE (2583)
FOR SALES INFORMATION: 800-232-2436
THE DOW CHEMICAL COMPANY
Dow Building Solutions • 200 Larkin • Midland, MI 48674
FOR TECHNICAL INFORMATION: 866-583-BLUE (2583) (English) • 800-363-6210 (French)
FOR SALES INFORMATION: 800-232-2436 (English) • 800-565-1255 (French)
DOW CHEMICAL CANADA ULC
Dow Building Solutions • Suite 2100 • 450 – 1st St. SW • Calgary, AB T2P 5H1
Printed in U.S.A.
®™Trademark of The Dow Chemical Company (“Dow”) or an affi liated company of Dow
Habitat for Humanity is a registered service mark owned by Habitat for Humanity International
Form No. 179-07305X-0410P&M
178-01084-0410P&M
 Loading...