

Page 1
Aladdin Hearth Products
401 N. Wynne
ADivision of Hearth Technologies Inc.
Colville, WA99114
THE MODEL 400
WOODSTOVE
INSTALLATION & OPERATING
INSTRUCTIONS
IF THIS STOVE IS NOT PROPERLY INSTALLED, A HOUSE FIRE MAY RESULT. FOR
YOUR SAFETY, FOLLOW THE INSTALLATION DIRECTIONS. CONTACT LOCAL BUILDING OR FIRE OFFICIALS ABOUT RESTRICTIONS AND INSTALLATION INSPECTION
REQUIREMENTS IN YOUR AREA.
Model 400 Woodstove
SAFETY NOTICE:
Page 2

5-98 2 72308B
MODEL 400 WOODSTOVE
PLEASE RETAIN THIS MANUALFOR FUTURE REFERENCE.
Table of Contents
A. Listings and Code Approvals..........................................................................................................................3
B. Woodstove System Components...................................................................................................................3
C. Pre-Installation Preparation............................................................................................................................4
1. Minimum Clearances to Combustibles.....................................................................................................4
2. Floor Protection........................................................................................................................................6
3. Chimney Height Requirements................................................................................................................7
4. Flue Systems............................................................................................................................................8
5. Masonry Chimney....................................................................................................................................9
6. Listed Factory-Built Chimney.................................................................................................................12
D. Step-By-Step Installation of the Woodstove.................................................................................................15
E. Operating Instructions ..................................................................................................................................17
F. Maintenance Instructions.............................................................................................................................21
G. Flue Draft .....................................................................................................................................................23
H. Installation of Replacement Glass................................................................................................................25
Limited Warranty...........................................................................................................................................27
Safety Precautions:
1. Please read these installation instructions com-
pletely before beginning installation procedures.
Failure to follow them could cause a woodstove
malfunction resulting in serious injury and/or
property damage.
2. Always check your local building Codes prior to
installation. The installation must comply with all
local, regional, state and national Codes and
Regulations.
3. An adequate supply of replacement combustion
air from outside the house must be available to
the fire for the woodstove to operate properly.
Aladdin is not responsible for any smoking or
related problems that may result from the lack of
adequate combustion air. It is the responsibility
of the builder/contractor to ensure that adequate
combustion air has been provided for the woodstove.
4. NEVER leave children unattended when there is
a fire burning in the woodstove.
5. This woodstove is built for solid fuel only. DO
NOT use chimney cleaners or flame colorants in
your fireplace.
6. NEVER use gasoline, gasoline type lantern fuel,
kerosene, charcoal lighter fluid, or similar liquids
in this woodstove. Keep any flammable liquids a
safe distance from the unit.
7. To ensure a safe woodstove system and to prevent the buildup of soot and creosote, inspect and
clean the woodstove and chimney prior to use
and periodically during the burning season.
Page 3
These installation instructions describe the installation
and operation of the D O V R E®Model 400 woodstove.
This stove meets the U.S. Environmental Protection
Agency's 1990 particulate emission standards. Under
specific test conditions this stove has been shown to
deliver heat at rates ranging from 8,700 to 22,500
BTU/HR.
The D O V R E®Model 400 is listed by Underwriters
Laboratories Inc. to UL Safety Standard 1482 and
ULC Safety Standard S627.
Check with your local Building Code Agency before
you begin your installation to ensure compliance with
local Codes, including the need for Permits and
follow-up inspections. Be sure local building Codes
do not supersede UL specifications and always obtain
a Building Permit so that insurance protection benefits
cannot be unexpectedly canceled. If any assistance
is required during installation, please contact your
local dealer or the Dovre Customer Relations
Department, 401 N. Wynne, Colville, WA99114.
D O V R E®is a registered trademark of Aladdin Hearth
Products. Aladdin Hearth Products is a Division of
Hearth Technologies Inc.
I t ’s a good idea to plan your installation on paper,
using exact measurements for clearances and floor
protection, before actually beginning the installation. If
you’re not using an existing chimney, place the stove
where there will be a clear passage for a factory-built
listed chimney through the ceiling and roof.
We also recommend that you have a qualified building
inspector and your insurance company representative
review your plans before installation.
5-98 3 72308B
MODEL 400 WOODSTOVE
A. LISTINGS AND CODE APPROVALS
B. WOODSTOVE SYSTEM COMPONENTS
The D O V R E®Model 400 has several options available for installation and appearance. These options are
packaged separately and are listed below and pictured on page 4.
Catalog Number Description:
400 Non-catalytic - painted black with ash pan
400PBK Non-catalytic - black porcelain enamel with ash pan
400PCR Non-catalytic - creme porcelain enamel with ash pan
400PGR Non-catalytic - green porcelain enamel with ash pan
400PBL Non-catalytic - blue porcelain enamel with ash pan
400HSB Back shield to reduce clearances & allows use of fan kit
DFK1 Fan kit (requires use of 400HSB for completion)
DT6BK Door trim kit, black
DT6G Door trim kit, gold
Page 4
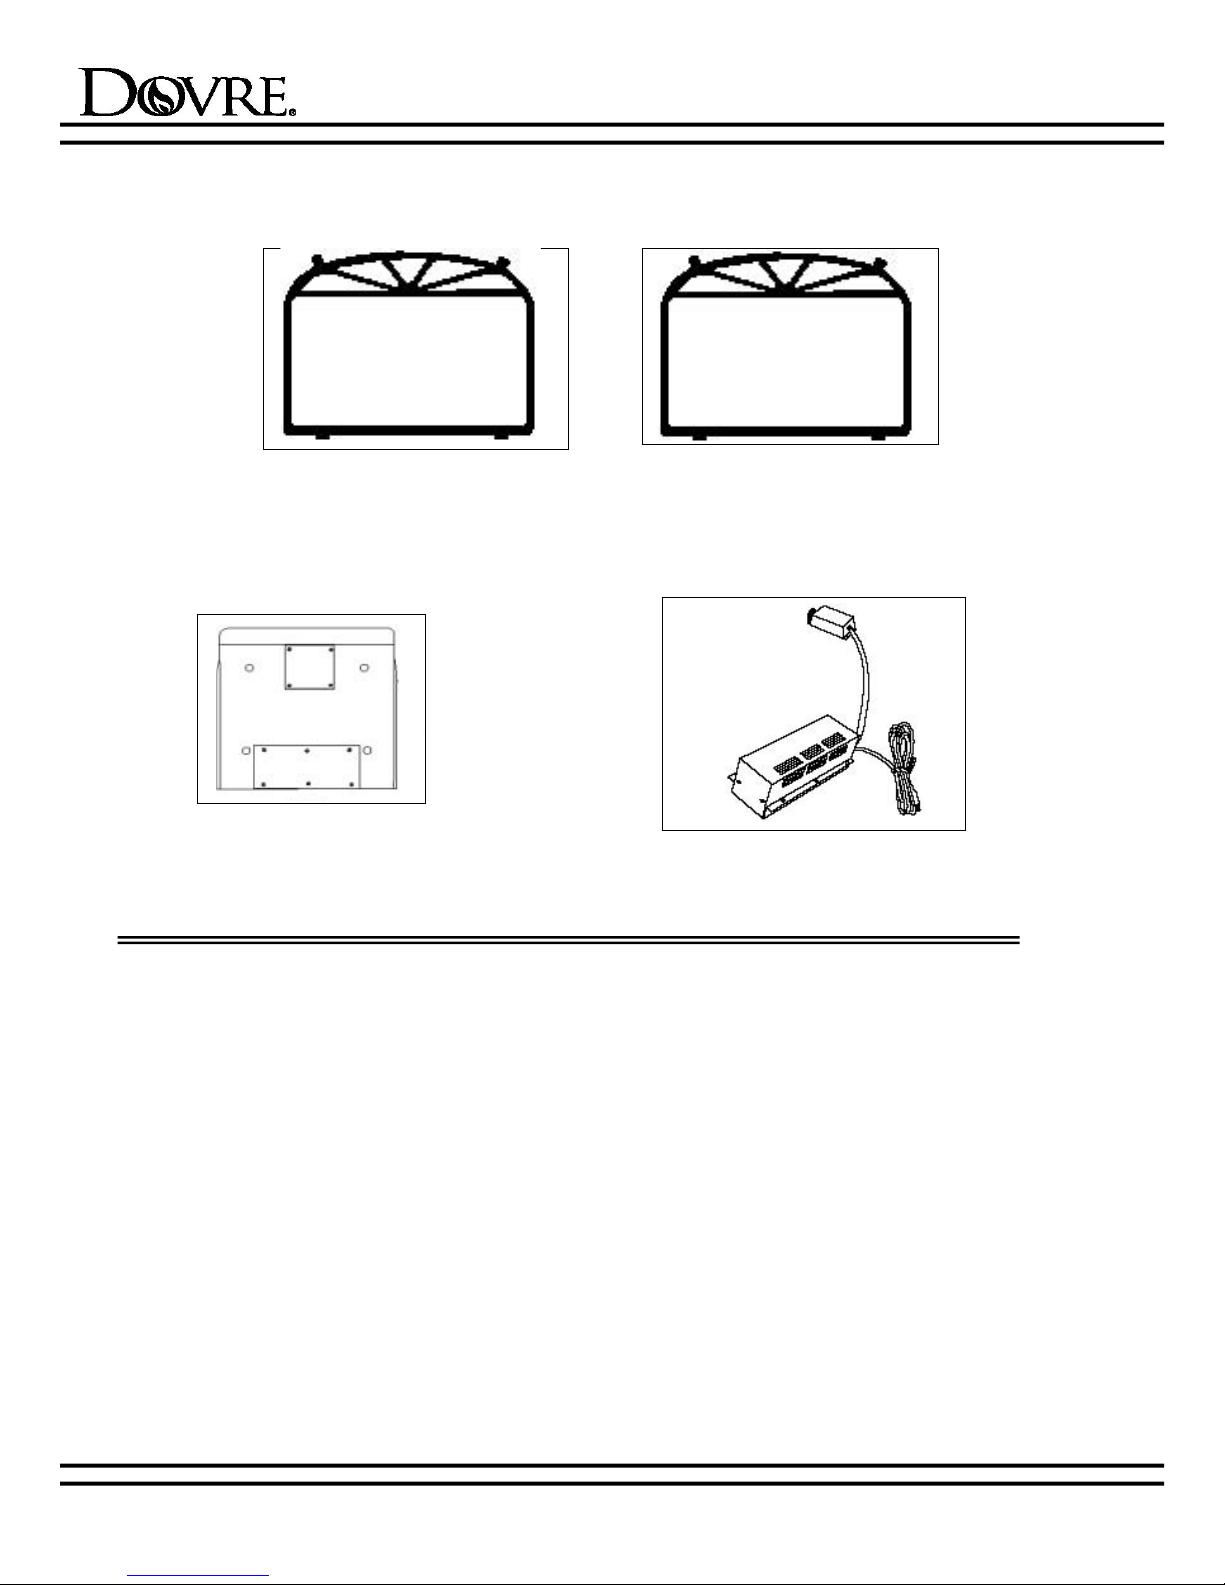
DOOR TRIM
MODEL 400 WOODSTOVE
DT6BK
DT6G
HEATSHIELD FAN KIT
400HSB
DFK1
C. PRE-INSTALLATION PREPARATION
1. MINIMUM CLEARANCES TO COMBUSTIBLES.
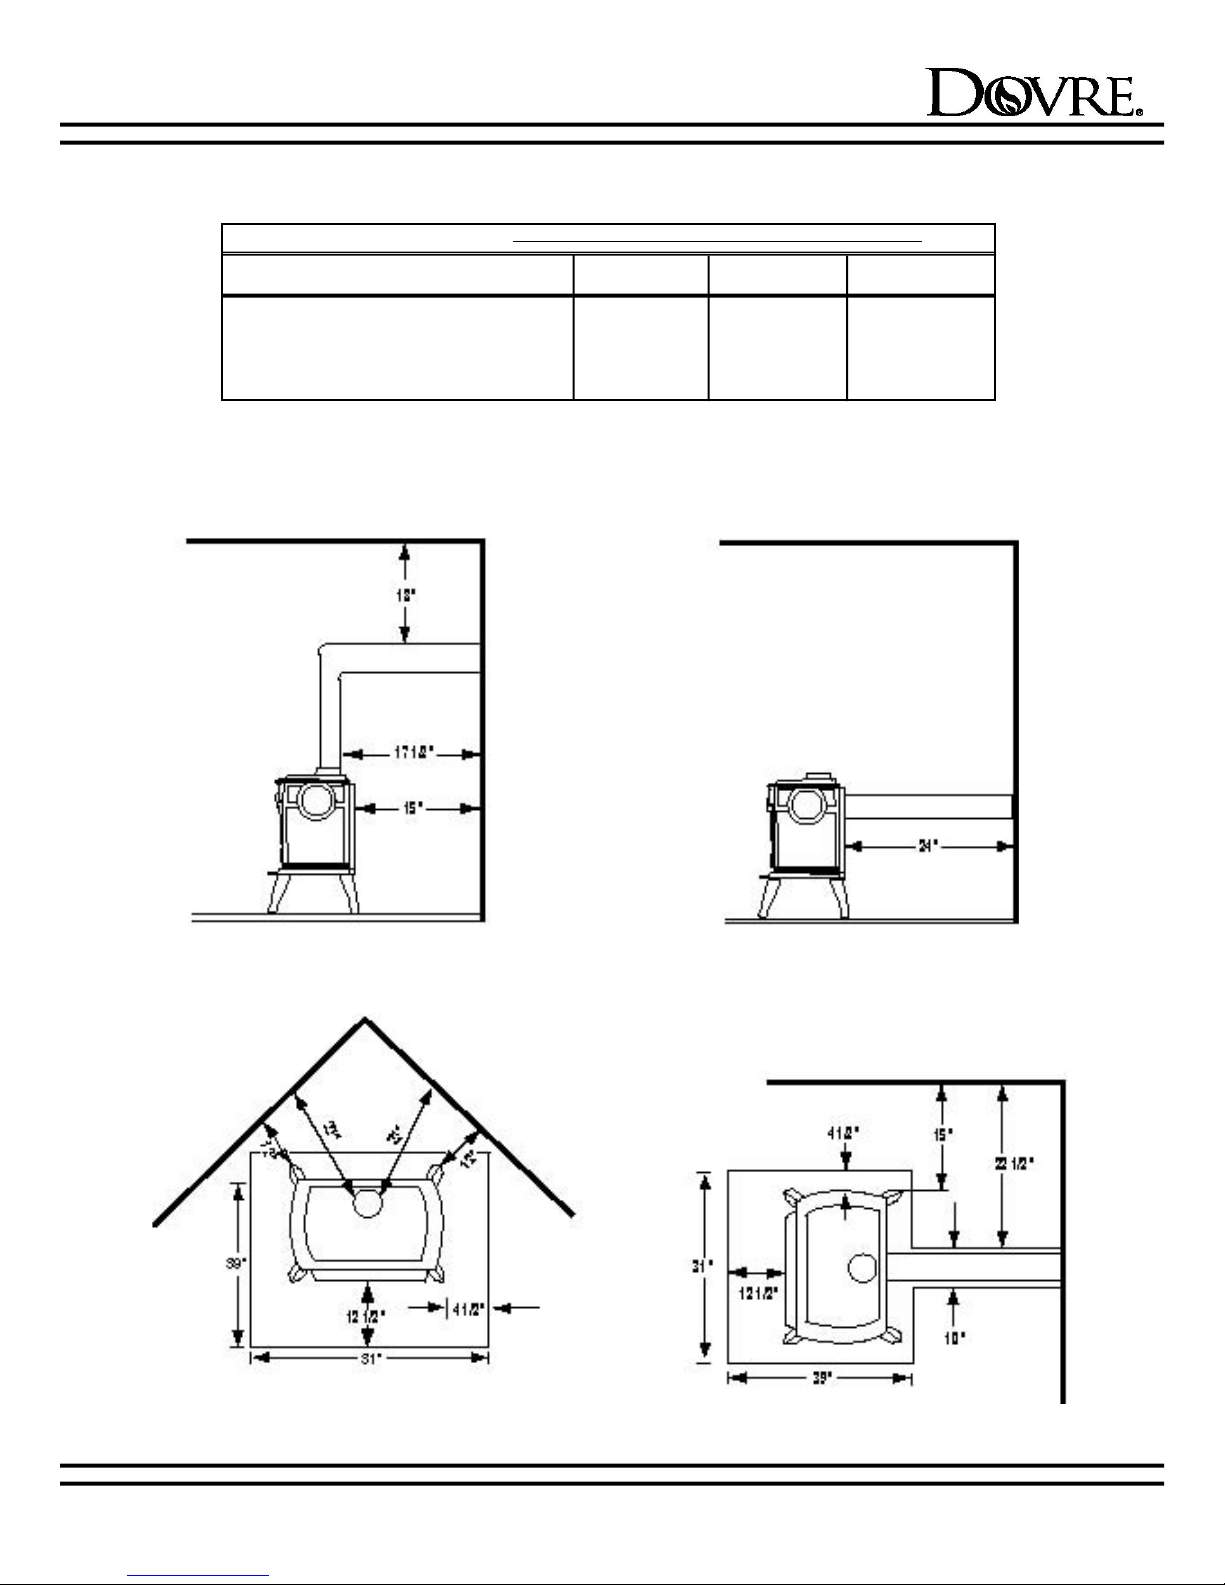
The clearances listed in Table I are the minimum distances that must be maintained, as demonstrated in Figures
1 and 2. It is important to note that simply covering a combustible material with a non-combustible material does
not offer sufficient heat protection. For example, drywall conducts the radiant heat directly to the wood, and the
effect is the same as if the wood was unprotected.
Clearances to a combustible backwall may be reduced to 8” by using Dovre Backshield, part #400HSB, and listed
double wall connector pipe.
The following table and diagrams show the minimum clearance requirements between your Dovre, chimney connectors and unprotected combustible walls and materials. If further reduced clearances are needed, obtain
requirements for construction of a protected wall from your local building code authorities and their allowable
reductions of the listed clearances.
5-98 4 72308B
Page 5
5-98 5 72308B
MODEL 400 WOODSTOVE
Table I
Minimum Clearances to Combustibles
FLUE TOP (WITH REAR HEATSHIELD) 8” 15” 18”
CLEARANCES FROM UNIT TO COMBUSTIBLES
BACKWALL SIDEWALL CEILING
FLUE TOP 15” 15” 18”
FLUE REAR 24” 15” - -
Figure 1
Flue Top Clearances
Figure 3a
Figure 2
Flue Rear Clearances
Figure 3b
Page 6
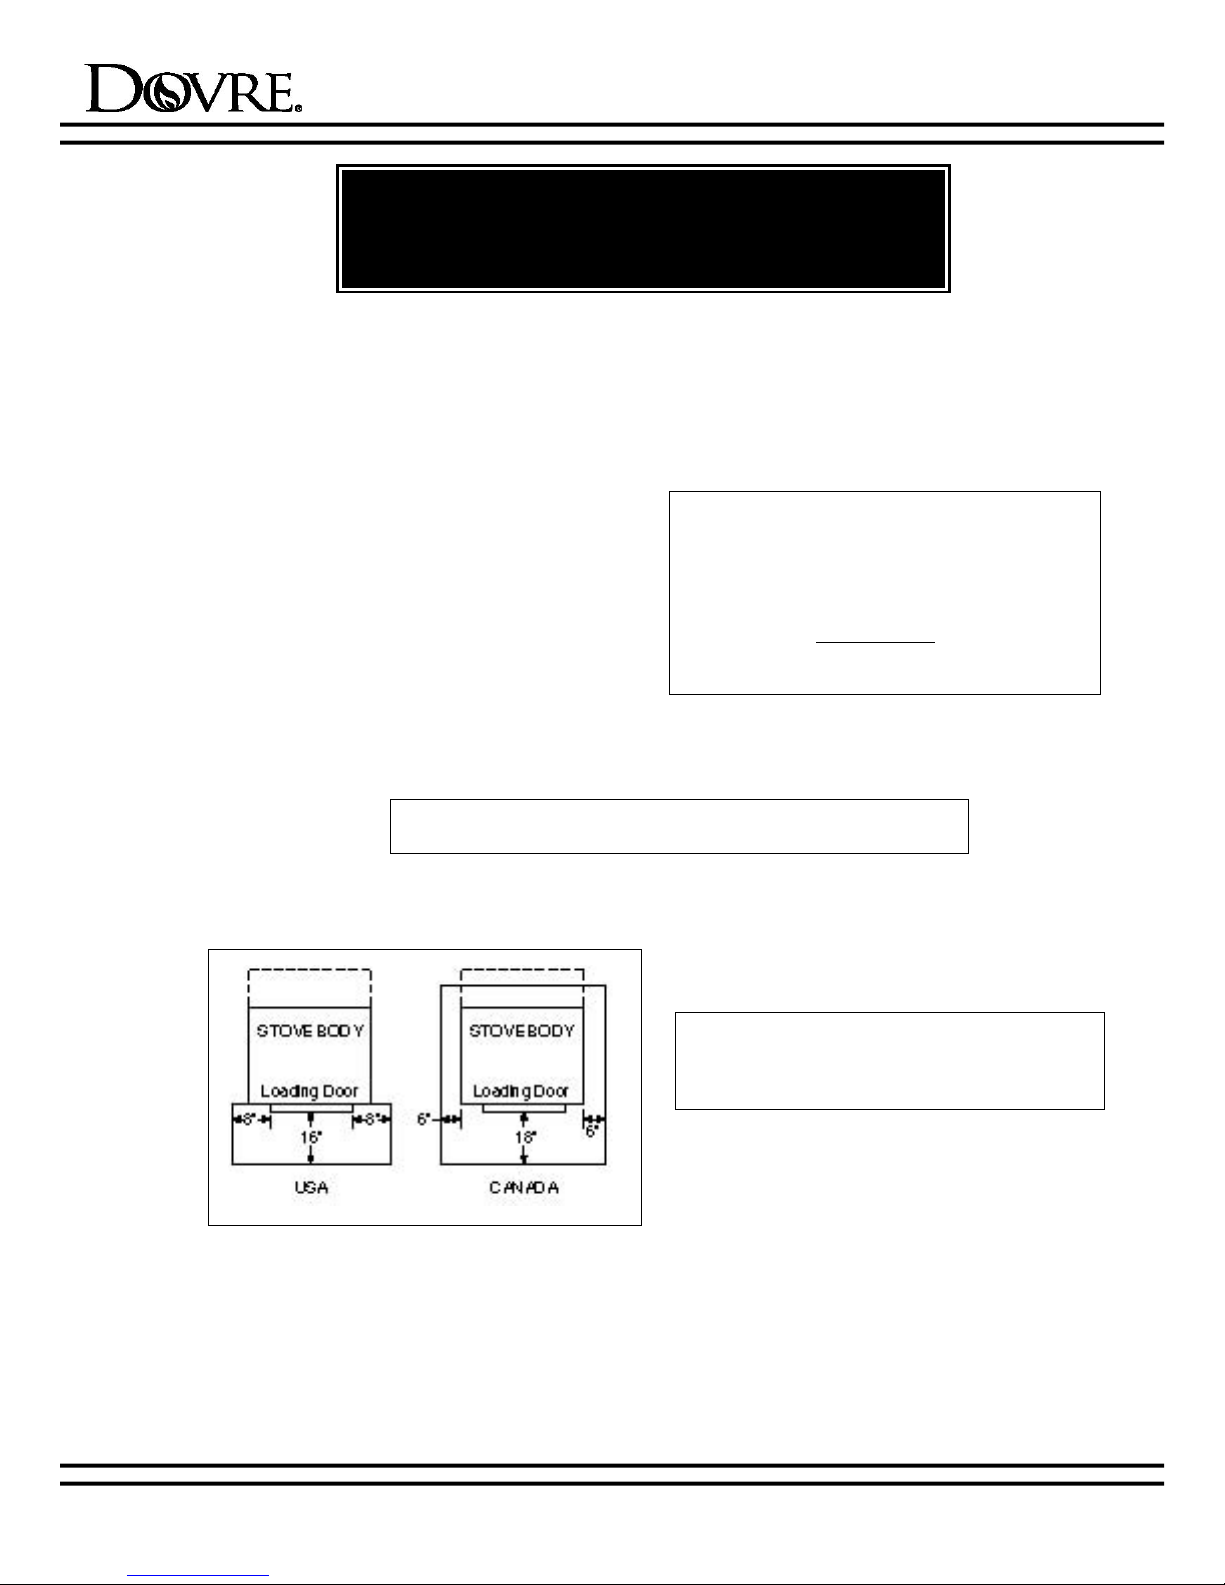
2. FLOOR PROTECTION.
Acombustible floor must be protected from the radiant heat given off by the unit and from the inevitable
spark or falling ember. This includes almost any floor
surface. Only a solid masonry or concrete floor adequately covering the distance around the unit is
acceptable. Alayer of thin brick or ceramic tile over a
combustible floor is insufficient. To protect your floor,
it is necessary to install a floor protector of one layer
of 3/8” non-combustible millboard having a thermal
conductivity of K = 0.84 BTU IN/FTHr F, or an equally
thick UL listed floor protector. The required dimensions of floor protector vary according to the length of
chimney connector as shown. If you construct your
own floor protector with the one layer of millboard, we
suggest that it be covered by one sheet of 24-gauge,
or heavier, galvanized sheet metal. It can then be
covered with ceramic tile, or thin brick, and framed to
protect the millboard and give it a finished look.
NOTE: The minimum Floor Protector Size for the Model 400
Woodstove is 31” wide x 39” deep.
Any horizontal length of chimney connector pipe must
also have the floor protector beneath it and extending
2” on each side of the pipe. The required floor protector size for Model 400 is 31” x 39”. Refer to
Figures 3a and 3b.
WARNING!
COMPLIANCE WITH ALL MINIMUM CLEARANCES SHOWN IN
THIS MANUAL IS NECESSARY FOR YOUR SAFETY.
MODEL 400 WOODSTOVE
NOTE: In calculating equivalent thickness
of alternate materials, the following formula
should be used:
One layer of 3/8” (0.375 inch) thick mill-
board has a K factor of
(BTU) (INCH)
0.31 (HR) ( FT
2)
(F) at 75 F
NOTE: Dotted line indicates additional floor
protection required on through-the-wall
chimney installation. Floor protection must
extend behind the stove to the rear wall.
Figure 4
Floor Protection
5-98 6 72308B
Page 7
5-98 7 72308B
MODEL 400 WOODSTOVE
Figure 5
(Thermal Conductivity) “K” = BTU in./hr. ft2F (based on 1” thickness)
To substitute alternate insulation material, you need to know the “K” factor for that material. To calculate the
required thickness for the alternate material use the following formula:
EXAMPLES OF INSULATION
Required
Thickness “K” Value
MICORE 300 1" .45
“K” Alt.
x 1 = Thickness of alternate mat. (inches)
.45
“K” of brick = 5
5
x .50 = 5.5 In. of brick.
.45
3. CHIMNEY HEIGHT REQUIREMENTS.
WARNING!
ALWAYS FOLLOW CHIMNEY CONNECTOR MANUFACTURER’S INSTRUCTIONS FOR
PROPER INSTALLATION.
CHIMNEY CONNECTOR IS TO BE USED ONLY WITHIN THE ROOM, BETWEEN THE
STOVE AND CEILING WALL, NEVER PASSING THROUGH A COMBUSTIBLE CEILING
OR WALL. ALWAYS KEEP MINIMUM CLEARANCES TO COMBUSTIBLES AS SHOWN
IN TABLE 1.
WARNING!
IF INSTALLING THIS MODELTO AMASONRY CHIMNEY, ALWAYS BE SURE THE
CHIMNEY IS IN GOOD CONDITION AND THAT IT MEETS THE MINIMUM STANDARDS
OF THE NATIONAL FIRE PROTECTION ASSOCIATION (NFPA) STANDARD 211.
THIS APPLIANCE IS MADE WITH A6 INCH/152 MM. DIAMETER CHIMNEY CONNECTOR (IF YOU ARE USING A FACTORY-BUILT CHIMNEY SYSTEM, AS RECOMMENDED) AS THE FLUE COLLAR ON THE UNIT.
CHANGING THE DIAMETER OF THE CHIMNEY CAN AFFECT DRAFT AND CAUSE
POOR PERFORMANCE. IT IS NOT RECOMMENDED TO USE OFFSETS OR ELBOWS
AT ALTITUDES ABOVE 4000 FEET ABOVE SEA LEVEL OR WHEN THERE ARE
OTHER FACTORS THAT AFFECT FLUE DRAFT.
Page 8
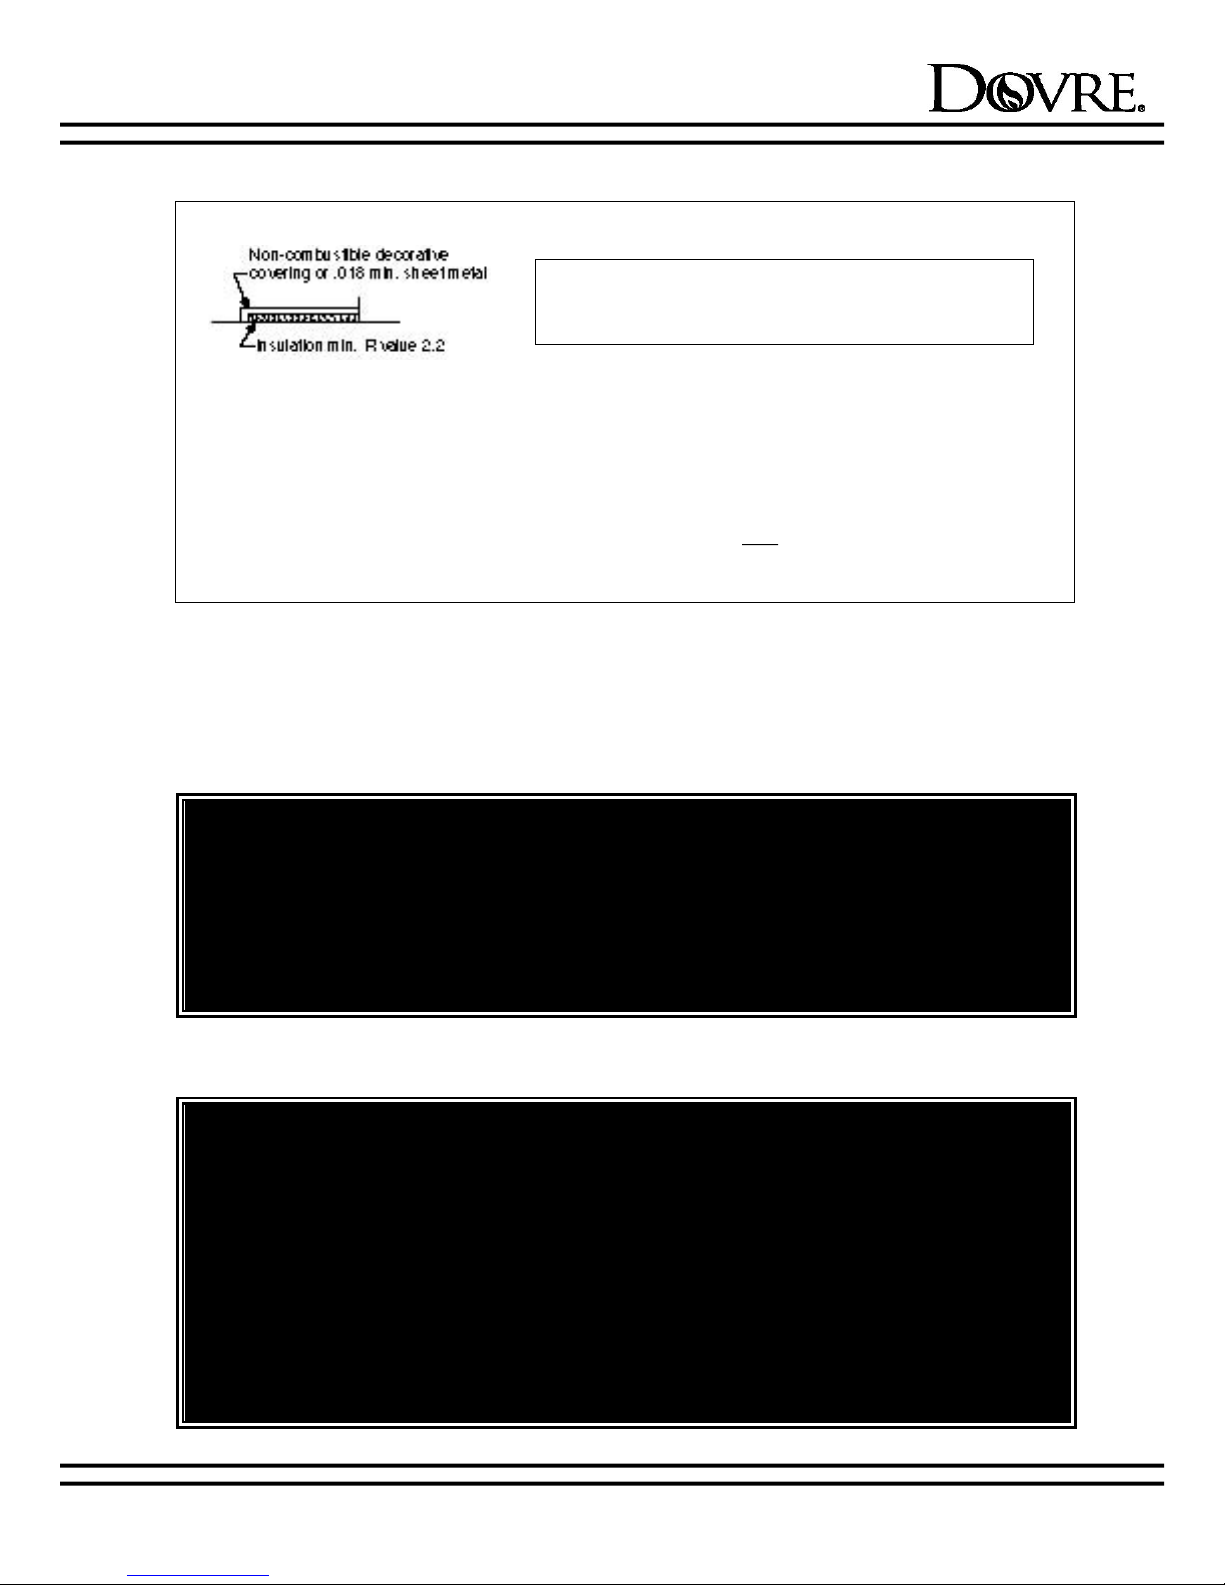
Amasonry chimney or a factory-built chimney must
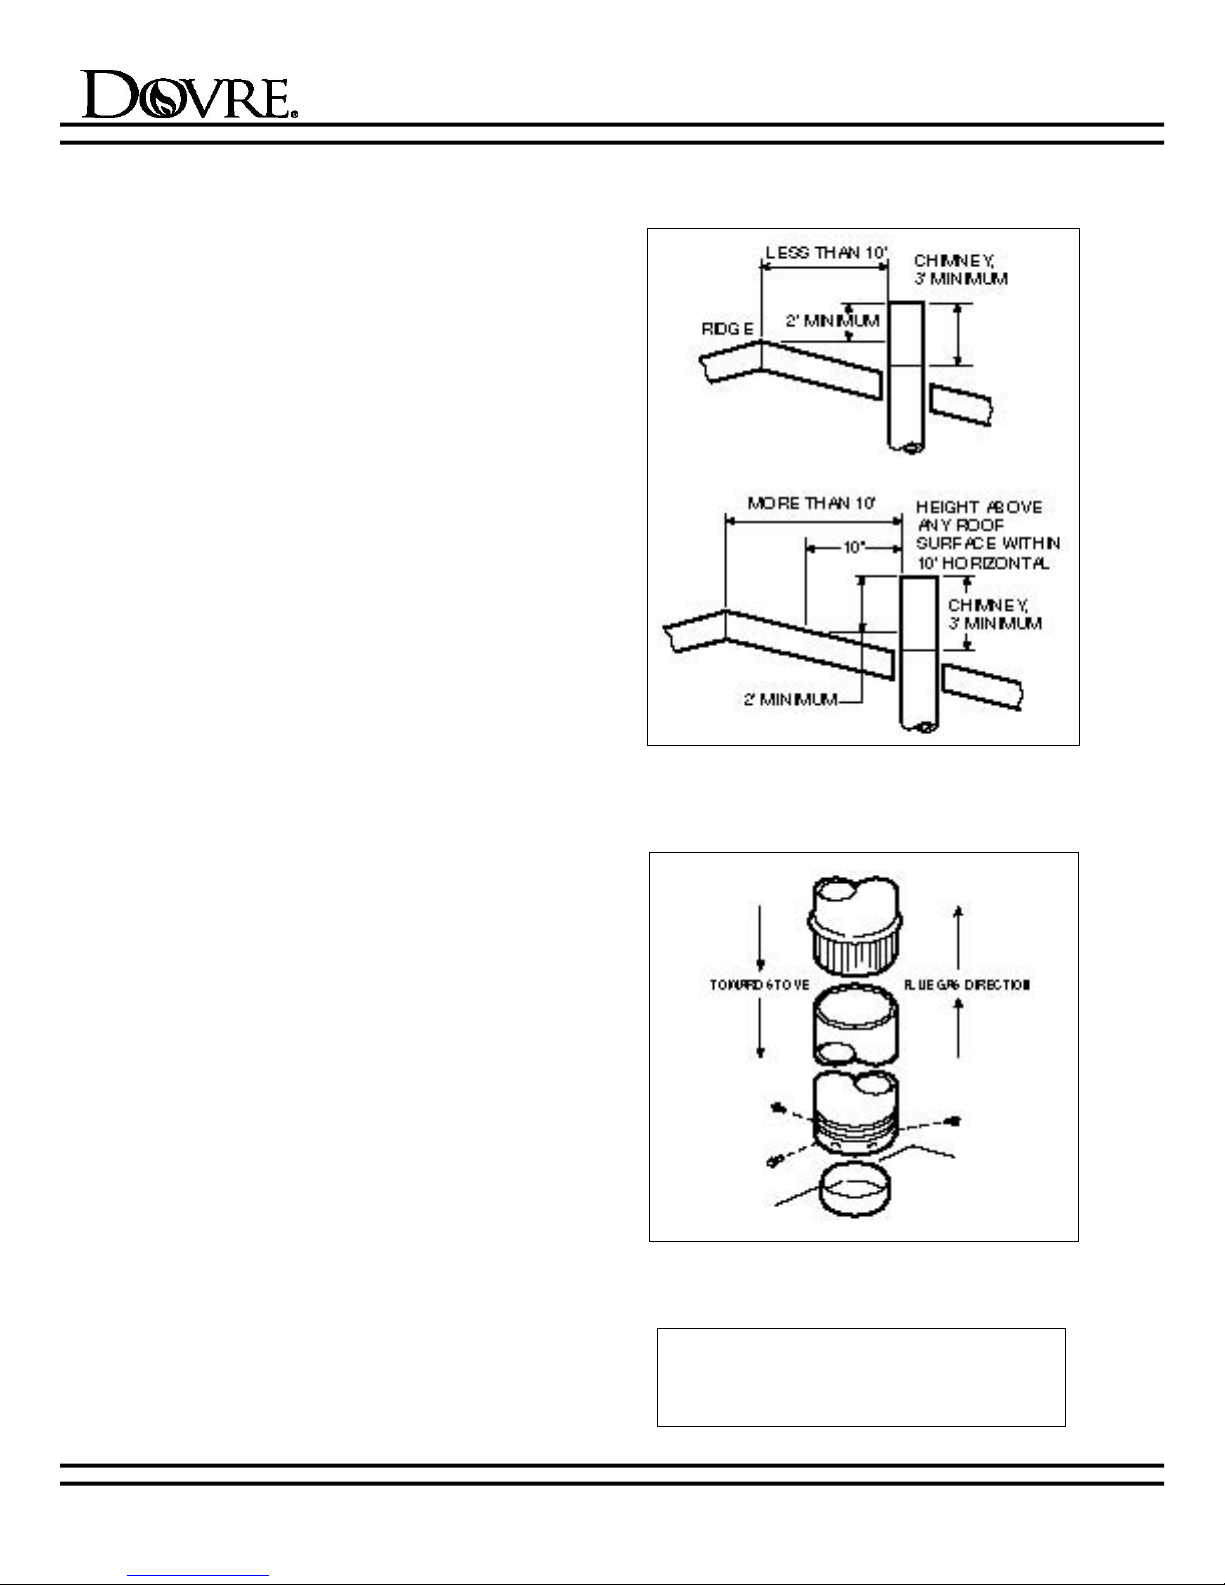
Figure 7
Chimney Connector
be the required height above the roof and any other
nearby obstructions. The chimney must be at least 3
feet higher than the highest point where it passes
through the roof and at least 2 feet higher than the
highest part of the roof or structure that is within 10
feet of the chimney, measured horizontally. See
Figure 6.
These are safety requirements and are not meant to
assure proper flue draft.
We recommend using a minimum total system height
of 12 feet/3657 mm when using single wall connector, not including the chimney cap, measured from
the stove flue collar to the top of the chimney. For a
listed connector pipe, use a minimum total system
height of 9 feet/2743 mm.
MODEL 400 WOODSTOVE
4. FLUE SYSTEMS.
There are two separate and different parts to a flue
system: the chimney connector and the chimney
itself.
Chimney Connector.
The chimney connector connects the stove to the
chimney. The connector must be the same size as
the flue outlet of the stove. There are two types of
chimney connectors.
A. Single wall connector or stovepipe. This must be
at least 24 gauge mild steel or 26 gauge blue
steel. The sections must be attached to the stove
and to each other with the crimped (male) end
pointing toward the stove. See Figure 7. All
joints, including the connection at the stove collar,
should be secured with three sheet metal screws.
Make sure to follow the minimum clearances in
Table 1, page 5.
B. Factory-built listed chimney connector (vented).
The listed connectors must be the same brand at
the listed chimney.
Figure 6
Chimney Height
5-98 8 72308B
NOTE: The chimney connector must be
attached to either an approved masonry
chimney or any safety listed factory-built
chimney.
Page 9

5-98 9 72308B
MODEL 400 WOODSTOVE
5. MASONRY CHIMNEY.
Be sure a masonry chimney meets the minimum standards of the National Fire Protection Association (NFPA)
Standard 211. It must have at least a 5/8 inch/16 mm fire clay liner or a listed chimney liner system. Make sure there
are no cracks, loose mortar or other signs of deterioration and blockage. It is best to have the chimney inspected by
a professional and be sure to have the chimney cleaned before the stove is installed and operated.
The flue should be checked to determine that it is not too large for the stove. NFPA211 allows the cross-sectional
area of the flue to be no more than 3 times the cross-sectional area of the flue collar of the stove (28 x 3 = 84). It is
recommended that a chimney with a larger diameter be relined, since the oversized flue can cause poor performance
and contribute to the accumulation of creosote. (See page 16 for more information about draft.)
When connecting the stove through a combustible wall to a masonry chimney, special methods are needed. There
are several ways to make this connection, including the construction of a masonry thimble. Check with your local
building authorities or consult the National Fire Protection Association (NFPA211). Refer to Figure 8.
NOTE: Never install more than one appliance to any Chimney.
Figure 8
Masonry Thimble
Page 10

MODEL 400 WOODSTOVE
5-98 10 72308B
EIGHT INCH SOLID PACK CHIMNEY
WITH METALSUPPORTS AS A
THIMBLE.
For the method of installation to a masonry chimney
shown in Figures 10 & 11, it will be necessary to purchase a 8 inch inside diameter 12 inch long section of
prefabricated listed solid pack chimney to use as a
thimble. Purchase a wall spacer, trim collar and a
ware manufactured to fit the chimney section you
purchase.
The safety features of this system are: 2 inch air
space between the chimney section and combustible
wall, and the 1 inch air space around the chimney
connector as it passes through the chimney section
to the chimney.
The location of the opening through the wall to the
chimney must leave a minimum 18 inch vertical clearance between the connector pipe and the ceiling to
prevent the ceiling from catching fire.
Cut out an opening in the wall large enough to
accommodate the outside dimension of the chimney
section plus the minimum air space specified by its
manufacturer. It may be necessary to cut the wall
studs and install a header and a sill frame to maintain
the wall support. The hole in the chimney must have
at least an 8 inch diameter fire clay liner or equivalent
secured with refractory mortar. If it is necessary to
cut a hole in the chimney liner, use extreme care to
keep it from shattering.
First, make the frame for the thimble, being sure it is
no smaller than 14 inches square, to maintain a 2
inch air space around the chimney section. Attach
the wall spacer to the chimney side of the frame.
Then insert the frame into the opening, toe nailing it
to the wall studs. Install the wall band in the framing
to secure the chimney section in place. Insert a single section of chimney connector into the chimney
through the wall band, being sure it does not protrude
into the chimney beyond the edge of the chimney flue
lining. Apply high temperature furnace cement to the
end of the chimney section and install it over the connector, through the wall spacer. Tighten the wall
band to hold the chimney section firmly in place and
against the chimney. Install the trim collar on the outside of the opening. Check to assure there is a 1
inch air space between the connector and the chimney section. Also, during installation, always check to
assure that a 2 inch air space is being maintained to
the wood framing. Do not fill this space with insulation. Insulation in this air space will cause a heat
buildup which may ignite the wood framing.
Page 11

MODEL 400 WOODSTOVE
Figure 10
Installation to a Masonry Chimney
5-98 11 72308B
Figure 11
Installation to a Masonry Chimney
Page 12

MODEL 400 WOODSTOVE
5-98 12 72308B
CONNECTION TO AMASONRY FIREPLACE.
There are several kits available to connect the stove to a mason-
ry fireplace. Look for a listed kit. The kit is an adapter which is
installed at the location of the fireplace damper. The existing
damper may have to be removed to allow installation of the kit.
The key points of this type of stove connection are that the connector pipe must extend up the chimney above where the fire
clay liner starts, and the areas of the kit installation and penetra-
tion should fit tightly and be sealed with high temperature furnace cement unless the kit’s instructions state otherwise.
See Figure12. The tight fitting installation aids the proper draw
of the chimney.
6. CONNECTION TO A METAL
PREFABRICATED CHIMNEY.
When a metal prefabricated chimney is used, the
manufacturer’s installation instructions must be
followed precisely. You must also purchase
(from the same manufacturer) and install the
ceiling support package or wall pass through and
“T” section package, firestops (when needed),
insulation shield, roof flashing, chimney cap, etc.
Maintain the proper clearance to the structure as
recommended by the manufacturer. This clearance is usually a minimum of 2 inches, although
it may vary by manufacturer or for certain com-
ponents.
There are basically two methods of metal chimney installation. One method is to install the
chimney inside the residence through the ceiling
and the roof. See Figures 13 and 14.
The other method is to install an exterior chim-
ney that runs up the outside of the residence.
See Figures 15 and 16. The components illustrated may not look exactly like the system you
purchase, but they demonstrate the basic components you will need for a proper and safe
installation.
The chimney must be the required height above
the roof or other obstruction for safety and for
proper draft operation. The requirement is that
the chimney must be at least 3 feet higher than
the highest point where it passes through the
roof and at least 2 feet higher than the highest
part of the roof or structure that is within 10 feet
of the chimney, measured horizontally.
Install an attic insulation shield to maintain the
specified clearance to insulation. Insulation in
this air space will cause a heat buildup which
may ignite the ceiling joists.
This method of installation requires, at minimum,
a ceiling support package, an insulation shield
and roof flashing.
Figure 12
Connection to a Masonry Fireplace
LISTED FACTORY-BUILT CHIMNEY.
Your Dovre unit requires a 6” diameter pipe.
Follow the installation instructions provided by the
chimney manufacturer and maintain the specified
clearances to combustibles.
When using a factory-built chimney, make sure it
is safety listed, Type HTor conforming to
CAN/ULC-S692M, STANDARD FOR 650°C FACTORY-BUILT CHIMNEYS.
IMPORTANT
FOLLOW THE MANUFACTURER’S INSTALLA-
TION INSTRUCTIONS AND MAINTAIN THE
MANUFACTURER’S CLEARANCE DIS-
TANCES.
Page 13

MODEL 400 WOODSTOVE
Figure 14
Figure 13
Installation of an Interior
Chimney
5-98 13 72308B
Page 14

MODEL 400 WOODSTOVE
5-98 14 72308B
Figure 15
Installation of an Exterior Chimney
Figure 16
Page 15

MODEL 400 WOODSTOVE
D. STEP BY STEP INSTALLATION OF THE WOODSTOVE
1. ASSEMBLY.
Before assembly, place the unit near the final
position, then follow the procedures below.
a. Open the stove and remove all the parts and arti-
cles packed inside. Inspect all the parts and the
cast iron body for shipping damage. Contact your
dealer if any irregularities are noticed.
b. Install floor protection if the heater is being placed
on a combustible floor. Refer to the section on
floor protectors for required materials and sizes on
page 6.
c. Lift the unit upright and place it into position on the
floor protector. DO NOT TILT THE UNIT ON THE
ON THE CAST IRON LEGS.
d. The Flue Collar is located inside the Model 400.
For a top flue exit, attach the Collar to the top of
the heater with the bolts and nuts provided. Furnace cement may be used to seal under the
Collar. See Figure 17.
Should a rear flue exit be necessary, you will
need to remove the center section from the back
shield to allow for rear exit. The Flue Collar is
then fastened to the back of the unit with the
bolts and nuts provided, as shown in Figure 17.
Install the cast iron Cover Plate on the top of the
heater in the unused Flue Opening by placing a
bead of furnace cement around the edge and
place the Cover in position so it sits firmly
against the cast iron. Attaching the Cover Plate
to the rear of the stove, you will also need to
attach the Fixing Bar to the Cover Plate with the
washers provided. See Figure 17 for Top and
Rear Cover Plate installation.
5-98 15 72308B
Figure 17
Top and Rear Cover Plate Installation
Page 16

2. FIREBRICK PLACEMENT.
Make sure the firebricks are in position and not broken
before operating the unit. Also make sure the baffle insulation is positioned all the way against the rear of the unit.
✔ PRE-USE CHECK LIST
Use the following checklist as a guide to be sure your installation is correct and complete.
All of the safety warnings have been read and
followed.
Floor protection requirements have been followed.
Chimney connector is properly installed.
The proper clearances from the stove and chimney
to combustible material have been met.
The masonry chimney is inspected and clean or
the factory built metal chimney is installed
according to the manufacturer’s instructions and
clearances.
The chimney meets the required minimum height.
5-98 16 72308B
CAUTION:
IF THE OPTIONAL BLOWER KIT IS
USED, THE CORD SHOULD BE
ROUTED AWAY FROM THE UNIT.
WARNING!
NEVER DRAW COMBUSTION AIR
FROM A WALL, FLOOR OR CEIL-
ING CAVITYOR FROM ANY
ENCLOSED SPACE SUCH AS AN
ATTIC OR GARAGE.
MODEL 400 WOODSTOVE
Page 17

MODEL 400 WOODSTOVE
DO NOT ATTEMPT TO OPERATE THIS WOODSTOVE WITHOUT READING A N D
U N D E R S TANDING THESE OPERATING INSTRUCTIONS THOROUGHLY. FA I L U R E
TO OPERATE THIS APPLIANCE PROPERLY M AY CAUSE A SERIOUS HOUSE FIRE.
E. OPERATING INSTRUCTIONS
WA R N I N G !
GENERAL INFORMATION.
The D O V R E®Model 400 woodstove is an efficient
woodstove designed to burn natural, seasoned
wood. Do not burn artificial logs or driftwood.
The Air Inlet Control is located at the upper right
corner of the stove. Move the lever to the left to
open and to the right to close. See Figure 18a. In
addition, when starting a fire in the Model 400 also
open the Spin Draft Control located in the center of
the Lower Door. To open this Control, turn counter
clockwise and clockwise to close. See Figure 18b.
The more combustion air allowed into the
Firebox, the hotter and faster the fire will burn.
Closing the Air Intake slows the rate of
combustion resulting in a slower burning fire.
Experience with your stove, the quality of your
firewood, and local conditions will determine
the proper setting for maintaining the heat
output that best suits your needs.
BREAK-IN PERIOD.
Build your first few fires small to allow the high temperature paint on your stove to cure. During this
period excessive temperatures may damage the
paint. Allow adequate ventilation to dissipate smoke
and odor that may come from the paint during curing.
Figure 18a
Air Inlet Control
5-98 17 72308B
Figure 18b
Spin Draft Control
Page 18

WARNING!
ALWAYS OPERATE THIS APPLIANCE
WITH THE DOOR CLOSED AND
LATCHED EXCEPT DURING START-
UPAND RE-FUELING.
WA R N I N G !
DO NOT USE A R T I F I C I A LLOGS THAT
C O N TAIN WAX, PARAFFIN, OR OTHER
INGREDIENTS THAT CAN RELEASE
V O L ATILE GASES WHICH MAY C O N-
DENSE ON THE INSIDE OF THE
FIREBOX AND CHIMNEY. SOME
A R T I F I C I A LLOGS CONTAIN FLAM-
MABLE LIQUIDS THAT MAY C A U S E
AN UNCONTROLLABLE FIRE.
3. Move the Air Intake control lever all the way to
the left (High) to open the air intake. Also, open
the Spin Draft by rotating it counter clockwise
4. Light the newspaper in several places, starting at
the back of the firebox and working towards the
front.
5-98 18 72308B
WARNING!
NEVER USE GASOLINE, GASOLINE-
TYPE LANTERN FUEL, KEROSENE,
CHARCOAL LIGHTER FLUID, OR
SIMILAR LIQUIDS TO START OR
‘FRESHEN-UP’A FIRE IN THIS
HEATER. KEEPALL SUCH LIQUIDS
WELL AWAY FROM THE HEATER.
WARNING!
BUILD THE FIRE DIRECTLYON THE
FIREBRICK FLOOR. DO NOT USE A
GRATE OR OTHERWISE ELEVATE
THE FIRE WHEN BURNING WOOD.
WA R N I N G !
FAILURE TO FOLLOW INSTRUC-
TIONS LISTED MAYAFFECT THE
PERFORMANCE OF THE A P P L I A N C E .
DURING STA R T- U PAND RE-FUELING
IT IS NECESSARY T H AT THE A P P L I-
ANCE REACH OPERATING TEMPER-
ATURE FOR PROPER PERFOR-
M A N C E .
STARTING THE FIRE.
1. Place several crumpled newspaper pages on the
firebox floor.
2. Cover the paper with several pieces of kindling.
The kindling should be less than 1" in diameter,
well seasoned, dry, split firewood.
5. Close the door to prevent smoke spillage but do
not latch. This allows extra air into the firebox
for start-up while preheating the glass to help
keep it cleaner.
6. Once the kindling is burning, place three or four
small pieces of firewood, two or three inches in
diameter on the fire, close the door and latch.
NOTE: If the chimney flue is cold due to low
outside temperatures, several pieces of crumpled paper on top of the fuel may help establish
a draft in the flue.
MODEL 400 WOODSTOVE
Page 19

MODEL 400 WOODSTOVE
7. Maintain the fire by adding small pieces of firewood periodically until a uniform fire bed has
been established.
8. After establishing the fire bed, and the small firewood is burning briskly, add a minimum of three
average sized pieces of split firewood, place the
wood in such a manner to allow combustion air
and flames between them.
DO NOT LEAVE THE FIRE UNAT-
TENDED WHEN THE DOOR IS
UNLATCHED. CARELESSLY
PLACED FIREWOOD COULD FALL
OUT OF THE FIREBOX CREATING A
9. After about 45 minutes to 1 hour the stove will
have reached operating temperature. You may
slow down the burn rate by pulling the air intake
control lever out to the desired setting.
10. If equipped with optional blower, turn it on at this
time.
ALWAYS OPEN THE DOOR SLOWLY
WHILE THE FIRE IS BURNING TO
AVOID SMOKE AND FLAME
SPILLAGE. IT IS BEST TO UNLATCH
THE DOOR, WAIT AFEW SECONDS,
THEN OPEN THE DOOR SLOWLY.
TO INSURE GOOD, RAPID RE-IGNI-
TION, CREATE AVALLEY IN THE
COAL BED FROM THE FRONT TO
ABOUT ITS CENTER, WHICH WILL
ALLOW COMBUSTION AIR UNDER-
NEATH THE FRONT PIECE OF FUEL.
WARNING!
FIRE HAZARD.
WARNING!
RE-FUELING.
When adding fresh wood to an existing fire:
1. Open the air intake by moving the control lever
all the way to the left.
2. Wait a few seconds, then open the door slowly.
If the fire has been allowed to die down between refueling, it may be necessary to use smaller pieces of
wood to re-kindle it. Leave the control lever on HI
after re-fueling for 10 to 20 minutes to re-establish a
moderately high firing rate and bring the stove back
up to operating temperature.
OPERATING EFFICIENCY.
Rather than burning the stove hot and not running
the blower, it is more efficient to adjust the damper
down and operate the blower on low to move air
across firebox surfaces. This method of operation
will conserve fuel and gain a maximum amount of
heat from the stove. Model 400 woodburning stove
is designed to be an exceptional value in heating effi-
ciency when installed, operated and maintained in
accordance with the information in this manual.
However, factors unique to your location, installation,
or firewood can affect or alter the performance of this
appliance. If you experience difficulty lighting the fire
or sporadic burning refer to Flue Draft section on
page 23 of this manual.
WARNING!
DO NOT STORE FUEL WITHIN THE
CLEARANCES TO COMBUSTIBLES
MENTIONED ON PAGE 5, OR IN THE
SPACE REQUIRED FOR REFUELING
AND ASH REMOVAL.
WARNING!
DO NOT OVER FIRE THIS HEATER.
ATTEMPTS TO ACHIEVE HEAT OUT-
PUT RATES THAT EXCEED HEATER
DESIGN SPECIFICATIONS CAN
RESULT IN PERMANENT DAMAGE
TO THE HEATER. IF ANY PART OF
THE UNIT OR FLUE SYSTEM IS
GLOWING, THE STOVE IS BEING
OVER FIRED.
5-98 19 72308B
WARNING!
BURNING WET UNSEASONED
WOOD CAN CAUSE EXCESSIVE
CREOSOTE A C C U M U L ATION. WHEN
IGNITED IT CAN CAUSE A C H I M N E Y
FIRE THAT MAY R E S U LT IN AS E R I-
OUS HOUSE FIRE.
Page 20

MODEL 400 WOODSTOVE
The following guideline will ensure properly seasoned wood:
1. Stack the wood to allow air to circulate freely
around and through the woodpile.
2. Elevate the woodpile off the ground to allow
air circulation underneath.
3. The smaller the pieces, the faster the drying
process. Any piece over six inches in diameter should be split.
4. Cover the top of the woodpile for protection
from rain and snow. Avoid covering the sides
and ends completely. Doing so may trap
moisture from the ground and impede air circulation.
The problems with burning wet, unseasoned wood
are twofold. First, you will receive less heat output
from wet wood because it requires energy in the form
of heat to evaporate the water trapped inside. This is
wasted energy that should be used for heating your
home. Secondly, this moisture evaporates in the
form of steam which has a cooling effect in your firebox and chimney system. When combined with tar
and other organic vapors from burning wood it will
form creosote which condenses in the relatively cool
firebox and chimney. See the maintenance section
of this manual for more information regarding creosote formation and need for removal.
5-98 20 72308B
WOOD FUEL.
Hardwood vs. Softwood
Your woodstove’s performance depends a great deal
on the quality of the firewood you use. Contrary to
popular belief, one species of wood varies very little
to the other in terms of energy content. All seasoned
wood, regardless of species, contains about 8,000
BTU’s per pound. The important factor is that hardwoods have a greater density than softwoods.
Therefore, a piece of hardwood will contain about
60% more BTU’s than an equal size piece of softwood. Since firewood is commonly sold by the cord
(128 cu. ft.), a volume measurement, a cord of seasoned oak (hardwood) would contain about 60%
more potential energy than a cord of seasoned pine
(softwood).
There are many definitions of hardwood and softwood. Although not true in every case, one of the
most reliable is to classify them as coniferous or
deciduous.
Softwoods are considered coniferous. These are
trees with needle-like leaves that stay green all year
and carry their seeds exposed in a cone. Examples
of softwood trees are Douglas fir, pine, spruce and
cedar.
Softwoods, being more porous, require less time to
dry, burn faster and are easier to ignite than hardwoods.
Deciduous trees are broadleaf trees that lose their
leaves in the fall. Their seeds are usually found within a protective pod or enclosure. Hardwoods fall into
this category. Some examples of deciduous trees
are oak, maple, apple, and birch. However it should
be noted that there are some deciduous trees that
are definitely not considered hardwoods such as
poplar, aspen and alder. Hardwoods require more
time to season, burn slower and are usually harder to
ignite than softwoods.
Obviously, you will use the type of wood that is most
readily available in your area. However, if at all possible the best arrangement is to have a mix of softwood and hardwood. This way you can use the softwood for starting the fire giving off quick heat to bring
the appliance up to operating temperature. Then add
the hardwood for slow, even heat and longer burn
time.
SEASONING.
Seasoned firewood is nothing more than wood that is
cut to size, split and air dried to a moisture content of
around 20%. The time it takes to season wood
varies from around nine months for softwoods to as
long as eighteen months for hardwoods. The key to
seasoning wood is to be sure it has been split,
exposing the wet interior and increasing the surface
area of each piece. Atree that was cut down a year
ago and not split, is likely to have almost as high a
moisture content now as it did when it was cut.
MOISTURE CONTENT.
Regardless of which species of wood you burn, the
single most important factor that effects the way your
stove operates is the amount of moisture in the wood.
The majority of the problems woodstove and fireplace
insert owners experience are caused by trying to
burn wet, unseasoned wood.
Freshly cut wood can be as much water as it is wood,
having a moisture content of around 50%. Imagine a
wooden bucket that weighs about 8 pounds. Fill it
with a gallon of water, put it in the firebox and try to
burn it. This sounds ridiculous but that is exactly
what you are doing if you burn unseasoned wood.
Page 21

MODEL 400 WOODSTOVE
ASH HANDLING.
Open the ash grate by sliding the upper grate to the
left. See Figure 19. Use a fireplace tool to work the
desired amount of ash through the grate into the ash
pan. Some ash on the grate is desirable to help keep
an active bed of coals for refueling. We recommend
emptying the ash pan at least once a day when the
stove is in constant operation. The amount of ash is
dependent on the type of wood being burned. DO
NOT LET ASHES BUILD UP IN THE ASH PAN
UNTIL THEY REACH THE GRATE AS THIS WILL
LEAD TO PREMATURE DETERIORATION OF THE
GRATE AND MAKE IT DIFFICULT TO EMPTY THE
ASH PAN. See Figure 20 for ash pan diagram.
F. MAINTENANCE INSTRUCTIONS
Figure 20
Ash Pan
Figure 19
Ash Grate
ASH DISPOSAL.
Ashes must be disposed of carefully. The National
Fire Protection Association (NFPA) suggests that all
ashes be placed in a metal container with a tight fitting lid. The closed container of ashes should be
placed on a non-combustible floor or on the ground,
well away from all combustible materials, pending
final disposal. If the ashes are disposed of by burial
in soil or otherwise locally disbursed, they should be
retained in the closed container until all cinders have
thoroughly cooled.
It is critical to remember that while you may not see
any red coals in the ashes being removed, it is most
likely there still is some residual burning occurring
unless the fire has been cold for at least 48 hours.
5-98 21 72308B
Page 22

MODEL 400 WOODSTOVE
WARNING!
NEVER ATTEMPT TO CLEAN THE
GLASS WHILE IT IS HOT.
WARNING!
DO NOT OPERATE THIS INSERT IF
THE DOOR GASKET IS MISSING OR
DAMAGED. DANGEROUS OVERFIR-
ING MAYOCCUR WHICH CAN DAM-
AGE THE APPLIANCE OR IGNITE
CREOSOTE IN THE CHIMNEY, POSSI-
BLYCAUSING A HOUSE FIRE.
Replace the gasket when necessary with 3/4" diameter woodstove gasket material available from your
local woodstove retailer or order Part #18589 Fire
door Gasket Kit from your nearest D O V R E®dealer.
The Fire door Gasket Kit comes complete with gasket material, high temperature adhesive and instructions.
WARNING!
ASHES SHOULD NEVER BE PLACED
IN WOODEN OR PLASTIC CONTAIN-
ERS, OR IN PAPER OR PLASTIC
BAGS, REGARDLESS OF HOW
LONG THE FIRE HAS BEEN OUT.
COALS HAVE BEEN FOUND TO STAY
HOT FOR SEVERAL DAYS WHEN
EMBEDDED IN ASHES.
CREOSOTE & SOOT.
Formation and need for removal.
When wood is burned slowly, it produces tar and
other organic vapors which combine with expelled
moisture to form creosote. The creosote vapors condense in the relatively cool chimney flue of a newly
started fire or from a slowly burning fire. As a result,
creosote residue accumulates on the flue lining.
When ignited, this creosote makes an extremely hot
fire which may damage the chimney or even destroy
the house.
The chimney should be inspected at least twice
monthly during the heating season to determine if a
creosote or soot build-up has occurred. If so, it
should be removed to reduce the risk of a chimney
fire.
To help prevent creosote build-up, always burn dry,
well seasoned firewood. When re-fueling after an
extended low burn rate, allow the appliance to burn
with the combustion air intake fully open (temperature setting on HI) for ten to twenty minutes to burn
off creosote deposits that accumulate during the low
burn.
Inspect the system at the insert connection and at
the chimney top. Cooler surfaces tend to build creosote deposits quicker, so it is important to check the
chimney from the top as well as the bottom.
The creosote and soot should be removed with a
brush specifically designed for the type of chimney in
use. Achimney sweep can perform this service. It is
also recommended that before each heating season
the entire system be professionally inspected, and
cleaned and repaired if necessary. This insert should
be removed for periodic inspection and cleaning of
chimney.
WARNING!
FAILURE TO INSPECT AND CLEAN
YOUR CHIMNEY REGULARLY CAN
RESULT IN A SERIOUS FIRE WHICH
MAYDAMAGE THE CHIMNEY OR
CAUSE A HOUSE FIRE.
DOOR GASKET.
Check the door gasket periodically for proper seal.
As the door gasket compresses or “seats” during use
it will be necessary to adjust or tighten the door latch.
Wear or damage to the gasket material can cause air
leakage into the firebox resulting in overfiring and
loss of efficiency.
5-98 22 72308B
Page 23

MODEL 400 WOODSTOVE
DOOR GLASS.
Do not strike or slam the door shut.
Inspect the glass regularly for cracks or breaks. If you
detect a crack or break, extinguish the fire immediately
and contact your D O V R E®dealer for replacement.
Aportion of the combustion air entering the firebox is
deflected down over the inside of the door glass. This air
flow “washes” the glass helping to keep smoke from
adhering to it’s surface.
When operated at a low burn rate less air will be flowing
over the glass and the smoky, relatively cool condition of
a low fire will cause the glass to become coated. If the
deposits on the glass are not very heavy, normal glass
cleaners work well. Heavier deposits may be removed
by using a damp cloth dipped in wood ashes or by using
a commercially available oven cleaner. After using
an oven cleaner, it is advisable to remove any
residue with a glass cleaner, or soap and water.
Oven cleaner left on during the next firing can permanently stain the glass and damage the finish on plated metal surfaces.
Do not clean the glass with materials that may
scratch or otherwise damage the glass. Scratches
on the glass can develop into cracks or breaks.
Never attempt to clean the glass while a fire is in the
unit.
The best way to keep the glass clean is to operate
the stove efficiently by using dry well seasoned wood
and burning moderate to hot fires.
GOLD PLATED DOOR TRIM.
NOTE: All prints and smudges must be wiped clean from the gold door trim prior to
initial burn. If this is not done, these prints will be cured into the gold finish
and set for the life of the stove.
To keep the finish looking its best, gently wipe with a soft cloth. If desired, use a nonabrasive cleaner such as soap and water, window cleaner, or vinegar and water.
Never use any solvent, thinner, or abrasive cleaner since these will damage the finish.
G. FLUE DRAFT
Like all modern woodburning appliances, The Model
400 woodstove requires the proper amount of flue
draft to assure safe and efficient operation. Flue
draft is measured as negative pressure in the chim-
ney. The amount of negative pressure determines
how strong the draft is. The draft is important
because it draws the combustion air into the firebox
and pulls the smoke out of the chimney.
There are three basic criteria essential in establishing
and maintaining flue draft:
1. Availability of combustion air
2. Heat generated from the fire
3. Diameter and height of the flue system
These three factors work together as a system to create the flue draft. Increasing or decreasing any one of
them will effect the other two and thus change the
amount of draft in the entire system. See Figure 21.
Figure 21
5-98 23 72308B
Page 24

MODEL 400 WOODSTOVE
1. Availability of combustion air. Asource of air
(oxygen) is required in order for combustion to
take place. The air enters the firebox through an
opening in the insert body. The amount of air
allowed in is regulated by the draft slide control.
The important thing is to realize that whatever air
is consumed by the fire must be replaced. If you
are using room air, the air is replaced through
cracks around windows, under doors, etc.
However, most newly constructed houses or
existing homes fitted with tightly sealed doors and
windows are relatively air tight. In this case, an
outside air source must be made available to feed
combustion air from outside the home into the
stove.
2. Heat generated from the fire. Most of the heat
produced from the fire is transferred into the heat
exchanger of the insert, then into the room.
However, part of this heat escapes up the chimney taking smoke and other combustion gases
with it. Most modern woodburning appliances,
including the Model 400, extract heat so efficiently
that the amount that goes up the flue can be minimal. This is one reason why it is important to
burn well seasoned wood. The heat generated
from the fire should be warming your home and
establishing the flue draft. It should not be wasted by evaporating moisture out of wet, unseasoned wood.
3. Diameter and height of flue system. Aspecific
volume of air, determined by the diameter and
height of the chimney connector and chimney, is
contained within the flue system. As heat from
the fire enters the flue, it warms this air causing it
to rise. The air moving up the flue draws smoke
and more heated air from the fire with it, thus
establishing draft. The amount of draft depends
on the temperature of the heated air and the volume of air that is contained in the flue system.
DRAFT PROBLEMS.
For the Model 400 woodstove, the minimum flue draft
requirement is 0.06 inches of water column as measured with a draft meter. Most woodstove dealers
have draft meters available to measure your flue
draft if you suspect a problem.
If the fire is hard to start and smoke spills out of the
door, or you find it difficult to establish and maintain a
moderately high burn rate, then the flue draft is too
low and corrective measures must be taken.
5-98 24 72308B
Be sure you have air available for combustion and
that your firewood is dry and well seasoned. Build
your fires properly and according to the instructions
given on page 18. Be sure your flue system is
installed correctly and that it is the proper diameter
and height. In addition, check for the following:
• All chimney connector sections are properly
installed and the joints are sealed tightly.
• The chimney and chimney connectors are clean;
free of creosote build-up.
• If utilizing an existing chimney that has been left
unused over a period of time, be sure it is not
obstructed with debris from animals or nesting
birds.
• Make sure overhanging trees and branches are cut
back within 10 feet of the top of the chimney.
• If the chimney cap is equipped with a spark arrestor
screen, be sure it is clean and free of any build-up
of soot or creosote.
If you still suspect you have a low draft problem it
may be necessary to increase the volume of air in
your flue system. Since the diameter of your flue system is matched with the size of the flue collar and
should not be changed, then the height of the system
will need to be increased. Add chimney a little at a
time until the draft improves.
In some cases, regardless of what you do, it can still
be difficult to establish the proper flue draft. This is
especially evident when using an exterior factory-built
chimney or exterior masonry chimney which is likely
to have too large of a flue. Try placing several sheets
of crumpled paper on top of your kindling as close to
the flue outlet of the stove as possible. Light this
paper first then the paper under the kindling. The
heat generated from the rapidly burning paper on top
of the kindling should help get the draft established.
Still other factors can effect how well your flue system
performs. Neighboring structures, high winds, tall
trees, even hillsides can effect air currents around the
chimney. Well designed chimney caps, wind directional caps, even draft inducing caps are available
that can help. Your woodstove dealer is the local
expert in your area. He can usually make suggestions or discover problems that can be easily corrected allowing your woodstove and flue systems to operate correctly as it has been designed, providing safe
and economical heat for your home.
Page 25

MODEL 400 WOODSTOVE
H. INSTALLATION OF REPLACEMENT GLASS
DO NOT OPERATE THE WOOD-
STOVE IF THE DOOR GLASS IS BRO-
KEN OR MISSING. DANGEROUS
OVERFIRING CAN OCCUR WHICH
CAN DAMAGE THE APPLIANCE OR
IGNITE CREOSOTE IN THE CHIMNEY,
POSSIBLYCAUSING A HOUSE FIRE.
1. Make certain the fire is out and the appliance is
cool to the touch.
2. Remove door from the appliance.
3. Lay door face down on a table or counter with
the door handle hanging off the edge of the table
so the door lays flat. Protect the table so neither
the table nor door will be scratched.
WARNING!
4. Remove the screws from each glass retainer.
5. Remove the glass.
6. Use only 5mm Ceramic Glass, Part No. 20912.
7. Position the glass with its edges evenly overlapping the opening in the front door.
8. Replace the glass retainers. Be careful not to
cross thread the screws.
9. Tighten each retainer just a few turns until each
is secured. Then continue to tighten alternately
each retainer a few turns at a time until the glass
panel is tightened snugly.
10. Replace the door on the appliance.
5-98 25 72308B
Page 26

MODEL 400 WOODSTOVE
5-98 26 72308B
THIS PAGE LEFT
BLANK INTENTIONALLY
Page 27

MODEL 400 WOODSTOVE
Aladdin Hearth Products warrants their wood heating appliances to the original purchaser for the
lifetime of the appliance, to be free from defects in material and workmanship. This warranty gives
you specific legal rights; you may have other rights which may vary from state to state.
This limited Lifetime Warranty covers items such as but not limited to steel and cast iron components, combustion chambers, doors, gold plating and glass damaged by thermal breakage.
All parts to be replaced must be returned to an authorized Aladdin Hearth Products dealer at purchaser’s expense for inspection and approval by Aladdin Hearth Products prior to repair or
replacement. No repair or replacement costs will be honored without approval of Aladdin Hearth
Products.
This new Dovre product must be installed by a competent, authorized, service contractor. It must
be installed and operated at all times in accordance with the Installation and Operating Instructions
furnished with this product, as well as any applicable local and national codes. Any alteration,
willful abuse accident, or misuse of the product shall void this warranty.
Any installation, construction, transportation or other related costs or expenses arising from defective part(s), repair, replacement, etc., will not be covered by this warranty, nor will Aladdin Hearth
Products assume responsibility for them. Further, Aladdin Hearth Products will not be responsible
for any incidental, indirect, or consequential damages, except as provided by law.
WARRANTY
All electrical components such as but not limited to the blower assembly and speed control switch
are covered by Aladdin’s one-year warranty program.
Aladdin Hearth Products will not be responsible for any alteration to the unit which causes sooting
that results in damage to the interior or exterior of the building in which this appliance is installed.
This warranty is void if the stove has been operated in atmospheres contaminated by chlorine, fluorine, or other damaging chemicals, the stove is subjected to prolonged periods of dampness or
condensation, or there is any damage to the stove or other components due to water or weather
damage which is the result of, but not limited to, improper chimney or venting installation.
This limited Lifetime Warranty does not extend to or include surface finish of the stove, door seal or
firebrick. It does not cover installation or operational-related problems such as overfiring, use of
corrosive driftwood, downdrafts or spillage caused by environmental conditions, nearby trees, buildings, hilltops, mountains, inadequate venting or ventilation, excessive offsets, or negative air pressures caused by mechanical systems such as furnaces, fans, clothes dryers, etc.
This limited Lifetime Warranty does not apply to venting components, hearth components orother
accessories used in conjunction with the installation of this product not manufactured by Aladdin
Hearth Products.
This limited Lifetime Warranty is effective on all wood stoves sold at point of retail after July 1,
1998, and supersedes any and all warranties currently in existence.
5-98 27 72308B
Page 28

Attention
WOODSTOVE
INSTALLER
Please return these
Operating & Installation
Instructions to the
Firebox
for Consumer Use
Aladdin Hearth Products
401 N. Wynne
ADivision of Hearth Technologies Inc.
5-98 28 72308 Rev B
Colville, WA99114
 Loading...