

Page 1
EN
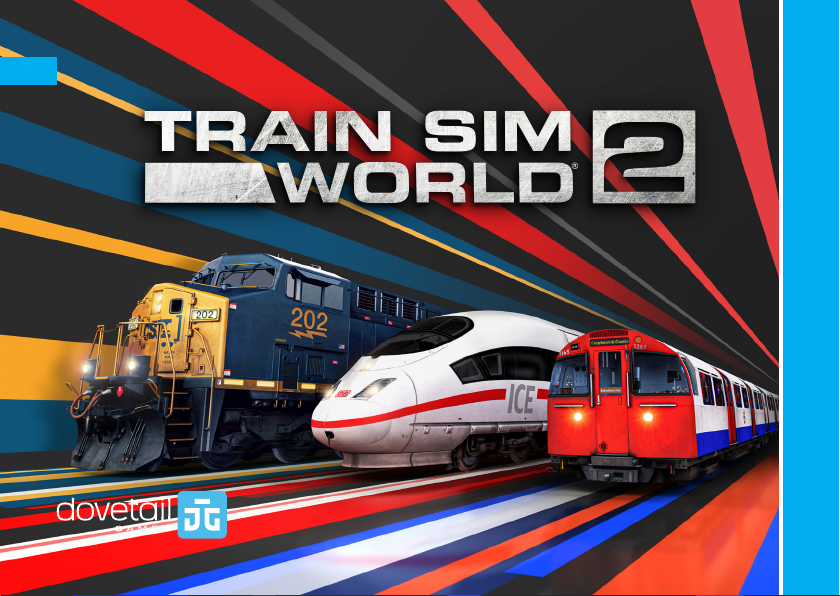
QUICK START GUIDE
Page 2
©2020 Dovetail Games, a trading name of RailSimulator.com Limited (“DTG”). “Dovetail Games”,
“Train Sim World” and “SimuGraph” are trademarks or registered trademarks of DTG. Unreal®
Engine, ©1998-2020, Epic Games, Inc. All rights reserved. Unreal® is a registered trademark of
Epic Games. Portions of this software utilise SpeedTree® technology (©2014 Interactive Data
Visualization, Inc.). SpeedTree® is a registered trademark of Interactive Data Visualization, Inc. All
rights reserved. CSX and others are trademarks owned by CSXT Intellectual Properties Corporation
and are used with permission. The ICE 3 is a registered design of Deutsche Bahn AG. The DB logo
is a registered trademark of Deutsche Bahn AG. Permission to use the London Underground Trade
Mark is granted by Transport for London. All other copyrights or trademarks are the property of their
respective owners and are used here with permission. Unauthorised copying, adaptation, rental, resale, arcade use, charging for use, broadcast, cable transmission, public performance, distribution or
extraction of the product or any trademark or copyright work that forms part of this product is prohibited.
Developed and published by DTG. The full credit list can be accessed from the TSW “Options” menu.
The depiction in this simulation is not intended to be a true-to-life representation of how all areas of
TfL operate, including health & safety etc. Care has been taken to ensure the design elements closely
match TfL’s IP, however this has not been reviewed in line with TfL’s brand guidelines, and TfL takes
no responsibility for any discrepancies.
Page 3
CONTENTS
INTRODUCING TRAIN SIM WORLD 2
Welcome to the next step for Train Sim World.
3
NAVIGATING THE ENVIRONMENT
How to get around and do pretty much anything in Train
4
Sim World 2.
THE CONTROLS
Familiarise yourself with the buttons you need to press.
5
INTRODUCING THE BAKERLOO LINE
Welcome to mass transit passenger service beneath the
13
busy streets of Britain’s capital.
LONDON UNDERGROUND 1972 MARK II STOCK
Getting started with the 1972 Mark II Stock.
14
INTRODUCING SAND PATCH GRADE
Welcome to challenging American freight as you power
15
over steep grades.
CSX AC4400CW
Getting started with the AC4400CW.
16
CSX GP38-2 & SD40-2
Getting started with the GP38-2 & SD40-2.
17
SCHELLFAHRSTRECKE KÖLN - AACHEN
Welcome to German high speed and commuter passen-
19
ger service in sleek German trains.
DB BR 406 ‘ICE 3M’
Getting started with the DB BR 406.
20
DB BR 442 ‘Talent 2’
Getting started with the DB BR 442.
21
TROUBLESHOOTING & HOW TO GET SUPPORT
What to do when you need help.
22
Page 4
3 INTRODUCING TRAIN SIM WORLD 2
Train Sim World 2 is the next evolution of train simulation putting
you in the engineer’s seat of breathtakingly authentic machines.
Master iconic locomotives on high-speed services, long
freight hauls or precise commuter trac, and get creative with
customisation tools in this advanced sequel.
Feel the thrill of high-speed inter-city German rail as you push
the throttle and climb speeds in the famous DB ICE 3M out of
Köln, take on the challenge of hauling long freight across Sand
Patch Grade with the CSX AC4400CW, and master the complex
operations of the London Underground on the Bakerloo Line. All
ocial licenses, all authentically recreated – you’re in the cab
and in control.
Personalise your rail journey with two new easy-to-use tools.
Create your own custom paint schemes with the Livery Designer
that allows you to craft both simple and complex designs to
bring your Train Sim World 2 locomotive paintwork to life. Create
your own scenarios with the Scenario Planner, picking trains
and destinations before you jump in and take to the rails - Quick
Drive, your way.
The proprietary SimuGraph® vehicle dynamics engine has
evolved - adding realistic adhesion characteristics for the rst
time. Feel the slip of wheels in adverse conditions, master
moving heavy freight and keep control of your train’s power on
steep grades. Optimised and upgraded visual delity also gives
Train Sim World 2 dynamic skies and support for 4K Ultra-High
Denition.
Get clearer information on instructions, grade and speed
proles as you drive, including new Head’s Up Displays, clarity
to onboard safety systems, brake controls, ammeter and
accelerometer. A new gamepad controller scheme provides
clearer choices on Camera and Driving modes and allows easier
access from external camera modes to enter another vehicle in
your consist without aecting the simulation.
Welcome to Train Sim World 2!
Page 5
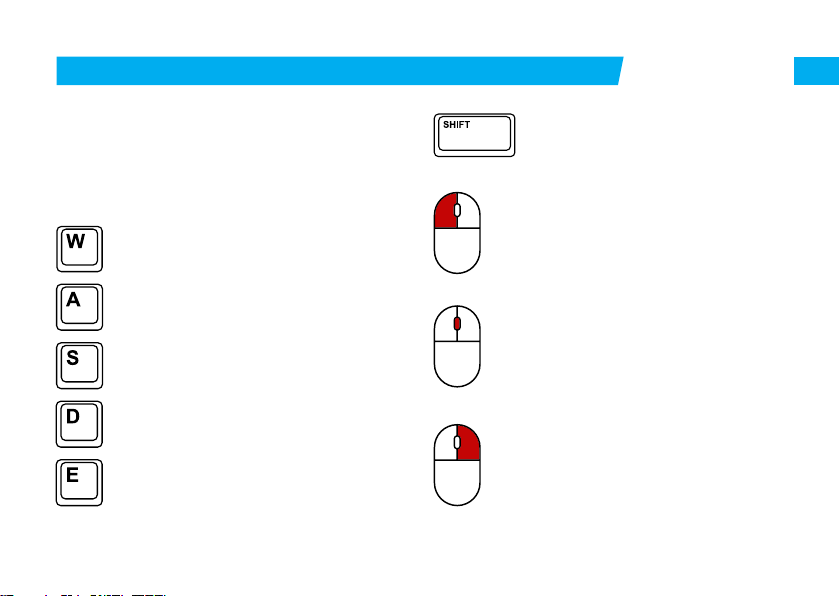
4NAVIGATING THE ENVIRONMENT
Navigating your way around the 3D world can be done in a
number of ways, either using a keyboard and mouse (PC Only)
or using an Xbox or PlayStation gamepad controller.
Use the keys below to move your character around and interact
with the world. The keys shown can be changed using the
Settings menu.
Moves your character forward.
Moves your character to the left.
Moves your character backward.
Moves your character to the right.
Use this key to interact with elements, such as
climbing steps, sitting down and standing up, etc.
Hold the shift key to change movement speed.
Note that default movement speed can also be
set in the Game Settings Menu.
The left mouse button is also used to interact with
elements, such as opening doors and using in-cab
controls
The scroll wheel is used to zoom in whilst operating
a loco or sitting in a passenger seat. When walking
or using one of the camera controls, it is used to
alter the eld of view. Scrolling forward narrows the
eld of view.
The right mouse button is used to release the mouse
pointer. When no mouse pointer is visible, the mouse
is used to pan and pitch the camera. Pressing the
right mouse button locks the position of the camera
and displays the mouse pointer. This is useful for
clicking on controls.
Page 6
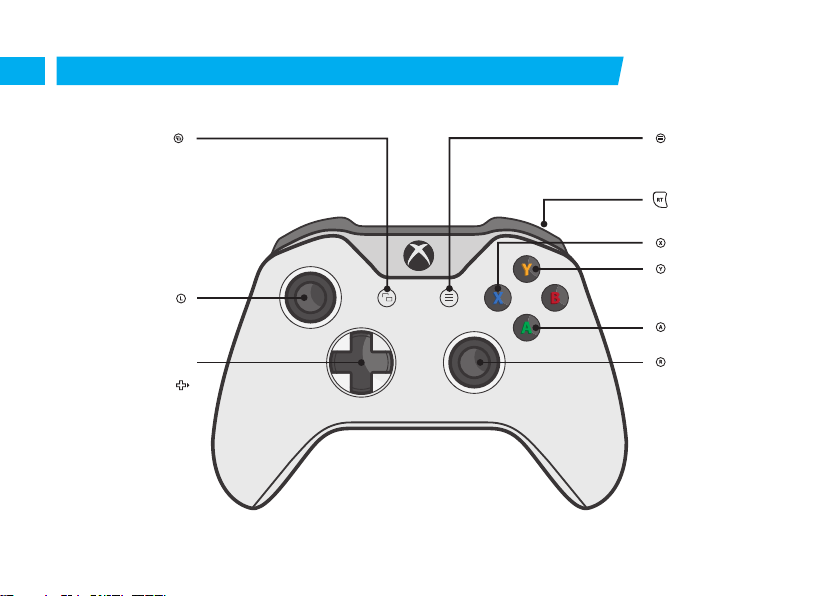
5 THE CONTROLS: ON FOOT (XBOX GAMEPAD)
(HOLD) Toggle Schedule
Map
Walk
(PRESS) Crouch
DPAD
Toggle Flashlight
Pause
Run
(HOLD) Take Screenshot
[Dovetail Live]
Sit Down
Interact
Look Around
Page 7
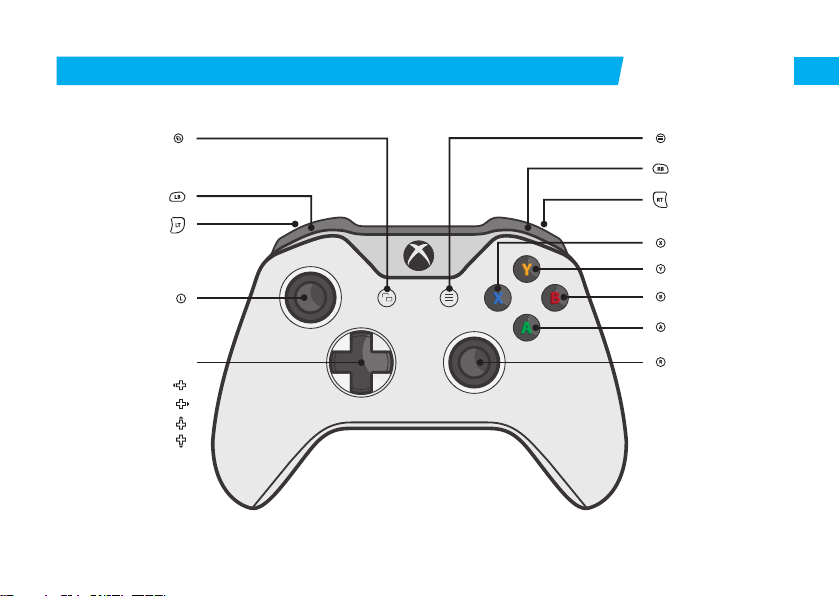
6THE CONTROLS: CAMERA (XBOX GAMEPAD)
(HOLD) Toggle Schedule
(PRESS) Sound Horn
Open/Close Doors Left
Open/Close Doors Right
Reverser / Gear Up
Reverser / Gear Down
Map
Release Brake
Apply Brake
Reposition Camera
DPAD
Pause / Clipboard
Reduce Throttle
Increase Throttle
Change Brake Type
Toggle Locomotive /
Camera Controls
Cancel / Back /
Acknowledge Alerter /
Safety Device
Interact
Pan Camera
(PRESS) Switch Internal /
External Camera
(HOLD) Toggle Front /
Rear
Page 8

7 THE CONTROLS: DRIVING (XBOX GAMEPAD)
Take Screenshot
Take Video Clip
(HOLD) Toggle Schedule
Open/Close Doors Left
Open/Close Doors Right
Reverser / Gear Up
Reverser / Gear Down
Map
Release Brake
Apply Brake
Zoom
(PRESS) Horn
DPAD
Pause
Reduce Throttle
Increase Throttle
Change Brake Type
Cancel / Back /
Acknowledge Alerter
(HOLD) Contact Signaller
Interact
Pan Camera
(PRESS) Switch Internal /
External Camera
Page 9
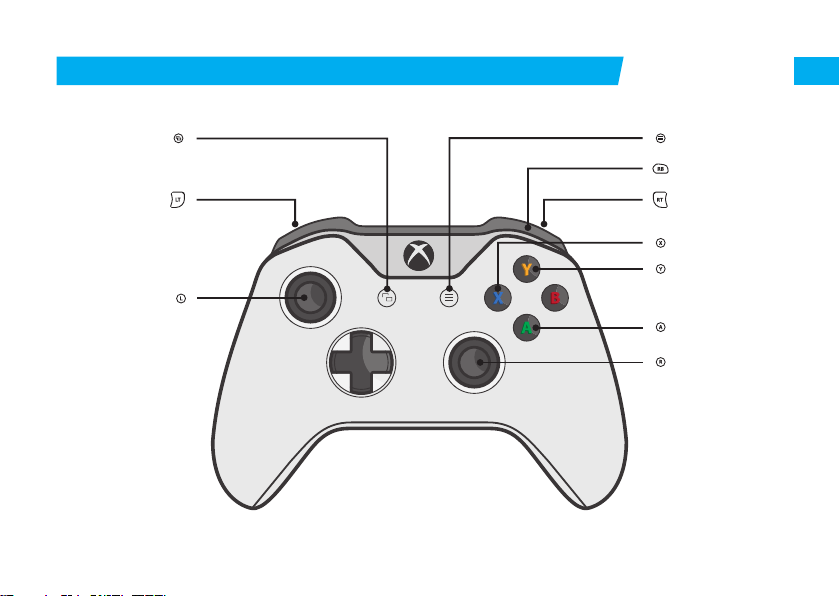
8THE CONTROLS: TURNTABLE (XBOX GAMEPAD)
(HOLD) Toggle Schedule
Map
Rotate Turntable
Counter Clockwise
Walk
Pause
Switch CCTV Feed
Rotate Turntable
Clockwise
Toggle Turntable Lock
Sit / Stand Up
Interact
Look Around
Page 10
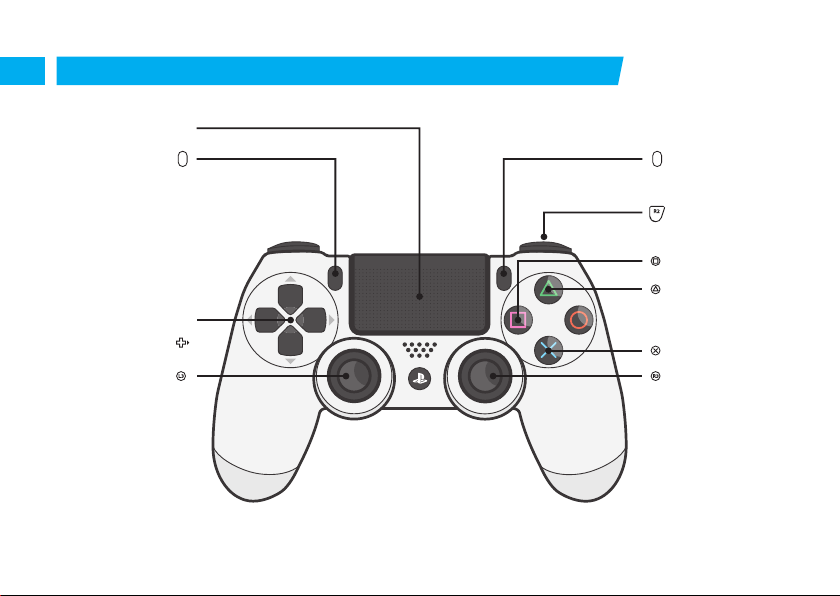
9 THE CONTROLS: ON FOOT (PS4 GAMEPAD)
(HOLD) Toggle Schedule
Map
Take Screenshot
DPAD
Toggle Flashlight
Walk
(PRESS) Crouch
SHARE
SHARE OPTIONS
OPTIONS
Pause
Run
(HOLD) Take Screenshot
[Dovetail Live]
Sit Down
Interact
Look Around
Page 11
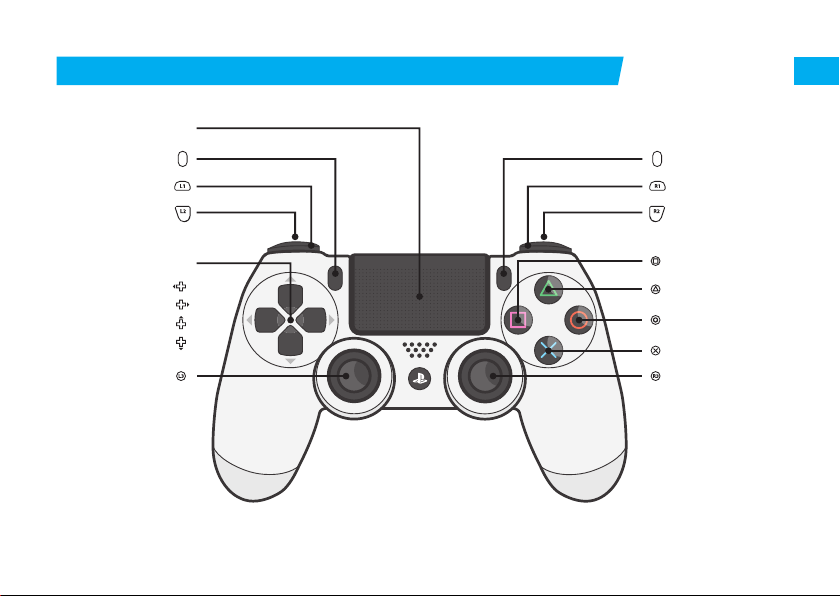
10THE CONTROLS: CAMERA (PS4 GAMEPAD)
(HOLD) Toggle Schedule
Take Screenshot
Release Brake
Apply Brake
DPAD
Open / Close Doors Left
Open / Close Doors Right
Reverser / Gear Up
Reverser / Gear Down
Reposition Camera
(PRESS) Sound Horn
Map
SHARE
SHARE OPTIONS
OPTIONS
Pause / Clipboard
Reduce Throttle
Increase Throttle
Change Brake Type
Toggle Locomotive /
Camera Controls
Cancel / Back /
Acknowledge Alerter /
Safety Device
Interact
Pan Camera
(PRESS) Switch Internal /
External Camera
(HOLD) Toggle Front / Rear
Page 12
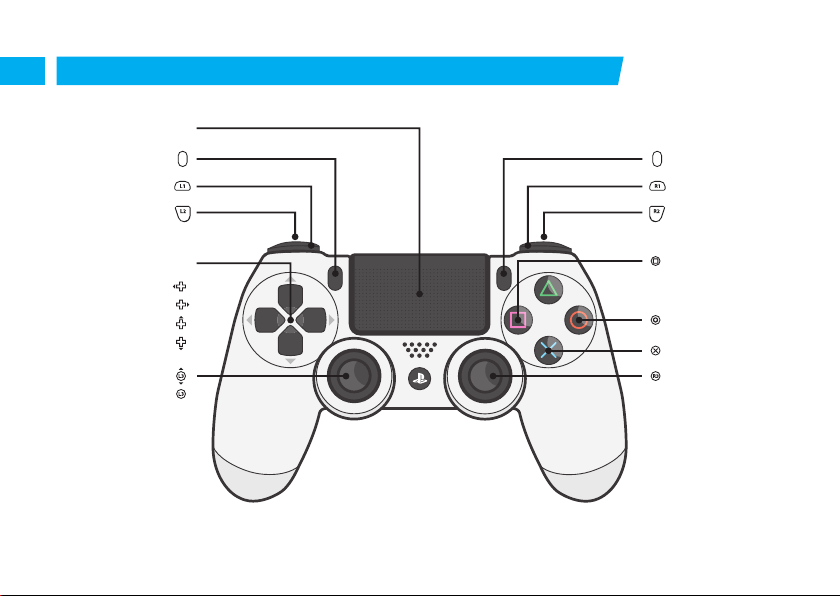
11 THE CONTROLS: DRIVING (PS4 GAMEPAD)
(HOLD) Toggle Schedule
Open / Close Doors Left
Open / Close Doors Right
Reverser / Gear Up
Reverser / Gear Down
Map
Take Screenshot
Release Brake
Apply Brake
DPAD
Zoom
(PRESS) Horn
SHARE
SHARE OPTIONS
OPTIONS
Pause
Reduce Throttle
Increase Throttle
Change Brake Type
Cancel / Back /
Acknowledge Alerter
(HOLD) Contact Signaller
Interact
Look Around
(PRESS) Switch Internal /
External Camera
Page 13
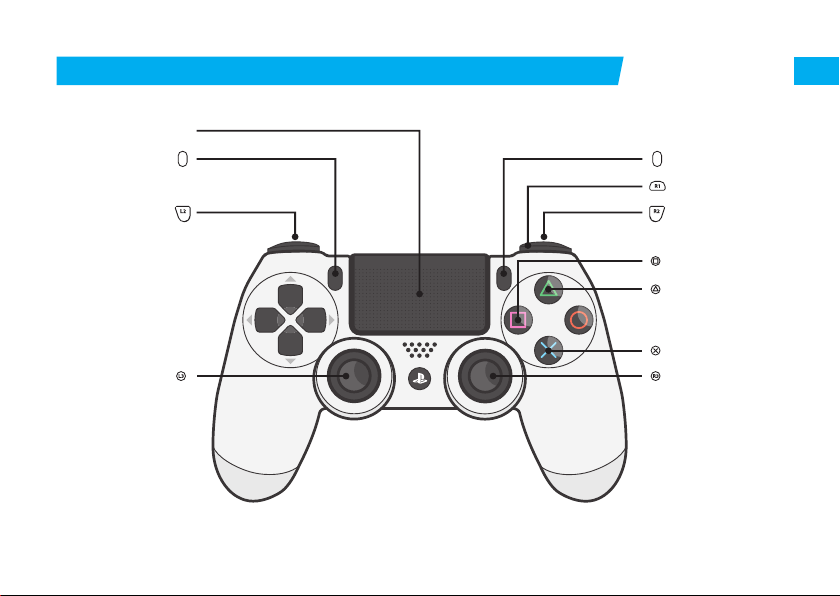
12THE CONTROLS: TURNTABLE (PS4 GAMEPAD)
(HOLD) Toggle Schedule
Map
Take Screenshot
Rotate Turntable
Counter Clockwise
Walk
SHARE
SHARE OPTIONS
OPTIONS
Pause
Switch CCTV Feed
Rotate Turntable
Clockwise
Toggle Turntable Lock
Sit / Stand Up
Interact
Look Around
Page 14
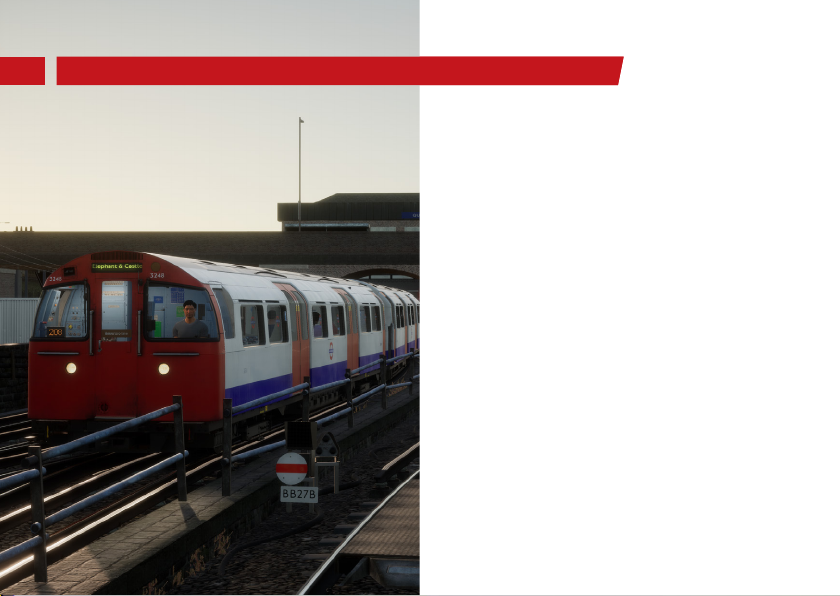
13 INTRODUCING THE BAKERLOO LINE
Sit in the cab and take control on one of the world’s busiest
underground railways, discover the Bakerloo Line in Train Sim
World 2.
Opened between 1906 and 1915 originally known as the
Baker Street and Waterloo Railway it was swiftly renamed The
Bakerloo Railway as the public abbreviation of the name had
gained popularity. The Bakerloo Line is one of the world’s busiest
commuter railways and the popularity of the line is no less today
than it was when it rst opened, carrying millions of passengers
annually.
The Bakerloo Line is 14.4 miles long and features 25 unique
stations, from Elephant & Castle in South London to Harrow
& Wealdstone in the North West of the city. It covers many of
London’s iconic landmarks and famous streets like Waterloo,
Piccadilly Circus, Baker Street and more. There are 10 overground and 15 underground stations to discover and the various
Timetable Services and Scenarios in Train Sim World 2 will take
you on a tour of these as you explore the full line.
Page 15
14LONDON UNDERGROUND 1972 MK II STOCK
1. If necessary, enter the rear cab and turn the Destination
Blind until it shows your service’s termination point.
2. Walk to the other end of the train and enter the front cab.
3. The Control Switch is located on the lower back wall on the
left side of the driver’s seat. Insert the Control Key.
4. Turn the Control Switch to ON. Note that turning the Control
Switch ON will automatically turn the taillights o and
headlights on at this end of the train.
5. Insert the Direction Selector Key.
6. Set the Direction Key to INTER.
7. Set the Traction Brake Control to EMERGENCY. Then move
it to OFF AND RELEASE.
8. You will hear the audible warning valve open and release air.
Press the Audible Warning Valve Reset button on the left wall
to cancel the warning.
9. Move the Traction Brake Control to RHEO 1. HOLD.
10. If necessary, turn the Destination Blind until it shows your
service’s termination point.
11. On the console opposite the driver’s seat, press the Saloon
Lighting & Heat & Vent Set button to turn on the passenger
lights.
12. Turn the gauge lights ON.
13. Return to the driver’s seat. Find the Cab Light switch on the
upper left-hand wall behind the driver and turn it OFF.
14. Set the Direction Selector to FORWARD.
You are now ready to apply power with the Traction Brake Control
handle. The handle has three settings that produce increasing
levels of power: SHUNT, SERIES and PARALLEL.
The Rate Switch on the upper left wall also oers two power-rate
settings. Set it to RATE 1 to take up less power if you need to
accelerate slowly in bad weather.
Page 16
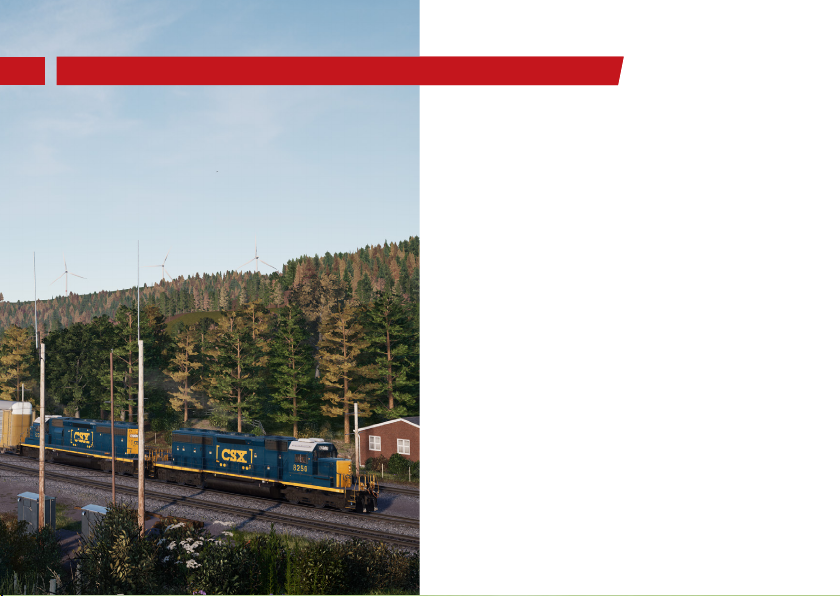
15 INTRODUCING SAND PATCH GRADE
Iconic railroads of the world are rarely more impressive than the
epic Sand Patch Grade. In Train Sim World 2 you’re in the cab on
one the most challenging and famous routes of the United States.
Sand Patch Grade is part of the Keystone Subdivision of the
Baltimore Division. Cutting through the remote Allegheny
Mountains it drops over 1000 feet over a 20-mile stretch,
making it one of steepest railroad grades in the US. Thanks to
mountainous terrain some interesting engineering solutions were
required, these include the infamous Sand Patch Tunnel and the
horseshoe curve, favourite’s amongst Railfans. Today the entire
line is double track and services daily freight trains from CSX.
Page 17
16CSX AC4400CW
1. Ensure the Handbrake is set on the left side of the long hood
end of the locomotive.
2. Enter the cab and set the Start/Run Switch to the START
position.
3. Press the Engine Start button and wait for the engine start
to complete.
4. Move the Start/Run Switch to the RUN position.
5. Turn ON the Front Number Lights.
6. Sit in the engineer’s seat.
7. Navigate to the engineer’s Primary IFD.
8. Press “1” on the IFD keypad to select the Air Brake Setup
screen.
9. The correct settings are:
Feed Valve: 90psi (use F1/F2 on the IFD Keypad to adjust
if needed)
Auto Brake: Cut in (use F3 on the IFD Keypad to toggle if
needed)
Independent Brake: Lead (Use F4 on the IFD Keypad to
toggle if needed)
10. If you made any changes, press F6 on the IFD Keypad to
make those changes Active.
11. Press F8 on the IFD Keypad to exit the Air Brake Setup
screen.
12. Navigate to see the switch panel down by the left of the
engineer’s leg.
13. Set the four switches labelled Engine Run, Gen Field,
Control and Dynamic Brake to the ON position (or upward).
14. Turn ON the Gauge Lights.
15. Return to the main engineer’s camera view.
16. Ensure the main reservoir is reading 140psi on the
engineer’s IFD.
17. Ensure the Independent Brake is applied fully.
18. Release the Automatic Brake and wait for the BP (Brake
Pipe) and ER (Equalising Reservoir) to fully pressurise to
90psi.
19. Ensure that the BC (Brake Cylinder) is reading at least 50psi.
If it is below this, the brakes are not properly on and you
should check the Automatic Brake handle position.
20. Move again to the long hood end of the locomotive and
release the Handbrake.
21. Return to the cab and set the Headlights to BRIGHT AUX.
You are ready to get moving. Set the Reverser, release the
Independent Brake and apply the Throttle.
Page 18
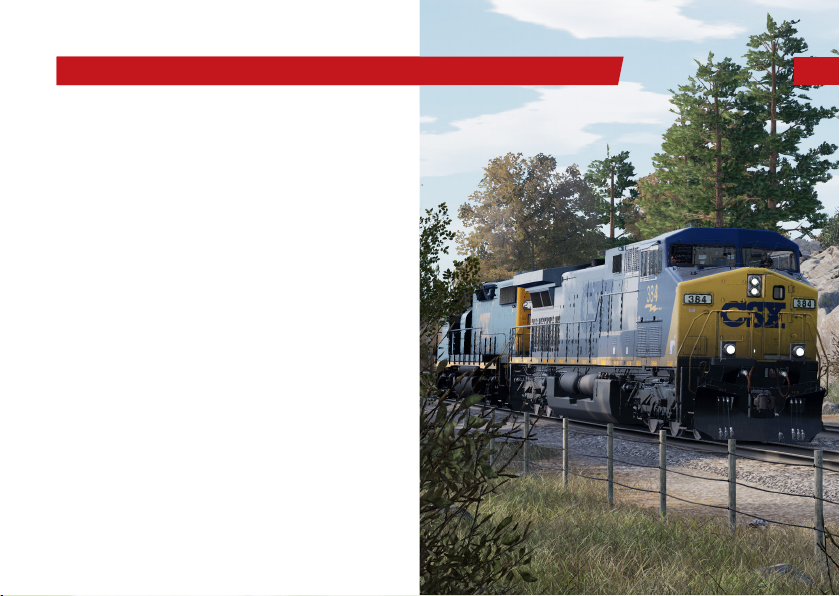
17 CSX GP38-2 & SD40-2
1. Set the Handbrake. You will nd the handbrake at the short
hood end of the locomotive.
2. Enter the cab and open the fuse box.
3. Check that the main breaker and all fuses are switched to the
ON position and close the fuse box door.
4. Above the fuse box, set the Start/Run Switch to the START
position.
5. Turn on the Engine Room Light, Platform Lights and Cab
Light if required.
6. Ensure the Reverser and Throttle are at neutral positions.
7. Walk halfway down the long hood end of the locomotive and
open the Latch (upper right of the engine room door) and
then the Engine Room Doors.
8. Move and hold the Prime/Start Switch to the LEFT (Prime)
for 5 seconds.
9. Release the Prime/Start Switch and then move it to the
RIGHT (Start) momentarily to trigger the engine start.
10. Wait for the engine start to complete.
11. Close the Engine Room Doors (note they must be closed in
the right order!).
12. Return to the cab and set the Start/Run Switch to the RUN
position.
13. Turn OFF the Engine Room Lights if you turned them on.
14. Turn ON the Number Lights as appropriate.
15. Sit in the engineer’s seat.
16. Turn ON the Ditch Lights and Gauge Lights and set the
Headlights to BRIGHT.
17. At the top right of the main control stand (your left), you will
see three switches labelled Engine Run, Generator Field and
Control & Fuel Pump. Set all three switches to the ON
position (or upward).
18. Check the brake stand and ensure the Cut-O Valve is set
to Freight.
19. Check the MU-2A Valve (bottom left of the control stand) and
ensure it is set to LEAD OR DEAD.
A cold and dark locomotive starts with no air in the brake pipe, so
this must now be pressurised.
1. Click the Reverser to insert it, but leave it in neutral. Move
the Throttle to NOTCH 1. You will hear the engine rev up and
you should see the red needle on the left brake gauge
(denoting the Main Reservoir pressure) rising. On the right
gauge, the red needle (denoting the Brake Cylinder
pressure) will also rise as the air is fed into the locomotive’s
brake system. Wait for the Main Reservoir to reach 140 psi.
2. Check that the Independent Brake is set to its maximum
setting (FULL APPLICATION).
3. Release the Automatic Brake, you should now see the white
needle in the left gauge (denoting the Equalising Reservoir
pressure) rise, and the white needle in the right gauge
(denoting the Brake Pipe pressure) rise behind it. Once both
needles reach 90 psi, the air brake system is ready for
service.
4. Move the Throttle back to IDLE.
5. Step out to the front of the locomotive and release the
Handbrake.
Page 19
The locomotive is now ready for operation. When you are ready,
you can get moving.
1. If necessary, click the Reverser to insert the handle and then
move it to the direction of travel.
2. Move the Independent Brake to the RELEASE position.
3. Release the train brakes by moving the Automatic Brake into
the RELEASE position.
4. Apply Throttle power as necessary to start the train moving.
18CSX GP38-2 & SD40-2
Page 20
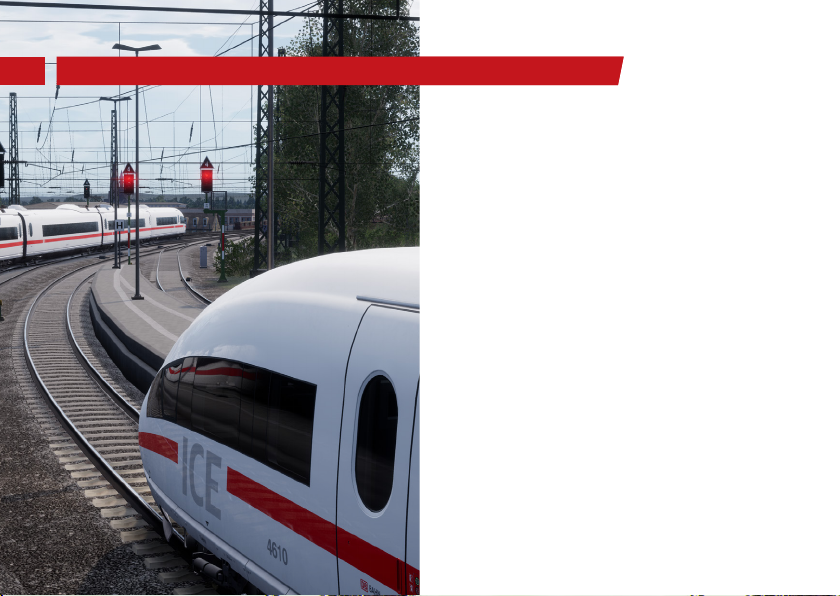
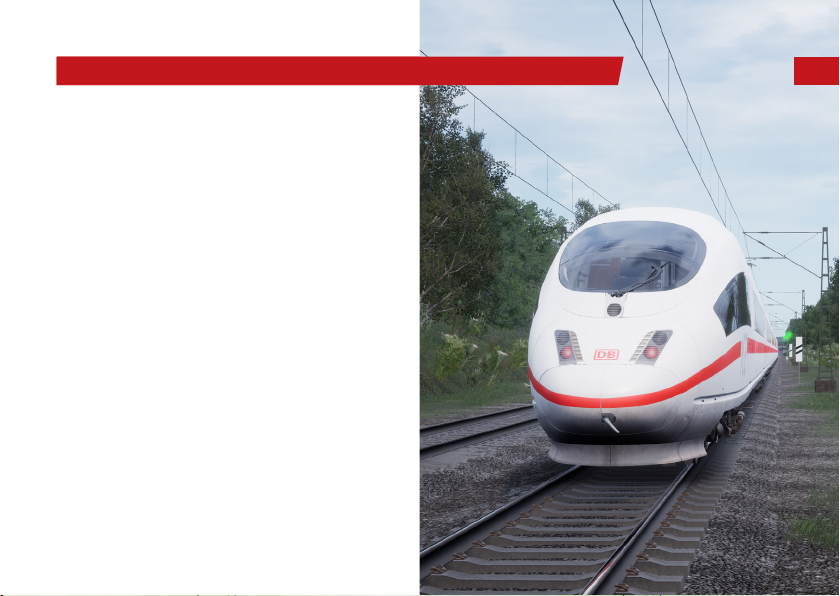
19 SCHNELLFAHRSTRECKE KÖLN-AACHEN
Sleek modern design and beautiful classic engineering meet
across one of Europe’s most impressive Railways, explore
Schnellfahrstrecke Köln - Aachen in Train Sim World 2.
The Köln - Aachen high speed railway is a 70 km stretch of the
Trans- European transport network. With Line speeds of up to
250 km/h separate track has been added on over half of the
route, running parallel to the existing track. This ensures the
swift international services with the ICE 3M are not held up by
the busy local S-Bahn services and are able to capitalise on their
incredible top speeds.
The route is steeped in history, from its heavily debated original
concept to the landmarks and bridges making up the surrounding
landscape. Each has been given the attention to detail required
to accurately bring them to life in Train Sim World 2 and allow
you to really immerse yourself in the route. As you leave Aachen
you are presented with the wonderful Burtscheid Viaduct, further
along the line you travel through the historic triangle truss
Dreigurtbrücke, and more as you journey to a panoramic view
of the Köln skyline including the beautiful cathedral and famous
Köln Hauptbahnhof.
Page 21
1. Enter the leading cab.
2. Open the Panel Door on the oor to the right of the Driver’s
seat. You may need to crouch to see inside the panel.
3. Hold the battery switch labelled “Batterie” to EIN for ve
seconds and then release.
4. To run with SIFA, PZB and/or LZB safety systems enabled,
toggle the SIFA, PZB and/or LZB switches to EIN
appropriately.
5. Close the Panel Door.
6. Sit in the Driver’s seat.
7. Set the Reverser switch to FORWARD (marked V on the
label).
8. Set the Pantograph switch to RAISE.
9. Set the Main Circuit Breaker to CLOSE.
10. Set the Headlights to NORMAL.
11. Set the Cab Lights to OFF.
12. On the left Multi-Function Display (MFD), press the UD
button until the MFD shows the Hauptmenu screen.
13. Use the up/down arrow buttons to highlight the
Zugeinstellugen option and press the E button to select it.
The MFD displays your currently selected destination.
14. Use the right/left arrow buttons to select your service’s
termination point and press the E button to save it.
15. Press the UD button to return to the main MFD screen.
16. Use the door control buttons to open the doors on the left or
right to board passengers as required.
17. On the right-side panel, press the Release Parking Brake
button.
18. Set the Train Brake to RELEASE.
19. When ready, use the Throttle to apply power and get moving.
20DB BR 406 ‘ICE 3M’
Page 22
21 DB BR 442 ‘TALENT 2’
1. Enter the leading cab.
2. On the back wall, hold the battery switch labelled “Batterie”
to EIN for four seconds and then release. “Lampentest
Schaltschrank” should now be lit and the battery meter
needle will move between 100 and 150.
3. To run with PZB and/or SIFA safety systems enabled, toggle
the PZB Störschalter and/or SIFA Störschalter switches to
EIN appropriately.
4. Sit in the Driver’s seat.
5. Turn the Master Switch to ON.
6. Use the Pantograph Height Control switch to RAISE the
pantograph.
7. Set the Pantograph Circuit Breaker switch to CLOSED.
8. Ensure that the Brake Cylinder is showing a pressure of at
least 3 bar.
9. Press the Handbrake Release button.
10. Ensure that the Throttle/Brake handle is at 0.
11. Move the Indirect Brake lever to the RELEASE position.
12. Set the headlights to the correct position.
13. On the left Multi-Function Display (MFD) screen, press the 8
button to select FIS. The screen will display the available
routes for the Fahrgastinformationssystem.
14. Use the arrow buttons on the side of the screen to select
your service’s termination point and press the E button to
save your selection.
15. Press the 0 key to return to the main MFD screen.
16. Move the Reverser Switch to FORWARD (marked V on the
label).
17. Use the door control buttons to open the doors on the left or
right to board passengers as required. Note that when the
doors are open or brakes are applied, the left MFD will
show a pink power-lockout icon to indicate that you cannot
apply power.
18. Turn the Cab Lights to OFF.
19. Close the doors and wait for the power lockout icon to turn
o. Then you may use the Throttle/Brake control to apply
power and get moving.
Page 23
I have a problem downloading the Steam client, how do I
contact them?
You can contact Steam Support by opening a customer service
ticket at https://support.steampowered.com. You will need to
create a unique support account to submit a ticket (your Steam
account will not work on this page) and this will enable you to
track and respond to any tickets you open with Steam.
How do I change the language of Train Sim World?
This is an easy process and will allow you to play Train Sim
World in English, French, German, Spanish, Russian and
Simplied Chinese. To change the language of Train Sim World,
double-click on the Steam icon on your PC desktop, left click on
‘Library’, right click on ‘Train Sim World’, left click on ‘Proper-
ties’, and nally left click on the Language tab and select your
preferred language.
How do I reset my display screen size settings?
It is possible to change the display screen size settings for Train
Sim World from within the game. Changing display screen size
settings is done from the Settings menu in the Display tab.
For any questions not covered here, visit our knowledgebase at
https://dovetailgames.kayako.com
22TROUBLESHOOTING GUIDE & HOW TO GET HELP
Page 24
 Loading...