

Page 1
STARPORT DOS MEMORY CONTROLLER
OWNER'S MANUAL
Dove Lighting Systems, Inc.
3563 Sueldo Street Unit E
San Luis Obispo, Ca 93401
+1 805 541 8292 fax +1 805 541 8293
dove@dovesystems.com / www.dovesystems.com
1
Page 2

TABLE OF CONTENTS
1. INTRODUCTION 3
A. General 3
B. Receiving your Equipment 3
2. SETUP AND CONNECTION 3
A. Plugging it in 3
B. Control 3
C. Dimming 4
D. Software 4
3. QUICK START 5
A. General 5
B. Boot up 5
C. Setting a patch 5
D. Setting a cue 5
E. Loading a cue into a fader 6
F. Setting a fade rate 6
G. Loading and saving shows 6
H. Screen Displays 6
4. PATCHING DIMMERS TO CONTROL CHANNELS 7
5. WRITING CUES 7
6. SETTING FADE RATES, RUNNING THE SHOW 9
7. SUBMASTERS 10
8. THE SOFTWARE DISKETTE 10
A. Contents 10
B. System configuration 11
C. Making copies of the diskette 11
9. IN CASE OF TROUBLE 12
A. Troubleshooting 12
B. Obtaining Service 12
C. Warranty 13
10. SCREEN DISPLAY EXAMPLES 14
A. Cues 14
B. Patch 15
C. QSheet 16
D. Subs 17
E. Q/Subs 18
F. Main 19
11. STARPORT I/O CONNECTIONS AND PINOUTS 20
2
Page 3

INTRODUCTION
The StarPort Memory Control System for PC computers automates the control of television and
theatrical lighting systems. The StarPort software runs on most PCs, from the 8088 to the Pentium. The
minimum system requirements are: 640K memory, an open parallel (printer) port, 3.5" diskette drive,
color monitor, and a MicroSoft compatible mouse. The StarPort can accept input from DMX controllers
and an optional submaster console but does not require one for operation. The output is DMX,
As soon as you have received your equipment, open the boxes and examine the contents. If any
damage is noted, contact the carrier immediately to file a claim for damages. You can be sure that
when the equipment left the factory it was in good condition, properly packed, and thoroughly tested.
If you find the equipment to be in accordance with your order and the packing slip and also in good
physical condition you may read on to the section covering SETUP AND CONNECTION. If, for some
reason, the equipment in the carton does not agree with your order or the packing slip, contact the
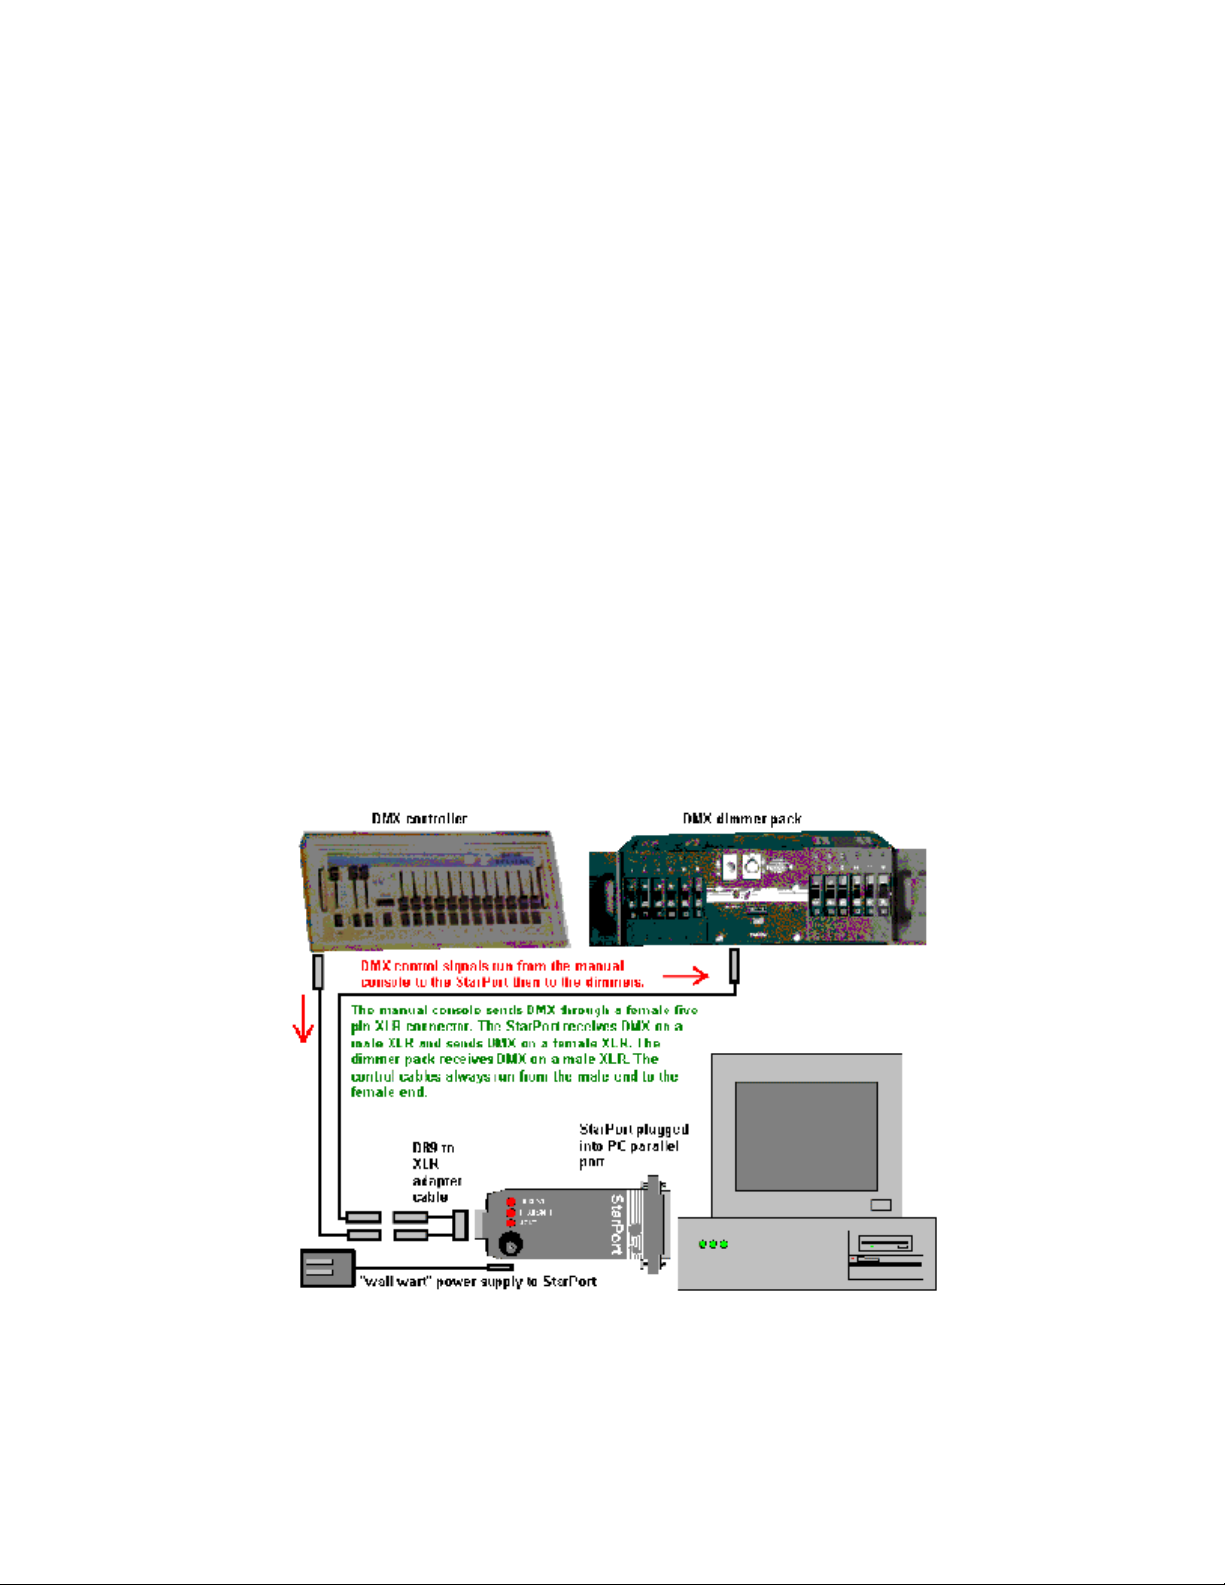
Control and dimming equipment should be de-energized before installing the StarPort. The StarPort
installs between the manual control console (if any) and the dimmers. The control console plugs into
the male 5 pin XLR connector on the included I/O cable. The dimmers plug into the female XLR. The
I/O cable plugs into the male DB9 connector on the end of the StarPort. See the riser diagram on the
Plug the StarPort into a standard parallel printer port on the PC. Plug the power supply into the StarPort
A. General
controlling up to 480 dimmers.
B. Receiving your Equipment
factory immediately and we will be happy to help you.
SETUP AND CONNECTION
A. Plugging it In
next page.
and an AC outlet. The transmit light should flash, indicating the StarPort in transmitting DMX.
B. Control
The StarPort accepts DMX-512 input. The connectors are shown below:
5 PIN XLR (DMX) DB9 (DMX)
PIN 1 Common PIN 1 Common
2 Data Not 2 Data Not TO DIMMERS
3 Data 3 N/C
4 N/C 4 Data TO DIMMERS
5 N/C 5 N/C
6 Data FROM CONTROL
7 N/C
8 Data Not FROM CONTROL
9 Common
3
Page 4
C. Dimming
The software will run from the factory supplied diskette or from a hard drive. On startup, a menu allows
you to configure the system, run the software, copy the software or view this manual. The configuration
portion of the menu generates a batch file containing appropriate command line switches. See section
The software runs under DOS only (a copy of DOS is included with the system). It does not run under
Windows. Do not attempt to run it under Windows, as it may cause Windows to "freeze" unexpectedly.
The simplest way to start the system is to boot the computer from the software diskette. Put the diskette
If you cannot boot from the diskette, exit Windows (if the computer is running Windows) and get to the
DOS prompt. For computers running Windows 3.1, exit to the DOS prompt before running the StarPort
software. In the Program Manager, select File-Exit. For computers running Windows 95 or 98, boot the
computer, press <F8> when the "starting Windows" message appears, then choose "command prompt
only" from the menu of startup options. You can then load an appropriate mouse driver, then run
starport.exe with appropriate command line switches (see section 8). It's generally easiest to just "boot
Dimmer output is DMX-512 only.
D. Software
8, "The Software Diskette", for details.
in drive A, then turn on the computer.
from the floppy!"
4
Page 5

QUICK START
Dove Systems memory controllers employ a "point and click" user interface similar to that of many
popular applications for personal computers. To select a command, roll the mouse to place the cursor
on the desired command and press either mouse button. To select a group of channels, cues,
submasters, or dimmers, position the cursor at the upper left of the block to mark, hold the mouse
button down, and drag the mouse to the bottom right of the block, releasing the button at the end.
As a general rule, channels or cues must be selected before a command option can be performed on
them. The program also may require the user to select a cue, submaster, or channel before selecting
dimmers or channels to assign to it. The prompt window just above the bottom of each screen displays
instructions or other information should the program logic require another operation be performed first.
Insert the supplied floppy disk into the A: drive and turn on the power switch. The computer will take a
minute or two to run the P.O.S.T. tests, then load DOS, then displays a starting menu. Choose item A
to run the StarPort software. If the software has not been previously configured, you'll be asked a few
questions about your installation. These questions include: Are you using a StarPort (attached to a
printer port) or a StarCard (an internal card)? Which printer port is the StarPort attached to? Are you
using the optional Dove Systems DMX submaster panel? How many DMX channels (dimmers) should
the StarPort output? How many channels are on the optional manual controller? The StarPort is faster
with lower numbers of channels and without a submaster. Once all the questions have been answered,
The cue screen color display should appear and near the bottom of the screen will be a message that
states the version of the program and the current input and output settings. Take note of the version
StarPort boots into the "Cues" screen. There are 96 control channels which are default patched to the
first 96 dimmers of the 480 possible. This default patch is a 1 to 1 patch at 100%. To change a patch,
roll the mouse up to the top of the screen and click on "Patch". This brings up the patch screen. Click
on the channel to which you wish to patch some dimmers then click on "Live" or "Blnd" at the bottom
of the screen. This shows which dimmers are patched to that channel. Mark the dimmers you wish to
patch to (up to 24 per channel), then click on "Levl%". The patch defaults to 100%, but other levels can
be set by rolling the mouse up and down or right and left. Click again to accept the levels. Click on
"Load" at the bottom right or left of the screen to save the patch for the current session. You must save
StarPort boots into the "Cues" screen. Click on a cue, then on "Live" or "Blind". This shows the levels
of the channels are in that cue. To set a level, click on some channels, then on "Levl%" at the bottom
of the screen. Roll the mouse up and down to set channel levels. Click again to accept the levels. Click
on "Load" at the bottom left of the screen. Levels in blue are set by the mouse. Levels appearing in red
A. General
Several channels or dimmers may be selected at a time by marking each one in succession.
B. Boot up
the StarPort software will start.
number and settings.
C. Setting a patch
the show to disk from the Main screen to save the patch for the next session.
D. Setting a Cue
5
Page 6

are set by optional manual controller. When these levels are loaded to a cue, they will appear in yellow.
You must save the show to disk from the Main screen to save the cues for the next session.
Click on a cue, then on "StgQ" to load it into the X fader, or the look on stage. Click on "NxtQ" to load
The third and fourth lines from the top of the screen represent the XY and AB crossfaders. Click on
either or both of the cues loaded into faders, then on "Down" at the bottom of the screen. Roll the
Up to four shows per diskette may be saved. The first show is the "default" show and is loaded upon
boot-up. Click on "Main" at the top of the screen, then on any of the "Save" options shown to the left.
Click on "Execute" at the bottom of the screen to save the show to disk. Click on any of the "Load"
There are six displays with a variety of cue, patch, and channel information. There are features
common to all six screens. The top line of each screen contains the playback controls and the names
of the screens in blue. The second and third lines display the status of the XY and AB crossfaders. The
bottom line displays the commands available from within that screen in blue, the rest in gray. The next
line up displays prompt messages, facilitating use of the program during the learning process.
This is the default screen when the program first loads. It is used primarily for setting channel levels to
save as a stage "look." The upper window shows cue levels, the lower active cues and their fader status.
This is the screen for setting patch levels. Up to 24 dimmers may be patched to any one channel, all at
different levels. It is used most often to establish a "house" patch table that will change little from show
Cue information including fade times and labels occupy the upper window. The lower window displays
This is similar to the patch screen. Any or all channels may be set to any combination of the 18
submaster sliders at any proportion, defining 18 manual stage "looks" in addition to the 252 memory
E. Loading a Cue into a Fader
it into the Y fader, or the look to which the console will crossfade.
F. Setting a Fade Rate
mouse up and down to set fade rates. Click again to finish.
G. Loading and Saving Shows
options shown to the right, then on "Execute" to load a show from disk.
H. Screen Displays
Examples of all six screens can be found in section 10 of this manual.
1. Cues
2. Patch
to show.
3. QSheet
active cues and their fader status.
4. Subs
cues.
5. Q/Subs
Similar to the QSheet screen, this one displays submaster information below the cue information.
6
Page 7

6. Main
The main screen presents a menu of utility options, including load/save shows. The lower window
confirms the software version number, control input, and dimmer output. You may exit the program
StarPort employs up to 96 channels and 480 dimmers. The dimmers above 96 must be patched to any
channel between 1 and 96 before they can be used. StarPort defaults to a one to one patch: dimmer 1
Up to 24 dimmers may be patched to any one channel, all at different levels; hence, StarPort uses a
proportional patch. If a dimmer is patched to a channel at 75%, the load attached to it will shine at 38%
if the channel if raised to 50%. The same dimmers also may be assigned to another channel at any
StarPort boots into the "Cues" screen. To set a patch, roll the mouse up to the top of the screen and
click on "Patch". This brings up the patch screen. Click on the channel to which you wish to patch some
dimmers then click on "Live" or "Blind" at the bottom of the screen. This shows which dimmers are
patched to that channel. The Patch screen displays the first 48 dimmers. Dimmers 49 through 480 can
be accessed by clicking on the "Page" command near the lower right of the screen. Mark the dimmers
you wish to patch to, then click on "Levl%". The patch defaults to 100%, but other levels can be set by
rolling the mouse up and down or right and left. Click again to accept the levels. Click on "Load" at the
bottom right or left of the screen to save the patch for the current session. You must save the show to
disk from the Main screen to save the patch for the next session. If patch assignments are to be used
over different productions it may be helpful to create a House Master disk by setting patch assignments
Patch levels may be reviewed by marking control channels then clicking on "Live" or "Blnd". Patch
For easy reference, dimmers can be assigned descriptive labels through the "Info" command at the
bottom of the screen. This requires use of the computer keyboard. Mark the dimmer you wish to label,
To load a cue, set channel levels to define a stage "look", mark a cue, and mark "Load" on either end
Channel levels may loaded from manual inputs or set with the mouse; either method has advantages
over the other. Manual fader levels are shown on the screen in red. These may be cleared by reducing
the Grand Master fader on the manual board. Channel levels may be set with the mouse by marking
through this screen. Make sure you have saved your data to disk before quitting!
PATCHING DIMMERS TO CONTROL CHANNELS
is patched to channel 1, dimmer 2 to channel 2, etc.
level. This is called an overlapping patch.
with no cues loaded and saving to disk.
levels are displayed for each channel in sequence.
then click on "Info" and type the description, ending with the <RETURN> key.
WRITING CUES
of the screen.
the channel(s), clicking on "Levl%", running the mouse up and down, then clicking again.
7
Page 8

The cue must be saved for the current session by assigning it to either the X/Y or A/B faders. The X/Y
and A/B faders represent the staged cues (X or A) and the next cue (Y or B). Cues may be assigned
to either the X/Y or A/B faders but not both. The "Load" commands make this assignment. They are
located at either end of the bottom line, one in yellow (indicating X/Y), the other green (indicating A/B).
You must save the show to disk from the Main screen to save the cues for the next session.
It is often helpful to build a cue using the levels set previously but the screen may be cleared by marking
a new cue and selecting "live" or "blind" mode. Cues may be viewed in either "live" or "blind" modes, in
which the cue is displayed on stage or simply viewed on the monitor without disturbing the look on
Cues previously set may be overwritten. Mark the cue set previously and click on "Load". The program
On occasion the designer may want to raise or lower a look while maintaining the proportional balances
between channels; place the mouse on channel one, hold the mouse button down, and drag it
diagonally to channel 96, releasing the button at the end. This should mark all channels. Then click on
"Levl%", run the mouse up or down, and click again to accept these levels. Finish by marking the cue
Cue 0.0 is automatically staged on boot-up. If cue 0.0 is unassigned to the X/Y faders, the stage
New cues may be created and inserted between any cues. The program assigns the new cue a number
between the existing cues, such as new cue 3.5 between cues 3.0 and 4.0. Mark the cues above which
Once defined, a cue can be copied to any number of other cues. Mark the cue to copy, then click on
"Copy" at the bottom of the screen. Mark the destination cues, then click on "Load" at either end of the
A cue not in the X/Y or A/B faders may be deleted from the cue list by marking the cue and selecting
"Del". If the cue is in one of the fader pairs, you must crossfade to another cue before the first can be
Cues can be marked to loop in sequence a number of times or continuously. A cue loop may be used
to simulate a chase. Mark previously defined cues then click on "Loop" at the bottom of the screen.
Using the computer keyboard, type the number of iterations, ending with the <RETURN> key. For an
infinite number of iterations, type "9999". If a keyboard is unavailable the mouse may be used. When
the "Loop" command has been activated, the left mouse key toggles back and forth from 9999 to 0. The
right mouse key acts like the <RETURN> key. To delete a loop the number of iterations must be set to
Any number of loops may be assigned, but there must be at least one defined and non-looping cue
between loops to keep them from stringing together. One or more loops can be nested with a loop,
following the rules above. When fades within a loop are in progress, the loop iteration may reduced to
one (such as when breaking out of a chase to resume normal action) by selecting the "GO" command
For easy reference, cues can be assigned descriptive labels through the "Info" command at the bottom
of the screen. This requires use of the keyboard. Mark the cue you wish to label, then click on "Info"
stage. To select live or blind modes, mark a cue and mark "Live" or "Blnd".
will ask for confirmation that you want to overwrite the cue. Click on "Load" again to confirm.
(if not already marked) and clicking on "Load".
remains dark on boot-up and cue 1.0, if assigned, is loaded into the Y fader.
the new cue will be inserted. Select the "Ins" command.
screen.
deleted. Mark another cue, click on "StgQ", and click on "GO".
0, using the method above. Then the cues themselves may be deleted.
at the top of the screen.
8
Page 9

and type the description, ending with the <RETURN> key. Dimmers, channels, and submasters can be
given labels using the same method.
Once loaded, the entire set of up to 252 cues must be saved to disk as a show. Up to four shows per
diskette may be saved. The first show, called DATA.PRO, is the "default" show and is loaded upon
boot-up. Click on "Main" at the top of the screen, then on any of the "Save" options shown to the left.
It is generally preferable to start each new production with a "clean" copy of the master disk, but disks
may be reused. On boot-up the program automatically loads the DATA.PRO file if LOCK.PRO is on the
disk. Otherwise, it starts without any previously saved information. LOCK.PRO may be deleted to start
The third and fourth lines from the top of the screen represent the XY and AB crossfaders. Click on
either or both of the cues loaded into faders, then on "Down" at the bottom of the screen. Roll the
mouse up and down to set fade rates. Click again to finish. Alternatively, fade rates for whole groups
of cues can be set in the QSheet screen. Mark any or all of the cues, then "Down" to set the fade rates.
The "Down" command sets the rate at which the previous cue fades out AS the next cue fades in: if the
down rate is set to 10 seconds for cue 1.0, it will take a total of 10 seconds for cue 0.0 to fade out and
When the "GO" command is selected, cue 0.0 begins to fade out, taking 10 seconds. There is a five
second delay, simultaneous with the fade-out, before cue 1.0 begins to fade in. After the delay, cue 1.0
"NxtQ" and "StgQ", at the bottom of the screen, load cues into the XY and AB crossfaders. "NxtQ" loads
the cue into either the Y or B fader. "StgQ" loads the cue into the X or A fader. This stages the cue
immediately. Cues will execute in numeric order but can be executed out of order by marking the next
desired cue and clicking on "NxtQ". This is helpful for backing up or jumping forward in a show with a
smooth crossfade. Alternatively, clicking on "Q-" and "Q+" at either end of the top of the screen loads
cues in sequence. There are three "Go" commands on the screen: "GoXY", "GoAB", and "GO".
Selecting any the "Go" commands will begin a crossfade using the predetermined fade rate. "GoXY"
begins a crossfade from X to Y, and "GoAB" begins a crossfade from A to B. Hitting "GO" will begin a
simultaneous crossfade from X to Y and from A to B. This is useful for an effect, ie. loop, in the middle
Click on "Execute" at the bottom of the screen to save the show to disk.
with a "clean" show and added later. LOCK.PRO contains just two characters: "OK".
SETTING FADE RATES AND RUNNING THE SHOW
cue 1.0 to fade in. Here is an example:
Cue # X Down Delay Y Up CueInfo
X> 0.0 0.0s 0.0s 0.0s
Y> 1.0 10.0s 0.0s 10.0s
Unequal fade rates are set with the "Dly" and "Up" commands. Here is an example:
Cue # X Down Delay Y Up CueInfo
X> 0.0 0.0s 0.0s 0.0s
Y> 1.0 10.0s 5.0s 7.0s
takes seven seconds to fade in.
of an already staged cue.
9
Page 10

THE SOFTWARE DISKETTE
The program diskette is readable by PC computers running DOS (the StarPort software will not run
under Windows). The contents of the disk can be verified, if desired, by typing DIR at the DOS prompt
The STARPORT program uses command line options to set up operation for use with the StarPort. The
INSTALL program is used only to configure the program for use with the StarCard (a card that fits inside
the computer). The command line options follow the name of the program (STARPORT) when the
program is started (either at the DOS prompt or through AUTOEXEC.BAT). The command line options
A few typical command lines are:
A. Contents
and pressing the <RETURN> key. The following files and directories should be present on the disk:
COMMAND.COM DOS command processor
DOS Directory holding DOS utility programs
MOUSE Directory holding mouse drivers
CTMOUSE.TXT Mouse driver documentation
CTMOUSE.COM Serial port mouse driver
CTMOUSEP.COM PS/2 mouse driver
MENU Directory holding menu text and batch files
MANUAL Directory holding this manual in WordPerfect and text formats
STARPORT Directory holding StarPort programs and files
DATA.PRO Data for show 1
DATA2.PRO Data for show 2
STARPORT.EXE StarPort software
INSTALL.EXE StarCard configuration program (not used on StarPort)
CONFIG.PRO StarPort configuration data (must be present)
LOCK.PRO If present, autoloads show 1 on program start
START.EXE Generates SP.BAT
STARTEST.EXE Tests a StarPort
ST.EXE Tests a StarPort
SP.BAT StarPort startup batch file created by START.EXE
SP.OLD Previous SP.BAT
AUTOEXEC.BAT DOS startup batch file
DEMO.BAT Same as autoexec.bat
B. System Configuration
are not case sensitive.
The command line options available are:
LPT1 use printer port 1
LPT2 use printer port 2
LPT3 use printer port 3
RXnnn receive nnn channels of DMX from manual controller
TXnnn transmit nnn channels of DMX to dimmers
Z: read and store show data on drive Z (typically Z is A, B, or C) instead of default drive
starport lpt1 use default settings on LPT1
10
Page 11

starport lpt2 tx12 use LPT2, disable DMX receive, transmit DMX channels 1 thru 12
The rx and tx options may be used to speed system operation on slower computers. Limiting the
number of transmitted or received channels reduces the amount of data sent from the host PC to the
StarPort. The StarPort always transmits 512 channels of data on the DMX line, even if the host PC is
Floppy diskettes are easily damaged, lost, and stolen. Although the main program can be replaced
easily, patch levels and stored cues cannot. Several copies of the program diskette should be made
and stored in different locations. Use menu item E to copy from the original diskette to a new one. The
program diskette is the source, and the copy is the target. If the program has been installed on a hard
drive (through the menu), it can be duplicated onto additional diskettes using the appropriate menu
CRET HARDWARE. FOR THIS REASON, SCHEMATICS CANNOT BE RELEASED FOR THIS
Occasionally electrical spikes, surges, brown-outs, or other interference may cause the computer to
mysteriously "lock up" or behave erratically. Turn the computer off, wait a few moments, and turn it
Check that the control cables are in good condition and have not been excessively stretched or
pinched. Also check that the cables connect corresponding pins on the controllers and dimmers,
especially if two different types of connectors are employed. Check that earth ground is not connected
to pins or wires labeled "COMMON"; ground and common are separate electrical connections and
Plug the manual control board, if any, directly into the dimmer control input. If no lights work, replace
the manual fader board with the computer to isolate the problem to either the manual faders or the
If the program seems to work but the dimmers do not respond, the StarPort may be defective. If the
program will not boot properly or locks up, the computer may be defective and the StarPort is probably
If the StarPort still does not work, it must be returned to Dove Systems for repair: attempts to diagnose
starport lpt1 tx24 use LPT1, (receive enabled), transmit DMX channels 1 thru 24
starport lpt1 tx24 rx24 use LPT1, transmit and receive DMX channels 1 through 24
sending only 12 channels to the StarPort.
C. Making copies of the diskette
items.
IN CASE OF TROUBLE
A. Troubleshooting
NOTE: DOVE SYSTEMS MEMORY CONTROLLERS EMPLOY PROPRIETARY AND TRADE SEPRODUCT.
back on again to see if this clears the problem.
Recheck the power connections, including all cords, switches, and circuit breakers.
must not be confused.
dimmers.
Substitute a known good disk to check for a defective copy of the software.
OK.
and fix the device may aggravate the problem, delay repairs, or void the warranty.
11
Page 12

B. Obtaining Service
Users with further technical or operational questions may contact the factory for assistance at
(805)541-8292. Dove Systems memory controllers employ proprietary and trade secret hardware. For
Please include a return address, daytime phone number, shipper preference (UPS ground, UPS
second day air, etc.), and "need by" date. The repair process is expedited when a note describing the
The manufacturer agrees that its products shall be free from defects in material or workmanship over
a period of one year from date of shipment from the factory. Said warranty will not apply if equipment
is used under conditions of service for which it is not specifically intended. The manufacturer is not
responsible for damage to its apparatus through improper installation, physical damage, or poor
If any device is found unsatisfactory under the warranty, the buyer should notify the manufacturer, and
after receipt of shipping advice, buyer may return it directly to Dove Systems, San Luis Obispo, CA,
shipping prepaid. Such equipment will be replaced or put in proper operating condition, free of all
turer shall constitute fulfillment of all obligations to the purchaser. Manufacturer does not assume
Manufacturer shall not be liable for any consequential damage in case of any failure to meet the
conditions of any warranty of shipping schedule, nor will claims for labor, loss of profits, repairs, or other
turer in connections with the manufacture and sale of its equipment. This warranty is non-transferable
this reason, schematics cannot be released for this product.
To have a unit repaired, return it freight prepaid to:
Dove Systems
3563 Sueldo Unit E
San Luis Obispo, CA 93401
specific symptoms is included with the unit.
C. Warranty
operating practice.
charges except transportation. The correction of any defects by repair or replacement by the manufacresponsibility for unauthorized repairs to its apparatus, even though defective.
expenses incidental to replacement be allowed.
No other representation, guarantees or warranties, expressed or implied, are made by the manufacand applies to the original buyer only.
Copyright Dove Systems 1997
12
Page 13

SCREEN DISPLAY EXAMPLES
This is the default screen when the program first loads. It is used primarily for setting channel levels to
save as a stage "look." The upper window shows cue levels, the lower active cues and their fader
status. In this example, channel 20 is up full and channel 22 is at 50%. Cue 0.0 has been marked and
is highlighted. When "Load" is selected at the lower left hand corner, Cue 0.0 will be overwritten. When
"GoXY" is selected at the right hand corner, a crossfade will commence, taking 8.2 seconds to complete.
A. Cues
-----------------------------------------------------------------------------GoXY Stop Q+ Q- Patch Cues QSheet GO STOP BLACK Sbs QSbs Main GoAB Stop Q+ Q-
----------------------------------------------------------------------------- Cue # X Down Delay Y Up CueInfo Cue # A Down Delay B Up CueInfo
X 0.0 0.0s 0.0s 0.0s A----- ------ ------ ------ -------Y 1.0 8.2s 0.0s 8.2s B----- ------ ------ ------ --------
------------------------------------Channels--------------------------------- 1 9 17 25 33 41 49 57 65 73 81 89
2 10 18 26 34 42 50 58 66 74 82 90
3 11 19 27 35 43 51 59 67 75 83 91
4 12 20 FL 28 36 44 52 60 68 76 84 92
5 13 21 29 37 45 53 61 69 77 85 93
6 14 22 50 30 38 46 54 62 70 78 86 94
7 15 23 31 39 47 55 63 71 79 87 95
8 16 24 32 40 48 56 64 72 80 88 96
--------------------------------------Cues----------------------------------- X 0.0 6.0 12.0 18.0 24.0 30.0 36.0
Y 1.0 7.0 13.0 19.0 25.0 31.0 37.0
2.0 8.0 14.0 20.0 26.0 32.0 38.0
3.0 9.0 13.0 21.0 27.0 33.0 39.0
4.0 10.0 14.0 22.0 28.0 34.0 40.0
5.0 11.0 15.0 23.0 29.0 35.0 41.0
----------------------------------------------------------------------------- PRO-MX A/DMX Version 3.11 No StarPort Installed - Demo Mode
-----------------------------------------------------------------------------Load Dwn Dly Up Ins Cpy StgQ NxtQ Levl% Loop Live Info Blnd Clr Del Page Load
------------------------------------------------------------------------------
13
Page 14

B. Patch
This is the screen for setting patch levels. Up to 24 dimmers may be patched to any one channel, all at
different levels. It is used most often to establish a "house" patch table that will change little from show
to show. In this example, channel 1 is displayed in Live mode. The dimmers patched to channel 1 are
-----------------------------------------------------------------------------GoXY Stop Q+ Q- Patch Cues QSheet GO STOP BLACK Sbs QSbs Main GoAB Stop Q+ Q-
----------------------------------------------------------------------------- Cue # X Down Delay Y Up CueInfo Cue # A Down Delay B Up CueInfo
X 0.0 0.0s 0.0s 0.0s A----- ------ ------ ------ -------Y 1.0 0.0s 0.0s 0.0s B----- ------ ------ ------ --------
-----------------------------------Channels---------------------------------- 1 9 17 25 33 41 49 57 65 73 81 89
2 10 18 26 34 42 50 58 66 74 82 90
3 11 19 27 35 43 51 59 67 75 83 91
4 12 20 28 36 44 52 60 68 76 84 92
5 13 21 29 37 45 53 61 69 77 85 93
6 14 22 30 38 46 54 62 70 78 86 94
7 15 23 31 39 47 55 63 71 79 87 95
8 16 24 32 40 48 56 64 72 80 88 96
-----------------------------------Dimmers----------------------------------- 1 FL 7 13 19 25 31 37 43
2 8 14 20 26 32 38 44
3 9 15 50 21 27 33 39 45
4 10 16 22 28 34 40 46
5 11 17 23 29 35 41 47
6 12 18 24 30 36 42 48
------------------------------------------------------------------------------
-----------------------------------------------------------------------------Load Dwn Dly Up Ins Cpy StgQ NxtQ Levl% Loop Live Info Blnd Clr Del Page Load
------------------------------------------------------------------------------
displayed. Dimmer 1 is patched to channel 1 at full, and dimmer 15 is patched to channel 1 at 50%.
14
Page 15

C. QSheet
Cue information including fade times and labels occupy the upper window. The lower window displays
active cues and their fader status. In this example there are three XY cues loaded and no AB cues.
When the "GO" command is selected a crossfade from cue 0.0 to cue 1.0 will commence, taking three
seconds to complete. The cue list will scroll down, putting cue 0.0 off the page, cue 1.0 into the X fader,
-----------------------------------------------------------------------------GoXY Stop Q+ Q- Patch Cues QSheet GO STOP BLACK Sbs QSbs Main GoAB Stop Q+ Q-
----------------------------------------------------------------------------- Cue # X Down Delay Y Up CueInfo Cue # A Down Delay B Up CueInfo
X 0.0 3.0s 0.0s 3.0s gobo A----- ------ ------ ------ -------Y 1.0 3.0s 0.0s 3.0s special B----- ------ ------ ------ --------
-----------------------------------Cue Sheet----------------------------------
2.0 6.0 0.0 6.0 restore ----- ------ ------ ------ --------
----- ------ ------ ------ -------- ----- ------ ------ ------ --------
----- ------ ------ ------ -------- ----- ------ ------ ------ --------
----- ------ ------ ------ -------- ----- ------ ------ ------ --------
----- ------ ------ ------ -------- ----- ------ ------ ------ --------
----- ------ ------ ------ -------- ----- ------ ------ ------ --------
----- ------ ------ ------ -------- ----- ------ ------ ------ --------
----- ------ ------ ------ -------- ----- ------ ------ ------ --------
-------------------------------------Cues------------------------------------ X 0.0 6.0 12.0 18.0 24.0 30.0 36.0
Y 1.0 7.0 13.0 19.0 25.0 31.0 37.0
2.0 8.0 14.0 20.0 26.0 32.0 38.0
3.0 9.0 13.0 21.0 27.0 33.0 39.0
4.0 10.0 14.0 22.0 28.0 34.0 40.0
5.0 11.0 15.0 23.0 29.0 35.0 41.0
------------------------------------------------------------------------------
-----------------------------------------------------------------------------Load Dwn Dly Up Ins Cpy StgQ NxtQ Levl% Loop Live Info Blnd Clr Del Page Load
------------------------------------------------------------------------------
and cue 2.0 into the Y fader.
15
Page 16

D. Subs
This is similar to the patch screen. Any or all channels may be set to any combination of the 18
submaster sliders at any proportion, defining 18 manual stage "looks" in addition to the 252 memory
cues. As submaster 1 is run up and down, the channels assigned to it, in this case channels 17, 28, 50,
-----------------------------------------------------------------------------GoXY Stop Q+ Q- Patch Cues QSheet GO STOP BLACK Sbs QSbs Main GoAB Stop Q+ Q-
----------------------------------------------------------------------------- Cue # X Down Delay Y Up CueInfo Cue # A Down Delay B Up CueInfo
X 0.0 0.0s 0.0s 0.0s A----- ------ ------ ------ -------Y 1.0 0.0s 0.0s 0.0s B----- ------ ------ ------ --------
-----------------------------------Channels---------------------------------- 1 9 17 FL 25 33 41 49 57 65 73 81 89
2 10 18 26 34 42 50 25 58 66 74 82 90
3 11 19 27 35 43 51 59 67 75 83 91
4 12 20 28 50 36 44 52 60 68 76 84 92
5 13 21 29 37 45 53 61 69 77 85 93
6 14 22 30 38 46 54 62 70 78 86 94
7 15 23 31 39 47 55 63 71 15 79 87 95
8 16 24 32 40 48 56 64 72 80 88 96
---------------------------------Submasters---------------------------------- 1 FL% submaster01 7 % submaster07 13 % submaster13
2 % submaster01 8 % submaster07 14 % submaster13
3 % submaster01 9 % submaster07 15 % submaster13
4 % submaster01 10 % submaster07 16 % submaster13
5 % submaster01 11 % submaster07 17 % submaster13
6 % submaster01 12 % submaster07 18 % submaster13
----------------------------------------------------------------------------- PRO-MX A/DMX Version 3.10 No StarPort Installed - Demo Mode
-----------------------------------------------------------------------------Load Dwn Dly Up Ins Cpy StgQ NxtQ Levl% Loop Live Info Blnd Clr Del Page Load
------------------------------------------------------------------------------
and 71 will go up and down.
16
Page 17

E. Q/Subs
Similar to the QSheet screen, this one displays submaster information below the cue information.
Submasters 1 is up full, and submaster 4 is at 50%. No AB cues have been loaded. There are three
XY cues loaded. When the "GoXY" command is selected at the top left corner of the screen, cue 0.0
will take three seconds to fade down. After a 1.5 second pause, cue 1.0 will fade in, taking 1.5 seconds.
-----------------------------------------------------------------------------GoXY Stop Q+ Q- Patch Cues QSheet GO STOP BLACK Sbs QSbs Main GoAB Stop Q+ Q-
----------------------------------------------------------------------------- Cue # X Down Delay Y Up CueInfo Cue # A Down Delay B Up CueInfo
X 0.0 4.0s 0.0s 4.0s special A----- ------ ------ ------ -------Y 1.0 3.0s 1.5s 1.5s gobo B----- ------ ------ ------ --------
-----------------------------------Cue Sheet----------------------------------
2.0 6.0s 0.0s 6.0s restore ----- ------ ------ ------ --------
----- ------ ------ ------ -------- ----- ------ ------ ------ --------
----- ------ ------ ------ -------- ----- ------ ------ ------ --------
----- ------ ------ ------ -------- ----- ------ ------ ------ --------
----- ------ ------ ------ -------- ----- ------ ------ ------ --------
----- ------ ------ ------ -------- ----- ------ ------ ------ --------
----- ------ ------ ------ -------- ----- ------ ------ ------ --------
----- ------ ------ ------ -------- ----- ------ ------ ------ --------
---------------------------------Submasters---------------------------------- 1 FL% submaster01 7 % submaster07 13 % submaster13
2 % submaster01 8 % submaster07 14 % submaster13
3 % submaster01 9 % submaster07 15 % submaster13
4 50% submaster01 10 % submaster07 16 % submaster13
5 % submaster01 11 % submaster07 17 % submaster13
6 % submaster01 12 % submaster07 18 % submaster13
------------------------------------------------------------------------------
-----------------------------------------------------------------------------Load Dwn Dly Up Ins Cpy StgQ NxtQ Levl% Loop Live Info Blnd Clr Del Page Load
------------------------------------------------------------------------------
17
Page 18

F. Main
The main screen presents a menu of utility options, including load/save shows. The lower window
confirms the software version number, control input, and dimmer output. You may exit the program
through this screen. Make sure you have saved your data to disk before quitting! NOTE: PRINT
-----------------------------------------------------------------------------GoXY Stop Q+ Q- Patch Cues QSheet GO STOP BLACK Sbs QSbs Main GoAB Stop Q+ Q-
----------------------------------------------------------------------------- Cue # X Down Delay Y Up CueInfo Cue # A Down Delay B Up CueInfo
X 0.0 0.0s 0.0s 0.0s A----- ------ ------ ------ -------Y 1.0 0.0s 0.0s 0.0s B----- ------ ------ ------ --------
----------------------------------Utilities----------------------------------SAVE :show to disk -> show #1 LOAD :show #1 from disk to memory
SAVE :show to disk -> show #2 LOAD :show #2 from disk to memory
SAVE :show to disk -> show #3 LOAD :show #3 from disk to memory
SAVE :show to disk -> show #4 LOAD :show #4 from disk to memory
PRINT :cue sheet
PRINT :submaster assignments
EXIT :to DOS PRINT :dimmer/channel patch
----------------------------Current Configuration---------------------------A/DMX Software Version = 3.11 0 Channels, 480 Dimmers
------------------------------------------------------------------------------
-----------------------------------------------------------------------------Execute Execute
------------------------------------------------------------------------------
UTILITIES ARE CURRENTLY DISABLED.
StarPort I/O CONNECTIONS AND PINOUTS
5 PIN XLR (DMX) DB9 (DMX)
PIN 1 Common PIN 1 Common TO DIMMERS
2 Data Not 2 Data Not TO DIMMERS
3 Data 3 N/C
4 N/C 4 Data TO DIMMERS
5 Overtemp Input 5 N/C
6 Data FROM CONTROL
7 N/C
8 Data Not FROM CONTROL
9 Common FROM CONTROL
18
Page 19

19
 Loading...