

Page 1

PRESET 10 PORTABLE
OWNERS MANUAL
Doug Fleenor Design
396 Corbett Canyon Road
Arroyo Grande, CA 93420
(805)-481-9599
Software Version 2.4
Revision 6
January, 2013
$ Serial Number 085000
Page 2
PRODUCT DESCRIPTION
The Preset 10 P ortable can act as a seamless backup for DMX512 lighting consoles or as a stand-alone DMX512 preset
console. The Preset 10 Portable is capable of storing up to ten presets. These presets are recorded by capturing the output
of a DMX512 console. Each preset can be assigned a unique crossfade time, from 0 to 999 seconds. Presets are recalled
by pressing one of the buttons.
W hen operating as a backup device, Preset 10 Porta ble monitors the DM X512 output from your lighting console. If console
output is lost, Preset 10 Portable begins transmitting to maintain the current look and alerts the user to the loss of DMX512.
Crossfading to any of the stored presets is then initiated by pressing a preset button.
The PRESET 10 also comes in a wall plate version for architectural applications.
SPECIFICATIONS
Connectors: Input: 5 pin m ale, gold plated contacts (3 pin connectors optional)
Output: 5 pin female, gold plated contacts (3 pin connectors optional)
Connecter pin out: 1 - DMX512 comm on
2 - DMX512 data 3 - DMX512 data +
4 - Passed Through
5 - Passed Through
Input/Output circuit: ESD protected EIA-485 transceiver (LT1785)
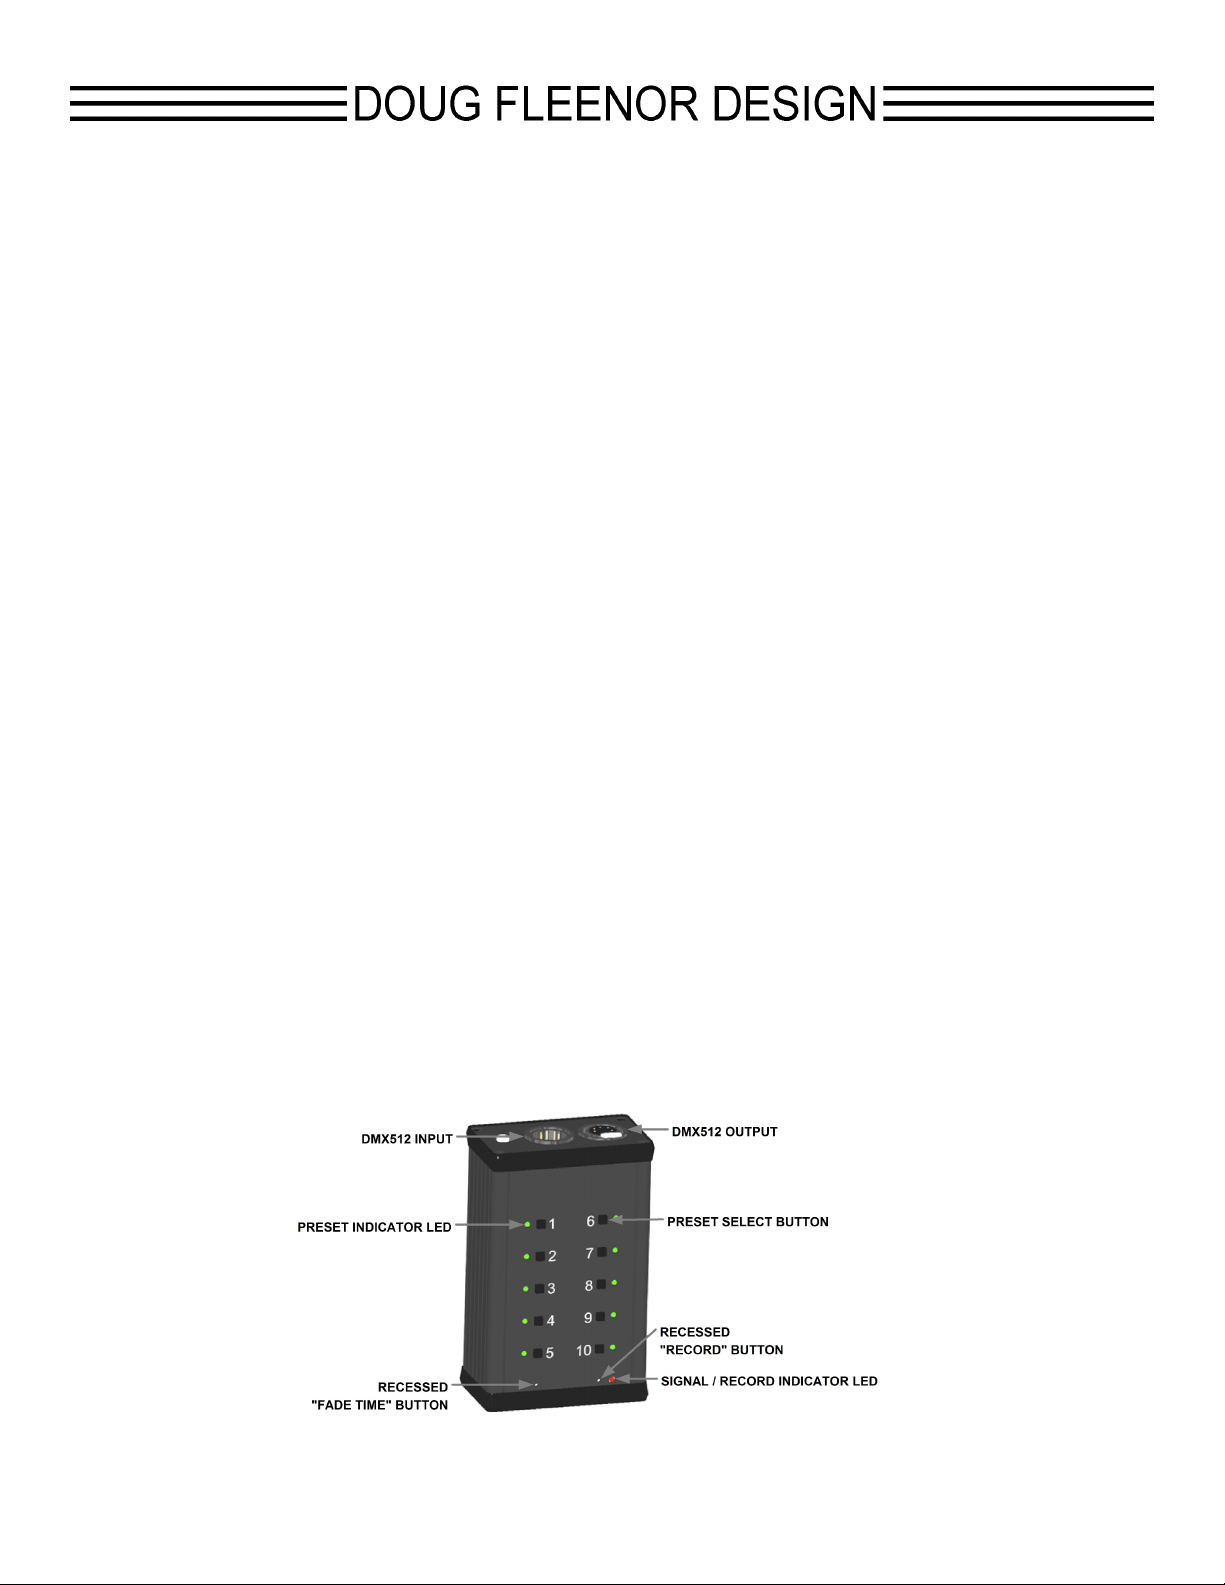
Indicators: Ten green preset indicator LEDs
One red Signal / Record LED
User controls: Ten preset push buttons
One recessed record push button
One recessed fade time push button
Power input: Universal power supply 100 - 240VAC, 50/60 hertz, 5 watts
Color: Black anodized with white nomenclature
Size and weight: Chassis 5.3"l X 3.2"w X 1.8"h, 12 ounces
Power supply 2.2"l X 1.9"w X 1.0"h, 5 ounces
Page 2 of 6
Page 3

SETUP AND CONNECTIONS
The Preset 10 Portable should be installed between the console and DMX512 receiving devices. Typically, it should be
within arm s length of the console operator.
Remove the cable connected to the output of the console. Use a short DM X512 cable to connect the output of the console
to the DMX512 input of the Preset 10 P ortable. Connect the cable that was originally connected to the console to the
DMX512 output connector of the Preset 10 Portable. This inserts the Preset 10 Portable into the DMX512 signal path.
Plug the Preset 10 P ortable power supply into mains power.
NOTE:
! The console will still operate normally when the Preset 1 0 Porta ble is not powered.
OPERATION
INDICATORS
RED LED
ON = RECEIVING DMX512
FLASHING = RECORD MODE
GREEN LED
ON = CURRENTLY SELECTED PRESET
FLASHING = TIME SETTING MODE SELECTED FOR THAT PRESET
ALL GREEN LEDS
FLASHING = LO SS OF DMX512 INPUT ALERT - PRESET 10 PORTABLE IS HOLDING THE LAST LOOK.
GREEN LED RED LED STATE
OFF OFF UNIT NOT POWERED
OFF ON
OFF FLASHING
FLASHING OFF TIME SETTING MODE ACTIVE FOR SELECTED PRESET
ON OFF
When the primary console is powered ON your lighting system should function normally. The RED LED of the Preset 10
Portable will illuminate indicating that a DMX512 signal is present.
RECEIVING DMX512
PRESET PLAYBACK IS LOCKED OUT
RECORD MODE ACTIVE
CURRENT LOOK WILL BE STORED TO NEXT PRESSED PRESET
PRESET 10 PORTABLE TRANSMITTING DMX512
NO DMX512 INPUT
Page 3 of 6
Page 4

RECORDING PRESETS
In order to set the individual dimmer levels recorded to a preset, the PRESET 10 must be connected to a DMX512 source.
When fewer than 512 dimmer levels are received, a level of 0% will be stored for all channels above those received.
Note:
! For predictable results, avoid recording when the DMX levels are changing.
1. Using the DMX512 console, set a “look” that you wish to record to a preset.
2. Using a small blunt object (i.e. paper clip), depress the recessed RECORD button located next to the RED LED. The
RED LED will begin to flash. If you decide after pressing the RECORD button that you do not wish to make an edit,
press the RECORD button a second time. No changes will have been made.
3. Depress the PRESET SELECT button adjacent to the preset number you wish to record. The adjacent GREEN LED
will illuminate as you depress the button. (Example: press the upper most left button to store preset 1)
4. Upon releasing the PRESET SELECT button, the RED LED will no longer flash. This Indicates recording is complete.
Repeat steps 1 through 4 until you have recorded as m any presets as required, up to ten total.
COPYING / MOVING PRESETS
Once a preset has been recorded it can be copied or moved. In order to copy one preset to another, DMX512 signal must be
disconnected from the Preset 10 Portable DMX IN PUT. Press the PR ES ET SELECT button of the preset you wish to copy.
Once the preset completes its fade follow steps 2 through 4 from RECORDING PRESETS above.
PRESET NUMBER 10 (OFF) - SPECIAL FUNCTION
When the levels stored in preset num ber 10(OFF) are all zeros a special function is enabled. W hen preset 10(O FF) is
selected and the crossfade has completed the Preset 10 will stop sending DMX512. By ending DMX512 transmission,
many moving lights and dimming systems will enter their standby mode. This feature can be disabled by recording any
non-zero level on any channel into preset number 10(OFF).
Page 4 of 6
Page 5

RECORDING PRESET CROSSFADE TIME
A crossfade is a fade where the new preset levels entirely replace the previous levels. Each of the ten presets can have its
own unique crossfade time. Crossfade times default to two seconds.
Note:
! Crossfade times range from a minimum of 0 seconds to a maximum of 999 seconds (16.65 minutes).
! Crossfade times can not be set while the Preset 10 is locked out (RED LED is illuminated).
To enter a different crossfade time:
1. Disconnect the Preset Ten from any DMX512 source.
2. Press the button of the preset you wish to edit. The GREEN preset indicator LED will illuminate.
3. Using a small blunt object (i.e. paper clip), depress the recessed FADE TIME button located below preset number 5.
The indicator LED, adjacent to the preset you selected to edit, will now flash. You will have ten seconds to set the
crossfade tim e before. If you decide after depressing the FADE TIME button that you do not wish to make an edit
simply wait ten seconds to exit or press the FADE TIME button a second time. No changes will have been made
4. Enter the time in seconds using the PRESET SELECT buttons. Use PRESET SELECT button 10(OFF) to enter a
zero. (i.e. 120 seconds is entered by pressing PRESET SELECT button 1 followed by 2 then 10). The time setting
command is completed by one of three methods.
a. Enter a three-digit time. The third digit will com plete the entry. The GREEN preset indicator LED will illuminate
steadily indicating success. A one or two digit time may be entered with leading zeros (i.e. five seconds as
005 or 10, 10,5).
b. Enter a one or two digit time followed by pressing the FADE TIME button. The GREEN preset indicator LED
will illuminate steadily indicating success.
c. Enter a one or two digit time and wait for ten seconds. The GREEN preset indicator LED will illuminate
steadily indicating success.
Page 5 of 6
Page 6

PLAYBACK OF PRESETS
Presets can be played back in one of two ways, a crossfade to a static preset or an autofollow of all ten presets. A crossfade
is a change from the current preset to the newly selected one. The time taken to fade from the current preset to the new preset
is taken from the newly selected preset. Once the fade has completed it will remain at that current preset (static) until another
preset is selected. W hen the autofollow method of playback is used once the fade tim e of the currently fading preset is
completed the next preset is automatically selected.
To begin a crossfade between presets, mom entarily press the preset select button of the preset you wish to play.
To begin autofollow of all ten presets , press and hold the preset select button of preset num ber 1 (approximately 5
seconds) until all the LEDs flash once. Once the fade time of a preset is complete, the next preset will be selected
automatically. When preset number 10(OFF) has been reached the next preset to be selected will be preset number 1.
To exit autofollow momentarily press any preset select button.
Note:
! If a static preset is playing at the time power is lost Preset 10 will return to that preset when power is
restored. The fade will begin with all 512 channels at 0% and fade up in the time recorded to that preset.
! If the Preset 10 was in autofollow playback at the time power was lost, the Preset 10 will resume
autofollow playback beginning with preset number 1.
! To bypass unused presets In autofollow enter the time as 999 seconds. This means the longest
autofollow fade time is 998 seconds.
PRESET NUMBER 10 (OFF) - SPECIAL FUNCTION
When the levels stored in preset num ber 10(OFF) are all zeros a special function is enabled. W hen preset 10(OFF) is
selected and the crossfade has completed the Preset 10 will stop sending DMX512. By ending DMX512 transmission,
many moving lights and dimming systems will enter their standby mode. This feature can be disabled by recording any
non-zero level on any channel into preset number 10(OFF).
Page 6 of 6
 Loading...