

Page 1
DOUG FLEENOR DESIGN
Installation and Operation Instructions
Model ES2 entry station
Overview
The ES2 is a stand-alone DMX snapshot recorder which can store two preset scenes or
“looks”. It can be used as a stand-alone master station or it can be configured as a
remote slave station in conjunction with another ES2 configured as a master station. It
can be used as a slave station with Doug Fleenor Design’s Preset 10-A, Preset 10-A2,
or Rerun stations.
In slave mode, the ES2 has two buttons which can be assigned to remotely trigger any
of the presets/shows on a master station. There is also a recessed button which is
used to record presets and to set fade times when the ES2 is configured as a master
station.
Each button has an LED which illuminates while its associated preset/show is active.
The third indicator is a bi-color LED. It is green when the active preset/show on a
master station is other than the ones represented by the buttons on the ES2. It is red
when DMX is coming in from a control console. It is yellow while any preset is fading.
The bi-color LED turns off while one of the local presets is active and not fading.
Back box selection
Any standard single gang wall box with a depth of at least 1.5 inches can be used for
the ES2. Raco models 590 and 660 are typical selections.
Wiring
The ES2 uses the same wiring conventions and methods as the Preset 10-A. A single
5 pin pluggable terminal block is used for all connections. Daisy-chain topology must
be used for the DMX512 signal. Multiple “home runs” are not acceptable for DMX512
signals. The cabling used for the DMX512 signal must be suitable for high speed digital
data. Examples include Belden 9729 and 9829.
Power to the station must be 9 - 15 volts either AC or DC. The ES2 current draw is
120mA. Cabling for the station power should be #16AWG. The low voltage power can
be run in the same conduit with the DMX512 cable.
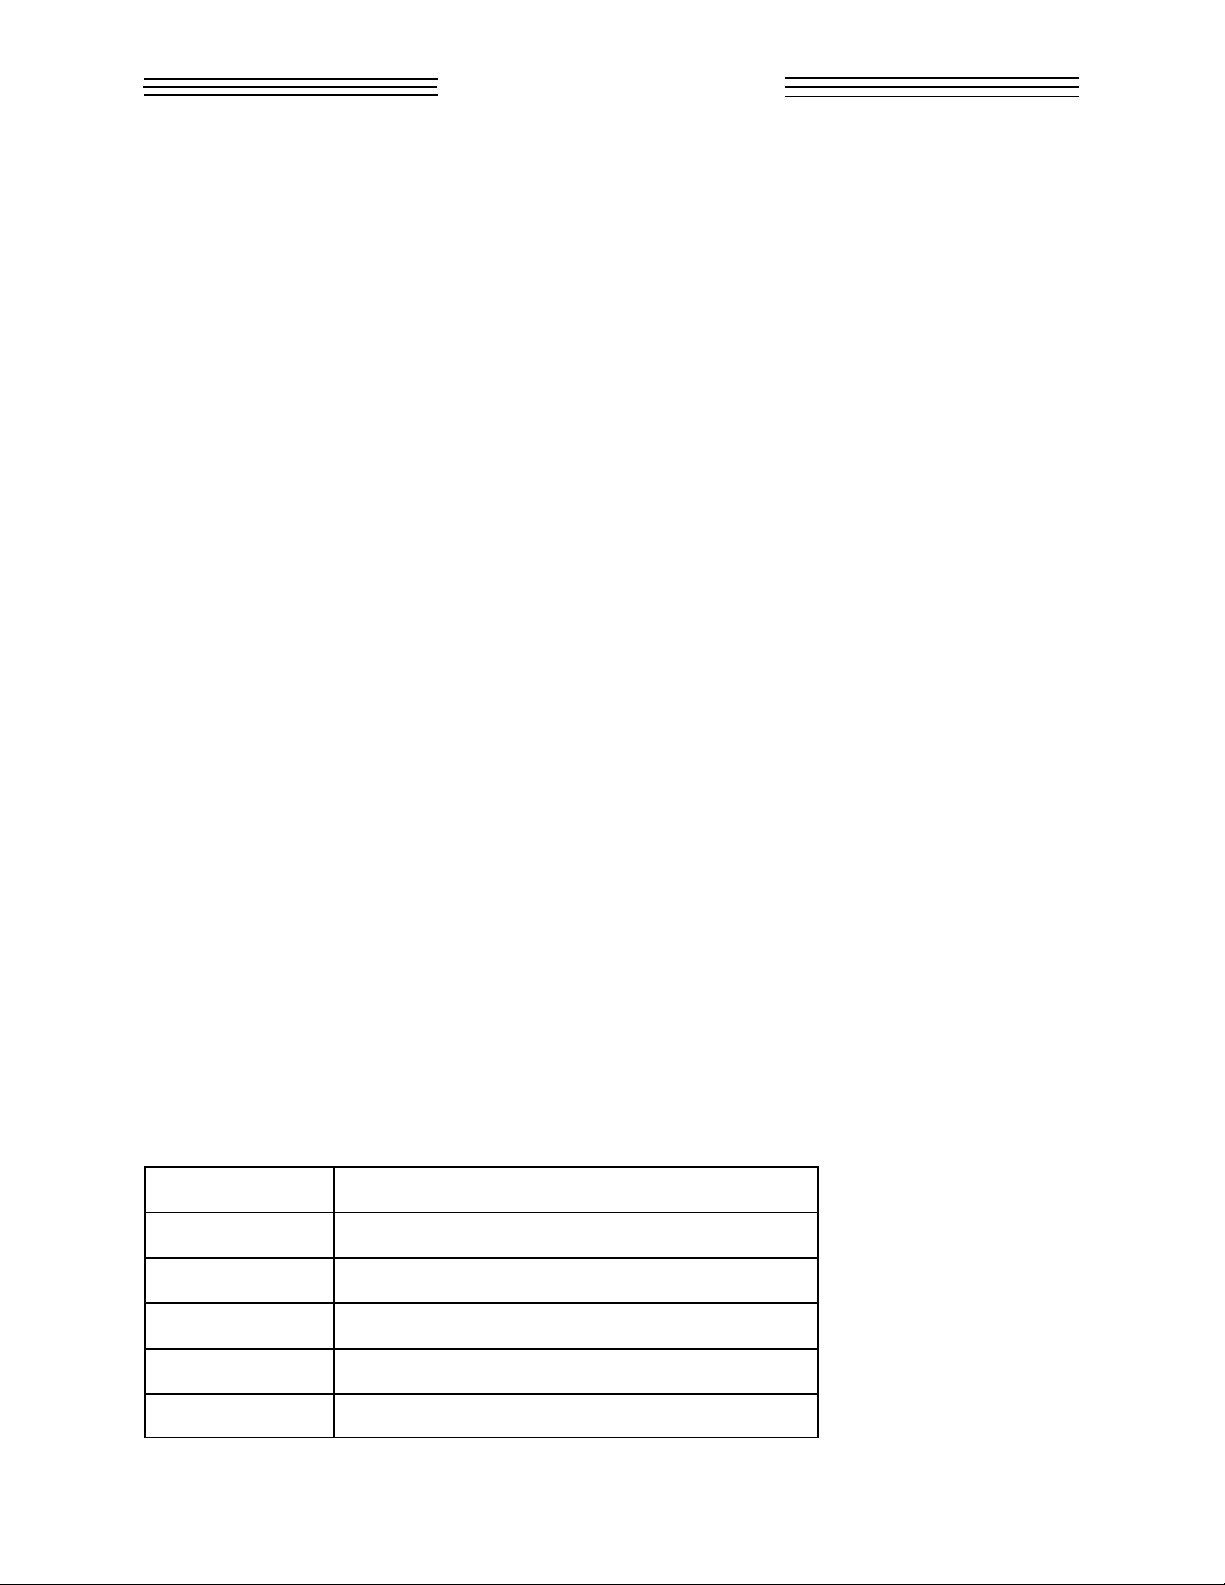
Wiring to the 5 position terminal block is as shown below:
Terminal Label Function
C DMX512 common (shield)
- DMX512 data minus signal
+ DMX512 data plus signal
C Power common (tied to DMX512 common)
V Power positive voltage
Page 1 of 5
Page 2
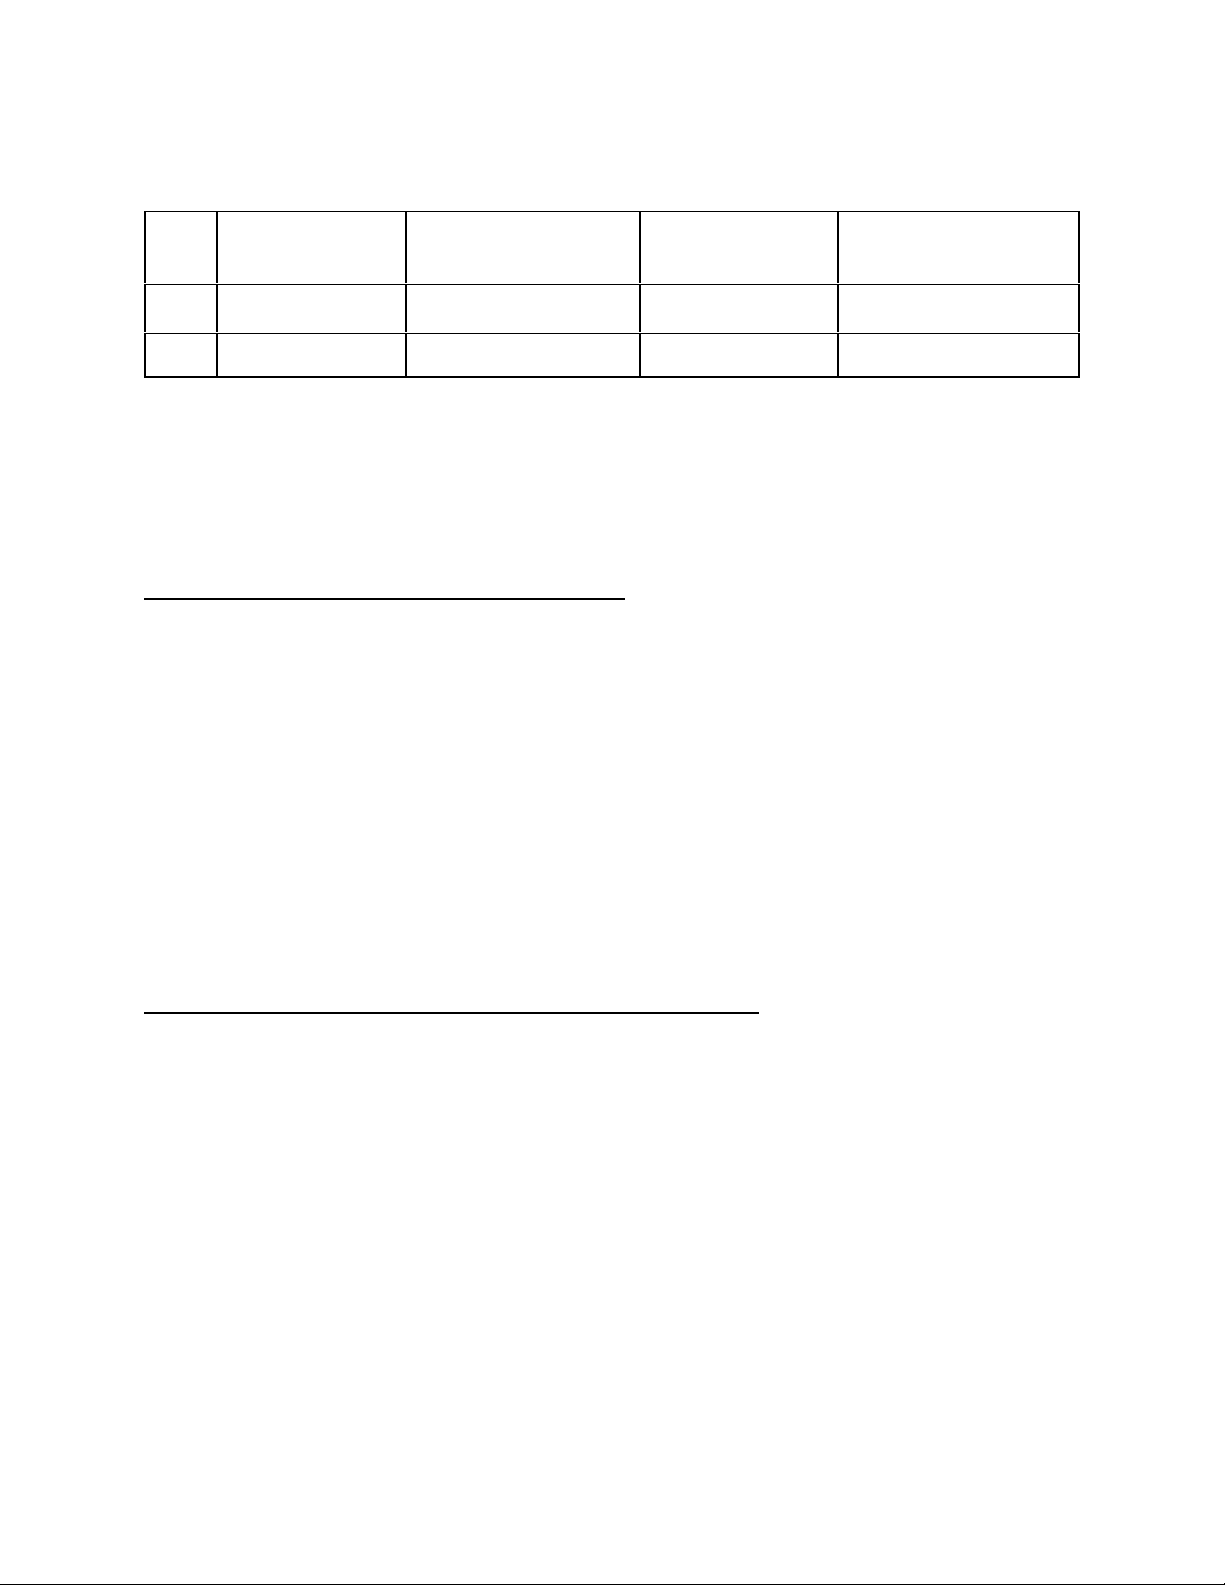
Jumper settings
Prior to installation, the two jumpers on the rear of the ES2 should be set for the
operation desired. The jumpers have the following functions:
Master Station Master Station with
Recording Disabled
JP1 Installed Removed Installed Removed
JP2 Removed Removed Installed Installed
Installation
Prior to installing the ES2 into the back box, verify that all cabling is secure and that no
wire or part of the station can short to the box. Secure the station to the wall box using
the two #6 screws included with the ES2.
Slave mode
Slave mode operation (default configuration)
Pressing a preset button on the ES2 triggers one of the presets on the master station.
The green LED next to the button will illuminate to indicate that the preset has been
selected. The bi-color LED will turn yellow while the system is fading from the prior
lighting preset to the newly selected preset. The bi-color LED will turn off when the fade
to the new levels is complete.
If a preset is selected on the master station which can not be triggered by the ES2, the
bi-color LED will illuminate green. This shows that a preset is active, but it is not one
which the ES2 can access.
Slave Station
(factory default)
Slave Station Button
Mapping Mode
If a DMX-based console is transmitting on the line, the bi-color LED will illuminate in red
to show that the station is locked out. The lighting is exclusively controlled by the
console.
Assigning presets/shows to the ES2 buttons (slave mode)
The ES2 factory default configuration has the upper preset button (ON) assigned to
preset/show 1 and the lower button (OFF) assigned to preset/show preset/show 2. In
order to re-assign the buttons to alternate master station presets/shows, the ES2 must
not be mounted on the wall. This allows access to the programming jumper. The ES2
slave must also be connected to a master ES2, Preset 10, Preset 10-A2, or Rerun. Be
sure to verify the jumper settings on the master station. It should be set up as a master
for a multi-station installation. Perform the following steps to program the buttons:
1. Verify that the slave ES2 is operating normally before re-programming.
2. Remove jumper JP1 from the slave ES2 circuit board. All of the ES2 LEDs will
begin to flash. If they do not, this is an indication that the master is not set up
correctly or there is a wiring problem.
3. On the master station, select the preset/show which you wish to assign to an
ES2 button.
4. Back at the slave ES2, press the button to which you wish to assign the active
preset/show. The change is recorded into its memory. The assignments are
Page 2 of 5
Page 3

held in non-volatile memory so they are not lost if power is interrupted.
5. Repeat steps 3 and 4 for the other ES2 button if desired.
6. Replace jumper JP1.
7. Verify proper operation and the new button assignments.
8. Remove power, mount the station in its wall box, apply power, and once again
verify proper operation.
Master mode
The ES2 can act as a stand-alone wall station. Refer to the jumper table for
configuration details. The ES2 has two recordable presets. Both contain all zero levels
as shipped from the factory. A number of options can be selected and configured as
well.
Master mode operation
Simply press the ON or OFF preset buttons to select a preset. The green LED next to
the selected preset will illuminate. The bi-color LED will light yellow while the ES2 is
fading from one preset to the other.
If the fade needs to be sped up, push the selected preset button again while the fade is
in progress. The fade time will be cut in half. Pressing the button again will further
speed the fade.
If DMX from a control console is present, the green preset LEDs will be off and the bicolor LED will light in red. This indicates that the station is receiving DMX and the ES2
is locked out. No presets can be played back while DMX from a control console is
present.
Upon loss of DMX from a control console, the ES2 will begin transmitting with the last
levels received from the console. It will immediately begin fading from those levels to
the levels in the preset which was active prior to the console being connected.
If power is lost, all presets and settings are held in non-volatile memory. When power
is restored, the ES2 will send DMX with all levels at zero and it will then fade to the last
active preset in its assigned fade time.
Recording a preset
To record levels into the ES2's presets, perform the following steps:
1. Connect a DMX512 control console.
2. Verify that the bi-color LED is red. This indicates that the ES2 is receiving a
signal.
3. Set the lighting levels as desired on the control console.
4. Using a small object such as a paper clip, press and release the recessed record
switch. The hole to access the switch is between the upper mounting hole and
the ON preset button. The bi-color LED will blink red.
5. Press and release the preset button to be recorded. The bi-color LED will turn
solid red to indicate that the levels have been recorded.
6. Repeat steps 3 through 5 for each preset to be recorded or re-recorded.
Note: Presets can not be recorded if the record lockout jumper is removed.
Page 3 of 5
Page 4

Setting a fade time
Fade times are defaulted to three seconds. Each preset can have its own fade time.
To set a preset’s fade time, perform the following steps:
1. Remove any control console and select the preset to have its fade time altered.
2. After the fade to the desired preset is complete, press and release the recessed
record switch. The hole to access the switch is between the upper mounting
hole and the ON preset button. The bi-color LED will illuminate yellow for about
two seconds. It will then begin blinking. Press the preset button when the
number of blinks equals the number of seconds you wish the fade time to be set
to. If a zero fade time is desired, press the preset button while the bi-color LED
is on during the first two second upon entering the time setting mode. A
maximum fade time of 30 seconds can be set.
Note: The fade times can not be altered if the record lockout jumper is removed.
OFF preset special feature
The OFF preset has a special feature which will allow the ES2 to stop transmitting
DMX. If the OFF preset is selected and all levels in the preset are at 0, the ES2 will
stop transmitting DMX about two seconds after all of the levels have reached 0. This
feature allows other equipment to power down. Examples include dimmer rack cooling
systems and moving light lamps.
If your system requires that DMX be present at all times, simply record the OFF preset
with any channel at any level above zero. If any channel (even an unused one) is nonzero, the ES2 will continue to transmit DMX.
Special functions
The ES2 has a number of advanced features which can be selected during power-up of
the station. To alter each feature, apply power to the station while holding the desired
button. In addition, the ES2 will display its configuration briefly during power-up.
Factory default reset
If the record button is held during power-up, the ES2 is set to its factory default
configuration. All preset levels are set to zero. All fade times are set to three seconds.
Slave station buttons are mapped to presets 1 and 2. The last active preset is set to 1.
The DMX output speed is set to normal. Slave support is enabled.
All LEDs will light to indicate that the ES2 has been factory defaulted. Upon releasing
the record button, the ES2 will perform its normal power-up cycle.
Adjusting the DMX output speed
If the ON preset button is held during power-up, the ES2 will toggle the status of the
DMX output speed. The bi-color LED will be green if the output speed is being set to
normal. It will be red if the output speed is being set to relaxed timing (slow output).
Upon releasing the button, the ES2 will perform its normal power-up cycle.
The status of the output speed is held in non-volatile memory so this setting only needs
to be set once. The default is normal speed output.
Page 4 of 5
Page 5

Changing the slave support mode
If the OFF preset button is held during power-up, the ES2 will toggle the slave support
capability. The bi-color LED will be green if slave support is being set to enabled. It will
be red if slave support is being set to disabled. Upon releasing the button, the ES2 will
perform its normal power-up cycle.
The status of slave support is held in non-volatile memory so this setting only needs to
be set once. The default is slave support enabled.
Slave support allows an ES2 master station to communicate with other ES2 stations
configured as slaves. This communication takes place between standard DMX data
packets using “alternate start code” packets of information. Some non-compliant
receiving devices can malfunction when these special packets are present. By
disabling slave support, the ES2 will only send traditional “null start code” data packets.
However, slave stations can not operate if slave support is disabled. If your system
requires the use of slave stations and non-compliant receivers, use Doug Fleenor
Design model DMX DECELERATOR between the last slave station and the first noncompliant receiving device to shield the devices from the “alternate start code” packets.
Please contact Doug Fleenor Design for more details.
Power-up sequence
When power is applied to the ES2, the LEDs on the front panel will light to show the
current configuration. The sequence takes place in about two seconds before normal
station operation begins.
Bi-color LED color Meaning
ON LED lit Green DMX speed = normal
ON LED lit Red DMX speed = slow
OFF LED lit Green Slave support enabled
OFF LED lit Red Slave support disabled
Warranty
Products manufactured by Doug Fleenor Design carry a five year parts and labor
warranty against manufacturing defects. It is the customer's responsibility to return the
product to Doug Fleenor Design (at the customer's expense). If covered by warranty,
Doug Fleenor Design will repair the unit and return it to the customer (at Doug Fleenor
Design's expense). If a trip is necessary to the customer's site to solve a problem, the
expenses of the trip must be paid by the customer.
Note that this warranty is against Manufacturing Defects. It does not include damage
due to misuse, abuse, or "acts of God". Most non-warranty repairs are made for a fixed
$30.00 fee, plus shipping.
Page 5 of 5
 Loading...