

Page 1
User
User
User
User Manual
Model:M975
Model:M975
Model:M975
Model:M975
Manual
Manual
Manual
Android
Android
Android
Android 4.0
4.0
4.0
4.0
1
Page 2

CONTENTS
CONTENTS
CONTENTS
CONTENTS
1.
Welcome
1.
Welcome
1.
1. Welcome
Welcome 3
2.
Important
2.
Important
2.
2. Important
Important notices
3.
Keys
3.
Keys
3.
3. Keys
Keys and
4.
Getting
4.
Getting
4.
4. Getting
Getting started
4.1.
4.1.
4.1.
4.1. Connect
4.2.
4.2.
4.2.
4.2. Turn
4.3.
4.3.
4.3.
4.3. Lock
5.
Your
5.
Your
5.
5. Your
Your homescreen
5.1.
5.1.
5.1.
5.1. Change
5.2.
5.2.
5.2.
5.2. Add
5.3.
5.3.
5.3.
5.3. Add
6.
Network
6.
Network
6.
6. Network
Network connection
6.1.
6.1.
6.1.
6.1. Wi-fi
6.2.
6.2.
6.2.
6.2. 3G-netwerk
notices
notices
notices 3
and
functions
and
functions
and functions
functions 4
started
started
started 5
Connect
Connect
Connect to
Turn
Turn
Turn on
4.2.1.Turn
4.2.1.Turn
4.2.1.Turn
4.2.1.Turn on
4.2.2.
4.2.2.
4.2.2.
4.2.2. Turn
Lock
Lock
Lock /
homescreen
homescreen
homescreen 6
Change
Change
Change wallpaper
Add
Add
Add /
Add
Add
Add widgets
connection
connection
connection 7
Wi-fi
Wi-fi
Wi-fi 7
6.1.1.
6.1.1.
6.1.1.
6.1.1. Turn
6.1.2.
6.1.2.
6.1.2.
6.1.2. Turn
6.1.3.
6.1.3.
6.1.3.
6.1.3. Add
3G-netwerk
3G-netwerk
3G-netwerk 8
to
your
to
to your
on
/
off
on
/
off
on /
/ off
off 5
Turn
Turn
Turn off
/
unlock
/
unlock
/ unlock
unlock the
wallpaper
wallpaper
wallpaper for
/
delete
/
delete
/ delete
delete applications
widgets
widgets
widgets from
Turn
Turn
Turn on
Turn
Turn
Turn off
Add
Add
Add a
computer
your
computer
your computer
computer 5
on
on
on 5
off
off
off
the
screen
the
screen
the screen
screen (sleep
for
for
for homescreen
applications
applications
applications from
from
the
from
the
from the
the homescherm
on
Wi-fi
on
Wi-fi
on Wi-fi
Wi-fi 8
off
Wi-fi
off
Wi-fi
off Wi-fi
Wi-fi 8
a
Wi-fi
a
a Wi-fi
network
Wi-fi
network
Wi-fi network
network manually
(sleep
(sleep
(sleep mode)
homescreen
homescreen
homescreen 7
from
from
from the
homescherm
homescherm
homescherm 7
mode)
mode)
mode) 5
the
homescreen
the
homescreen
the homescreen
homescreen 7
manually
manually
manually 8
3
3
3
3
3
3
4
4
4
5
5
5
5
5
5
5
5
5
5
5
5
5
5
5
6
6
6
7
7
7
7
7
7
7
7
7
7
7
7
7
7
7
8
8
8
8
8
8
8
8
8
8
8
8
7.
Internet
7.
Internet
7.
7. Internet
Internet Browsing
8.
Install
8.
Install
8.
8. Install
Install and
8.1.
8.1.
8.1.
8.1. Install
8.2.
8.2.
8.2.
8.2. Manage
8.3.
8.3.
8.3.
8.3. Market
9.
Multi-media
9.
Multi-media
9.
9. Multi-media
Multi-media Functions
9.1.
9.1.
9.1.
9.1. Music
9.2.
9.2.
9.2.
9.2. Video
9.3.
9.3.
9.3.
9.3. Gallery
9.4.
9.4.
9.4.
9.4. Camera
9.5.
9.5.
9.5.
9.5. E-book
9.6.
9.6.
9.6.
9.6. E-mail
1
0
.
1
1
1 0
11.
11.
11.
11. Explorer
Settings
0
.
Settings
0 .
. Settings
Settings 20
10.1.
10.1.
10.1.
10.1. Wireless
10.2.
10.2.
10.2.
10.2. Device
10.3.
10.3.
10.3.
10.3. Personal
10.4.
10.4.
10.4.
10.4. System
Explorer
Explorer
Explorer 21
Browsing
Browsing
Browsing 8
and
manage
and
manage
and manage
manage Apps
Install
Install
Install Apps
Manage
Manage
Manage Apps
Market
Market
Market 11
Functions
Functions
Functions 11
Music
Music
Music 11
Video
Video
Video 12
9.2.1.
9.2.1.
9.2.1.
9.2.1. Video
9.2.2.
9.2.2.
9.2.2.
9.2.2. HDMI
Gallery
Gallery
Gallery 13
Camera
Camera
Camera 13
E-book
E-book
E-book reader
E-mail
E-mail
E-mail 15
Wireless
Wireless
Wireless and
Device
Device
Device 20
Personal
Personal
Personal 20
System
System
System 20
Apps
Apps
Apps 10
Apps
Apps
Apps 10
Apps
Apps
Apps 10
Video
Video
Video Player
HDMI
HDMI
HDMI Output
Player
Player
Player 12
Output
Output
Output 12
reader
reader
reader 14
and
networks
and
networks
and networks
networks 20
8
8
8
10
10
10
10
10
10
10
10
10
11
11
11
11
11
11
11
11
11
12
12
12
12
12
12
12
12
12
13
13
13
13
13
13
14
14
14
15
15
15
20
20
20
20
20
20
20
20
20
20
20
20
20
20
20
21
21
21
12.
12.
12.
12. Battery
13.
13.
13.
13. Troubleshooting
Battery
Battery
Battery 22
Troubleshooting
Troubleshooting
Troubleshooting 23
22
22
22
23
23
23
2
Page 3

WELCOME
WELCOME
1.
1.
WELCOME
WELCOME
1.
1.
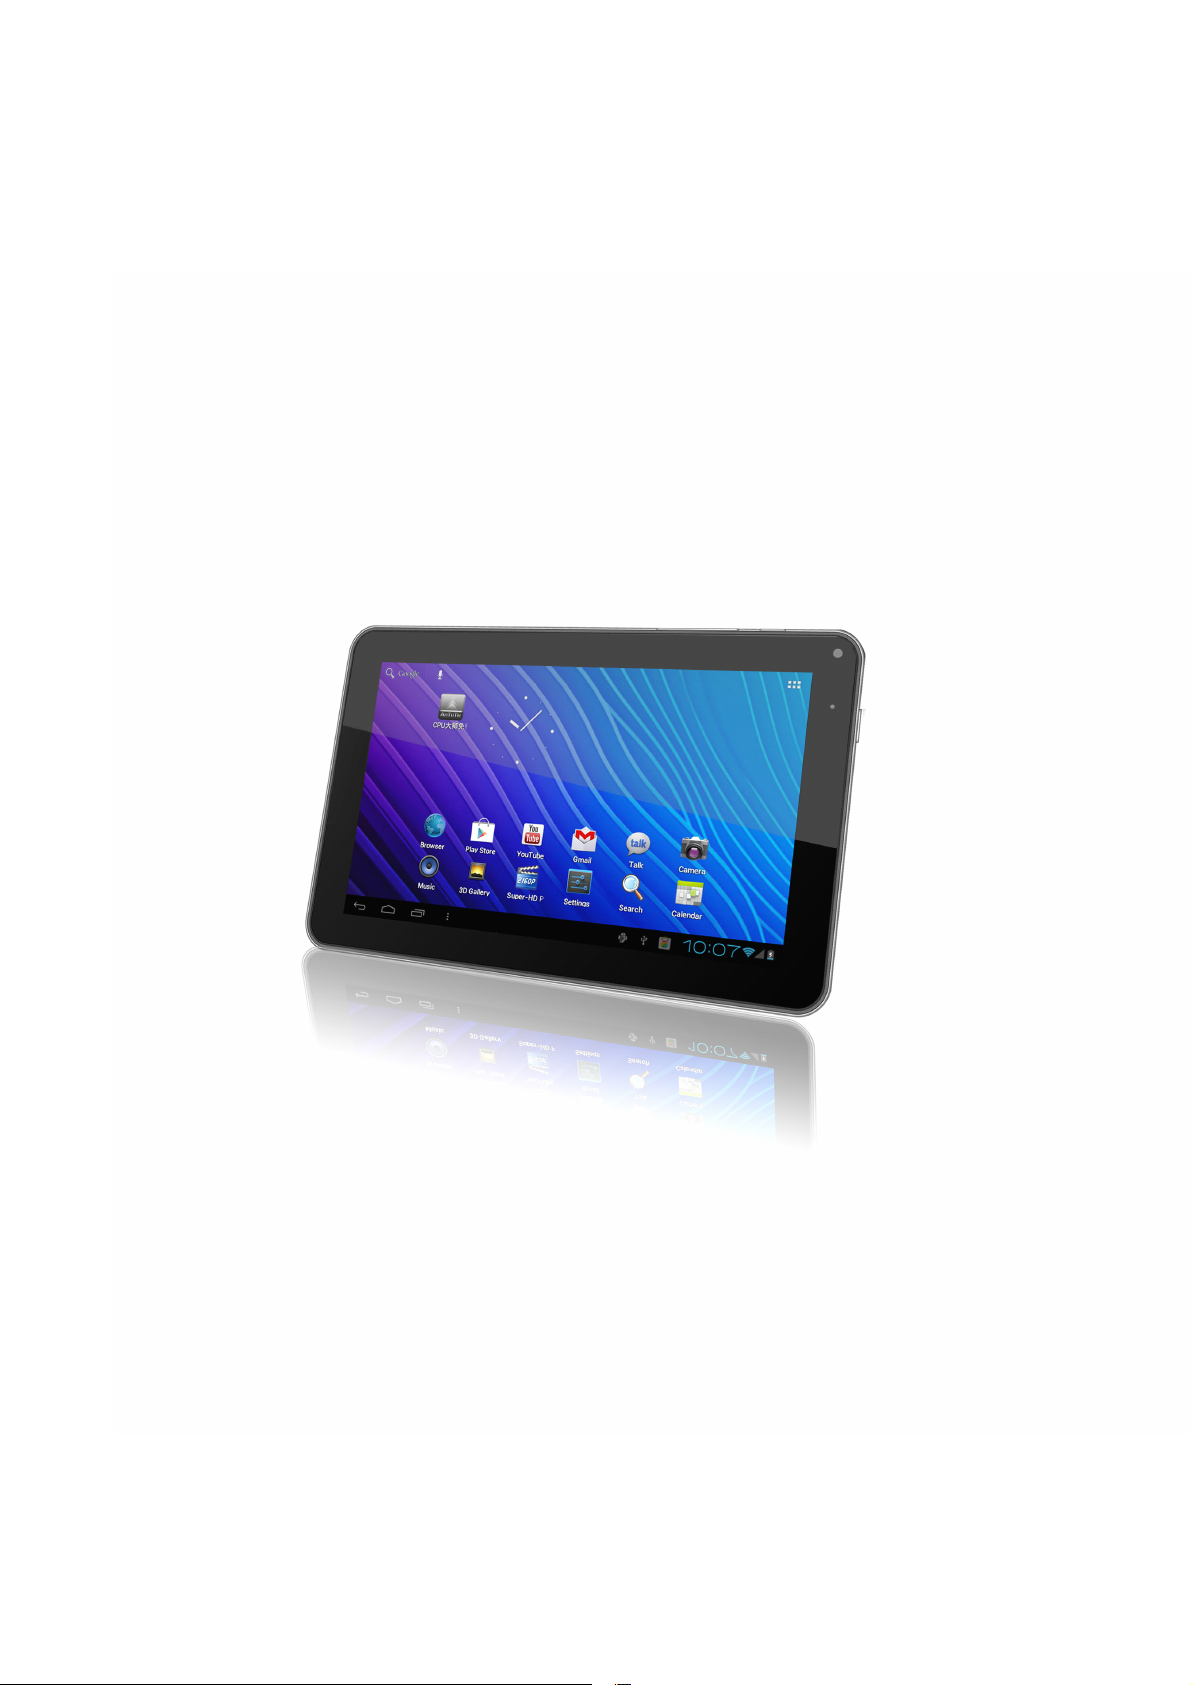
Thank you for purchasing th e DOPO tablet.
This tablet offers total convenience for your business (supports Word, Excel, send & receive e-mails...) and
personal entertainment needs (chatting, movie playback, e-books etc.).
Android
Running on Android
experience.
Before you begin, please read this User Manual carefully.
2.
IMPORTANT
2.
IMPORTANT
2.
2. IMPORTANT
IMPORTANT NOTICES
•
Your tablet's battery will reach optimum performance after you have fully charged and discharged the tablet 2-3
times.
• Excessive use of earphones at high volumes may cause hearing impairment.
• Adjust the volume of the player to a moderate level and limit earphone usage.
• Do not suddenly disconnect the tablet when formatting or uploading and downloading, this can lead to program
errors.
• Do not dismantle the tablet by yourself, and do not use alcohol, thinner or benzene to clean its surface.
•
Do not use the tablet while driving or walking.
• The tablet is not moisture/water-resistant. Please do not use it in a damp environment.
Android
Android 4.0
4.0
4.0
4.0 and with a highly responsive capacitive touch screen, it will bring you a wonderful user
NOTICES
NOTICES
NOTICES
•
Do not drop the tablet or slam it down on a hard surface as this may damage the screen .
.
.
.
3
Page 4
3.
KEYS
3.
KEYS
3.
3. KEYS
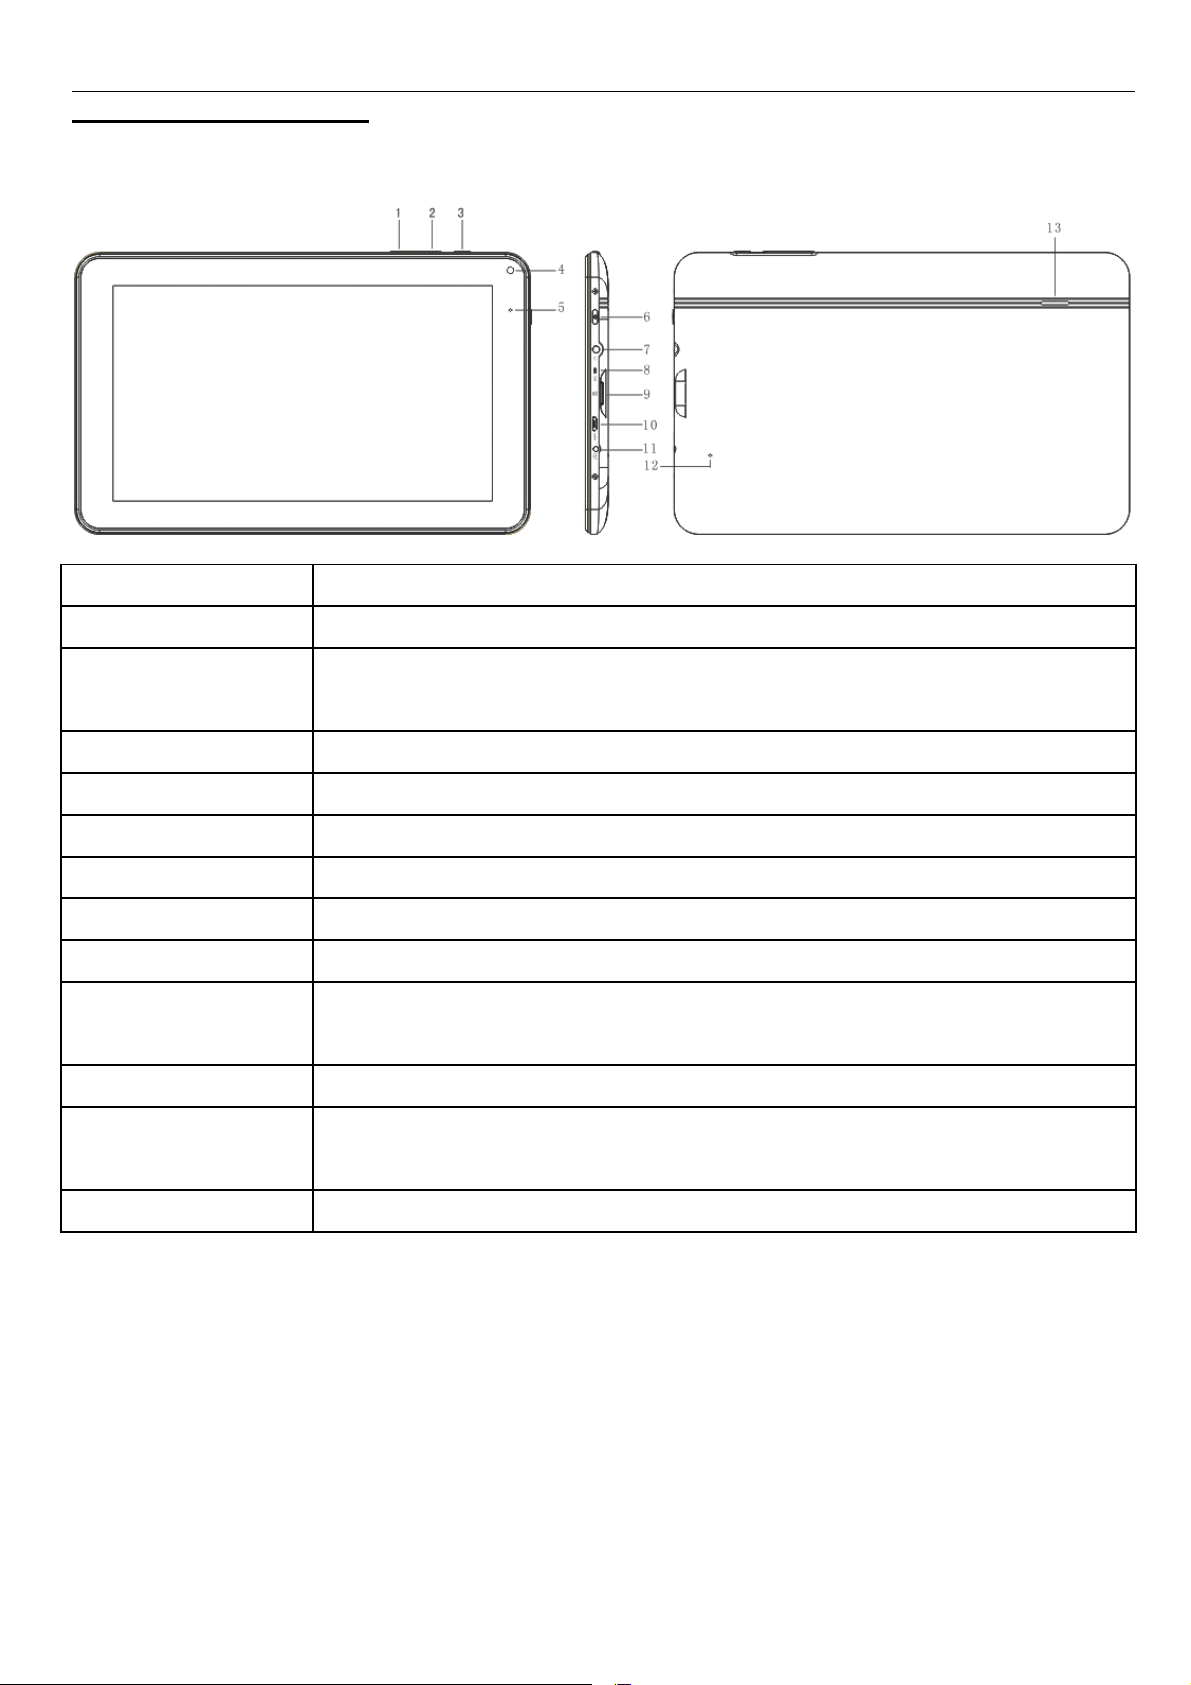
KEYS AND
1. Vol+key Press to increase the volume
2. Vol- key Press to decrease the volume
3. ESC key
AND
FUNCTIONS
AND
FUNCTIONS
AND FUNCTIONS
FUNCTIONS
Front
view
Front
view
Front
Front view
view Side
Tap to return to the previous screen/page. If the keyboard is in use, close the
keyboard.
Side
view
Side
view
Side view
view Backside
Backside
Backside
Backside view
view
view
view
4. Camera 0.3M camera
5.Power indicator light The light lits up when power on
6. Power and lock key Power and lock key
7. Earphone jack To connect your earphone
8. Microphone socket To connect your microphone
9. TF card slot To insert an TF card
10. Mini USB port
11. Power jack(DC input)
12. Reset hole
13. Speaker Speaker
Connect to a computer via a USB cable to transfer data (e.g. music, videos, photos
and other files).
Connect to a 5V output adapter
Press to reset the tablet. Insert a paper clip or other small object with a narrow tip into
his reset hole.
4
Page 5
4.
GETTING
4.
GETTING
4.
4. GETTING
GETTING STARTED
4.1.
Connect
4.1.
Connect
4.1.
4.1. Connect
Connect to
Connect your tablet to your computer with the supplied USB cable to transfer media files when you are running
Windows 7 or Vista.
For Windows XP, please install Windows Media Player 11 before you transfer media files.
Earlier versions of Windows require the MTP Porting Kit.
For Mac please refer to: www.android.com/filetransfer .
4.2
Turn
4.2
Turn
4.2
4.2 Turn
Turn On
4.2.1.
Turn
4.2.1.
Turn
4.2.1.
4.2.1. Turn
Turn on
To start your tablet, press and hold the power key at the right side of your tablet for about 5 seconds.
STARTED
STARTED
STARTED
to
to
to computer
On
/
Off
On
/
Off
On /
/ Off
Off
on
on
on
computer
computer
computer
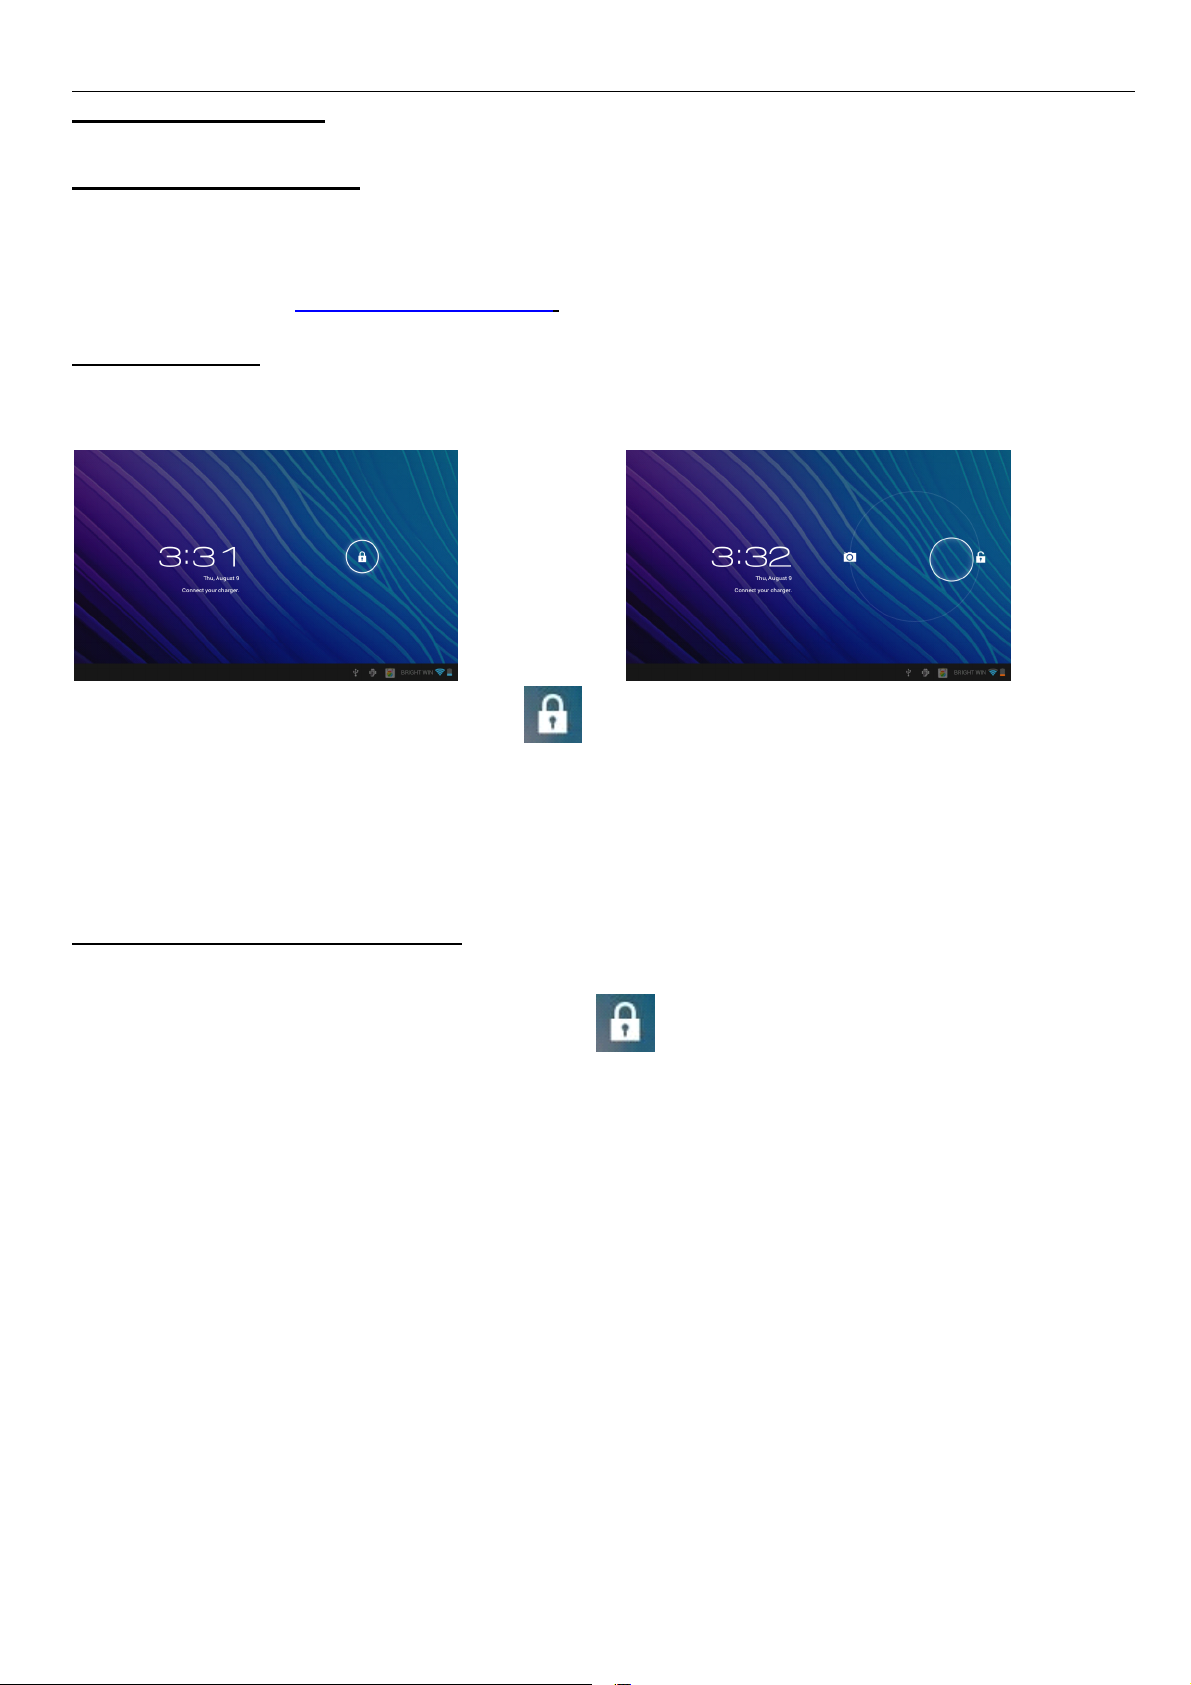
After your tablet has booted click and hold the lock and do the following:
Drag the lock on the open lock icon: you will go to the home screen.
Drag the lock on the camera icon: you will go directly to the camera app.
4.2.2.
Turn
Turn
Turn off
off
off
off
the
screen
the
screen
the screen
screen (sleep
(sleep
(sleep
(sleep mode)
mode)
mode)
mode)
4.2.2.
4.2.2.
4.2.2. Turn
To turn off your tablet, press and hold the power button until the “ Would you like to shut down? ” dialog appears
and tap “ OK ” to turn it off.
4.3.
Lock/unlock
4.3.
Lock/unlock
4.3.
4.3. Lock/unlock
Lock/unlock the
To save the battery, place your tablet in sleep mode by turning off the LCD display. To do this, shortly press the
power key. Press it again to wake up the screen.
After you have turned on the screen click and hold the lock and do the following: Drag the
lock on the open lock icon: you will go to the home screen.
Drag the lock on the camera icon: you will directly go to the camera app.
5
Page 6
5.
YOUR
5.
YOUR
5.
5. YOUR
YOUR HOME
HOME
HOME
HOME SCREEN
SCREEN
SCREEN
SCREEN
a
a
a
a b
b
b
b c
c
c
c
d
d
d
d e
a. Google search Tap to enter a Google search
b. Voice search Tap to start a voice search
c. Apps Launcher Tap to view all the applications installed
d. ESC key Tap to return to the previous screen/page
e. Home Tap to return to your home page
f. Recent
g. Connect to PC When connected to a PC, this icon will appear.
h. System time Displays the current system time
i. Wi-Fi Wi-Fi-signal when your tablet is connected to a Wi-Fi network
e
e
e f
f
f
f g
Tap to view your most recently opened apps
g
g
g h
h
h
h I
I
j
I
j
I j
j
j. Battery status Displays the battery status
6
Page 7
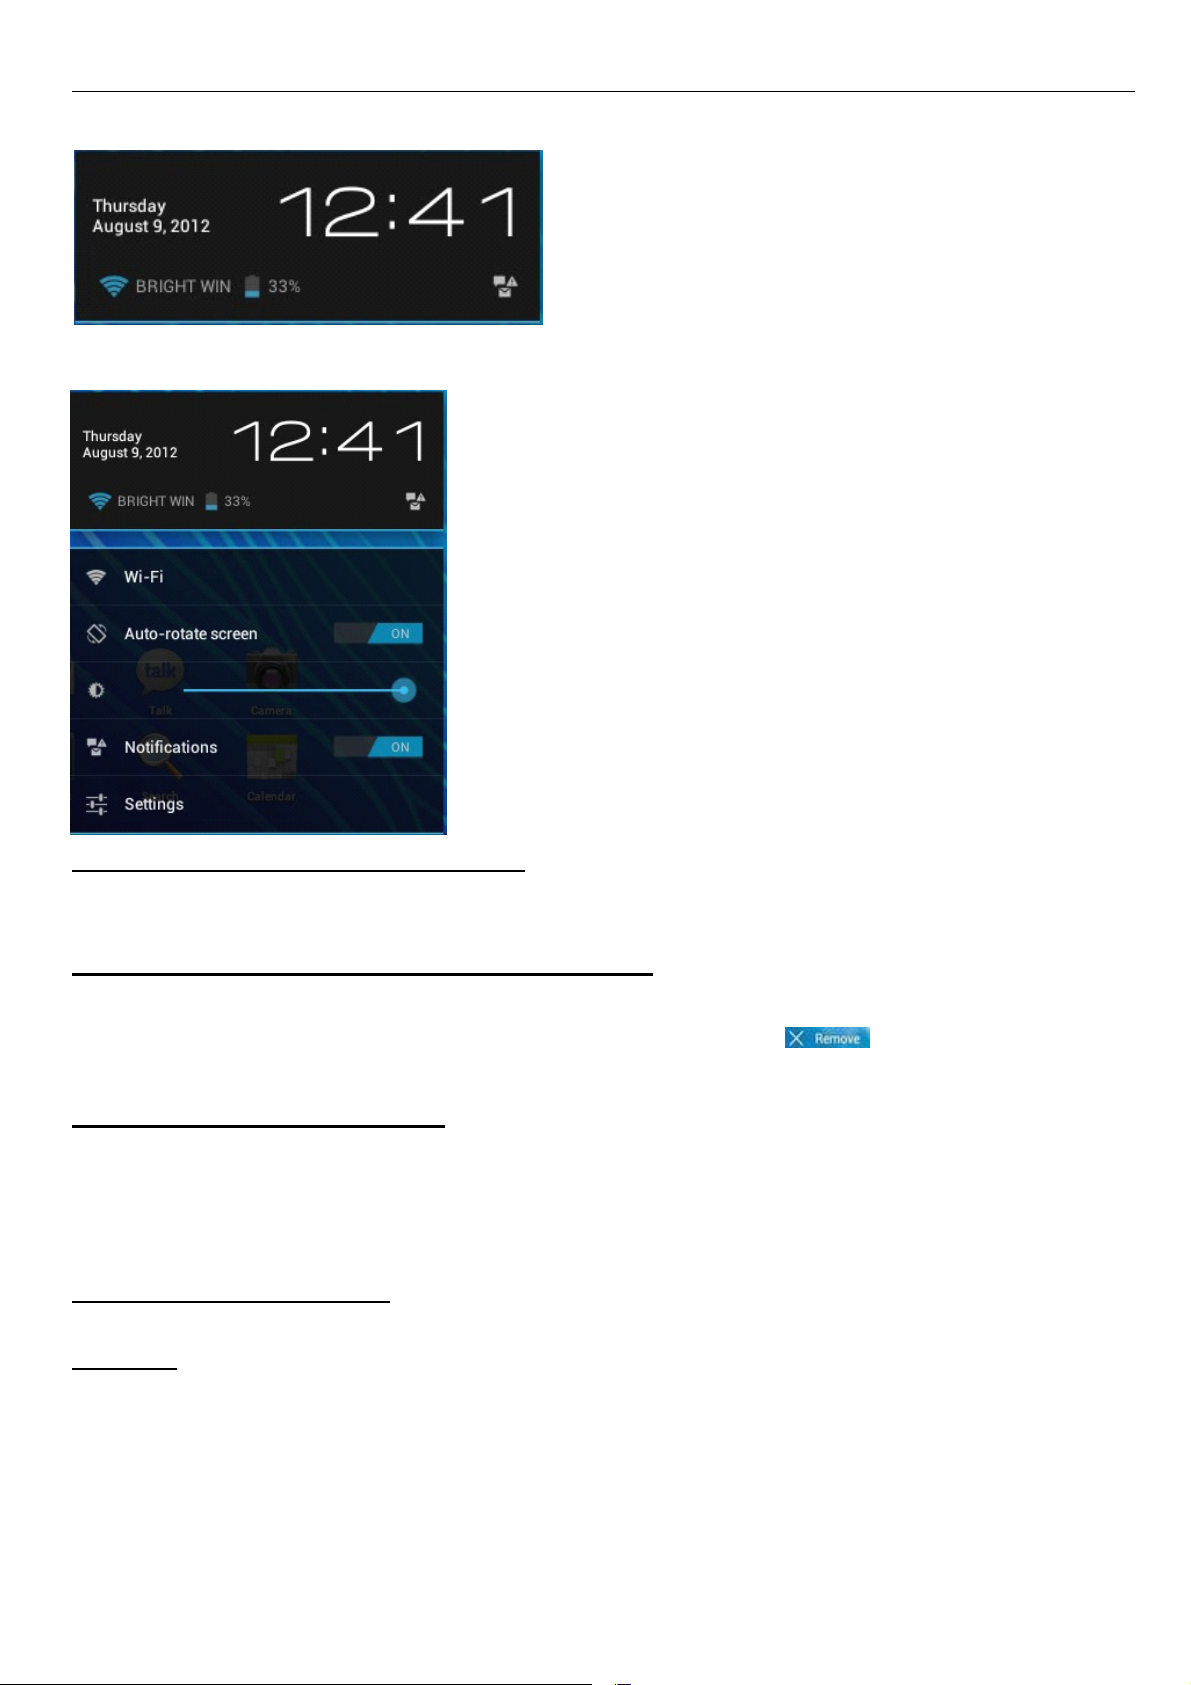
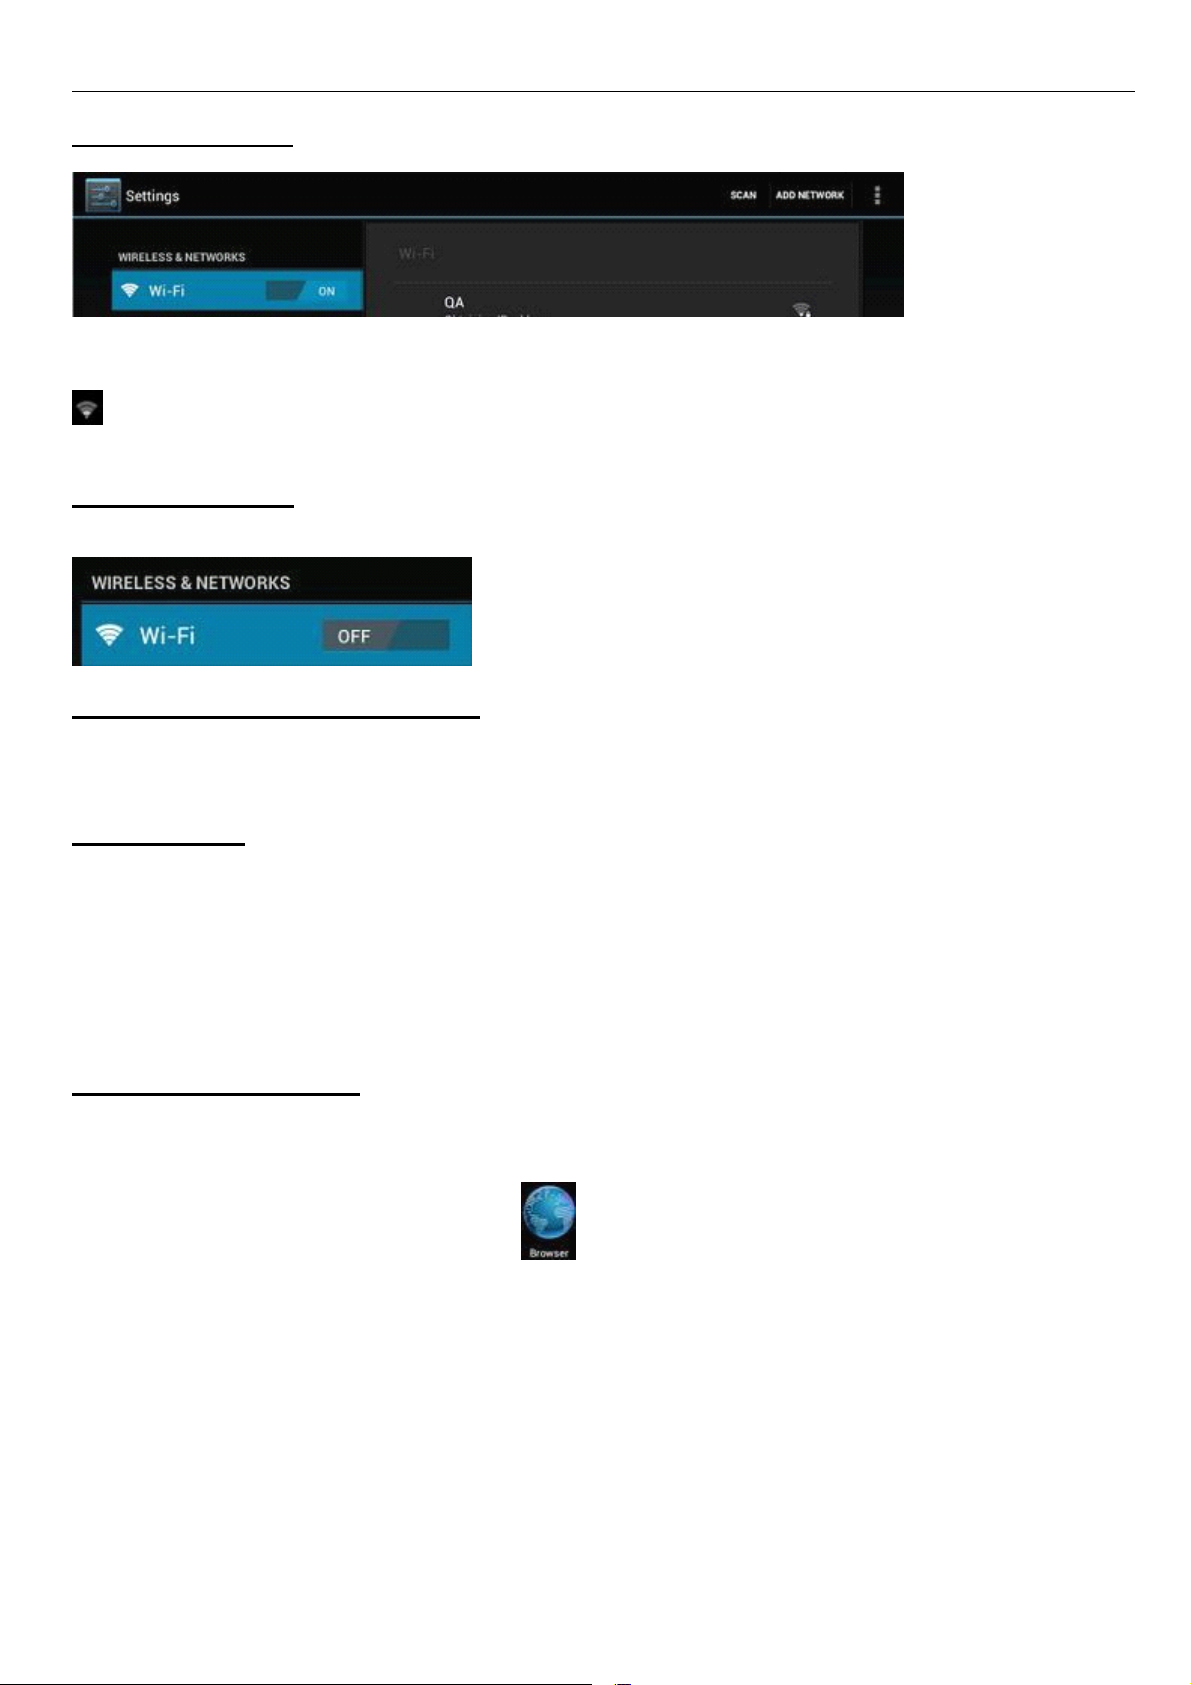
Click once on the time on the home screen to open the status screen and view the Wi-Fi, battery status and the
current time and date.
If you click again on the time in the status screen a menu will appear enabling a quick way of adjusting the settings of
your tablet.
5.1.
Change
5.1.
Change
5.1.
5.1. Change
Change wallpaper
Tap and hold your finger in an empty space on the home screen, you will then see a pop-up screen; you can
choose to select a wallpaper from the Gallery or a pre installed Wallpaper or Live Wallpaper.
5.2.
Add/delete
5.2.
Add/delete
5.2.
5.2. Add/delete
Add/delete applications
You can add frequently used apps on the home page and delete undesired apps. Tap the app launcher in the top
right corner to go to the apps panel, then tap and hold the app you want to add to the home screen. To delete an app
from the home screen, tap and hold it, and then drag the app to the remove icon . The app icon will then
turn red, release the icon to delete it.
5.3.
Add
5.3.
Add
5.3.
5.3. Add
Add widgets
Tap the Apps launcher and then select Widgets on the top of the screen. Here you will find widgets like an analog
clock, bookmarks, calendar, Email, and many more. Tap and hold the widget you want and drag it to the home
screen.
Tips: Besides your home screen, you can access four other panels by sliding left or right on your home
screen. You can also customize these panels.
6.
NETWORK
6.
NETWORK
6.
6. NETWORK
NETWORK CONNECTION
6.1.
Wi-Fi
6.1.
Wi-Fi
6.1.
6.1. Wi-Fi
Wi-Fi
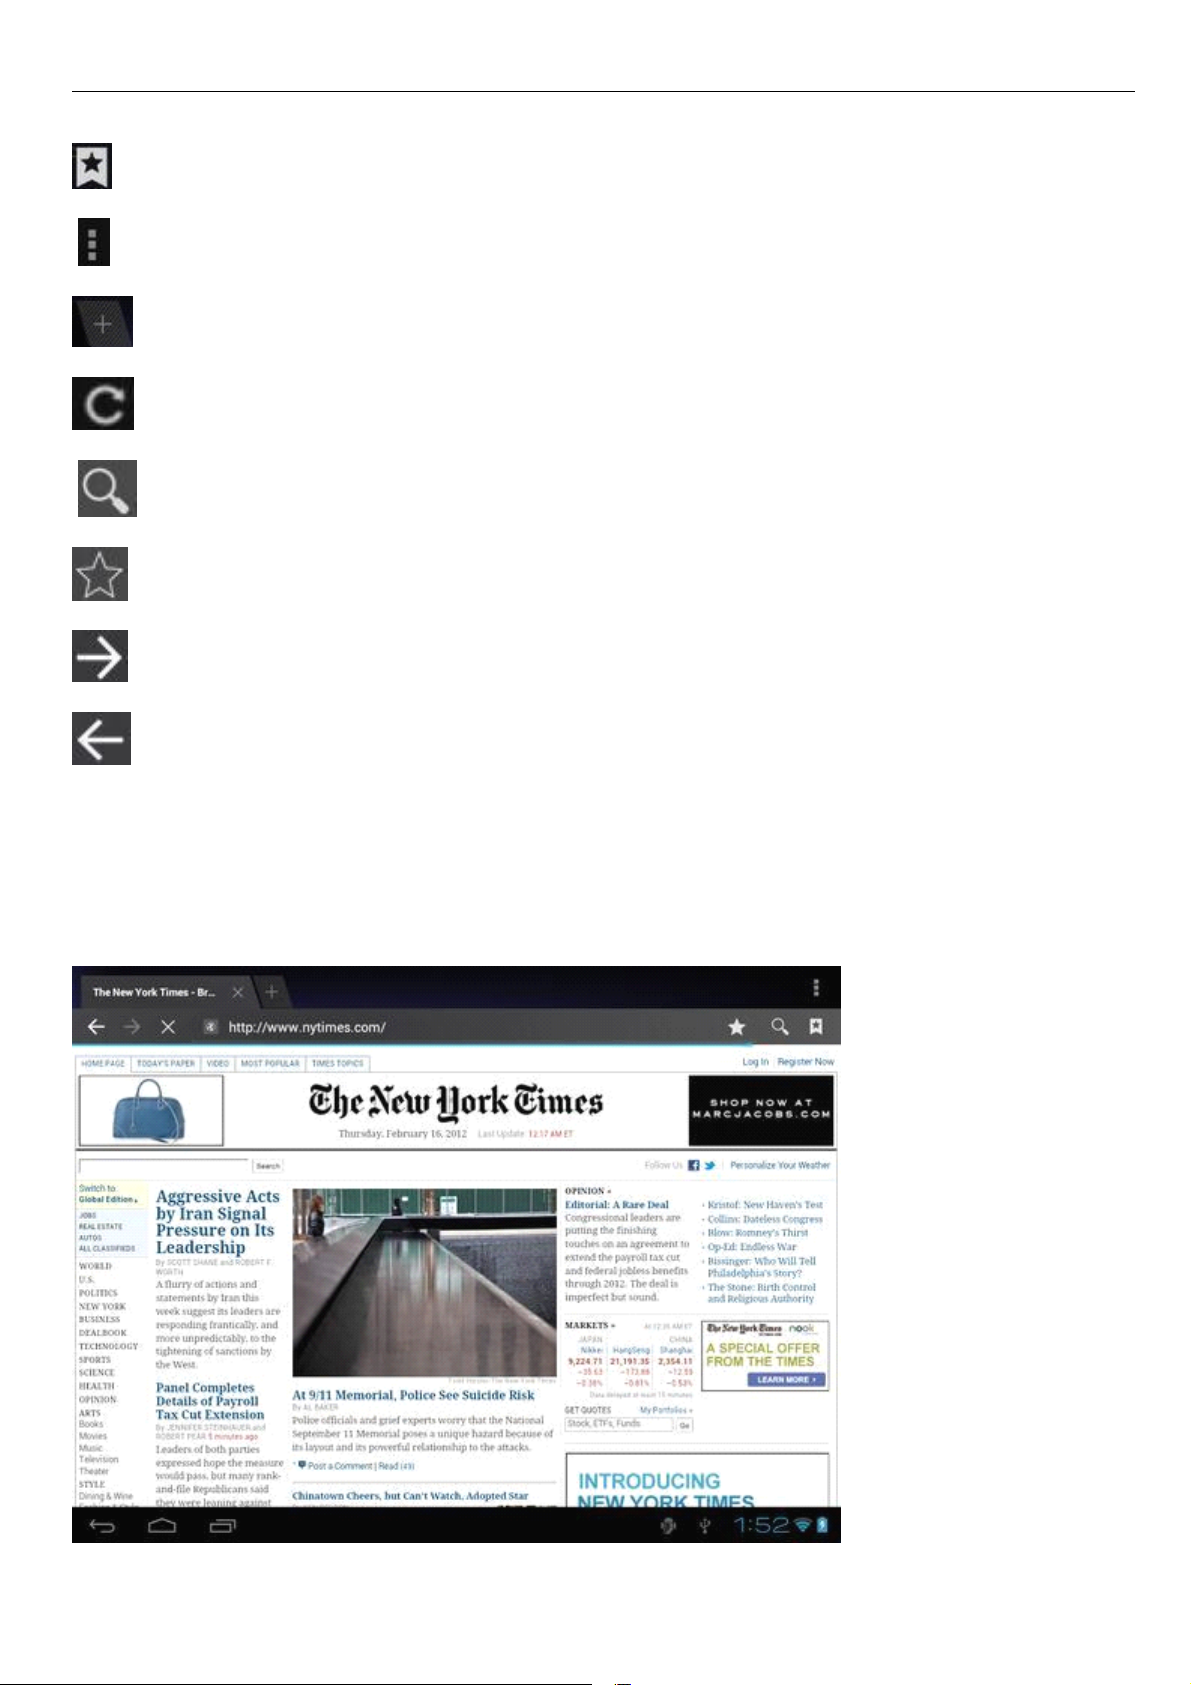
Wi-Fi can only be used when you are within a range of networks you know or when you are at a free unsecured
Wi-Fi hotpot. Under “ Wireless & networks ” , tap “ Wi-Fi ” to turn it on. After a moment, your Wi-Fi networks list
should populate. If you need to rescan for available networks, tap "Scan".
wallpaper
wallpaper
wallpaper for
widgets
widgets
widgets to
CONNECTION
CONNECTION
CONNECTION
for
home
for
home
for home
home screen:
applications
applications
applications from
to
home
to
home
to home
home screen
screen
screen
screen
screen:
screen:
screen:
from
from
from the
the
home
the
home
the home
home screen:
screen:
screen:
screen:
7
Page 8
6.1.1.
6.1.1.
6.1.1.
6.1.1. Turn
Within the App Panel, tap “ Settings ” , “ Wireless & networks ” and then “ Wi-Fi ” to turn it on.
Your tablet will list all the networks it finds within range. Tap a network to connect. If necessary, enter the Wireless
password, and tap “ Connect ” . When your tablet is connected to the network, the wireless indicator
network.
Turn
on
Turn
Turn on
appears in the status bar. The number of grey/blue waves indicates the connection strength of the wireless
Wi-Fi
on
Wi-Fi
on Wi-Fi
Wi-Fi
6.1.2.
6.1.2.
6.1.2.
6.1.2. Turn
Turn off Wi-Fi when you are not using it to save the battery. To turn off Wi-Fi, tap Wi-Fi again.
6.1.3.
6.1.3.
6.1.3.
6.1.3. Add
You can also manually add a Wi-Fi network under “ Wi-Fi settings ” . In “ Wi-Fi settings ” , tap “ Add network ” .
Enter the SSID (name) of the network. If necessary, enter security or other network configuration details. Touch
Save.
6.2
6.2
6.2
6.2 3G
A 3G network is a mobile network that allows high-speed data access and advanced network capacity. It features a
wider range of services and advanced network capacity over the previous 2G network.
Your tablet supports external 3G network by a 3G dongle. 3G dongles are connected via the USB HOST port. Note:
some models support an optional 3G network. If you have purchased a tablet with a SIM card slot, you can access the
Internet via your 3G SIM card when a Wi-Fi network is not available. Please insert your 3G card into the SIM card slot
of the tablet, and the tablet will obtain 3G signal automatically. If you've purchased a tablet without a SIM card slot,
you can also access Internet with a USB 3G dongle.
Turn
off
Turn
off
Turn off
off Wi-Fi
Add
a
Add
a
Add a
a Wi-Fi
3G
Network
3G
Network
3G Network
Network
Wi-Fi
Wi-Fi
Wi-Fi
Wi-Fi
Wi-Fi
Wi-Fi network
network
network
network manually
manually
manually
manually
Note:
Note:
Note:
7.
INTERNET
7.
INTERNET
7.
7. INTERNET
INTERNET BROWSING
Before using the browser, make sure you have set up an Internet connection on your tablet. Go to the
“ Settings ” app and under “ Wireless and networks ” connect to a Wi-Fi network.
To browse the Internet, open the browser app in the applications overview.
Tap the address bar to bring up the Android keyboard for entry of keywords or a web address (a URL). Hold
down the text field to edit text or change an input method.
BROWSING
BROWSING
BROWSING
8
Page 9
The browser will display the following buttons by default:
Bookmarks:
Bookmarks:
Bookmarks:
Bookmarks: Open and manage bookmarks
Menu:
Menu:
Menu:
Menu: Here you will find the other Browser options (including “ Settings ” )
New
tab
New
New
New tab
Refresh:
Refresh:
Refresh:
Refresh: Refresh the page
Search:
Search:
Search:
Search: Search in Google
Set
Set
Set
Set bookmark:
Next
Next
Next
Next page:
sheet:
tab
sheet:
tab sheet:
sheet: Open a new tab sheet
bookmark:
bookmark:
bookmark: Create a new bookmark for the page that you are currently viewing
page:
page:
page: Continue to the next page
Previous
Previous
Previous
Previous page:
page:
page:
page: Return to the previous page
Press the Menu button to select the other options including:
New
tab
New
New
New tab
New
New
New
New incognito
Page
Page
Page
Page sharing:
Settings:
Settings:
Settings:
Settings: Adjust all browser settings
Request
Request
Request
Request desktop
Refresh:
Refresh:
Refresh:
Refresh: Refresh the current page
sheet:
tab
sheet:
tab sheet:
sheet: Open a new tab sheet
incognito
incognito
incognito tab
sharing:
sharing:
sharing: Share the Internet page with your contacts
tab
sheet:
tab
sheet:
tab sheet:
sheet: Open a tab sheet that does not save entries
desktop
desktop
desktop version:
version:
version:
version: View desktop version instead of the mobile website
9
Page 10

8.
INSTALL
8.
INSTALL
8.
8. INSTALL
INSTALL AND
8.1.
Install
8.1.
Install
8.1.
8.1. Install
Install Apps
The ApkInstaller allows you to install an .apk file from the internal memory or an SD card. The
ApkInstaller can be found in the applications overview.
Select "Install" to install a program.
After you have selected this option, select the medium on which the .apk file is stored: the Internal Memory or an SD
card (TF card). Open the .apk file and follow the steps on the screen to install the application.
Note:
Note:
Note:
Note: Make sure the .apk file is workable on android 4.0, and the suffix is .apk. e.g. “ angrybirds.apk ” .
In some cases, there may be no icon in the App Panel after an .apk file has been installed. Possible reasons may be
that this app is not compatible with your OS or the downloaded .apk file is a broken one so you may need to
download a working version.
8.2.
Manage
8.2.
Manage
8.2.
8.2. Manage
Manage Apps
The ApkInstaller allows you to manage all the programs installed. The
ApkInstaller can be found in the application overview.
AND
MANAGE
AND
MANAGE
AND MANAGE
MANAGE APPS
Apps
Apps
Apps
Apps
Apps
Apps
APPS
APPS
APPS
Select “ Manage ” to launch, export or uninstall an app.
After you have selected this option, you will receive an overview of all the applications installed on your tablet.
Click on an app to launch, export or uninstall it. Exported applications are always stored in the internal memory.
This tablet can read files directly from an SD Card or USB stick. To use a memory card, place it in the card slot at the
side of the device. Make sure the card is inserted correctly! Push the card all the way in until it clicks. To remove the
card, push it slightly inward until it is released. To use a USB stick, insert the stick in the USB port. In both cases go to
Explorer in the application overview to gain access to the files stored on the SD card or the USB stick.
You can also go to “ Apps ” under “ Settings ” to manage apps.
10
Page 11
8.3
Market
8.3
Market
8.3
8.3 Market
Market
The Market app allows you to download and install all the available apps for your tablet.
To use the Market app open the “ Settings ” application, go to “ Apps ” and click on “ Show Google Apps in Launcher ” .
You will now find the Market in the Apps Launcher.
If you wish to use the Android Market, you must use your current Google Account or register a new
account.
The Market app has the following options:
Search:
Search:
Search:
Search: search for available apps for your tablet
My
apps:
My
apps:
My
My apps:
apps: manage and update all the apps on your tablet
Menu:
Menu:
Menu:
Menu: contains all other options of the application
9.
MULTI-MEDIA
9.
MULTI-MEDIA
9.
9. MULTI-MEDIA
MULTI-MEDIA FUNCTIONS
9.1
Music
9.1
Music
9.1
9.1 Music
Music
After loading music on your tablet, tap the music icon to open the music player. You can select to sort your
music by Artist, Album, Song or stored Playlist. Tap to select. The media player allows you to shuffle, skip, or pause
your current selection and even displays the album artwork when available.
FUNCTIONS
FUNCTIONS
FUNCTIONS
Tap at the bottom of the screen to open a submenu on the music page.
11
Page 12

9.2.
Video
9.2.
Video
9.2.
9.2. Video
Video
9.2.1.
9.2.1.
9.2.1.
9.2.1. Video
You can play videos stored on your tablet or SD card. To play, tap the Video icon to launch the video player:
Video
Video
Video Player
Player
Player
Player
Tap the video you would like to play. To playback, fast forward or pause your video tap the screen to display the
toolbar. You can also add bookmarks, adjust the brightness, or set the screen ratio. Below is an example of the
toolbar:
9.2.2.
9.2.2.
9.2.2.
9.2.2. HDMI
Connect the tablet to your TV via an HDMI cable and wait a few seconds for your TV set to receive the display
signal. Adjust your TV settings if necessary. An HDMI cable is not included as an accessory.
The HDMI port is a single-ended output. The screen of the tablet goes dark when connected to the TV. To carry
out operations on the tablet, please use a USB mouse.
HDMI
HDMI
HDMI Output
Output
Output
Output
12
Page 13

9.3.
Gallery
9.3.
Gallery
9.3.
9.3. Gallery
Gallery
You can view and edit your digital pictures on the tablet ’ s full color, high-resolution display.
After placing images on your tablet, tap Gallery to display your pictures:
Tab the picture you want to display and slide right or left to show the next or previous picture. Tap the
Menu icon to edit, rotate, crop, or set the image as a wallpaper.
9.4.
Camera
9.4.
Camera
9.4.
9.4. Camera
Camera
Tap the icon to open the camera app.
You can take a photo, or record a video with the front camera.
Note:
Note:
Note:
Note: After turning on your tablet, you can go to the camera directly by dragging the lock icon onto the camera.
13
Page 14

9.5.
E-book
9.5.
E-book
9.5.
9.5. E-book
E-book reader
The tablet supports many e-book formats like PDF, Text, E-Pub, FB2.
Tap the “ e-book ” icon to open the e-bookshelves. Tap an e-book to open the book and read.
reader
reader
reader
You can go to the next or previous page by sliding your finger right or left.
Tap on the Menu button to check the sub-menus. You can change the font size, Go To Page, check your
bookmarks, set the auto flip time, etc.
14
Page 15
9.6
E-mail
9.6
E-mail
9.6
9.6 E-mail
E-mail
To use email on your tablet, use the E-Mail application in the App Launcher.
If you want to use Gmail, instead of using the E-mail app use the GMail application which is specially
designed for GMail, Google mail.
To set up an email account on your tablet, you will need the incoming and outgoing server settings of your email
account for the configuration.
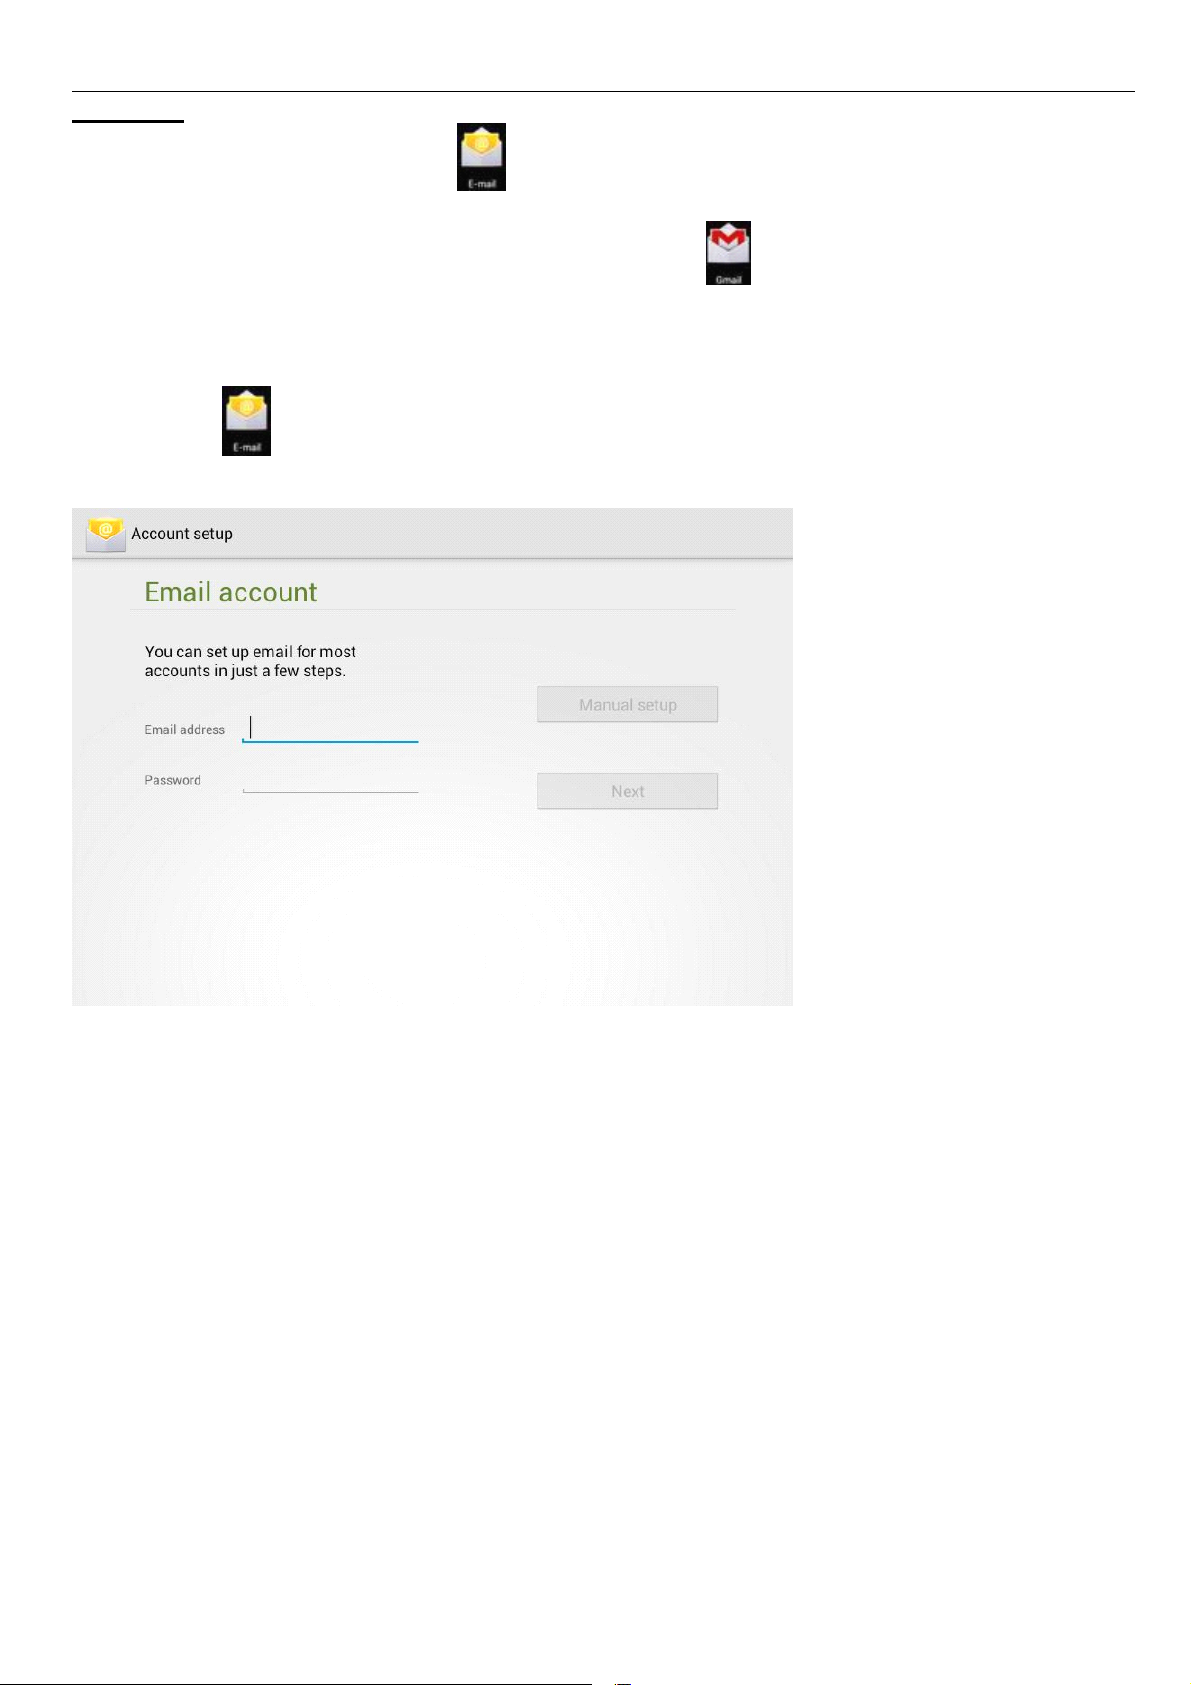
Open the E-mail application, which will display the screen below. Enter your email address and
password and select “ Volgende ” (Next).
You will then be asked to select your email account type. After you have clicked on the appropriate type you will
proceed to the next step.
15
Page 16
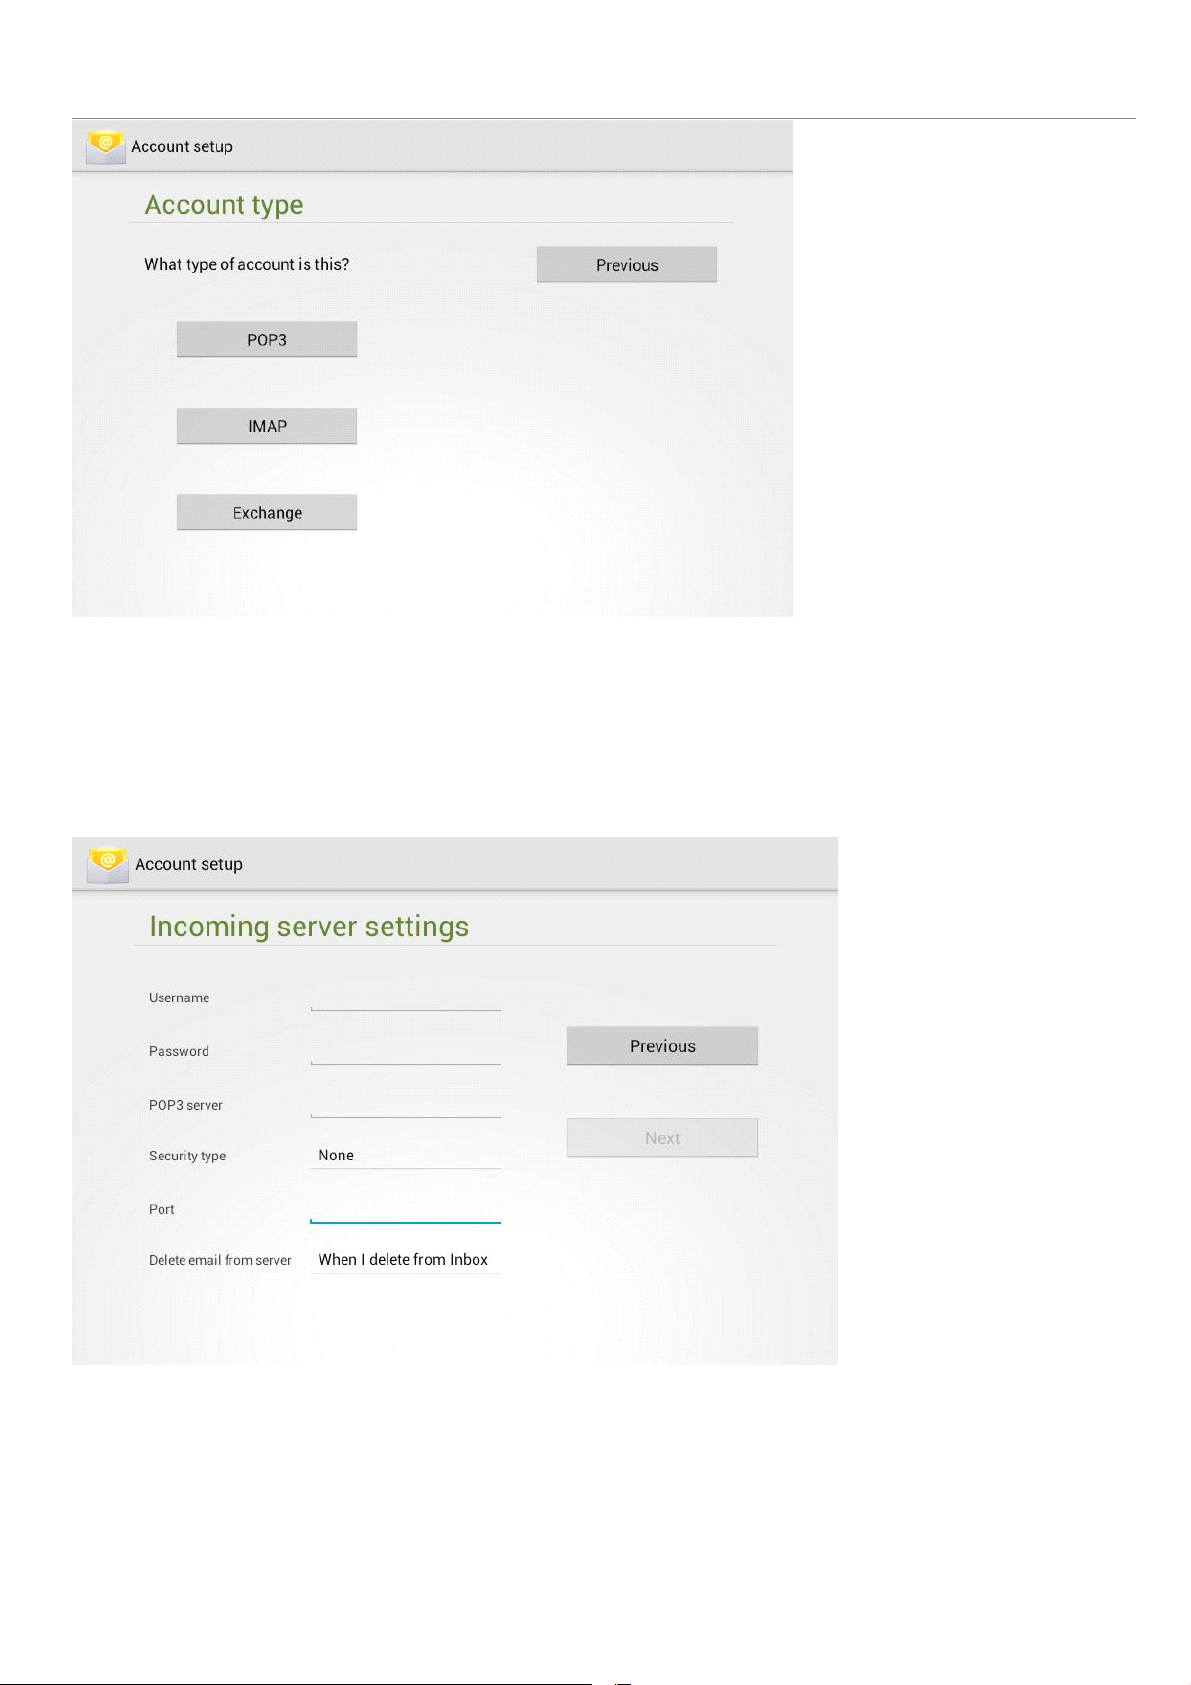
Depending on the type of account, details of the incoming server settings will be requested; enter all the details of
the incoming server settings for your email account.
The E-mail app will automatically enter the most common default settings however they should be checked for
correctness.
After entering the settings, click on “ Volgende ” .
If the settings are correct, you will proceed to the next step. If this is not the case, the tablet will indicate which
details have not been correctly entered.
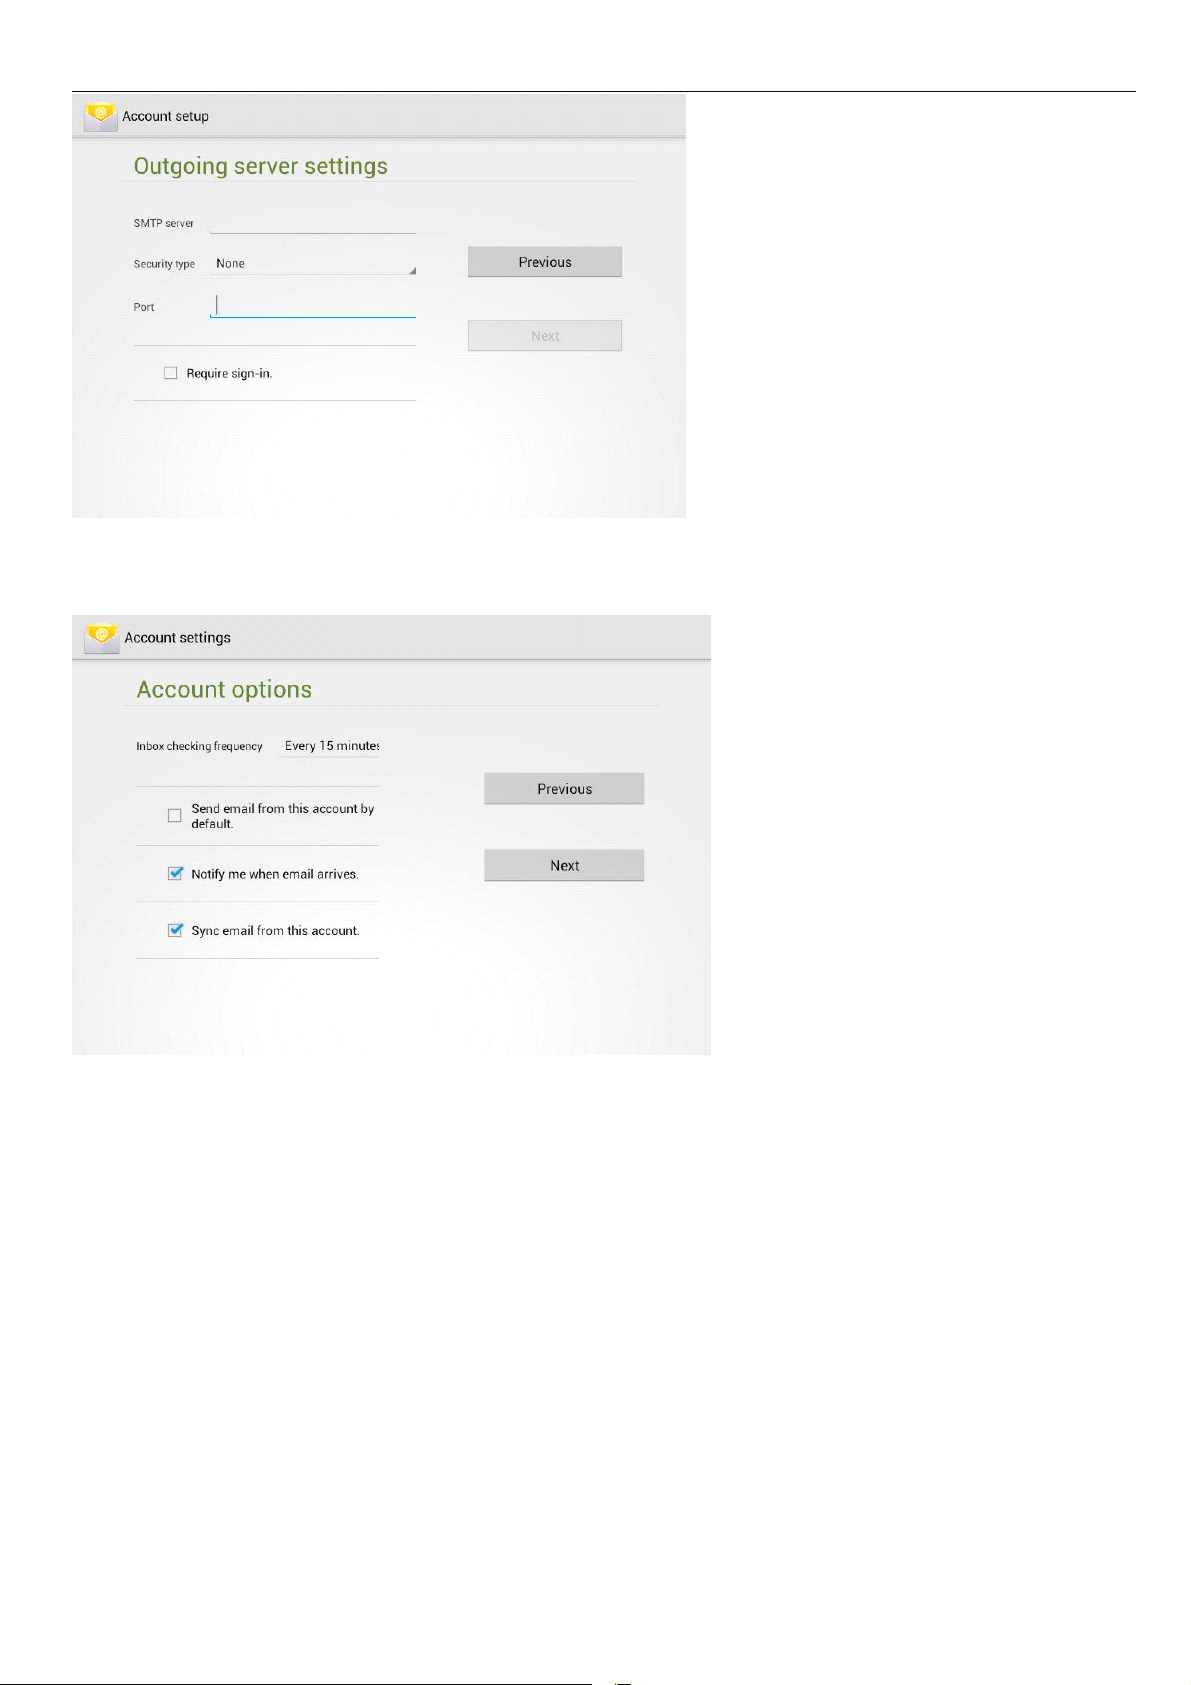
Next, enter the outgoing server settings and then select “ Volgende ” .
The E-mail app will automatically enter the most common default settings however they should be checked for
correctness.
If the settings are correct, you will proceed to the next step. If this is not the case, the tablet will indicate which
details have not been correctly entered.
16
Page 17
After the incoming and outgoing mail server settings have been correctly entered, the tablet will ask which mail
account data requires to be synchronized and the interval for downloading emails.
Finally, you will be asked under which name the account should be added and which sender address should be
.
displayed on emails sent by you .
.
.
17
Page 18
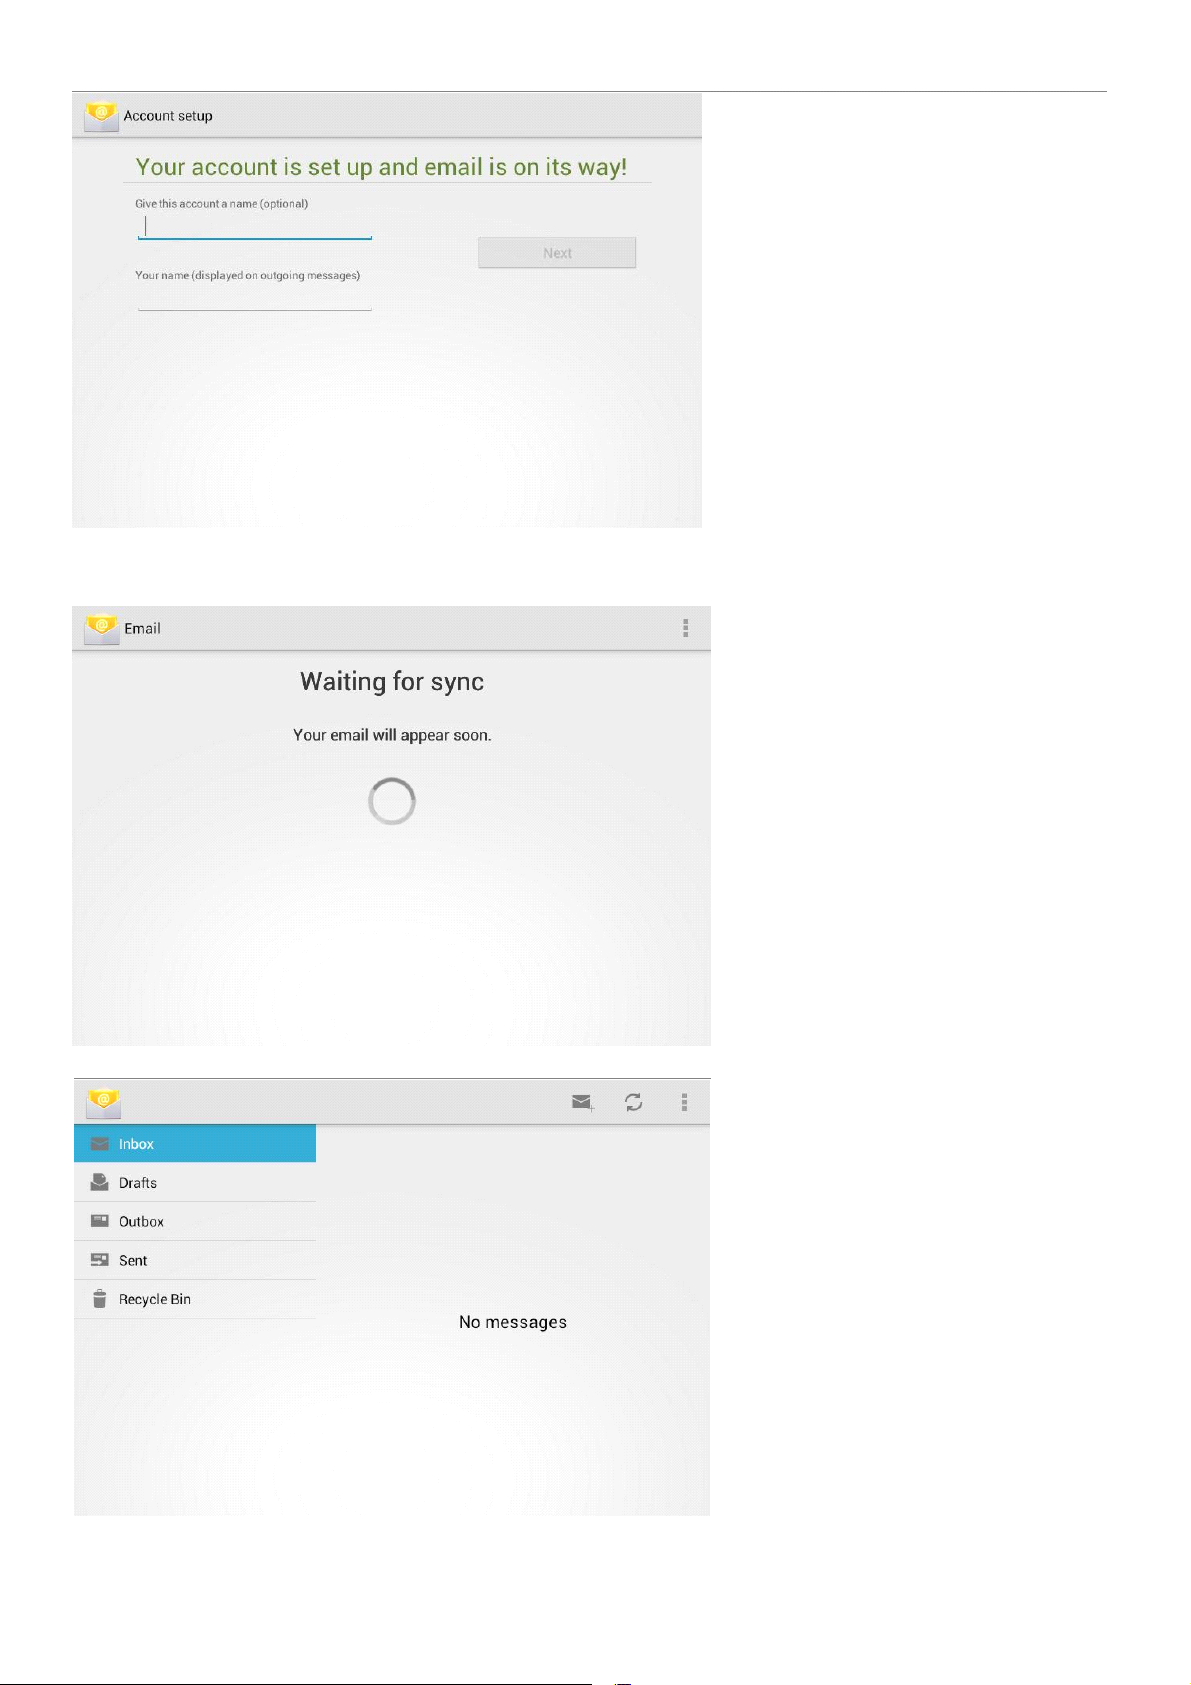
After entering the required information, mail from your account will be downloaded onto the tablet and will appear on
the screen within a few minutes.
18
Page 19
10.
SETTINGS
10.
SETTINGS
10.
10. SETTINGS
SETTINGS
Tap the “ Settings ” icon in the app launcher to go to the settings menu.
In the “ Settings ” menu you will find the following categories and subcategories:
10.1.
Wireless
10.1.
Wireless
10.1.
10.1. Wireless
Wireless and
Wi-Fi: Connect to or manage your wireless networks
Data usage: View and limit the data usage of a mobile (3G) connection
10.2.
Device:
10.2.
Device:
10.2.
10.2. Device:
Device:
Sound: Set volume levels and turn sounds on/off.
Display: Set all display options including brightness and sleep mode.
Storage space: Display storage space of internal memory, SD card and USB stick.
Battery: Battery ’ s charge percentage and total standby time.
Apps: Manage all your applications.
10.3.
Personal:
10.3.
Personal:
10.3.
10.3. Personal:
Personal:
Accounts and synchronization: Manage accounts and set account synchronization options. Location
services: Manage the use of your location used by applications.
Security: Set screen security and manage other security settings.
Language & input: Adjust language and keyboard settings.
Back-up & reset: Make a back-up of your data to the Google servers and restore the tablet back to factory settings.
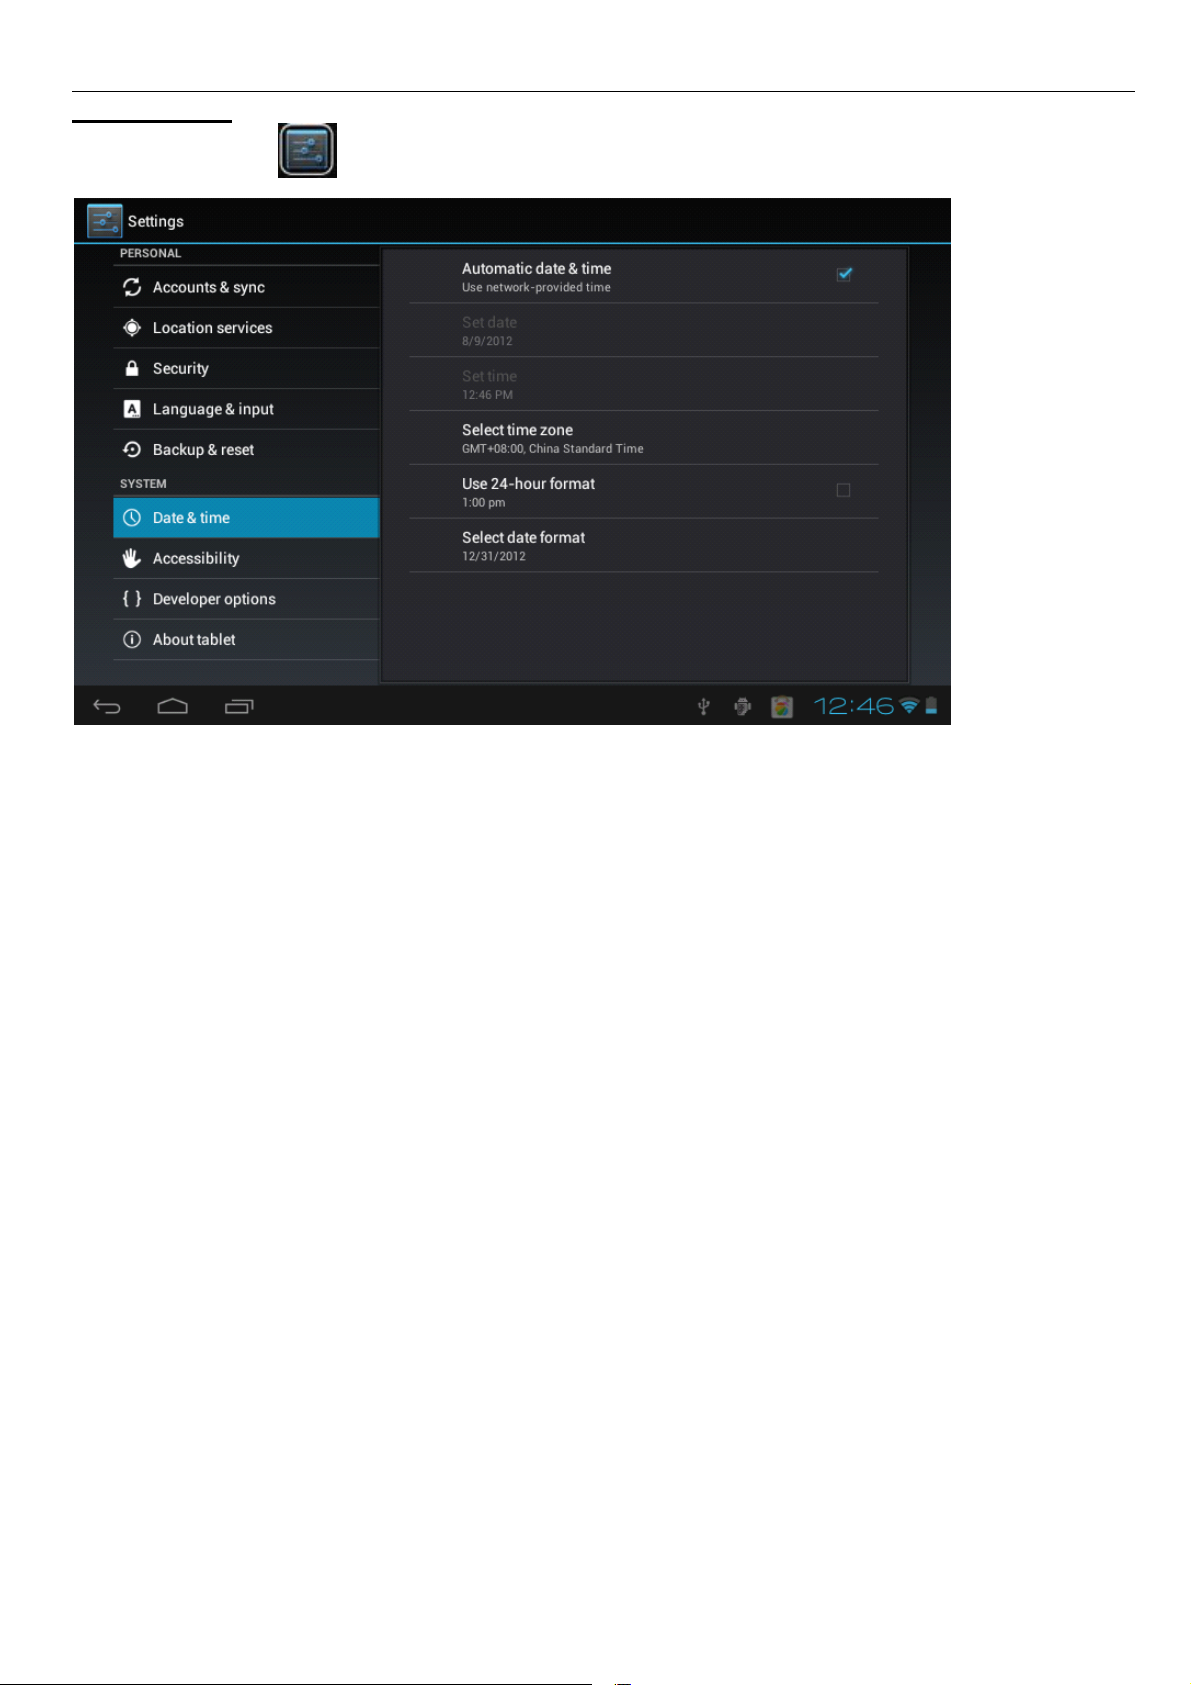
10.4.
System:
10.4.
System:
10.4.
10.4. System:
System:
Date and time: Set date and time including time zone and date notation. Accessibility:
Enable/disable automatic screen rotation and other accessibility options.
About tablet: Information about the tablet including IP/MAC address and Android version.
and
networks:
and
networks:
and networks:
networks:
19
Page 20
11.
EXPLORER
11.
EXPLORER
11.
11. EXPLORER
EXPLORER
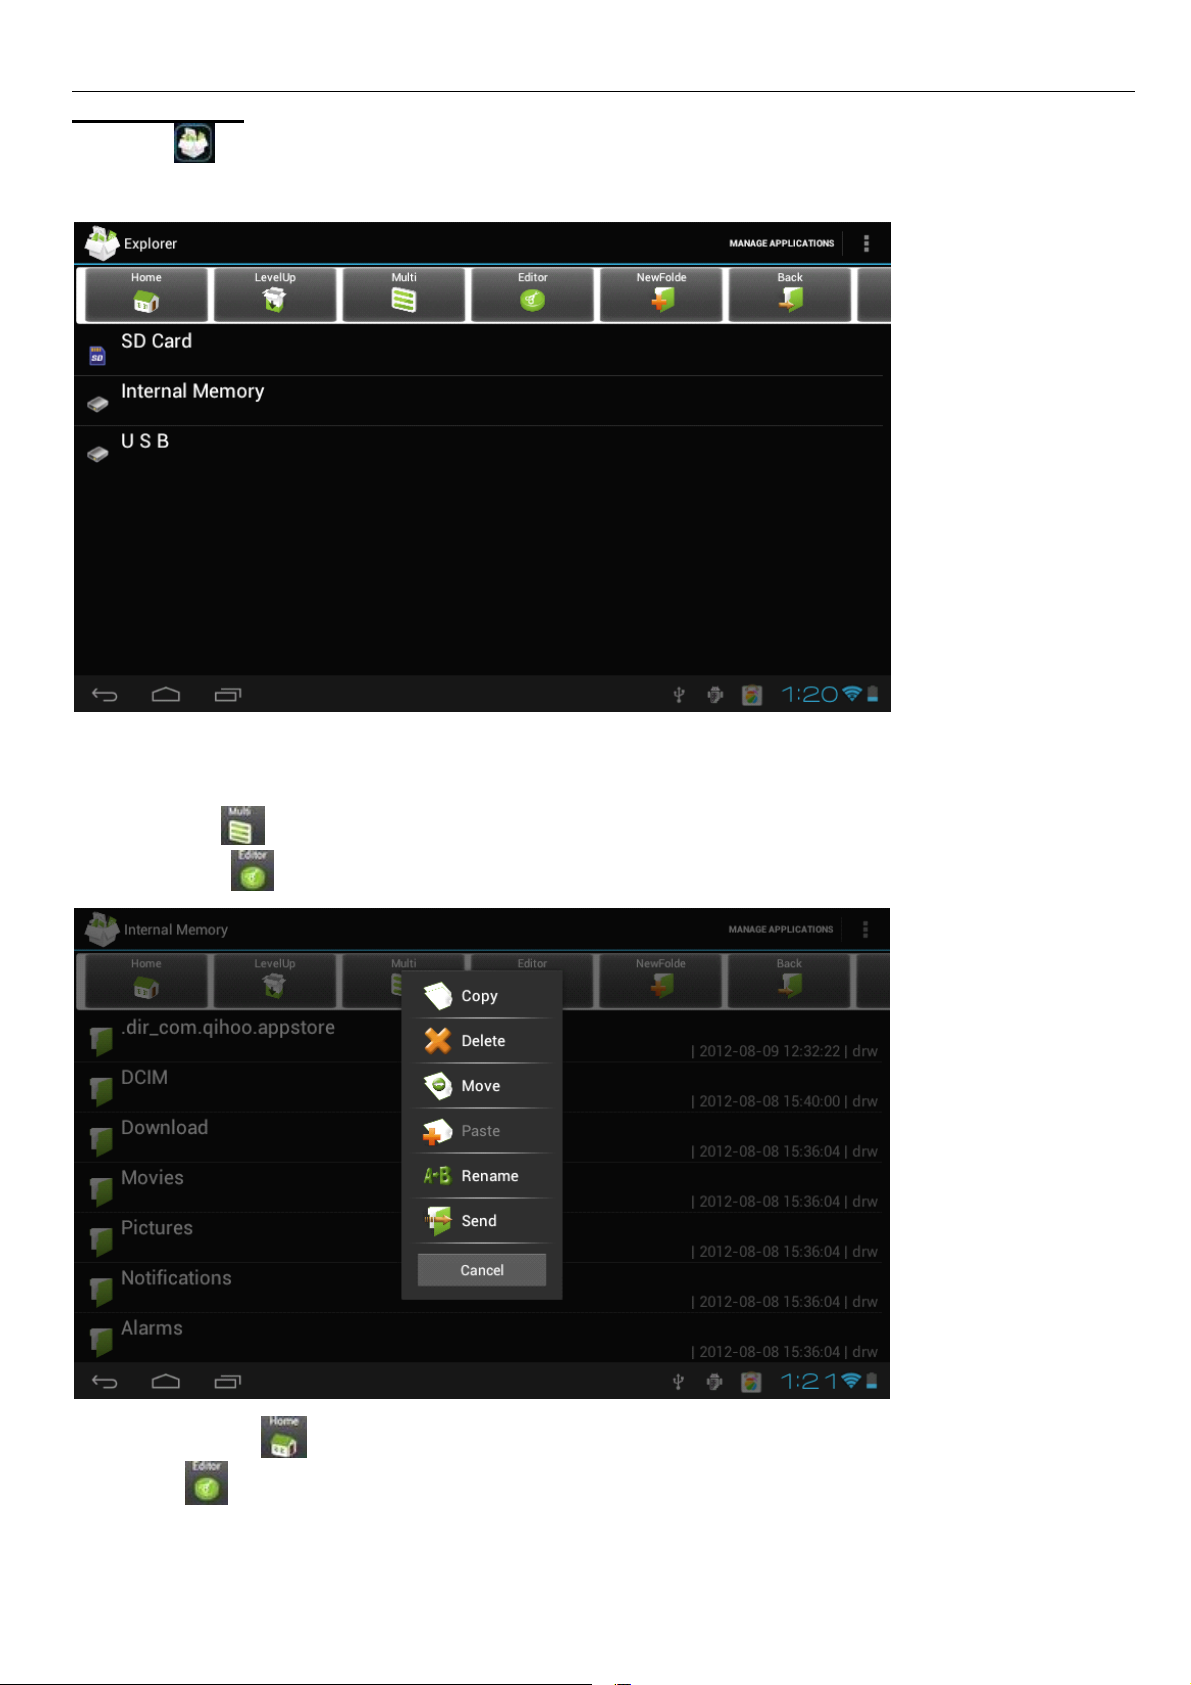
In Explorer , you can manage all your files. You can copy, delete, paste, or rename your files in your Micro
SD Card, Internal Memory and USB disk.
For example, to copy files from "Internal Memory" to Micro "SD Card":
1. Open "Explorer", you will see the above interface
2. Tap "Internal Memory" to see all the files that are on your tablet
3. Tap "Multi" icon and then select all the files you want to edit
4. Tap "Editor" icon, you will see a pop-up menu, select "copy"
5. Tap the"Home" icon in the top left corner to return to the main interface, select "SD card", then tap the
"Editor" icon, you will see a pop-up menu, select "Paste".
After these steps the files are copied from your tablet to your Micro SD card.
20
Page 21
12.
BATTERY
12.
BATTERY
12.
12. BATTERY
BATTERY
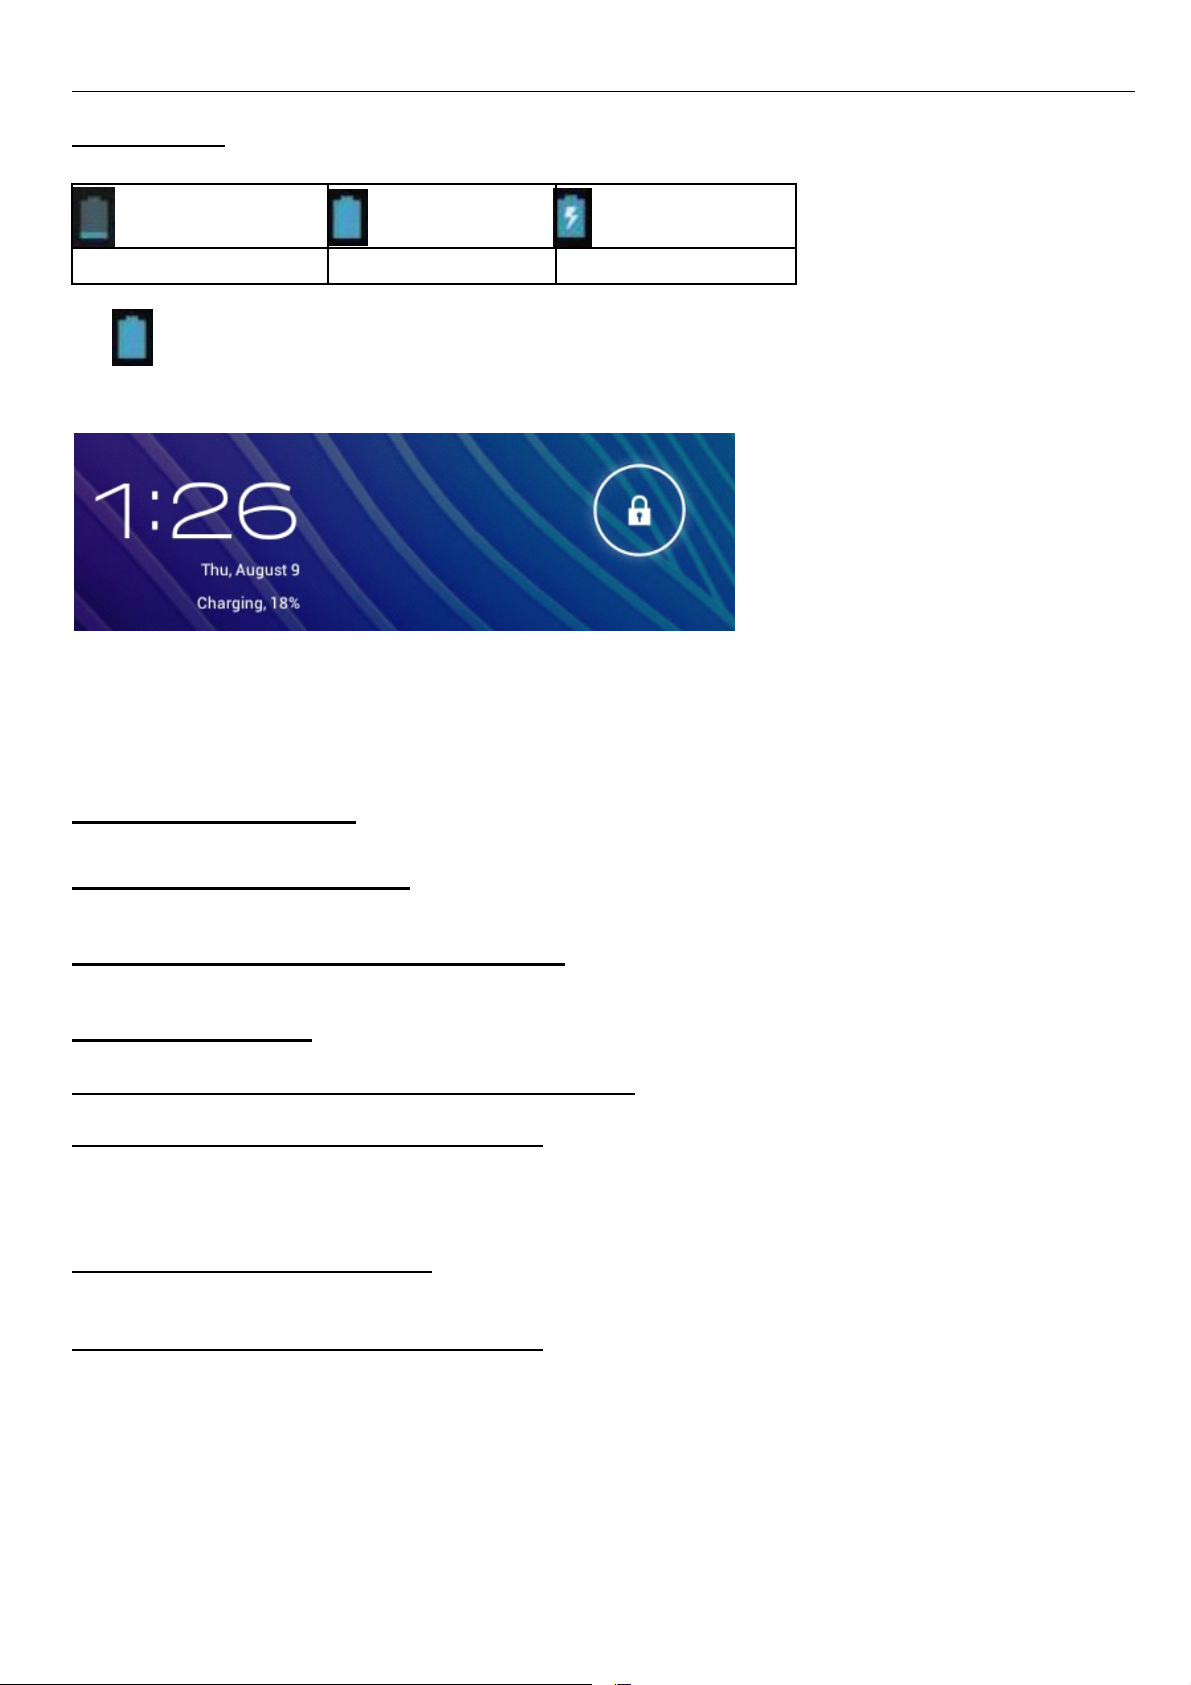
Low battery Full battery Battery charging
The icon indicates that the battery is full. When the battery level becomes too low, a prompt comes up to notify
you to charge your tablet.
While charging, you can check the charging status in the lock screen:
It takes approximately 5 hours to charge your tablet to full battery. Please only use the 5V/2.0A adaptor included
in the package to charge the tablet.
13.
TROUBLESHOOTING
13.
TROUBLESHOOTING
13.
13. TROUBLESHOOTING
TROUBLESHOOTING
13.1
Cannot
13.1
Cannot
13.1
13.1 Cannot
Cannot turn
Check the tablet ’ s power level, please charge it before starting the tablet.
If you still cannot turn on your tablet, try to reset it.
13.2
No
13.2
No
13.2
13.2 No
No sound
Check to see if the volume is turned off or is turned down to "0". Also try another earphone to make sure it is not
damaged.
13.3
Earphone
13.3
Earphone
13.3
13.3 Earphone
Earphone noise
Check for dust in the earphone or speaker. Check to see if the music file you are playing is damaged.
13.4
Tablet
13.4
Tablet
13.4
13.4 Tablet
Tablet freezes
Use a pin to reset and then restart your tablet.
13.5
Screen
13.5
Screen
13.5
13.5 Screen
Screen drift
To correct it, you may a) Go to Settings → Accessibility → Touch panel calibration to calibrate it, or b) In case
calibration cannot be carried out, you may press and hold the power button for about 15 seconds to force the
tablet to shut down. Calibration will be automatically carried out after you start up your tablet. Use a USB mouse
to carry out calibration operations on your tablet.
13.6
Application
13.6
Application
13.6
13.6 Application
Application is
Possible reasons may be that this app is not compatible with Android or the downloaded .apk file is
damaged.
13.7
How
13.7
How
13.7
13.7 How
How can
If an account is added, the account is shown in “ Accounts & sync ” under “ Settings ” , where you may also add
another account. To delete an undesired account, go to “ Settings ” → “ Privacy settings ” → “ Factory data reset ” .
Your tablet ’ s internal storage, downloaded apps, etc. will also be deleted, except for the info that is stored on
external devices such as a USB disk or SD card. Be careful when carrying out this operation.
turn
on
turn
on
turn on
on the
sound
sound
sound coming
can
coming
coming
coming from
noise
noise
noise
freezes
freezes
freezes and
drift
drift
drift or
I
delete
can
I
delete
can I
I delete
delete a
or
or
or unresponsive
is
is
is not
the
tablet
the
tablet
the tablet
tablet
from
from
from the
and
and
and doesn't
unresponsive
unresponsive
unresponsive screen
not
working
not
working
not working
working
a
a
a Google
the
earphones
the
earphones
the earphones
earphones
doesn't
doesn't
doesn't respond
Google
Google
Google account?
respond
respond
respond on
screen
screen
screen
account?
account?
account?
on
input
on
input
on input
input
21
Page 22

14
FCC
S
14
FCC
14
14 . FCC
FCC S
This device complies with Part 15 of the FCC Rules. Operation is subject to the following two conditions:
(1) This device may not cause harmful interference, and
(2) This device must accept any interference received, including interference that may cause undesired operation.
Note:
Note:
Note:
Note: This equipment has been tested and found to comply with the limits for Class B digital devices, pursuant to Part
15 of the FCC rules. These limits are designed to provide reasonable protection against harmful interference in a
residential installation. This equipment generates, uses and can radiate radio frequency energy and, if not installed and
used in accordance with the instructions, may cause harmful interference to radio communications. However, there is no
guarantee that interference will not occur in a particular installation. If this equipment does cause harmful interference to
radio or television reception, which can be determined by turning the equipment off and on, the user is encouraged to try
to correct the interference by one or more of the following measures:
• Reorient or relocate the receiving antenna.
• Increase the separation between the equipment and receiver.
• Connect the equipment into an outlet on a circuit different from that to which the receiver is connected.
• Consult the dealer or an experienced radio/TV technician for help
Use of shielded cable is required to comply with Class B limits in Subpart B of Part 15 of the FCC rules.
Do not make any changes or modifications to the equipment unless otherwise specified in the manual. If such changes
or modifications should be made, you could be required to stop operation of the equipment.
TATEMENT
S
TATEMENT
S TATEMENT
TATEMENT :
:
:
:
15
IMPORTANT
15
IMPORTANT
15
15 . IMPORTANT
IMPORTANT SAFETY
1. Read Instructions: All the safety and operating instruc-tions should be read before the product is operated.
2. Retain Instructions: The safety and operating instruc-tions should be retained for future reference.
3. Heed Warnings: All warnings on the product and in the operating instructions should be adhered to.
4. Follow Instructions: All operating and usage instruc-tions should be followed.
5. Cleaning: Unplug this product from the wall outlet be-fore cleaning. Do not use liquid cleaners or aerosol cleaners.
Use a damp cloth for cleaning.
6. Attachments: Use only attachments recommended by the manufacturer. Use of other attachments may be
hazardous.
7. Water and Moisture: Do not use this product near water (e.g., near a bath tub, washbowl, kitchen sink, laundry tub,
in wet basements, or near a swimming pool and the like).
8. Ventilation: Slots and openings in the cabinet are provided for ventilation to ensure reliable operation of the product
and to protect it from overheating. These openings should never be blocked by placing the product on a bed, sofa,
rug, or other similar surface. This product should not be placed in a built-in installa-tion such as a bookcase or rack
unless proper ventila-tion is provided or the manufacturer instructions have been adhered to.
9. Power Sources: This product should be operated only from the type of power source indicated on the rating label. If
you are not sure of the type of power supply to your home, consult your product dealer or local power company. For
products intended to operate from bat-tery power or other sources, refer to the operating instructions.
10. Overloading: Do not overload wall outlets, extension cords, or integral convenience receptacles as this can result in
a risk of fire or electric shock.
11. Object and Liquid Entry: Never push objects of any kind into this product through openings as they may touch
dangerous voltage points or shout-out parts that could result in a fire or electric shock. Never spill liquid of any kind
on the product.
12. Servicing: Do not attempt to service this product your-self as opening or removing covers may expose you to
dangerous voltage or other hazards. Refer all servic-ing to qualified service personnel.
13. Damage Requiring Service: Unplug this product from the wall outlet and refer servicing to qualified service personnel
under the following conditions: a) when the power-supply or plug is damaged; b) if liquid has been spilled or if objects
have fallen into the product; c) if the product has been exposed to rain or water; d) if the product does not operate
normally by following the operating instructions. Adjust only those controls that are covered by the operating instructions as
improper adjustment of other controls may result in damage and will often require extensive work by a qualified techni-cian
to restore the product to its normal operation; e) if the product has been dropped or damaged in any way; f) when the
product exhibits a distinct change in performance — this indicates a need for service.
14. Replacement Parts: When replacement parts are re-quired, be sure that your service technician has used
replacement parts specified by the manufacturer or have the same characteristics as the original part. Unauthorized
substitutions may result in fire, electric shock, or other hazards.
SAFETY
SAFETY
SAFETY INSTRUCTIONS
INSTRUCTIONS
INSTRUCTIONS
INSTRUCTIONS
22
Page 23

15. Safety Check: Upon completion of any service or repairs to this product, ask the service technician to perform safety
checks to ensure that the product is in proper operating condition.
16. Heat: The product should be situated away from heat sources such as radiators, heat registers, stoves, or other
products (including amplifiers) that produce heat.
16
WARRANTY
16
WARRANTY
16
16 . WARRANTY
WARRANTY
16.1
ONE-YEAR
16.1
ONE-YEAR
16.1
16.1 ONE-YEAR
ONE-YEAR LIMITED
DOPO provides a warranty to the original purchaser of a new Product against defects in materials and workmanship
for a period of one year of non
-commercial usage and ninety (90) days of commercial use. If a Product covered by this by this warranty is determined
to be defective within the warranty period, DOPO will either repair or replace the unit at its sole option and discretion.
16.2
Parts
16.2
Parts
16.2
16.2 Parts
Parts and
There will be no charge for parts or labor during the first ninety (90) days of the warranty period. Thereafter and up to
one year from the date of purchase, parts only are under warranty. There will be a labor fee if repairs are required during
this time. Replacement parts and units may be new or recertified at DOPO's option and sole discretion.
Replacement parts and units are warranted for the remaining portion of the original warranty or for ninety (90) day from
warranty service or replacement, whichever is greater.
LIMITED
LIMITED
LIMITED WARRANTY
and
Labor
and
Labor
and Labor
Labor
WARRANTY
WARRANTY
WARRANTY ON
ON
PARTS
ON
PARTS
ON PARTS
PARTS AND
AND
AND
AND 90
90
DAYS
90
DAYS
90 DAYS
DAYS ON
ON
LABOR
ON
LABOR
ON LABOR
LABOR
16.3
Type
16.3
Type
16.3
16.3 Type
Type of
Defective Products must be sent to a DOPO service center to obtain warranty service. DOPO is not iresponsible for
transportation costs to the service center, but DOPO will cover return shipping to the customer. Pre-authorization is
required before sending any unit in for warranty service.
Product returns to DOPO ’ s service centers must utilize either the original box and shipping material or packaging that
affords an equal degree of protection. DOPO T echnical Support will provide instructions for packing and shipping the
covered Product to the DOPO service center.
16.4
Limitations
16.4
Limitations
16.4
16.4 Limitations
Limitations and
DOPO ’ S one-year limited warranty only covers defects in materials and workmanship. This warranty does not cover:
cosmetic damage, units that are dropped, normal wear and tear, improper operation, improper voltage supply or power
surges, signal issues, damages from shipping, acts of God, any type of customer misuse, modifications or adjustments,
as well as installation and set-up issues or any repairs attempted by anyone other than by a DOPO authorized service
center. Products with unreadable or removed serial numbers, or requiring routine maintenance are not covered. This
one year limited warranty does not cover Products sold 。 ” AS IS ” , ” FACTORY RECERTIFIED ” or by a non-authorized
reseller.
there are no express warranties other than those listed or described above.Any omplied warranties, including any
implied warranty of merchantability and fitness for a particular purpose, shall be limited in duration to theperiod of time
set forth above.DOPO'S total liability for any and all losses and damages resulting from any cause from any cause
whatsoever including DOPO'S negligence, alleged damage, or defective good's,whether such defects are discoverable
or latent,shall in no event exceed the purchase price of the product.DOPO shall not be responsible for loss of use,loss
of information or data, commercial loss, lost revenue or lost profits, or other incidental or consequential damages.
of
Service
of
Service
of Service
Service
and
Exclusions
and
Exclusions
and Exclusions
Exclusions
Some states do not allow limitations on how long an implied warranty lasts or the exclusion of incidental or
consequential damages, so the above limitations or exclusions may not apply to you. This warranty gives you specific
THIS
legal rights, and you may also have other rights, which vary from state to state. THIS
CHANGE
CHANGE
CHANGE
CHANGE WITHOUT
WITHOUT
WITHOUT
WITHOUT NOTICE.
NOTICE.
NOTICE.
NOTICE.
23
THIS
THIS WARRANTY
WARRANTY
WARRANTY
WARRANTY S
S
SUBJECT
S
SUBJECT
S SUBJECT
SUBJECT TO
TO
TO
TO
Page 24

SERVICE
SERVICE
SERVICE
SERVICE CENTER
1845 S.Vineyard Ave.Ste.4
Ontario,CA 91761
909-974-2859
909-974-2859
Tel:
909-974-2859
909-974-2859
909-974-2865
909-974-2865
Fax: 909-974-2865
909-974-2865
Hours:8:30AM-5:00PM PST
TO
OBTAIN
TO
OBTAIN
TO
TO OBTAIN
OBTAIN WARRANTY
contact DOPO T echnical Suport
email: TechSupport@doublepowertech.com
phone: 800.838.3315
from 8:30AM to 5:00PM Monday through Friday
Pacific Time.
Pre-authorization must be obtained before sending
any product to the Service Center.Proof of
purchase in the form of a purchase receipt or copy
there of is required to show that a product is within
the warranty period.
CENTER
CENTER
CENTER
WARRANTY
WARRANTY
WARRANTY SERVICE
SERVICE
SERVICE
SERVICE
24
 Loading...