


User Manual
1
1+1 Pocket
Mult
i-Currency Banknote Sorter
User Manual
Preface
Thank you for choosing our products! It is an accurate, reliable multi-currency banknote
sorter, the structure design and performance are more scientific and the operation is extremely
smooth and vibration free. it defines a new standard of banknote counting machines with sorting
functions.
In order to make the best use of the accurate banknote counting/sorting capability of the unit,
please read this manual carefully before using and operate as per the procedures stipulated in the
manual.
Contents
Safety Instruction
...................................................................................................................................................
2
Features
....................................................................................................................................................................
3
Unpacking
................................................................................................................................................................
3
Exterior Introduction
..............................................................................................................................................
4
Operation Instruction
............................................................................................................................................
6
Function Instruction
..............................................................................................................................................
8
User Menu Instruction
........................................................................................................................................
12
Sensitivity Parameters Setting
..........................................................................................................................
13
Resume to Factory Setting
................................................................................................................................
15
Troubleshooting
...................................................................................................................................................
15
Regular Maintenance Instruction
.....................................................................................................................
20
How to replace the fuse
....................................................................................................................................
20
Specifications
.......................................................................................................................................................
21
Prepared by
Reviewed by
Approved by

User Manual
2
Safety Instruction
To avoid damage to the machine and personal injury, please read all warnings and cautions
carefully before first use!
Place the unit on a solid flat surface.
Before moving the unit, please disconnect the power cord, otherwise the
power cord may be damaged resulting in fire and electrical shock.
Don't place the unit on a shaky or vibrating surface.
Keep the unit away from volatile gases or flammable materials
Keep the unit away from heavy humidity and strong sunlight, it may cause
machine's failure.
Don't try to modify, pull, bend and rub the power cord, and don't put
heavy objects on the power cord.
In case of the spilled water come into the interior of the unit, please stop
operating it, switch off and disconnect the power cord immediately, then
contact the service center for help.
Please connect the supplied power cord to a grounded well wall outlet.
If the unit is unused for a long period, please switch off the unit and
disconnect the power cord from the unit, otherwise there will be a
decrease in insulation and electrical shock, creep age or fire may occur.
Don't touch the power cord with the wet hand.
Don't expose the unit to dust.
Please take care to avoid any foreign objects dropping into the unit,
otherwise will damage the machine or effect the note feeding.
It is strictly prohibited for unprofessional personnel to dissemble the
machine.
!
!

User Manual
3
Features
Detects magnetic ink, infrared ink, UV, CIS image, length, thickness, etc.
Compact size, dual-operator user interface with large and clear LCD display.
Installs up to 4 different currencies, banknotes can be processed in all four orientations.
High-capacity hopper, stacker and reject pocket.
ADD function, batch function, reporting and printing function are available.
Easy enters user menu and maintenance menu interface for flexible operation, user friendly.
Adopts auto adjustable technology, Easy software upgraded via SD card or USB interface.
Configurable USB interface, printer interface, external display interface.
Full open channel design for better maintenance and jam removing.
Unpacking
Please check whether the appearance of the machine is in good condition and whether all of
the accessories are available. Inside the package there shall be the following.
Banknote sorter User manual Power cable
Cleaning brush Fuse USB download cable
(Optional)
External LCD display Print cable SD card
(Optional) (Optional) (Optional)

User Manual
4
♦Hopper with adjustable guides
Exterior Introduction
1. Three-view drawing
2. Back view
♦Hopper
♦Banknote pressing wheel
♦Control panel
♦Reject pocket
♦LCD display
♦Banknote receiving sensor
♦Stacker
♦USB Port for connection to PC
♦RS232 port
♦SD card Slot
♦Banknote twiddling wheel
♦Port for printer
♦Handle of back drawer
♦On/off Switch
♦Power Connection
♦ Adjusting screw
♦ Handle
♦Banknote receiving wheel
User Manual
5
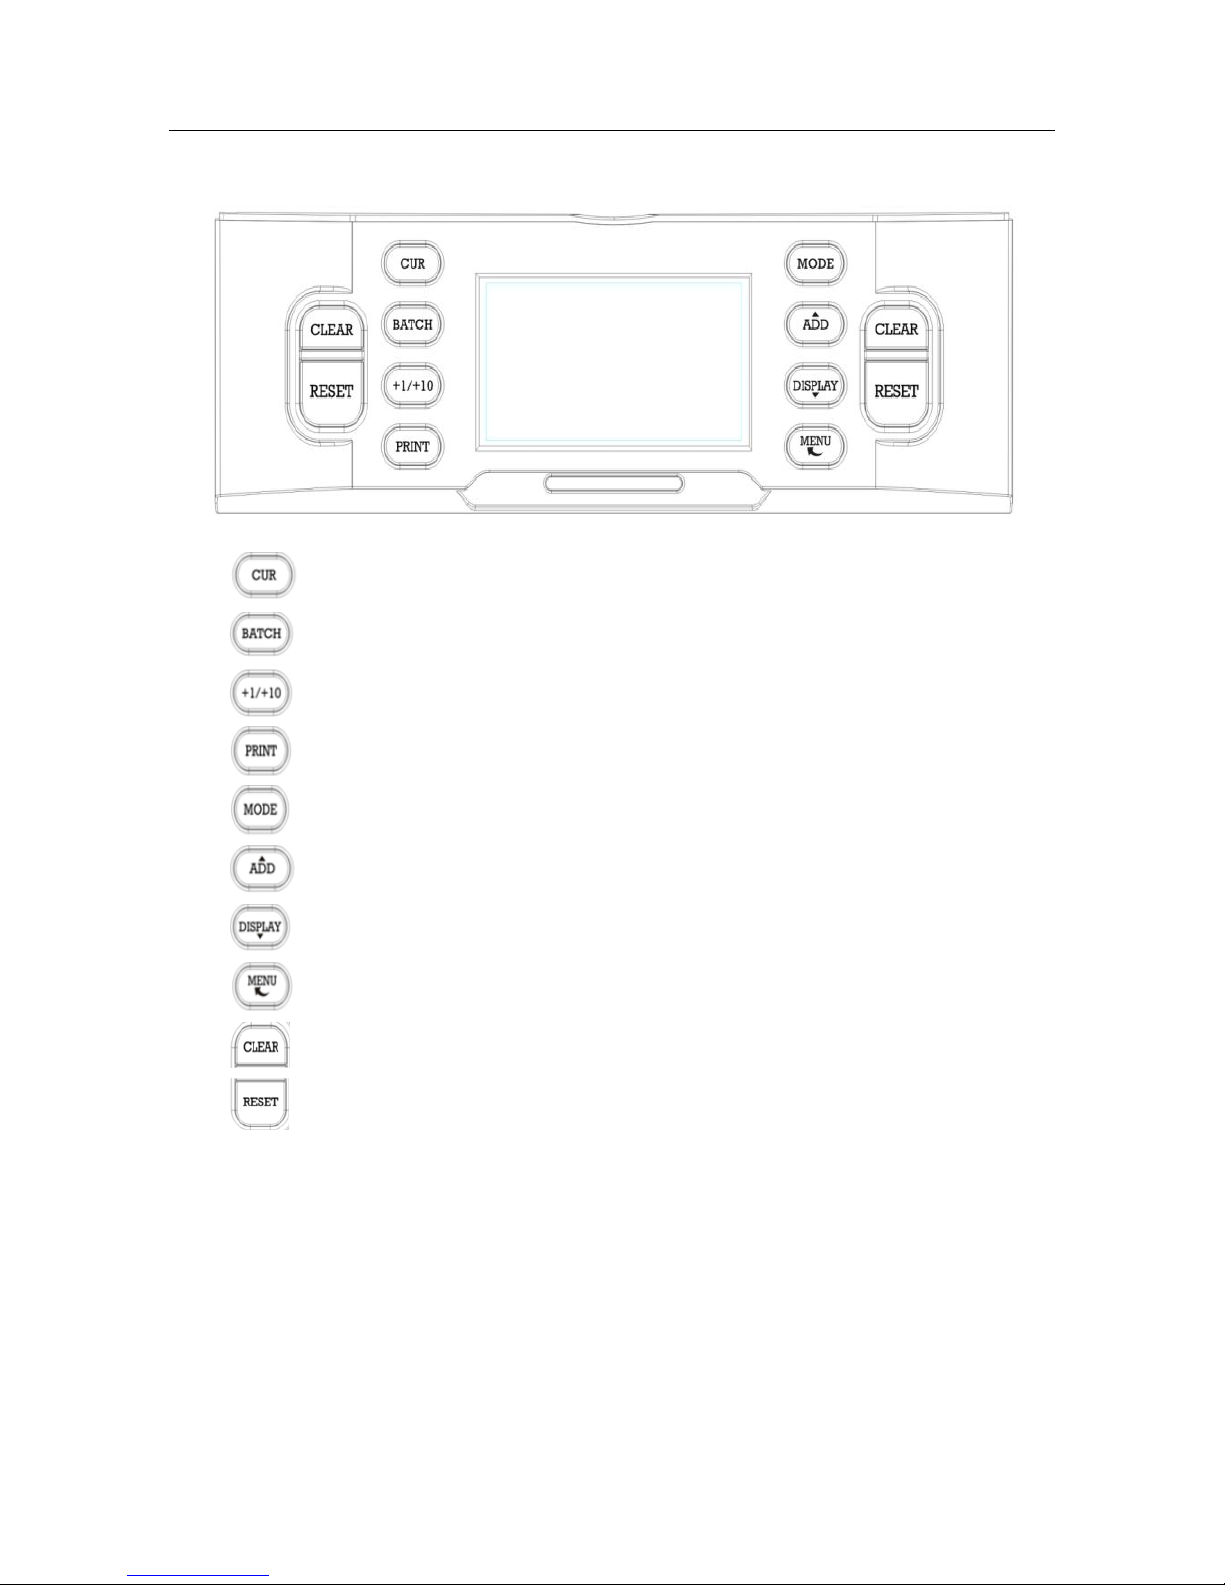
3. Explanation about the user’s panel
1] :Currency section.
2] :Batch function on/off and set batch number.
3] :Increase the batch number by 1(just press) or 10(press and hold).
4] :Send count report to print.
5] :Counting mode settings: MIX, SINGLE, FACE, ORIENT, COUNT.
6] :Add function on/off. Also served as a upward navigation key.
7] :View the counting result report. Also served as a downward navigation key.
8] :Open/ close device menu and go back previous level(in MENU mode).
9] :Clear the number of counted banknotes and turn the batch function off.
10] :Start counting/ Confirm selection in menu mode.

User Manual
6
Operation Instruction
In order to avoid counting/detecting errors, the following banknotes should be handle before
counting:
① Keep the banknotes in order
② Straighten out the folded notes
③ Remove the wrinkled notes
④ Remove any stray foreign object from the note pack
⑤ Unwrap the fold corner and curved banknotes
Place the machine on a solid flat surface, ensure there is no strong electromagnetic field
and strong sunshine around it. Then plug the electric socket into 100~240V AC electric source,
make sure all the connections are secure. If you have purchased an external display, connect it to
the RS232 interface on the back of the machine.
Note: In order to ensure personal safety, the electric socket shall be safety grounded.
Turn on the power switch, the machine will display the software version first, then perform a
self-test.
If the test is successful, the machine will enter ready state (See figure 1). If some error

User Manual
7
messages are displayed on the LCD, please handle them according to the Troubleshooting in the
manual.
Figure 1
Before counting the banknotes, please adjust the left and right hopper guide to a suitable
position base on the length of the banknotes for smooth feeding.
Next place the well-prepared banknotes onto the hopper flatly and the machine will start
counting. The suspicious or unfit banknotes are rejected to the reject pocket.
Note: When an error is found, and causes the machine to stop automatically, please
re-count these banknotes.
The suspicious or unfit notes

User Manual
8
Function Instruction
1. Currency selection
After turning on the machine, the symbol of current currency is displayed on the LCD. If you
need counting/sorting other types of currencies, press "CUR" key to change current currency, the
symbol of installed currency will be displayed in turn.
"EUR" means Euro
"USD" means US Dollar
“TRY” means Turkish Lira
"GBP" means Pound Sterling
…etc.
2. Counting/Sorting mode
Five counting/sorting modes are supported. They are Mix mode, Single mode, Face mode,
Orientation mode and Count Mode. User can press the "MODE" key on the control panel to switch
the counting/sorting mode according to requirement.
A. Mix mode
In mix mode, "MIX" is displayed on the LCD and the machine can count the mixed banknotes
with different denomination of the same currency type.
After the counting is finished, the total value and total pieces are displayed on the LCD, and
the machine will provide a report for detailed counting result by pressing the "DISPLAY" key.
e.g. Euro result can be as follows:

User Manual
9
If the printer is connected to the machine, press the "PRINT" key, the report will be printed.
B. Single mode
In single mode, "SINGLE" is displayed on the LCD and the machine can count the same
denomination. After the counting is finished, the total value and total pieces are displayed on the
LCD, If a suspicious or a different denomination of banknote is mixed in the pile, it will be rejected
into the reject pocket.
C. Face mode
Denomination
Piece
Value
EUR
2015-06-26 08:33
Deno PCS Value
EUR 10 10 100
EUR 20 16 320
EUR 50 8 400
Total 34 820

User Manual
10
In Face mode, "FACE" is displayed on the LCD and the machine will sort the banknotes
according to front and back.
The banknote with a front or the rear side first detected by the sensor, becomes the reference
for stacker. These banknotes are stacked there.
The banknote facing to the other side are then sorted into reject pocket, including any
suspect notes.
D. Orientation mode
In Orientation mode, "ORIENT" is displayed on the LCD and the machine will sort the
banknotes by orientation.
The banknote with a forward or the reversed orientation first detected by the sensor,
becomes the reference for stacker. These banknotes are stacked there.
The banknote facing to the other orientation are then sorted into reject pocket, including any
suspect notes.
Note: We suggest you to sort the banknotes by face first and then by orientation.
E. Count mode
If you only need to count the pieces of banknotes, press the "MODE" key on the control panel.
when the "COUNT" is displayed on the LCD, the machine will count the total pieces without
detection. After the banknote counting is finished, the number displayed on the LCD is the total

User Manual
11
pieces that have been counted.
Note: In count mode, the counterfeit detecting function is switched off.
3. Accumulative Counting
When you need accumulative counting, press the "ADD" key on the control panel, if "ADD" is
displayed on the LCD, the machine will count on the basic of the original number displayed on the
LCD. After the counting is finished, the number displayed on the LCD is the summation of the
several times' counting. When the accumulative pieces reach 9999+1 or accumulative value
reaches 999999+1, the number will be resumed to 0.
Note: To ensure accuracy of counting, in accumulative counting function, if any problem
happens such as jam, the current count will not be added.
4. Batch Counting
When you need a batch counting, press the "BATCH" key, if “100” is displayed on the LCD, it
shows the batch function has been turned on and the current batch number is 100. Each time
when you press the "BATCH" key, “100, 50, 20, 10 and ---" will be displayed in turn repeatedly,
When switch to "---", the batch function is disabled. Furthermore, you can press or hold the
"+1/+10" key to increase the batch number by 1 or 10 according to the requirement of the
banknotes counting. The batch number is select-able in the range of 1~200. After setting the
batch number, put the banknotes on the hopper and the machine will count automatically. While
reach the batch number, the machine will stop automatically.
EUR MIX ADD B:---
PCS 9999
VAL 999999
R:
S:M 26-06-2015 14:00
EUR MIX ADD B:---
PCS 0
VAL 0
R:
S:M 26-06-2015 14:00

User Manual
12
User Menu Instruction
In normal working state, press the "MENU" key to enter user menu interface, you can select
the any item by pressing the "ADD" key or "DISPLAY" key.
1. Counting Speed
After selecting "1:SPEED" item, press the "RESET" key to enter, there are three kinds of speed
you can select. After selecting the counting speed, press the "RESET" key once again to save the
parameter. And press the "MENU" key for 2 times to exit and enter normal working state.
● "SPEED L" means low speed mode and its counting speed is 800 notes/min;
● "SPEED M" means medium speed mode and its counting speed is 1000 notes/min;
● "SPEED H" means high speed mode and its counting speed is 1200 notes/min.
When selecting the medium speed or high speed, the serial number identification function
will be turned off.
2. Serial Number Identification
In user menu interface, After selecting " 2:SERIAL" item, press the "RESET" key to enter, and
then you can select to turn the serial number identification function on or off.

User Manual
13
3. Capacity of the Reject Pocket
In user menu interface, After selecting " 3:REJECT POCKET CAPACITY" item, press the
"RESET" key to enter, and then you can select the capacity of the reject pocket.
4. Date and Time Setting
In user menu interface, After selecting " 4:DATE TIME" item, press the "RESET" key to enter,
and then you can set date format, and modify the parameter of date and time by pressing the
" ” key.
5. Alarm Beep
In user menu interface, After selecting "6: ALARM BEEP" item, press the "RESET" key to enter,
and then you can select to turn the alarm beep function on or off.
Sensitivity Parameters Setting
You may meet the following problems during counting/sorting:
■ Machine doesn't sort the notes properly;
■ Machine frequently recognizes the fit notes as unfit notes;
DD-MM-YY
MM-DD-YY
YY-MM-DD
HH-MM-SS

User Manual
14
Please follow the steps to change the sensitivity parameters setting:
In normal working state, press the “CLEAR” key for 5 times to enter maintenance menu, press
the “ ” key to enter “1 SENSITIVE SET” item;
Press the " ” or “ ” key to select desired item, For USD notes:
Item
Default value
Range
WIDTH LEVEL
4
0~8
LENGTH LEVEL
4
0~8
UV LEVEL
4
0~8
THICK LEVEL
4
0~8
PAPER LEVEL
3
0~8
IMAGE LEVEL
5
0~4
SN
5
0~8
IR
3
0~8
MG
5
0~8
MG1
4
0~8
MG2
4
0~8
MG3
4
0~8
Press the “ ” key to change the parameter value; After setting, press the “ ” key
to save the setting result; Click " " key to return to the previous menu.
The counterfeit detection sensitivity for different currency should be set separately.

User Manual
15
Resume to Factory Setting
Press the “ CLEAR” key for 5 times to enter maintenance menu, press the “ ” or
“ ” key to select the “5 FACTORY DEF” item, press the “ ” key to enter the item or
save the setting result; Click " " key to return to the previous menu, these operations make
the machine resume to the factory setting.
Troubleshooting
1. Remove the jammed banknotes
When the LCD displays "JAM! CODE=6, REMOVE ALL NOTES THEN PRESS RESET" error
message during counting, please remove the jammed banknotes by the following steps.
(A) Open the top cover to remove
the jammed banknotes.
(B) Pull the handle of back drawer to open the back
drawer, then remove the jammed banknotes.

User Manual
16
2. How to adjust the feeding clearance
The adjusting screw of the feeding clearance on the top cover has already been set to the
best position in the factory. But when you meet the following problems during counting/sorting, it
is necessary to re-adjust the adjusting screw.
■ If the machine frequently occurs jammed notes or can't count the banknotes smoothly,
please turn the adjusting screw clockwise to make the clearance larger.
■ If the machine frequently frequently occurs double notes or chained notes, please turn the
adjusting screw counter-clockwise to make the clearance smaller.
Note: The adjusting screw is very sensitive, make only minor adjustment.
3. Self-test error message display and solutions
The machine will perform a self-test after powering on. If one of the following error messages
is displayed on the LCD, usually it is because the sensor is blocked by banknotes or dusts. Pls
use a brush or a piece of soft cloth to clean the dusts on the sensor or remove the banknotes, and
then restart the machine.
Error message display
Solutions
Banknote feeding sensor
1.Remove the banknote and clear away the dust.
2.Replace banknote feeding sensor.
Banknote receiving sensor
1.Remove the banknote and clear away the dust.
2.Replace banknote receiving sensor.
Banknote Check Rejector
1.Remove the banknote and clear away the dust.
2.Replace check rejector sensor
Fluorescence
1. Adjust top cover to right position so as to
Adjusting screw
Increase the clearance
Decrease the clearance

User Manual
17
avoid strong light source
2. Re-adjust UV sensor
Left Counting
1.Remove the banknote and clear away the dust.
2.Re-adjust counting IR sensor
3.Replace left/right counting receiving tube
Right Counting
Left2 Counting SENSOR
Right2 Counting SENSOR
Left CIS IR
1. Remove the banknote and clear away the dust
2. Replace the counting IR tube.
Right CIS IR
Rotate Speed Sensor
1. Clean away the dust and rotate speed sensor
2. Replace rotate speed sensor
3. Replace main motor
4. Replace main board
Rotate2 Speed Sensor
1.Clean away the dust and rotate speed sensor
2.Replace rotate speed sensor 2
3.Replace main motor
4. Replace main board
CIS Sensor 0
CIS Sensor 1
CIS Sensor 2
1. Clean away the dust
2. Replace CIS sensor
BIS TOP
1.Adjustment of the Commutator position
2.Detect gap of the reject pocket. Acceptable
value: 0.9~1.3MM
BIS BTT
BIS BOTTOM
BIS TTB
AD ERROR
1.Power off and restart the machine.
2. Replace main board
BRAKE ERROR
1. Replace the motor control board
2. Replace the feeding motor
Auto Adjust Ir Clean Counting Sensor
1. Clean away the dust
2. Replace the counting IR sensor
(MG8)
170(MG0)
(MG1)
Replace magnetic board on the left

User Manual
18
(MG2)
(MG5)
Replace MRS magnetic board
(MG4)
(MT)
Replace big magnetic sensor
(MG6)
(MG7)
(MG9)
Replace magnetic board on the right
4. Detective error message display and solutions
If one of the following error messages is displayed on the LCD during the course of
counting/sorting, please handle them as per the following solutions after the machine is stopped.
Error message display
Causes and solutions
SLANT/PASSWIDTH
Banknote tilt
1. Press "RESET" to continue the counting
2. If it is often displayed, adjust the adjusting screw toward the
clockwise direction to increase clearance.
CHAINED
DOUBLE
TIME1
FOLLOW
Some banknotes are connected or overlapped
1. Put the banknotes on the banknote stacker back to the banknote
hopper to count again.
2. If it is often displayed, adjust adjusting screw toward the
counter-clockwise direction to decrease clearance.
HALF
Half piece or incomplete banknote.
1.Remove it and continue the counting
MG/MG1/MG2/MG3
Counterfeit suspicious banknote
1.Remove it and continue counting
2.Clean away the dust on magnetic sensor
3.Replace magnetic sensor
WIDTH/LENGTH
The banknotes are nonconforming in size
1. Remove them and continue the counting.
2. Adjust counting IR sensor.
DENO DF
Denomination different
1.Remove suspect notes and re-count.
JUDGE

User Manual
19
IR
1.Remove it and continue the counting
2.If it is often displayed, adjust CIS IR transmission light
3.Lower the sensitivity level.
UV
1.Remove it and continue the counting
2.If it is often displayed, adjust UV sensor
3. Replace UV sensor
FL
Remove it and continue the counting.
IMAGE
IMAGE1
IMAGE2
IMAGE3
IMAGE4
IMAGE5
IMAGE6
IMAGE7
DOG EAR
1.Remove it and continue the counting
2.If it is often displayed, adjustment of CIS white radiation
3.Replace CIS sensor
TOP COVER OPEN!
Lock of the top cover well
BACK DRAWER OPEN!
It may be some banknotes are jammed,remove the banknote, then
installation of the back drawer
JAM
Some foreign substance falls inside the machine or notes are blocked, open
the back cover to remove them.
QUE
Adjust the adjusting screw to adjust feeding clearance.
SN Repeat
Remove it and continue the counting.
SN Invalid
Reject Pocket Full
Remove the banknotes on the reject pocket.
Stacking Pocket Full
Remove the banknotes on the stacker.
COUNT
Put the banknotes on the banknote stacker back to the banknote
hopper to count again
Old Ver
Remove it and continue the counting.
VER DIFF
TIME2
Put the banknotes on the banknote stacker back to the banknote
hopper to count again
FACE DIFF
Remove it and continue the counting.
ORIENT DIF
Remove it and continue the counting.

User Manual
20
Regular Maintenance Instruction
■ If the temperature is lower than 20℃, please turn on the machine and wait for 3 minutes
before counting.
■ The machine shall be operated at places with good ventilation and kept away from strong
sunshine and strong magnetic field.
■ The power plug of the machine shall be inserted to electrical socket with safety grounded.
■ The power supply of the machine shall be within the range of 100~240V AC. Otherwise it will
affect the machine’s normal operation.
■ Banknote twiddling wheel, contra rotating wheel, and delivering wheel can’t be stained with
any grease, otherwise it will slide and the counting will be inaccurate.
■ Dusts on CIS image detecting module, IR sensors, and magnetic sensor shall be thoroughly
cleaned once a week at least. You may clean the machine by using the provided brush to
remove any dust build-up on the exposed portions of the machine.
NOTE: Do not use any chemicals to clean this machine.
How to replace the fuse
The fuse can be replaced if it is burned-out, open the cover of fuse holder and insert a new
one, and then recover it.
Note: For continued protection against risk of fire, replace only with same type and rating of fuse.
Fuse Holder

User Manual
21
Specifications
Counterfeit detection: IR, MG, CIS IMAGE, MT, UV, etc
Counting speed: 800/1000/1200 notes/min, select-able
Hopper Capacity: 500 notes
Stacker Capacity: 200 notes
Reject Pocket Capacity Max, 50 notes
Power supply: 100~240V AC, 50/60Hz
Power consumption: ≤50W
Temperature: 0℃~40℃
Humidity: 40~90%
Interface: RS232, RJ-11, USB, SD Card
Dimensions: 251(L)×271(W)×264(H) mm
Weight: 8.5kg
If the machine has some faults that you can’t solve, please contact the Technical Support
Dept of our company or our agent for services.
Products subject to change without further notice.
 Loading...