

Page 1
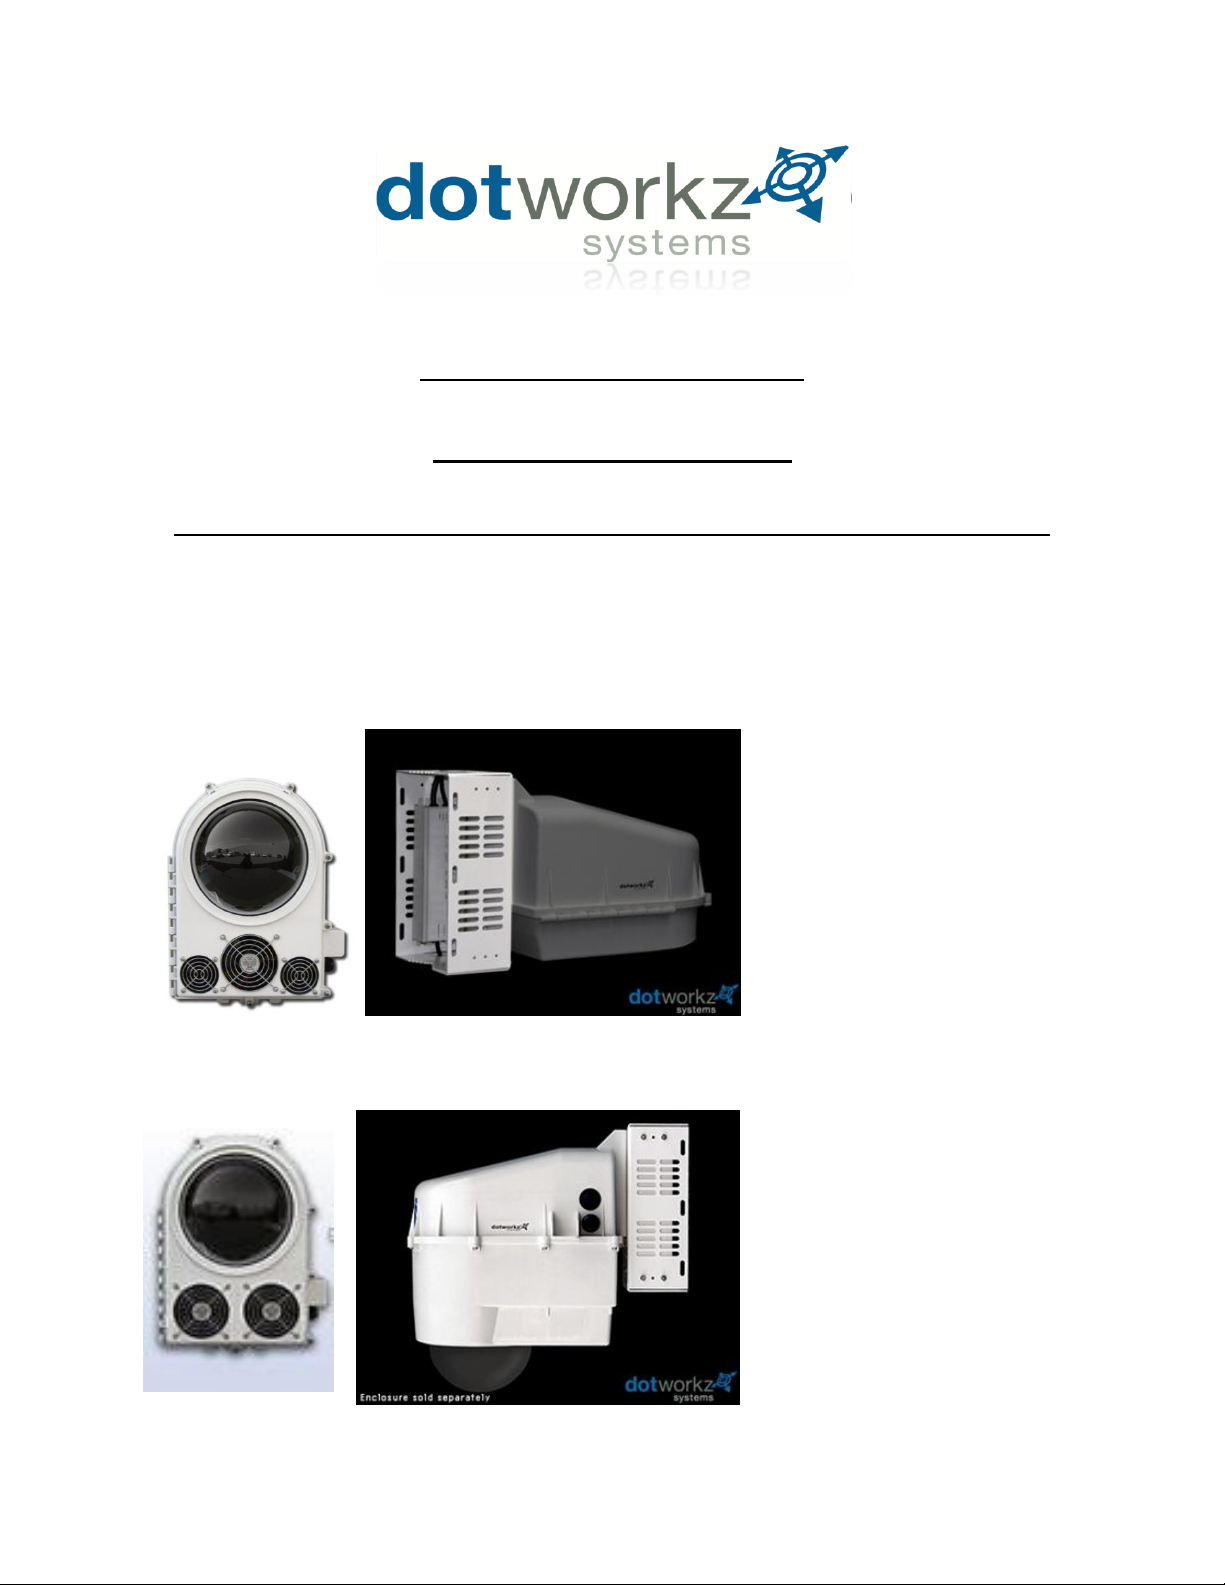
For D2 COOLDOME™
For D3 COOLDOME™
KT-CDR2
KT-CDR3
INSTALLATION GUIDE
KT-CDR2 & KT-CDR3
Including Mounting & Sealing of Housing & Electrical Details
For COOLDOME™ ENCLOSURE SERIES
Page 2
IMPORTANT SAFEGUARDS
1 Read Instructions - All the safety and operating instructions should be read
before the unit is operated.
2 Retain Instructions -The safety and operating instructions should be retained for
future reference.
3. Heed Warnings - All warnings on the unit and in the operating instructions
should be adhered to.
4. Follow Instructions -All operating & user instructions should be followed.
5. Electrical Connections - Only a qualified electrician should make electrical
connections.
6. Attachments - Do not use attachments not recommended by the product
manufacturer as they may cause hazards
7. Cable Runs - All cable runs must be within permissible distance
8. Mounting -This unit must be properly and securely mounted to a supporting
structure capable of sustaining the weight of the unit. Accordingly:
a. Installation should be made by a qualified installer.
b. Installation should be in compliance with local codes
c. Care should be exercised to select suitable hardware to install the unit,
taking into account both the composition of the mounting surface and
the weight of the unit. Be sure to periodically examine the unit and the
supporting structure to make sure that the integrity of the
installation
is intact. Failure to comply with the foregoing could result in the unit
separating from the support structure and falling, with resultant damages
or injury to anyone or anything struck by the failing unit,
SERVICE
If the unit ever needs repair service, customer should contact Dotworkz Systems +1
(619) 224-LIVE (5483) for return authorization & shipping instructions
CAUTION: TO REDUCE THE RISK OF ELECTRICAL SHOCK, DO NOT EXPOSE
COMPONENTS TO WATER OR MOISTURE
The lightning flash with an arrowhead
symbol, within an equilateral triangle,
is intended to alert the user to the
presence of non-insulated "dangerous
voltage" within the product's enclosure
that may be of sufficient magnitude to
constitute a risk of electric shock to
persons
The exclamation point within an
equilateral triangle is intended to
alert the user to the presence of
important operating and
maintenance (servicing) instructions
in the literature accompanying the
appliance
UNPACKING
Unpack carefully. Electronic components can be damaged if improperly handled
or dropped. If an item appears to have been damaged in shipment, replace it
properly in its carton and notify the shipper. Be sure to save
1.The shipping carton and packaging material. They are the safest material in
which to make future shipments of the equipment.
2. These Installation and Operating Instructions.
PRECAUTIONS – WARNINGS – ADDITIONAL INFORMATION
(RETAIN THIS DOCUMENT)
PRODUCT INSTALLATION
For technical questions or product returns – call Dotworkz Customer Service (866-575-4689) 7:30 AM to 4:30 PM (PST). The proper
technician will contact you as soon as possible.
The External Nut on All electrical wire feed Glands must be tightened to create a weather tight seal prior to putting D2 in service. Failure
to create this seal may result in water incursion into enclosure. This may lead to electrical shock, product failure and damage to electrical
systems installed within enclosure, including but not limited to damage to camera, heater and blower circuitry, cooling circuitry and other
systems installed in unit.
All screws on hinged lower must be tightened to create seal on enclosure. Failure to create this seal may result in water incursion into
enclosure. This may lead to electrical shock, failure and damage to electrical systems installed within enclosure, including but not limited
to damage to camera, heater and blower circuitry, cooling circuitry and other systems installed in unit.
Do not over tighten any Screws, Stand Offs, or other fasteners on this unit. Failure to heed this warning will cause damage or failure of
the D2 enclosure.
Be sure to take extra care to Protect Lens of unit prior to and during installation, and during service. Suspension packaging box is a handy
platform to protect lens and enclosure, while installing camera and accessory electronics before installation. Failure to protect lens will
adversely affect product perform
0
Page 3
Conduit Guidelines:
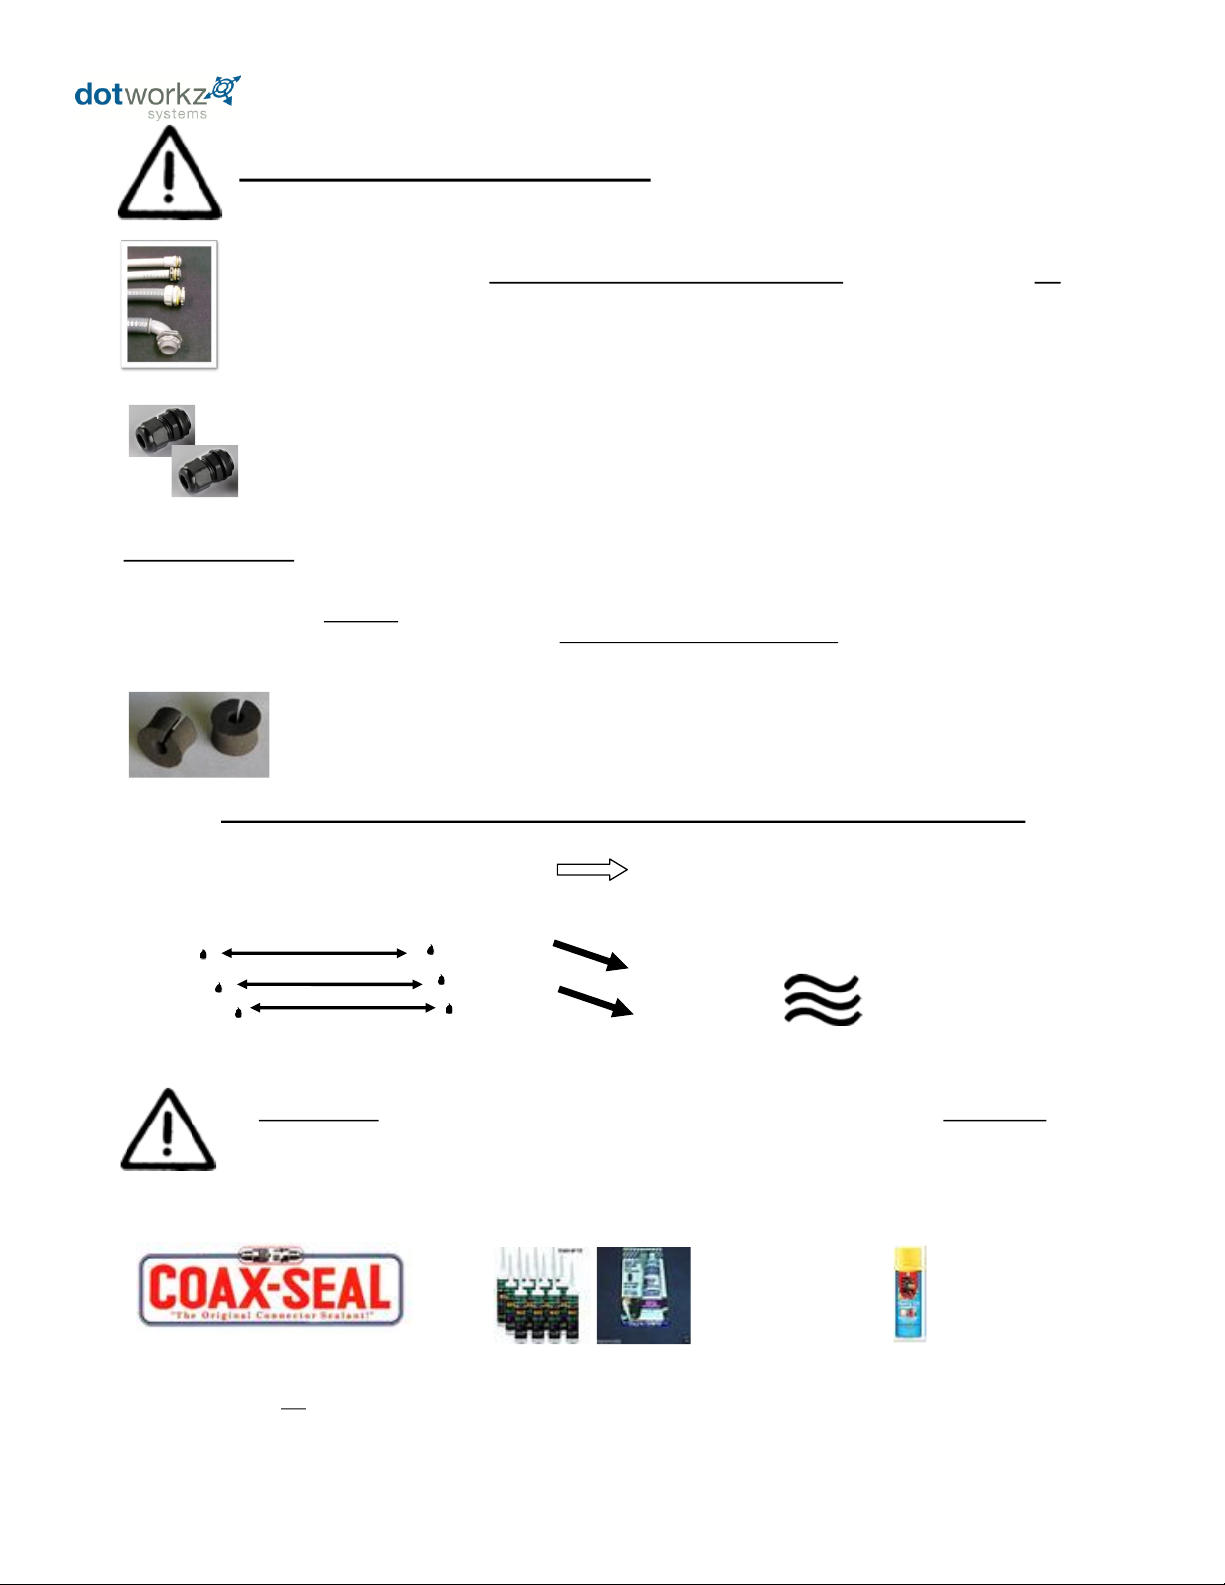
1) If wires, cabling, or conduit are coming at enclosure wire entry level, or above, always create a drip loop.
2) Please use only approved watertight electrical conduit and connectors, IP66 or better, with proper seals and fittings installed & fully seal.
3) Then, after all wire and cables are installed into enclosure, Seal wire entry ports inside of enclosure with any number of commercially
available sealing putty’s, Silicone Sealant, or similar products that are approved by applicable local and relevant electrical codes.
SHOCK HAZARD! Failure to fully seal enclosure wire and cabling entry ports may lead to shock hazard,
unsatisfactory product performance, a possibility of damage to electronics in the Dotworkz enclosure product,
including camera damage, and damage to integrated electronics due to air driven moisture traveling thru the
conduit, condensing and collecting in the enclosure creating a short circuit hazard.
Dotworkz does not endorse, nor has it evaluated any of these products. Test products first, and follow all manufacturers’ instructions.
Follow all applicable electrical and building codes and installation guidelines. End user assumes liability for applicability of these products and
their effectiveness and incurred liability in using these products.
Electrical Conduit Guidelines
For optimal performance, your Dotworkz Enclosure is designed to be Air & Water Tight to eliminate any
moisture, dust, and insect damage, safety, performance, reliability, and maintenance related issues.
Use of Electrical Conduit, without sealing the entry ports/ inside wire feeds within Camera Enclosure, will
subject the inside of your enclosure to possibility of condensation driven moisture, dust, and insect contamination
hazards.
Dotworkz has provided each enclosure with two Cable Gland Strain Relief seal ports that fully seal
enclosure to an IP68 rating, Waterproof and Airtight Seal. To properly seal, only one round cable is used in each
cable gland port. (Holes on enclosure are 7/8” diameter, ready for standard ½” I.D. NPT connector, or PG13 fittings.)
However, we realize our customers are retrofitting these connectors with electrical conduit fittings. We
acknowledge this industry customization and installation practice, and would like to guide customers to properly
install these products.
Humid Air
Condensing to Water
FORCES AT WORK IN ANY UNSEALED, CONDUIT WIRE FEED ENCLOSURE SYSTEM
WARM/MOIST IN UNSEALED CONDUIT MOVES THRU CONDUIT
FEEDS EXPAND & CONTRACT WHEN CONDUIT HEATS & COOLS
WITH OUTSIDE TEMPERATURES
EXPANDING HEATED AIR IS PUSHED INTO ENCLOSURE THEN COOLS &
CONDENSES, HUMID AIR CONDENSES ON SURFACES INSIDE
ENCLOSURE
Electrical Putty & Putty Tapes
Silicone Sealants
Foam Sealants (use very sparingly)
Dotworkz supplies two ½” diameter foam conduit plugs, that when installed, will assist in
sealing off airflow in conduit feed thru, at cable entry inside of enclosure. Putty or Sealant can be
used in conjunction with these plugs, to assure a full seal inside enclosure cable feed entry.
1
Page 4
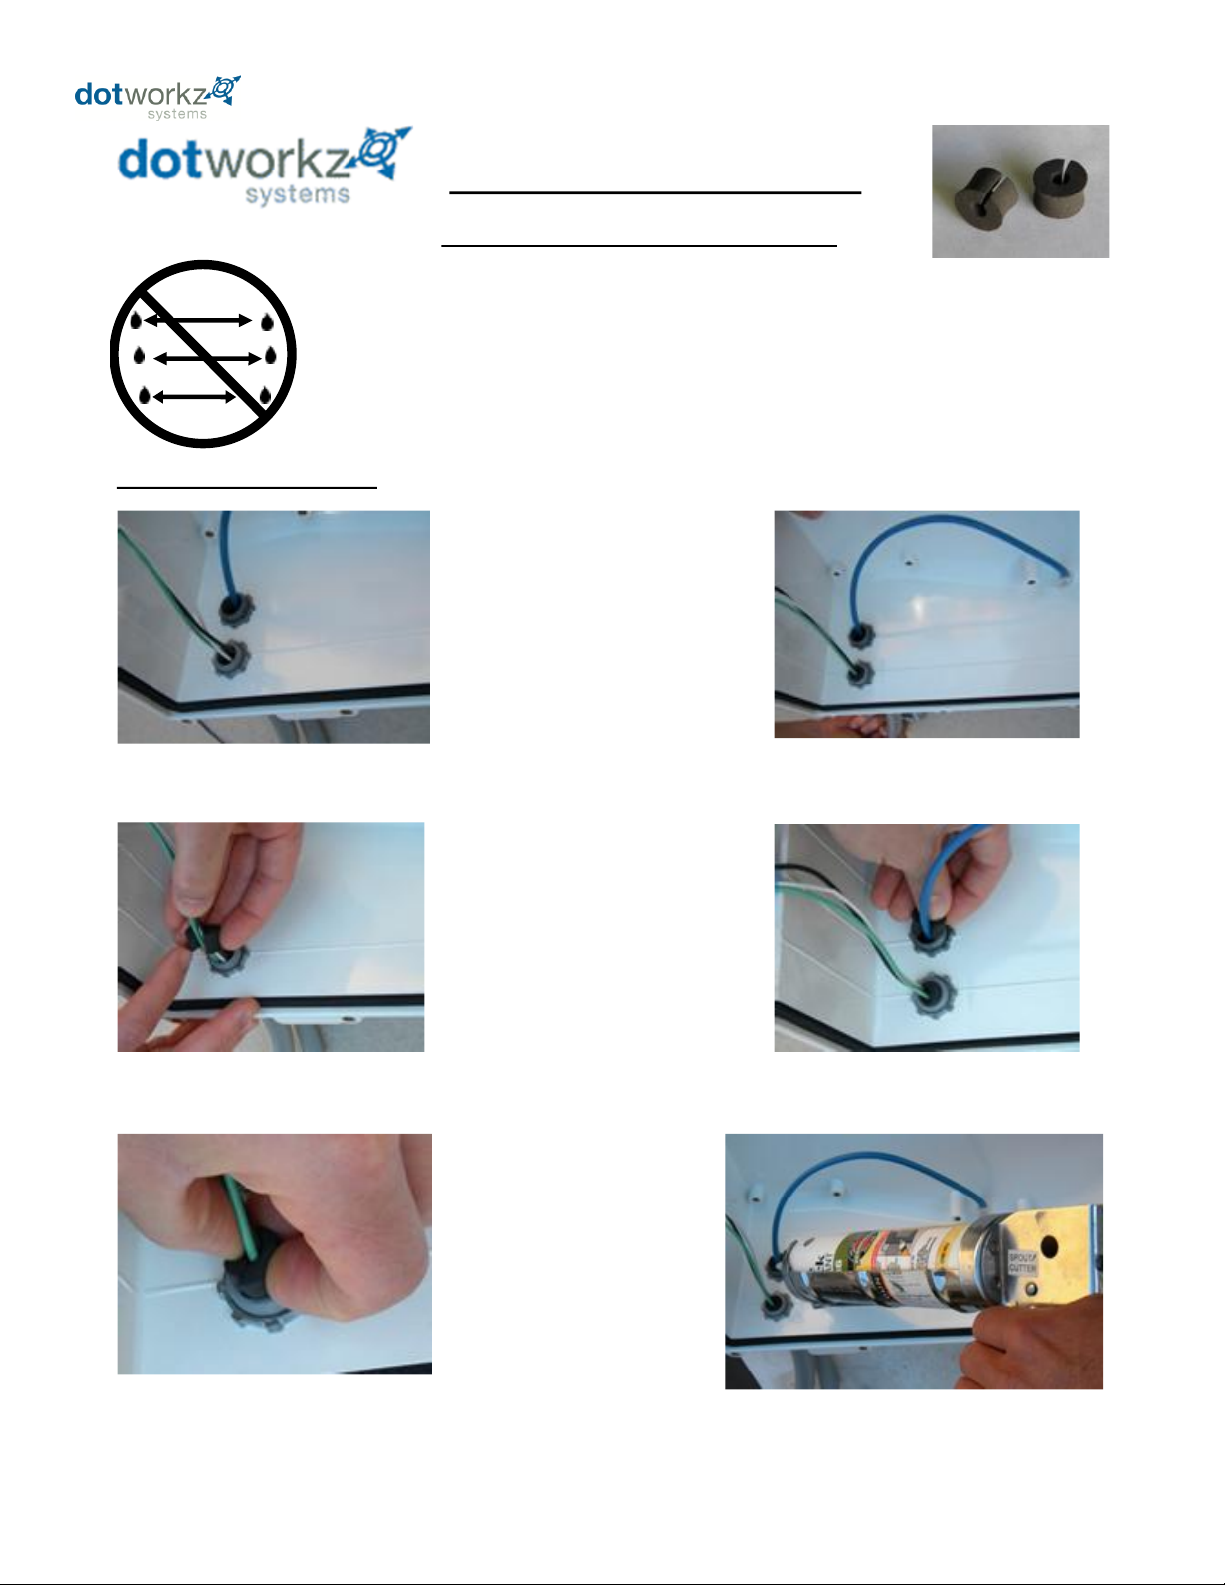
Foam Conduit Feed Plugs for ½” I.D. (PG-13) Conduit
Prevents Humid Air exchange from venting thru electrical conduit into Dotworkz sealed enclosures,
Thus eliminating condensation issues within Dotworkz sealed enclosures.
QUICK INSTALLATION GUIDE
VENT STOPPER PLUGS for Conduit
1) Pull wires to final installed length.
2) Open Vent Stop Plug and install over wire.
3) Pinch Plug to compress over wire, and insert into
conduit feed mouth.
4) Push plug into conduit mouth with finger
tips till it flush with outside of fitting
5) Repeat steps 1-4 for any other conduit
feeds as needed.
6) To assure an airtight seal, caulk around wires
and cables, coating entire plug surface with sealant.
2
Page 5
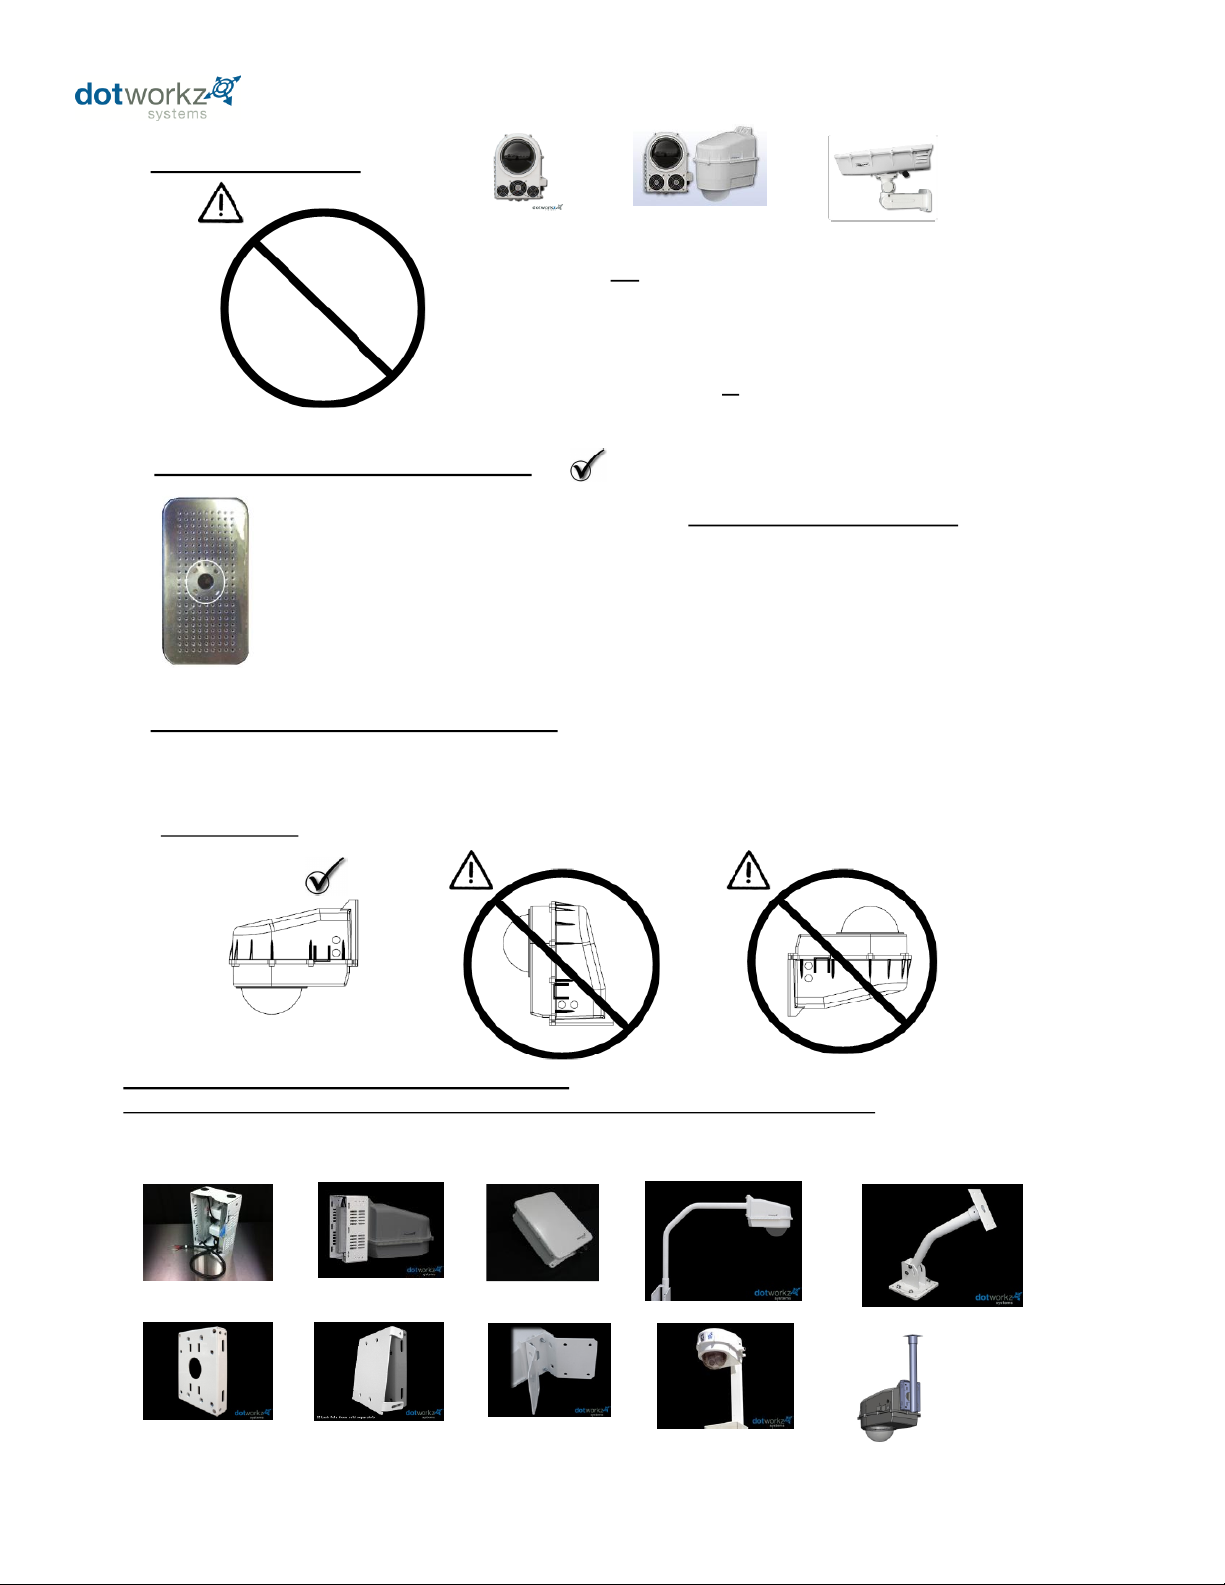
Dotworkz D-Series Seals & drip edges are engineered for horizontal installation Only: Dome bubble faces down.
Vertical and dome-up installations are not advised, and will be prone to moisture incursion within housing, and
will void warranty.
Dotworkz D-Series Mounting Guidelines
COOLDOME™ Wiring
Dotworkz CD Series Operate using DC low voltage only, and
creates ample currents when cooler is engaged.
18 gg wire is Not recommended for cooler wiring.
Follow relevant Cable Gauge Guidelines provide in this
document applicable to your product model.
CD’s are Dedicated 12 VDC or 24 VDC models Only.
Use Step Down Power supply Included in CD Package to power
from high voltage line supply.
Dotworkz Humidity Removal Canister
Dotworkz Provides a Humidity Removal Canister must be installed into COOLDOME prior to entering
enclosure into service.
Active Cooler within COOLDOME lowers temperature to at or near dew point within
COOLDOME, so trapped air must be dried out to eliminate condensation issues. The sealed air is
efficiently dried out by this desiccant canister, which provides a color coded saturation state window.
It must be removed from its foil envelope, and can be installed on shelf next to cooler, or
above camera on camera mounting plate. See installation section for service info on this product.
COOLDOME™ Accessories & Mount Options
(some brackets only compatible with D-Series, consult Dotworkz Sales Representative for Details)
Your COOLDOME is wall mount ready, but can be Installed with a number of Dotworkz Optional Mounts (sold separately)
NO
18 gg
BR-ECB1
BR-PSA1
BR-CNR1
NM-CDPS NEMA for
CD Power Supply
KT-CDR2 Outdoor CD Power Pole Mount Kit
BR-MPM1
BR-MPM1-AC
BR-APM1
BR-MPM1
With common
Pipe anchor for
pendant mounting
3
Page 6
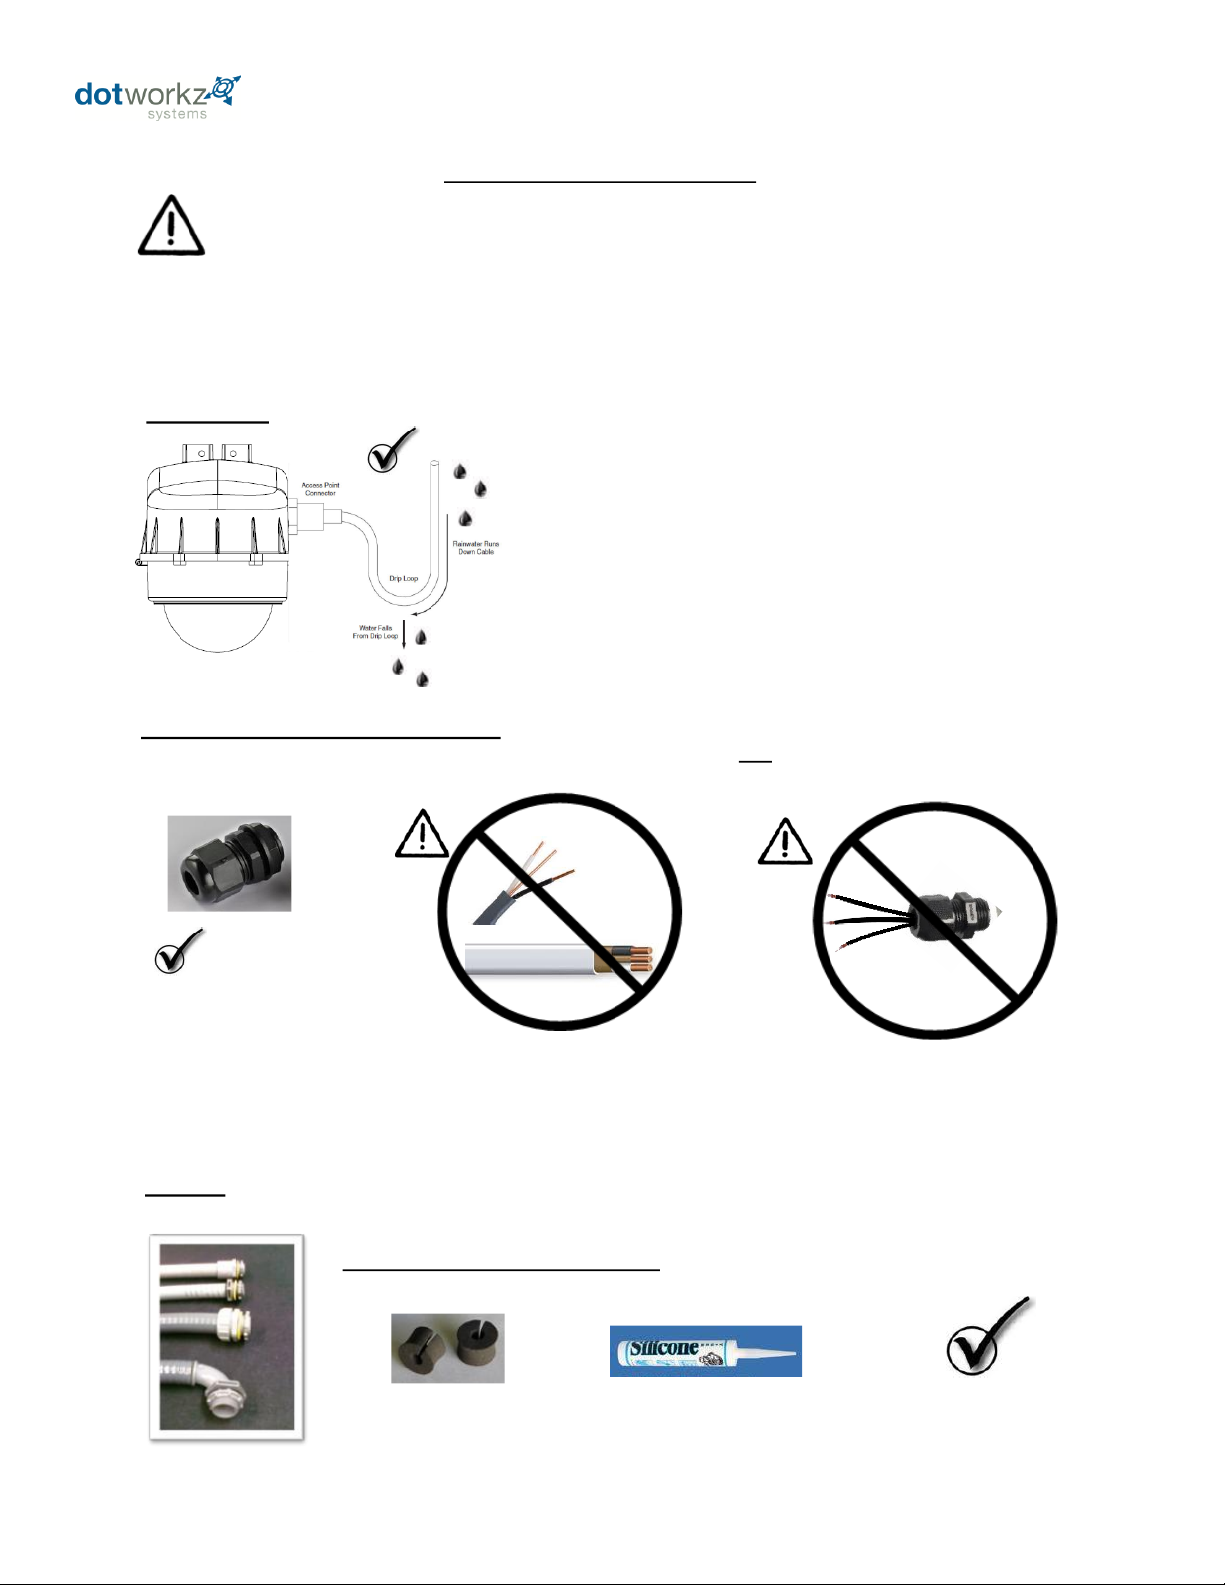
Proper Cable Management to Enclosure
Avoid common Installation Mistakes
Always Create a Drip Loop for all Cables or Conduit Entering
Dotworkz D2 Housing from level or Above D2
Conduit, Power, Data, & Antennae
To avoid gravity driven moisture entry into Enclosure
To properly seal, Dotworkz Cable Gland Strain Relief Ports will only accept One single round cable per port
NO
Romex
Flat Cable
* SJOOW
* Cat5/ Cat6
* Coaxial
+
=
Dotworkz Standard Cable Gland Port
Seals are designed for ONE single round
cable only per port
Use Round Cable Only with
provide Cable Gland Port Seal
Only Use Qualified Installation or Service Technician for Installing & Servicing Dotworkz Enclosures.
Power Must be disconnected and kept off while installing or Servicing Enclosure.
Follow All Local and Applicable Electrical Codes and Standards for Installation of Electrical components.
All Cable Ports, wire feeds, or Conduit must be fully sealed to eliminate moisture within Enclosure.
All Dotworkz Enclosures are required to be fully sealed before placing into service, to protect integrated products, to
eliminate any moisture driven shock hazard, to perform optimally as designed.
DRIP LOOPS
Cable can be multi-conductor in single round cable bundle such as Cat5/ 6e (burial rated), or Conductor cable SJ00W (water rated)
Cable Gland Strain Relief Port Seals
Conduit
+
If Conduit is used in Lieu of Cable Gland Port Seals provided,
Then Use Only Liquid Tight Conduit & fittings properly sealed.
Internal Wire feeds must be fully sealed prior to placing Enclosure into Service.
See Conduit Guidelines section of this manual.
4
Page 7
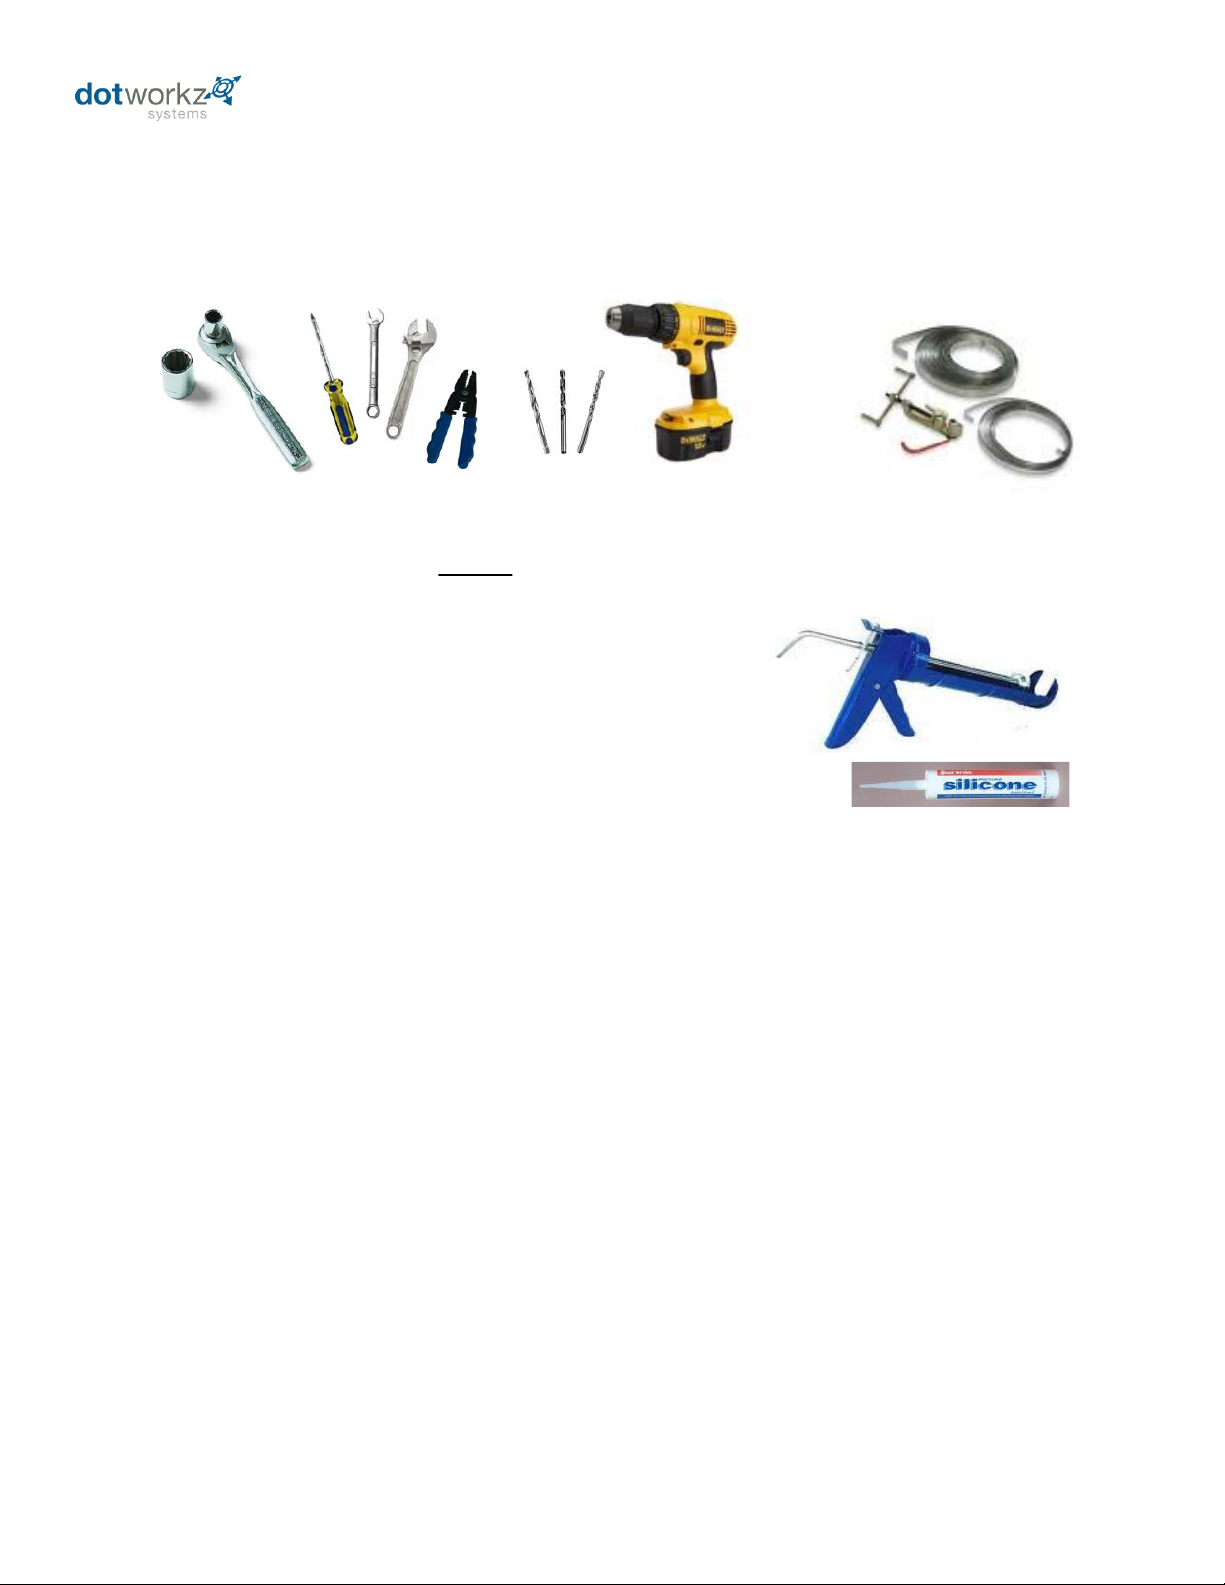
- #1 & #2 Phillips head screw driver
-#1 Flat Blade screw driver or smaller
- 3/8 Socket wrench, nut driver, or adjustable wrench
- 5/16 Socket wrench, nut driver, or adjustable wrench
- 7/16 Socket wrench, nut driver, or adjustable wrench
- 7/32 Socket wrench, nut driver, or adjustable wrench
- 11/32 Socket wrench, nut driver, or adjustable wrench
- Wire stripping tool
- Caulk Gun & Silicone Sealant
Tools Recommended for Enclosure & Camera Mounting
Pole Strapping Tools
Drill & Bits
For Wall Mounting
- Drill and Bits for user supplied fasteners for wall mounting enclosure
For Pole Mounting
- Strapping / Banding Tools for user supplied Stainless Steel Pole Straps
For other needed Mounting Styles:
**See Dotworkz for Available Optional Mounting Brackets for a wide selection of Enclosure
Mounting Styles @ www.dotworkz.com, or ask your favorite distributor or Sales Associate, or call
Dotworkz Support (866) 575-4689
Dotworkz D2 COOLDOME accepts four (4) 3/8" Bolts or Lag Screws to Wall Mount
See Mounting Template at back of this manual for hole pattern.
(Customer provides enclosure mounting hardware)
Hand Tools
5
Page 8
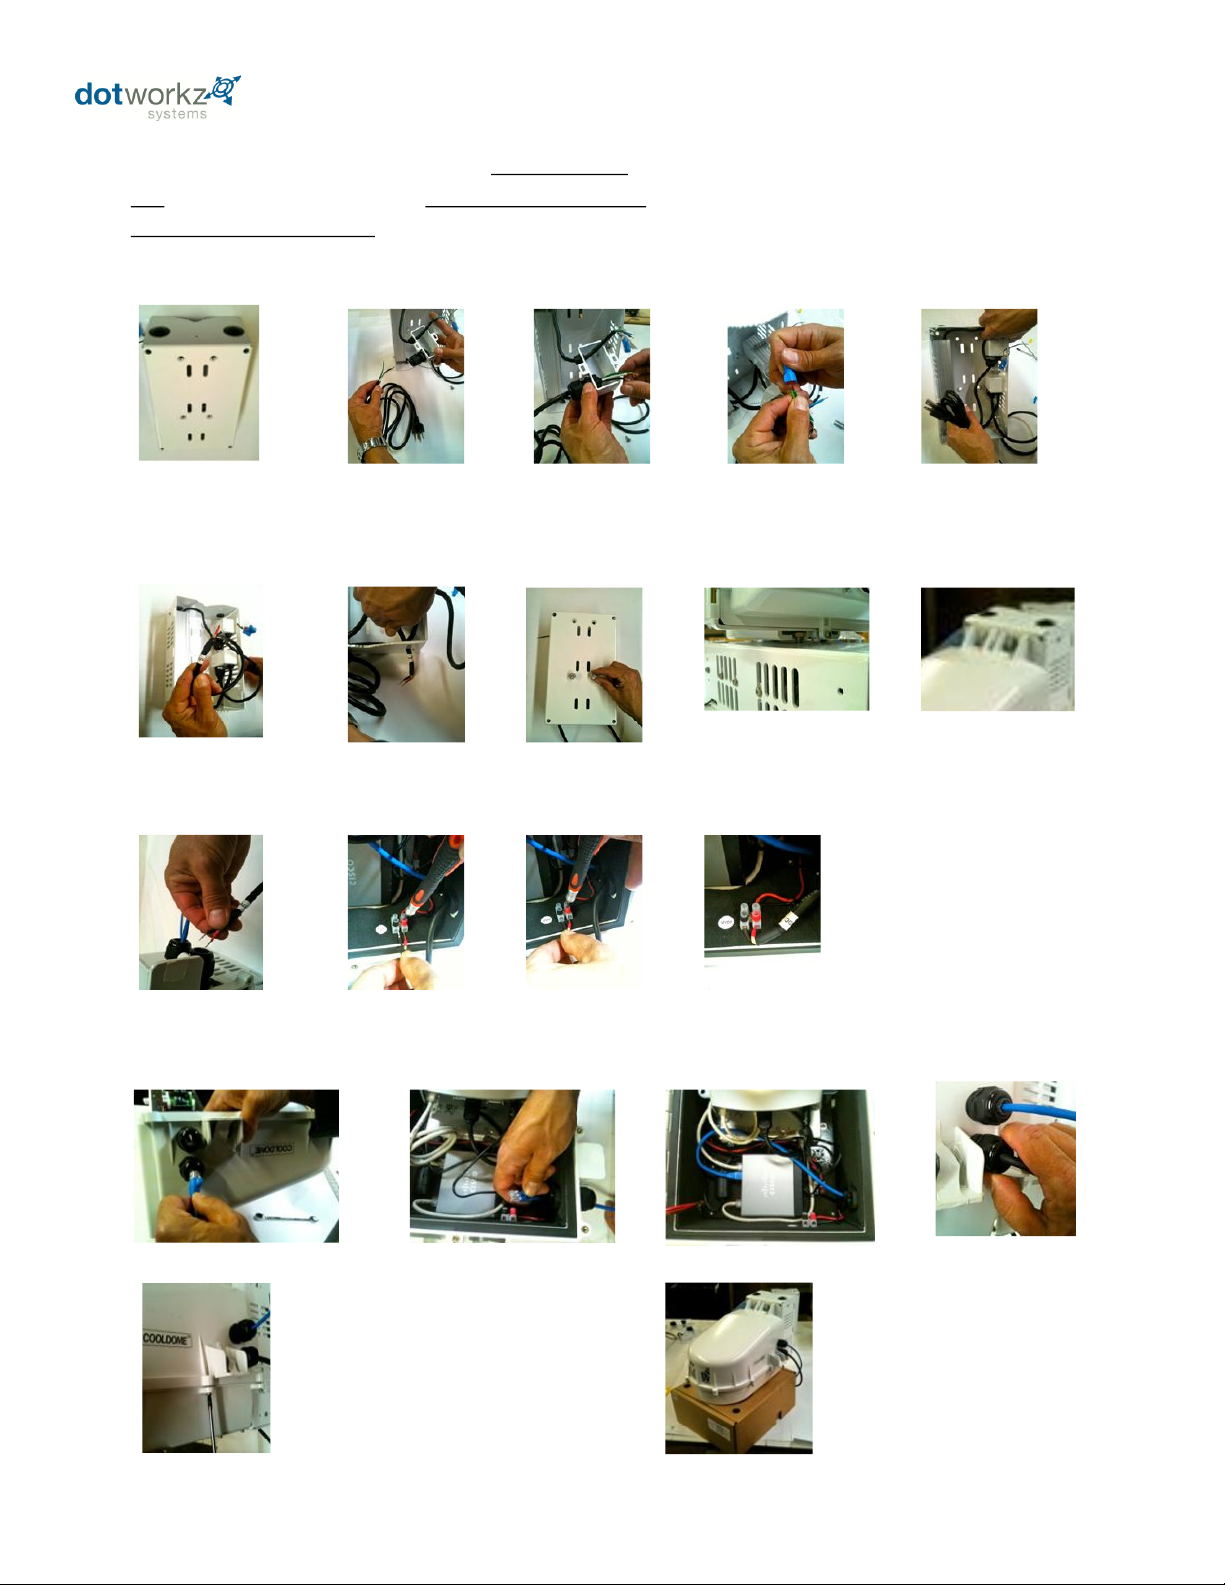
KT-CDR2 & KT-CDR3: Power & Cable Hook Up
Pre-wiring High Voltage Input
Locate Power Pack Pole
Mount high voltage input
box
Remove High Voltage
input Wiring Box by
removing two machine
screws that fasten it to
metal bracket
Then, Pull customer
provided wiring first thru
one of the four round cable
ports on metal bracket,
then thread cable thru
cable gland port on small
electrical box
Using provided waterproof
wire nuts, mate three
corresponding wires to step
down power supply input
wiring
Tighten Strain relief nut around
wire just installed, then Reinstall plastic box onto Metal
Bracket using original fasteners.
Mating Enclosure to Bracket
Locate 12VDC Cable from
power supply output, this
go into D2 enclosure
First feed thru round
port on metal bracket
as shown
Then install the lower
mounting bolts 3/8"-18 x 1"
on bracket, leaving hex
head protruding about 3/8"
Install two upper bolts on
rear tabs including washers
provided, securely fasten,
but do not over-tighten
First feed thru round port on metal bracket
Low Voltage 12 VDC Cabling
Ethernet Cable Installation
The provided Dotworkz D2 COOLDOME enclosure is Powered by dedicated 12 VDC Only, (or 24VDC on 24V models) and must
use step down Power Pack Pole Mount to be powered by High Voltage
Never apply High Voltage directly to inputs directly inside enclosure to power COOLDOME.
Feed Cat5e/ 6e cable thru port as shown Plug into any open port on Cisco router
Securely tighten seal nuts on all
cabling for proper seal and cable
strain protection
Close enclosure by shutting
lower hinged clamshell
Tighten all Six closure screws
around sides and rear of D2 to
fully seal
Shown is an example of enclosure
ready to Strap mount to a pole
If wall mounting, long lag bolts
(customer provided) must be
used in four 5/16" corner
clearance holes are used to affix
KT-CDR2 or KT-CDR3 to wall
Bracket depth is 4.0"
Using a small flat blade screw driver, secure wires to color coded terminals as shown
Slide D2 Keyhole mounts on
rear of enclosure to mate to
these lower bolts
Power must be shut off during installation. Installation must be done by a qualified electrical technician. Read and Understand all product instruction before installation.
Always follow local and applicable electrical codes and safety standards. Contact applicable manufacturer if you have any questions on any part of this product installation.
* Water Proof Wire Nuts are Provided with this kit-
Please use provided wire nut terminations or other waterproof connection solution for a complete seal
D3 Model uses two separate 12VDC Power supplies, Do Not jumper both 12VDC power sources together, as they were designed to be powered as two independent circuits.
Wire two 12VDC pairs separately to color coded terminals provided in D3 COOLDOME; second independent pair is banded together to show second associated 12VDC pair.
6
Page 9
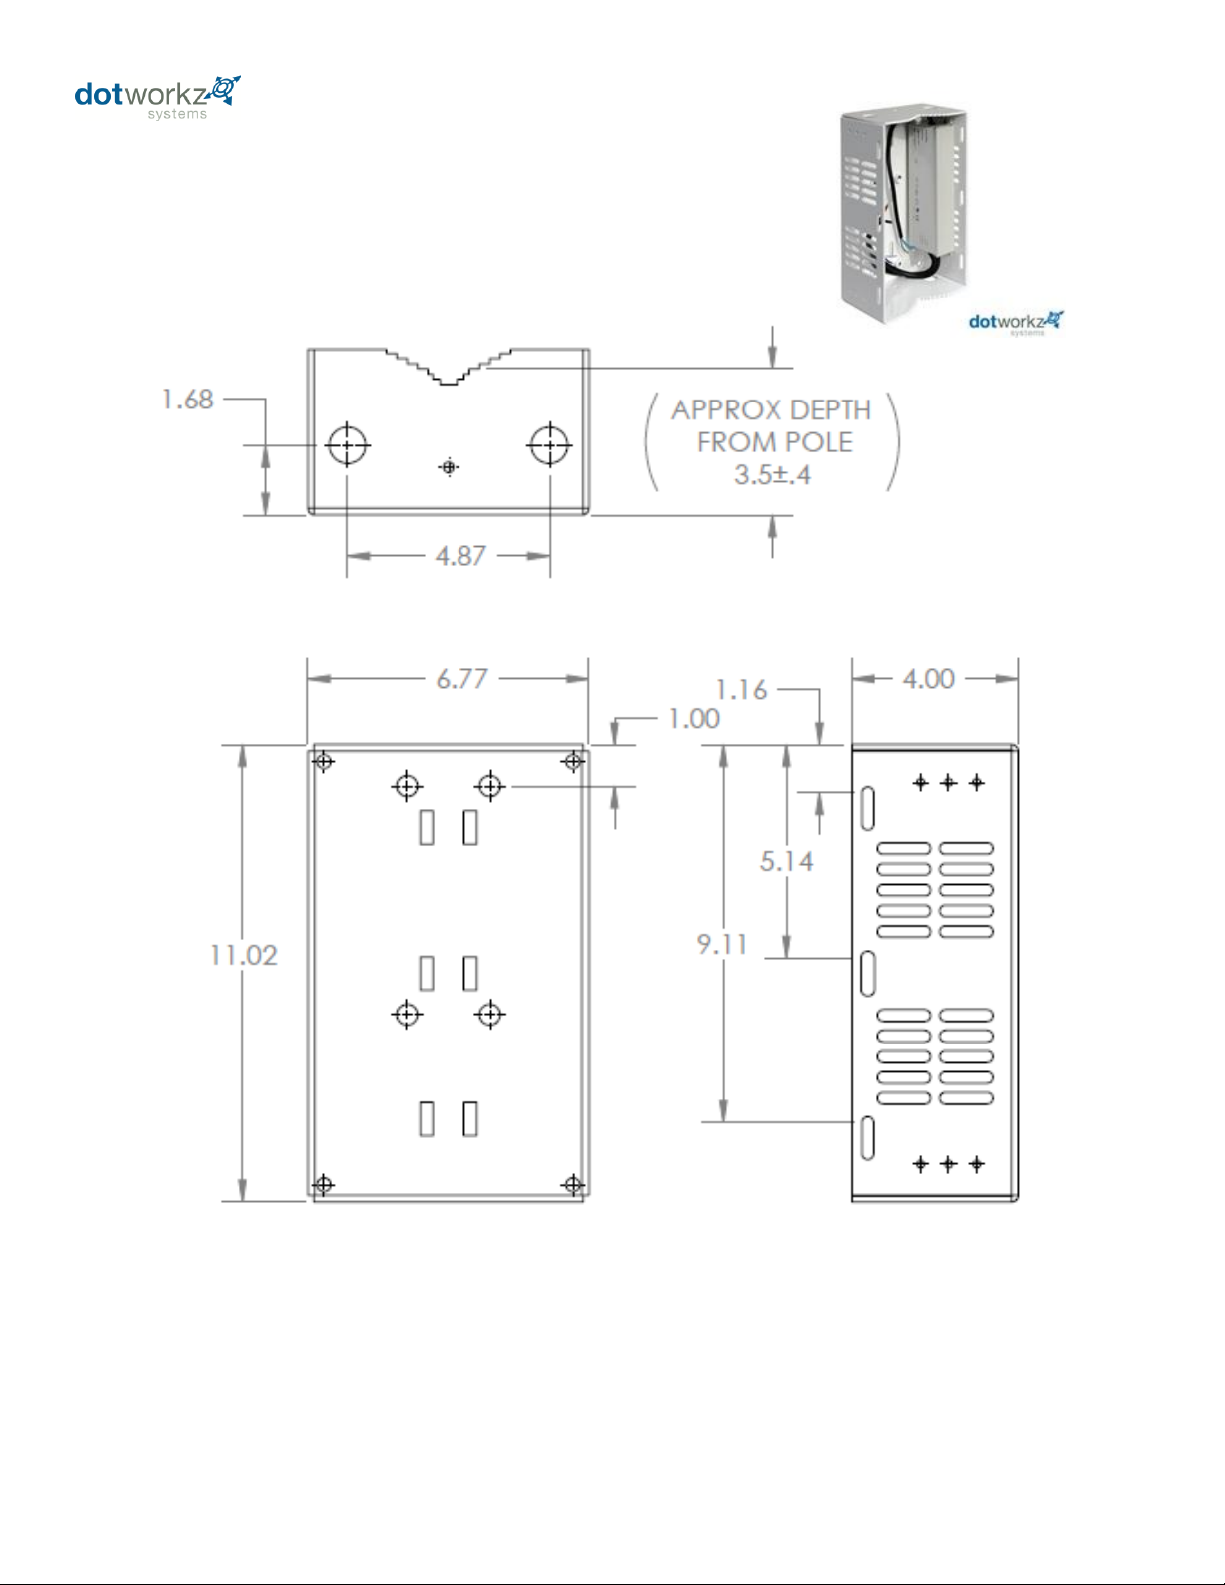
Detail Specifications
STRAPPING: Slots Compatible with All DOT-rated ½” minimum, to 3/4” wide max. Stainless Steel Strapping Bands
Use Center face slots for Strapping onto small diameter poles (1-7” dia.), Use Side slots for larger diameter poles
Lag Bolting: Four (4) x 0.35” diameter corner holes for wall mounting using Lag Bolts
7
 Loading...