

Page 1
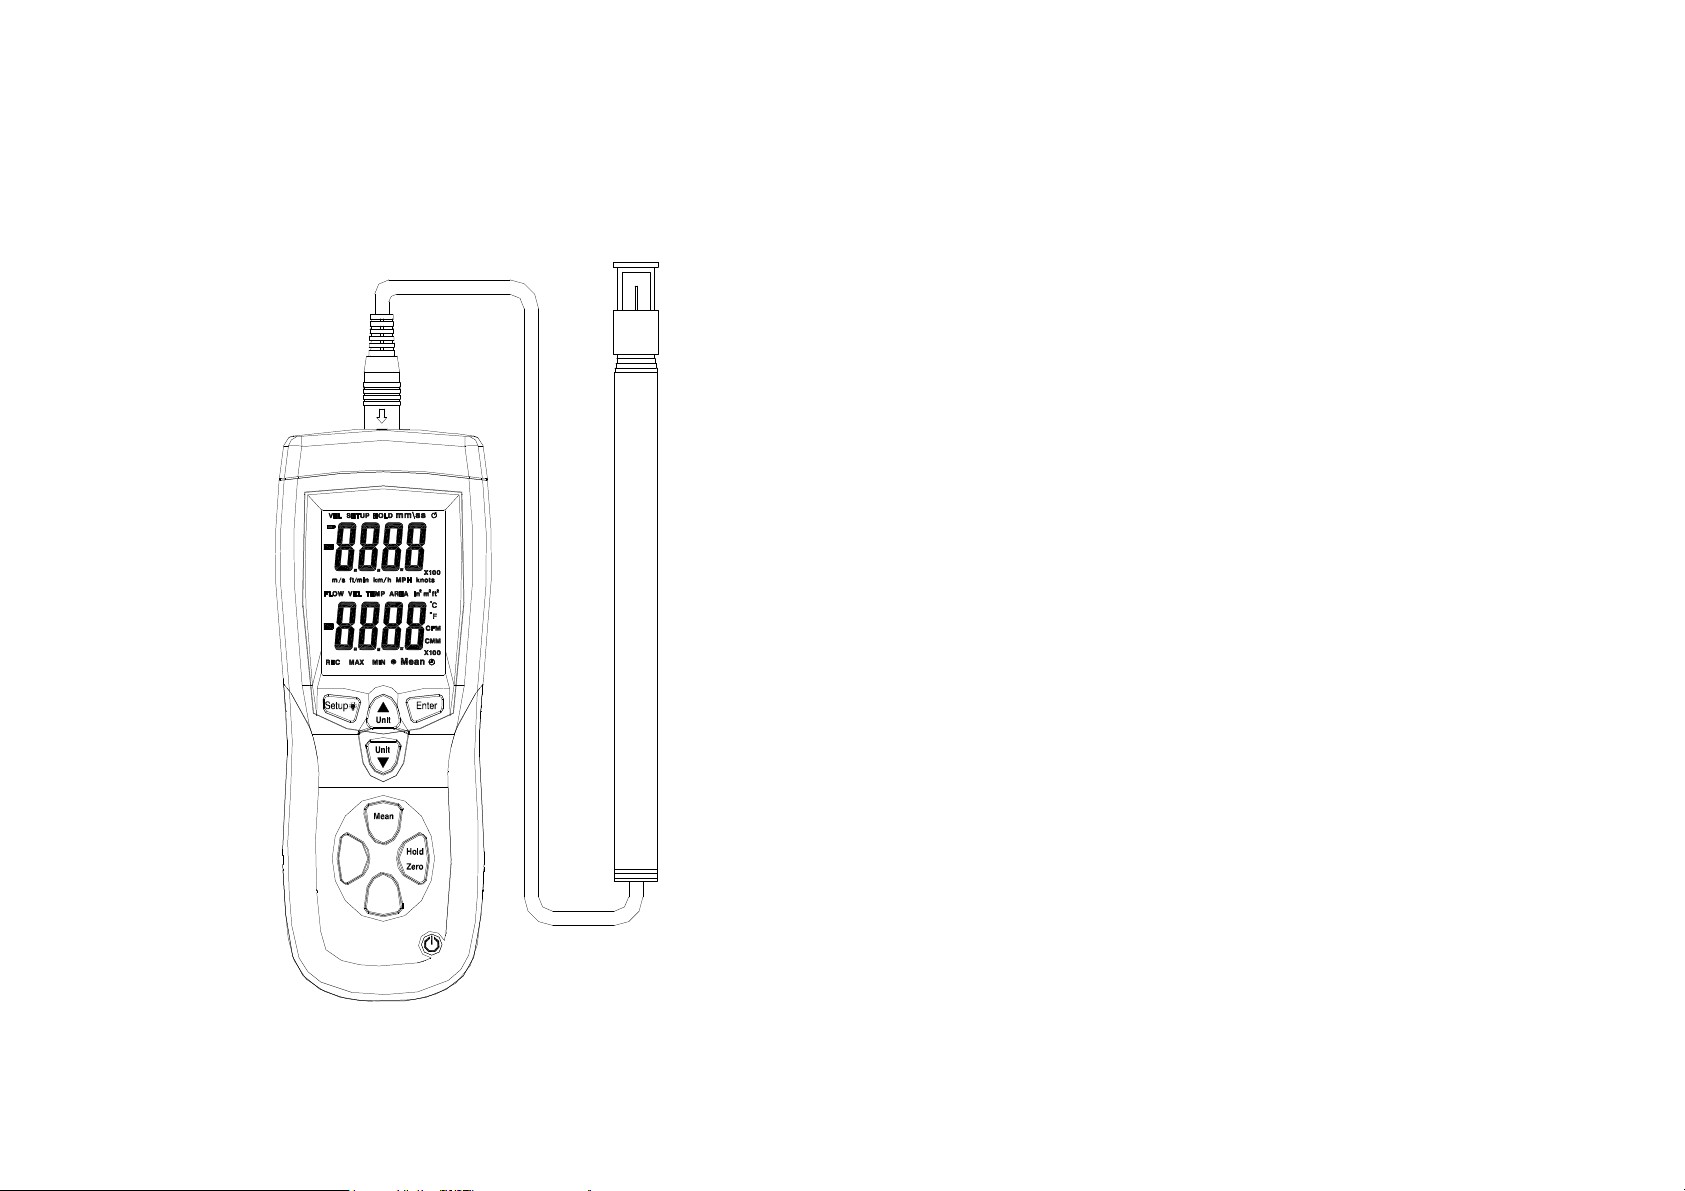
TA 888 Hot Wire Anemometer
Max
Min
Flow
Temp
Your purchase of this HOT WIRE ANEMOMETER makes a step forward
for you into the field of precision measurement.
Although this ANEMOMETER is a complex and delicate instrument, its
durable structure will allow many years of use if proper operating
techniques are developed. Please read the following instructions carefully
and always keep this manual within easy reach..
Features
1. Thermal anemometer, available for very low air velocity measurement.
2. Slim probe, ideal for grilles & diffusers.
3. Combination of hot wire and standard thermistor, deliver rapid and
precise measurements even at low air velocity.
4. Records Maximum and Minimum readings with recall.
5. Microprocessor circuit assures maximum possible accuracy, provides
special functions and features.
6. Super large LCD with dual function meter’s display, read the air
velocity & temp. at the same time.
7. Records Maximum and Minimum readings with recall.
8. Data Hold.
9. Power supply by 9V battery.
10. The portable anemometer provides fast, accurate readings, with digital
readability and the convenience of a remote probe separately.
11. Multi-functions for air flow measurement: m/s, km/h, ft/min, MPH,
Knots.
12. Build in temperature , measurement.
13. Thermistor sensor for Temp. measurement, fast response time.
14. Used the durable, long-lasting components, including a strong, light
Page 2
weight ABS-plastic housing case.
±
±
15. Deluxe hard carry case.
16. Applications: Environmental testing, Air conveyors, Flow hoods, Clean
rooms, Air velocity, Air balancing, Fans/motors/blowers, Furnace
velocity, Refrigerated case, Paint spray booths.
Specifications
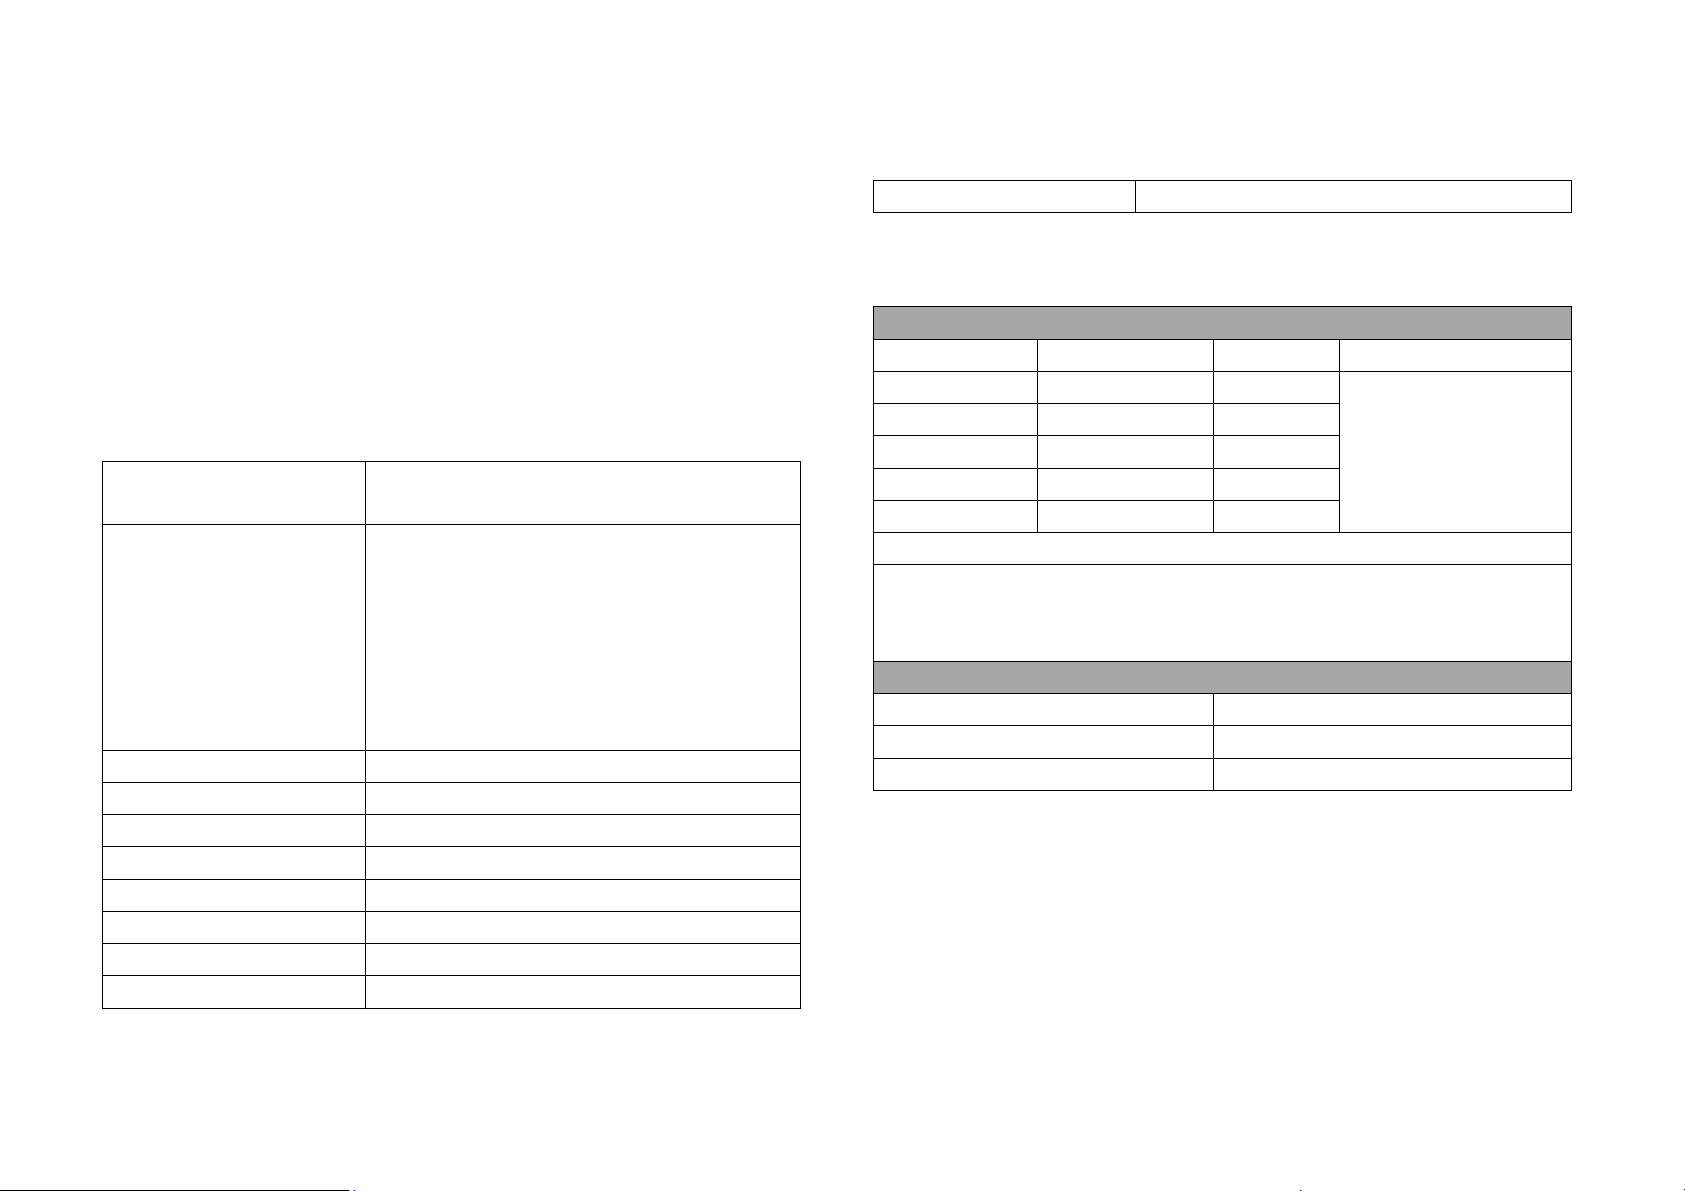
General Specifications
Display 46.7mm × 60 mm larger LCD display.
Dual function meter’s display.
m/s ( meters per second )
km/h (kilometers per hour )
ft/min (feet per minute)
measurement
Memory Maximum and Minimum with recall
Sampling Approx.0.8 sec
Operating Temperature
Operating Humidity Less than 80% RH
Power Supply 9V battery
Power Current Approx. DC 60~90mA
weight 280g
Dimension 210mm×75mm×50mm
MPH (miles per hour)
knots ( nautical miles per hour )
Temp. --- ,
Data hold.
0 to 50 (32 to 122 )
Accessories included Hot wire sensor 9V battery
Electrical Specifications
Air Velocity
Measurement Range Resolution Accuracy
m/s 0.1~25.0m/s 0.01m/s
km/h 0.3~90.0km/h 0.1km/h
ft/min 20~4925/min 1ft/min
MPH 0.2~ 55.8 MPH 0.1MPH
knots 0.2~48.5knots 0.1knots
Notes:
m/s - meters per second km/h -kilometers per hour
ft/min -feet per minute MPH -miles per hour
knots- nautical miles per hour
Temperature
Measuring Range
Resolution
Accuracy
0 to 50 (32 to 122 )
0.1/0.1
1/1.8
(5%+1d)FS
(full scale = 25m/s)
Page 3
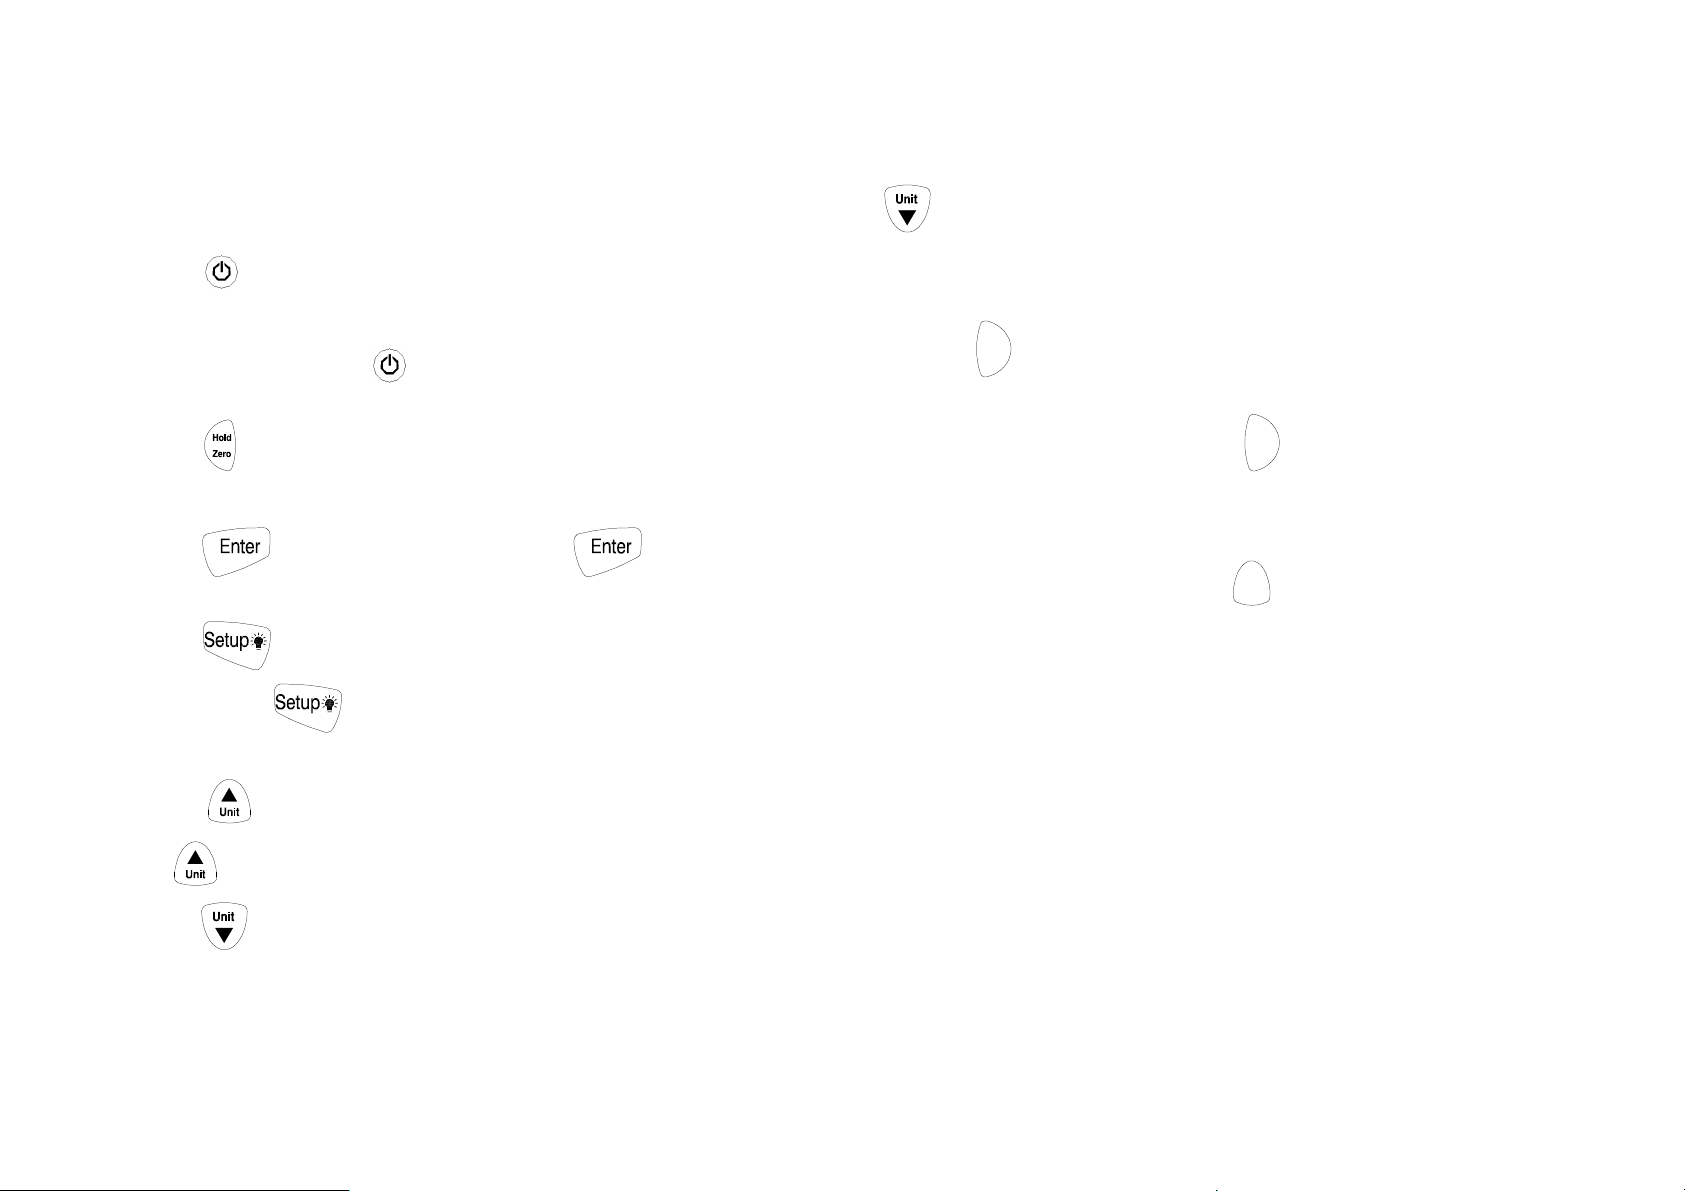
Button
1, Press .The thermal sensor is heated up (5s). Measurement view is
opened: The current reading is displayed, or “――――”lights up if no
reading is available. Press again, turn off the instrument.
2, Press to freeze or unfreeze the displayed readings or air velocity
to decrease the displayed setting.
7, performing a multi-point mean calculation or performing a mean
calculation in time.
Max
Min
8, Press
exit the MAN/MIX mode, press the
to step through the maximum and minimum readings. To
Max
Min
button for 2 seconds to return
Zero Adjust.
3, Press to enter a Setup option. Press again to store
the displayed setting in memory.
4, Press to turn on the backlight. Press it again to turn off the
backlight. Press button for 3 seconds to start or exit Setup. (See
"Changing Setup Options.")
5, Press to scroll to the Setup option you want to change.
Press to increase the displayed setting.
6, Press to start recording and press again to stop recording .if enter
a Setup option .scroll to the Setup option you want to change. Press
to normal operation.
9, To change between displaying the temperature, flow velocity, and
Flow
calculated volumetric flow rate: Press
Temp
.
Page 4
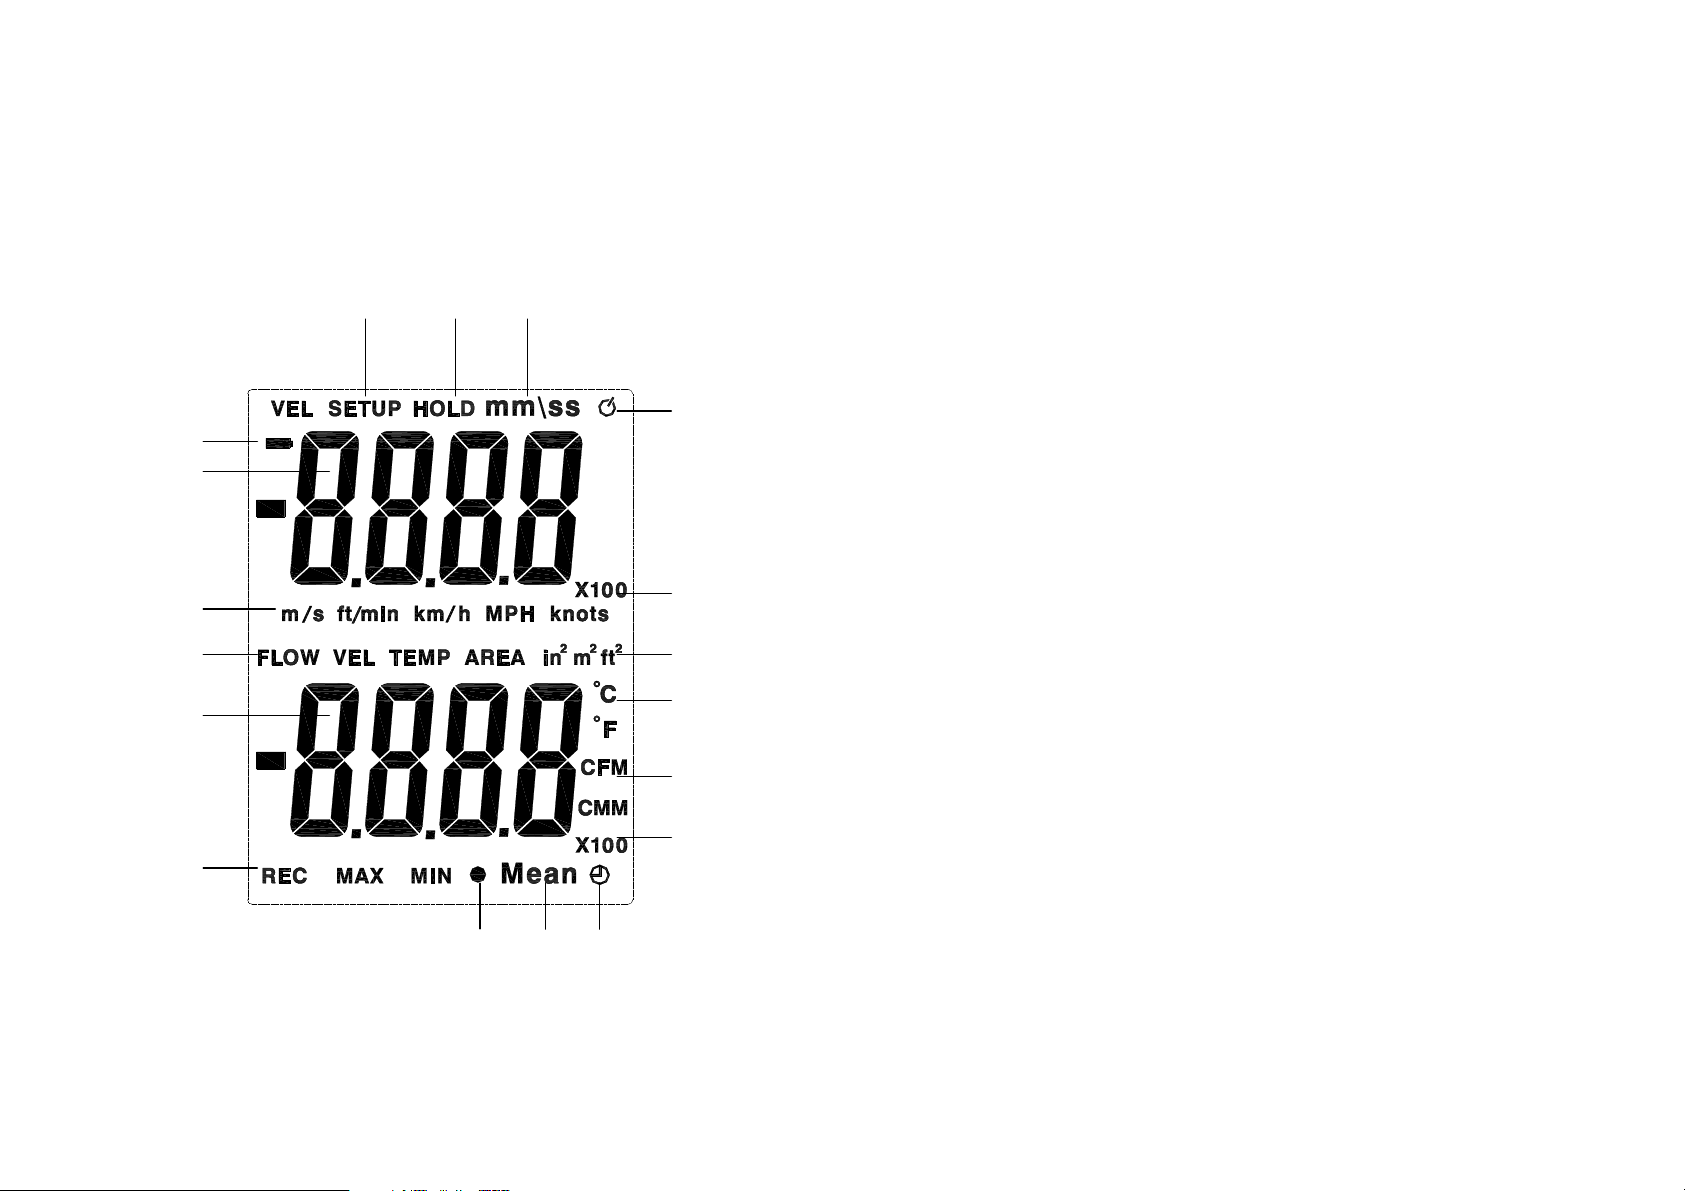
Display Elements
18 17 16
1
2
3
4
5
6
7 8 9
15
14
13
12
11
10
1. Low Power.
2. Primary Display: air velocity, recording data or time.
3. Air velocity units.
4. Secondly display data.
5. Secondly display: air flow, temperature, or air velocity data.
6. Record MAX, MIN display.
7. Sign of multi-point mean calculation.
8. Mean calculation
9. Sign of mean calculation in time.
10. The multiple of Secondly display data.
11. Flow units.
12. Temperature units.
13. Flow area units.
14. The multiple of Primary display data.
15. The Sign of Auto Power Off.
16. The sign of time.
17. Freezing the data.
18. Entering or Exiting Setup.
Page 5
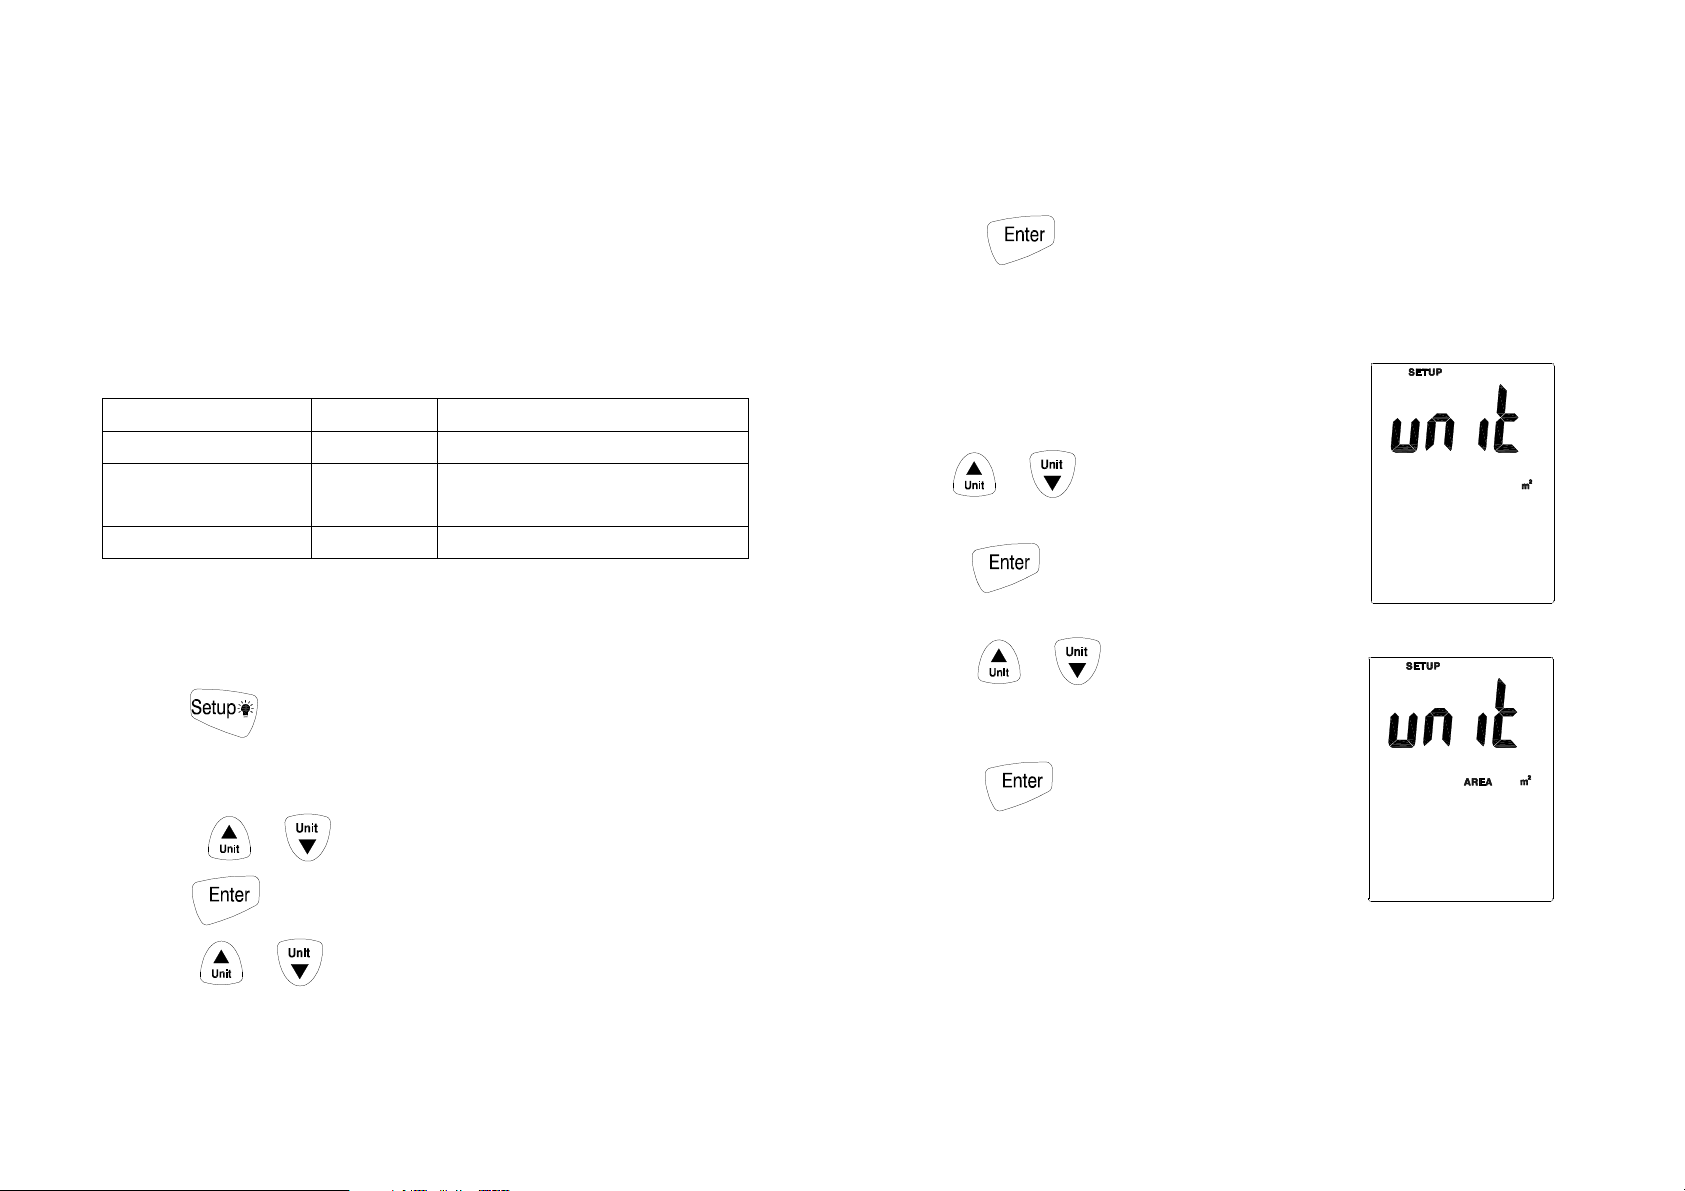
display.
Changing Setup Options
Use Setup to change area unit, flow area, sleep mode settings. The
thermometer stores the settings in its memory.
Setup Options
Option Menu item
Chose area unit
Change the flow
area
Auto Power Off mode SLP auto off or on
Unit set area unit
area
Settings
set area of measuring air
flow
Entering or Exiting Setup
When the thermometer is in Setup mode, the display shows SETUP.
Press button for 3 seconds start or exit Setup.
Changing a Setup Option
1. Press or to scroll to the setup option you want to change.
2. Press to indicate that you want to change this setting.
3. Press or until the setting you want to use appears on the
2. Press to store the new setting in memory.
Notes: Setup is disabled in MIN MAX, Mean mode.
Area unit Setting
1.
When the thermometer is in Setup mode,
press or to scroll to the area unit
setup option (refer Fig.2).
2.
Press button., The string “AREA”
and area unit shows in the screen.
3.
Press or to scroll to unit that you
want to change((refer Fig.3).
).
4. Press to store the new area in
memory.
Fig 1
Fig.2
Page 6
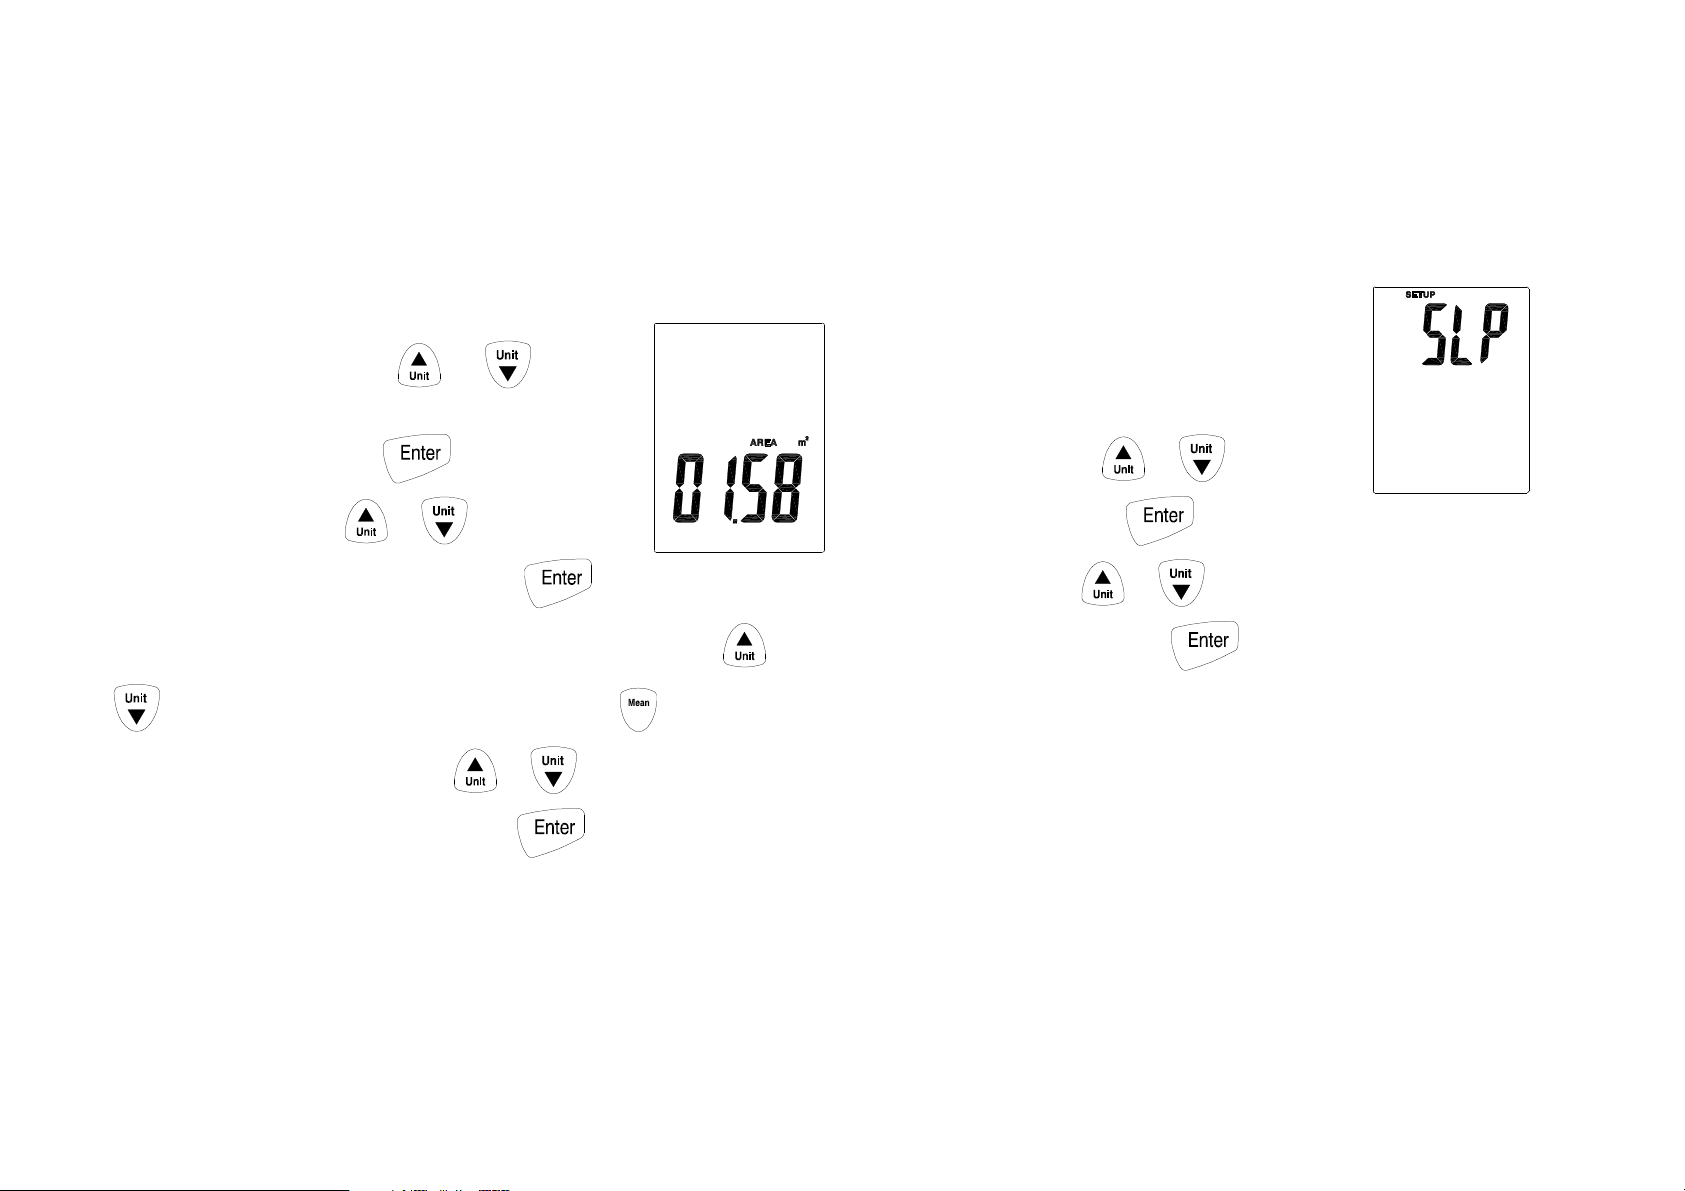
Area Setting
Changing the number digits of area and Change the
number value of area. Press or to scroll
to the area value setup option when the thermometer
Auto Power Off Mode
The thermometer enters sleep mode
(default). That is to say, the meter will
automatically shut off after 20 minutes if no
button press occurs for 20 minutes. When the
thermometer is in Setup mode, the display
is in the setup mode. Press button, the area
number flashes. Press or to scroll to digit
Fig.3
that you want to change (refer Fig.3). Press t,
the screen indicate that area number with a flashing digit. Press or
to change the flashing digit from 0 to 9. Press to change the
station of flashing digit and press or to change the number,
the adjust order is from right to left. Press to store the new area
in memory.
shows SETUP. Press or to scroll to
the “ SLP ” page . Press to indicate
“On” or “OFF”. Press or until the setting you want to use
appears on the display. Press to store the new setting in memory.
On (sleep mode on)or 0FF (sleep mode off).
Page 7
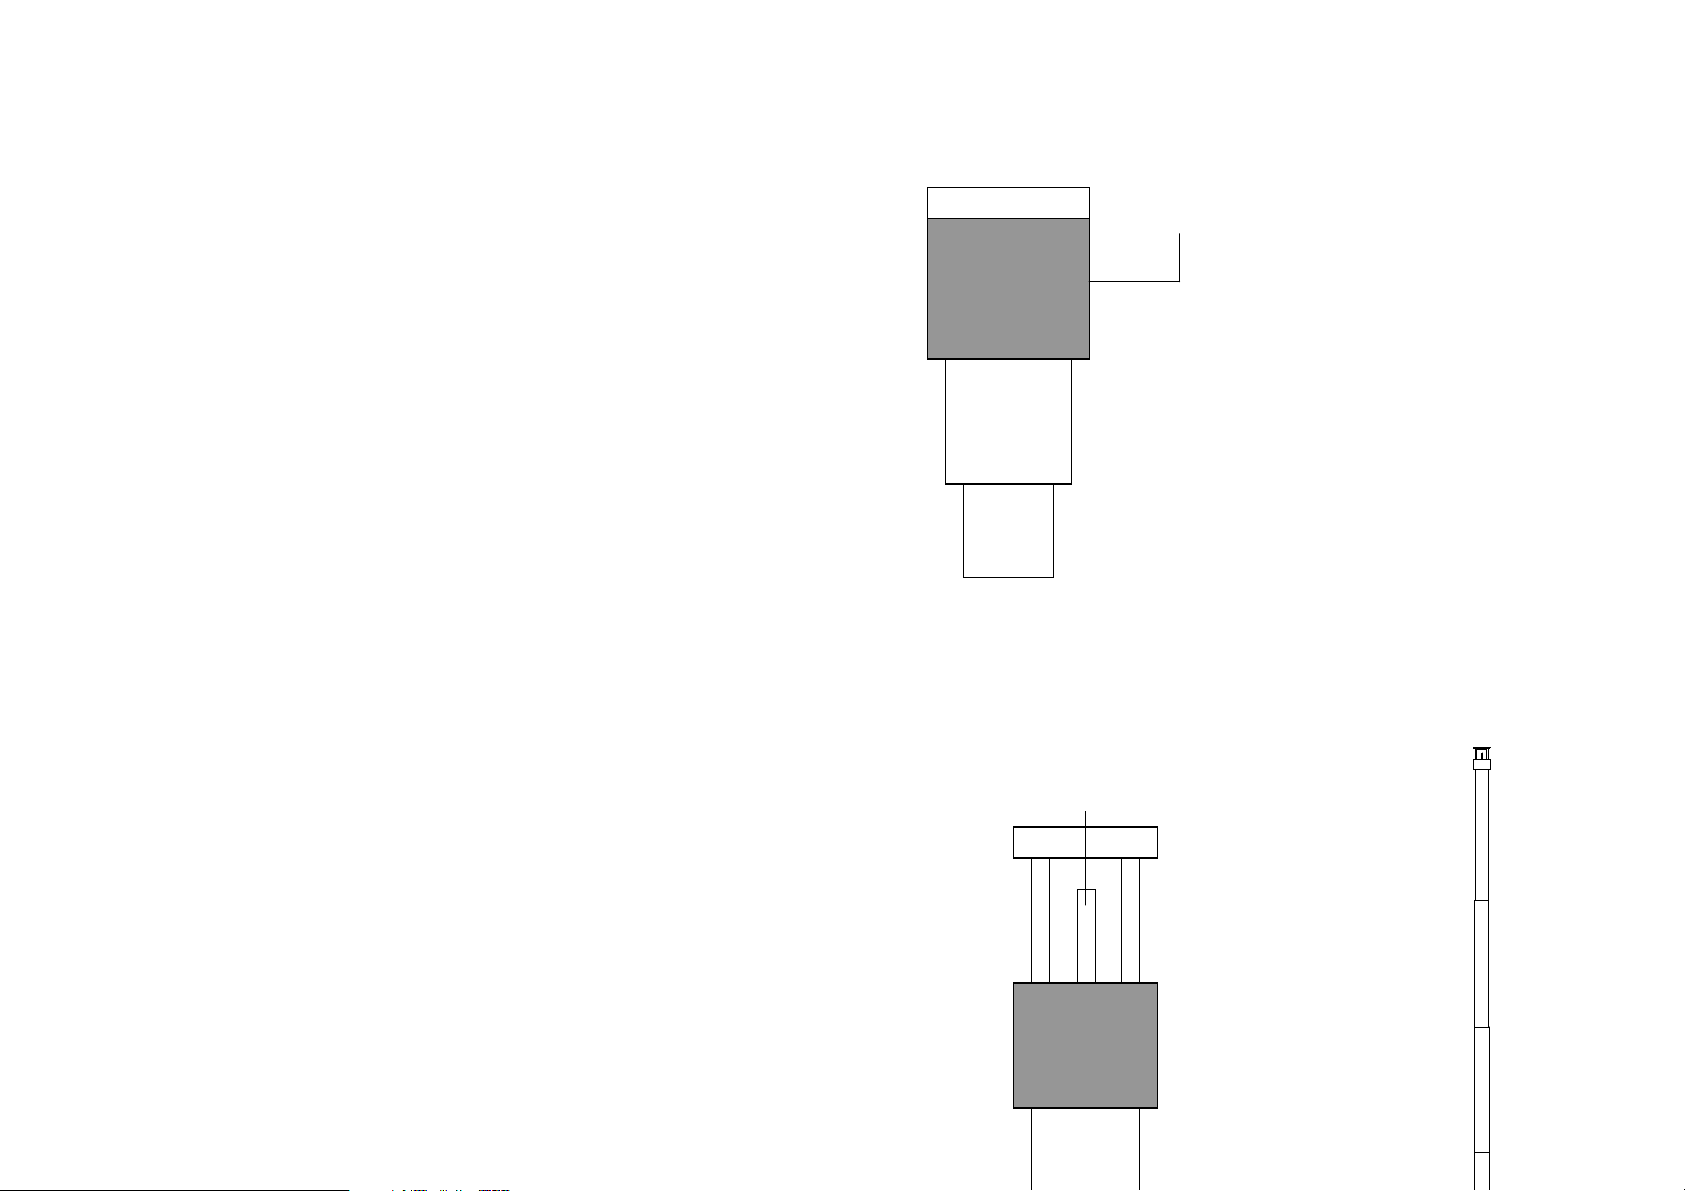
Measuring Procedure
1. Connect the “Probe’s Plug” to the “Probe Input Socket”.
2. Power on the meter by push the “Power On/Off Button”.
3. Select the desire air velocity units and temperature units.
4. Zero setting:
a. On the “Sensing Head”, slide the sensor cover to the up position
to let the air velocity sensor isolated from the environment.
b. Push the “Zero Button” to let reading value of air velocity shows
zero value.
“Sensor cover” slide to the up position
Probe Handle
5.
Slide the sensor cover to the down position, let the air velocity sensor
to contact
length, refer Fig.4.
the air, refer Fig.2. Extent the telescope probe to the convenient
Air velocity sensor
Page 8
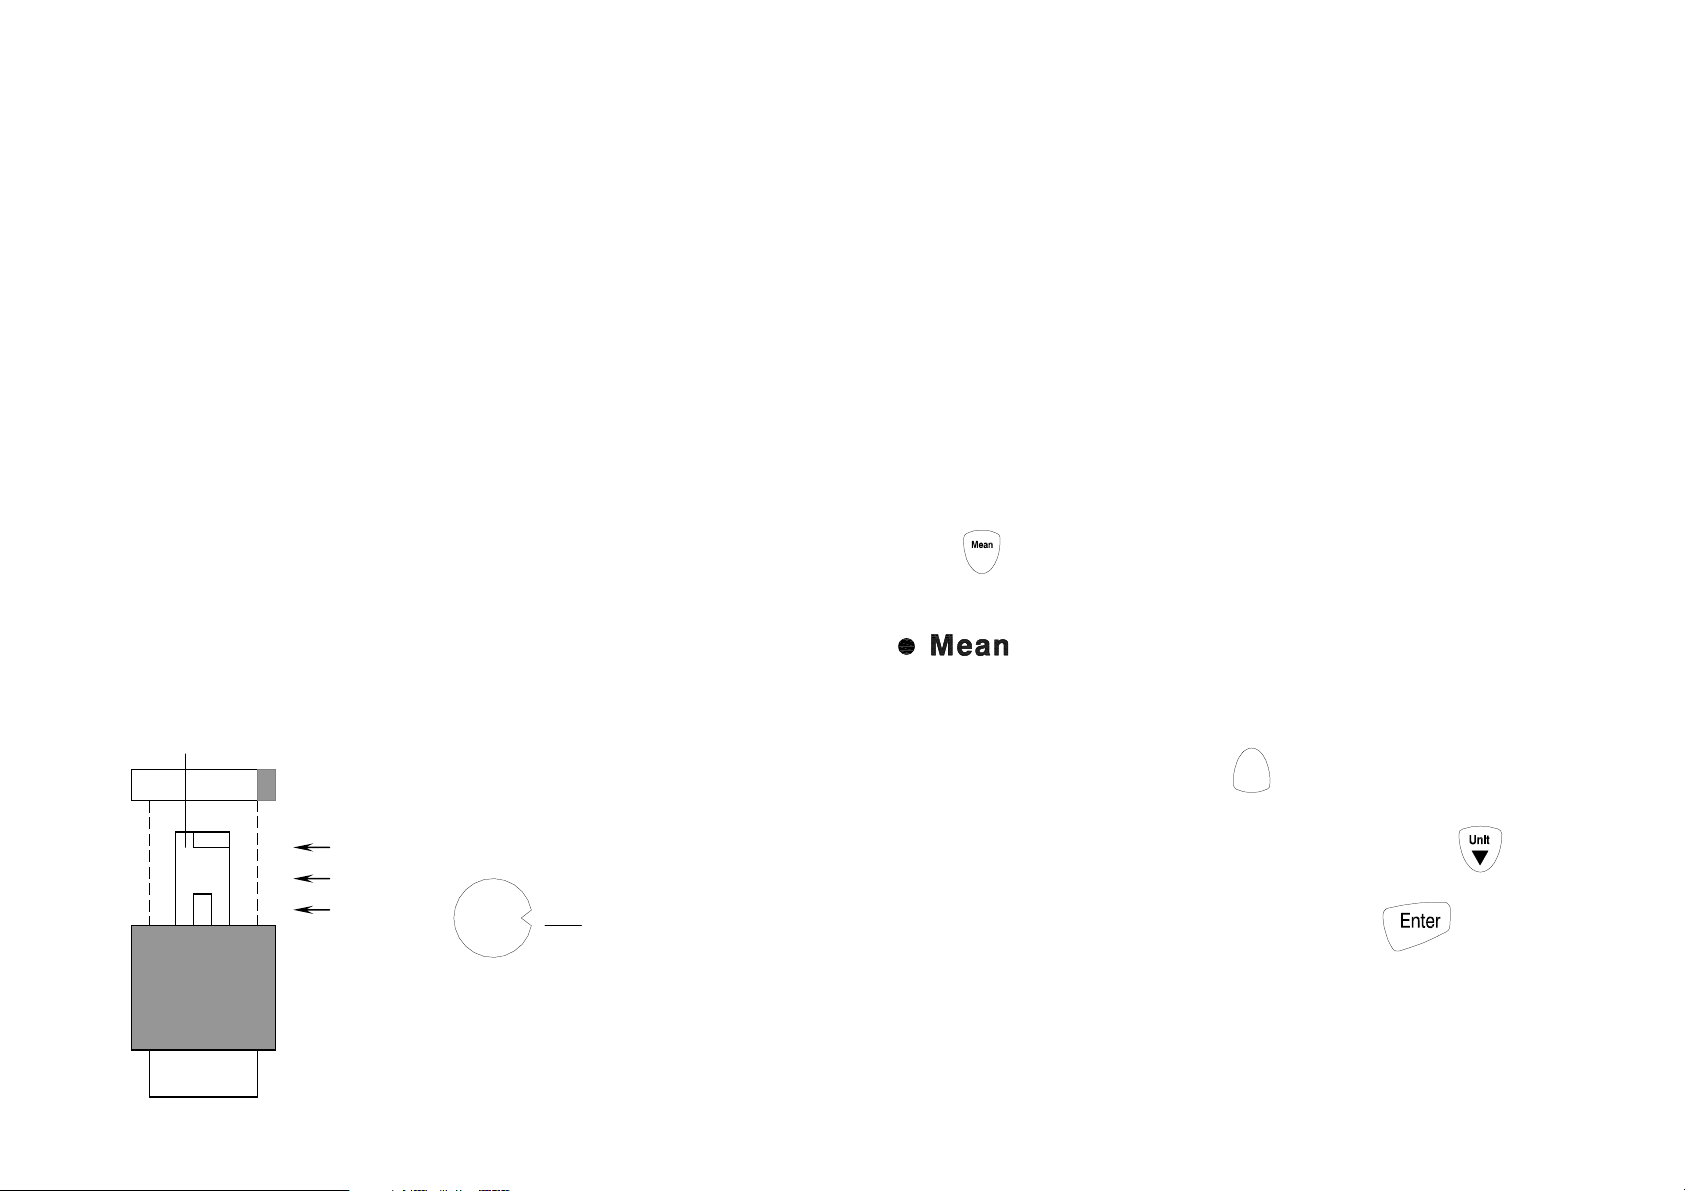
6. Direction of the sensor head:
There is mark on the top of the “Sensor Head”, When make the
Air velocity sensor
Sensor head (top view)
Flow
measurement, then this mark should against the measured wind, refer
Fig. 4, Fig5.When sensor head face against the measurement air, then
sensor head face against the measurement air, then the upper display
will show the air velocity value. The lower display will show the
temperature value.
Performing a multi-point mean calculation
1. Press .
is lit. The number of readings recorded is displayed in the
upper line, while the current reading is displayed in the lower line.
2. To change between displaying the temperature, flow velocity and
Flow
calculated volumetric flow rate: Press
Temp
.
3. If we want to change the units of the current reading, press .
Direction mark should face
the measured wind.
4. To include readings (in the desired quantity): Press (several
times).
Probe Handle
Fig.4 Fig.5
Page 9

5. To end measurement and calculate the mean value:Press .
flashes. The calculated spot mean value is displayed.
4 To return to measurement view: Press .
7. To return to measurement view: Press .
Holding the Displayed Readings
Performing a mean calculation in time
1. Press for 2 seconds.
is lit. The elapsed measuring time (mm:ss) is displayed in
the upper line, while the current reading is displayed in the lower line.
2. To change between displaying the temperature, flow velocity and
Flow
calculated volumetric flow rate: Press
3. If we want to change the units of the current reading, press .
4. To interrupt/continue measurement: Press each time.
5. To end measurement and calculate the mean value: Press .
Mean flashes. The calculated mean value in time is
displayed.
Temp
.
1. Press to freeze the readings on the display .The display shows
HOLD.
2. To change between displaying the temperature, flow velocity and
Flow
calculated volumetric flow rate: Press
Temp
.
3. Press again to turn off the HOLD function.
Viewing the MIN, MAX Readings
Max
Min
1. Press
the average (AVG) readings. The elapsed time since entering MAX/ MIN
mode, or the time at which the minimum or maximum occurred appears on
the display.
2. Press
to step through the maximum (MAX), minimum (MIN), or
Max
Min
button for 2 seconds to exit MAX/MIN mode.
Page 10

Replacing the Batteries
1. Turn off the thermometer if necessary.
2. Loosen the screw and remove the battery door.
3. Replace 9V batteries.
4. Replace the battery door and tighten the screw.
 Loading...