


BEDIENUNGSANLEITUNG
(INSTRUCTION MANUAL)

DATA LOGGER SOUND LEVEL METER
INHALTSVERZEICHNIS
Titel Seite
I. SICHERHEITSINFORMATIONEN 2
II. ALLGEMEINE BESCHREIBUNG 2
III. FEATURES 3
IV. SPEZIFIKATION 3
V. FUNKTIONEN 4
VI. MESSVORBEREITUNG 6
VII. GERÄTEVORBEREITUNG 7
VIII. KALIBRIERUNG 7
IX. MESSUNG 8
1

DATA LOGGER SOUND LEVEL METER
I. SICHERHEITSINFORMATIONEN
Lesen Sie bitte sorgsam die folgenden Informationen, bevor Sie mit den
Messungen beginnen.
Benutzen Sie das Messgerät nur in der beschriebenen Form,
anderenfalls erlischt die auf das Gerät gewährleistete Garantie.
Umweltbedingungen
§ Bis 2000m über NN
§ Relative Feuchtigkeit max. = 90% rH
§ Arbeitstemperaturbereich = 0 … + 40 °C.
Wartung & Reinigung
§ Reparaturarbeiten am Gerät sollten nur durch den Hersteller
durchgeführt werden.
§ Halten Sie bitte as Gerät sauber und in trockenem Zustand.
Sicherheitssymbole
Stimmt mit EMC überein
Benutzen Sie bei der Wartung nur spezifische Ersatzteile.
II. ALLGEMEINE BESCHREIBUNG
Vielen Dank, dass Sie sich für dieses Gerät entschieden haben. Um das
Gerät bestmöglich zu nutzen, empfehlen wir Ihnen die folgende
Betriebsanleitung sorgfältig zu lesen.
Das Gerät unterliegt den allgemein gültigen Normen und Standards
(IEC61672-1 Klasse2, ANSI S1.4 Typ2) und ist CE-zertifiziert.
Dieses Schallpegel-Messinstrument wurde für die Anforderungen für
Sicherheitsingenieure, Gesundheit, industrielle Sicherheitsbüros und für
Soundqualitätskontrollen in verschiedenen Umgebungen.
2

DATA LOGGER SOUND LEVEL METER
III. FEATURES
- Handlich
- Leichte Bedienung
- Preiswert aber Leistungsfähig
- Bereichsautomatik
- Höchste Aufnahmefähigkeit
- 4-stelliges digitales LCD mit einer Auflösung von 0.1 dB
- Betriebsinterne Eicheinrichtung
IV. SPEZIFIKATION
Standards: IEC61672-1 Klasse2, ANSI S1.4 Typ2
Frequenzbereich: 31.5Hz ~ 8KHz
Messbereich: 32 ~ 130dB
Mikrophon: 1/2 inch Electret Kondensor Mikrophon
Display LCD
Auflösung: 0.1dB
Werteerneuerung: 0.5 s
Frequenzgewichtung: A
Zeitbewertung: SCHNELL
Genauigkeit: ±1.4dB ( unter Referenzbedingungen @ 94 dB,
1kHz )
Alarmfunktionen: “OVER” wird angezeigt, wenn der aktuelle
Messwert höher als der gewählte Messbereich ist
“UNDER” wird angezeigt, wenn der aktuelle
Messwert niedriger als der gewählte Messbereich
ist
Stromversorgung: Zwei IEC R03 (size „AAA“) Batterien, 1,5V X2.
Batterielebenszeit: ca. 50h (Alkaline Batterie LR03)
Arbeitstemperatur: 0 ...+40 °C ( 32 ... +104 °F )
Arbeitsfeuchte: 10 bis 90% rH
Lagertemperatur: -10 ... 60 °C ( 14 ... 140 °F )
3
DATA LOGGER SOUND LEVEL METER
Lagerfeuchte: 10 bis 75%rH
Abmessung: 206 (L) × 42 (W) × 25 (H)mm
8.1° (L) x 1.7“ (W) x 1.0“ (H)
Gewicht: 100g (0.22 lbs) (inkl. Batterie)
Zubehör: Zwei 1,5V Batterie, Bedienungsanleitung,
Schraubenzieher. Windschutz.
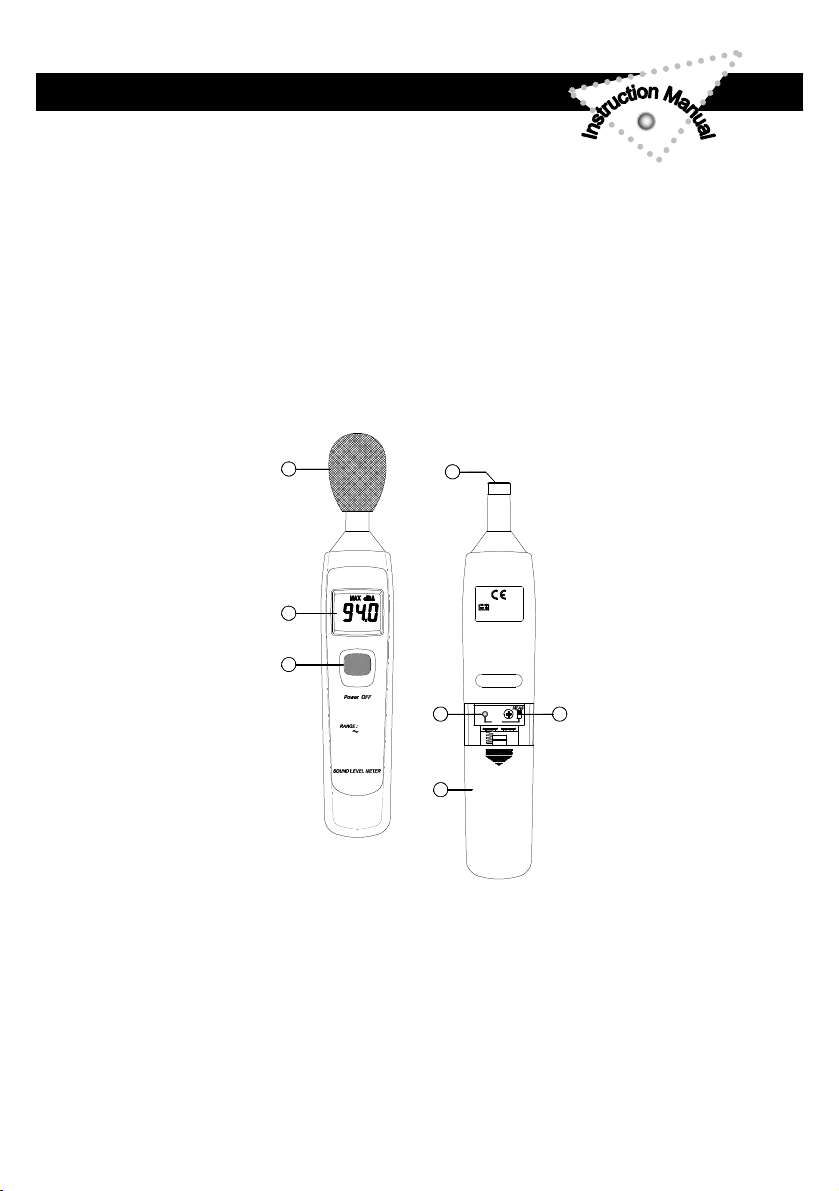
V. FUNKTIONEN
1
2
Max Hold
3
Press 2 Sec
32 dB 130 dB
4
1.5V X 2
SIZE AAA / IEC LR03
CAL
OPEN
7
56
4

Time Weighting Indicator
DATA LOGGER SOUND LEVEL METER
(1) Windschutz
Wenn Sie bei Windgeschwindigkeit > 10m/s messen, verwenden Sie
bitte den Windschutz auf dem Mikrofon
(2) Display
Low Battery Indicator
Max Mode Indicator
Frequency Weighting Indicator
Sound Level Reading
F
Fast
(3) An-/Ausschalter & Max. Haltetaste
Anschalter
Sie schalten das Gerät ein, indem Sie die „Max Hold“-Taste
drücken.
Max. Aufnahmemodus
Drücken Sie die „Max Hold“-Taste um zum max. Haltemodus zu
gelangen. Der LCD wird das „MAX“-Symbol anzeigen. Der Max.
Aufnahmemodus beinhaltet und sichert die maximalen
Eingabewerte. Wenn das Gerät eine Eingabe entdeckt, die über
dem aufgenommenen Maximum ist, speichert das Messgerät den
neuen Maximalwert.
Mit der „Max Hold“-Taste verlassen Sie den Maximalmodus wieder.
Die aufgenommenen Werte werden gelöscht und das „MAX“-Symbol
verschwindet.
Ausschalter
Sie schalten das Gerät aus, indem Sie die „Max Hold“-Taste für
mindestens 2 Sekunden gedrückt halten. Der LCD wird
„OFF“ anzeigen, danach können Sie die Taste loslassen.
Over-Range IndicatorUnder-Range Indicator
5

DATA LOGGER SOUND LEVEL METER
(4) Mikrofon
1/2 inch Electret Kondensor Mikrofon
(5) Messung / Kalkulation
Messungen oder interne Kalibrierung wählen Schalter aus
(6) Kalibrierungsabgleichung
(7) Batteriefachdeckel
VI. MESSVORBEREITUNG
(1) Batterie einfügen
Drücken Sie leicht den Batteriefachdeckel und schieben Sie ihn
nach unten. Legen Sie zwei 1,5V Batterien ein. Achten Sie dabei auf
die Polarität wie sie im Fach angezeigt wird. Schließen Sie den
Deckel.
(2) Batterieaustausch
Wenn die zur Messung benötigte Spannung abfällt, erhalten Sie ein
Warnzeichen. Es ist die Batterie (1.5 Volt) zu tauschen.
VII. GERÄTEVORBEREITUNG
(1) Wehender Wind, welcher übers Mikrofon bläst, wird für zusätzliche
Geräusche sorgen.
Wenn Sie das Gerät in Gegenwart von Wind benutzen, ist es Pflicht
den Windschutz zu befestigen, um keine unerwünschten Geräusche
zu empfangen.
(2) Kalibrieren Sie das Gerät vor dem Gebrauch, wenn das Gerät
längere Zeit nicht mehr benutzt wurde oder in einer schädlichen
Umgebung benutzt wurde.
(3) Lagern oder benutzen Sie das Gerät nicht bei hohen Temperaturen
und hoher Umgebungsfeuchtigkeit.
(4) Halten sie das Gerät trocken und vermeiden sie starke
Erschütterungen.
6

DATA LOGGER SOUND LEVEL METER
(5) Wenn das Messinstrument für eine längere Zeit nicht benutzt wird,
sollten die Batterien aus dem Batteriefach nehmen, da diese
eventuell auslaufen.
VIII . KALIBRIERUNG
Das Gerät muss kalibriert sein, bevor Sie eine Messung beginnen.
Es gibt zwei verschiedene Arten der Kalibrierung: interne elektrische
Kalibrierung und akustische Kalibrierung mit einem Soundkalibrator.
Normalerweise wird nur eine interne elektrische Kalibrierung
benötigt.
Interne Kalibrierung (9dB @ 1kHz)
Drücken Sie leicht den Batteriefachdeckel und schieben Sie ihn
nach unten. Prüfen Sie, ob der „Cal Mode“ auf „Internal
CAL“ gesetzt wurde. Das LCD wird für etwa 1 Sekunde
„CAL“ anzeigen. Aktivieren Sie den eingebauten Oszillator ( 1 kHz,
Sinuskurve) für die elektrische Kalibrierung des Geräts. Am Ende
der Kalibrierung schieben sie den Schalter auf die „MEAS“ position.
IX. MESSUNG
(1) Schalten Sie das Gerät ein und wählen Sie die von Ihnen
gewünschten Parameter und Einstellungen aus. Standardmäßig wird
die A-Bewertung verwendet, um dem menschlichen Hörempfinden
nahe zu kommen.
(2) Stellen Sie sicher, dass der Schalter an der Rückseite des Geräts
auf „MEAS“ steht.
(3) Halten Sie das Messgerät in Richtung der Schallquelle
(4) Die numerische Ebenenanzeige zeigt den momentan gemessenen
Geräuschpegel. Der Messwert wird jede Sekunde zwei Mal
aktualisiert.
7

DATA LOGGER SOUND LEVEL METER
CONTENTS
Title Page
I. SAFETY INFORMATION 10
II. GENERAL DESCRIPTION 10
III. FEATURES 11
IV. SPECIFICATIONS 11
V. NAME AND FUNCTIONS 12
VI. MEASUREMENT PREPARATION 14
VII. OPERATING PRECAUTIONS 14
VIII. CALIBRATION 15
IX. MEASUREMENT 15
8

DATA LOGGER SOUND LEVEL METER
I. SAFETY INFORMATION
Read the following safety information carefully before attempting to
operate or service the meter.
Use the meter only as specified in this manual; otherwise, the protection
provided by the meter may be impaired.
Environment conditions
§ Altitude up to 2000 meters
§ Relatively humidity 90% max.
§ Operation Ambient 0 ~ 40°C
Maintenance & Clearing
§ Repairs or servicing not covered in this manual should only be
performed by qualified personnel.
§ Periodically wipe the case with a dry cloth. Do not use abrasives or
solvents on this instruments.
Safety symbols
Comply with EMC
When servicing, use only specified replacement parts.
II. GENERAL DESCRIPTION
Thank you for using our Sound Level Meter. To ensure that you can get
the most from it, we recommend that you read and follow the manual
carefully before use.
This unit conforms to the IEC61672-1 Class2, ANSI S1.4 Type2 for
Sound Level Meters.
This Sound Level Meter has been designed to meet the measurement
requirements of safety Engineers, Health, Industrial safety offices and
sound quality control in various environments.
9

DATA LOGGER SOUND LEVEL METER
III. FEATURES
§ Mini size
§ Easy to use
§ High performance at a low cost
§ Autoranging
§ Maximum recording
§ 4-digit LCD with a resolution of 0.1 dB
§ Internal Calibrator (94dB@1kHz)
IV. SPECIFICATIONS
Standard applied: IEC61672-1 Class2, ANSI S1.4 Type2
Frequency range: 31.5Hz ~ 8KHz
Measuring level range: 32 ~ 130dB
Microphone: 1/2 inch electret condenser microphone
Display: LCD
Resolution: 0.1dB
Display Update: 0.5 sec.
Frequency Weighting: A
Time Weighting: FAST
Accuracy: ±1.4dB ( under reference conditions, 94dB @
1kHz )
Alarm function: “OVER” when input is more than upper limit of
range.
“UNDER” when input is Less than lower limit
of range.
Power supply: Two IEC R03 (size “AAA”) batteries, 1.5V X2.
Battery Life: Approx. 50hrs (alkaline battery LR03)
Operation temperature: 0 to 40°C ( 32 to 104°F )
Operation humidity: 10 to 90%RH
Storage temperature: -10 to 60°C ( 14 to 140°F )
Storage humidity: 10 to 75%RH
Dimensions: 206 (L) × 42 (W) × 25 (H)mm
10

DATA LOGGER SOUND LEVEL METER
8.1” (L) × 1.7” (W) × 1.0” (H)
Weight: 100g (0.22 lbs) (including batteries)
Accessories: two 1,5V batteries, instruction manual,
screwdriver, windscreen.
V. NAME AND FUNCTIONS
(1) Windscreen
When making outdoor measurements in windy weather, wind noise
at he microphone can cause measurement errors. Such effects can
be using the windscreen.
1
2
Max Hold
3
Press 2 Sec
32 dB 130 dB
4
1.5V X 2
SIZE AAA / IEC LR03
CAL
OPEN
7
56
11

Time Weighting Indicator
DATA LOGGER SOUND LEVEL METER
(2) Display
Low Battery Indicator
Max Mode Indicator
Frequency Weighting Indicator
F
Fast
Over-Range IndicatorUnder-Range Indicator
(3) Power On/Off & Max Hold button
Power On
Turn the unit on by press the “Max Hold” button.
Max recording mode
Press the “Max Hold” button to enter the Max Hold mode under the
power-on. The LCD will show “MAX” symbol.The MAX recording
mode captures and stores the maximum input values detected.
When the unit detects an input that is above the recorded
maximum, the unit recods the new maximum value.
Press the “Max Hold” button again to exit the MAX mode.
Recorded values are erased, “MAX” symbol disappears.
Power-off
Turn the unit off by holding down the “Max Hold” button for at least
2 seconds. The LCD will show “OFF”, release the button.
Sound Level Reading
(4) Microphone
1/2 inch electret Condenser microphone
(5) Measurement / Calculation
(6) Calibration adjustment
(7) Battery Cover
Measurements or internal calibrator select switch
12

DATA LOGGER SOUND LEVEL METER
VI. MEASUREMENT PREPARATION
(1) Inserting the batteries
Lightly press the battery cover and slide it to the down. Insert two
1.5V batteries, paying attention to the polarity as indicated in the
compartment. Replace the cover.
(2) Battery Replacement
When the battery voltage drops below the operating voltage, this
symbol will appear.
Replace 1.5 Volt batteries.
VII. OPERATION PRECAUTIONS
(1) Wind blowing across the microphone will bring additional
extraneous noise.
When using the instrument in the presence of wind, it is a must to
mount the windscreen to not pick up undesired signals.
(2) Calibrate the instrument before the operation if the instrument was
not in use for a long time or operated in bad environment.
(3) Do not store or operate the instrument at high temperature and
high humidity environment.
(4) Keep microphone dry and avoid severe vibration.
(5) If the unit is not used for a long period of time, the batteries will
have to be removed from the battery compartment, since it might
leak.
VIII. CALIBRATION
Before starting a measurement, the unit must be calibrated. There are
two types of calibration: internal electrical calibration and acoustic
calibration using a sound calibrator. Normally, internal electrical
calibration only is required.
Internal Calibrator (9dB @ 1kHz)
Lightly press the battery cover and slide it to the down. Slide the switch
to the down. Verify that the Cal Mode is set to “Internal” CAL. LCD
shows “CAL” approx. 1 sec. Activates the built-in oscillator (1 kHz, sine
wave) for electrical calibration of the unit. When calibration is end, slide
the switch to the up “MEAS” position.
13

DATA LOGGER SOUND LEVEL METER
IX . MEASUREMENT
(1) Turn the power ON to measure noise sound.
For general sound level measurements, A- - frequency weighting
and F (FAST) time weighting (dynamic characteristics) the setting
should be used.
(2) Make sure that slide the switch to the “MEAS” position on rear of
the unit.
(3) Hold the instrument comfortably in hand and point the
microphone at the suspected noise source.
(4) The numer ic level indication shows the current measured sound
level. The reading is updated twice every second.
14
 Loading...