

Page 1
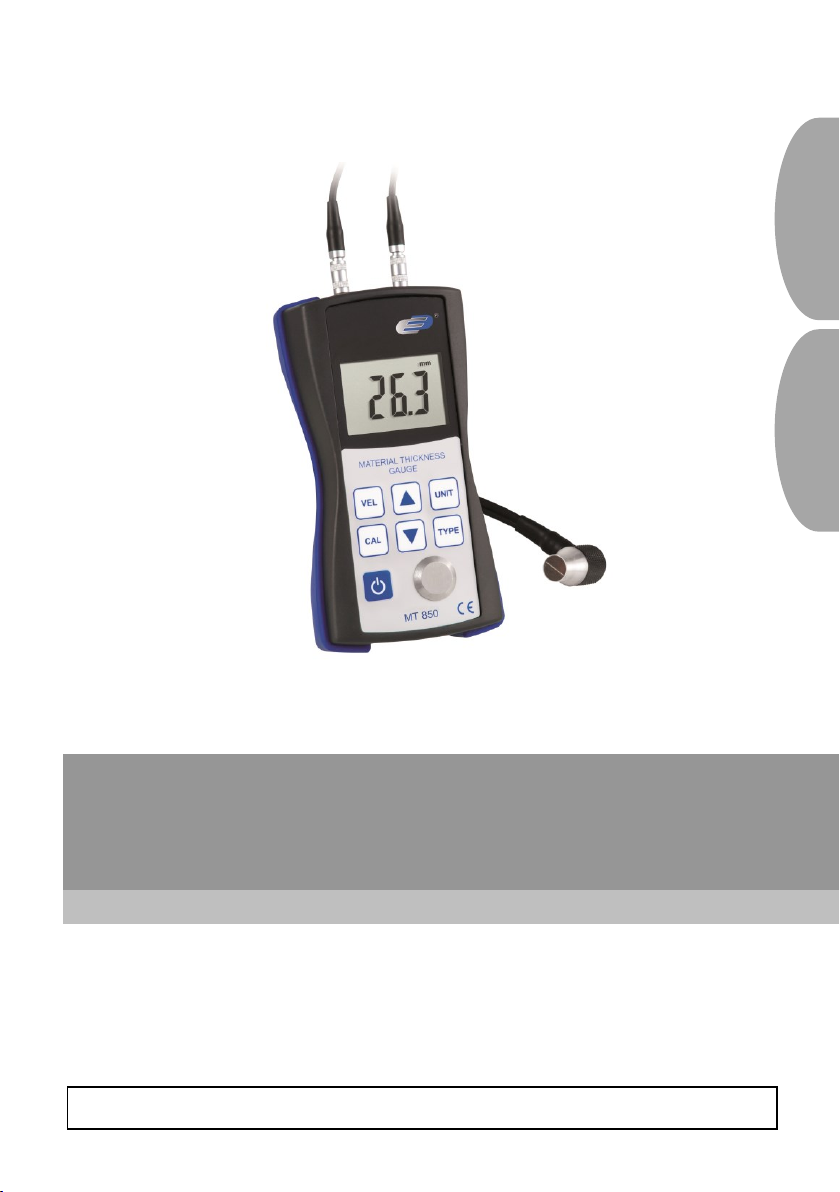
MT 850 Ultraschall-Materialdickenmessgerät / Ultrasonic material thickness gauge
Bedienungsanleitung
User Manual
Letzte Änderung / last change: 18 September 2017
v1.0
Deutsch
English
Page 2

Deutsch
Inhaltsverzeichnis
1 Sicherheitsinformationen ..................................................................... 1
2 Spezifikationen ...................................................................................... 2
2.1 Technische Spezifikationen .............................................................................................. 2
2.2 Lieferumfang .................................................................................................................... 2
2.3 Optionales Zubehör .......................................................................................................... 2
3 Systembeschreibung ............................................................................ 3
3.1 Gerät ................................................................................................................................ 3
4 Vorbereitung .......................................................................................... 4
4.1 Stromversorgung .............................................................................................................. 4
4.2 Materialauswahl ............................................................................................................... 4
5 Betrieb .................................................................................................... 4
5.1 Messen ............................................................................................................................ 4
5.2 Messung mit Einstellung der Schallgeschwindigkeit ......................................................... 5
6 Kalibrierung ........................................................................................... 5
7 Garantie .................................................................................................. 6
8 Entsorgung ............................................................................................ 6
Page 3

English
Contents
1 Safety notes ........................................................................................... 7
2 Specifications ........................................................................................ 8
2.1 Technical specifications ................................................................................................... 8
2.2 Delivery contents .............................................................................................................. 8
2.3 Optional accessories ........................................................................................................ 8
3 System description ............................................................................... 9
3.1 Device .............................................................................................................................. 9
4 Getting started ..................................................................................... 10
4.1 Power supply ..................................................................................................................10
4.2 Material selection ............................................................................................................10
5 Operation ............................................................................................. 10
5.1 Measurement ..................................................................................................................10
5.2 Measurement with set sound velocity ..............................................................................11
6 Calibration ........................................................................................... 11
7 Warranty ............................................................................................... 11
8 Disposal ............................................................................................... 11
Page 4

Deutsch
1 Sicherheitsinformationen
Bitte lesen Sie dieses Benutzer-Handbuch sorgfältig und vollständig, bevor Sie das Gerät zum
ersten Mal in Betrieb nehmen. Die Benutzung des Gerätes darf nur durch sorgfältig geschultes
Personal erfolgen. Schäden, die durch Nichtbeachtung der Hinweise in der
Bedienungsanleitung entstehen, entbehren jeder Haftung.
Dieses Messgerät darf nur in der in dieser Bedienungsanleitung beschriebenen Art
und Weise verwendet werden. Wird das Messgerät anderweitig eingesetzt, kann es
zu gefährlichen Situationen kommen.
Verwenden Sie das Messgerät nur, wenn die Umgebungsbedingungen (Temperatur,
Luftfeuchte, …) innerhalb der in den Spezifikationen angegebenen Grenzwerte
liegen. Setzen Sie das Gerät keinen extremen Temperaturen, direkter
Sonneneinstrahlung, extremer Luftfeuchtigkeit oder Nässe aus.
Setzen Sie das Gerät keinen Stößen oder starken Vibrationen aus.
Das Öffnen des Gerätegehäuses darf nur von Fachpersonal von Dostmann electronic
vorgenommen werden.
Benutzen Sie das Messgerät nie mit nassen Händen.
Es dürfen keine technischen Veränderungen am Gerät vorgenommen werden.
Das Gerät sollte nur mit einem Tuch gereinigt werden. Verwenden Sie keine
Scheuermittel oder lösungsmittelhaltige Reinigungsmittel.
Das Gerät darf nur mit dem von Dostmann electronic angebotenen Zubehör oder
gleichwertigem Ersatz verwendet werden.
Überprüfen Sie das Gehäuse des Messgerätes vor jedem Einsatz auf sichtbare
Beschädigungen. Sollte eine sichtbare Beschädigung auftreten, darf das Gerät nicht
eingesetzt werden.
Das Messgerät darf nicht in einer explosionsfähigen Atmosphäre eingesetzt werden.
Der in den Spezifikationen angegebene Messbereich darf unter keinen Umständen
überschritten werden.
Wenn die Sicherheitshinweise nicht beachtet werden, kann es zur Beschädigung des
Für Druckfehler und inhaltliche Irrtümer in dieser Anleitung übernehmen wir keine Haftung.
Wir weisen ausdrücklich auf unsere allgemeinen Gewährleistungsbedingungen hin, die Sie in
unseren Allgemeinen Geschäftsbedingungen finden.
Bei Fragen kontaktieren Sie uns. Die Kontaktdaten finden Sie am Ende dieser Anleitung.
Gerätes und zu Verletzungen des Bedieners kommen.
1
Page 5
Deutsch
2 Spezifikationen
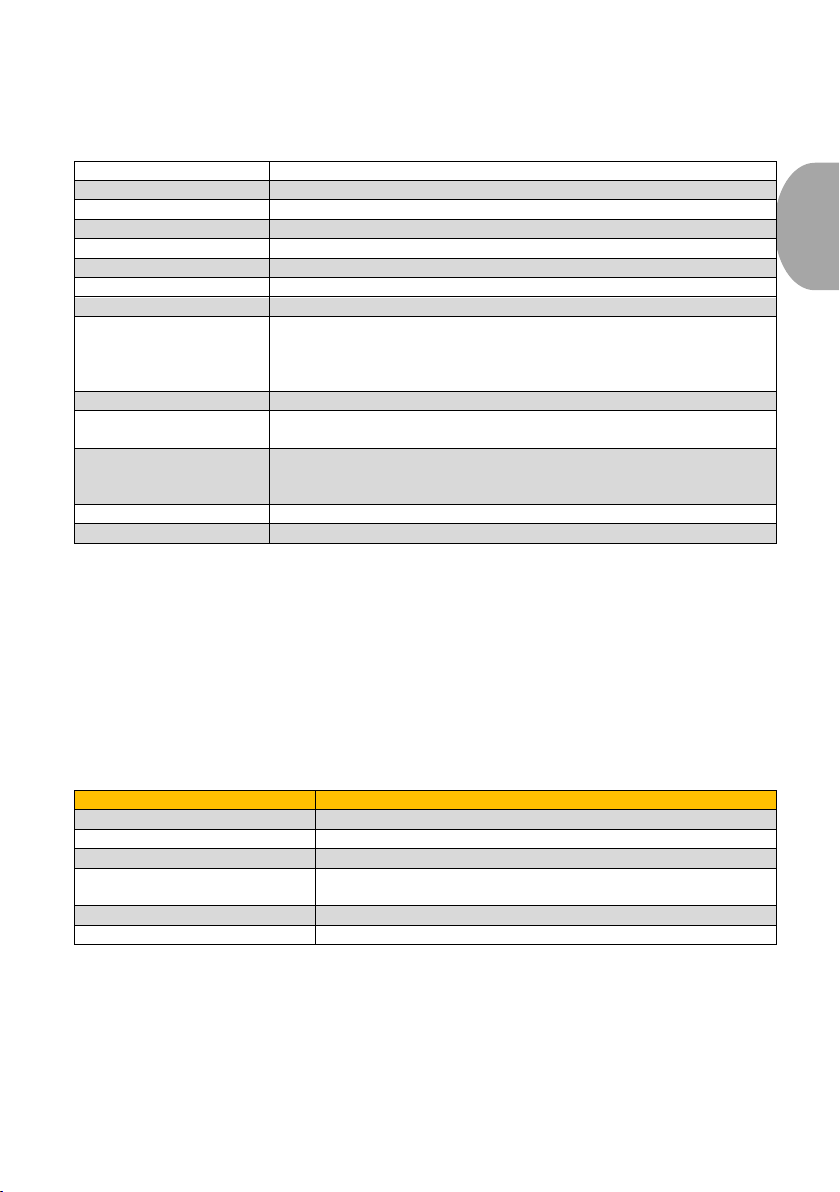
Messbereich
1,2 … 200 mm (Stahl)
Genauigkeit
±0,5 % v. Mw. ±0,1 mm
Auflösung
0,1 mm (0,001 Zoll)
Schallgeschwindigkeit
800 … 9950 m/s
Einheiten
mm / Zoll (umschaltbar)
Spannungsversorgung
3 x 1,5 V AAA Batterien
Kalibrierblock
5,0 mm (integriert)
Datenausgang
RS-232
Sensor
5 MHz Frequenz
Messfläche: Ø 8,0 mm
Auflagefläche: Ø 10,2 mm
Kopf: Ø 15,4 mm
Display
4 Digits LCD
Betriebsbedingungen
Temperatur: -10 … 50 °C
Luftfeuchte: <80 %
Materialtemperatur
0 … 50 °C (dauerhaft)
50 … 85 °C (für 5 Minuten, danach 30 Minuten Abkühlung unter 50
°C)
Abmessungen
142 x 77 x 40 mm
Gewicht
265 g (mit Batterien und Sensor)
Artikelnummer
Artikelbeschreibung
6031-0100
Ultraschall Kontakt-Gel
6050-0850
Standardsensor für MT 850
6050-0851
Miniatur Sensor für MT 850 Ø 6mm
6050-0852
Hochtemperatursensor für MT 850
-10 .. .+300 °C
5090-0850
Datenübertragungssoftware inkl. Datenkabel
5600-0030
ISO Kalibrierzertifikat für Materialdickenmessgeräte
2.1 Technische Spezifikationen
2.2 Lieferumfang
1 x Ultraschall-Materialdickenmessgerät
1 x 5 MHz Sensor
3 x AAA Batterie
1 x Koppelgel
1 x Tragekoffer
1 x Bedienungsanleitung
1 x Werkskalibrierzertifikat
2.3 Optionales Zubehör
2
Page 6
Deutsch
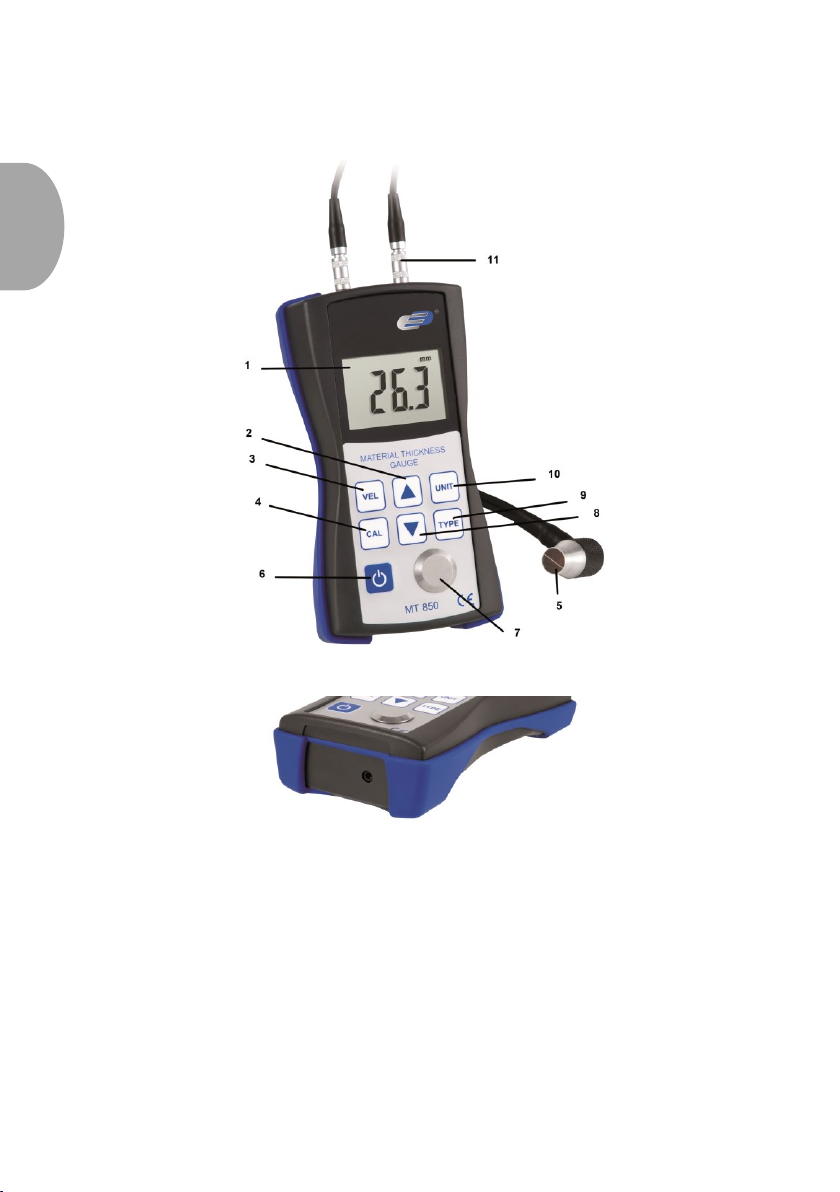
1 Display
7 Standardblock
2 Plustaste
8 Minustaste
3 Taste Schallgeschwindigkeit
9 Materialauswahltaste
4 Kalibriertaste
10 Einheitstaste
5 Sensor
11 Sensoranschluss
6 Ein / Aus Taste
3 Systembeschreibung
3.1 Gerät
3
Page 7
Deutsch
4 Vorbereitung
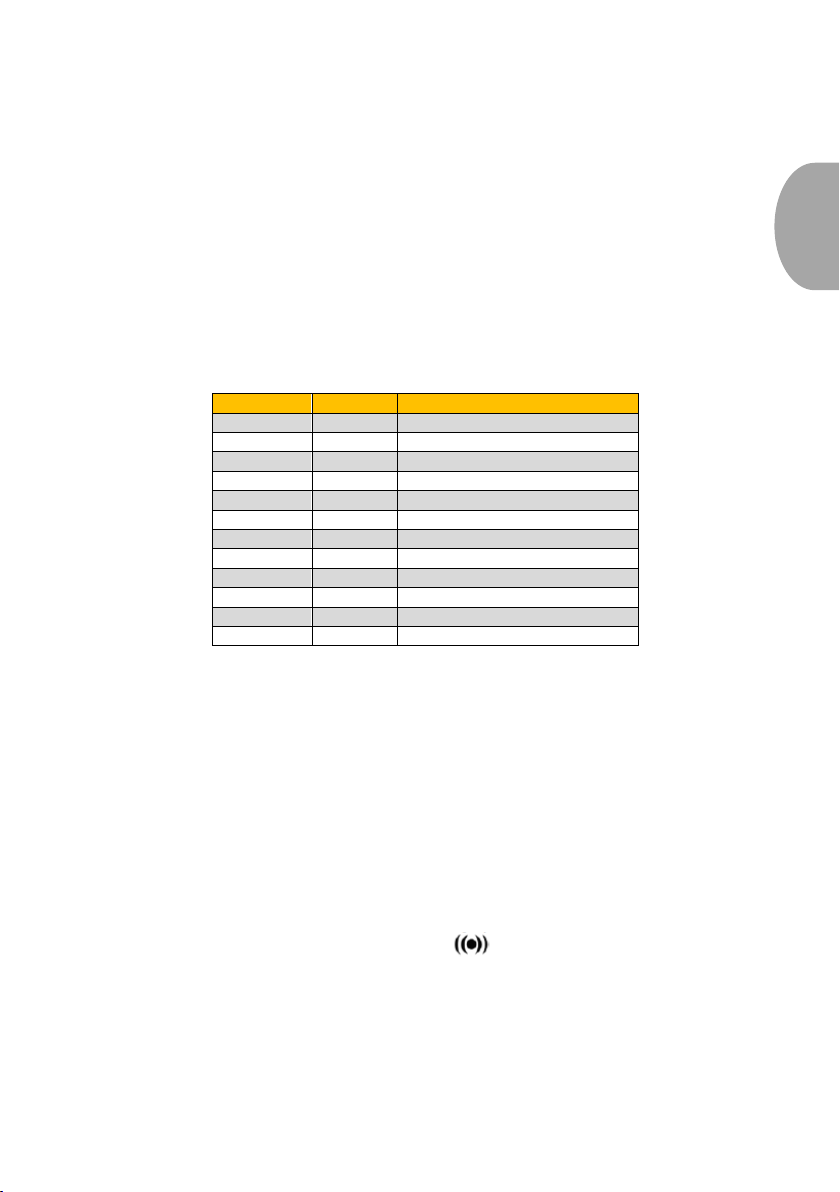
Nummer
Code
Material
1
cd01
Stahl
2
cd02
Gusseisen
3
cd03
Aluminium
4
cd04
Kupfer
5
cd05
Messing
6
cd06
Zink
7
cd07
Quarzglas
8
cd08
PE
9
cd09
PVE
10
cd10
Graugusseisen
11
cd11
Kugelgraphitgusseisen
12
yyyy
Schallgeschwindigkeit
4.1 Stromversorgung
Wenn der Ladestand der Batterie zu gering ist, erscheint im Display das Batteriesymbol.
Zum Wechseln der Batterien öffnen Sie die Batteriefachabdeckung und ersetzen Sie die
Batterien gegen Neue. Beachten Sie dabei die korrekte Polarität.
4.2 Materialauswahl
Drücken Sie die Ein / Aus Taste, um das Gerät einzuschalten. Drücken Sie anschließend auf
die Materialauswahltaste und das Display zeigt Ihnen einen Materialcode „cdxx“ oder „yyyy“ an.
„cd“ steht für Code, „xx“ steht für die Materialnummer 1…11. Die Zuordnung zum Material
entnehmen Sie der folgenden Tabelle. Für eine individuelle Eingabe der Schallgeschwindigkeit
kann der Punkt „yyyy“ ausgewählt werden. Die Schallgeschwindigkeit muss in diesem Fall
durch vorheriges drücken der Taste für die Schallgeschwindigkeit eingegeben werden.
Drücken Sie Plus oder Minus Taste um einen Materialcode auszuwählen. Bestätigen Sie den
Code mit der Materialauswahltaste. Das Display zeigt nun 0 an. Wenn Sie einen Code
auswählen ohne zu bestätigen zeigt Ihnen das Display nach ein paar Sekunden ebenfalls 0 an
und das Material gilt als bestätigt.
Achtung!
Es ist unbedingt notwendig, dass das Material vor der Messung ausgewählt wird, da sonst die
Messwerte verfälscht werden.
5 Betrieb
5.1 Messen
Drücken Sie die Ein / Aus Taste um das Gerät einzuschalten und wählen Sie mit der
Einheitstaste die Einheit aus. Stellen Sie sicher, dass der Sensor mit dem Gerät korrekt
verbunden wurde. Wenn dies der Fall ist, erscheint im Display.
Geben Sie etwas Kopplungspaste auf das auf die Oberfläche und drücken Sie den Sensor auf
das Material, das Sie messen möchten. Das Messergebnis wird Ihnen nun auf dem Display
angezeigt und so lange gehalten, bis eine neue Messung durchgeführt wird oder das Gerät
ausgeschaltet wird.
4
Page 8

Deutsch
5.2 Messung mit Einstellung der Schallgeschwindigkeit
Drücken Sie die Taste für die Schallgeschwindigkeit. Das Gerät wechselt sofort von der
Materialauswahl in den Schallgeschwindigkeitsmodus. Es wird Ihnen die zuletzt eingestellte
Schallgeschwindigkeit angezeigt.
Mit den Plus- und Minustasten können Sie den Wert der Schallgeschwindigkeit verändern.
Mit jedem Tastendruck wird der Wert um 10 m/s verändert. Wenn eine der Tasten länger als 4
Sekunden gedrückt wird, verändert sich der Wert um 100 m/s.
Geben Sie etwas Koppelpaste auf die zu messende Oberfläche und drücken Sie den Sensor
auf. Das Messergebnis wird Ihnen auf dem Display angezeigt.
Wenn Ihnen das Material, das Sie messen möchten, nicht bekannt ist, gehen Sie wie folgt vor:
Messen Sie an einem Punkt die Dicke des Materials (z. B. mit einem Messschieber) und
notieren Sie sich die Dicke. Messen Sie nun mit dem Messgerät und verändern Sie die
Schallgeschwindigkeit, bis der angezeigte Wert mit dem Wert, den Sie sich notiert haben,
übereinstimmt. Notieren Sie sich die eingestellte Schallgeschwindigkeit für das Material. Wenn
Sie nun weitere Messungen an dem Material durchführen möchten, müssen Sie vorher die
ermittelte Schallgeschwindigkeit einstellen.
6 Kalibrierung
Geben Sie etwas Kopplungspaste auf den 5 mm Standardblock und drücken Sie anschließend
die Kalibriertaste. Das Display zeigt nun CAL an.
Drücken Sie den Sensor auf den Standardblock. Wenn der Sensor korrekt angeschlossen
wurde, wird Ihnen im Display angezeigt. Danach erscheinen 5 mm und CAL im Display.
Wenn die Anzeige stabil ist, drücken Sie die Kalibriertaste erneut, um den Wert zu übernehmen
und zurück in den Messmodus zu gelangen.
Die Kalibrierung ist nun abgeschlossen und der Wert ist im Messgerät gespeichert.
5
Page 9
Deutsch
7 Garantie
Unsere Garantiebedingungen können Sie in unseren Allgemeinen Geschäftsbedingungen
nachlesen.
8 Entsorgung
HINWEIS nach der Batterieverordnung (BattV)
Batterien dürfen nicht in den Hausmüll gegeben werden: Der Endverbraucher ist zur Rückgabe
gesetzlich verpflichtet. Gebrauchte Batterien können unter anderem bei eingerichteten
Rücknahmestellen zurückgegeben werden.
Zur Umsetzung der ElektroG (Rücknahme und Entsorgung von Elektro- und
Elektronikaltgeräten) nehmen wir unsere Geräte zurück. Sie werden entweder bei uns
wiederverwertet oder über ein Recyclingunternehmen nach gesetzlicher Vorgabe entsorgt.
Alternativ können Sie Ihre Altgeräte auch an dafür vorgesehenen Sammelstellen abgeben.
WEEE-Reg.-Nr.DE68422510
Alle Dostmann electronic Produkte sind CE und RoHs zugelassen.
6
Page 10

1 Safety notes
Please read this manual carefully and completely before you use the device for the first time.
The device may only be used by qualified personnel and repaired by Dostmann electronic
personnel. Damage or injuries caused by non-observance of the manual are excluded from our
liability and not covered by our warranty.
The device must only be used as described in this instruction manual. If used
otherwise, this can cause dangerous situations for the user and damage to the meter.
The instrument may only be used if the environmental conditions (temperature,
relative humidity, …) are within the ranges stated in the technical specifications. Do
not expose the device to extreme temperatures, direct sunlight, extreme humidity or
moisture.
Do not expose the device to shocks or strong vibrations.
The case should only be opened by qualified Dostmann electronic personnel.
Never use the instrument when your hands are wet.
You must not make any technical changes to the device.
The appliance should only be cleaned with a damp cloth. Use only pH-neutral
cleaner, no abrasives or solvents.
The device must only be used with accessories from Dostmann electronic or
equivalent.
Before each use, inspect the case for visible damage. If any damage is visible, do not
use the device.
Do not use the instrument in explosive atmospheres.
The measurement range as stated in the specifications must not be exceeded under
any circumstances.
Non-observance of the safety notes can cause damage to the device and injuries to
We do not assume liability for printing errors or any other mistakes in this manual.
We expressly point to our general guarantee terms which can be found in our general terms of
business.
If you have any questions please contact Dostmann electronic. The contact details can be found
at the end of this manual.
the user.
Page 11
Measurement range
1.2 … 200 mm (steel)
Accuracy
±0.5 % rdg. ±0.1 mm
Resolution
0.1 mm (0.001 inch)
Sound velocity
800 … 9950 m/s
Units
mm / inch (switchable)
Power supply
3 x 1.5 V AAA batteries
Calibration block
5.0 mm (integrated)
Data output
RS-232
Sensor
5 MHz frequency
Test surface: Ø 8.0 mm
Contact area: Ø 10.2 mm
Head: Ø 15.4 mm
Display
4-digit LCD
Operating conditions
Temperature: -10 … 50 °C
Relative humidity: <80 %
Material temperature
0 … 50 °C (continuous)
50 … 85 °C (for 5 minutes, followed by cooldown to below 50 °C for
30 minutes)
Dimensions
142 x 77 x 40 mm
Weight
265 g (with batteries and sensor)
Part no.
Item description
6031-0100
Ultrasonic coupling gel
6050-0850
Standard sensor for MT 850
6050-0851
Miniature sensor for MT 850 Ø 6mm
6050-0852
High-temperature sensor for MT 850
-10 .. .+300 °C
5090-0850
Data transfer software incl. data cable
5600-0030
ISO calibration certificate for material thickness gauges
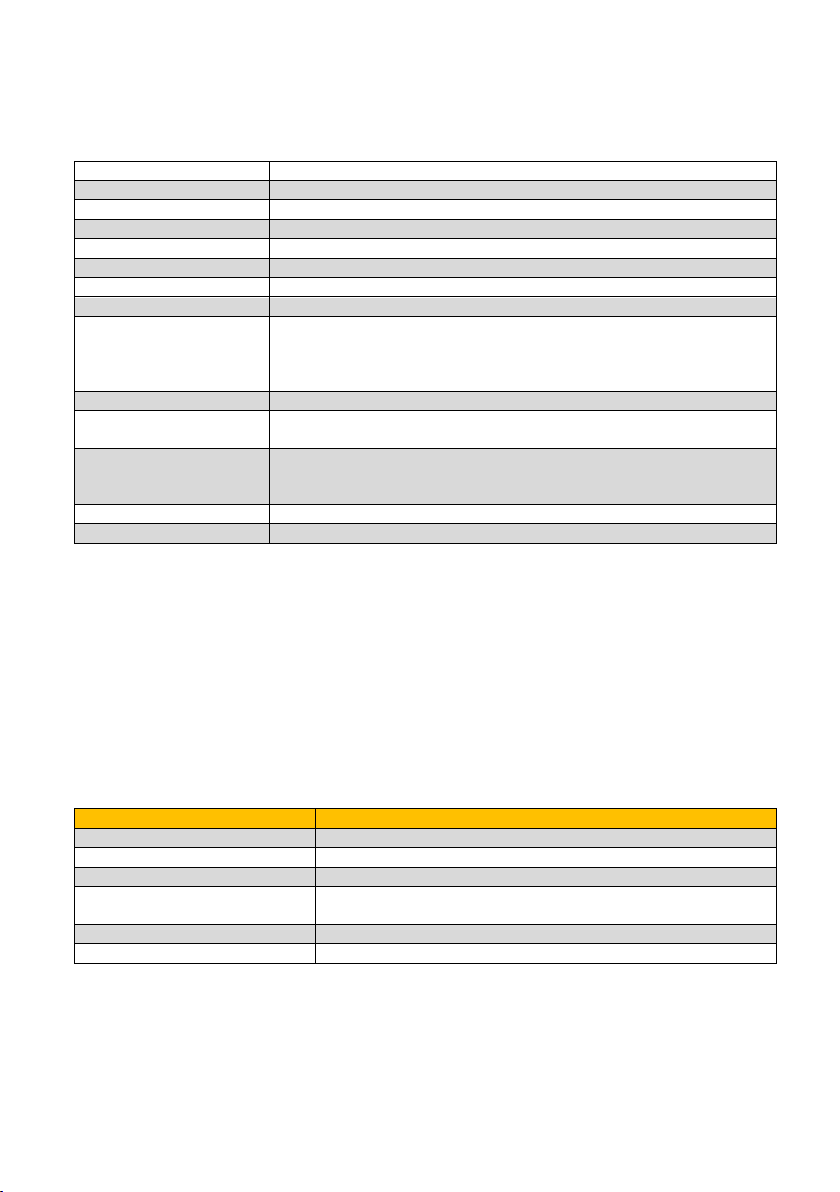
2 Specifications
2.1 Technical specifications
2.2 Delivery contents
1 x Ultrasonic material thickness gauge
1 x 5 MHz sensor
3 x AAA battery
1 x coupling gel
1 x carrying case
1 x user manual
1 x factory calibration certificate
2.3 Optional accessories
Page 12
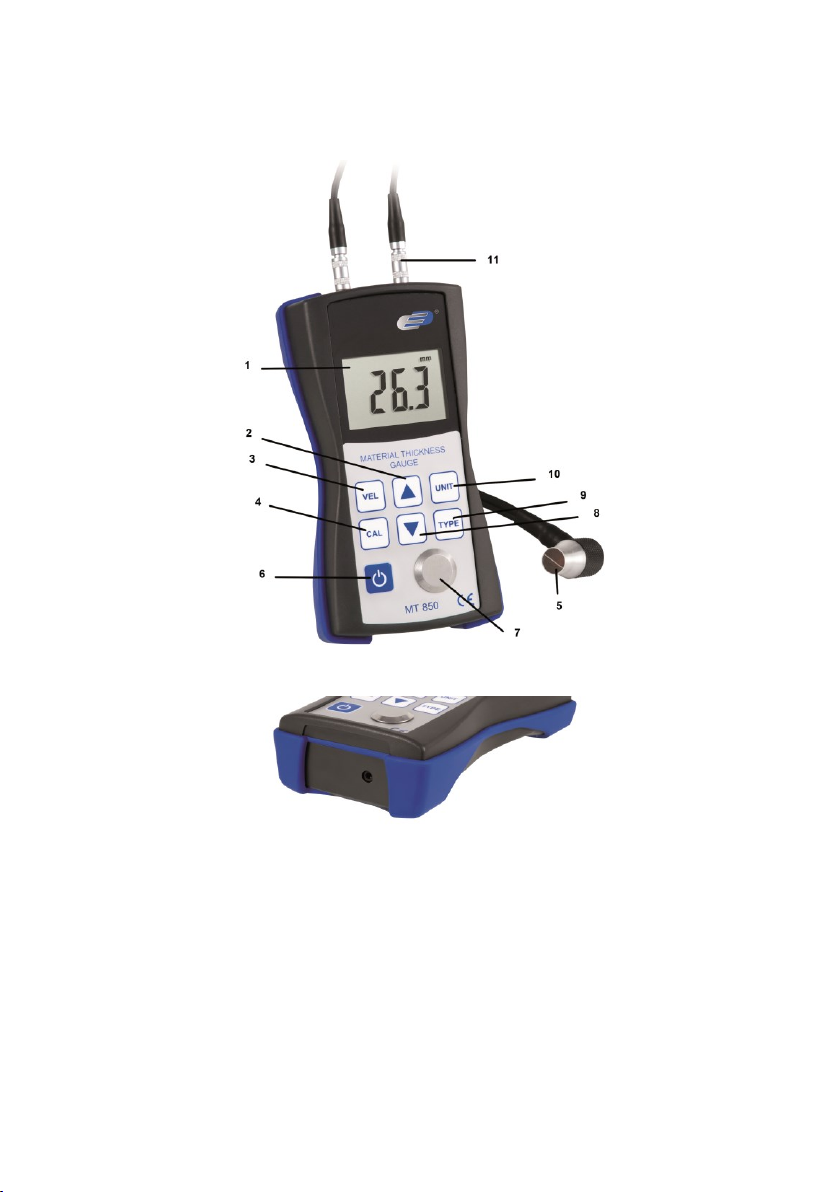
1 Display
7 Standard block
2 Plus key
8 Minus key
3 Sound velocity key
9 Material selection key
4 Calibration key
10 Unit key
5 Sensor
11 Sensor connection
6 On / off key
3 System description
3.1 Device
Page 13
Number
Code
Material
1
cd01
steel 2 cd02
Cast iron
3
cd03
Aluminium
4
cd04
Copper
5
cd05
Brass
6
cd06
Zinc 7 cd07
Quartz glass
8
cd08
PE
9
cd09
PVE
10
cd10
Grey cast iron
11
cd11
Ductile iron
12
yyyy
Sound velocity
4 Getting started
4.1 Power supply
When the battery level is too low, the battery icon will appear in the display.
To change the batteries, open the battery compartment cover and replace the used batteries by
new ones. Make sure the polarity is correct.
4.2 Material selection
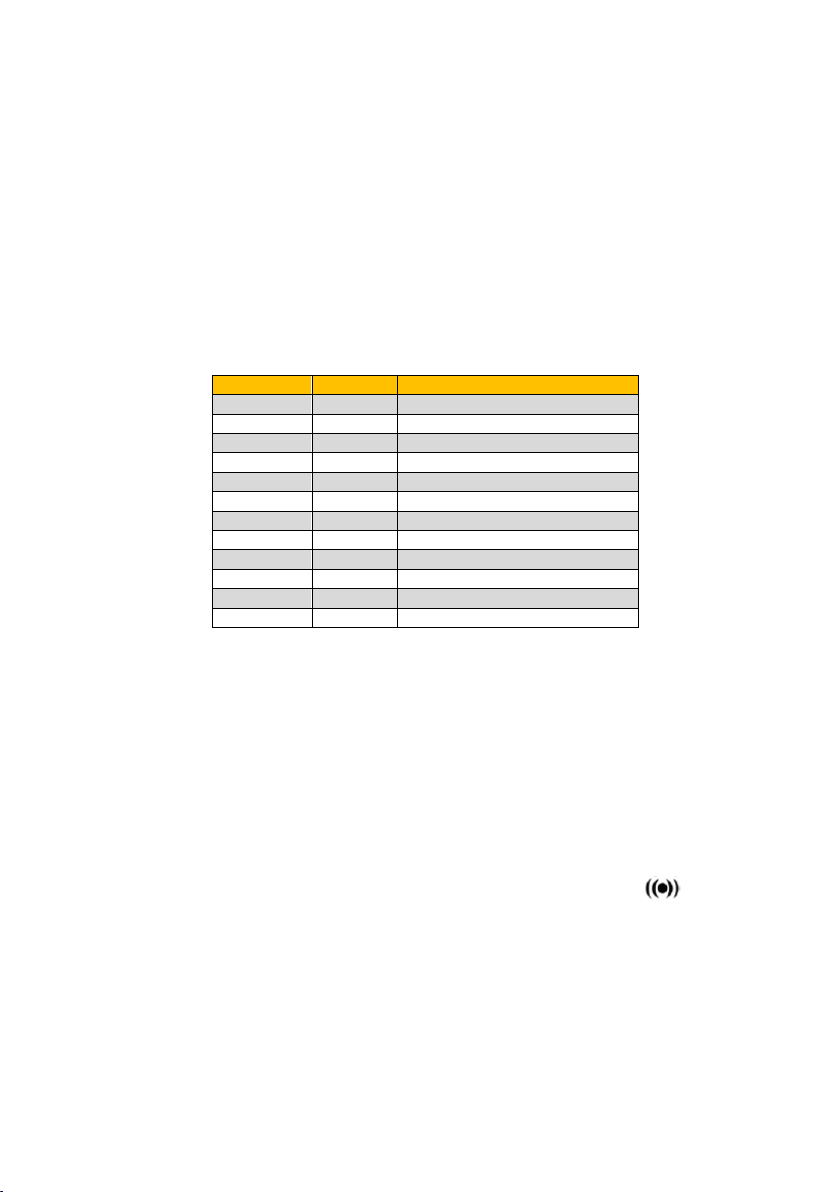
Press the On / off key to switch on the device. Then press the material selection key. The
display will now show a material code “cdxx” or „yyyy“. „cd“ is the abbreviation for code and „xx“
indicates the material number 1…11. The material numbers assigned to each material can be
found in the chart below. If you wish to enter the sound velocity individually, you can select
„yyyy“. The sound velocity must be entered in advance by pressing the sound velocity key.
Press the Plus or Minus key to select a material code and confirm the code with the material
selection key. The display now shows 0. If you select a code without confirming, the display will
also show 0 after a few seconds and the material is considered as confirmed.
Attention!
It is essential to select the material before making a measurement as otherwise the measured
values will be incorrect.
5 Operation
5.1 Measurement
Press the On / off key to switch on the device and select the unit by pressing the Unit key.
Make sure the sensor is correctly connected to the device. If this is the case, will appear
in the display.
Apply some coupling gel to the surface and press the sensor onto the material you want to
measure. The reading will now be displayed until another measurement is made or until the
meter is powered off.
Page 14
5.2 Measurement with set sound velocity
Press the sound velocity key. The device immediately switches from the material selection to
sound velocity mode. The sound velocity last set will be displayed.
You can use the Plus and Minus keys to change the sound velocity value.
At each keypress, the value is increased or decreased by 10 m/s. If any of the two keys is
pressed and held for more than 4 seconds, the value will be changed by 100 m/s.
Apply some coupling gel to the surface to be measured and press the sensor onto the surface.
The reading will be shown on the display.
If you do not know the material to be measured, do the following:
Measure the thickness of the material at one point (e. g. with a caliper) and make a note of the
thickness. Now measure with the meter and change the sound velocity until the displayed value
is the same value as the one you wrote down. Write down the sound velocity set for the
material. If you would like to make further measurements of the current material, you must set
the determined sound velocity before you start a measurement.
6 Calibration
Apply some coupling gel to the 5 mm standard block and press the calibration key. CAL will be
displayed.
Press the sensor onto the standard block. If the sensor is correctly connected, will be
shown in the display. After that, 5 mm and CAL will be indicated. When the displayed value is
stable, press the Calibration key again to apply the value and to get back to measurement
mode. The calibration is now completed and the value is saved to the meter.
7 Warranty
You can read our warranty terms in our General Business Terms.
8 Disposal
For the disposal of batteries in the EU, the 2006/66/EC directive of the European Parliament
applies. Due to the contained pollutants, batteries must not be disposed of as household waste.
They must be given to collection points designed for that purpose.
In order to comply with the EU directive 2012/19/EU we take our devices back. We either re-use
them or give them to a recycling company which disposes of the devices in line with law.
For countries outside the EU, batteries and devices should be disposed of in accordance with
your local waste regulations.
If you have any questions, please contact Dostmann electronic.
WEEE-Reg.-Nr.DE68422510
Page 15

Page 16

DOSTMANN electronic GmbH
Mess- und Steuertechnik
Waldenbergweg 3b
D-97877 Wertheim-Reicholzheim
Germany
Phone: +49 (0) 93 42 / 3 08 90
Fax: +49 (0) 93 42 / 3 08 94
E-Mail: [email protected]
Internet: www.dostmann-electronic.de
Technische Änderungen vorbehalten ● Nachdruck auch auszugsweise untersagt
Stand01 / 1709CHB ● © DOSTMANN electronic GmbH
Technical changes, any errors and misprints reserved ● Reproduction is prohibited in whole or part
Stand01 / 1709CHB ● © DOSTMANN electronic GmbH
 Loading...