

Page 1
M296107A
MODEL NUMBER: 296107 & 296108
SERIAL NUMBER: _____________
Owner’s Manual
Instructions for Assembly and Testing
Tow package for Stump and Root Grinders
296107 (620-TP) tow package: 2961020 & 2961060 models
296108 (337-357TP) tow package: 2961000 & 2961010 models
WARNING
READ and UNDERSTAND this manual completely before using this Tow Package.
All operators of this equipment must read and completely understand all safety information, operating
instructions.
Improper use of the tow package could result in serious injury to the operator or nearby persons.
Any Questions, Comments, Problems, or Parts Orders
Call your dealer or Dosko Customer Service 1-800-822-0295
1
Page 2
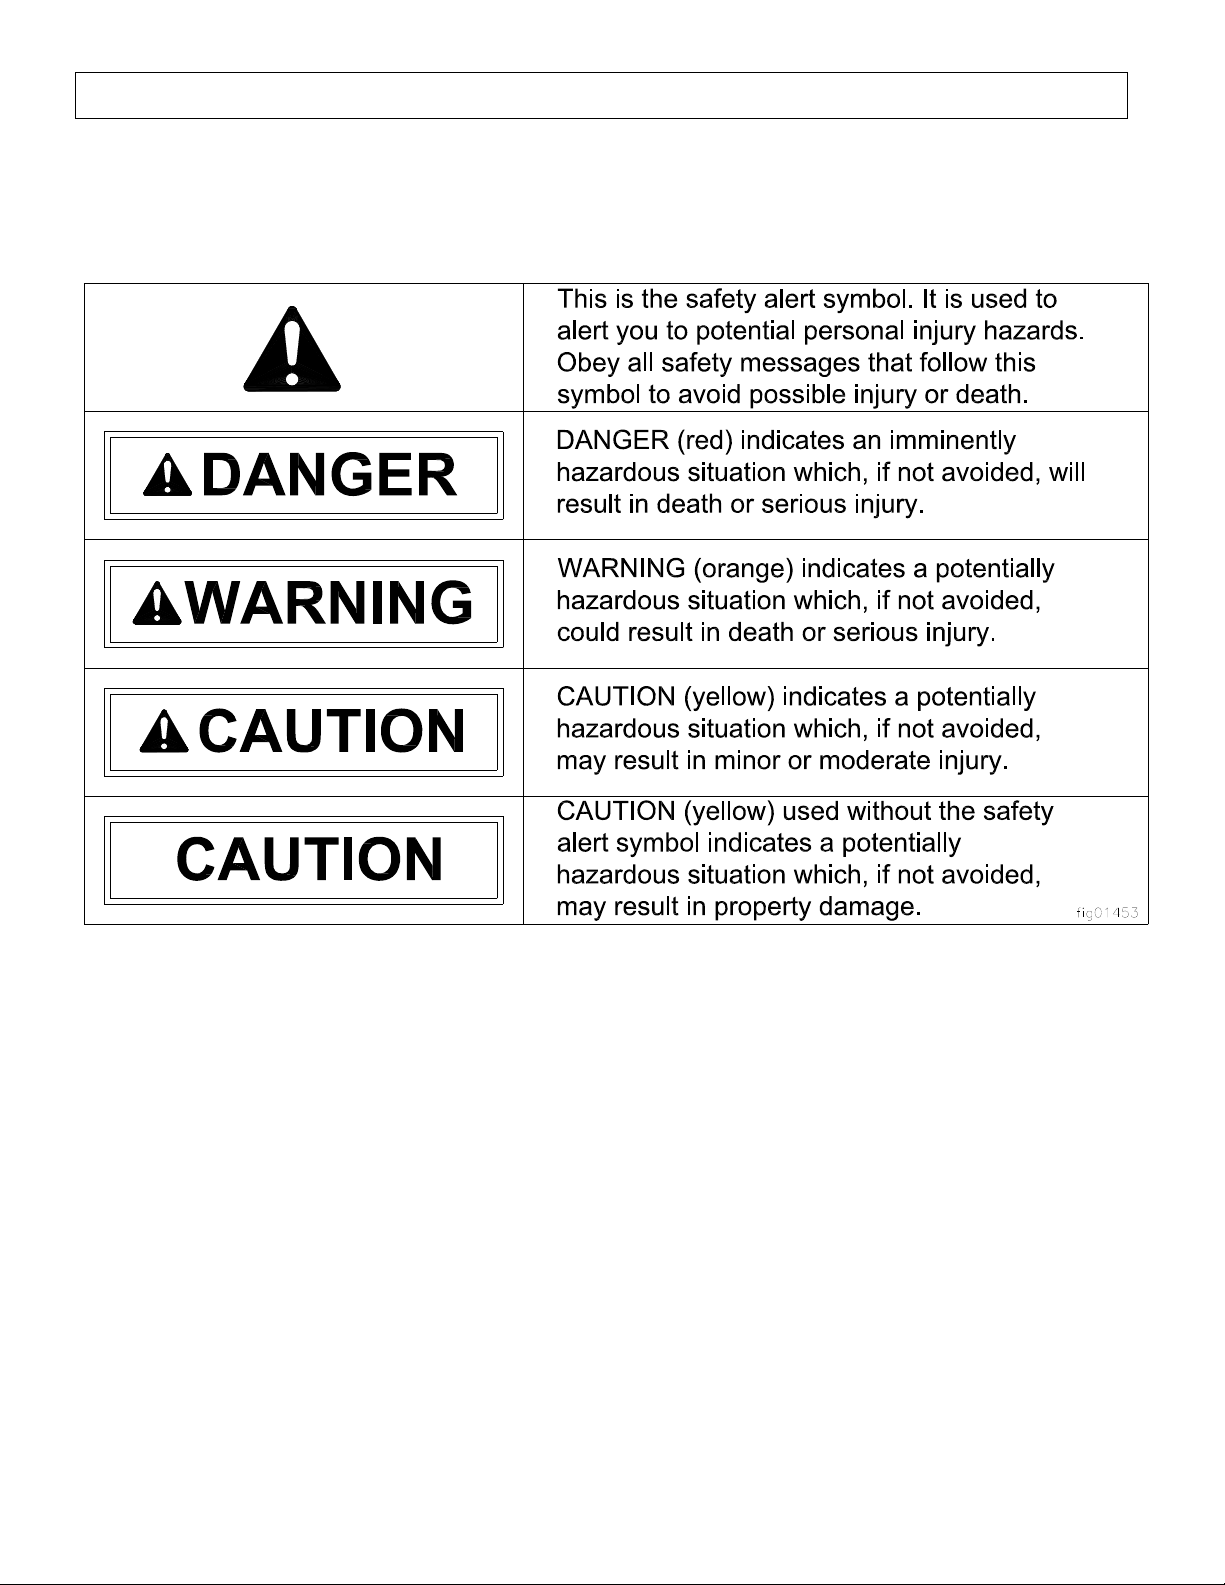
Hazard Signal Word Definitions
2
Page 3

Table of Contents
Safety Label Location ............................................................................................................................ 4
Machine Components Identification ...................................................................................................... 5
Towing Instructions ................................................................................................................................ 6
Specifications ......................................................................................................................................... 8
Parts Breakdown – Exploded View ....................................................................................................... 9
Safety Instructions .................................................................................................................................. 10
Unpacking .............................................................................................................................................. 11
Assembly Instructions ............................................................................................................................ 12
Limited Warranty ................................................................................................................................... 15
3
Page 4
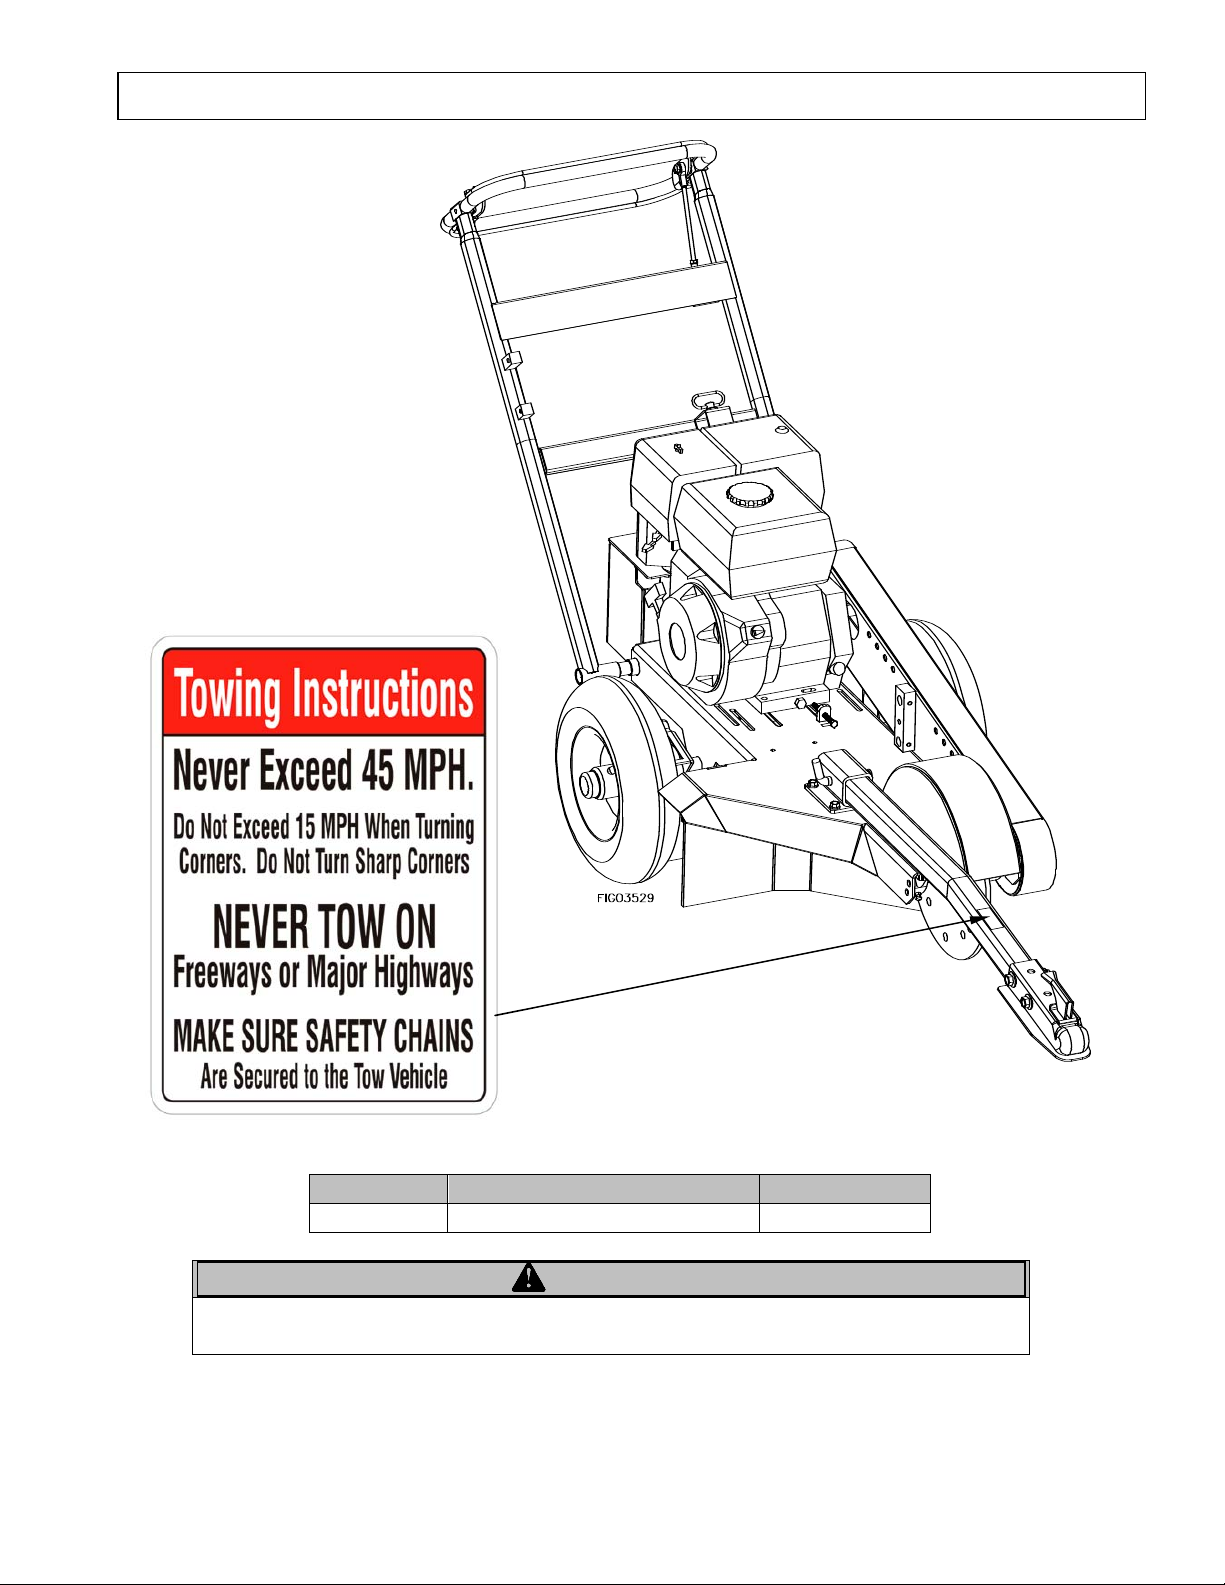
Safety Decal Locations
Part # Description Model #
784081 Towing Decal All
WARNING
ALWAYS make sure safety labels are in place and in good condition. If a safety label is
missing or not legible, order new labels.
To order replacement safety labels, call Dosko Customer Service at 1-800-822-0295.
4
Page 5
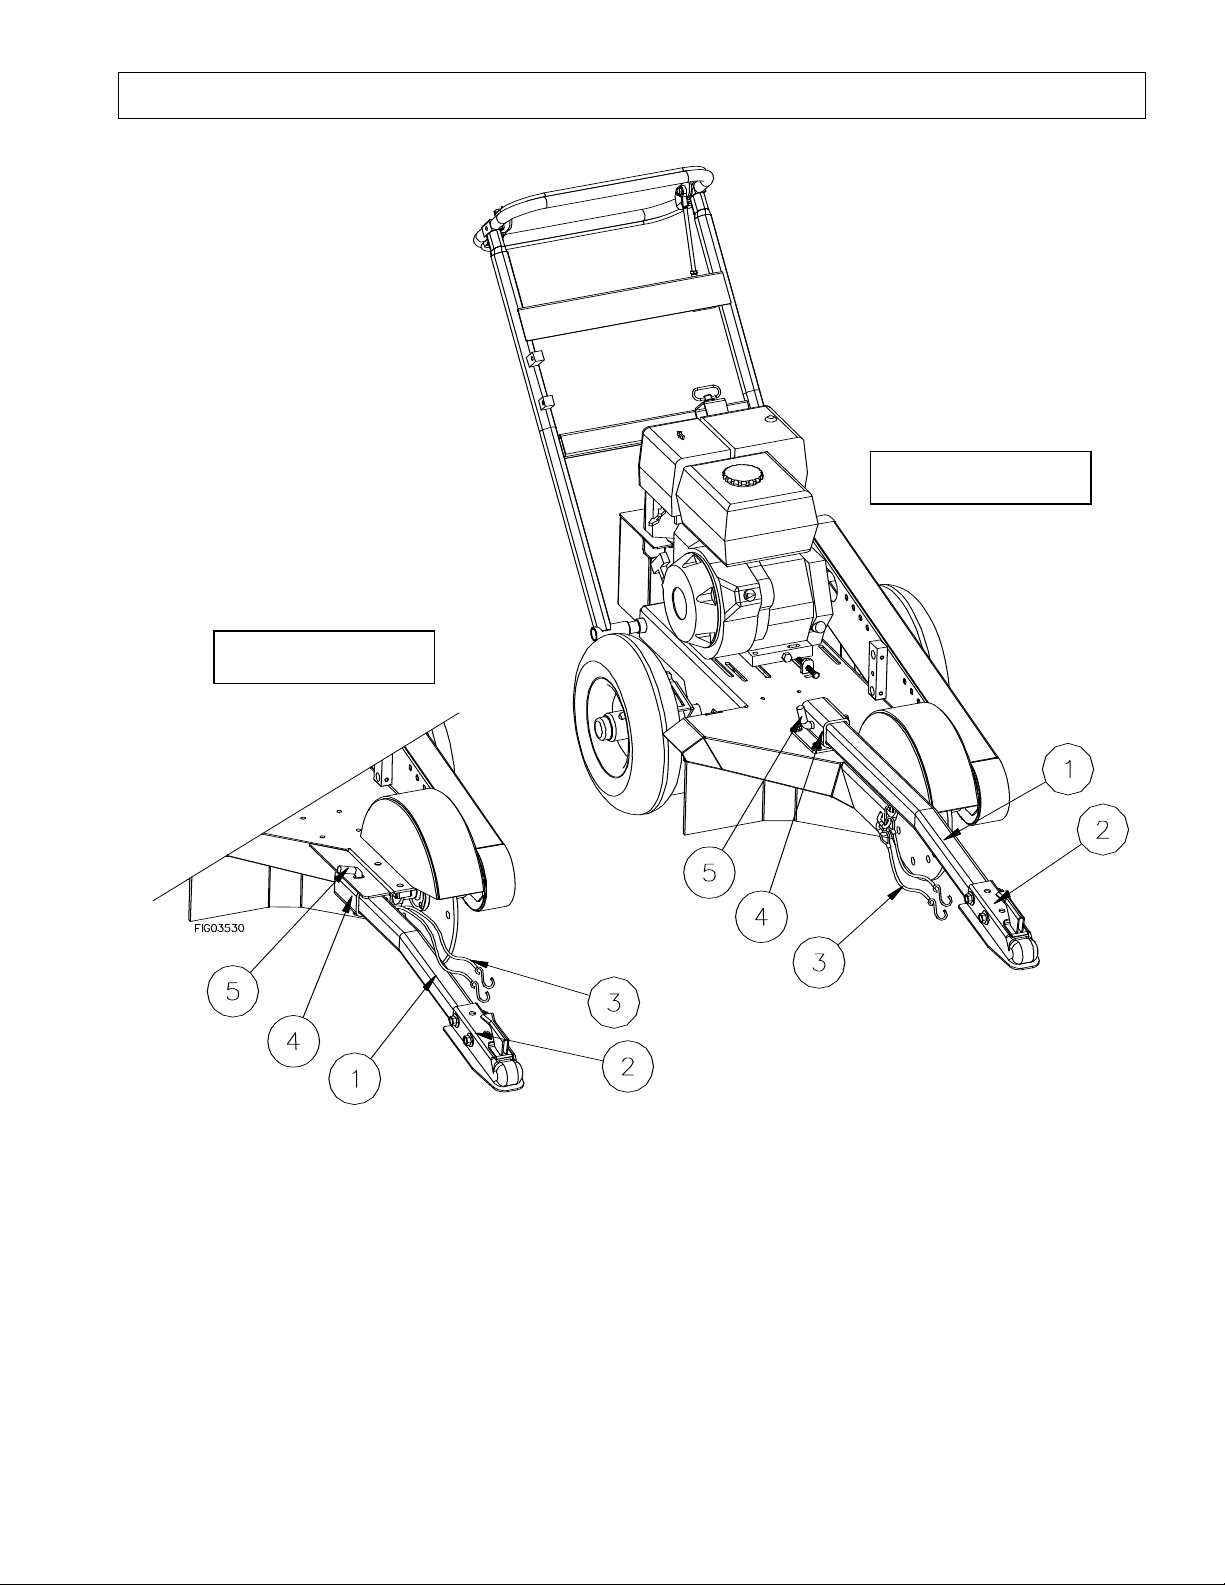
Machine Components Identification
Model # 296107
1.) Tow Bar. Connects the Stump Grinder to the tow vehicle.
2.) 2” Coupler. Allows the trailer unit to be hooked up to a 2” ball hitch.
3.) Safety Cables. Secures trailer to vehicle in case of accidental disconnection of ball and coupler.
4.) Tow Bar Socket. Connects the Tow Bar to the Stump Grinder
5.) Hitch Pin. Locks tow bar into Tow Socket
All grinder units can be transported via trailers, or with the purchase of an optional towing kit package
can be towed behind the vehicle.
Model # 296108
5
Page 6
Towing Instructions
n
n
t
r
IMPORTANT!
See Assembly Instructions section of this manual to assemble the Stump Grinder Tow Package.
Now that you have installed the Stump Grinder Tow Package, there is some important safety information you
need to know with regard to vehicle handling with the Stump Grinder attached.
Step One. Inspect/Repair
If the Stump Grinder has been towed previously, it must be prepared BEFORE EACH SUBSEQUENT USE.
WARNING
Read instructions below carefully for inspecting and preparing the Stump Grinder for high speed towing.
Damaged or missing components could result in injury to the operator, bystanders, or property damage.
Important safety rules:
• Replacement parts. If a part needs replacement, only use parts that meet the manufacturer’s
specifications. Replacement parts that do not meet specifications may result in a safety hazard or poor
operation.
Inspect and repair
Step Two. Towing
1. Read instructions Review towing safety instructions in your vehicle manual.
Inspect and test the Stump Grinder Tow Package thoroughly
a. Check tires for proper pressure level.
b. Check to be sure that all nuts and bolts are tight.
2. Check tires Make sure tires are fully inflated and in good repair.
See tire sidewall for recommended tire pressure.
WARNING:
● Do not over-inflate tires. Serious injury can occur if tire explodes.
● When seating a bead after repair, do not exceed 30 PSI. Pressures higher than 30
PSI can cause the tire and wheel to rupture and explode.
3. Tow bar is
secured and
locked
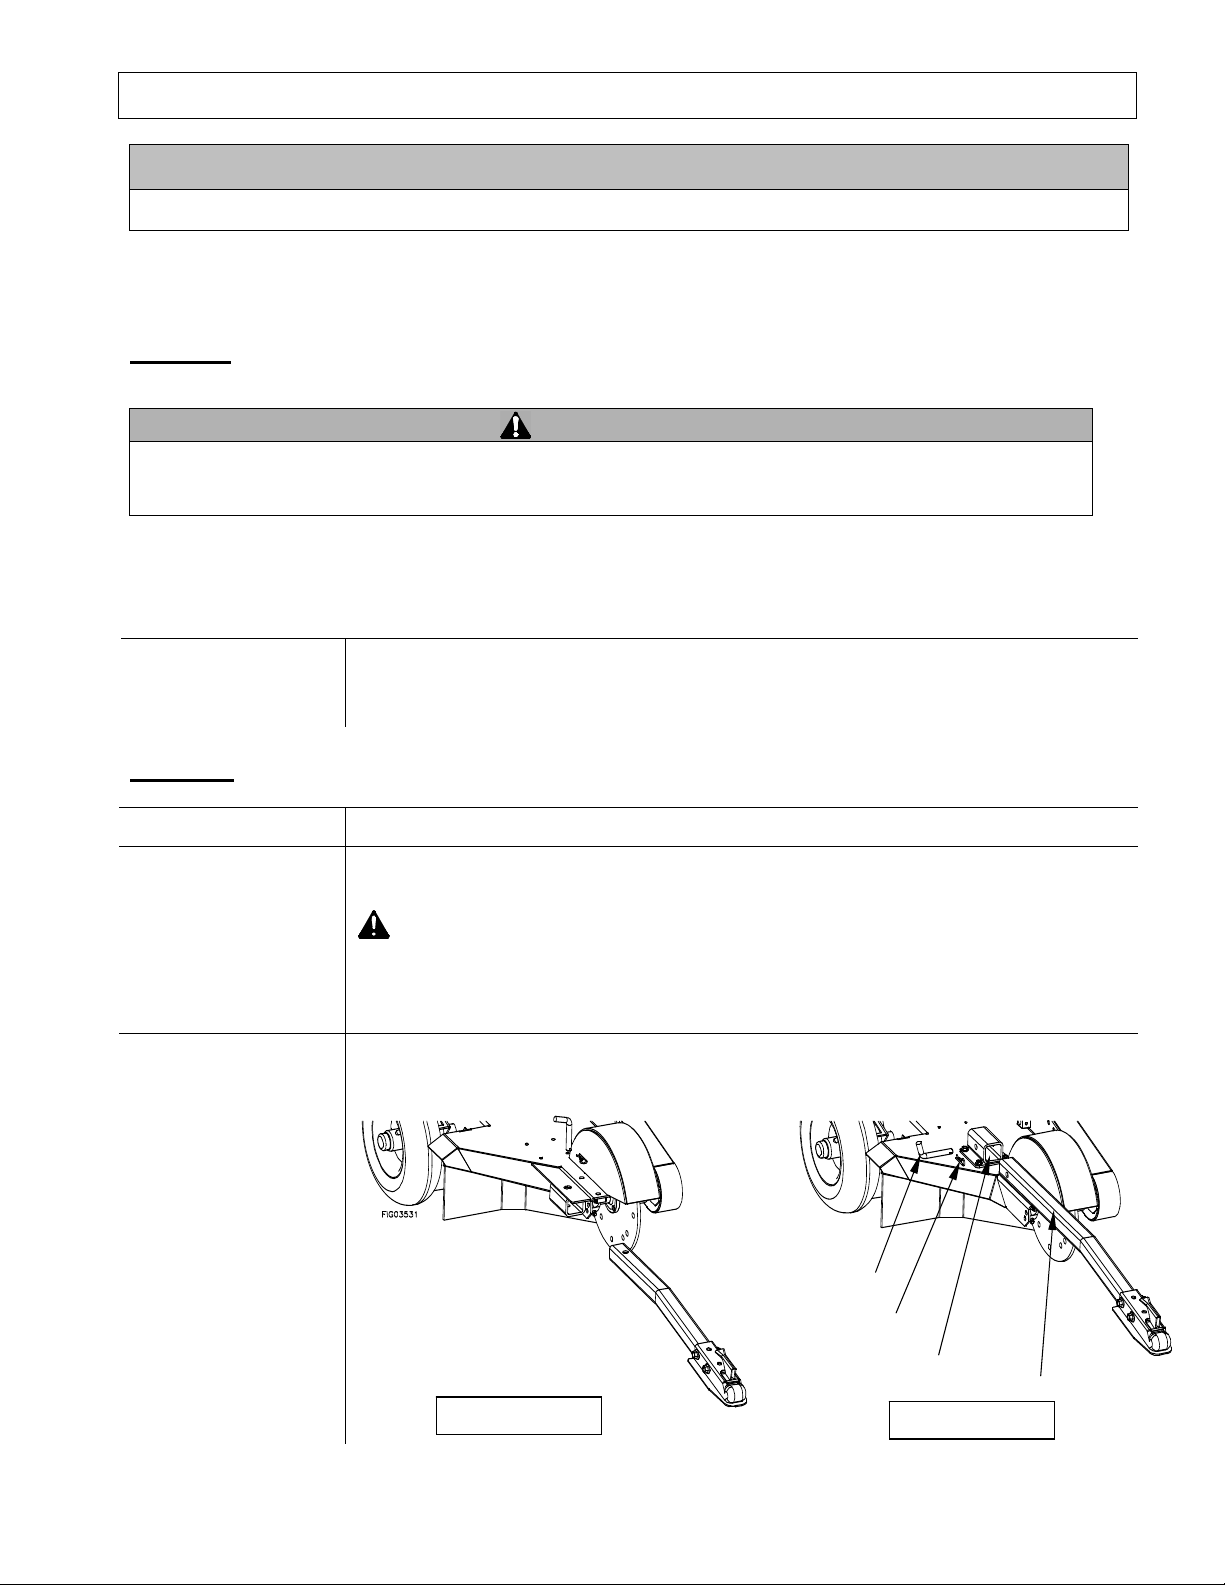
Insert the tow bar into the tow bar socket. Secure the hitch pin with a cotter pin.
Hitch pi
Cotter pi
Model # 296107
Tow bar
socke
Model # 296108
Tow ba
6
Page 7
Towing Instructions
4. Attach to hitch
(2” ball)
Attach Stump Grinder to vehicle hitch.
Each state has legal requirements for towing equipment and trailers (such as lighting
and licensing). Be sure receiver on towing vehicle is bolted tightly. Towing vehicle
capability must be matched to trailer weight and type of hitch arrangement
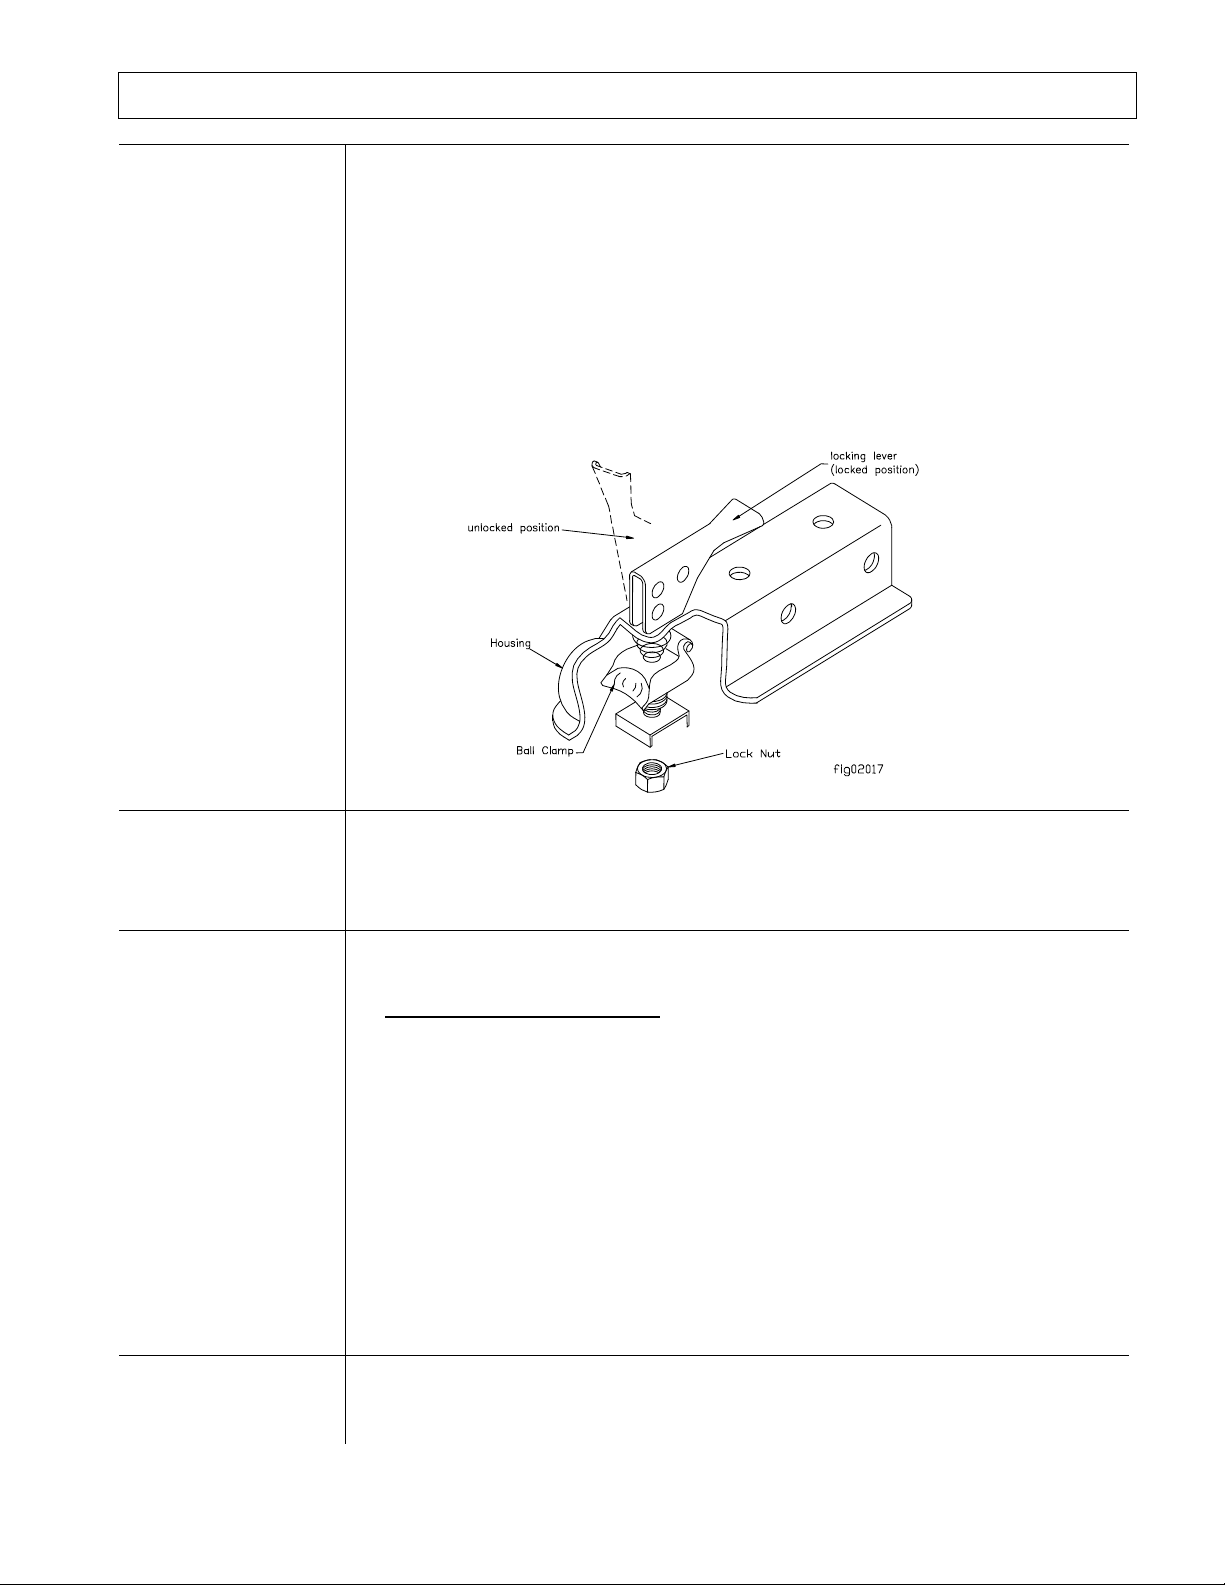
1. Attach Stump Grinder coupler to a class 2 or higher hitch with 2” ball (only).
2. Adjust coupler to ball by raising locking lever and turning lock nut with fingers.
3. Proper adjustment is obtained when coupler is as tight as possible on ball and
locking lever can still be opened and closed.
4. Close the lock lever to secure the attachment. An optional locking pin or padlock
may be inserted in the locking lever hole for extra security.
5. Attach safety
chains
6. Tow to desired
location
7. Remove tow bar
& safety chains
after towing.
Attach safety chains.
1. Two safety chains must be used while towing.
2. Cross safety chains under the coupler allowing only enough slack for vehicle
turns.
Tow Stump Grinder carefully to desired work site.
Important safety instructions
• Speed limit. Never tow this Stump Grinder over 45 mph. Faster speeds may
result in loss of control.
• Added length. Be aware of the added length of the Stump Grinder.
• Rough terrain. Drive slowly and take extra caution when traveling over
rough terrain.
• On public roads. If towing on a public road, make sure to comply with all
local, state, and federal towing requirements. It is the sole responsibility of
the purchaser to obtain licensing, trailer lights, safety chains or signage, as
needed to comply.
• Unattended. Turn off the towing vehicle before leaving the Stump Grinder
unattended.
• Under the influence. Never tow or operate this Grinder while under the
influence of alcohol, drugs, or medication
Remove tow bar and Safety chains after towing and before operating your
Stump Grinder.
NEVER operate Stump Grinder while the Tow Bar or Safety Chains are attached.
:
7
Page 8

Specifications
The manufacturer reserves the right to make improvements in design and/or
changes in specifications at any time without incurring any obligation to install
Maximum Towing Speed……………. 45 MPH
Coupler Size…………………………. 2” Ball
Overall Dimensions (boxed)…….…... 39.5”L x 7”W x 4.5 ”H
Weight (shipping)………………….… 20 lbs.
them on units previously sold
Any Questions, Comments, Problems, or Parts Orders
Call your dealer or Dosko Customer Service 1-800-822-0295
.
8
Page 9
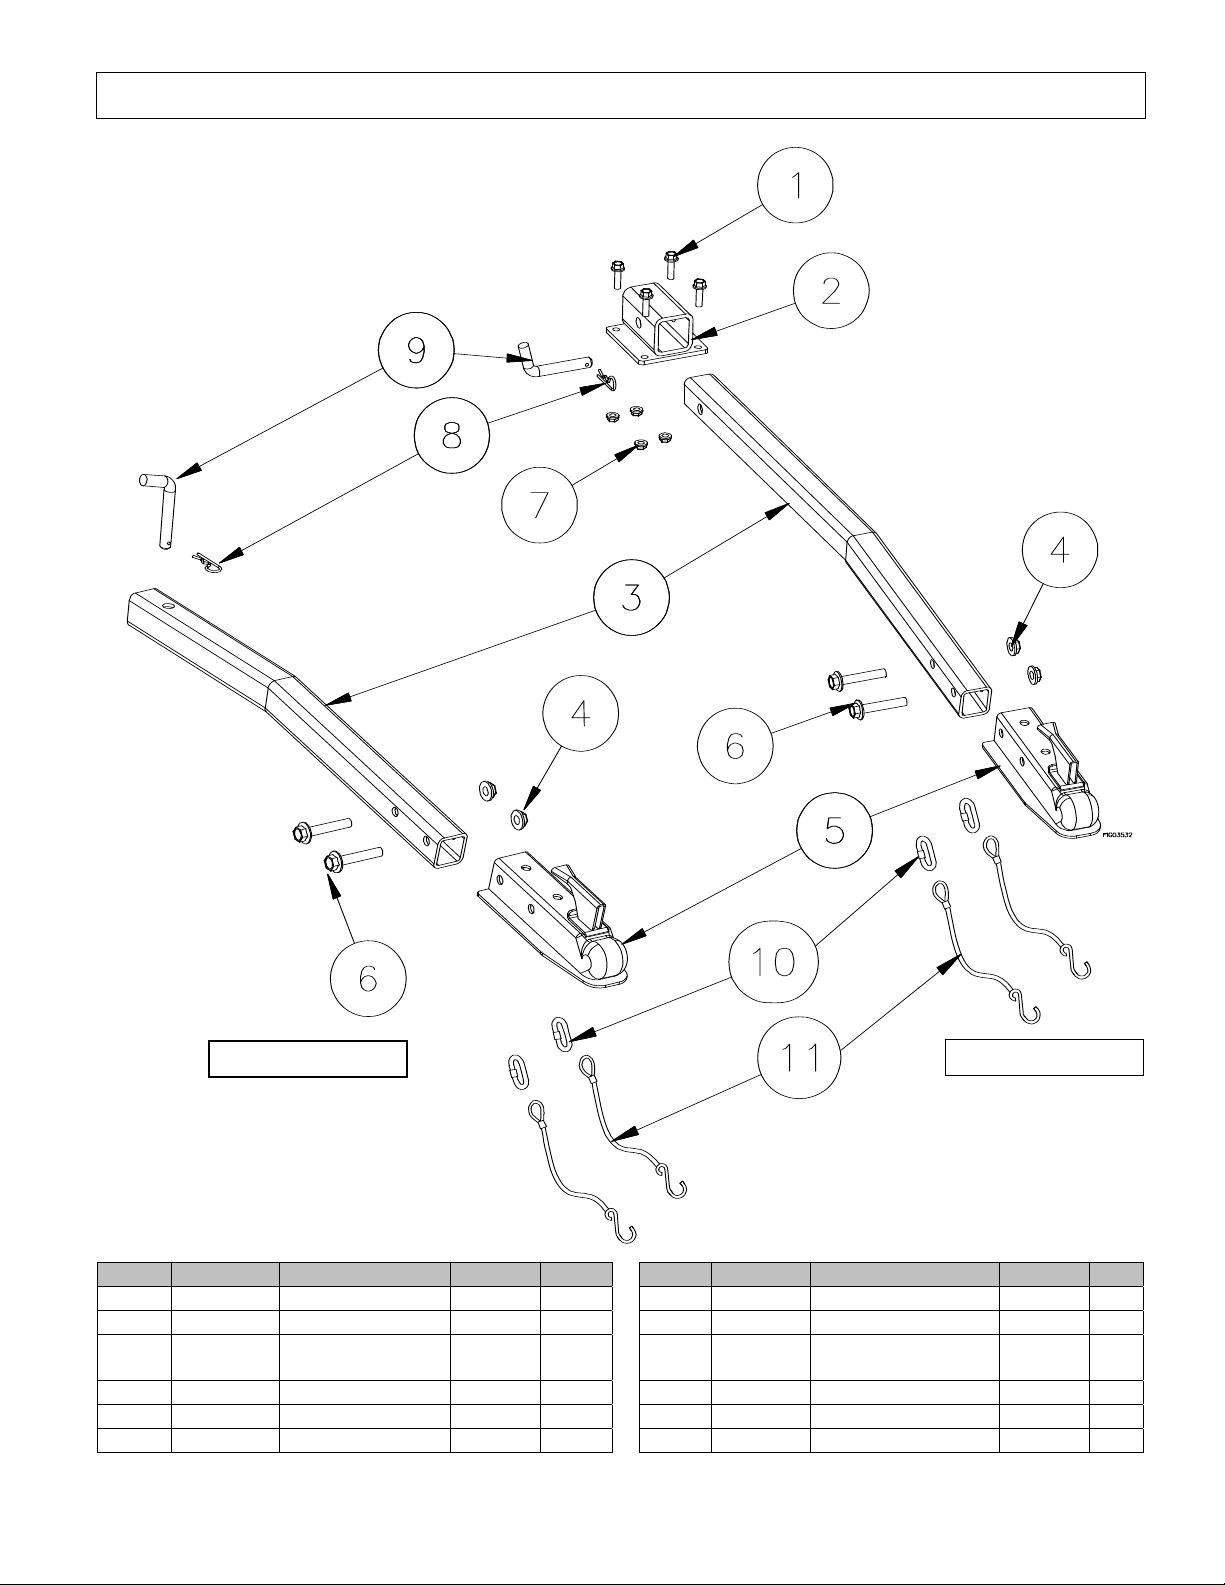
Parts Breakdown – Exploded View
Model # 296107
Model # 296108
Item Part # Description Model Qty Item Part # Description Model Qty
1 82024 3/8” x 1-1/4” Bolt 296108 4 6 82118 1/2” x 3” Bolt All 2
2 783488 Tow socket 296108 1 7 82290 3/8” Lock nut 296108 4
3
4 82291 1/2” Flange nut All 2 9 37459 Hitch pin All 1
5 38587 2” Ball coupler All 1 10 783948 Threaded connector All 2
11 779542 Safety cable All 2
784044
783488
Tow bar
296107
296108
1 8 30312 Cotter pin All 1
9
Page 10
Safety Instructions
WARNING
Carefully read and make sure you understand the following safety information before towing the
Stump Grinder.
Improper use or maintenance of the Stump Grinder can result in serious injury to the operator
or bystanders.
Safety in Moving and Towing the Stump Grinder
WARNING
The Stump Grinder is very heavy. It can crush and cause serious injury if it rolls out of control or tips over.
Follow the instructions below for safely moving and towing the Stump Grinder.
Safety – Before Use
Always inspect your Stump Grinder before each use, and repair as needed, to keep it in safe working condition:
• Read manual. Do not allow anyone to tow the Stump Grinder who has not read the Owner’s Manual.
• Review safety rules. Before towing this Stump Grinder, review the instructions for safe towing. Failure to
follow these instructions may result in serious injury to the operator or bystanders.
• Mechanical parts. Check to be sure all nuts and bolts are tight to make sure the Stump Grinder is in safe
working condition.
• Tires. Be sure tires are fully inflated and in good repair before towing the Stump Grinder. When adding air
to tires, do not over-inflate -- serious injury could occur if tire explodes.
Safety During Towing
• Read instructions. Review towing safety instructions in your towing vehicle manual.
• Securely attached. Be sure the Stump Grinder is securely attached to the towing vehicle before towing.
• Tires. Be sure tires are fully inflated and in good repair before towing the Stump Grinder. When adding air
to tires, do not over-inflate -- serious injury could occur if tire explodes.
• Added length. Be aware of the added length of the Stump Grinder.
• Speed limit. Never tow this Stump Grinder over 45 mph. Faster speeds may result in loss of control.
• Rough terrain. Be extra cautious and drive slowly when traveling over rough terrain.
• Under the influence. Never tow this Stump Grinder while under the influence of alcohol, drugs, or
medication.
• On public roads. If towing on a public road, make sure to comply with all local, state, and federal towing
requirements. It is the sole responsibility of the purchaser to obtain licensing, trailer lights, safety chains or
signage, as needed to comply.
• Unattended. Turn off the towing vehicle before leaving the Stump Grinder unattended.
• Disconnect before operate. Do not use the Stump Grinder while it is connected to the towing vehicle.
Safety – After use
• Periodic maintenance. Perform periodic maintenance as directed in this manual to keep the Stump Grinder
in safe working condition.
10
Page 11
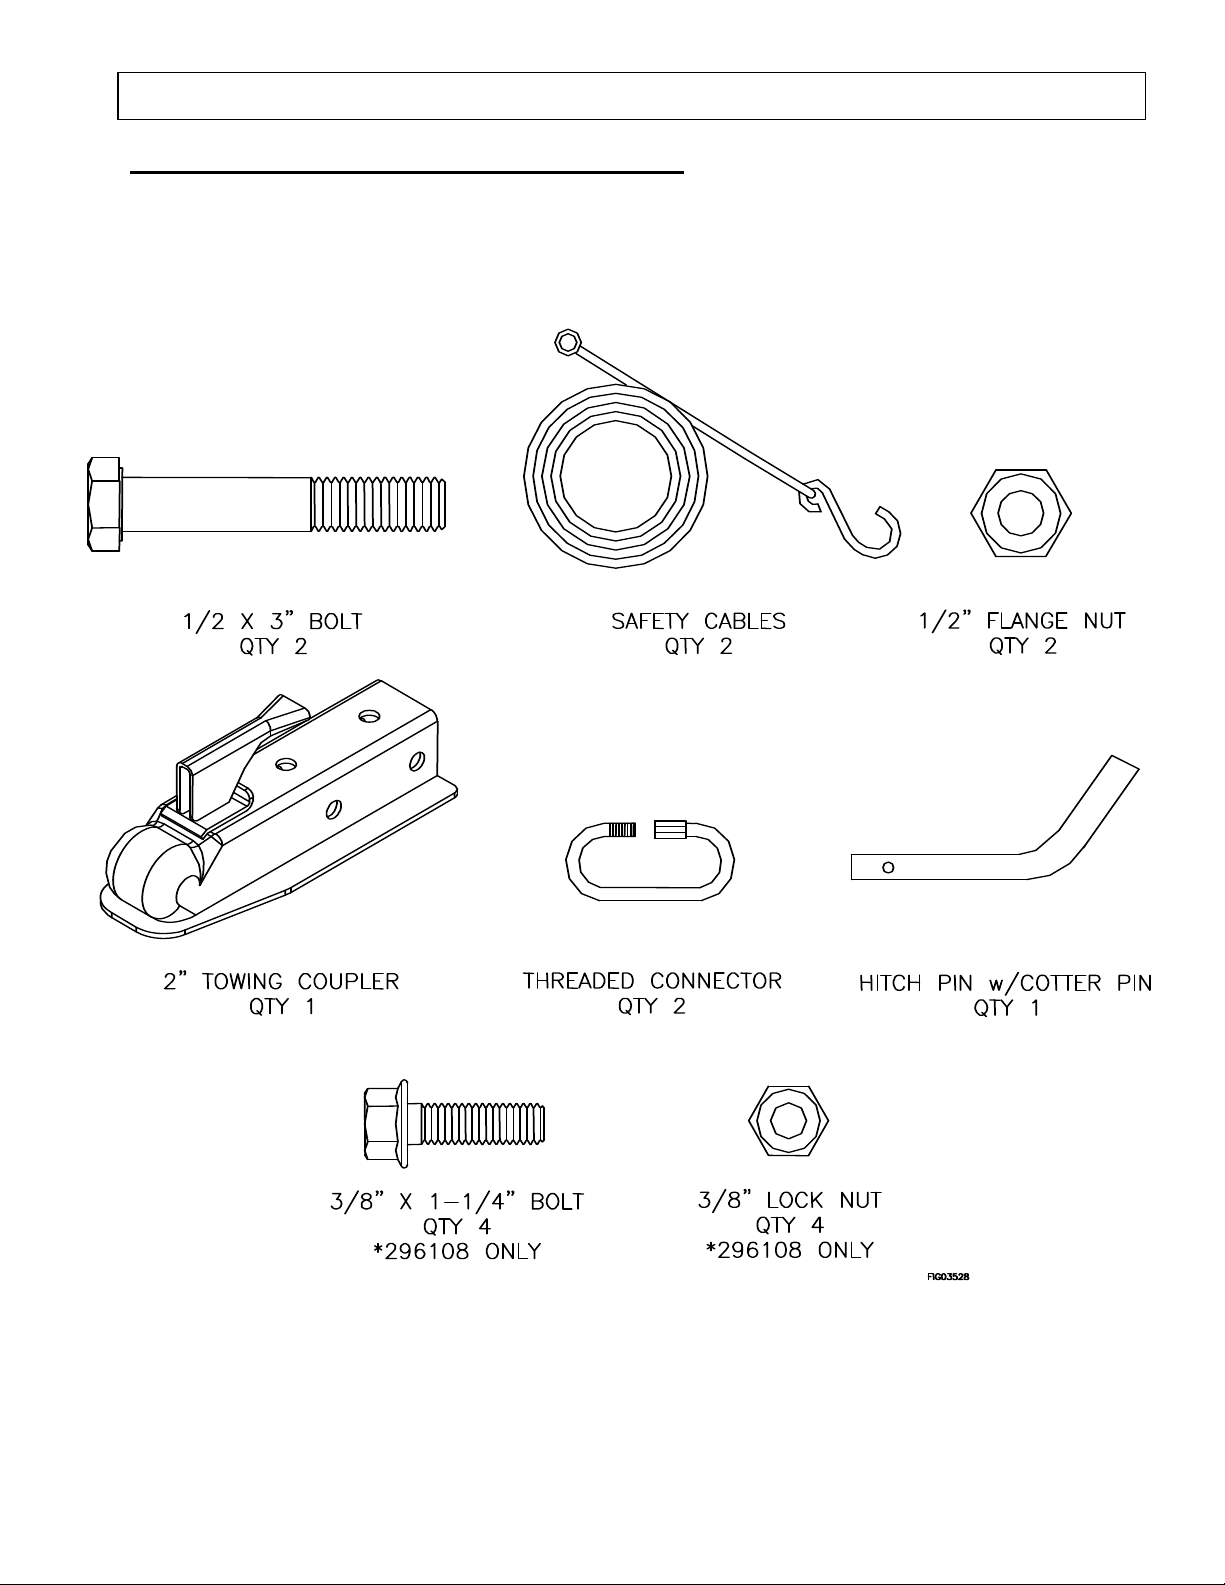
Unpacking
Closely inspect all contents in the shipping carton.
• If you have damaged components: Contact the freight company that delivered the unit and file a
claim.
• If you have missing components: Contact Dosko Customer Service at 1-800-822-0295.
11
Page 12
Assembly Instructions
t
t
t
r
r
t
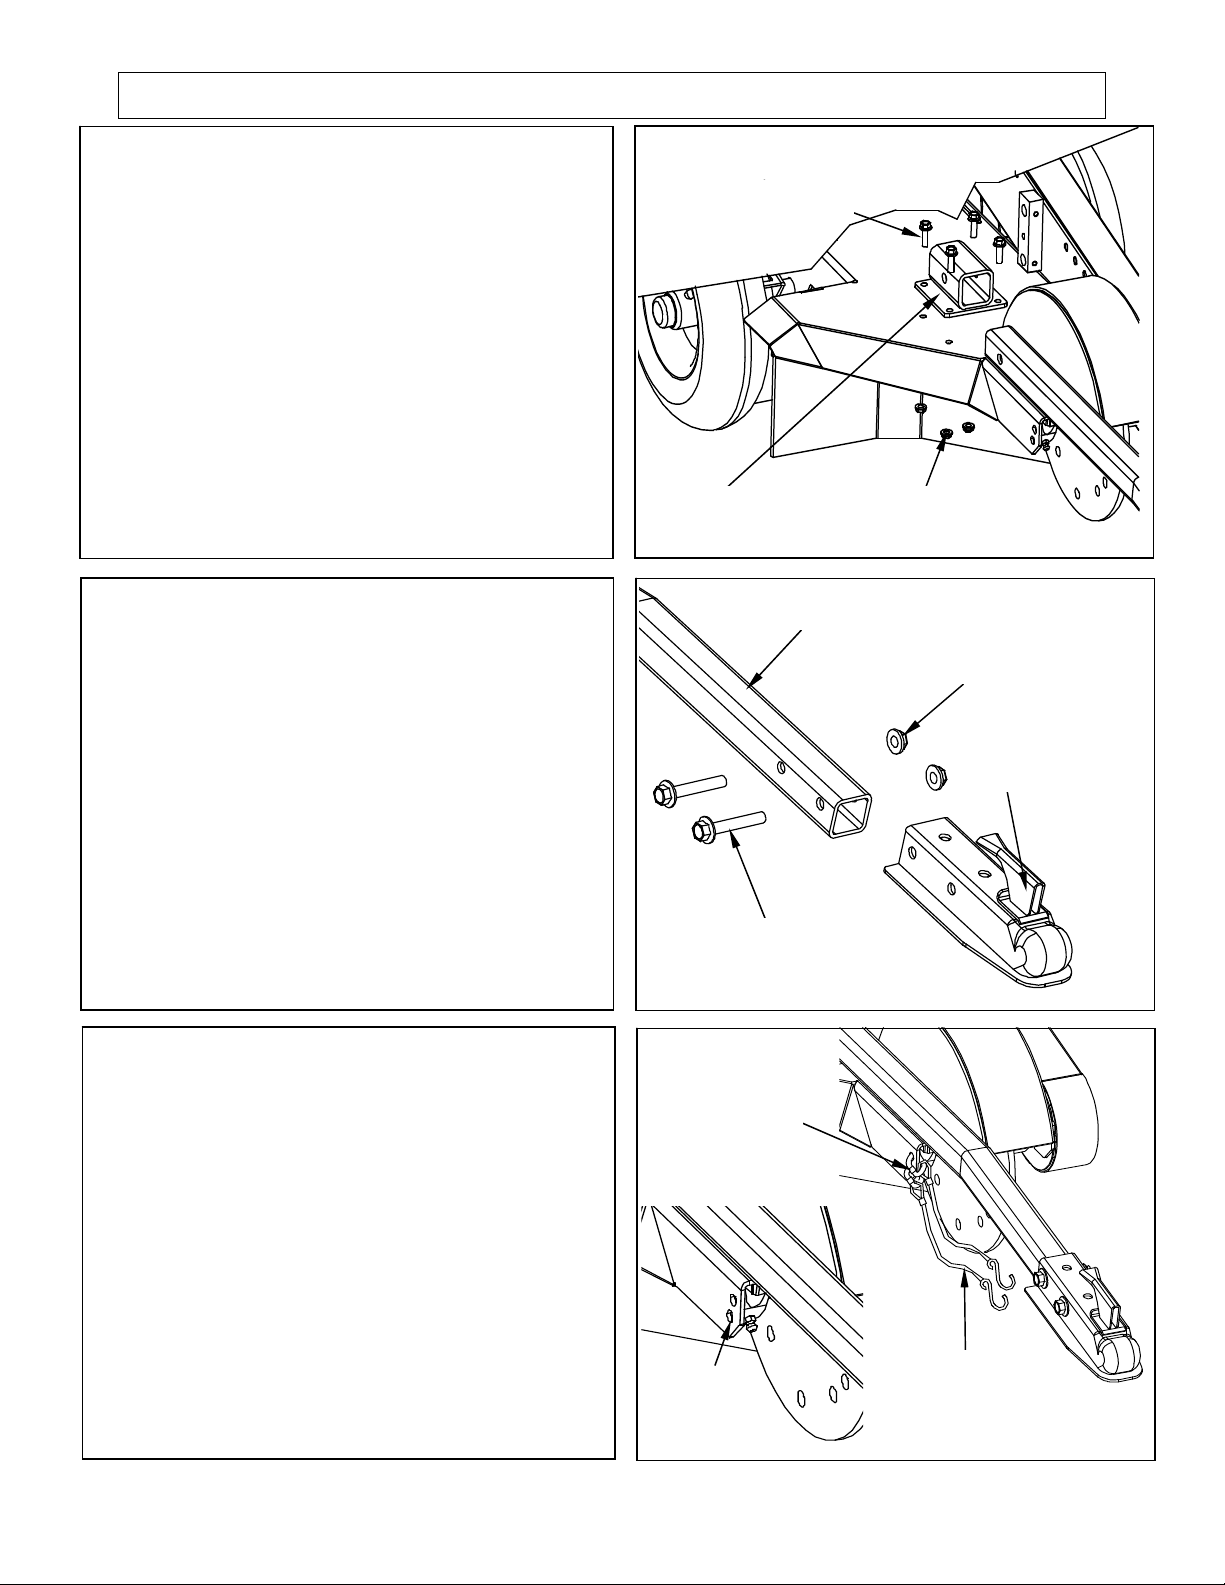
Step 1 (296108 only)
Attach Tow Bar Socket to Stump
Grinder Using (4) 3/8” x 1-1/4” Bolts
and (4) 3/8” Class G Locking Nuts.
Tighten Bolts to 19 lb-ft torque.
3/8” bol
Step 2
Attach coupler to Tow Bar by using (2)
1/2” x 3” bolts and (2) 1/2” Class G
Flange Nuts.
Tighten Bolts to a 90 lb-ft torque.
Step 3
Attach Safety Cables to Stump Grinder
by attaching (2) Threaded Connectors to
the Mounting Holes on the Stump
Grinder Frame.
Tow bar socke
Tow Ba
1/2” bol
Threaded
connectors
3/8” lock nut
Fig 03534
1/2” lock nu
2” couple
Fig03535
Mount
holes
12
Safety
cables
Fig03536
&
Fig03537
Page 13
Summary of Important Safety Information (cont’d)
t
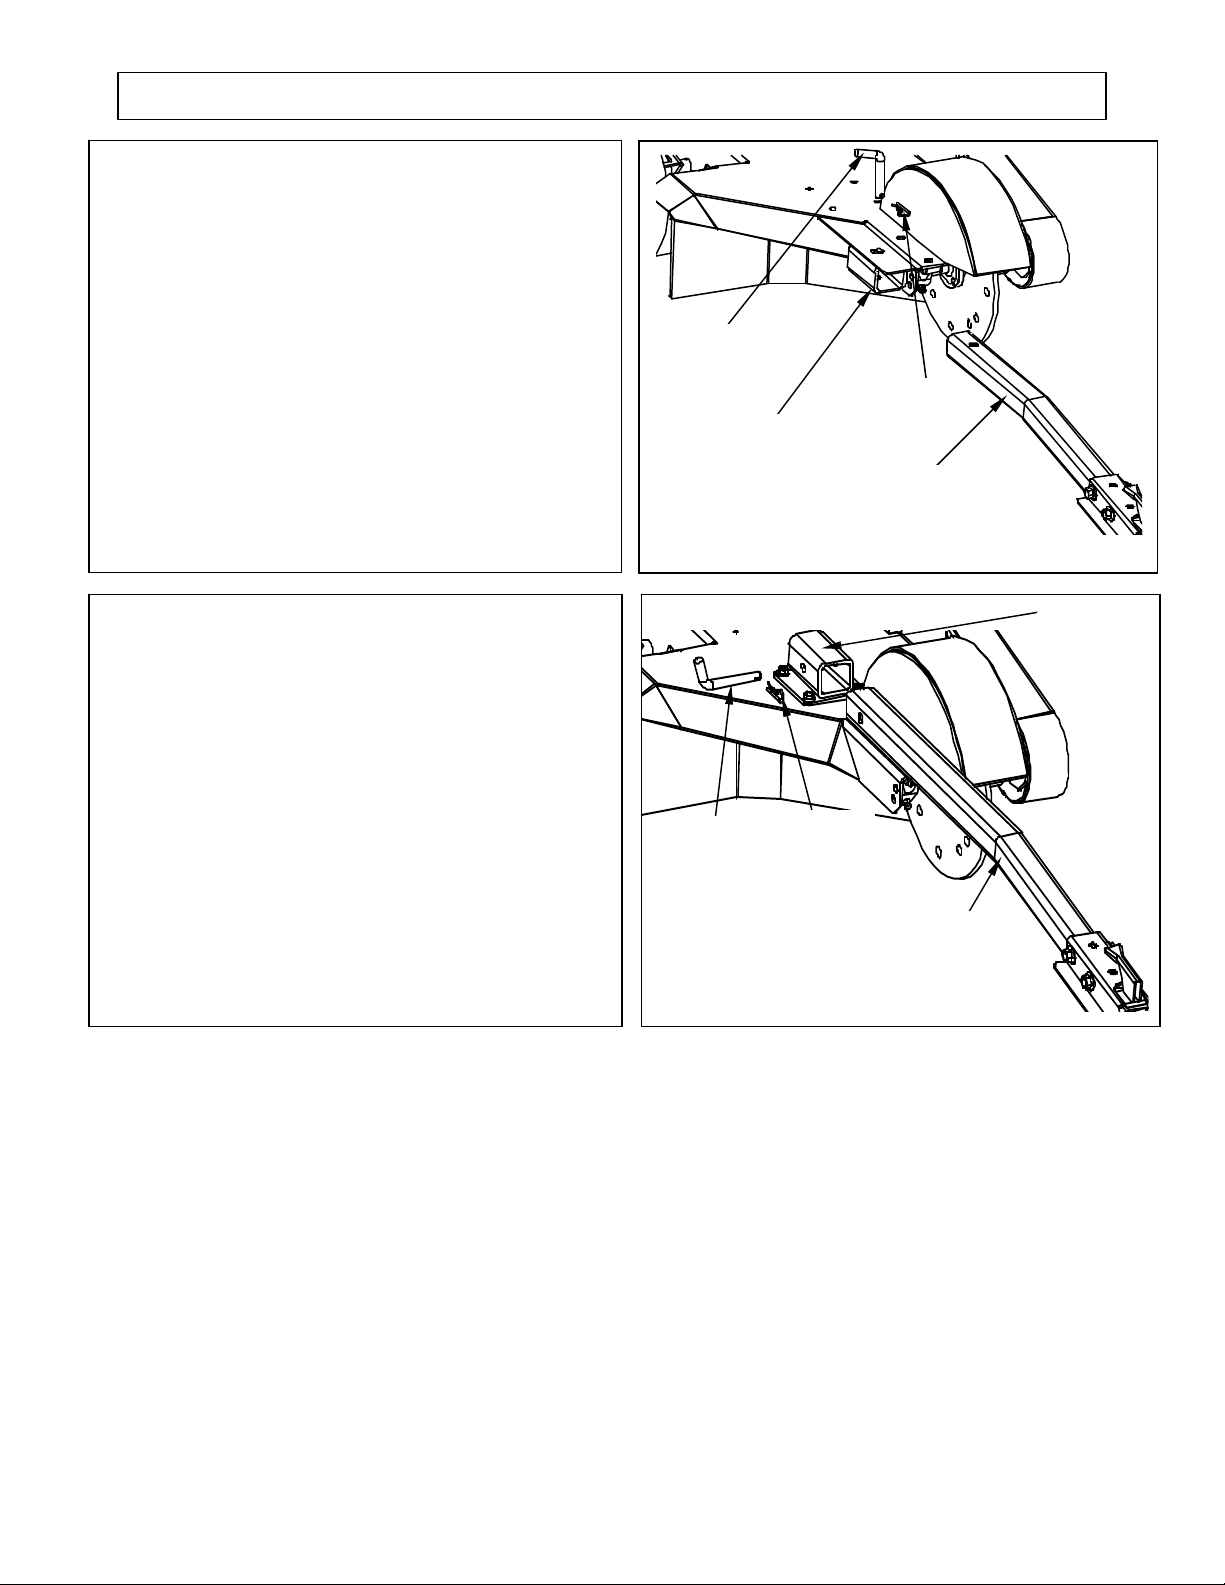
Step 4a (296107 only)
Slide the Tow Bar into the Tow Bar
Socket and secure with Hitch Pin.
Lock Hitch Pin into position using cotter
pin.
Step 4b (296108 only)
Slide the Tow Bar into the Tow Bar
Socket and secure with Hitch Pin.
Lock Hitch Pin into position using cotter
pin.
Hitch pin
Tow bar socke
Hitch Pin
Fig03531
Cotter pin
Tow Bar
Fig03531
Tow Bar
Socket
Cotter
Pin
Tow Bar
13
Page 14

This page has intentionally been left blank.
14
Page 15

Limited Warranty Policy
August 2010
This warranty is limited to Dosko units distributed by Great Northern Equipment Distributing, Inc. 20195 South
Diamond Lake Road, Rogers, MN and sold by dealers or distributors authorized to sell that product. The
following warranty applies to Dosko units purchased at retail or placed into rental service on or after
August 1st 2010.
Dosko warrants each Dosko unit to be free from defect in factory materials and workmanship for a period of 90
days from date of purchase or first rental. See limitations and time parameters stated below.
DOSKO SHALL NOT BE LIABLE FOR ANY IMPLIED WARRANTIES INCLUDING THE IMPLIED
WARRANTIES OR MERCHANTABILITY AND FITNESS ON ITS PRODUCTS AFTER THE 90 DAY
PERIOD.
DOSKO WARRANTY ON ANY OF ITS PRODUCTS SHALL BE VOID IF THE PRODUCT HAS BEEN
MODIFIED BY THE ADDITION OF PARTS OR THE DELETION OF PARTS. IN THIS EVENT, TO THE
EXTENT PERMITTED BY FEDERAL, STATE OR LOCAL LAWS, DOSKO SHALL BE UNDER NO
LIABILITY WHATSOEVER IN RESPECT TO ANY LOSS, DAMAGE, INJURY, OR EXPENSE ARISING
FROM ANY DEFECTS IN ANY DOSKO PRODUCTS.
The warranty period, as explained in the Warranty Policy, is for 90 days from the original date of sale. The fact
that our product is repaired, or parts are replaced during the original 90 day period, does not extend the
expiration date of the original warranty due to any loss of time resulting from failures. This warranty shall not
apply to any Dosko product which has been modified, repaired, or altered in such a manner as to affect its
stability, performance or operation, nor which has been subjected to misuse, abuse, negligence or accident.
The owner is responsible for all regular maintenance as explained in the operator’s manual. Neglect in regular
maintenance or failure to replace normal wear items such as knives, bed knife, lubrication, oils, filters, belts,
bearings, etc. may void warranty.
Your authorized Dosko dealer will repair or replace, any parts that are found to be defective within the warranty
period. ALL WARRANTIES MUST BE PRE-APPROVED through Dosko warranty department prior to any
work being done. Failure to do so will void warranty and reimbursement will not be permitted. Proof of
purchase date must be provided.
In order to register for the warranty on your new Dosko unit, the dealer or rental owner should fill out and
return to Dosko the enclosed warranty registration cards within ten (10) days after your purchase.
“No Warranty on Purchased Wear Parts”
Purchased wear parts (example: tires, battery, engine, belts, spark plugs, etc.) are not warranted by Dosko.
Description of Limited Warranty of Major Component Parts
Major component failures will be handled according to Manufacturers warranty statement. Problems and
defects in the engine should be referred to your authorized engine repair dealer. Other major component
failures will be handled according to appropriate manufacturers warranty statement otherwise 90 day warranty
applies.
Limited Warranty of Frames/Fabrication
Dosko warrants any steel frame, tow bar, handlebar or chute for a period of two (2) years from original date of
purchase to be free from defects.
20195 So. Diamond Lake Rd, Ste 100 * Rogers, MN 55374 * Toll-Free: 800.822.0295 * Fax: 763.428.4821
15
Page 16

Great Northern Equipment Distributing Inc.
20195 S. Diamond Lake Rd, Ste 100
Rogers, MN 55374
Made in USA
16
 Loading...