

Dörr SnapShot Multi Mobil 3G 16MP HD Service Manual
SnapShot Multi Mobil
3G 16 MP HD
GB
INSTRUCTION MANUAL
GAME & SURVEILLANCE CAMERA
In order to use the sending function of your
camera successfully you need to set it up with
the help of a PC with Microsoft® Windows
operating system.
doerr-outdoor.de

GB
THANK YOU for choosing this DÖR R quality product.
Please read the instruction manual and safety hints carefully before
fi rst us e. Keep this i nstruction manual together wit h the device f or future use. If o ther people use this device, make this ins truction manual
available. This instruction manual is part of the device and must be
supplied with the device in case of sale.
DÖRR is not liable for damages caused by improper use or the failure
to observe the instruction manual and safety hints.
INDEX
01 | SAFETY HINTS
02 | SAFETY HINTS FOR BATTERIES
03 | PRIVACY POLICY
04 | MOBILE PHONE COSTS
05 | PRODUCT DESCRIPTION
06 | FEATURES
07 | NOMENCLATURE
08 | FIRST USE
08.1 Inser ting the batteries
08.2 Alternative Power Supply
08.3 Inserting SD card
08.4 Ins talling SIM card
09 | CAMERA SETTINGS
09.1 Changing Menu language
09.2 Basic set tings
10 | DOWNLOAD U SET TO YOUR PC
11 | U SET.EXE (SETUP PROGRAM)
11.1 Send Mode
11.2 Operator Parameter
11.3 Send to
11.4 SMS Cont rol
11.5 Recipient
11.6 R ename
11.7 CAM Set ting (Camera Set tings)
11.8 Default A ll
11.9 Save Path
12 | TRANSFER SETTINGS TO THE CAMERA
13 | MANUAL PICTURE TRANSMISSION
14 | CAMERA MENU SETTINGS
14.1 Camera settings CAM
14.2 Motion detector set tings PIR
14. 3 Mobile net work set tings NE T
14.4 Sys tem settings S YS (System)
15 | SMS CONTROL FUNCTION
15.1 List of SMS commands
16 | WATCHING PHOTOS AND VIDEOS ON SCREEN/DELETE
16.1 Display photos and videos on LCD screen
16.2 Delete photos and videos
17 | TEST PHOTO AND VIDEO
18 | MOUNTING THE CAMERA
19 | ORIENTATION OF THE CAMERA
20 | START SURVEILLANCE
21 | CAMERA INSPECTION
22 | CLEANING AND STORAGE
23 | IMPORTANT INFORMATION AND TIPS
23.1 SIM card
23.2 Mobile network
23.3 SD cards
23.4 WiFi® SD cards
23.5 Motion detector
23.6 Light conditions
23.7 Weather protection
24 | TECHNICAL SPECIFICATIONS
22.1 Technical changes
25 | SCOPE OF DELIVERY
26 | ACCESSORY (OPTIONAL)
27 | DISPOSAL, CE MARKING, SIMPLIFIED EU DECLARATION OF CONFORMITY
27.1 Disposal of batteries/accumulators
27.2 W EEE information
27.3 RoHS conformit y
27.4 CE Marking
27.5 Simpli fi ed EU Declaration of Conformity
2

01 | SAFETY HINTS
•
Your camera is fitted with a weatherproof housing according to protection class IP5 4
(dust and splash waterproof). So the camera can be used outdoors. Nevertheless
prot ect the camera from extreme weather conditions and direct sunlight.
•
Make sure to use only fresh batteries of the same type and brand only. When inserting
the ba tteri es, please pay at tention to the co rrect pol arity ( +/-). Please re move bat teries
when the device is not in use for a longer period. Also note chapter "Safety Hints for
Batteries".
•
Do not use re-chargeable bat teries. They may lead to malfunction.
•
LED bulbs cannot be replaced.
•
Do not drop the camera onto a hard surface. Do not use the camera if it has been
dropped. In this case a qualified electrician should inspect the camera before you use
it again.
•
Do not attempt to repair the device by yourself. Risk of electrical shock! When service
or repair is required, contact qualified service personnel.
•
Do not open the camera housing (except the protective cover and the battery cover) –
otherwise the warran ty will become void. The housing may only be opened by qualified
DÖRR GmbH staff.
•
People with cardiac pacemakers, defibrillators or any other electrical implants should
maintain a minimum distance of 30 cm, as the device generates magnetic fields.
•
People with physical or cognitive disabilities should use the camera with supervision.
•
Do not use the camera nearby mobile phones and devices t hat generat e strong electromagnetic fields (e.g. electric engines).
•
Avoid touching the camera lens with your fingers.
•
Protect the camera against extensive dirt. Never use aggressive cleansing agents
or benzine to clean the camera. We recommend a soft microfiber cloth to clean the
outer part s of the camera and the camera lens. Make sure to remove batteries before
cleaning.
•
Store the camera in a dust-f ree, dry and cool place.
•
This device is not a toy. To prevent accidents and suffocation keep the device, the
accessories and the packing materials away f rom children and pet s.
•
If the camera is defective or without any further use, dispose of the camera according
to the Waste Electrical and Electronic Equipment Directive WEEE. For further information, please contact your local authorities.
03 | PRIVACY POLICY
In ever y country, legal data protection rules apply. As these rules may vary per country,
please contact the appropriate authorities to learn about the latest privacy policy in your
country. In any case kindly note:
•
Do not observe public areas
•
Respect the general right of privacy
•
Do not publish pictures showing individuals without having their permission
•
Make awa re of the observed areas with a sign and inform your neighbours and visitors
if necessary
04 | MOBILE PHONE COS TS FOR E-MAILS, MMS, SMS
Services like MMS, SMS and GPRS always cause extra costs. These costs may var y depending on your provider and selected tari and are not covered by the purchase of this
camera. Please cont act your mobile phon e provider f or information about t ari and cost s.
02 | SAFETY HINTS FOR BATTERIES
Only use high-quality batteries of popular brands. When inserting the batteries, please
pay at tention to the correct polarity (+/-). Do not inser t bat teries of di erent types and
always replace all bat teries at the same time. Do not combine used bat teries with fresh
batteries. Please remove batteries when the device is not in use for a longer period. Do
not throw the bat teries into fi re, do no t short-circuit and do not disassemble t hem! Never
charge non-rechargeable batteries – risk of explosion! Remove empty batteries immediately from the device to avoid the leaking of bat tery acid. Remove leaking batteries from
the device immediately. Clean the contacts before inserting fresh batteries. Risk of battery acid burn! In case of contact with bat tery acid, rinse the a ected area immediately
with water and contact a doctor. Batteries can be dangerous to life if swallowed. Keep
batteries away from small children and pets. Do not dispose of bat teries in household
waste (see also chapter "Disposal of Bat teries/Accumulators").
3
07 | NOMENCLATURE05 | PRODUCT DESCRIPTION
Brilliant colour pictures during the day, black and white pictures by night. The nearly invisible infrared fl ash with 60 BL ACK VISION LEDs achieves an illumination up to 2 0 m.
With the incorporated 3G module (SIM card not included) the SnapShot Multi Mobil 3G
16 MP HD sends images via MMS or cost-e ectively via mobile data transmission as
email. Up to 4 mobile phone numbers and/or 4 email addresses can be registered, so the
pictures taken are available to a group of people, almost in real time.
06 | FEATURES
•
MMS/Email image/video transmission via 3G technology
•
SMS control
•
Picture and /or video recording with audio, time lapse function
•
Resolution 16 MP (Sensor 3 MP), MMS size 640 x480 pi xels
•
Supports SD/SDHC and WiFi® SD memory cards up t o max. 32 GB (SD card n ot included)
•
Trigger time 0, 6 seconds only
•
LCD s creen wit h 2 inch / 5 cm color d isplay for m enu set tings and pi cture/ video pl ayback
•
Camera set ting wit h internal keyboard, camera menu in German, English, French,
Italian, Finnish, Czech, Swedish, Danish, Hungarian or Norwegian
•
Camera name, lunar phase, date, time, battery status and termperature
in °C on every image
•
Weatherproof housing with IP 5 4 protection
•
Operation w ith 4, 8 or 12 x A A batteries (not included)
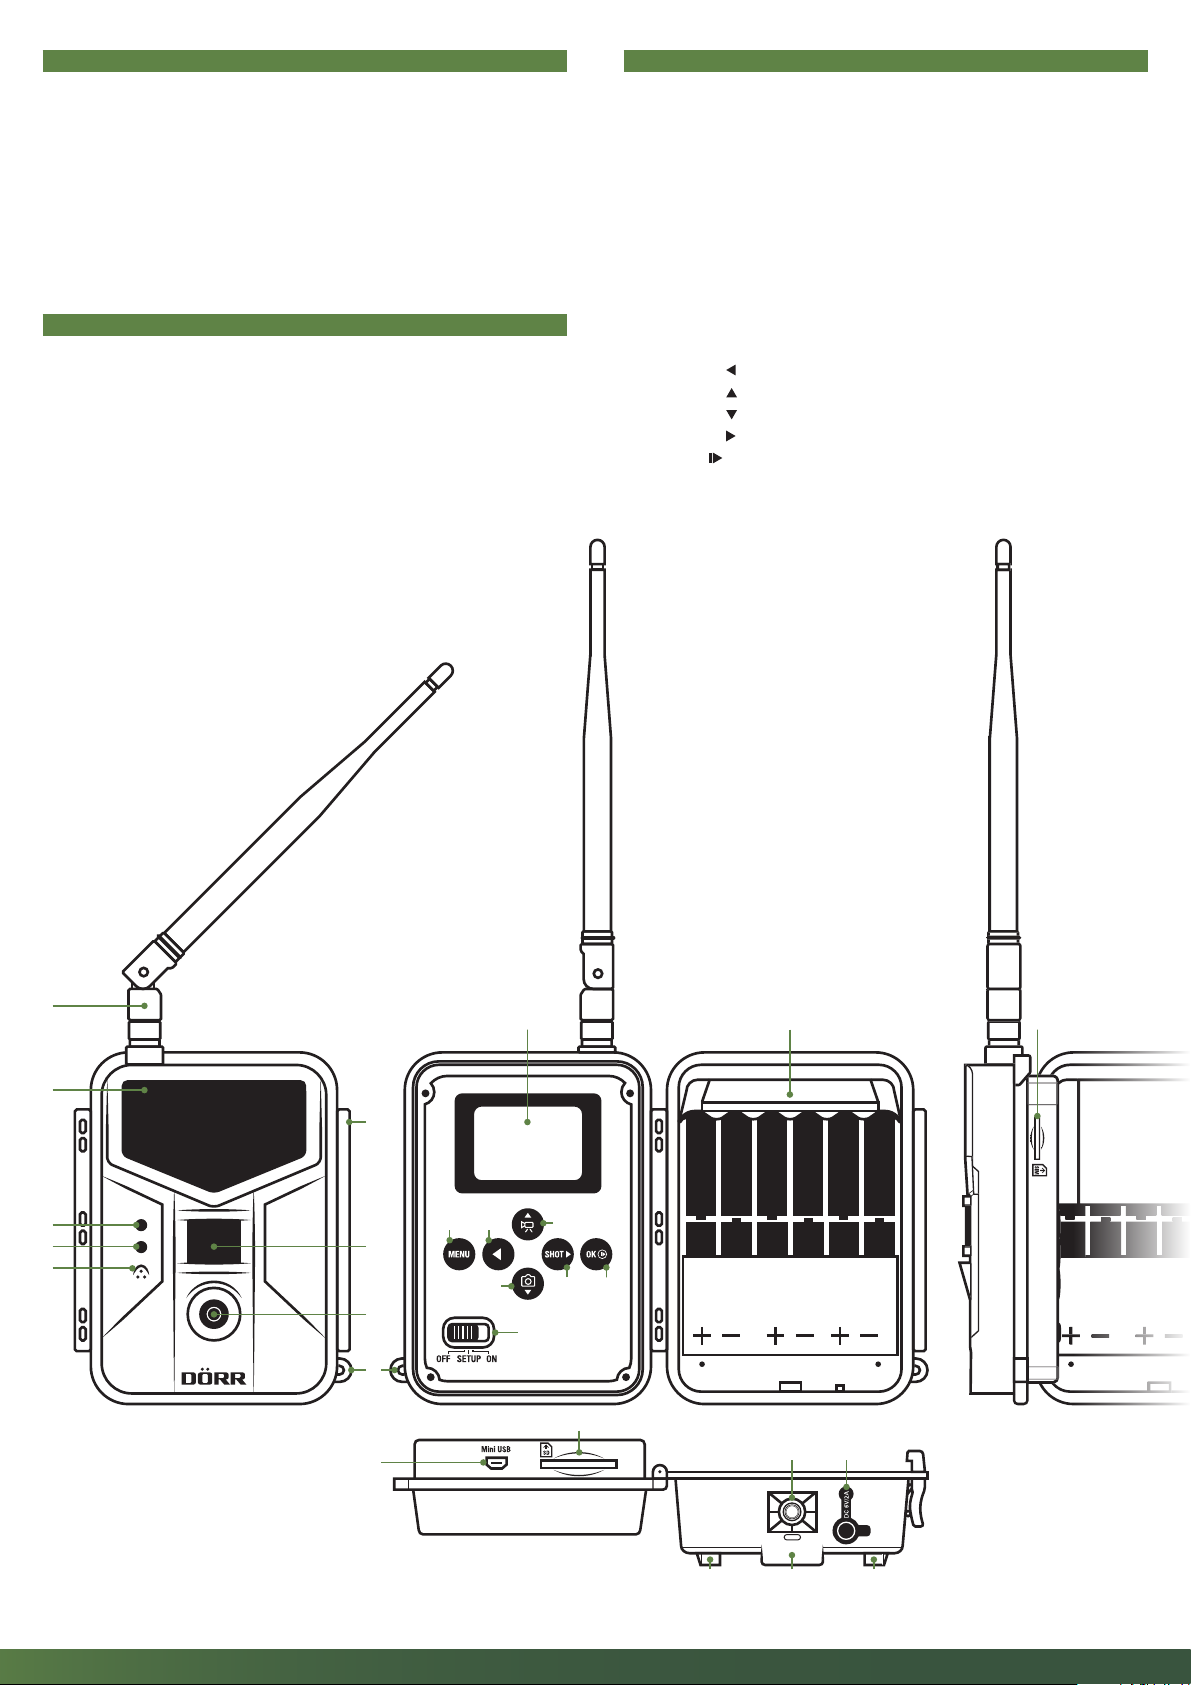
1 Directional antenna
2 Black vision infrared fl ash
3 LED indicator WiFi®
4 LED indicator battery capacit y /motion detector
5 Microphone
6 Tension lock
7 Motion detector/PIR sensor
8 Camera lens
9 Eyelet for U-lock (lock optional)
10 LCD display
11 SIM card slot
12 Menu button
13 Menu button
14 Menu button /Video mode
15 Menu button
16 Menu button
17 OK but ton
/Photo mode
SHOT/Test button photo/video
/Playback photo /video
18 Slide control O /Setup /On
19 Batter y compartment
20 Mini USB port
21 SD card slot
22 ¼" thread mount
23 DC 6V/2A connection
24 Eyelit for mounting st rap
25 Eyelet for cable lock (lock opt ional)
1
10 19
11
2
6
3
4
7
12 13
14
5
15 16 17
8
18
9
21
20
22 23
2524 24
4
08 | FIRST USE
08.4 INSTALLING SIM CARD
08.1 INSERTING BATTERIES
Open the camera releasing the lateral tension lock (6).
Make sure the slide control (18) is in position OFF.
CAUTION
To avoid camera damages always make sure that camera slide control (18) is switched to
position OFF when inserting batteries or changing SD card. Otherwise the camera might be
damaged.
Inser t 4, 8 or 12 AA /1, 5V batteries (optional) into the battery compar tment (19). We recomme nd to use Alk aline mangane se batteries . Pay atte ntion to the c orrect polarit y (+/-).
Make sure to use fresh high-qualit y batteries of the same brand.
To setup the camera, 4 bat teries (6V) are su cient. In obser vation mode please use
12 batteries.
CAUTION
Do not use rechargeable batteries. They may lead to malfunction.
08.2 ALTERNATIVE POWER SUPPLY
Alternatively your camera can be operated with an external 6V lead battery (battery cable required) or an AC Adapter 100-240V (all optionally available from DÖRR). For
further accessor y please see chapter 2 6. The 6V battery as well as the AC adapter need
to be connect ed to the came ras DC6V connec tion (2 3). Any insert ed batt eries do not need
to be removed when using external power supplies. The camera automatically reverts to
the inserted bat teries as soon as the external power supply is disconnected.
The LCD display (10) shows the symbol
when an external power supply is success-
fully connected.
In order to use the mobile tran smission f unction make sure to inser t a SIM card (optional)
into the SIM card slo t (11). Please mind the symbol
next to the SIM card slot (11) which
shows how to insert the SIM card correct ly.
CAUTION
•
Micro-SIM cards and Nano-SIM cards can be used with an adapter only!
•
The PIN request has to be deactivated. You can do this directly in the shop where you
bought the SIM card, or with the help of a mobile phone.
•
Make sure the SIM card is activated for the ser vice you want to use (mobile network,
MMS, SMS)
In order to transmit pictures via MMS or mobile ne twork t he camera needs the par ameter
data of the respective provider and the selected tari . To enter this data please refer to
the chapters 10 ,11,12.
CAUTION
As soon as a SIM card is installed and the slide control (18) is on position ON or SETUP
the ca mera searc hes for net work rece ption. This may tak e up to 1 minute . In SETUP m ode
no set tings can be made in camera menu during network search.
After successful connection, the L CD display (10) will show your network provider and
signal strength.
Mobile Network
The signal strength of mobile networks may vary depending on camera location and
selected provider. During picture transmission the camera needs constant access to the
mobile phone network. Therefore we recommend to use SIM cards of popular mobile
phone providers, as they have the best network coverage.
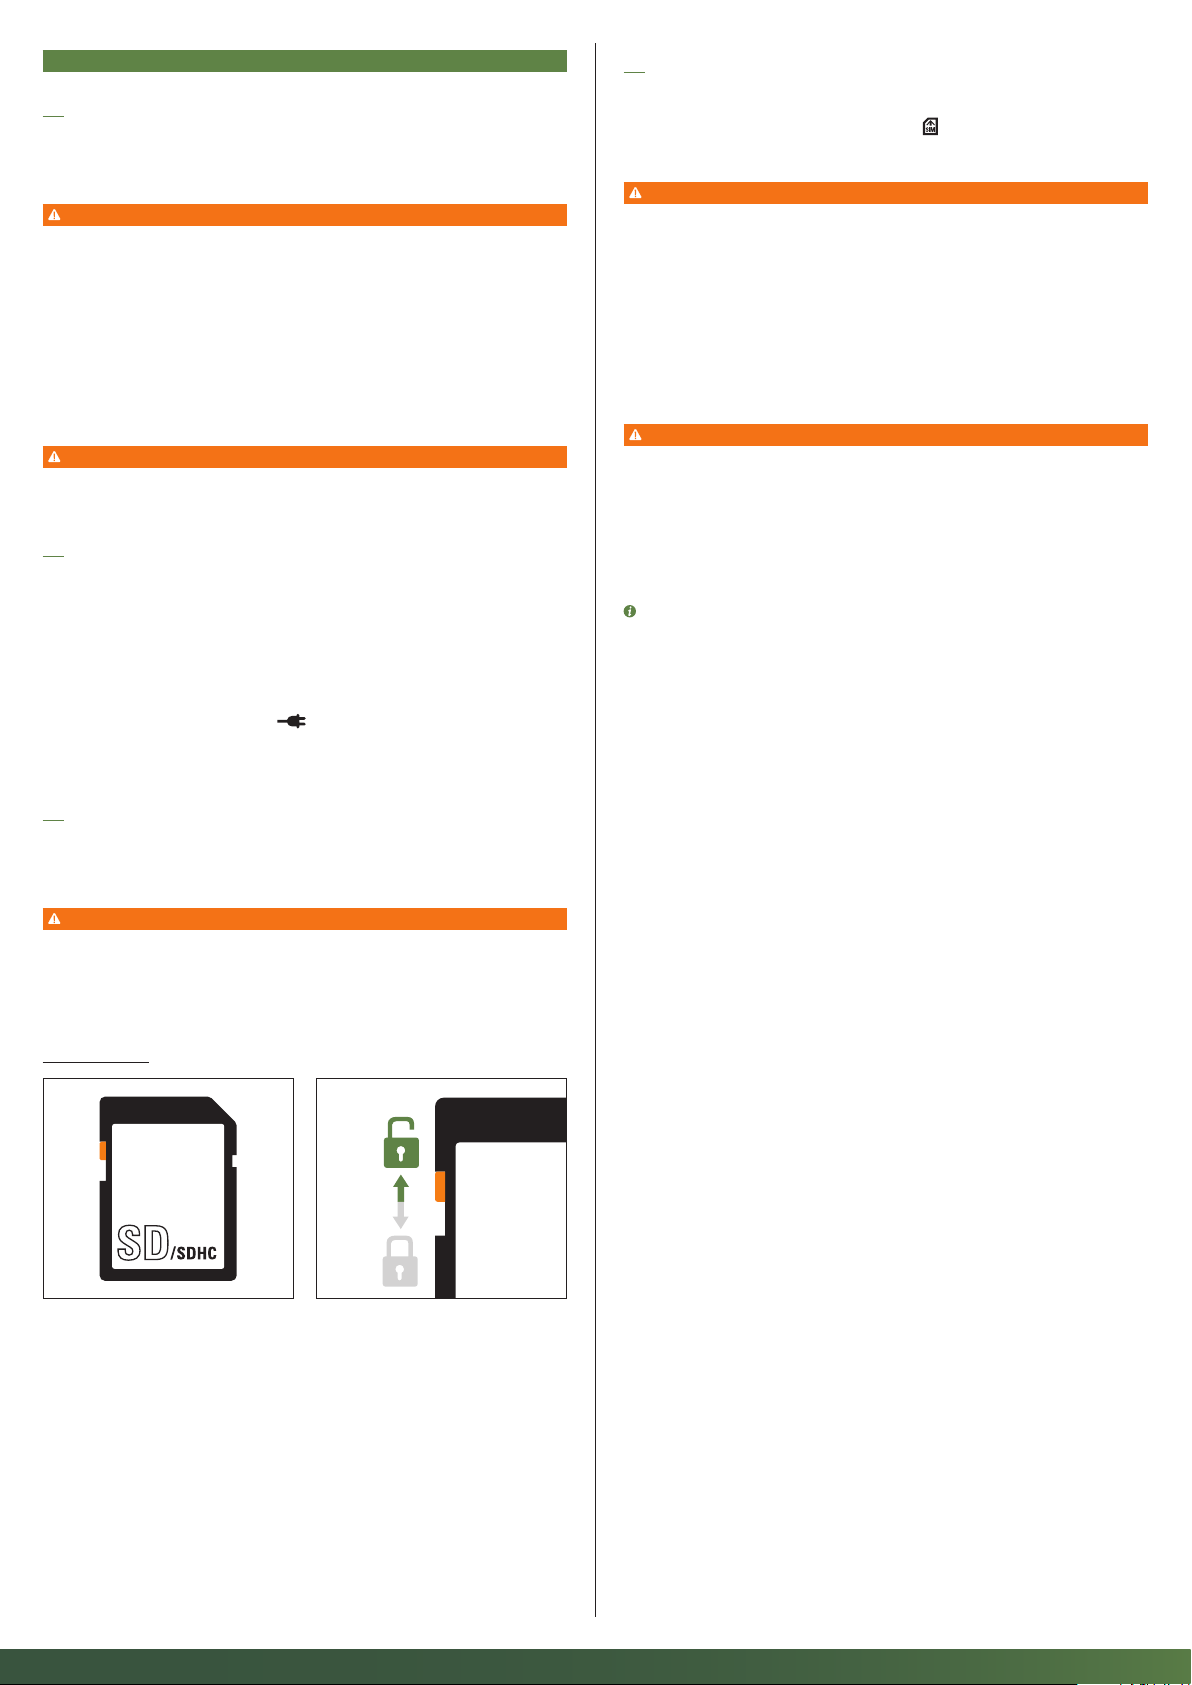
08.3 INSERTING SD CARD
Inser t a SD/SDHC/ WiFi® memory card (optional) with the label facing upwards into the
SD card slot (21).
CAUTION
Make sure that the SD card is formatted and unlocked!
In order to format the SD card with your camera, please read chapter 14.4 Camera menu
SYS "Format SD card".
Unlocking SD card
The camera support s SD/SDHC/WiFi® memory cards from 2GB up to 32GB. In order to
achieve the bes t results we recommend to use SD cards with "Class 10" speed or higher
(optionall y available from DÖRR).
5

09 | CA MERA SETTINGS
Swi tch the slide control (18) to position SET UP. The LCD display (10) will show real time image and the basic settings.
09.1 MENU LANGUAGE
First of all please choose your desired menu language. The preselected menu language is GERMAN.
In order to change the cameras menu language, press the menu but ton (12) then the menu but ton
the menu point "Sprache" (language). Confi rm with OK button
HUNGARIAN OR NORWEGIAN with the help of the menu but tons
(17). Now navigate to the desired language GERMAN, ENGLISH, FRENCH, ITALIAN, FINNISH, CZECH, SWEDISH, DANISH,
(14) or (15). Confi rm your selection with OK button (17). Pressing the menu but ton (12) twice will return you to the
SHOT (16) until you r each the menu register SYS. Pre ss the menu bu tton (15) and select
main screen.
09.2 BASIC SETTINGS
Camera is in pho to mode
Trigger mode (PIR)
P
Net work provider name
.....
Indication o f signal strengt h
8Picture r esolution 8 Mega Pixels
8MP
00099/00111M
dd/mm/yy
hh:mm:ss
Stored pictures/Remaining capacity S D card
Date display
Display time
Battery status
Camera mode Photo
Camera scene Auto
Trigger mode PIR Trigger
PIR Sensitivity Auto
PIR Int erva l 1 min
Work time 1, 2, 3, 4 OFF
In Set up mode, the camera au tomatically switches o after 3 minutes if no button input is detected. In order to en ter SET UP mode again, turn t he camera o and switch the slide con trol (18)
to Setup position again.
CAUTION
Some settings can be entered directly in the camera menu – therefore read chapter 14.
Though we recommend to confi gure your camera with the Setup Program on your PC. The Setup of your camera is described in the following chapter 10.
6

10 | DOWNLOAD U SET TO YOUR PC
Requirement: PC with Microsoft® Windows operating system.
1. M ake sure the S D card is inser ted corr ectly (switch off camera first) in the SD card slot (2 1) and th e card is unlocked and format ted. See chapter 14.4 ca mera menu SYS "For mat SD card ".
2. S witch the slide control (18) to position SETUP.
3. Press t he menu but ton (12).
4. Select the menu register NE T with the menu button SHOT
message "Setup tool has been successfully dow nloaded to SD card". Pressing Menu button (12) closes this message again. A ZIP file is created on SD card.
5. a) Connect the camera with the Mini USB cable to the PC.
Open the SD card/removable s torage device (e.g.: F:\).
b) Alter nativel y remove the SD card an d insert it in an external SD card reader or t he SD card slot of your P C/Laptop. Before removing the SD card , make sure to sw itch the slide control
(18) to position OFF.
Open the SD card/removable s torage device (e.g.: F:\).
6. Unpack /Unzip the ZIP file on the SD card and open /execute the U Set.exe file.
7. Afterwards a security alert may appear. Please confirm with OK/ YES in order to open t he program..
(16). Choose the menu point " Download Setup" with menu button (15). Confirm with OK button (17). The screen shows the
7
11 | U SET.E XE (SETUP PROGRAM)
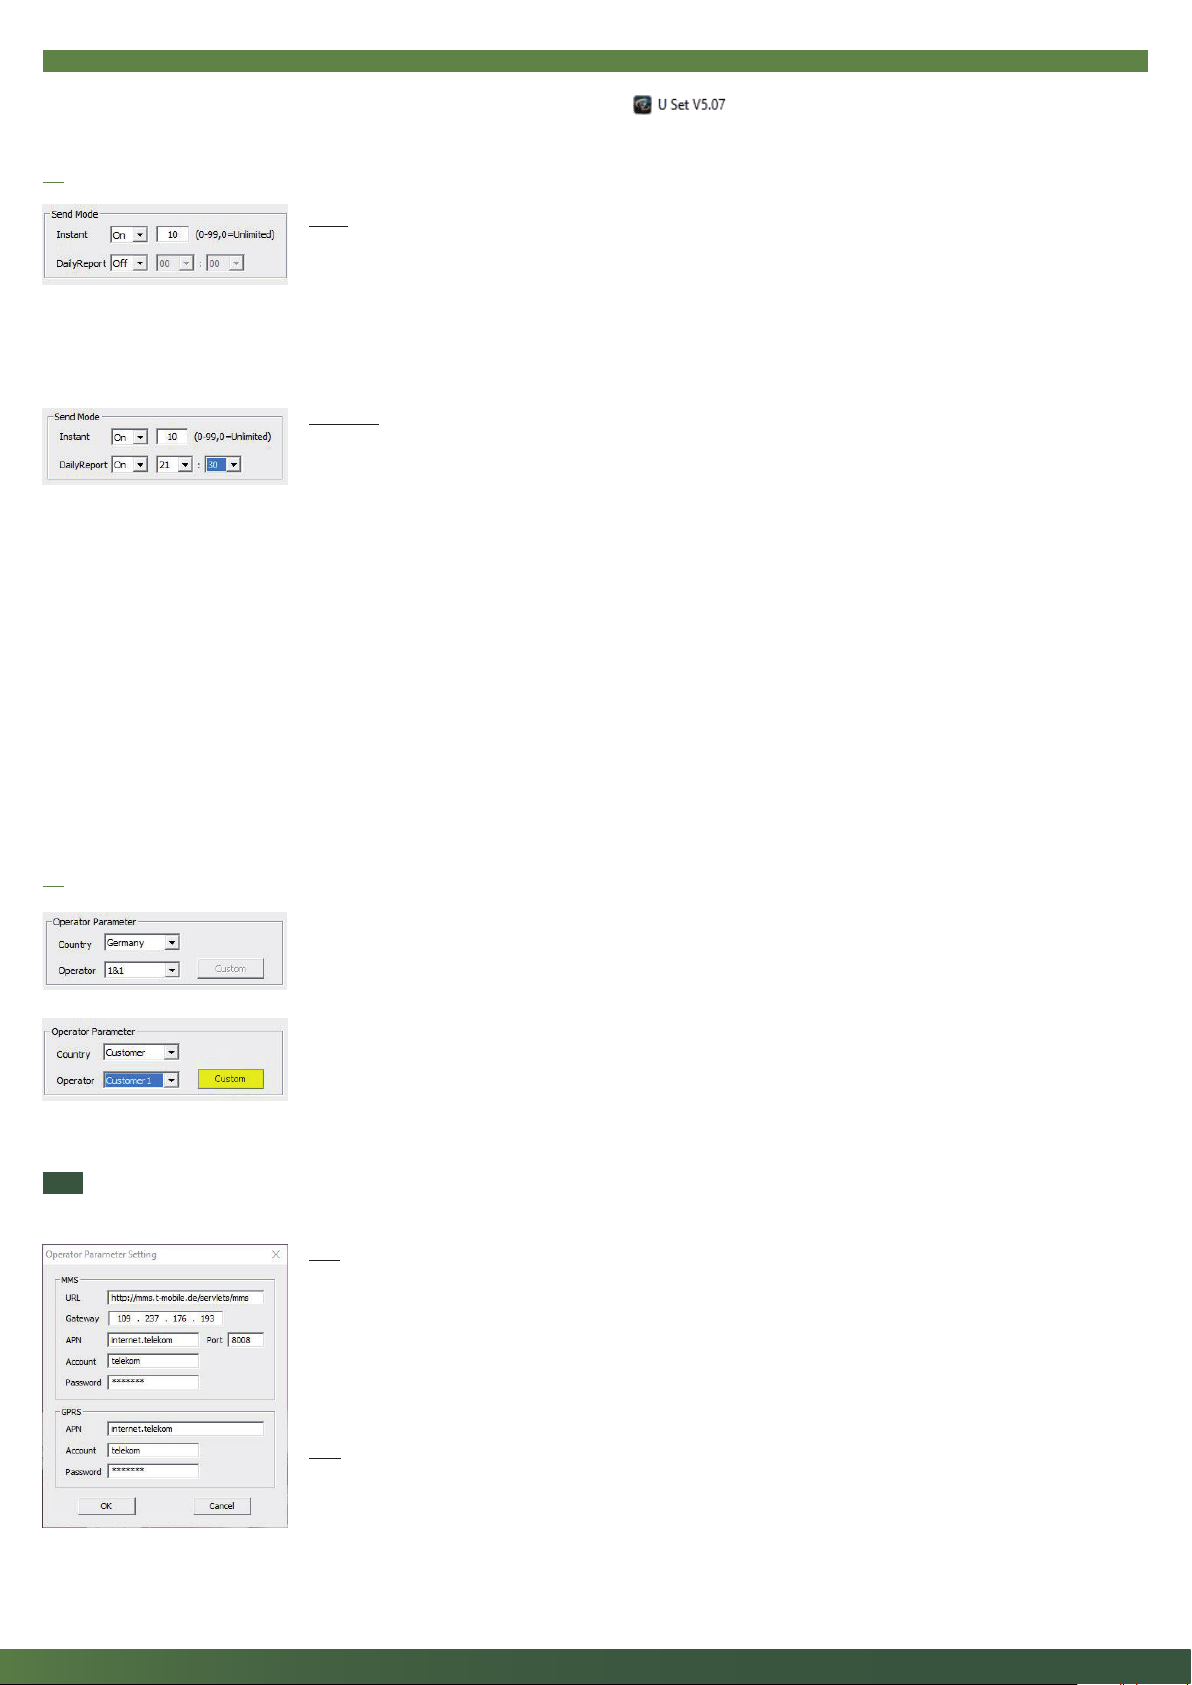
Top left in the main window of the SETUP program (U SET.exe) you will see the version number, e.g.
11.1 SEND MODE
Instant
Choo se "O " to t urn o the sending function of yo ur camera. T he camera wi ll take pict ures/ videos according t o the set tings done a nd store s the
fi les on the SD card. The camera will not transmit any image or v ideo.
Choo se "On" to ac tivate t he sending fu nction. A fter pictur e/vide o release th e camera wil l start t ransmi tting t he fi le . A value bet ween 0- 99 limit s
the amount of fi les transmit ted per day. Choose " 0" (unlimited) to transmit all fi les.
As soon as the maximum number of transmitted fi les is reached, the camera will stop sending for this day. You will get a notifi cation in the last
pictures email subject: " Reached max number, stop sending today"
Daily Report
O Camera will not send a daily report.
On Camera sends a daily report on the activities of the last 24 hours .
Set a time (e.g. 21:30 o’clock) when the report should be sent .
The daily report contains the following information:
Photo mode Last picture – amount of the recorded pictures during the last 24 hours, as well as date, time, tempera-
ture, bat tery status , signal str ength, already used storage and free s torage at the momen t of the report..
Video mode Amount of recorded videos in the last 24 hours as well as date, time, temperature, battery status, signal
strength, already used storage and free storage at the moment of the report .
.
Pictue/Video combination mode Amount of recorded photos/videos as well as date, time, temperature, battery status, signal strength,
already used storage and free storage at the moment of the report.
11.2 OPERATOR PARAMETER
Choose the countr y where the camera will be operated from the drop down menu.
Select the Operator of the inser ted SIM card from the drop box menu
If your network provider is not preset, choose C ountry – Customer and Operator Cus tomer 1. The window "Custom" now becomes selectable.
By clicking the "Custom" window a new window opens. You may now en ter the MMS and/or GPRS operator set tings manually. The following example shows T-Mobile, Germany.
NOTE The network provider data is in the scope of delivery of your SIM card. You may also contact your network provider and ask for this data.
MMS
URL Enter the website
Gateway Enter the IP address
APN Enter the access address (Access Point Name)
Port Enter the MMS Port
Account Enter the account name
Password Enter the password
GPRS
APN Enter the access address (Access Point Name)
Account Enter the account name
Password Enter the password
Save your set tings with "OK" or reject w ith "Cancel" – afterwards this window will close again.
8

11.3 SEND TO
Phone Picture transmission via MMS to a MMS capable phone. You may enter up to 4 mobile phone numbers, which will all receive the
picture (follow ing named "Recipients/Phone Number 1-4 ").
Email Picture transmission via GPRS to an email address. You may enter up to 4 email addresses, which will all receive the picture/video
(following named " Recipients/ Receive Email 1-4").
Email Size Selection
Big Photo/Video
Choose "Big Photo/ Video", if you want to receive high resolution pictures or 5 sec videos.
NOTE
•
Choose PIR Interval or Time Interval, respectively the combination (both) and mind to give the camera the time to transmit high resolution
picture/videos successfully.
•
The more MMS /Email recipients you enter, the longer the camera needs to transmi t successfully.
Small Photo
In order to reduce to data consumption choose "Small Photo" (images are scaled down to max. 2 00KB).
CAUTION
NO videos can be sent in the "Small Photo" mode!
Email Setting
When " Send To – Email" is choosed, the button Email Setting becomes selectable. The window "Sender Email Set ting" will open as soon as you
click "Email Setting".
Choose your email provider of your email address from the drop box menu. (This example shows gmail (googlemail)).
If your email provider is not preset, choose "Other" from the Select Email drop box menu. Following you are now able to enter the data of your
email provider manually. Required data are SMTP Server, Secure Type as well as SMTP Por t.
You may ask your email provider for the ser ver data or fi nd the information on the o cial homepage of your provider.
Email: Enter your full email address
Accoun t: Enter your full email address
If you log in your emails with an account name, enter your user/account name in the Account box.
Enter your email password in the password box. Set the checkmark "Show password" in order to show the password input. W ithout t he checkmark the input is concealed. Mind small and capital letters, numbers and special characters.
Confi rm the settings with "OK". Pressing "Cancel" discards the input.
9
 Loading...