

dormakaba EAD WRU200 User Manual
User Manual B-Net 93 60 BECO service module
7.3.4 Start page
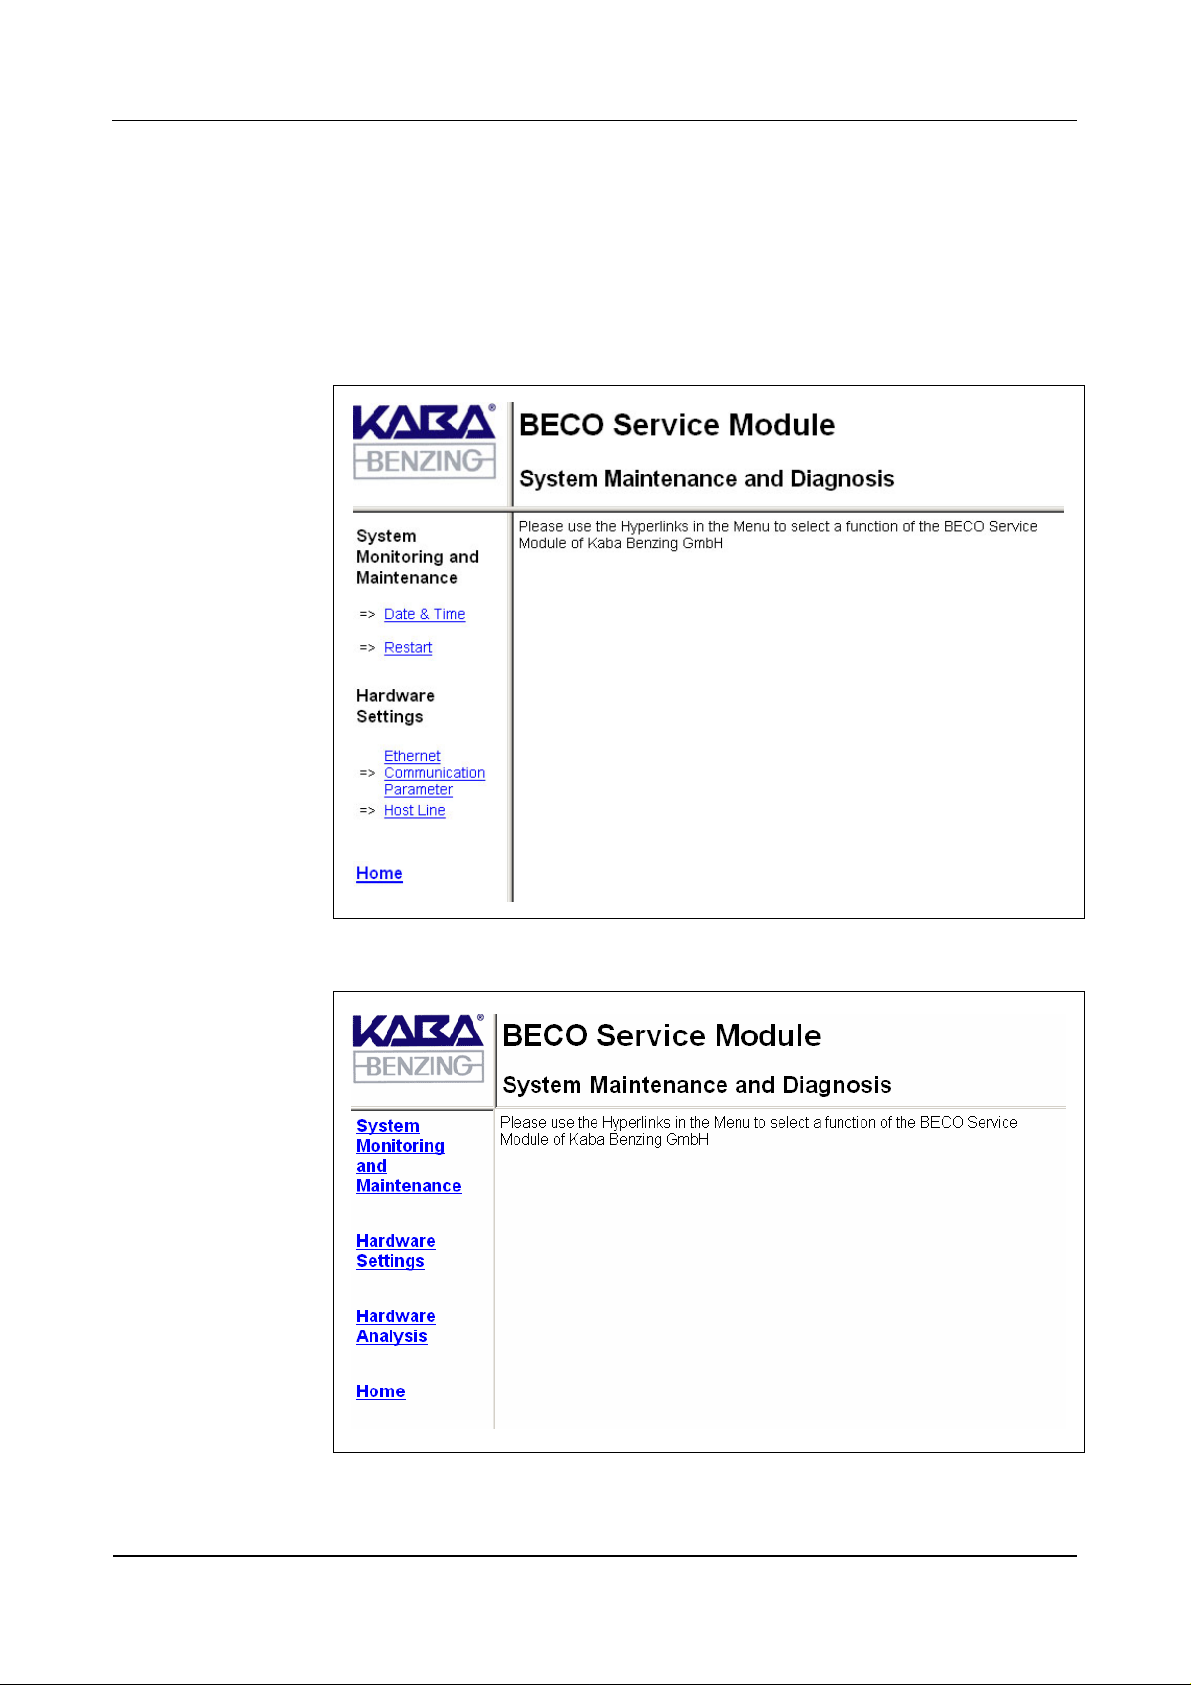
After you have logged in, the service function’s start page is displayed. On the left
hand side below the company logo is the main menu and to the right side the
dialog box.
By clicking one of the main menu items, a submenu with the individual function
calls displays. The particular function or information displays in the dialog box.
Fig. 30: Start page local user
Fig. 31: Start page root
01/2006 © Kaba Benzing GmbH 51

BECO service module User Manual B-Net 93 60
7.3.5 Overview of functions
Authorization root
Authorization local user
Initial startup
Repair / exchange
Diagnosis
Information
Function Description Chapter
System monitoring and maintenance
7.3.6
Program version Display of program version 7.3.6.1 X X
File system maintenance Formatting of file systems 7.3.6.2 X X
Date & time Display/set date and time 7.3.6.5 X X X X X
Security Management of access rights to the service
module
7.3.6.6
7.3.6.7
X X
Software option protection License key 7.3.6.8 X X
Network boot parameters Settings for remote boot 7.3.6.9 X X
Restart Remote-controlled reboot of BECO
7.3.6.10
X X X X X
Hardware settings
Ethernet communication
Setting of network parameters 7.3.7.1 X X X X
7.3.7
parameters
Serial line communication
Setting of serial interfaces 7.3.7.2 X X
parameters
Reader Setting of rea der parameters 7.3.7.3 X X
Host Line Setting of host line 7.3.7.4 X X X X
Sub Line Setting of sub-partyline 7.3.7.5 X X X
Serial number Display/modify device serial number 7.3.7.6 X X
RTC calibration Alignment of hardware clock 7.3.7.7 X
Modem setup Initialization of modem 7.3.7.8 X X X
Setup list List with all hardware settings 7.3.7.9 X X X X
Hardware analysis
7.3.8
Hardware version Display of hardware versions 7.3.8.1 X X
SRAM option Show optional memory 7.3.8.2 X X
Memory size Determine memory si ze 7.3.8.3 X X X
EEPROM dump Read-out internal EEPROM 7.3.8.4 X X X
Display test Display test 7.3.8.5 X X
Digital I/O test Testing of inputs and outputs 7.3.8.6 X X
52 © Kaba Benzing GmbH 01/2006
User Manual B-Net 93 60 BECO service module
7.3.6 System monitoring and maintenance
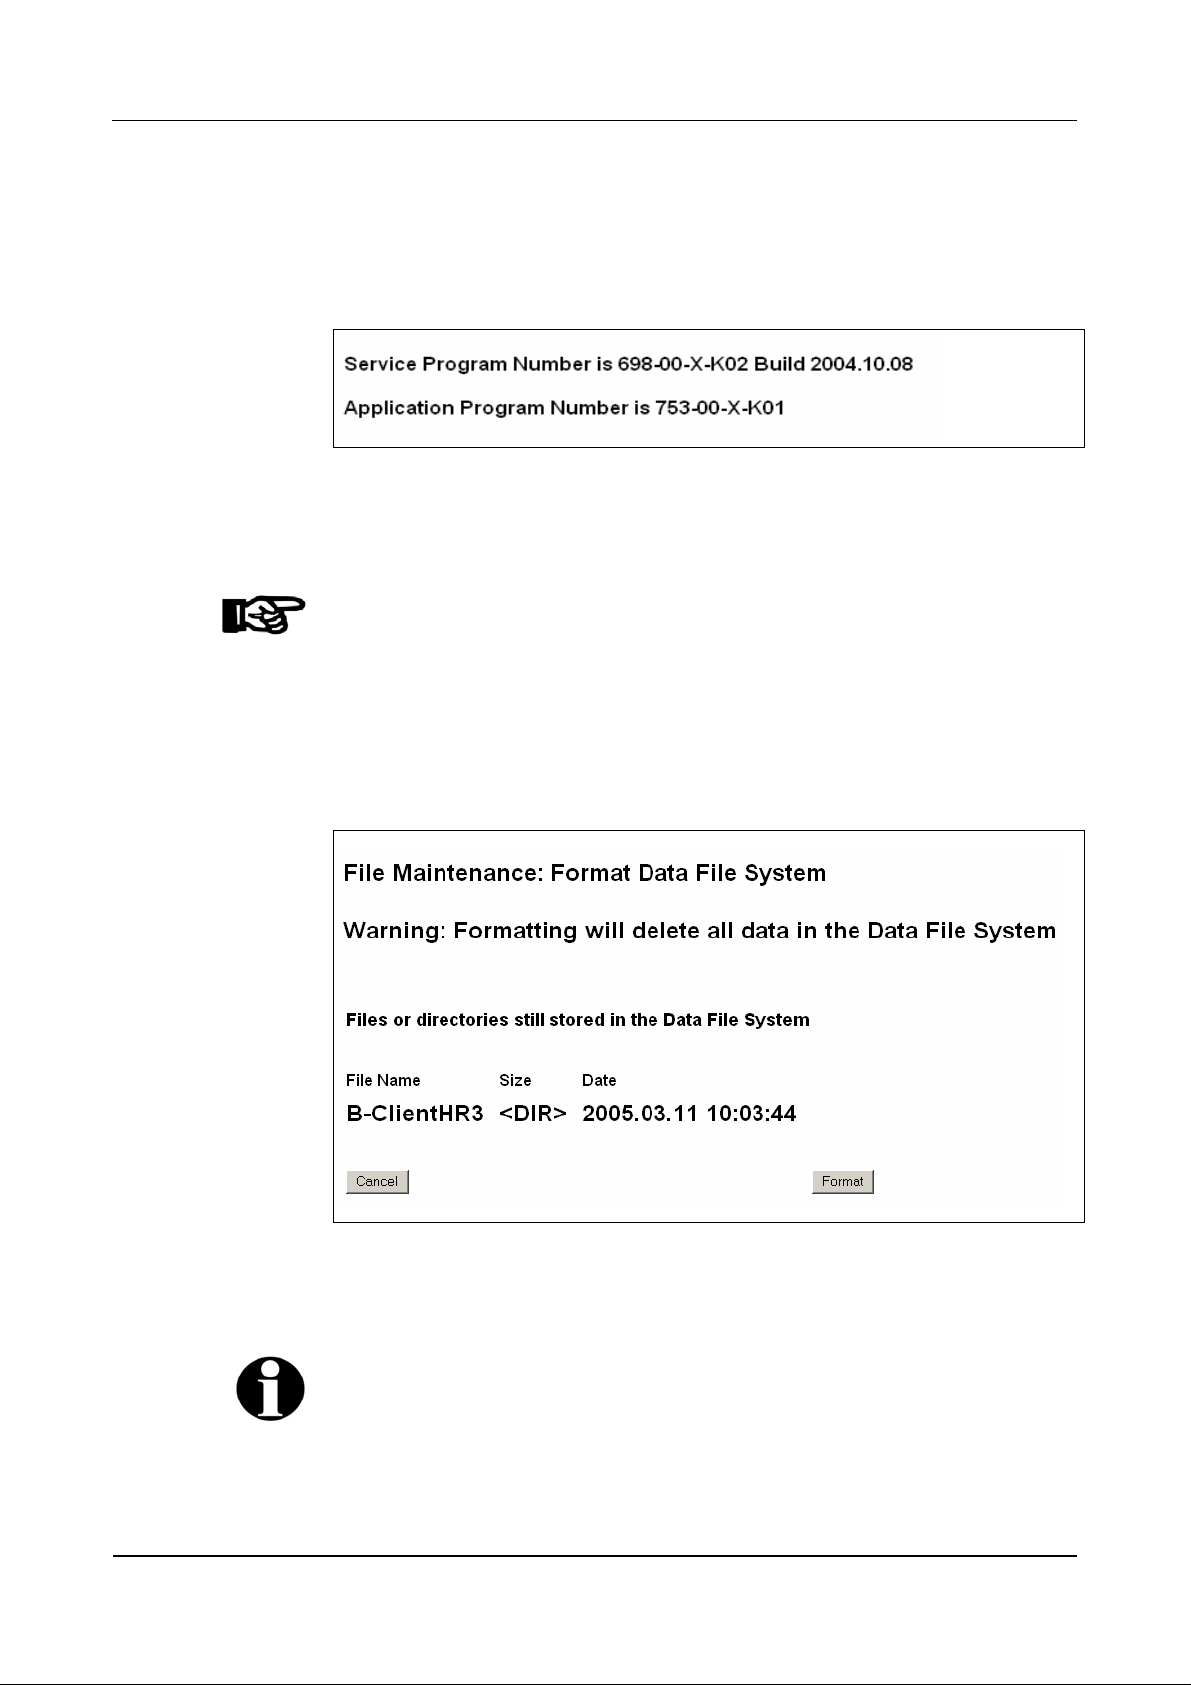
7.3.6.1 Program version
Display of the application and service module program version.
Fig. 32: Example – display of program version
7.3.6.2 File system maintenance
NOTICE!
This function should only be used by system specialists.
7.3.6.3 Data file system
With this function, the BECO’s data file system is being formatted. In doing so,
master records, log file, and booking records are deleted. Parameters are reset to
their default values.
Fig. 33: Example – formatting Data File System
By operating the “Format” button the formatting process is being started.
Remark
The formatting of the Data File System is also executed with a cold start of the
device.
01/2006 © Kaba Benzing GmbH 53
BECO service module User Manual B-Net 93 60
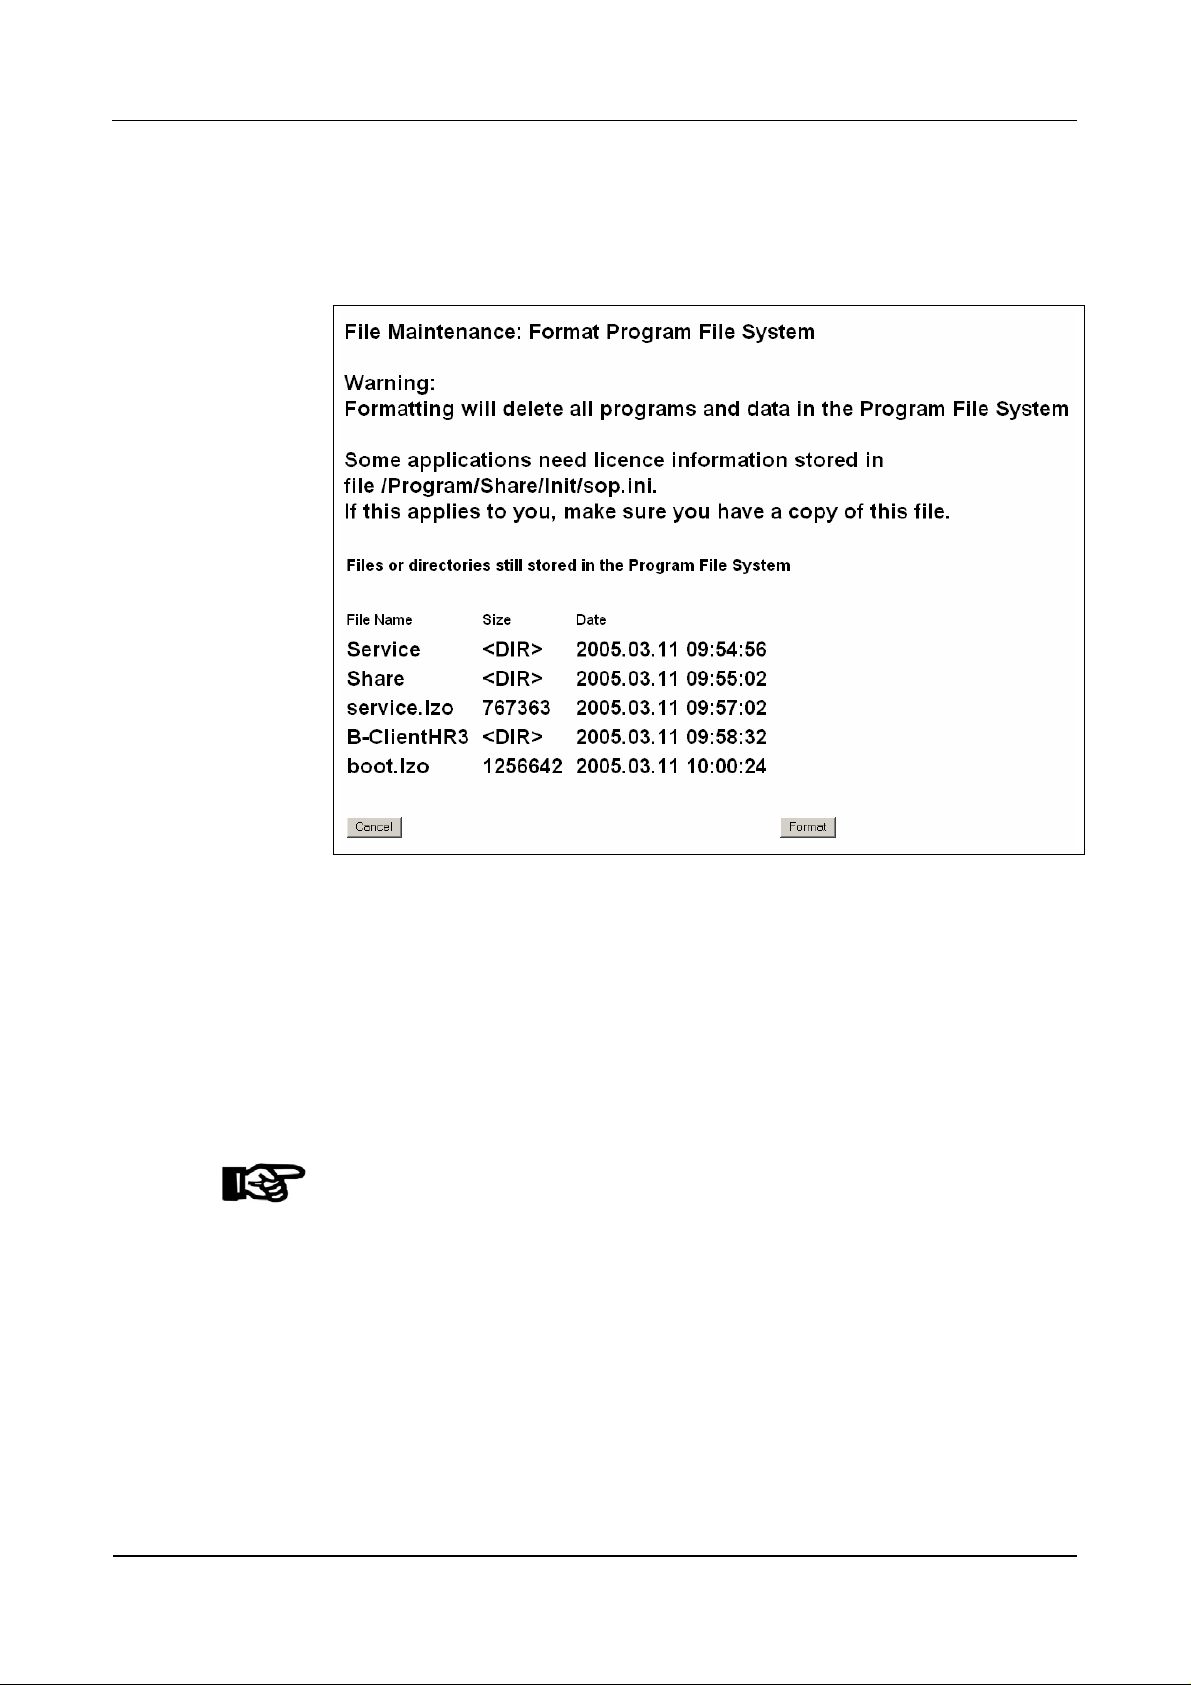
7.3.6.4 Program file system
With this function, the BECO’s Program File System is formatted in the flash
memory. All programs and the system parameter files are thereby deleted.
Fig. 34: Example – formatting Program File System
By operating the “Format” button the formatting process is being started.
Because all internal programs are deleted with the formatting, an external program
file must be available for the booting after the formatting.
The computer’s IP address where the boot file is located, as well as the file name
are specified in the "Network Boot Parameters" function.
It must be ensured that the TFTP service is active on the source server and that
the stated program file is available.
NOTICE!
Formatting is only executed if a valid program file is available in remote access.
Please refer to chapter
7.3.6.9 Network boot parameters
Otherwise the message “There is no network boot server defined” displays.
54 © Kaba Benzing GmbH 01/2006
User Manual B-Net 93 60 BECO service module
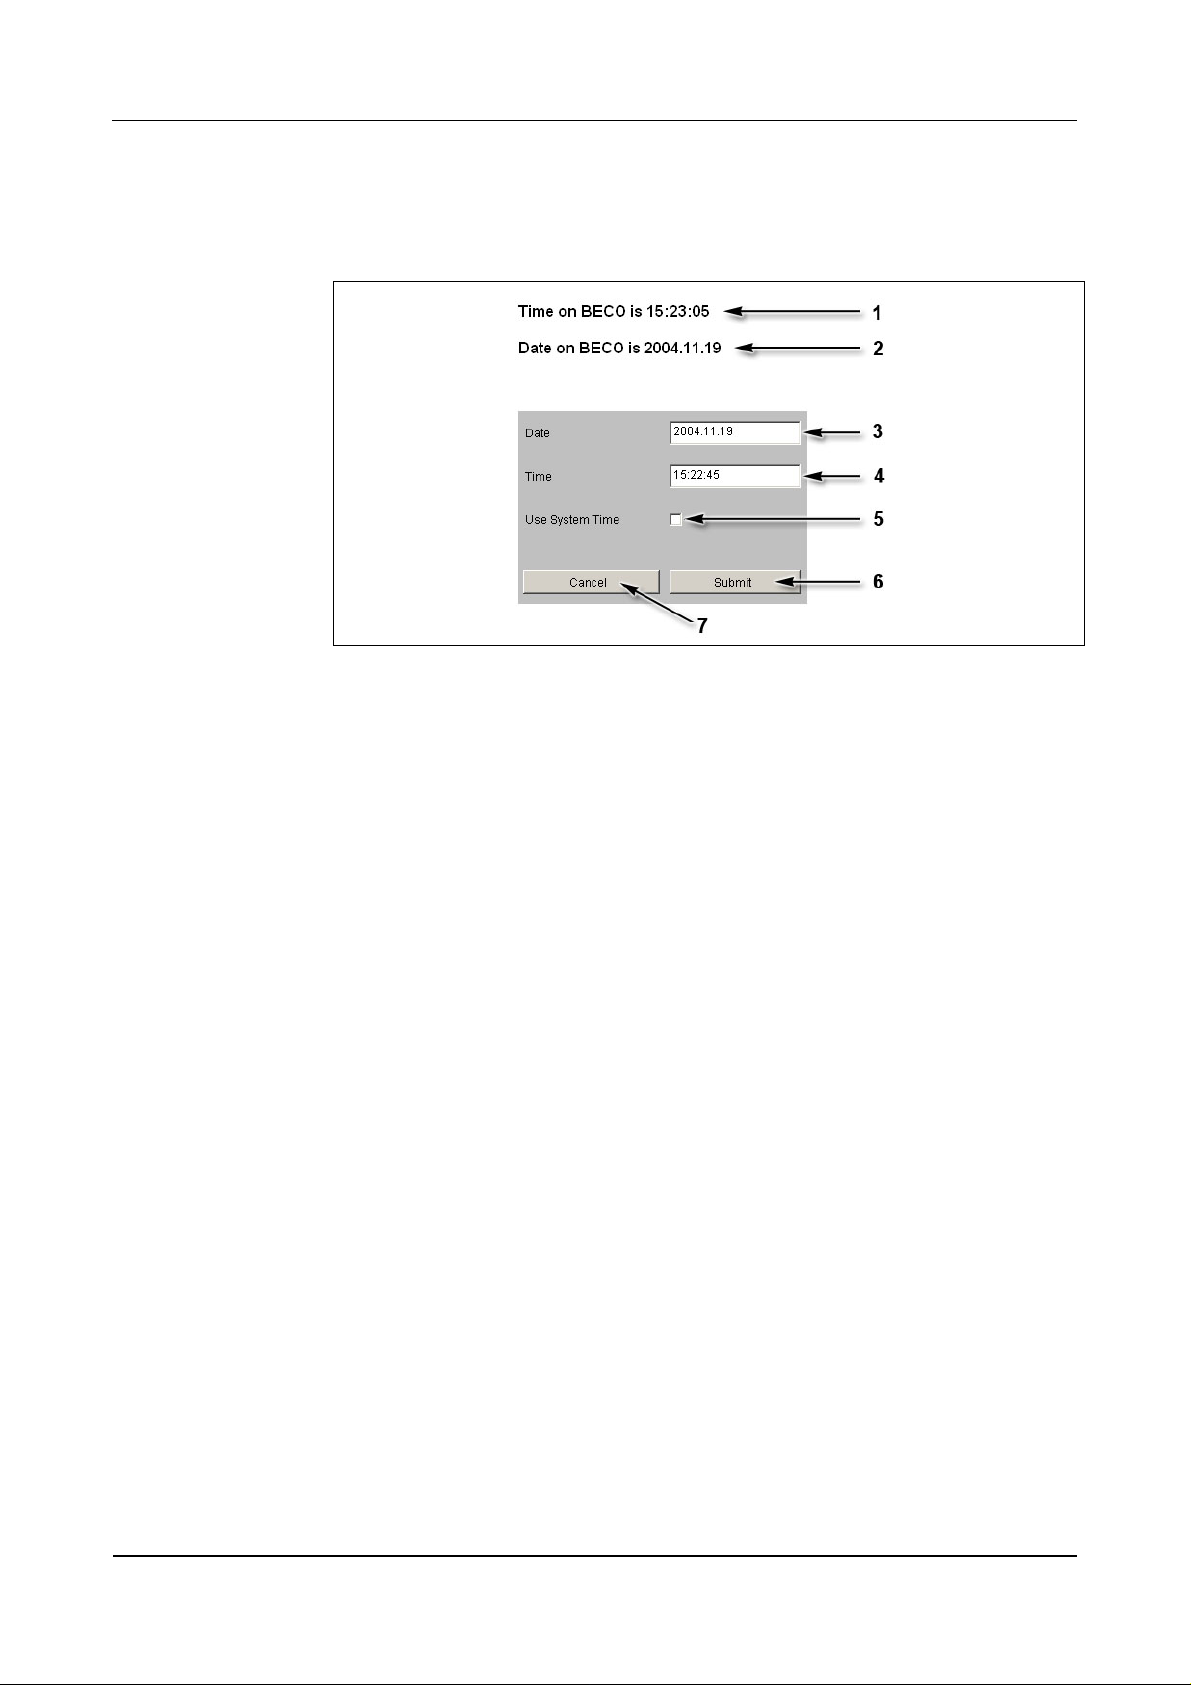
7.3.6.5 Date & time
Show date and time and if necessary set date and time.
Fig. 35: Date and time
1 BECO’s current time
2 BECO’s current date
3 Input field for date, format "yyyy.mm.dd"
4 Input field for time, format "hh:mm.ss"
5 Take over time of the local computer into the Date/Time input fields
6 Take over submit, date, and time to the BECO
7 Cancel
01/2006 © Kaba Benzing GmbH 55
BECO service module User Manual B-Net 93 60
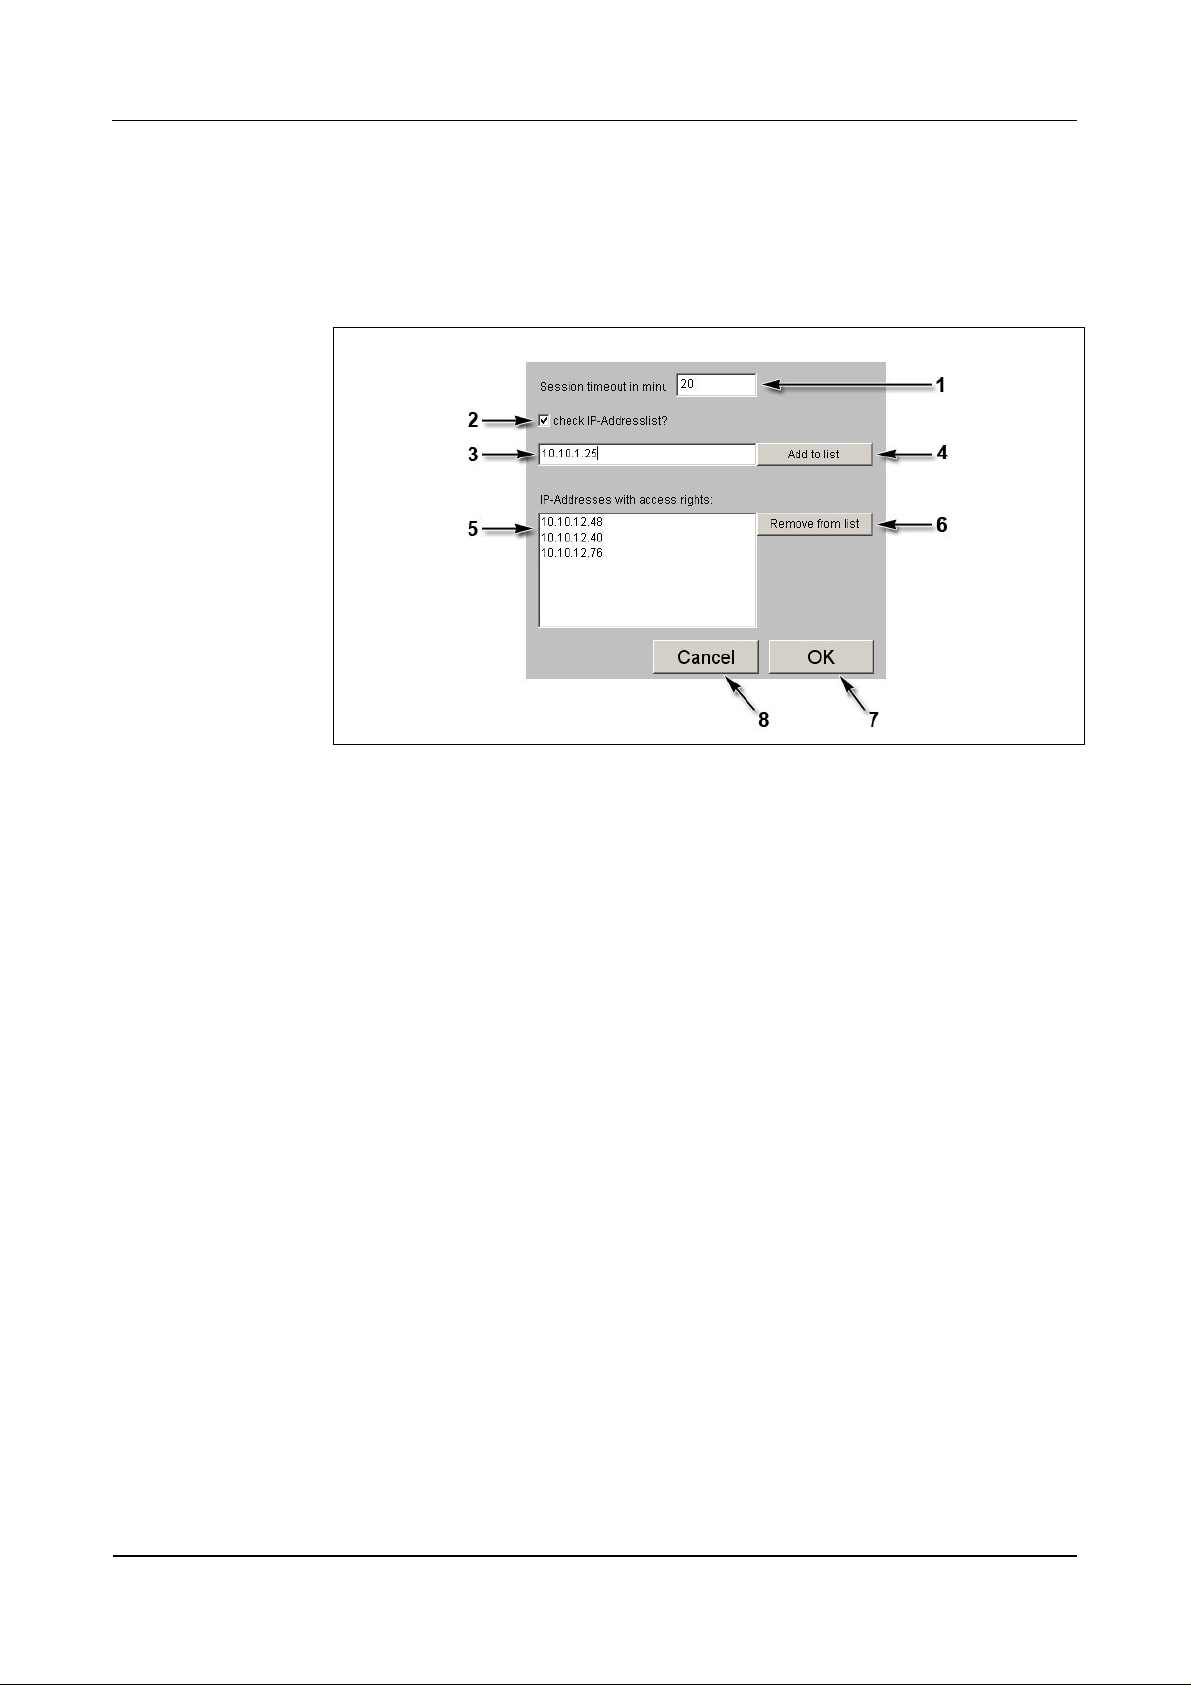
7.3.6.6 Security/configuration manager
Access to the Service Module (HTTP server and FTP server) can be limited to
certain IP addresses. If this is requested, the respective IP addresses must be
deposited in the list “IP addresses with access rights.”
Fig. 36: Example - Security/Configuration manager
1 Session Timeout in minutes.
If no entry is made within this period of time, the current session is ended by
the service module. Afterwards the user has to login again. Ten minutes are
preset.
2 Check IP address list?
With this check box the IP address check can be activated or deactivated
respectively. In ex-works condition, the IP address check is not activated!
If during start of the service mode the BECO is reset to the IP address
123.0.0.2, the access for host IP address 123.0.0.1 is also released again.
3 Input field for authorized host IP addresses.
4 Take over host IP address.
After the first operation, the specification on this button changes to “Confirm
input.” Now, the IP address has to be entered and confirmed a second time.
Afterwards the IP address appears in the list (5).
5 List with authorized IP addresses.
6 Remove marked IP address from the list.
7 OK, take over settings and end function.
8 Cancel, terminate function.
56 © Kaba Benzing GmbH 01/2006
User Manual B-Net 93 60 BECO service module
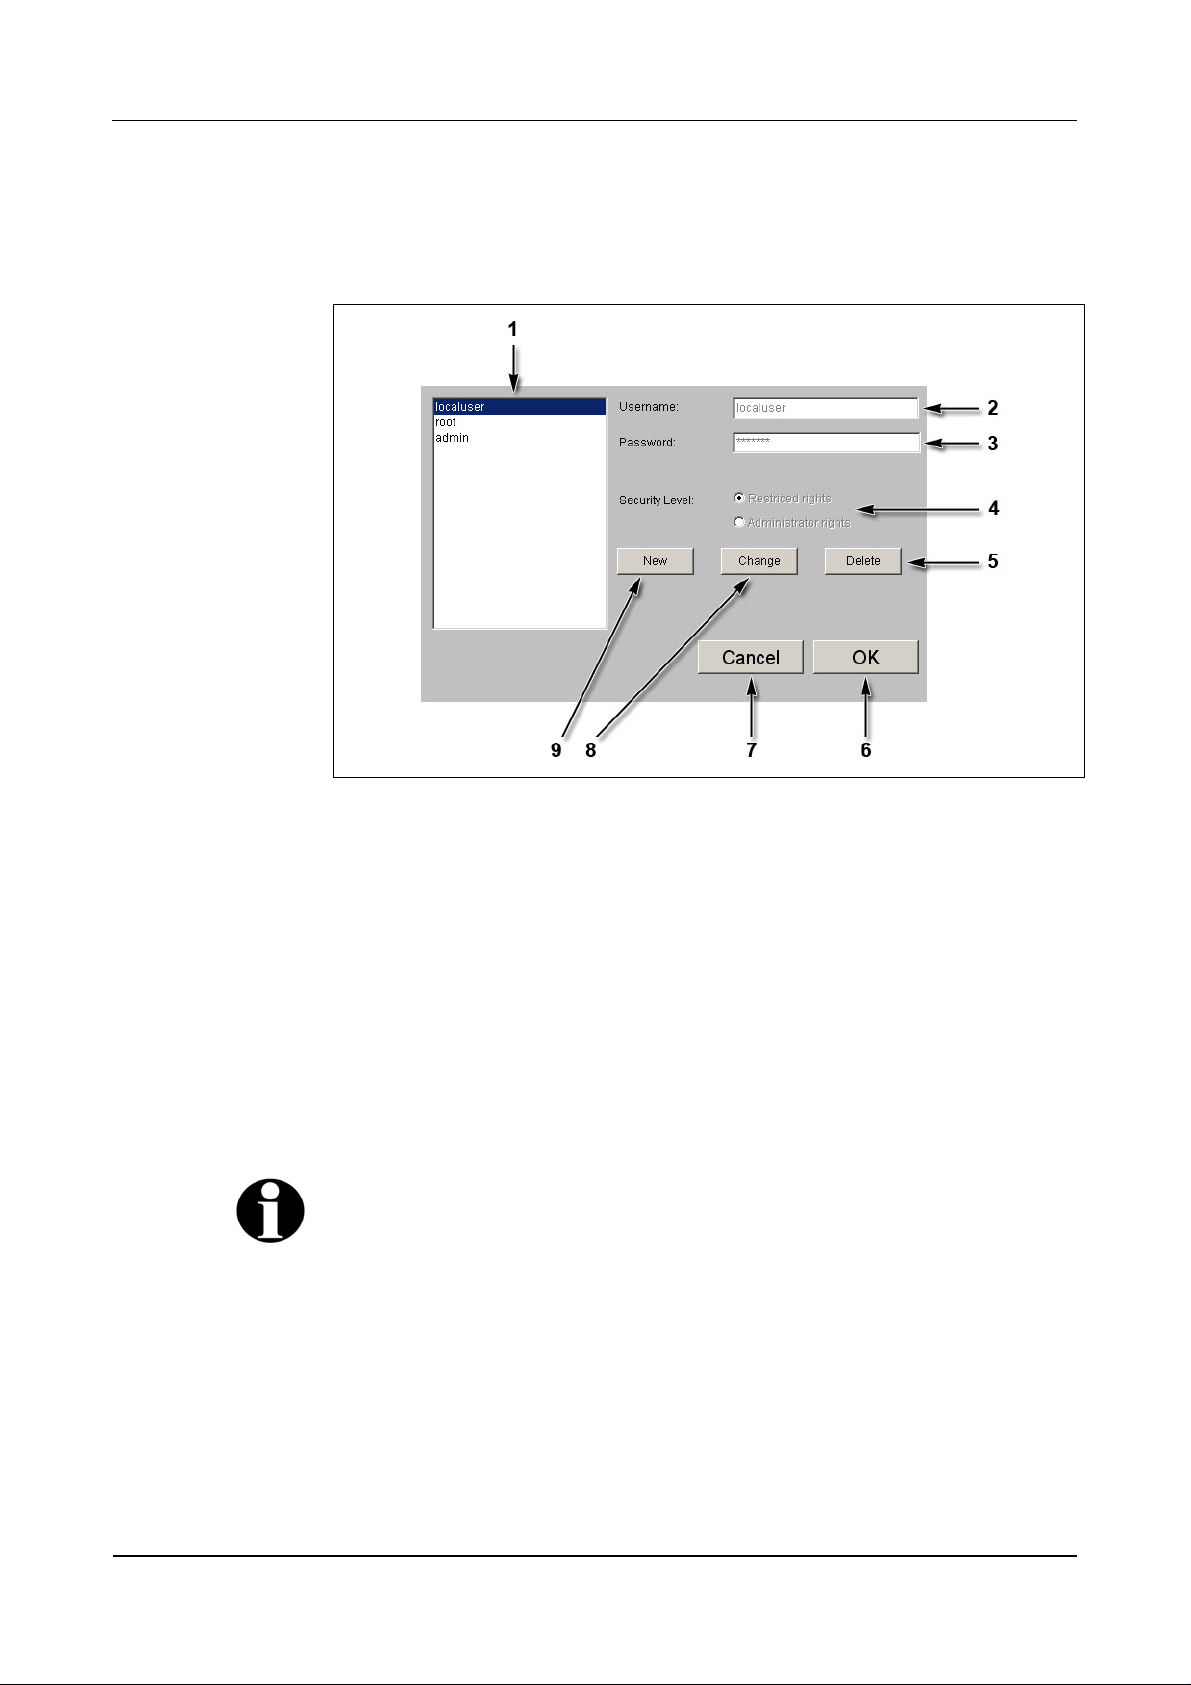
7.3.6.7 Security/user manager
This function manages the users for access to the Service Module. Users can be
created, deleted, or modified.
Fig. 37: Example – Security/User Manager
1 List of existing users.
2 Input field for user name.
3 Input field for password.
4 Selection of authorization, limited rights or administrator rights.
5 Delete marked user.
6 OK, take over modifications and end function.
7 Cancel, terminate function.
8 Change marked user.
9 Create new user.
Remark
User name and password may contain the characters a-z, A-Z, and 0-9 and may be
up to 256 characters long.
01/2006 © Kaba Benzing GmbH 57

BECO service module User Manual B-Net 93 60
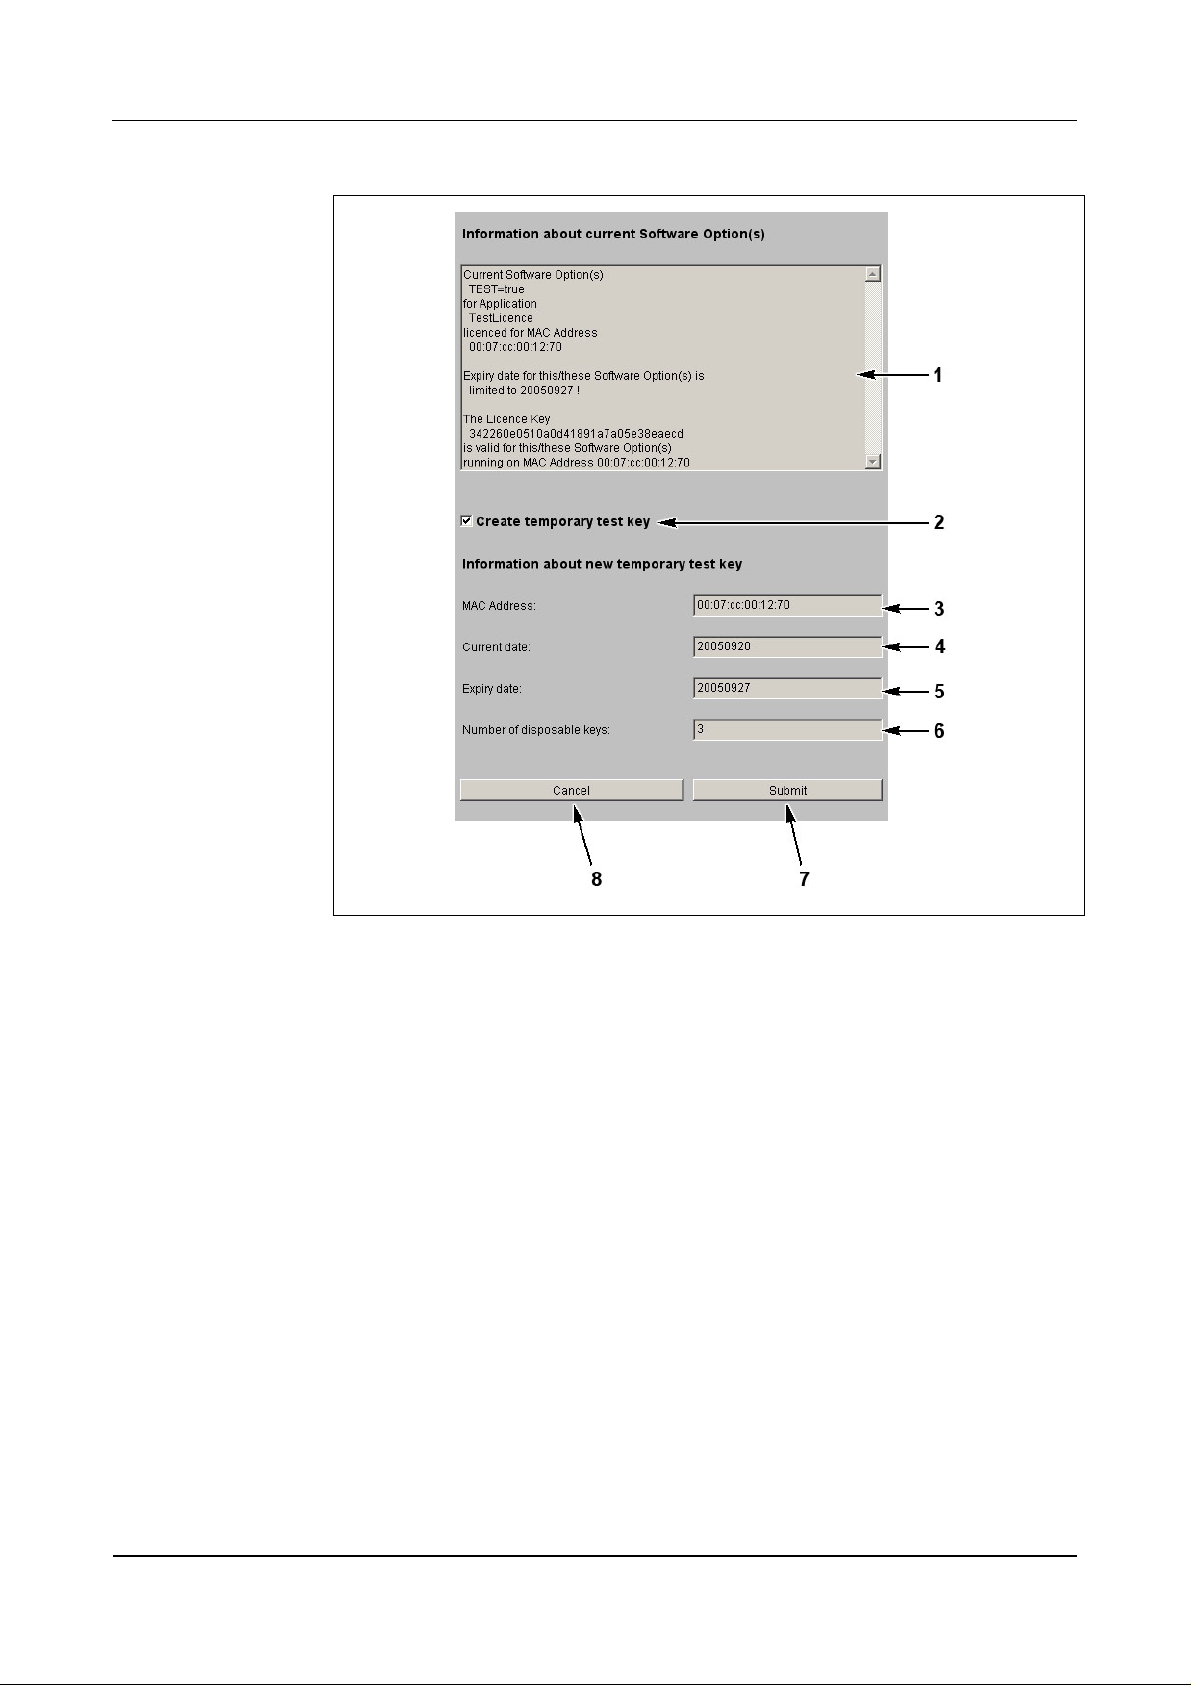
7.3.6.8 Software option protection
In order to use the application a corresponding license key is required.
This license key is bound to the device’s MAC address.
The function ”Software Option Protection” allows to create a temporary test license.
Unlimited license key
NOTICE!
An unlimited license file can only be obtained from Kaba Benzing.
Normally, the license key is supplied with the ”sop.ini” file.
The license key is being activated by copying this file via FTP to the
/Program/Share/Init/ directory.
The license key is only accepted, if the application and their options indicated in
the fields, corresponds with the license.
Test license
The “Software Option Protection“ function offers the option to create a temporary
license key. This test license allows you to utilize all options.
NOTICE!
The license key is valid for a duration of 7 days. After the license key has expired
the device automatically switches to service mode.
A temporary license key can be created seven times altogether. By deploying an
unlimited license file this counter is reset again.
Create test license
• Select “Create temporary test key.”
• Confirm with “Submit."
Remark
A possibly already existing unlimited license file is saved as "sop.bak."
58 © Kaba Benzing GmbH 01/2006
User Manual B-Net 93 60 BECO service module
Fig. 38: Example - Software Option Protection
1 Current license data of the “sop.ini” file.
2 Selection temporary license.
3 MAC address of the BECO.
4 Current date.
5 Expiry date.
6 Number of remaining and temporarily limited licenses.
7 Submit; create temporary license file and terminate function.
8 Cancel; terminate function.
01/2006 © Kaba Benzing GmbH 59
BECO service module User Manual B-Net 93 60
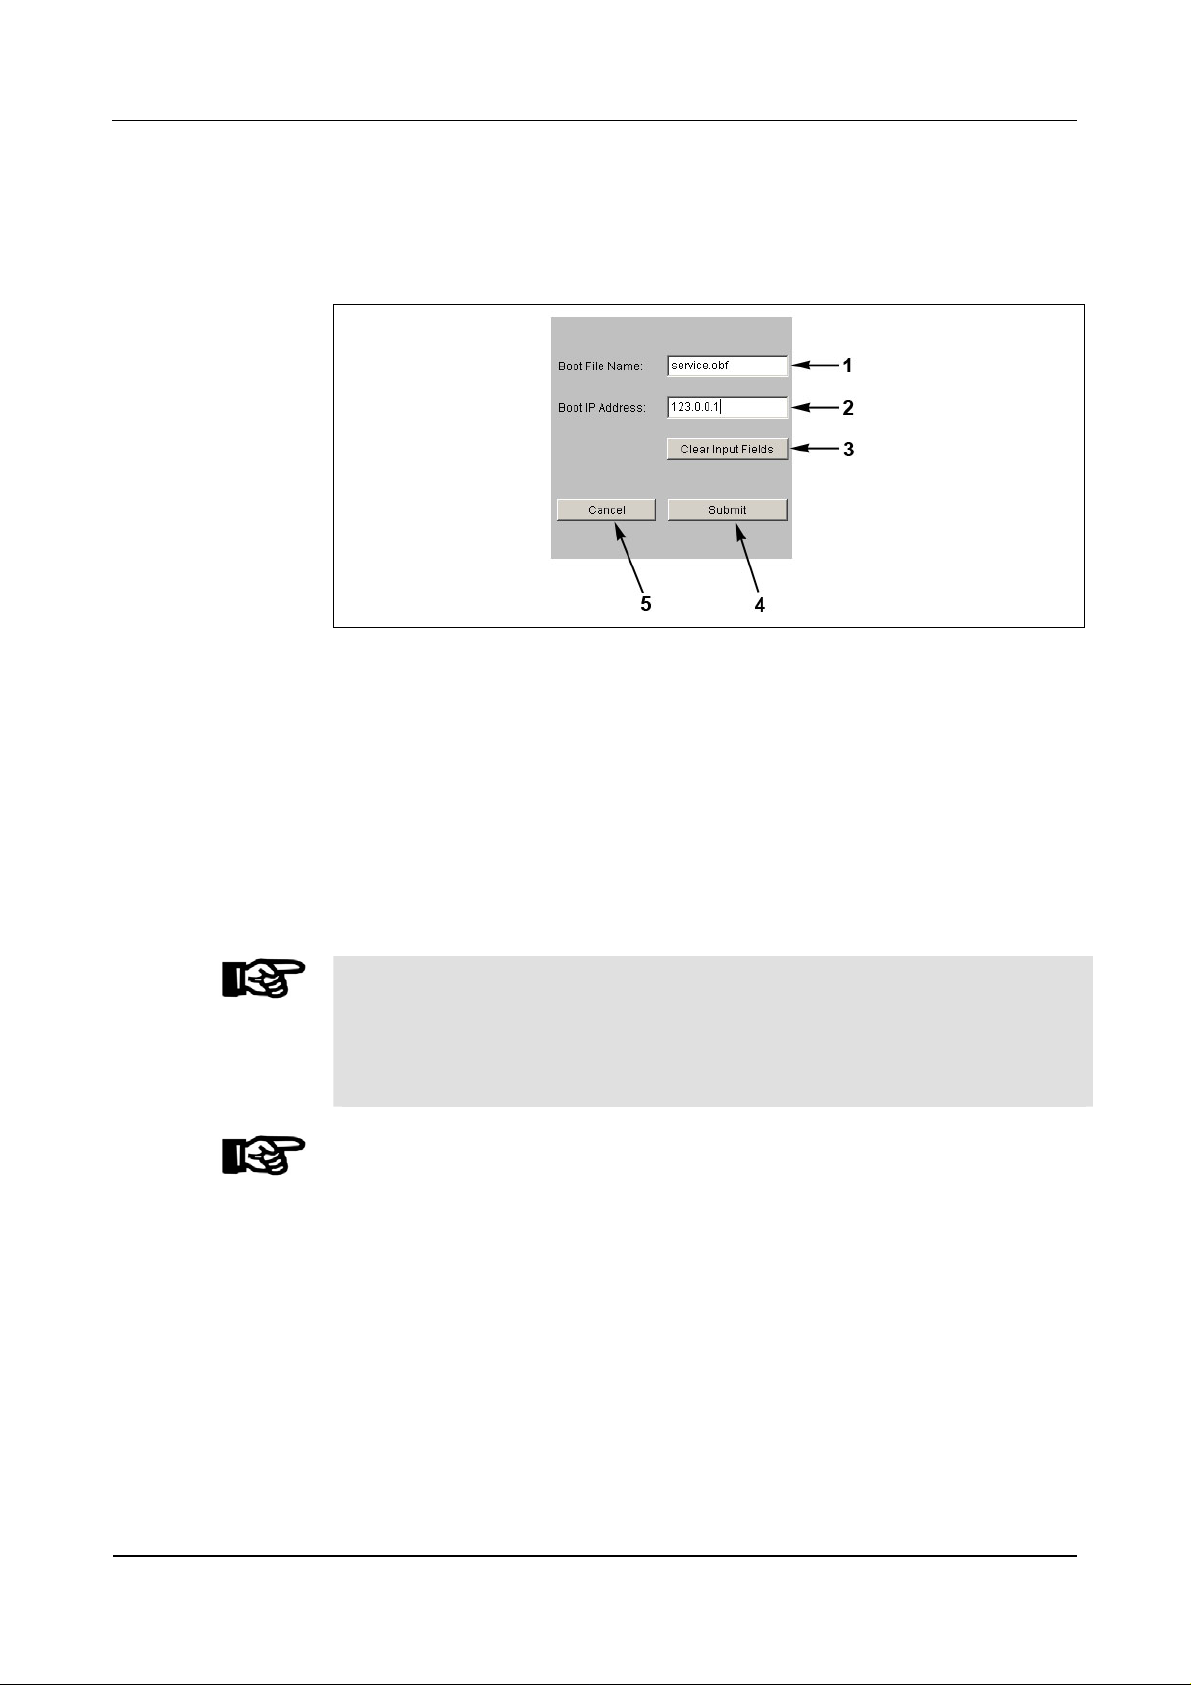
7.3.6.9 Network boot parameters
With this function an external program file can be stipulated for booting. In case of
a warm start this program file is loaded remotely via TFTP.
Fig. 39: Example - Show / Set Network Boot Parameters
1 Input field for file name of external program file (service.obf).
Packed files with the ending “Izo” cannot be used!
2 Input field for the computer’s IP address where the boot file is stored. A
TFTP server must be active on the computer.
3 Delete content of data fields.
4 Submit; take over settings and terminate function.
5 Cancel; terminate function.
NOTICE!
If no remote boot is required, the input fields must be handed over empty. ("Clear
Input Fields" button and "Submit" button afterwards).
Otherwise the device tries to load the quoted boot file after a reset or power failure.
If it cannot be found, neither the application nor the Service Module can be started.
NOTICE!
During a restart of the BECO (refer to chapter
7.3.6.10) with a local program file, the
values in the function Network Boot Parameters are deleted.
60 © Kaba Benzing GmbH 01/2006
User Manual B-Net 93 60 BECO service module
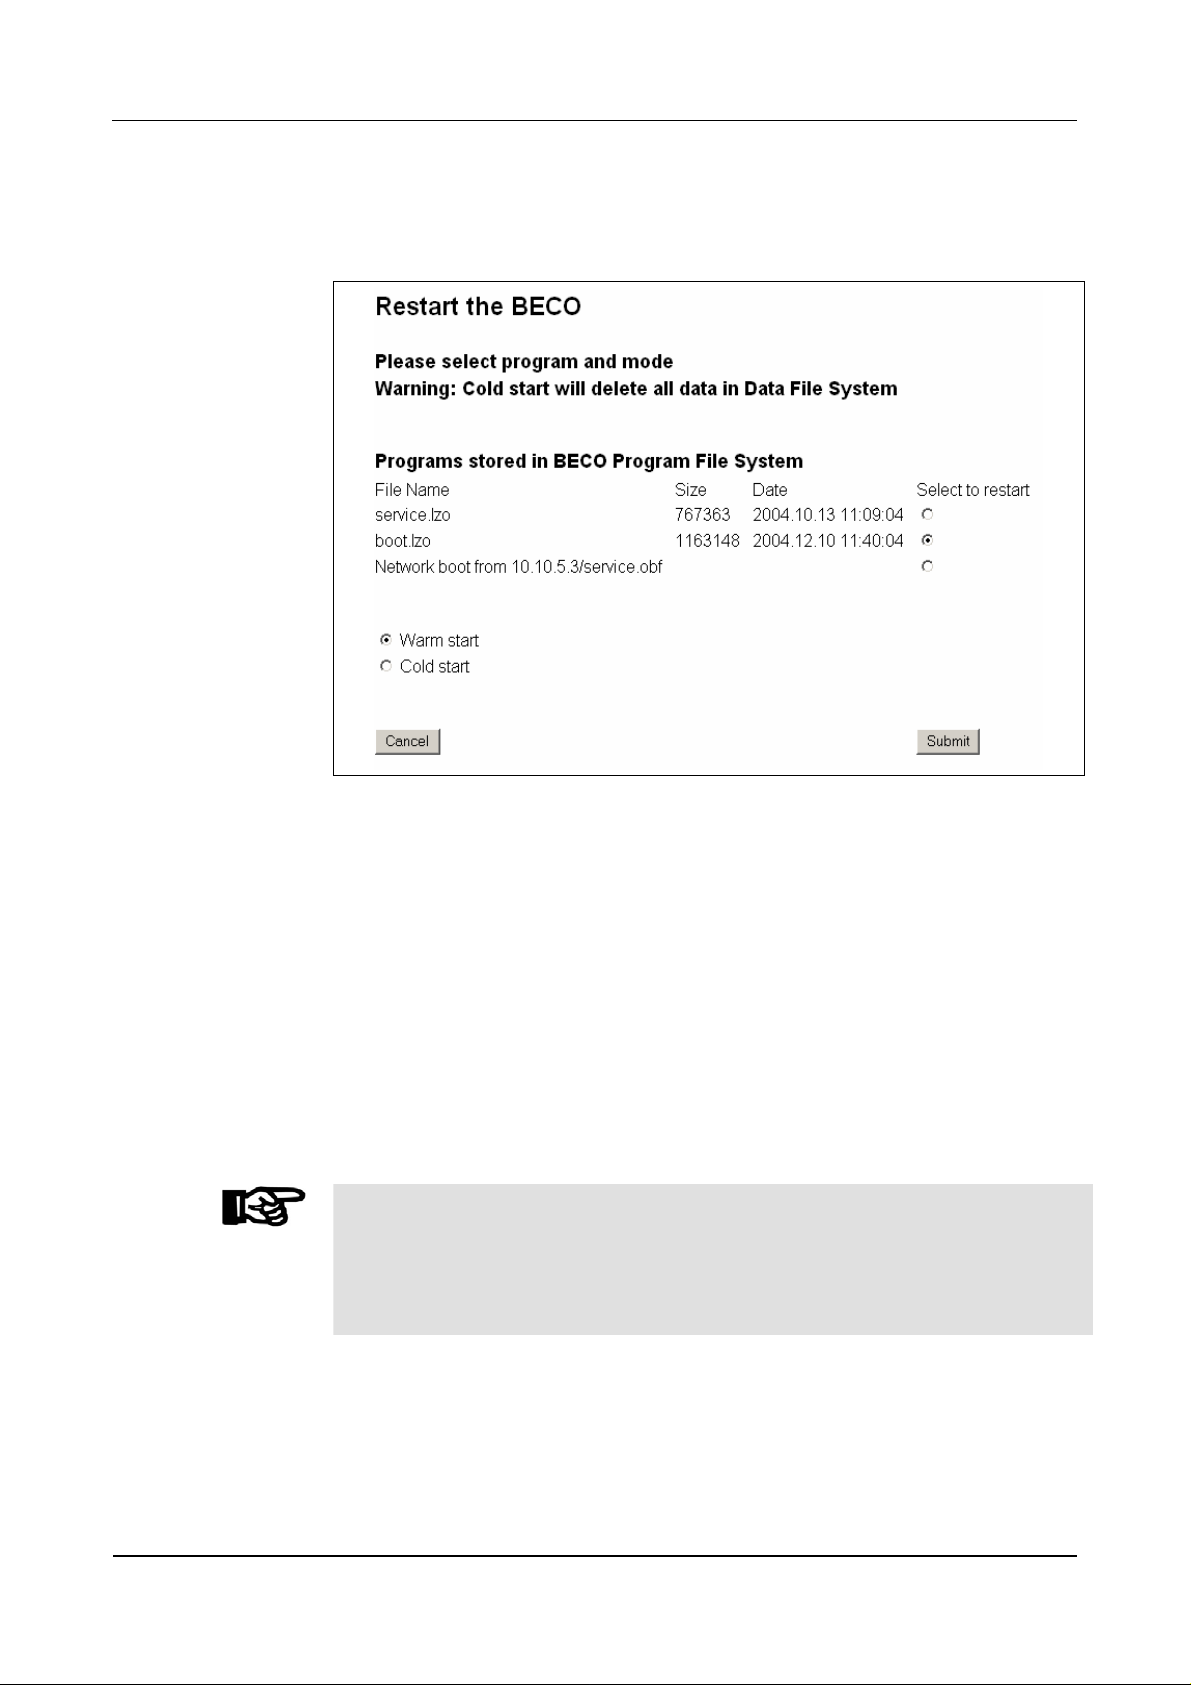
7.3.6.10 Restart
This function causes a remote-controlled reboot of the BECO.
Fig. 40: Example – restart of BECO
Before carrying out this function, the program to be started must be stipulated.
• Files "boot.obf" or "boot.lzo"
the BECO is started in application mode
• Files "service.obf" or "service.lzo"
the BECO is started in service mode
• Network boot
Start with the program file that has been stipulated in the "Show / Set
Network Boot Parameters" function.
If you want to execute a cold start at the same time, the “Cold start” option must
also be activated. The default setting is “Warm start.”
After operating the “Submit” button the restart is being performed.
NOTICE!
When performing a cold start, parameters are reset to their default values. Master
records and booking records are deleted.
Network settings, group and device address, as well as the INI file entries remain
unchanged.
01/2006 © Kaba Benzing GmbH 61
BECO service module User Manual B-Net 93 60
7.3.7 Hardware settings
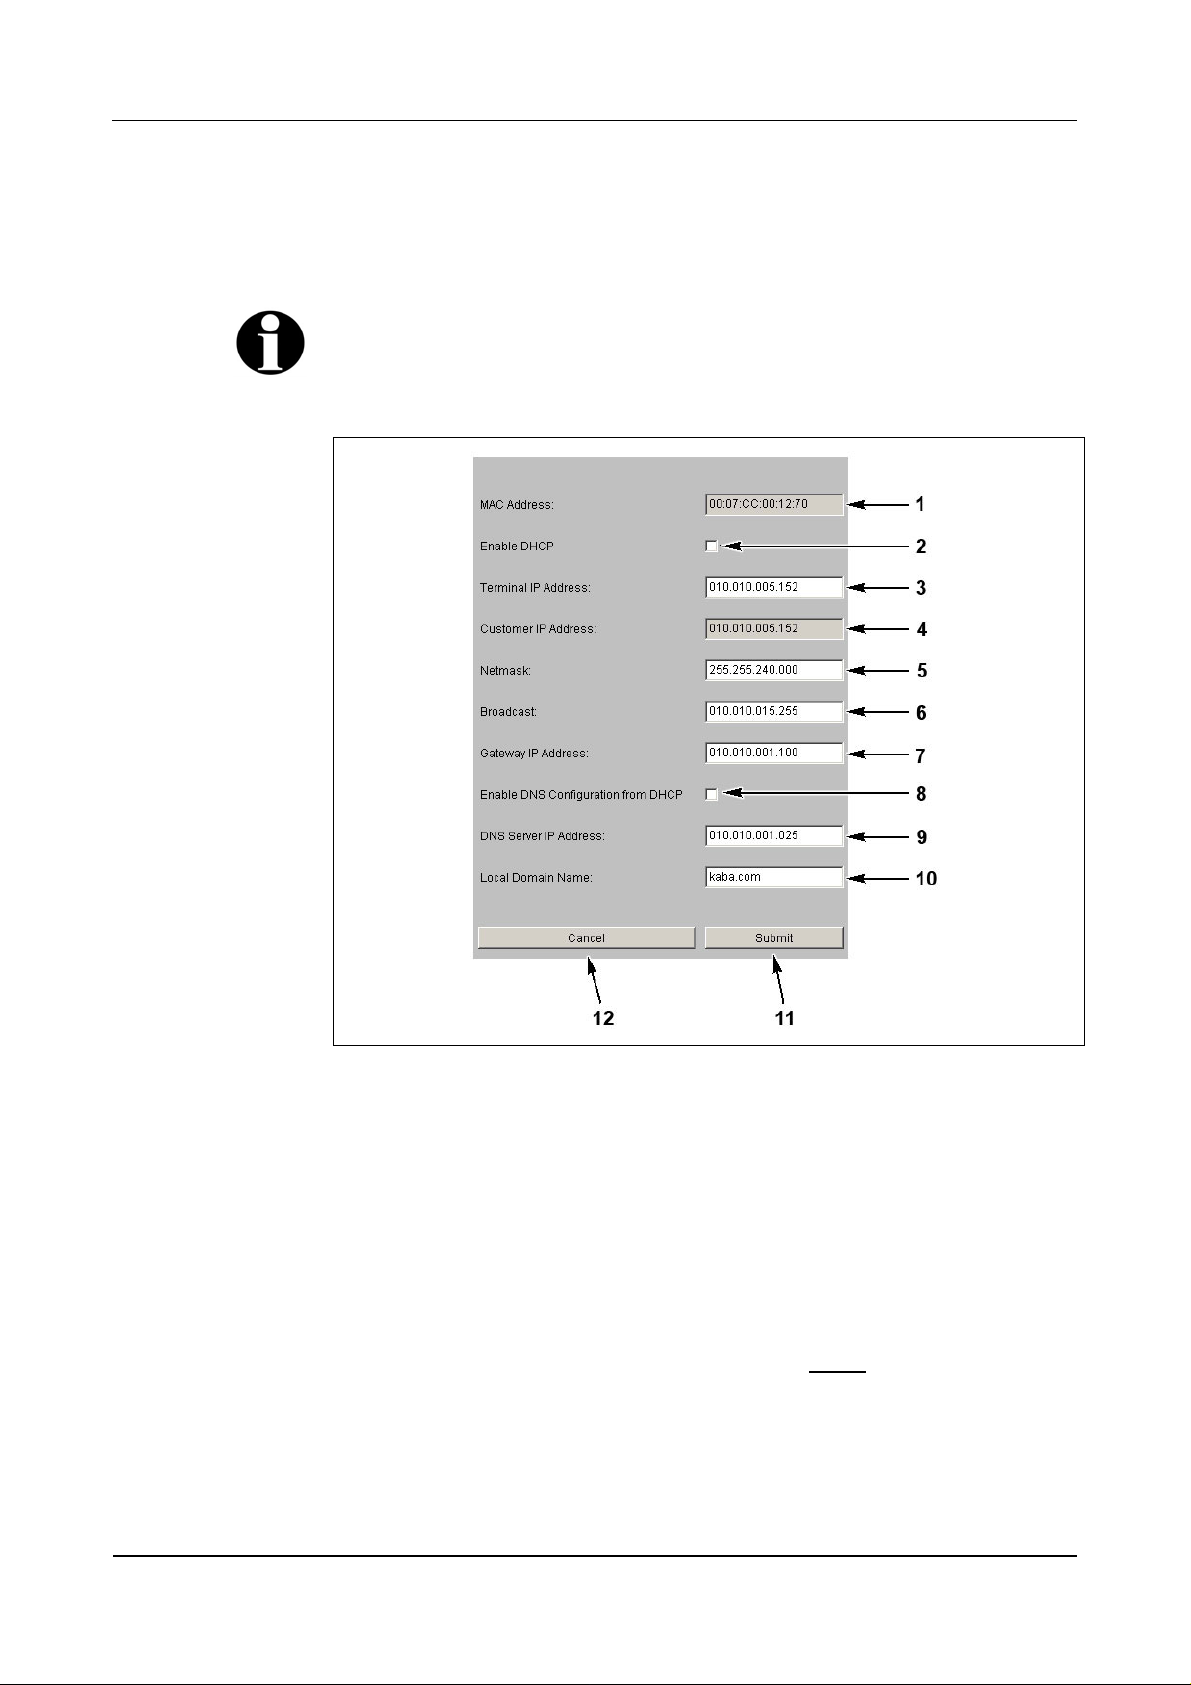
7.3.7.1 Ethernet communication parameters
This function is used for the setting of network parameters.
Remark
Those values are being displayed which are used with the next booting.
After a change the presently used values can be no longer be requested.
Fig. 41: Example Show / Set Ethernet Communication Parameter
1 MAC Address = Media Access Control Address
The MAC address is used for clear identification of the adapter within the
network. It is firmly assigned to the BECO and cannot be modified.
2 DHCP = Dynamic Host Configuration Protocol, DHCP automatically assigns
the device with a terminal IP address.
3 Terminal IP address = IP address of the device.
4 Customer IP address
Terminal IP address of the device that was set before
the last reset to the
default IP address (info field, cannot be edited).
5 Netmask
The netmask defines which bits of the terminal IP address belong to a sub-
network and which bits belong to an individual device.
62 © Kaba Benzing GmbH 01/2006

User Manual B-Net 93 60 BECO service module
6 Broadcast
IP address for messages to all participants.
Broadcast = addressing mode for sending messages to all participants within
a network.
7 Gateway IP address
A gateway connects different networks with each other that could otherwise
not communicate with one another.
If the device and the host PC are in different network segments, you will
have to enter the Gateway’s IP address that connects the network segments.
8 This checkbox activates the DNS configuration through DHCP.
9 IP address of the DNS server
DNS = Domain Name System
10 Domain where the device is located.
11 Submit; take over settings and terminate function.
The settings are then active after the next reboot.
12 Cancel, terminate function.
Explanations
IP Address = Internet Protocol Address. With the IP address a computer can be
clearly identified and addressed. An IP address consists of four, 8 bit large
numbers seperated by points from one another.
Sub-network example
The network’s address comes from the AND operation of netmask and host
address.
The address of a broadcast within a sub-network results from the network address
where all bits of the host part are set to "1."
Class Network part Host part
Host IP
Netmask
Net IP
Broadcast
198.85.46.140 110 00110.01010101.00101110.10 001100
255.255.255.192 111 11111.11111111.11111111.11 000000
198.85.46.128 110 00110.01010101.00101110.10 000000
198.85.46.191 110 00110.01010101.00101110.10 111111
01/2006 © Kaba Benzing GmbH 63

BECO service module User Manual B-Net 93 60
Permanently assign terminal IP address in the device
Fig. 42: Ethernet Communication Parameter
If the terminal IP address in the device is to be permanently assigned, the
checkbox “Enable DHCP” (1) may not be activated.
The following must be entered: IP address of the BECO (2), the network mask (3),
the broadcast address (4), and the gateway IP address (5).
If a DNS server is available and the name resolution is to be activated, then the
DNS server’s IP address must be entered in the field "DNS Server IP Address"(6).
The name of the domain, where the device is located, must be specified in the field
"Local Domain Name“ (7).
If no DNS server is available within the network, then 0.0.0.0 must be entered in
the "DNS Server IP Address" (6) field. The field “Local Domain Name” (7) is left
empty.
64 © Kaba Benzing GmbH 01/2006
 Loading...