

Page 1
DORMA •
1. Commissioning
ES 200
Easy
ES 200
ES 200-20
ES 200 C048/ DAC 300
~
DORMA
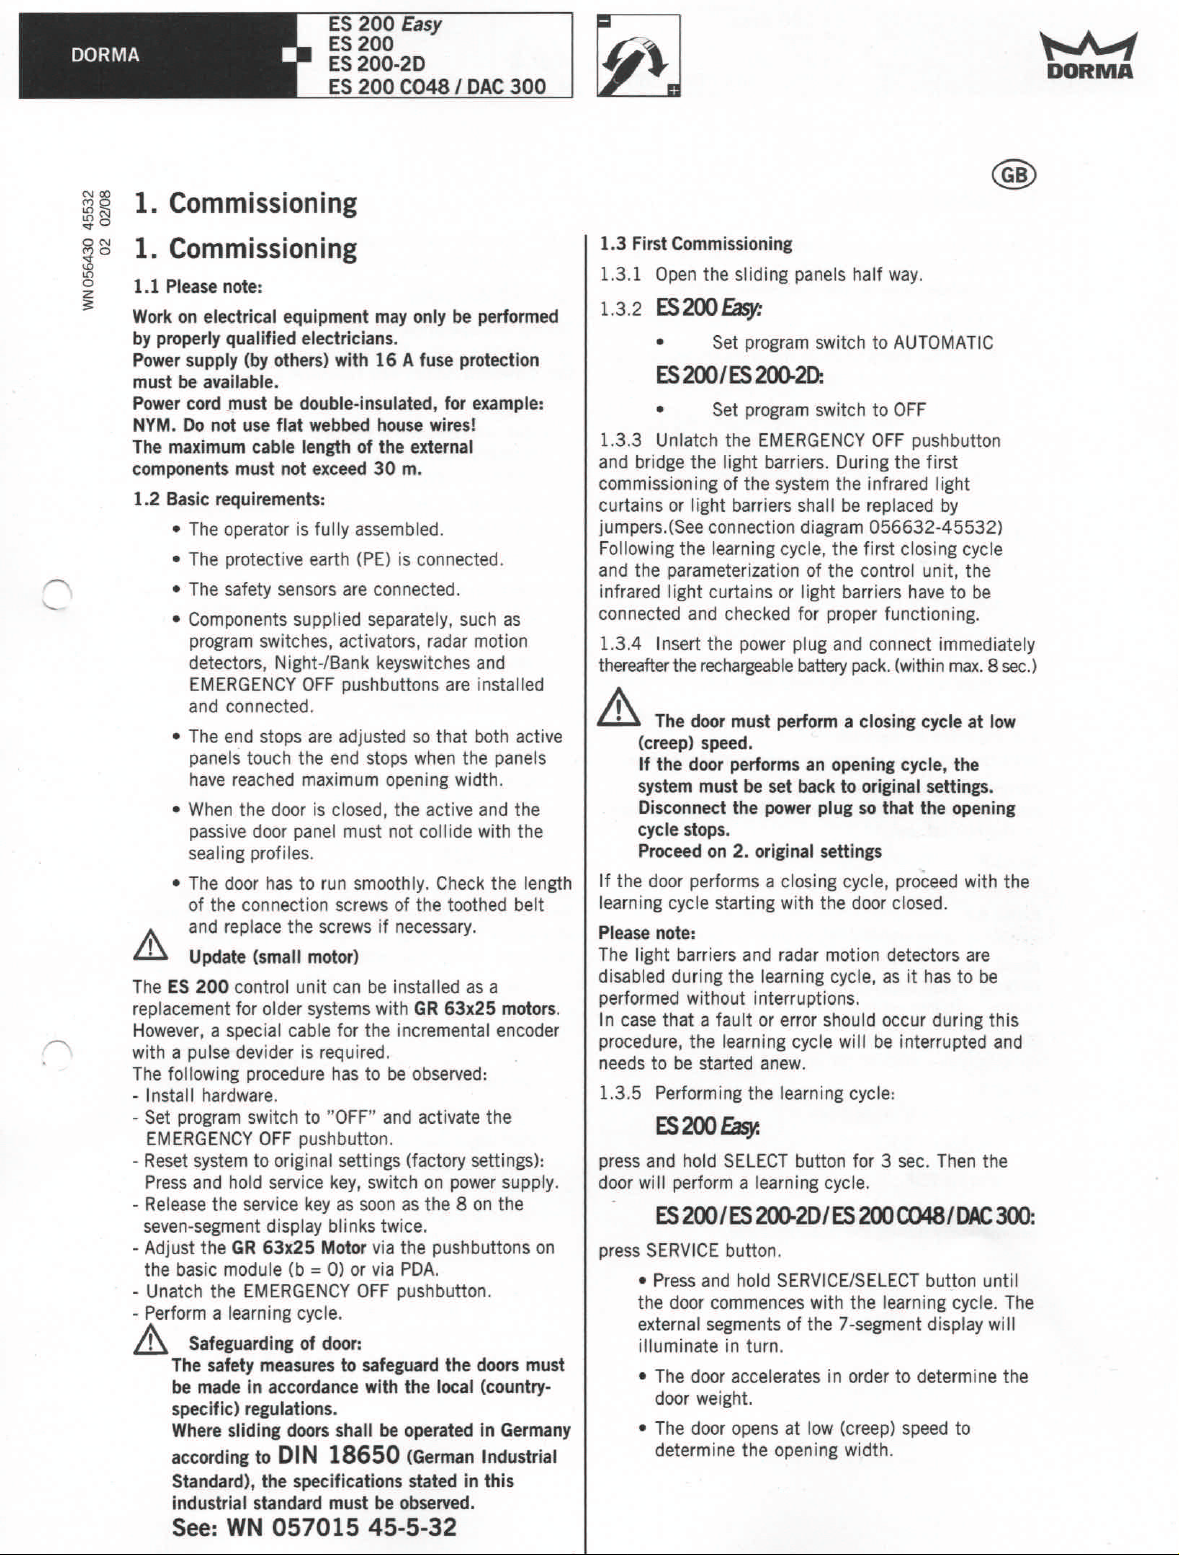
1. Commissioning
1.1 Please note:
Work on electrical equipment may only be performed
by properly qualified electricians.
Power supply (by others) with 16 A fuse protection
must be available.
Power cord must be double-insulated, for example:
NYM. Do not use flat webbed house wires!
The maximum cable length of the external
components must not exceed 30 m.
1.2 Basic requirements:
• The operator is fully assembled.
• The protective earth (PE) is connected.
• The safety sensors are connected.
• Components supplied separately, such as
program switches, activators, radar motion
detectors, Night-/Sank keyswitches and
EMERGENCY OFF pushbuttons are installed
and connected .
• The end stops are adjusted so that both active
panels touch the end stops when the panels
have reached maximum opening width.
• When the door is closed, the active and the
passive door panel must not collide with the
sealing profiles.
• The door has to run smoothly. Check the length
of the connection screws of the toothed belt
Ij\ and replace the screws if necessary.
Lll
Update (small motor)
The ES 200 control unit can be installed as a
replacement for older systems with GR 63x25 motors.
However, a special cable for the incremental encoder
with a pulse devider is required.
The following procedure has to be observed:
- Install hardware.
- Set program switch to "OFF" and activate the
EMERGENCY OFF pushbutton.
- Reset system to original settings (factory settings):
Press and hold service key, switch on power supply.
- Release the service key as soon as the 8 on the
seven-segment display blinks twice.
- Adjust the GR 63x25 Motor via the pushbuttons on
the basic module (b = 0) or via PDA.
- Unatch the EMERGENCY OFF pushbutton.
- Perform a learning cycle.
A
Safeguarding of door:
The safety measures to safeguard the doors must
be made in accordance with the local (country-
specific) regulations.
Where sliding doors shall be operated in Germany
according to DIN 18650 (German Industrial
Standard), the specifications stated in this
industrial standard must be observed.
See:WN 057015 45-5-32
1.3 First Commissioning
1.3.1 Open the sliding panels half way.
1.3.2
ES200 Easy:
• Set program switch to AUTOMATIC
ES200IES200-2D:
• Set program switch to OFF
1.3.3 Unlatch the EMERGENCY OFF pushbutton
and bridge the light barriers. Duri ng the first
commissioning of the system the infrared light
curtains or light barriers shall be replaced by
jumpers.(See connection diagram 056632-45532)
Following the iearning cycle, the first closing cycle
and the parameterization of the control unit, the
infrared light curtains or light barriers have to be
connected and checked for proper functioning .
1.3.4 Insert the power plug and connect immediately
thereafter the rechargeable battery pack. (within max. 8 sec.)
.&
The door must perform a closing cycle at low
(creep) speed.
If the door performs an opening cycle, the
system must be set back to original sellings.
Disconnect the power plug so that the opening
cycle stops.
Proceed on 2. original sellings
If the door performs a closing cycle, proceed with the
learning cycle starting with the door closed.
Please note:
The light barriers and radar motion detectors are
disabled during the learning cycle, as it has to be
performed without interruptions.
In case that a fauit or error should occur during this
procedure, the learning cycle will be interrupted and
needs to be started anew.
1.3.5 Performing the learning cycle:
ES200Easy.
press and hold SELECT button for 3 sec. Then the
door will perform a learning cycle.
ES200/ES
press SERVICE button.
• Press and hold SERVICE/SELECT bullon until
the door commences with the learning cycle. The
external segments of the 7-segment display will
illuminate in turn.
• The door accelerates in order to determine the
door weight.
• The door opens at low (creep) speed to
determine the opening width.
200-2D/ES
200
C048I
DAC300:
Page 2
DORMA •
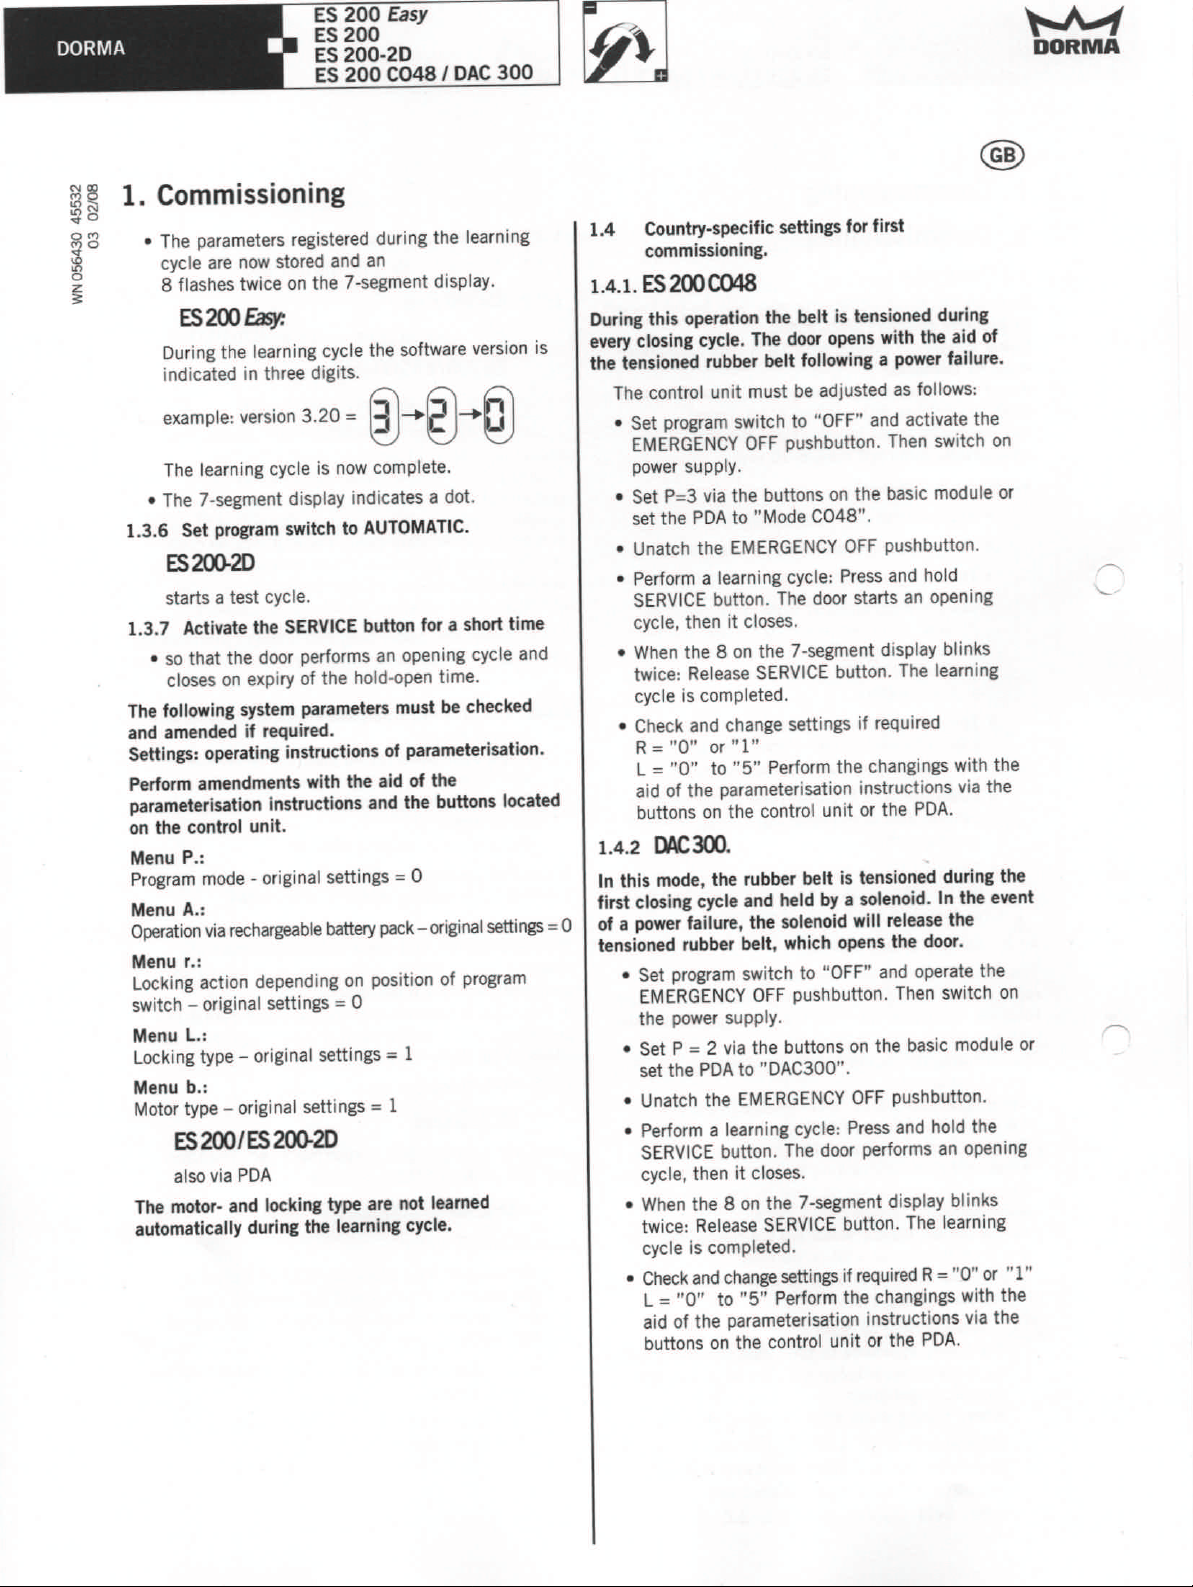
1. Commissioning
o The parameters registered during the learning
cycle are now stored and an
8 flashes twice on the 7-segment display.
ES200Easy:
During the learning cycle the software version is
indicated in three digits.
example: version 3.20 =
The learning cycle is now complete.
o
The 7-segment display indicates a dot.
1.3.6 Set program switch to AUTOMATIC.
ES200-2D
starts a test cycle.
1.3.7 Activate the SERVICE button for a short time
o so that the door performs an opening cycle and
closes on expiry of the hold-open time.
The following system parameters must be checked
and amended if required.
Settings: operating instructions of parameterisation.
Perform amendments with the aid of the
parameterisation instructions and the buttons located
on the control unit.
Menu P.:
Program mode - original settings = 0
Menu A.:
Operation via rechargeablebattery pack- ",iginal settings = 0
Menu r.:
Locking action depending on position of program
switch - original settings = 0
Menu L.:
Locking type - original settings = 1
Menu b.:
Motor type - original settings = 1
ES
200/ES
also via PDA
The motor- and locking type are not learned
automatically during the learning cycle.
ES 200
ES 200
ES 200-20
ES 200 C048IDAC 300
Easy
@-+g)-+@
200-20
1.4 Country-specific settings for first
commissioning.
1.4.1.
ES 200C048
During this operation the belt is tensioned during
every closing cycle. The door opens with the aid of
the tensioned rubber belt following a power failure.
The control unit must be adjusted as follows:
• Set program switch to "OFF" and activate the
EMERGENCY OFF pushbutton. Then switch on
power supply.
o
Set P=3 via the buttons on the basic module or
set the PDA to "Mode C048".
o
Unatch the EMERGENCY OFF pushbutton.
o
Perform a learning cycle: Press and hold
SERVICE button. The door starts an opening
cycle, then it closes.
o When the 8 on the 7-segment display blinks
twice: Release SERVICE button. The learning
cycle is completed.
• Check and change settings if required
R="0"
L = "0" to "5" Perform the changings with the
aid of the parameterisation instructions via the
buttons on the control unit or the PDA.
1.4.2
In this mode, the rubber belt is tensioned during the
first closing cycle and held by a solenoid. In the event
of a power failure, the solenoid will release the
tensioned rubber belt, which opens the door.
o
Set program switch to "OFF" and operate the
EMERGENCY OFF pushbutton. Then switch on
the power supply.
• Set P = 2 via the buttons on the basic module or
set the PDA to "DAC300".
o Unatch the EMERGENCY OFF pushbutton.
o
Perform a learning cycle: Press and hold the
SERVICE button. The door performs an opening
cycle, then it closes.
o
When the 8 on the 7-segment display blinks
twice: Release SERVICE button. The learning
cycle is completed.
o
Check and change settings if required R= "0" or "1"
L = "0" to "5" Perform the changings with the
aid of the parameterisation instructions via the
buttons on the control unit or the PDA.
or"
DAC300.
1"
~
DORMA
Page 3
DORMA •
ES 200
ES 200
ES 200-2D
Easy
ES 200 C048/ DAC 300
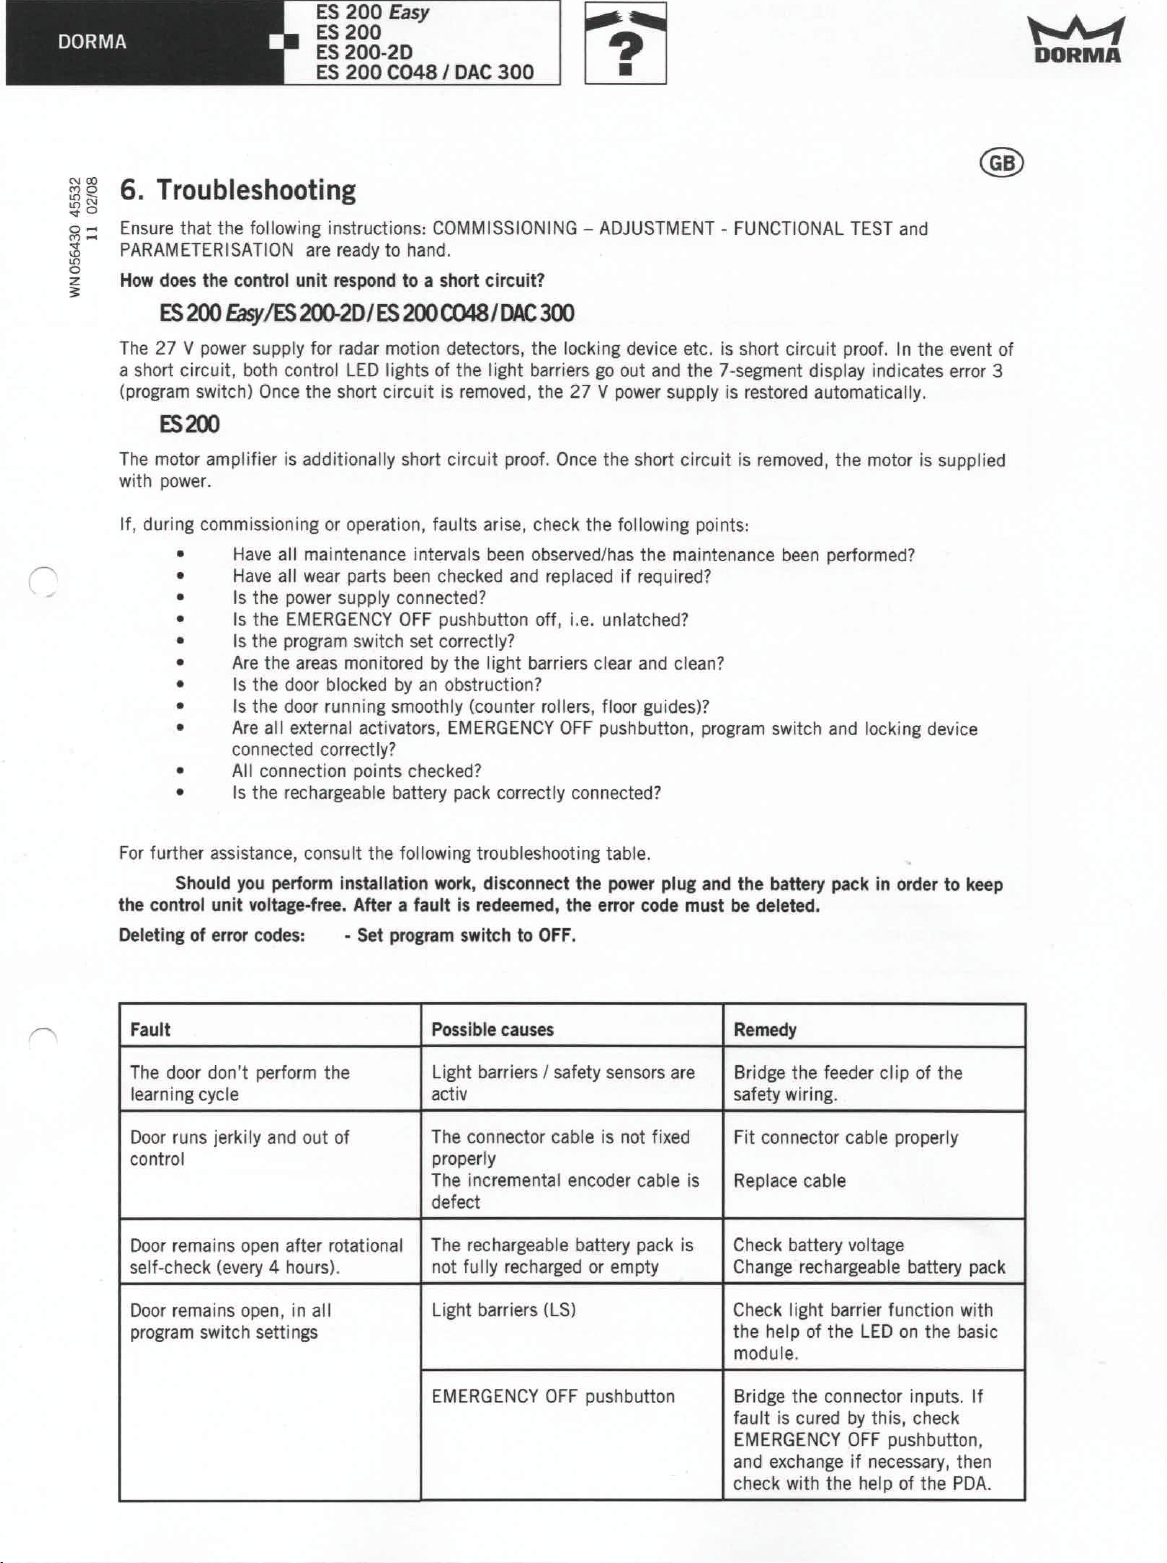
~~ 6. Troubleshooting
~o
iil;:: Ensure that the following instructions: COMMISSIONING - ADJUSTMENT - FUNCTIONAL TEST and
~ PARAMETERISATION are ready to hand.
~ How does the control unit respond to a short circuit?
ES200 Easy/ES 2QO-2D/ES 200 C048/DAC 300
The 27 V power supply for radar motion detectors, the locking device etc. is short circuit proof. In the event of
a short circuil, both control LED lights of the light barriers go out and the 7-segment display indicates error 3
(program switch) Once the short circuit is removed, the 27 V power supply is restored automatically.
ES200
The motor amplifier is additionally short circuit proof. Once the short circuit is removed, the motor is supplied
with power.
If, during commissioning or operation, faults arise, check the following points:
• Have all maintenance intervals been observed/has the maintenance been performed?
• Have all wear parts been checked and replaced if required?
• Is the power supply connected?
• Is the EMERGENCY OFF pushbutton off, i.e. unlatched?
• Is the program switch set correctly?
• Are the areas monitored by the light barriers clear and clean?
• Is the door blocked by an obstruction?
• Is the door running smoothly (counter rollers, floor guides)?
• Are all external activators, EMERGENCY OFF pushbutton, program switch and locking device
connected correctly?
• All connection points checked?
• Is the rechargeable battery pack correctly connected?
~
DORMA
For further assistance, consult the following troubleshooting table.
Should you perform installation work, disconnect the power plug and the battery pack in order to keep
the control unit voltage.free. After a fault is redeemed, the error code must be deleted.
Deleting of error codes: • Set program switch to OFF.
Fault Possible causes Remedy
The door don't perform the
learning cycle
Door runs jerkily and out of The connector cable is not fixed Fit connector cable properly
control
Door remains open after rotational The rechargeable battery pack is Check battery voltage
self-check (every 4 hours).
Door remains open, in all
program switch settings
Light barriers / safety sensors are
activ safety wiring.
properly
The incremental encoder cable is
defect
not fully recharged or empty Change rechargeable battery pack
Light barriers (LS)
EMERGENCY OFF pushbutton Bridge the connector inputs. If
Bridge the feeder cl ip of the
Replace cable
Check light barrier function with
the help of the LED on the basic
module.
fault is cured by this, check
EMERGENCY OFF pushbutton,
and exchange if necessary, then
check with the help of the PDA.
Page 4
ES 200 Easy
DORMA •
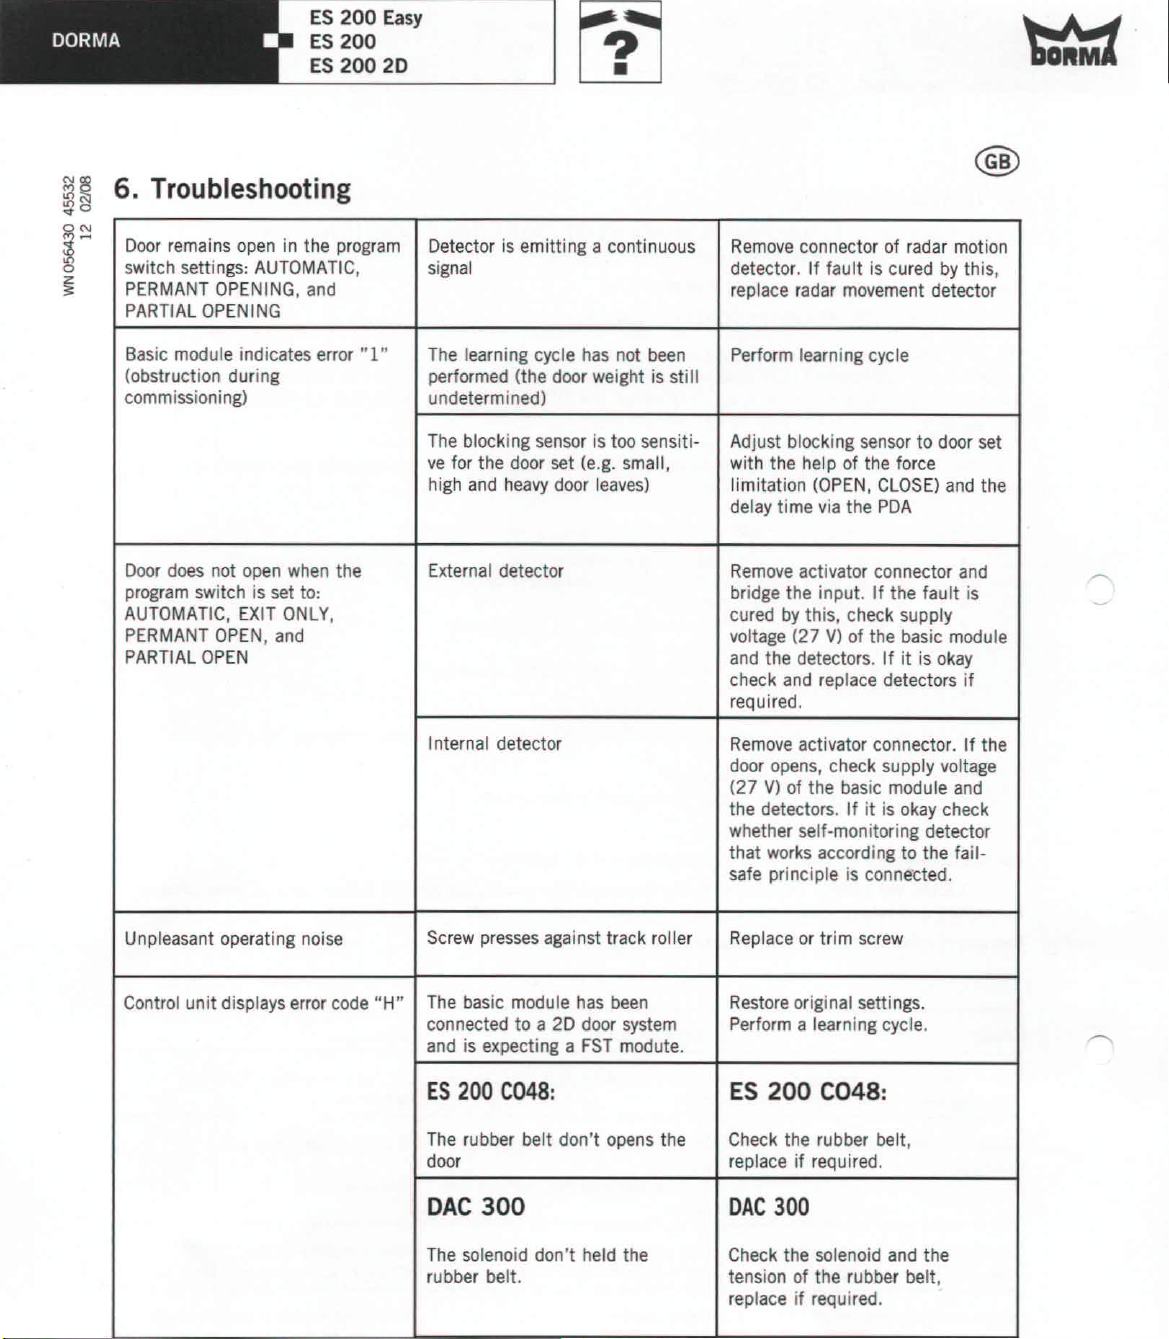
1il~6. Troubleshooting
0
'{I
~~
~
~
Door remains open in the program
switch settings: AUTOMATIC,
PERMANT OPENING, and
PARTIAL OPENING
ES 200
ES 200 20
Detector is emitting a continuous Remove connector of radar motion
signal
detector. If fault is cured by this,
replace radar movement detector
Basic module indicates error •.[ •.
(obstruction during
commissioning)
Door does not open when the External detector
program switch is set to:
AUTOMATIC, EXIT ONLY,
PERMANT OPEN, and
PARTIAL OPEN
The learning cycle has not been
performed (the door weight is sti II
undetermined)
The blocking sensor is too sensiti-
ve for the door set (e.g. small,
high and heavy door leaves)
Internal detector
Perform learning cycle
Adjust blocking sensor to door set
with the help of the force
limitation (OPEN, CLOSE) and the
delay time via the PDA
Remove activator connector and
bridge the input. If the fault is
cured by this, check supply
voltage (27 V) of the basic module
and the detectors. If it is okay
check and replace detectors if
required.
Remove activator connector. If the
door opens, check supply voltage
(27 V) of the basic module and
the detectors. If it is okay check
whether self-monitoring detector
that works according to the fail-
safe principle is connected.
Unpleasant operating noise
Control unit displays error code "H"
Screw presses against track roller
The basic module has been Restore original settings.
connected to a 2D door system Perform a learning cycle.
and is expecting a FST modute.
ES 200
The rubber bell don't opens the
door replace if required.
DAC
The solenoid don't held the
rubber belt. tension of the rubber belt,
C048:
300 OAC
Replace or trim screw
ES 200
Check the rubber belt,
C048:
300
Check the solenoid and the
replace if required.
 Loading...