

Page 1

TODDLER BED
WM3239
DARK CHERRY
WM3239E
ESPRESSO
WHITE
WM3239:
0-65857-15352-1
0-65857-15670-6
0-65857-15671-3
LOT NUMBER:
DO
NOT
RETURN PRODUCT TO THE STORE.
DOREL ASIA
NOTE:
UPC CODE:
WM3239E:
WM3239W:
WM3239W
DATE OF PURCHASE:
MODEL NO:
THIS INSTRUCTION BOOKLET
CONTAINS IMPORTANT SAFETY
INFORMATION. PLEASE
READ AND KEEP FOR
FUTURE REFERENCE.
(TAKEN FROM CARTON)
______ / ______ / ______
If a part is missing or damaged, contact our
customer service department. We will
replace the part FREE of charge.
Tel # : 1-800-295-1980
Fax #: 514-353-7819
Page 2

*
Adult assembly required.
E-MAIL: [email protected]
If you are missing parts or have any questions about this product, contact our customer service representative first!
CUSTOMER SERVICE
You can also order parts by writing to the address listed below. Please include the product model number, color and a
proof of purchase. This is solely limited to the repair or replacement of defective furniture components and no assembly
CALL 1-800-295-1980
detailed description of the part.
Customer Service Department No. 413
12345 Albert-Hudon Boulevard, Suite 100
Montreal, Quebec
Canada, H1G 3L1
WARNING ENTRAPMENT/STRANGULATION HAZARD:
Infants have died in toddler beds from entrapment and strangulation.
*
Failure to follow these warnings and assembly instructions could result in serious injury or death from entrapment or
*
strangulation.
NEVER use bed with children under 15 months.
*
NEVER place bed near windows where cords from blinds or drapes may strangle a child.
The TODDLER BED is not intended for children under 15 months of age or over 50 pounds (22.7kg).
*
*
If guardrails are used as the mattress containment means, guardrail(s) provided must be used to avoid the formation
of a gap between the mattress and the bed that could cause an entrapment.
DO NOT place TODDLER BED near windows where cords from blinds or drapes may strangle a child.
*
DO NOT place items with a string, cord, or ribbon around a child's neck, such as hood strings or pacifier cords.
*
DO NOT suspend strings over a TODDLER BED for any reason.
*
*
The mattress intended for use on the bed shall be a full size crib mattress having dimensions of 51 5/8 in (131 cm) in
length and 27 1/4 in. (69 cm) in width with a minimum thickness of 4 in. (10 cm) but not exceeding 6 in. (15 cm).
NOTE
* Phillips head screwdriver is not included.
* Assembly will require 2 people.
* Estimated assembly time: 25 minutes.
*
Caution:
CARE AND CLEANING
*
Dust regularly with a soft, lint-free cloth to prevent soil build-up. A damp cloth may be used occasionally to clean
surface. Dry immediately. Do not use any abrasives that may damage finish. Excessive exposure to sunlight and
extreme changes in temperature and moisture can damage wood furniture.
MAINTENANCE
Check bolts periodically and tighten if necessary.
*
LIMITED WARRANTY
Dorel Asia warrants its product to be free from defects in material and workmanship and agrees to remedy any such
defect. This warranty covers 1 year from the date of original purchase. This warranty is valid only upon presentation of
labor is included. This warranty does not apply to any product which has been improperly assembled, subjected to
misuse or abuse or which has been altered or repaired in any way. This warranty gives you specific legal rights and you
may also have other rights which vary from State to State.
WARNING: Should this product become damaged, and/or
components are broken or missing, DO NOT USE.
Page 3

WM3239 / WM3239E / WM3239W
HARDWARE LIST
TODDLER BED
1
Φ1/4" x 1-3/4"
HEX SOCKET HEAD BOLT
2 PCS
2
Φ1/4" x 2-3/4"
HEX SOCKET HEAD BOLT
22 PCS
43
Φ1/4" x 1/2"
BARREL NUT
10 PCS
4MM
ALLEN KEY
1 PC
Φ10mm x 40mm
4 PCS
65
Φ8mm x 30mm
WOOD DOWELWOOD DOWEL
20 PCS
1
Page 4

PARTS LIST
TODDLER BED
WM3239 / WM3239E / WM3239W
A
HEADBOARD POST
2 PCS
D
HEADBOARD PANEL
1 PC
G
B
TOP CROSS
2 PCS
FOOTBOARD POST
2 PCS
C
BOTTOM CROSS
2 PCS
FE
FOOTBOARD PANEL
1 PC
IH
LEFT SIDE RAIL RIGHT SIDE RAIL
1 PC
CENTER SUPPORT SLAT
1 PC 4 PCS
WIDE SUPPORT SLAT NARROW SUPPORT SLAT
1 PC 2 PCS
GUARDRAIL
LKJ
6 PCS
2
Page 5

TODDLER BED
STEP 1
WM3239 / WM3239E / WM3239W
B
2
A
2
Attach top cross (B) to the headboard post (A) using hex socket head bolt (2) as
shown. Use Allen Key (4) to tighten the bolt.
NOTE: Do not fully tighten bolt. This will facilitate assembly in the following steps.
Insert the headboard panel (D) into the grooves of the top cross (B) and the headboard
post (A). Push the headboard panel (D) to secure it into place.
3
Page 6
TODDLER BED
STEP 2
WM3239 / WM3239E / WM3239W
5
4
5
2
A
5
4
2
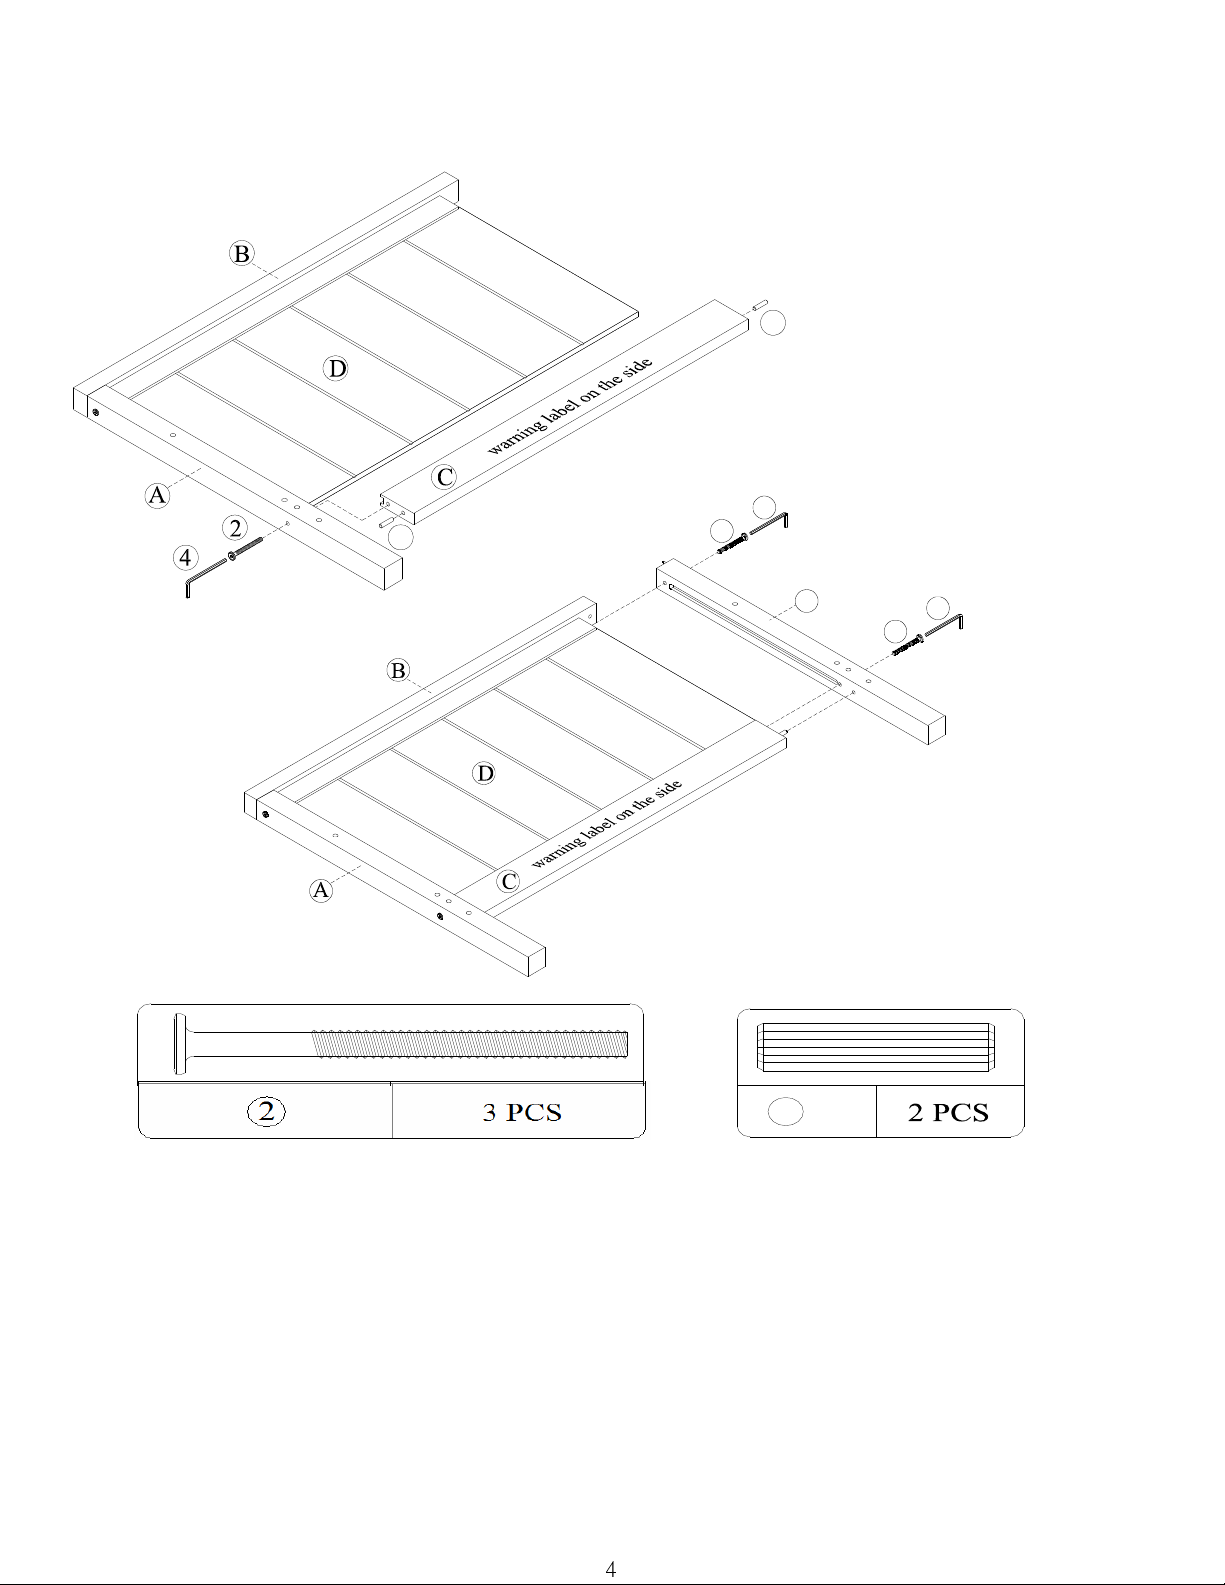
Use the bottom cross (C) with a warning label in this step.
Insert wood dowels (5) into both ends of bottom cross (C).
Insert bottom cross (C) to the headboard post (A). Ensure that headboard panel (D) rests inside the
grooves of bottom cross (C).
Secure bottom cross (C) to headboard post (A) using hex socket head bolt (2) and Allen Key (4).
Attach the other headboard post (A) to top cross (B) and bottom cross (C) using hex socket head bolts
(2) and Allen Key (4).
NOTE: Do not fully tighten bolt. This will facilitate assembly in the following steps.
4
Page 7
TODDLER BED
WM3239 / WM3239E / WM3239W
2
4
E
F
2
STEP 3
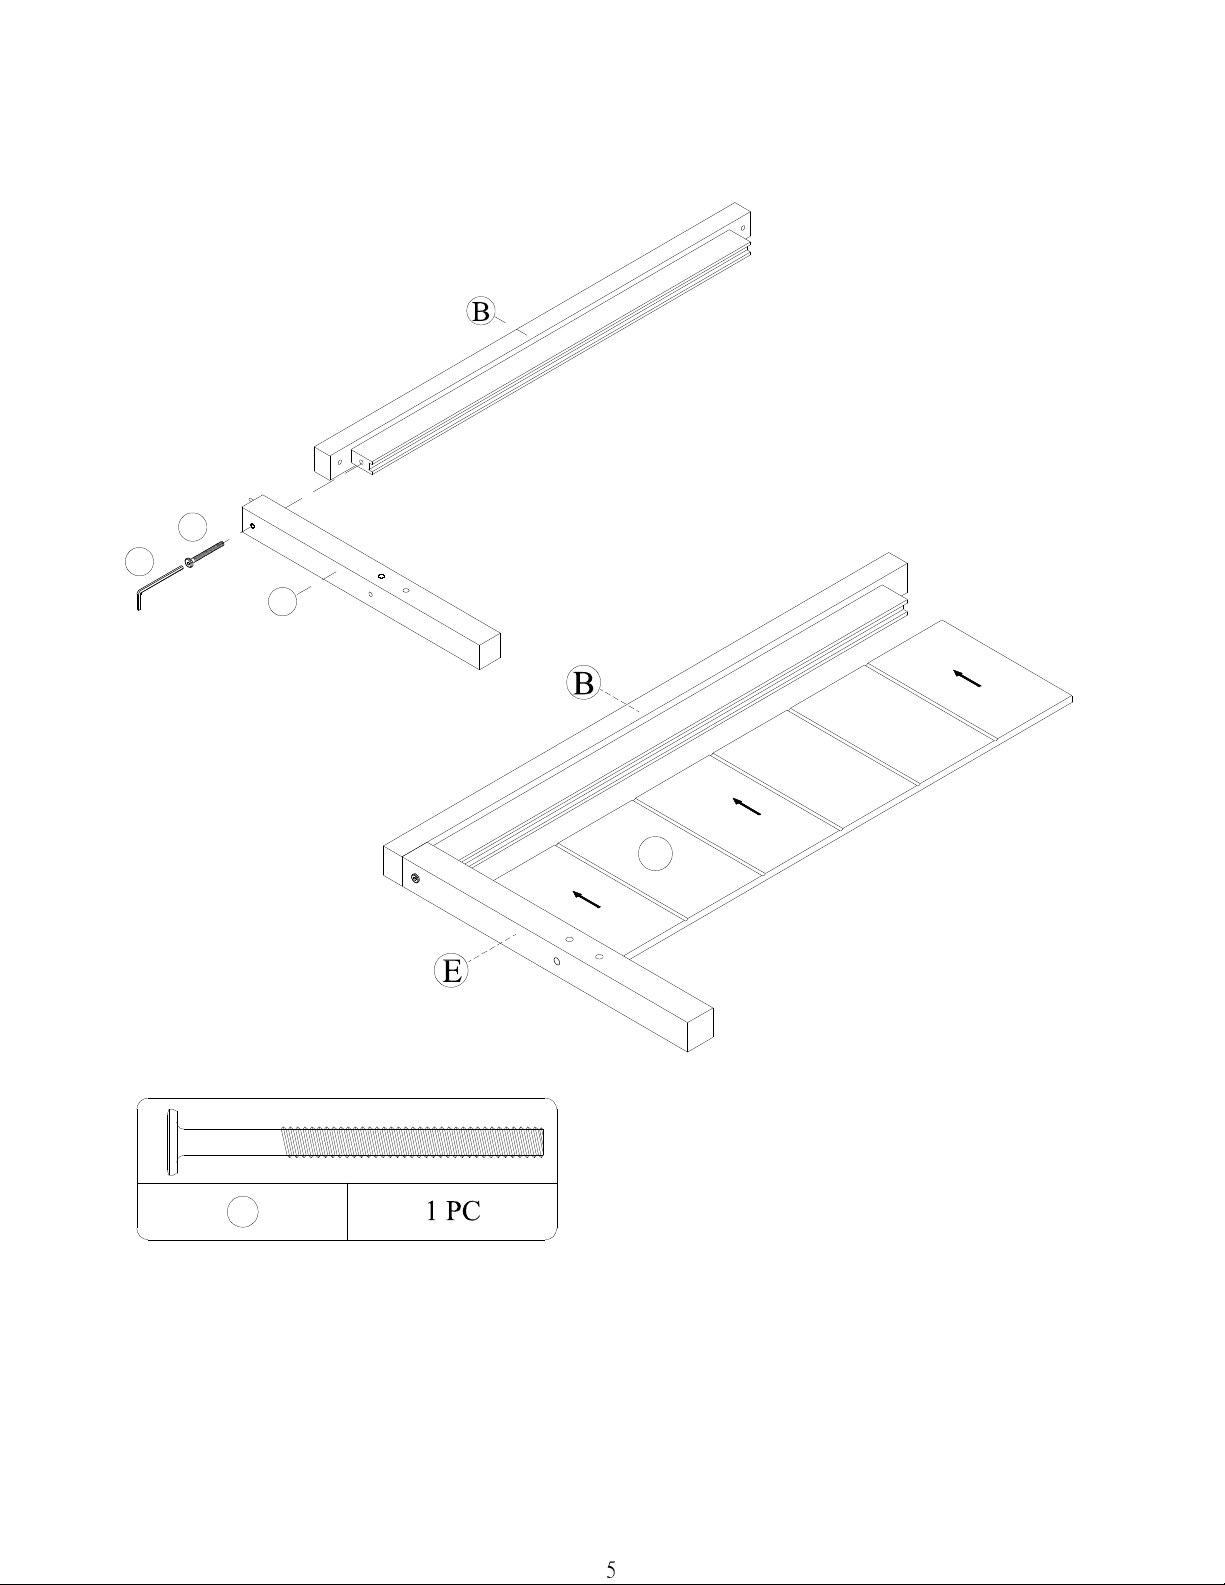
Attach top cross (B) to the footboard post (E) using hex socket head bolt (2) and Allen Key (4).
NOTE: Do not fully tighten bolt. This will facilitate assembly in the following steps.
Insert the footboard panel (F) into the grooves of the top cross (B) and footboard post (E). Push the
footboard panel (F) to secure it into place.
5
Page 8
TODDLER BED
STEP 4
WM3239 / WM3239E / WM3239W
5
F
C
4
2
2
4
5
E
4
2
5
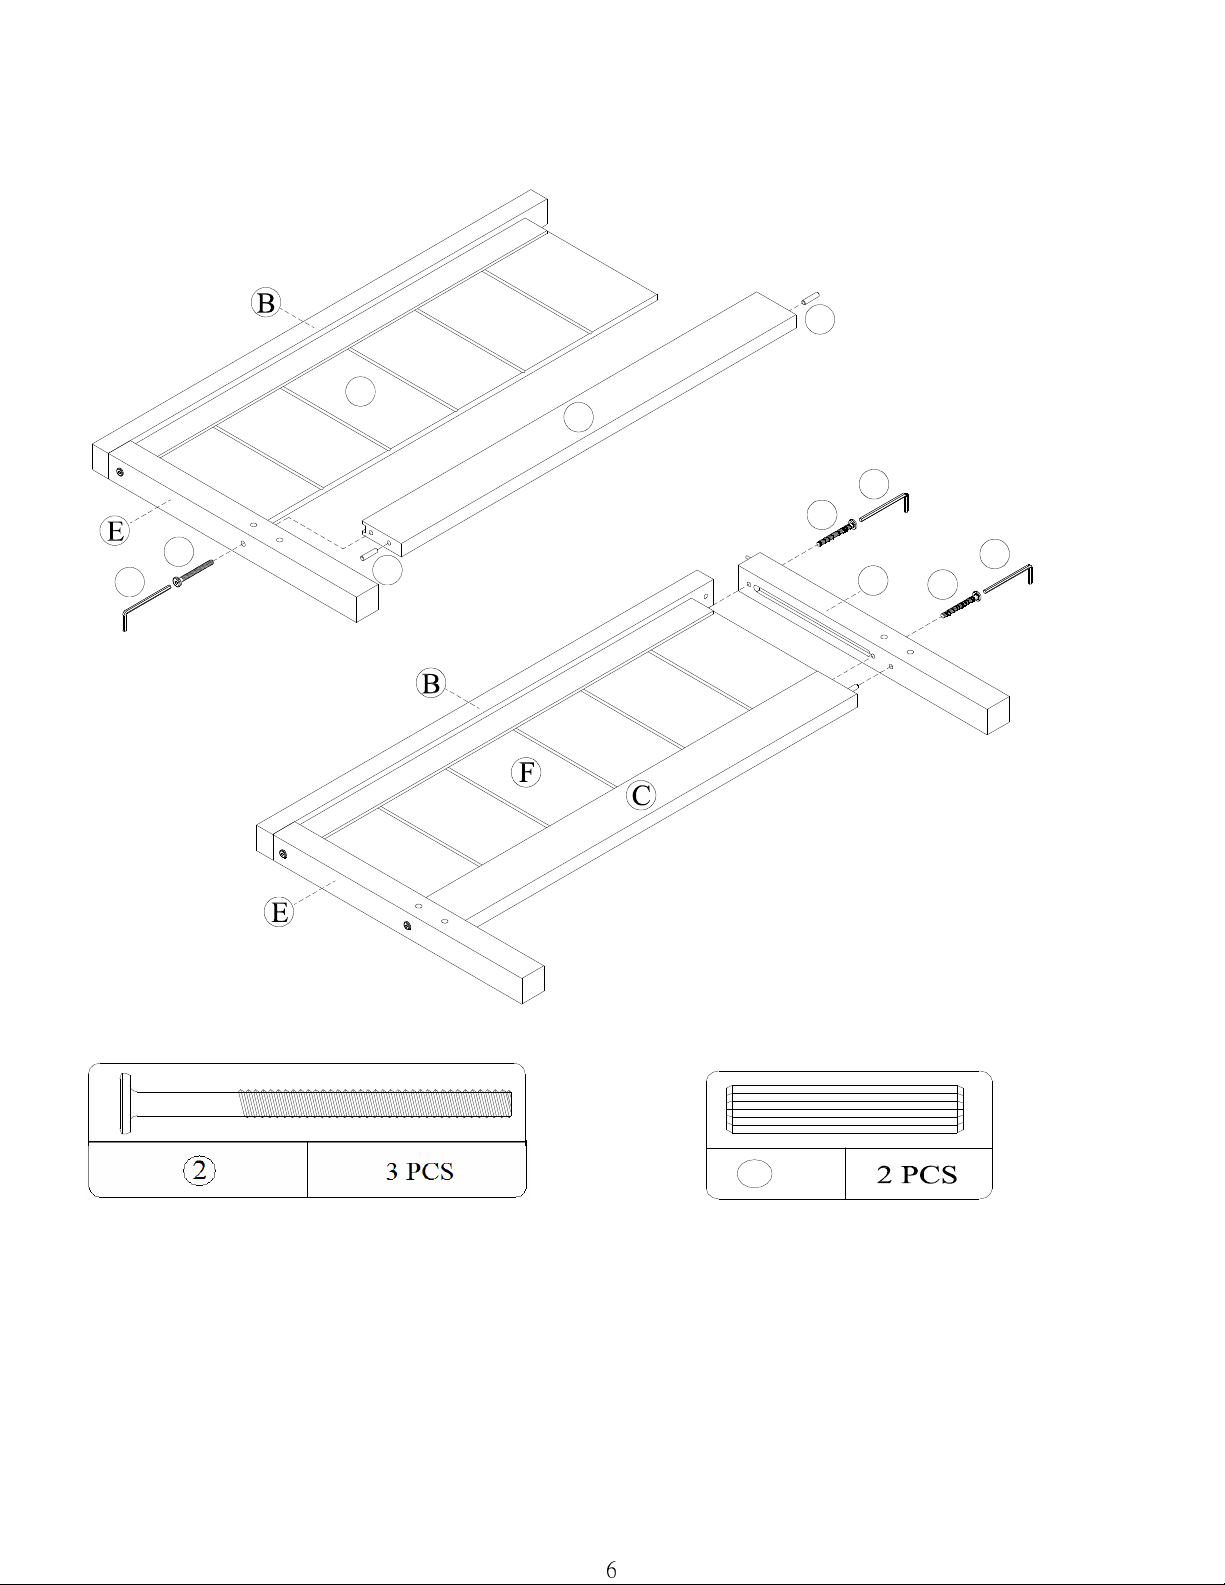
Insert wood dowels (5) into ends of the bottom cross (C).
Insert bottom cross (C) to the footboard post (E). Ensure that footboard panel (F) rests inside the grooves of
bottom cross (C).
Secure bottom cross (C) to footboard post (E) using hex socket head bolt (2) and Allen Key (4).
Attach the other footboard post (E) to the top cross (B) and the bottom cross (C) using hex socket head bolts
(2) and Allen Key (4).
NOTE: Do not fully tighten the bolts. This will facilitate assembly in the following steps.
6
Page 9
TODDLER BED
WM3239 / WM3239E / WM3239W
2
6 3
STEP 5
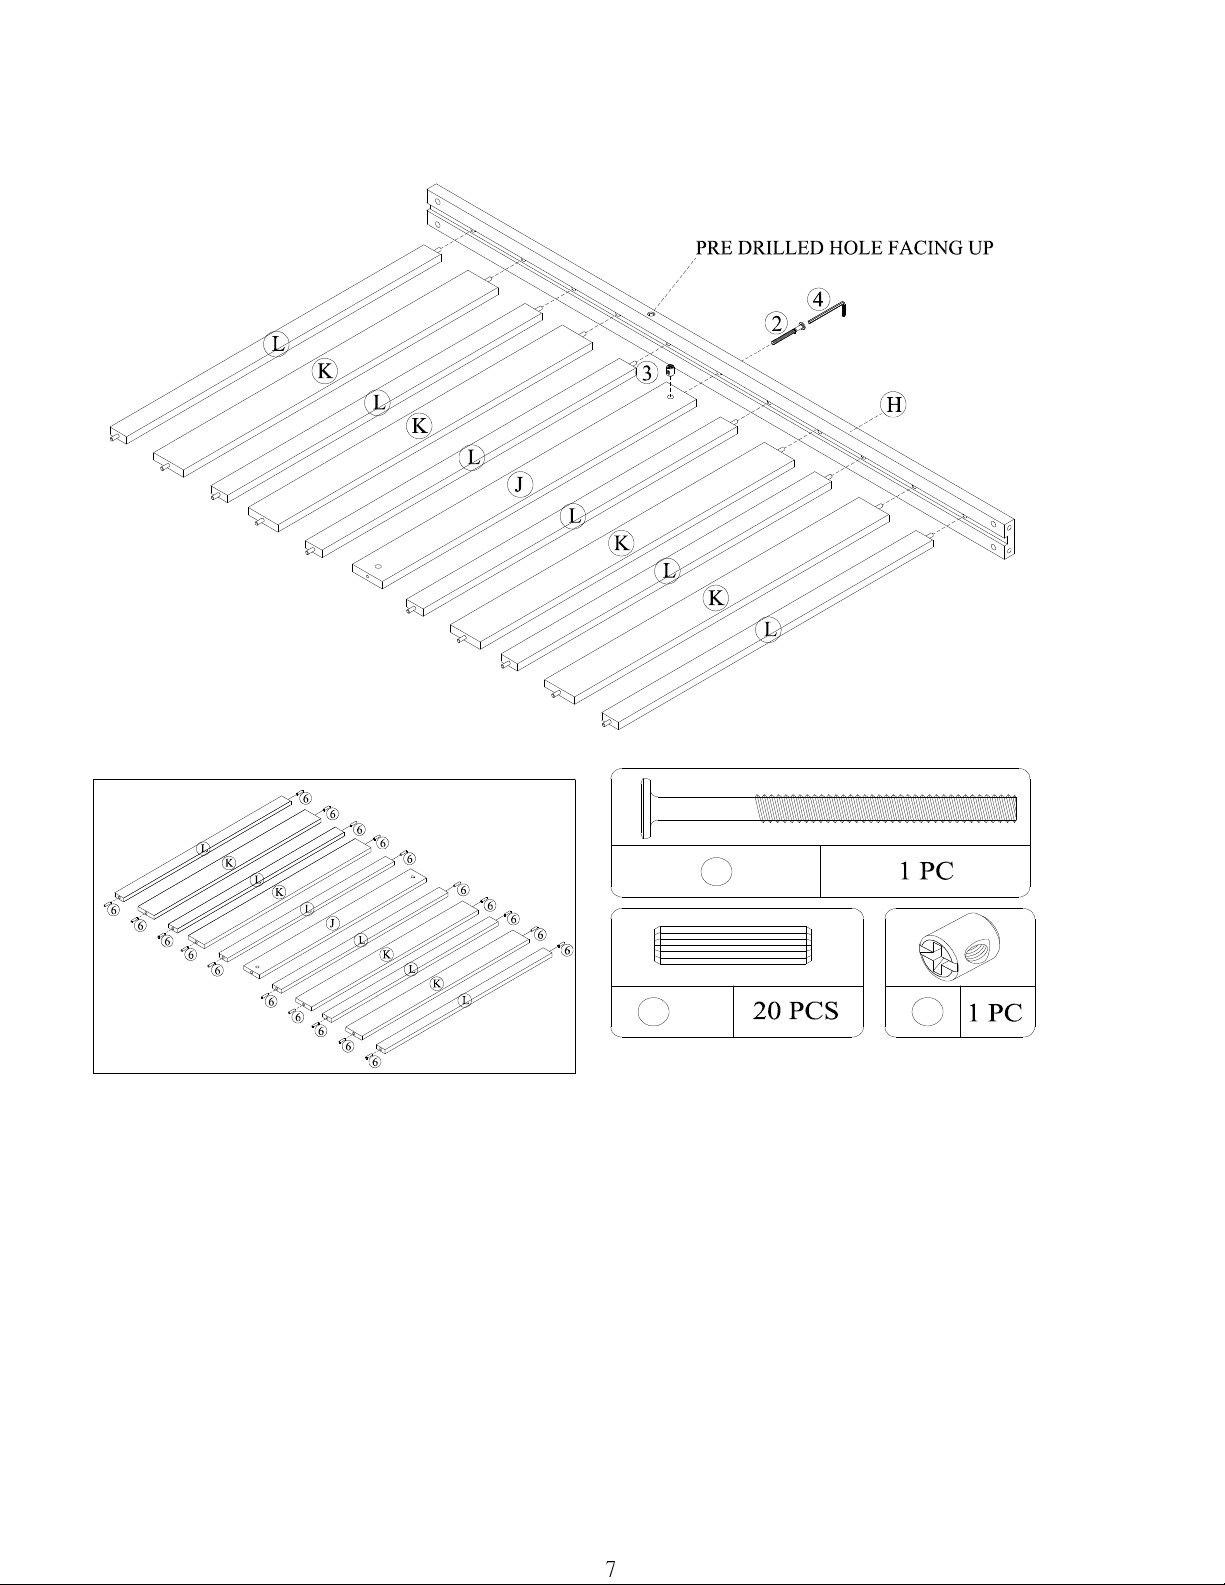
Insert barrel nut (3) into the hole on the wide surface of center support slat (J). Ensure the barrel nut
(3) is flush with center support slat (J).
Attach center support slat (J) to right side rail (H) with hex socket head bolt (2) as shown. Use Allen
Key (4) to tighten the bolt.
NOTE: Barrel nut (3) can be rotated using a screwdriver (not included) to properly align with the
bolt coming through side rail (H).
Insert wood dowels (6) into both ends of wide support slats (K) and narrow support slats (L).
Insert the support slats (K & L) into the grooves of the right side rail (H) as shown.
7
Page 10
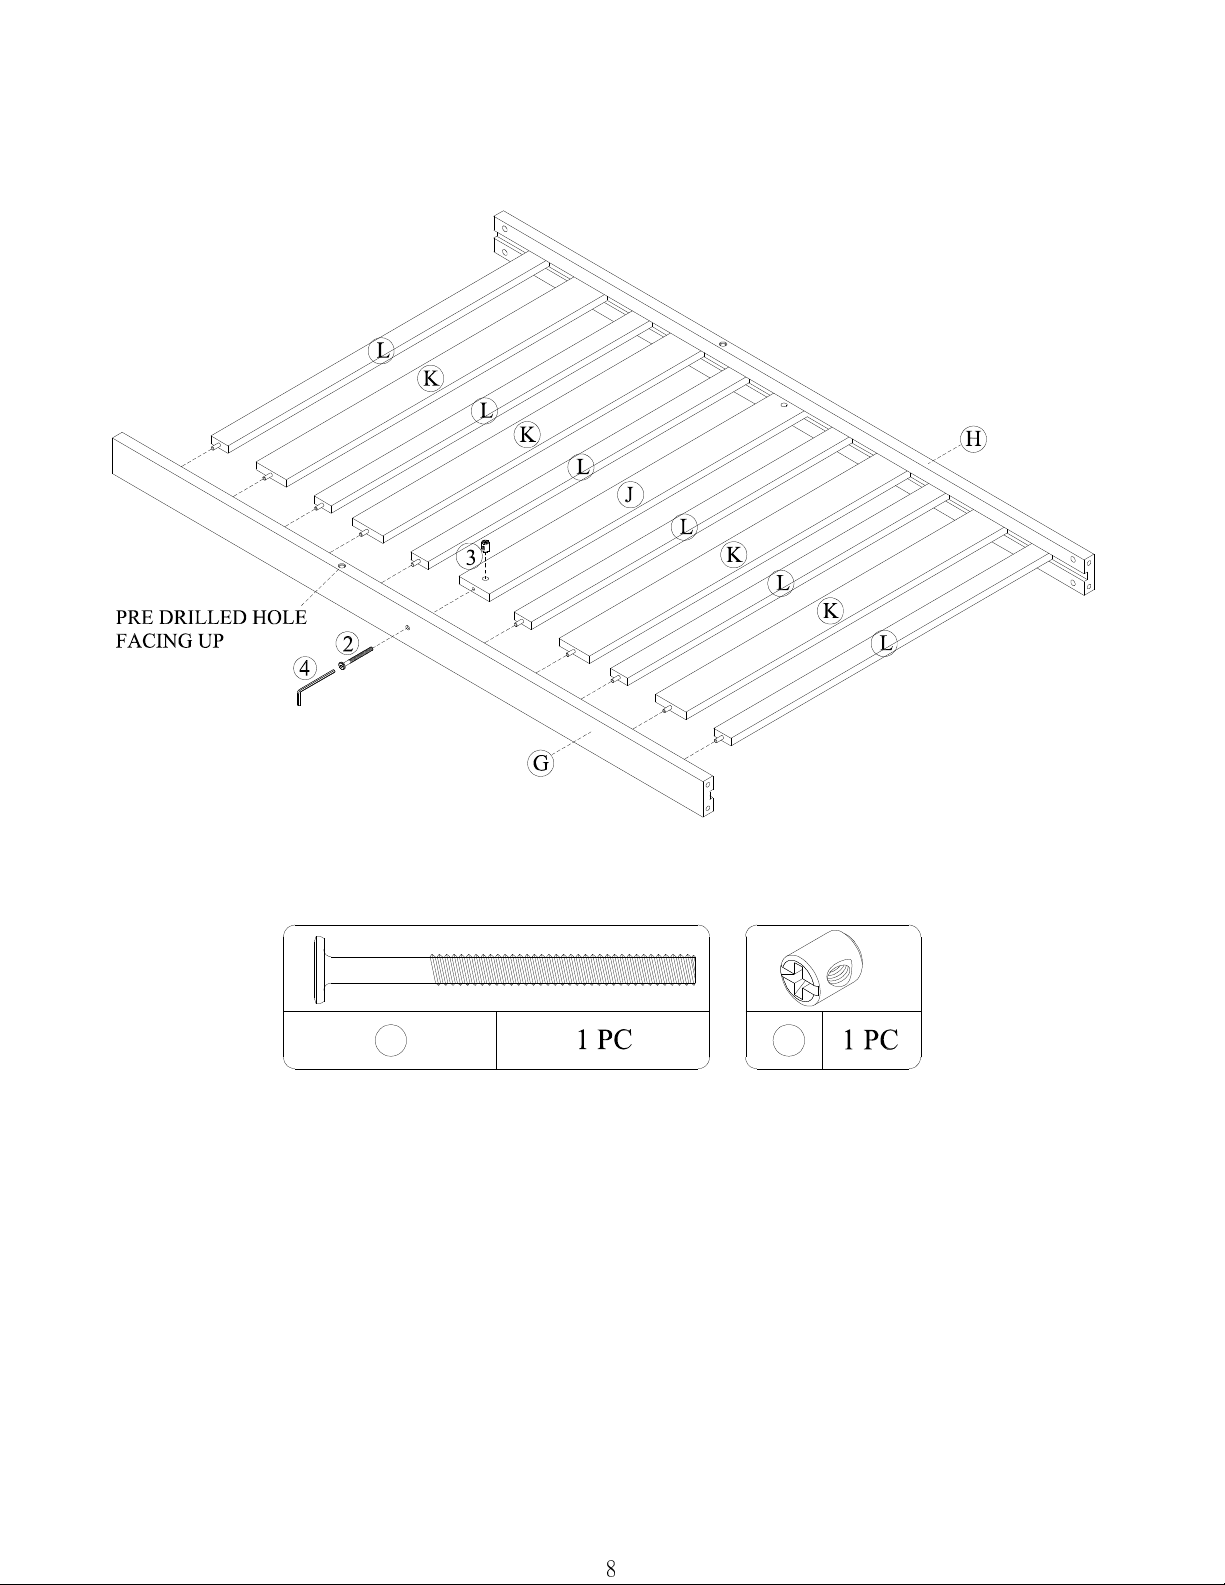
The barrel nut (3) can be rotated using a screwdriver (not included) to properly align with the
TODDLER BED
WM3239 / WM3239E / WM3239W
2
STEP 6
Insert barrel nut (3) into the hole on the wide surface of center support slat (J). Ensure the barrel nut
(3) is flush with center support slat (J).
Insert the support slats (K & L) into the grooves of left side rail (G).
Attach the left side rail (G) to center support slat (J) with hex socket head bolt (2). Make sure that
barrel nut (3) is properly aligned to allow hex socket head bolt (2) to be installed.
Use Allen Key (4) to fully tighten the bolt.
NOTE:
bolt coming through side rail (G).
8
3
Page 11
TODDLER BED
WM3239 / WM3239E / WM3239W
2
STEP 7
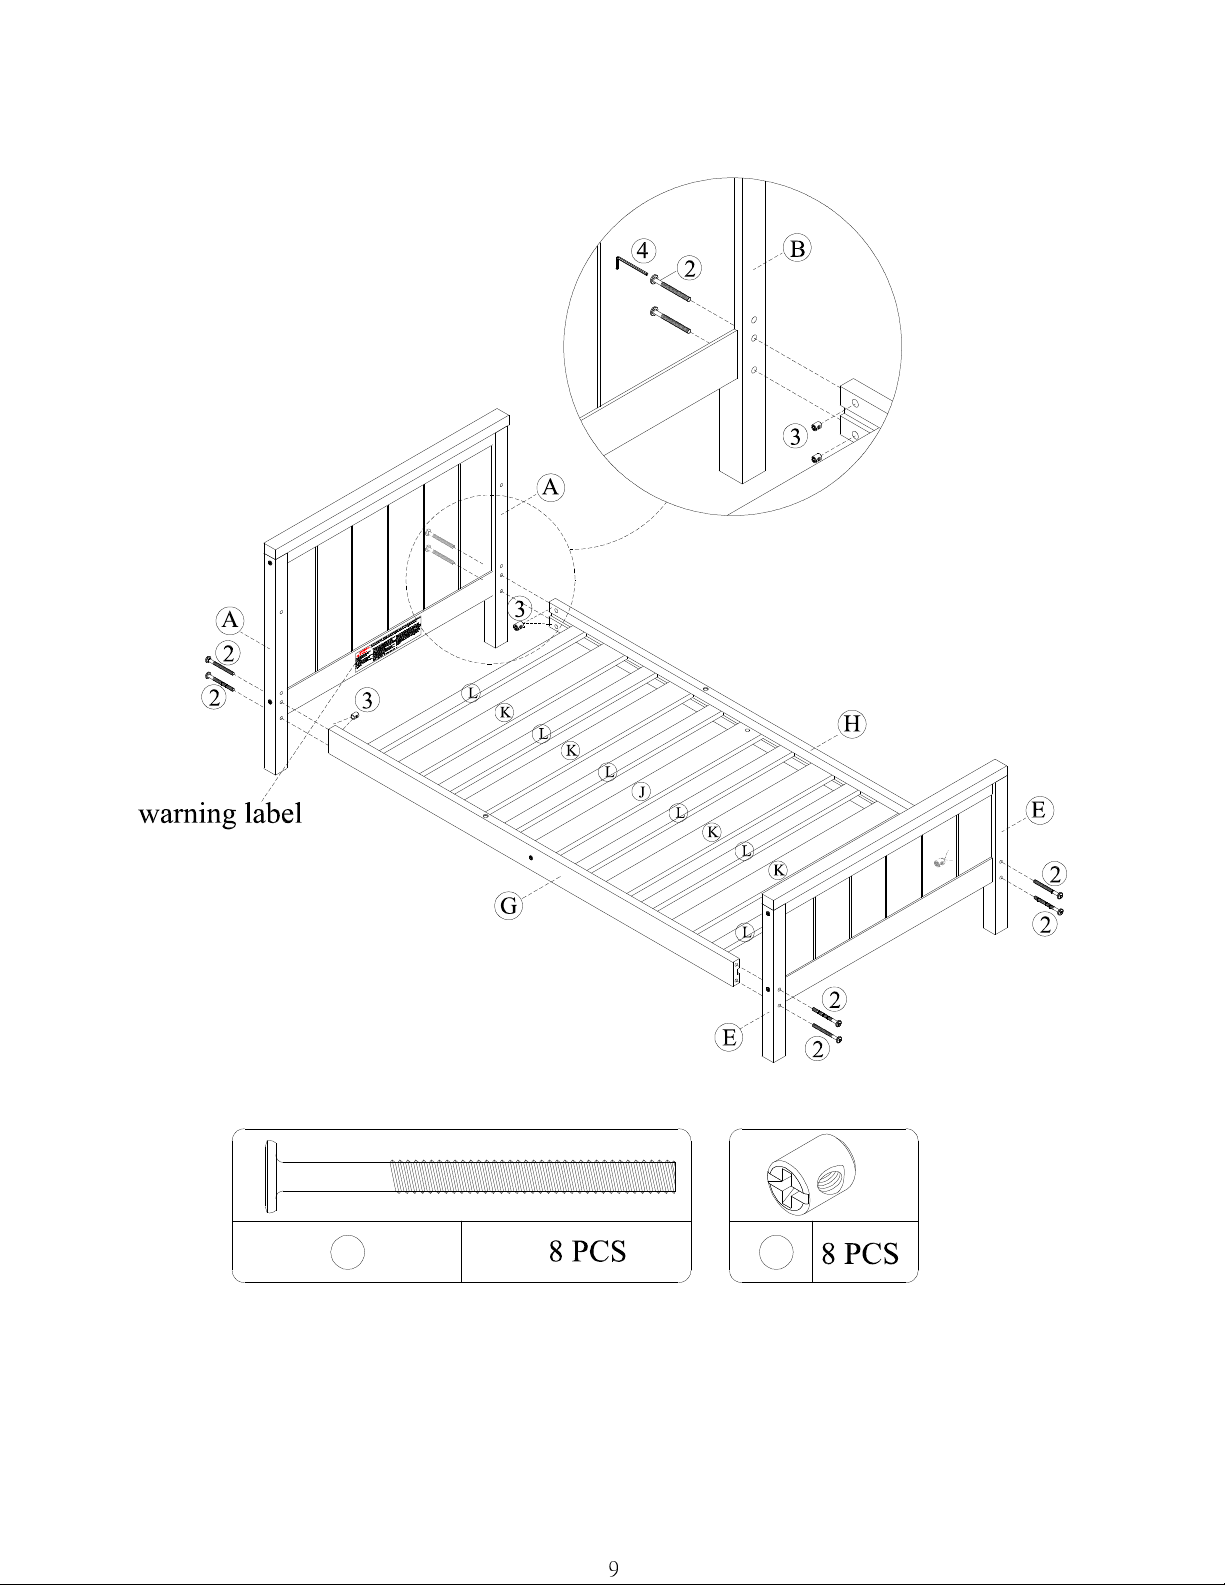
Insert barrel nuts (3) into both ends of the left and right side rails (G & H).
Attach the headboard and footboard to the left and right side rails (G & H) by threading hex socket
head bolts (2) through the headboard posts (A) and footboard posts (E).
Use Allen key (4) to tighten bolts.
NOTE: Do not fully tighten bolts. This will facilitate assembly in the following steps.
9
3
Page 12
TODDLER BED
WM3239 / WM3239E / WM3239W
1 2
STEP 8
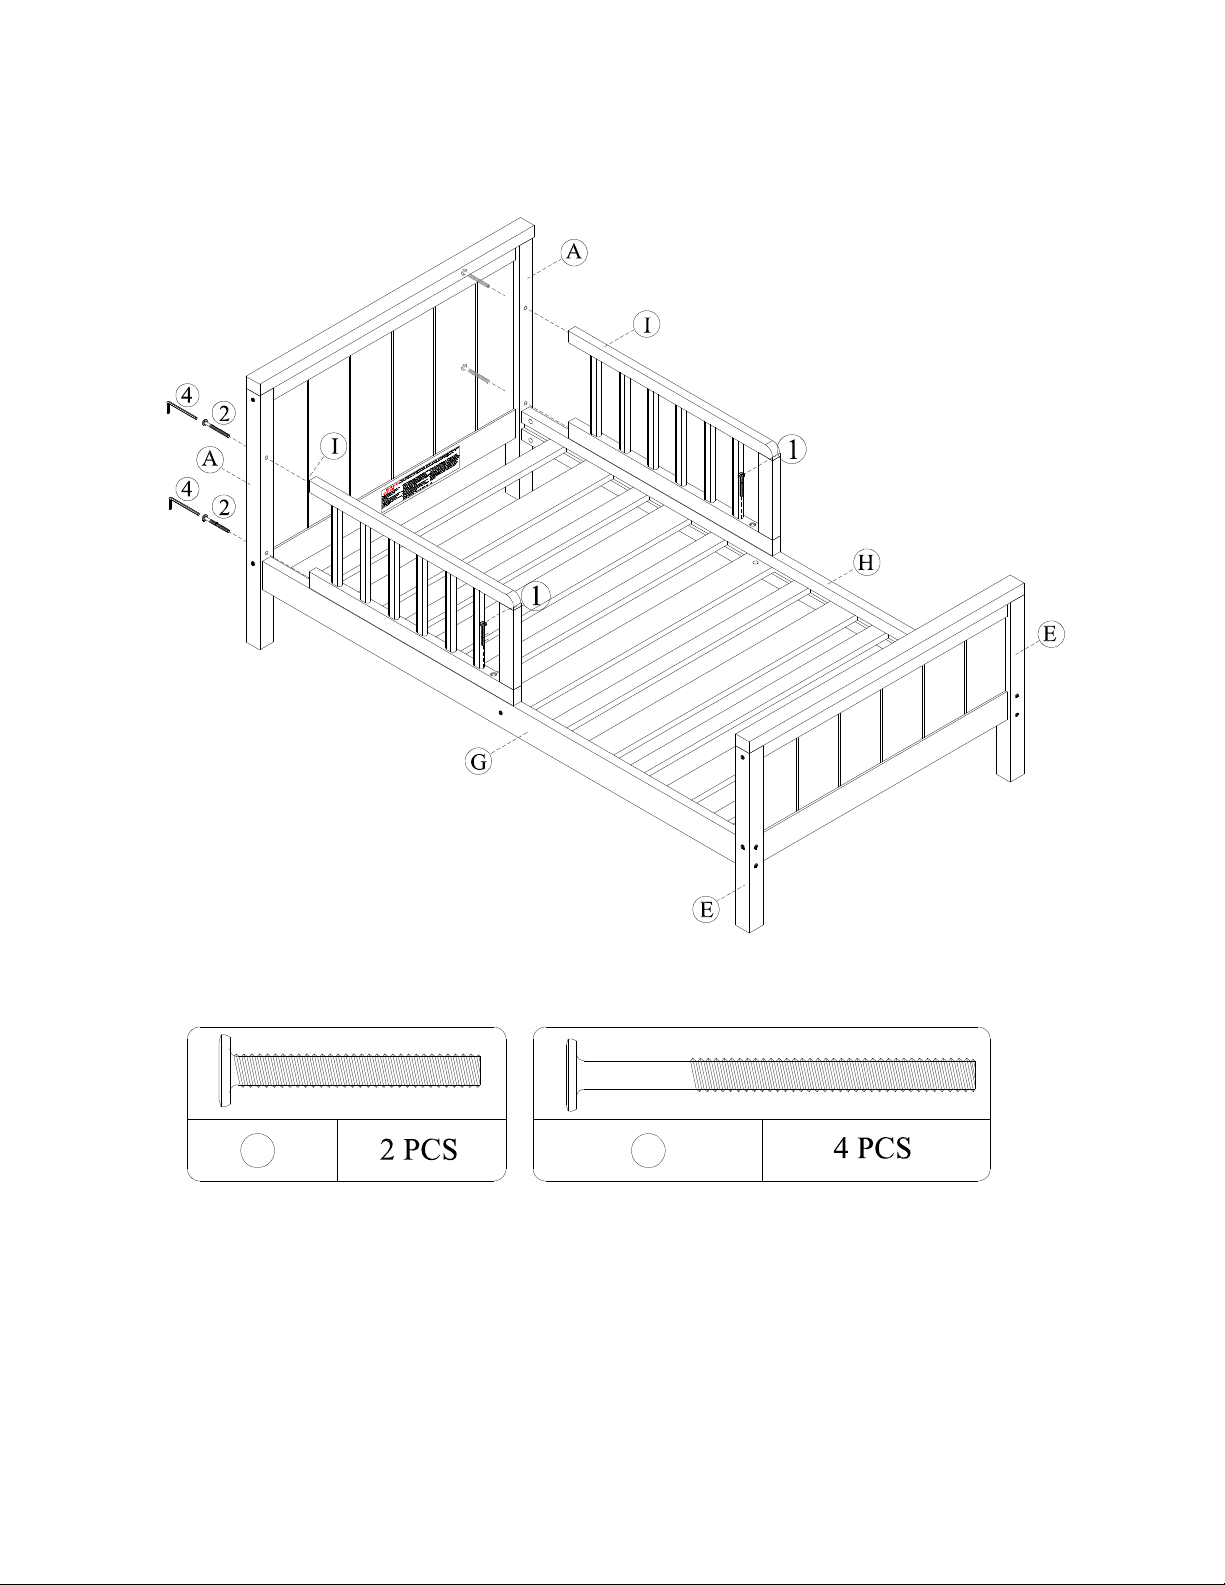
Attach guardrails (I) to headboard posts (A) with hex socket head bolts (2).
Attach the guardrails (I) to the left and right side rails (G & H) with hex socket head bolts
(1) as shown. Use Allen key (4) to tighten bolts.
NOTE: Fully tighten all bolts installed in previous steps.
10
Page 13
TODDLER BED
products and/or maximum weights indicated. Use with other
products and/or products heavier than the maximum weights
RETURN PRODUCT TO THE
If a part is missing or damaged, contact our
customer service department. We will replace the
Fax #: 514-353-7819
size crib mattress having dimensions of 27-
WM3239 / WM3239E / WM3239W
CAUTION: This unit is intended for use only with the
indicated may result in instability or cause possible injury.
To avoid dangerous gaps, any mattress
intended for use on this bed shall be a full-
1/4 in. (690 mm) in width by 51-5/8 in.
(1310 mm) in length with a minimum
thickness of 4 in. (100 mm) but not
exceeding 6 in. (150 mm).
NEVER use bed with
children under 15
months or weighing
more than 50 lbs (22.7
kg).
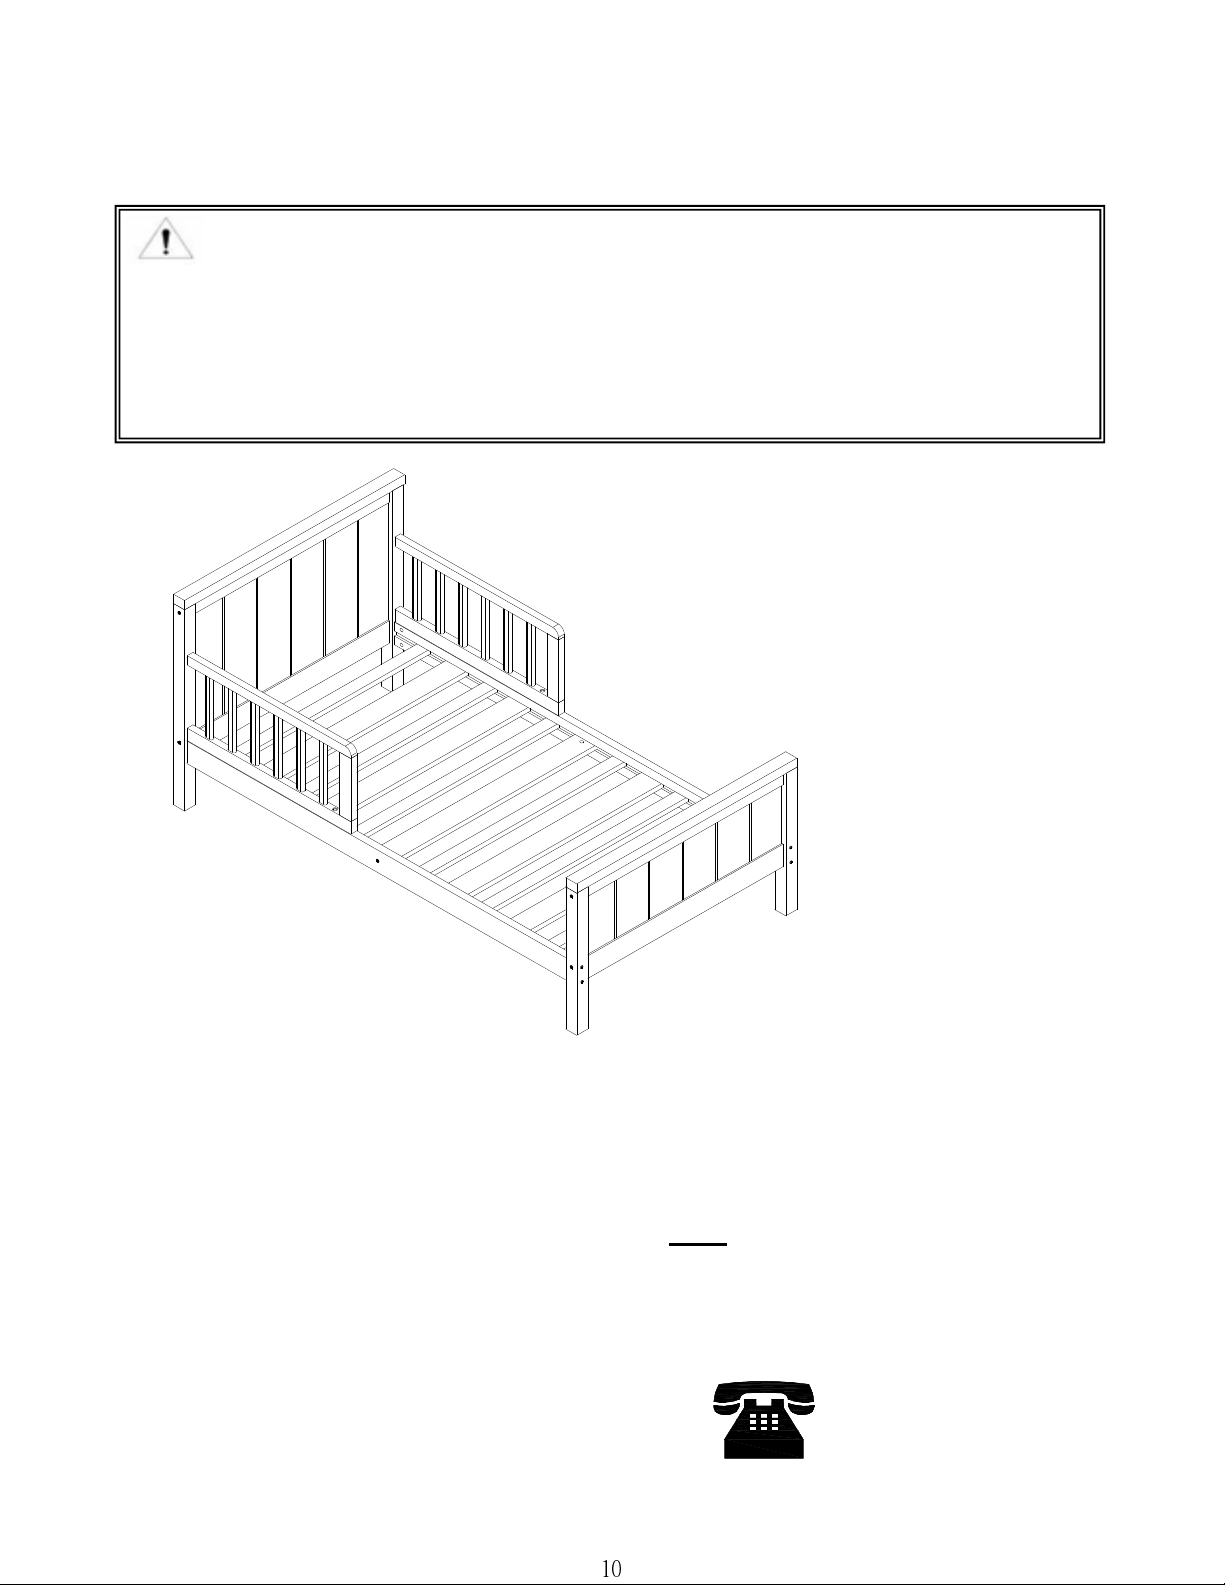
That's it ! You've finished assembling your Toddler Bed.
DO NOT
STORE.
part FREE of charge.
Tel #: 1-800-295-1980
E-Mail: [email protected]
10
Page 14

MODEL #: WM3239 / WM3239E / WM3239W
Customer Service
DO NOT RETURN THIS PRODUCT TO THE STORE
PLEASE CONTACT CUSTOMER SERVICE REPRESENTATIVES AT THE FOLLOWING
NUMBERS SHOULD THERE BE ANY MISSING OR DEFECTIVE PART(S).
Customer Service Phone Number 1-800-295-1980
Customer Service Fax Number 514-353-7819
Request Date:
Name:
Shipping Address:
Street & Number:
City & State:
Zip Code:
Day Time Phone Number:
(including area code)
Email: [email protected]
Date & Place of Purchase:
Customer Service Department No. 413, 12345 Albert-Hudon Boulevard, Suite 100, Montreal, QC, Canada, H1G 3L1
Part(s) description and quantity: (Please be sure to list model number or SKN number)
Customer Service Representative Mailing Address:
 Loading...