

Page 1

2-IN-1 CRIB
DA4162ND
THIS INSTRUCTION BOOKLET
CONTAINS IMPORTANT SAFETY
INFORMATION. PLEASE READ AND
KEEP FOR FUTURE REFERENCE.
ASSEMBLY MANUAL
Model No:
NOTE:
NEED HELP!
CALL US FOR ASSISTANCE
1-800-295-1980
Page 2

*
*
*
*
*
*
*
*
*
*
*
*
*
*
*
*
Follow warnings on all products in a crib.
WARNING ENTRAPMENT / STRANGULATION HAZARD:
*
Infants have died in toddler beds from entrapment and strangulation.
*
NEVER use bed with children under 15 months.
*
NEVER place bed near windows where cords from blinds or drapes may strangle a child.
*
*
*
*
*
Montreal, Quebec
Canada H1G 3L1
CUSTOMER SERVICE
If you are missing parts or have any questions about this product, contact our customer service representative first!
CALL 1-800-295-1980
You can also order parts by writing to the address listed below. Please include the product model number, color and a detailed
description of the part.
Customer Service Department No. 413
12345 Albert-Hudon Boulevard, Suite 100
Stop using crib when child begins to climb out or reaches the height of 35 in. (89 cm).
To reduce the risk of SIDS, pediatricians recommend healthy infants be placed on their backs to sleep, unless
otherwise advised by your physician.
When child is able to pull to standing position, set mattress to lowest position and remove bumper pads, large toys
and other objects that could serve as steps for climbing out.
Never use plastic shipping bags or other plastic film as mattress covers because they can cause suffocation.
Replace teething rail if damaged or loose (if teething rail is provided for this model).
Failure to follow these warnings and assembly instructions could result in serious injury or death.
Read all instructions before assembling crib. KEEP INSTRUCTIONS FOR FUTURE USE.
DO NOT place crib near window where cords from blinds or drapes may strangle a child.
Strings can cause strangulation! DO NOT place crib with a string around a child's neck, such as hood strings or
pacifier cords. DO NOT suspend strings over a crib or attach strings to toys.
To help prevent strangulation tighten all fasteners. A child can trap parts of the body or clothing on loose
fasteners.
If refinishing, use a non-toxic finish specified for children's products.
E-MAIL: [email protected]
WARNING
CAUTION: ANY MATTRESS USED IN THIS CRIB MUST BE AT LEAST 27-1/4 INCHES BY 51-5/8
INCHES (69CM BY 131CM) WITH A MINIMUM THICKNESS OF 4 INCHES (10CM) BUT NOT
EXCEEDING 6 INCHES (15CM).
Check this product for damaged hardware, loose joints, loose bolts or other fasteners, missing parts or sharp edges
before and after assembly and frequently during use. Securely tighten loose bolts and other fasteners. DO NOT use
crib if any parts are missing, damaged or broken. Ask your dealer or contact a customer service representative
(address & phone number shown above) for replacement parts and instructional literature if needed. DO NOT
substitute parts.
Infants can suffocate on soft bedding. Never add a pillow or comforter. Never place additional padding under an
infant.
Infants can suffocate in gaps between crib sides and a mattress that is too small.
The TODDLER BED or DAY BED is not intended for children under 15 months of age or over 50 pounds
(22.7kg).
If guardrails are used as the mattress containment means, guardrail(s) provided must be used to avoid the formation
of a gap between the mattress and the bed that could cause an entrapment (when product is used as a TODDLER
BED or DAY BED).
DO NOT place DAY BED or TODDLER BED near windows where cords from blinds or drapes may strangle a
child.
DO NOT place items with a string, cord, or ribbon around a child's neck, such as hood strings or pacifier cords.
DO NOT suspend strings over a TODDLER BED or DAY BED for any reason.
Page 3

*
*
*
*
*
*
Ensure all parts and components are present before beginning assembly.
CARE AND CLEANING
DO NOT use power tools.
CAUTION: Adult assembly required.
NOTES
Assemble on soft, smooth surface to prevent damage to product finish.
Phillips head screw driver is not included.
Dust regularly with a soft, lint-free cloth to prevent soil build-up. A damp cloth may be used occasionally to
clean surface. Dry immediately. Do not use any abrasives that may damage finish. Excessive exposure to
sunlight and extreme changes in temperature and moisture can damage wood furniture.
If the crib is to be stored, store in cool dry place and carefully package all original hardware to protect from
loss.
MAINTENANCE
Check bolts/screws periodically and tighten them if necessary.
Assembly will require two people.
WARNING: Should this product become damaged, and/or
components are broken or missing, DO NOT USE.
Page 4

DA4162ND
2-IN-1CRIB
1
SPRING WASHER - 26 PCS
7
BARREL NUT
8 PCS
BARREL NUT
2 PCS
HARDWARE LIST
ALLEN KEY
1 PC
GATE PIN
2 PCS
HEX SOCKET HEAD BOLT
16 PCS
HEX SOCKET HEAD BOLT
10 PCS
6 mm x 3/4"
1/4" x 2-1/2"
1
4
5
63
2
Page 5
2
2-IN-1CRIB
DA4162ND
A
D
C
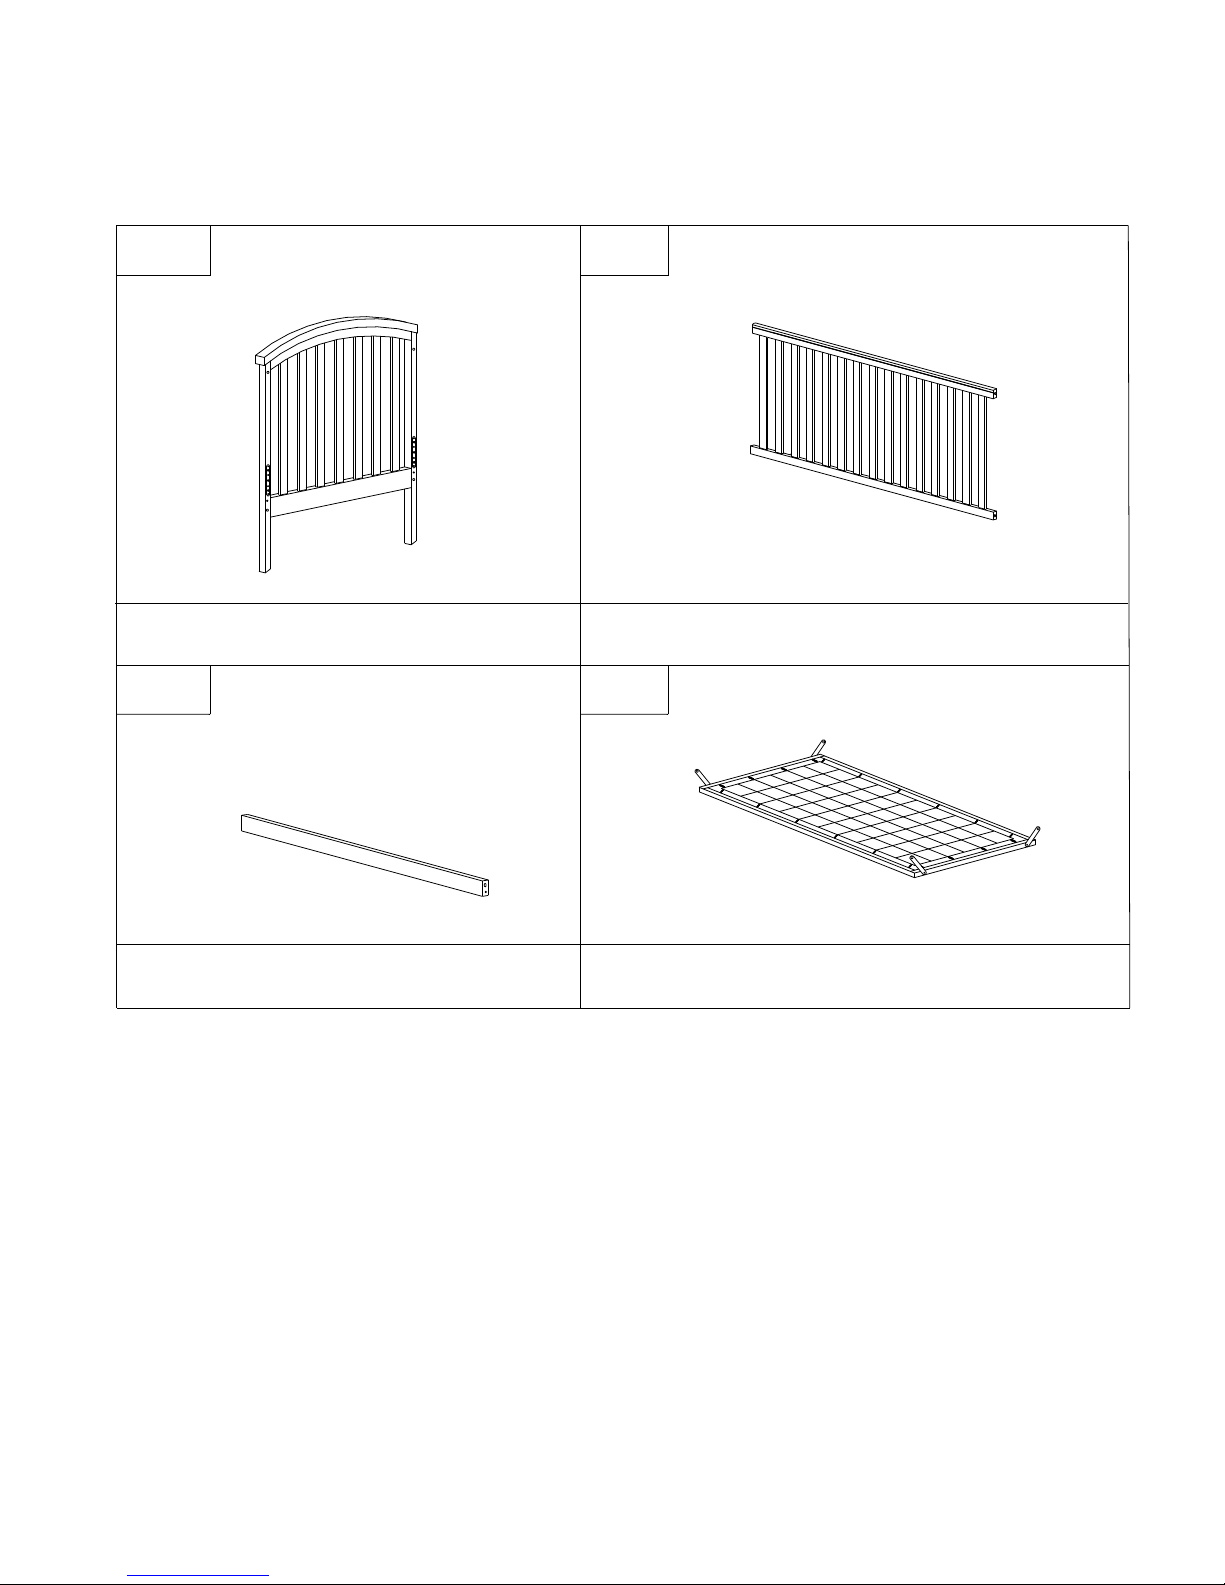
GUARD RAIL
1 PC
MATTRESS SUPPORT
1 PC
STATIONARY SIDE
2 PCS
SIDE FRAME
2 PCS
B
PARTS LIST
Page 6
2-IN-1CRIB
DA4162ND
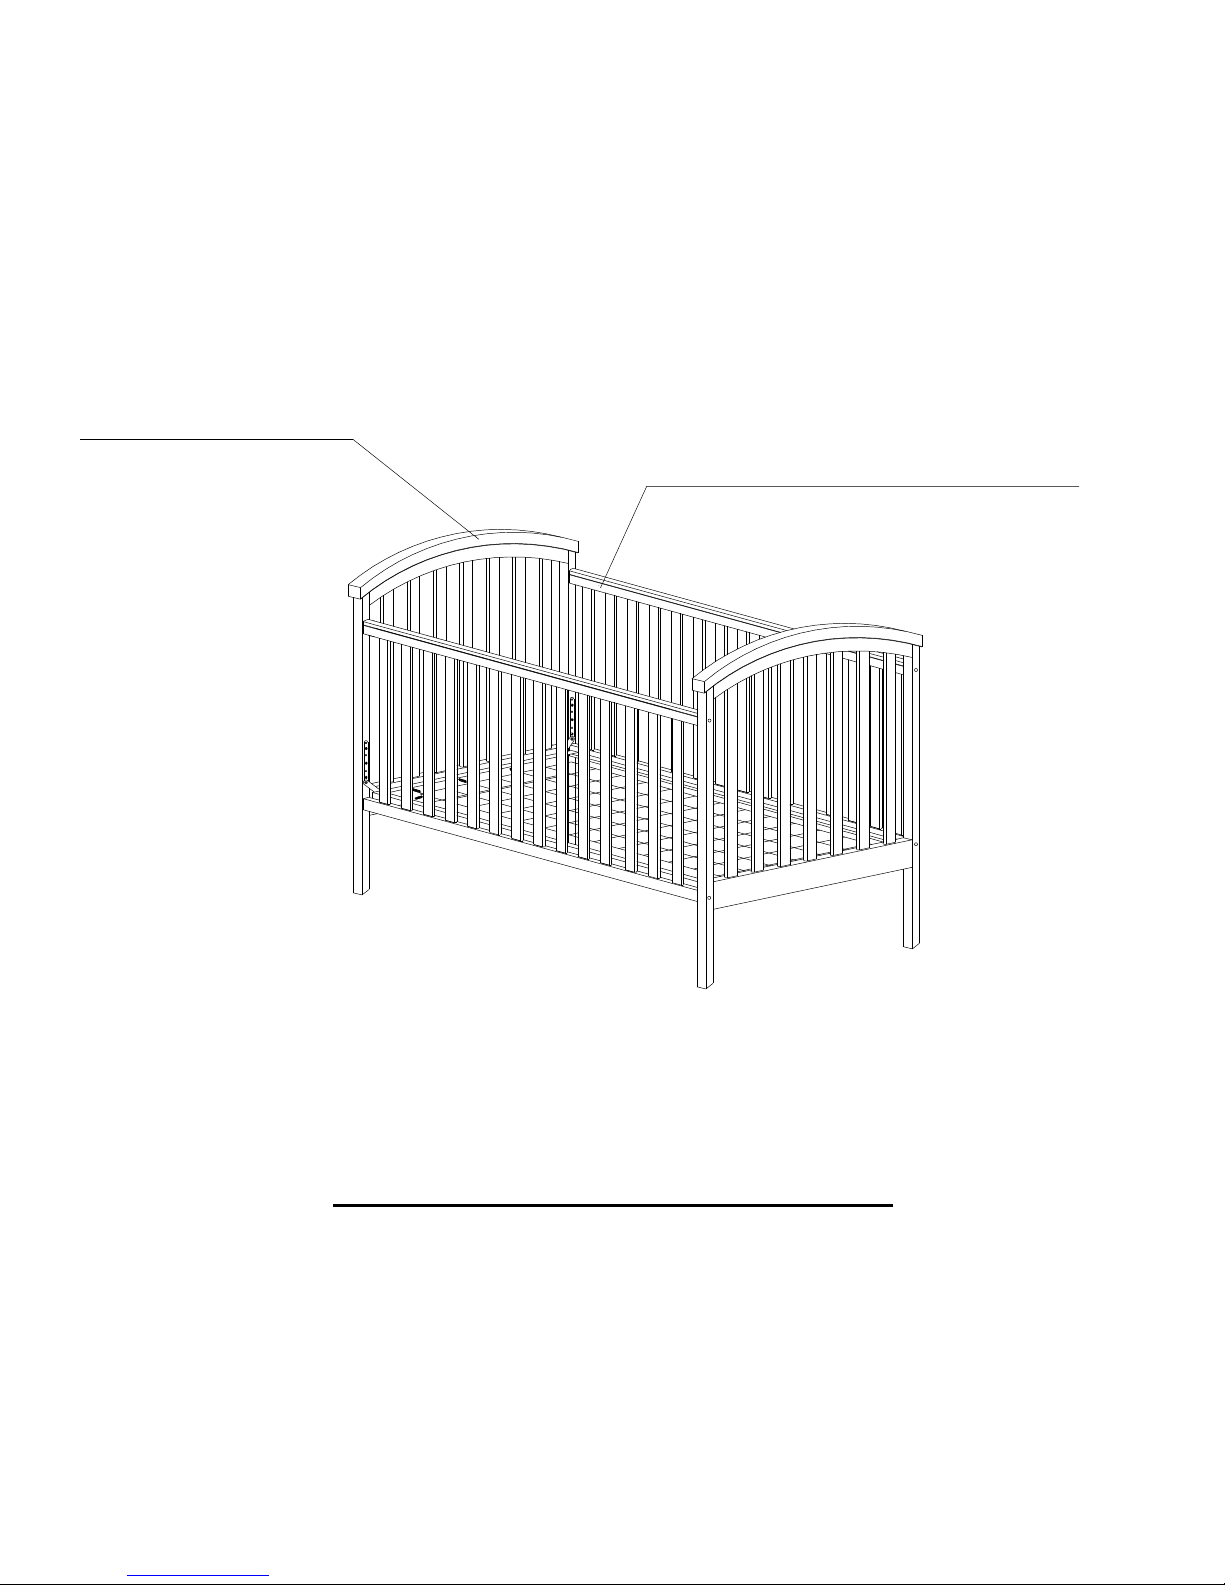
NOTE: PLEASE MAKE SURE THE TEETHING RAILS ON THE
STATIONARY SIDE (B) ARE FACING UP.
CRIB ASSEMBLY INSTRUCTION
NOTE: When inserting bolts, turn clockwise until tighten. Then loosen 1/2"-3/4"
of a turn. After crib is completely assembled, return to each bolt and tighten.
Use wax or soap on all bolts to facilitate assembly.
SIDE FRAME (A)
STATIONARY SIDE (B)
-3-
Page 7
2-IN-1CRIB
DA4162ND
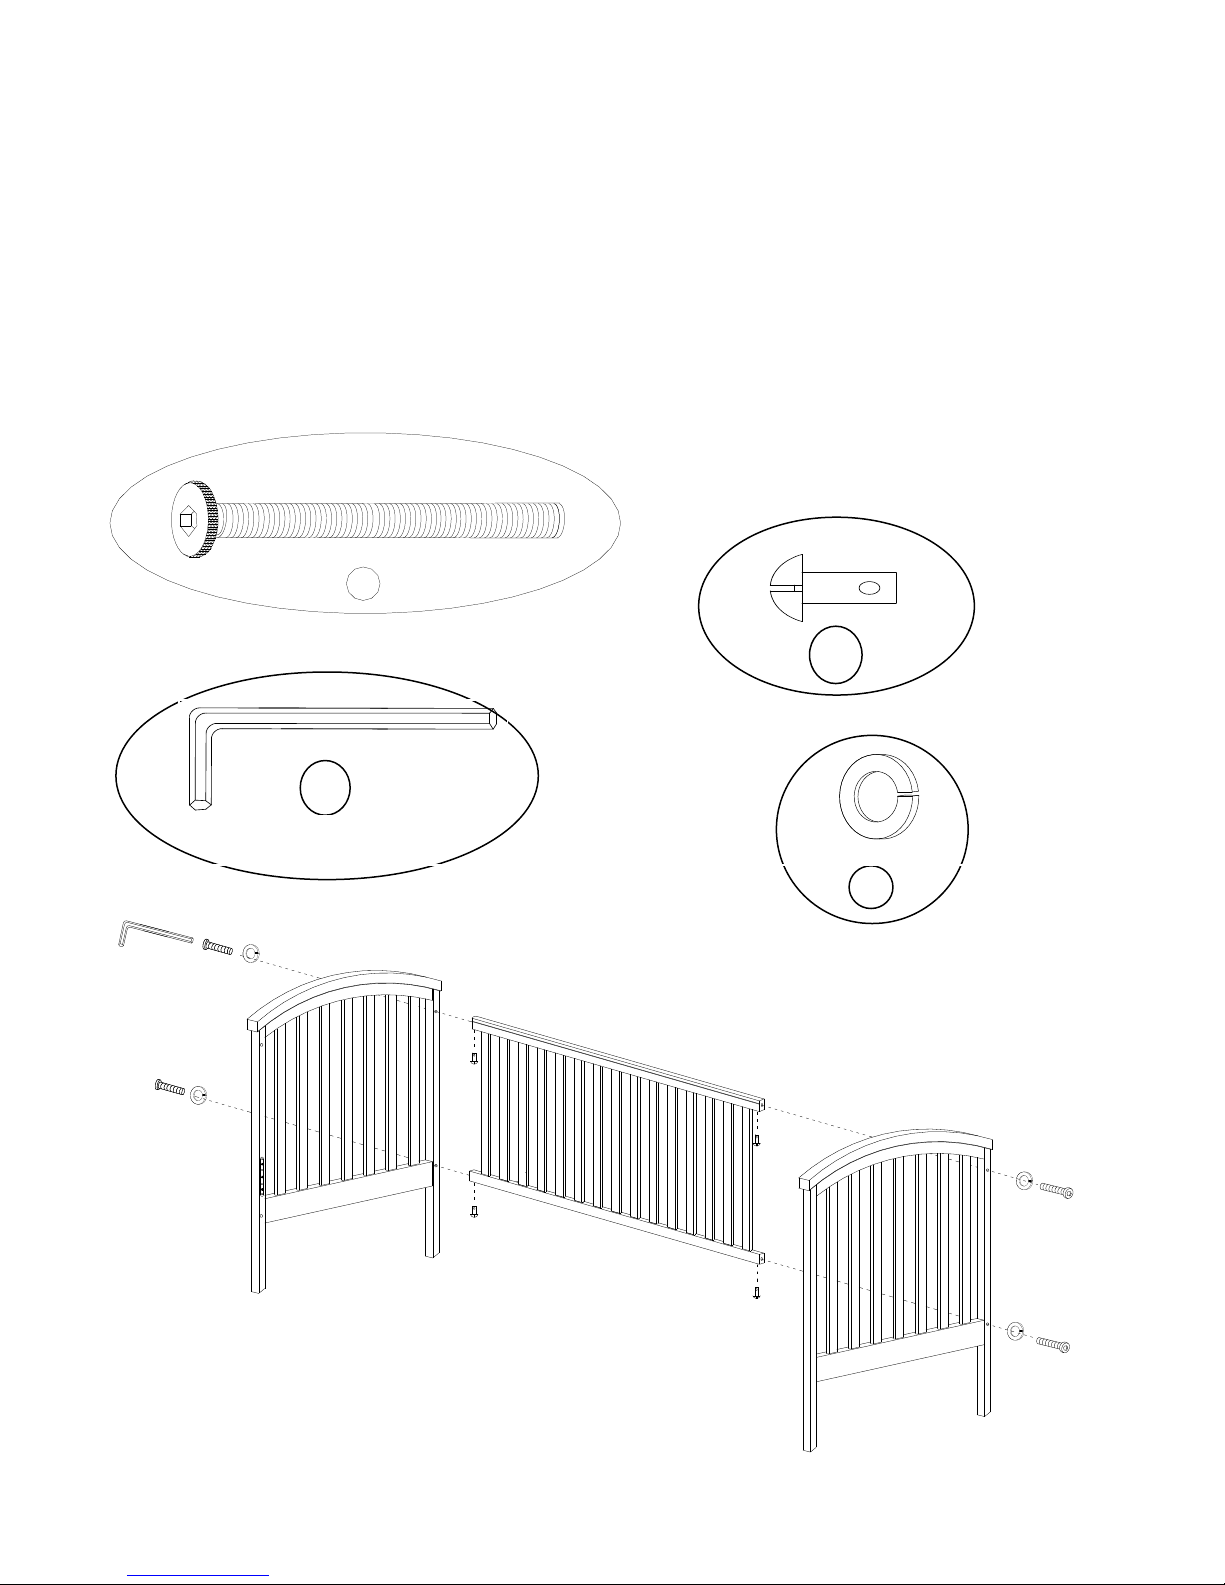
STEP 1
Attach left and right side frames (A) to stationary side (B) with hex socket
head bolts (1), spring washers (7) and barrel nut (4) . Use Allen key (3) to
tighten hex socket head bolts (1).
4
3
7
7
7
7
7
1
A
A
1
1
3
1
1
4
4
4
4
B
BOLT
2 PCS
HEX SOCKET HEAD BOLT
16 PCS
RUBBER STOPPER
2 PCS
HEX SOCKET HEAD BOLT
6 PCS
6 mm x 3/4"
1/4" x 2-1/2"
4
5
63
3/16" x 3/8"
GATE PIN
2 PCS
BOLT
2 PCS
2 PCS
-4-
Page 8
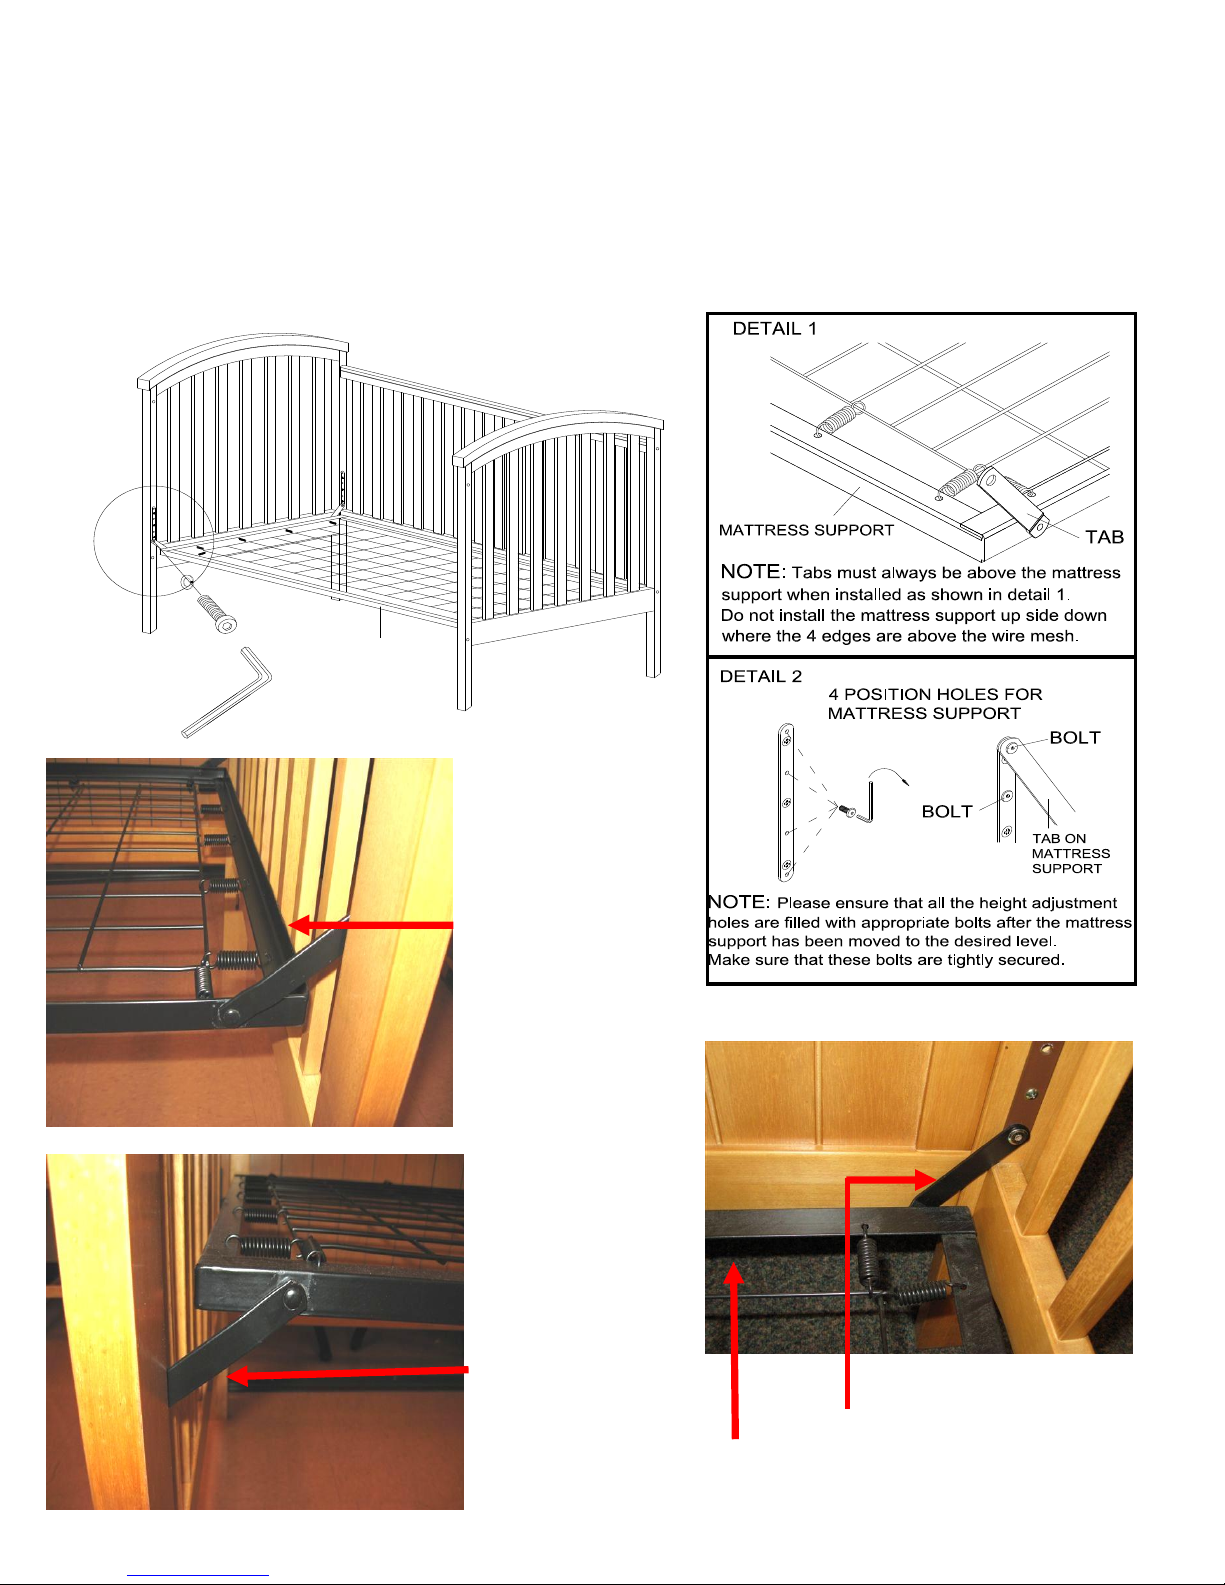
STEP 2:
Attach mattress support (D) to the 4 corner posts with bolts (2) and spring washers (7). Use Allen Key
(3) to tighten bolts. Refer to details 1 and 2 for direction on how to properly attach the mattress
support.
2-IN-1CRIB
DA4162ND
INCORRECT-
Tabs on corners
of mattress
support should
point up.
INCORRECT-
Raised edge
should face
down -this photo
shows mattress
support is upside
down.
CORRECT
*Tabs to point UP.
* Flat surface of mattress support to face
up - mattress must sit on flat surface.
7
A
A
B
D
3
2
-5-
Page 9
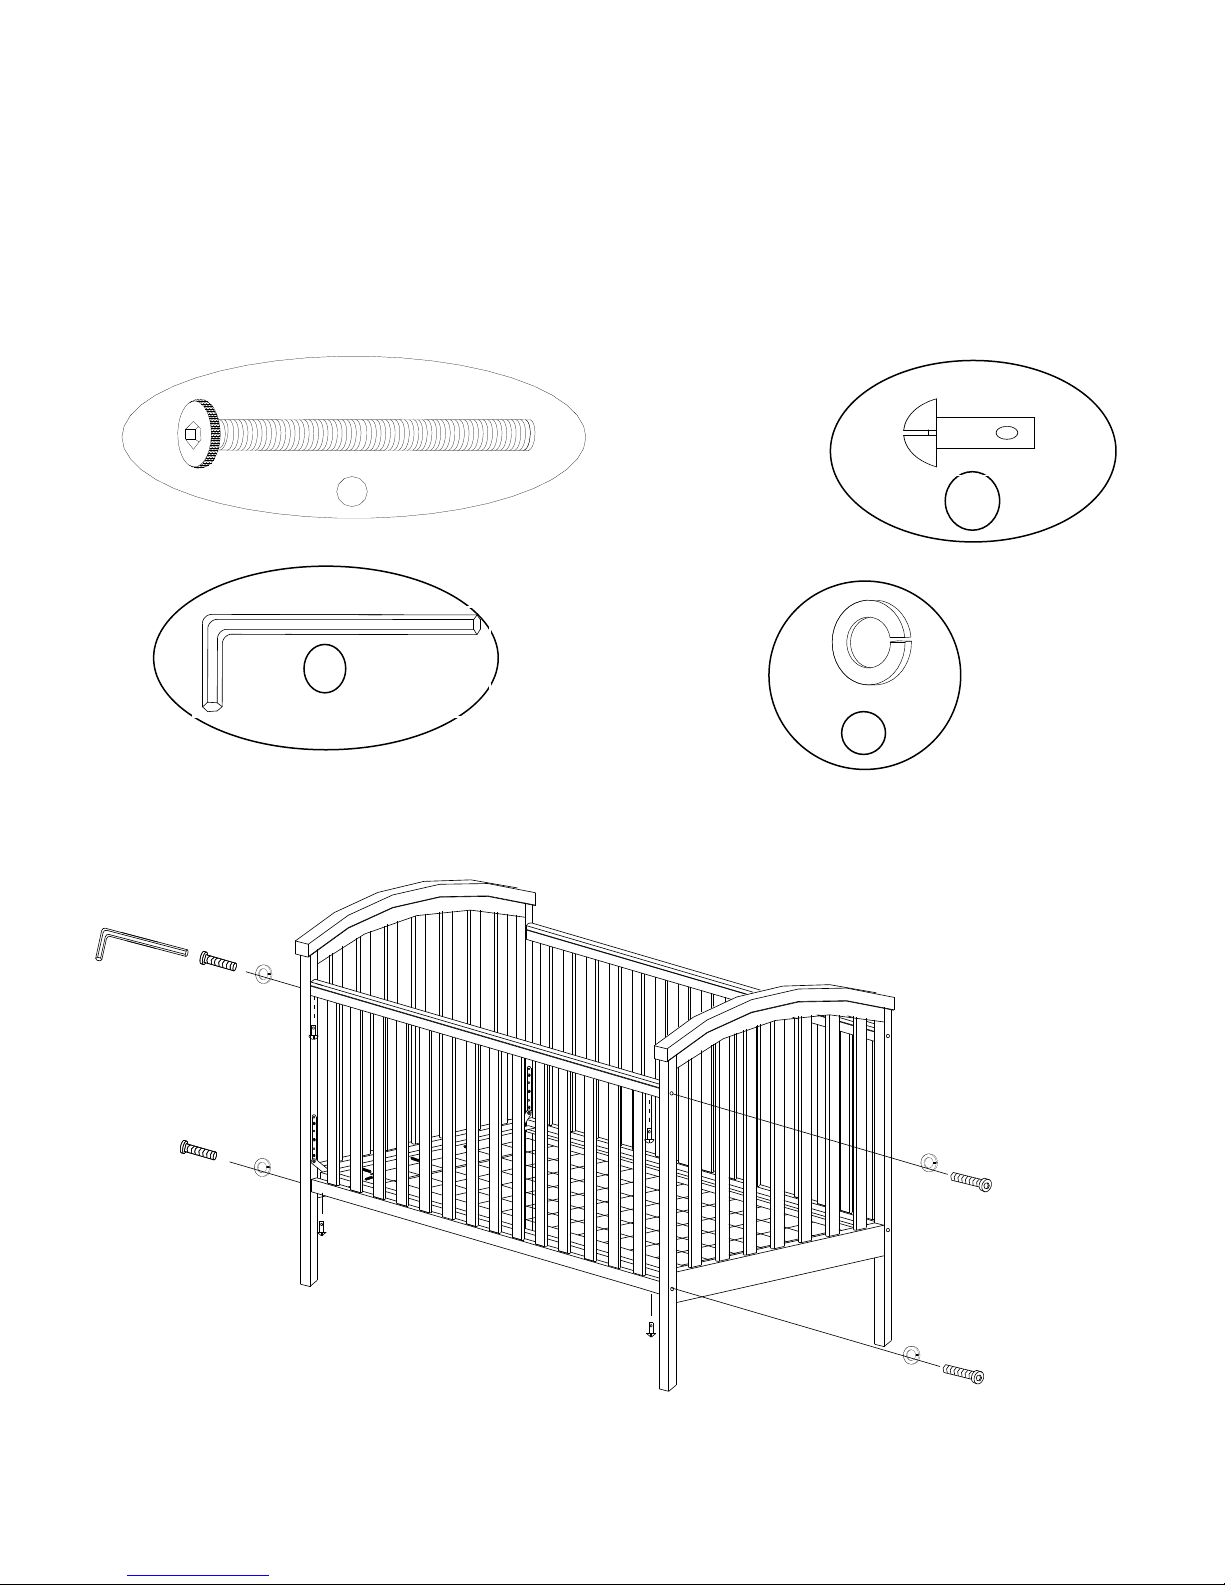
Attach left and right side frames (A) to stationary side (B) with hex socket
head bolts (1), spring washers (7) and barrel nut (4) . Use Allen key (3) to
tighten hex socket head bolts (1).
2-IN-1CRIB
DA4162ND
STEP 3
4
7
7
7
7
7
1
A
1
1
3
1
4
4
1
A
B
BOLT
2 PCS
HEX SOCKET HEAD BOLT
16 PCS
RUBBER STOPPER
2 PCS
HEX SOCKET HEAD BOLT
6 PCS
6 mm x 3/4"
1/4" x 2-1/2"
4
5
63
3/16" x 3/8"
GATE PIN
2 PCS
BOLT
2 PCS
2 PCS
-6-
Page 10
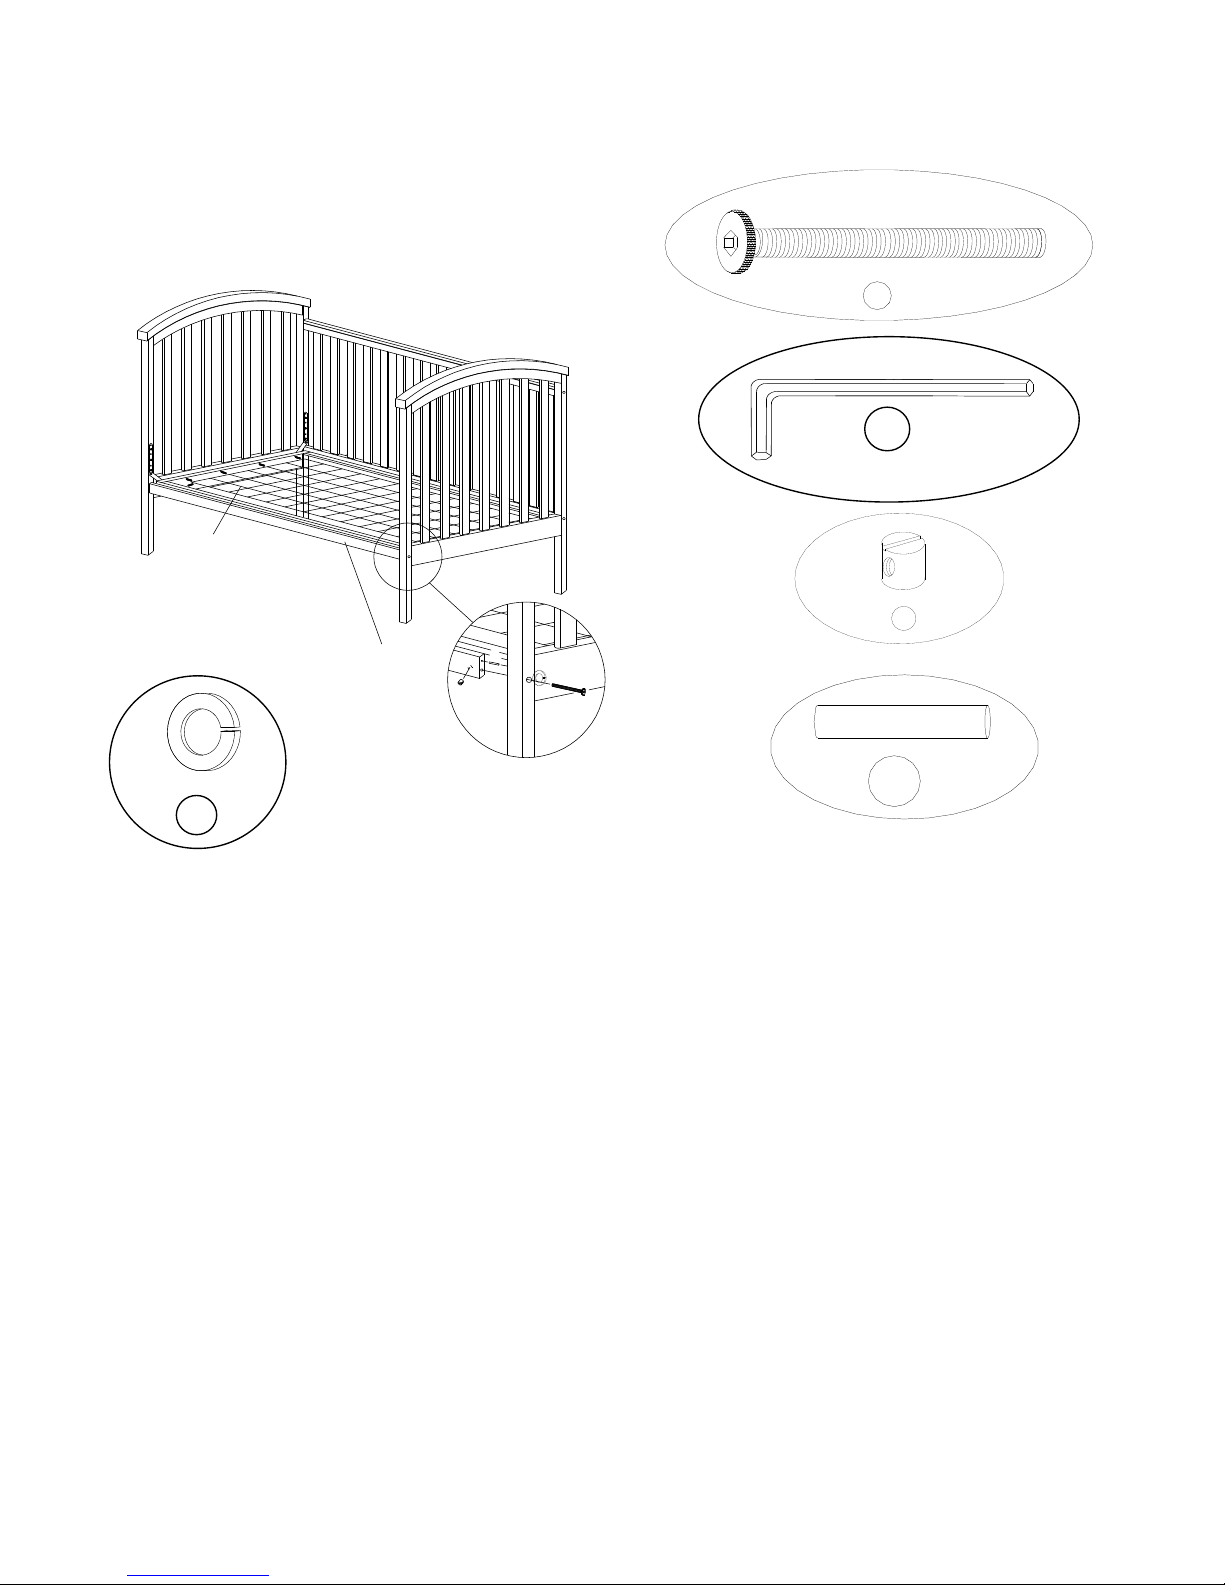
STEP 4 Tighten all screws clockwise.
STEP 2 Move the mattress support (D) to the lowest position by unscrewing mattress support hex
socket head bolts (2) using Allen key (3).
2-IN-1CRIB
DA4162ND
TODDLER BED & DAY BED ASSEMBLY INSTRUCTIONS: STARTING
FROM CRIB
TODDLER BED & DAY BED ASSEMBLY INSTRUCTIONS
TODDLER BED & DAY BED ASSEMBLY INSTRUCTIONS: STARTING
FROM SCRATCH
STEP 2: Follow step 3 to 4 for the TODDLER BED & DAY BED assembly instruction located
above (starting from crib).
STEP 1: Follow step 1 to 2 of the crib assembly instruction.
STEP 1 Detach the stationary side (B) with 2 side frame (A) by Allen key (3).
STEP 3 Using Allen key (3), attach the TODDLER BED & DAY BED Guard rail (C) using hex
socket head bolts (1), spring washer (7) gate pin (6), and barrel nuts (5) between 2 side frame (A)
(see illustration).
DIAGRAM A
5
7
7
1
6
A
B
C
D
6
1
5
A
BOLT
2 PCS
HEX SOCKET HEAD BOLT
16 PCS
RUBBER STOPPER
2 PCS
HEX SOCKET HEAD BOLT
6 PCS
6 mm x 3/4"
1/4" x 2-1/2"
4
5
63
3/16" x 3/8"
-7-
Page 11
2-IN-1CRIB
DA4162ND
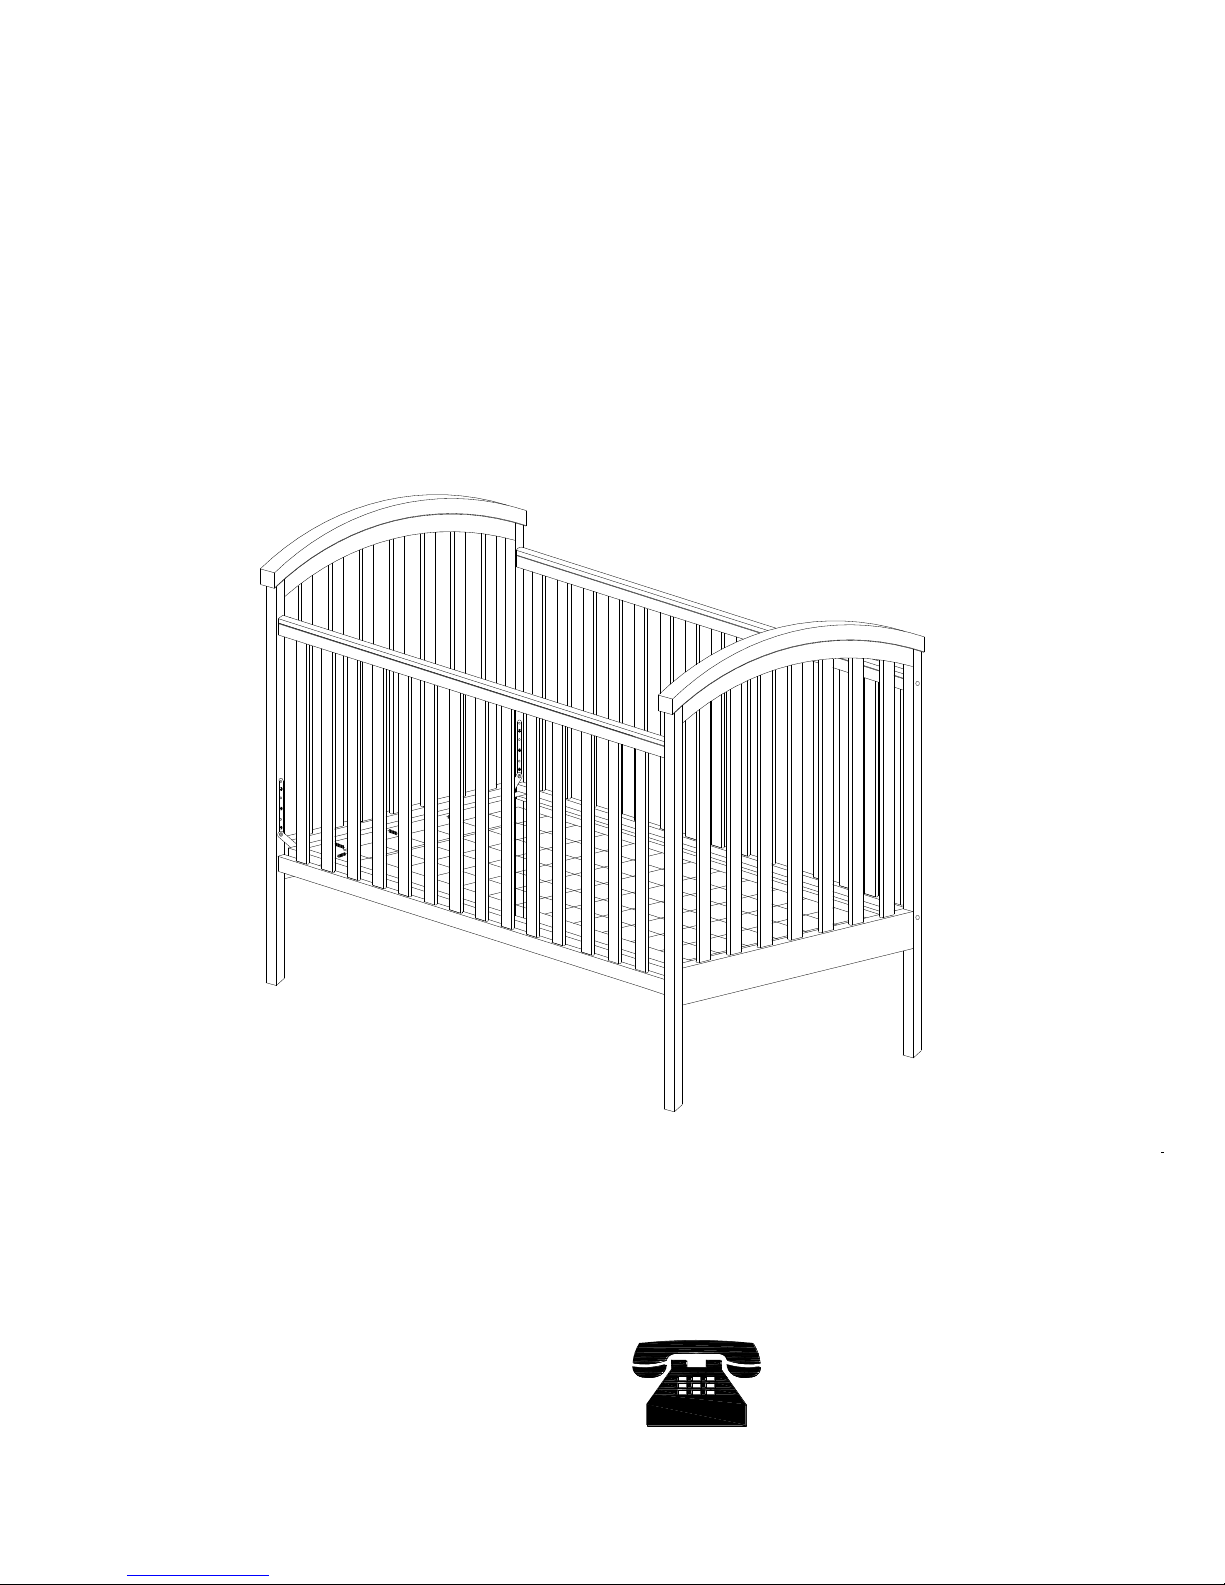
Stop using crib when
child begins to climb out
or reaches the height of
35 in. (89 cm).
CAUTION: ANY MATTRESS USED
IN THIS CRIB MUST BE AT LEAST
27-1/4 INCHES BY 51-5/8 INCHES
(69CM BY 131CM) WITH A
MINIMUM THICKNESS OF 4
INCHES (10CM) BUT NOT
EXCEEDING 6 INCHES (15CM).
The TODDLER BED or
DAY BED is not intended
for children under 15
months of age or over 50
pounds.
NEED HELP!
CALL US FOR ASSISTANCE
1-800-295-1980
 Loading...