

Page 1
1
Read all instructions BEFORE assembly and
USE of this stroller.
KEEP INSTRUCTIONS FOR FUTURE USE.
I
f you are missing parts or have any questions
about this stroller, contact us first!
Contact our Consumer Relations Department at
www.djgusa.com and click on “contact us”,
or FAX 24 hours a day at 1-800-207-8182,
or call 1-800-544-1108 Mon. thru Thur.7 a.m.to
6 p.m. and Fri. 7 a.m. to 4:30 p.m.
You can also order parts by writing to the address
below.Include the product model number,color
and a brief description of the part.
Dorel Juvenile Group, Inc.
Consumer Relations
P.O.Box 2609
Columbus, IN
47202-2609
USA
Thank You!
Thank you for purchasing our Stroller, the best choice on the market
for value and quality.For proper assembly and safe use of this product, please read and follow these instructions carefully.
Table of Contents
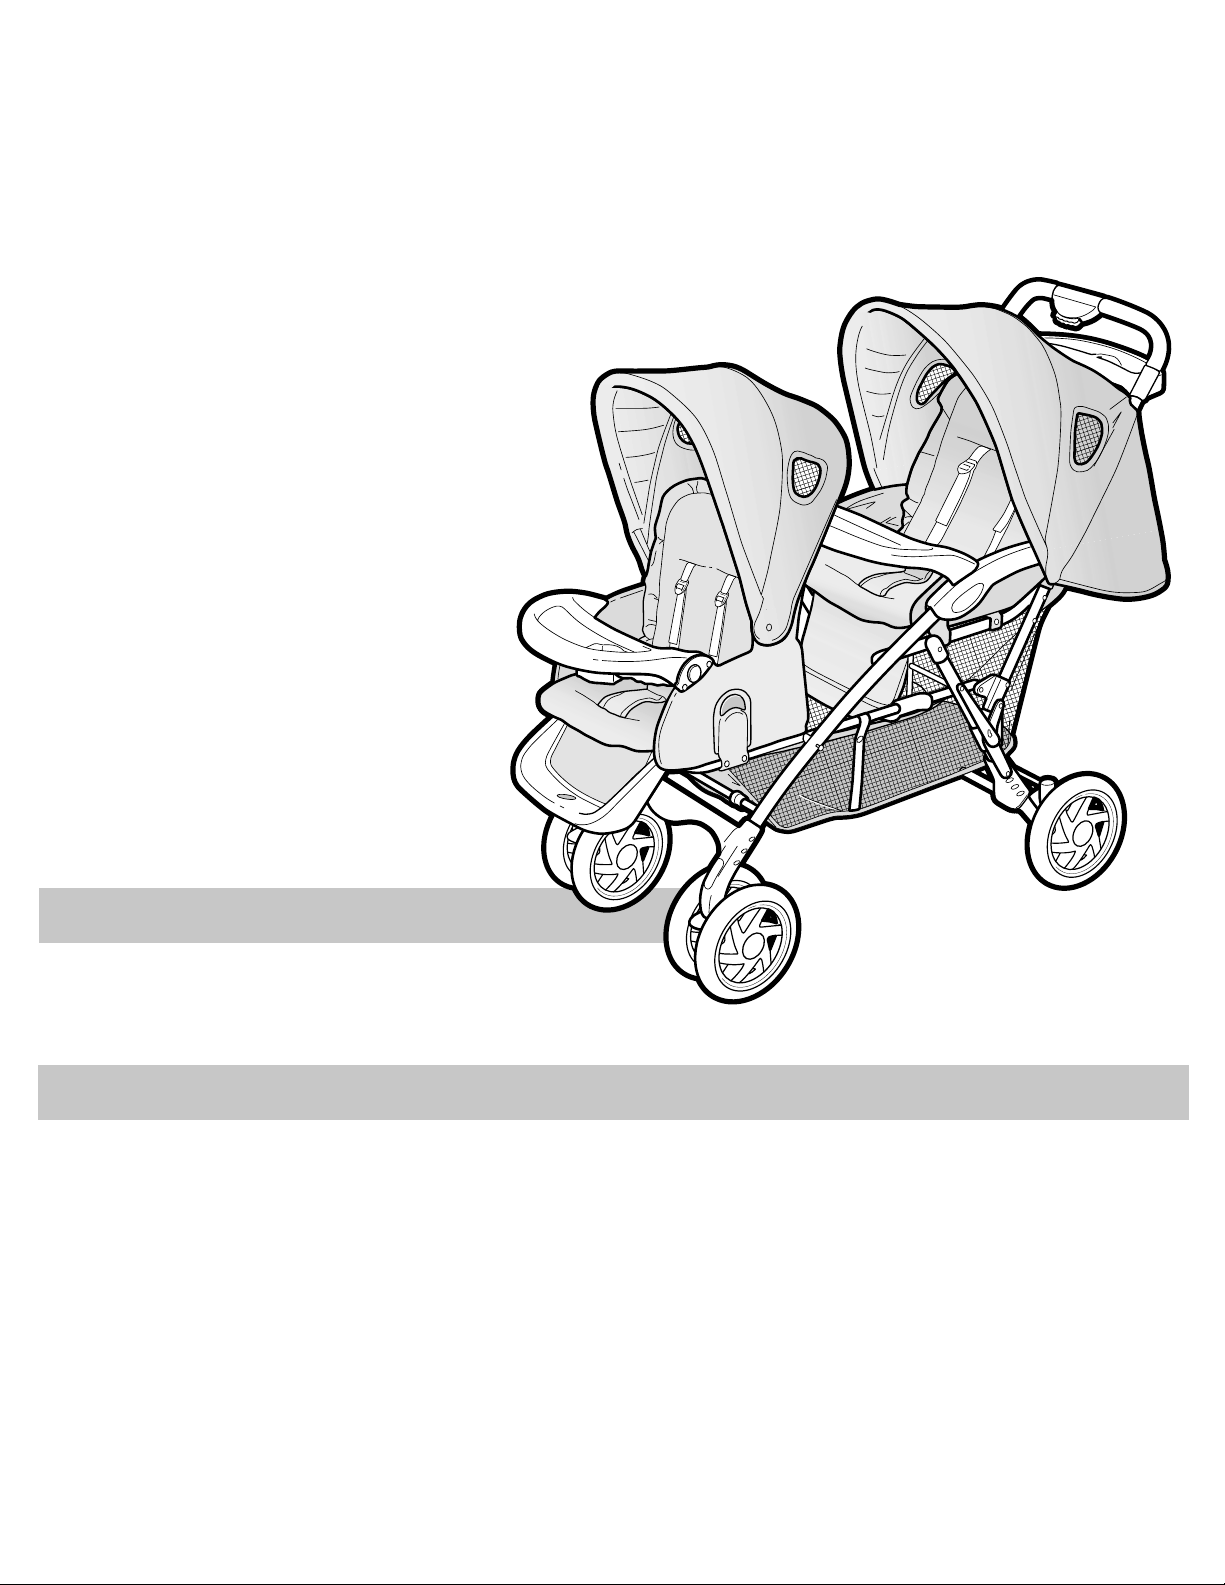
Stadium-Seating Tandem Stroller
Owner’s Manual
(Model 01-068/668)
Warnings: . . . . . . . . . . . . . . . . . . . . . . . . . . . . . . . .Page 2
Parts list: . . . . . . . . . . . . . . . . . . . . . . . . . . . . . . . . .Page 3
Assembly: . . . . . . . . . . . . . . . . . . . . . . . . . . . . .Page 4 - 6
To Unfold: . . . . . . . . . . . . . . . . . . . . . . . . . . . . . .Page 4
Install Rear Wheels: . . . . . . . . . . . . . . . . . . . . . .Page 4
Install Front Wheels: . . . . . . . . . . . . . . . . . . . . . .Page 4
Install Front Seat: . . . . . . . . . . . . . . . . . . . . . . . .Page 5
Install Canopies . . . . . . . . . . . . . . . . . . . . . . . . .Page 5
Install Trays: . . . . . . . . . . . . . . . . . . . . . . . . . . . .Page 5
Use: . . . . . . . . . . . . . . . . . . . . . . . . . . . . . . . . . .Page 6 -10
Restraint System: . . . . . . . . . . . . . . . . . . . . . . . .Page 6
Recline Seats: . . . . . . . . . . . . . . . . . . . . . . . . . . .Page 6
Using Rear Seat as Carriage: . . . . . . . . . . . . . . .Page 7
To Use Front Footrest: . . . . . . . . . . . . . . . . . . . .Page 8
Using Brakes: . . . . . . . . . . . . . . . . . . . . . . . . . . .Page 6
To Use Swivel Locks: . . . . . . . . . . . . . . . . . . . . .Page 8
To Attach Car Seats: . . . . . . . . . . . . . . . . . . . . . .Page 9
To Fold: . . . . . . . . . . . . . . . . . . . . . . . . . . . . . . .Page 10
Remove Pad For Washing: . . . . . . . . . . . . . . . .Page 10
Replace Pad After Washing: . . . . . . . . . . . . . . .Page 11
Warranty: . . . . . . . . . . . . . . . . . . . . . . . . . . . . . .Page 11
Order Replacement Parts: . . . . . . . . . . . . . . . .Page 12
www.djgusa.com
4358-4206 12.17.02
Page 2
2
WARNINGS
WARNINGS:
Avoid serious injury from falling or sliding out.Always use
seat belt. Check frequently to make sure it is secure.
This stroller is for use by one (1) child in each seating
area only.
This stroller is for use with children up to 40 pounds (18 kg.)
Remove clear protective wrapping before using stroller.
Before using stroller, always make sure straps holding
seat to frame are secure. (See also “Remove pad for
machine washing” section for adjustment instruction).
When folding, unfolding or adjusting the stroller, keep
child away from moving parts.
Always make sure stroller is fully open and locked before
using.
Always use the brakes when stroller is stopped.
For use as a stroller only in the upright seating position.
It is recommended that the child be able to sit up
unassisted.
Parent tray is not designed to hold more than 5 lbs.
If weight is exceeded, hazardous conditions may exist.
Child may slip into leg openings
and strangle. Never use
rear seat in reclined
carriage position unless the footrest
is completely raised and snapped.
WARNING:
Never leave child unattended. Al ways keep child in view when in stroller.
Please read the following and keep for future reference:
!
!
DO NOT:
– use stroller on stairs or escalators.
– allow children to play with or hang onto the stroller.
– allow children to climb into the stroller unassisted.
Stroller may tip over and injure child.
Basket is not designed to carry more than 20 pounds (9.5 kg.)
If weight is exceeded, hazardous conditions may exist.
Do not place or hang parcels, bags or accessories on any
other part of the stroller, including the handle or canopy.
The stroller may tip over or the canopy may collapse.
Wash pad in cold water. Clean frame with house-hold
soap or mild detergent.
Periodically check for loose screws,worn parts,torn
material or loose stitching. Tighten and replace parts
as needed.
Page 3
Parts List
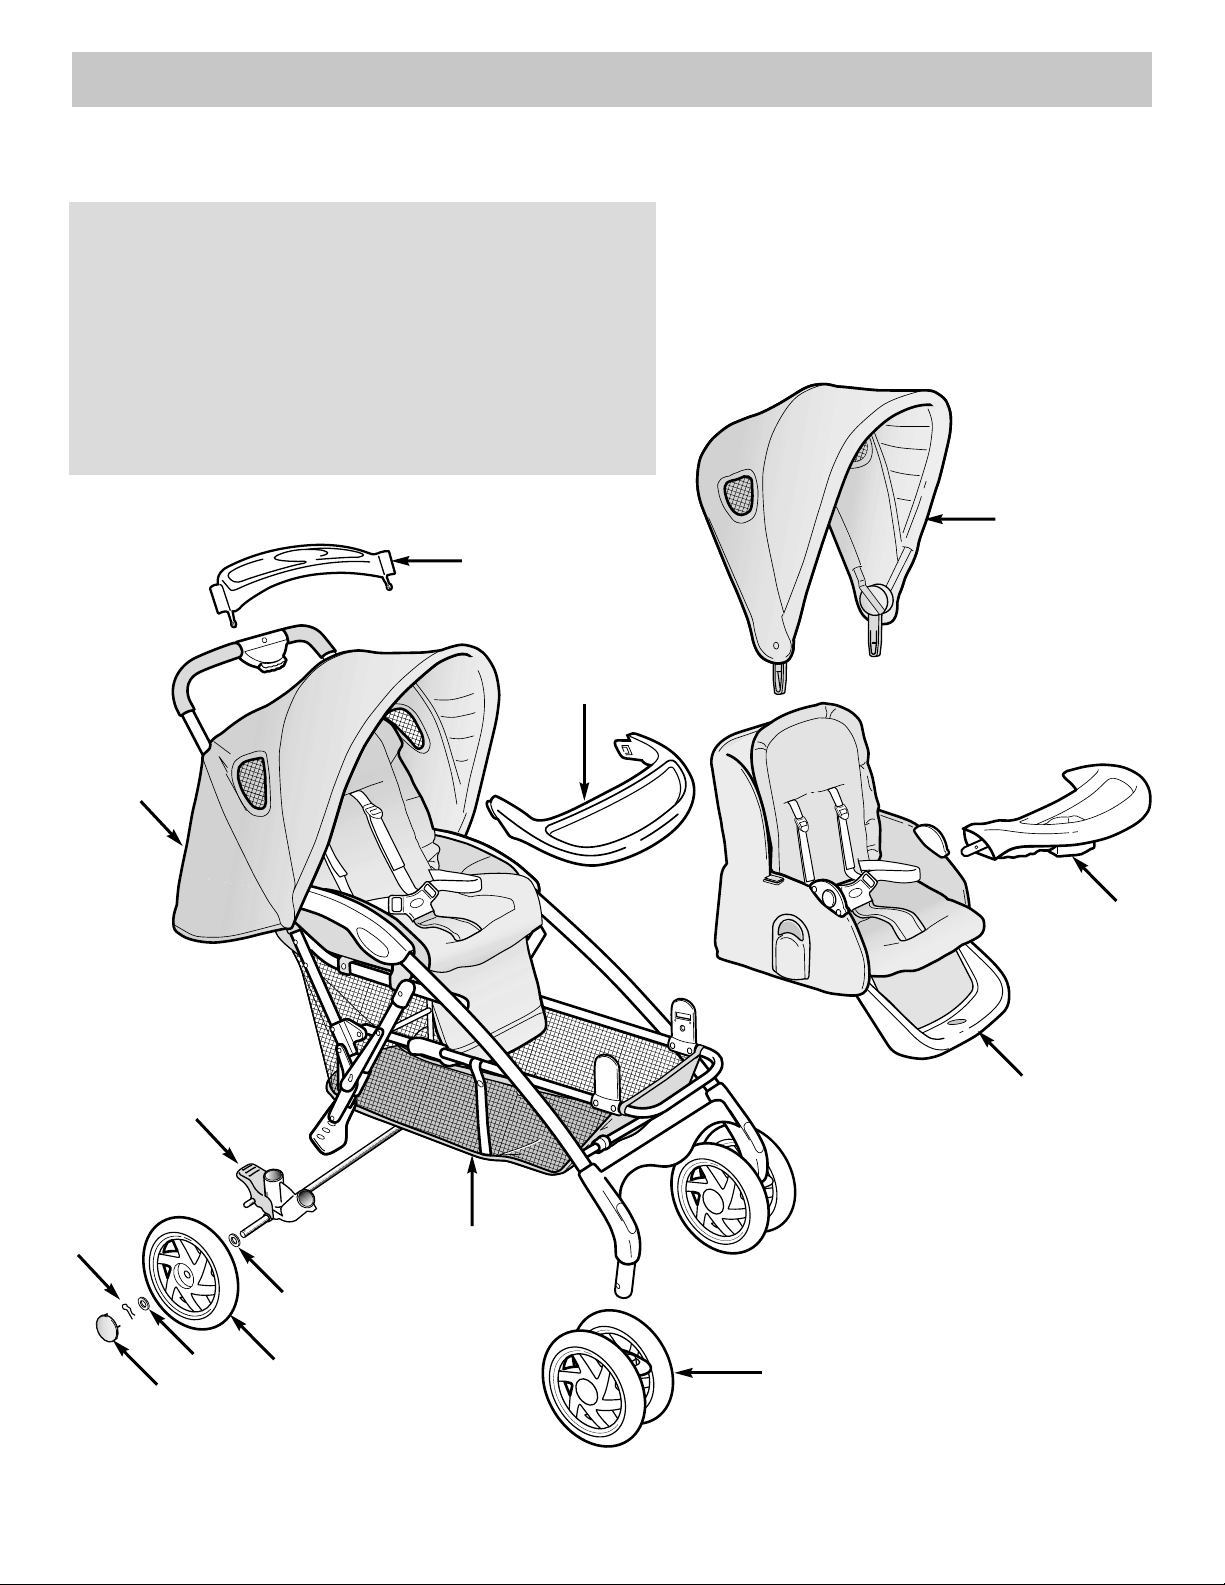
NOTE: Please check that you have all the parts shown BEFORE
assembling your Stroller.
A
G
C
3
H. Rear Canopy
I. Parent Tray
J. Rear Child Tray
K. Front Canopy
L. Front Child Tray
M.Front Seat
Parts List:
A. Frame
B. 2 Single Rear Wheels
C. 4 Washers (Hardware Bag)
D. 2 Cotter Pins (Hardware Bag)
E. 2 Rear Hub Caps
F. 1 Rear Axle
G. 2 Dual Front Wheels
B
C
M
L
E
D
H
F
J
I
K
Page 4
4
Assembly Instructions
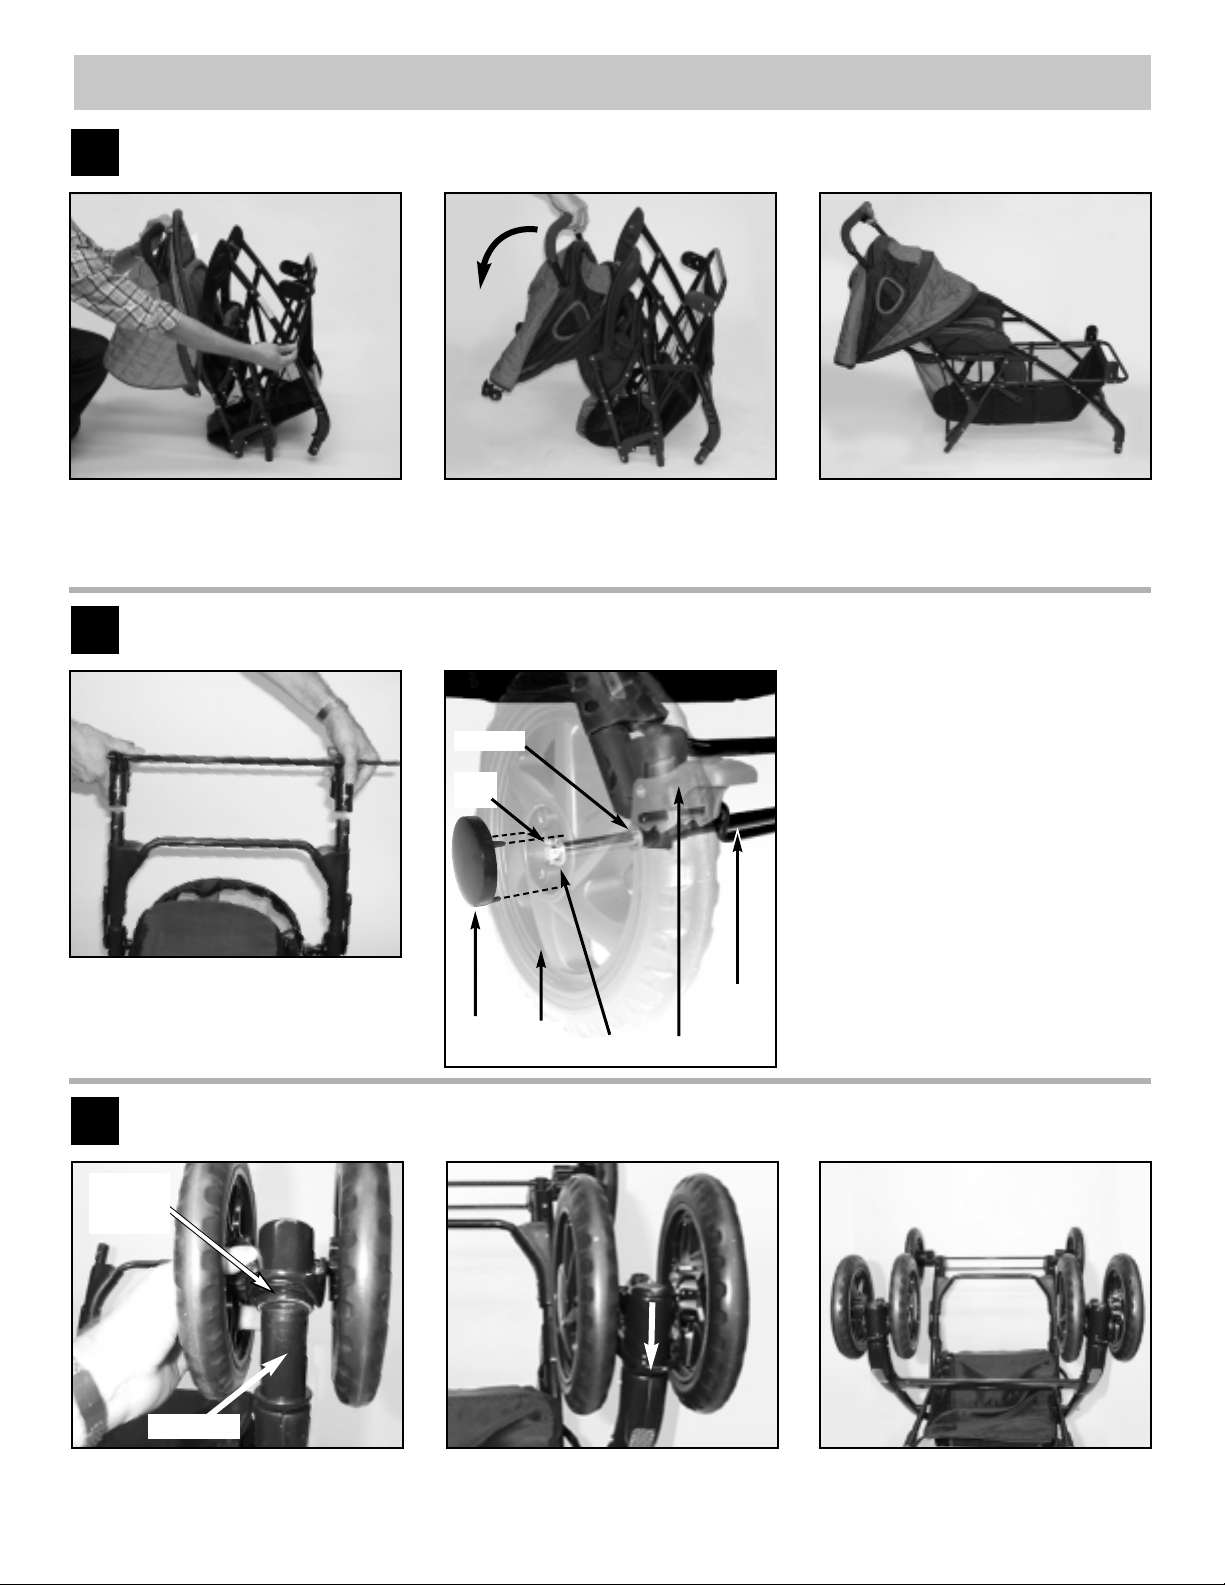
Place stroller frame on end as shown. Grasp handle, pull back and up
sharply until frame opens and locks
with a click.
View of unfolded stroller.
1
To Unfold:
3
To Install Front Wheels:
2
To Install Rear Wheels:
Push axle assembly onto frame until buttons snap into holes on assembly.Make
sure both sides are on completely.
Remove protective packing from axle
ends and discard. Remove Cotter pins
and washers from axle and set aside.
S
lide 1 washer onto axle so washer
is against the brake. Put one of the
single wheels onto axle with hub to
the inside. Slide on another washer.
Insert straight side of Cotter pin
through hole in the axle.Align pegs
in wheel cover with holes in wheel
and snap on. Repeat for other side.
1 washer
1 washer
single
wheel
hub
cap
cotter
pin
brake
axle
assembly
View of assembled front wheels.
frame tube
wheel
assembly
socket
Align front wheel assembly socket with
front frame tube as shown.
Push the wheel assembly onto frame
tube until it clicks into position. Repeat
for other front wheel.
Page 5
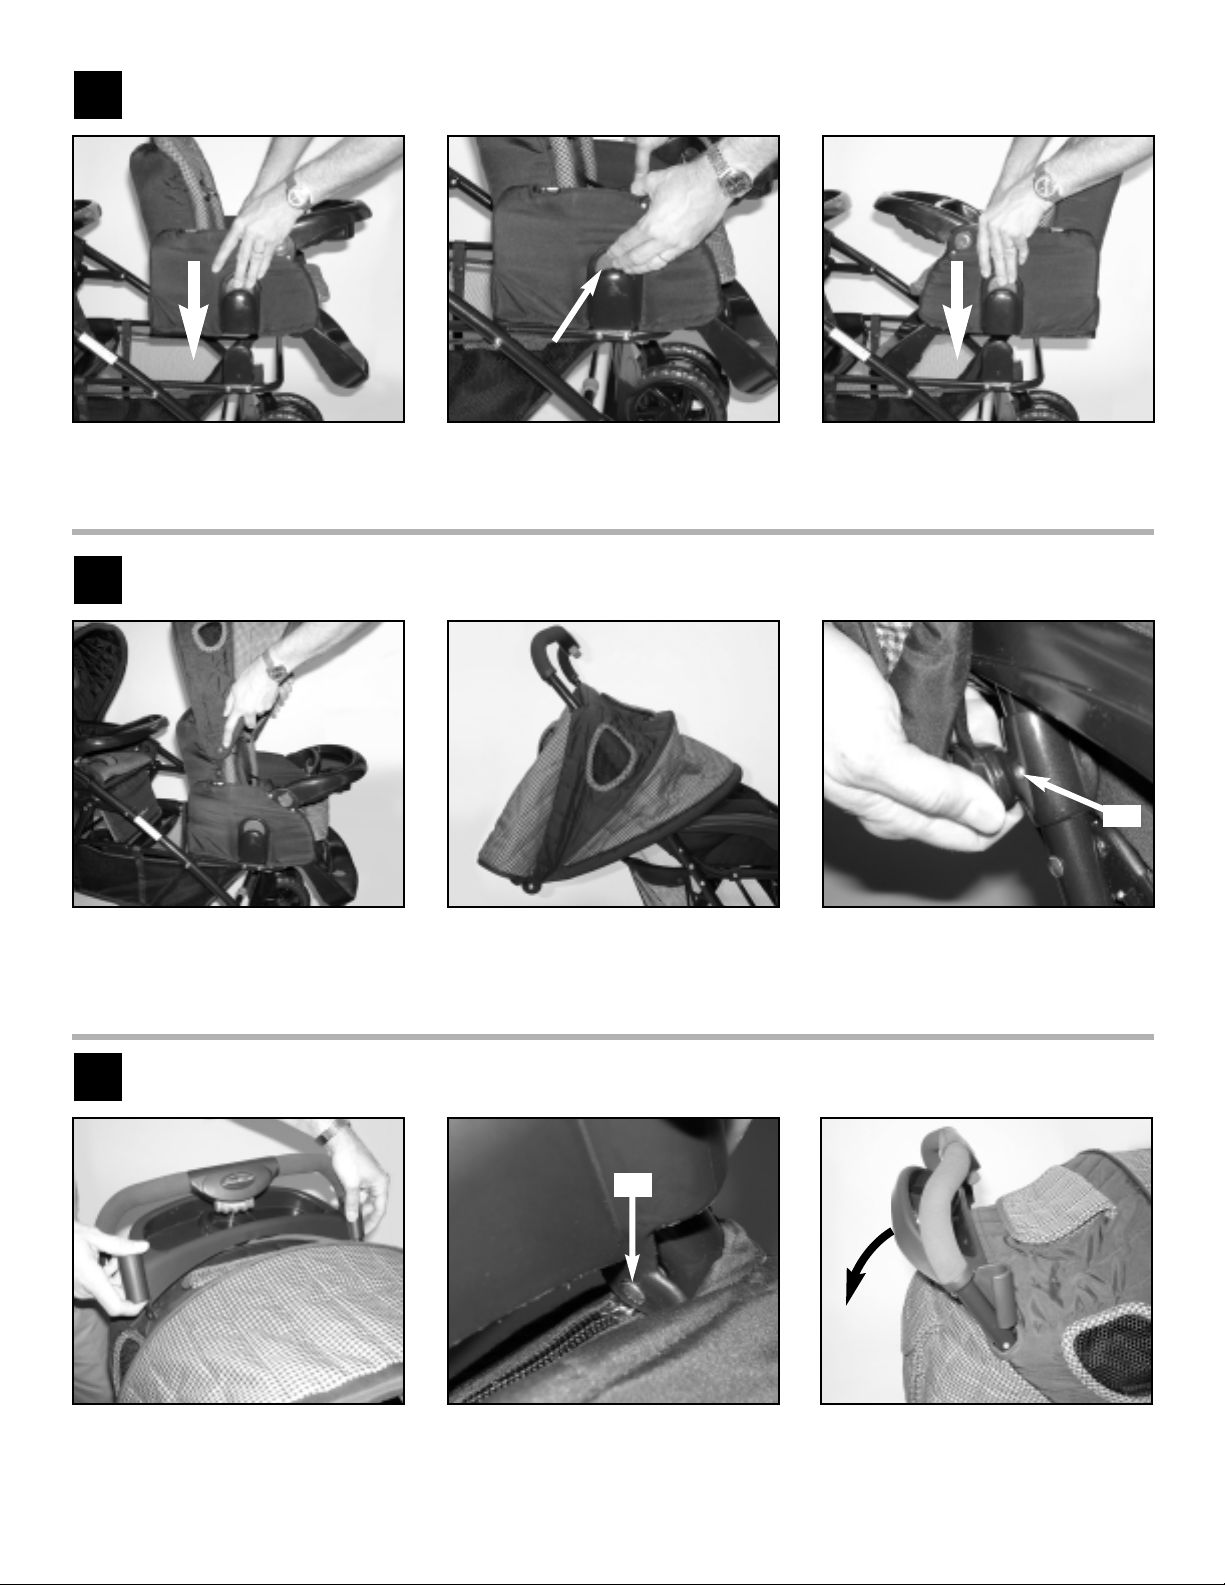
Face seat forward and align sockets
on seat with brackets on frame. Push
down until seat locks with a click.
To attach seat in rear-facing position,
press red buttons on sides of seat to
release locks, lift seat off brackets.
Rotate seat 180 degrees, align sockets with brackets and push down
until seat locks with a click.
4
To Install Front Seat:
6
To Install Trays:
5
To Install Canopies:
5
Front Canopy:Align canopy tabs with
sockets in seat sides, push down
until locked. Note:Vent in canopy
goes toward back of seat as shown.
Rear Canopy:The rear canopy comes
partially installed over frame.To complete, canopy hinge brackets must be
attached to stroller frame.
Snap canopy hinge brackets onto frame
just below “armrests”,aligning hole in
brackets over pins on frame as shown.
Parent Tray: From front of handle,
insert tray between handle frame.
Align holes in tray brackets with pins
on each side of frame as shown.
Gently pivot tray down until brackets
snap around handle frame.
pin
pin
Page 6
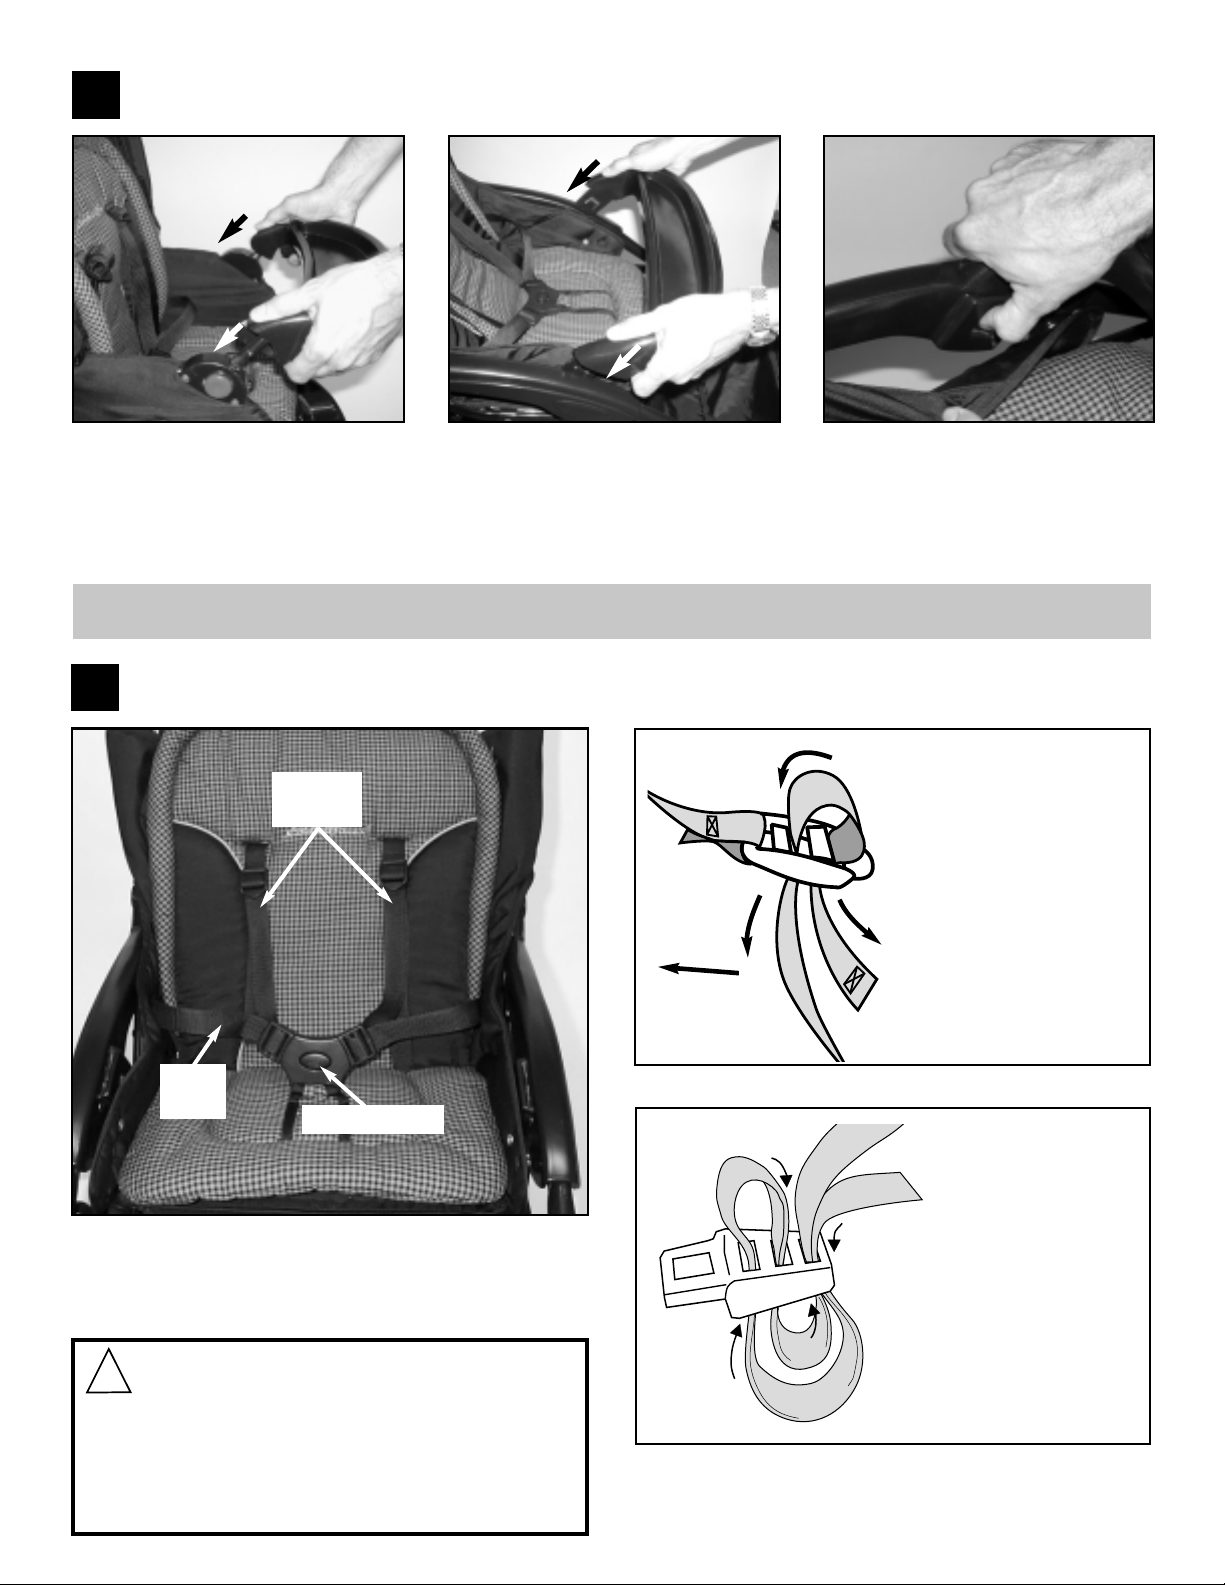
6
To remove, grasp tray as shown, press
tabs with thumbs to release locks, pull
up and out
.
7
To Install Trays:
(continued)
Rear seat Tray: Slide tabs on tray
brackets into slots on rear seat “armrests”
as
shown. Push down until tray locks
with a snap.
To Use
To adjust waist
strap length:
To shorten, pull out
bottom loop (2), then
pull on strap end.To
lengthen, pull out top
loop (3), then pull out
on buckle.
WARNING:Avoid serious injury
from falling or sliding out. Always use the seat belt.
Check frequently to make sure it is secure.
Belts must be threaded exactly as shown. Fail ure to
follow these instructions could result in the serious
injury or death of your child.
!
To unlock buckle, press in on center button and pull harness out from each side. To buckle,push each side of
harness back into buckle until each clicks in place. Belt
should fit snugly on child.
1
2
3
4
To adjust shoulder
straps length:
To tighten, pull out
on strap end (3).To
loosen, pull up top
loop (1), then pull on
strap (3).
1
3
2
Adjusting Harness Straps:
8
Using Restraint System:
Center Button
Shoulder
Straps
Waist
Strap
Front seat Tray: Align tubes on tray
ends with holes on both sides of
seat. Push in until tray locks with a
snap.To remove,push both red buttons next to tray,pull out.
Page 7
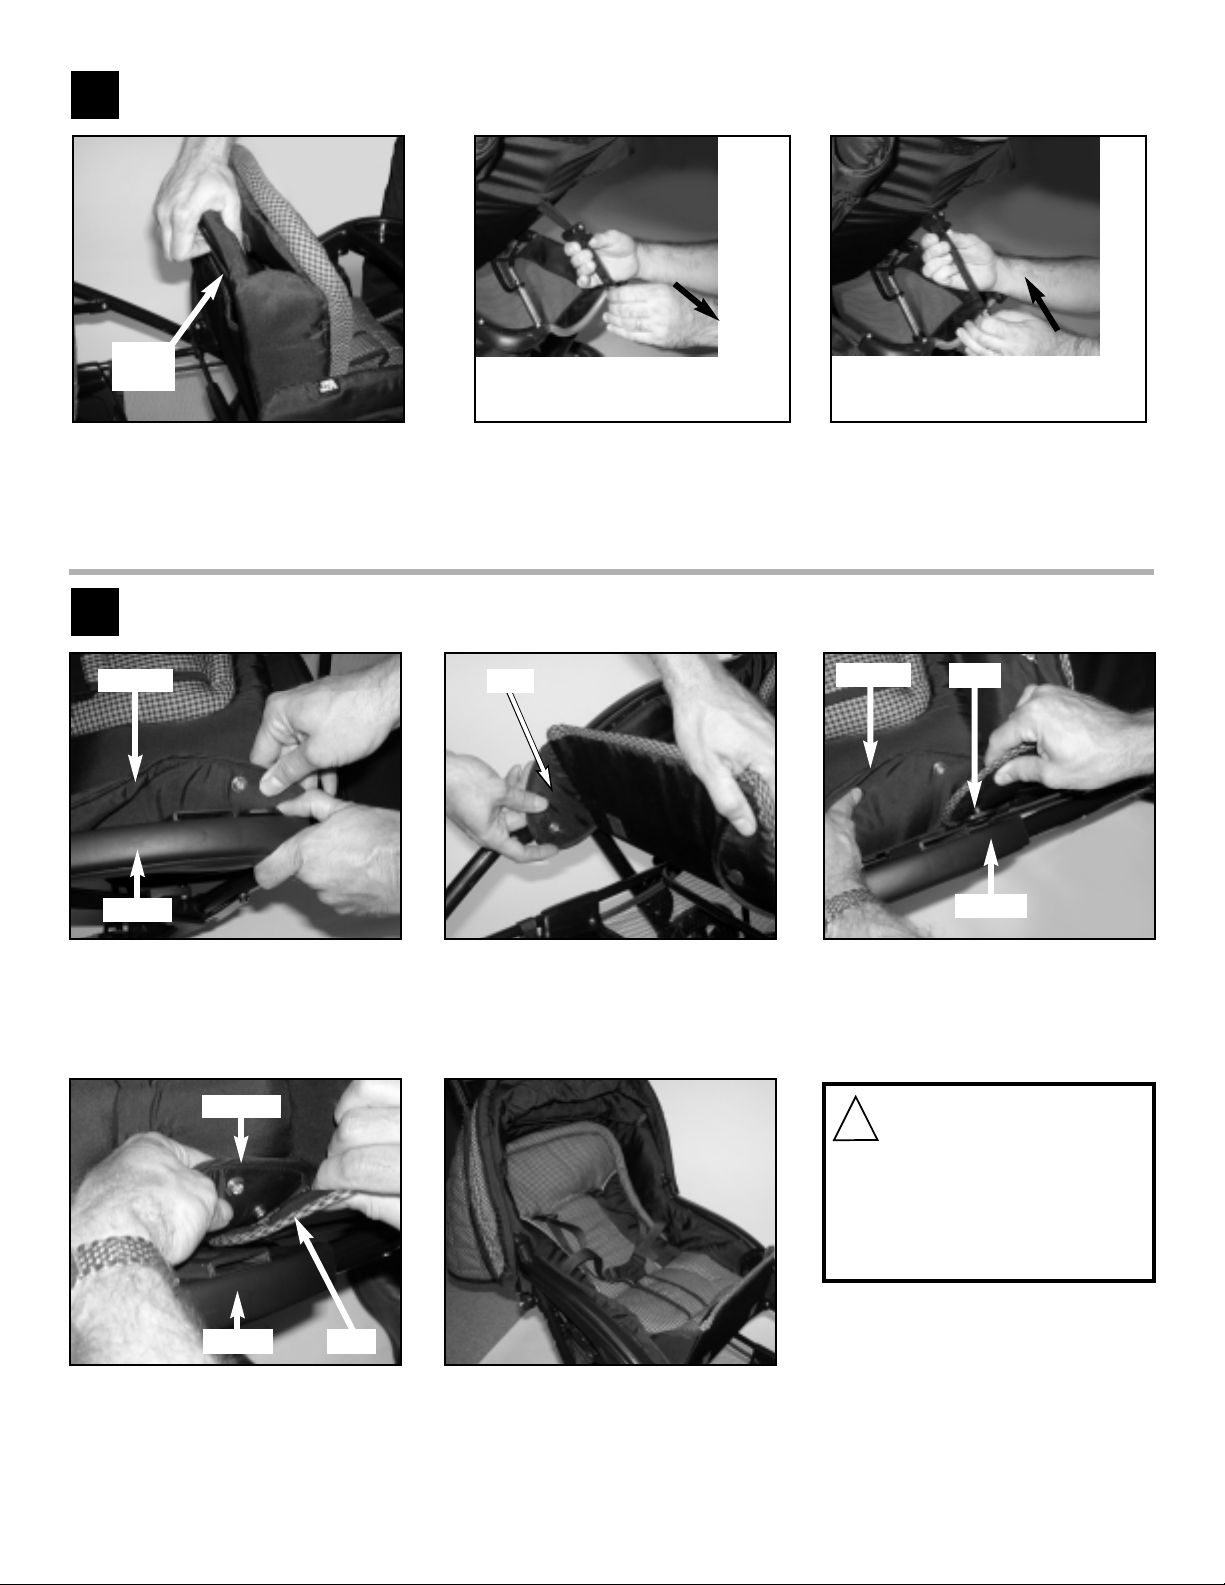
Rear Seat:To lower seat back, squeeze
harness release on back of seat
pulling release back while moving
seat back to the desired position.
To raise seat back, squeeze harness release and push release up
towards seat back while moving
seat to the desired position.
10
To Use Rear Seat as carriage:
9
To Recline Seat Backs:
Front Seat: Squeeze release bar on
back of seat as shown, tilt seat back to
recline position.To return to upright,
squeeze release bar, pull to upright.
Recline seat back. Unsnap seat side
from frame on both sides as shown.
Place “wing”between frame and seat
side and attach to snap where seat
side had been attached previously as
shown.
7
WARNING:
Child may slip into leg openings
and strangle. Never use rear seat
in reclined
carriage position unless
the footrest is completely raised
and snapped.
!
release
bar
Attach seat side to “wing”with two
snaps as shown. Repeat for other side.
When complete, carriage should appear
as above.
Lift flap beneath seat front, detach
“wings” from underside of flap and fold
up.
wing
snap
seat side
arm rest
seat side
arm rest
seat side
arm rest
wing
Page 8
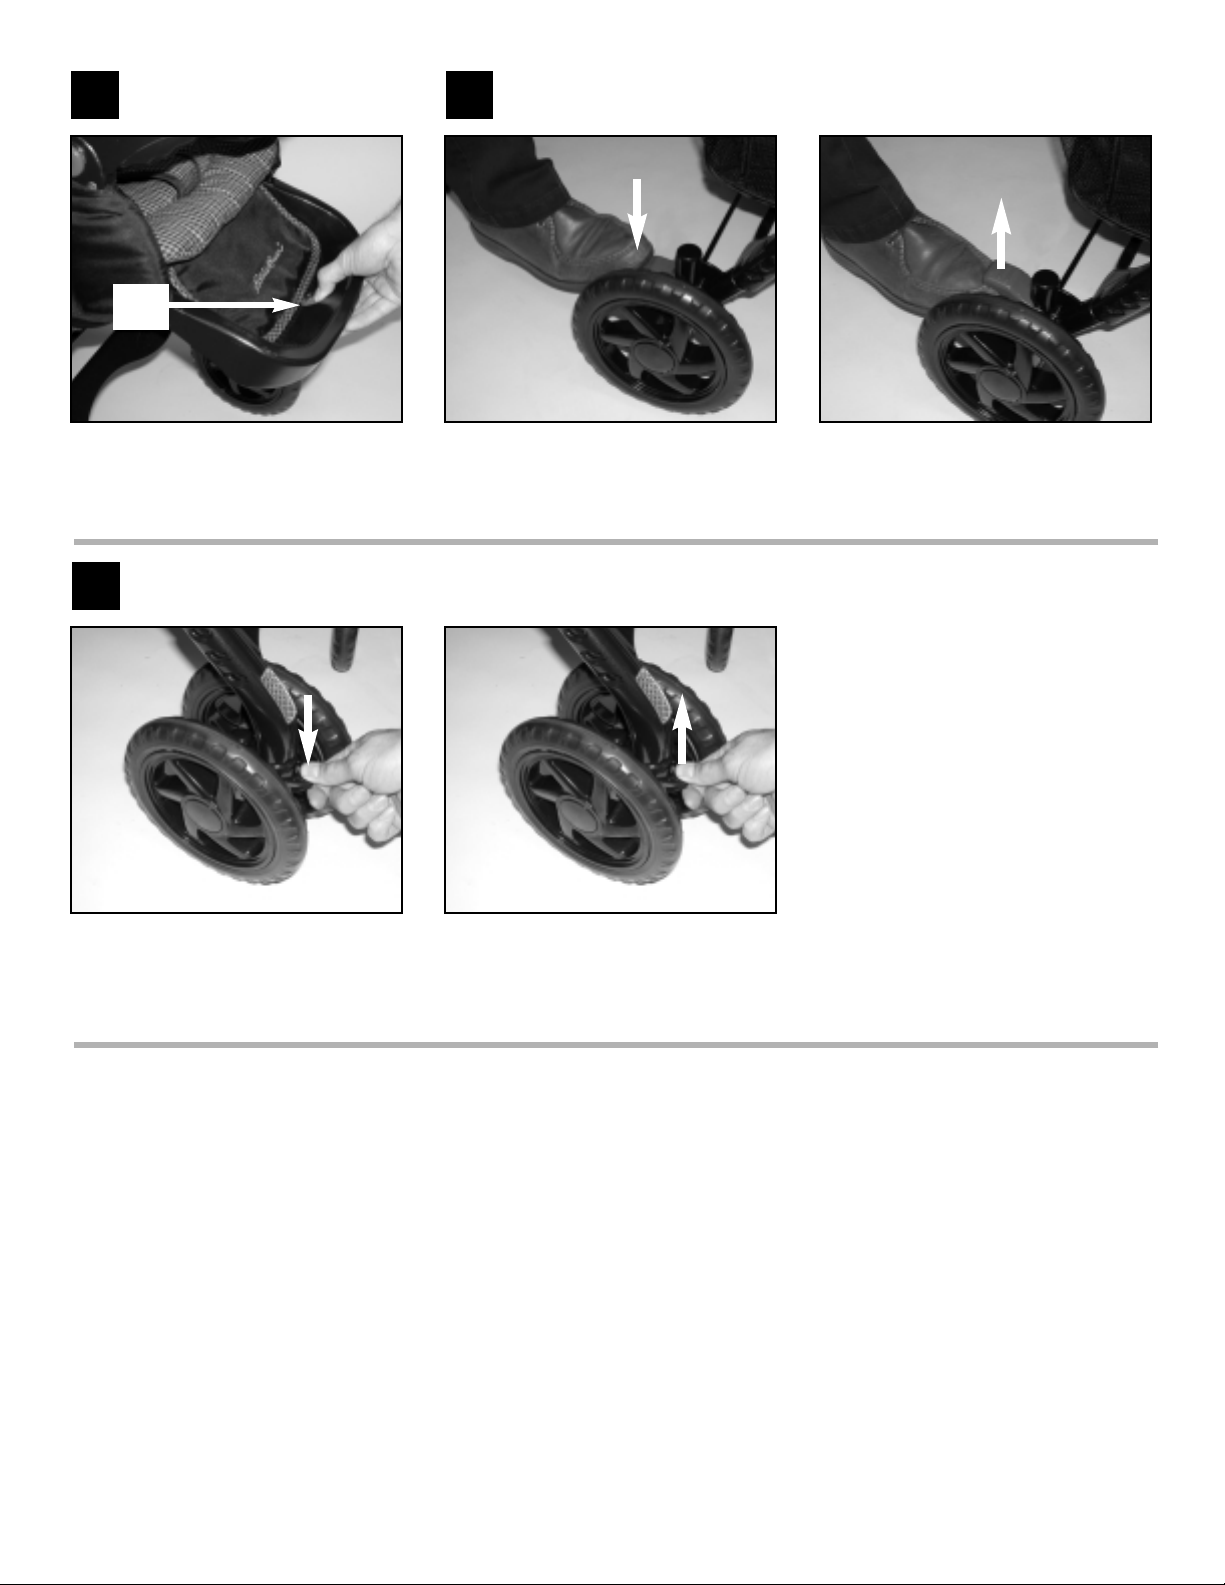
8
11
To Use Front Footrest:
To raise footrest, lift up until you hear
a “click.”To lo wer,press in on red
button, lift slightly and lower footrest.
Red
Button
12
To Use Rear Brakes:
13
To Use Swivel Locks:
To lock brake:With stroller stopped,
press down on both rear brake
levers with foot.
To unlock brake, lift up levers with
toe.
With front wheels straight, press
down on front wheel levers between
each set of wheels to lock.
To unlock, pull levers up.
Page 9
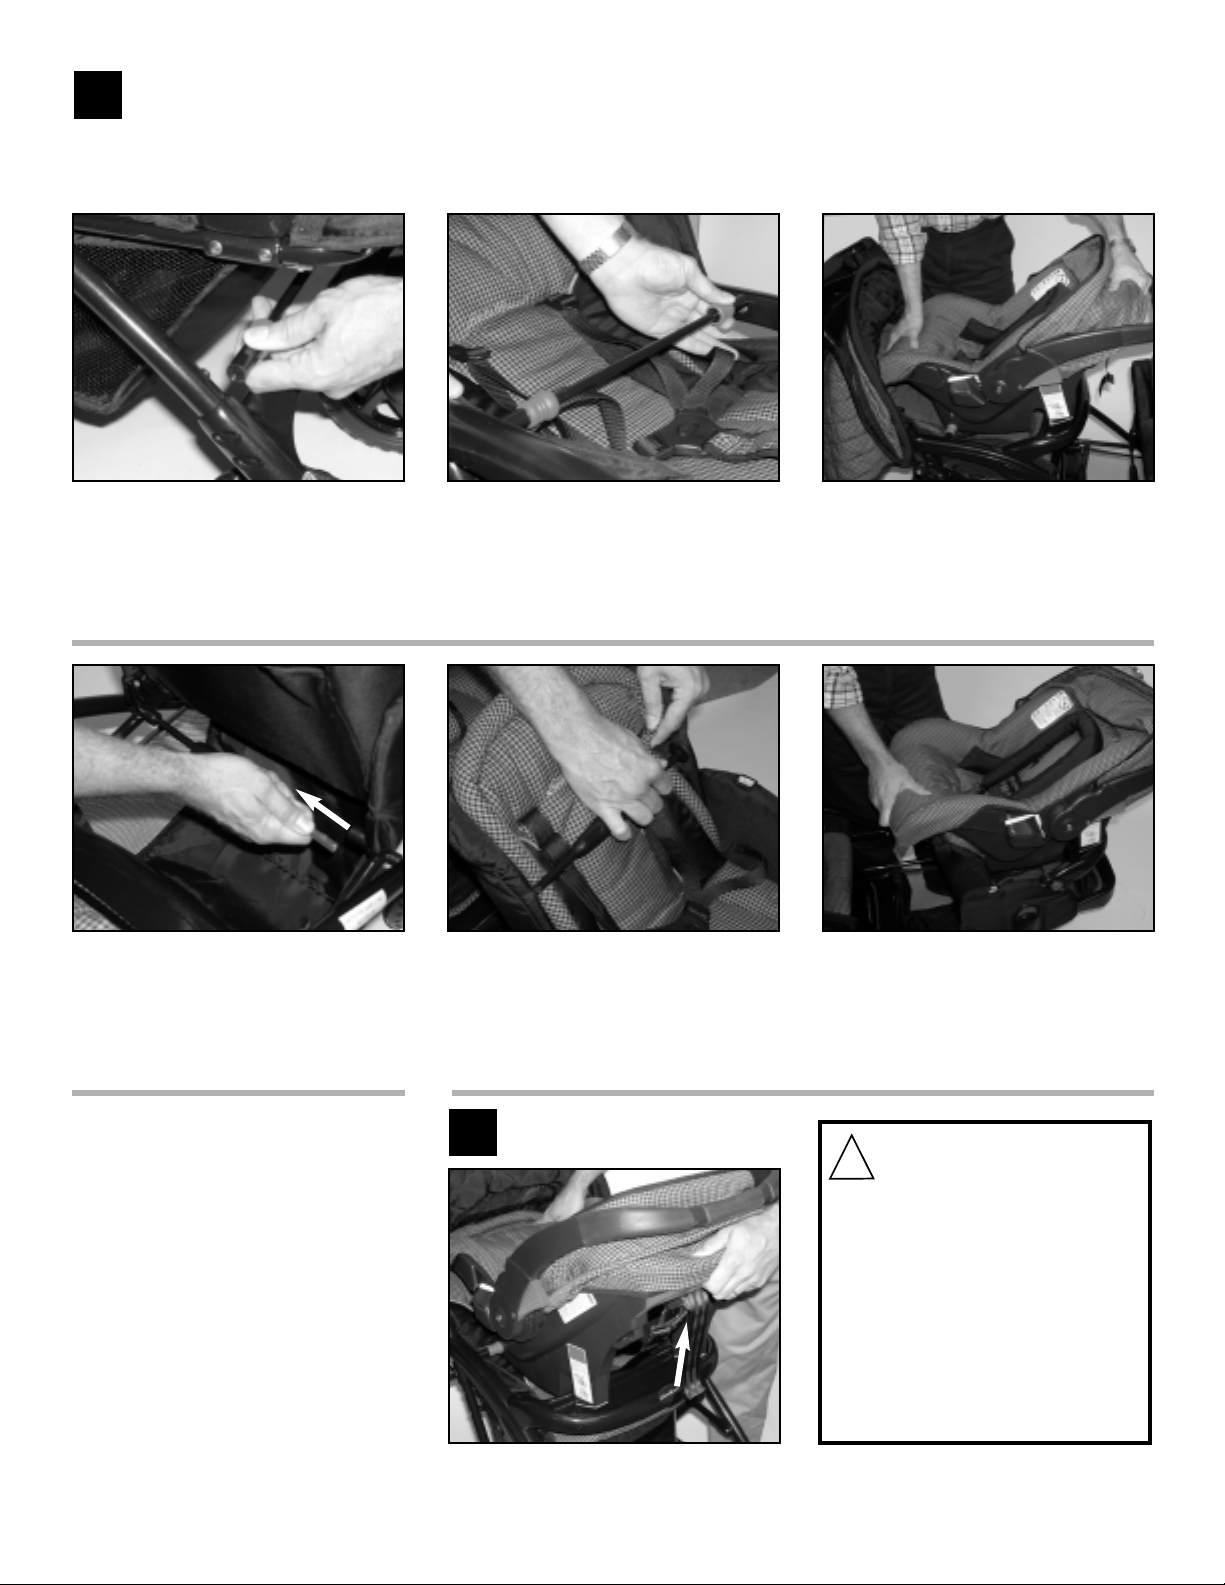
Rear seat: Remove mounting bar
from between frame beneath front
seat. (Grasp red handle and push
toward center of bar to release from
frame.)
Place mounting bar into the two
holes on the inside of stroller arms.
Put one end in first, the pull in on the
other end to put into second hole.
14
To Attach Car Seats:
15
To Remove Car Seats:
Front seat: Place seat back in upright
position. Remove mounting bar from
back of front seat frame. (Grasp
one
end and pull back to release bar from
seat frame).
Note:When using two car seats,
1.The front stroller seat must be
forward-facing.
2. Both car seats must be rear-facing.
3. Both front and rear trays must be
in place when car seats are attached.
4. Make sure both car seats are
locked in place before placing child
in car seat.
Place mounting bar into the two holes
on the inside of seat back as shown.
Put one end in first, then, compress
bar to place other end into second
hole. Place seat in upright position.
Pull up on the 1-hand release handle
on back of car seat and place car
seat rear facing into mounting bar
firmly (listen for locking click) until
fully locked.
To remove each car seat, pull up on
the 1-hand release handle and lift
car seat out.
If you have an Eddie Bauer
®
, Cosco®or Safety 1st®02-600 or 22-600 series infant car seat(s), the following instructions
explain how to attach the car seat(s) to the stroller.Complete instructions for using the car seats are located on the back
of the car seat.
With back of stroller seat in the reclined position,
pull up on the 1-hand
release handle
on back of car seat and
place seat rear facing into mounting
bar firmly (listen for locking click).
9
WARNING:
To avoid serious injury
• Always use tray when car seat
is attached.
• Always attach car seat facing to
the rear of the stroller.
• Always use the restraint system.
• Place mounting bar in storage
position when not in use.
!
Page 10
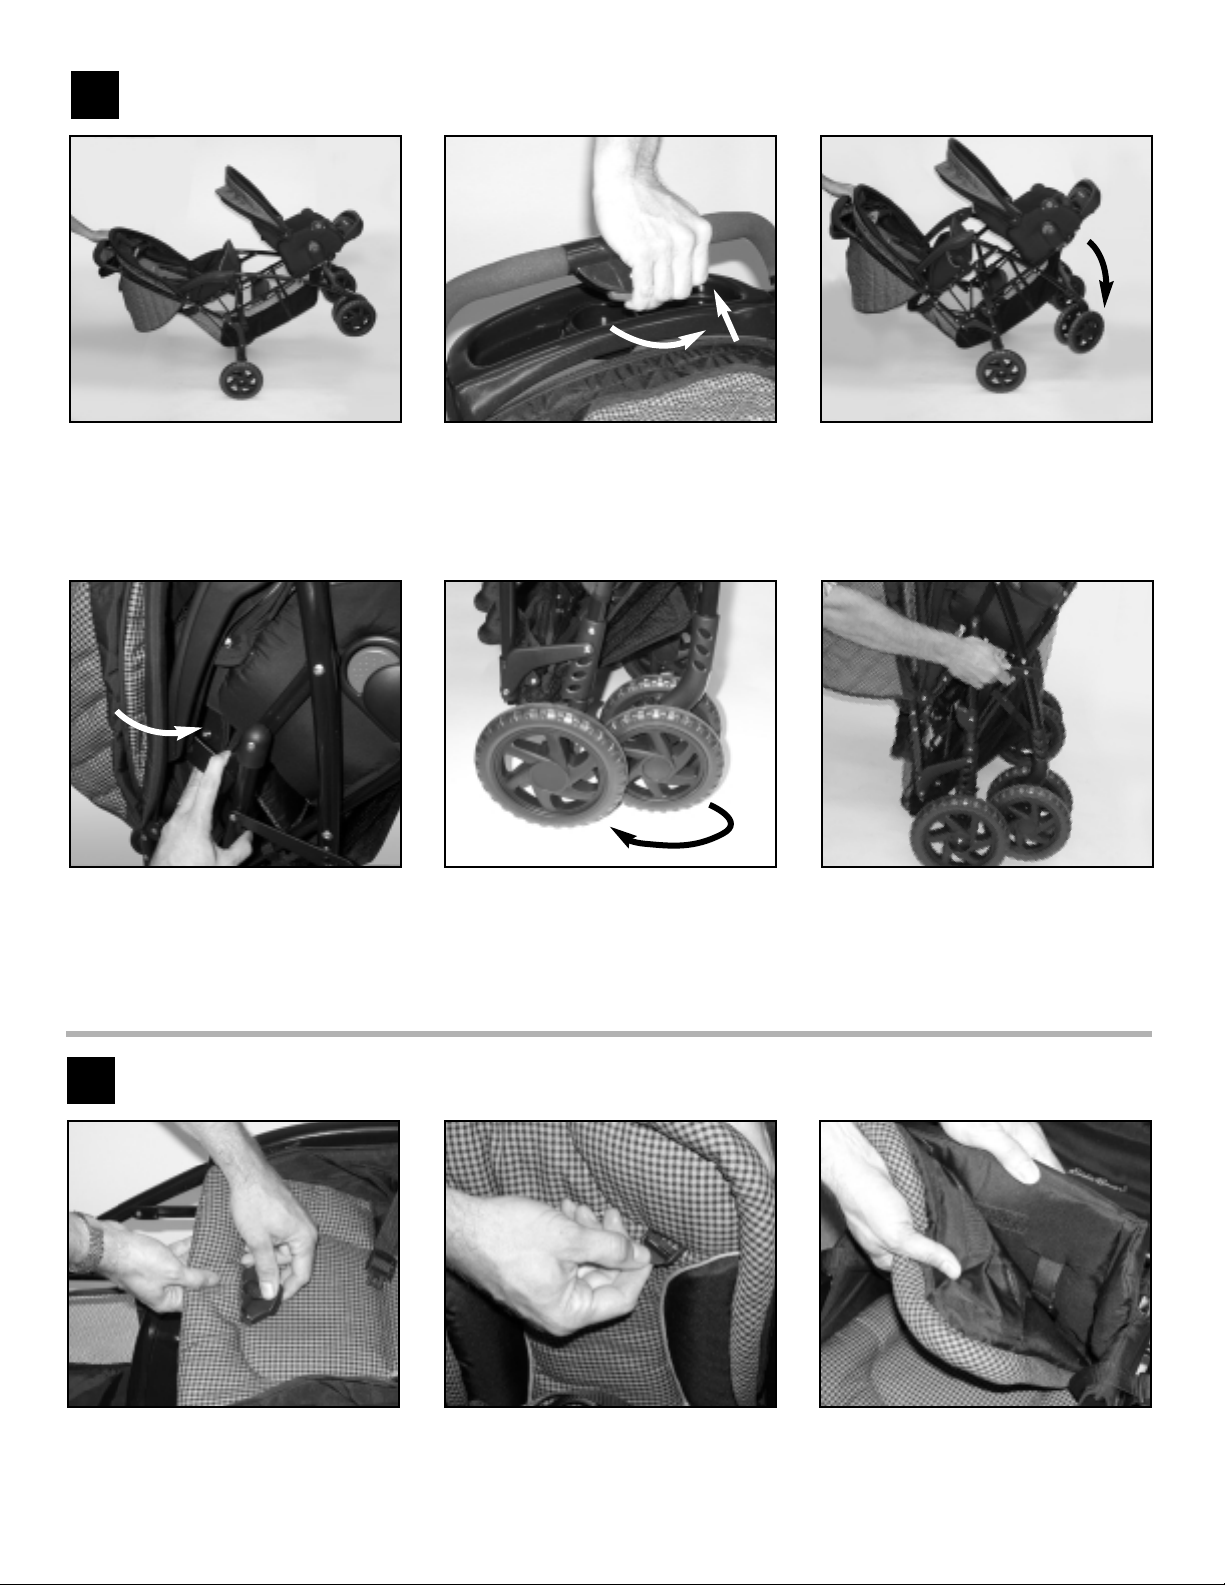
10
17
To Remove Pads for Washing:
Unsnap buckle and feed buckle and
strap through hole in seat pad.
Unthread shoulder strap adjusters to
enable straps to be pulled back
through seat back pad.
Pull pad free from fastening strip on
seat back and remove, pulling shoulder
straps through holes in pad. Pad should
now be ready for washing.
16
To Fold:
Fold rear canopy back to handle.
With brakes on, push down on handle to raise front wheels as shown.
Grip red release handle, slide to left and
squeeze to release frame lock.
Weight of stroller front will cause frame
to fold.
Rear seat side boards must be
unsnapped from frame and folded in
when folding stroller.
Front wheels may need to be rotated
180˚ to make latching frame easier.
Attach lock strap on frame side.
Page 11
Dorel Juvenile Group, Inc. (DJG) warrants this product to the original retail purchaser as follows:
This product is warranted against defective materials or workmanship for one year from the
date of original purchase. An original receipt is required to validate your warranty. DJG
will, at its option, provide replacement parts or replace this product. DJG reser ves the right to
substitute if the part or model has been discontinued.
To make a claim under this warranty you may contact us at www.djgusa.com and click on
“contact us”, fax us at 1-800-207-8182 24 hours a day, write to DJG, Consumer Relations
Department, P O Box 2609, Columbus,IN 47201-2609, or call 1-800-544-1108 from 7:00 a.m.
to 6:00 p.m. EST Monday through Thursday and from 7:00 a.m. to 4:30 p.m. on Friday. Proof
of purchase is required and shipping charges are the responsibility of the consumer.
Warranty Limitations:
This warranty does not include damages which arise from misuse or abuse of this product.
Limitation of Damages:
The warranty and remedies as set forth are exclusive and in lieu of all others,oral or written,
expressed or implied. In no event will DJG or the dealer selling this product be liable to you for
any damages, including incidental or consequential damages, arising out of the use or inability
to use this product.
Limitation of warranties and other warranty terms and state law rights:
Any implied warranties, including implied warranties of the merchantability and fitness for a
particular purpose, shall be limited to the duration and terms of the express written warranty.
Some states do not allow limitations as to how long an implied warranty lasts or the exclusion
or limitation of incidental or consequential damages, so the above limitations may not apply to
you. This warranty gives you specific legal rights, and you may have other rights, which vary
from state to state. Neither DJG nor the dealer selling this product authorized any person to
create for it any other warranty,obligation, or liability in connection with this product.
One Year Limited Warranty
11
18
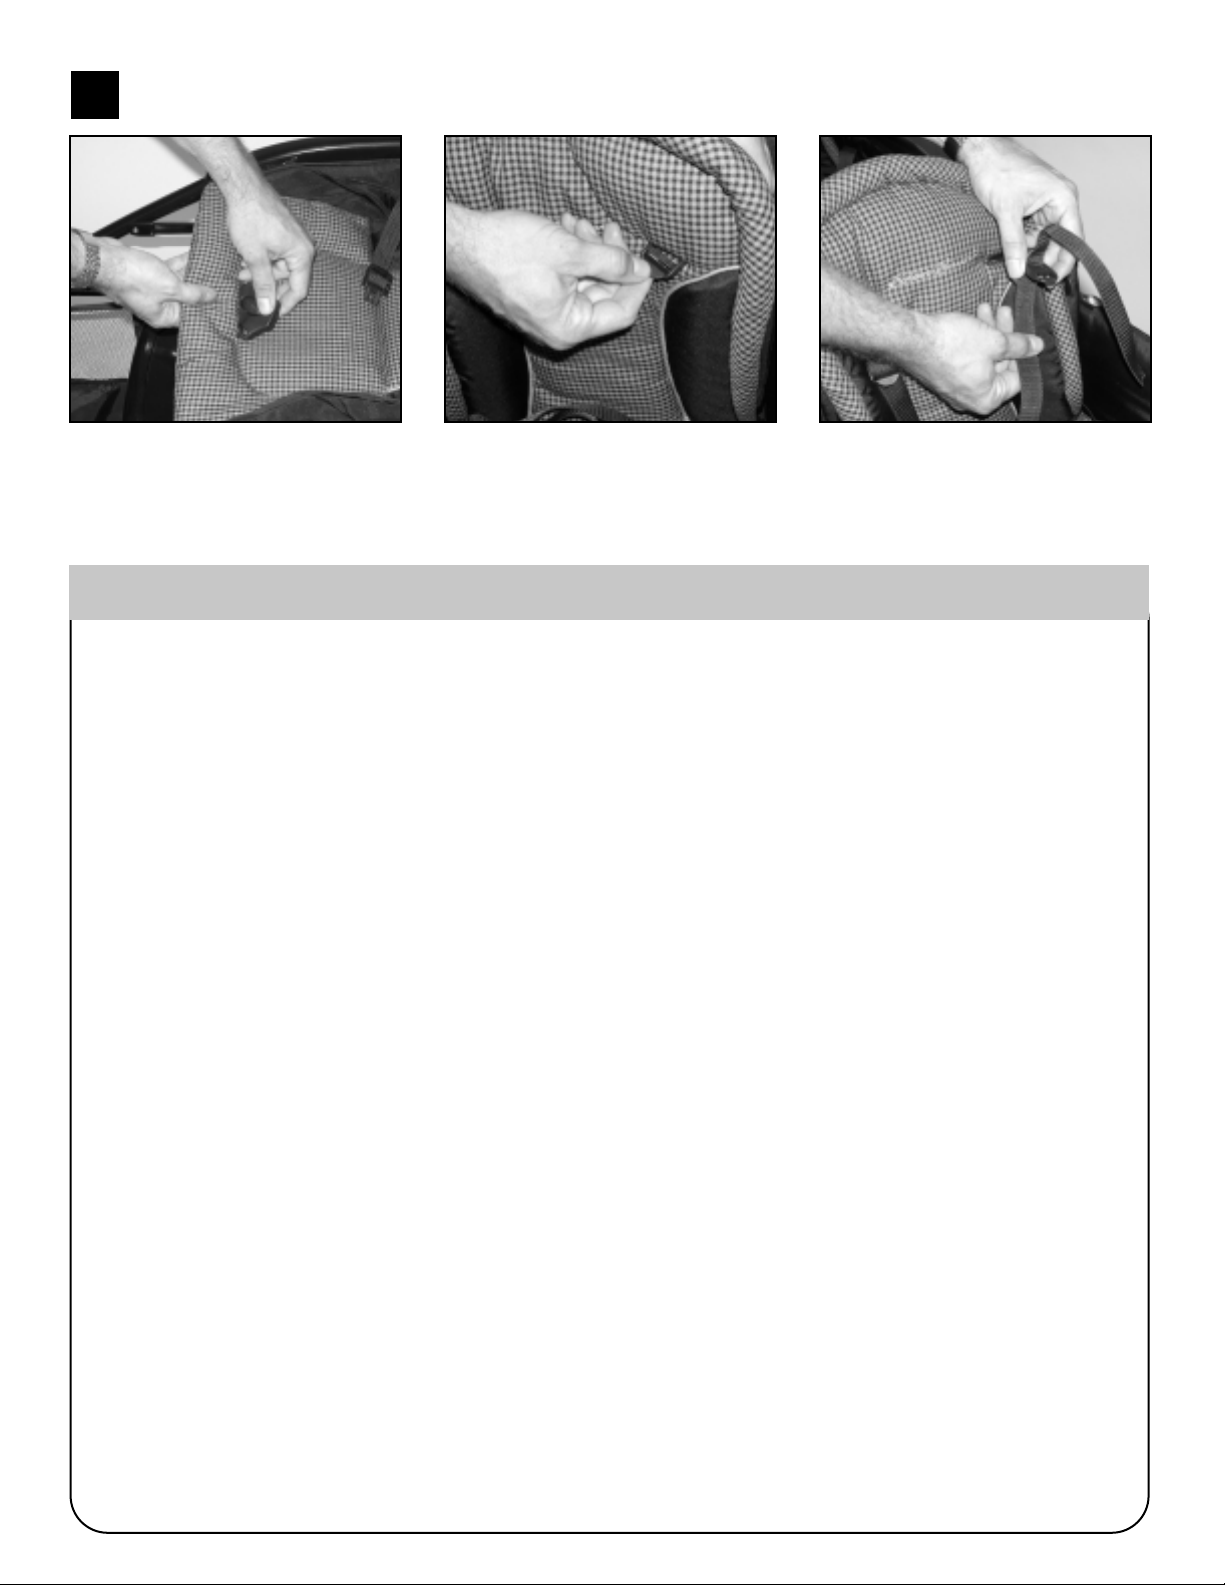
To Replace Pads after Washing:
Set pad in stroller as originally positioned. Feed crotch strap and buckle
through hole in seat pad.
Thread shoulder straps and
adjusters through seat back pad. Reattach pad to seat with attachment
strips.
Re-thread shoulder straps through
strap adjusters and adjust as per page
6. Re-installation is complete.
Page 12
Total $
Sales Tax $
Add Shipping and Handling
$
Outside Continental USA $
Grand Total $
Replacement Parts Order Form
Complete the form below. Your model number with color code and manufacturer date code MUST be included on the form to
ensure proper replacement parts. Your model number with color code and the date code can be found on a sticker on the
stroller frame. Payment in U.S. dollars must accompany your order. Choose parts needed from the list below. You can cross
reference your parts with the illustration on pages 2 and 3.
Return the form with payment to:
Dorel Juvenile Group, Inc.
Consumer Relations Department
P.O. Box 2609
Columbus, IN 47202-2609
Fax orders to: 1-800-207-8182
Replacement Parts List
Part Quantity . . . . . . . . . . . . . . . .Cost . . Quantity Ordered . . . . . . . . . . . .Total Cost
2 Single Wheels with Caps . . . . . . . .$5.99 . . . . . . . X ________ . . . . . . . . .= $__________
2 Dual Wheels . . . . . . . . . . . . . . . . .$4.50 . . . . . . . X ________ . . . . . . . . .= $__________
Hardware Bag
(Axle, Cotter Pins) . . . . . . . . . . . . .$5.00 . . . . . . . X ________ . . . . . . . . .= $__________
(Cotter Pins, Washers) . . . . . . . . .$2.00 . . . . . . . X ________ . . . . . . . . .= $__________
Front Child Tray . . . . . . . . . . . . . . . .$5.99 . . . . . . . X ________ . . . . . . . . .= $__________
Rear Child Tray . . . . . . . . . . . . . . . . .$5.99 . . . . . . . X ________ . . . . . . . . .= $__________
Parent Tray . . . . . . . . . . . . . . . . . . .$5.99 . . . . . . . X ________ . . . . . . . . .= $__________
Front Seat Pad . . . . . . . . . . . . . . . .$16.99 . . . . . . . X ________ . . . . . . . . .= $__________
Rear Seat Pad . . . . . . . . . . . . . . . .$16.99 . . . . . . . X ________ . . . . . . . . .= $__________
Front Canopy . . . . . . . . . . . . . . . . .$10.99 . . . . . . . X ________ . . . . . . . . .= $__________
Rear Canopy . . . . . . . . . . . . . . . . .$11.99 . . . . . . . X ________ . . . . . . . . .= $__________
Front Car Seat Mounting Bar . . . . . .$5.00 . . . . . . . X ________ . . . . . . . . .= $__________
Rear Car Seat Mounting Bar . . . . . .$5.00 . . . . . . . X ________ . . . . . . . . .= $__________
Instructions . . . . . . . . . . . . . . . . . . .$0.00 . . . . . . . X ________ . . . . . . . . .= $__________
(Indiana, Georgia, California, Arkansas, and
Massachusetts residents add applicable sales tax)
(Up to $25.00 . . . . . . . .$5.95
$25.01 to $50.00 . . . . . .$6.95
$50.01 to $75.00 . . . . . .$8.95
$75.01 to $100.00 . . . . .$9.95
$100.01 to $150.00 . . .$10.95
$150.01 to $200.00 . . .$11.95
$200.01 and up . . . . .$13.95)
10.00
We MUST have this
information to
process your order:
Model Number
(5 digits & 3 let-
ters)
Manufacture Date
(4 digit number)
Please make money orders payable to Dorel Juvenile Group, Inc. Fill in the
area below to charge to Visa or Mastercard. We do not except personal checks
or Discover Card. All outside of U.S. and Canada MUST use credit card.
NOTE: If requested color is not available, simular color will be substituted.
Fill Out For Credit Card Use
Visa Mastercard Card Exp.Date:
Cardholder’s Name:
Card Number:
Signature
Ship To:
Name:
Address:
City:
State/Province:
Telephone: ( ) Email Address:
No shipping and handling on instructions for quantities under 6.
Add $.50 for each instruction over 6, then add applicable shipping and handling.
(circle one)
12
 Loading...