

Page 1

USER MANUAL
“DECO” MODELS
RECEIPT OF GOODS
Your device has been packaged with care.
Make sure, ON RECEPTION, that the package is COMPLETE and in GOOD
CONDITION.
If you notice an anomaly, immediately make all reservations with your carrier, this is
PRIMORDIAL.
Before leaving, your device has been thoroughly tested.
It must be used for a long time, provided that you follow the installation, operating
and installation instructions. To help you do this, comply with the data in this leaflet.
CAUTION: The warranty certificate provided with the invoice automatically loses its
validity to cover any damage resulting from non-compliance with the instructions.
Always devoted to your orders, our commercial and technical services remain entirely
yours.
WE WISH YOU GOOD DEALS! !
ELECTRICAL CONNECTION
wo operating voltages:
230 V + T) EARTH
400 V + N + T)
- Check if the mains voltage corresponds to
- that indicated on the machine.
IN ALL CASES, DON'T FORGET TO
CONNECT THE EARTH.
FOR MACHINES PLACED OUTSIDE:
DON'T FORGET TWO THINGS
- A WATERPROOF CONNECTION SOCKET
- A PROTECTION ROOF
DON'T FORGET TO EQUIP THESE DEVICES
OF A PROTECTIVE ROOF
Page 2
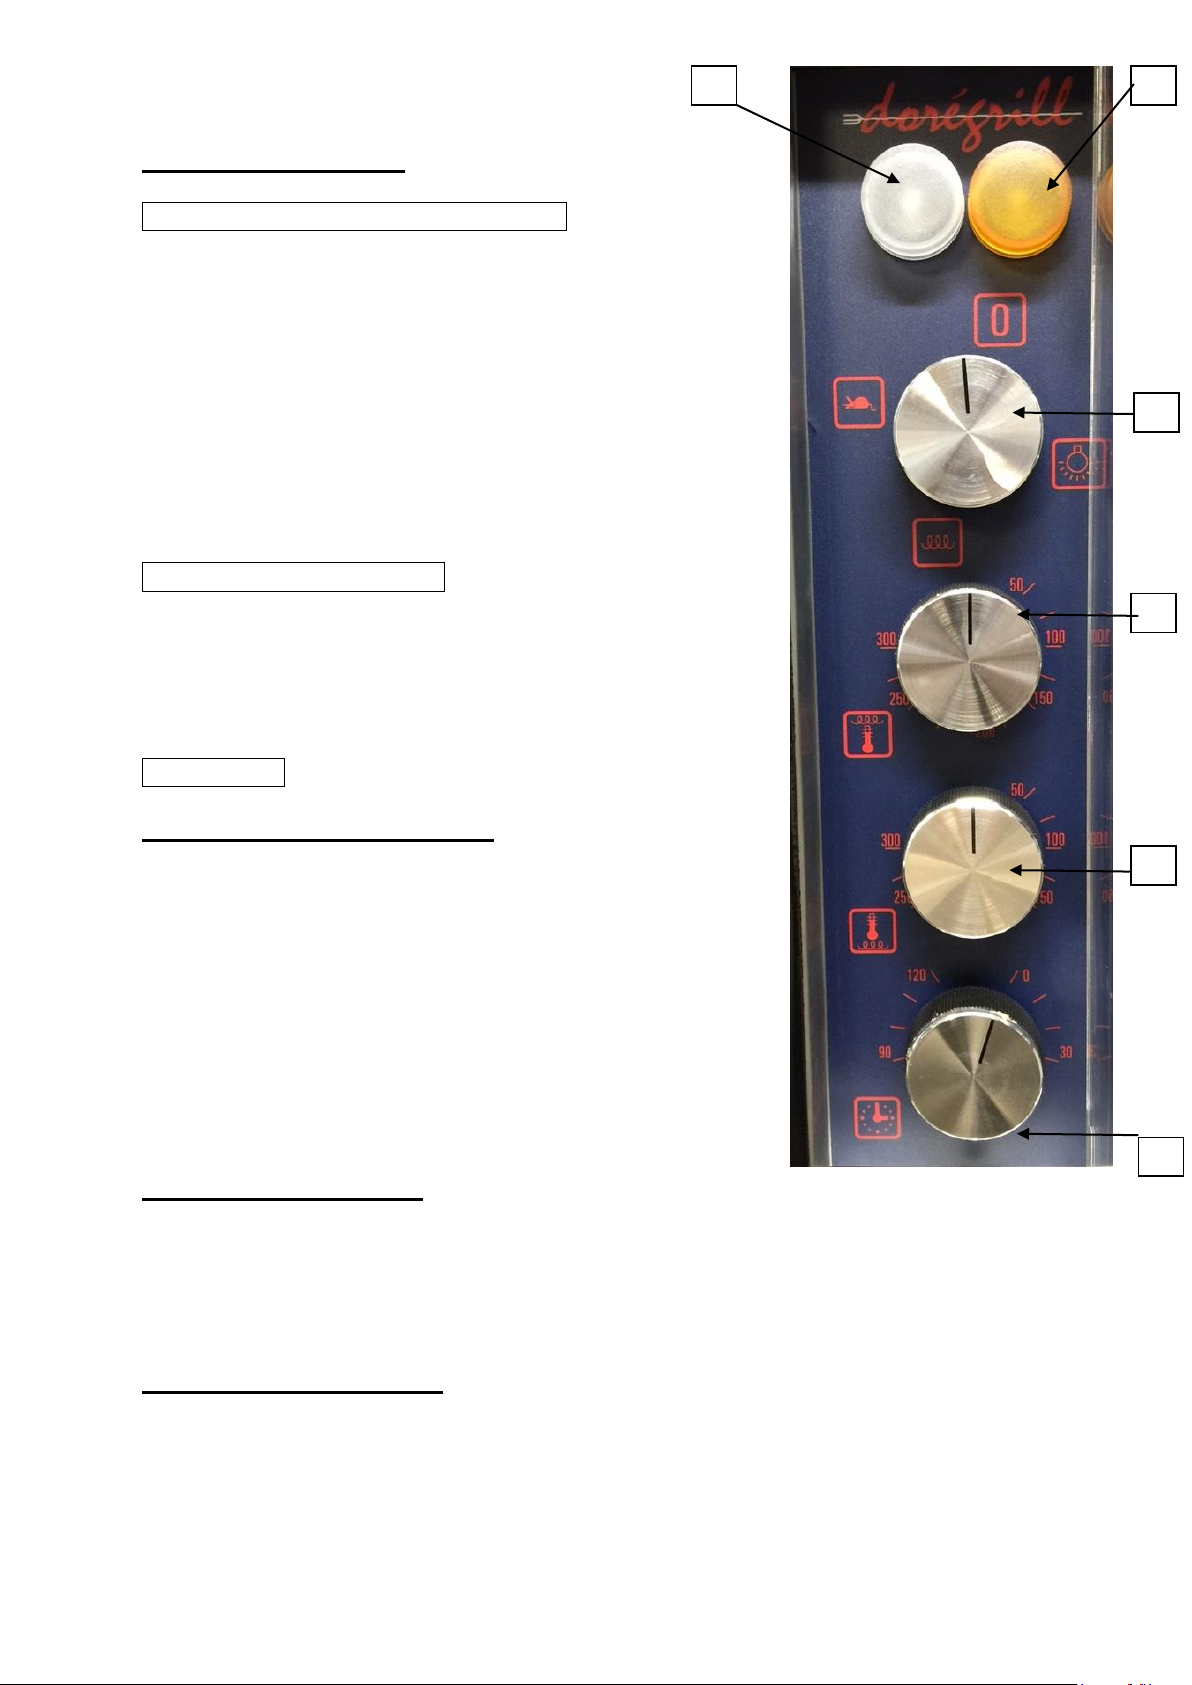
GETTING STARTED
LEGEND OF THE CONTROL PANELM
A: White LED indicating power on (when the device is
connected to the mains this LED lights up)
B: Yellow light indicating the heating operation
- C: 3-position selector switch
- ECL : lighting (light only)
- ROT : Lighting + heater
- MOT : Lighting + heater + engine
D: thermostat: for regulating the resistance at the top
E: thermostat: for regulating the 2 resistors at the bottom
F: Timer to program the cooking time
PREPARATION (for poultry)
- Fill the dish with water (about 2 to 3 cm)
- Prick the poultry, salt and pepper
- Place the poultry in the swings (lying down for the 15/20
series; standing for the 30 series)
OPERATION
IN THE ROTISSERIE POSITION
- Selection switch C in MOT position
- Thermostat E on 300 ° possibly reduce up to 150 °
- Thermostat D "regulate between 200 and 300 °
depending on the desired cooking"
- Timer F on 60 mm (recommended for a 1 kg chicken)
At the end of the cycle: automatic stop of all resistors
Storage at temperature thanks to quartz lighting for a
certain time.
IN THE OVEN POSITION (WITH GRILL )
- Selection switch C in ROT position
- Thermostat D and E: to be regulated according to the nature of the product to be
cooked
- Timer F: depending on the time required for the product to cook.
IN THE WARMIN POSTION
a) Minimum heating limited in time (falls below 65 ° regulatory)
- Selection switch C on Ecl
- Timer F to zero
A
B
C
D
E
F
Page 3

b) Heating with controlled temperature
- Selection switch C in ROT or MOT position
- Thermostat E at zero
- Thermostat D: regulate to the desired temperature (between 70 ° and 90 °)
- Timer F: depending on the time required for the product to cook.
VERY IMPORTANT: POSITIONING CROSSING SWING MOUNT
The support cross member located along the side window has a square: this square
is directed towards the inside of the oven to support the grid.
On the other hand, this same bracket must be positioned IMPERATIVELY towards
the outside of the oven, that is to say towards the ice when using the star, the
swinging support disc or the spit.
SETTING UP THE EMAIL COVER AND STAINLESS STEEL DEFLECTORS
DRESSING
The inner part of the roasting pan on the button side is fitted with a removable
colored enamel coating.
This covering is instantly attached by buttonholes on three studs in triangle.
MAKE SURE THAT THE FIXING IS LOCKED BY DESCENDING THE PART AND
REMOVING BY REASSEMBLING THE SAME PLATE.
DEFLECTOR
Under the front and rear windows are stainless steel deflectors.
Check that these deflectors are in place and correctly positioned.
The upper part of these deflectors must pass under the windows and behind the
resistors.
UNDER NO CIRCUMSTANCES SHALL RESISTANCES BE COVERED.
RISK OF DANGEROUS OVERHEATING
CLEANING
- Put the sauce tray, the swings and the deflectors to soak
- Impregnate the stained areas with a strong stripper such as Décagrill or similar,
when the roasting pan is still warm.
- Possible application on stainless steel; enamel and ice cream
- Rinse after a quarter of an hour with a damp sponge
- Finish if necessary with white of Spain or methylated spirits
Page 4

IMPORTANT: NEVER USE ALU PAPER TO PROTECT THE DEFLECTORS (RISK
OF FIRE)
It is however possible to use aluminum foil for the central crosspiece of the swing
star.
To facilitate cleaning, the whole of the support-swing star is removable.
Proceed as follows:
- Open the side door
- Slightly lift the end of the star
- Clear the lateral cross member from its housings
- Remove by bringing it towards you the "star" set
- For reassembly, proceed in reverse
CAUTION: This device is equipped with new lighting with quartz lamp.
To ensure the longevity of this lamp, the following instructions must be observed:
- Never touch the lamp with your fingers. If this happens, for example during a
replacement and before starting up, wipe the glass with a cloth soaked in methylated
spirits.
- When cleaning, avoid any projection of miro-oven, décap’four or similar on the
lamp.
In any case, at the end of cleaning the roasting pan, wipe the lamp with a cloth
soaked in methylated spirits.
Page 5
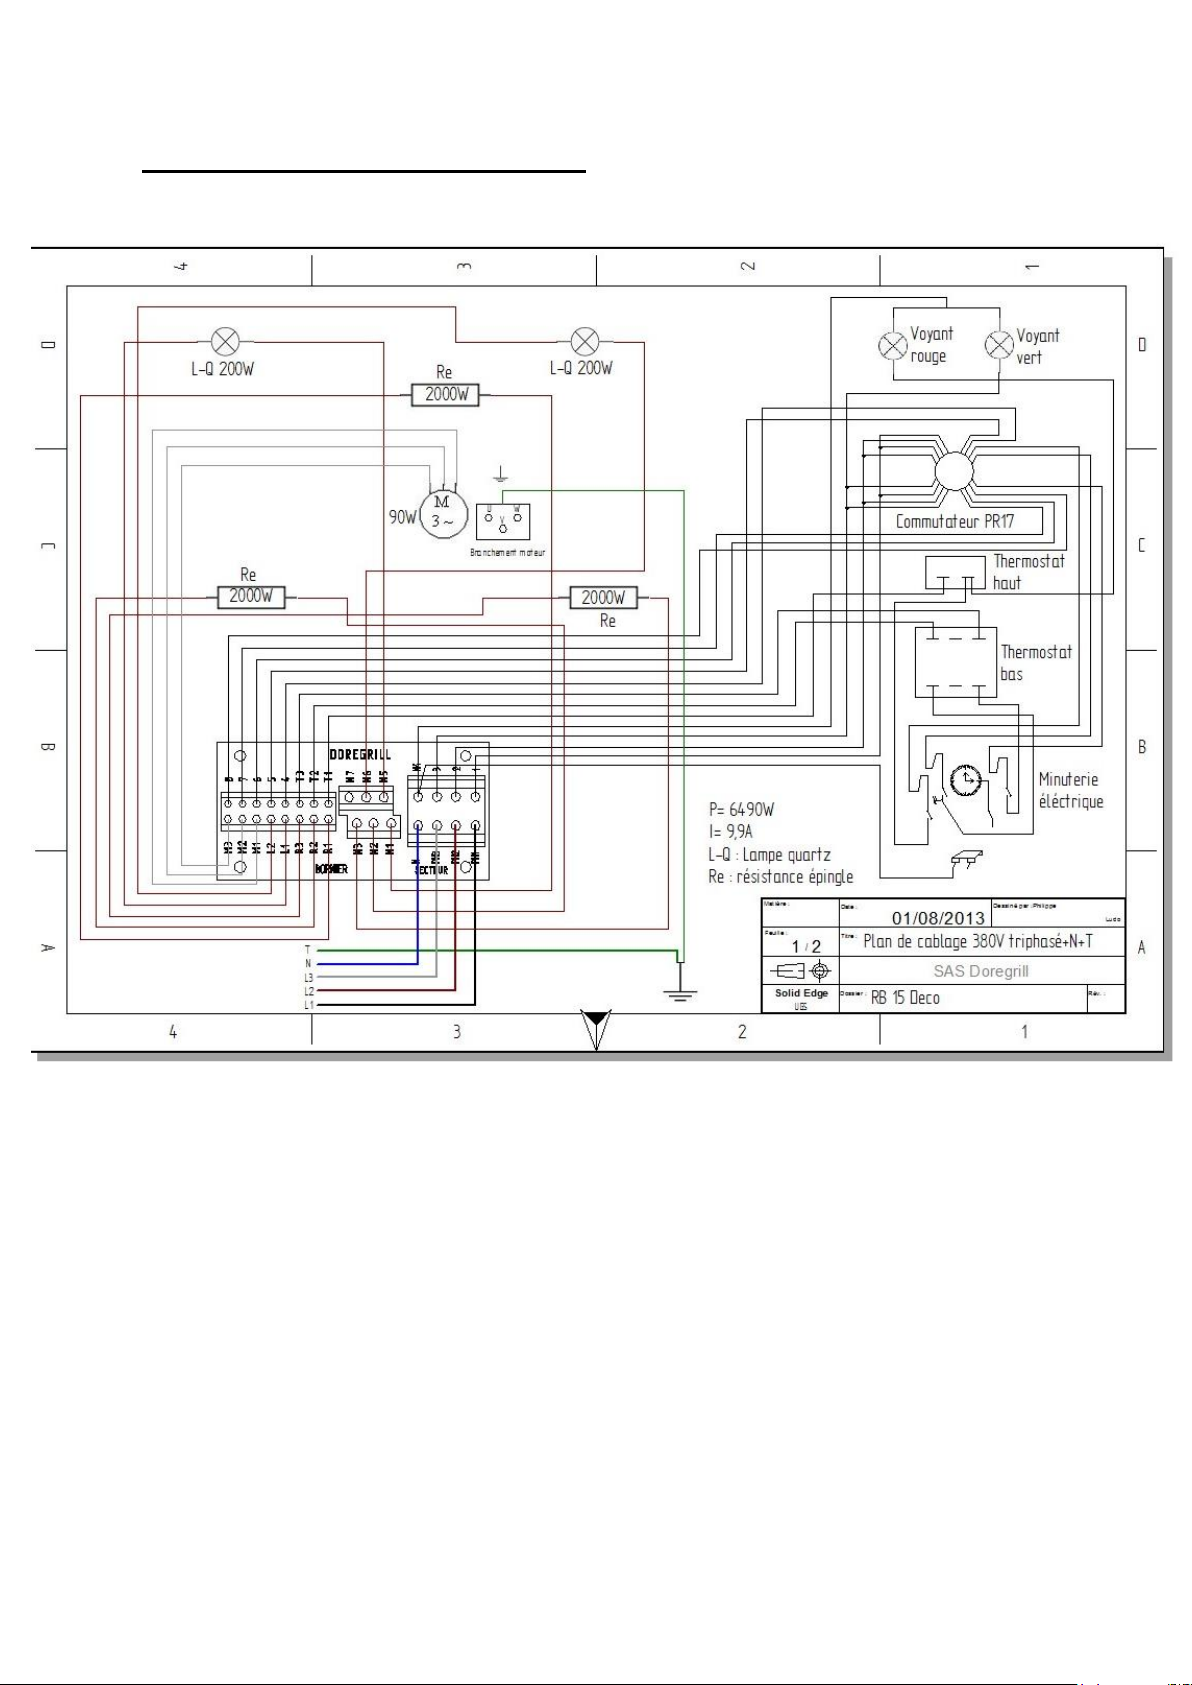
PLAN DE CABLAGE 380V + N + T
 Loading...