

DORCHESTER DR-CC 12-160, DR-CC 12-200, DR-CC 20-160, DR-CC 20-200, DR-CC 24-245 User guide
...Page 1

DORCHESTER
DR-CC 12-160 to DR-CC 32-380
CONDENSING HOT WATER
STORAGE HEATERS
Installation, Commissioning
and Maintenance Instructions
DORCHESTER MODELS:
DR-CC 12-160, 12-200, 20-160, 20-200, 24-245,
24-285, 32-285, 32-285, 32-380
Room Sealed or Open Flue, Direct Gas Fired Condensing Hot Water
Storage Heaters with Premix Burner and Automatic Ignition for
Domestic Hot Water Installations
NOTE:
THESE INSTRUCTIONS MUST BE READ AND UNDERSTOOD BEFORE
INSTALLING, COMMISSIONING, OPERATING OR SERVICING EQUIPMENT.
THIS WATER HEATER IS FOR USE ON GROUP H NATURAL GAS (2 FAMILY) I ,
OR PROPANE (3 FAMILY) I . PLEASE ENSURE RELEVANT INFORMATION
RD
3P
ND
2H
REQUIRED WITHIN DOCUMENT IS FOUND RELATING TO GAS TO BE FIRED
BEFORE FIRING HEATER.
THIS WATER HEATER COMPLIES WITH ALL RELEVANT EUROPEAN DIRECTIVES.
PUBLICATION NO. XXXXXXXX
ISSUE: “A”.
MARCH 2018
0312934
Page 2

Page 3

Preface
Copyright
Copyright © 2018 Hamworthy Heating
All rights reserved.
Nothing from this publication may be copied, reproduced and/or published by means of
printing, photocopying or by whatsoever means, without the prior written approval of
Hamworthy Heating.
Hamworthy Heating reserves the right to modify specifications in this manual.
Trademarks
Brand names in this manual are registered trademarks of their respective owners.
Warranty
Refer to the appendix Warranty (see section 13.6) for the warranty provisions.
Liability
Hamworthy accepts no liability for claims from third parties caused by:
unauthorized use
•
use other than stated in this manual
•
use other than in accordance with the General Conditions registered at the Chamber
•
of Commerce.
For more information, refer to the General Conditions. These are available on request, free
of charge.
We believe that this manual provides you with accurate and complete descriptions of all
relevant components. If you, nonetheless find errors or inaccuracies in this manual, please
inform Hamworthy. This helps us to further improve our documentation.
Compliance
To safely produce domestic hot water, the design and construction of the DR-CC water
heaters is in accordance with:
the European Gas Appliance Directive (GAD).
•
the European Standard for Gas–fired storage water heaters for the production of
•
domestic hot water (EN89).
The European ECO-Design Directive.
•
The European Energy Labeling Directive
•
0312934_DR-CC_UKUK_V1.0, 2018-03-01 3
Page 4

Refer to the appendix Declaration of conformity (see section 13.5).
Regulations
Gas Safety (installations and Use) Regulations 1998 (as
amended).
It is law that all gas appliances are installed by competent persons, in accordance with the
above regulations. Failure to install appliances correctly could lead to prosecution. It is in
your own interest and that of safety, to ensure that this law is complied with.
The installation of the water heater MUST be in accordance with the relevant requirements
of the Gas Safety Regulations, Building Regulations, IEE Regulations and the Water Supply
(water fittings) Regulations. The installation should also be in accordance with any
relevant requirements of the HSE, local gas region and local authority and the relevant
recommendations of the following documents:
British and European Standards
BS 6891:2015
•
Specification for the installation and maintenance of low pressure gas installation
pipework of up to 35 mm (R1¼) on premises.
BS 6798: 2014
•
Specification for selection, installation, inspection, commisioning, servicing and
maintenance of gas-fired boilers of rated input not exceeding 70 kW net.
BS 6644: 2011
•
Specification for installation and maintenance of gas-fired hot water boilers of rated
inputs between 70 kW (net) and 1.8 MW (net) (2nd and 3rd family gases).
BS EN 806-1: 2000
•
Specification for installations inside buildings conveying water for human
consumption. General.
BS EN 806-2: 2005
•
Specifications for installations inside buildings conveying water for human
consumption. Design.
BS EN 806-3: 2006
•
Specifications for installations inside buildings conveying water for human
consumption. Pipe sizing. Simplified method.
BS EN 806-4: 2010
•
Specifications for installations inside buildings conveying water for human
consumption. Installation.
BS EN 806-5: 2012
•
Specifications for installations inside buildings conveying water for human
consumption. Operation and maintenance.
BS 8558: 2015
•
Guide to design, installation, testing and maintenance of services suppling water to
domestic use within buildings and their curtilages. Complementary guidance to BE EN
806.
BS 5546: 2010
•
Specification for installation and maintenance of gas-fired water-heating appliances
of rated input not exceeding 70 kW net.
BS 5440-1: 2008
•
Flueing and ventilation for gas appliances of rated input not exceeding 70 kW net
(1st, 2nd and 3rd family gases). Specification for installation of gas appliances to
chimneys and for maintenance of chimneys.
BS 5440-2: 2009
•
Flueing and ventilation for gas appliances of rated input not exceeding 70 kW net
(1st, 2nd and 3rd family gases). Specification for the installation and maintenance of
ventilation provision for gas appliances.
4
Page 5

Institute of Gas Engineers and Managers (IGEM) Publications
IGE/UP/1 Edition 3:
•
Strength testing, tightness testing and direct purging of industrial and commercial
gas installations.
IGE/UP/1A:Edition 3:
•
Strength testing, tightness testing and direct purging of small low pressure industrial
and commercial natural gas installations.
IGE/UP/2: Edition 3:
•
Installation pipework on industrial and commercial premises.
IGE/UP/10 Edition 4:
•
Installation of flued gas appliances in industrial and commercial premises.
CIBSE Publications
Guide G Aug 2014:
•
Public Health & Plumbing Engineering
Contact information
In the event of problems with your gas, electricity or water supply connections or when
you have any comments or questions, please contact your supplier.
0312934_DR-CC_UKUK_V1.0, 2018-03-01 5
Page 6

6
Page 7

c
About this manual
Scope
This manual gives information about safe and correct use of the water heater and how
installation, maintenance and service activities have to be done correctly. You must obey
the instructions in this manual.
Caution
Read this manual carefully before you start the water heater. It can cause personal injury
and damage to the water heater when you do not read the manual and/or do not obey
the instructions.
The purpose of this manual is to:
describe the working principles and layout of the water heater
•
explain the safety devices
•
highlight possible hazards
•
describe the use of the water heater
•
describe the installation, service and maintenance of the water heater
•
This manual has two parts:
An User part that describes the correct usage of the water heater.
•
An Installation, Maintenance and Service part, that describes the correct installation
•
and maintenance procedures.
Target group
The information in this manual applies to three target groups:
users
•
installation engineers
•
service and maintenance engineers
•
The User part is intended for the (end) users. The Installation, Maintenance and Service
part is intended for the installation engineers and the service and maintenance engineers.
Notation conventions
This manual uses the following text conventions:
Numbers between parentheses e.g. (1), refer to elements in a figure that are
•
described by the text.
Texts displayed on the user interface always are shown similar to the characters in
•
the display, for example parameter 120 or Off.
Buttons are always shown between brackets, for example: [ ], [ENTER], [RESET].
•
Cross-references to sections, tables, figures etc. are underlined and written as (see
•
section "..."). In the digital version, the cross-references function as hyperlinks that
can be used to navigate through the manual by clicking on them. Example: Safety
(see section 2).
0312934_DR-CC_UKUK_V1.0, 2018-03-01 7
Page 8
n
c
w
This manual contains the following text styles/symbols for situations that may endanger
users/engineers, cause damage to equipment or need special attention:
Note
A note gives more information on a topic.
Caution
Obey the caution instructions to prevent damage of the water heater.
Warning
Obey the warning instructions to prevent danger of personal injury, and serious damage
to the water heater.
Document identification
Article number Language Version
0312934 EN 1.0
8
Page 9

Table of Contents
Preface........................................................................................ 3
Copyright.......................................................................... 3
Trademarks....................................................................... 3
Warranty...........................................................................3
Liability.............................................................................3
Compliance....................................................................... 3
Regulations....................................................................... 4
Contact information............................................................ 5
About this manual....................................................................... 7
Scope............................................................................... 7
Target group..................................................................... 7
Notation conventions.......................................................... 7
Document identification.......................................................8
User part.................................................................. 13
1 Introduction.............................................................................. 15
2 Safety........................................................................................17
3 Interface................................................................................... 19
3.1 Operator interface............................................................ 19
3.1.1 Control Switch..................................................................19
3.1.2 Buttons........................................................................... 20
3.1.3 LCD display..................................................................... 20
3.2 Status of the water heater................................................. 21
3.2.1 Operating modes.............................................................. 21
3.2.2 Error conditions................................................................22
3.2.3 Service conditions.............................................................22
3.2.4 Anode warning................................................................. 23
4 Use............................................................................................ 25
4.1 Set a parameter value.......................................................25
4.2 Turn on the water heater...................................................25
0312934_DR-CC_UKUK_V1.0, 2018-03-01 9
Page 10

4.2.1 Switch to ON mode........................................................... 25
4.2.2 Set the water temperature.................................................25
4.3 Turn off the water heater...................................................26
4.3.1 Turn off for a short period..................................................26
4.3.2 Isolate from the mains...................................................... 26
4.3.3 Turn off for a long period...................................................26
Installation, Maintenance and Service part.............. 27
5 Introduction.............................................................................. 29
5.1 About the water heater..................................................... 29
5.2 Working principle..............................................................29
6 Safety........................................................................................31
6.1 Safety instructions............................................................31
6.2 Instructions on the water heater.........................................32
6.3 Safety devices..................................................................33
6.4 Environmental aspects...................................................... 34
6.4.1 Recycling.........................................................................34
6.4.2 Disposal.......................................................................... 34
7 Water heater............................................................................. 35
7.1 Structure of the water heater............................................. 35
8 Installation............................................................................... 37
8.1 Packaging........................................................................37
8.2 Conditions....................................................................... 37
8.2.1 Ambient conditions........................................................... 37
8.2.2 Maximum floor load.......................................................... 37
8.2.3 Water composition............................................................38
8.2.4 Working clearances...........................................................38
8.2.5 Level the water heater...................................................... 38
8.3 Installation diagram..........................................................40
8.4 Water connections............................................................ 40
8.4.1 Cold water connection....................................................... 40
8.4.2 Hot water connection........................................................ 41
10
8.4.3 Circulation connection....................................................... 41
8.5 Condensate drain............................................................. 41
8.6 Gas connection.................................................................41
8.7 Venting system................................................................ 42
8.7.1 C13/C33 concentric systems.............................................. 44
Page 11

8.7.2 C13/C33 parallel systems.................................................. 46
8.7.3 C43/C53/C63 systems.......................................................48
8.8 Electrical connections........................................................ 49
8.8.1 Preparation......................................................................49
8.8.2 Mains power.................................................................... 50
8.8.3 Optional electrical connections............................................50
8.8.4 Finalization...................................................................... 51
8.9 Commissioning.................................................................51
8.9.1 Filling..............................................................................52
8.9.2 Air pressure differential..................................................... 52
8.9.3 Gas supply pressure..........................................................53
8.9.4 CO2 value........................................................................54
8.9.5 Turn on the water heater...................................................55
8.10 Decommisioning...............................................................55
8.10.1 Turn off the water heater...................................................55
8.10.2 Draining.......................................................................... 55
9 Conversion of gas type.............................................................. 57
10 Settings.....................................................................................59
10.1 Operator interface............................................................ 59
10.2 Parameters......................................................................59
10.3 Hysteresis....................................................................... 61
10.4 Error history.................................................................... 61
10.5 Test cycle........................................................................ 62
10.6 Legionella prevention........................................................ 62
11 Maintenance.............................................................................. 63
11.1 Performance check........................................................... 63
11.2 Preparation......................................................................64
11.3 Water-side maintenance....................................................64
11.3.1 Descale the tank.............................................................. 64
11.3.2 Clean the condensate drain................................................64
11.4 Gas-side maintenance....................................................... 65
11.4.1 Clean the burner.............................................................. 65
11.4.2 Clean the combustion chamber...........................................67
11.4.3 Assemble the burner.........................................................68
11.5 Finalization...................................................................... 68
12 Troubleshooting........................................................................ 71
12.1 Errors and warnings..........................................................71
0312934_DR-CC_UKUK_V1.0, 2018-03-01 11
Page 12

12.1.1 General errors..................................................................71
12.1.2 Displayed errors............................................................... 73
12.1.3 Warnings.........................................................................80
13 Appendices................................................................................81
13.1 Technical details...............................................................81
13.2 Dimensions......................................................................82
13.3 Gas details...................................................................... 84
13.3.1 Energy labeling................................................................ 85
13.4 Electrical wiring diagram....................................................87
13.5 Declaration of conformity...................................................89
13.6 Warranty.........................................................................90
Index........................................................................................ 91
12
Page 13

User part
0312934_DR-CC_UKUK_V1.0, 2018-03-01 13
Page 14

14
Page 15
1 Introduction
1
2
3
4
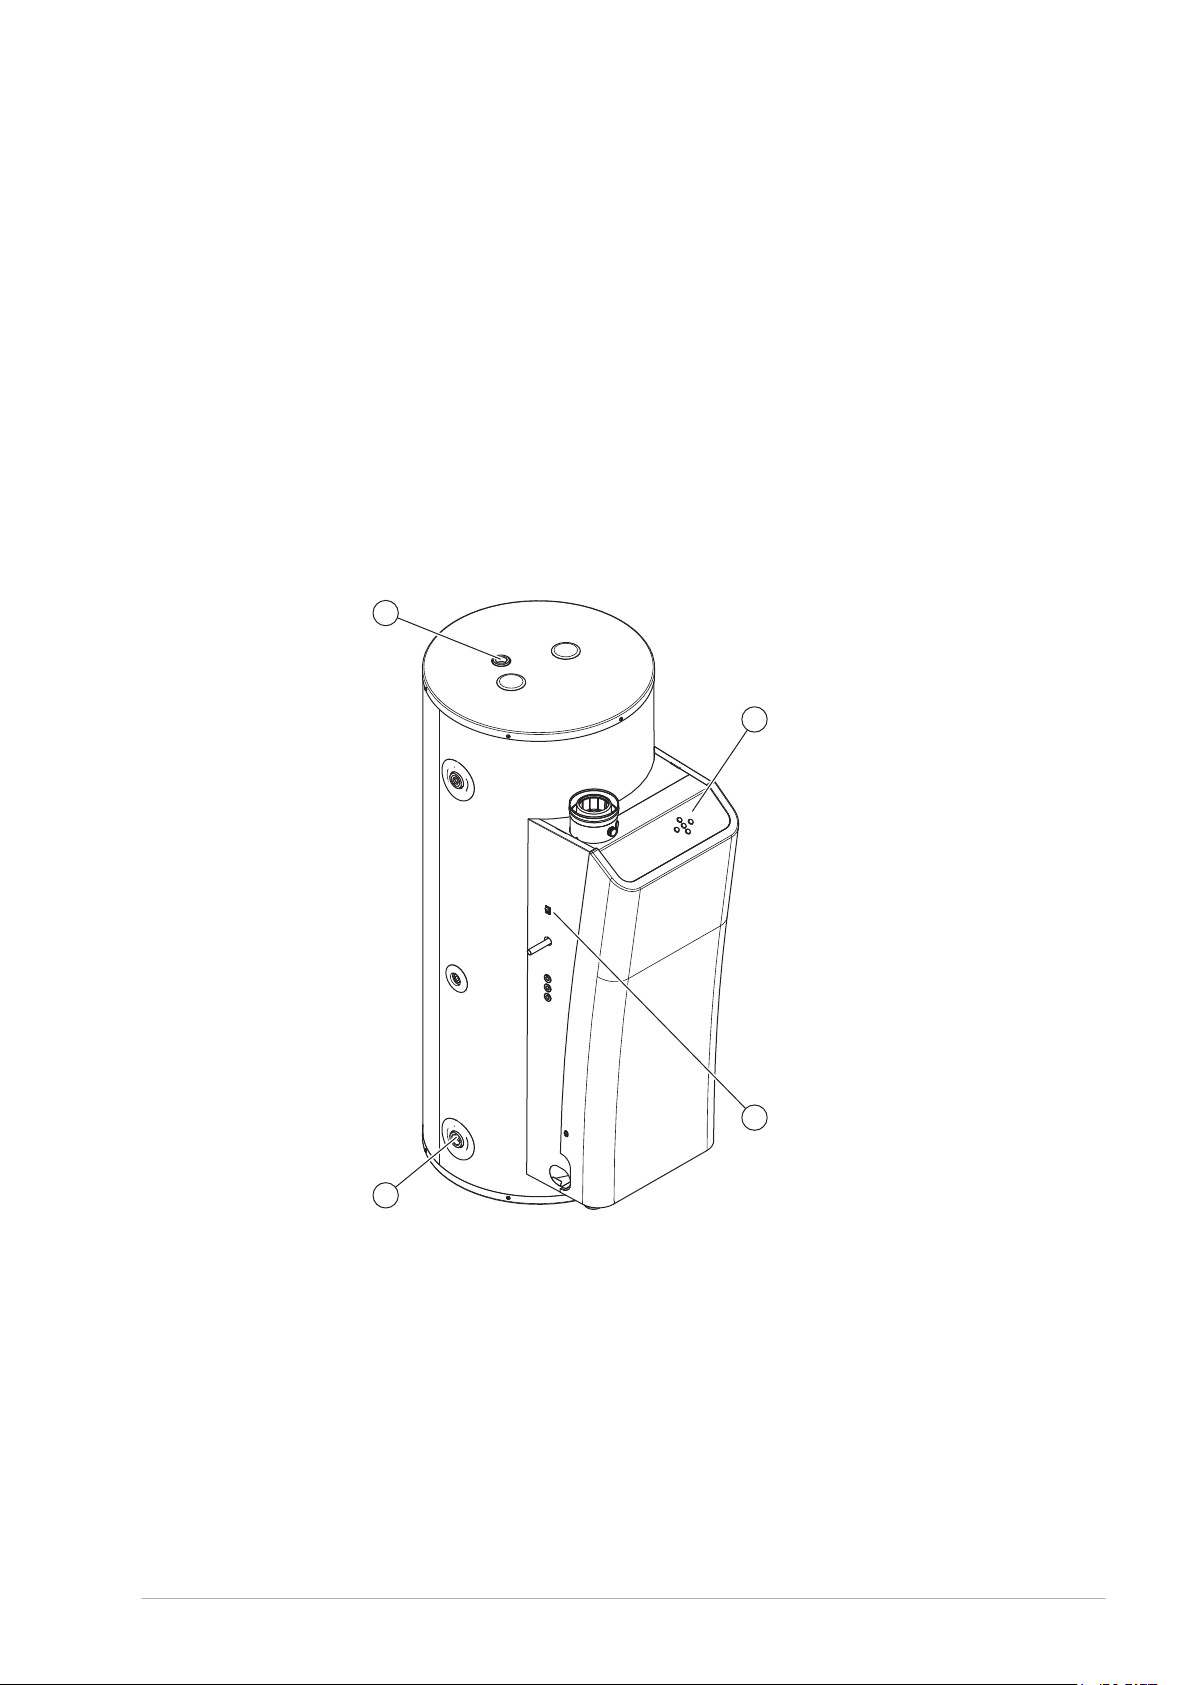
The DR-CC water heater stores and heats water for sanitary purposes.
Cold water enters the bottom of the tank through the water inlet (1). The heated water
leaves the tank at the top through the hot water outlet (2). To operate the water heater,
the operator interface (3) and control switch (4) are used.
Fig. DR-CC water heater
1. Water inlet
2. Water outlet
3. Operator interface
4. Control switch
0312934_DR-CC_UKUK_V1.0, 2018-03-01 15
Page 16

16 User part
Page 17

2 Safety
Hamworthy cannot be held responsible for damages or injuries leading back to:
Failure to follow the instructions provided in this manual.
•
Carelessness during use or maintenance of the water heater.
•
Every user has to study the user part of this manual and has to follow the instructions in
this part of the manual strictly. Do not change the sequence of the actions to be done.
This manual has to be available for the user and service engineer all the time.
Warning
w
If you smell gas:
Shut off the mains gas supply valve!
•
Avoid causing sparks! Do not use any electrical equipment or switch, i.e. no
•
telephones, plugs or bells!
No naked flames! No smoking!
•
Open windows and doors!
•
Warn occupants and leave the building!
•
After leaving the building, alert the gas distribution company or your
•
installation engineer.
c
n
Caution
Do not store or use chemical substances in the room where the water heater is installed
because of the risk of explosion and corrosion of the water heater. Some propellants,
bleaching agents and degreasing agents etc. disperse of explosive vapors and/or cause
accelerated corrosion. If the water heater is used in a room where such substances are
stored or used, the warranty will be void.
Caution
Installation, maintenance and service may only by carried out by a qualified engineer.
Caution
The water heater is not intended for use by persons with reduced physical, sensory or
mental capacities, or who lack the necessary experience or knowledge. When the person
responsible for their safety is supervising them or has explained to them how the water
heater should be used, these persons can use the water heater.
Caution
This water heater is not intended to be used by children. Always supervise children, and
make sure that they do not play with the water heater.
Note
Regular maintenance extends the service life of the water heater. To determine the
correct service interval, the service and maintenance engineer has to do a check on both
the water and gas side of the water heater three months after installation. Based on this
check, the best service interval can be determined.
0312934_DR-CC_UKUK_V1.0, 2018-03-01 17
Page 18

18 User part
Page 19
3 Interface
Dorchester DR-CC
2
1
3.1 Operator interface
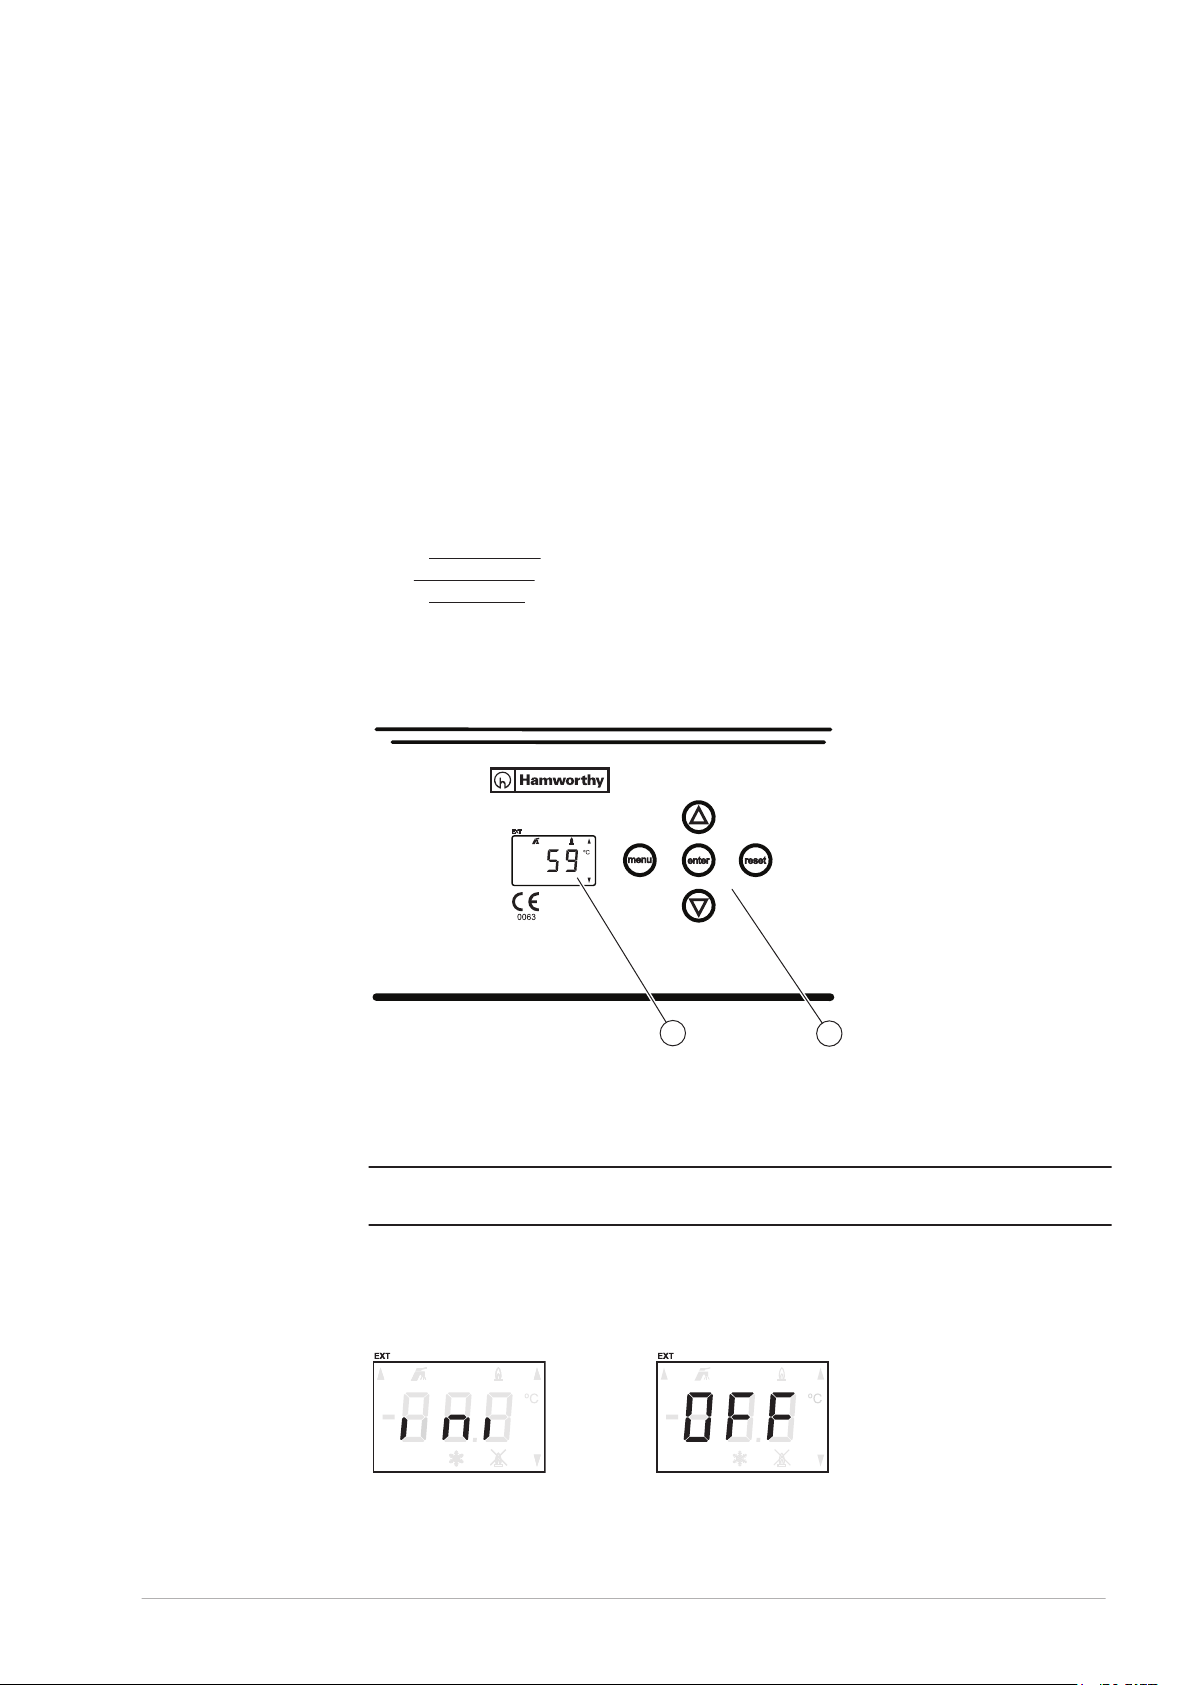
The operator interface consists of:
a control switch (see section 3.1.1) on the left side of the water heater
•
5 push buttons (see section 3.1.2) to navigate through the menu
•
a LCD-display (see section 3.1.3) that shows settings, functions, values and errors.
•
The operator interface is parameter driven and enables the user to change parameters and
to verify the status and history of the water heater.
Fig. Operator interface
1. LCD display
2. Push buttons
3.1.1 Control Switch
With the control switch you can activate and deactivate the controller of the water heater.
Warning
The power of the water heater stays on when the control switch is set to 0.
w
When the control switch is set to I, the display first shows ini for some seconds. After
that, the display shows OFF.
Fig. Display
0312934_DR-CC_UKUK_V1.0, 2018-03-01 19
Page 20
3.1.2 Buttons
2
1
The 5 buttons on the operator panel give access to the menu of the water heater.
Button Function
[ ] Scroll up / Raise
[ ] Scroll down / Lower
[ENTER] Enter / Confirm
[RESET] Reset / Cancel
[MENU] Go to menu
3.1.3 LCD display
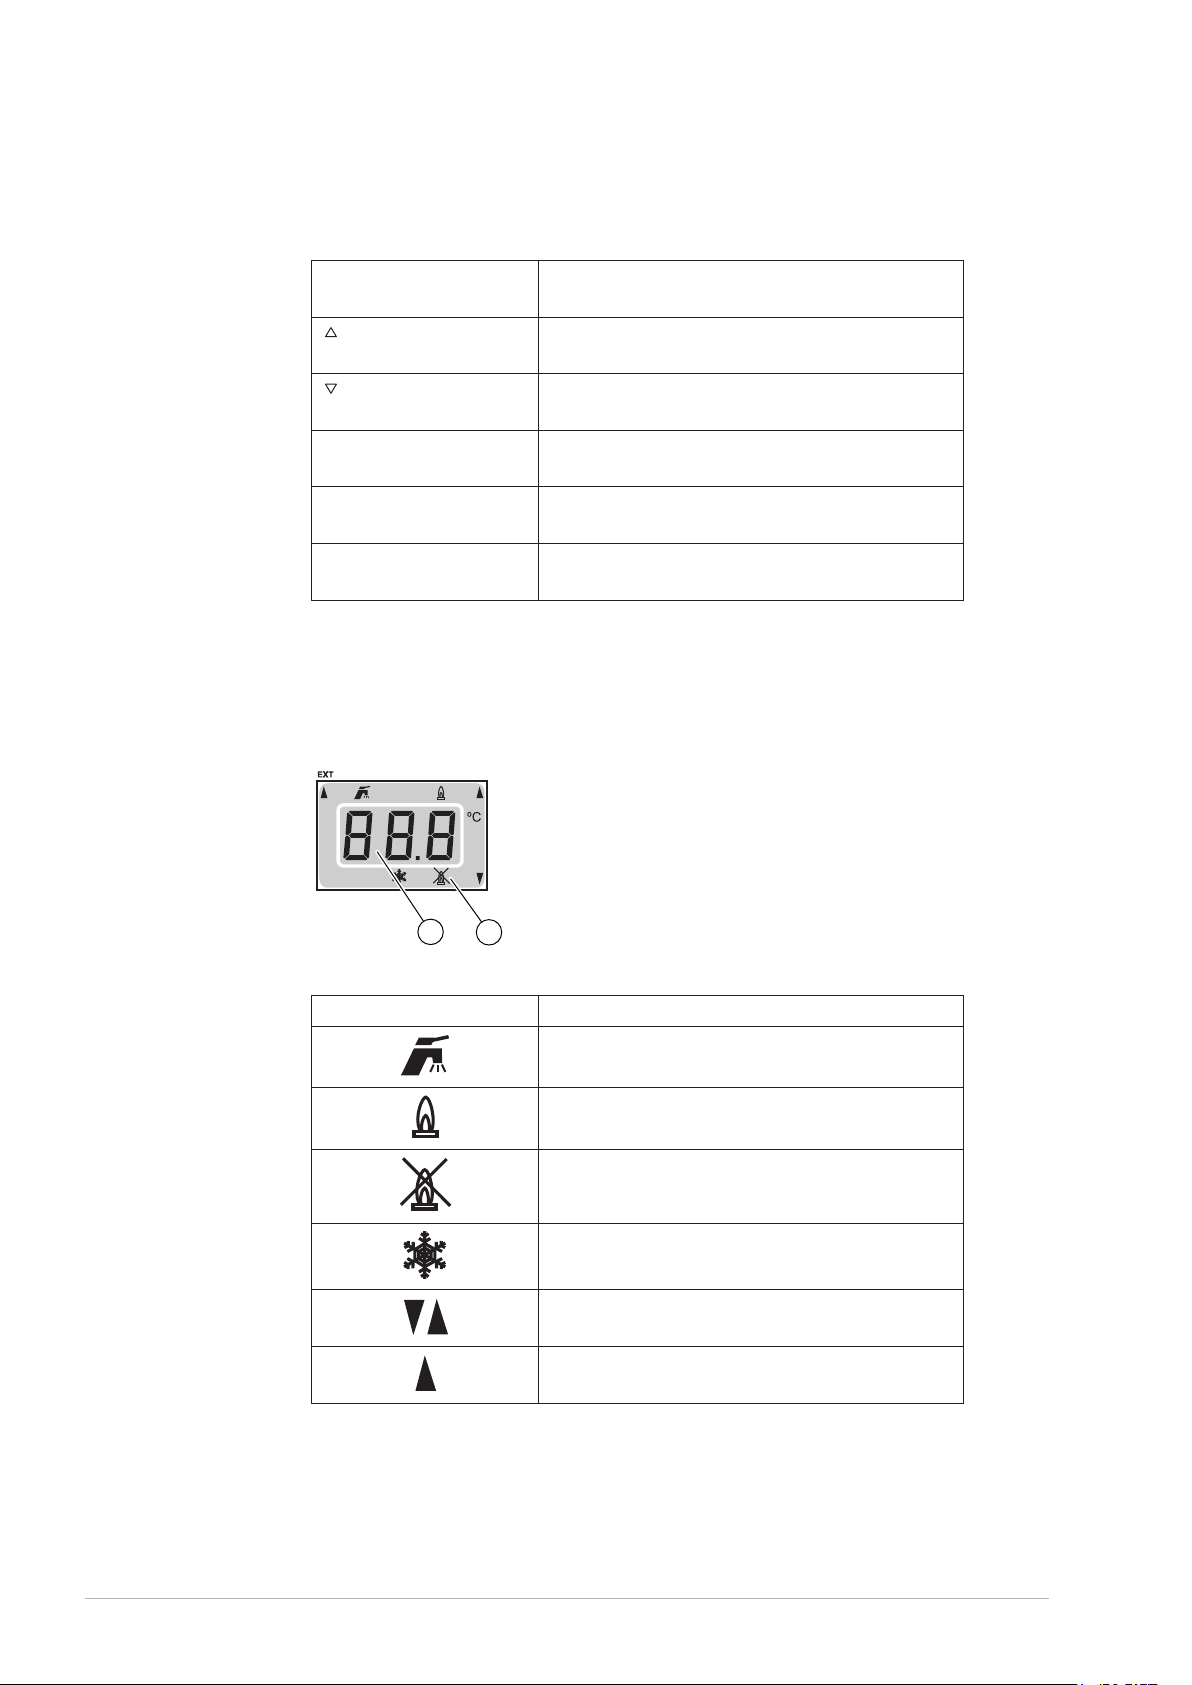
The LCD display shows 7 different symbols around the outer edge of the display and 3
characters in the center of the display. The characters represent parameters.
Fig. LCD display
1. Characters
2. Symbols
The symbols on the display show visual information about the status of the water heater.
Symbol Explanation
Heat demand present
Water heater in operation
Water heater not in operation - ERROR
Frost protection is activated
Scroll through menu
Shown on the right side corners of the display
External ON mode is activated
Shown on the upper left side corner
20 User part
Page 21
The user menu parameters are:
Parameter Description Unit/Value Adjustable Range Default
001
002
003
004 Turn setpoint EXT mode (005)
005
(2)
Turn the water heater on or off.
Setpoint ON mode ºC Yes
Hysteresis ºC Yes
on or off.
Setpoint EXT mode ºC Yes
OFF
ON
ENA
dIS
Yes
Yes
OFF - water heater off (OFF
mode)
ON - water heater on (ON
mode)
40…max setpoint
2…15 10
ENA - Enable
dIS - Disable
40…max. setpoint
(1)
(1)
OFF
65
dIS
70
1 - The maximal setpoint (parameter 207) is factory set at 70. A qualified engineer can modify this value.
2 - Parameter 005 will only be accessible when parameter 004 is set on ENA.
3.2
Status of the water heater
During operation, the display shows the status of the water heater.
3.2.1
Operating modes
The DR-CC has 3 operating modes:
OFF mode (see section 3.2.1.1)
•
ON mode (see section 3.2.1.2)
•
External ON mode (EXT mode) (see section 3.2.1.3)
•
3.2.1.1 OFF mode
Use parameter 001 to switch the water heater to OFF mode.
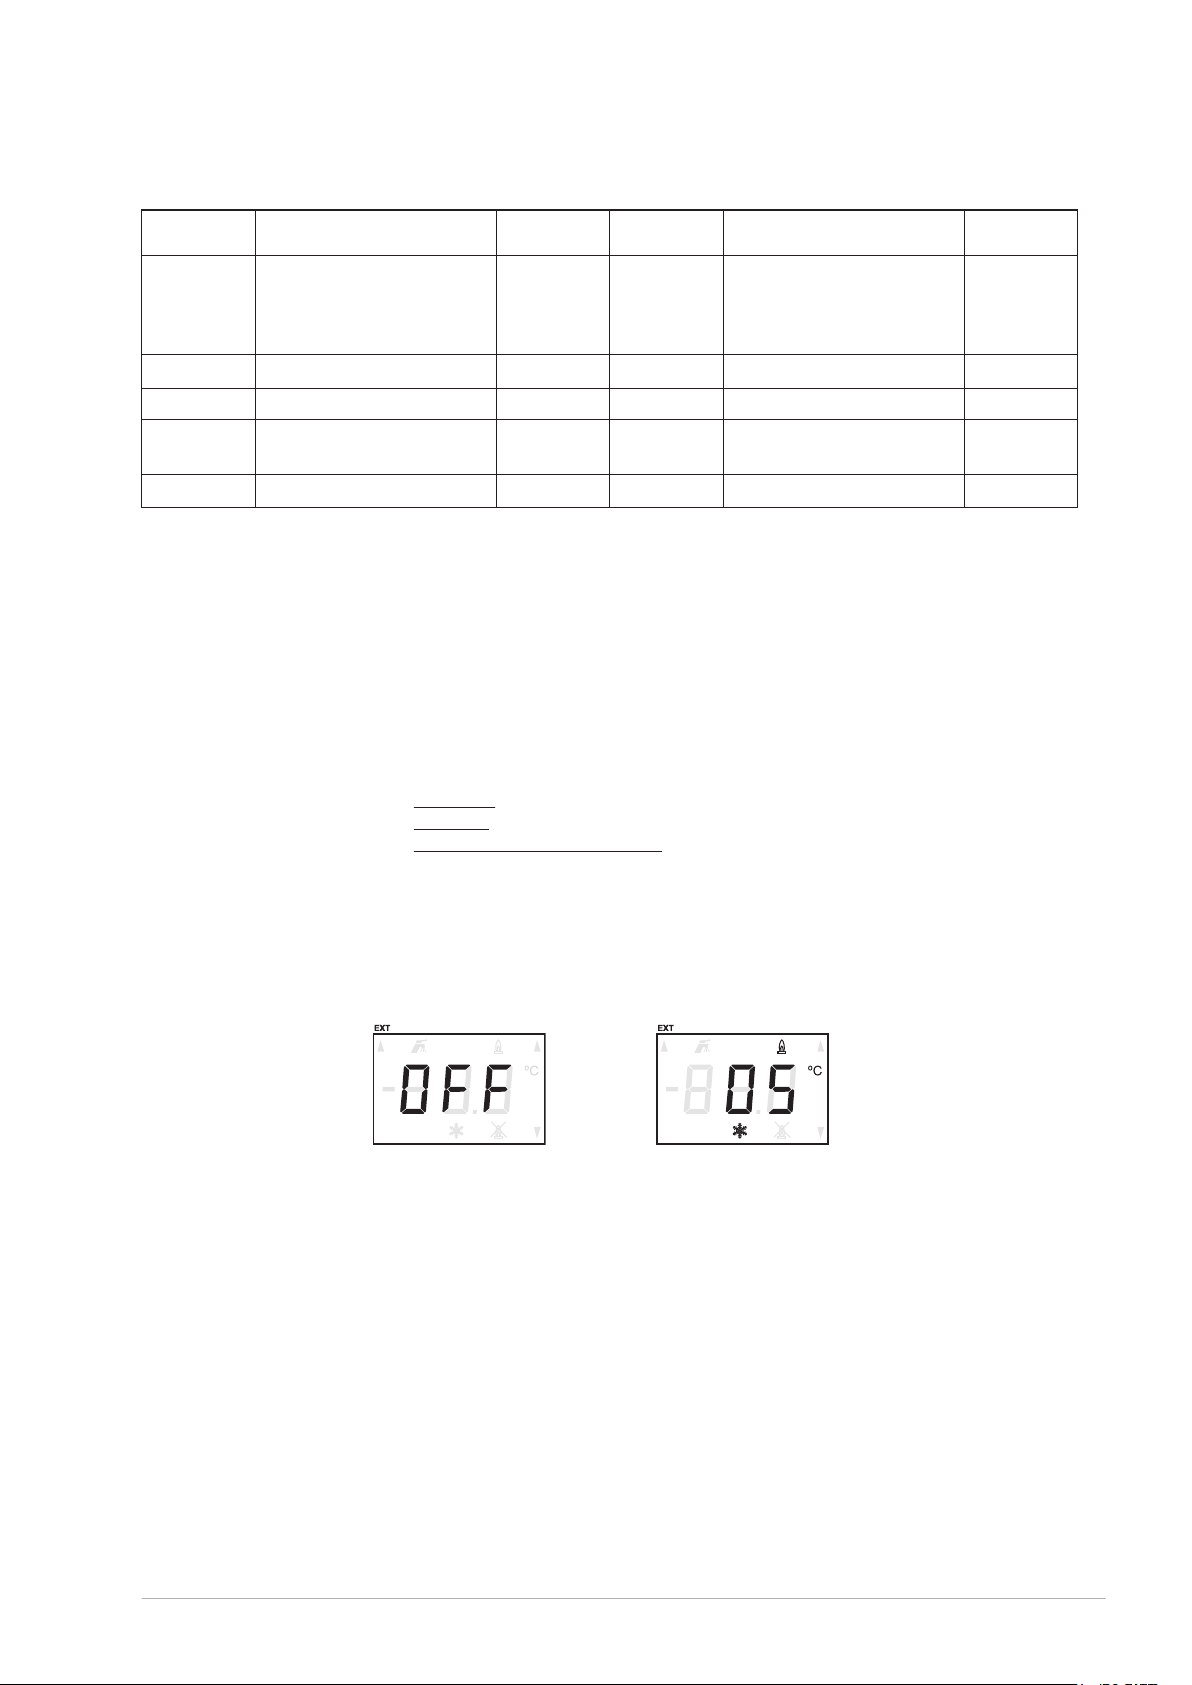
In the OFF mode the water heater is de-activated. The display shows the characters OFF.
Fig. OFF mode display Fig. Frost protection is activated
To prevent that the water in the system freezes, the frost protection is activated when the
water heater is in OFF mode. The frost protection starts when the temperature of the
water drops below 5°C. The display shows the frost protection symbol.The water heater
will heat the water to 20°C and then turns back to OFF mode.
3.2.1.2 ON mode
Use parameter 001 to switch the water heater to ON mode.
In the ON mode the water heater continuously responds to the heat demand.
When the water heater is heating the water, the display on the operator interface
alternately shows two different screens. The first shows the actual temperature, the
second shows the setpoint temperature.
When the water heater is not heating the water, only the actual temperature is visible. The
symbols Heat demand and In operation will not be shown.
0312934_DR-CC_UKUK_V1.0, 2018-03-01 21
Page 22
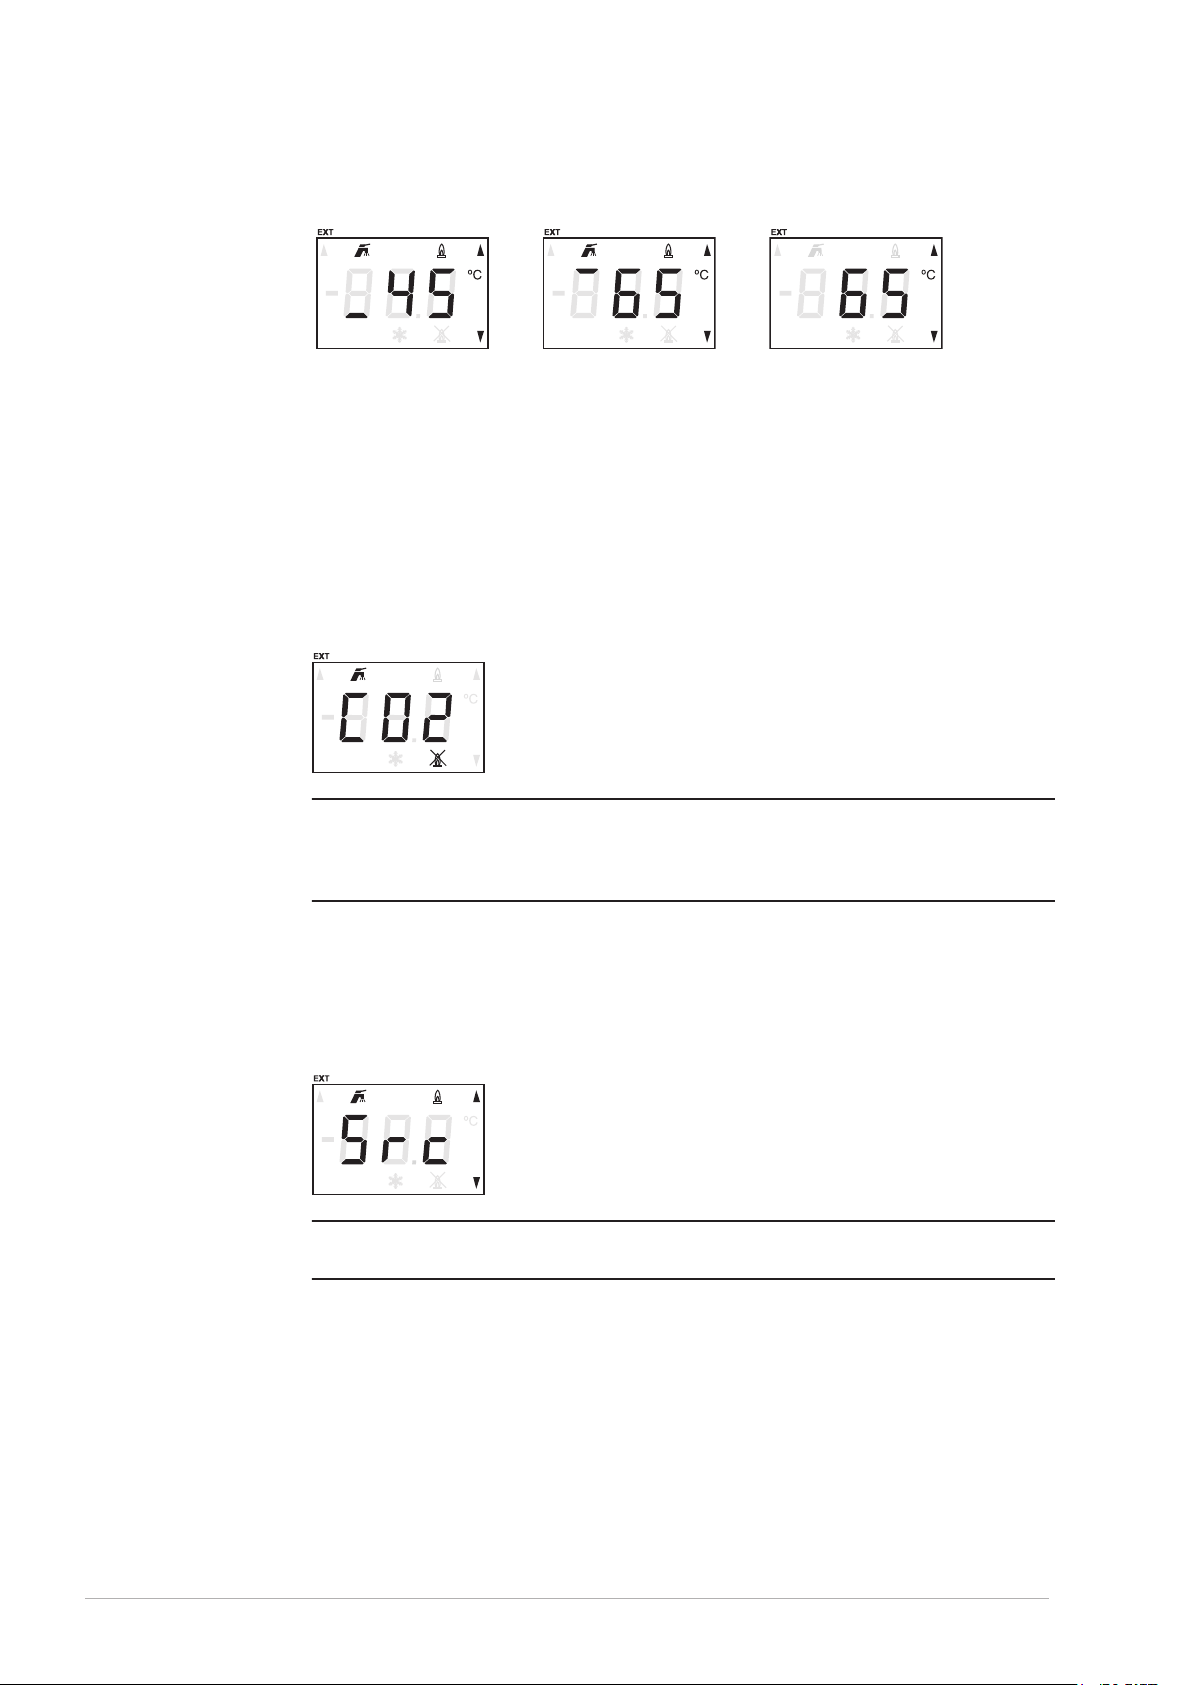
Fig. Actual water
temperature
3.2.1.3 External ON mode
In the external ON mode, the water heater will respond to a heat demand when the relay
switch is closed. Use parameter 004 to switch on the setpoint (parameter 005) of the
external ON mode.
Fig. Setpoint Fig. Standby
3.2.2
3.2.3
n
Error conditions
If there is an error, the display shows an error code. Error codes always have one letter
and two digits.
Fig. Error code display
Note
When the display shows an error code, try to reset the water heater.
Contact your service and maintenance engineer or supplier when the water heater does
not restart or when the display shows the error code again.
Service conditions
When the display shows Src the water heater functions normally but requires periodical
service. Contact your service and maintenance engineer.
Fig. Service required display
Note
Regular maintenance extends the service life of the water heater.
n
22 User part
Page 23
3.2.4 Anode warning
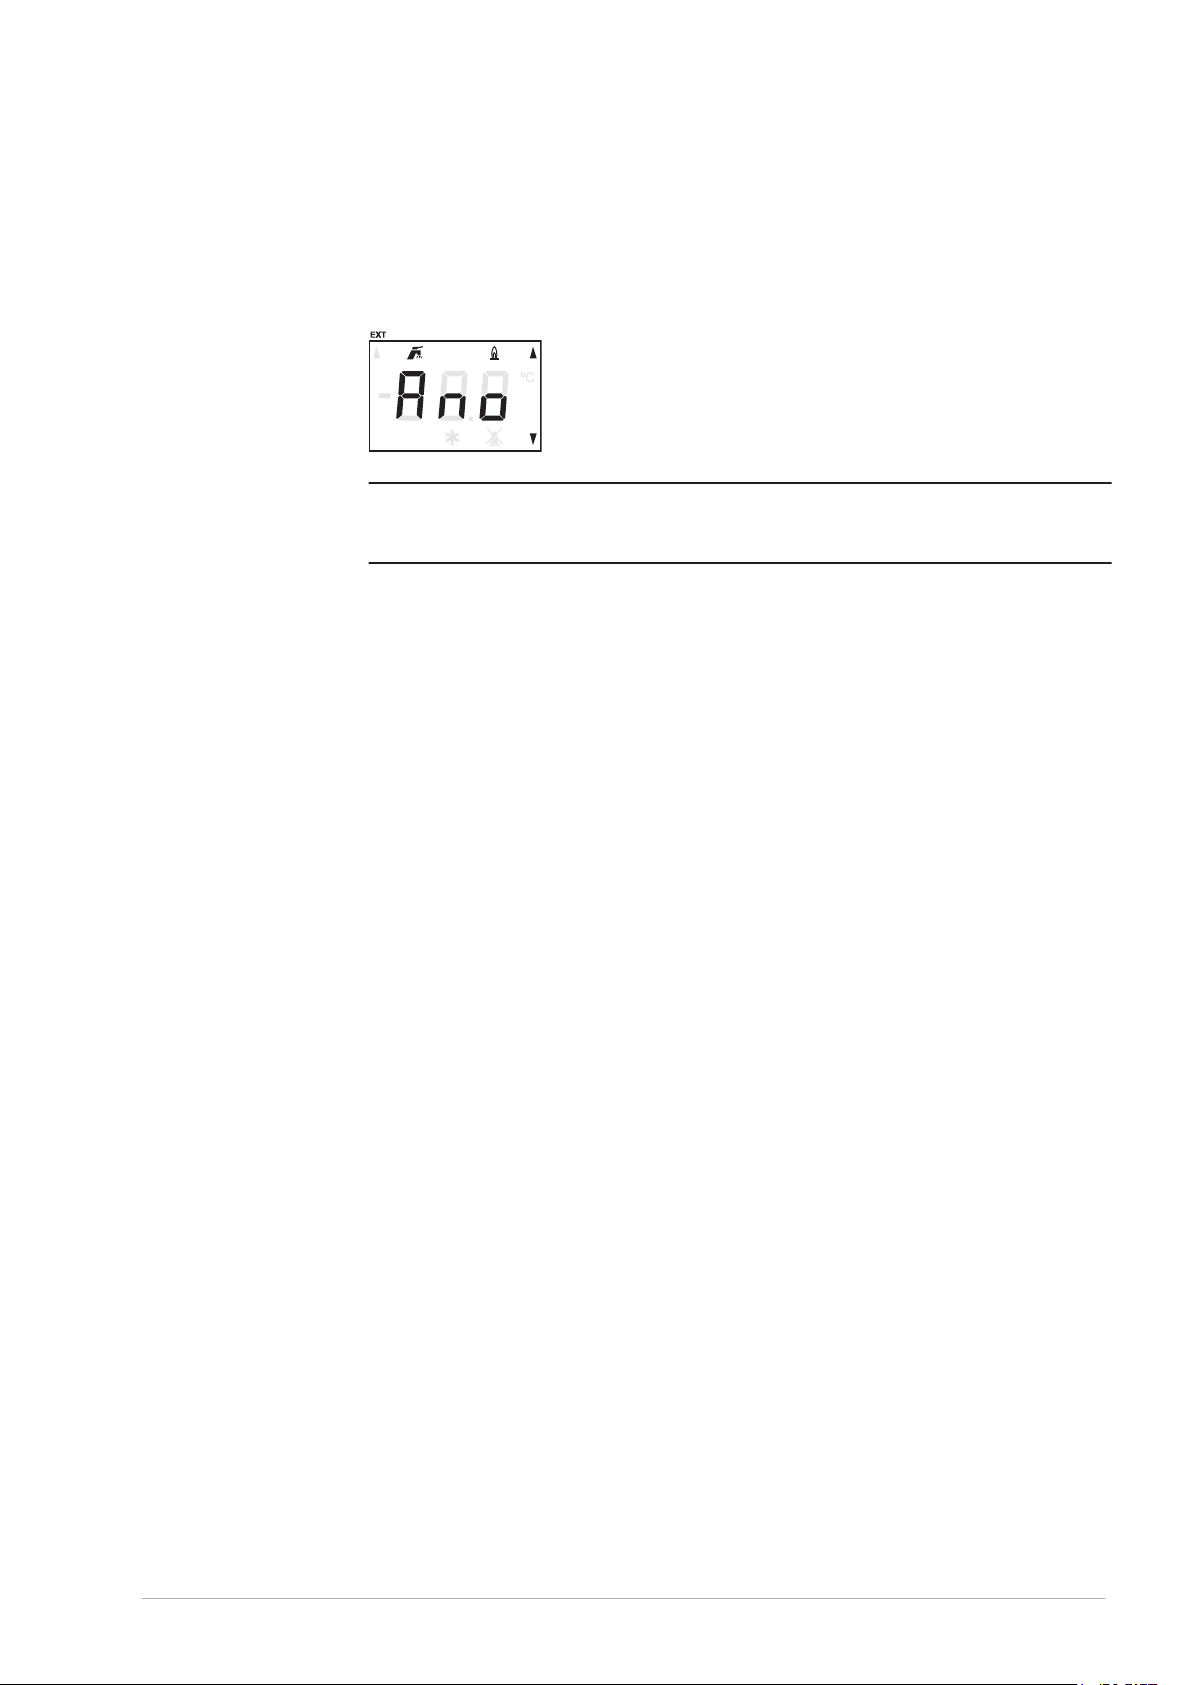
An anode protects the tank against corrosion. When the anode protection is not active, the
display shows Ano. Contact your service and maintenance engineer.
Fig. Anode warning display
Note
n
If you ignore the anode warning, the tank protection cannot be guaranteed. The warranty
will be void.
0312934_DR-CC_UKUK_V1.0, 2018-03-01 23
Page 24

24 User part
Page 25

4 Use
4.1 Set a parameter value
To set a parameter value:
Press [MENU] to access the user menu.
1.
Press [ ] or [ ] to scroll to the concerning parameter, refer to Parameters (see
2.
section 3.1.3).
Press [ENTER] to select.
3.
Use [ ] or [ ] to change the parameter value.
4.
Press [ENTER] to confirm.
a.
Press [RESET] to go back to the main menu.
b.
Press [RESET] to leave the user menu.
5.
4.2 Turn on the water heater
To start the water heater:
Make sure the water heater connects to the mains power supply.
1.
Set the control switch on the side of the water (see section 1) heater to I.
2.
The display will show ini for about 10 seconds.
3.
When the display shows OFF the water heater is ready to use.
4.2.1 Switch to ON mode
To switch to ON mode (see section 3.2.1.2), change parameter 001 to ON, refer to Set a
parameter value (see section 4.1).
4.2.2
Set the water temperature
To change the temperature setpoint:
•
Adjust parameter 002, refer to
Directly from ON mode:
•
Directly use [ ] or [ ] to set the temperature value.
a.
Press [ENTER] to confirm.
b.
Set a parameter value (see section 4.1), or
0312934_DR-CC_UKUK_V1.0, 2018-03-01 25
Page 26

4.3 Turn off the water heater
4.3.1 Turn off for a short period
To turn off the water heater for less than 2 months, change parameter 001 to OFF, refer to
Set a parameter value (see section 4.1).
The water heater will switch to OFF mode (see section 3.2.1.1)and the frost protection is
on.
Caution
The anode protection remains active when the OFF mode is selected.
c
Note
n
If the water heater is in OFF mode for more than 2 months and no water is drained, air
bubbles may be formed in the water heater. This can lead to air in the water pipes.
4.3.2
Isolate from the mains
To isolate the water heater from the mains:
1.
Set parameter 001 to OFF, refer to
Wait 1 minute to make sure that the water heater stopped operating.
2.
Set the control switch to 0.
3.
Disconnect the water heater from the mains by turning the isolator.
4.
4.3.3 Turn off for a long period
When the water heater needs to be turned off for more than 2 months, contact your
service and maintenance engineer to decommission the water heater.
Set a parameter value (see section 4.1).
26 User part
Page 27

Installation, Maintenance and Service
part
0312934_DR-CC_UKUK_V1.0, 2018-03-01 27
Page 28

28 User part
Page 29
5 Introduction
1
3
2
5.1 About the water heater
The DR-CC water heater is intended for heating water for sanitary purposes.
The DR-CC is a condensing gas–fired storage water heater with a fan in the air intake. The
flue gasses transfer their heat to the water through an efficient heat exchanger. The water
heater has a concentric venting connector and can function as an open or as a roomsealed water heater.
5.2
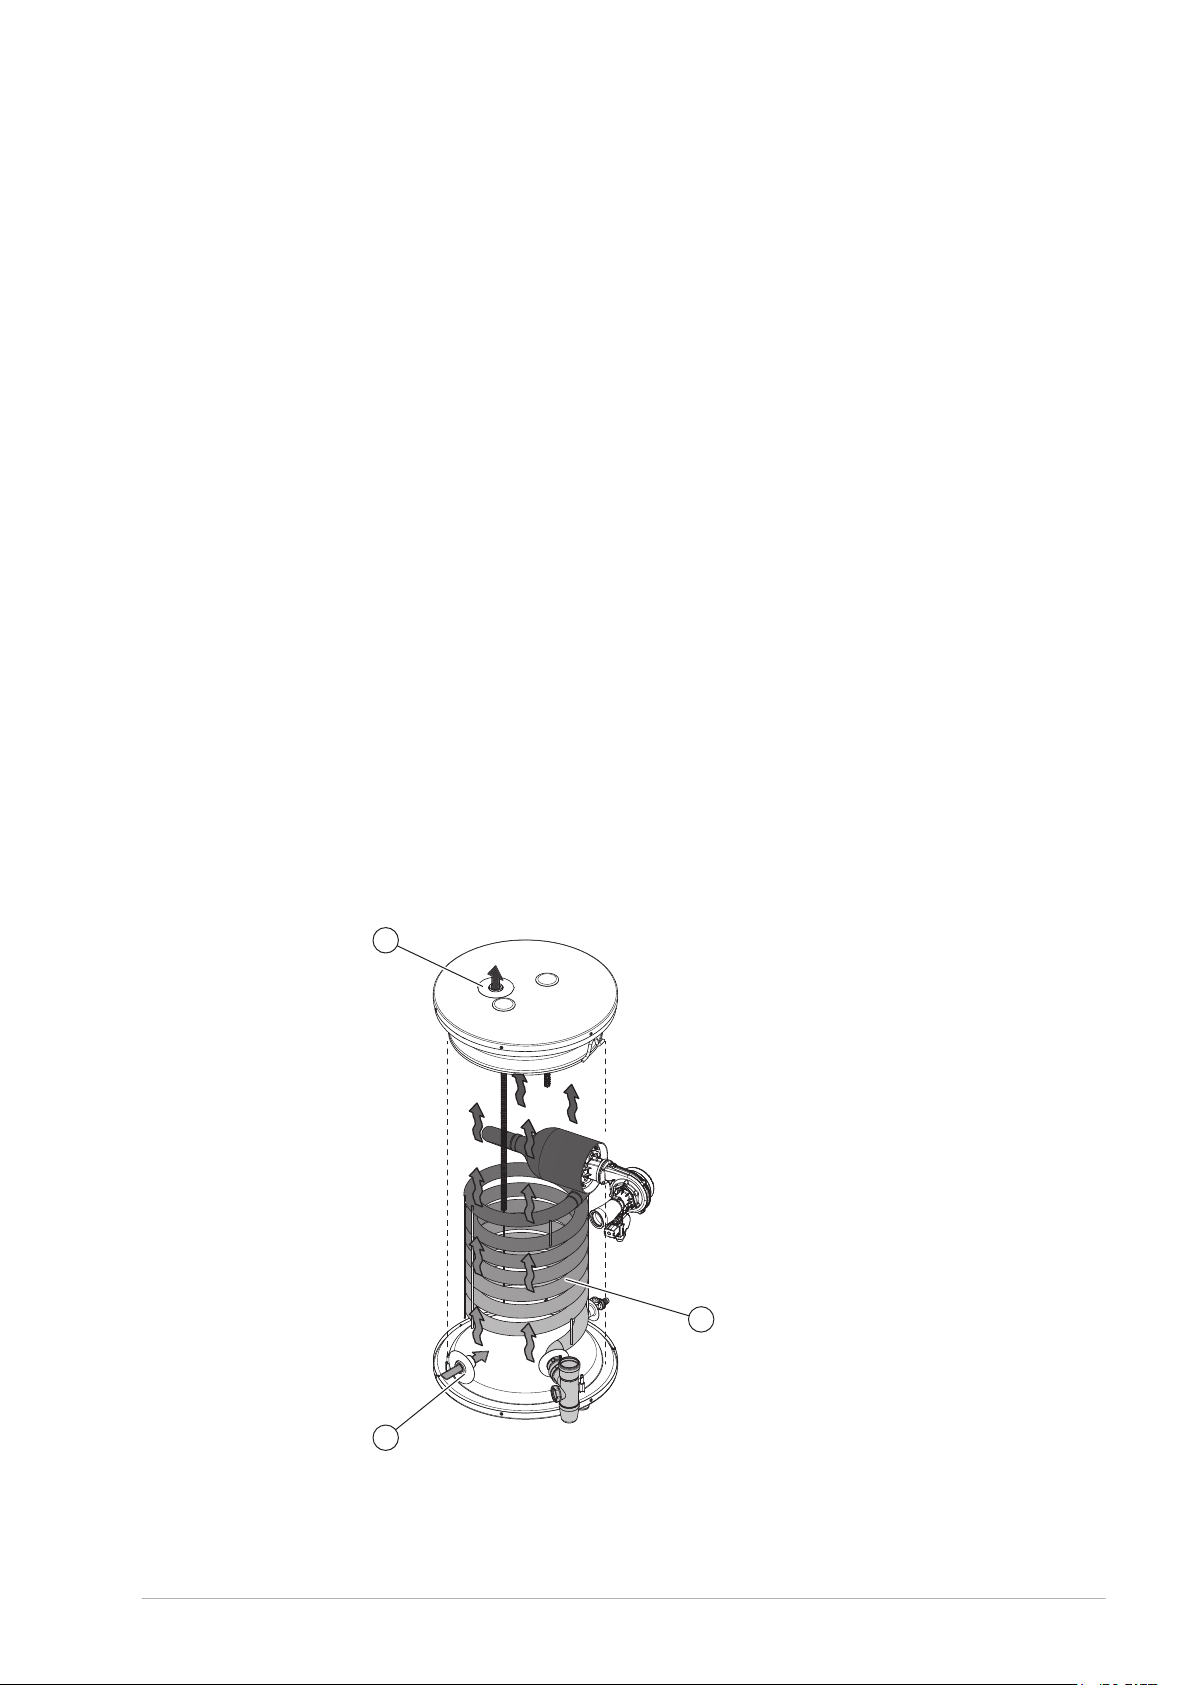
Working principle
Cold water enters the bottom of the tank through the water inlet (1). A heat exchanger (2)
transfers the heat from the flue gasses to the water and the hot water leaves the tank
through the water outlet (3) at the top of the tank. The tank of the water heater has to be
completely filled during operation. The tank at least must remain under mains water
supply pressure at any time. Fresh cold water is immediately added when hot water is
drawn from the water heater. A temperature sensor measures the water temperature.
Fig. DR-CC water heater
1. Water inlet
2. Heat exchanger
3. Water outlet
0312934_DR-CC_UKUK_V1.0, 2018-03-01 29
Page 30

When the temperature is too low, the water heater starts a operating cycle:
The controller detects a "heat demand". The icon "Heat demand present" is shown on
1.
the display of the water heater.
The fan starts pre-purging.
2.
The air proving switch closes when the air pressure differential is sufficient.
3.
The hot surface igniter starts pre-ignition.
4.
The gas control valve opens and the gas/air mixture is ignited.
5.
The water heater heats the water in the tank. The icon "Water heater in operation" is
6.
shown on the display of the water heater.
When the water temperature reaches the setpoint, the heat demand ends and the
7.
controller stops the operating cycle.
The icons "Heat demand present" and "Water heater in operation" on the display turn
off.
The fan starts post-purging.
8.
The operating cycle starts again when a new heat demand is detected.
30 Installation, Maintenance and Service part
Page 31

6 Safety
6.1 Safety instructions
For safety instructions about the use of the water heater, refer to Safety (see section 2) in
the User part of this manual.
Warning
w
Installation, maintenance and service must be carried out by a qualified engineer in
compliance with the general and local regulations imposed by the gas, water and power
supply companies and the fire brigade. The appliance may only be installed in a room that
complies with the requirements stated in national and local ventilation
Warning
Leave the water heater electrically isolated until you are ready to commission it.
regulations.
c
Caution
The water heater may only be manoeuvred in an upright position. After unpacking, make
sure that the water heater is not damaged.
Caution
Use of an incorrect roof or wall-mounted flue terminal can cause the water heater to
malfunction.
Caution
During installation, obey the instructions delivered with the sets of air supply components
and the flue gas discharge components. Make sure that the venting system does not
exceed the maximum number of 45º and 90º bends and the maximum pipe length.
Caution
Make sure that the diameter and length of the gas supply pipe are large enough to supply
sufficient capacity to the water heater.
Caution
Make sure that the condensate drain is connected to the waste water discharge using an
open connection.
Caution
Fill the water heater completely before use. Dry firing will damage the water heater.
Caution
After installation, maintenance or service, you must always check that the appliance is
gas tight and make sure that the gas supply pressure, the CO2 value and the air pressure
differential are correct.
If the gas supply pressure is not correct, contact your mains gas supply company. Do not
use the water heater.
Caution
To prevent that you damage the components of the water heater, make sure that it is
completely stopped operation before you turn off the water heater (see section 4.3). Wait
1 minute after you switch the water heater to OFF mode, before you switch the control
switch to 0.
0312934_DR-CC_UKUK_V1.0, 2018-03-01 31
Page 32
Caution
The anode protection remains active when the water heater is in OFF mode and the
control switch is set to 0.
Note
n
Any leakage from the tank and/or connections can cause damage to the immediate
environment or floors below the level of the boiler room. Install the water heater above a
waste water drain or in a suitable metal leak tray.
The leak tray must have an appropriate waste water drain and must be at least 5 cm
deep with a length and width at least 5 cm greater than the water heater.
6.2 Instructions on the water heater
The water heater has some safety instructions on its cover:
The text "Read the installation instructions before installing the appliance".
•
The text "Read the user instructions before putting the appliance into operation".
•
Also the packaging has some safety instructions:
The text "Read the installation instructions before installing the appliance".
•
The text "Read the user instructions before putting the appliance into operation".
•
The text "The appliance may only be installed in a room that meets the required
•
ventilation regulations".
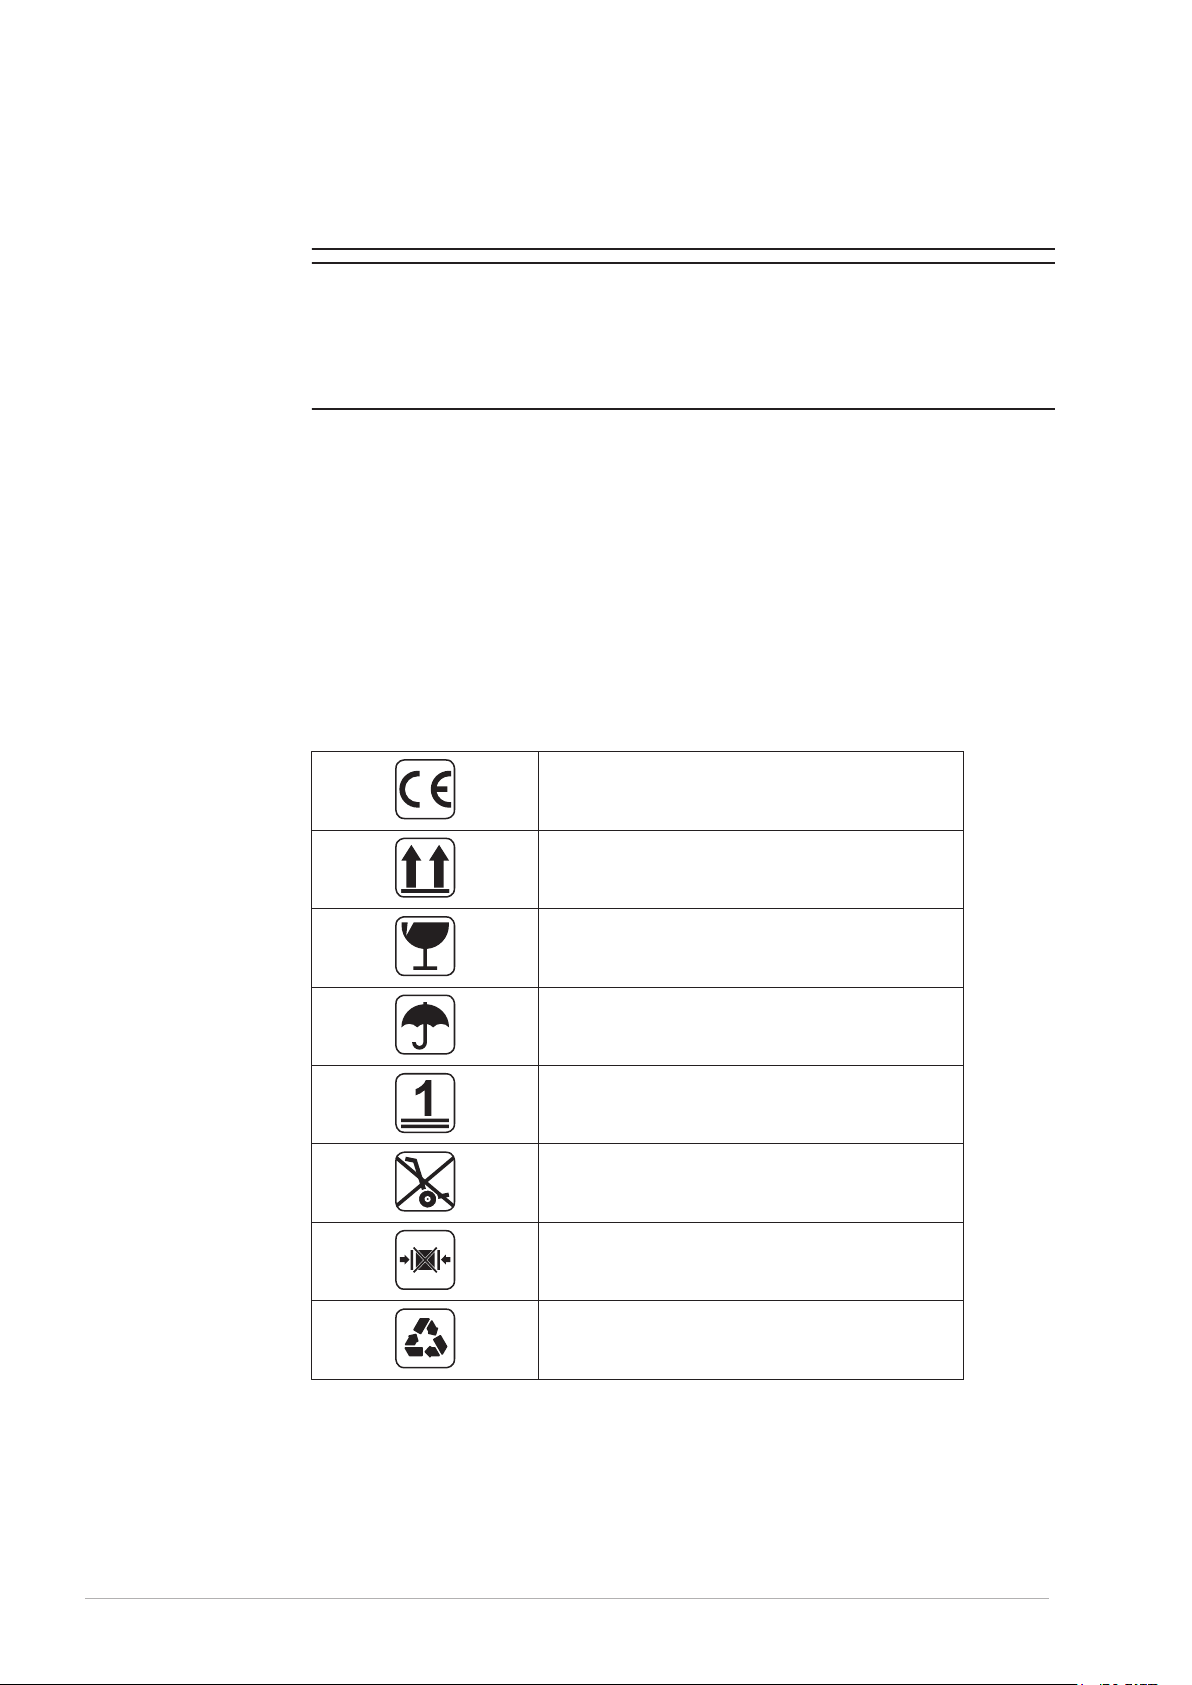
Some safety pictograms:
•
CE approved
this way up
fragile
keep dry
maximum stacking height is 1
do not use a trolley
do not use a clamp truck
recycled packaging
32 Installation, Maintenance and Service part
Page 33
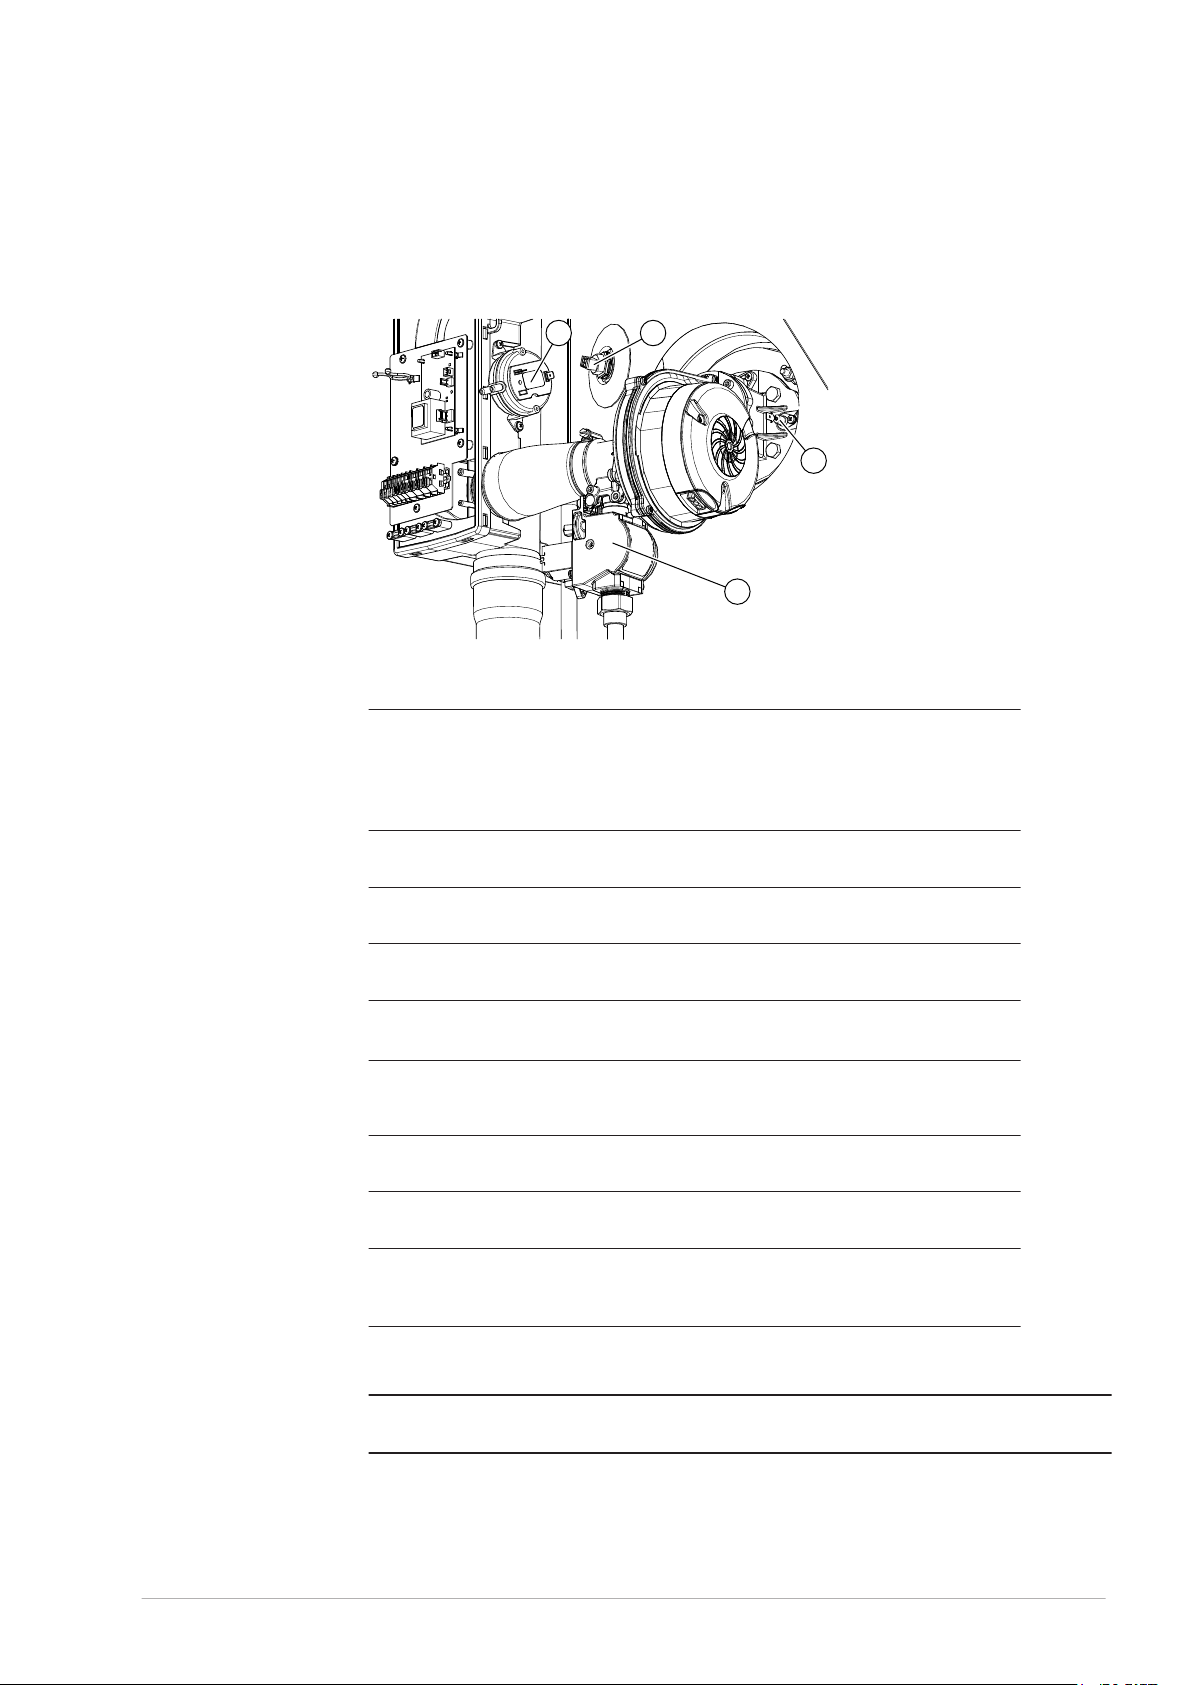
6.3 Safety devices
1
4
2
3
Fig. Safety devices
Safety devices of the water heater:
1. Temperature
sensor
2. Gas control valve
3. Air proving
switch
4. Flame probe
Temperature
sensor (1)
Gas control valve (2) The gas control valve controls the gas supply to
Air proving switch (3) The air proving switch guarantees the air supply
Flame probe (4) The flame probe detects if there is a flame in the
The water heater controls the water temperature
using a temperature sensor:
T < 5 ºC, frost protection is activated.
•
T > 88 ºC, max. temperature.
•
T > 93 ºC, for extra safety.
•
the burner.
differential during pre-purging.
burner.
Safety devices of the installation:
Expansion vessel The expansion vessel stores temporarily expansion
water to keep the pressure in the installation at the
right level.
Expansion valve The expansion valve prevents excessive pressure
in the tank of the water heater.
Pressure-reducing valve The pressure-reducing valve reduces the water
mains pressure, if necessary.
Temperature and
pressure relief valve
(T&P valve)
(1)
The T&P valve prevents excessive pressure and
temperature in the tank.
1 - All installations have a T&P valve connection. A T&P valve is mandatory for unvented
installations.
Note
This manual only discusses unvented installations.
n
0312934_DR-CC_UKUK_V1.0, 2018-03-01 33
Page 34
6.4 Environmental aspects
6.4.1 Recycling
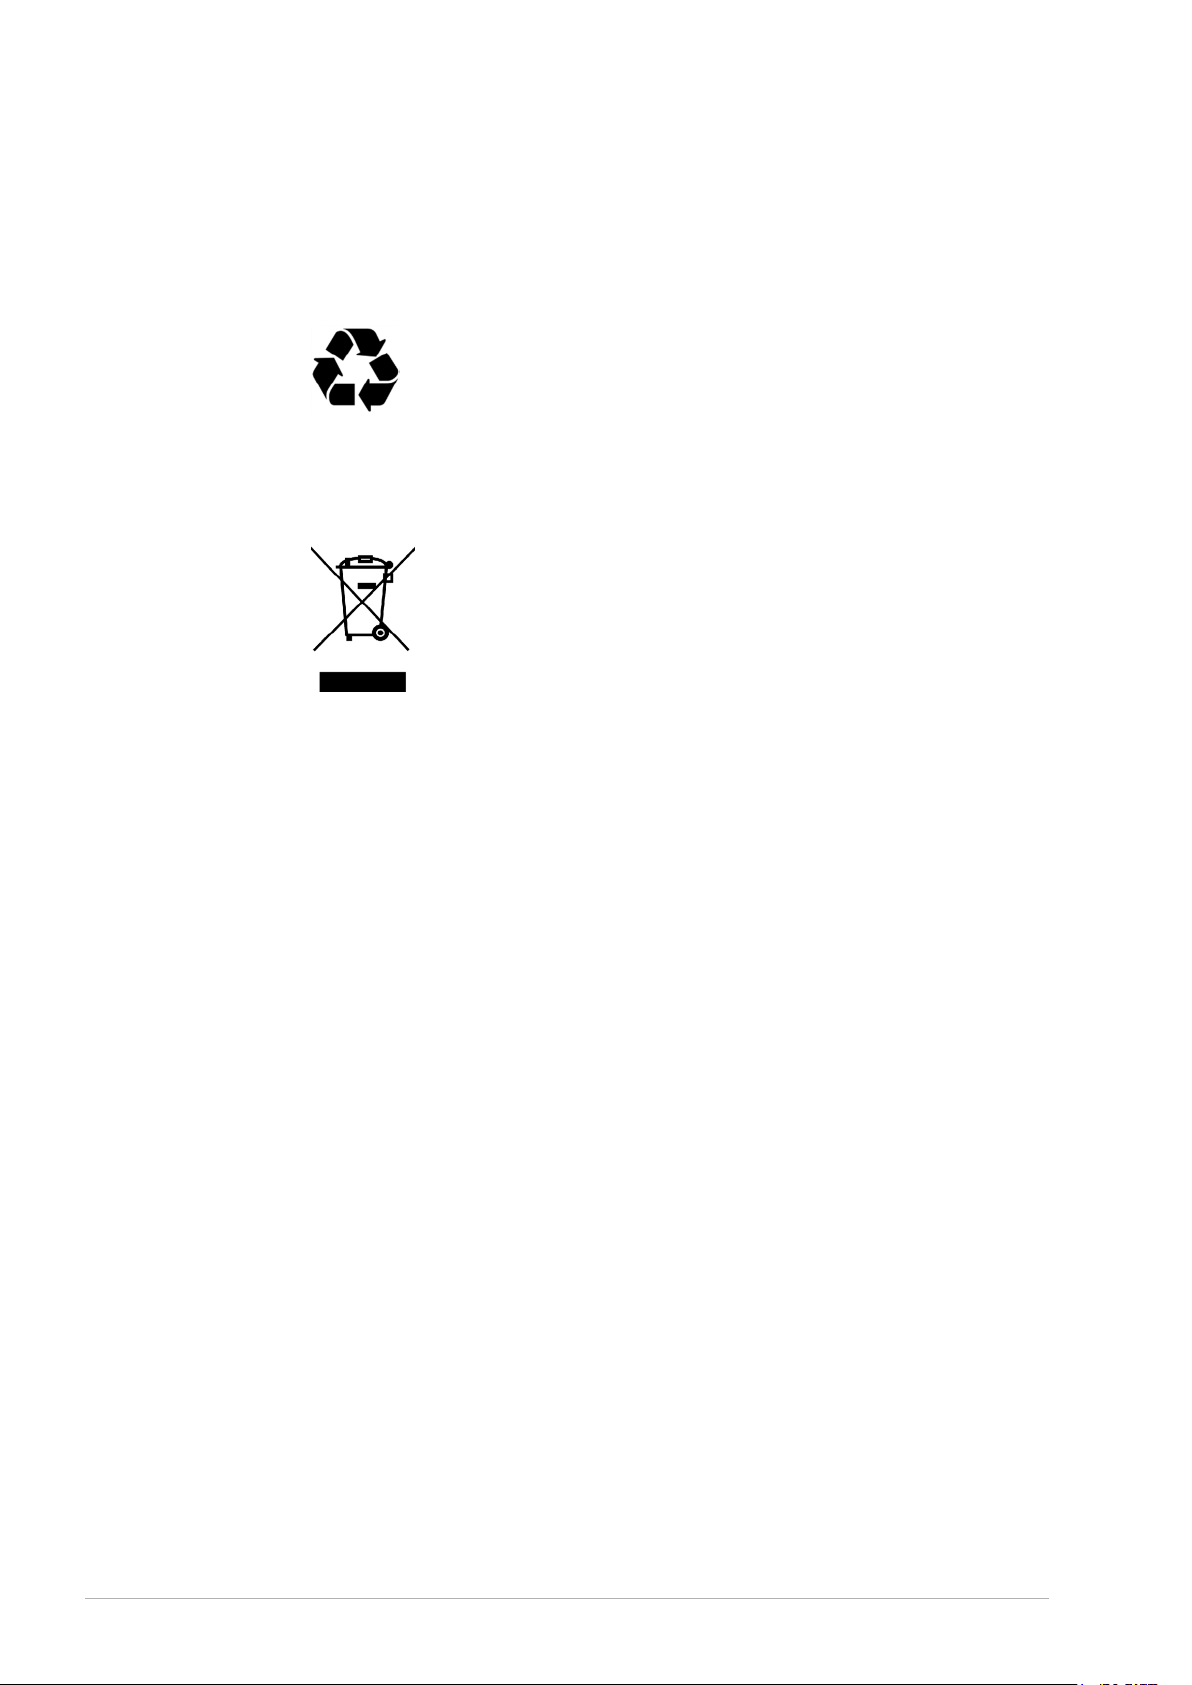
The packaging material is environmentally friendly, recyclable and relatively easy to
discard.
6.4.2
Disposal
Old end-of-life appliances contain materials that need to be recycled. When you discard
devices at the end of their service life, you must obey local legislation related to waste
disposal.
Never discard your old device together with regular waste. Put the device into a municipal
waste collection depot for electrical and electronic equipment. If necessary, ask your
supplier or your service and maintenance engineer for advice.
34 Installation, Maintenance and Service part
Page 35
7 Water heater
1
5
4
3
2
6
7
8
9
12
10
11
13
14
7.1 Structure of the water heater
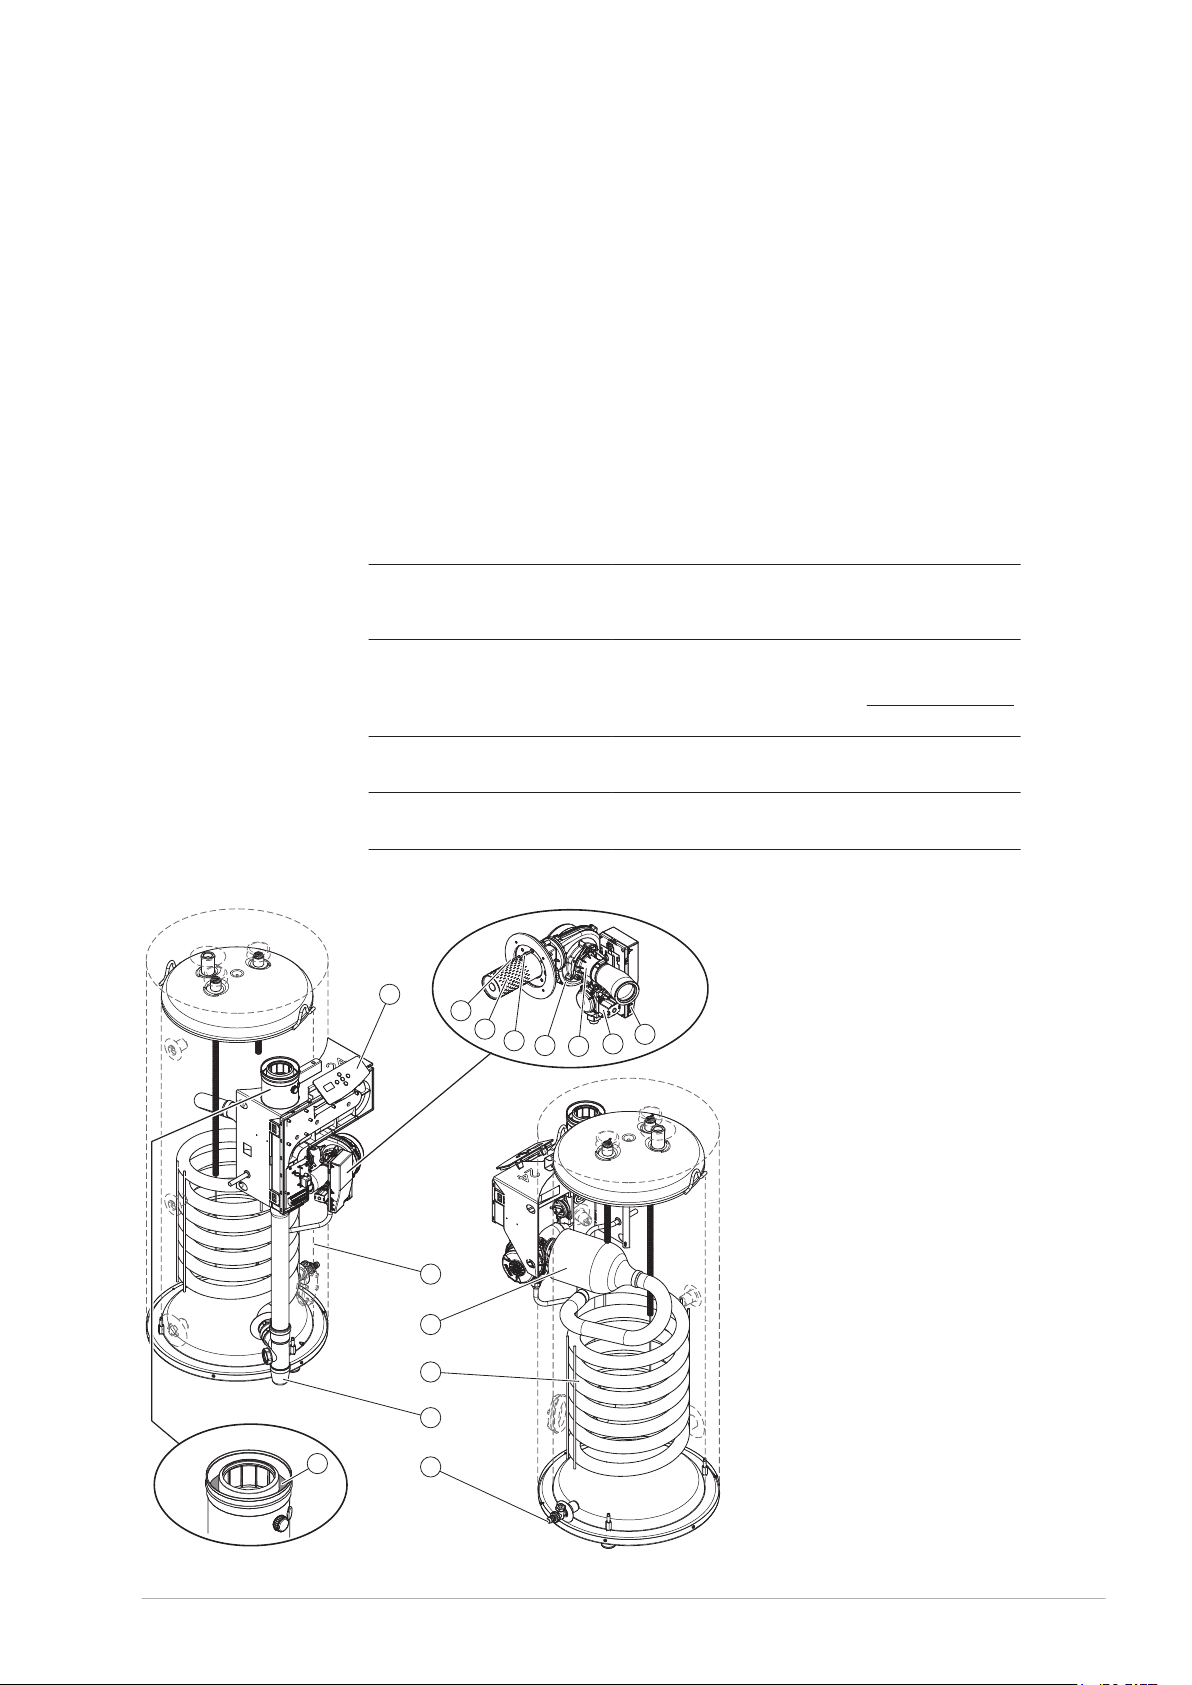
The water heater has the following main components:
Controller (8) The controller monitors and manages all internal
processes of the water heater for a safe
operation.
Operator interface (1) To control the water heater and to verify the
status, the operator interface has 5 buttons and
a 3-character display. Refer to Operator interface
(see section 3.1).
Tank (9) The water is stored and heated up in the tank.
Burner engine (2-8) The burner engine ignites the air and gas
mixture to heat up the water.
Fig. Components water heater
1. Operator interface
2. Flame rod
3. Burner
4. Hot surface igniter
5. Fan
6. Venturi
7. Gas control valve
8. Controller
9. Tank
10. Combustion chamber
11. Heat exchanger
12. Condensate drain
13. Drain tap
14. Air inlet screen
0312934_DR-CC_UKUK_V1.0, 2018-03-01 35
Page 36

36 Installation, Maintenance and Service part
Page 37

8 Installation
Warning
w
c
The installation must be done by a qualified person, in compliance with general and local
applicable regulations.
Caution
The water heater may not be used in rooms where chemical substances are stored or
used because of the risk of explosion and corrosion of the water heater. Some
propellants, bleaching agents and degreasing agents etc. disperse of explosive vapors
and/or cause accelerated corrosion. If the water heater is used in a room where such
substances are stored or used, the warranty will be void.
For more safety instructions, refer to Safety instructions (see section 6.1).
8.1
8.2
Packaging
Hamworthy recommends to unpack the water heater at or near its intended location.
Remove the packaging material carefully to prevent damage to the water heater.
Conditions
The water heater is suitable for room-sealed and for open combustion:
For room-sealed combustion, the air inlet does not depend on the installation site.
•
For open combustion, you must comply with the local applicable directives and
•
ventilation regulations for open water heaters.
8.2.1 Ambient conditions
The installation site must be frost-free. If necessary, adjust the installation site to keep it
frost-free.
Make sure that the ambient conditions are correct to prevent malfunction of the electronics
in the water heater.
Air humidity and ambient temperature
Air humidity Max. 93% RH at + 25 ºC
Ambient temperature Functionality: 0 < T < 40 ºC
8.2.2 Maximum floor load
Refer to the general and electric specifications in the appendices (see section 13) to make
sure that the maximum floor load is sufficient for the weight of the water heater.
0312934_DR-CC_UKUK_V1.0, 2018-03-01 37
Page 38
8.2.3 Water composition
The water must comply with the regulations for drinking water for human consumption.
Water composition
Hardness
(alkaline earth ions)
Conductivity > 125 µS/cm
Acidity (pH value) 7.0 < pH value < 9.5
Note
n
If the water specifications differ from the specifications in the table, the tank protection
cannot be guaranteed, refer to Warranty.
> 1.00 mmol/l:
German hardness > 5.6° dH
•
French hardness > 10.0° fH
•
English hardness > 7.0° eH
•
CaCO3 > 100 mg/l
•
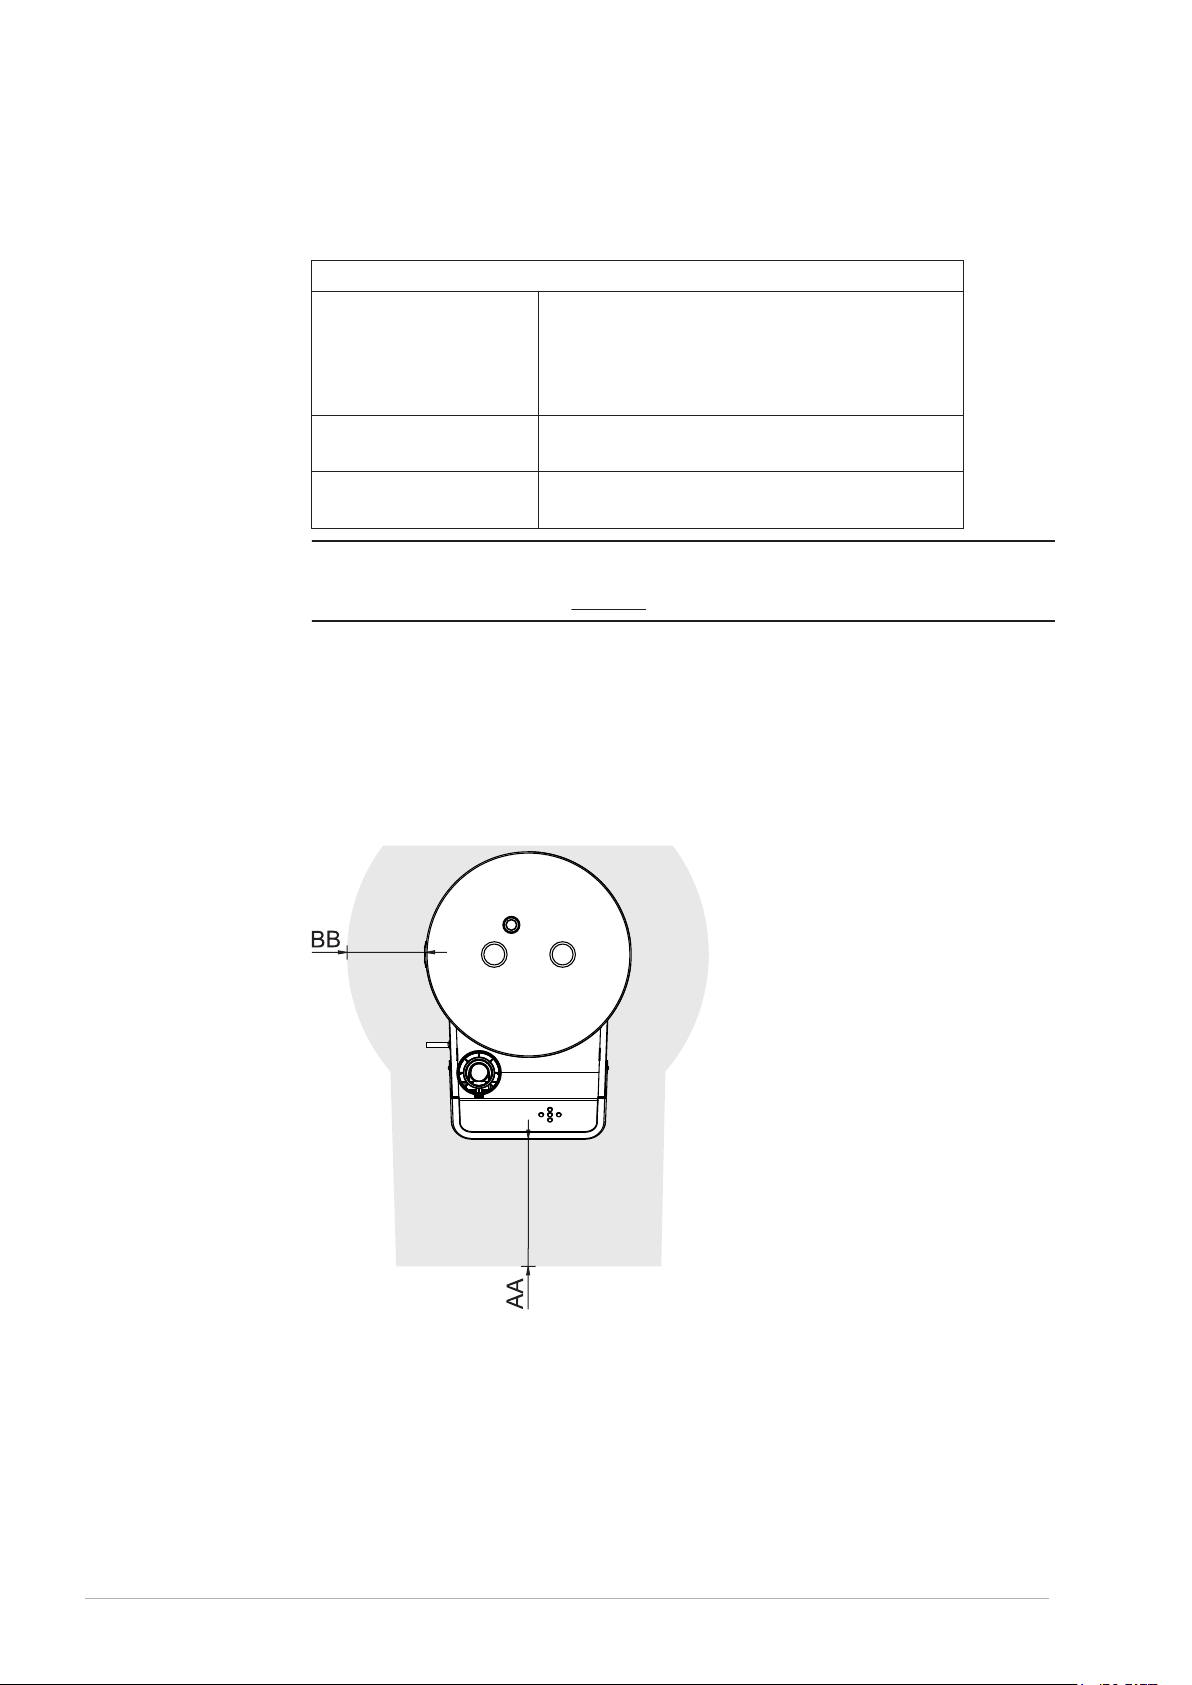
8.2.4
Working clearances
Make sure that there is sufficient clearance to access the water heater:
100 cm in front of the water heater (AA).
•
50 cm at the left and right side of the water heater (BB).
•
100 cm at the top of the water heater.
•
Fig. Working clearances
8.2.5
38 Installation, Maintenance and Service part
Level the water heater
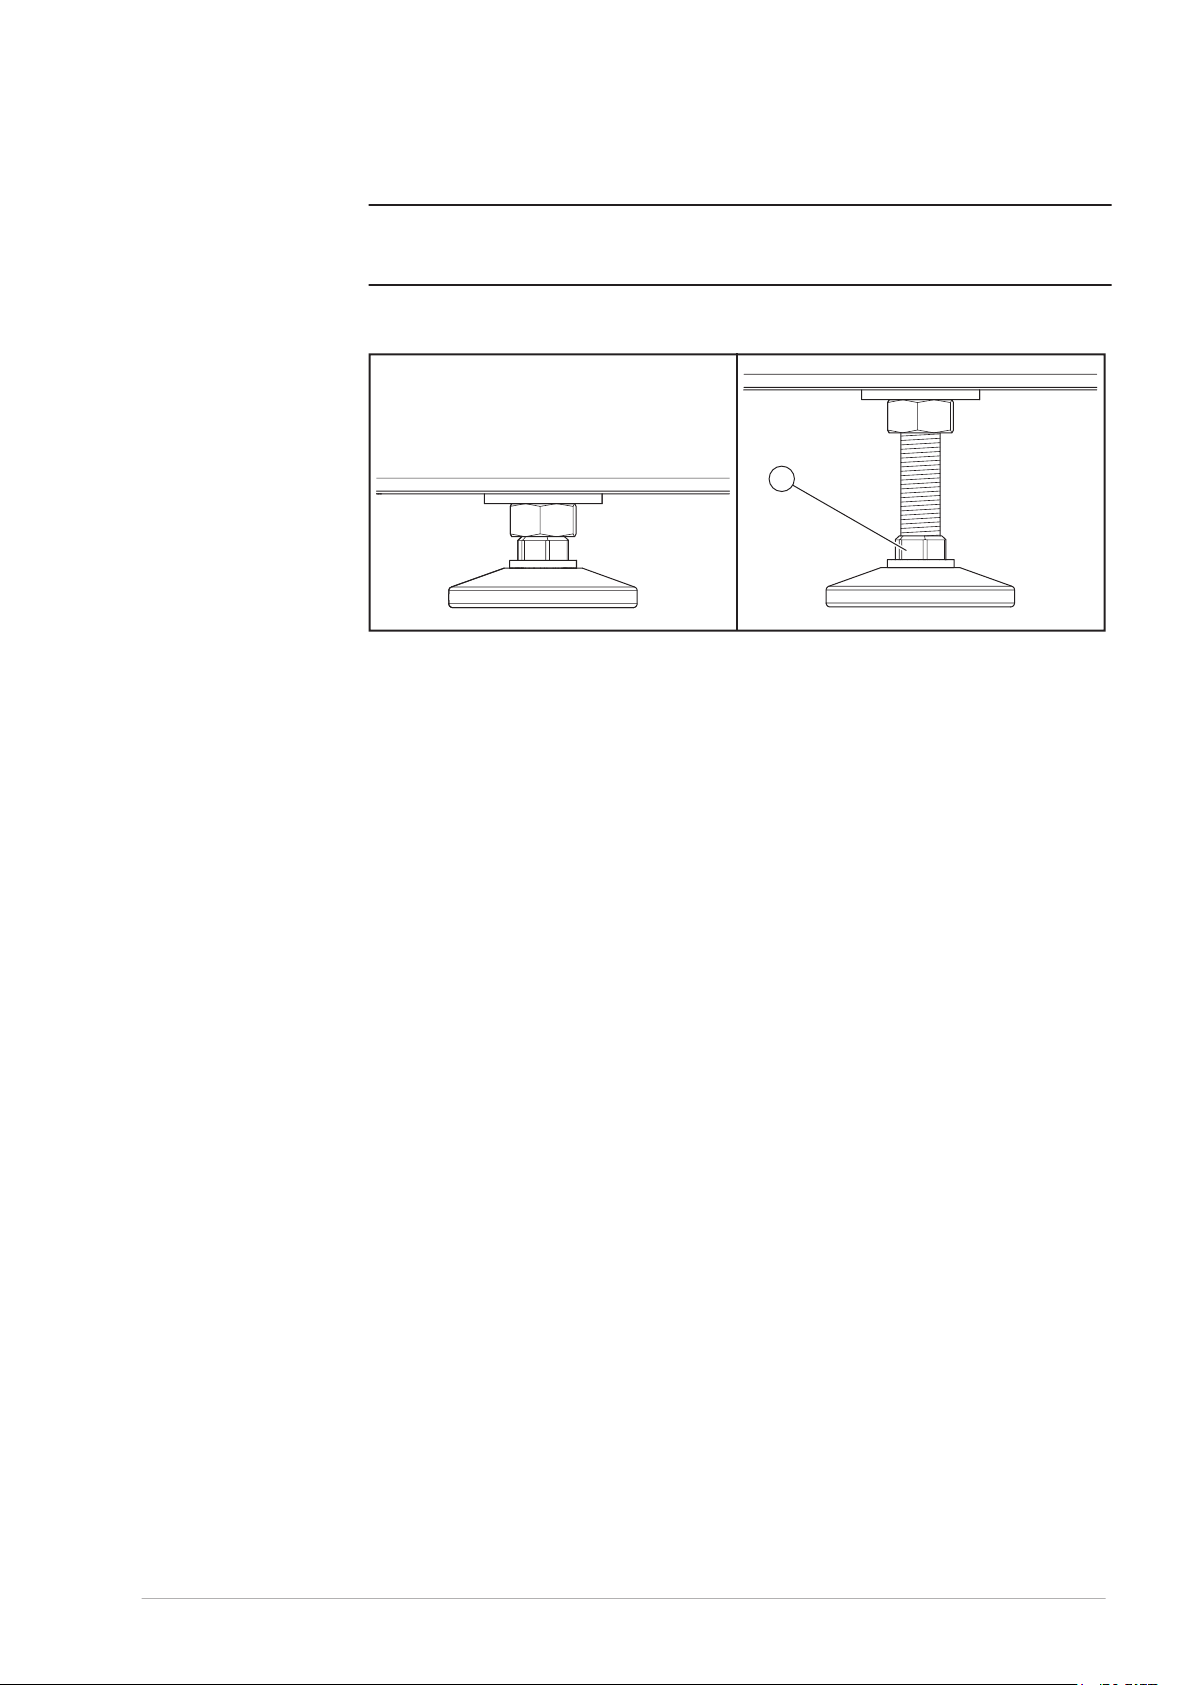
Make sure that the water heater is level, before installation:
Use a wrench to turn the nut (1) on the adjustable leg clockwise to move the water
•
heater up.
Use a wrench to turn the nut (1) on the adjustable leg anticlockwise to move the
•
water heater down.
Page 39
1
n
The water heater can move up maximal 20 mm.
Note
Make sure that the working clearance at the top of the water heater does not become
smaller than 100 cm.
Fig. Adjustable leg water heater
0312934_DR-CC_UKUK_V1.0, 2018-03-01 39
Page 40
8.3 Installation diagram
Note
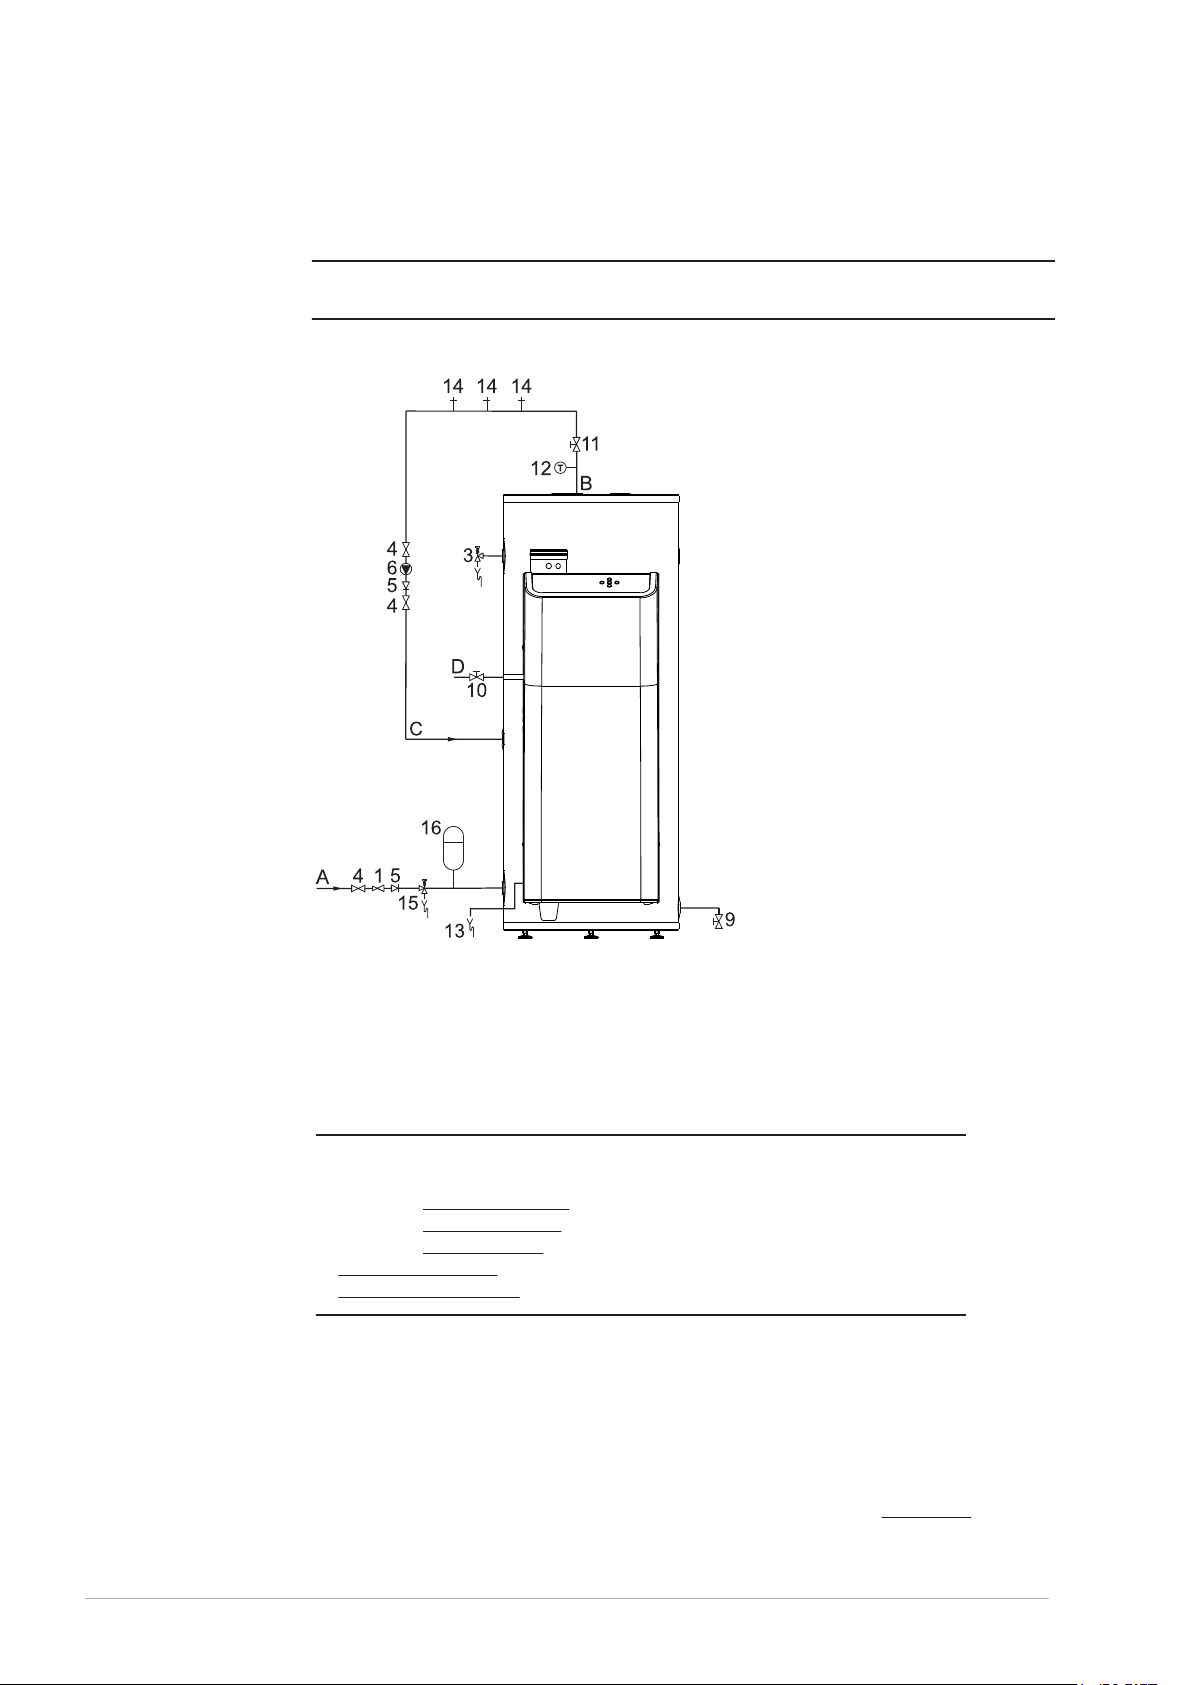
This manual only discusses unvented installations.
n
Fig. Installation diagram
1. Pressure relief valve
(mandatory if the
mains water
pressure is too high)
3. T&P valve
4. Stop valve
(recommended)
5. Non-return valve
6. Circulation pump
(optional)
9. Drain valve
10. Manual gas valve
11. Service stop valve
(recommended)
12. Temperature gauge
(optional)
13. Condensate drain
14. Draw-off points
15. Expansion valve
16. Expansion vessel
Note
n
Use this installation diagram when you:
install the water connections (see section 8.4)
•
install the condensate drain (see section 8.5)
•
install the gas connection (see section 8.6)
•
fill the water heater (see section 8.9.1)
•
drain the water heater (see section 8.10.2)
•
8.4 Water connections
8.4.1 Cold water connection
Install the cold water connection:
Install an approved stop valve (4), as required by the applicable regulations.
1.
A. Cold water supply
B. Hot water outlet
C. Circulation pipe
D. Gas supply
40 Installation, Maintenance and Service part
Page 41

Install an approved pressure reducing valve (1) to prevent that the pressure in the
2.
cold water supply pipe exceeds the maximum working pressure of the tank, 8 bar.
Refer to the Technical details.
Install a non-return valve (5).
3.
Install an expansion valve (15).
4.
Connect the overflow connection of the expansion valve, to an open waste water
5.
pipe.
Install an expansion vessel (16).
6.
8.4.2 Hot water connection
Note
Insulate long hot water pipes to prevent unnecessary energy loss.
n
Install the hot water connection:
Install a stop valve (11) in the hot water outlet pipe for service reasons.
1.
If applicable, install a temperature gauge (12).
2.
Install a T&P valve (3).
3.
8.4.3 Circulation connection
Install a circulation pump when an immediate flow of hot water at draw-off points is
required. This improves comfort and reduces water wastage.
Note
n
Use the special connection for the circulation pipe on the water heater for a more efficient
use of the water heater.
Note
Make sure that the pump has the correct capacity for the length and resistance of the
circulation system.
Install a circulation pump:
Install a circulation pump (6).
1.
Install a non-return valve (5) after the circulation pump to make sure that the
2.
direction of circulation is guaranteed.
Install a stop valve (4) before the circulation pump.
3.
Install a stop valve (4) after the non-return valve.
4.
Connect the circulation pipe.
5.
8.5 Condensate drain
Caution
c
When the condensate drain is not connected to the waste water discharge by an open
connection, this can cause faults.
Caution
Do not change the condensate drain or cause any blockage in the condensate drain.
Install the condensate drain:
Install a drain pipe to the condense drain (13) for condensate drainage.
1.
Make sure that the slope of the drain pipe is 5 mm/m.
2.
Connect the drain pipe through an open connection to the waste water discharge.
3.
8.6 Gas connection
Caution
c
0312934_DR-CC_UKUK_V1.0, 2018-03-01 41
Make sure that the gas supply pipe has the correct diameter and length to supply
sufficient capacity to the water heater.
Page 42
Caution
Make sure that the gas supply pipe is clean. Contamination in the pipe can cause damage
to the gas control valve, during operation.
Caution
Install the manual gas valve on a spot accessible for the user.
Install the gas connection:
Install a manual gas valve (10) in the gas supply pipe.
1.
Make sure that the gas pipe is clean before use. If necessary, remove the
2.
contamination from the pipe.
Close the manual gas valve.
3.
Install the gas supply pipe to the gas control valve.
4.
Make sure that there are no gas leaks.
5.
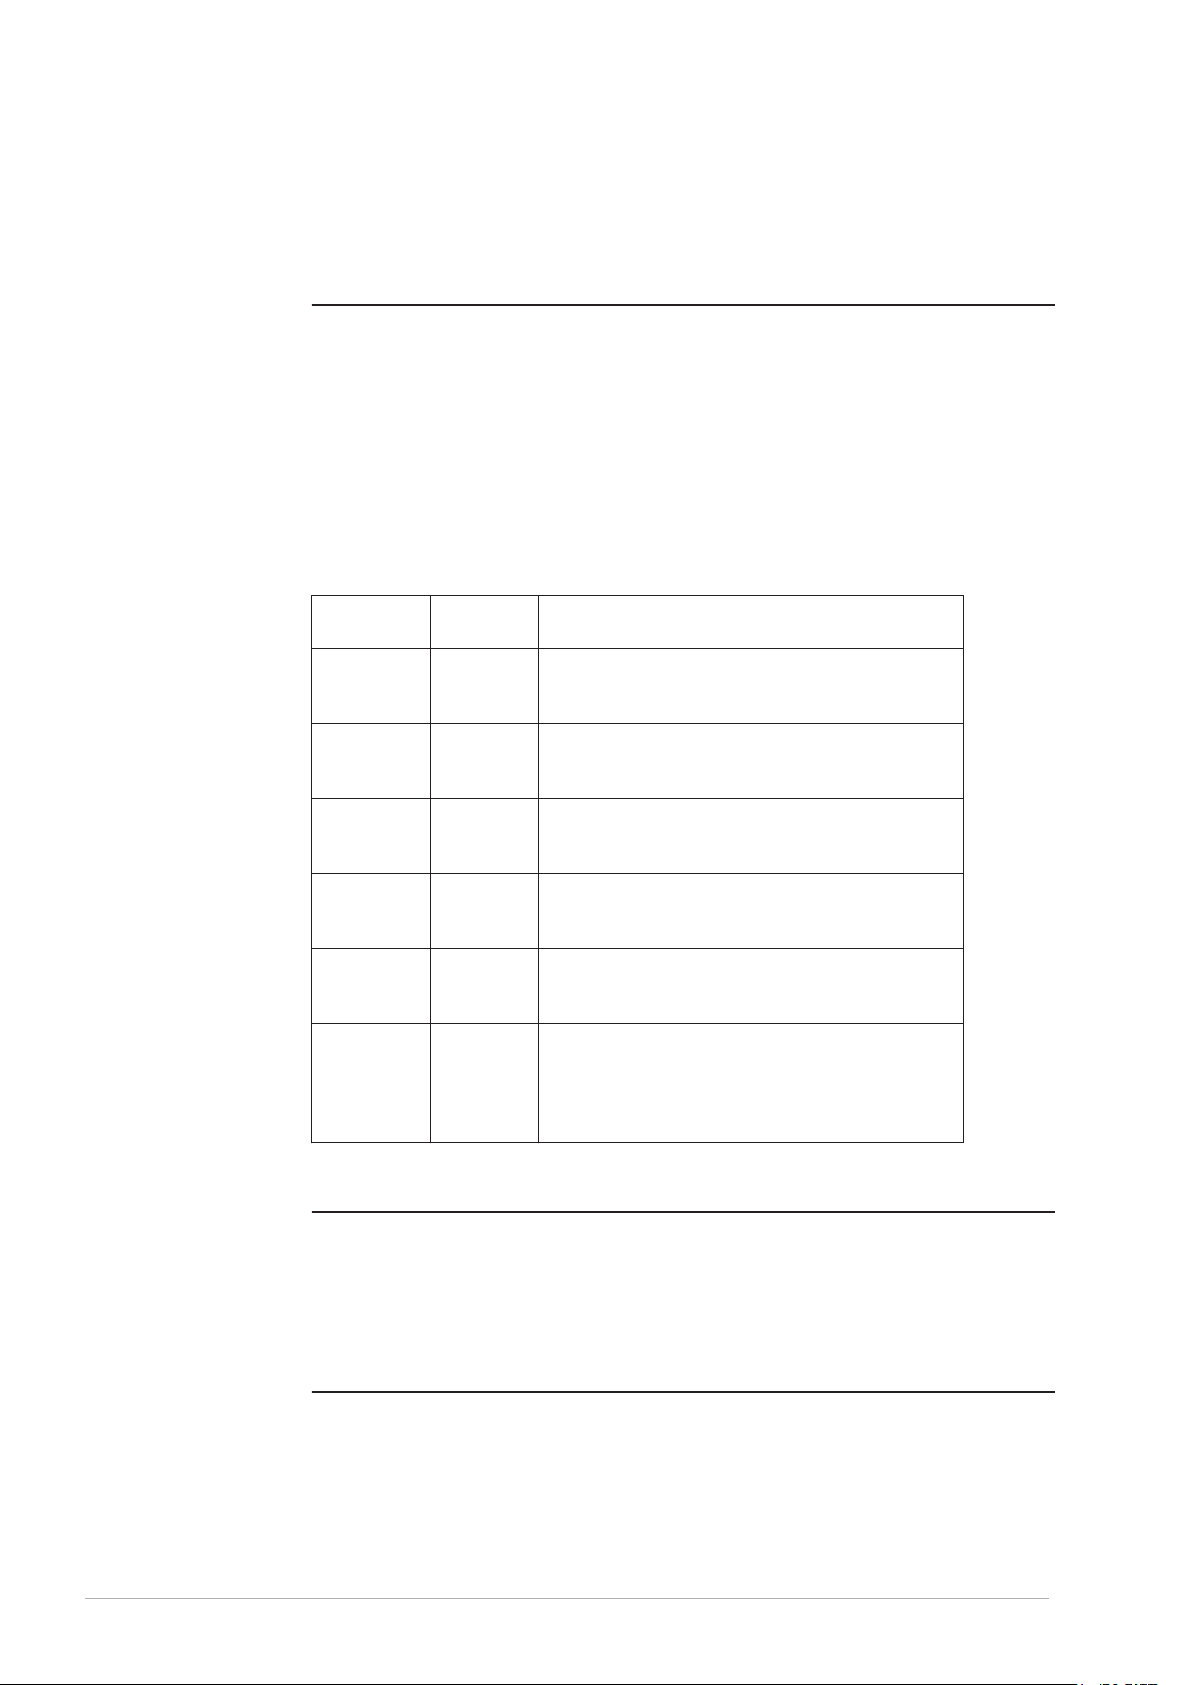
8.7 Venting system
There are several alternatives for installation of the air inlet and flue gas outlet:
Installation
type
B23 Open Air for combustion is drawn from installation room
C13 Closed Concentric and/or parallel venting system, with
C33 Closed Concentric and/or parallel venting system, with
C43 Closed Water heaters on common air inlet and flue gas
C53 Closed Separate air inlet and flue gas outlet terminal
C63 Closed Water heaters supplied without venting materials.
Version Description
and the flue gasses leave the water heater via a
vertical roof terminal.
horizontal air inlet and flue gas outlet, in same
pressure zone.
vertical air inlet and flue gas outlet, in same
pressure zone.
outlet (concentric and/or parallel) in a multiple
floor building.
types mixed. Air inlet and flue gas outlet
termination may be in different pressure zone.
These water heaters must be installed in
compliance with local regulations. The water heater
is intended to be connected to a separately
approved and marketed venting system.
This manual does not discus installation type B23. When you need a B23 system, contact
Hamworthy for more information.
Caution
c
42 Installation, Maintenance and Service part
Always make sure that the flue gas outlet discharges into an area approved for the
correct type of installation.
Caution
The use of a different wall or roof terminal can result in incorrect functioning of the water
heater. Use the part number from the table to order a terminal set from your supplier or
the manufacturer.
Page 43
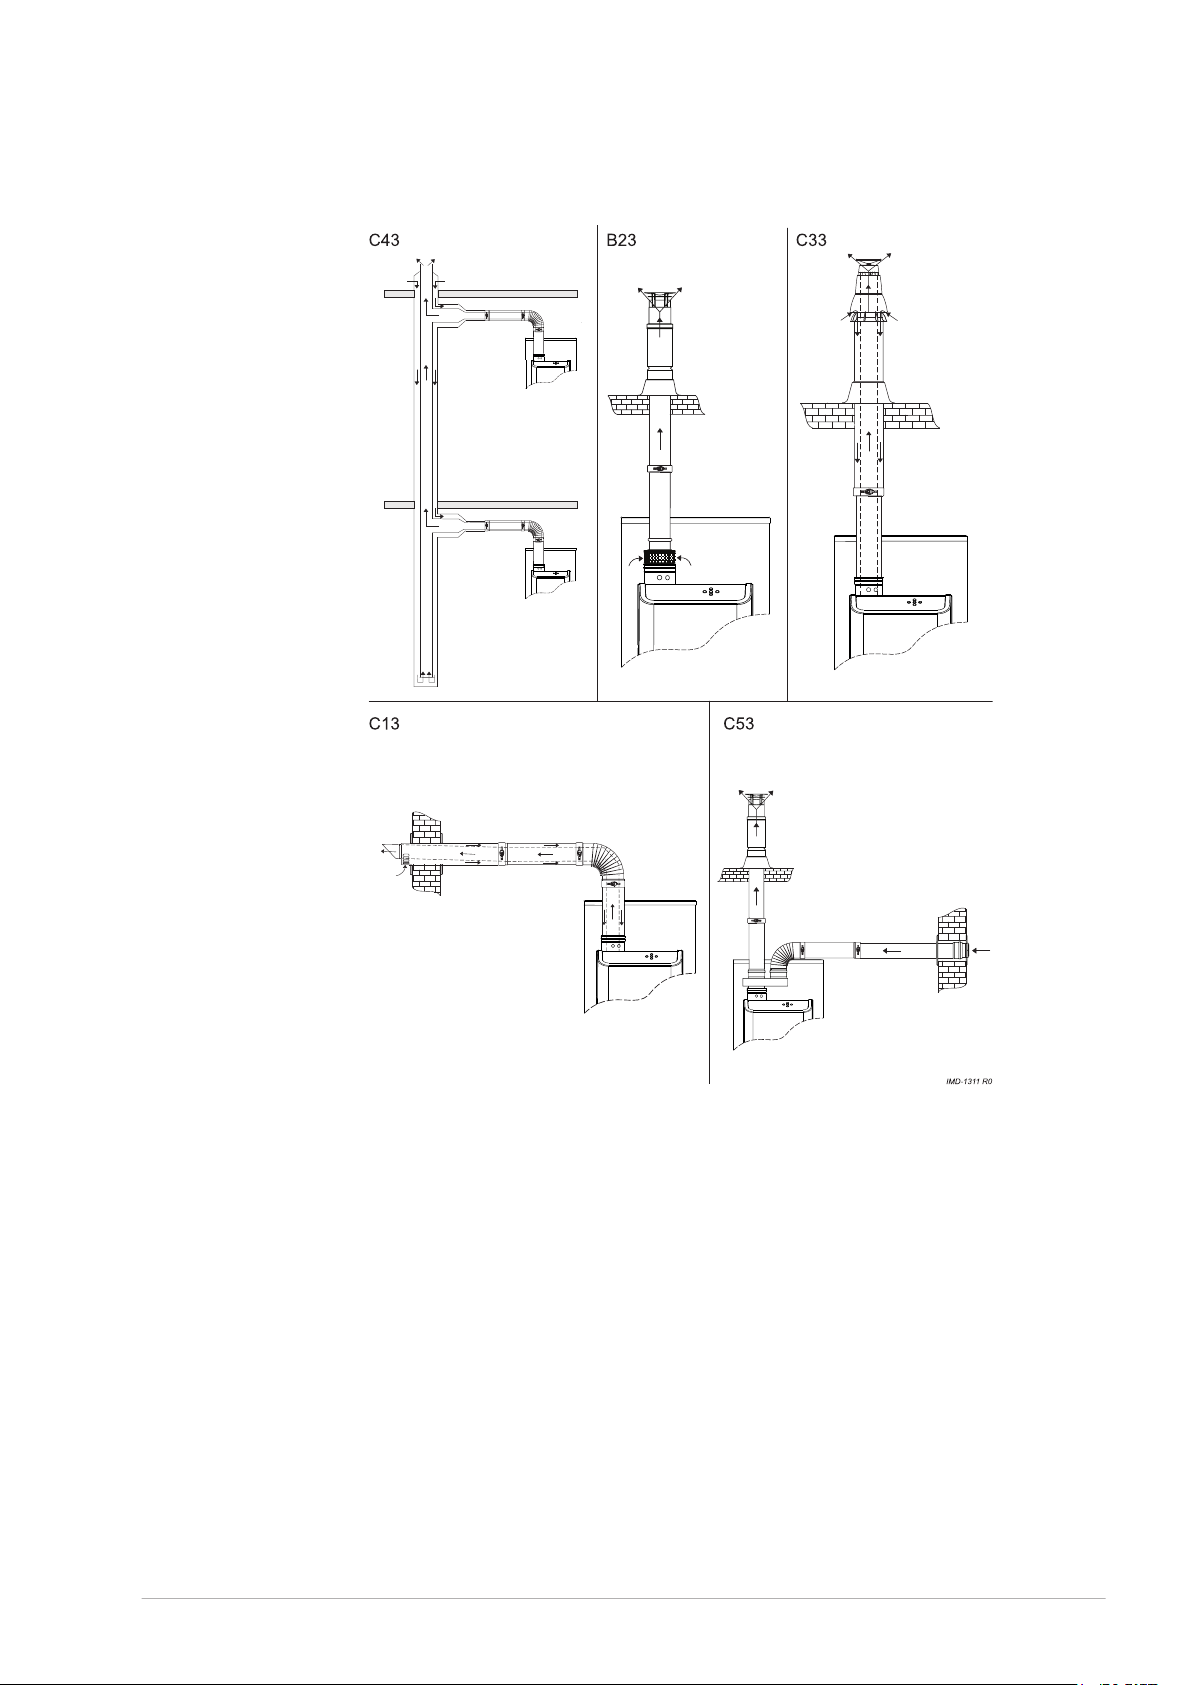
Fig. Venting systems
0312934_DR-CC_UKUK_V1.0, 2018-03-01 43
Page 44
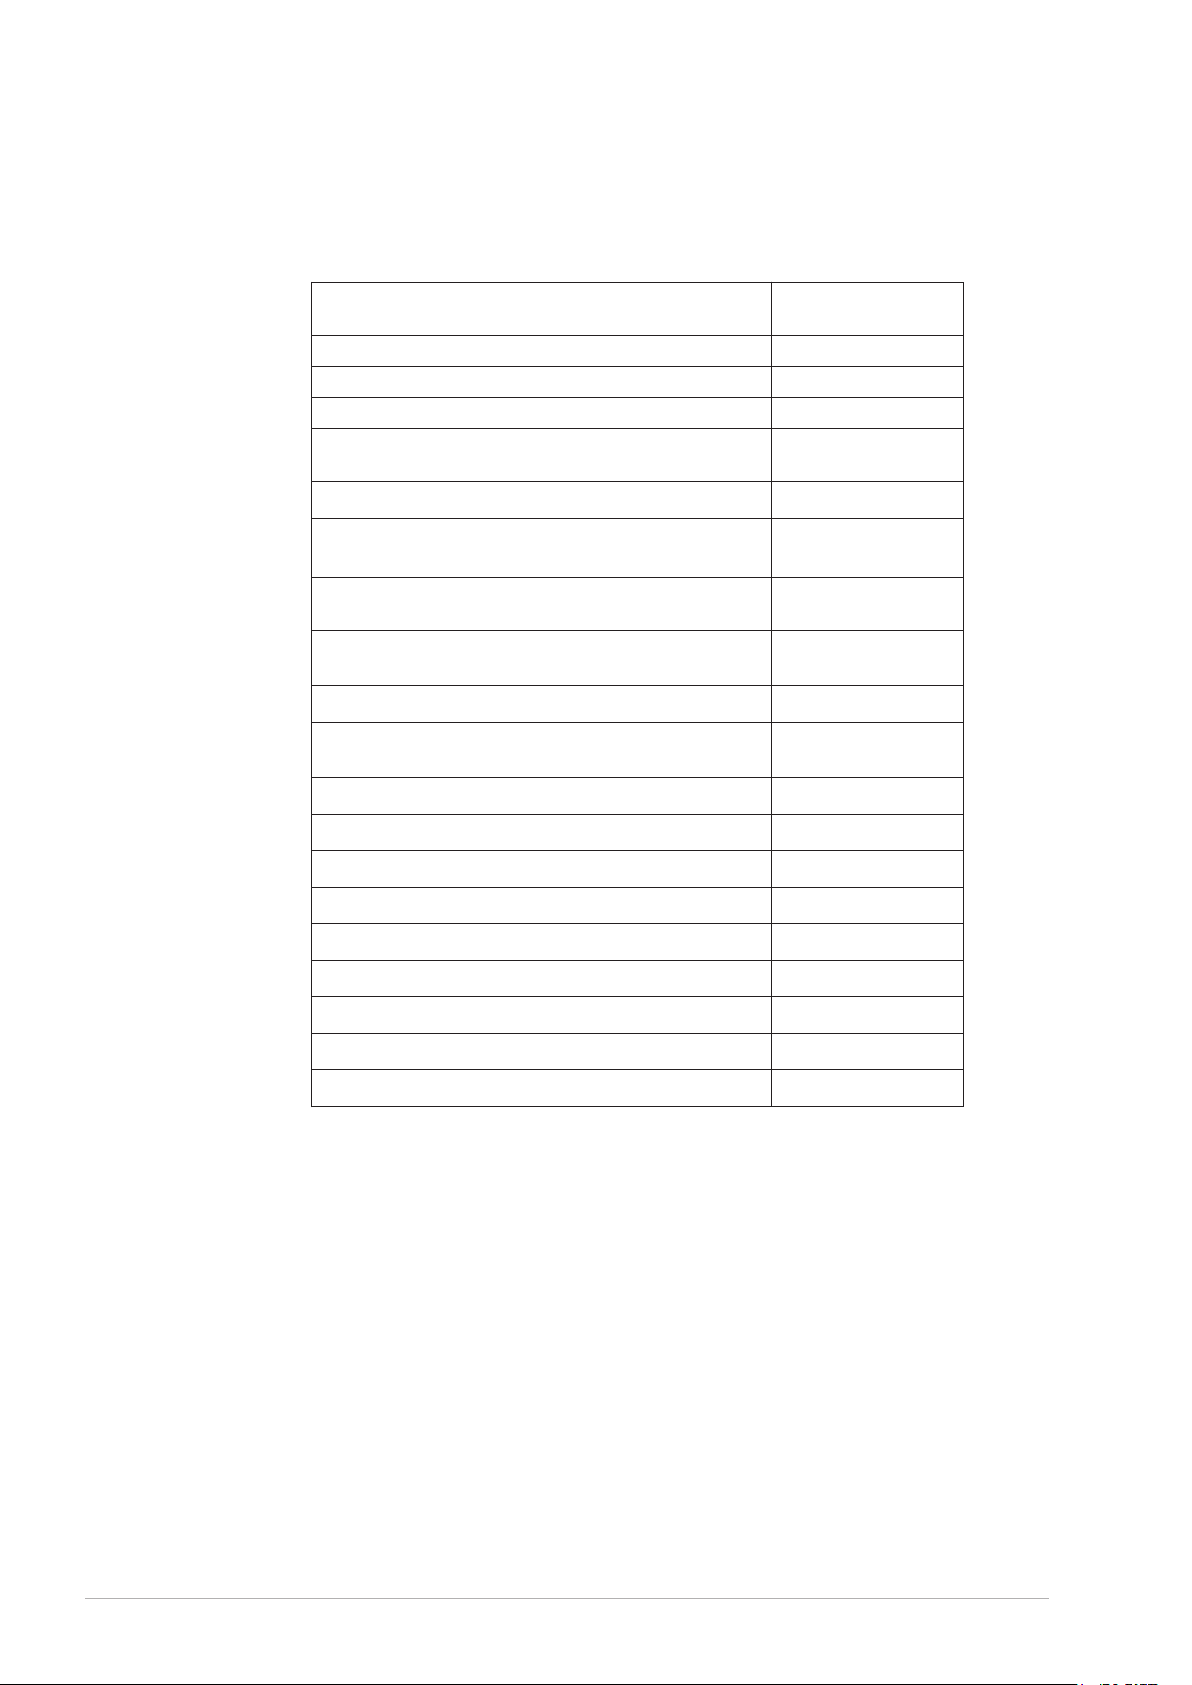
8.7.1 C13/C33 concentric systems
Use a wall terminal set or a roof terminal set to install a C13 or a C33 concentric venting
system.
Description Concentric Venting material Venting material
Manufacture venting material Muelink & Grol
Construction Concentric
Material flue gas outlet PP - Temp. Class T120
Material air inlet Thin walled galvanized
Diameter flue gas outlet
Diameter air inlet
Description parts Hamworthy Part
Wall terminal set
A wall terminal (1), a 500 mm concentric pipe and a 90° bend
Wall terminal 218575
PP
steel
+0,6
80
+0,5
124
(Dn 125)
number
218574
/
-0,6
/-1 mm
mm
Roof terminal set
A roof terminal (2), a 1000 mm concentric pipe and a roof plate
218572
Roof terminal 218573
Concentric pipe 250 mm 218577
Concentric pipe 500 mm 218578
Concentric pipe 1000 mm 218579
Concentric pipe 2000 mm 218581
Concentric pipe telescopic
(3)
218582
Concentric pipe to cut 218583
Concentric bend 45° 218584
Concentric bend 90° 218585
1 - supplied with wall flange and clamping ring
2 - supplied with clamping ring
3 - use this part to connect the air inlet and flue gas outlet to the water heater
44 Installation, Maintenance and Service part
Page 45
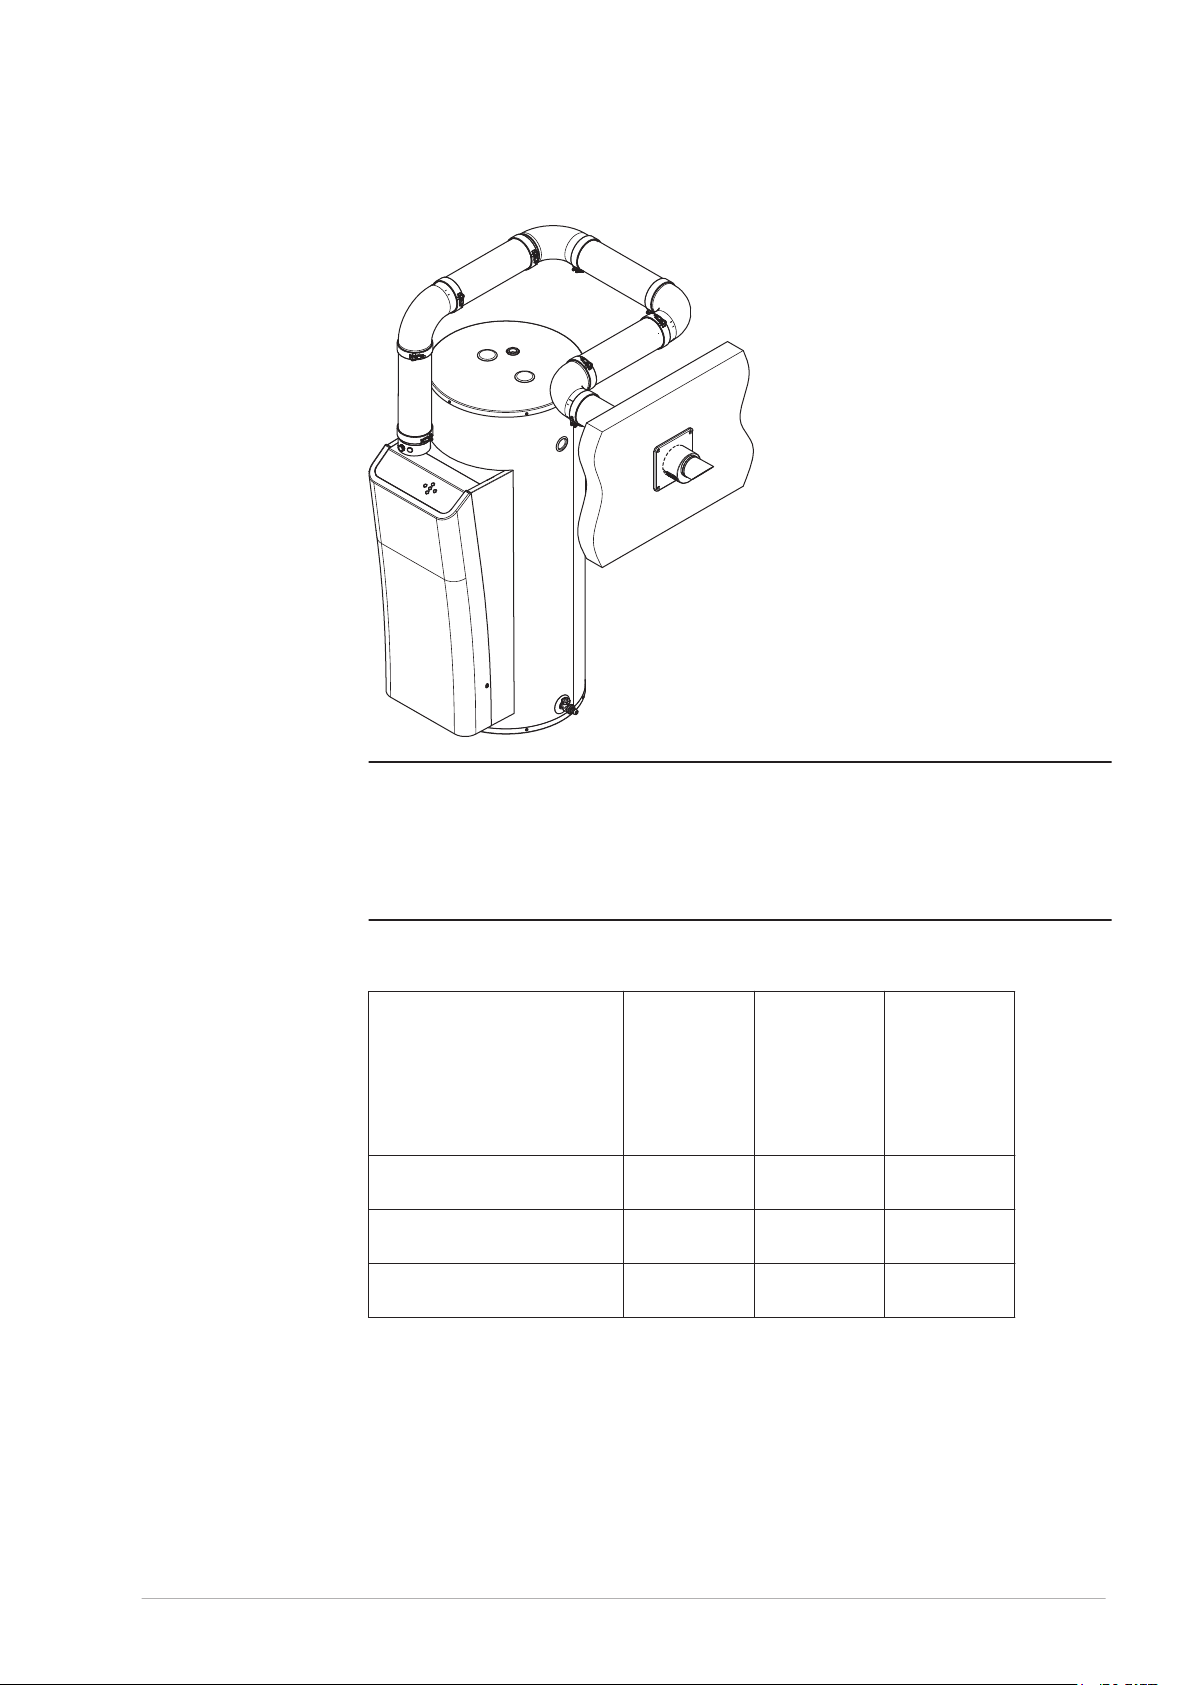
c
Fig. Example concentric venting system
Caution
During installation, obey the instructions delivered with the sets of air supply components
and the flue gas discharge components. Make sure that the venting system does not
exceed the maximum number of 45º and 90º bends and the maximum pipe length.
Caution
Use a run-off of 50 mm per meter towards the water heater.
Refer to the table for the correct pipe dimensions of the C13 and C33 concentric systems.
Description Unit
DR-CC 12-160 to
DR-CC 20-200
Diameter flue discharge/
air inlet
Maximum length m 40 40
Maximum number of 45º and
90º bends
mm/mm 80/125 80/125
- 8 8
DR-CC 24-245 to
DR-CC 32-380
0312934_DR-CC_UKUK_V1.0, 2018-03-01 45
Page 46
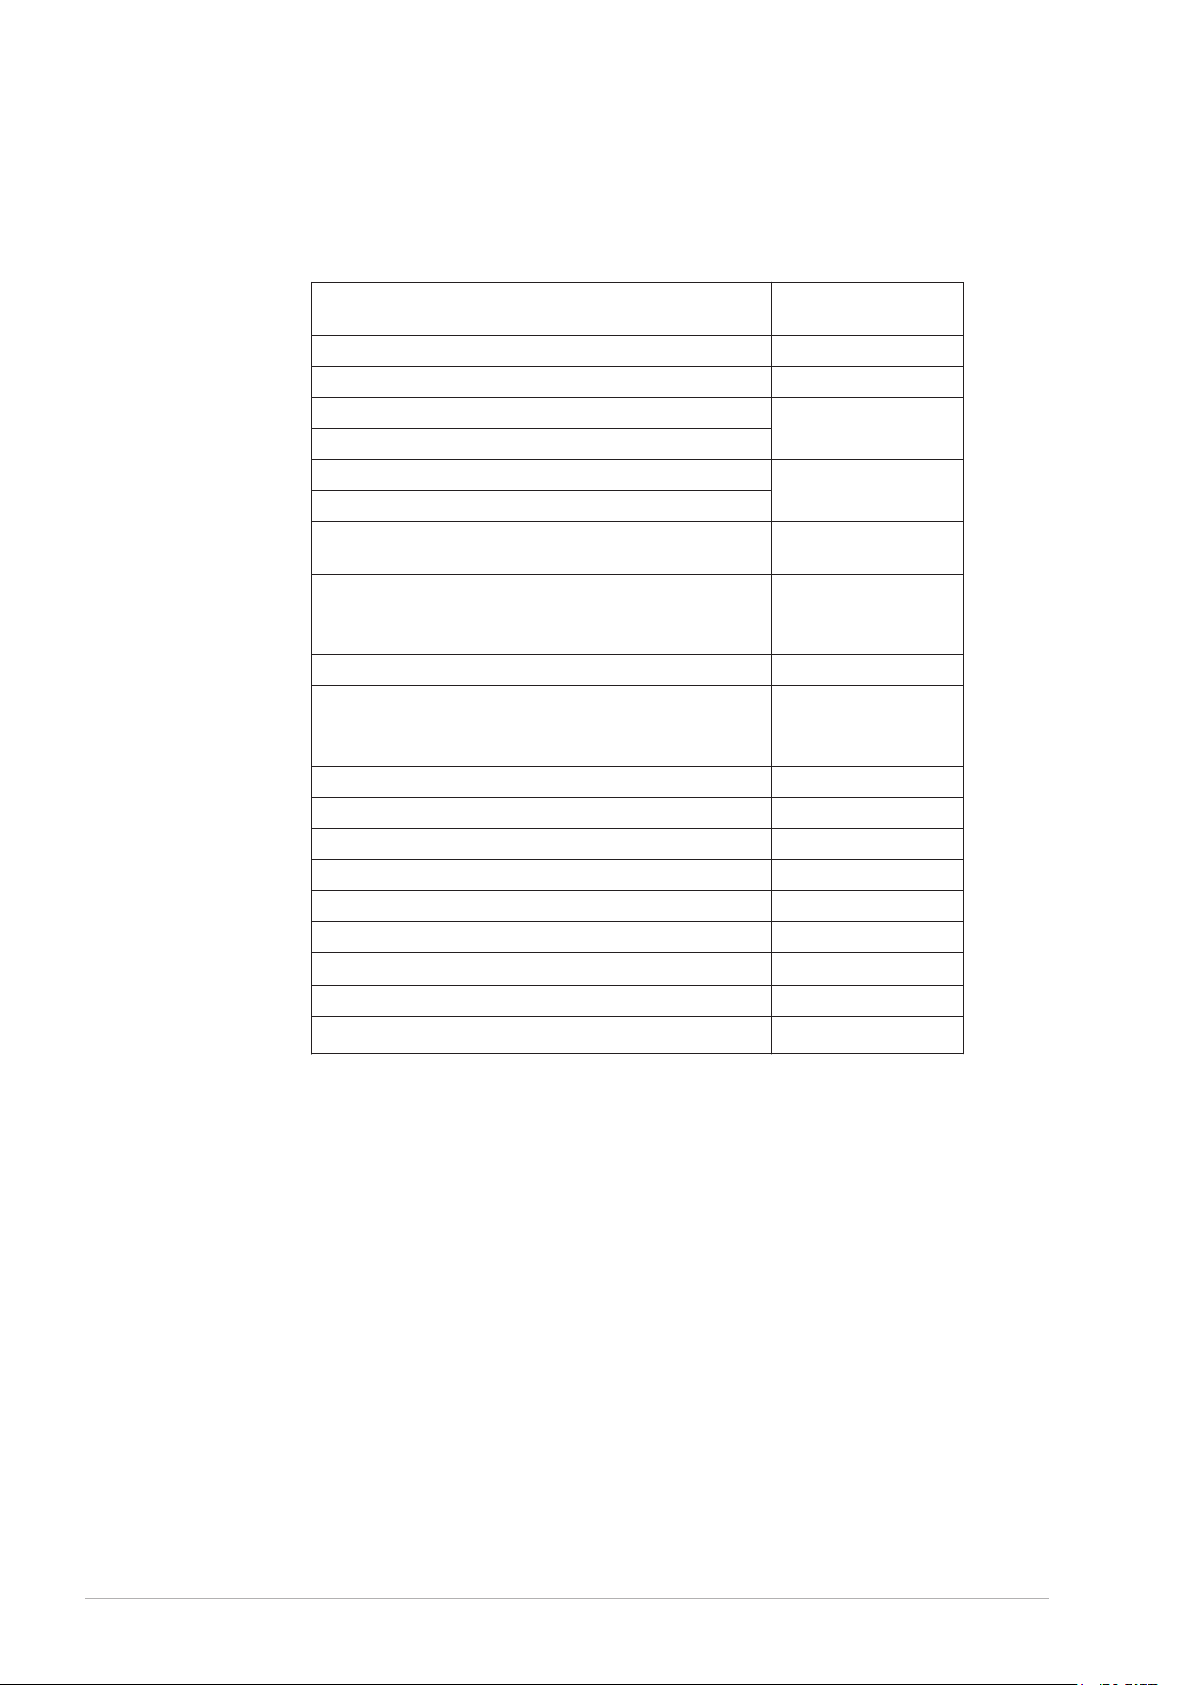
8.7.2 C13/C33 parallel systems
Use a wall terminal set or a roof terminal set to install a C13 or a C33 parallel venting
system.
Description Parallel Venting material Venting material
Manufacture venting material Muelink & Grol
Construction Parallel
Material flue gas outlet PP - Temp. Class T120
Material air inlet
Diameter flue gas outlet
Diameter air inlet
Description parts Hamworthy Part
Wall terminal set
A wall terminal (1), an adapter, a 500 mm parallel pipe and a 90°
bend
Wall terminal 218590
Roof terminal set
A roof terminal (2), an adapter, a 1000 mm parallel pipe and a
roof plate
Roof terminal 218588
Adapter box concentric to parallel - water heater side 218586
Parallel pipe 250 mm 218591
Parallel pipe 500 mm 218592
Parallel pipe 1000 mm 218593
Parallel pipe 2000 mm 218595
Parallel pipe telescopic
Parallel bend 45° 218597
Parallel bend 90° 218598
(3)
PP
+0,6
80
number
218589
218587
218596
/
-0,6
mm
1 - supplied with wall flange and clamping ring
2 - supplied with clamping ring
3 - use this part to connect the air inlet and flue gas outlet to the water heater
46 Installation, Maintenance and Service part
Page 47
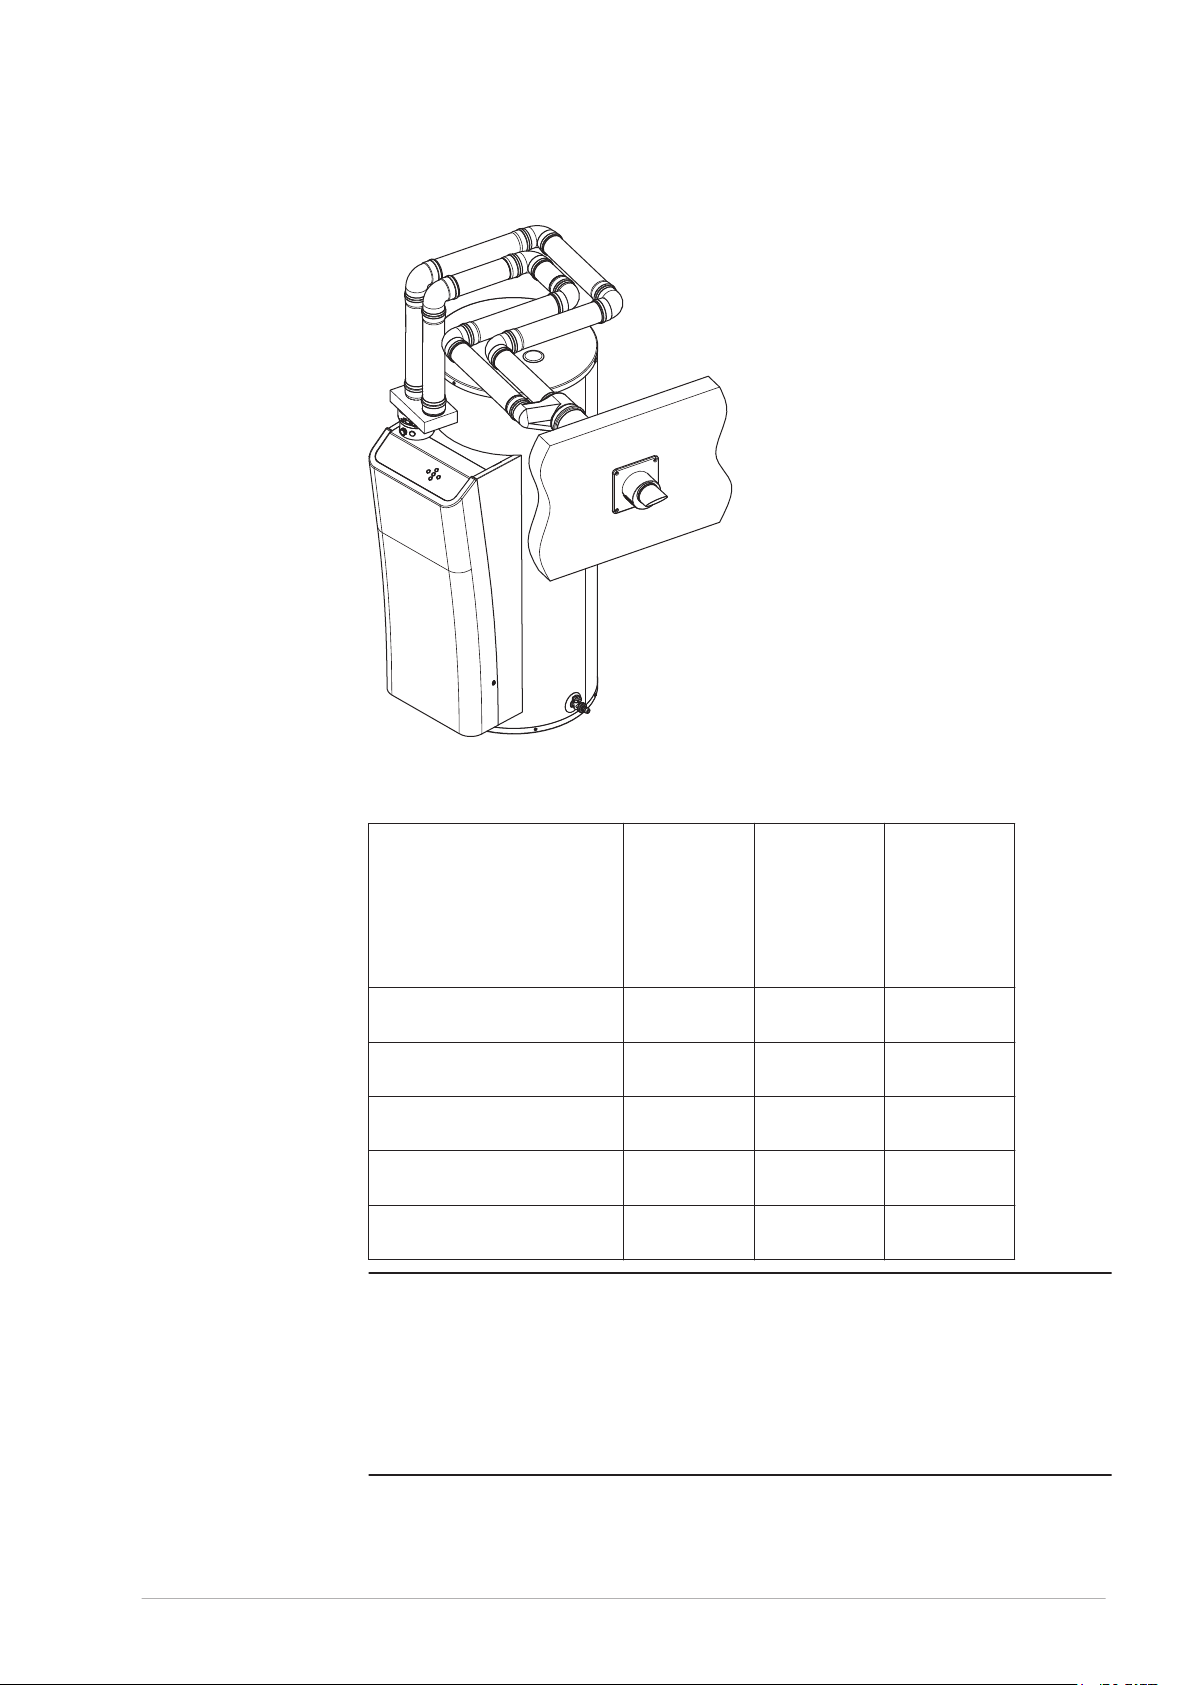
Fig. Example parallel venting system
Refer to the table for the correct pipe dimensions of the C13 or a C33 parallel venting
systems.
Description Unit
c
DR-CC 12-160 to
DR-CC 20-200
Diameter flue discharge/
air inlet
Maximum length air inlet m 50 75
Maximum length flue gas
outlet
L
equivalent
L
equivalent
Caution
Always make sure the installation is in compliance with the requirements stated in this
table.
Caution
Use a special adapter box to convert the concentric connection on the water heater to a
parallel connection. This adapter box converts the 80/125 mm to two times 80 mm. This
adapter (218586) can be ordered at your supplier or wholesaler. The use of a different
adapter box may cause the water heater to malfunction.
45°-bend m 1,1 1,1
90°-bend m 3,9 3,9
mm/mm 80/80 80/80
m 50 75
DR-CC 24-245 to
DR-CC 32-380
0312934_DR-CC_UKUK_V1.0, 2018-03-01 47
Page 48
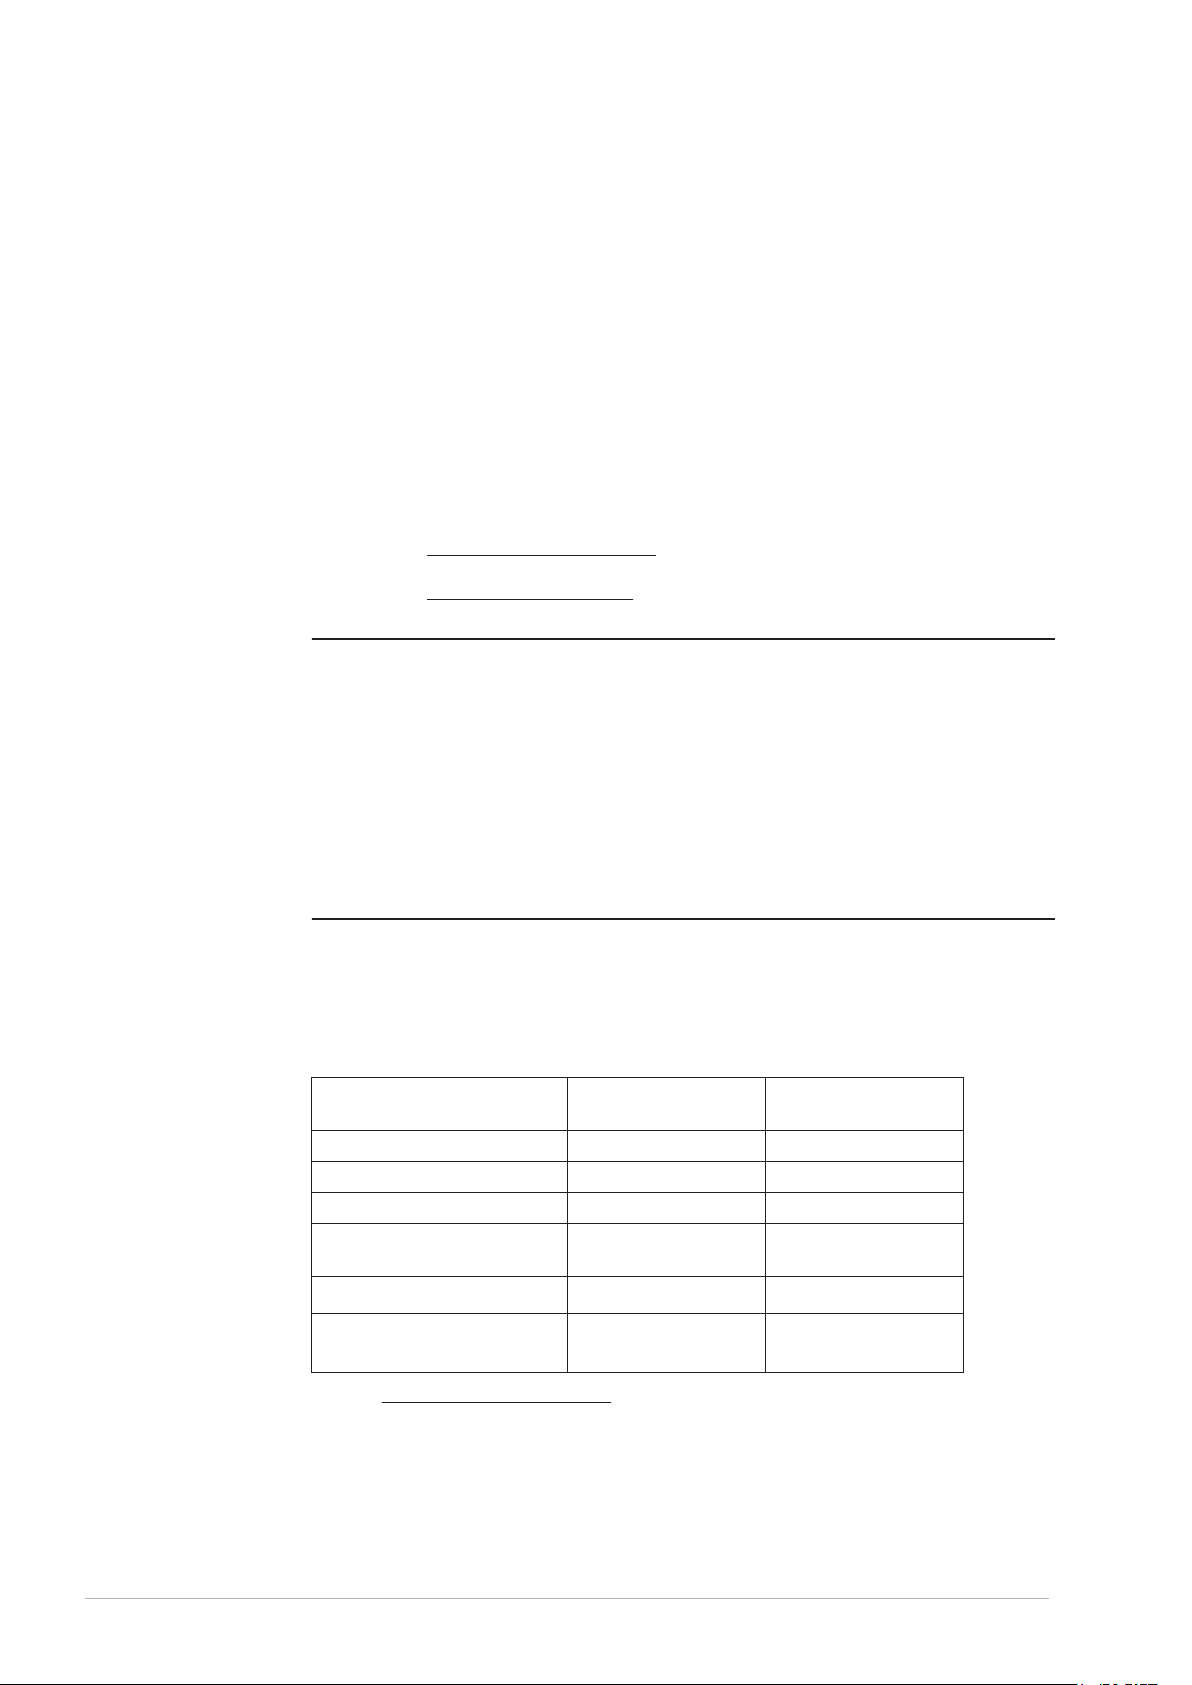
Calculate the maximum length of the air inlet and the flue gas outlet seperately:
Sum the lengths of the different pipe sections without bends. Ignore the length of
1.
the adaptor box.
Sum the lengths of the bends. Ignore the bend in the adapter box:
2.
Sum L
-
Sum the lengths of the pipe sections and the lengths of the bends to calculate the
3.
overall length of the air inlet and the flue gas outlet.
Adjust the length of the air inlet and/or the flue gas outlet when the overall length
4.
exceeds the maximum length as stated in the table.
Sum L
equivalent
equivalent
for each 45° bend.
for each 90° bend.
8.7.3 C43/C53/C63 systems
The length of the air inlet and flue gas outlet is the same for C43, C53 and C63 systems as
for C13 and C33 systems:
Refer to C13/C33 concentric systems (see section 8.7.1) for the maximum pipe
•
lengths of concentric systems.
Refer to C13/C33 parallel systems (see section 8.7.2) for the maximum pipe lengths
•
of parallel systems and non-concentric systems.
Note
n
Only use a C43 venting system when the common duct is a natural draught chimney. The
common duct is part of the building, not a part of the system.
Note
In a C53 venting system the flue gas terminal must be CE approved and must comply to
the EN 1856-1 requirements.
Note
Connect a C63 venting system to a separately approved and marketed system for the
supply of combustion air and discharge of flue gasses.
The flue gas terminal must comply to the EN 1856-1 requirements. The maximum
allowable recirculation rate is 10% under wind conditions.
Contact Hamworthy for more information and/or part numbers of the C43, C53 and C63
venting systems.
Concentric systems
Refer to the table for the correct pipe dimensions of the C43, C53 and C63 concentric
systems.
Description Venting material
PP
Manufacture venting material Muelink & Grol Muelink & Grol
Construction Concentric Concentric
Material flue gas outlet PP - Temp. Class T120 Thick walled aluminum
Material air inlet Thin walled galvanized
steel
Diameter flue gas outlet
Diameter air inlet
Refer to C13/C33 concentric systems (see section 8.7.1) for the Hamworthy part numbers.
The same parts can be used for the C43, C53 and C63 concentric systems.
+0,6
80
+0,5
124
(Dn 125)
/
mm 80
-0,6
/-1 mm
Venting material
Alu
Thin walled galvanized
steel
+0,3
/
mm
-0,7
+0,5
124
(Dn 125)
/-1 mm
Parallel and non-concentric systems
Refer to the table for the correct pipe dimensions of the C43, C53 and C63 parallel
systems.
48 Installation, Maintenance and Service part
Page 49
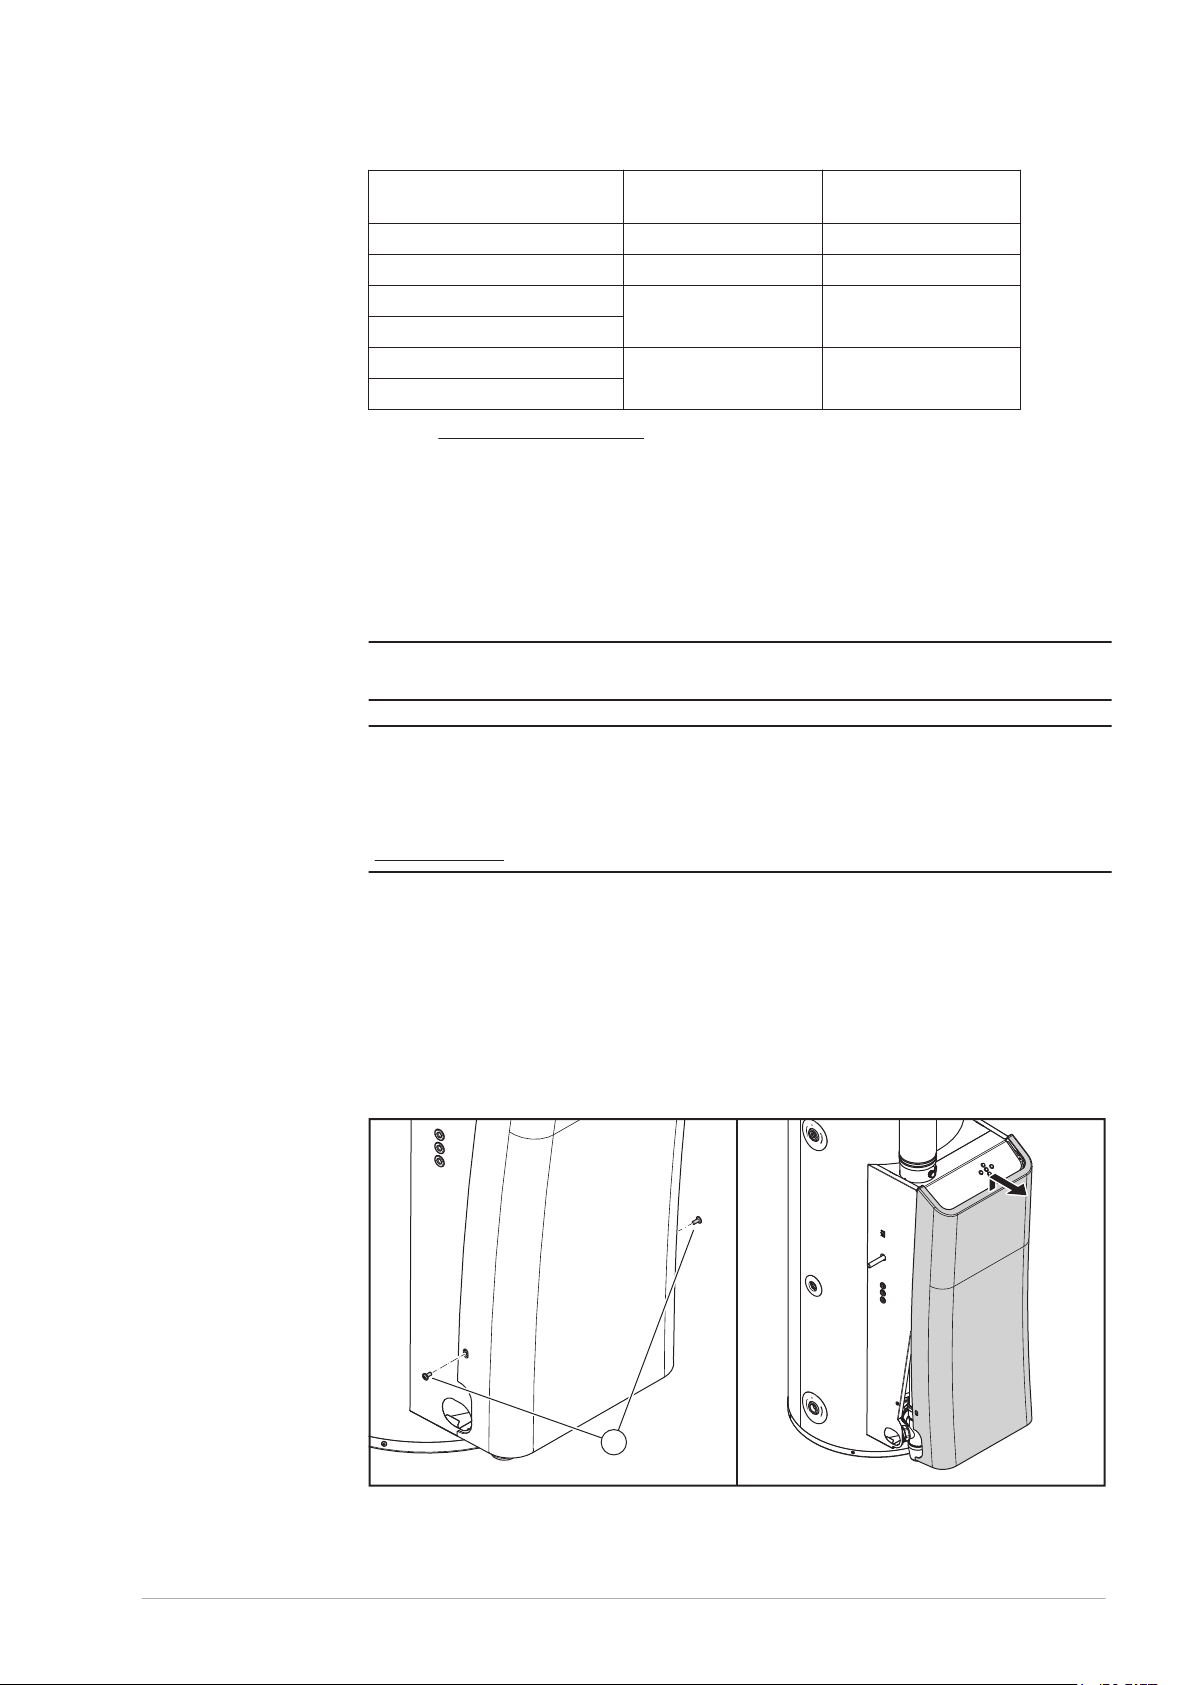
Description Venting material
1
PP
Manufacture venting material Muelink & Grol Muelink & Grol
Construction Parallel Parallel
Material flue gas outlet PP - Temp. Class T120 Thick walled aluminum
Material air inlet
Diameter flue gas outlet
Diameter air inlet
Refer to C13/C33 parallel systems (see section 8.7.2) for the Hamworthy part numbers.
The same parts can be used for the C43, C53 and C63 parallel systems.
Use the "adapter box concentric to parallel - water heater side" (part number 218586) for
C63 parallel systems.
80
+0,6
/
mm 80
-0,6
Venting material
Alu
+0,3
/
mm
-0,7
8.8
8.8.1
w
c
Electrical connections
Warning
Leave the water heater electrically isolated until you are ready to commission it.
Caution
The water heater is phase-sensitive. It is absolutely essential to connect the mains live
(L) to the live of the water heater and the mains neutral (N) to the neutral of the water
heater. The water heater can handle a potential difference between live (L) and neutral
(N), but the potential difference between live (L) and earth has its restrictions, refer to
displayed errors (see section 12.1.2), error F19.
Preparation
Remove the cover of the water heater to make the electrical section and the terminal block
visible:
Use a hex driver to remove the screws (1) at the cover.
1.
Hold the cover at the sides.
2.
Lift the cover and take it from the water heater.
3.
Fig. Remove the cover
0312934_DR-CC_UKUK_V1.0, 2018-03-01 49
Page 50
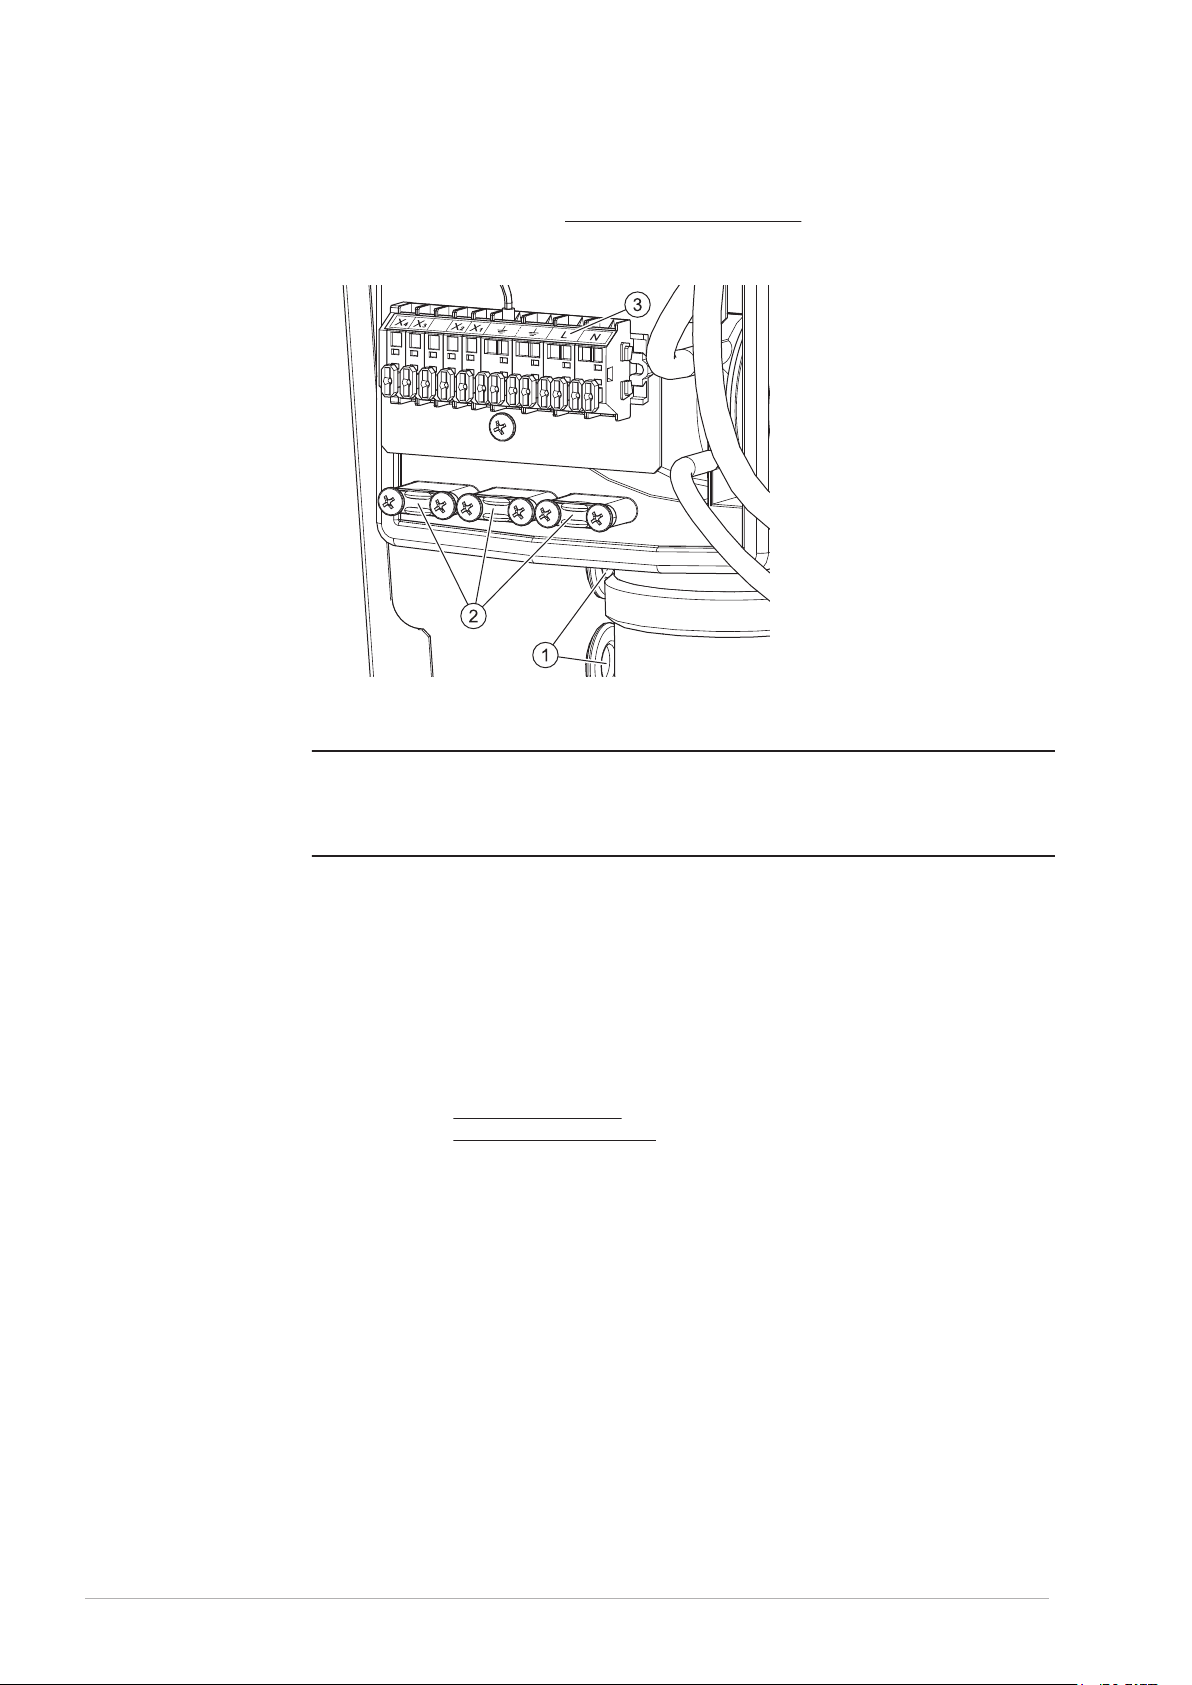
The mains power and optional electrical connections have to be connected to the terminal
block of the controller, refer to Structure of the water heater (see section 7.1).
Fig. Terminal block
8.8.2 Mains power
Note
n
The water heater is supplied without a power cable and isolator.
Use a power cable with cores of at least 3 x 0,75 mm2 and a double-pole isolator with a
contact gap of at least 3 mm.
1. Tulles
2. Pull relieves
3. Connections
Connect the water heater to the mains power supply:
Pull the power cable through the tulles.
1.
Connect the mains neutral core to N, the mains live core to L and the mains earth
2.
core to A.
Install the power cable in the pull relief under the electrical section.
3.
Connect the power cable to the double pole isolator.
4.
8.8.3 Optional electrical connections
Optionally, it is possible to:
Connect an isolating transformer (see section 8.8.3.1).
•
Connect an external ON mode switch (see section 3.2.1.3).
•
Connect an additional error signal to the water heater.
•
8.8.3.1 Isolating transformer
For more information about an isolating transformer, or to order an isolating transformer,
please contact Hamworthy.
8.8.3.2 External ON mode switch
Install an external ON mode switch:
Pull the cables through the tulles.
1.
Connect the cables to X3 and X4.
2.
Install the cables in a pull relief under the electrical section.
3.
Set the appropriate settings in the interface.
4.
50 Installation, Maintenance and Service part
Page 51
8.8.3.3 Additional error signal
1
Note
n
The water heater has a relay contact that can be used when an error occurs. The relay
contact is potential–free (maximal 5 A).
Install an additional error signal:
Pull the power cable through the tulles.
1.
Connect the cables to X1 and X2.
2.
Install the cables in a pull relief under the electrical section.
3.
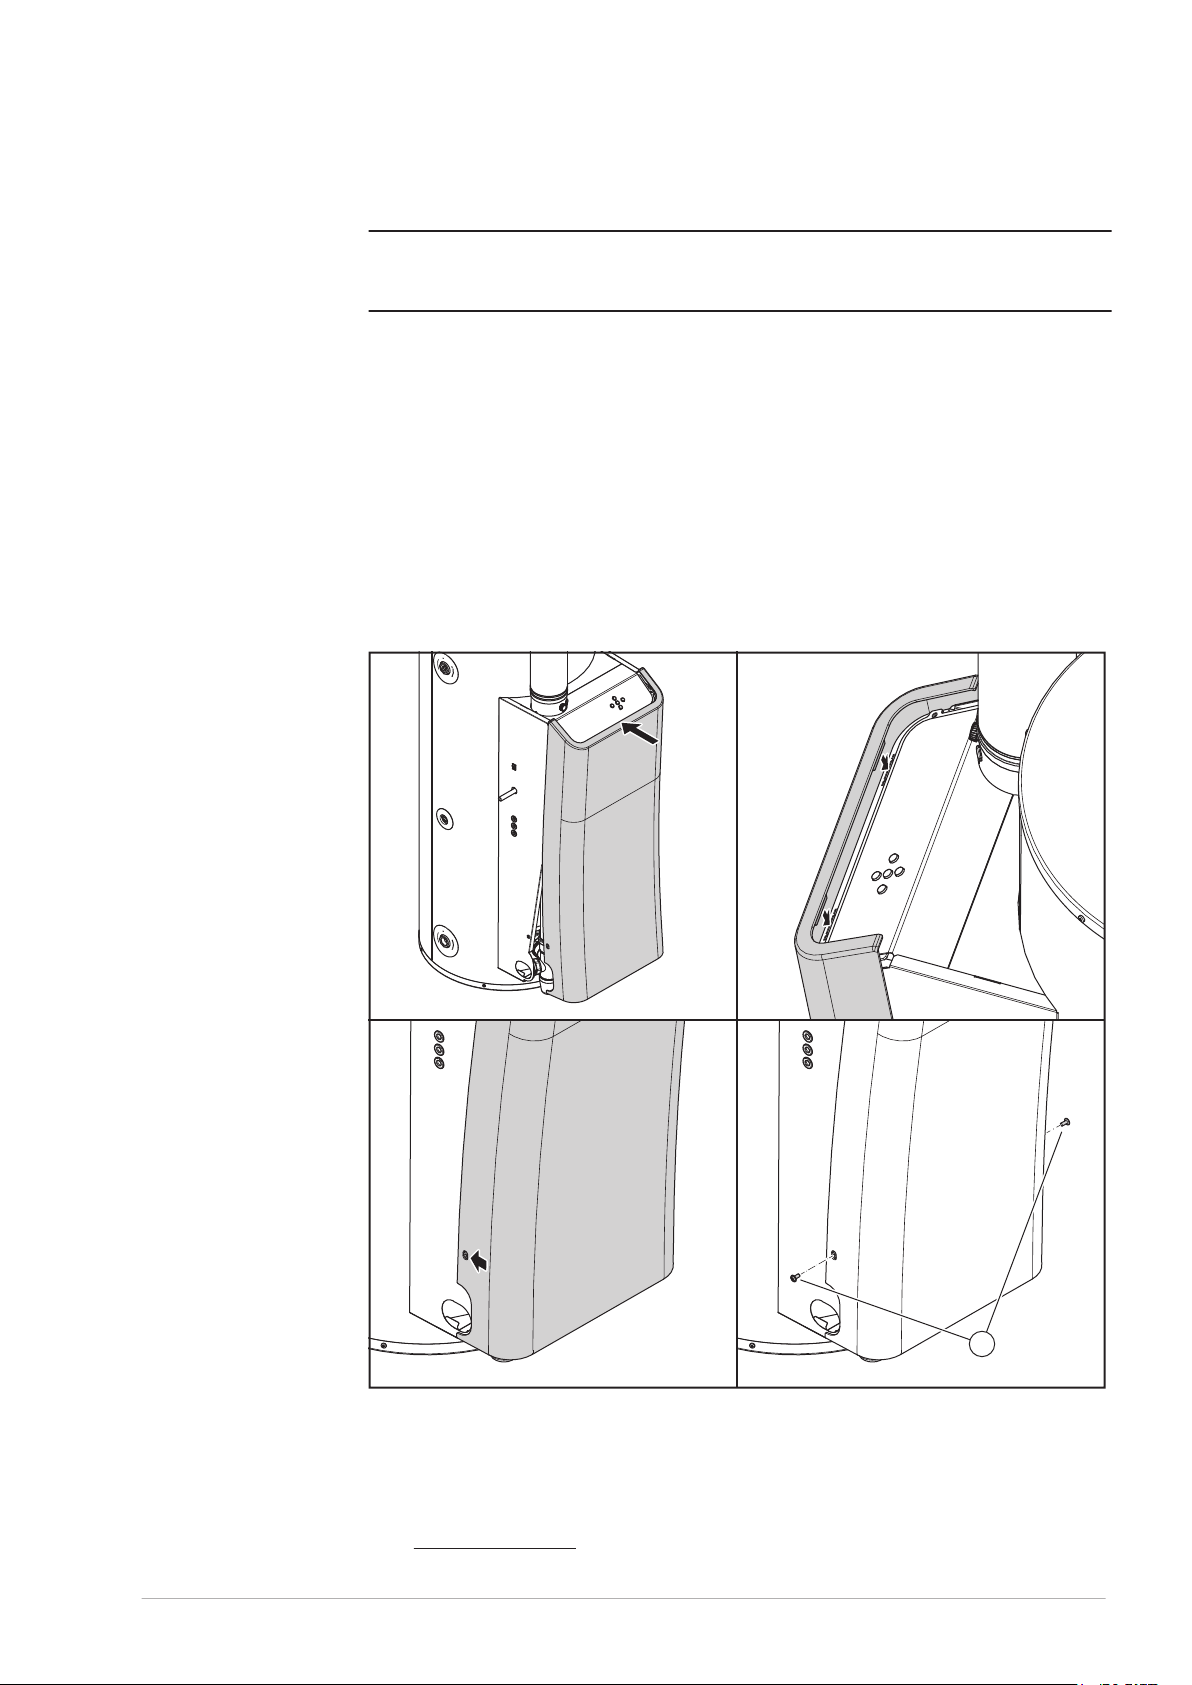
8.8.4 Finalization
When all connections are made, install the cover on the water heater:
Place the cover on the water heater.
1.
Make sure that the two brackets on top and the bracket at the bottom of the cover
connect to the water heater.
Tighten the screws at both sides of the cover.
2.
Fig. Install the cover
8.9
0312934_DR-CC_UKUK_V1.0, 2018-03-01 51
Commissioning
To commission the water heater:
Fill the water heater (see section 8.9.1)
1.
Page 52

Check the air pressure differential (see section 8.9.2)
2.
Check the gas supply pressure (see section 8.9.3)
3.
Check the CO2 value (see section 8.9.4)
4.
Turn on the water heater (see section 8.9.5)
5.
8.9.1 Filling
Refer to the installation diagram (see section 8.3) when you fill the water heater:
Open the stop valve (11) in the hot water supply pipe.
1.
If applicable, open the stop valves (4) of the circulation pipe (C).
2.
Make sure that the drain valve (9) is closed.
3.
Open the nearest hot water draw-off point (14).
4.
Open the stop valve (4) of the cold water supply pipe (A). Cold water flows into the
5.
water heater.
Fill the water heater until a full water jet flows from the nearest draw-off point. The
6.
water heater is completely full.
Open all draw-off points to bleed the entire installation of air.
7.
The water heater is now under water supply pressure.
Make sure that no water comes out of the expansion valve (15) or the T&P valve (3).
8.
If water comes out:
Examine if the water supply pressure is greater than the specified value in the
-
Technical details. If necessary, install a pressure reducing valve (1).
Examine if the expansion valve in the protected cold supply set-up is installed
-
correctly and is not defect. If necessary, replace the expansion valve.
8.9.2 Air pressure differential
n
n
Check the air pressure differential across the air pressure switch:
Disconnect hose H of the air proving switch and connect this side of the hose to the
1.
+ of the pressure gauge.
Disconnect hose L of the air pressure switch and connect this side of the hose to the
2.
- of the pressure gauge.
Turn the water heater on and set the water heater in OFF mode, refer to Turn on
3.
the water heater (see section 4.2).
Note
Make sure that the water heater is not in ON mode or in External ON mode.
4.
Set parameter 201 to FAn, refer to
Read the pressure value from the meter.
5.
Compare the measured value to the value from the table.
6.
Note
When the air pressure differential is not correct, refer to Displayed errors (see section
12.1.2), error F03.
7.
Set parameter 201 to dIS, refer to
Press [RESET].
8.
The water heater goes into OFF mode.
Set the control switch on the side of the water heater to 0 to turn off the water
9.
heater.
Disconnect the pressure gauge.
10.
Reconnect the hoses of the air proving switch and the gas valve.
11.
Settings (see section 10).
Settings (see section 10).
52 Installation, Maintenance and Service part
Page 53
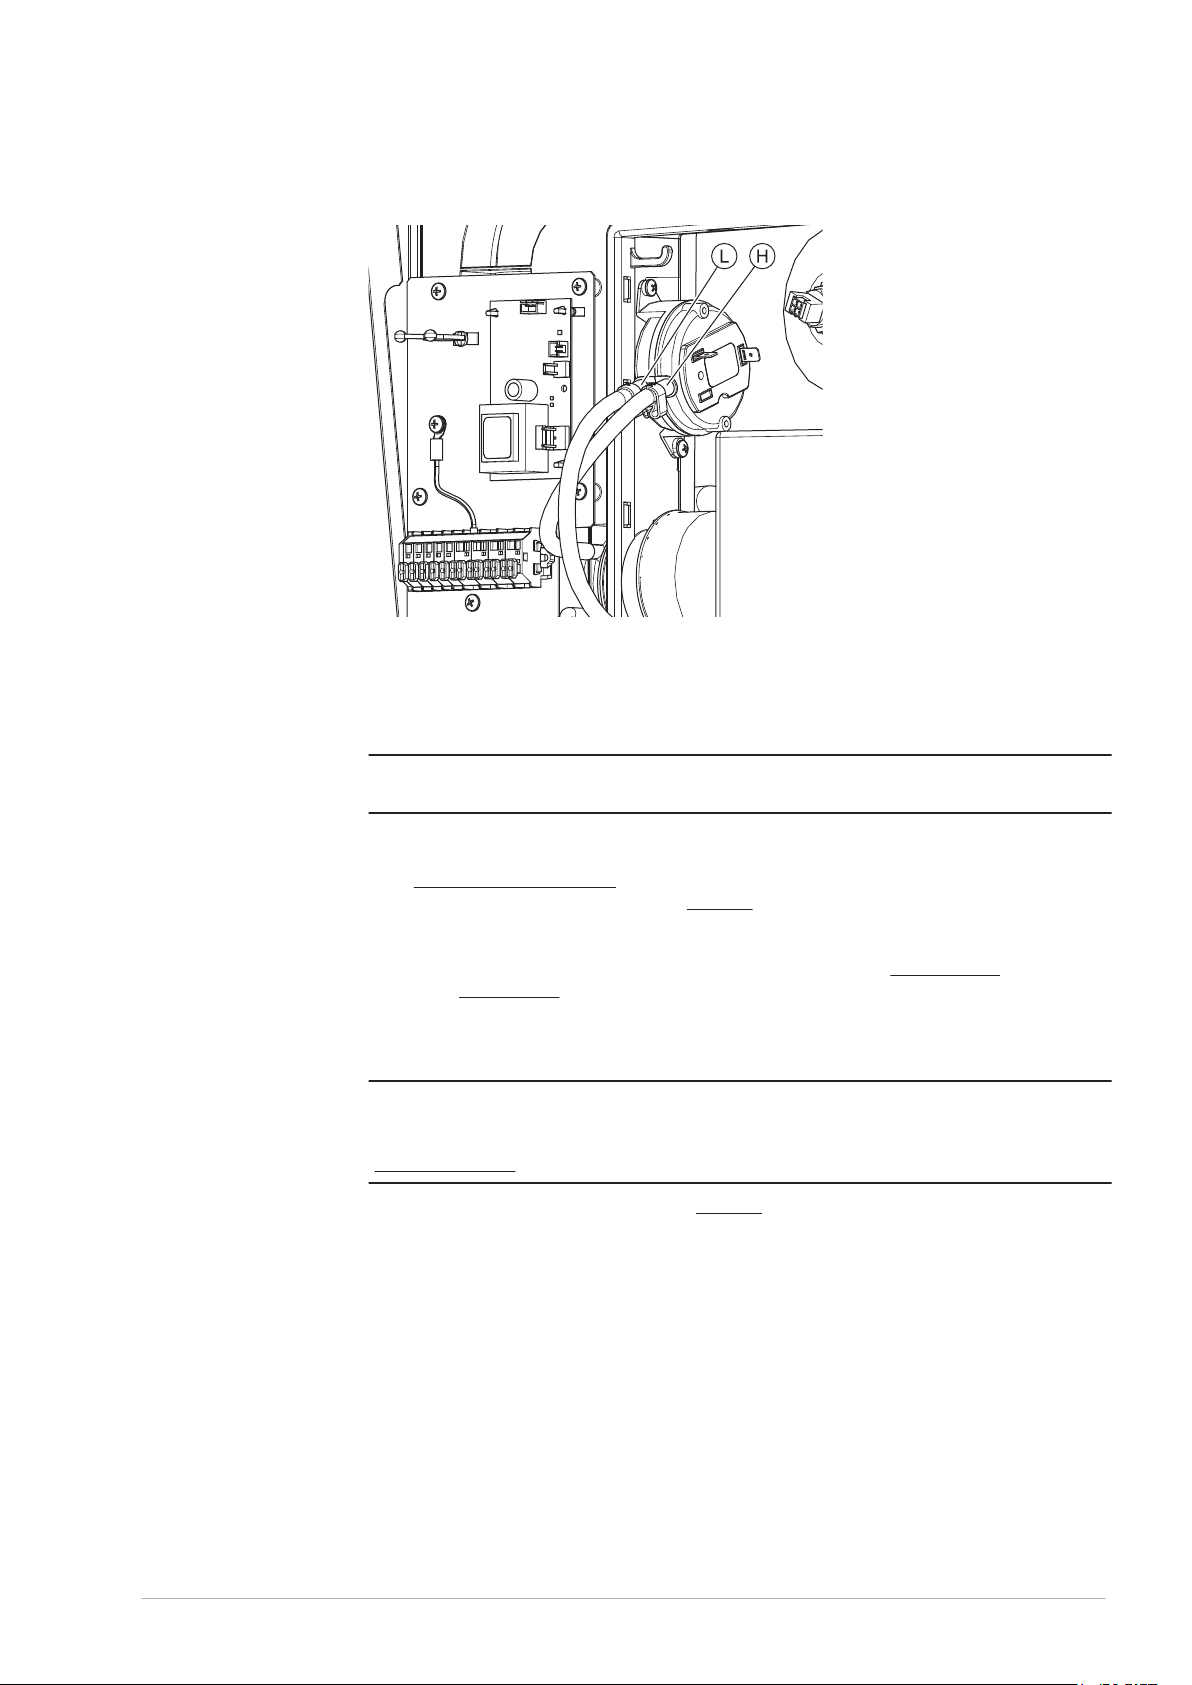
Fig. Air pressure differential
8.9.3 Gas supply pressure
Check the gas supply pressure:
Loosen the sealing screw (4) of the test nipple by a few turns.
1.
Note
Do not completely loosen the sealing screw, it can be difficult to retighten it.
n
Open the gas supply to vent the gas pipes through the test nipple.
2.
Connect a pressure gauge to the test nipple as soon as you smell gas.
3.
Turn on the water heater (see section 4.2).
4.
5.
Set parameter 201 to Hi, refer to Settings (see section 10).
If necessary, create a heat demand:
6.
Use a hot water draw-off point to tap water, or
-
Raise the setpoint of the water temperature, refer to Set the water
-
temperature (see section 4.2.2).
Wait about 1 minute.
7.
Use the pressure gauge to read the supply pressure and compare it with the value
8.
from the appendix Gas details.
Note
n
0312934_DR-CC_UKUK_V1.0, 2018-03-01 53
Consult the mains gas supply company if the supply pressure is not correct. Take the
water heater out of service until the supply pressure is correct, refer to section
Decommissioning (see section 8.10).
9.
Set parameter 201 to dIS, refer to
Press [RESET]. The water heater goes into OFF mode.
10.
Set the control switch on the side of the water heater to 0 to turn off the water
11.
heater.
Shut off the gas supply.
12.
Disconnect the pressure gauge.
13.
Tighten the sealing screw in the test nipple.
14.
Settings (see section 10).
Page 54
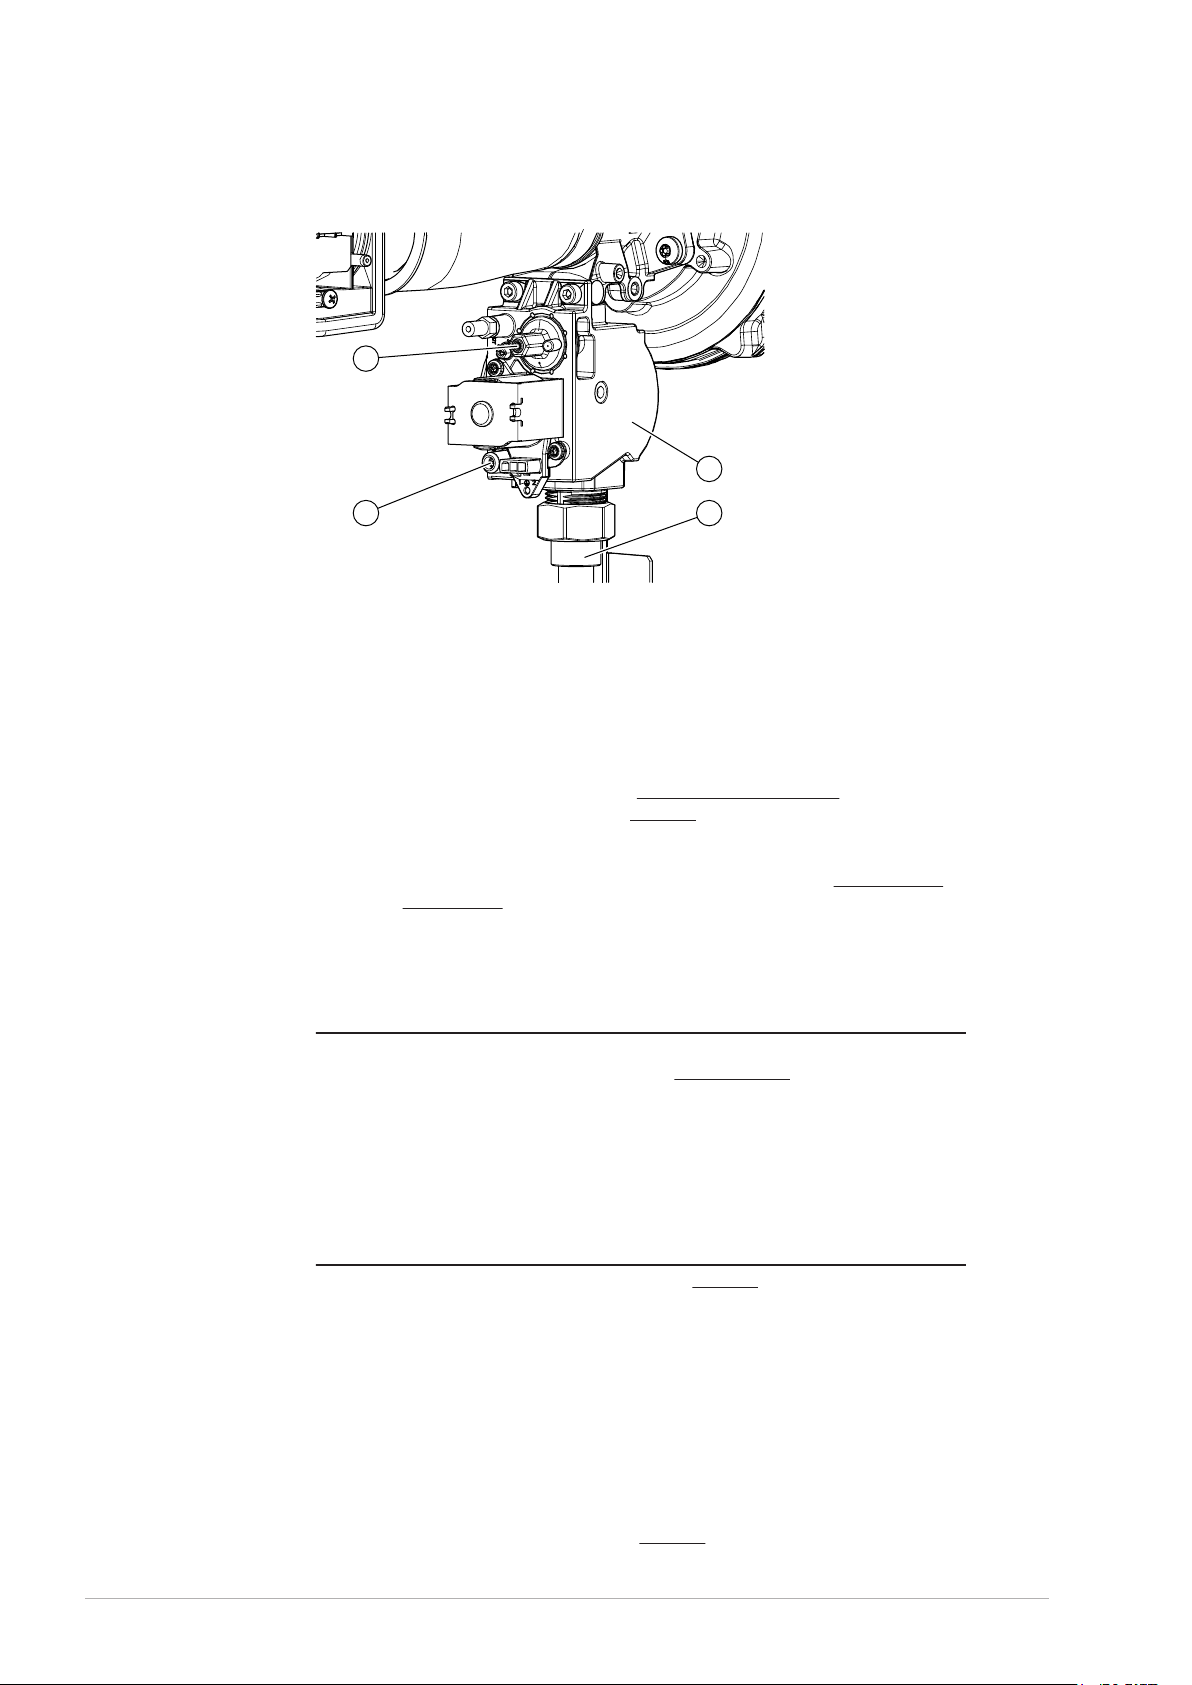
Fig. Gas supply pressure
4
1
3
2
8.9.4 CO2 value
Check the CO2 value:
Open the gas supply.
1.
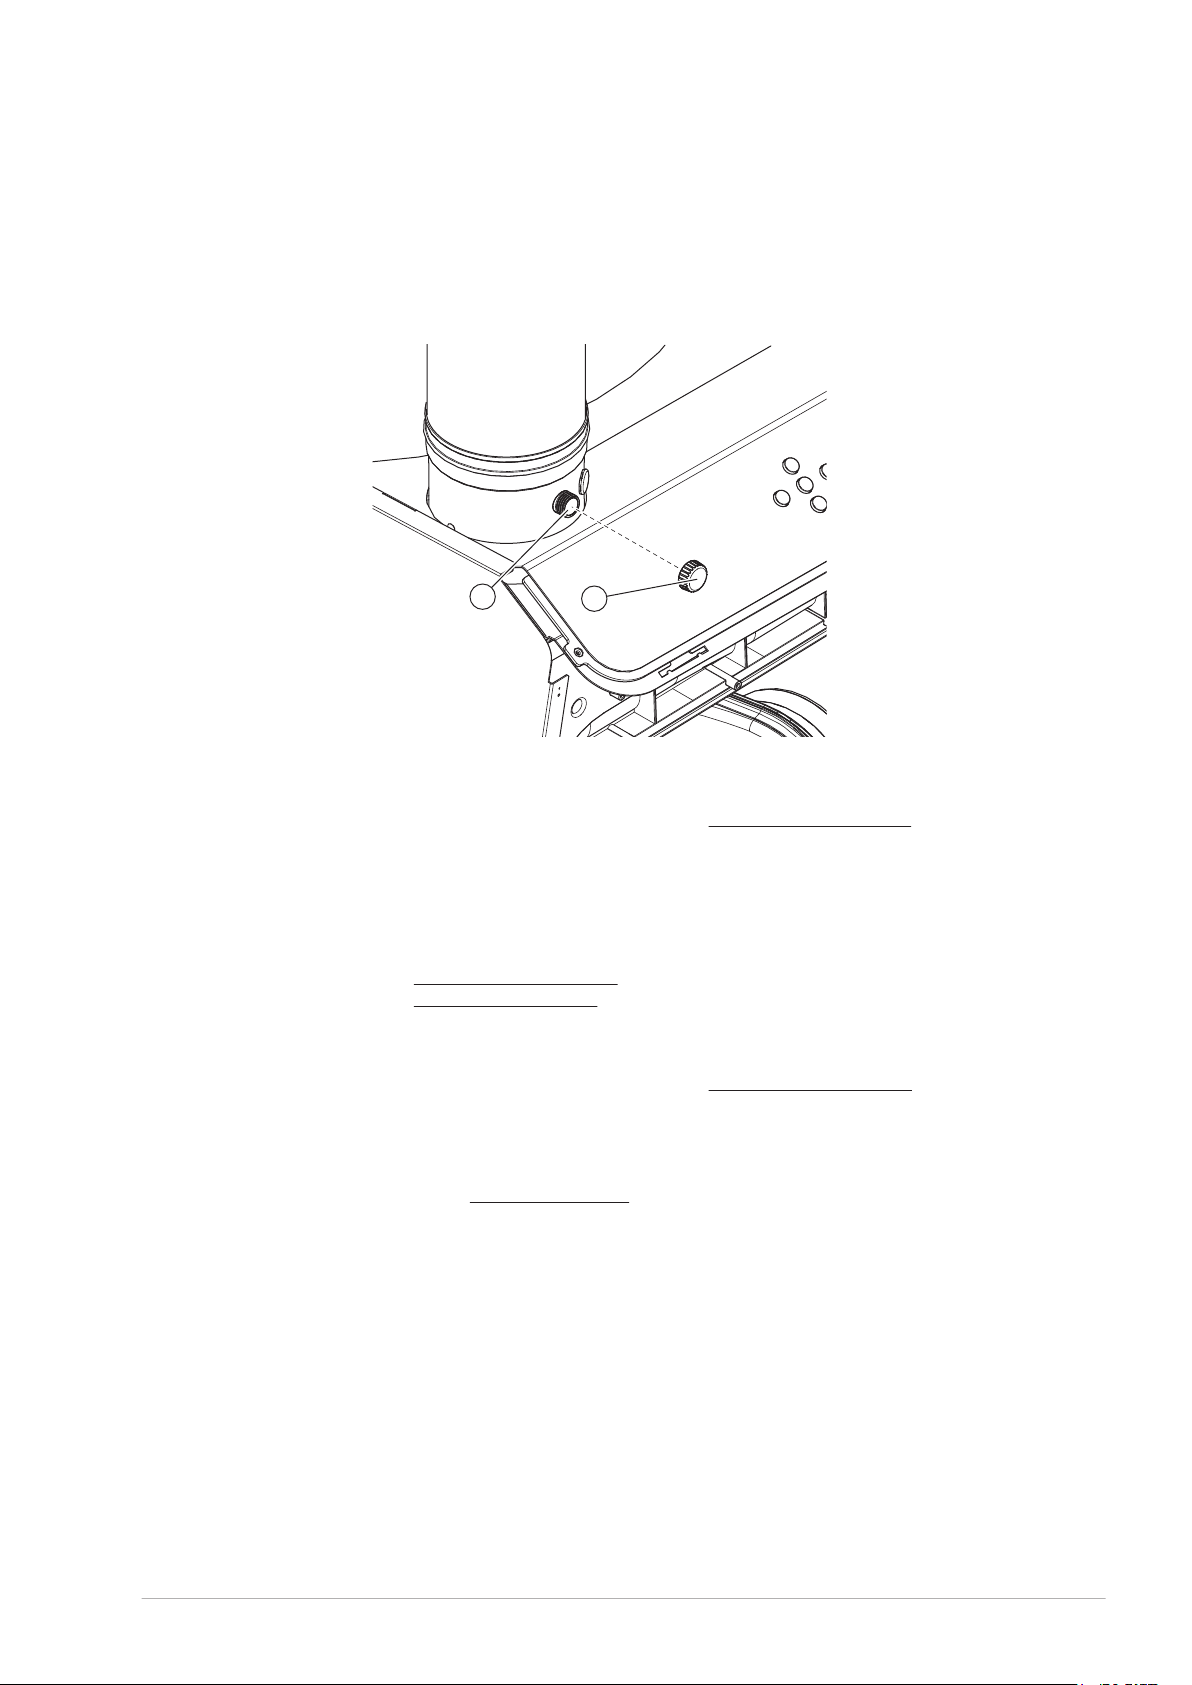
Remove the cap (1) from the test nipple (2) of the flue gas outlet pipe.
2.
Place the measurement probe of the CO2 meter in the test nipple of the flue gas
3.
outlet pipe.
Turn on the water heater, refer to Turn on the water heater (see section 4.2).
4.
5.
Set parameter 201 to Hi, refer to Settings (see section 10).
If necessary, create a heat demand:
6.
Use a hot water draw-off point to tap water, or
-
Raise the setpoint of the water temperature, refer to Set the water
-
temperature (see section 4.2.2).
Wait until the measured value on the CO2 meter remains stable for some time. This
7.
can take several minutes.
Compare the full load measured value to the value from the appendix Gas details.
8.
The CO2 value at full load must be within ±1.0 vol% of the CO2 value stated in the
table.
1. Adjuster screw
2. Gas control valve
3. Gas supply pipe
4. Sealing screw
Caution
c
54 Installation, Maintenance and Service part
When the CO2 value is not correct, refer to General errors (see section
12.1.1), CO2 value (at full load) is not correct.
Do not use the water heater when the CO2 value is not correct and this is not
caused by the restrictor, venturi, venting system or gas category:
Switch off the appliance.
•
Turn off the gas supply.
•
Put the cover back on the water heater.
•
Contact your supplier.
•
9.
Set parameter 201 to Lo, refer to section Settings (see section 10).
Wait until the measured value on the CO2 meter remains stable for some time. This
10.
can take several minutes.
Compare the measured value to the value measured under full load.
11.
The CO2 value at partial load must be within ±0.3 vol% of the CO2 value measured
under full load.
If necessary, use a hex driver to adjust the adjuster screw until the CO2 value is
12.
correct.
Turn the screw clockwise for a higher CO2 value.
a.
Turn the screw anticlockwise for a lower CO2 value.
b.
13.
If applicable, set the temperature value back to the original value (parameter 002).
14.
Set parameter 201 to dIS, refer to Settings (see section 10).
Press [RESET]. The water heater goes into OFF mode.
15.
Page 55
Set the control switch on the side of the water heater to 0 to turn off the water
1
2
16.
heater.
Remove the measurement probe of the CO2 meter from the test nipple and place the
17.
cap (1) back on the nipple (2).
Shut off the gas supply.
18.
Fig. CO2 value
1. Cap
2. Test nipple
8.9.5 Turn on the water heater
Refer to the procedure in the user part to Turn on the water heater (see section 4.2).
8.10
Decommisioning
To decommission the water heater:
Turn off the water heater (see section 8.10.1)
1.
Drain the water heater (see section 8.10.2)
2.
8.10.1 Turn off the water heater
Refer to the procedure in the user part to Turn off the water heater (see section 4.3) and
isolate the water heater from the mains power supply.
8.10.2
Draining
Refer to the installation diagram (see section 8.3) when you drain the water heater:
Close the manual gas valve (10).
1.
If applicable, close the service stop valve (11) in the hot water pipe.
2.
Close the stop valve (10).
3.
Open the drain valve (9).
4.
Aerate the entire installation of air until the water heater is completely drained.
5.
0312934_DR-CC_UKUK_V1.0, 2018-03-01 55
Page 56

56 Installation, Maintenance and Service part
Page 57

9 Conversion of gas type
Caution
Conversion of the water heater may only be carried out by a qualified person.
c
Use a special conversion kit to converse the water heater when:
The water heater has to operate on a different family of gases (liquid petroleum gas
•
or natural gas).
The water heater has to operate on a gas category other than that for which the
•
water heater has been configured at the factory.
You can order the conversion kit you need from the supplier of your water heater. The
conversion kit contains all the parts needed to do the conversion and a description of how
to do the conversion.
The following conversions are possible:
Conversion from natural gas to LPG.
•
Conversion from LPG to natural gas.
•
Conversion from natural gas to natural gas.
•
c
Caution
After the conversion, make sure that the water heater is gas-tight. Make sure that the
supply pressure, the gas control valve pressure, the CO2 value and the switching pressure
have the correct value.
0312934_DR-CC_UKUK_V1.0, 2018-03-01 57
Page 58

58 Installation, Maintenance and Service part
Page 59
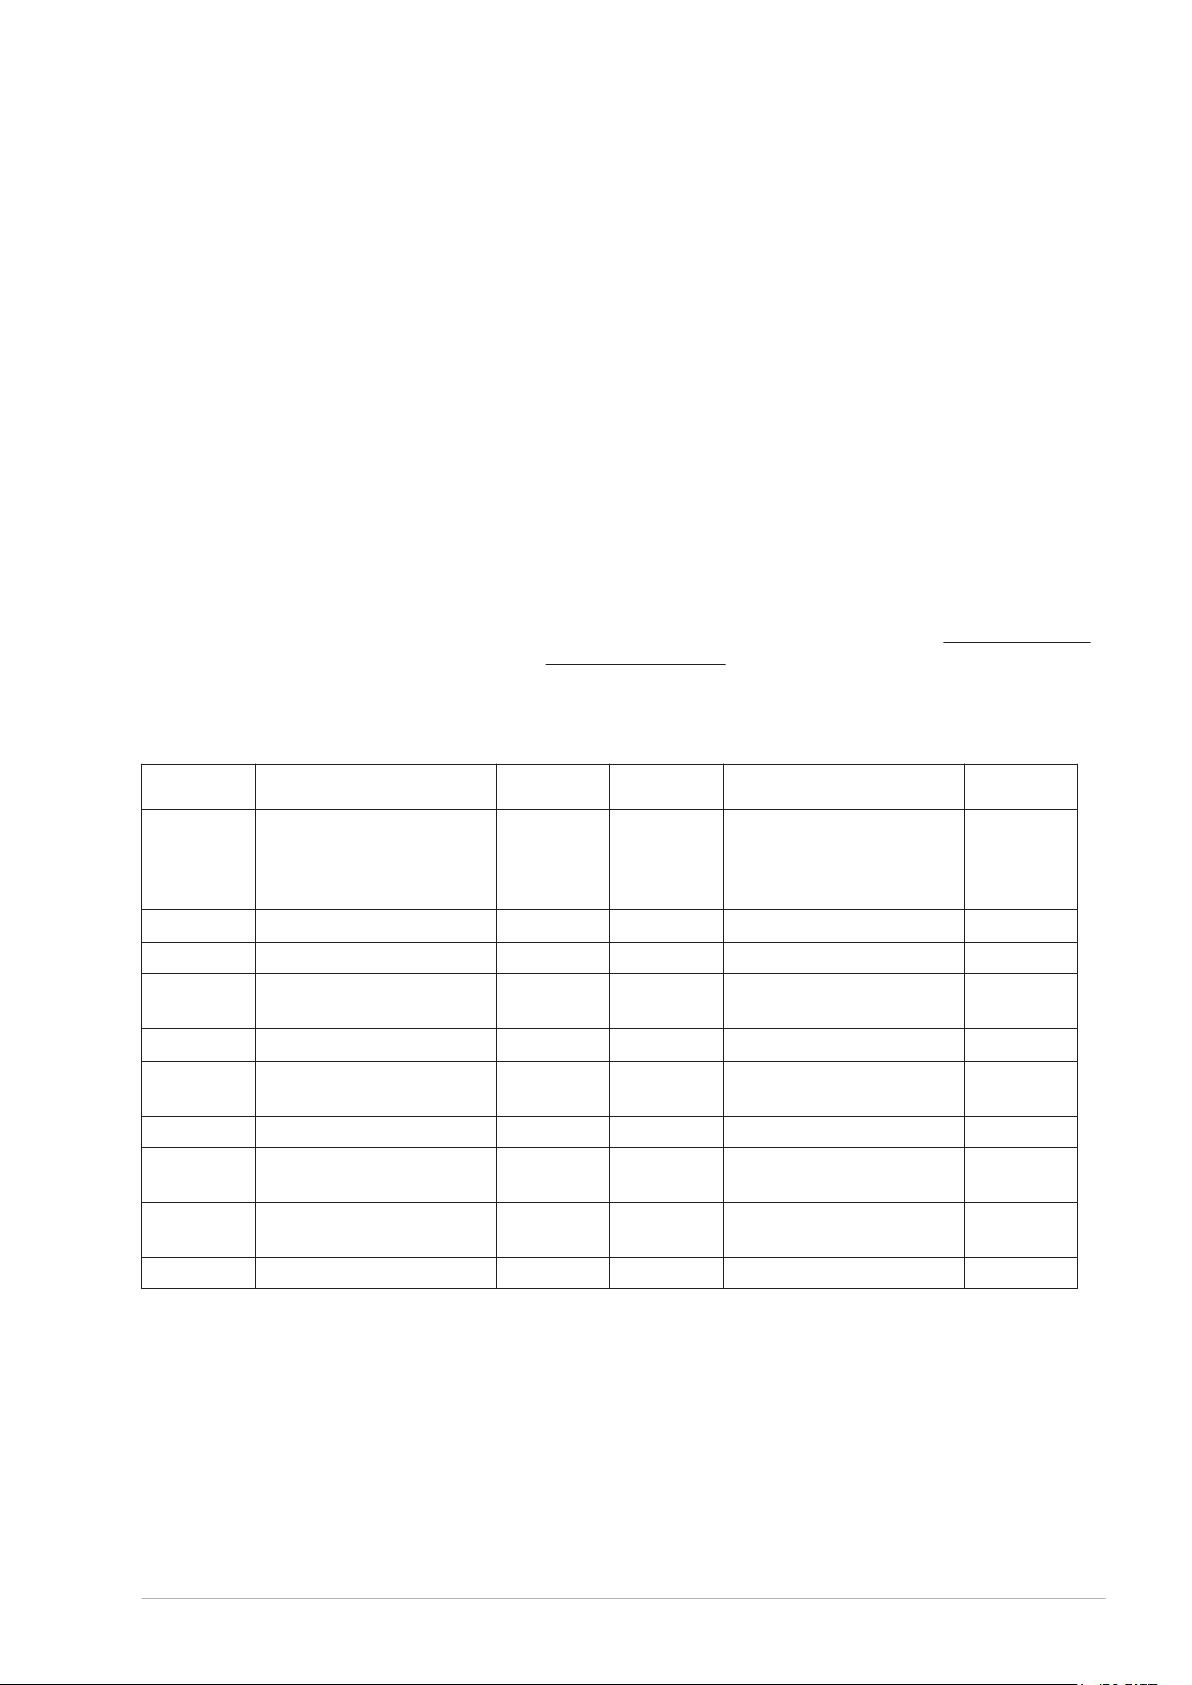
10 Settings
10.1 Operator interface
The operator interface is parameter driven and enables the user to change parameters and
to verify the status and history of the water heater.
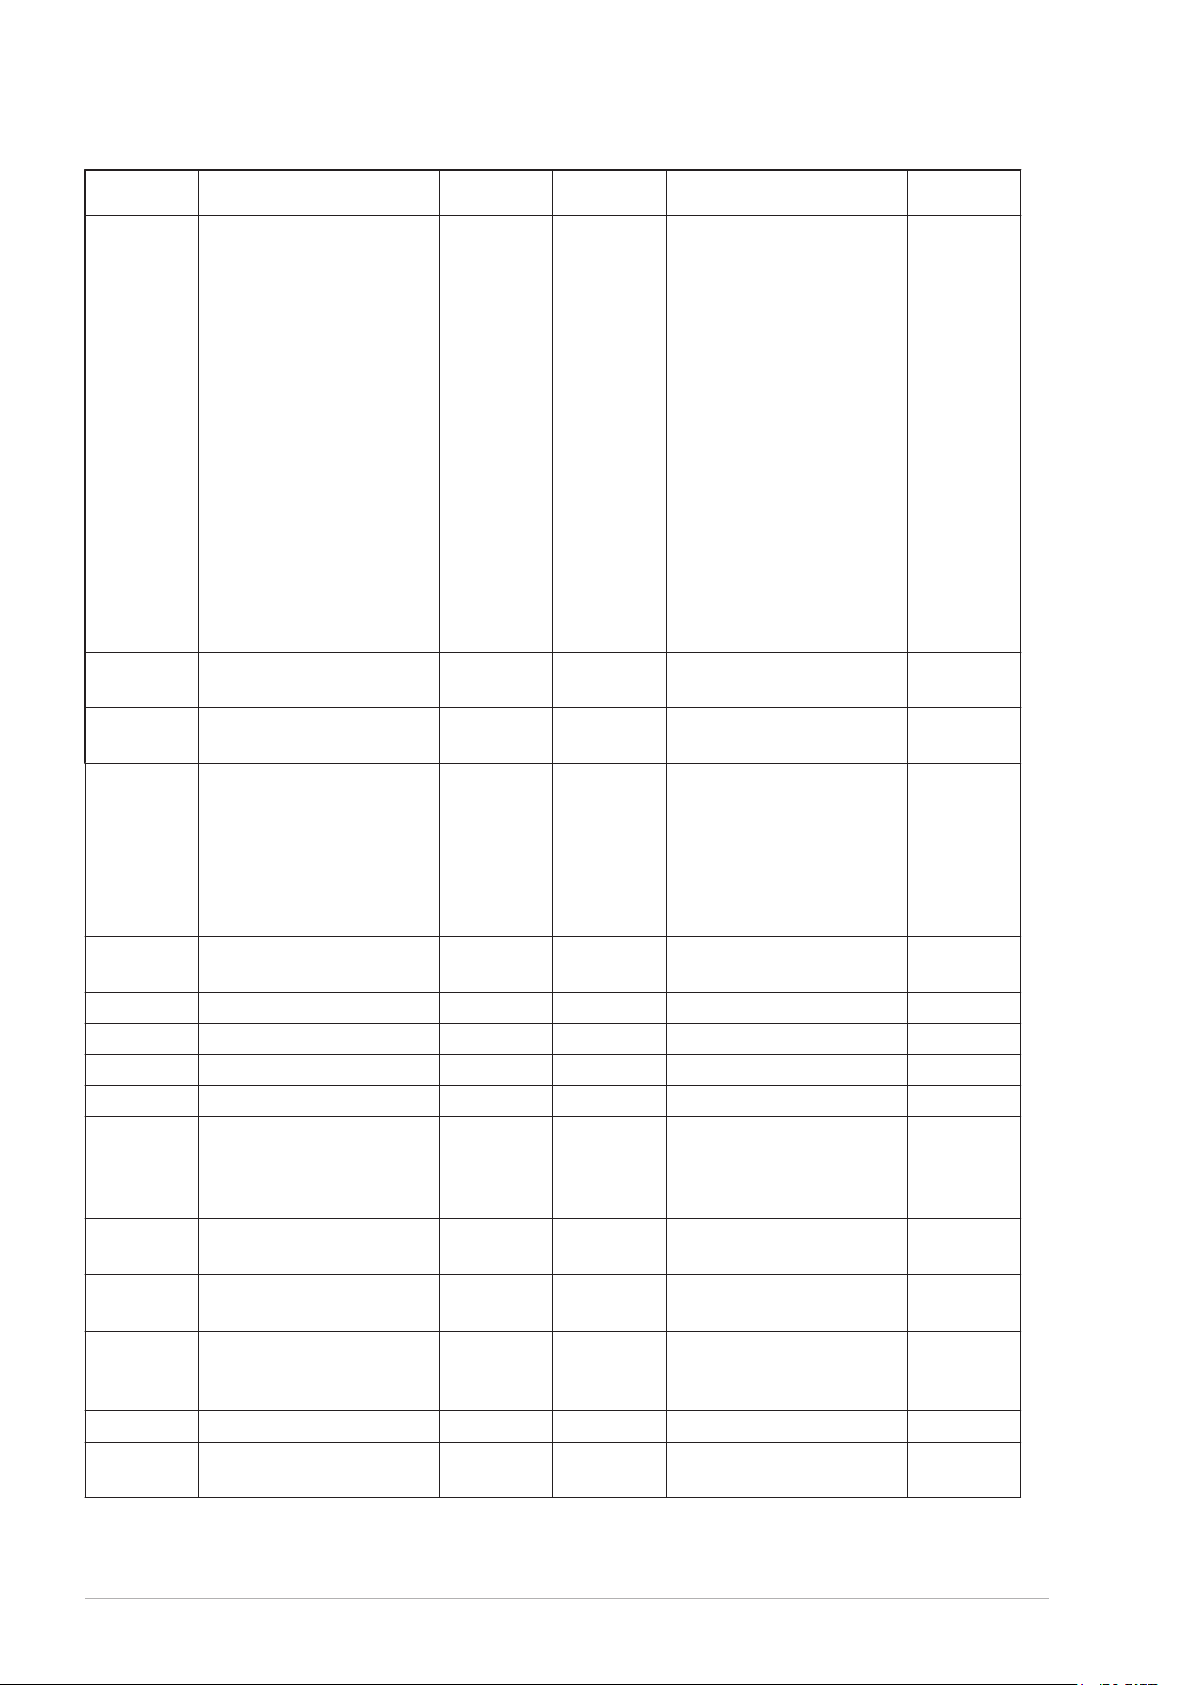
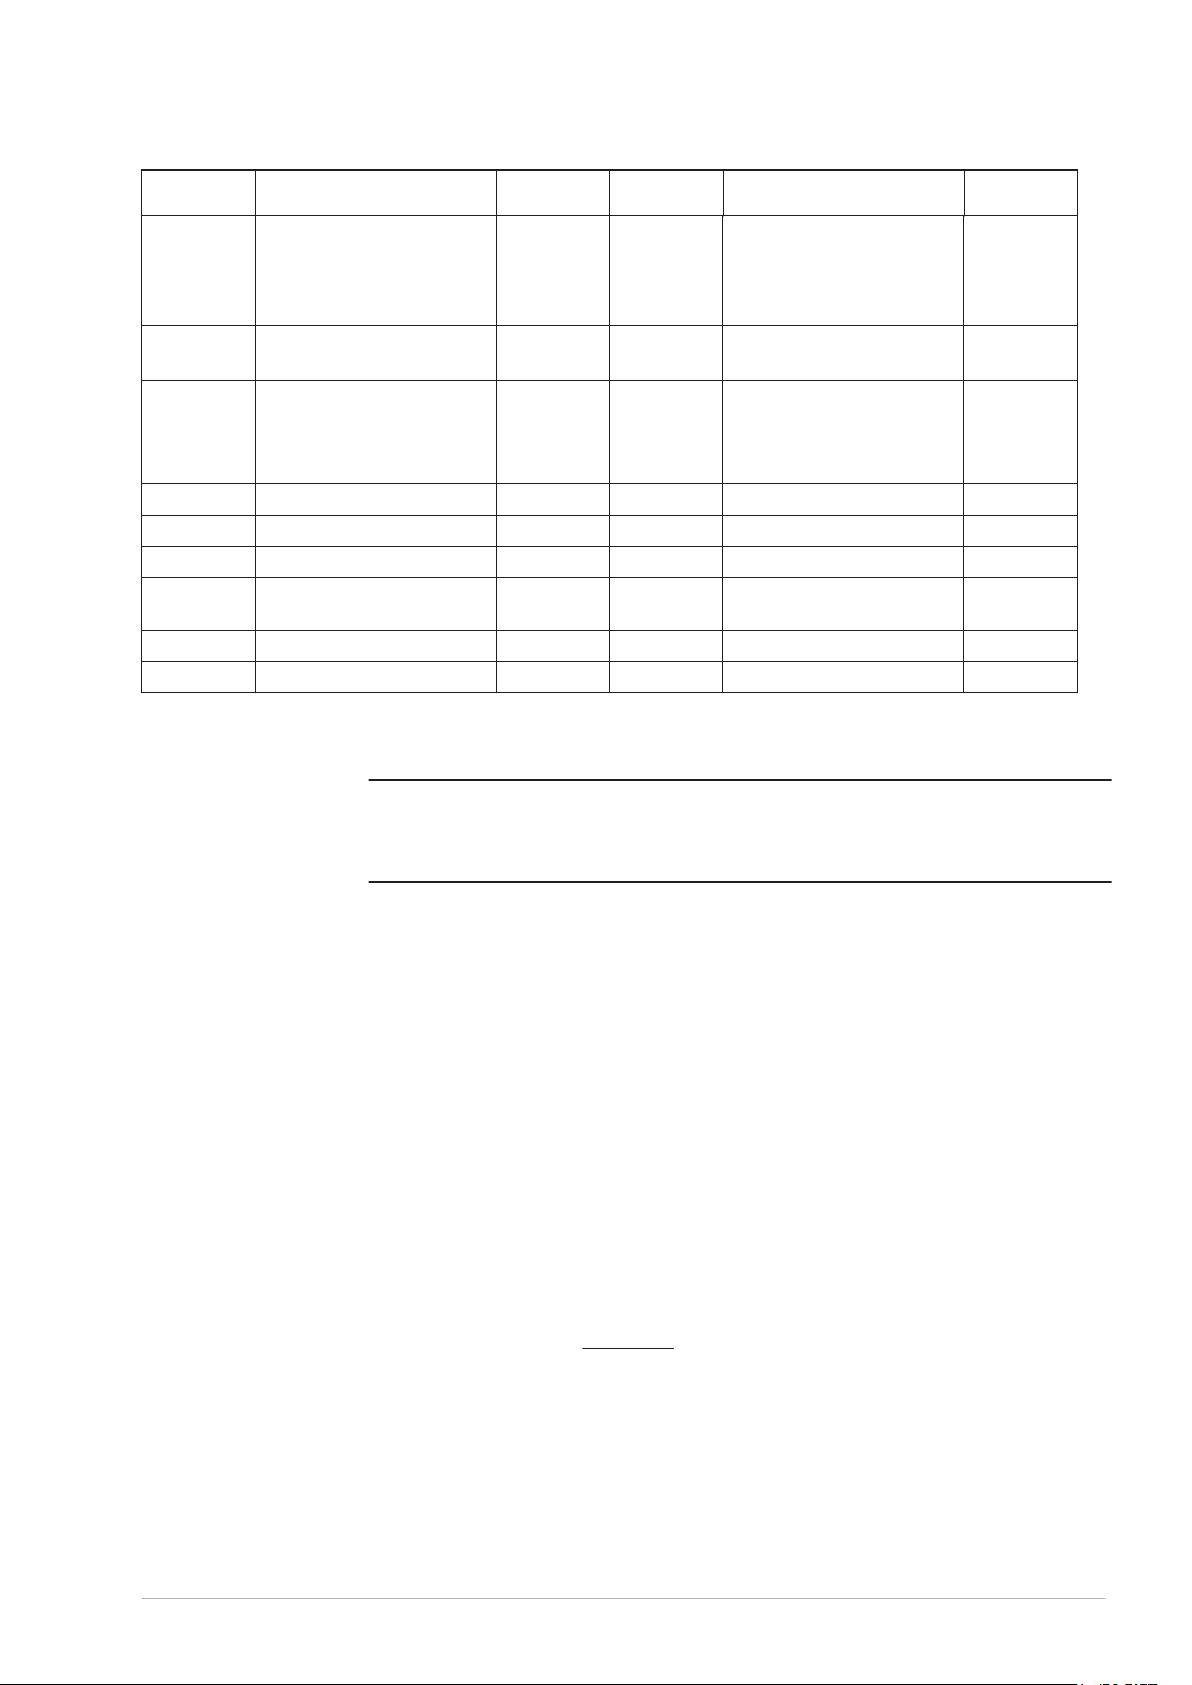
When you press [MENU] once, parameters 001 to 120 can be accessed. All other
parameters can be accessed when you press [MENU] for 10 seconds.
For more information about how to use the operator interface, refer to Operator interface
(see section 3.1) and Set a parameter value (see section 4.1).
10.2
Parameter Description Unit/Value Adjustable Range Default
001
002
003
004
005
101/
102
109
112
113
115
(2)
Turn the water heater on or off.
Setpoint ON-mode ºC Yes
Hysteresis ºC Yes
Turn setpoint EXT-mode (005)
on or off.
Setpoint EXT-mode 2 ºC Yes
Actual water temperature °C No
Actual Ionisation signal μA No
Status EXT contact
Status air proving switch
Actual fan speed x10 rpm No
Parameters
Off
ON
ENA
dIS
OPE
CLo
OPE
CLo
Yes
Yes
No
No
Off - water heater off
(OFF mode)
ON - water heater on
(ON mode)
40…max setpoint
2…15 10
ENA - Enable
dIS - Disable
40…max. setpoint
0…99
0…15
OPE - EXT contact open
CLo - EXT contact closed
OPE – air proving switch open
CLo - air proving switch closed
0…990
(1)
(1)
Off
65
dIS
70
-
-
-
-
-
0312934_DR-CC_UKUK_V1.0, 2018-03-01 59
Page 60
Parameter Description Unit/Value Adjustable Range Default
116
117
120
201
202
203
204
205
207
208
209
Status burner Initialization
Reset
Stand-by
Pre-purge (1)
Pre-Purge (2)
Pre-Ignition
Ignition
Flame check
Burn
Post-Burn
Post-Purge (1)
Post-Purge (2)
Blocking
Lockout
Warning
Burner Boot
Actual error number # No
Time left till service reminder
appears on display
Test cycle
Turn the power anode warning
on or off.
Minimum fan speed ×10 rpm No
Ignition fan speed ×10 rpm No
Maximum fan speed ×10 rpm No
Maximum setpoint ºC No
Minimum load % Yes
Anti legionella setpoint ºC Yes
Months
Days
dIS
FAn
Lo
Ign
Hi
rEg
Off
ON
No
No
Yes
Yes
0 - Initialization
1 - Reset
2 - Stand-by
3 - Pre-purge
(part 1)
4 - Pre-Purge
(part 2)
5 - Pre Ignition
6 - Ignition
7 - Flame check
8 - Burn
9 - Post Burn
10 - Post Purge (part 1)
11 - Post Purge (part 2)
12 - Blocking
13 - Lockout
14 - Warning
15 - Burner Boot
C02…S13
--- - no error
≥ 1 Month = 01 - 36
< 1 Month = 01d - 31d
dIS - leave test cycle
FAn - pre-purge on ignition
speed
Lo - burn on partial load
Ign - burn on ignition speed
Hi - burn on full load
rEg - t.b.d.
Off - power anodes deactivated
ON - power anodes activated
0…990
0…990
0…990
40…85 70
0…50
0 and 1 = minimum load
50 = 50% between minimum
load and maximum load
40…DHW max. (par. 207) 65
-
-
12
dIS
ON
-
-
-
0
210
211
212
270
Anti legionella on or off
Service reminder
Setting service interval Months Yes
Last lock-out error # No
Off
ON
Off
ON
rst
Yes
Yes
Off anti legionella deactivated
ON anti legionella activated
Off - service reminder off
ON - service reminder on
rst - reset service reminder
0…36 12
C02…S14
--- - no error
Off
ON
-
60 Installation, Maintenance and Service part
Page 61
Parameter Description Unit/Value Adjustable Range Default
271
272
273
274
275
276
277
278
281
Interval between last lock-out
and read-out.
Last blocking error # No
Interval between last blocking
error and read-out.
Number of flame failures # No
Number of successful ignitions ×100 No
Number of failed ignitions # No
Total of actual days that control
is active
Total of actual burning days ×10 days No
Selection code # No
Minutes
Hours
Days
Weeks
Minutes
Hours
Days
Weeks
×10 days No
No
No
00n...59n = 0 till 59 minutes
01h...23h = 1 till 23 hours
01d...06d = 1 till 6 days
01...63 = 1 till 63 weeks
C02…S14
--- - no error
00n...59n = 0 till 59 minutes
01h...23h = 1 till 23 hours
01d...06d = 1 till 6 days
01...63 = 1 till 63 weeks
0…990
0…990
0…990
0…990
0…990
0…990
-
-
-
-
-
-
-
-
-
1 - The maximal setpoint (parameter 207) is factory set at 70. A qualified engineer can modify this value.
2 - Parameter 005 will only be accessible when parameter 004 is set on ENA.
Note
When parameter 202 is set to Off, the anode warning Ano will not be shown on the
n
display. Also when there is a problem with the anode protection, this warning will not be
shown. The tank protection cannot be guaranteed. The warranty will be void.
10.3
10.4
Hysteresis
The water heater does not start immediately when the water temperature is below the
temperature setpoint. To prevent that the water heater switches on and off too often,
there is a margin; the hysteresis.
The standard hysteresis is 10 °C. Thus, the water heater starts to heat up when the water
temperature is 10 °C below the temperature setpoint. Use parameter 003 to change the
hysteresis.
Error history
The control unit automatically stores data of occurred errors and failed actions of the water
heater. The error history can be used to analyse the water heater and to find the causes of
the errors and failed actions.
Use parameters 270 till 273 to read the errors. Use parameters 274 till 277 to read the
appliance history, refer to Parameters (see section 10.2).
0312934_DR-CC_UKUK_V1.0, 2018-03-01 61
Page 62
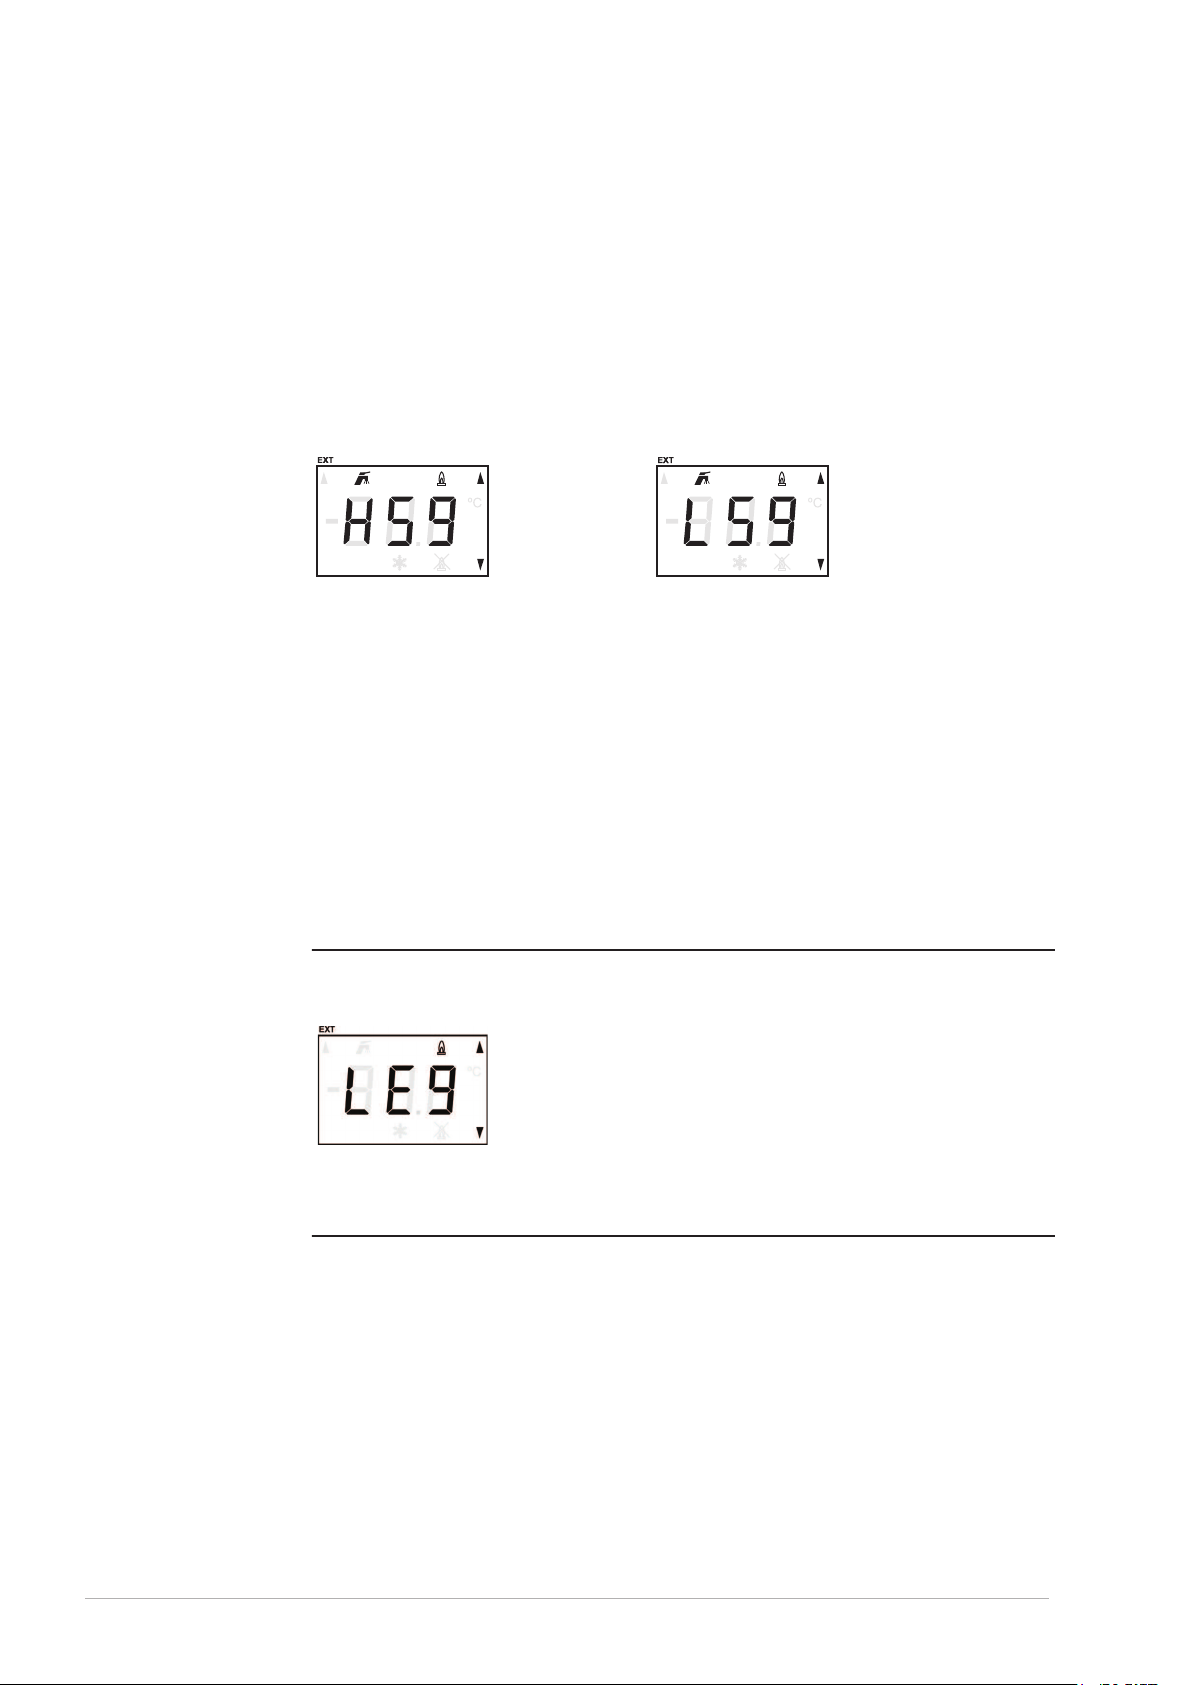
10.5 Test cycle
The test cycle can be used to activate the test modes. These test modes can, for example,
be used to set the CO2 value at full and at partial load or to check the air pressure
differential.
Use parameter 201 to activate the test cycle.
The test cycle is shown on the display. Each test setting can be recognized by the first
letter on the display.
Fig. Example Hi-setting test cycle Fig. Example Lo-setting test cycle
10.6 Legionella prevention
Use parameter 210 to activate the legionella prevention. When the anti legionella program
is activated, the water heater heats the water to the anti legionella setpoint. When the anti
legionella setpoint is reached, the temperature may not decrease more than 3 °C below
the anti legionella setpoint for 60 minutes. The anti legionella setpoint can be set with
parameter 209.
The anti legionella program has 2 functionalities:
"start-up" functionality: The anti legionella program starts when the water
•
temperature did not exceed the anti legionella setpoint within 2 hours after the water
heater is turned on.
"normal" functionality: The anti legionella program starts when the water
•
temperature did not exceed the anti legionella setpoint for 7 days (168 hours).
n
Note
When you activate the anti legionella program, parameter 002 (setpoint ON mode) will be
overruled. The display will show the text LEG when the anti legionella mode is activated.
Note
When the water heater is heating the water, the current water temperature and the anti
legionella setpoint is shown alternately on the display.
62 Installation, Maintenance and Service part
Page 63
11 Maintenance
The water heater needs maintenance at least once a year. The maintenance interval is
determined by the water quality, the average burning time each day and the set water
temperature.
On the operator interface, the maintenance interval can be set as a reminder. The display
shows Src when the pre-set interval has elapsed.
To determine the correct interval, Hamworthy recommends to do a system check on both
the water and the gas side, three months after installation.
Note
n
Do maintenance to maintain an effective and efficient transfer of heat to the water. This
significantly increases the service life of the water heater.
Note
When needed, spare parts can be ordered. To be sure that you receive the correct spare
parts, look at the data plate for the full serial number, the water heater model, and the
used gas category. Use this information when you order the spare parts.
11.1
n
w
Do the following maintenance activities:
Performance check (see section 11.1)
•
Water side maintenance (see section 11.3)
•
Gas side maintenance (see section 11.4)
•
Finalization (see section 11.5).
•
Note
For maintenance purposes, a special gasket and mounting set can be ordered at your
supplier. This kit contains the necessary gaskets, bolts and washers. Look at the data
plate for the correct ordering information.
Performance check
Check if the performance of all components is correct:
Make sure that the water heater operates the operating cycle correctly.
1.
Make sure that the color of the flame is blue.
2.
If applicable, make sure that the T&P valve operates correctly.
3.
Open the T&P valve pressure relief and make sure that water spurt out.
Warning
Hot water can come out of the T&P valve.
Make sure the pressure relief connection of the inlet security group operates
4.
correctly.
Open this pressure relief and make sure that water spurt out.
Remove the cover from the water heater, refer to Installation (see section 8.8.1).
5.
Make sure that the condensate drain operates correctly.
6.
If necessary, remove any contamination.
Make sure that there are no leaks in the venting system.
7.
0312934_DR-CC_UKUK_V1.0, 2018-03-01 63
Page 64
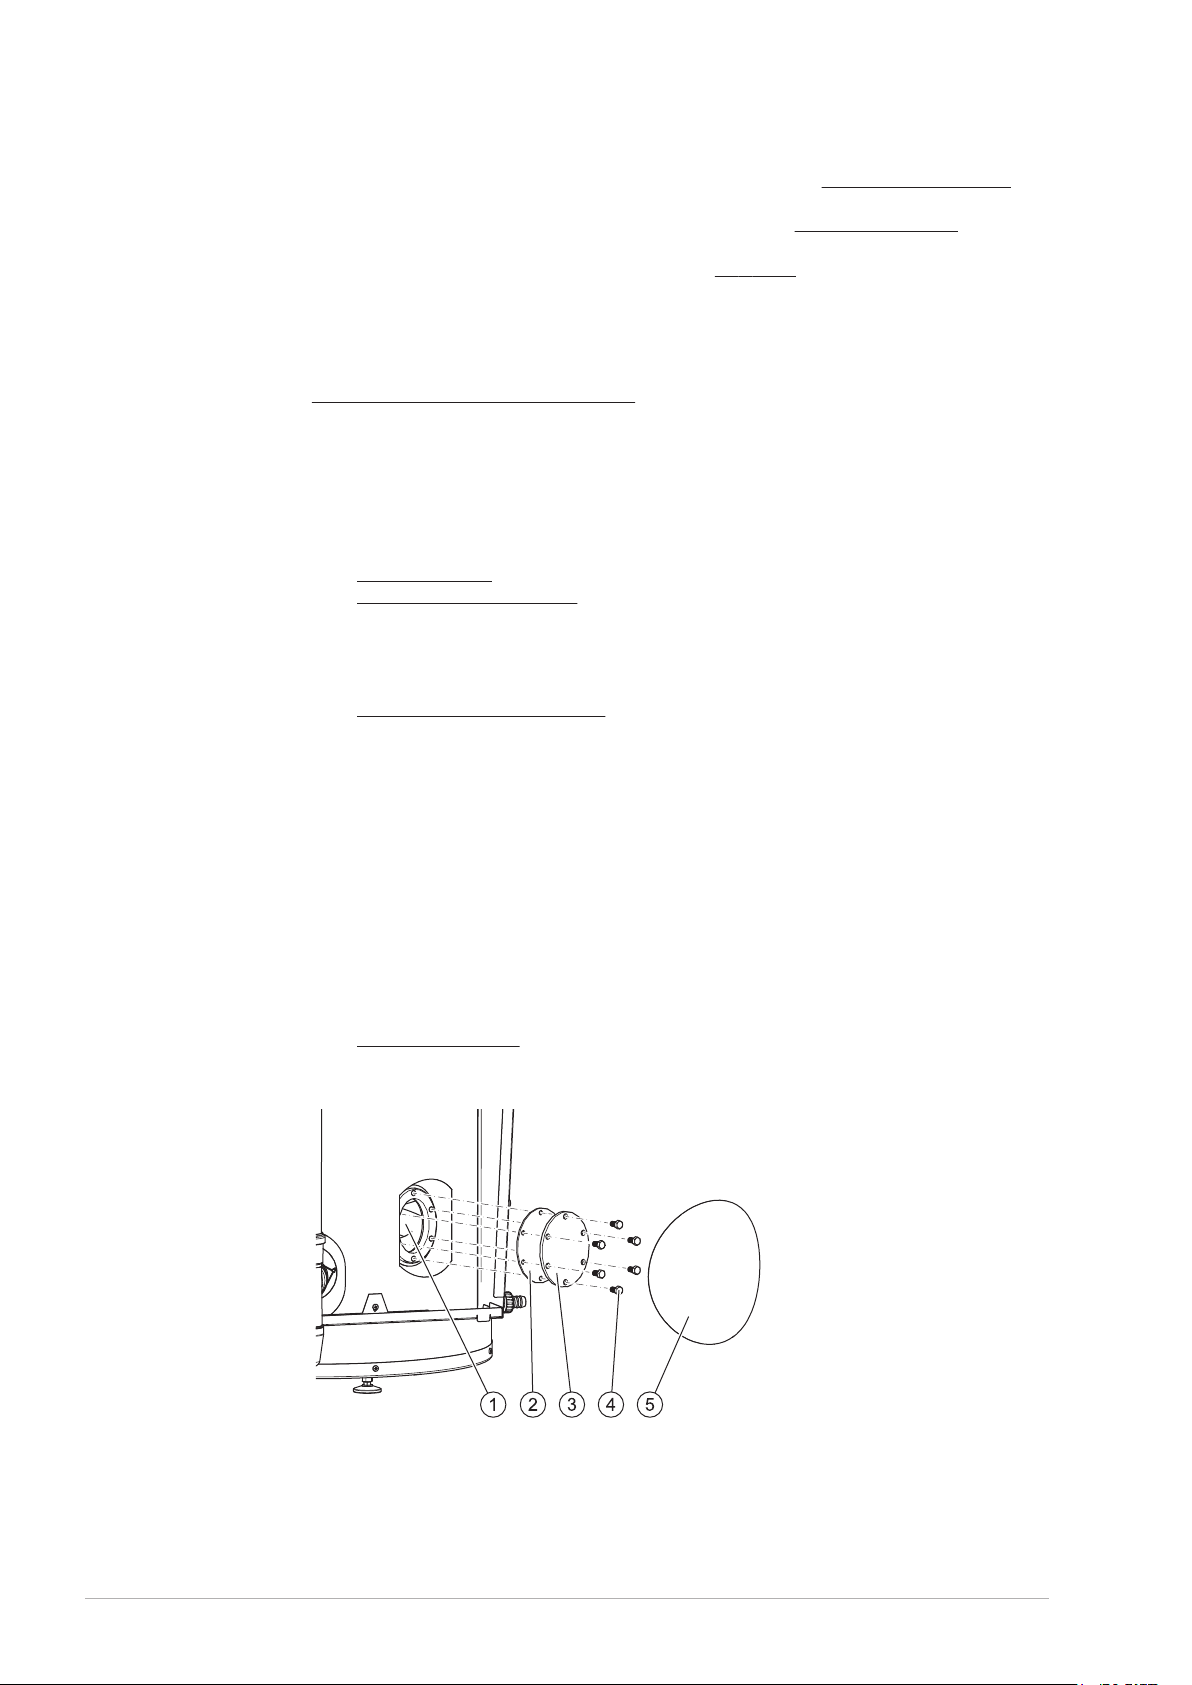
Make sure the air pressure differential is correct, refer to Air pressure differential
8.
(see section 8.9.2).
Make sure the gas supply pressure is correct, refer to Gas supply pressure (see
9.
section 8.9.3).
Make sure the CO2 value is correct, refer to CO2 value (see section 8.9.4).
10.
11.2 Preparation
Isolate the water heater from the mains (see section 4.3.2) before you start maintenance
tasks.
11.3 Water-side maintenance
To do water side maintenance:
Descale the tank (see section 11.3.1)
•
Clean the condensate drain (see section 11.3.2)
•
11.3.1 Descale the tank
To descale and clean the tank:
Decommision the water heater (see section 8.10).
1.
Remove the cover plate (5) on the bottom of the front of the tank.
2.
Remove the isolating material to see the cleaning opening.
3.
Loosen the 6 bolts (4).
4.
Remove the cleaning opening cover (3).
5.
Remove the gasket (2).
6.
Inspect the tank and remove the loose scale deposits and contamination:
7.
Remove the scale and contamination by hand.
a.
If necessary use a descaling agent to remove the scale and contamination.
b.
Contact the supplier of your water heater for advice on what descaling agent to
use.
Replace the gasket.
8.
Close the cleaning opening.
9.
Use a torque wrench to tighten the bolts with a maximal torque of 50 Nm to prevent
damage to the tank
Fill the water heater (see section 8.9.1).
10.
Fig. Cleaning opening
1. Cleaning opening
2. Gasket
3. Cleaning opening
cover
4. Bolts
5. Magnetic cover
plate
11.3.2 Clean the condensate drain
To clean the condensate drain:
Place a tray or towels under the condensate drain to collect water leakage.
1.
Remove the condense trap (2) at the bottom of the condensate drain (1).
2.
64 Installation, Maintenance and Service part
Page 65
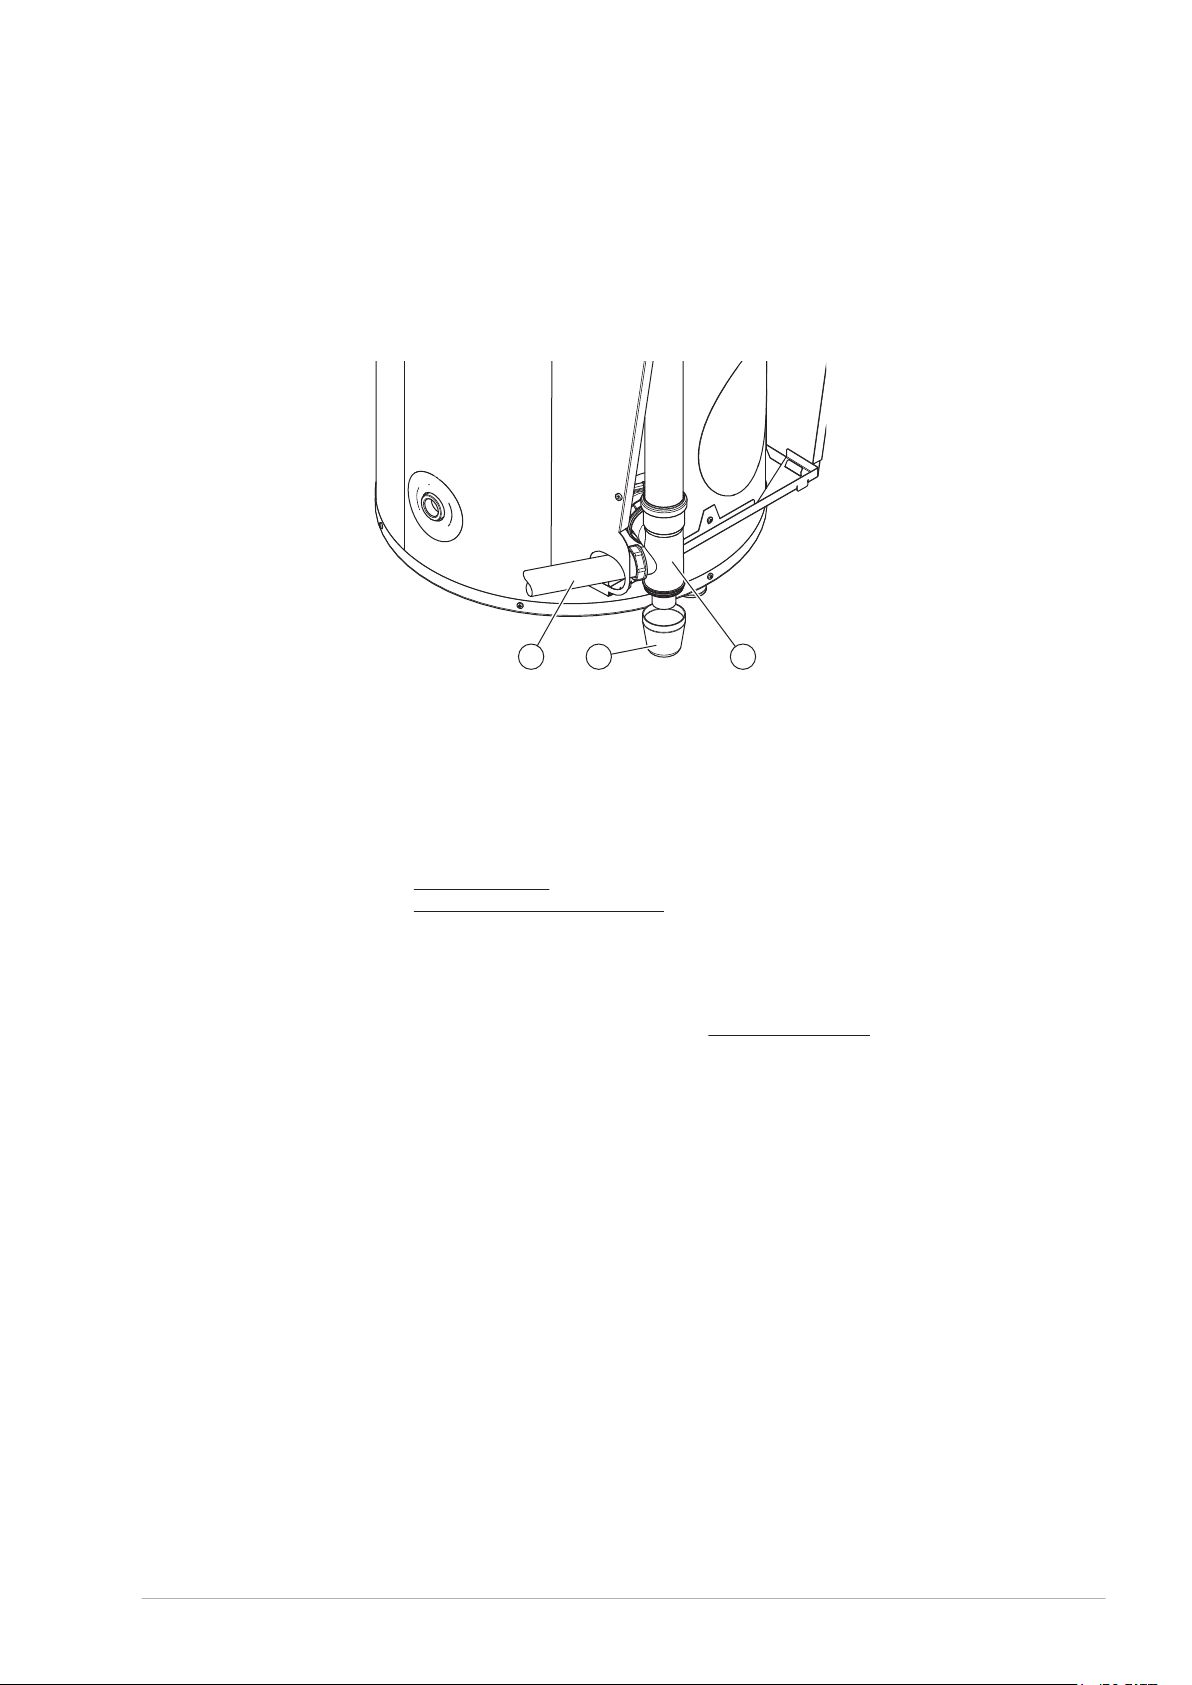
Empty the condense trap and clean it with water.
123
3.
Make sure that there is no grit or other blockages in the condense trap.
4.
Make sure that there is no grit or other blockages in the condensate drain.
5.
Make sure that there is no grit or other blockages in the drain pipe (3).
6.
Make sure that the slope of the drain pipe is correct; 5 mm/m.
7.
Install the condense trap onto the condensate drain.
8.
Fig. Condensate drain
11.4 Gas-side maintenance
1. Condensate drain
2. Condense trap
3. Drain pipe
Do gas side maintenance when the water heater does not operate correctly, the air
pressure differential is not correct and/or the CO2 value is not correct.
To do gas side maintenance:
Clean the burner (see section 11.4.1)
•
Clean the combustion chamber (see section 11.4.2)
•
11.4.1 Clean the burner
Remove the burner engine:
Close the gas control valve, refer to Installation diagram (see section 8.3).
1.
Disconnect all plugs from the burner engine (1).
2.
Disconnect the gas supply pipe (2).
3.
Loosen the two bolts (3) to disconnect the burner engine (4) from the adapter.
4.
Take the burner engine out of the water heater.
5.
0312934_DR-CC_UKUK_V1.0, 2018-03-01 65
Page 66
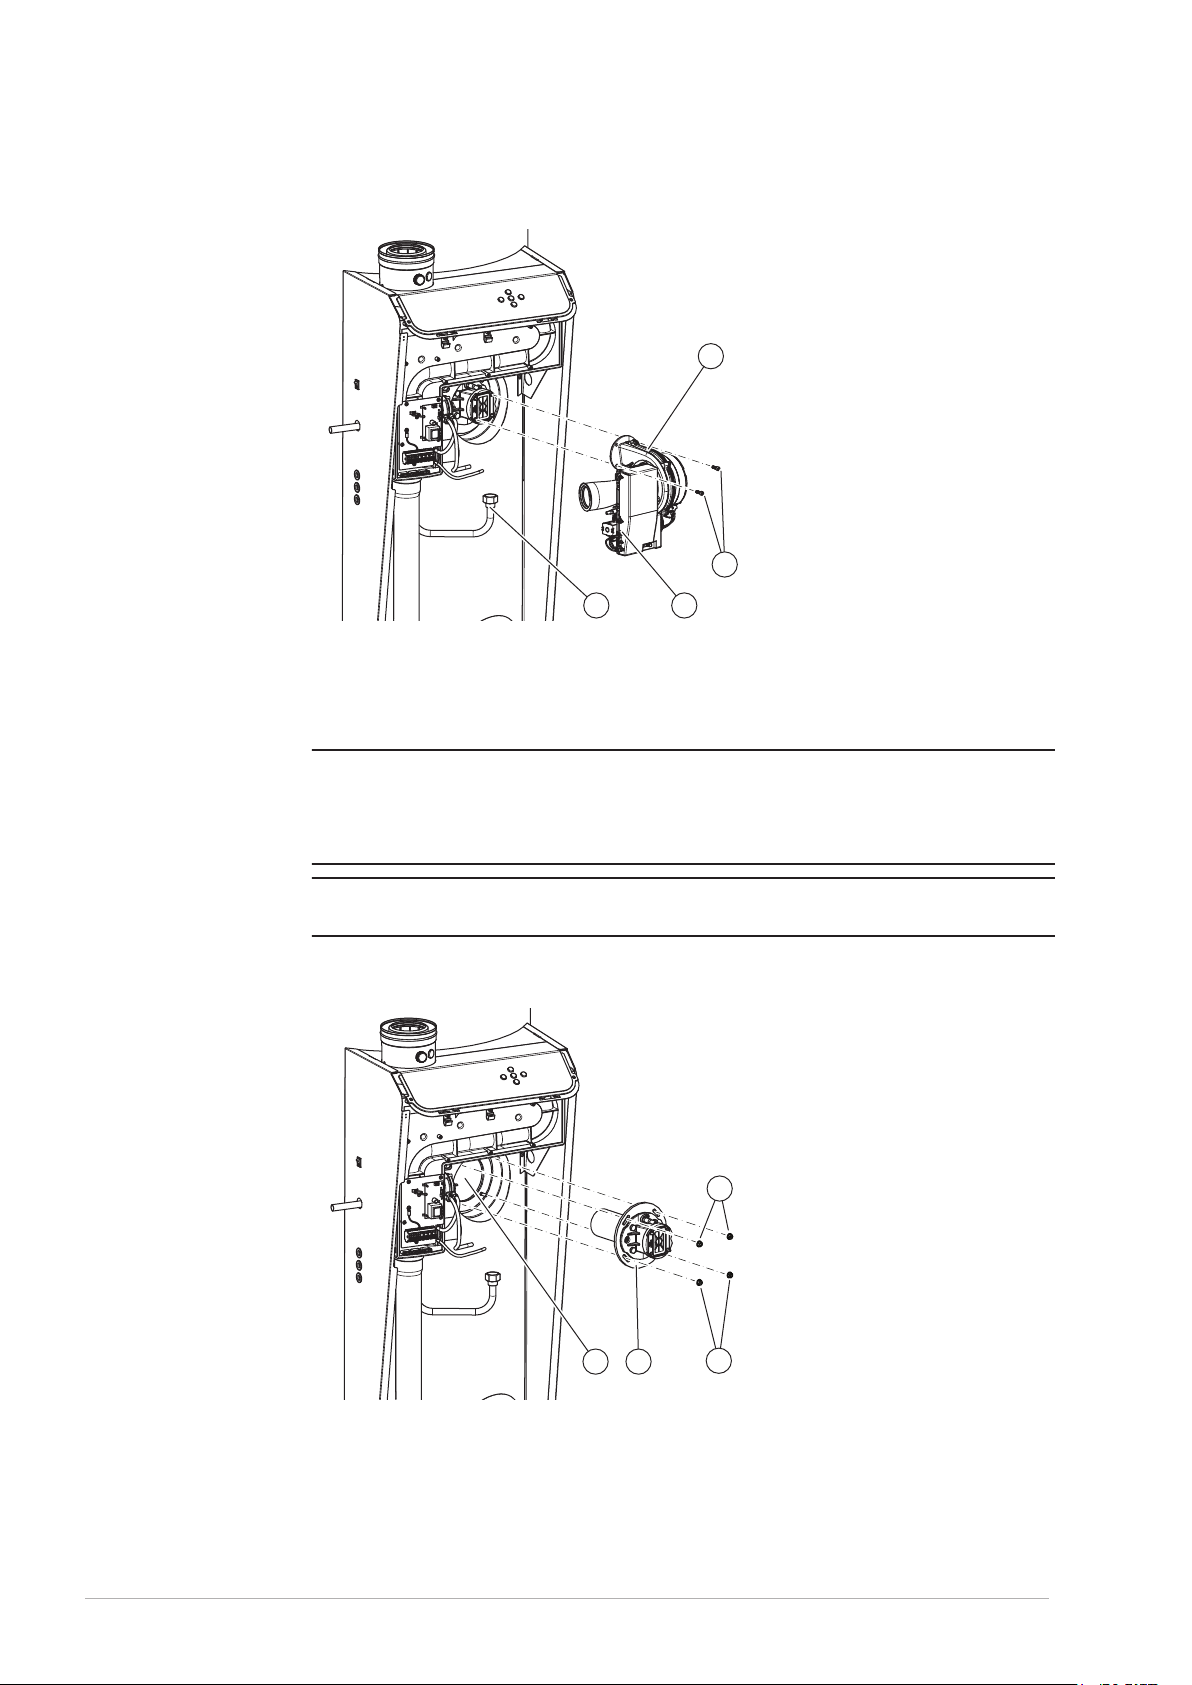
2 1
4
3
67
5
5
c
Fig. Remove the burner engine
1. Plugs on burner
engine
2. Gas supply pipe
3. Bolts
4. Burner engine
Remove the burner:
Loosen the four nuts (5) to disconnect the burner assembly (6) from the combustion
6.
chamber (7).
Take the burner assembly out of the combustion chamber.
7.
Caution
Be carefull, the burner can be hot
Caution
Always replace the seal after removal of the burner
n
Note
Mind the ground cable!
Fig. Remove the burner assembly
5. Nuts
6. Burner assembly
7. Combustion
chamber
Disassemble the burner:
8.
9.
Remove the flame rod (11) from the adapter (12). Do a visual check on the flame
rod.
Remove the hot surface igniter (10) from the adapter. Do a visual check on the hot
surface igniter.
66 Installation, Maintenance and Service part
Page 67
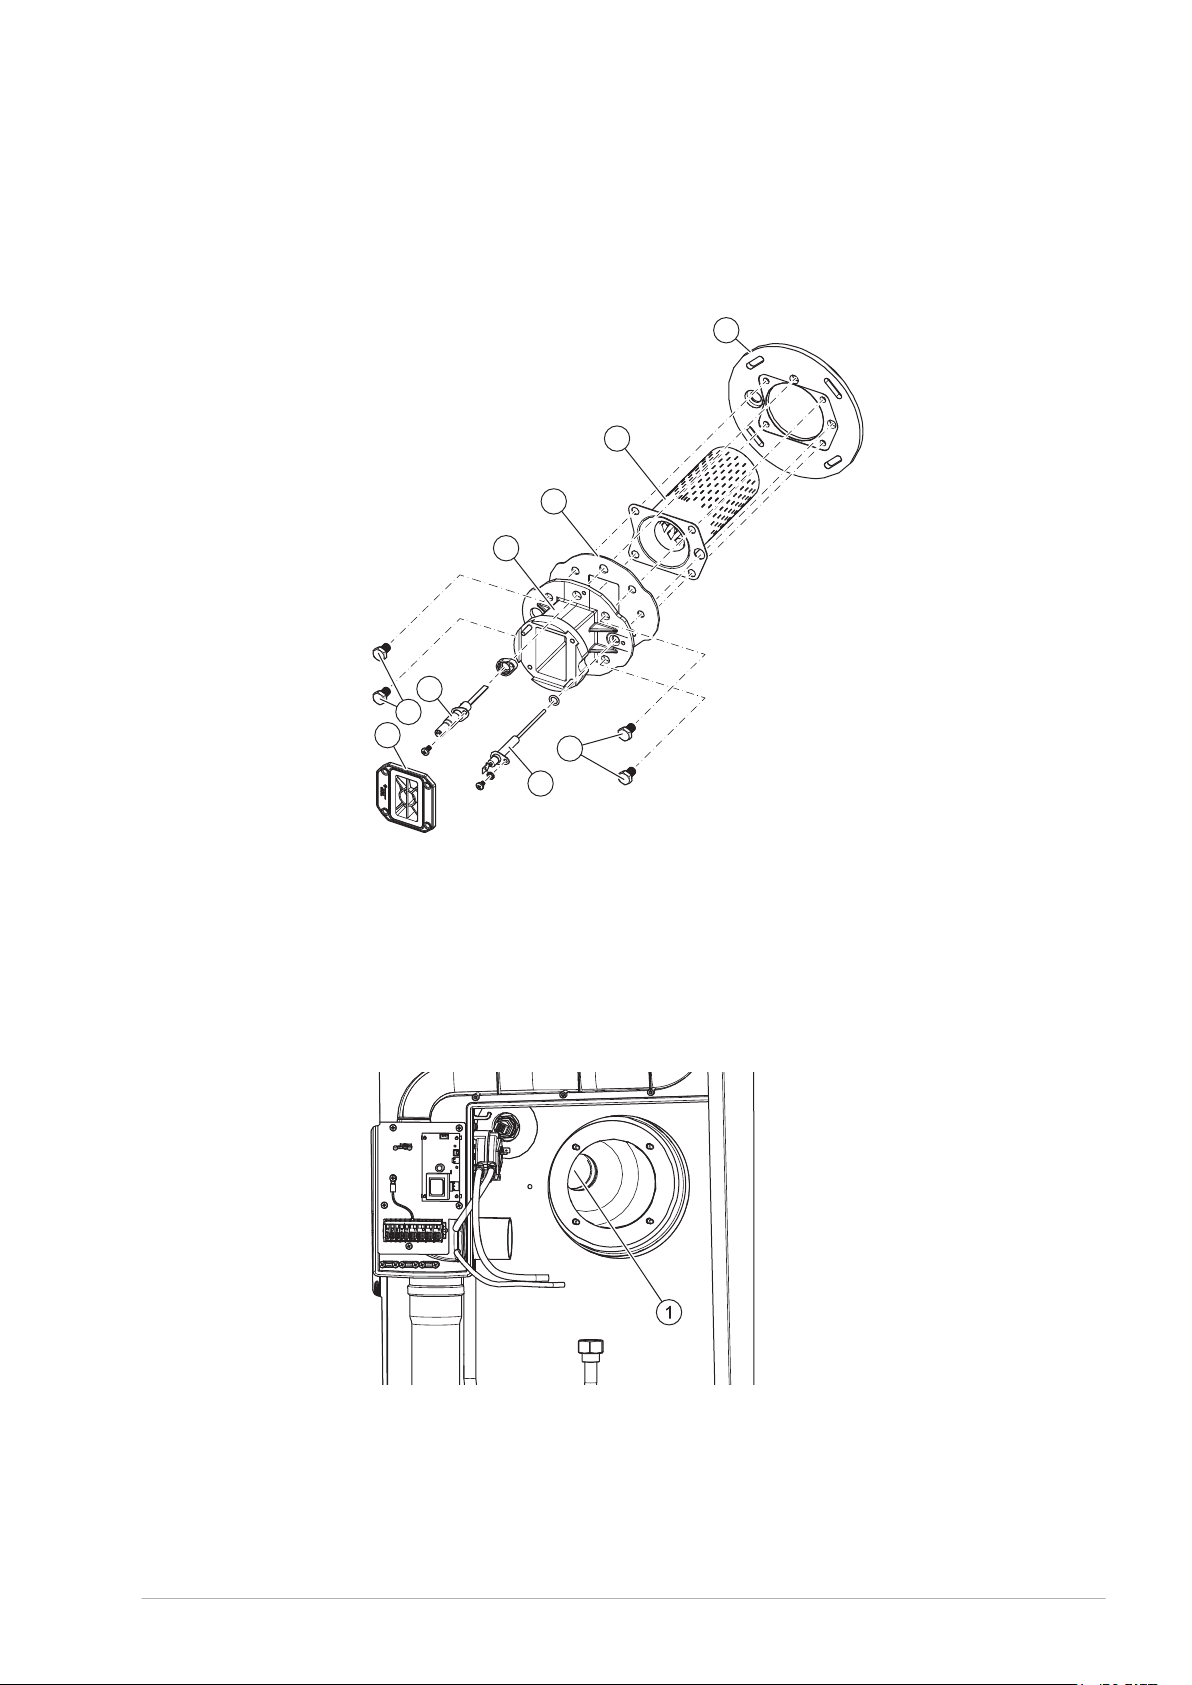
Make sure that there is no tear on the non-return valve (8) and that this valve is not
8
10
11
9
9
12
13
14
15
10.
deformed.
Loosen the four bolts (9) to disconnect the adapter from the burner flange (15).
11.
Take out the burner (14) from the burner flange.
12.
Fig. Disassemble the burner assembly
8. Non return
valve
9. Bolts
10. Hot surface
igniter
11. Flame rod
12. Adapter
13. Gasket
14. Burner
15. Burner
flange
11.4.2
Use compressed air to remove all contamination from the outside to the inside of the
burner (7).
Clean the combustion chamber
Use a vacuum cleaner and a soft brush to clean the combustion chamber (1) of the heat
exchanger.
Fig. Combustion chamber
0312934_DR-CC_UKUK_V1.0, 2018-03-01 67
Page 68
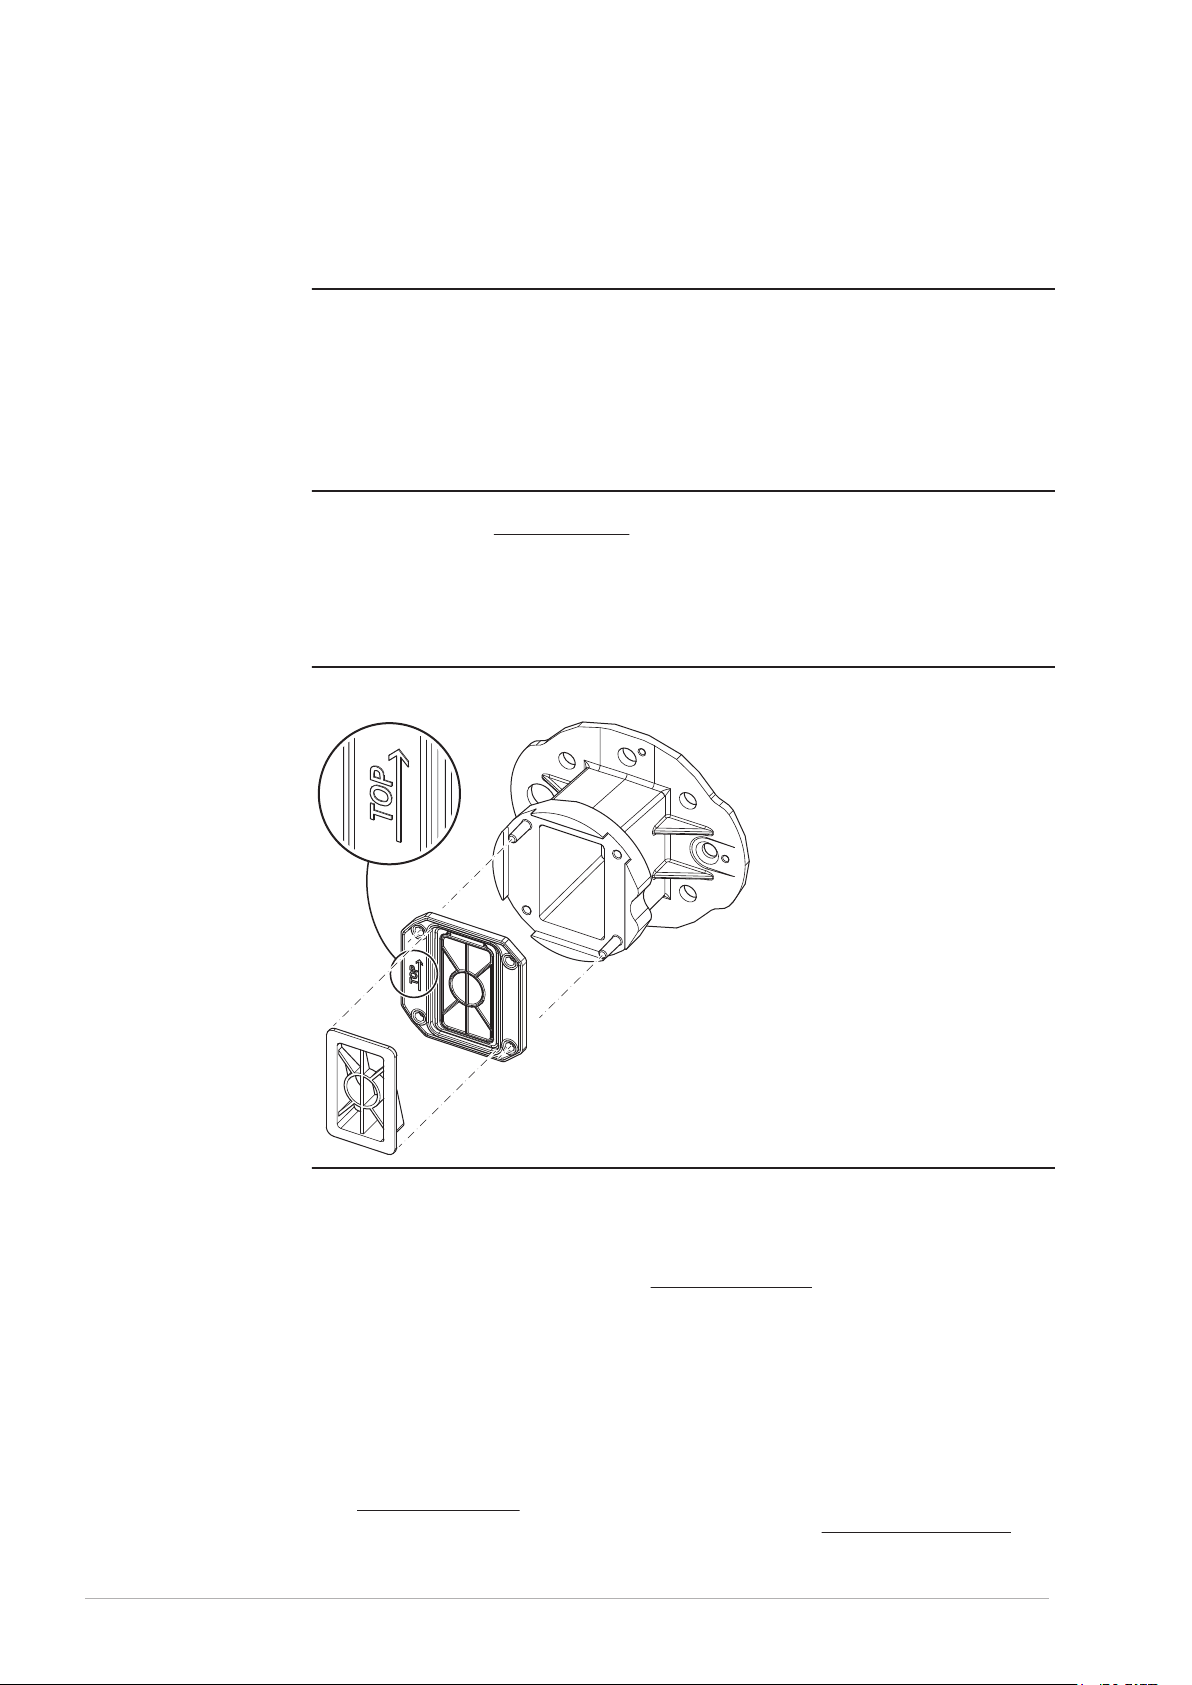
11.4.3 Assemble the burner
Assemble the burner again when the burner and the combustion chamber both are
cleaned.
Note
n
Before reassembly replace the gasket, bolts and washers. You can order a special gasket
and mounting set at your supplier. Look at the data plate for the correct ordering
information.
Note
If necessary, replace the cleaning opening cover with gasket and bolts. You can order a
clean out service kit at your supplier. Look at the data plate for the correct ordering
information.
Refer to the figures in Clean the burner (see section 11.4.1) to assemble the burner:
Place the burner in the burner flange.
1.
Connect the adapter with four bolts to the burner flange.
2.
Install the hot surface igniter and the flame rod on the adapter.
3.
Install the burner assembly with four nuts onto the combustion chamber.
4.
Place the non return valve on the adapter.
5.
Note
Make sure that you install the non return valve upright.
n
Install the burner engine with two bolts to the adapter.
6.
Connect the gas supply pipe to the burner engine.
7.
Connect the flexible air connector to the air inlet box.
8.
Connect all control box plugs.
9.
Open the gas control valve, refer to Installation diagram (see section 8.3).
10.
11.5 Finalization
When all maintenance activities are done, place the cover back on the water heater:
Place the cover on the water heater.
1.
Use a hex driver to tighten the screw at the front of the cover.
2.
After that:
Fill the water heater (see section 8.9.1).
3.
Make sure the air pressure differential is correct, refer to Air pressure differential
4.
(see section 8.9.2).
68 Installation, Maintenance and Service part
Page 69

Make sure the gas supply pressure is correct, refer to Gas supply pressure (see
5.
section 8.9.3).
Make sure the CO2 value is correct, refer to CO2 value (see section 8.9.4).
6.
Turn on the water heater (see section 4.2).
7.
8.
Set parameter 211 to rst, refer to Settings (see section 10).
Press [RESET].
9.
The water heater goes to OFF mode.
0312934_DR-CC_UKUK_V1.0, 2018-03-01 69
Page 70

70 Installation, Maintenance and Service part
Page 71
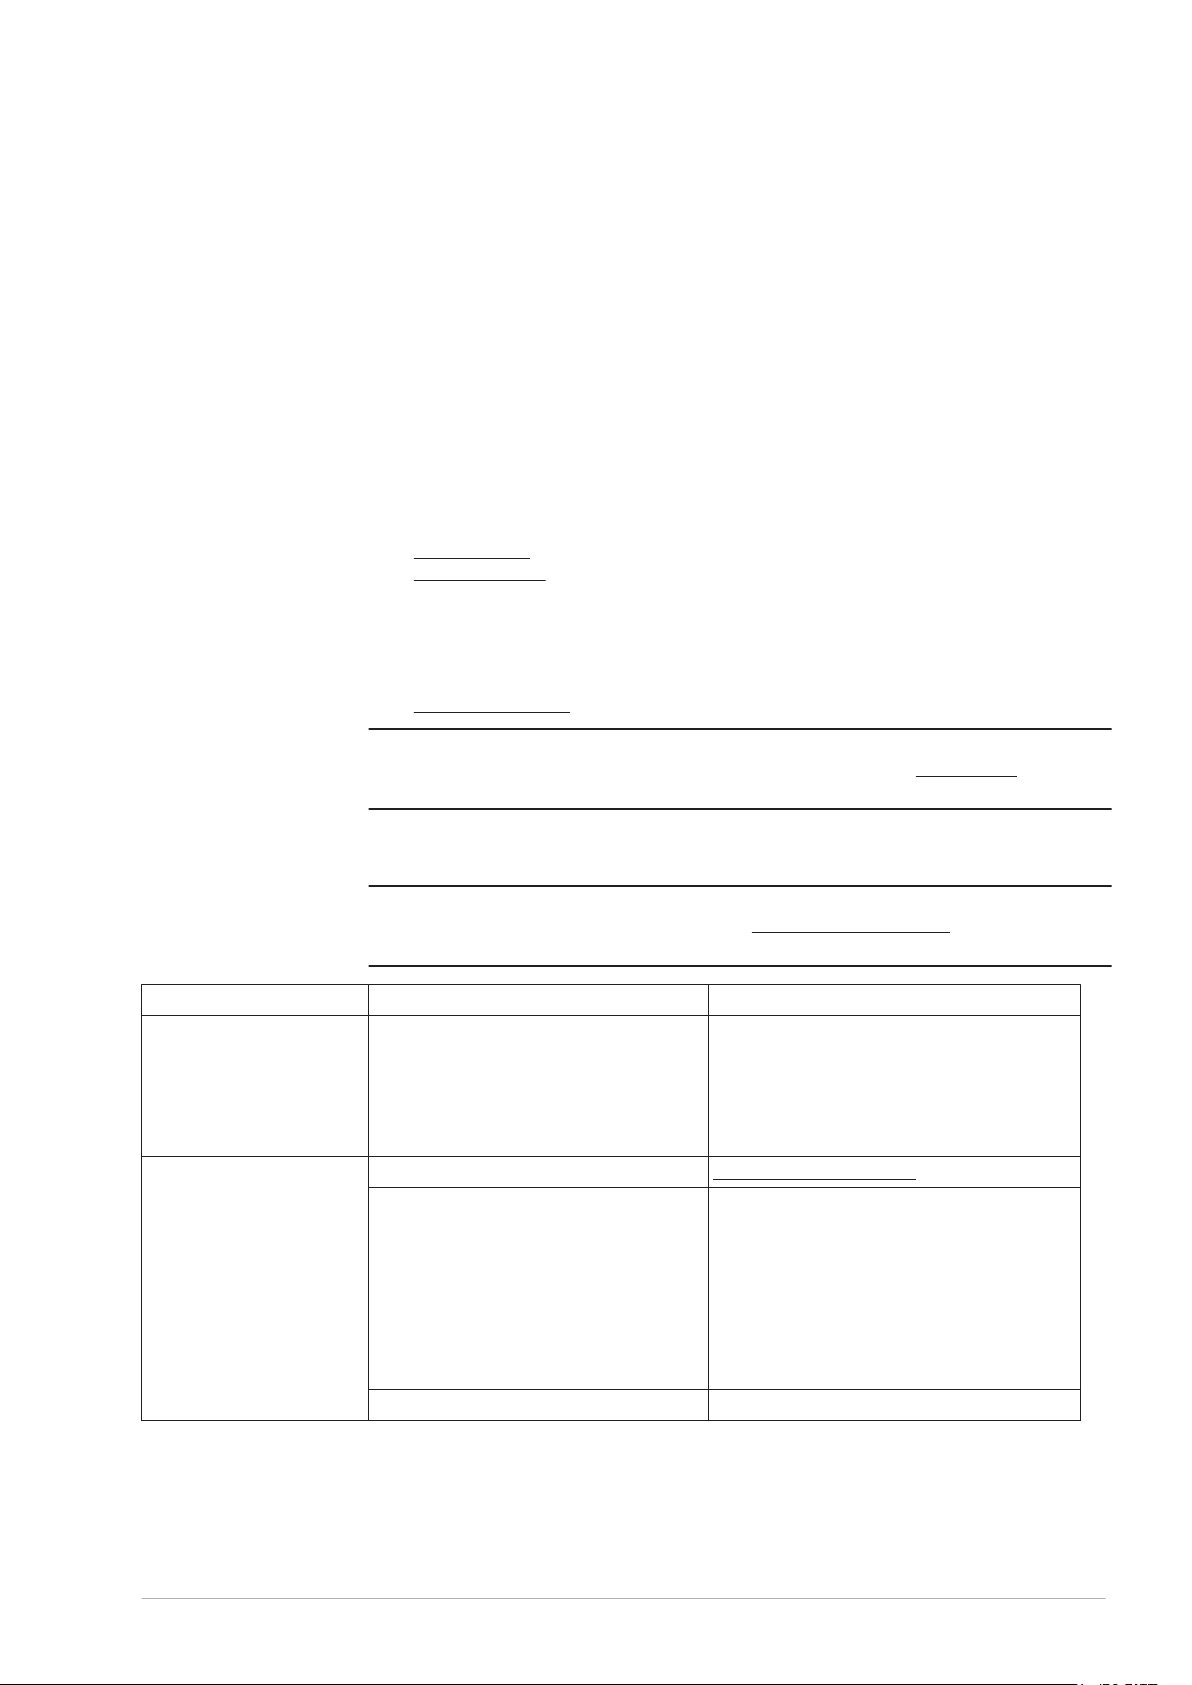
12 Troubleshooting
12.1 Errors and warnings
The water heater can have three different kinds of errors and warnings:
General errors (see section 12.1.1), which are not displayed
•
Displayed errors (see section 12.1.2), which are divided in two different groups:
•
Lock out errors: when the cause is removed, you can reset the error to resume
-
operation. The displayed code and the back-light of the display blink.
Blocking errors: when the cause is removed, the error resets automatically to
-
resume operation. The code is displayed continuously and the back-light of the
display blinks.
Displayed warnings (see section 12.1.3)
•
Note
n
It is possible to view the error history of the water heater, refer to Error history (see
section 10.4).
12.1.1
n
Indication Cause Measure
Gas smell There is a gas leak Close the mains gas valve at once.
The display is off The water heater is off. Turn on the water heater (see section 4.2).
General errors
Note
For the coding of the connections, refer to the Electrical wiring diagram (see section
13.4).
•
Do not operate any switches.
•
No naked flames.
•
Ventilate the boiler room.
•
Immediately contact your installation
•
engineer or your local gas company.
There is no supply voltage. Make sure that:
the control switch is set to I.
•
the isolator is in ON position.
•
there is power on the isolator.
•
there is power to the electrical connector
•
block.
The measured voltage must be
230 VAC (-15%, +10%).
Defective fuse(s) Replace the fuse(s).
0312934_DR-CC_UKUK_V1.0, 2018-03-01 71
Page 72
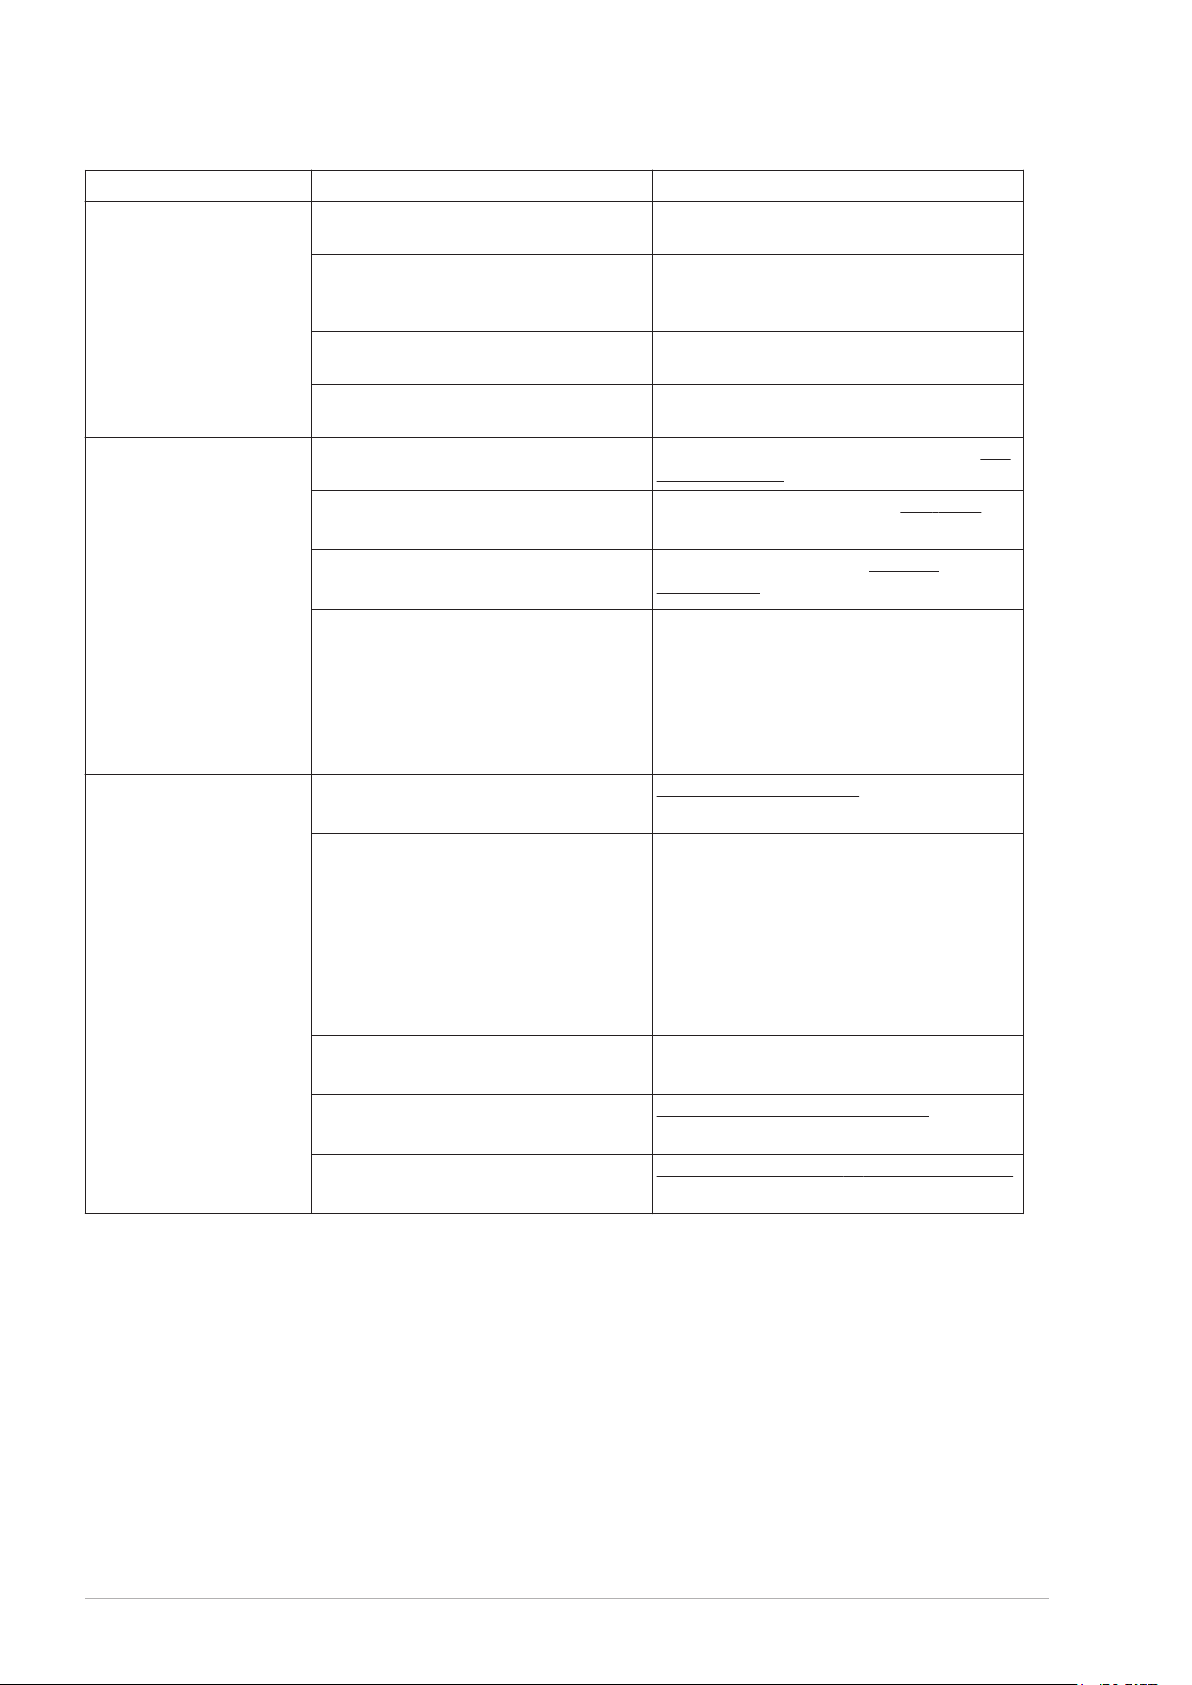
Indication Cause Measure
Water leakage There is a leakage from a threaded
Tighten the threaded connection.
water connection.
There is a condensate leakage Make sure that the condensation water
discharge is working properly.
If necessary, correct the water discharge.
There is a leakage from another nearby
Trace the leakage.
water heater or pipe segment.
There is a leakage from the water heater
Contact the supplier of your water heater.
tank.
Explosive ignition The gas supply pressure is incorrect. Check the gas supply pressure, refer to Gas
supply pressure (see section 8.9.3).
The CO2 value is incorrect. Check the CO2 value, refer to CO2 value
(see section 8.9.4).
The burner is contaminated. Clean the burner, refer to Gas-side
maintenance (see section 11.4).
Insufficient or no hot
water
There is an air leakage between the
venturi and the flexible air connector.
Make sure that:
the flexible air connector is not damaged.
•
If necessary, replace the flexible air
connector.
the flexible air connector is correctly
•
connected to the venturi.
If necessary, tighten the clamp.
The water heater is off. Turn on the water heater (see section 4.2).
There is no supply voltage. Make sure that:
the control switch is set to I.
•
the isolator is in ON position.
•
there is power on the isolator.
•
there is power to the electrical connector
•
block.
The measured voltage must be
230 VAC (-15%, +10%).
The hot water supply is used up. Reduce the hot water consumption. Wait
until the water heater heats up.
The controller is in the OFF mode. Set the controller in the ON mode (see
section 4.2.1).
The temperature (T
) is set too low. Set the temperature (T
set
) to a higher value
set
(see section 4.2.2).
72 Installation, Maintenance and Service part
Page 73
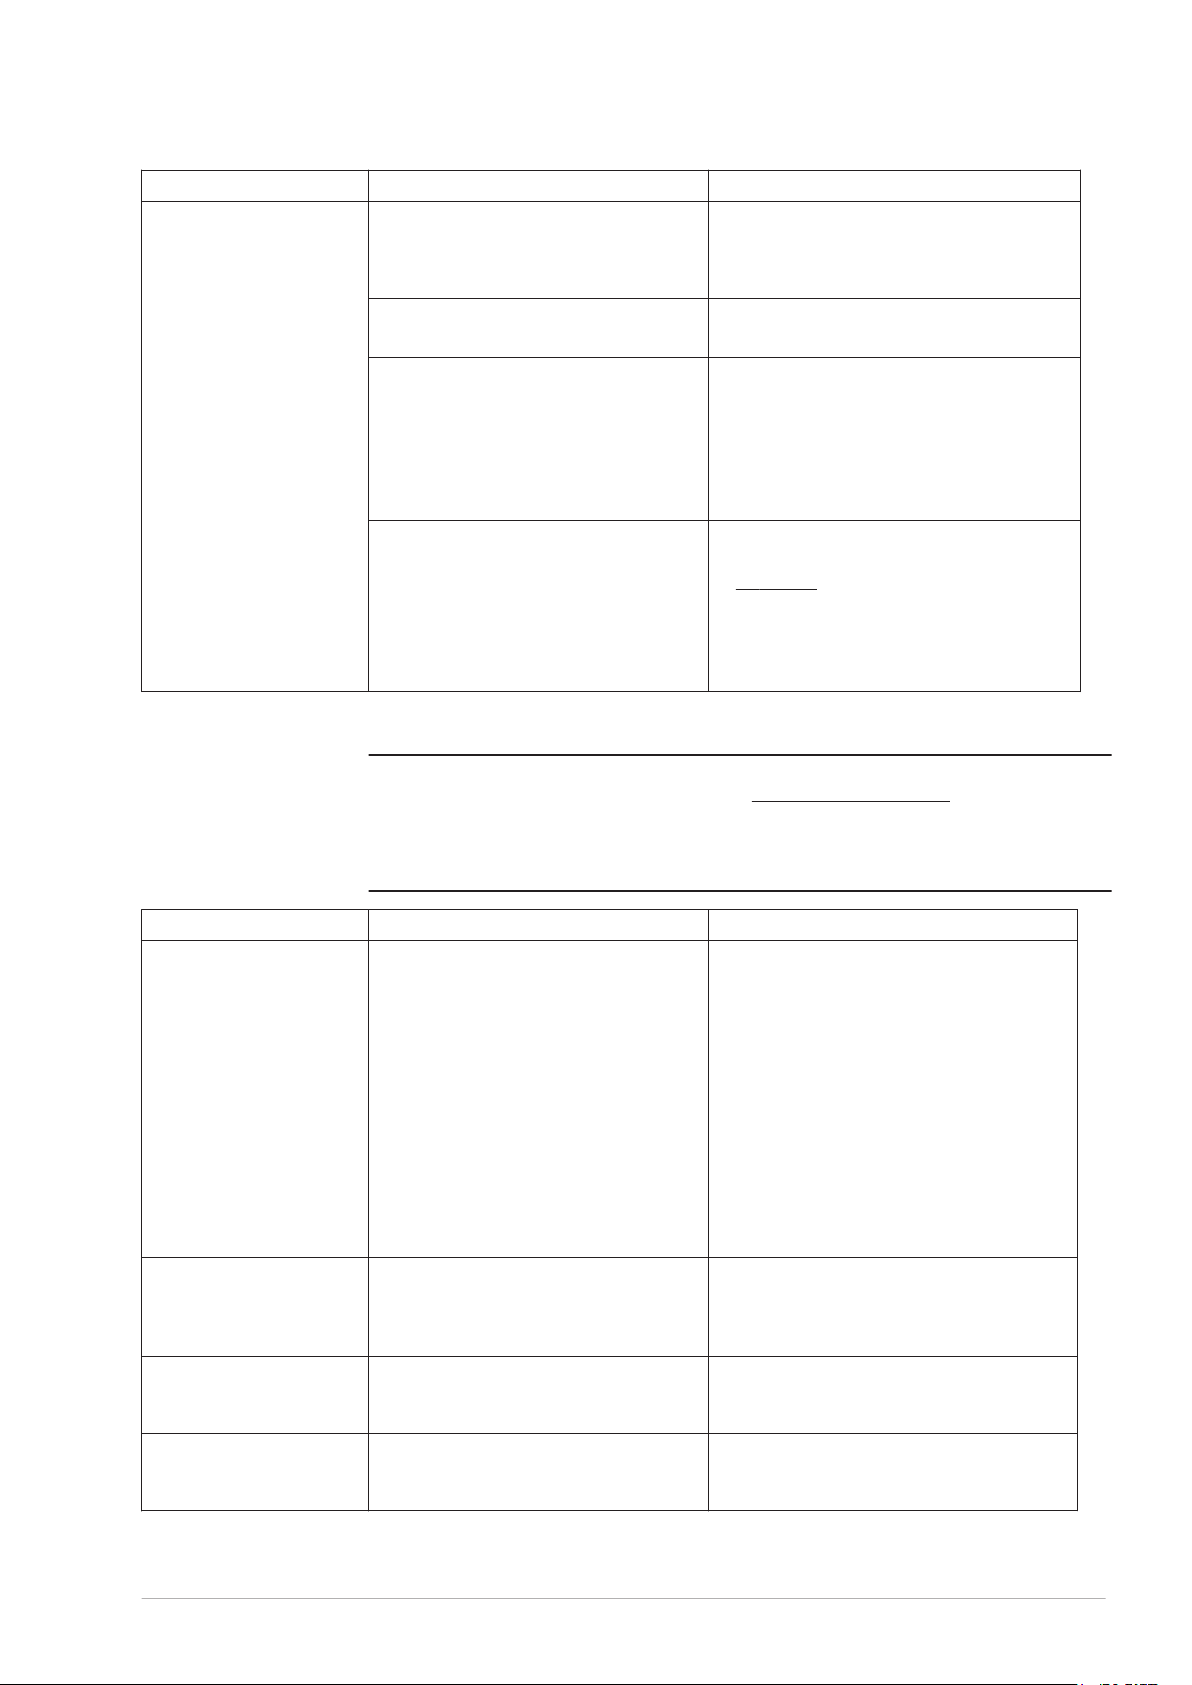
Indication Cause Measure
CO2 value (at full load)
is not correct
The unit is not set for the correct gas
type
Contaminated venturi Remove any contamination from the venturi
Make sure that the gas type corresponds
•
with the information on the rating plate
Make sure if the venturi restrictor has the
•
correct diameter, refer to Gas details.
inlet.
Leakage between venturi and flexible
venturi connector
Recirculation of flue gases Make sure that the CO2-value measured
Make sure that the flexible venturi
•
connector is not damaged.
If necessary replace the flexible venturi
connector
Make sure that the flexible venturi
•
connector is correctly connected.
If necessary, tighten the clamp.
•
in the flue gas outlet is correct, refer to
CO2 value (see section 8.9.4).
Make sure that the CO2 value measured
•
in the air inlet is below 0.5 vol%.
If necessary, reconnect the venting
•
system and change the necessary seals.
12.1.2 Displayed errors
Note
n
Code and description Cause Measure
C02 (lock out error)
Control error
Error message from the
controller
C03 (blocking error)
Control error
C04 (blocking error)
Control error
C05 (blocking error)
Control error
For the coding of the connections, refer to the Electrical wiring diagram (see section
13.4).
Note
Contact your service and maintenance engineer if the error persists.
Incorrect reference voltage from the
•
AD converter.
EEPROM read error.
•
50 Hz error.
•
Internal communication error.
•
Gas control valve relay error.
•
Safety relay error.
•
Ignition relay error.
•
RAM error.
•
EEPROM error.
•
EEPROM content does not match the
•
software version.
Processor software error.
•
Ionisation circuit error
•
More then 7 resets detected in a short
period.
This error appears when the controller
and/or display is replaced.
Incorrect selection of the water heater.
Content EEPROM not correct. Reset the controller.
Make sure that the wiring/flame probe
•
are not damaged. If necessary, replace
the wiring/flame probe.
Make sure that the flame probe is not
•
bend. If necessary, replace the flame
probe.
Reset the controller.
•
If the error reappears, make sure that
•
the frequency of the power supply is 50
Hz (-1, +1 Hz).
If the frequency is not correct, contact
•
your service and maintenance engineer.
If the frequency is correct and the error
•
reapers, replace the controller.
Wait for the error to disappear (maximal 1
hour).
If the error does not disappear, replace the
controller
Turn the water heater OFF and ON. When
the error reappears contact your supplier.
If the error reappears, contact your
supplier.
0312934_DR-CC_UKUK_V1.0, 2018-03-01 73
Page 74
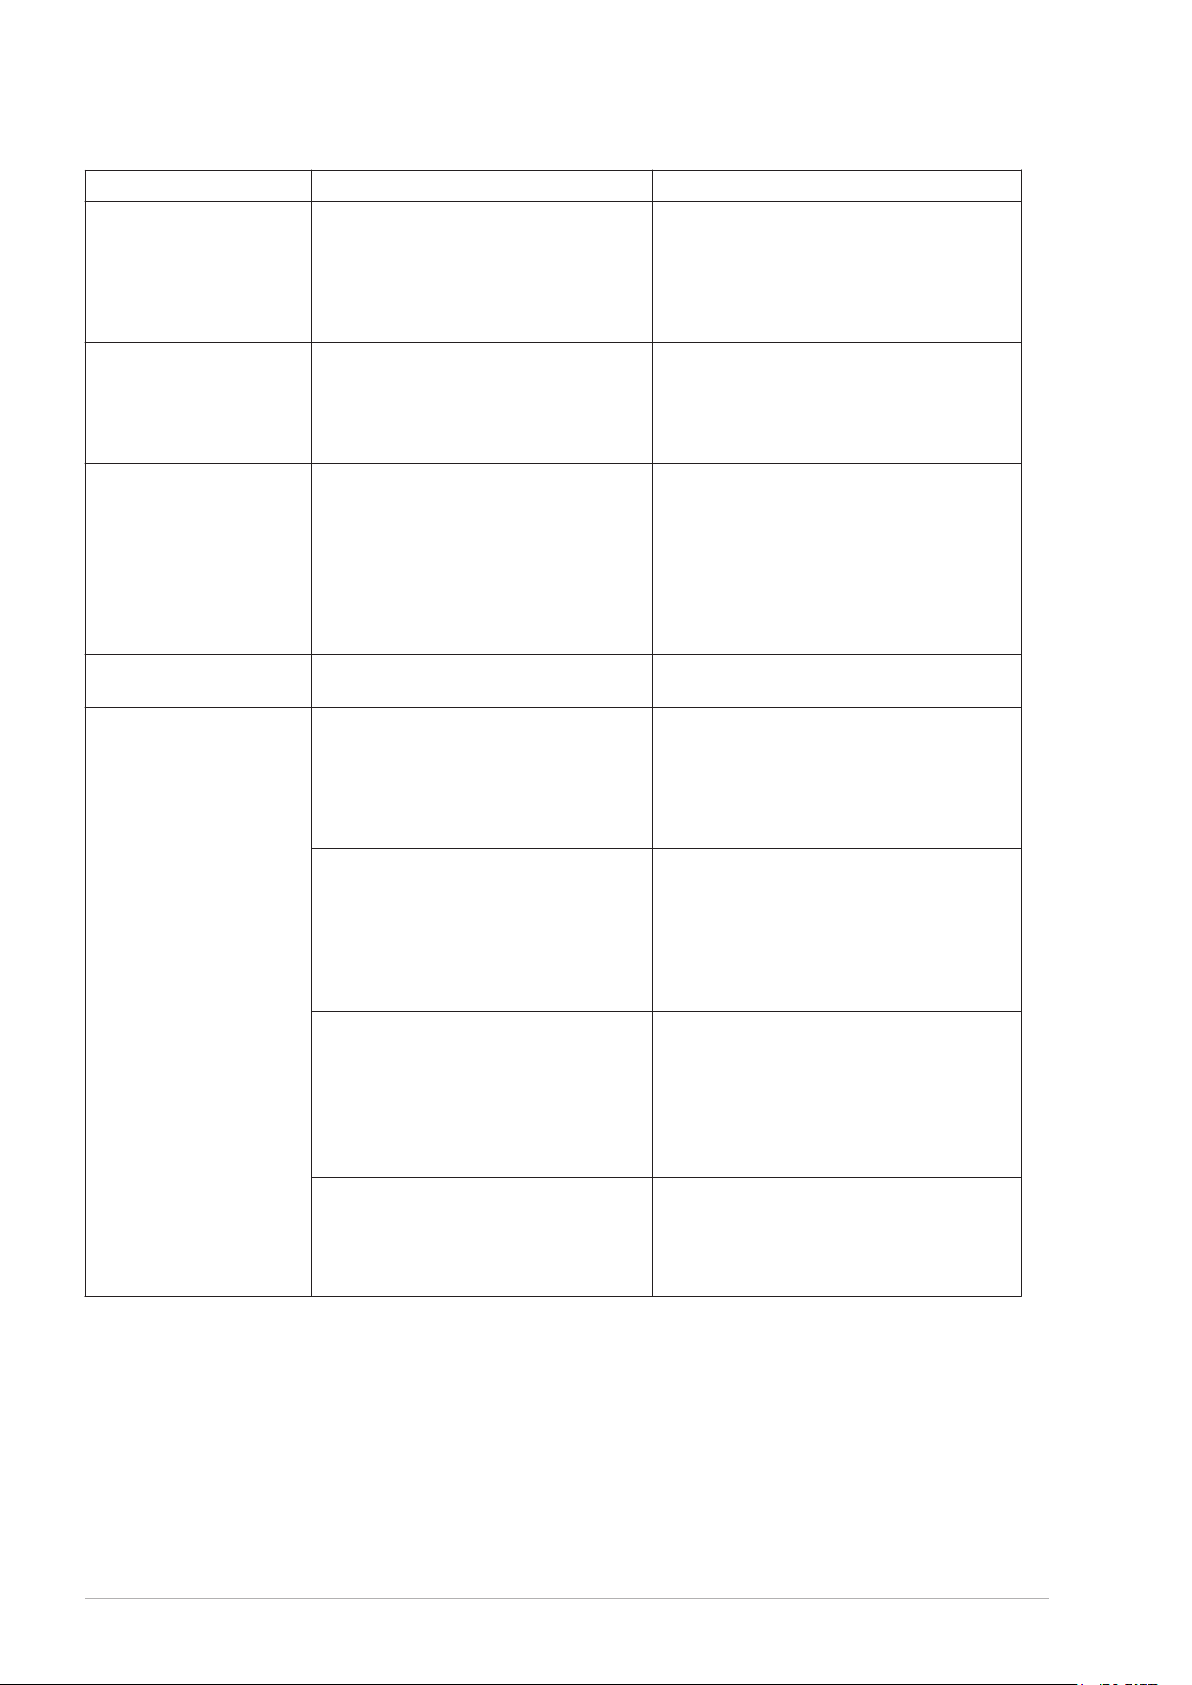
Code and description Cause Measure
E01 (blocking error)
Temperature error
The temperature in the tank is above
90ºC.
Tap off water, so the temperature drops
•
in the water heater.
Reset the controller.
•
Make sure that there is no scale on the
•
temperature sensor. If necessary,
replace the sensor.
E03 (lock out error)
Temperature error
Temperature difference, between sensor
1 and sensor 2, is more then 10ºC, for
at least 60 seconds.
Make sure that the sensor wiring is
connected and not damaged. Reset the
controller.
If necessary replace the sensor and/or
wiring if the error reappears.
E05 (lock out error)
Control error
Control was in a blocking error for at
least 20 hours.
Press [RESET] to reset the water heater.
•
If the error reappears:
Find the cause of the blocking error
•
(parameter 272).
Remove the blockage and reset the
•
controller.
If the error reappears, replace the
controller.
F01 (blocking error)
Control error
F02 (lock out error)
Fan error
Fan does not run on
correct speed
Live and neutral are connected the
wrong way around.
Damaged or disconnected wiring. Make sure that the wiring between the
Make sure that the live and neutral are
connected correctly and rectify if necessary.
•
fan and the controller is connected and
not damaged.
If necessary, replace the wiring. Reset
•
the controller when the wiring is
reconnected
Contaminated or blocked fan. Make sure that the motor and/or rotor of
•
the fan are not dirty or blocked.
If necessary remove the dirt and/or
•
blockage.
Reset the controller.
•
Make sure that the rotor of the fan can
•
rotate freely and reset the controller.
Due to a drop in supply voltage, the fan
will not run at the correct speed.
Make sure that the supply voltage is
•
correct and reset the controller.
The measured voltage must be 230 V
(-15%, +10%)
Contact you maintenance and service
•
engineer when the supply voltage is not
correct.
Defective motor and/or rotor. Make sure that the motor and/or rotor
•
are not defective and reset the controller.
Replace the fan when the motor and/or
•
rotor are defective and reset the
controller.
AC
74 Installation, Maintenance and Service part
Page 75

Code and description Cause Measure
F03 (lock out error)
Air proving switch error
Switch is closed when fan
is not running.
Damaged wiring/closed circuit. Make sure that the wiring, between the
Air proving switch defect. Make sure that the air proving switch
•
air proving switch and the control, is
connected and not damaged.
If necessary replace the wires or
•
reconnect the wires. Reset the controller,
when wires are replaced or reconnected.
•
works properly.
If necessary, replace the air proving
•
switch.
When the air proving switch is replaced
•
and reconnected, reset the controller.
0312934_DR-CC_UKUK_V1.0, 2018-03-01 75
Page 76
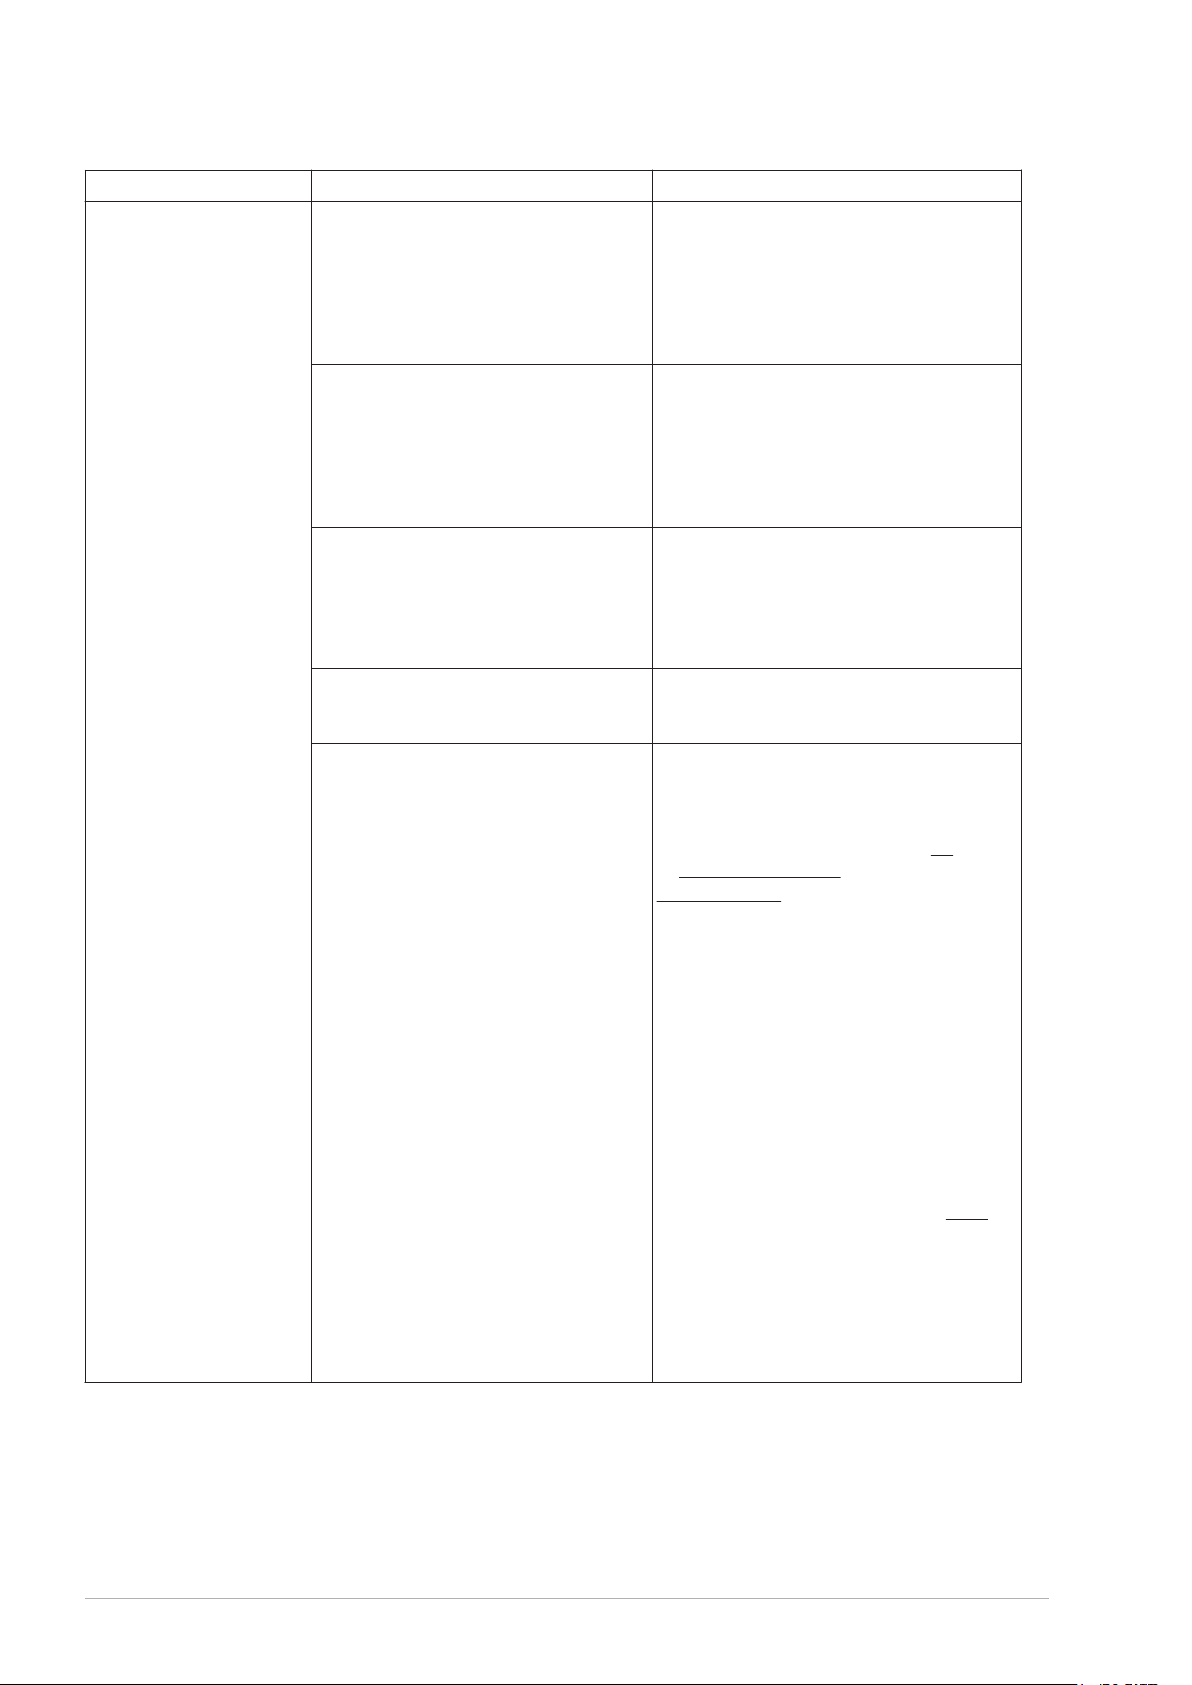
Code and description Cause Measure
F03 (lock out error)
Air proving switch error
Switch is not closed when
fan is running during prepurge.
Hoses are damaged. Make sure that the hoses, between the
Wiring is damaged. Make sure that the wiring, between the
Leakage of air between venturi and
flexible air connector.
Non return valve, between fan and
burner, is stuck.
Not enough pressure differential across
the air proving switch, due to:
venting system
•
malfunctioning condensation
•
discharge
dirty burner
•
blocked heat exchanger
•
•
air proving switch and fan and the air
proving switch and gas control valve are
not damaged and reset the controller.
If necessary replace the hose(s)
•
When the hose(s) are replaced and
•
reconnected, reset the controller.
•
air proving switch and the control, is
connected and not damaged.
If necessary, replace the wires or
•
reconnect the wires.
When wires are replaced or reconnected,
•
reset the controller.
Make sure that the flexible air connector
•
is not damaged. If necessary, replace the
flexible air connector.
Make sure that the hose is properly
•
connected to the venturi. If necessary,
tighten the clamp.
Make sure that the non return valve can
move freely. If necessary replace the non
return valve.
Check, after each fix, if the error reappears.
If the error reappears continue in finding
the cause.
Measure the pressure differential across
•
the air proving switch, refer to Air
pressure differential (see section 8.9.2).
Venting system (see section 8.7):
Make sure if the venting system is
•
compliant.
Make sure that the venting system has
•
no blockages.
Make sure if the air inlet screen has no
•
blockages.
Condensation discharge:
Make sure the condensate drain has no
•
blockages.
Make sure that the condensate drain is
•
connected to the waste water discharge
by an open connection.
Burner:
Make sure that the the burner is clean
•
(see section 11.4.1).
Measure the pressure differential across
•
the air proving switch again. If the
pressure differential is insufficient, clean
the heat exchanger.
Make sure that the air proving switch is
•
closing, by using a multimeter.
76 Installation, Maintenance and Service part
Page 77
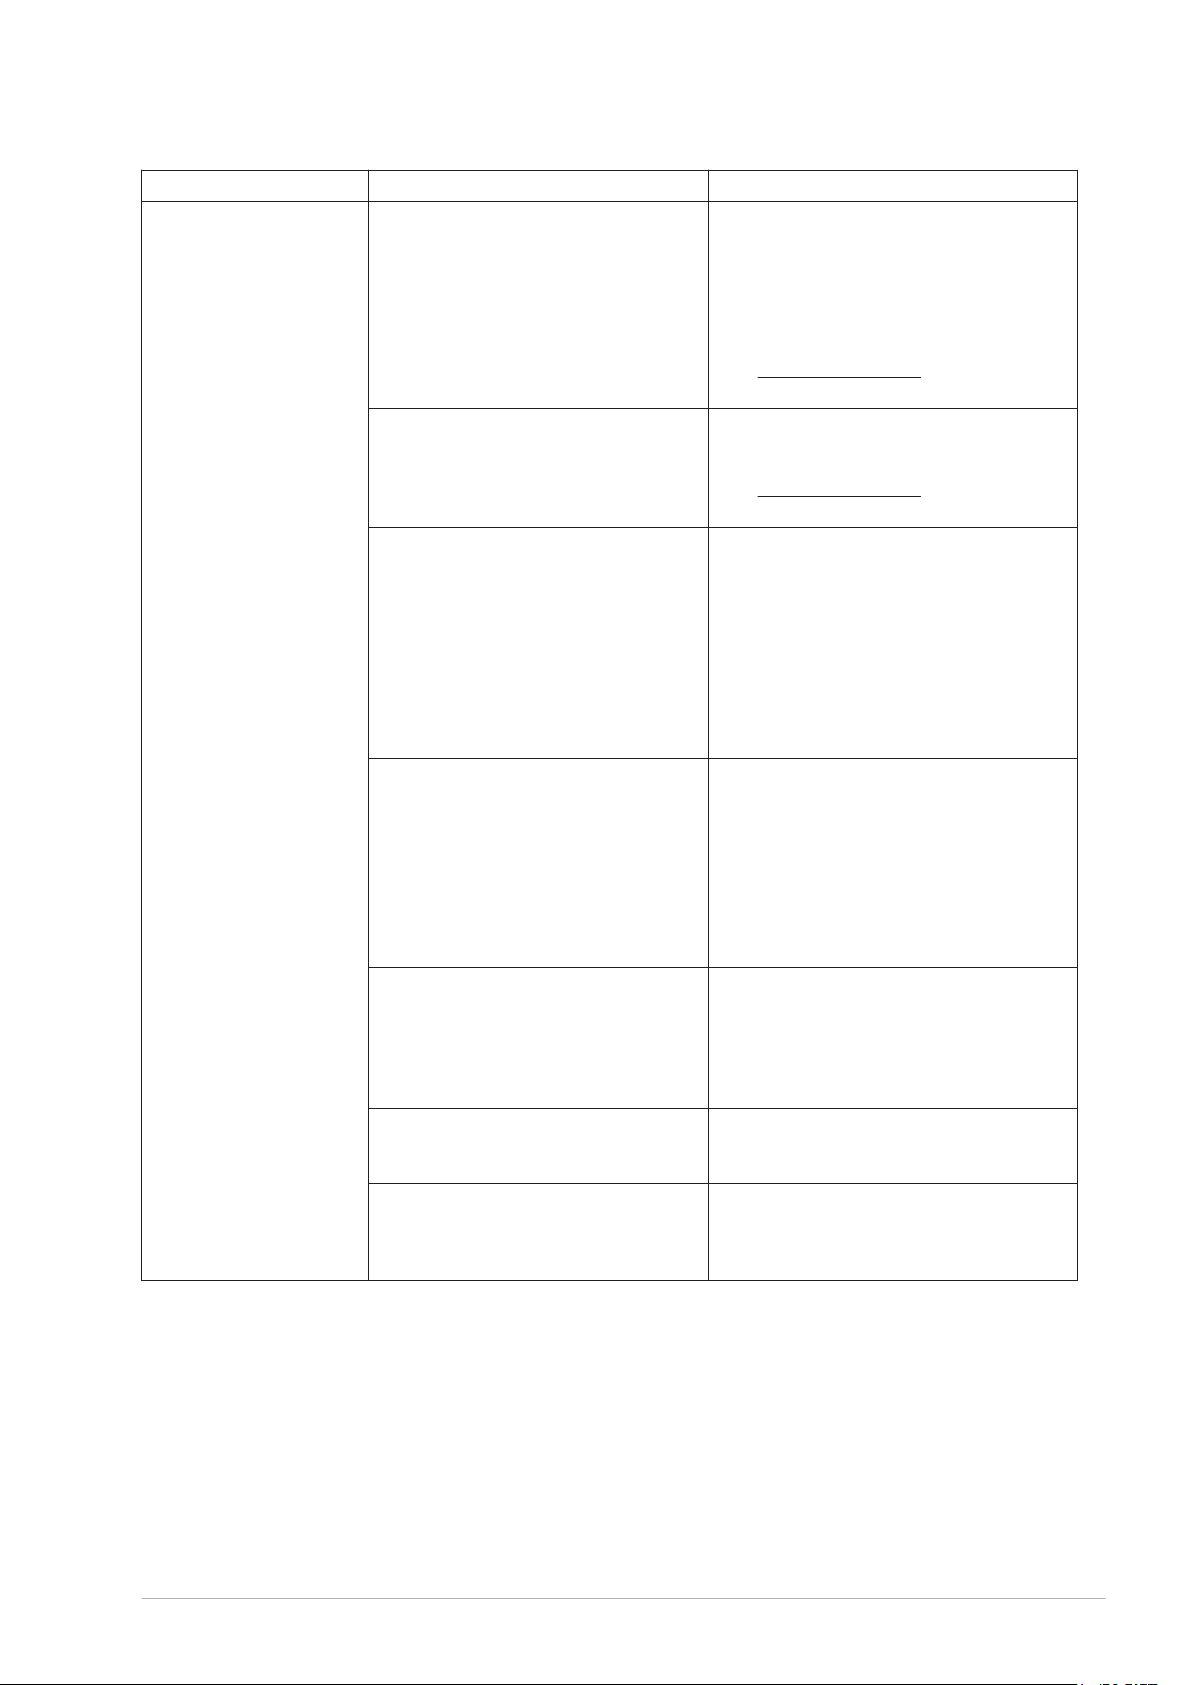
Code and description Cause Measure
F04 (lock out error)
Ignition error
Three unsuccessful
ignition attempts.
No gas. Make sure that the main gas supply valve
Air in the gas pipes. Bleed the air out of the gas pipe.
Defect in the hot surface igniter circuit. Make sure that the hot surface igniter is
Defect in the ionisation circuit. Make sure that the flame probe is
Supply voltage too low. Make sure that the supply voltage on the
Bent flame probe is in contact with
metal surface.
Ceramic part, of the flame probe, is
broken or cracked.
•
is open. If necessary, open the valve.
Make sure that the manual gas supply
•
valve, before the gas control valve, is
open. If necessary, open the valve.
Make sure that the gas supply pressure
•
to the gas control valve is correct, refer
to Gas supply pressure (see section
8.9.3).
•
Make sure that the gas supply pressure
•
to the gas control valve is correct, refer
to Gas supply pressure (see section
8.9.3).
•
installed correctly.
Make sure that the wiring of the hot
•
surface igniter is not damaged.
Measure the resistance across the hot
•
surface igniter. This must be between the
36 and 72 Ohm (at room temperature).
Make sure that the hot surface igniter
•
lights up during ignition.
If necessary, replace the hot surface igniter.
•
installed correctly.
Make sure that the wiring of the flame
•
probe is not damaged.
Measure the ionisation current. This
•
current must be a minimum of 3 μA
(parameter 109).
If necessary, replace the wiring and/or
flame probe.
•
controller is correct.
If the supply voltage is below the stated
•
tolerance and the error persists, contact
your maintenance and service engineer.
Install an isolating transformer.
•
Make sure that the flame probe is not
•
bend.
If necessary, replace flame probe.
•
Make sure that the ceramic part of the
•
flame probe is not broken or cracked in
the vicinity of the burner.
If necessary, replace flame probe.
•
0312934_DR-CC_UKUK_V1.0, 2018-03-01 77
Page 78
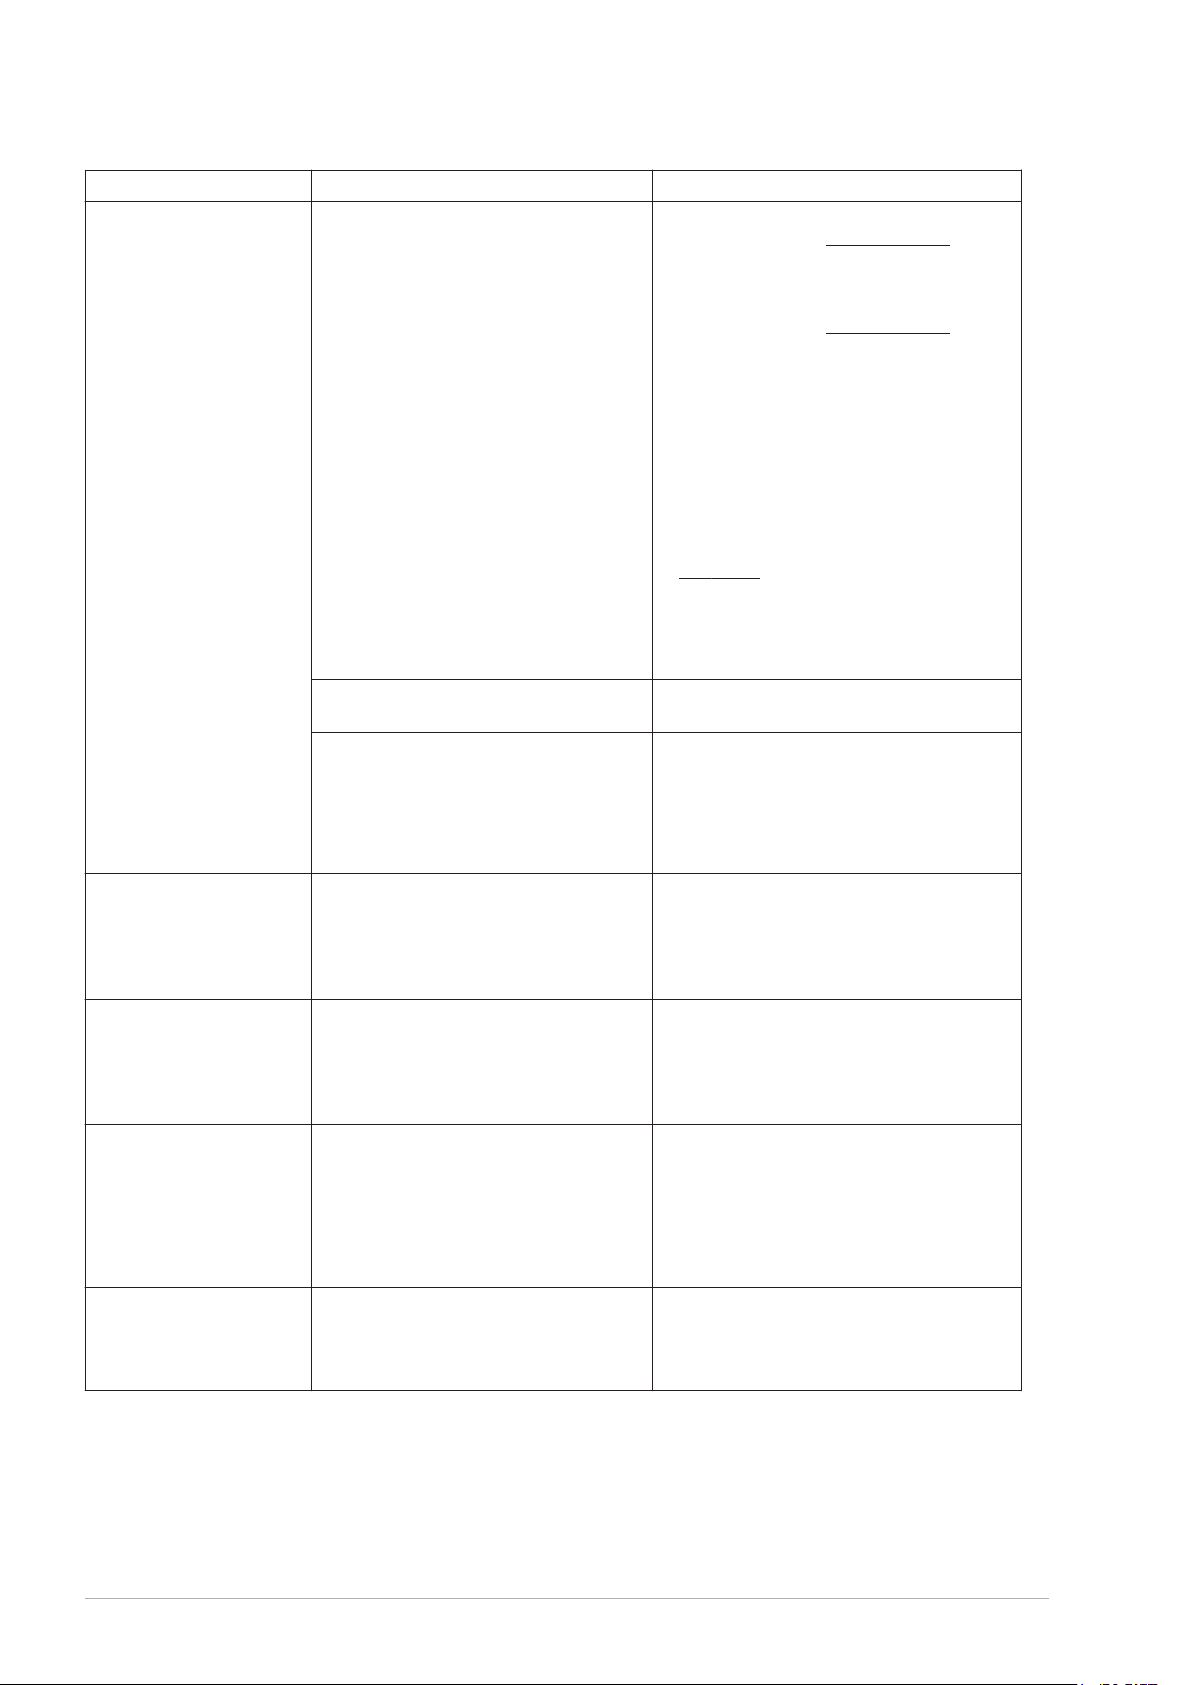
Code and description Cause Measure
F05 (lock out error)
Flame error
Too many flame failures
are detected
F07 (lock out error)
Ionisation error
Ionisation measured after
the gas control valve was
closed
F08 (lock out error)
Ionisation error
Ionisation measured
before the gas control
valve was opened
F09 (lock out error)
Temperature error
F11 (blocking error)
Ionisation error
Ionisation measured with
a closed gas control valve
Recirculating flue gases due too
incorrect roof or wall flue terminal.
No sufficient gas supply. Make sure that the gas supply pressure is
Supply voltage too low. Make sure that the supply voltage on the
Defective gas control valve. Make sure that there is no flame after
Defective safety relay. Reset the controller.
Temperature, in the tank is above the
97ºC.
Defective gas control valve. Make sure that there is no flame after
Make sure the flue terminal is installed
•
correctly, refer to Venting system (see
section 8.7). If necessary, connect the
correct flue terminal.
Make sure that the terminal is installed
•
correctly, refer to Venting system (see
section 8.7). If necessary connect the
flue terminal correctly.
Make sure that there are no flue gas
•
leaks to the rest of the venting system.If
necessary reconnect the venting system
and replace any damaged seals.
Make sure that the flue terminal
•
discharges into a permitted area.
Make sure that the CO2-value measured
•
in the flue gas outlet is correct, refer to
CO2 value (see section 8.9.4).
Make sure that the CO2 value measured
•
in the air inlet is below 0.5 vol%.
If necessary, reconnect the venting
•
system and change the necessary seals.
correct.
•
controller is correct.
If the supply voltage is below the stated
•
tolerance and the error persists, contact
your maintenance and service engineer.
Install an isolating transformer.
•
•
the gas control valve has closed.
If there is a flame, the gas control valve
•
must be replaced.
•
If error appears again, replace the
•
controller.
•
See measure of error E01.
Make sure that the wiring between 1 and
•
7 of J9 is connected and not damaged.
If necessary, replace or reconnect the
•
wiring.
When the wiring is reconnected, reset
•
the controller.
•
the gas control valve has closed.
If there is a flame, the gas control valve
•
must be replaced.
78 Installation, Maintenance and Service part
Page 79
Code and description Cause Measure
F19 (blocking error)
Supply voltage error
Three unsuccessful
ignition attempts.
F21 (lock out error)
Air proving switch error
Switch is not closed, while
fan runs during post purge
S02 (blocking error)
Sensor error
Open circuit from sensor 1
of the temperature sensor
S03 (blocking error)
Sensor error
Open circuit from sensor 2
of the temperature sensor
S12 (blocking error)
Sensor error
Short circuit in sensor 1 of
the temperature sensor
S13 (blocking error)
Sensor error
Short circuit in sensor 2 of
the temperature sensor
There is not enough or too much supply
voltage during 60 seconds.
The measured voltage between live and
neutral must be 230 VAC (-15%,
+10%).
The supply voltage between live and
earth must be between 110 VAC and
230 VAC (-15%, +10%)
Damaged wiring/open circuit.
Sensor is not (correctly) connected. Make sure that the connector is
Damaged wiring and/or defective
sensor.
Sensor is not (correctly) connected. Make sure that the connector is
Damaged wiring and/or defective
sensor.
Short circuit in the sensor circuit. Replace the wiring and/or sensor.
Short circuit in the sensor circuit. Replace the wiring and/or sensor.
Make sure that the supply voltage on the
•
controller is correct.
If the supply voltage is above or below
•
the stated tolerance and the error
persists, contact your maintenance and
service engineer.
Install an isolating transformer.
•
See measure of error F03 - Switch is not
closed when fan is running during prepurge.
•
connected to J3.
Make sure that the wire is connected to
•
the sensor.
Replace the wiring and/or sensor.
•
connected to J3.
Make sure that the wire is connected to
•
the sensor.
Replace the wiring and/or sensor.
0312934_DR-CC_UKUK_V1.0, 2018-03-01 79
Page 80
12.1.3 Warnings
Note
n
Indication Cause Remark
Src Service is required
Ano Anode protection is
not working
For the coding of the connections, refer to the Electrical wiring diagram (see section
13.4).
The water heater exceeded the pre-set
service interval.
The water heater runs, but there is no
anode protection for the tank.
The orange and the green LED of the
anode controller are off:
There is no power to the potentiostat.•
The orange LED of the anode controller
is on and the green LED is off:
The cables between the potentiostat
•
and the anode(s) are loose or
connected incorrectly.
The earth connection, of the
•
anode(s), is loose.
The water heater is not filled with
•
water.
There is short circuit between the
•
anode(s) and the tank.
There is low conductivity of the
•
water.
The orange and the green LED of the
anode controller are on:
The cable between the potentiostat
•
and the display are damaged or not
connected.
The water heater operates, but displays this
warning.
Periodic maintenance is a part of the
Warranty. When you do not obey this
condition, the warranty will void.
Proper functioning of the anode protection is
a part of the conditions for installation and
use as stated in the Warranty. When you do
not obey this condition, the warranty will
void.
Make sure that there is power to the
potentiostat.
Make sure that:
The cable between the anode controller
•
and the anode(s) are connected.
If necessary connect the wires correctly.
The water heater is filled with water.
•
If necessary, fill the water heater (see
section 8.9.1).
The anode is in contact with the tank.
•
If necessary, replace the anode(s).
Make sure that the water conductivity is
•
correct, refer to Water composition (see
section 8.2.3).
Make sure that the cable between the
potentiostat and the display is not damaged
and connected
If necessary, replace the wiring or reconnect
cable.
80 Installation, Maintenance and Service part
Page 81
13 Appendices
13.1 Technical details
Description Unit
DR-CC 12-160
DR-CC 20-160
General
Capacity l 162 202 247 288 384
Empty Weight kg 95 106 120 136 155
Maximum floor load kg 255 306 365 421 535
DR-CC 12-200
DR-CC 20-200
DR-CC 24-245
DR-CC 32-245
DR-CC 24-285
DR-CC 32-285
DR-CC 32-380
Maximum operating pressure
kPa (bar) 550 (5.5) 550 (5.5) 550 (5.5) 550 (5.5) 550 (5.5)
- installation
Maximum operating pressure
kPa (bar) 800 (8) 800 (8) 800 (8) 800 (8) 800 (8)
- tank
Control thermostat -
°C 40…85 40…85 40…85 40…85 40…85
adjustment range
Control thermostat - default
°C 65 65 65 65 65
value
Hysteresis upwards -
°C 2…15 2…15 2…15 2…15 2…15
adjustment range
Hysteresis upwards - default
°C 10 10 10 10 10
value
Number of (electrical) anodes - 1 1 2 2 2
Minimum measured air
Pa ≥ 210 ≥ 210 ≥ 460 ≥ 460 ≥ 460
pressure differential across
the pressure switch
Setpoint pressure switch Pa 175 175 400 400 400
Heating time ΔT = 45 °C min. 28
18
(12-160)
(20-160)
43
28
(12-200)
(20-200)
26
20
(24-245)
(32-245)
33
25
(24-285)
(32-285)
32
Electrical
Electrical power consumption
W 85 85 105 105 105
(peak)
Electrical power consumption
(nominal)
W 25
36
(12-160)
(20-160)
25
36
(12-200)
(20-200)
51
85
(24-245)
(32-245)
51
85
(24-285)
(32-285)
85
0312934_DR-CC_UKUK_V1.0, 2018-03-01 81
Page 82
Description Unit
DR-CC 12-160
DR-CC 20-160
Supply voltage/Main
frequency
IP-class - IP20
VAC / Hz 230 (-15%, +10%) / 50 (± 1)
DR-CC 12-200
DR-CC 20-200
DR-CC 24-245
DR-CC 32-245
13.2 Dimensions
Size Description Unit
DR-CC 12-160
DR-CC 20-160
Dimensions water heater
DR-CC 12-200
DR-CC 20-200
DR-CC 24-245
DR-CC 32-245
DR-CC 24-285
DR-CC 32-285
DR-CC 24-285
DR-CC 32-285
DR-CC 32-380
DR-CC 32-380
A Height
D Width mm 560 560 610 610 675
E Depth mm 780 780 830 830 890
G Flue gas outlet/Air inlet mm/mm 80/125 80/125 80/125 80/125 80/125
Dimensions connections
1 Cold water supply
2 Hot water outlet
3 Gas control valve
4 Drain valve connection
5 T&P-valve connection
7 Condensation drainage
14 Circulation connection
(1)
connection (female)
connection (female)
connection (male)
(female)
(female)
Cleaning/inspection
opening
connection (female)
(female)
mm 1270 1545 1545 1745 1745
- Rp 3/4 Rp 3/4 Rp 1 Rp 1 Rp 1
- Rp 3/4 Rp 3/4 Rp 1 Rp 1 Rp 1
mm 15 15 15 15 15
- Rp 3/4 Rp 3/4 Rp 3/4 Rp 3/4 Rp 3/4
- Rp 3/4 Rp 3/4 Rp 1 Rp 1 Rp 1
mm 95x70 95x70 95x70 95x70 95x70
mm Ø 40 Ø 40 Ø 40 Ø 40 Ø 40
- Rp 3/4 Rp 3/4 Rp 3/4 Rp 3/4 Rp 3/4
82 Installation, Maintenance and Service part
Page 83
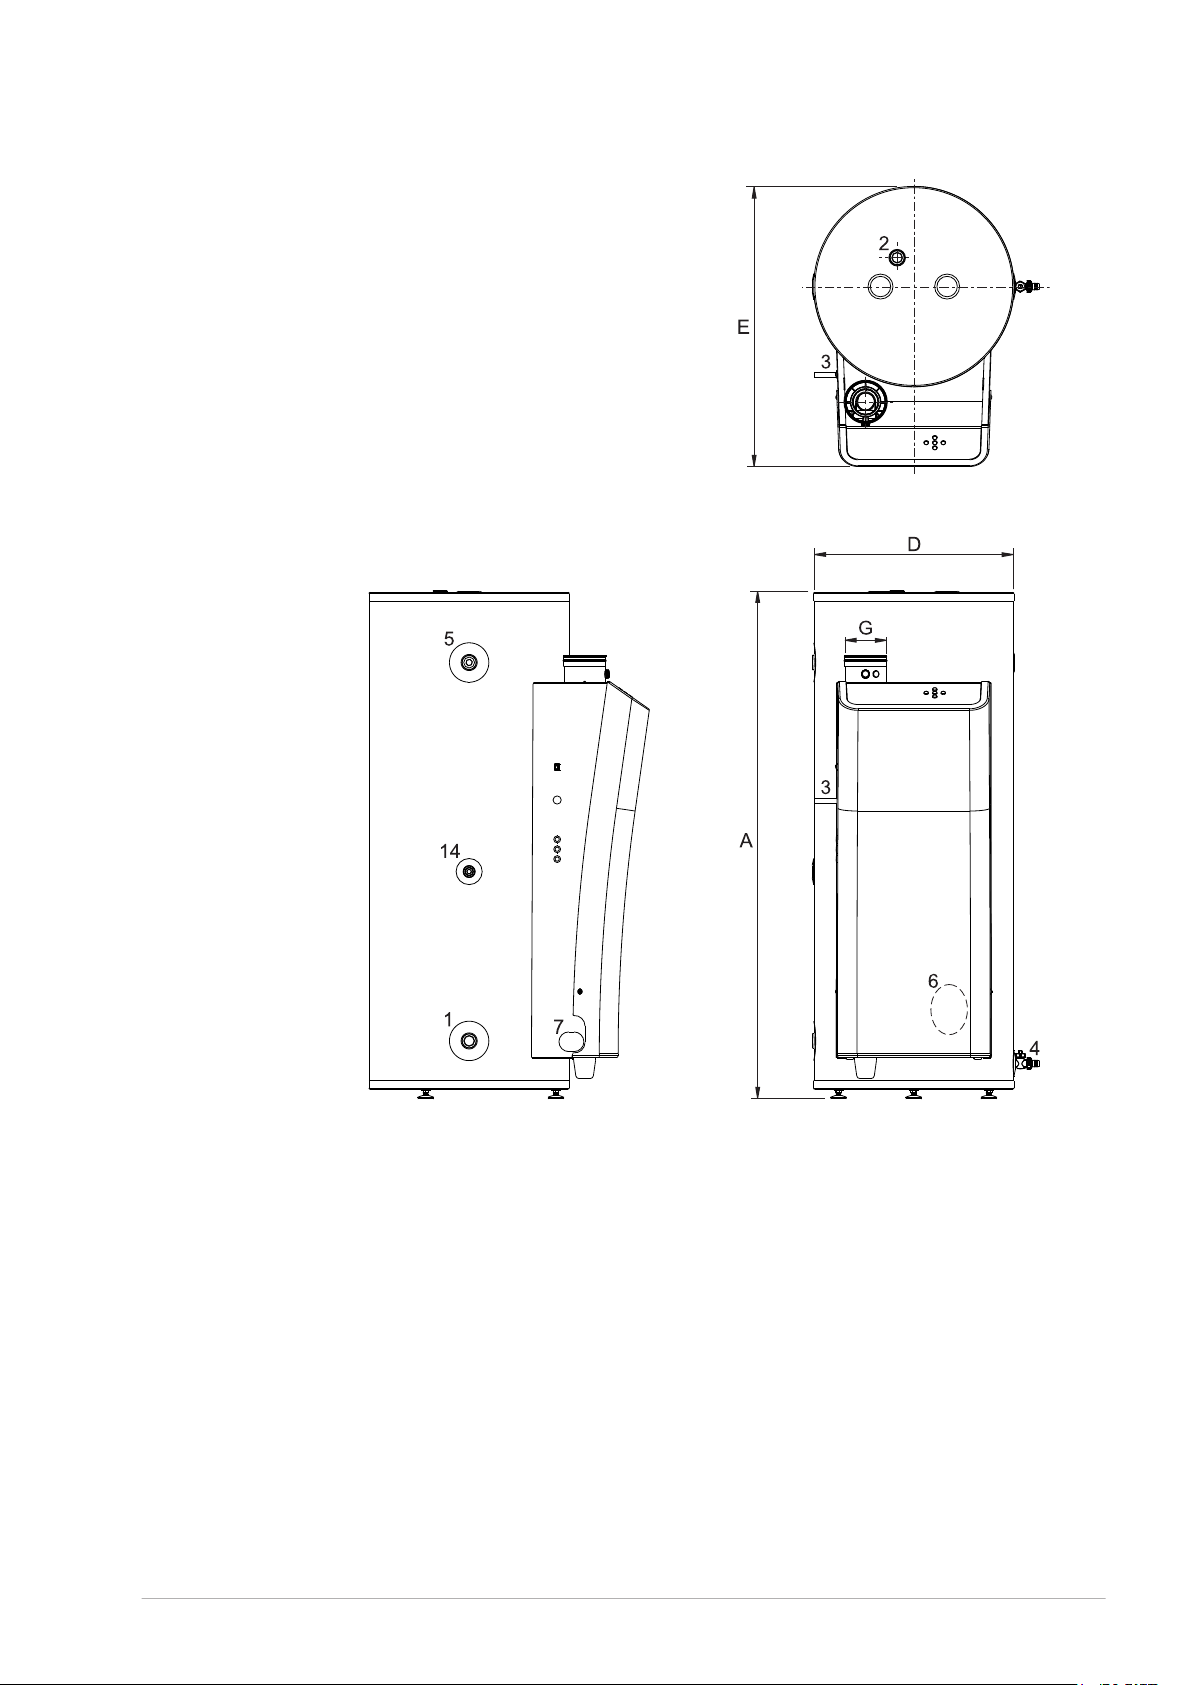
0312934_DR-CC_UKUK_V1.0, 2018-03-01 83
Page 84
13.3 Gas details
Description Unit
Gas category 2H (G20)
DR-CC 12-160
DR-CC 12-200
DR-CC 20-160
DR-CC 20-200
DR-CC 24-245
DR-CC 24-285
DR-CC 32-245
DR-CC 32-285
DR-CC 32-380
Diameter of the venturi
mm 3.95 3.95 3.95 3.95
restrictor
Nominal Load (gross) kW 12.1 20.0 24.4 32.2
Nominal output kW 11.7
11.9
(12-160)
(12-200)
19.1 23.5
23.8
(24-245)
(24-285)
30.7
31.0
31.3
(32-245)
(32-285)
(32-380)
Supply pressure mbar 20.0 20.0 20.0 20.0
CO2 (full load) vol% 9.3 ± 1.0 9.3 ± 1.0 9.3 ± 1.0 9.3 ± 1.0
O2 (full load) vol% 4.3 ± 1.8 4.3 ± 1.8 4.3 ± 1.8 4.3 ± 1.8
Gas consumption
(1)
m3/h
1.2 1.9 2.3 3.1
NOx-emission mg/kWh GCV 22 30 33 37
Mass flow rate flue gases
kg/h 9.1 9.1 9.1 9.1
(minimal load)
Mass flow rate flue gases
kg/h 19.0 31.4 38.4 50.7
(nominal load)
Flue gas temperature
ºC 42 61 57 65
(nominal load)
Gas category 3P (G31)
Diameter of the venturi
mm 3.05 3.05 3.05 3.05
restrictor
Nominal Load (gross) kW 11.8 19.6 23.9 31.5
Nominal output kW 11.4
11.6
(12-160)
(12-200)
18.7 23.0
23.3
(24-245)
(24-285)
30.1
30.4
30.7
(32-245)
(32-285)
(32-380)
Supply pressure mbar 37.0…50.0 37.0…50.0 37.0…50.0 37.0…50.0
CO2 (full load) vol% 10.0 ± 1.0 10.0 ± 1.0 10.0 ± 1.0 10.0 ± 1.0
O2 (full load) vol% 5.7 ± 1.5 5.7 ± 1.5 5.7 ± 1.5 5.7 ± 1.5
Gas consumption kg/h 0.8 1.4 1.7 2.3
NOx-emission mg/kWh GCV 23 30 33 37
Mass flow rate flue gases
kg/h 8.8 8.8 8.8 8.8
(minimal load)
Mass flow rate flue gases
kg/h 20.0 33.1 40.5 53.3
(nominal load)
84 Installation, Maintenance and Service part
Page 85
Description Unit
Flue gas temperature
(nominal load)
ºC 39 56 55 59
13.3.1 Energy labeling
Description Unit
DR-CC 12-160
DR-CC 12-200
DR-CC 20-160
DR-CC 20-200
DR-CC 24-245
DR-CC 24-285
DR-CC 32-245
DR-CC 32-285
DR-CC 32-380
DR-CC 12-160
Declared load profile
Load profile - XL XL XL XL
Energy efficiency class
( Energy label)
Energy efficiency % 92 94 92 91
Daily electricity consumption kWh 0.175 0.181 0.172 0.182
Daily fuel consumption kWh GCV 20.526 19.924 20.661 20.853
Mixed water 40 °C (V40) l 272 372 772 1111
Additional load profile
Load profile - - - - XXL
Energy efficiency class
(Energy label)
Energy efficiency % - - - 90
Daily electricity consumption kWh - - - 0.191
Daily fuel consumption kWh GCV - - - 26.761
Mixed water 40 °C (V40) l - - - 382
Description Unit
- A A A A
- - - - A
DR-CC 12-200
DR-CC 20-160
DR-CC 20-200
DR-CC 24-245
Declared load profile
Load profile - XXL XXL XXL XXL XXL
Energy efficiency class
( Energy label)
Energy efficiency % 92 91 92 90 90
Daily electricity consumption kWh 0.192 0.207 0.201 0.219 0.204
Daily fuel consumption kWh GCV 26.210 26.414 26.255 26.638 26.748
Mixed water 40 °C (V40) l 599 682 1976 2282 3372
0312934_DR-CC_UKUK_V1.0, 2018-03-01 85
- A A A A A
DR-CC 24-285
DR-CC 32-245
DR-CC 32-285
DR-CC 32-380
Page 86
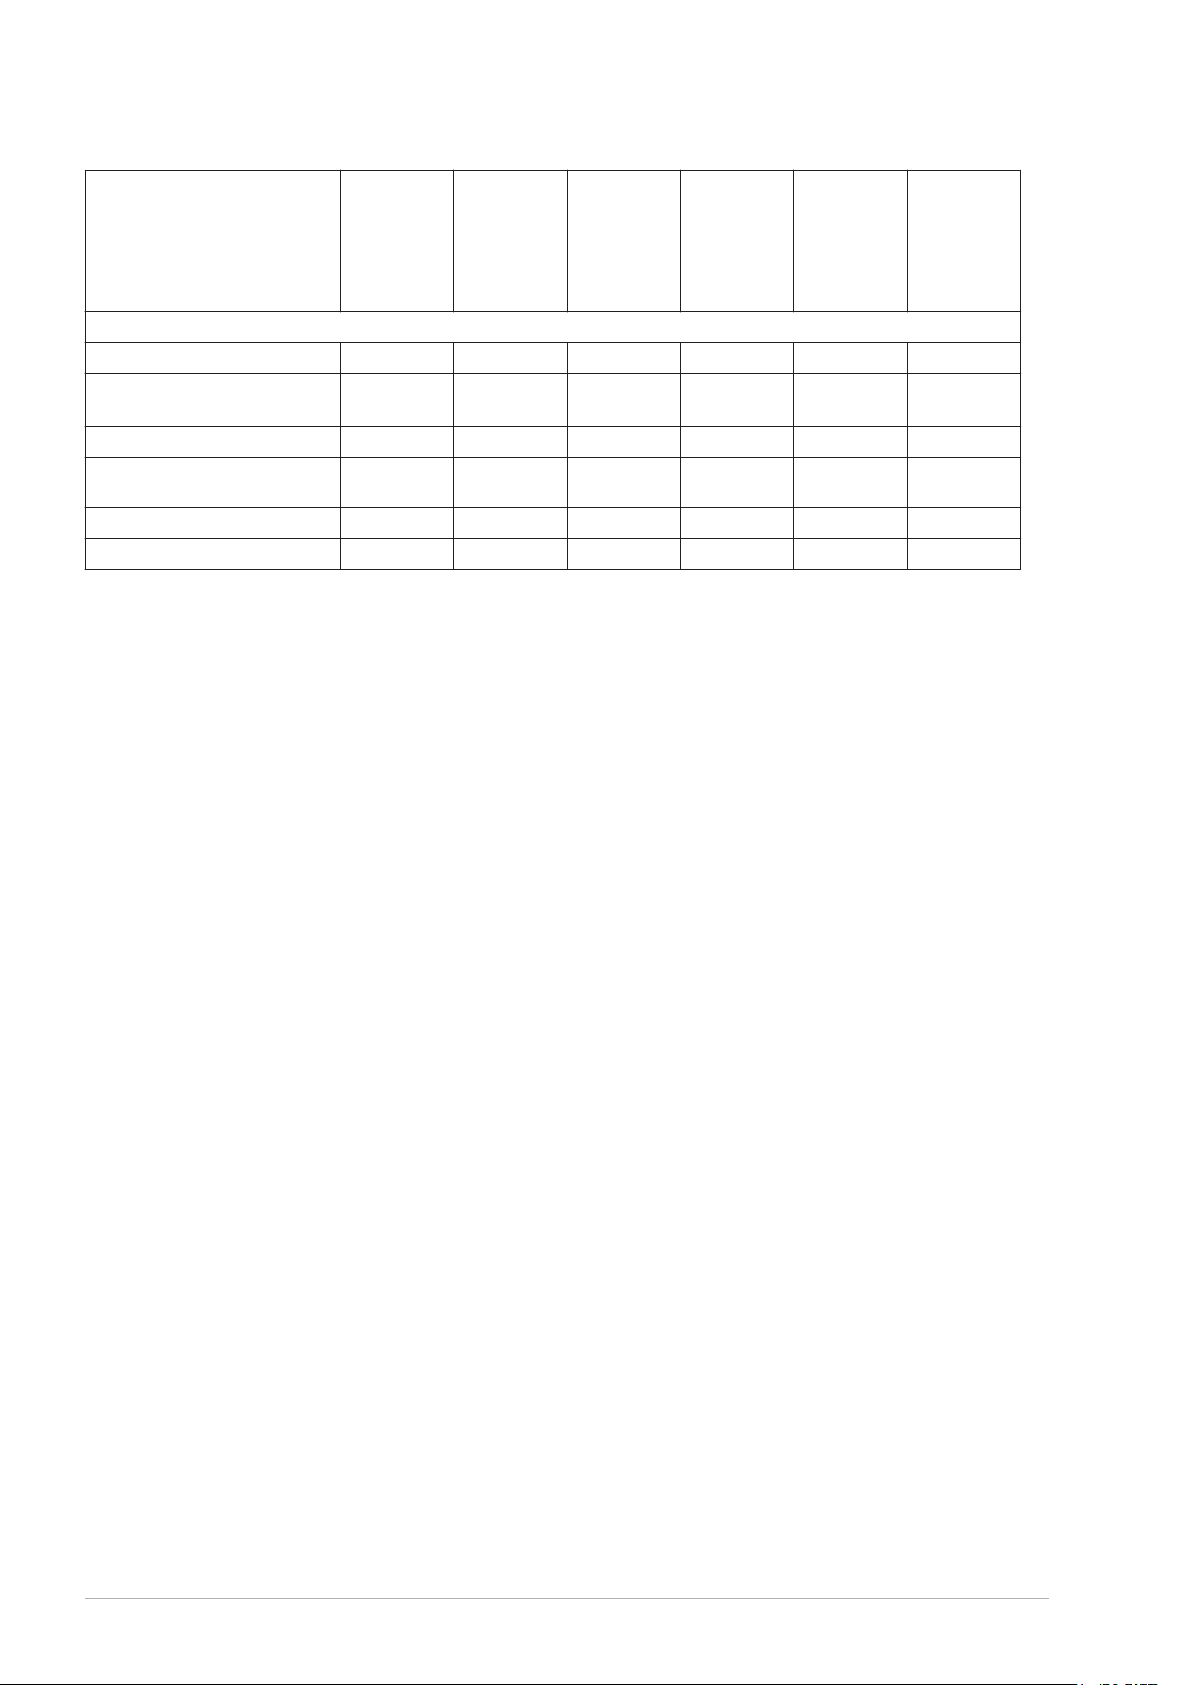
Description Unit
DR-CC 24-245
Additional load profile
Load profile - - - - - 3XL
Energy efficiency class
(Energy label)
Energy efficiency % - - - - 92
Daily electricity consumption kWh - - - - 0.256
Daily fuel consumption kWh GCV - - - - 50.428
Mixed water 40 °C (V40) l - - - - 548
- - - - - -
DR-CC 24-285
DR-CC 32-245
DR-CC 32-285
DR-CC 32-380
86 Installation, Maintenance and Service part
Page 87
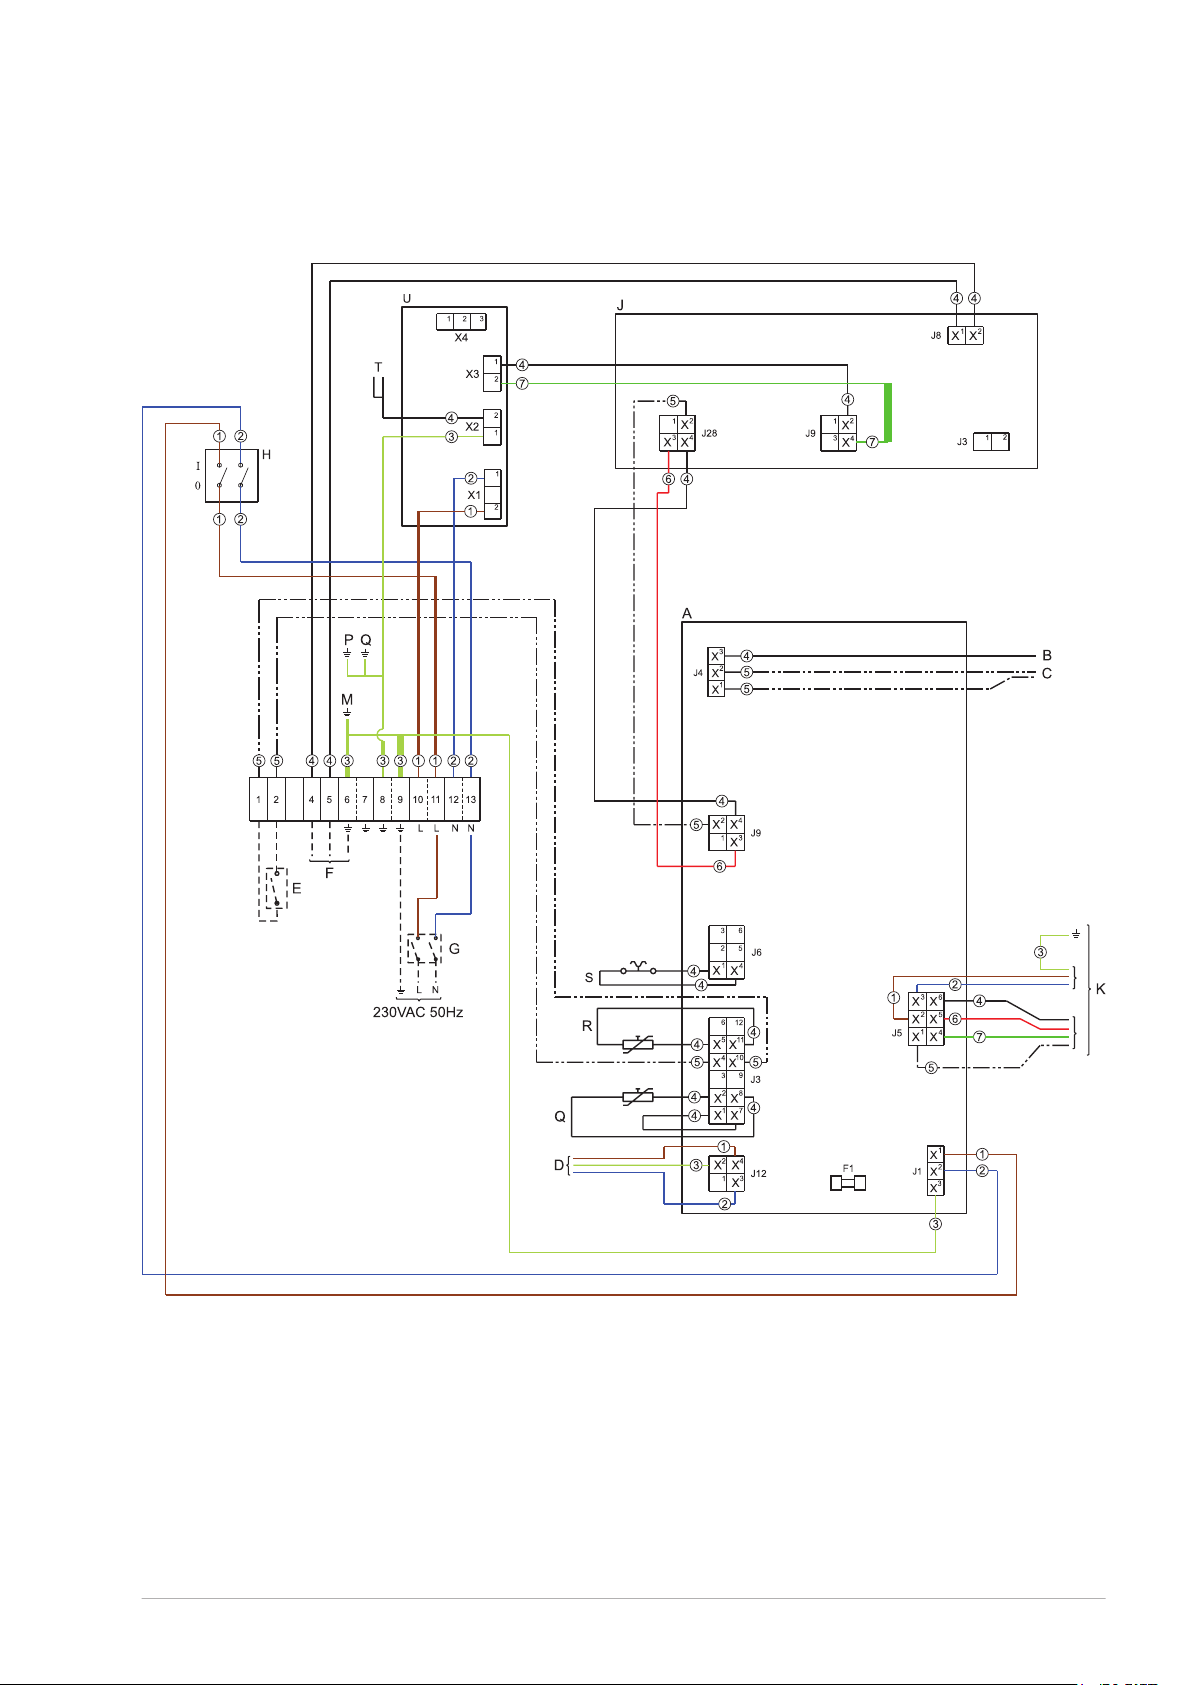
13.4 Electrical wiring diagram
0312934_DR-CC_UKUK_V1.0, 2018-03-01 87
Page 88

Cable colors:
1. Brown
2. Blue
3. Yellow/Green
4. Black
5. White
6. Red
7. Green
Terminal block connections:
A. Earth
N. Neutral
L. Phase input
Components:
A. Control
B. Flame rod
C. Hot surface igniter
D. Gas control valve
E. External ON mode switch
F. Additional error signal (max. 5A)
G. Isolating transformer
H. Control switch
J. Display
K. Fan
M. Earth connection
mounting plate
P. Earth connection
burner flange
Q. Earth connection
housing
R. Temperature sensor
S. Pressure switch
T. Electrical anodes
U. Potentiostat
F1. Fuse (TSA-250V)
88 Installation, Maintenance and Service part
Page 89
13.5 Declaration of conformity
Declaration of Conformity
The Manufacturer of the Products covered by this Declaration is : -
Hamworthy Heating Ltd. Date: 14/02/17
The Product Covered by this Declaration :-
Condensing gas fired storage water heater: Dorchester DR-CC 12-160, DR-CC 12-200, DR-CC 20-160, DR-CC 20200, DR-CC 24-245, DR-CC 24-285, DR-CC 32-245, DR-CC 32-385, DR-CC 32-380
The Basis on which Conformity is being Declared :-
The product identified above complies with and satisfies the requirements of the following named
Directives:-
Electromagnetic Compatibility Directive (EMC) - 2004/108/EG
This product demonstrates compliance with the following standards-
EN 55014-1 :2007
EN 55014-2:2015
EN 61
000-3-2:2014
EN 61
000-3-3:2013
Low Voltage Directive (LVD) - 2006/95/EG
This product demonstrates compliance with the following standards-
EN 60
335-1 :2012
EN 60335-2-102:2006
(Gas Appliance Directive (GAD) - 2009/142/EG
This product demonstrates compliance with the following standards-
EN
89:2015
Pressure Equipment Directive (PED)- 97/23/EG
This product demonstrates compliance with the following directive-
Based on Art. 3, Sub 3. (PS < 10 bar, pressure vessel for non-hazardous fluids)
ECO Design Directive (ErP) - 2009/125/EG
This product demonstrates compliance with the following directive-
Commission regulation No. 814/2013 based on notices 2014/C – 207103
Energy Labelling Directive - 2010/30/EG
This product demonstrates compliance with the following directive-
Commission regulation No. 812/2013
The technical documentation required to demonstrate that the products meet these Directives has been
compiled and is available for inspection by the relevant enforcement authorities. (As stated in the EC type-
examination report, 151002037, by KIWA Gastec Certification b.v., The Netherlands.)
The CE mark was rst applied in : - 2017
Feb 22, 2018
Signed :
.................................................. Dr. E. Lancaster
Date: ………………………..
Authority :
R & D Director (
empowered to bind the company)
0312934_DR-CC_UKUK_V1.0, 2018-03-01 89
Page 90

13.6 Warranty
Please contact your supplier for the guarantee conditions.
90 Installation, Maintenance and Service part
Page 91

Index
A
About the water heater
About this manual............................... 7
Additional error signal........................ 51
Air pressure differential...................... 52
Ambient conditions............................ 37
Anode warning..................................23
Appendices.......................................81
Assemble the burner..........................68
B
Buttons............................................
Buttons............................................20
...................... 29
20
D
Declaration of conformity
Decommisioning................................55
Descale the tank............................... 64
Dimensions...................................... 82
Displayed errors................................73
Disposal........................................... 34
Document identification....................... 8
Draining...........................................55
................... 89
E
Electrical connections
Electrical wiring diagram.................... 87
Energy labeling................................. 85
Environmental aspects....................... 34
Error conditions.................................22
Error history..................................... 61
Errors and warnings...........................71
External ON mode............................. 22
External ON mode switch....................50
External ON mode switch....................50
.........................49
C
C13/C33 concentric systems............... 44
C13/C33 parallel systems................... 46
C43/C53/C63 systems....................... 48
Circulation connection........................ 41
Clean the burner............................... 65
Clean the combustion chamber........... 67
Clean the condensate drain.................64
CO2 value.........................................54
Cold water connection........................40
Commissioning..................................51
Compliance........................................ 3
Condensate drain.........................35, 41
Conditions........................................ 37
Contact information.............................5
Control switch...................................19
Control Switch.................................. 19
Controller......................................... 35
Conversion of gas type.......................57
Copyright...........................................3
Copyright...........................................3
F
Fan
................................................. 35
Filling.............................................. 52
Finalization................................. 68, 51
G
Gas connection
Gas details....................................... 84
Gas supply pressure.......................... 53
Gas-side maintenance........................65
General errors.................................. 71
................................. 41
H
Heat exchanger
Hot water connection......................... 41
Hysteresis........................................ 61
.................................35
0312934_DR-CC_UKUK_V1.0, 2018-03-01 91
Page 92

I
Installation....................................... 37
Installation diagram...........................40
Installation, Maintenance and Service
part.................................................27
Instructions on the water heater..........32
Interface.......................................... 19
Introduction................................ 15, 29
Isolate from the mains....................... 26
Isolating transformer......................... 50
L
LCD display...................................... 20
Legionella prevention......................... 62
Level the water heater....................... 38
Liability..............................................3
M
Mains power..................................... 50
Maintenance..................................... 63
Maximum floor load........................... 37
N
Notation conventions........................... 7
O
OFF mode........................................ 21
ON mode..........................................21
Operating modes...............................21
Operator interface........................19, 59
Optional electrical connections............ 50
R
Recycling......................................... 34
Regulations........................................ 4
S
Safety........................................ 17, 31
Safety devices.................................. 33
Safety instructions.............................31
Scope................................................7
Service conditions............................. 22
Set a parameter value....................... 25
Set the water temperature................. 25
Settings........................................... 59
Status of the water heater.................. 21
Structure of the water heater..............35
Switch to ON mode............................25
T
Tank................................................35
Target group...................................... 7
Technical details................................81
Test cycle.........................................62
Trademark......................................... 3
Trademarks........................................3
Troubleshooting................................ 71
Turn off for a long period....................26
Turn off for a short period.................. 26
Turn off the water heater.............. 26, 55
Turn on the water heater....................25
Turn on the water heater....................55
U
Use................................................. 25
User part..........................................13
P
Packaging.........................................37
Parameters.......................................59
Performance check............................ 63
Preface.............................................. 3
Preparation.......................................64
Preparation.......................................49
92 Installation, Maintenance and Service part
V
Venting system................................. 42
Page 93

W
Warnings............................................80
Warranty..............................................3
Warranty............................................ 90
Water composition............................... 38
Water connections............................... 40
Water heater.......................................35
Water inlet......................................... 29
Water outlet....................................... 29
Water-side maintenance....................... 64
Working clearances..............................38
Working clearances..............................38
Working principle.................................29
0312934_DR-CC_UKUK_V1.0, 2018-03-01 93
Page 94

94 Installation, Maintenance and Service part
 Loading...